

EPIGY TECHNOLOGIES QUADRO2X, QUADRO4X, QUADRO 2XI, QUADRO4XI, QUADRO16X Installation Manual
...Page 1
Quadro Manual I: Installation Guide
Quadro2x, 2xi; Quadro4x, 4xi; Quadro16x, 16xi (SW Vers ion 5.3.x)
Page 2

Quadro Manual I: Installation Guide
Quadro2x, 2xi; Quadro4x, 4xi; Quadro16x, 16xi (SW Vers ion 5.3.x)
Copyright and Trademarks
Copyright © 2003-2013 Epygi Technologies, Ltd. All Rights Reserved. Quadro is a registered trademark of Epygi Technologies, Ltd. Microsoft, Windows, and the Windows logo are registered trademarks of Microsoft Corporation. All other
trademarks and brand names are the property of their respective proprietors.
Limited Warranty
Epygi Technologies, Ltd. (‘Epygi’) warrants to the original end-user purchaser every Quadro to be free from physical defects in material and workmanship under normal use for a period of one (1) year from the date of purchase (proof of purchase required) or two (2) years from the date of purchase (proof of purchase required) for products purchased in the
European Union (EU). If Epygi receives notice of such defects, Epygi will, at its discretion, either repair or replace products that prove to be defective.
This warranty shall not apply to defects caused by (i) failure to follow Epygi’s installation, operation or maintenance instructions; (ii) external power sources such as a power line, telephone line, or connected equipment; (iii) products that
have been serviced or modified by a party other than Epygi or an authorized Epygi service center; (iv) products that have
had their original manufacturer’s serial numbers altered, defaced, or deleted; (v) damage due to li ghtning, fire, flood, or
other acts of God.
In no event shall Epygi’s liability exceed the price paid for the product from direct, indirect, special, incidental, or consequential damages resulting from the use of the product, its accompanying software, or its documentation. Epygi offers no
refunds for its products. Epygi makes no warranty or representation, expressed, implied, or statutory, with respect to its
products or the contents or use of this documentation and all accompanying software, and specifically disclaims its quality, performance, merchantability, or fitness for any particular purpose.
Return Policy
If the product proves to be defective during this warranty period, call Epygi Customer Support at (972) 692-1166 to obtain
a Return Material Authorization (RMA) Number. Registered users also may access Epygi’s Technical Support
(www.epygi.com; ‘Support’) to send their RMA request. For Brazil representatives, call (21) 2518-3161 or contact via Web
(www.saga.com.br). Please have your proof of purchase on hand when contacting us. When returning a product, mark
the Return Authorization Number clearly on the outside of the package and include your original proof of purchase. Return
requests cannot be processed without proof of purchase. Customers are responsible for shipping and handling charges
when shipping to Epygi.
Epygi or its service center will use commercially reasonable efforts to ship a replacement product within ten (10) working
days after receipt of the returned product. Actual delivery times may vary depending on customer location.
Epygi reserves the right to revise or update its products, pricing, software, or documentation without obligation to notify
any individual or entity. Please direct all inquiries to:
Epygi Technologies, Ltd., Two Legacy Town Center, 6900 North Dallas Parkway, Suite 850, Plano, Texas 75024
Representative in Brazil - Saga Sistemas e Computadores SA, Av. Rio Branco, 18 - 8 andar, Rio de Janeiro 20090-001
Notice to Users
This Installation Guide, in whole or in part, may not be reproduced, translated, or reduced to any machine-readable form
without prior written approval.
Epygi provides no warranty with regard to this Installation Guide or other information contained herein and hereby expressly disclaims any implied warranties of merchantability or fitness for any particular purpose in regard to this manual or
other such information. In no event shall Epygi be liable for any incidental, consequential, or special damages, whether
based on tort, contract, or otherwise, arising out of or in connection with this manual or other information contained herein
or the use thereof.
FCC Statement (Part 15) Class B
The Epygi Quadro2x, Quadro2xi, Quadro4x, Quadro4xi, Quadro16x and Quadro16xi have been tested and found to
comply with the limits for a class B digital device, pursuant to Part 15 of the FCC Rules. These limits are designed to provide reasonable protection against harmful interference in a residential installation. This equipment generates, uses, and
can radiate radio frequency energy and, if not installed and used in accordance with the instructions, may cause harmful
interference to radio communications. However, there is no guarantee that interference will not occur in a particular installation. If this equipment does cause harmful interference to radio or television reception, which is found by turning the
equipment off and on, the user is encouraged to try to correct the interference by one or more of the following measures:
• Reorient or relocate the receiving antenna.
• Increase the separation between the equipment and the device.
• Connect the equipment to an outlet on a different circuit from the receiver.
• Consult a dealer or an experienced Radio/TV technician for assistance.
You are cautioned that any change or modification to the equipment not expressly approved by the manufacturer could
void the user’s authority to operate this device.
FCC Statement (Part 15) Class A
• The Epygi Quadro16x and Quadro16xi have been tested and found to comply with the limits for a class A digital de-
vice, pursuant to Part 15 of the FCC Rules. These limits are designed to provide reasonable protection against
harmful interference in a commercial installation. This equipment generates, uses, and can radiate radio frequency
energy and, if not installed and used in accordance with the instructions, may cause harmful interference to radio
communications. However, there is no guarantee that interference will not occur in a particular installation. If this
equipment does cause harmful interference to radio or television reception, which is found by turning the equipment
off and on, the user is encouraged to try to correct the interference by one or more of the aforementioned measures.
You are cautioned that any change or modification to the equipment not expressly approved by the manufacturer could
void the user’s authority to operate this device.
Page 3

Quadro Manual I: Installation Guide
Quadro2x, 2xi; Quadro4x, 4xi; Quadro16x, 16xi (SW Vers ion 5.3.x)
Administrative Council for Terminal Attachments (ACTA) Customer Information
This equipment complies with Part 68 of the FCC rules and the requirements adopted by the ACTA. On the back of this
equipment is a label that contains, among other information, a product identifier in the format US:AAAEQ###TXXXX,
made out to HX7OT00BHX70100. If requested, this number must be provided to the telephone company.
Any plug or jack that is used to connect this equipment to the premises wiring and telephone network must comply with
the applicable FCC Part 68 rules and requirements adopted by the ATCA.
The Ringer Equivalence Number is an indicator of the maximum number of devices allowed for connection to a telephone
interface. The termination on an interface may consist of any combination of devices subject only to the requirements that
the sum of the RENs of all the devices does not exceed five. Excessive RENs on a telephone line may result in the devices not ringing in response to an incoming line. The REN for this product is part of the product identifier that has the
format US:AAAEQ###TXXX, made out to HX7OT00BHX70100. The digits represented by ### are the REN without a decimal point (in this case 00B is a REN of 0.0B.)
If the Quadro causes harm to the telephone network, the telephone company will notify you in advance that a temporary
discontinuance of service may be required. But if advance notice isn’t practical, the telephone company will notify the customer as soon as possible. Also, you will be advised of your right to file a complaint with the FCC if you believe it is necessary.
The telephone company may make changes in its facilities, equipment, operations or procedures that could affect the operation of the equipment. If this happens, the telephone company will provide advance notice for you to make the necessary modifications to maintain uninterrupted service.
Connection to a party line service is subject to state tariffs. Contact the state public utility commission, public service
commission or the corporation commission for information.
If your home has specially wired alarm equipment connected to the telephone line, ensure the installation of the Quadro
does not disable your alarm equipment. If you have any questions about what will disable alarm equipment, consult your
telephone company or a qualified installer.
Electrical Safety Advisory
To reduce the risk of damaging power surges, we recommend you install an AC surge arrestor in the AC outlet from which
the Quadro is powered.
Industry Canada Statement
This product meets the applicable Industry Canada technical specifications.
Safety Information
Before using the Quadro, please review and ensure the following safety instructions are adhered to:
• To prevent fire or shock hazard, do not expose your Quadro to rain or moisture.
• To avoid electrical shock, do not open the Quadro. Refer servicing to qualified personnel only.
• Never install wiring during a lightning storm.
• Never install telephone jacks in wet locations unless the jack is specified for wet locations.
• Never touch uninsulated telephone wire or terminals unless the telephone line has been disconnected at the net-
work interface.
• Use caution when installing or modifying cable or telephone lines.
• Avoid using your Quadro during an electrical storm.
• Do not use your Quadro or telephone to report a gas leak in the vicinity of the leak.
• An electrical outlet should be as close as possible to the unit and easily accessible.
Emergency Services
The Quadro SIP Service is intended to function as a secondary telephone service. This services is made available
through the Internet and therefore is dependent upon a constant source of electricity and network availability. If a power
outage occurs, the Quadro SIP Service automatically will be disabled. User understands in the event of a power or network outage, the Quadro SIP Service will not support 911 emergency services, and further, such services only will be
available via the user's regular telephone line that is not connected to the Quadro. User further acknowledges that any interruption in the supply or delivery of electricity or network availability is beyond Epygi's control and Epygi shall have no
responsibility for losses arising from such interruption.
Page 4

Quadro Manual I: Installation Guide
Quadro2x, 2xi; Quadro4x, 4xi; Quadro16x, 16xi (SW Vers ion 5.3.x)
Table of Contents
Manual I: In stalla t ion Guide
About This Installation Guide ....................................................... 6
Requirements ........................................................................... 8
Hardware Overview ................................................................... 9
The Connectors Panel of Quadro2x, 4x and 16x ......................................... 9
The Connectors Panels of Quadro2xi, 4xi and 16xi ................................... 11
Quadro’s Front Panel LEDs .................................................................... 12
Step 1: Installing the Quadro .................................................... 14
Networking O v e rv ie w ........................................................................... 14
LAN/WAN Conne ction Op tions ............................................................... 15
Connecting the Hardware ..................................................................... 17
Step 2 : Configuri ng the Quadro ................................................. 19
Step 2.1: Logging in to Quadro ............................................................. 20
Step 2.2: S y ste m Configuration Wizard .................................................. 21
System Configuration ...................................................................................21
DHCP Settings for the LAN Interface ................................................................22
Regional Settings .........................................................................................22
Emergency and PSTN Access Code Settings ......................................................23
Finishing the System Configuration Wizard .......................................................24
Step 2.3: Internet C onf iguration Wizard ................................................. 26
Uplink Configuration .....................................................................................27
WAN IP Configuration ...................................................................................27
PPP/PPTP Configuration .................................................................................29
WAN Interface Configuration ..........................................................................30
DNS Settings ..............................................................................................30
Finishing the Internet Configuration Wizard ......................................................31
Step 2.4: Fire wal l Conf iguration ............................................................ 32
Step 2-A: Using IP Lines ........................................................... 33
Supported SIP Phones .......................................................................... 36
Tested SIP Phones ............................................................................... 36
Step 2-B: Using Receptionist ..................................................... 38
Step 2-C: Using ISDN Lines....................................................... 39
Step 3: Registering on Epygi’s Technical Support .......................... 45
Step 4: Making/Receiving Calls .................................................. 46
Using the Default SIP Addresses ............................................................ 46
Appendix: PC DHCP Settings ..................................................... 48
Appendix: Changing the Admin Password .................................... 50
Appendix: Configuring NAT Traversal .......................................... 52
Appe n dix: Regis tering on Epygi ’ s SIP Server ................................ 54
Appendix: Checking the Connections .......................................... 59
Page 5

Quadro Manual I: Installation Guide
Quadro2x, 2xi; Quadro4x, 4xi; Quadro16x, 16xi (SW Vers ion 5.3.x)
Appendix: Pin Assignment of ISDN ............................................. 62
Manual II: see Administrator's Guide
This guide de scribes i n detail the menus a vailable f or admi nistrators o nly. Furthermore, it inclu d e s all t he sy ste m’s d e f a ult v a lue s at a g la nce .
Manual III: see Extension User's Guide
This guide de scribes in detail the menus available for extension users. Furthermore, it includes a l l t he call cod e s a t a g l an ce.
Page 6

Quadro Manual I: Installation Guide About This Installation Guide
Quadro2x, 2xi; Quadro4x, 4xi; Quadro16x, 16xi (SW Version 5.3.x) 6
About This Installation Guide
This Installation Guide explains the installation of the Quadro IP PBXs of Quadro2x/2xi,
Quadro4x/4xi and Quadro1 6x/16xi series. The Quadro models differ both in t heir feature
sets and the numb er of phone lin es an d ext ens ions th at are supported:
• Quadro2x offers 1 phone line (FXO), 2 phon e extensions (FXS) and 1 Ethern et WAN
port
• Quadro2xi offers 1 phone line (ISDN), 2 phone extensions (FXS) and 1 Ethernet
WAN port
• Quadro4x supports 2 phone lines (FXO), 4 phone extensions (FXS) and 1 Ethernet
WAN port - a sp ec ial versi on of Qu adro4x offers 2 additional FXO lines
• Quadro4xi supports 1 phone line (ISDN), 4 ph one extens ions (FX S) and 1 Ethernet
WAN port - a sp ec i al ver s i on of Quadro4xi offers 2 additional ISDN lines
• Quadro16x supports 4 phon e lines (F XO), 16 ph one ext ensi ons (FX S) and 1 Ethernet
WAN port
• Quadro16xi supports 3 p hone lin es (ISDN), 16 phone ext ensions (FXS) and 1 Ether-
net WAN port
The inst al lati on pr oc edur e f or all Q uadr o IP PB Xs is t he s ame. T hr oug h out this Ins tall ati on
Guide, t h e stand ard editi on of the Quadr o4x with t wo F XO port s is sh own as th e ref erenc e
system.
This Installation G uide gives step-by-step i nstructi ons to provis ion the Quadro and configure the phone extensions with the Epygi SIP Server. After successfully configuring the
Quadro, a user wil l b e able to m ak e SI P phon e c alls t o remot e Quad ro devices, m ak e l oc al
calls to the PSTN and access the Internet from devices connected to the LAN.
This I nstallat ion Guid e neith er descr ibes the PBX, Au to Atten dant, Call Rel ay, and Voice
Mail features of t h e Q u adro nor d oes it p rovide advanced firew al l and VPN configuration i nformation. For these features, refer to the Administrator' s and E xtension User's Guides.
Step 1: I nstal ling th e Quadr o explai ns th e connec tion of c ables and devic es to th e Qu a-
dro.
Step 2: C onfigur ing th e Quadr o describes the c onfig uration s teps nec essar y to integ rate
the Quadro into you r n etw or k en vironm ent .
Step 2-A: Using IP Lines exp l ai ns h ow to conf ig ure IP lin es on the Quadr o I P PBX and to
connect IP phones to become functional in the Quadro’s LAN.
Step 2 -B: Us in g R ecep tionis t refers to the docu ment d escr ibin g R ecept ionis t’s c onfig ura-
tion on th e Qu ad ro.
Step 2-C: Using ISDN Lines explai ns how to conf igure IS DN trunks and to d efi ne a d e-
fault ou tg oing MSN.
Step 3: R egisterin g on Epygi’s Tech nical Support shows you how to access the Epygi
Technical Support Center and the Epygi SIP Server.
Step 4: Making/R eceivi ng Calls explai ns how to en able th e Qu adro’s various t elephony
features.
Appen dix: PC DHCP Settings expl ains h ow to config ure your P C to access the Quadro
Configuration GUI.
Page 7

Quadro Manual I: Installation Guide About This Installation Guide
Quadro2x, 2xi; Quadro4x, 4xi; Quadro16x, 16xi (SW Version 5.3.x) 7
Appendix: Changing the Admin Password e xpl ai ns h ow t o c hange t h e d efault ad ministr a-
t or pas sword.
Appen dix: C onfiguri ng NAT Traver sal explains confi gurat ion of t he Qu adro if it is p laced
behind a NAT enabled router.
Appen di x: Regist er i ng on Epygi ’s SIP S er ver explains how to register on Epygi's powerful
SIP server.
Appendix: Checking t he Connections gives hints on solving common problems.
Page 8

Quadro Manual I: Installation Guide Requirements
Quadro2x, 2xi; Quadro4x, 4xi; Quadro16x, 16xi (SW Version 5.3.x) 8
Requirements
• One 120/240 VAC power outlet in close proximity to the Quadro.
• One RJ45 Ethernet 10/100 broadband Internet connection.
• At least one RJ11 tel ephone conn ection is rec ommended to c onnect the Quadr o to
the PST N n etw ork ( all Qu adro IP PB Xs wit h FXO por ts). F or ISDN Qu adros an R J45
CAT 5 cable is needed to connect Quadro to ISDN.
• At least on e off-the-shelf analog phone with an RJ11 telephone cable.
• One CAT 5 Ethernet cable with an RJ45 connector to connect to the Quadro LAN port.
• One PC wi th a 10/ 1 00 M bps Ether n et c ard or ad ap ter inst al l ed.
• TCP/IP network protocol installed on each PC.
• For opti mal res ults , Inter n et Explor er 5. 5 or high er, or N etsc ape Navi g ator 4.7 or high-
er are recommended.
Please Note: A ll Qu adr o IP PB Xs ar e shi pp ed wit h one RJ 11 c able and one st raig ht RJ 45
CAT 5 c able. If th e LAN c onn ect or of t h e Quadr o c onnec ts t o a hub or s witch, a c ross over
cable m ay b e r equired.
Other c ables are add ed accor din g to t h e dif fer ent c onn ecti vit y req uir emen ts of th e Qu adr o
IP PBX types.
Page 9
Quadro Manual I: Installation Guide Hardware Overview
Quadro2x, 2xi; Quadro4x, 4xi; Quadro16x, 16xi (SW Version 5.3.x) 9
Hardwa re O ver vie w
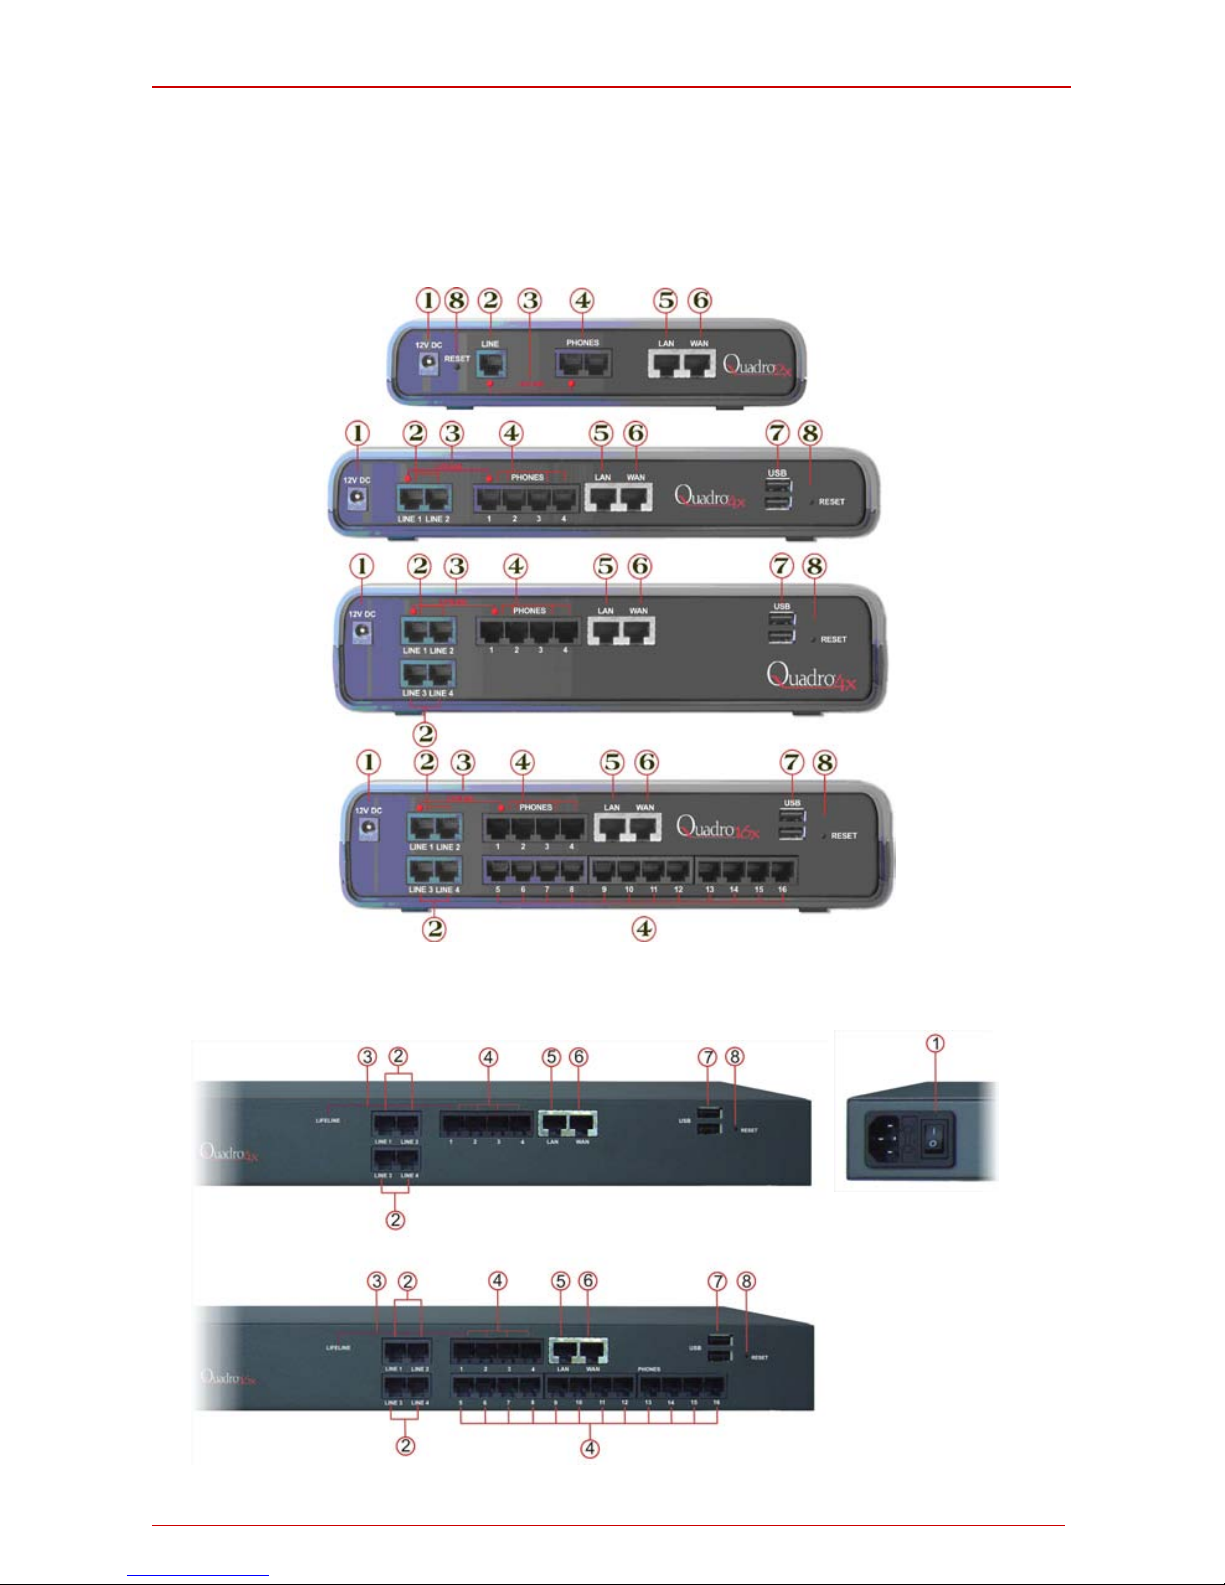
The Connectors Panel of Qua d ro2x, 4x and 16x
The illustration below includes the connectors panel of regular Quadro models in plastic
enclosure.
Fig. I-1: Regular Quadro's Connectors Panels in plastic enclosure
The illustration below includes the connectors panel of regular Quadro models in rack
mountable enclosure.
Fig. I-2: Regular Quadro's Connectors Panels in rack mountable enclosure
Page 10

Quadro Manual I: Installation Guide Hardware Overview
Quadro2x, 2xi; Quadro4x, 4xi; Quadro16x, 16xi (SW Version 5.3.x) 10
1 Power supply socket. Use only the power adapter delivered with the Quadro.
2 LINE sockets to connect the Quadro to the PSTN network using standard analog
phone service. These are FXO (Foreign Exchange Office) analog ports.
3 In the even t of a pow er fail ur e, PHO N E 1 is c on n ect ed to LINE 1, all owing th e p h one
to send/ receiv e ph one calls di rectly t o the PST N network. P HONE 1 is powered b y
the PSTN.
Pleas e Note: On ly LINE 1 is connec t ed to PHON E 1 duri ng a power failure. T h e oth-
er LINE and PHONE ports are not con nected t ogether.
4 PHONE sockets with RJ11 connectors enable connectivity of regular analog tele-
phones . Thes e are FXS (Foreig n Exch ange Stat ion) an alog por ts. As a factor y default, the phones connected to PHONE sockets 1-3 (1-2 for Quadro2x) are configured
as voice extensions. PHONE socket 4 is preconfigured for a fax machine.
5 RJ45 sock et t o attach t o the Local Ar ea Networ k ( LA N) vi a an Ethernet CA T 5 cable.
If a PC is c onnected directly to this socket, a strai ght cab le is us ed. If an Ether net
hub, router or switch is used; a crossover cable may be required.
6 RJ45 socket to attach the Internet Uplink (WAN) via an Ethernet CAT 5 cable.
7 The USB soc ket en ables c onnec tivit y of USB flas h mem ory pr ovidi ng exp ansion for
additional voice mails and record data. Refer to the Admin istrator’s Guide f or supported devices.
8 The Res et button m ay b e used in t wo w ays : ( 1) t o initiat e a normal r eset or (2) t o c ar-
ry out a factor y r eset. A normal r eset is ex ec ut ed by press i n g t he Res et b utt on with a
paper clip for an instant .
Press in g the res et b ut t on and hol di ng it down for sev en seconds or more wi ll ex ecute
a f actory res et. T his will restor e the factory defaults and clear all settings includi ng
the IP address an d th e adm in is t r at i on p assword you en tered.
Pleas e Note: A Fact ory Reset f orces the defau lt LAN IP address of 172.30 .0.1 and
default a dm i n p assword of 1 9.
Page 11
Quadro Manual I: Installation Guide Hardware Overview
Quadro2x, 2xi; Quadro4x, 4xi; Quadro16x, 16xi (SW Version 5.3.x) 11
The Connectors Panels of Quad ro2xi, 4xi and 16xi
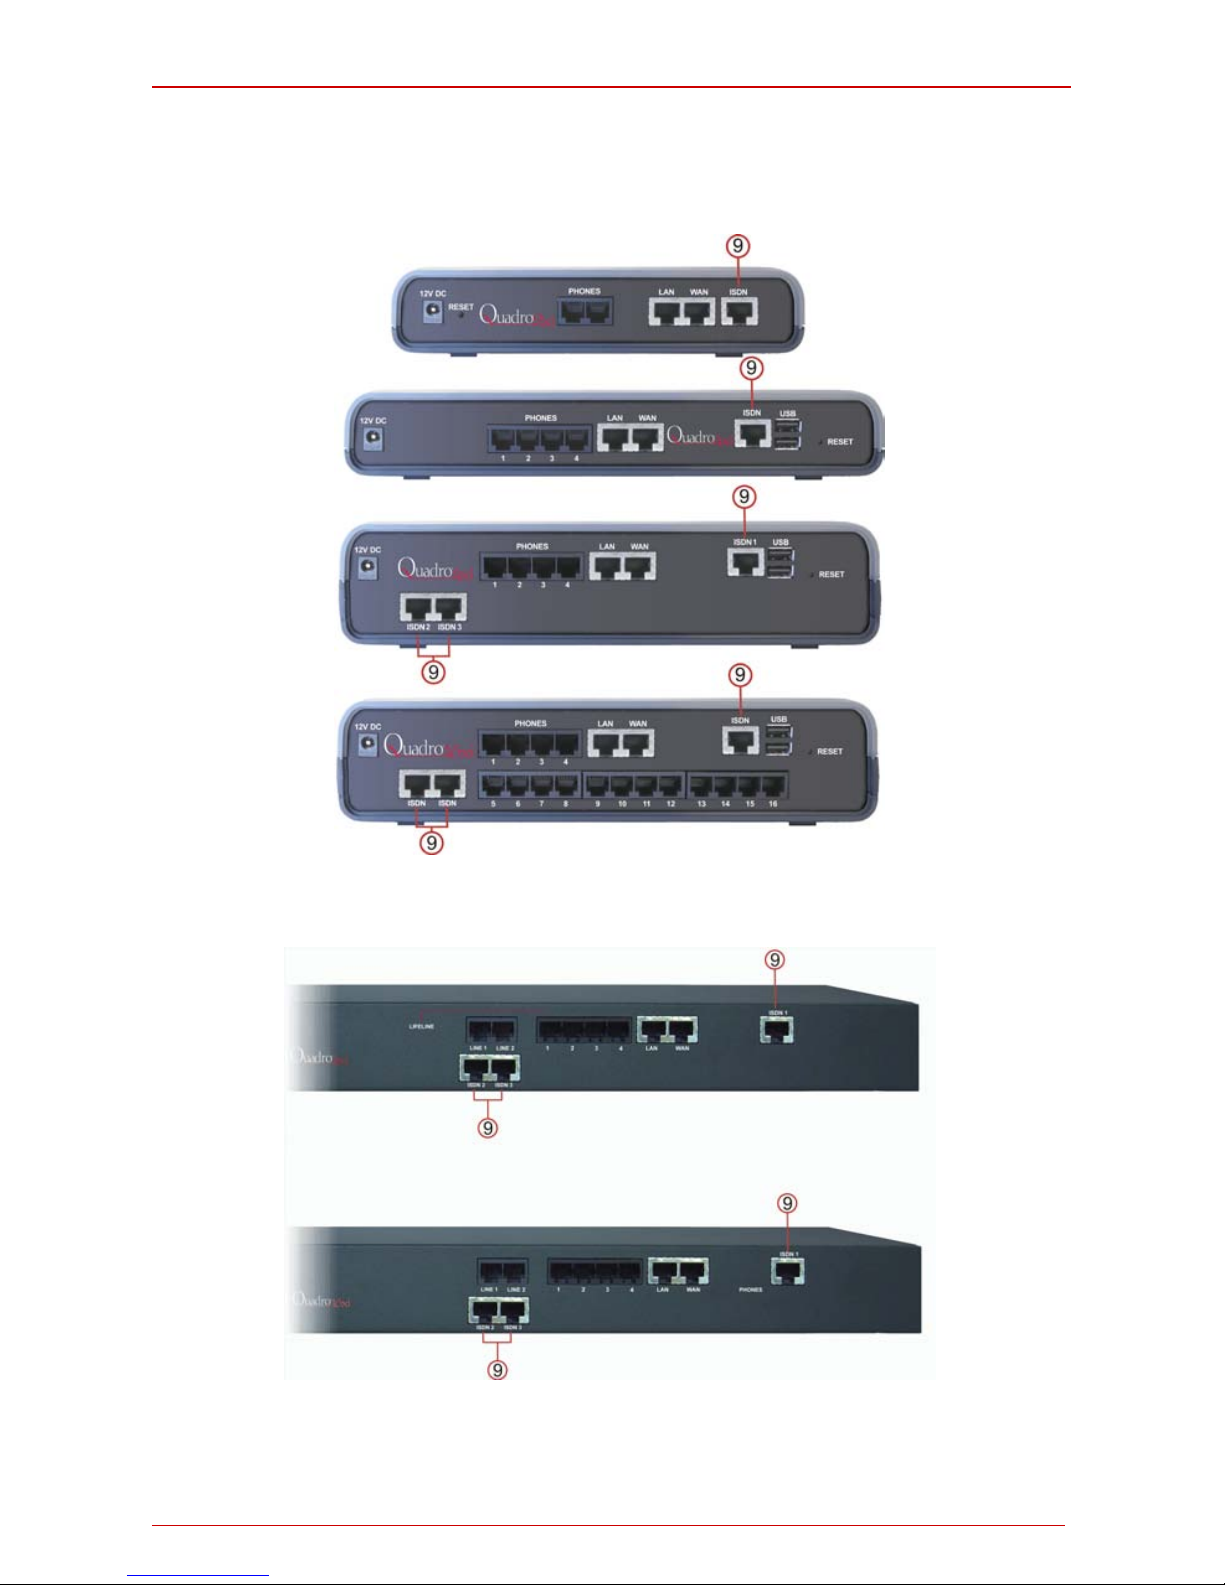
The illustr ation below includes t he connectors pan el of ISDN f lavored Quadro models in
plastic enclosure.
Fig. I-3: ISDN/Ethernet flavored Quadro's Connectors Panels in plastic enclosure
The illustr ation below includes t he connectors pan el of ISDN f lavored Quadro models in
rack mountabl e enc l os ure.
Fig. I-4: ISDN/Ethernet flavored Quadro's Connectors Panels in rack mountable enclosure
9 RJ45 socket(s) to connect the Quadro to the ISDN-PSTN network using a digital
phone service.
Page 12
Quadro Manual I: Installation Guide Hardware Overview
Quadro2x, 2xi; Quadro4x, 4xi; Quadro16x, 16xi (SW Version 5.3.x) 12
Quadro’s Front Panel LEDs
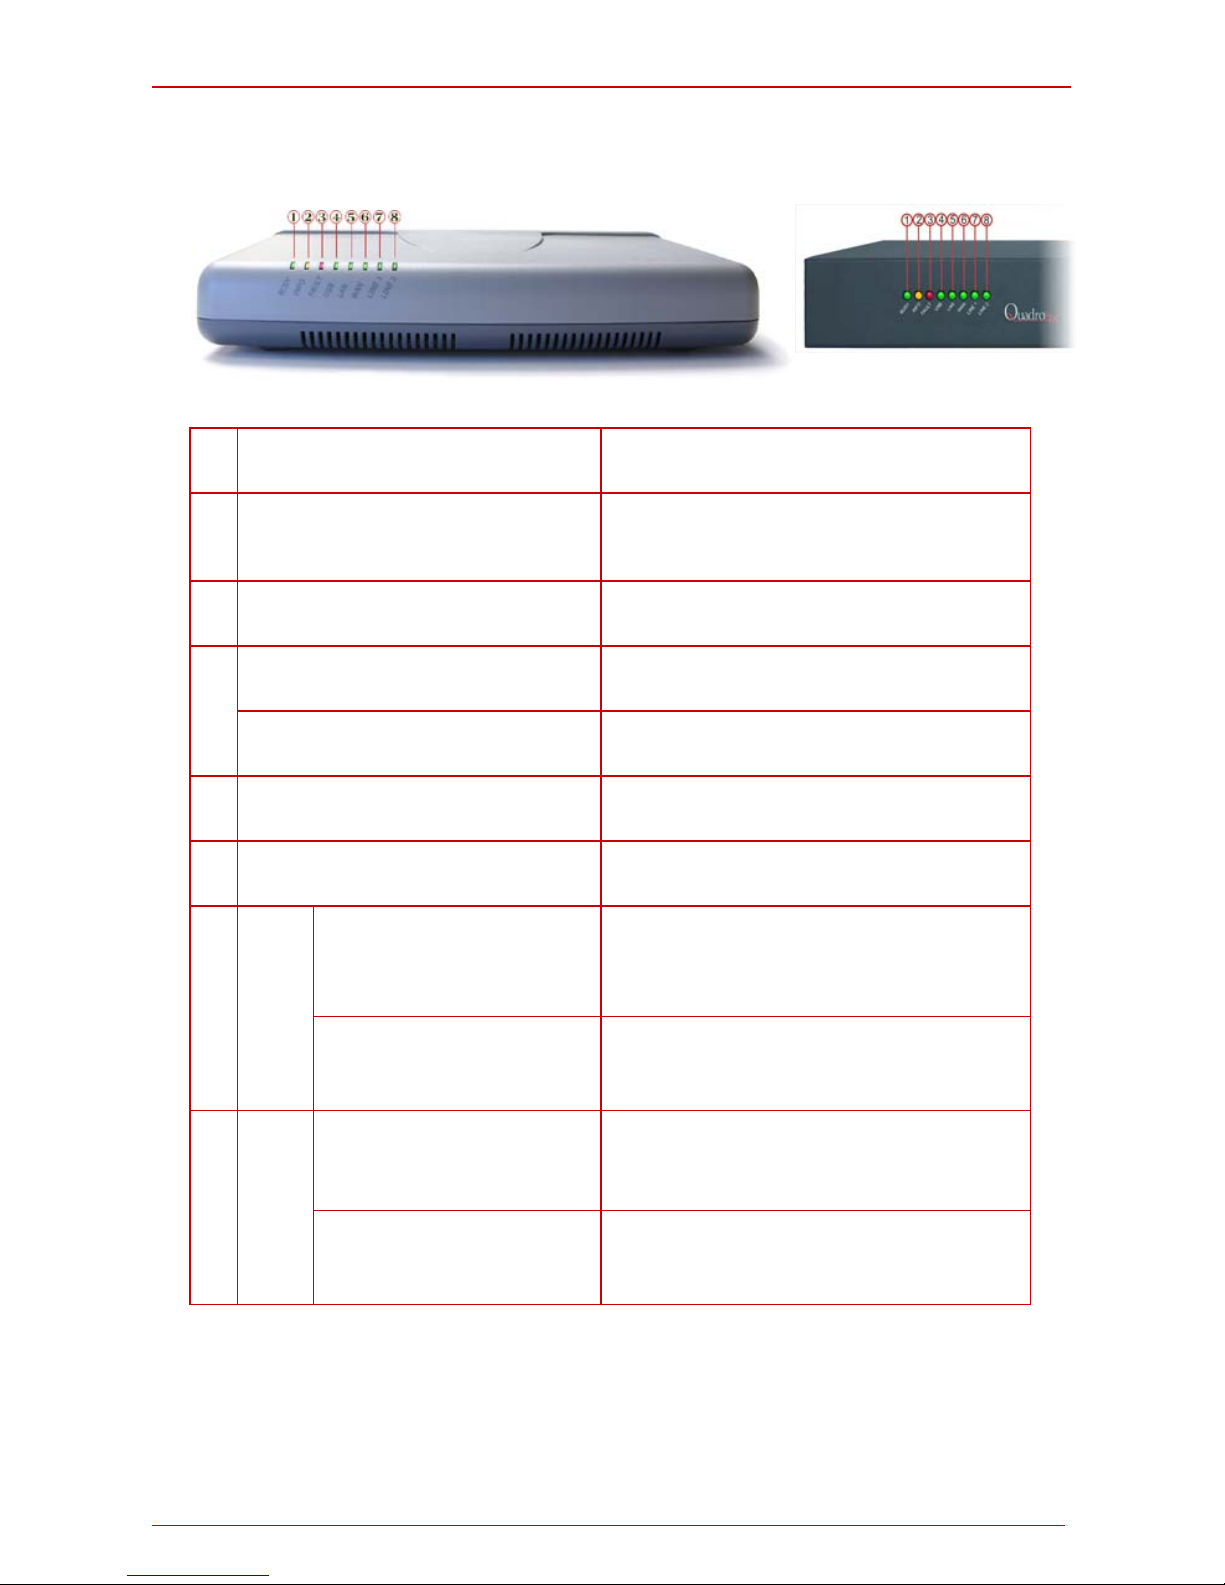
Fig. I-5: Quadro's Front Panel LEDs
1
Busy
green
Status of CPU
off: no power
on or blinking: normal activity
2
Info
yellow
System information
on: device is booting
off: no information
blinking: an event occurred; details specified in the Sys-
tem Event section of the Management interface
3
Fault
red
System status
on either an error or the device is booting
off: no error
blinking: system unusable
4
USB
green
Status of the USB interface
on: USB memory device installed correctly
off: no USB memory device found
(Quaro2x: not used)
PWR (Quadro2x only)
green
Status of the power supply
on: power supply ok
off: no power supply or device is still booting
(Quadro2x only)
5
LAN
green
Status of the LAN interface
on: link ok
off: no link
flickering: traffic on the link
6
WAN
green
Status of the WAN interface
on: link ok
off: no link
flickering: traffic on the link
7
Line1
green
Status of the:
FXO LINE (Quadro2x)
FXO LINE 1 (Quadro4x)
FXO LINE 1 or 2 (Quadro16x, 4x
special edition)
on: line in use
off: line not in use
Status of ISDN
(Quadro2xi, 4xi, 16xi)
on: one or more (but not all) channels are busy
off: all channels are free
flickering: at least one of the started trunks is discon-
nected
8
Line2
green
Status of the:
FXO LINE 2 (Quadro4x)
FXO LINE 3 or 4 (Quadro16x, 4x special edition)
(Quadro2x: not used)
on: line in use
off: line not in use
Status of ISDN
(Quadro2xi, 4xi, 16xi)
on: all channels are busy
off: free channels available
flickering: at least one of the started trunks is discon-
nected
Page 13

Quadro Manual I: Installation Guide Hardware Overview
Quadro2x, 2xi; Quadro4x, 4xi; Quadro16x, 16xi (SW Version 5.3.x) 13
LED indication during a firmware update
A firmw are up dat e is in dic ated b y the r ed (Fault) and yellow (Info) L EDs . Both will blin k simultaneously for about two minutes while the firmwar e is being updated. The Quadro will
then reboot automatically showing the bo ot LED sequence.
LED indication during a boot sequence
A boot s equenc e is in dicat ed as foll ows: The red Fault LED wi ll glow f or a f ew seconds ,
then t he yellow Info LED will glow for another four or five minut es while the green Busy
LED is b lin k in g. Once th e Info LED is off, the b oot sequence has b e en compl eted successfully.
LED indication during emergency firmware upload
The r ed Fault LED and the yell ow Busy LEDs will stop blinking alternately and start blinking in p ar allel . T his s hows that Qu adr o has acc ept ed th e emerg enc y f irmwar e and is loading it . Aft er a f ew sec onds, Q uadro will b oot, indic ated as follow s: T he red Fault LED will
glow f or a few s econds , th en the yel low Info LED will gl ow for anoth er few sec onds while
the green Busy LED is jittering. When the yellow Info LED extinguishes, the boot sequence has been completed successfully.
Page 14

Quadro Manual I: Installation Guide Step 1: Installing the Quadro
Quadro2x, 2xi; Quadro4x, 4xi; Quadro16x, 16xi (SW Version 5.3.x) 14
Step 1: Installing the Quadro
Networking Overvi ew
To establish a connection between the Internet and your local area network (LAN), an
access router is needed . T he Qu adro IP PB X ser ves, am ong ot h er funct ions , as an acc ess
router, an d will p erf orm th e task of conn ecti ng your LA N, or a group of on e or more PCs , to
the wid e area net w ork (W A N) or t h e I nternet. The Q u adro will proces s and regul ate t he data traffic between these two n etworks. All Quadro IP PB Xs have on e LAN port that c an
connect to Ethernet hubs and switches on the LAN, allowing additional devices to be connected to the network.
The Qu adr o is a devic e with tw o sid es: on e si de c onn ects t o your L AN, and th e other s ide
connects t o the Intern et, or th e W AN. Quadr o’s firew all and Net work Addr ess Trans lation
(NAT) functionalit y pr otects your LAN from being s een from th e Internet side making the
LAN pri vat e an d s ecure.
The Eth ernet WAN port t ransmi ts up t o 10 Mb ps , and the LAN port tr ans mits at 10 Mbps or
100 Mbps .
Ever y device wit hin an IP net work req uires a uni que IP addr ess to i dentif y itself. S inc e th e
Quadr o conn ects to bot h the LAN and th e W AN, it has t o be par t of b oth net works, and
must ha ve two IP address es: one f or th e W AN sid e and on e f or t he L AN s id e. T he Q u adro’s integrat ed firewall/ NAT f unctionalit y will h ide the LAN IP address f rom the W AN (Internet) side.
Ther e are t wo w ays of ass i gn i n g an IP ad dr ess : st atically or d yn am ic all y.
A Static IP address is a fixed, manually assigned IP address that remains valid until
changed. If you plan to use the Quadro as your Internet access router, contact your Internet
Servic e Provid er (ISP) to find out if a static IP ad dress is ass igned to your acc ount. If so,
you will need this static IP address when configuring the Quadro device.
A dyn amic IP addr ess is a temporar y address t hat is automatic ally assi gned by y our ISP
and will change periodically. If your ISP offers a dynamic IP addres s, the Quadr o will act as
a DHCP client an d will rec eive a new IP addres s from th e ISP’s DH CP server or PPPoE
feature.
Please Note: A DHCP client is a piece of software that reques ts an IP address from a
DHCP s erver. A DHCP s erver assigns on request a unique IP address to a d evice. The
Quadro, like many routers, acts as a DHCP client on its W AN interface and as a DHCP
server on its LAN interface.
The Qu adro must b e vis i ble to th e Internet to be ab l e to recei ve and s end VoIP calls. When
the Qu adro is p laced in a pri vate n et w ork, typ ically b ehind existing rout ers, it will by def ault
attempt to pass through the NAT of this router with its STUN (Simple Traversal of UD P ov er
NAT) feature. ST UN will work wit hout us er conf igurat ion wit h the maj ority of b asic r outers.
In som e scenari os , p or t f orwardi ng on th e router is requir ed to make t h e Q u adro access i ble
to oth er Quadr o devices and th e Epygi SI P Serv er on the I nternet . Anoth er config uration
opti on is to us e the Q uadr o as th e Intern et acc ess r outer, c onnec ted dir ectl y to the W AN,
elim inating the traverse to the local NAT firewall.
Page 15
Quadro Manual I: Installation Guide Step 1: Installing the Quadro
Quadro2x, 2xi; Quadro4x, 4xi; Quadro16x, 16xi (SW Version 5.3.x) 15
LAN/WAN Conne ction Opti ons
•
A Quadro IP PBX with an Ethernet WAN port behind a router, which is connected
to a cable or xDSL modem.
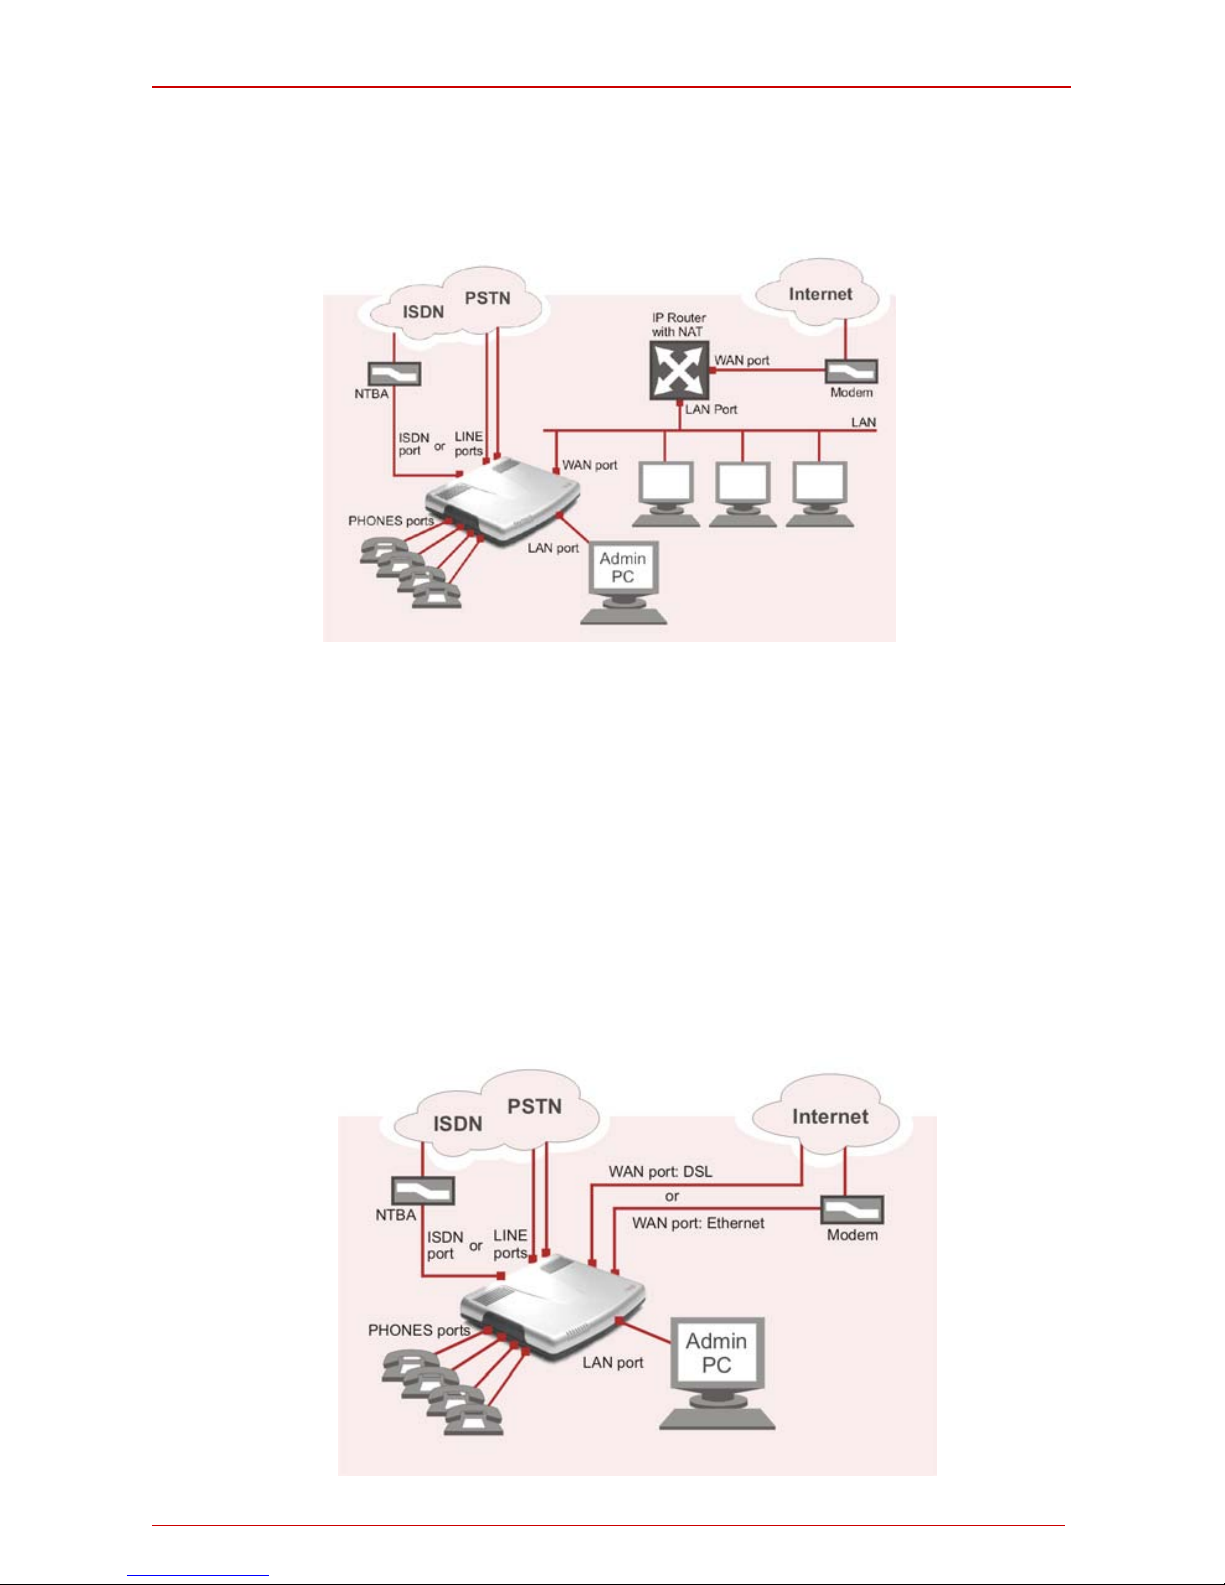
Fig. I-6: Configuration: Quadro behind a router
In this configuration (Fig.I-7), t h e IP r o u t er t yp ica l l y act s as a D HC P s er v er for t h e LA N an d
assigns the I P addresses to the PCs and oth er devic es. The Quadr o can be c onnected
throu gh its W AN port dir ectly to one of the r outer's LA N ports and will get an IP address
from the router. By default, the Quadro acts as a DHCP client on the WAN port.
Please Note: Since Qu adro uses STU N by default, it wi ll work with most b asic rou-
ters without any furt her co nfiguration.
Pleas e Note: Initi ally, t he Ad min P C mus t be c onnec ted t o t h e Q u a d r o L A N p or t t o access
W eb Management of th e Quadr o. Later, this PC can b e moved to the r outer’s LAN. T he
Quadr o W eb Manag ement can b e acc essed f rom any PC in t he rout er’s L AN as s o on as
the firewall is disabled on the Quadro.
• A Quadr o IP PBX used as an Internet Acce ss Router, conne cted direct ly to
the Internet
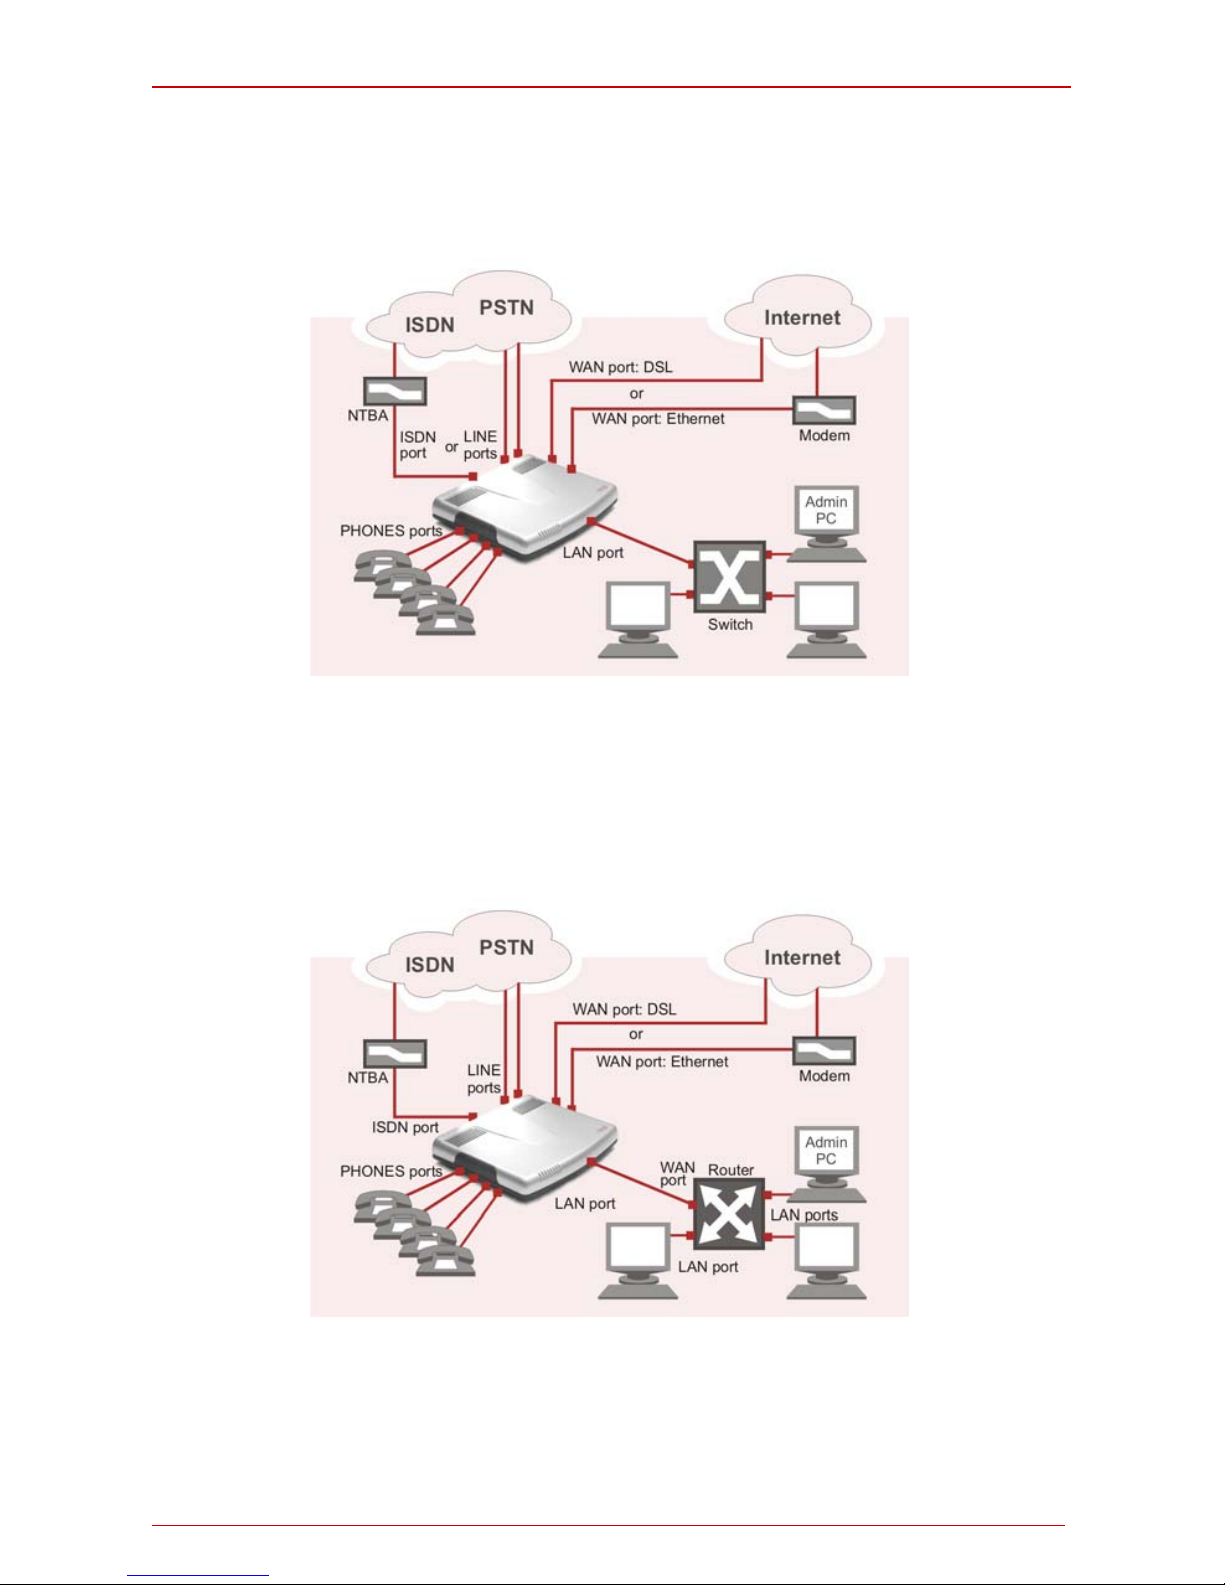
Fig. I-7: Configuration: Quadro used as Internet Access Router
Page 16
Quadro Manual I: Installation Guide Step 1: Installing the Quadro
Quadro2x, 2xi; Quadro4x, 4xi; Quadro16x, 16xi (SW Version 5.3.x) 16
Please Note: The Admin PC is connected to the Quadro LAN port to access the Web
Manag emen t of th e Q u adro. After t h e i ni t i al config uration has b een compl et ed, this PC c an
then b e m o ved to th e LAN and connect to t h e Q uadro ov er a s witch (s ee Fig.I-7). You als o
may reac h t h e Qu adro f or its f irs t c onfigu r ation f rom an Ad min PC wi thin the LA N, b ut this
may cause collisions in case of non-fitti ng IP addresses and c ompeting DHCP servers.
Fig. I-8: Configuration: Quadro used as Internet Access Router with a switch connected to the LAN port
If the us er alr eady op erat es a rout er conn ect ed to th e cabl e or DSL m odem an d has d evices behind the router, the router is disc onnected from the modem and the Quadro is insert ed bet ween the mod em and th e rout er (s ee Fig.I-9). Th e Qu adr o s erves as an I nter net
acc es s r out er a nd D HCP s erve r. Th e Qu adro will be c onfigur ed to connec t directl y to th e
Intern et throu gh a cabl e or DSL m odem. T he rout er then is connec ted to t he Quad ro LAN
port.
Fig. I-9: Configuration: Quadro used as Internet Access Router with a router connected to the LAN port
Please Note: If th ere ar e servic es conf igured b ehind t he exist ing rout er such as W eb or
gaming s ervers, these servic es also must be configured through the Quadro firewall for
proper operation. Refer to the Administrator’s Guide for more information.
Page 17
Quadro Manual I: Installation Guide Step 1: Installing the Quadro
Quadro2x, 2xi; Quadro4x, 4xi; Quadro16x, 16xi (SW Version 5.3.x) 17
Connecting t he H ardware
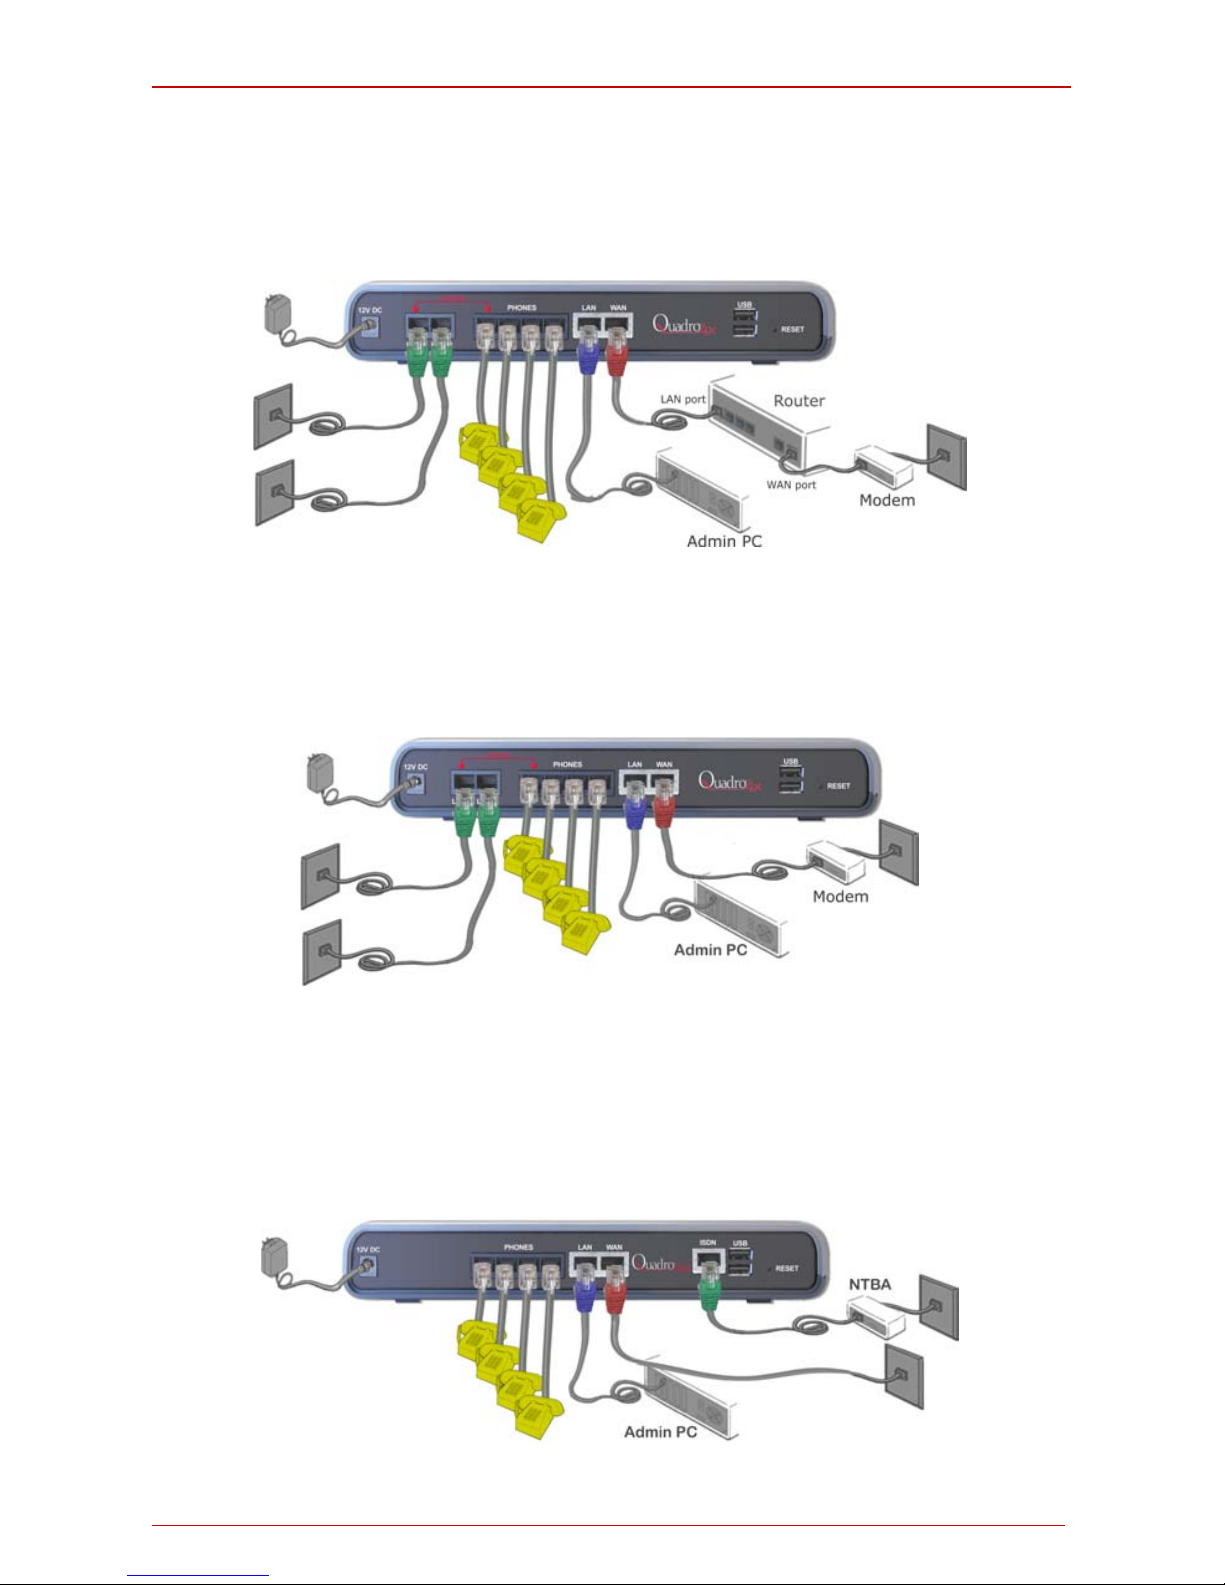
• Quadro4x behind a router
Quadro2x and Qu adro16 x ar e c onn ec t ed accord in gl y.
Fig. I-10: Installation: Quadro4x behind a router
• Quadro4x used as Internet access router
Quadro2x and Quadro16 x ar e c onn ec t ed accord in gl y.
Fig. I-11: Installation: Quadro4x used as an Internet Access Router
• Quadro4xi used as Internet access router
All Quadr o ISDN IP P BXs ar e conn ected acc ordingl y. They als o may be c onnected wi th its Eth ern et W AN port t o a rout er (s ee Fig.I-9) and ad dition ally, th e
ISDN ports of all Quadro devices may be joine d to a PBX with ISDN interfaces.
Fig. I-12: Installation: Quadro4xi used as an Internet Access Router
Page 18

Quadro Manual I: Installation Guide Step 1: Installing the Quadro
Quadro2x, 2xi; Quadro4x, 4xi; Quadro16x, 16xi (SW Version 5.3.x) 18
• Ver ify th e product p ac k ag e c ontents are c omplet e. R ef er t o the cont ents s h eet i ncluded
in the packaging to determine if all the items we re shipped in the box.
• Before you connect the hardware, make sure that all devices are power ed off .
• Connect telephones to the PHONE ports on the Quadro’s r ear p anel. You m ay connect
as many phones as there PHON E sock ets avai lable. PHONE s ocket 1 must be c onnected to a telephone to enable lifeline support functionality.
• C onnect at leas t one of Qu adro's LINE (FXO) ports to th e tel ephon e servic e fr om th e
PSTN . Th e Quadr o2 x off ers c onnec ti vit y of on e lin e, Qu adr o4x offer t wo lin es, and t he
Quadro16x offers f our lines. If you use a Qu adro4xi , connect the Q u adr o' s ISD N p ort t o
the digital telephone service (or to an ISDN port of a PBX).
Pleas e Note: If your In t ernet c onn ect ion is a DS L m odem , you m ay n eed t o us e a mi-
cro fil ter b et ween the F XO LIN E p ort and t h e phon e li ne. M icr o filt er s are t ypic all y pr ovided b y you r IS P b ut ar e also avail abl e at m ost c omp uter st ores. If a m icr o fil ter is alread y inst alled, s imply conn ect th e RJ1 1 from th e existin g phone to t he Quadr o FXO
port leaving the micro filter connection as is.
• Connect t h e E t h er n et port on you r PC vi a a s t r aight CAT 5 cable wi t h an RJ4 5 connec-
tor to th e LAN s ock et of the Q uadr o. If a hub or swi tch is c onnect ed b etween t he Qu adro an d your PC, us e a cross over cab le from the L AN int erf ace of the Qu adro to th e
hub/switch.
• Connect the WAN port of the Quadro to the Internet service via a cable or DSL modem.
• Power up the DSL or Cable modem first.
• C onnect th e pow er adapt er to th e POW ER port on t he Quadr o’s rear p anel an d plug
the power ad ap ter int o a power ou tlet. O nly us e the orig inal Quadro power ad apt er and
plug it int o a p ow er str i p w it h surge prot ection or to a UPS if avail abl e .
The red LED (Fault) will glow for sever al seconds f ollowed by th e yellow LED (I nfo),
which will glow for several minutes. When Info LED is off, the Quadro is operational.
• Power up an y hu b or s witc h f oll ow ed b y an y PC an d other devices on the LA N si de.
Pleas e Note: Th e PC mus t be c onfigur ed f or DHCP to rec eive an IP address direc tly
from th e Quadro. Refer to
App en di x: P C DHCP S ettings for instr ucti ons on s etti ng up a
PC for DHCP operation.
• Check the LEDs: The green Busy LED must gl ow continuously. T he green LAN and
W AN LED s will bli nk w h en cables are c onn ect ed to t h es e ports and all d e vices are powered up. If the gr een LAN and WAN LEDs do not bl ink, v erif y cabl ing an d ensu re th at
all devices ar e pow ered up.
Pleas e Note: CAT 5 cables can be f aulty without any visual indication. The LAN and
W AN LED s verify that t h e E th er n et connect ion is est abl is h ed between the en d p oin t s . If
these LE Ds are n ot illumi n ated , th ere is a connecti on probl em b et w e en t he Quadr o and
the other device. Some modems, hubs, switches and routers will require the use of
crossover cables.
Page 19

Quadro Manual I: Installation Guide Step 2: Configuring the Quadro
Quadro2x, 2xi; Quadro4x, 4xi; Quadro16x, 16xi (SW Version 5.3.x) 19
Step 2: Configuring the Quadro
Quadro IP PBXs with Ethernet WA N up-
link do not require further
configuration in two cases:
• The Quadro is connected behind a basic router that has no con-
flicts with the STUN protocol.
• The Quadro is used as the Interne t access router and your
ISP support s DHC P. Ther e are n o oth er r outer d evic es bet ween
the Quadr o and the DSL or c able mod em and you get th e IP address ass igned au t om aticall y b y the ISP.
Simpl y power u p th e mod em. Once the m odem is up an d runnin g (after a
few minu tes) power up the Q u adro.
Verify functionality of both IP and PSTN calls:
• PST N telephony: Make an outbou nd PSTN call an d arran ge to recei ve an in-
coming call. Th e incom ing PS TN c alls will be routed t o the Au to Attend ant by
def ault, and the caller has to enter a valid extens ion numb er, e.g., 11, follow ed
by the # s ig n to r eac h a ph one c on nect ed t o t he f irst PHON E p ort of th e Qu adro.
• IP telephony: D ial 899# and you w ill hear a voice mess age that confi rms you
have s ucc essfull y establ ished an IP c all. If this c all is not suc cess ful, go t o
A-
ppendix: Checking the Connections for troubleshooting.
You m ay cus t omiz e th e f ollowi ng s ettings by connecting the PC to Quadro's LAN port and
logging in to the Quadro’s Web Management:
• Bandwidth - to regulate the number of calls allowed by the Quadro to avoid
degradation in low bandwidth conditions.
• Time/Date - to ensure the correct time and time zone are used for call records.
• Regional S ettings - if your Qu adro is loc ated outs ide th e United States, i t is
impor tant t o pr operl y conf ig ure you r li ne c onnec tions to th e PSTN in your l ocation.
• Firewall - if your Qu adr o is conn ect ed b ehind a rout er with its own f irewal l ser-
vice run ning, dis able the f irewal l to make Qu adro acc essi ble for m anagemen t
purposes.
Page 20
Quadro Manual I: Installation Guide Step 2: Configuring the Quadro
Quadro2x, 2xi; Quadro4x, 4xi; Quadro16x, 16xi (SW Version 5.3.x) 20
Step 2.1: Logging in to Quadro
• Start a browser (MS I nternet Expl orer , Netscape, O p er a) on a P C connec ted to
the LAN port.
• Enter http://172.30.0.1 (Quadro’s default LAN IP address) into the address
field.
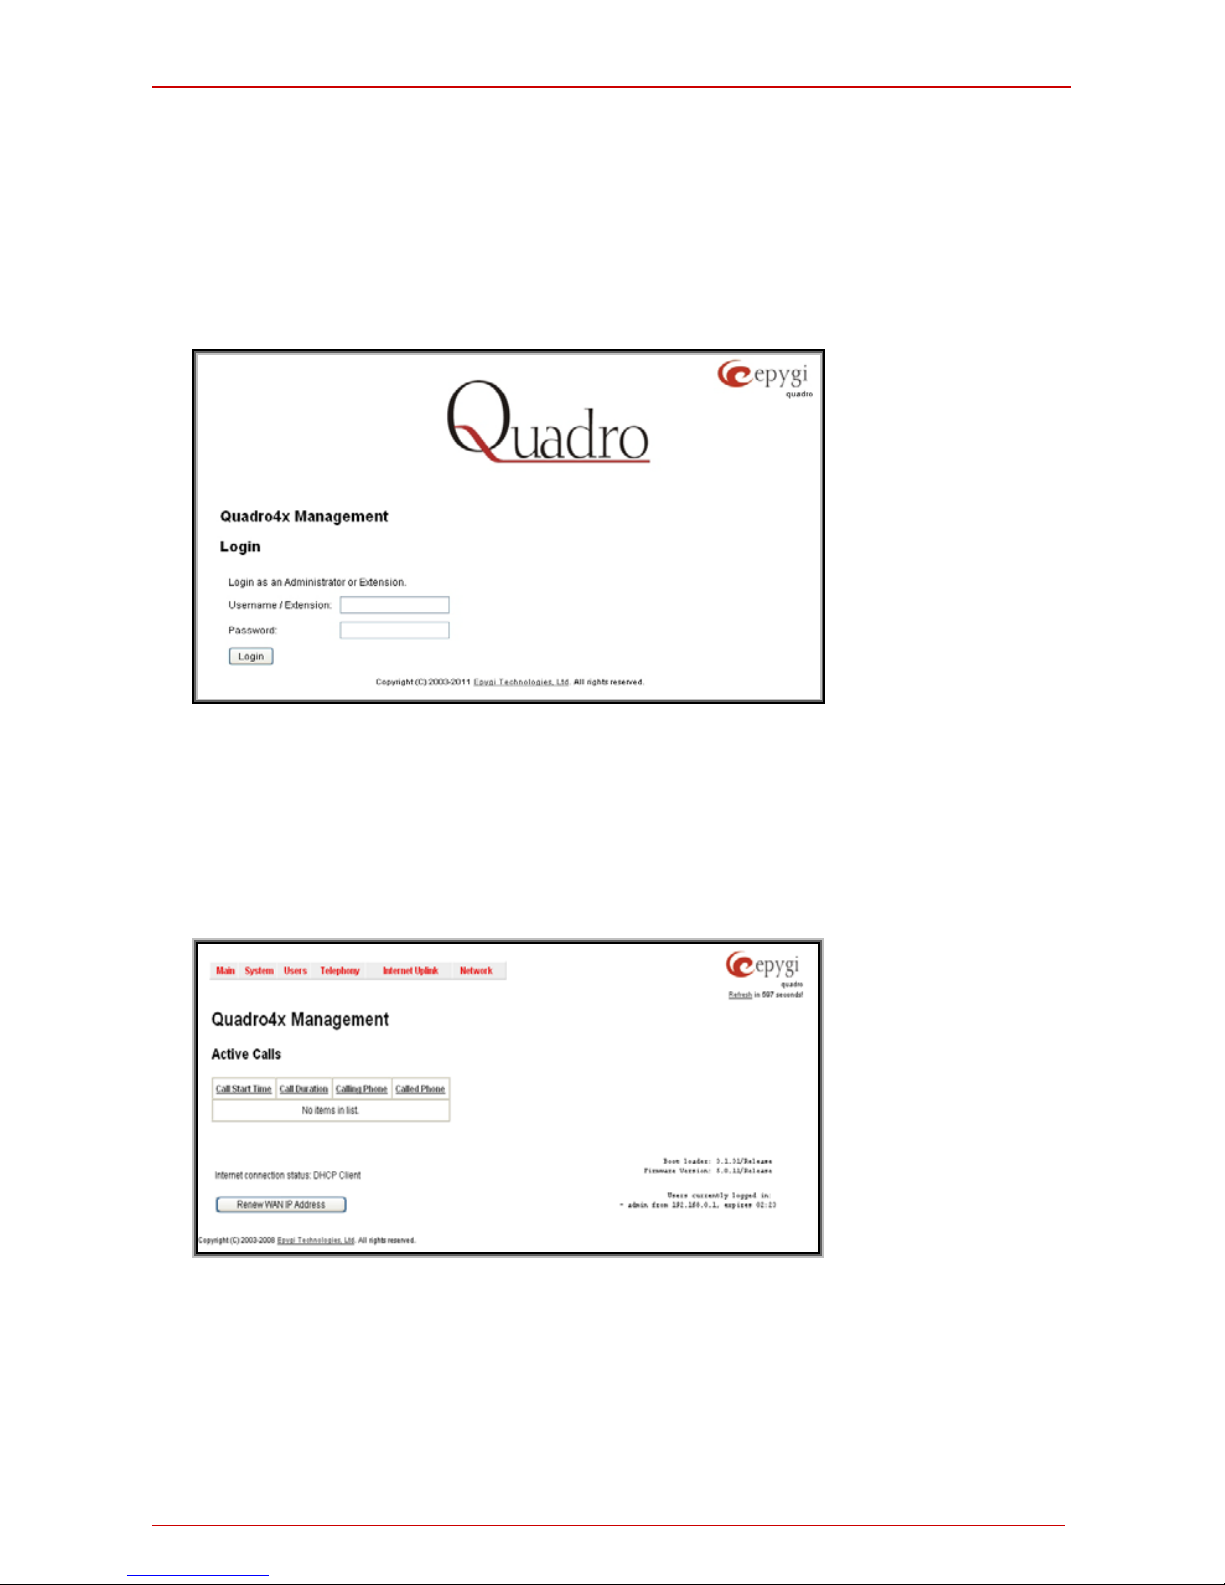
• The Login page of the Quadro will be displayed (see Fig.I-13).
Fig. I-13: Login page
Enter admin as t h e Usernam e and 19 as the pass wor d to log in as th e adminis tr ator. Once
you log in, you will enter into the Quadro Management Menu.
Pleas e Note: If you consecutively ent er a wron g p ass word and/ or u sern ame f or f ive t im es
the device will be unavailable for login for five minutes.
After log in, the Quadro Management p ag e will be displayed.
Fig. I-14: Quadro Management page
Pleas e Note: Th e ill ustr ati ons abov e and th e f ollow ing s cr eensh ots sh ow th e sc r eens of a
Quadro4x. The management screens of the other Quadro IP PBXs differ only slightly,
therefore the Qu adr o4x man agem ent s cr eens wi ll b e us ed a s r ef er en c e throug h this doc ument.
Page 21
Quadro Manual I: Installation Guide Step 2: Configuring the Quadro
Quadro2x, 2xi; Quadro4x, 4xi; Quadro16x, 16xi (SW Version 5.3.x) 21
Step 2.2: System Configuration Wizard
Select the Sy ste m Configur ation Wiz ard from the System menu. The Syst em C onfiguration Wizard is a tool f or t h e ad mi nis t r ator to define th e Q uadro's L oc al A r ea Netw ork set-
tings an d to s pec if y r egion al c onfi gur ation s etti ngs to m ake Q u adro oper ati onal in i ts LAN .
The System Configuration Wizard must be run upon Quadro first startup.
For the b asic c onfigur ation, s ome pag es in this wizard may b e skip ped and lef t d ef a ul t f or
the basic configuration.
Pleas e Note: I t is s trong l y rec omm end ed th at f actor y def aul t s etting s ar e left u nchang ed if
their m ean in gs ar e n ot c omplet el y unders tandable to the party administrating the Quadro.
System Configuration
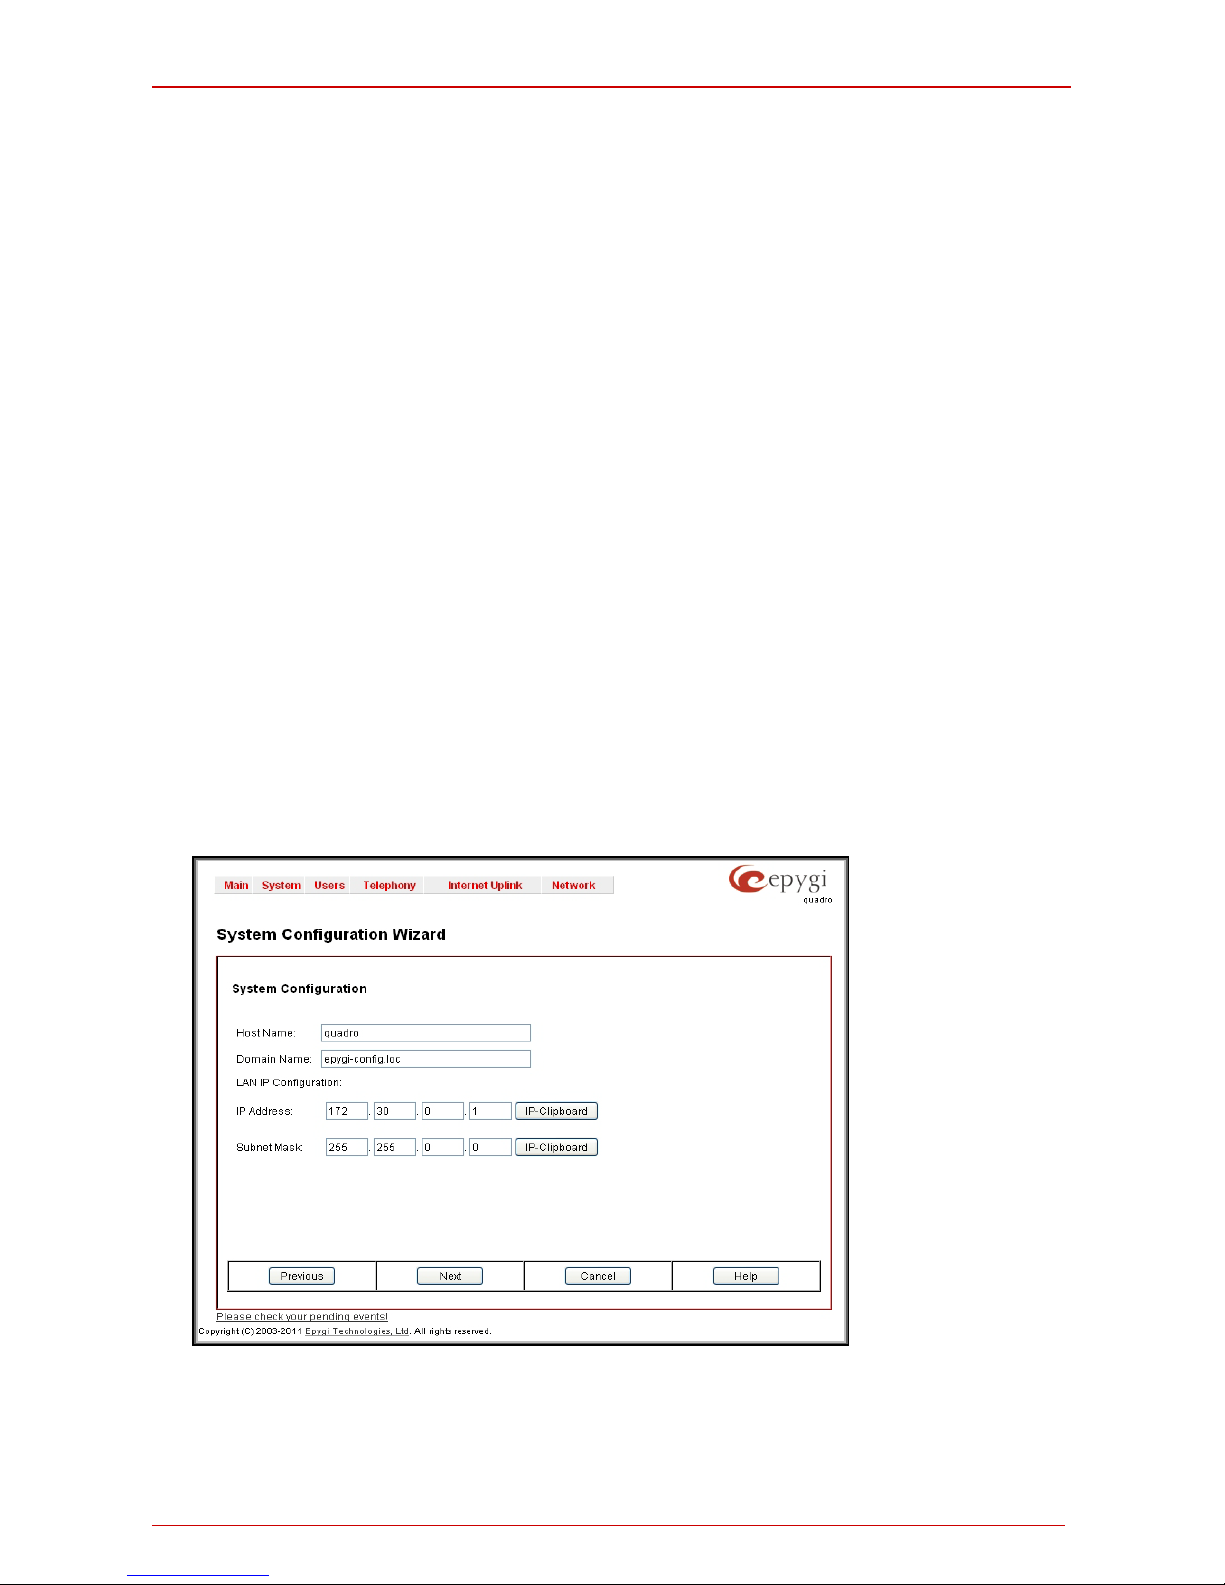
T he f irs t p ag e of S ystem C onfi guration Wizard show s all i tems t o be c onfigur ed. Clic k the
Next but ton t o star t. E nter i nt o the Host Name field the unique name (top ri ght c orn er, u nder Epygi logo) for the Qu adr o device. The Doma in Name t ext f ield r equires the LAN side
domain name which the Quadro belongs to.
For a basic configuration, th e LAN IP addres s does n ot need to be changed, but if you
must change it (for ex ample, to in tegr ate the de vice int o an exis ting LAN), record the new
LAN IP addr ess and h ave it h andy. You’ ll n eed it f or s ubs equ ent acc ess t o Qu adro’s management.
Please Note: The Ho st Nam e is very us eful wh en many Quadro's are part of a network
and one adminis trat or has r emote acc ess t o all of th em. All Quadro pages s how t he h os tname on the top right corner under Epygi logo.
Fig. I-15: System Configuration page
Clicking Next shows the page DHCP Settings for the LAN Interface.
Page 22
Quadro Manual I: Installation Guide Step 2: Configuring the Quadro
Quadro2x, 2xi; Quadro4x, 4xi; Quadro16x, 16xi (SW Version 5.3.x) 22
DHCP Settings for the L AN Interface
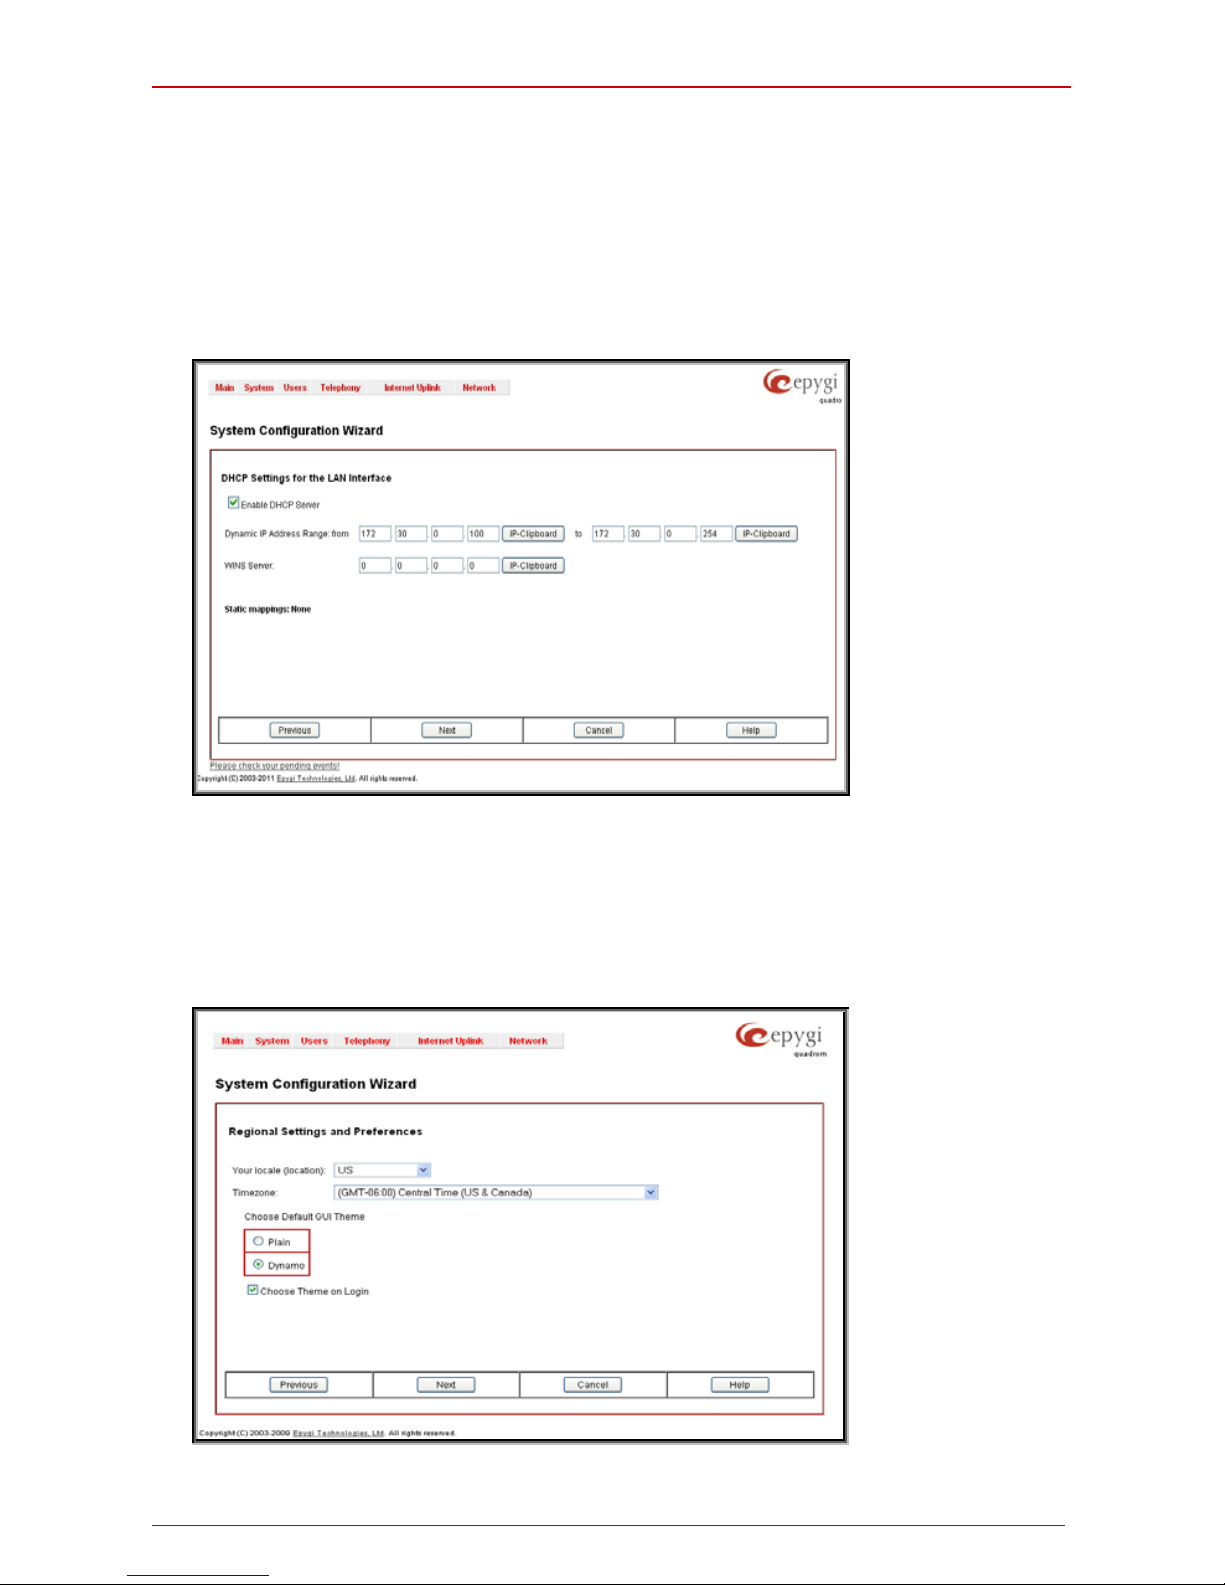
If th e DHCP s erv er is en abled , the Q uadr o will automatically ass ign dyn amic IP addr esses
to th e stations connected to its LAN port.
If you di dn’t c han ge th e def ault LAN IP addr ess of th e Quadr o, you als o may l eave th e d ef aul t v alues f or th e IP Ad dress R ange. M ake sure you r conn ected LAN devic es belon g to
the same network as the LAN port of you r Q u adro.
Pleas e Note: Make sur e there is onl y one DHCP ser ver on the LAN, other wis e, unpredic t-
able network b eh avi or c an oc cur.
Fig. I-16: DHCP Settings for the LAN Interface page
Click on Next to display the Regional Settings page.
Regional Settings
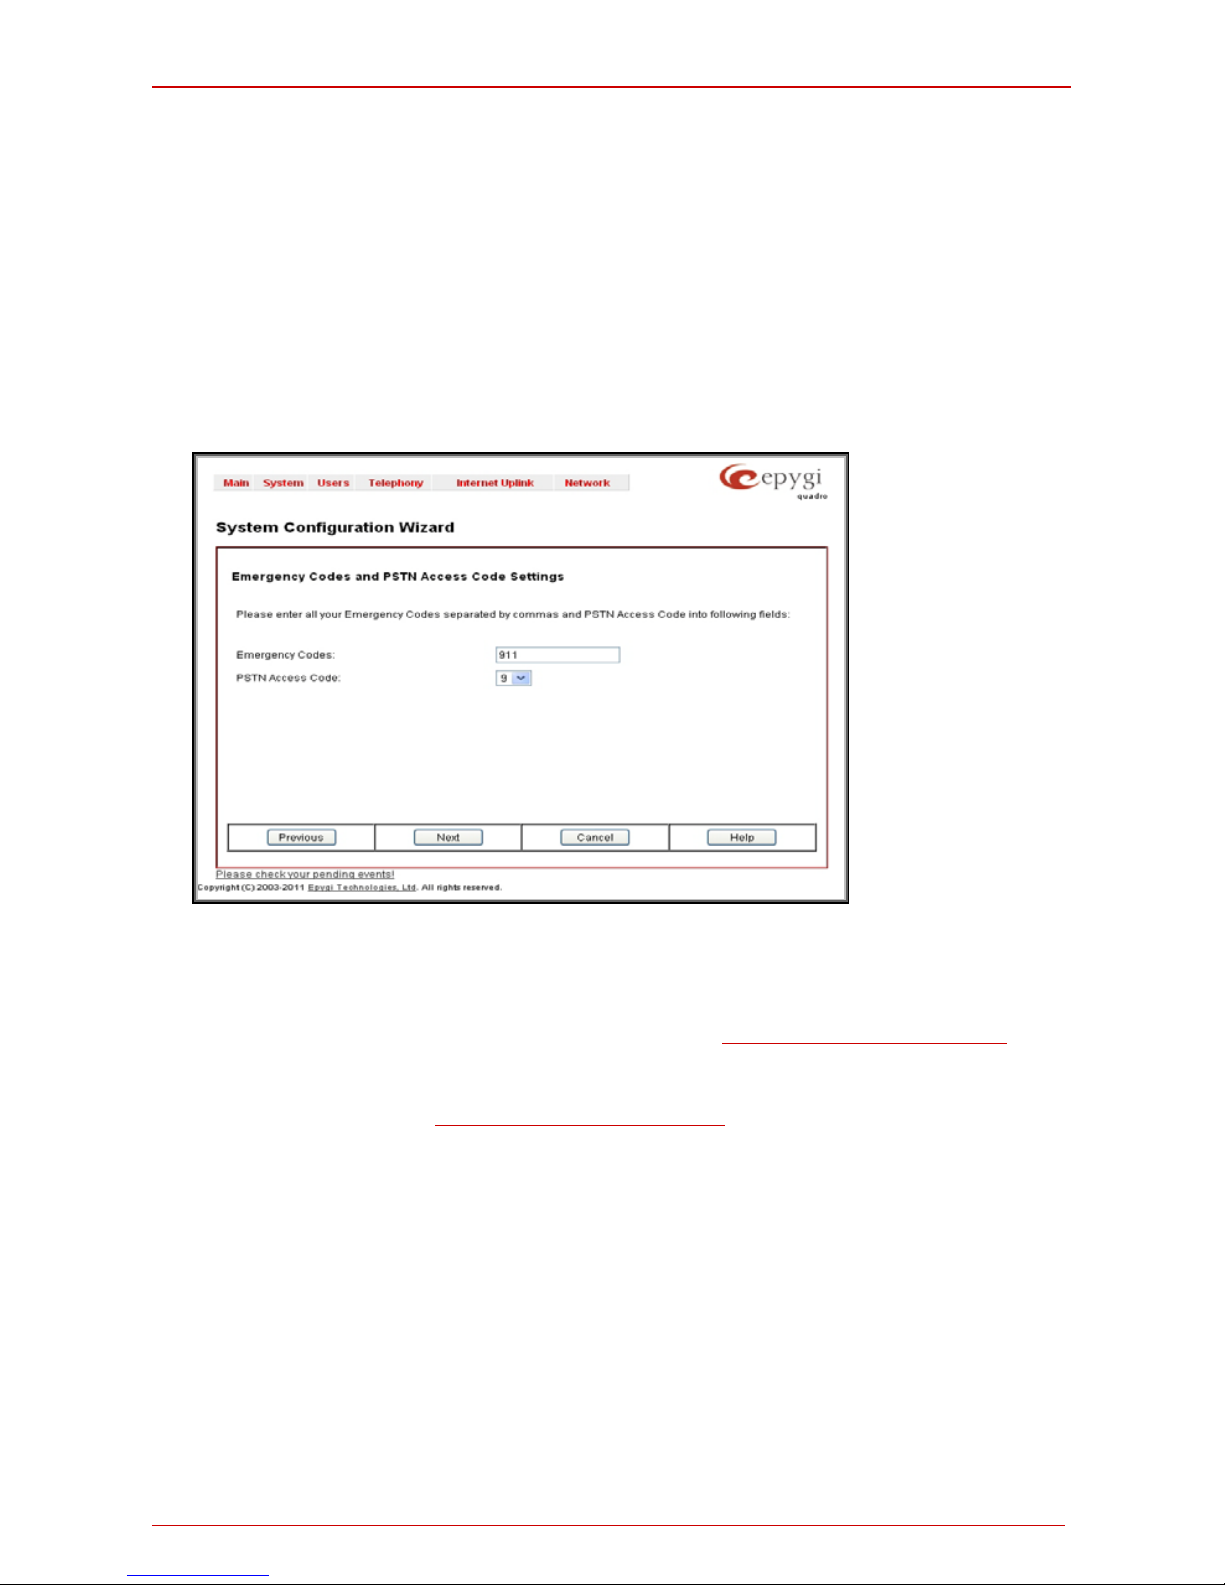
If your Qu adr o is locat ed outs ide of th e United Stat es, it is im port ant t o properl y conf igure
your lin e c on n ections t o the PST N in y our l ocation.
Fig. I-17: Regional Settings page
Page 23
Quadro Manual I: Installation Guide Step 2: Configuring the Quadro
Quadro2x, 2xi; Quadro4x, 4xi; Quadro16x, 16xi (SW Version 5.3.x) 23
Proper c onfiguration of Regional Settings is important for the functionality of the voice
subsystem. The Regional Settings determine the proper telephony parameters on the
LINE ( ISDN ) an d PHO NE port s of th e Qu adro for th e sp ecif i ed c ountr y. Select th e countr y
where t he Qu adro is loc ated. If you d o not f ind your c ountry in the l ist, pic k th e closes t in
your timezone.
The Quad ro obtains the corr ect t ime autom atically o ver the Int ernet f rom a time ser ver. If
you are not located in the US/Central standard time zone, you will need to change the
Timezone to your region.
Click on Next to display the Emergency and PSTN Access Code Settings page.
Emergency and PSTN Access C ode Settings
Fig. I-18: Emergency and PSTN Access Code Settings page
You may ent er your loc al spec ific emer genc y cod es i nt o t h e ap propriate field . For example,
in th e United States the emerg ency numb er is 911, w hereas in G erman y it is 112,11 0. In
case of an emergency you can then pick up any FXS phone and dial your configured
emergency code without any prefixes for PSTN calls (see
Step 4: Making/Receiving Calls).
The PSTN A c cess Cod e is the prefi x nu m ber you ch oose to dial to tell th e Q u adro to “mak e
this c all over PSTN” (see St ep 4: Making/ Receivi ng Calls). U s ers in th e U nited S tates will
usuall y choos e 9 here. Eur opean users us ually wou ld want to enter z ero (0). If you do not
enter anything into this field the currently configured PSTN Access Code will stay unchanged.
Click on Next to display the Summary Page.
Page 24
Quadro Manual I: Installation Guide Step 2: Configuring the Quadro
Quadro2x, 2xi; Quadro4x, 4xi; Quadro16x, 16xi (SW Version 5.3.x) 24
Finishing t he Sy stem Config uration Wi za rd
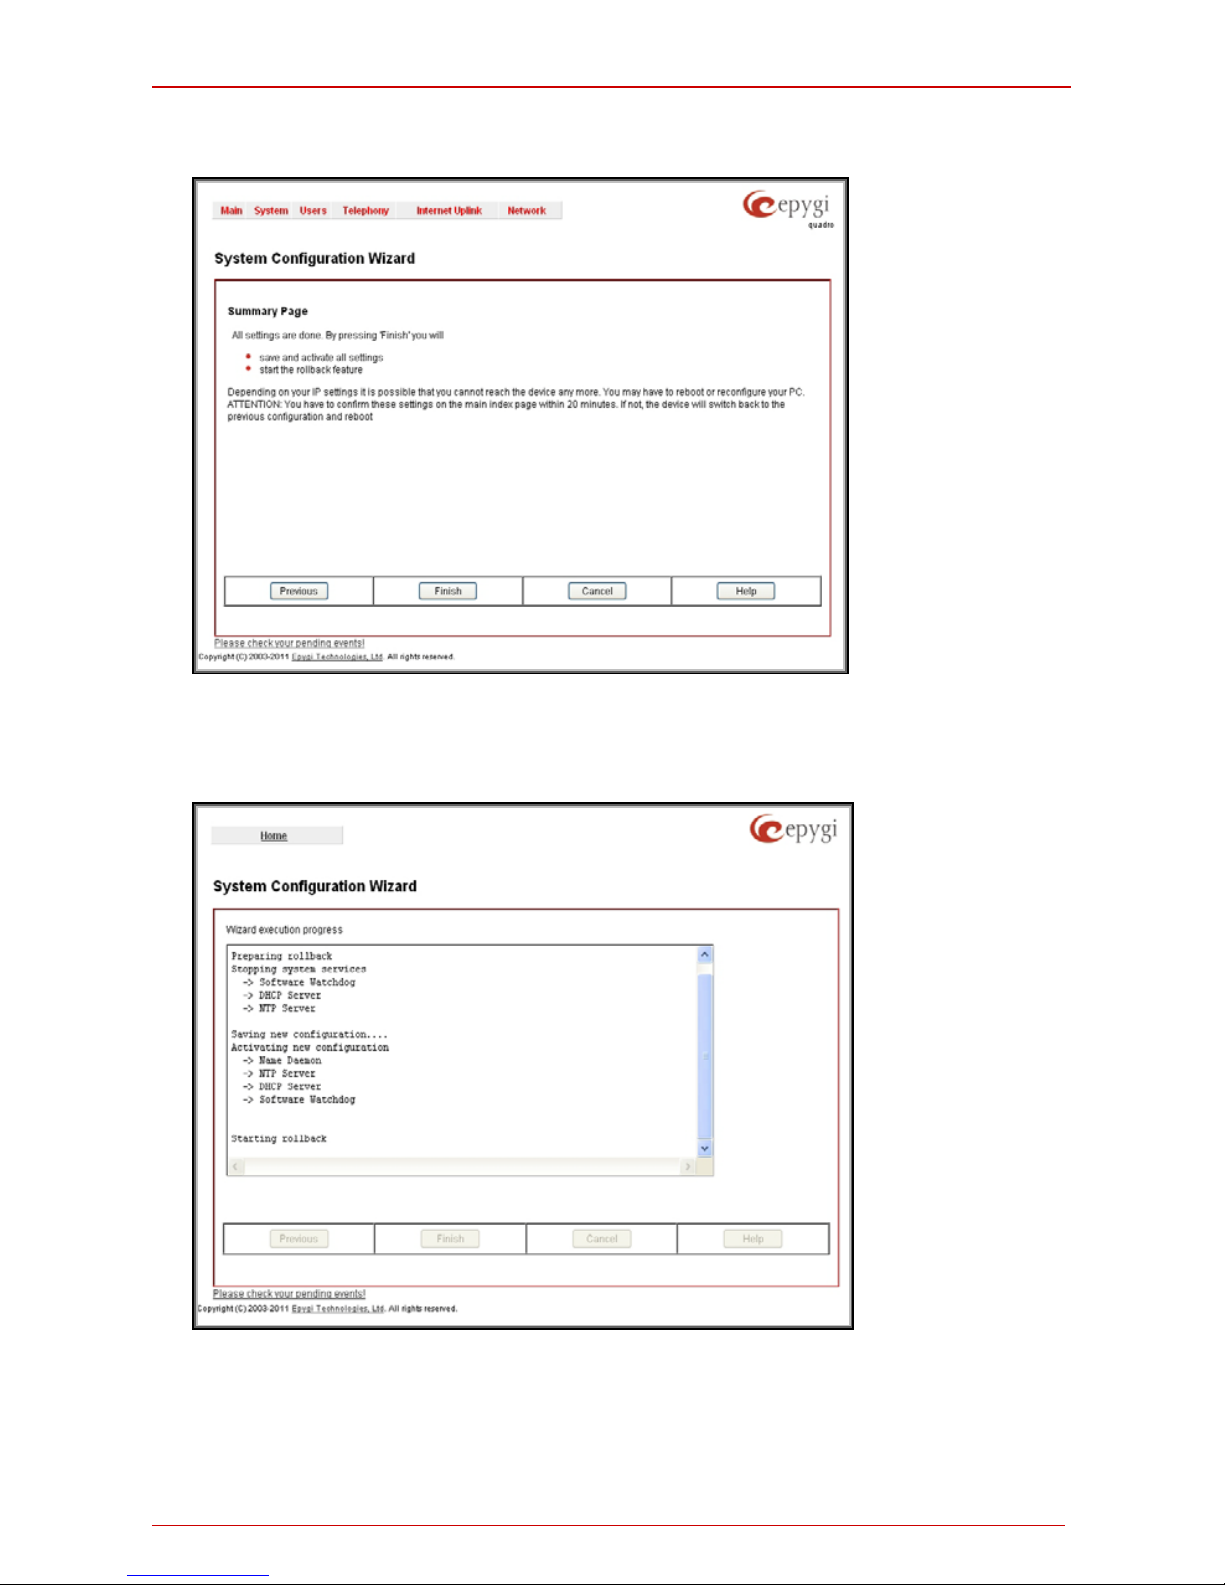
Fig. I-19: System Configuration Wizard finishing page
Click on Finish to complete the System Configuration Wizard. The Quadro will then stop internal functions and apply the changes made in the Wizard.
Fig. I-20: Wizard Execution Progress page
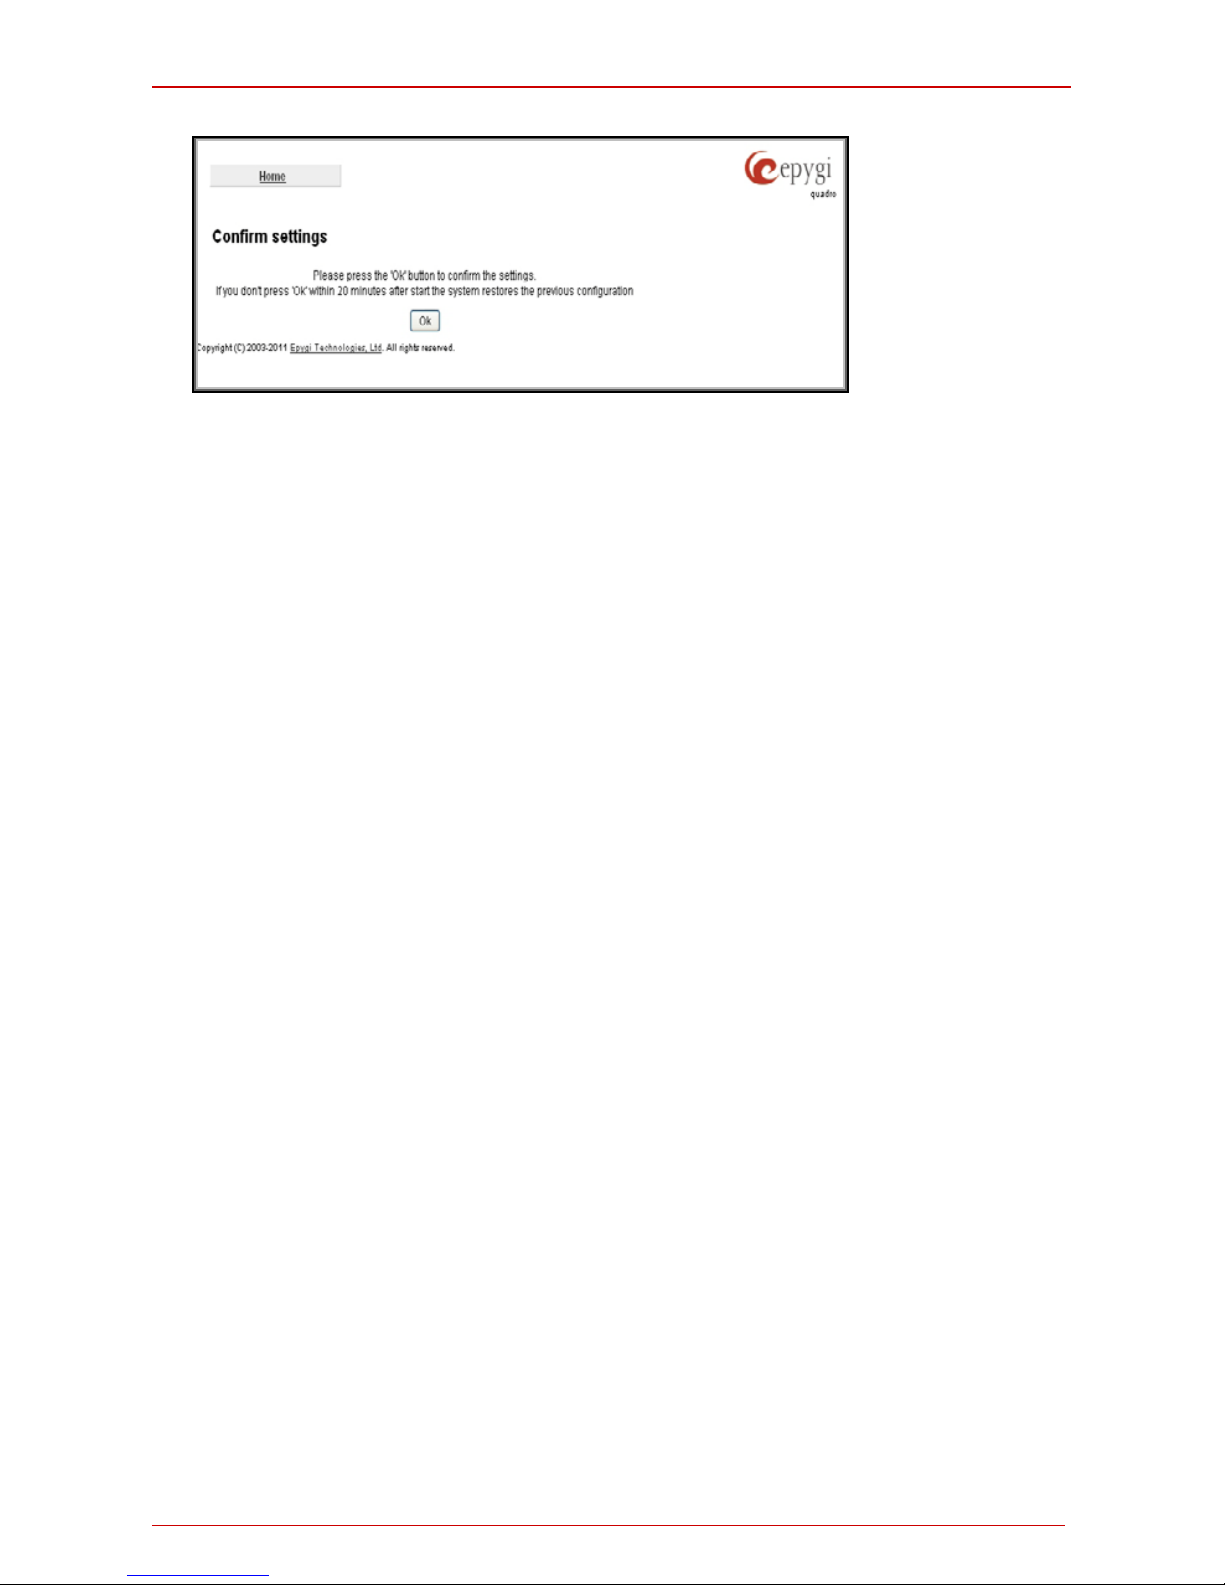
After this is complete, the Quadro will reply with the Confirm Settings page requesting
confirmation of the changes. Press on OK to confirm the settings.
Page 25
Quadro Manual I: Installation Guide Step 2: Configuring the Quadro
Quadro2x, 2xi; Quadro4x, 4xi; Quadro16x, 16xi (SW Version 5.3.x) 25
Fig. I-21: Confirm Settings page
Please Note: You m ust confir m th e settin gs within 2 0 minut es. Otherwise the device will
revert back to the prev ious configuration and reboot.
Pleas e Note: If you do not us e DHCP for you r LAN and y ou have c hanged your LAN s et-
tings, m ak e s ur e t h at the IP ad dress of the PC connect ed t o Q u adro is s till wit hi n the sp ec ified IP address r ang e, otherw ise your PC m ay n ot est ab lis h a c onnection to Quadro.
If you ch anged the networ k configuration of t he LAN, restart your LAN connection t o receive a new IP add ress f rom th e new network. Then you can access the W eb Man ag em ent
of the Quadro on the new IP addr ess you ’ ve as s igned to the Quadro.
Page 26
Quadro Manual I: Installation Guide Step 2: Configuring the Quadro
Quadro2x, 2xi; Quadro4x, 4xi; Quadro16x, 16xi (SW Version 5.3.x) 26
Step 2.3: I nt ernet Con fi guratio n W izard
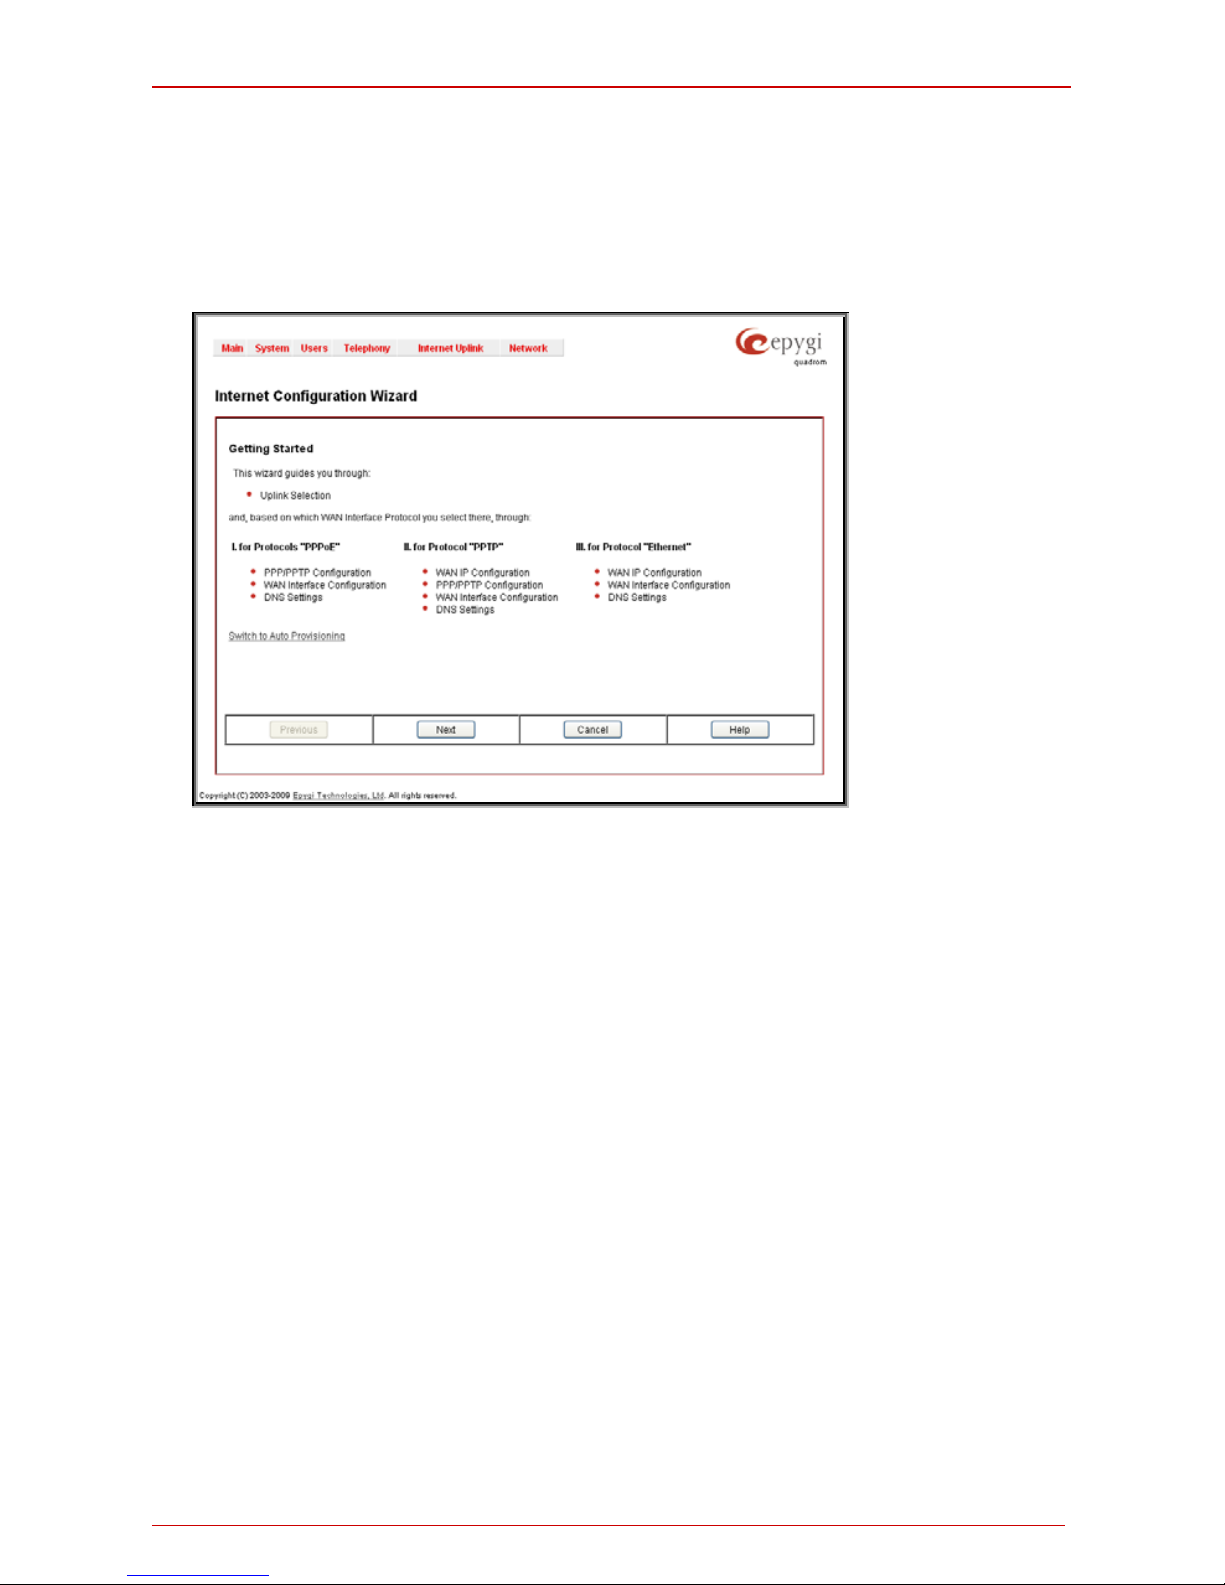
Open th e Internet Con f igur ati on Wizard by selectin g th e corres p on di n g m enu i tem on t h e
System menu. The Intern et Conf igur ation Wizard is a to ol f or th e adm inis trat or t o c onfi-
gure th e WAN s ettings and to adj us t Quadro's connect ivity in th e g lobal n et w ork. It m us t b e
run if Quadro is desired to be connected to the Internet.
The page Getting Started will be displayed:
Fig. I-22: Internet Configuration Wizard
This first page of t he I nter net Configurat ion Wiz ard is for informational purpos es only and
lists the items to be configured, Click on the Next button for the Uplink Configuration
page.
Bef ore confi guring t he W AN port t o the I ntern et, you n eed t o get th e foll owing information
from your internet service provider:
• Bandwidth - how much is available upstream and downstream?
• W A N IP C onf igurati on - is DHCP su pported ? If yes, n o m or e i nforma ti on is n eed ed .
If DHCP is not supported, the f ollowing data is needed: the WAN IP address, the
subnet mask, the IP address of the standard gateway and the IP address of the
Domain Name Server (DNS).
• MAC address - needed when the ISP requires a specific MAC address for the
WAN.
Additionally, for Point-to-Point P rotoc ol ov er Eth er net (P PP oE) WAN in t er f ace , you need t o
get the following information from you r i nt ernet service provider:
• PPP C onfigu r ation - does your ISP us e a dynamic or fi xed W AN IP address ? If the
W AN IP address is d yn am ic , no mor e informat i on is n eeded. If the WA N IP addres s
is fixed, you will have to enter it.
• Authentication - does your ISP r equir e aut hen tic ation ? If aut hentic ation is requir ed,
inf ormation about the c orresp ondin g meth od (PAP , CHAP or MS CHAP ) is n eeded
includi ng the us ername and p assword of the PP PoE acc oun t.
Page 27
Quadro Manual I: Installation Guide Step 2: Configuring the Quadro
Quadro2x, 2xi; Quadro4x, 4xi; Quadro16x, 16xi (SW Version 5.3.x) 27
This information will be needed to be inserted in the Internet Configuration Wizard.
Uplink Configuration
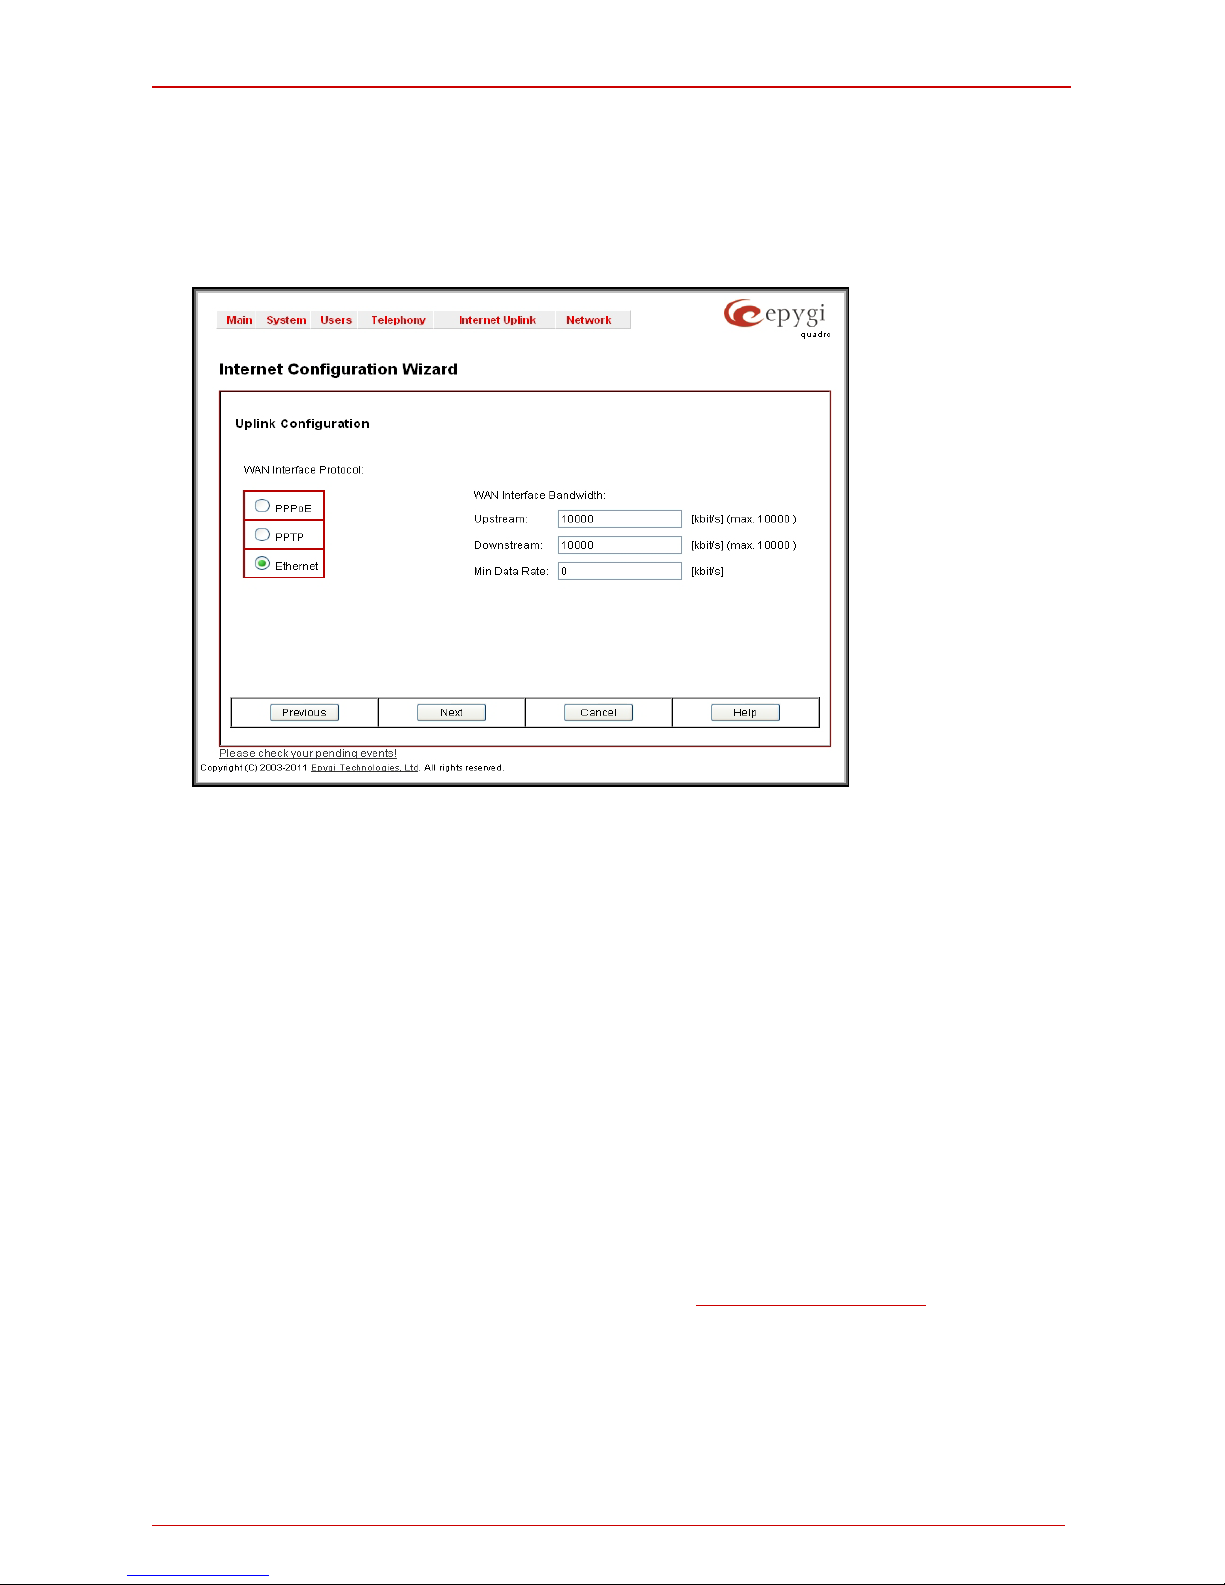
S el ec t the d es i r e d W A N In t er face Pro t oc o l an d en t er t h e WA N Interf ace Bandwi dth t o assure the quality of IP calls.
Fig. I-23: Uplink Configuration
If the available bandwidth is used to the point where the quality of an additional IP call
would suffer, then new IP calls are rejected.
The bandwidth provided by your ISP must be specified for both Upstream and Downstream fields. T he defaul t entr y in both f ields is 10000, the maximum bandwidth of the 10
MB uplink module. For basic DS L and c able mod em servic e in the U nited States, typical
values ar e 300 for Ups tr eam and 1500 for Downstream.
The M in Data R at e text f iel d is us ed t o sp ecif y th e amou nt of b and widt h r eser ved f or d ata
applic ations. T he value en tered h ere n eeds to be s maller th at the value s pecified f or Up-
stream Bandwidth.
Specify the WAN Int erface Pr otoco l by choosi ng betw een avail able W AN interf ace prot o-
cols: PPPoE (P oint t o Point over Et hern et), PPTP (P oint to P oint T unnelin g Prot ocol) and
Ethernet. Use Ethernet for DHCP or static IP.
For Ethernet, clicking Next will display the WAN IP Configur ation page. If PPPoE is t he
selected WAN Interface Protocol, the n ext page will be
PPP/PPTP Configuration. For PPTP
W AN In ter f ac e Pr ot oc ol , PPP/PPT P Configura tion page will follow the W AN IP Config u-
ration.
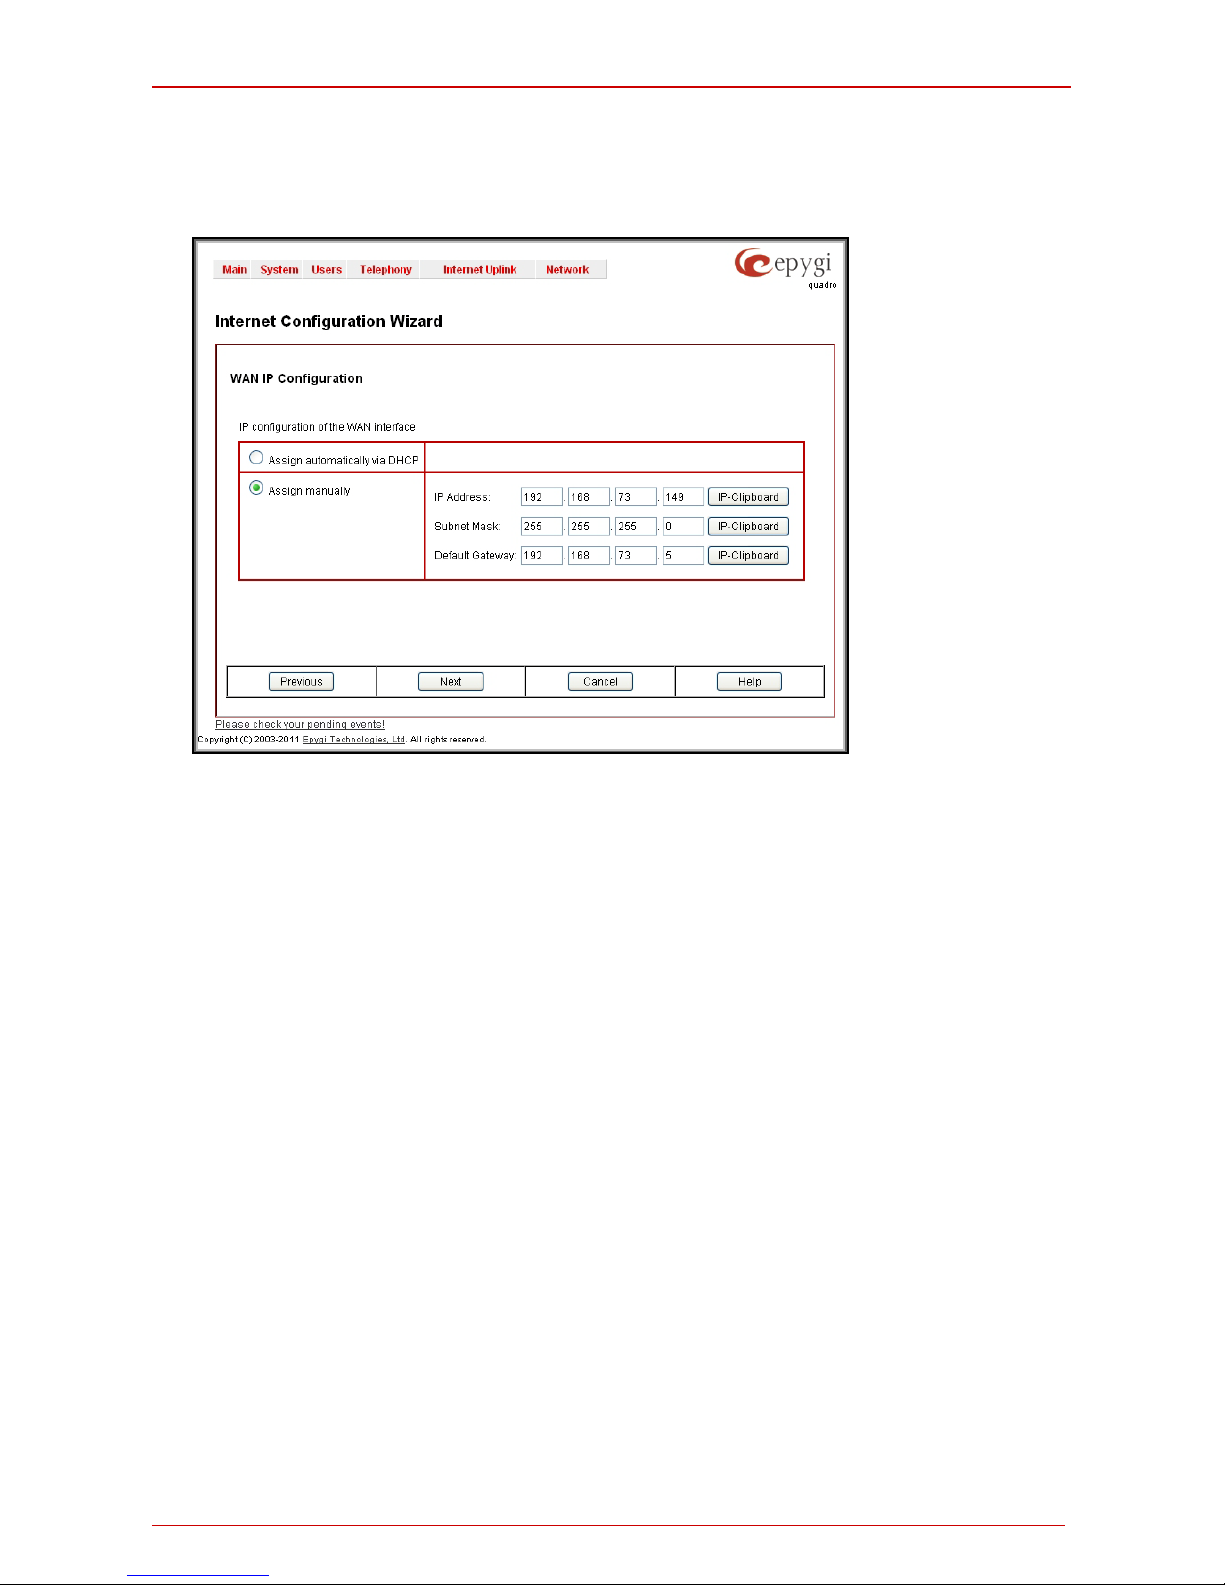
WAN IP Configuration
Your Internet Service Provider (ISP) should provide this information.
• Assign auto matically via DHCP - T he par ameters are set autom atic ally by th e ISP.
This is common with cable modem and DSL service.
Page 28
Quadro Manual I: Installation Guide Step 2: Configuring the Quadro
Quadro2x, 2xi; Quadro4x, 4xi; Quadro16x, 16xi (SW Version 5.3.x) 28
• Assign M anua lly requir es t h e administ r ator to enter the extern al IP Addr ess , th e c or-
responding Subnet Mask, and the IP address of the Standard Gateway. This is
comm on w h en you h ave a st at ic IP address wit h y our ISP.
Fig. I-24: WAN IP Configuration page
Click on Next to displ ay th e WAN Interface Configuration page.
Page 29
Quadro Manual I: Installation Guide Step 2: Configuring the Quadro
Quadro2x, 2xi; Quadro4x, 4xi; Quadro16x, 16xi (SW Version 5.3.x) 29
PPP/P PTP Config uration
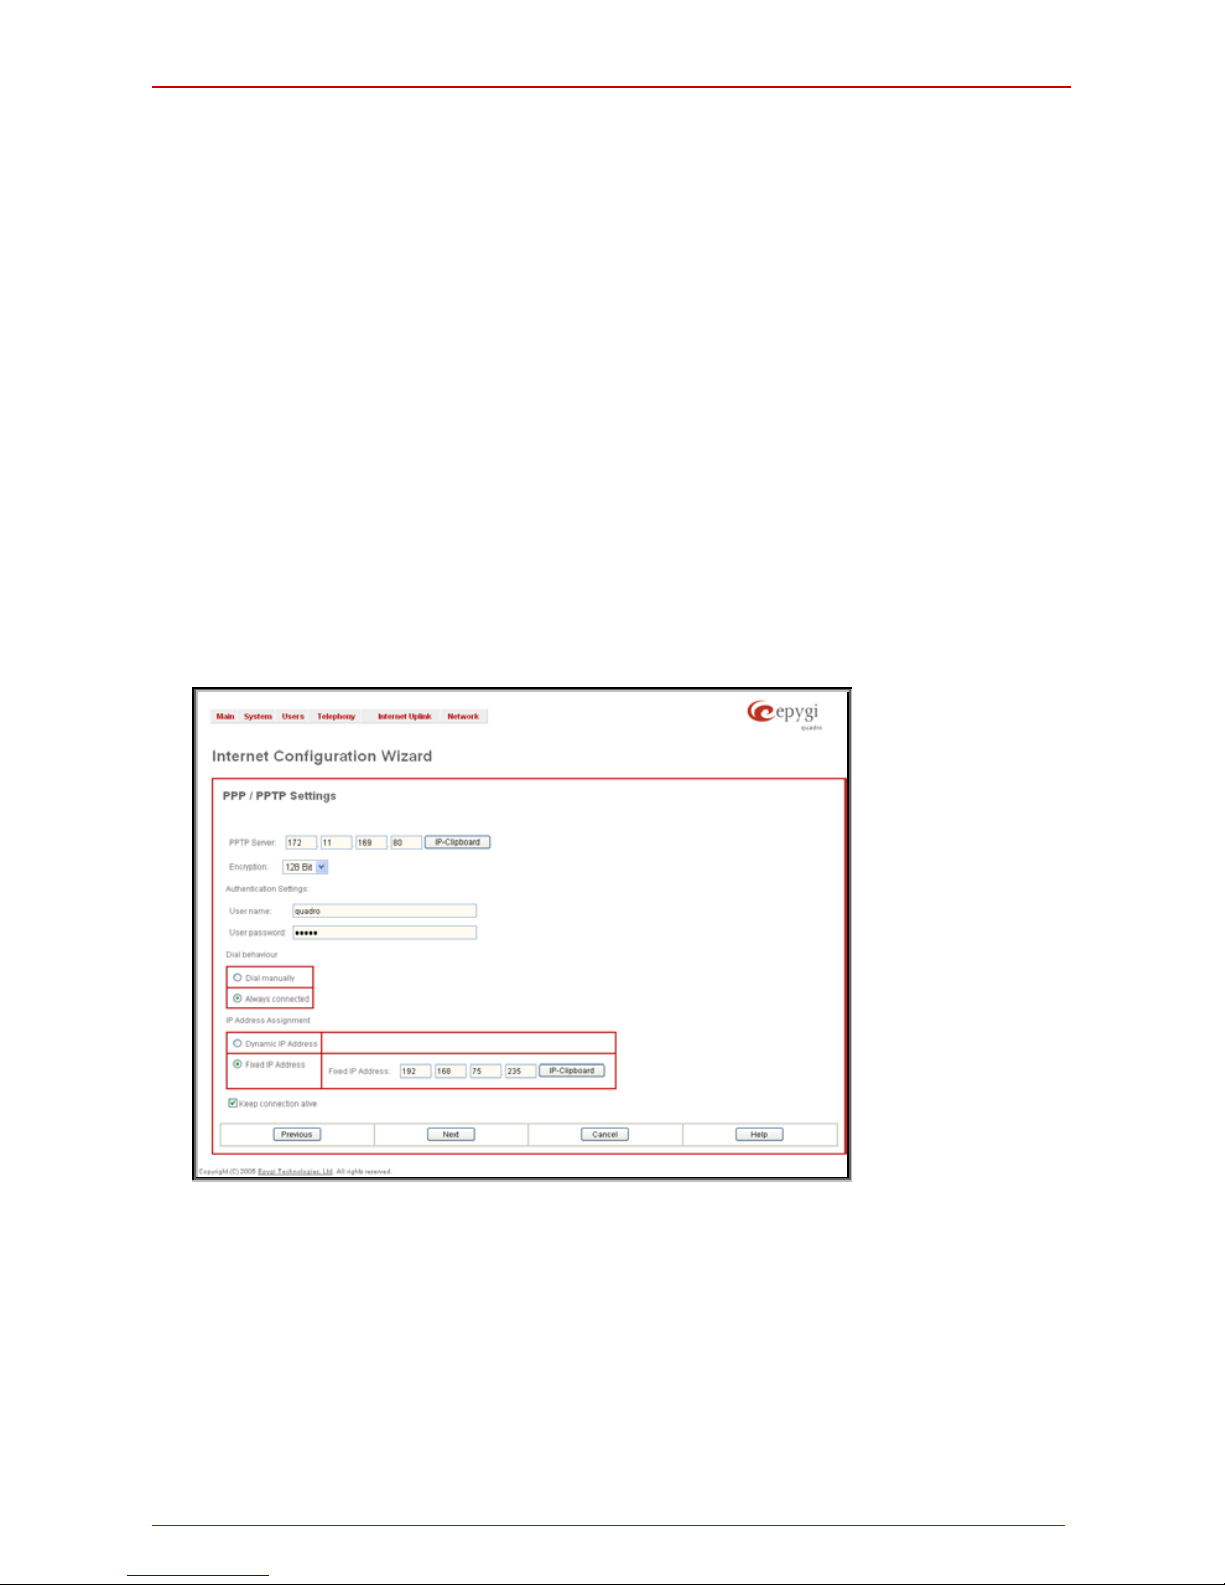
Enter the IP address of the PPTP server into the PPTP Server text field.
Choose the encryption for the traff ic over th e PPTP int erface from the Encryption drop
down list.
Authenti cation Sett ings req uir e the Us er n am e an d t h e Passw ord used for the authentication on th e IS P server.
Dial Beh av i or radio buttons:
• Di al Manu ally - if this radio button is activated, a button will be displayed in the main
manag ement wind ow that s erves t o switch the Int ernet connection on/ off. W hen accessing the Internet, every station of th e connected LAN has to c onnect to Quadro
first.
• Al way s con necte d - Quadro s ta ys in the al ways c onnec t ed mod e. This will all ow Qu-
adro always remain online in the networ k.
The I P Address Ass ignment field is used t o spec ify the extern al IP address given to the
Quadr o. Usuall y it is a dynam ic addr ess b ut in some c ases you may be gi ven a static IP
address.
Fig. I-25: PPP/PPTP Configuration page
If you r ISP ass igns a d ynam ic IP addres s, acti vat e th e Dynam ic IP Addr ess radi o but ton ,
other wise acti vate the Fixed I P Addres s r adio butt on and enter t he IP addr ess you were
assigned by your ISP.
Keep Connection alive checkbox enables keeping the connection alive by sending control
packets dedicated for the link stat e ver if icati on.
Click th e Next butt on to displ ay th e WAN Interface Configuration page.
Page 30
Quadro Manual I: Installation Guide Step 2: Configuring the Quadro
Quadro2x, 2xi; Quadro4x, 4xi; Quadro16x, 16xi (SW Version 5.3.x) 30
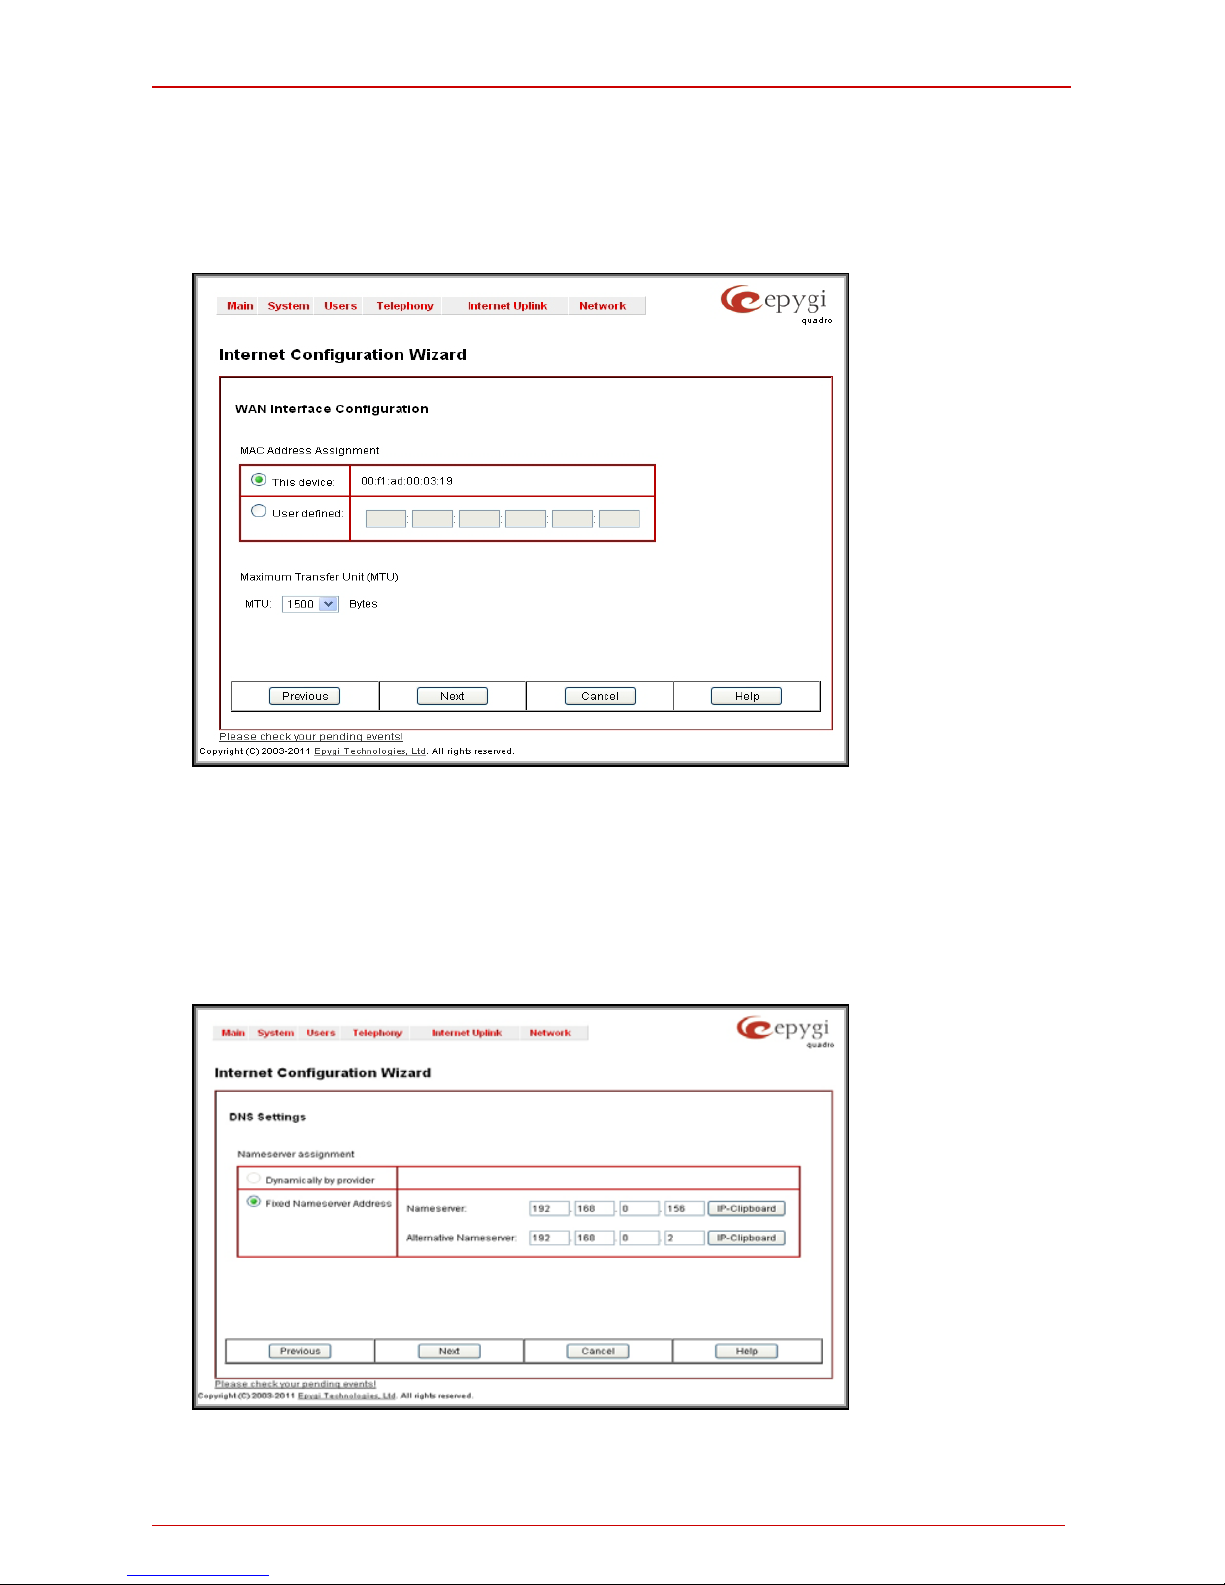
WAN Interface Configuration
If you r ISP r equ ires a specif ic MA C address , (for exam ple, f or auth ent ic ation), it can be entered on this pag e. T he req uir ed MAC add r ess can b e enter ed int o th e User d efin ed field.
If a specific MAC address is not required, leave the default selection This device selected.
Fig. I-26: WAN Interface Configuration page
Use the MTU drop down list to select the maximum packet size on the Ethernet (in bytes).
Click Next to display the DNS Settings page.
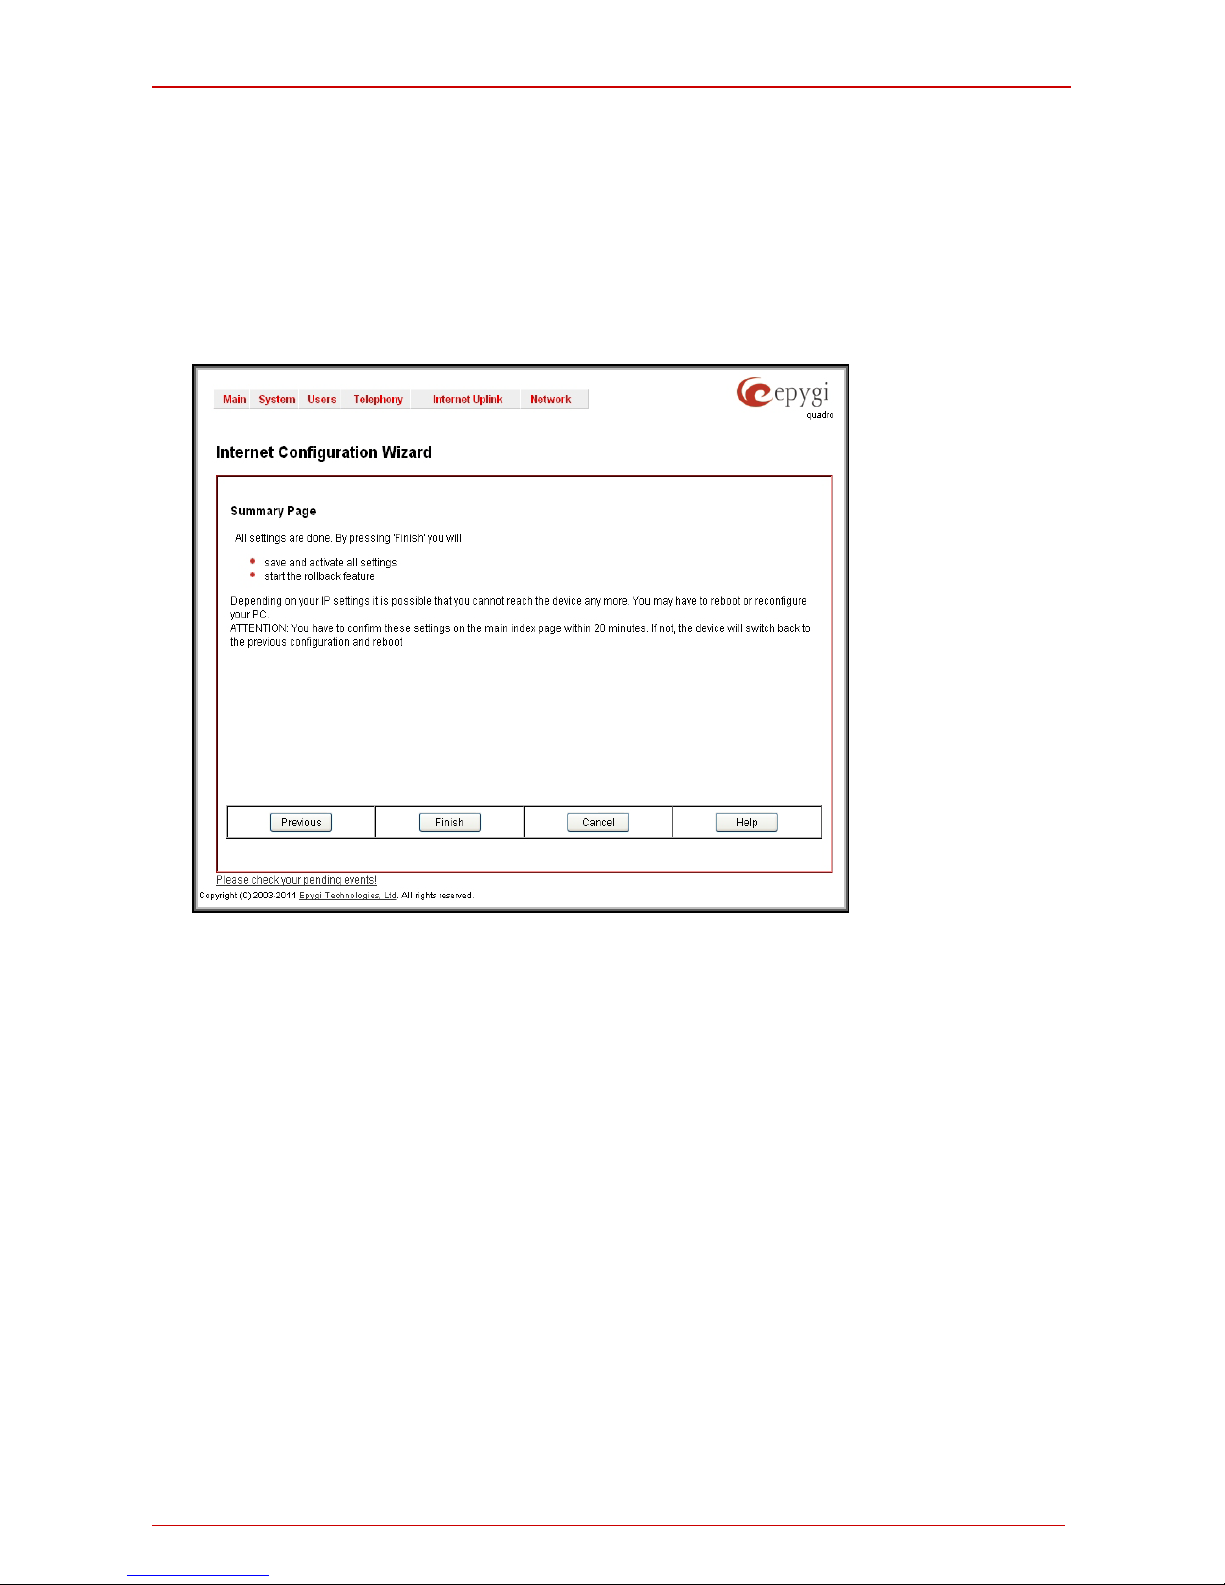
DNS Settings
For DNS, the selection is set to Dynamically by Provider. When using a static IP address,
fixed values mus t be entered.
Fig. I-27: DNS Settings page
Page 31
Quadro Manual I: Installation Guide Step 2: Configuring the Quadro
Quadro2x, 2xi; Quadro4x, 4xi; Quadro16x, 16xi (SW Version 5.3.x) 31
The Qu adro wil l sugg est th e corr ect sett ings. I f Dynami cally by Pr ovider is s elect ed, the
DNS s erver s ettings will b e set automat icall y when ever a c onnecti on t o the Int ernet is established.
If Fixed Nameserver Address i s s el ected, manu ally enter the IP address es provided by
your ISP for the name server and the alternative name server.
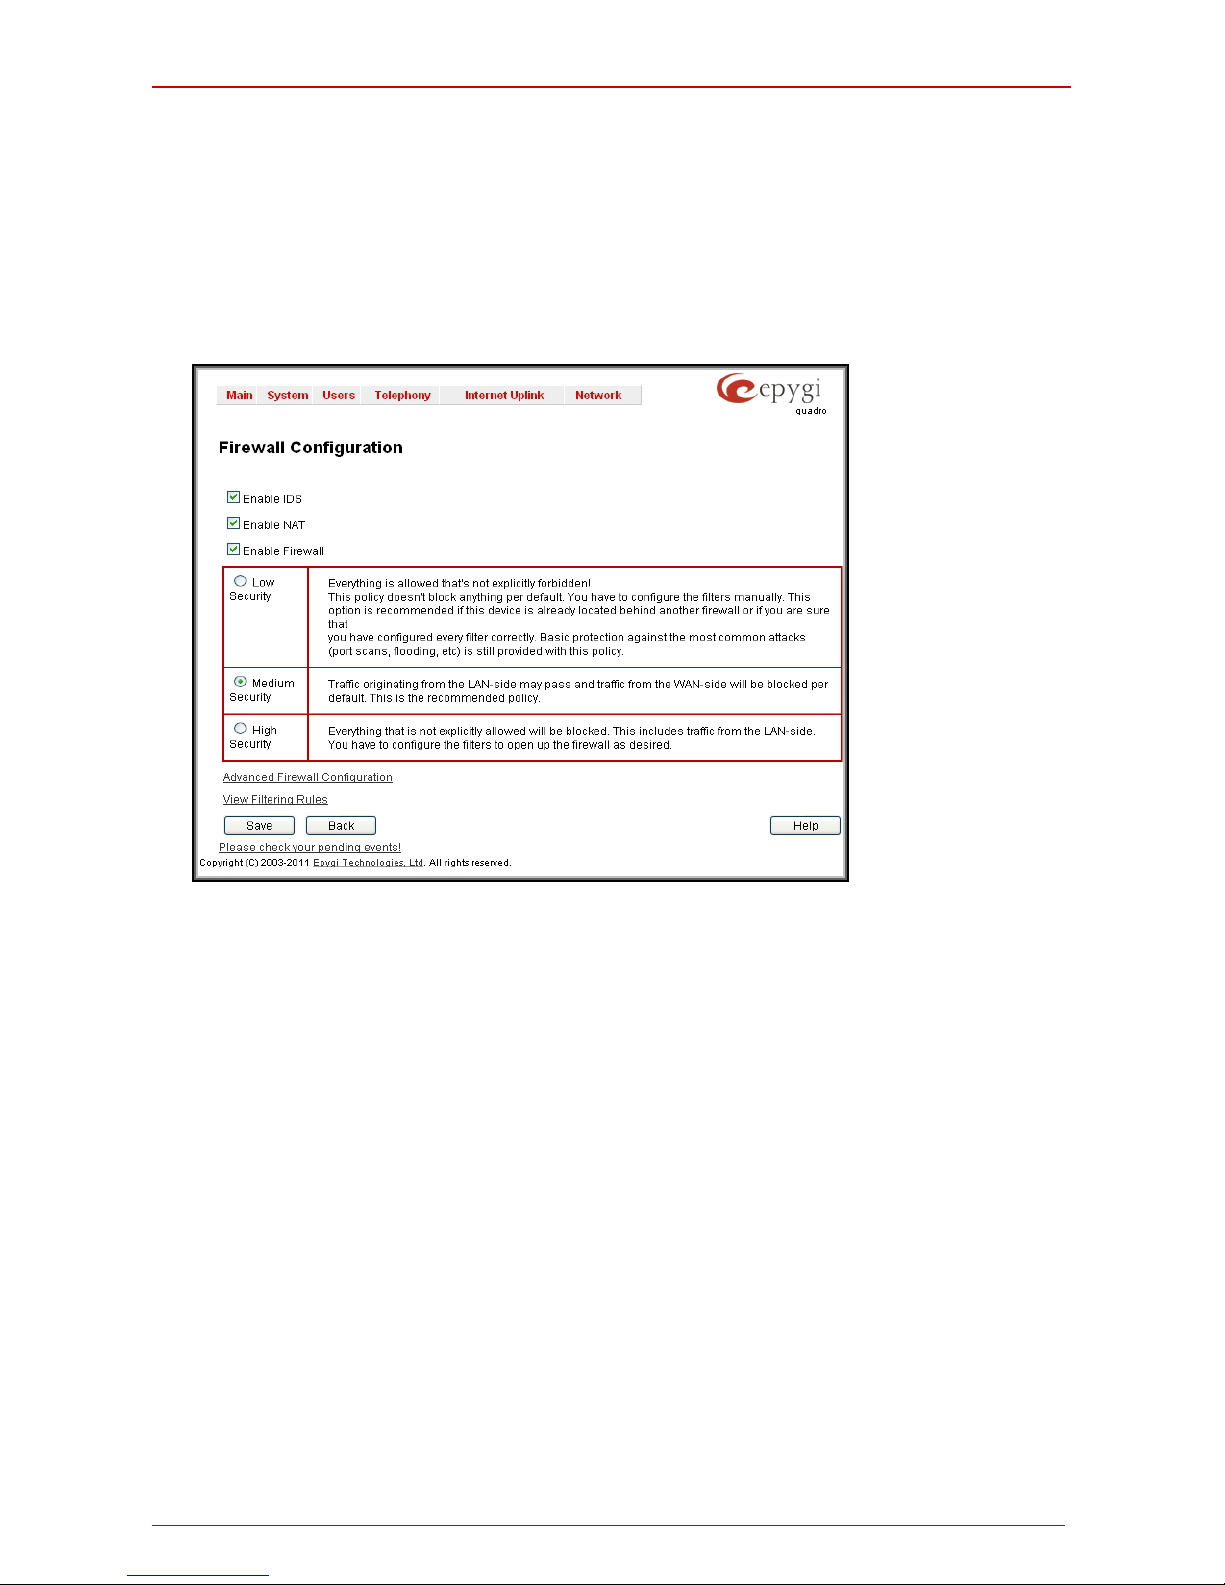
Clicking Next shows the summary page of the Inter n et C onf igurat ion W izard.
Finishing t he Internet Co nfi g uration Wi za rd
Fig. I-28: Internet Configuration Wizard Summary page
Click t h e Finish but ton to c om pl et e t h e Internet Config uration Wizard. T he Q u adro will then
stop int ernal func tions and apply th e chan ges mad e in the W izard. After t his is c omplet e,
the Quadro will display the Confir m Se ttin gs page reques ti ng confirmati on of th e ch an ges.
Press the OK button to confirm the settings.
Please Note: the settin gs sh ould be conf irm ed with in 20 minu tes; ot h erwis e, the devic e will
revert back to the previous configurati on an d reboot.
Page 32
Quadro Manual I: Installation Guide Step 2: Configuring the Quadro
Quadro2x, 2xi; Quadro4x, 4xi; Quadro16x, 16xi (SW Version 5.3.x) 32
Step 2.4: Firewall Configuration
By def ault, Fir ewal l conf igur ati on on the Qu adro h as medi um sec urit y, whic h deni es an y incoming traffic from the WAN except for voice traffic.
Dis abling the f ir ewal l is only req uir ed t o acc ess th e Qu adr o’s man agem ent wh en th e Qu adro is connected behind a router. To disable the firewall, open Firewall Configuration
from the Internet Uplink menu. Disable the firewall by deselecting the corresponding
checkbox and save changes.
Fig. I-29: Firewall Configuration page
Page 33
Quadro Manual I: Installation Guide Step 2: Configuring the Quadro
Quadro2x, 2xi; Quadro4x, 4xi; Quadro16x, 16xi (SW Version 5.3.x) 33
Step 2-A: Using IP Lines
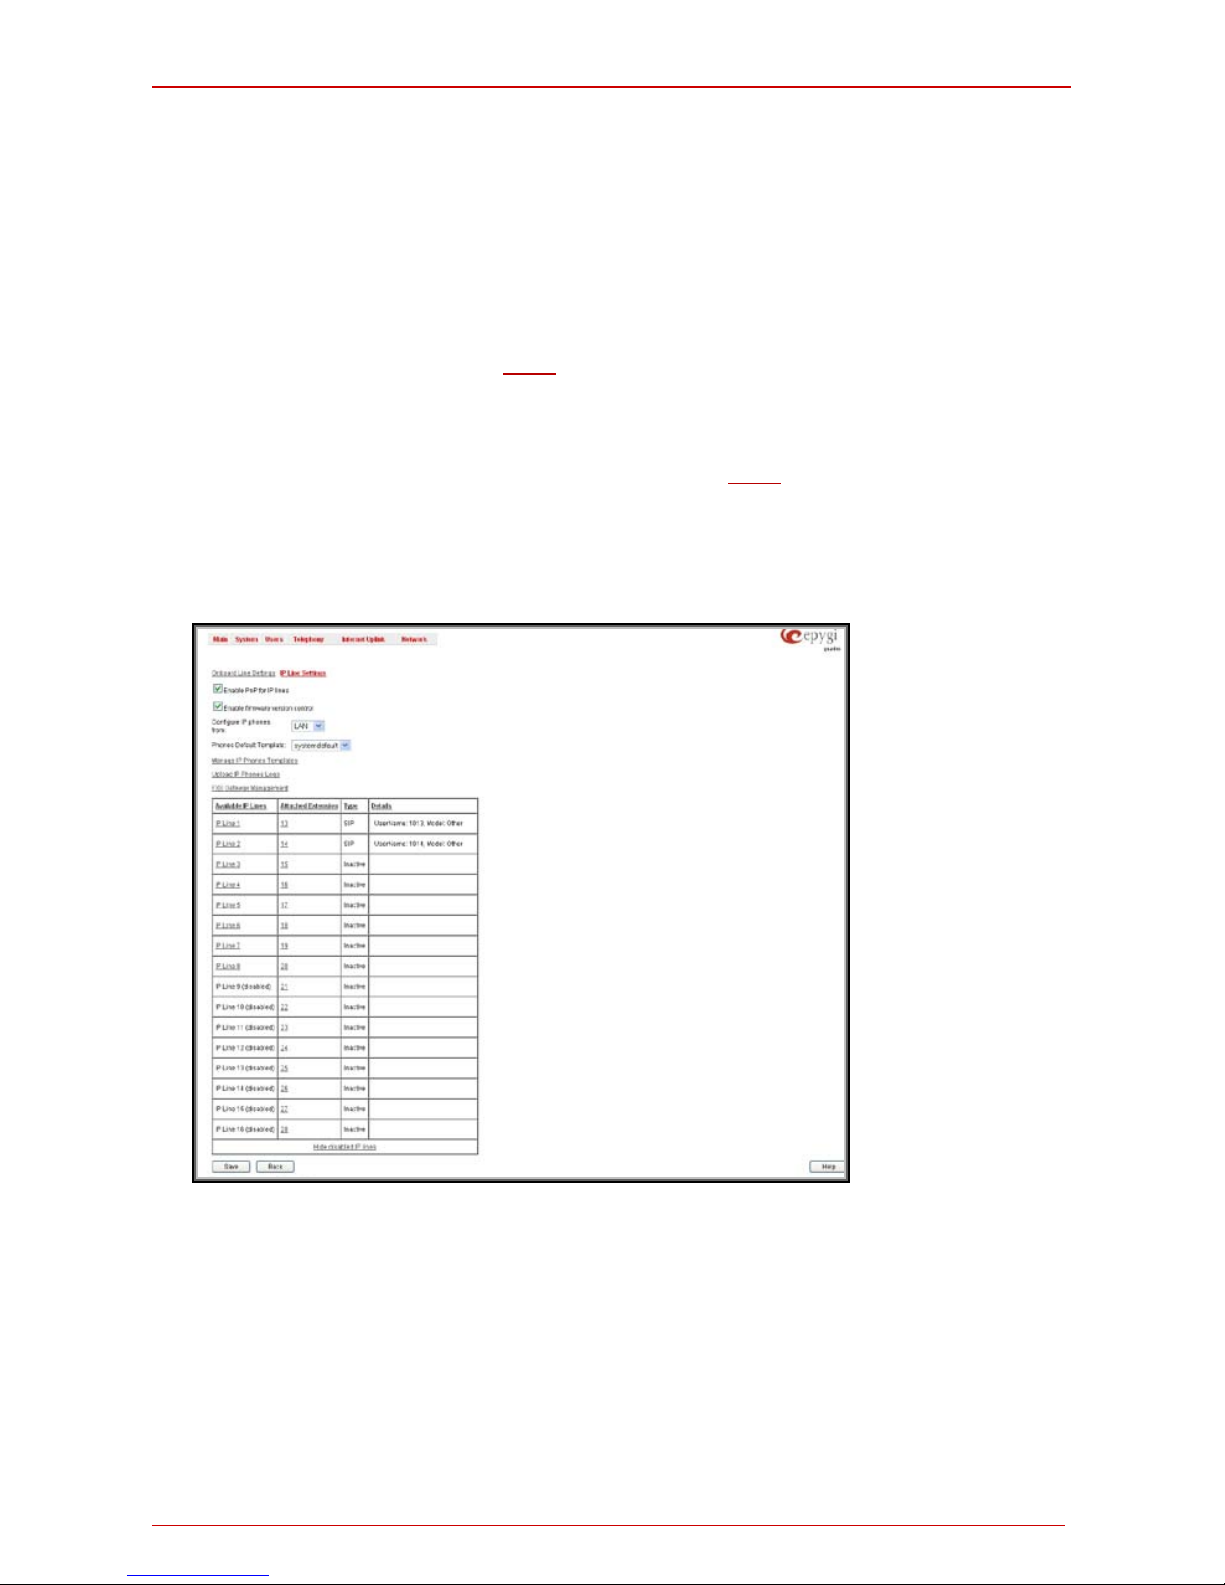
Bef ore starting t h e IP Lin es confi gur ation, th e appropriate IP phone should be connected to
the Quadr o eith er to the W AN or LAN p ort. If the ph ones ar e plac ed on the Qu adro W AN,
which is assu m ed by th e default c onf igu rat ion, p leas e ens ur e that th e Conn ect IP pho nes
from WAN side c h ec k b ox is en abled on th e Line Settings page (see Fig.I-30).
The Quadro2x, 2xi, 4x, 4xi, 16x and 16xi provides two options for configuring IP phones:
• The Plug-and-Play option is avail able for sup port ed SI P p hon es onl y. Th e lis t of
these phones is given
below. The Plug-and-Play option does not require any
specif ic c onfigur ation except that the Enable Pn P for IP lines checkbox should
be enabled on the Line Settings page (see Fig. I-31).
• The Auto-Configuration option is available for tested and supported SIP
phones . The lis t of test ed SIP ph ones is gi ven
below. T he Auto-Configuration
opti on (desc ribed in det ail bel ow) r equires s pecif ying s ome bas ic par amet ers on
the Quadro and restarting the pho ne.
Each IP line s hould be configured individually from the Telephony menu, Line Settings
page, IP Line Settings tab.
Fig. I-30: Line Settings page
Click on the IP Line number to enter the IP Lines Settings page.
Page 34
Quadro Manual I: Installation Guide Step 2: Configuring the Quadro
Quadro2x, 2xi; Quadro4x, 4xi; Quadro16x, 16xi (SW Version 5.3.x) 34
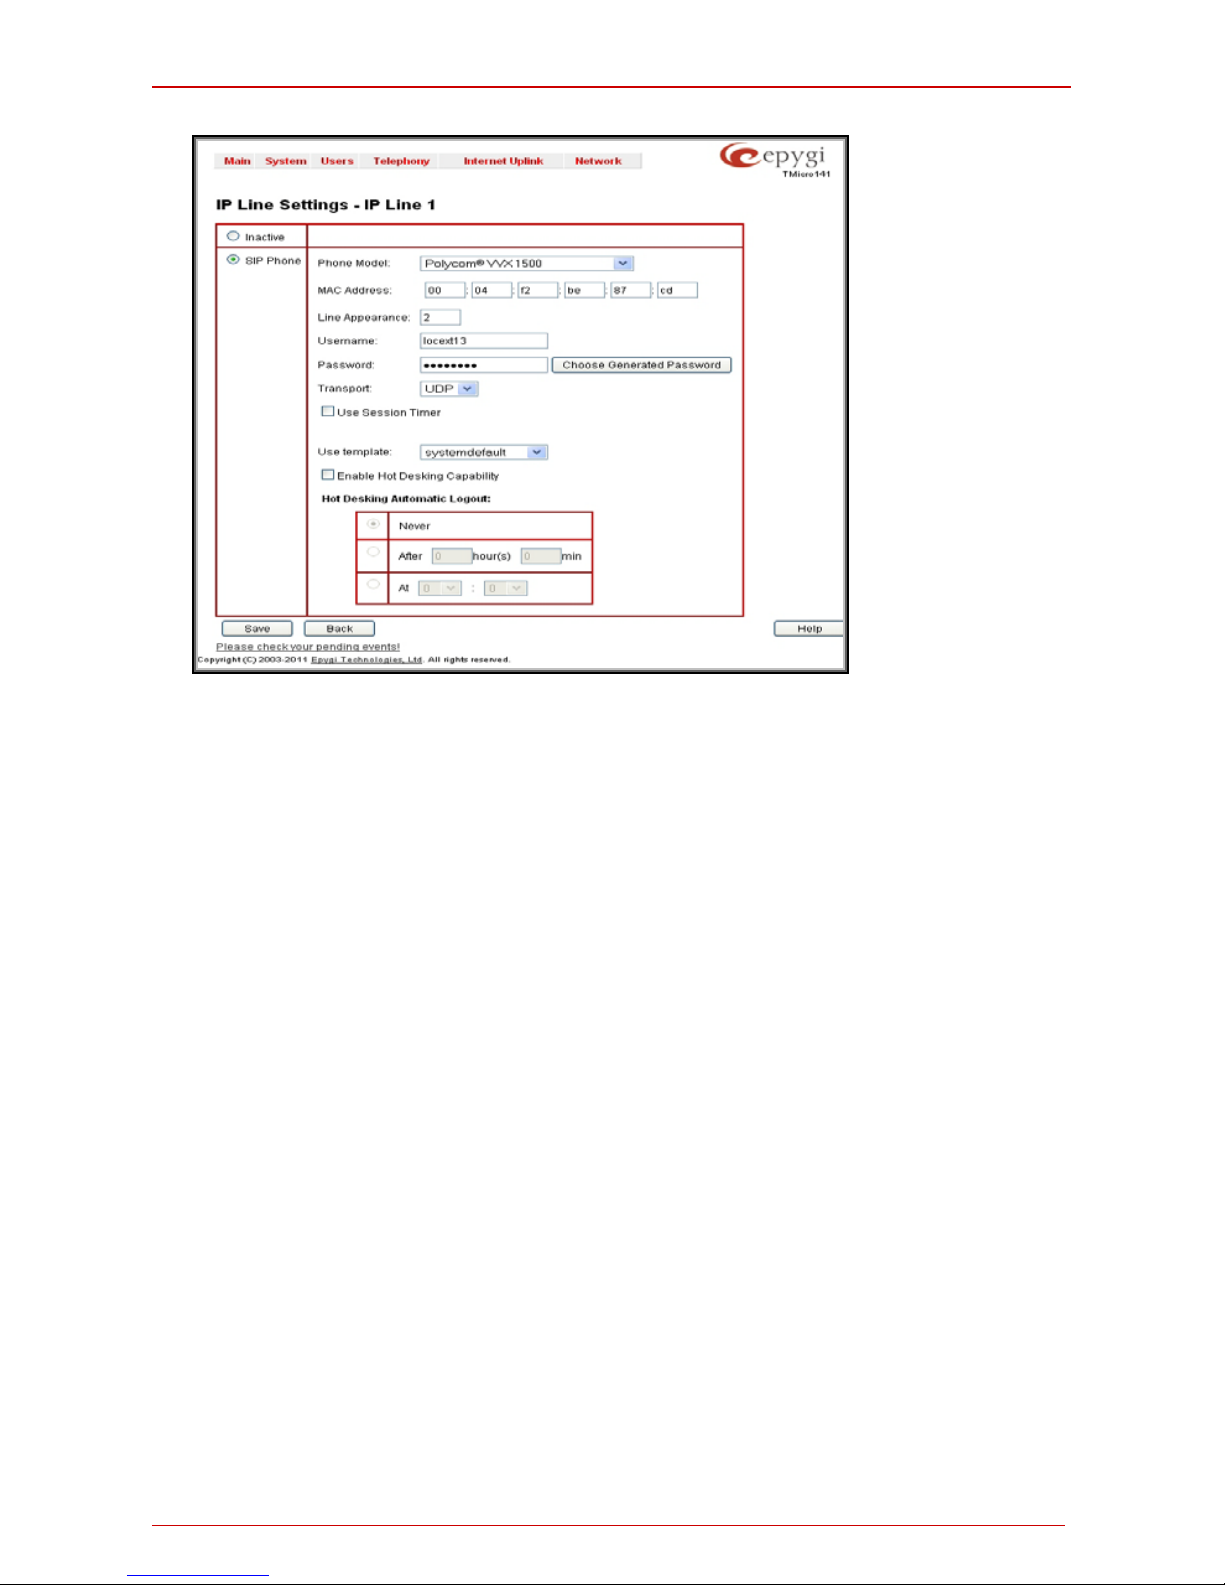
Fig. I-31: IP Line Settings page
S el ec t the SI P Ph on e r adio butt on. S elect the SIP IP phone model from the Phon e Model
drop down list.
Insert t he S IP P hon e’s M AC a ddres s in th e c orres pond ing f ields . T h e MAC address of an
IP phon e is us u ally print ed on th e b ac k of th e ph on e’s b as e uni t .
In th e Line Appearanc es text box, enter t he nu mber f or sim ultan eous c alls su pport ed by
the SIP IP phone – which is t h e s um of t h e n um b er of active an d h el d calls. F or e xam p l e, if
this f i eld is set to 1, only one act ive call is possibl e to have on th e phon e and maki ng or accepting a second c all whil e the oth er is on hold wi ll not be all owed. N ote, that t his numb er
depends on the phon e bran d and model, an d cannot exc eed the numb er of simult aneous
cal ls supported by the phone .
Username and Password are r equired t o be ins erted for this select i on. T hey should m atc h
on both Quadro and SIP phone for a successful connection. The Password field is
check ed agai nst it s str ength an d you m ay see how s trong is your ins erted p assword r ight
below that field. To achieve the well pr otected stron g password minimu m 8 characters of
letters i n upper an d l ow er case, symb ols and nu mb ers s houl d be used. If you are un abl e to
defin e a strong p assw ord, pr ess Cho ose Gen erated Pass word to us e one of system d efined strong passwords.
The Transport drop d ow n l is t is used t o select th e S I P pr otocol tr ansport l ay er - UDP, TCP
or TLS. F or T LS you m ay act ivat e the T LS c ertif ic ate up dat e mech a nism f rom IP Ph one to
obtain the latest certificate generated by the Quadro.
The Use S es sion T im er enables the SIP session timer for the corresponding IP line. This
checkbox enabl es advanc ed mechanis ms for connection activity chec king. This option allows bot h user agen ts and proxies t o d etermin e if the S IP s ess ion is st ill ac ti ve.
The Use Template drop down list is used select a preconfigured custom template for the IP
phone. When th e “Us e default ” is sel ected in t his dr op down l ist, th e templ ate selec ted on
the IP Line Settings pag e w il l be used.
Page 35

Quadro Manual I: Installation Guide Step 2: Configuring the Quadro
Quadro2x, 2xi; Quadro4x, 4xi; Quadro16x, 16xi (SW Version 5.3.x) 35
The Ena ble Hot Deskin g Capability check box is us ed to en able th e H ot Des king feature
on the corresponding IP line (see Manual II – Administrator’s Guide for more details).
The Hot Desking Aut om ati c Log out secti on is used to c onfig ure Hot D esk in g functi on ality
expir ation on t he corr espond ing IP line. This may be us eful when s omeon e wh o logged in
to the public phone with the extension att ached t o this lin e forg ot to l og out after using it.
W ith this opt ion enabl ed, once the exp iration ti me arrives , the extens ion will autom aticall y
log out fr om the public ph on e.
The foll owing opti ons are avail ab l e:
• Never – th e extensi on will never expire and will remain l ogged in to th e public
phone.
• After th e defi ne d period o f ti me – req uires t h e period after w hich th e extens i on
will aut om at ically l og out f r om the public ph on e.
• At the certa in mo ment – r eq uires the m om en t (h ou r and minut e) w h en the ex-
tension will automatically log out from the public phone.
Reset the SIP Phone. After restart, the appropriate configuration will be automatically
downloaded from the Quadro to the SIP Phone.
Pleas e N ote: For aut om atic config ur at i on , s om e S IP p h on es m ay requi r e addition al actions
t o follow the restart. For ex am pl e, b y d efault the IP D i al og S I P Tone II is in a non-auto provision ing mode, so it sh ou ld be m an u all y enabled on t h e phon e. R ef er to the user’s m anual
of the c orrespon ding SIP phon e for instr uctions on perf orming a fact ory reset or reboot on
any of t he s upp orted p h ones, wh at add ition al c onf igur ati ons are r equir ed f or a s pecif ic SIP
phone, an d h ow t o man ip ulate wit h th e GUI .
To make sure the line confi gurati on w orks properl y, d o the followin g:
• Go t o Quadr o Status - SIP R egist rat ion statu s – Registered I P Li nes to s ee if
IP Line registration is successful.
• Dial *74 to get the line information.
• Make out going an d accept inc om in g c alls.
To make t he IP li ne funct ion al (for ex ampl e, to be able to make/ receive c alls), r ef er to th e
Step 4: Mak ing/R ec eivi ng C alls and App endi x: R egist ering on E pyg i’s SIP S erver chapters
further in this guide, wit h t h e d i f f er ence that the ext ens ions sh ould b e attach ed t o the configured IP line.
Page 36

Quadro Manual I: Installation Guide Step 2: Configuring the Quadro
Quadro2x, 2xi; Quadro4x, 4xi; Quadro16x, 16xi (SW Version 5.3.x) 36
Supported SIP Phones
Below is the list of SIP phones that are officially supported by Epygi and can b e config ur ed
to work wi th Q u adro2x, 2xi; 4x, 4xi; 16x, 16xi using both Plug and Play and the automat ically confi gurati on opti ons, as well as th e full s et of adv anc ed f eatur es, like p aging and i ntercom:
• snom 300 (also supports FVC) • Aastra 9112i (also supports FVC)
• snom 320 (also supports FVC) • Aastra 9133i (also supports FVC)
• snom 360 (also supports FVC) •
Aastra 9143i(33i)(also supports
FVC)
• snom 370 (also supports FVC) •
Aastra 9480i(35i)(also supports
FVC)
•
sno m 710 (al so supports FVC) • Aastra 9480iCT
•
snom 720 (also supports FVC) • Aastra 6751i (also supports FVC)
• snom 760 (also supports FVC) • Aastra 6753i (also supports FVC)
•
sno m 820 (al so supports FVC) • Aastra 6755i (also supports FVC)
• sn om 821 (w hich is replac ement for
snom 820)
• Aastra 6757i(57
i) (also supports
FVC)
• snom 870 (also supports FVC) • Aastra 6757iCT (57iCT) (als o sup-
ports FVC)
• snom MeetingPoint (also supports
FVC)
• Aastra 6730i (also supports FVC)
• Aastra 480i (also supports FVC) • Aastra 6731i (also supports FVC)
• Aastra 480iCT • Aastra 6739i (also supports FVC)
Tested SIP Phones
Below is th e list of S IP phon es that are tes ted an d can b e configu red to work with Quadro2x, 2xi; 4x, 4xi; 16x, 16xi using the automatic ally configuration option. Some Quadro
supported features like Paging, Intercom, etc. may be missing in these SIP phones.
• CISCO 7960
• Grandstream GXP1405
• CISCO SPA525G2
•
Grandstream GXP1450
• CISCO SPA303
•
Grandstream GXP2000
• CISCO SPA501G
• Grandstream GXP2100
• CISCO SPA509G
• Grandstream GXP2110
• IpDialog SipTone II
• Grandstream GXP2120
• Polycom SoundPoint IP 300SIP
•
Grandstream GXV3140
• Polycom SoundPoint IP 330SIP*
•
Grandstream GXV3175
• Polycom SoundPoint IP 331SIP*
• Grandstream HT286
• Polycom SoundPoint IP 335SIP*
•
Grandstream HT386
• Polycom SoundPoint IP 450SIP*
•
Links ys SP A 921
• Polycom SoundPoint IP 501SIP
• Lin ksys SPA 92 2
Page 37

Quadro Manual I: Installation Guide Step 2: Configuring the Quadro
Quadro2x, 2xi; Quadro4x, 4xi; Quadro16x, 16xi (SW Version 5.3.x) 37
• Polycom SoundPoint IP 550SIP*
• Lin ksys SPA 94 1
• Polycom SoundPoint IP 601SIP
•
Links ys SP A 942
• Polycom SoundPoint IP 650SIP*
•
Linksys SPA2002
• Polycom SoundStation IP 5000*
• Linksys PAP2T
• Polycom SoundStation IP 60 00*
• Yealink SIP-T20P
• POLYCOM VVX 1500*
•
Yealink SIP-T22P
• POLYCOM KIRK wireless server 6000
•
Yealink SIP-T26P
• POLYCOM KIRK wireless server 300
•
Yealink SIP-T28P
• SIPUra SPA 841
• Yealink SIP-T32G
• sno m 190
•
Yealink SIP-T38G
• sno m 200
•
Yealink VP530
• sno m 220
• Yealink VP-2009/VP-2009P
• snom M 3
• Aastra MBU400
• snom PA1
•
Telematrix IP550 Spectrum Plus
• snom m9
• Telematrix IP 3300
•
Swissvoice IP 10S
• Telematrix IP9600 MWD5
•
Thomson ST2030S
• AudioCodes 31 0HD
• Berkshire (ATL) 5000
• AudioCodes 32 0HD
• Grandstream BT100
• Panasonic KX-UT136
• Grandstream BT200
• Panasonic KX-UT123
•
Grandstream GXP1400
• Panasonic KX-TGP550T04
T o u se P lug and Pl ay (PnP) option for s up ported I P p h ones, c on n ect t h em to LAN/WAN for
the Qu adro and p ower up. If the ph on e is in default setti ngs t h en it will aut om atically select
a fr ee IP li n e and att ach to an ext ens ion. If not, r es et th e phone t o factory def aults manually.
Pleas e Not e: To use PnP th e appropriate option should be selected in the IP line settings.
Please Note: In t he model ’s list t he Polyc om phon es with (*) si gn ar e als o pres ented as
Polycom-xx-Pre-3.3.0 du e to bac kward i ncom patib ility of UC Sof twar e 3.1.1 c onfigur ation.
It is recommended to use Pre-3.3.0 models with Application SIP software 3.2.2.0477.
Page 38

Quadro Manual I: Installation Guide S tep 2-B: Using Receptionist
Quadro2x, 2xi; Quadro4x, 4xi; Quadro16x, 16xi (SW Version 5.3.x) 38
Step 2-B: Using Rece pt ionis t
If you w is h t o use th e Recept i onis t ’s feat ures, th e Recept i onis t s h ou l d be set up on the Quadro. T he Quadro’s basic config uration should be done in th e same way as descri bed in
the Step 2.
The Rec eptionis t related s etup, with d etail ed instruct ions on h ow to configure the Qu adro
and th e attach ed IP Phon es, is described in the “Receptioni st Setup on Q uadro” document, which you can find at the Epygi’s Support Web portal.
Page 39
Quadro Manual I: Installation Guide Step 2-C: Using ISDN Lines
Quadro2x, 2xi; Quadro4x, 4xi; Quadro16x, 16xi (SW Version 5.3.x) 39
Step 2-C: Using ISDN Lines
The b asic c onfigur ation proc edure f or Qu adro IP PBXs that use IS DN lines is exactl y the
same as d esc ribed in St ep 2.
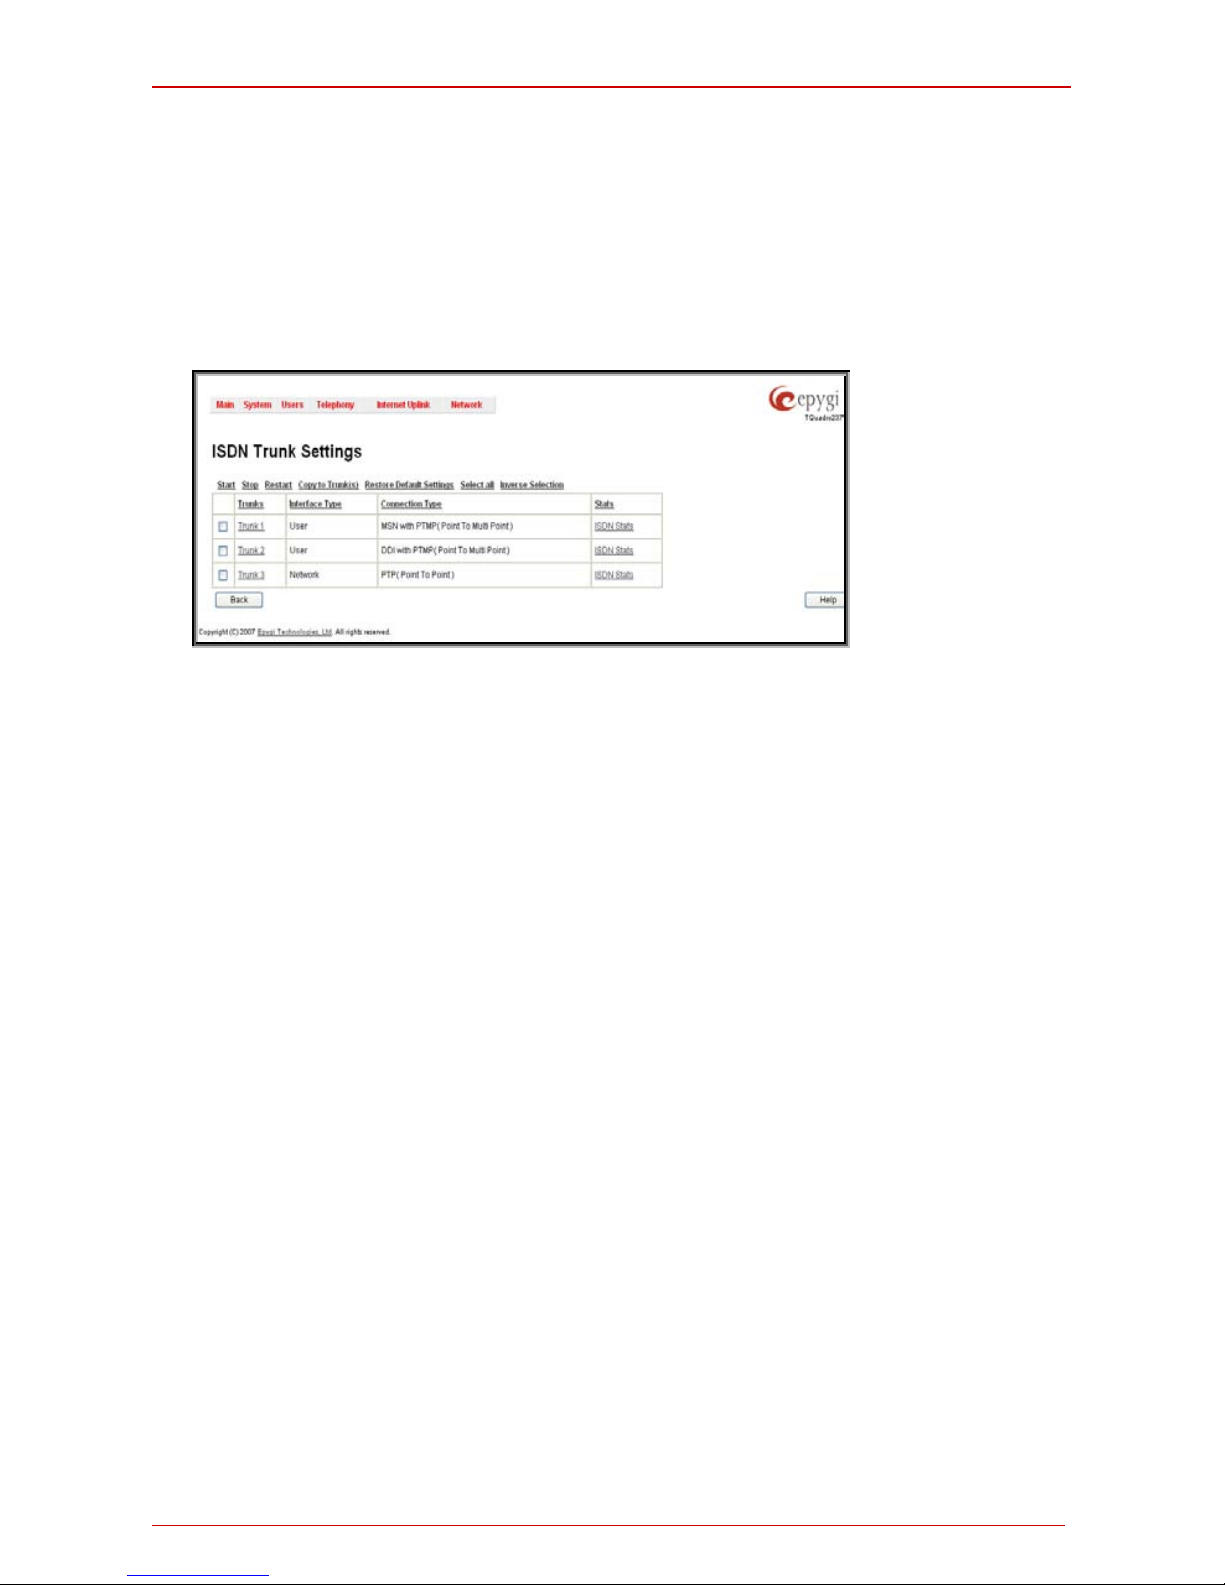
As some ISDN providers require an outgoing MSN to be defined, go to the Telephony
menu and op en the ISDN Sett ing s page.
The n umb er of avail able I SD N tr unks is d epen dent on the t ype of your Qu adr o. Qu adr o2xi
and Quadr o4xi have onl y one ISDN trunk avai lable. Qu adro16xi and the sp ecial editi on of
Quadro4xi h ave 3 ISD N t ru nks av ailabl e.
Fig. I-32: ISDN Trunk Settings page
Bef ore st arting th e ISDN Tru nk config uration, please c onsult with your I SDN pr ovider administrator to receive instructions for which settings are necessary to be configured.
Run th e IS DN Wizard f or each ISDN tru nk t o make s ure that all setti ngs are prop er. To
access ISDN Wizard, push the appropriate trunk number in the ISDN Trunk Settings table.
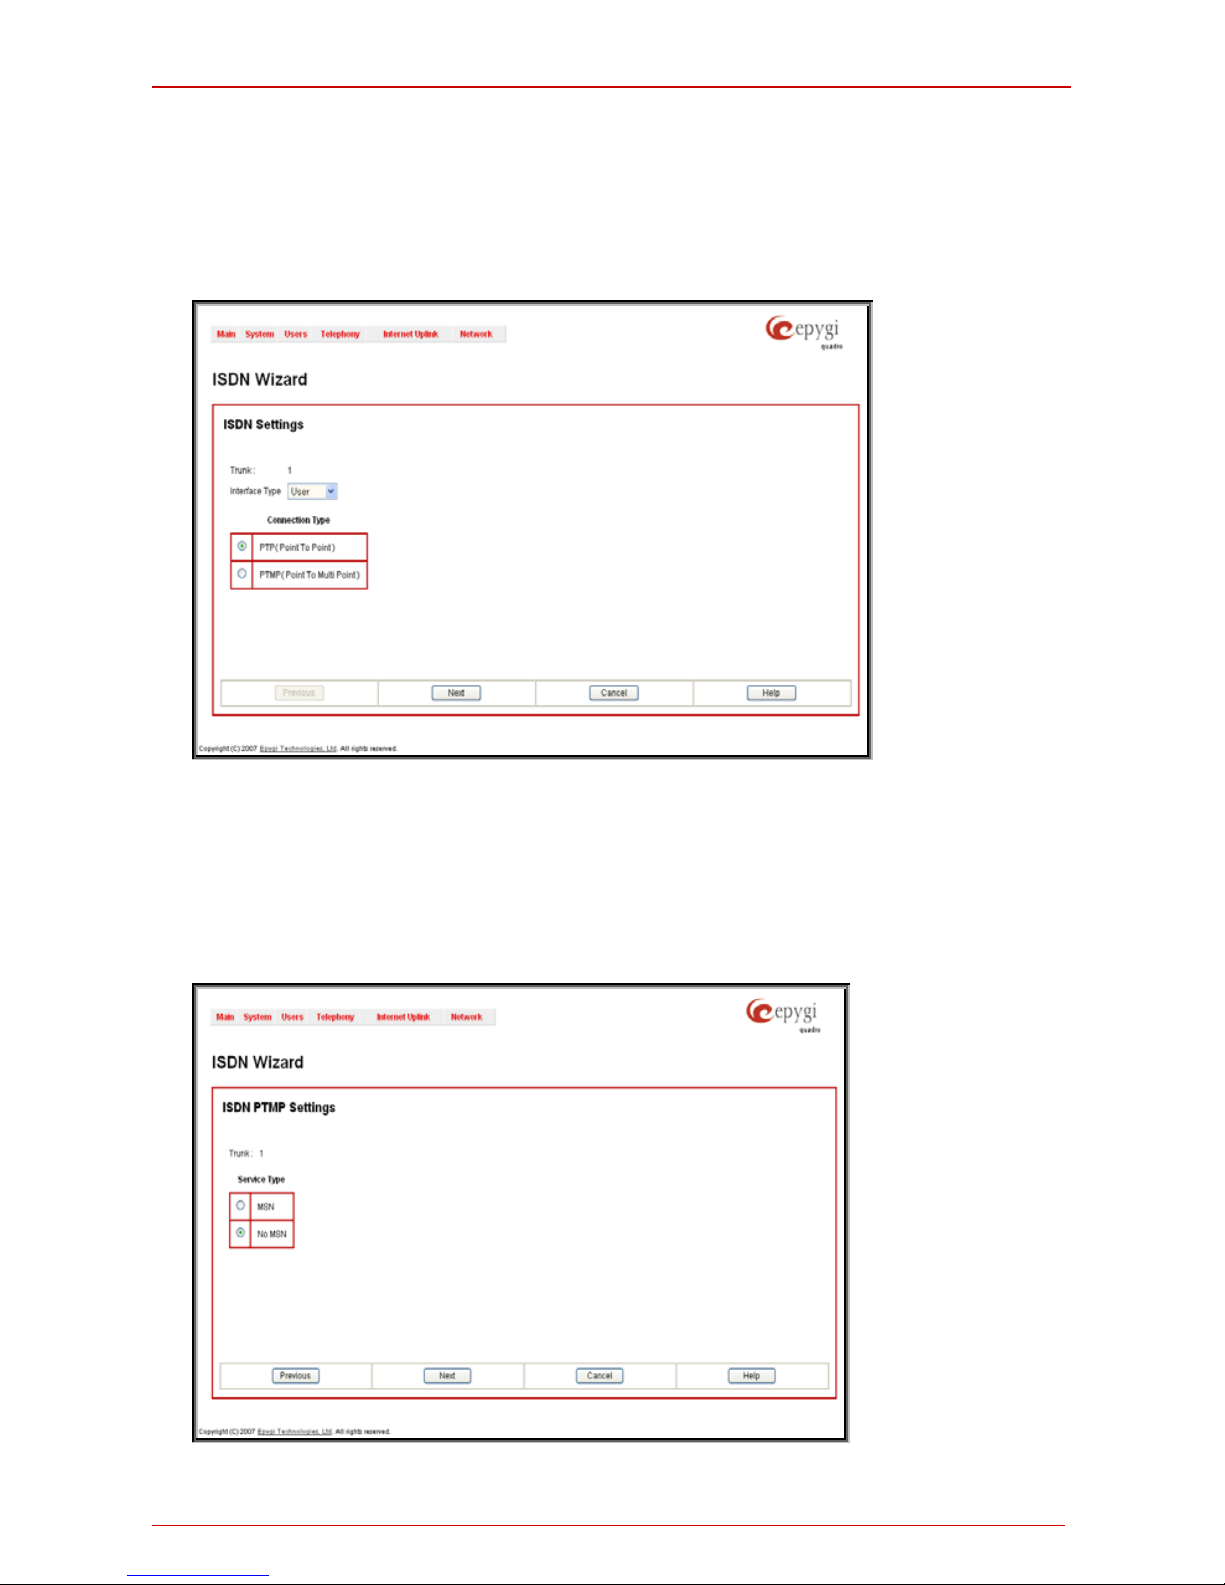
The ISDN Wizard – ISDN Sett ings all ows you to ch oose the int erface t ype and the c onnec tion type of the selected trunk (s).
The Interface T ype dr op down list all ows you to select bet ween the Us er and the Networ k
interfaces. If the ISDN port of the Q uadr o is c onn ected t o the CO t h en User in t erf ac e t yp e
should b e select ed. If the IS DN p ort of the Q u adr o is c onn ect ed to the PB X then Network
interface type should be selected (in that case Quadro acts as a CO for that PBX).
The Con nection T ype man ipulati on r adio butt on gr oup all ows you to ch oose th e conn ection type for the selected trunk(s):
• PTP (Point to Point)
In cas e of c onnecti on t o the CO (User int erfac e type is sel ected on Qu adro) choose
this opti on if onl y Quadr o is c onnec ted t o the ISDN trunk from CO (no other ISDN devices are connected to the particular ISDN trunk from CO besides the Quadro).
In case of connection to the PBX (Network interface type is selected on Quadro)
choos e this opt i on if only th e PBX is c onn ec ted to the ISDN tru nk f rom the Quadro (no
other ISDN devices are connected to the particular ISDN trunk from the Quadro).
In both cases, wit h t his selection, Q u adro sets t h e T EI to manu all y mode ass igni ng the
def ault val ue of 0. If needed, t hat value c an be chan ged lat er in the Adv anced Set-
tings pag e of ISD N Wizard.
• PTMP (Point to Multi Point)
In case of connection to the CO (User interface type is selected on the Quadro)
choose t his opt ion if t her e can be ot her devi ces con nec ted t o th e same I SDN tru nk
from CO except the Quadro.
In case of connection to PBX (Network interface type is selected on the Quadro)
choos e t his option i f th ere c an b e other devi ces con nec ted t o the same ISDN trunk
Page 40
Quadro Manual I: Installation Guide Step 2-C: Using ISDN Lines
Quadro2x, 2xi; Quadro4x, 4xi; Quadro16x, 16xi (SW Version 5.3.x) 40
from Quadro except for the PBX.
In both cases, with this selection Quadro sets the TEI to automatic mode.
Please Note: Consult with your CO operator or network administrator before configuring
the ISDN connection type.
Fig. I-33: ISDN Wizard – ISDN Settings
The ISDN Wizard - Page 2 c ontent is dep endent on the connec tion t ype select ed on the
previ ous p ag e of ISDN Wizard:
The next page is ISDN Wizar d – M SN Settings pag e which is used to t urn on th e MSN
configuration. It is rec omm end ed to en abl e the MSN when t here ar e multiple ISDN devices
connec ted to th e sam e ISDN bus. If the MSN is enabled on this page, the next page will
require the MSN table configuration.
Fig. II-34: ISDN Wizard – ISDN PRMP Settings
Page 41
Quadro Manual I: Installation Guide Step 2-C: Using ISDN Lines
Quadro2x, 2xi; Quadro4x, 4xi; Quadro16x, 16xi (SW Version 5.3.x) 41
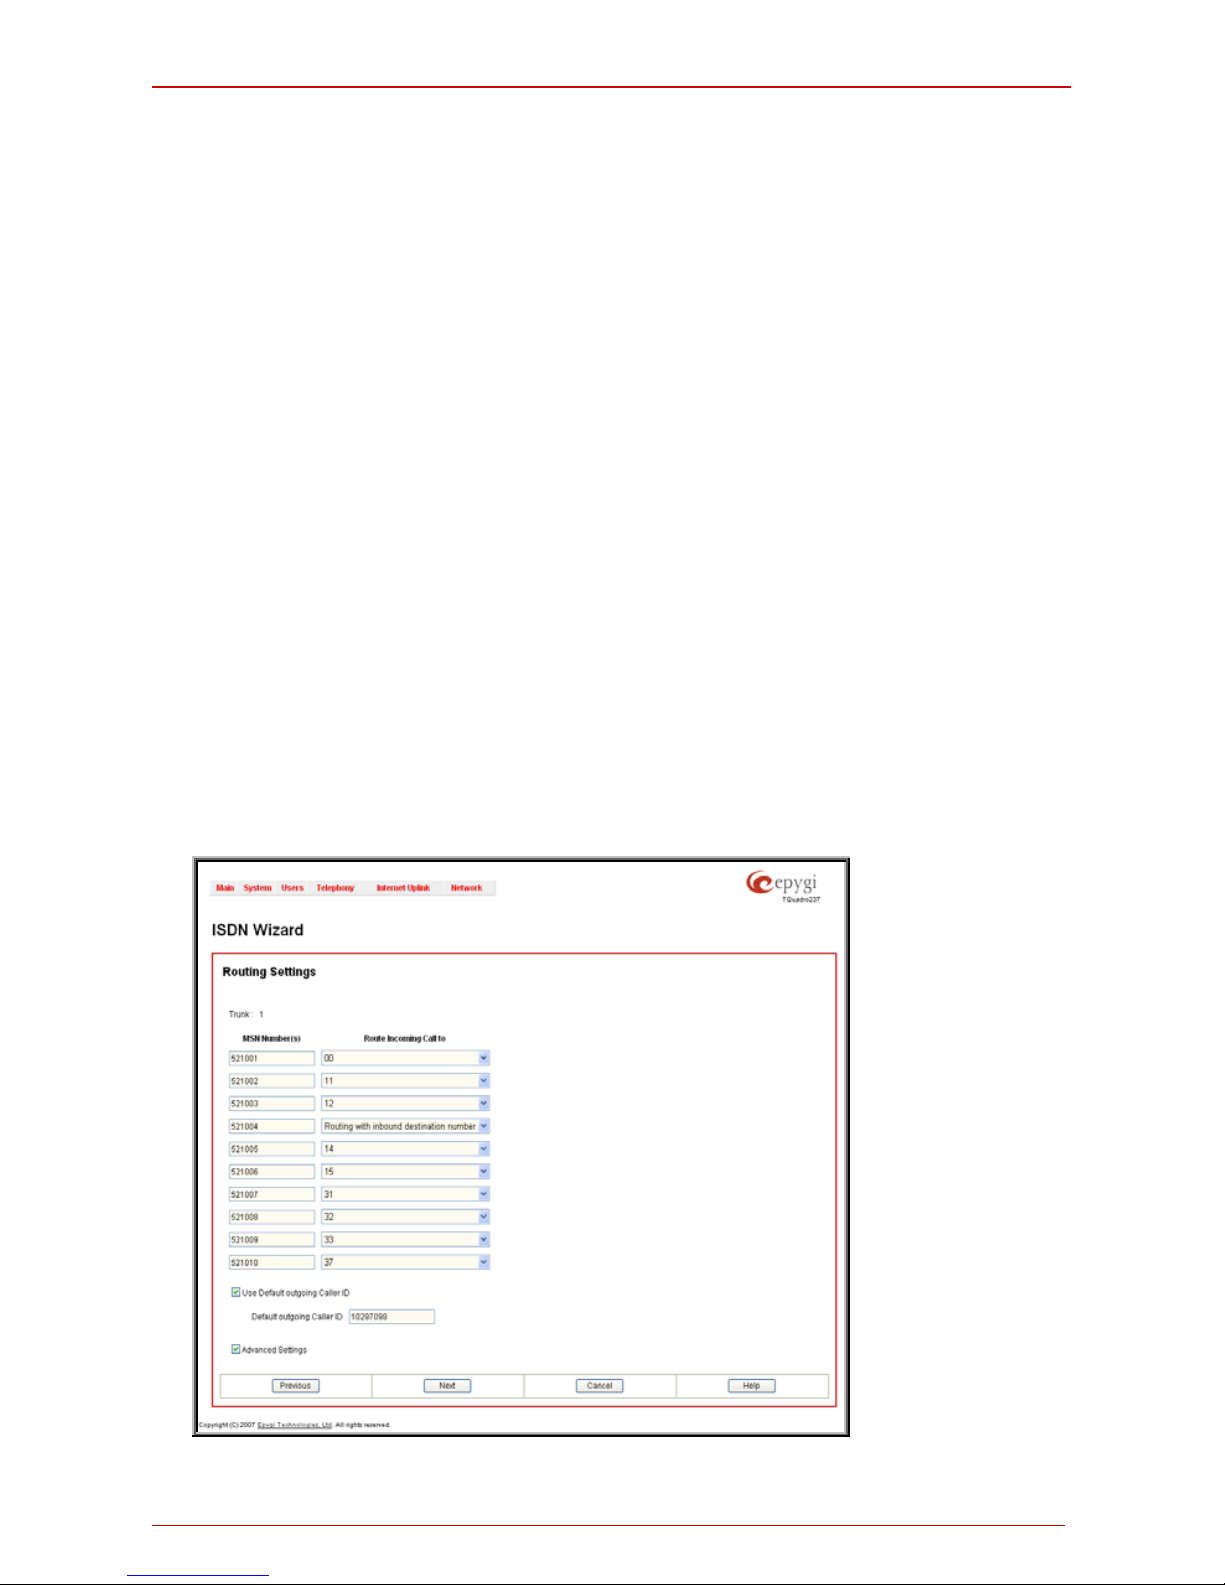
For M SN se r vic e enabled, the Ro uting Sett ings pag e is us ed to assign MSN numbers to
the c ert ai n d es t i n ations on the Q u ad ro. Th e MS N numb er can be assigned t o the Qu adro’s
extens ions, to the Auto Att endant, or t o the routing agent. The d estination sel ec ted from
this page will ring upon incoming call to the corresponding MSN number comes in.
The fields in the MS N Numb e r column require the MSN numbers allocated to the Quadro.
Please Note: A t least on e MSN num ber should be defin ed in this p age. The system dis-
plays an error message if the same MSN number is used twice in this page.
The Route I ncoming Ca ll to drop-down l ists are us ed to s elect th e desti nation wher e the
incomi ng call address ed to th e certai n MSN nu mber wil l be routed. Choos ing the Routing
with inbo und destinatio n number selection will automatically use the initially dialed number to connect the destination without any additional dialing. If MSN is disabled on the
ISDN Wiz ard - MSN Settings page, the ISDN W izard - Rou ting Sett ings p age c ontains
only one Route Incoming Call to drop-down lis t .
Selecting the Use Defa ult o utgo ing C aller I D allows you to o verwr it e the s ourc e c aller in-
form ation wit h th e one s pec ifi ed in the Def ault ou tgo ing Ca ller I D field when placing outgoing calls toward t he CO. T he Default o utgoin g Caller ID field requires the caller ID for
the out going c alls f rom the Qu adro thr ough t he ISDN trun k. That nu mber sh ould b e registered at the CO and can be one of the MSNs provided by the CO. If this checkbox is
enabled but no value is defined in the Default outg oin g Cal ler ID, emp ty call er inform ati on
will b e sent to th e C O . If this c h ec kb ox is dis abl ed , the sourc e c all er inform ati on will be forwarded to the CO.
Selec t t he Advanced Settings checkbox if you wish to adjust trunk L2 and L3 Settings
manual ly, otherwise lea ve t his checkb ox unselected t o us e the s yst em def ault v alu es .
Fig. II-35: ISDN Wizard – Routing Settings
Page 42
Quadro Manual I: Installation Guide Step 2-C: Using ISDN Lines
Quadro2x, 2xi; Quadro4x, 4xi; Quadro16x, 16xi (SW Version 5.3.x) 42
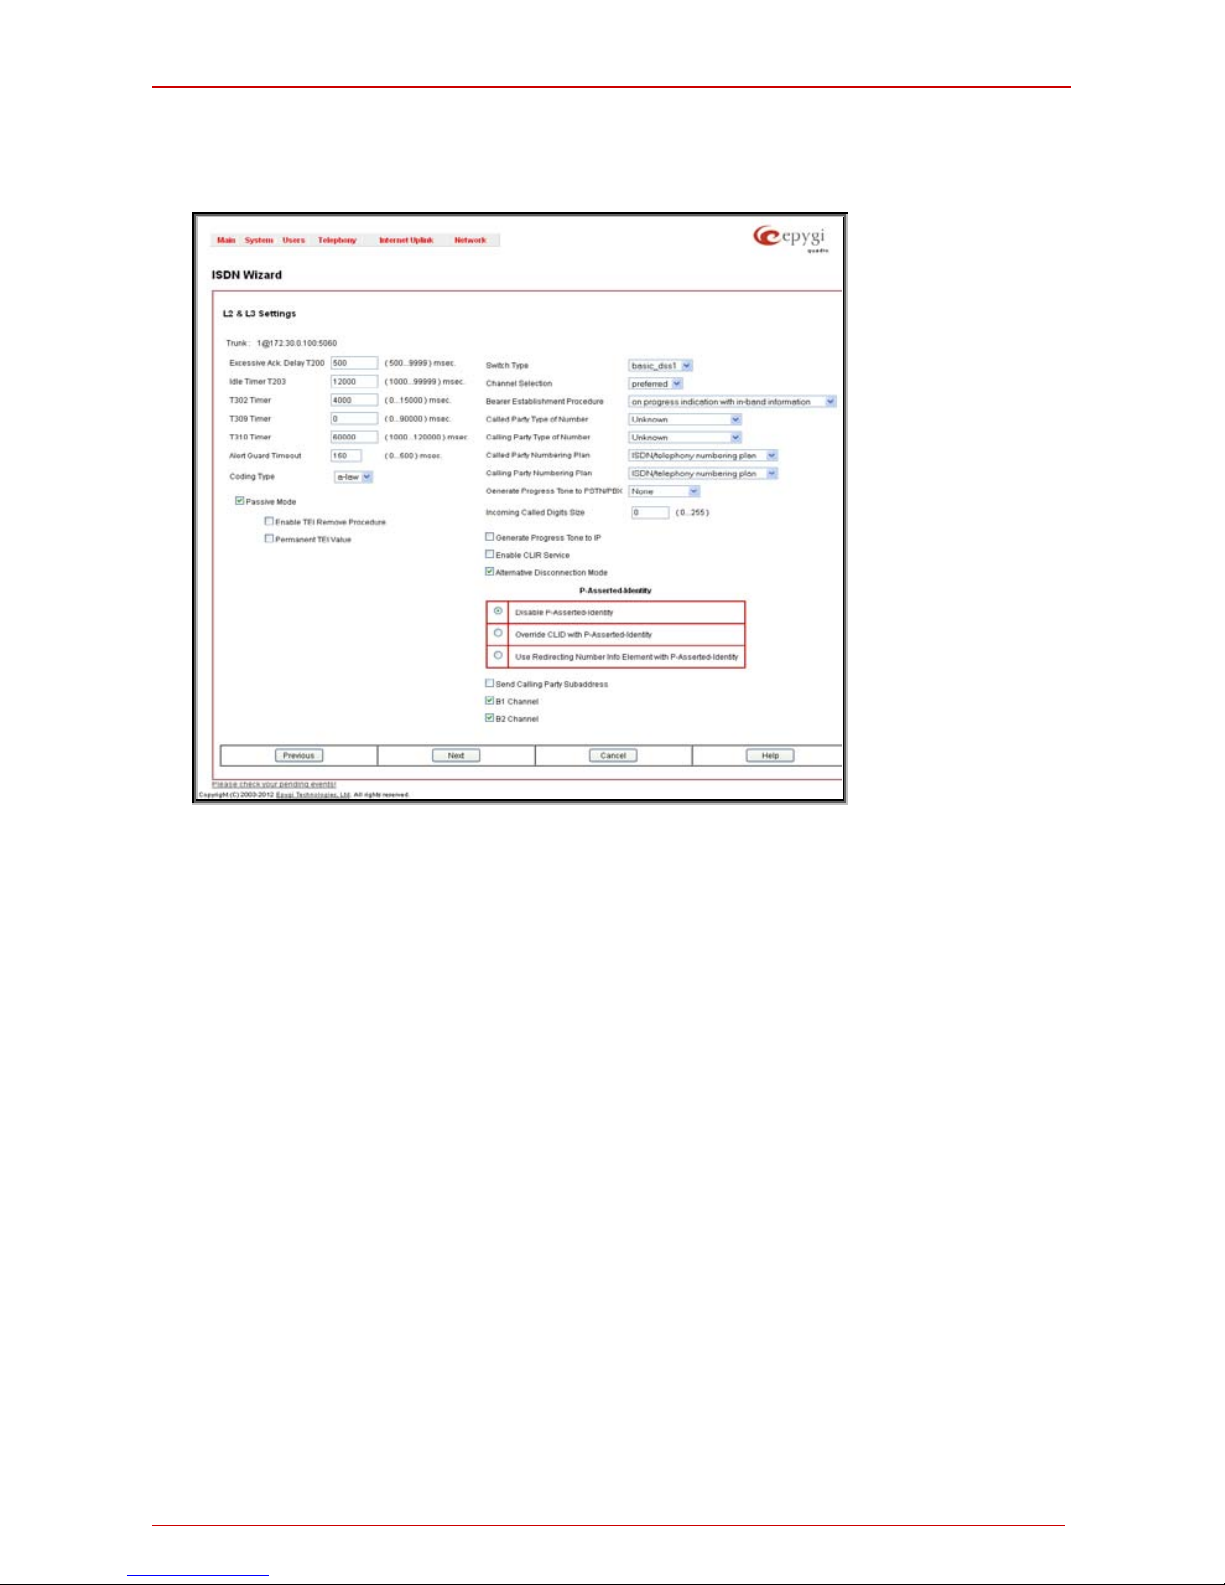
The ISDN Wizard – L2&L3 Settin gs is used for ad vanc ed c onfigur a tion onl y and c ont ains
L2&L3 Settings. This page only appears when the Advanced Settings checkbox is selected on the previous page of the wizard. This page contains the following components:
Fig. II-36: ISDN Wizard – L2&L3 Settings
ISDN L2 Timers:
• Excessive Ack. Delay T200 configures the period in milliseconds (numeric values
from 50 0 to 999 9) b etween the tr ansm itt ed sig nali ng pac ket an d its acknow led gem ent
received.
• Idle T imer T203 c onfigur es the p eri od in millis econds (numeric valu es f rom 1000 t o
99999) for the ISDN client idle timeout.
ISDN L3 Timers:
• The T30 2 Ti mer text field requires the value for the T302 timer in milliseconds (digit
values from 0 t o 15000). It ind icates that th e time f r ame system is w ait ing f or a digit t o
be dialed. When the timer expire s, it initiates the call.
• T309 Timer requir es the val u e f or th e T3 09 tim er in m illis ec on ds (numeric valu es from
0 to 90000). It is responsible f or call st eadiness during lin k disc onnection within the
peri od equ al to thi s ti mer value. If the value in this field is zero (0), the T 309 timer will
be disabl ed.
• T310 Timer requir es the val u e f or th e T3 10 tim er in m illis ec on ds (numeric valu es from
1000 t o 120 000). I t is r esponsi ble f or the outg oing c all stead iness wh en CALL PROCEEDING is already received from the destination but call confirmation (ALERT,
CONNECT, DISC or PROGRESS) has not yet arrived.
• Alert Guard Timeout requires the value for the Alert Guard Timer in millise-
conds (numeric values f rom 0 to 500) between CALL PR OC and A LERT messages.
Alert Guard Timer it is used when Quadro is connected to a slow ISDN-PBX.
Rec omm en d ed val u es are:
- fast connection (0ms);
- normal ( 1 50 ms ) , d efault;
Page 43

Quadro Manual I: Installation Guide Step 2-C: Using ISDN Lines
Quadro2x, 2xi; Quadro4x, 4xi; Quadro16x, 16xi (SW Version 5.3.x) 43
- sl o w IS DN-PBX (350ms);
- very slow ISDN-PBX (500ms).
The Co ding Ty pe drop d own list allows you to s elect b etween a-law and mu-law coding
types.
The Switch Type is anoth er c onf igu ration p ar am et er th at d ep ends o n t h e Ser vice Provider.
The Passive M ode checkbox is used to leave the ISDN Layer1 c onnection in the Slave
mode. W hen this c heckb ox is s elected, Layer1 remai ns idle when calls are not availab le.
W hen this c h ec kb ox is not select ed, Quadro keeps its L ay er1 always acti ve. This c h ec k b ox
enables the E na ble T EI R e move Pr oc ed ure and Perm anent T EI Value checkboxes. W ith
the Enabl e TEI Re move Procedure checkbox is selected, the trunk will lose the assigned
TEI when entering into passive mode on the Layer 2. With the Permanent TEI Value
check b ox is s elec ted, the tr un k w il l k eep the assigned TEI wh en en tering into passive mode
on the Layer 2 or when Quadro detected ISDN link DOWN signal from carrier.
Channel Se lectio n is used t o select bet ween th e Preferred and Exclusive B c hann el s e-
lection meth ods. For Preferred ch annel s election, the CO ans wers t o the call r equest b y
the first available timeslot. With the Exclusive channel selection, the CO should feedback
only by the timeslot as k ed in the call request.
The Bearer Establ ishment Procedur e dr op down lis t allows selec ting the s ession in itiation method on the B chan nel. O ne of th e foll owing op tions can b e sel ected f or the tr ansmissi on p at h completion prior to receipt of a call acceptance indication:
• on channel negotiation at the destination interface
• on progress indic ati on w it h in-b and inf orm at i on
• on call acceptance
The C a lli ng Par ty T y pe o f Nu mb er drop d own list allows you to select the type identifying
the orig in of c all.
The Calle d Party T ype of Number drop dow n lis t all ows you to s elect the t yp e id entif ying
the subaddress of the called party of the call.
The Called Party Numbering Plan and Calling Party Numbering Plan drop down lists
correspondingly indicate the numbering plan of the called party's and calling party's number.
The Incoming Called Digits Size t ext field indicates t he number of recei ved digits (in a
rang e from 0 to 255) requir ed to estab lis h a call. W hen this f ield h as a “ 0” valu e, t h e s yst em
uses either the timeout defined in the T30 2 field or the Sending Complete Inf ormation
element messages to establish a call. Independent on the value in this field, Sending
Complete Information element and the pound sign always result in call establishment.
When Generate Progress Tone to PST N/PBX checkbox is selected, Q uadro generates
ring t on es to call ers d ur i ng I S DN call dialing. T his featur e is m ai n l y a ppl icable to 2-s t ag e d ialing mode.
The Incoming Called Digits Size t ext field indicates t he number of recei ved digits (in a
range from 0 to 255) required to establish a call. When this field has a "0" value, the system
uses either the timeout defined in the T30 2 field or the Sending Complete Inf ormation
element messages to establish a call. Independent on the value in this field, Sending
Complete Information element and the pound sign always results in call establishment.
The Gen erat e Pro gre ss to ne on I P ch eckb ox s elect ion will gen erat e the pr og ress tone to
IP.
Enable CLIR Service checkbox selection enables Calling Line Identification Restriction
(CLIR) s ervice which disp lays the inc oming call er ID only if Present ation In dication is allowed on th e r emot e sid e. Ot her wis e, if CLIR s er vic e is dis abled, c a ller ID will be unc onditionally displayed.
W hen the Altern ative Di sconnec tion M ode c heck box is not s elec ted, Q u adr o will disc onnect t he call as soon as the dis conn ect mess age h as been r eceive d from t he peer . When
Page 44

Quadro Manual I: Installation Guide Step 2-C: Using ISDN Lines
Quadro2x, 2xi; Quadro4x, 4xi; Quadro16x, 16xi (SW Version 5.3.x) 44
the chec kbox is s elected, Q uadr o’s user m ay hear a bus y tone when peer has been disconnected.
P-Asserted-Identity:
The Di sable P-Asserted-Identity radio button disables the P-Asserted-I de n tit y f e at ur e f or
both incomin g and outg oing cal ls .
The Override CLID with P-Asserted-Identity radio butt on selection enables the SIP PAsserted-Identity support. For the calls from SIP to ISDN if the Invite SIP message contains
a P-Asserted-Identit y or a P-Preferred-Id entity or a Remot e-Party-I D, th en the C allerID on
ISDN is s ent wit h th e ori gin al C aller ID w hich c omes f rom t h e ident ity f i eld. SIP us er ag ent
should check for the existence of the P-Asserted-Identity, then the P-Preferred-Identity,
then the Remote-Party-ID to fill the identity field.
For th e c alls from IS DN to S IP with restric ted Caller ID, the SIP In vi te message contains PAsserted-Iden tity f ield w ith the value f rom th e Call er ID on IS DN. T he SIP From fi eld c ontains anonymous .
The Use Redire cting Numb er Info Element with P-Asserted-Identity radi o b ut t on selection enables full support of the SIP P-Asserted-Identity. For the calls from SIP to ISDN, if
the SIP Invit e message c ontains a P-Asserted-Identity or a P-Preferred-Identity or a Remote-Party-ID , then the CallerID on ISDN cont ains the numb er from the us er name field
and the Redirecting Number IE contains the ori ginal number from the identity field. SIP user
agent should check for the existence of the P-Asserted-Identity, then the P-PreferredIdentity, then the Remote-Party-ID to fill the identity field.
For th e calls from I S DN t o SIP with Caller ID , t he SIP I n vite m essage contains P -AssertedIdentity field with the original number value f rom the Redirecting Number IE on ISDN. The
SIP From field contains the value from the user name.
When the Sen d Ca llin g P arty Sub address checkbox is select ed, Quadr o w ill send th e extension number as subaddress and the value defined in the Default outg oing Caller ID
field as call er ID on the outgoing call. W hen this c heck box is dis abled, n o su baddr ess information will be sent and the caller ID will be defined according to th e s el ection of th e Use
Default Outgoing Caller ID c heckbox (s ee above). C aller ID inf or mation, al ong with the
Subad dr ess , can b e dis p l ayed on th e p hone d is pl ay d ep ending on th e phon e an d PBX s ettings and capabilities.
The B1 Channel and B2 Channel che ckboxes e nables/di sa bles timeslo ts for v oice transfer. Disablin g th e ti m esl ot w il l prevent b oth inc om i n g an d out going c al ls .
Page 45
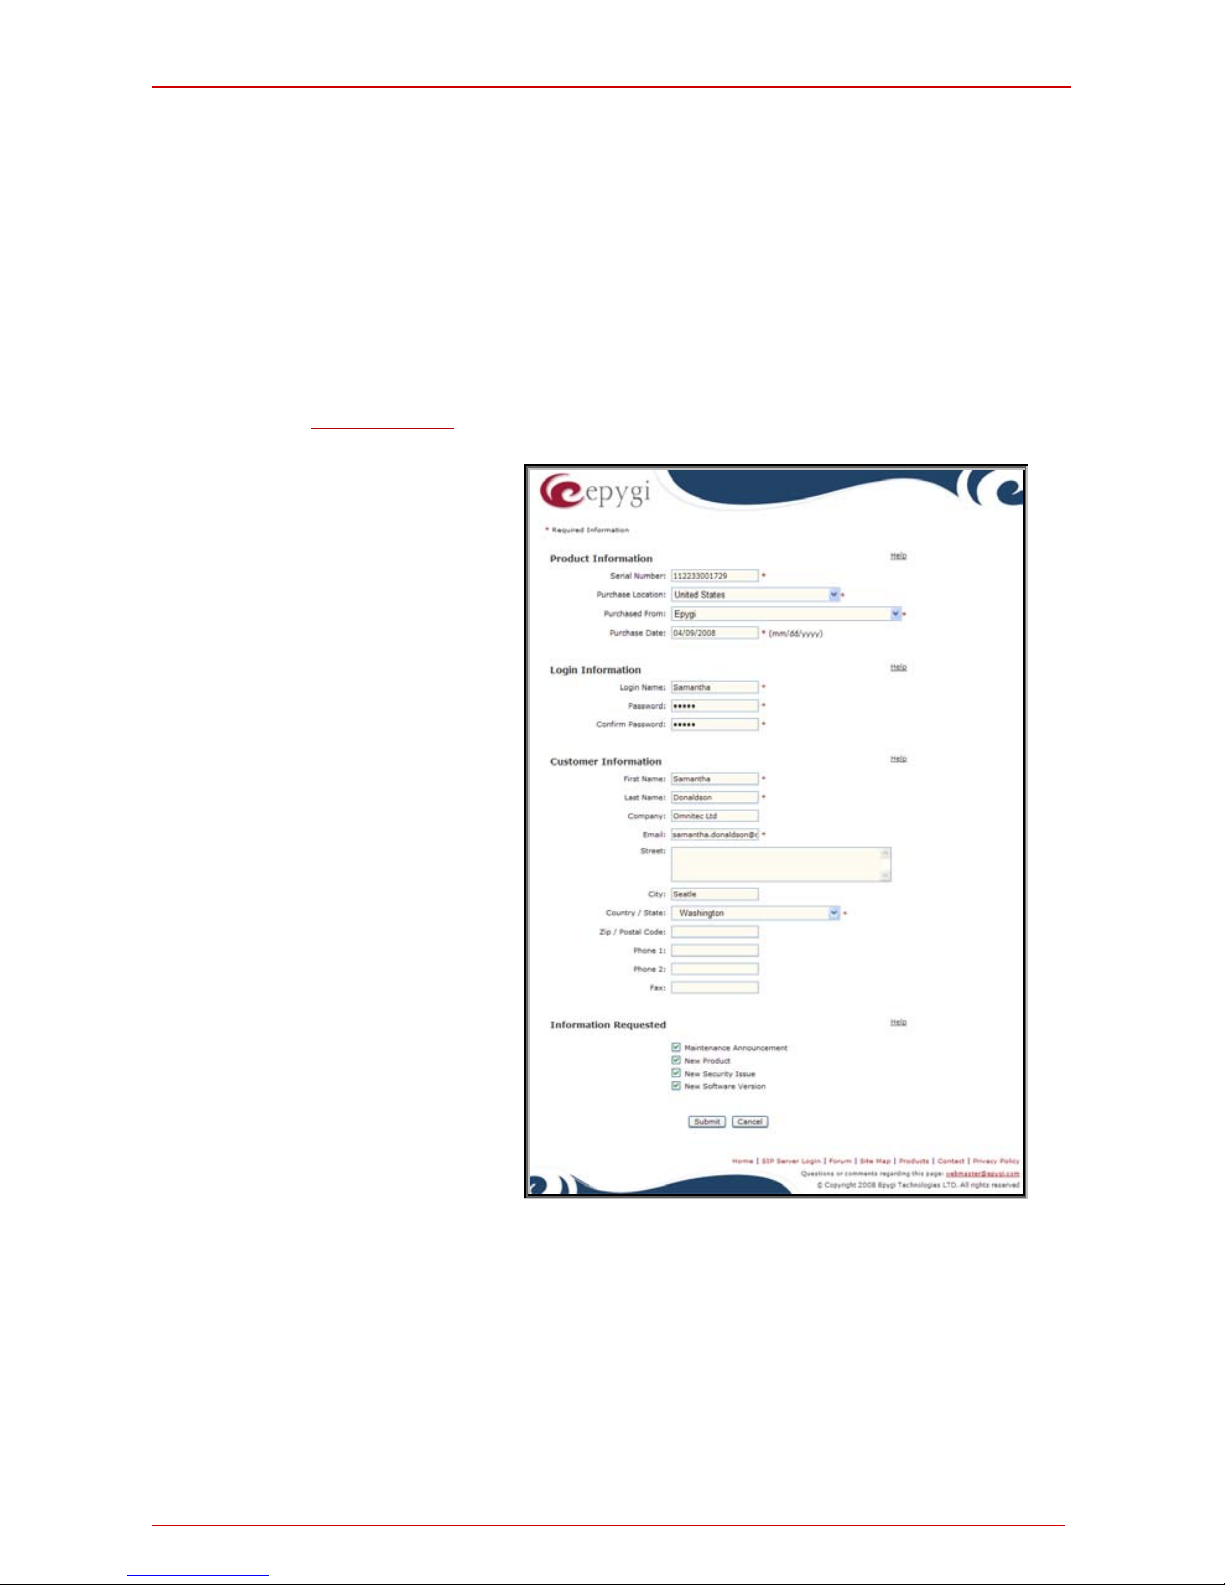
Quadro Manual I: Installation Guide Step 3: Reg istering on Epygi’s Technical Support
Quadro2x, 2xi; Quadro4x, 4xi; Quadro16x, 16xi (SW Version 5.3.x) 45
Step 3: Registering on Epygi’s Technical Support
It is recommended that you register your Quadro on the Epygi Technical Support web
page. Registrat i on wi ll g ive you access to the Technical S up p or t Datab as e. Ther e, you can
submit requests concerning t ech nical problems as well as refer t o the Frequently Asked
Questions ( FAQ) section. In additi on , the tech nic al supp ort p age all ows us ers to d ownl oad
new firmware, manuals and other inf ormation. You can access the support section only if
you ar e reg istered. Add itional ly, regis tration at Epygi’s T echnical S upport w eb page gives
you the username and password to login to the Epygi SIP Server.
To regis t er , you n eed to know t h e s erial number of your Q uadro, whi c h is located on a label
on the bottom of Quadro. You will also need the date of purchase. Next, open the Epygi
home p age (
www.epygi.com) , sel ect Support and c lick on Reg istration Form . The online
registration page will appear:
Complete all fields and record
the Lo gin Name and Password
in a safe place. You will need it
for the SIP server.
Pleas e No te: In some cases, the
Quadro units will be shipped
preconfigured from the factory
with the Su pport logi n and password already set up. In t h is c as e,
an information sheet is included
in th e p ac k ag ed cont ents in dicating th e usern ame and password
to access Epygi’s Online Support
and the Epygi SIP Server.
Fig. I-37: Online Registration page
Page 46
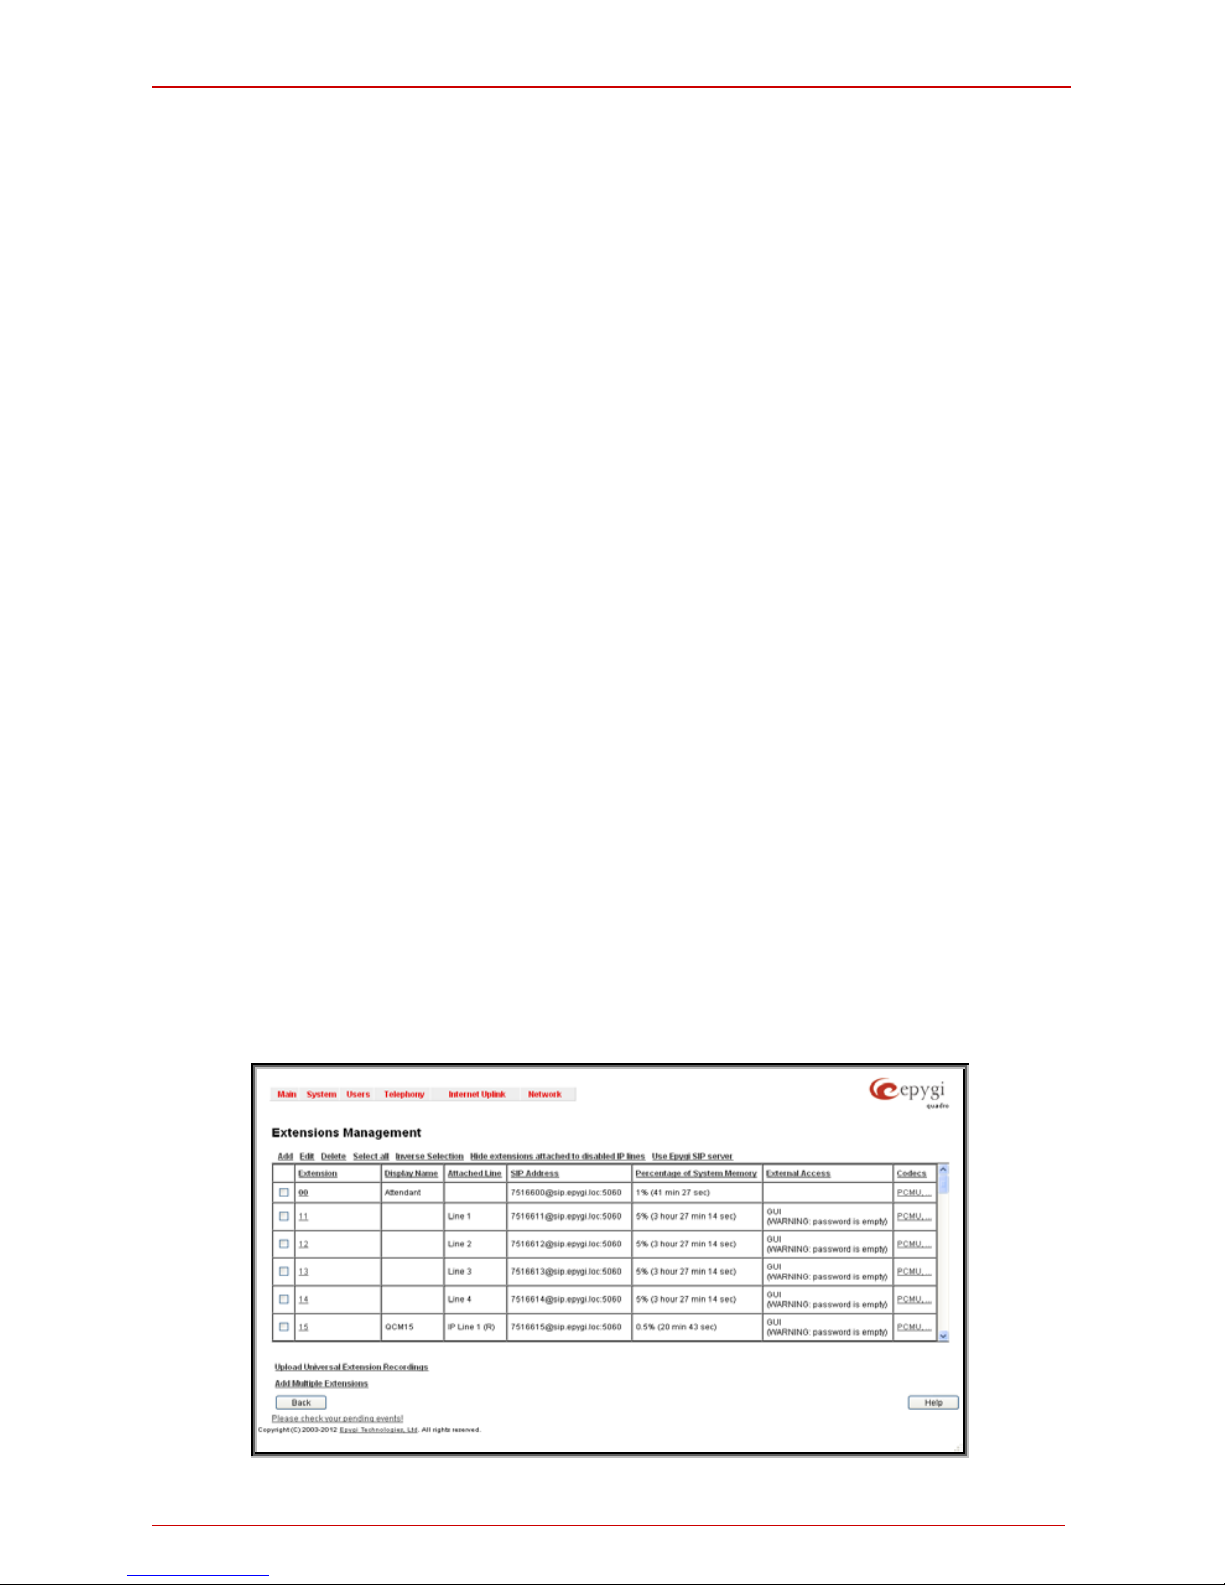
Quadro Manual I: Installation Guide Step 4: Making/Rec ei ving Calls
Quadro2x, 2xi; Quadro4x, 4xi; Quadro16x, 16xi (SW Version 5.3.x) 46
Step 4: Making/Receiving Calls
Pleas e Note: T h e Quadro default se ttin gs are s uf fi cie nt t o make SI P phone call s. It i s
not ne cess ary to mak e any c hange s unles s t he u ser want s t o c reat e n ew S IP extensions on the Epy gi SI P Serv er, creat e a priv ate d irectory for several Quadro units , or
use alt ern ate V oIP serv ic es. R efer to t he A dmini str ator 's Gu id e fo r mor e i nformation
on these configurations.
• To make a c all to the PST N, di al 9 an d t he l ocal ph one numb er. You m ay accel erate
the dial ing process by addi ng the # after the last di git, e.g., 9 + 972-661-1335 #. You
are m aking a l ocal c all thr ough the PST N. It is assumed an FXO p hone line is connected to the Quad ro.
Pleas e Note: In case you had changed the def au lt val ue of the PSTN Access Code
in th e System C onfigur ation W izard to s omethi ng other t han 9, you wil l need to dial
your chosen digit instead.
• To mak e a VoIP c all t o a us er on the r em ote Quadro, lift th e handset and d ial 8 + SI P
Address ( of t h e user on th e r em ot e Q u adro) + #. Y ou ar e c all in g ove r th e In t er n et to a
remote user.
Please Note: Epygi has a SIP Address test line t o test newly provisioned Quadro de-
vices. C all 8 + 99 + # and you will hear a m essage if the call was successful. This
message comes from a Quadro in one of ou r offic es. SIP Address es ar e desc r i b ed below.
• Rec eived IP c alls will rin g the extens i ons au tomatically.
• Received PSTN calls will be directed to the Quadro’s default Auto Attendant (00).
Using the De faul t SIP Addresses
Making Intern et I P calls is s i m pl e with the Q u adro. By d efault, ev ery stan d ar d ( analog) t elephone c onnec t ed to one of Qu adr o’s phon e li nes func ti ons as an IP phon e. If you op en the
Extensions Management pag e, you w ill s ee that some SIP Addresses are available, one
attac hed to the Aut o Att endan t and one to each ext ens ion. T hes e SIP add res ses are t he IP
telephone numbers of these extens ions. Anyone wit h a Qu adro or an y other SIP IP devic e
on the Inter net can pl ac e a call t o [email protected] and t he call will ring the
associat ed extens i on .
Under Extensions Management, y ou m ay ed it the Disp lay N am es to assi gn extens i ons to
people.
Fig. I-38: Extensions Management page
Page 47

Quadro Manual I: Installation Guide Step 4: Making/Rec ei ving Calls
Quadro2x, 2xi; Quadro4x, 4xi; Quadro16x, 16xi (SW Version 5.3.x) 47
To d o s o, c lick on t he box i n th e first column next t o the extension to edit and click th e Edit
button. When the page opens, go to G eneral Settings and edit the Display Name and
click th e Save b utton. D o not ch ange any ot her s ettings at this ti me. For m ore inf ormati on
on the Extensions Management settings , refer to th e Admini stra tor’ s G u i de a n d
Appendix:
Regis ter ing on Ep ygi’s SIP S erver of this d ocum ent. Th e def ault SIP addr ess es ar e b as ed
on int ernal par ameters un ique to eac h Quadr o device. If the Quadr o underg oes a factory
r eset , the defa u l t a d d resses will be restored.
If you want to est ablish a dial plan bet w een sever al Q u adro units in a pr i vat e group, refer t o
Appen dix: R egist ering on Epyg i’s SIP Ser ver, which describes how to change the def ault,
SIP ad dr ess es on the E p ygi SI P s erver and i n th e Qu adro devic es . W ith the d ir ector y s ervice, you can create a private directory accessible from the Internet using a username/password. This service is enabled through the Epygi SIP Server.
Page 48
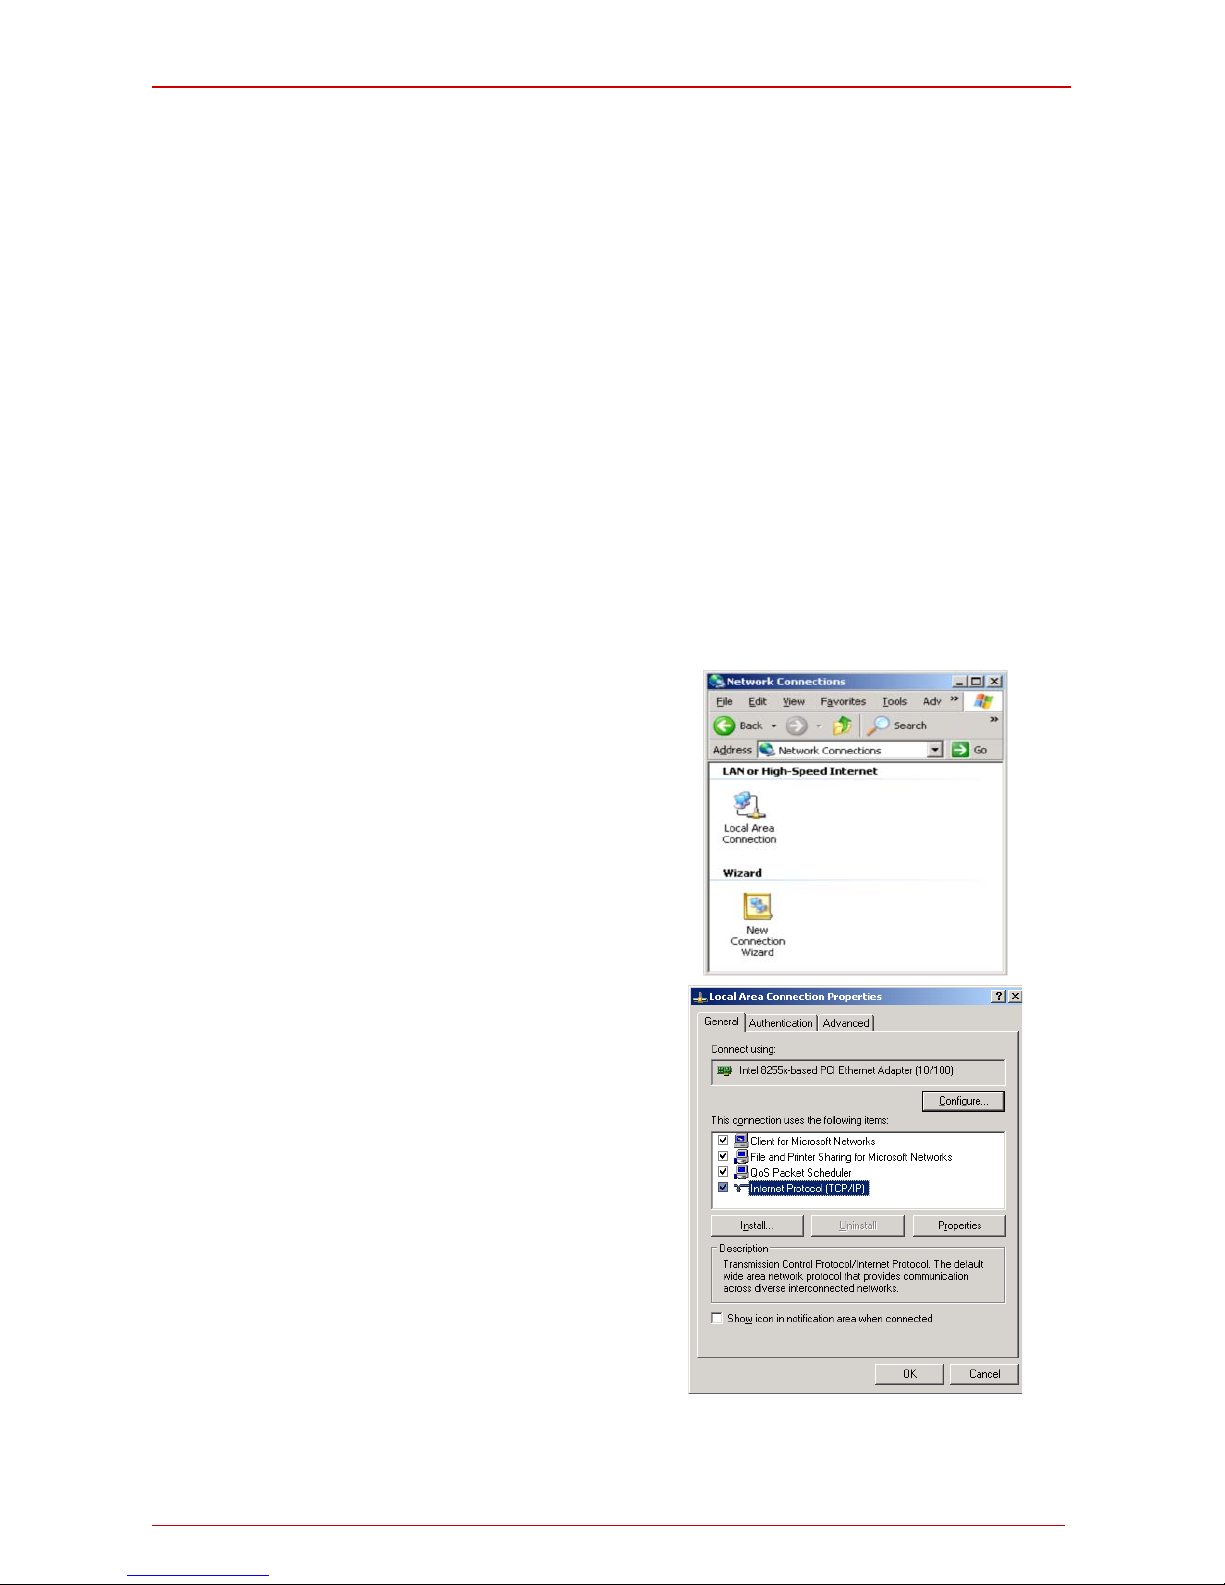
Quadro Manual I: Installation Guide Appendix: PC DHCP Settings
Quadro2x, 2xi; Quadro4x, 4xi; Quadro16x, 16xi (SW Version 5.3.x) 48
Appendix: PC DHCP Settings
The Quadro has a DHCP server for the LAN side devices that provides DHCP IP addresses to devices connected to the LAN either directly or through an Ethernet hub or
switch. This appendix describes how to configure Windows PCs for DHCP. The PC used to
access the Quadro must meet the following conditions:
• TCP/IP network protocol has to be installed.
• DHCP has to be activated in order to request the IP address automatically.
Pleas e Note: If you r PC is alr ead y c onfigur ed f or DHCP and c onn ected d ir ectl y to th e Qu-
adro, th en simply p ower it on and ver ify the LAN LED is lit. If L ED i s of f, check the cable
connections.
Foll ow th e ins tructi ons b elow t o inst all TCP/IP and enab l e DHC P func ti onality:
TCP/IP and DHCP under Windows 2000/W indows XP
W indows 2000 and W indows XP PC s with Ether net cards or ad apters nor mally are conf igured wit h a T C P/ IP network c onn ect i on by def au lt. N ot h in g i n additi on is requir ed. To en able th e DHCP s func tional it y, you m ay h ave to modify the pr op erties of TCP/IP:
1. Click th e Start b utt on. Choos e Settings, then
Control Panel.
2. Double-click on the Network Connection icon
to open t he c orresp on ding wind ow. S elect Lo-
cal Area Connection with the right mouse
button and select Properties.
3. Highlight Internet Protocol (TCP/IP) under
General tab and clic k Properties. T he c or-
responding window will be displayed.
Page 49
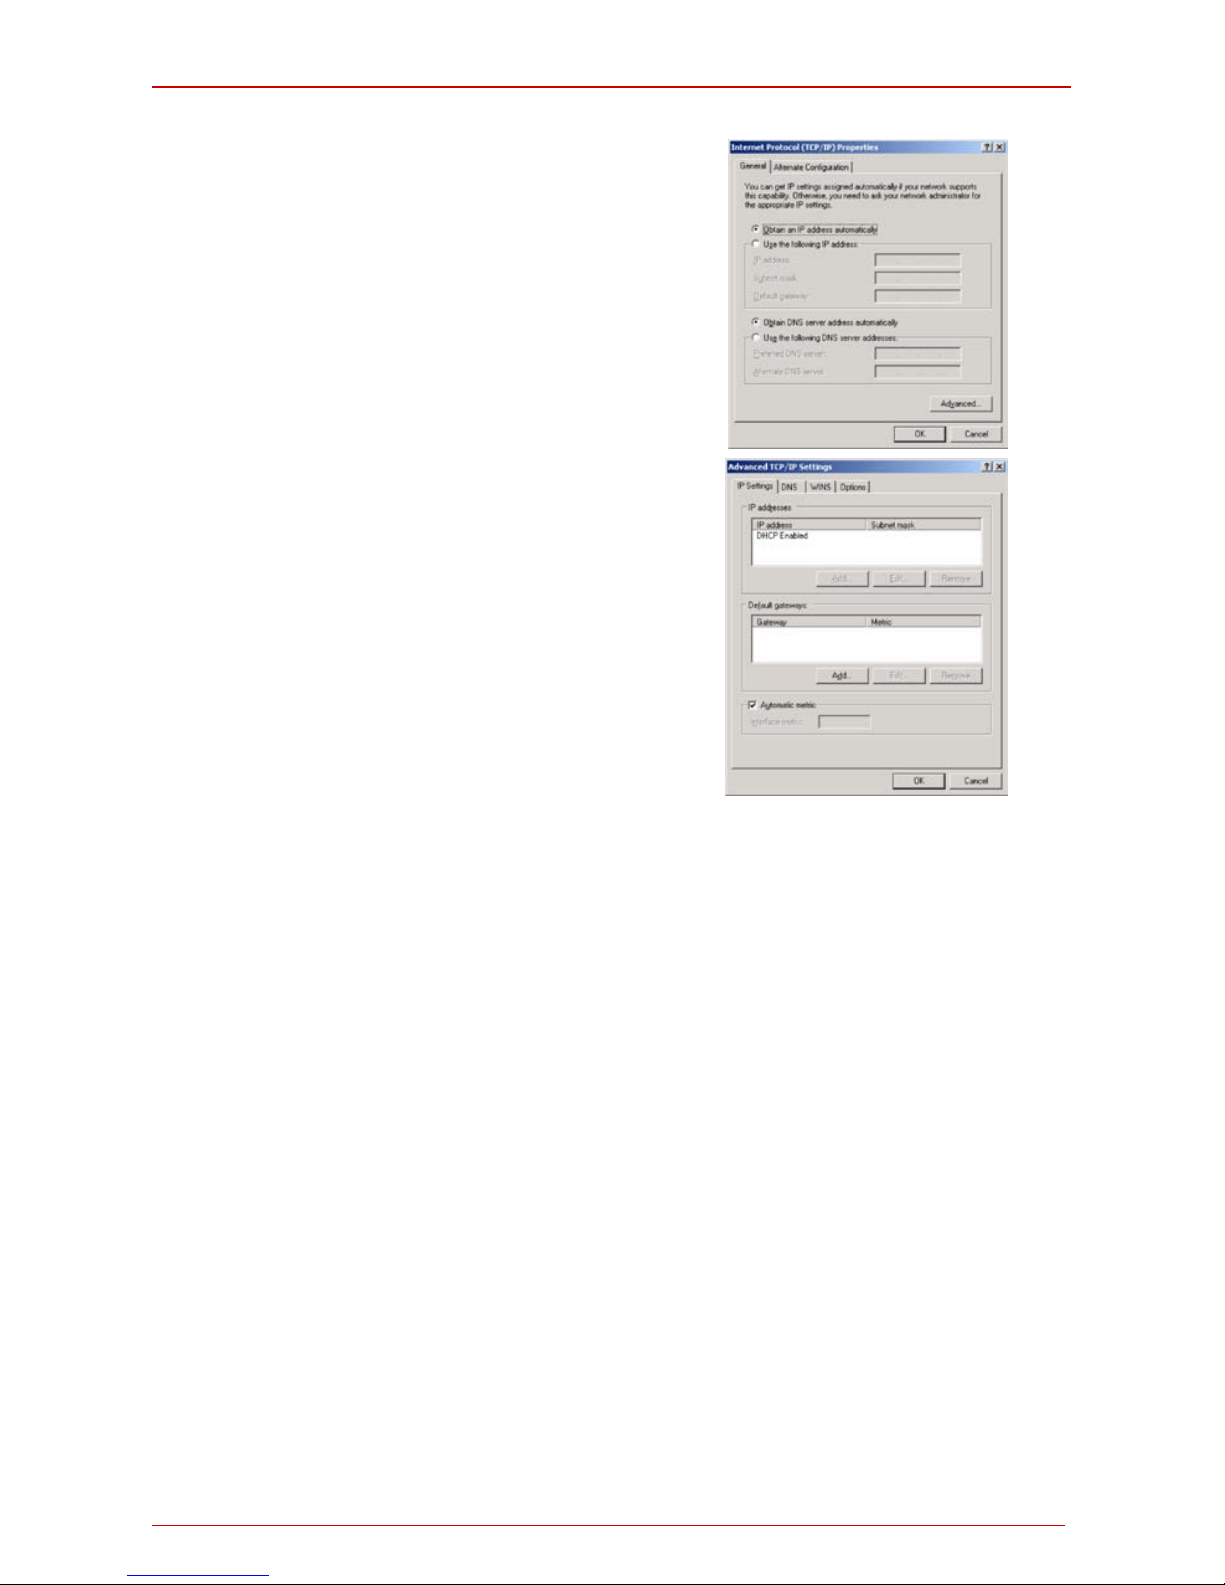
Quadro Manual I: Installation Guide Appendix: PC DHCP Settings
Quadro2x, 2xi; Quadro4x, 4xi; Quadro16x, 16xi (SW Version 5.3.x) 49
4. Choose Obtain an IP address automati-
cally and Obtain DNS serv er address automatically selections and press Advanced
button.
5. You will see the entry DHCP Enabled.
6. Click OK three times to close all windows.
TCP/IP and DHCP under Windows 95/98/ME
1. Click the Start button. Choose Settings, then Control Pa nel .
2. Double-c li c k on t h e Network ic on t o open your Net wor k wind ow. Sel ect th e Con-
figuration tab.
3. Click Add.
4. Double-click on Protocol.
5. Highlight “Microsoft” under the list of manufacturers.
6. Find and double-click on TCP/IP in the list to the right.
7. The Network window will appear with the TCP/IP protocol now listed.
8. Highlight “TCP/IP” and click on Properties.
9. Select Getting IP address automatically to enable the DHCP functionality.
10. Click OK.
11. Windows will ask you to restart the PC. Click Yes.
The TCP/IP installation is now complete and the DHCP functionality is enabled.
Page 50
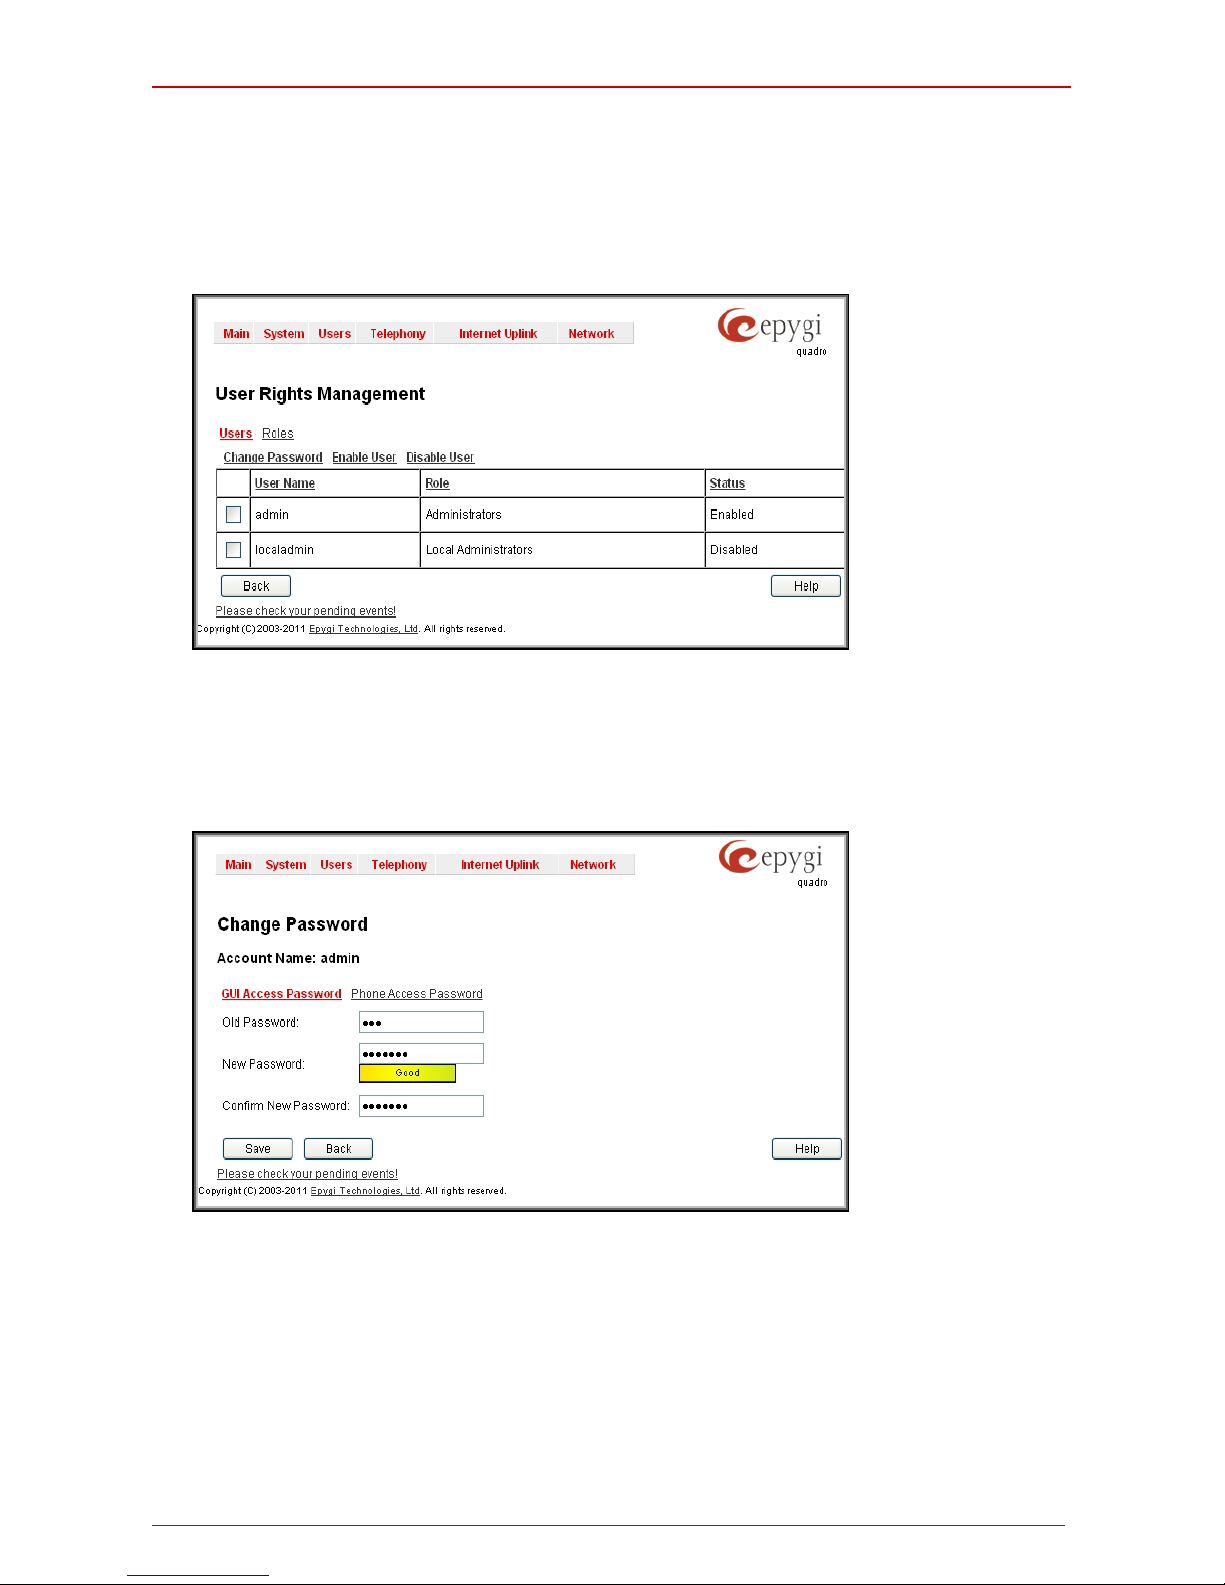
Quadro Manual I: Installation Guide Appendix: Changing the Admin Password
Quadro2x, 2xi; Quadro4x, 4xi; Quadro16x, 16xi (SW Version 5.3.x) 50
Appendix: Changing t he Ad m i n Password
For sec urity reas ons , it is r ec om m en ded that you ch an ge the def ault admin p assword. Th e
usern am e of the administrator (admin) cannot be changed.
To change the administrator pass word , go to the System menu, User Rights Manage-
ment.
Fig. I-39: User Right Management page
Choose admin f rom the list and press the Ch ange Passwor d functional button from the
User Right Management page toolbar.
For Administrator account the page contains two parts - one for GUI Access Password,
the oth er one for Phon e A cc es s P as s wor d .
Fig. I-40: Change Password page
The G UI A cc es s Passwor d offers the following components:
• The Old Pa ss word field requires the current password of the Administrator. An
error message prevents entering the wrong password.
• The New Password field requires a new password f or th e Administrator. Reen-
tering the new passwor d in the Confir m N e w Pass wor d field will confirm the
new password. Up t o tw ent y ( 0-20) digit s an d s ym b ols ar e all owed. The New
Password field is checked against its strength and you may see how strong is
your inserted password right below that field.
Page 51
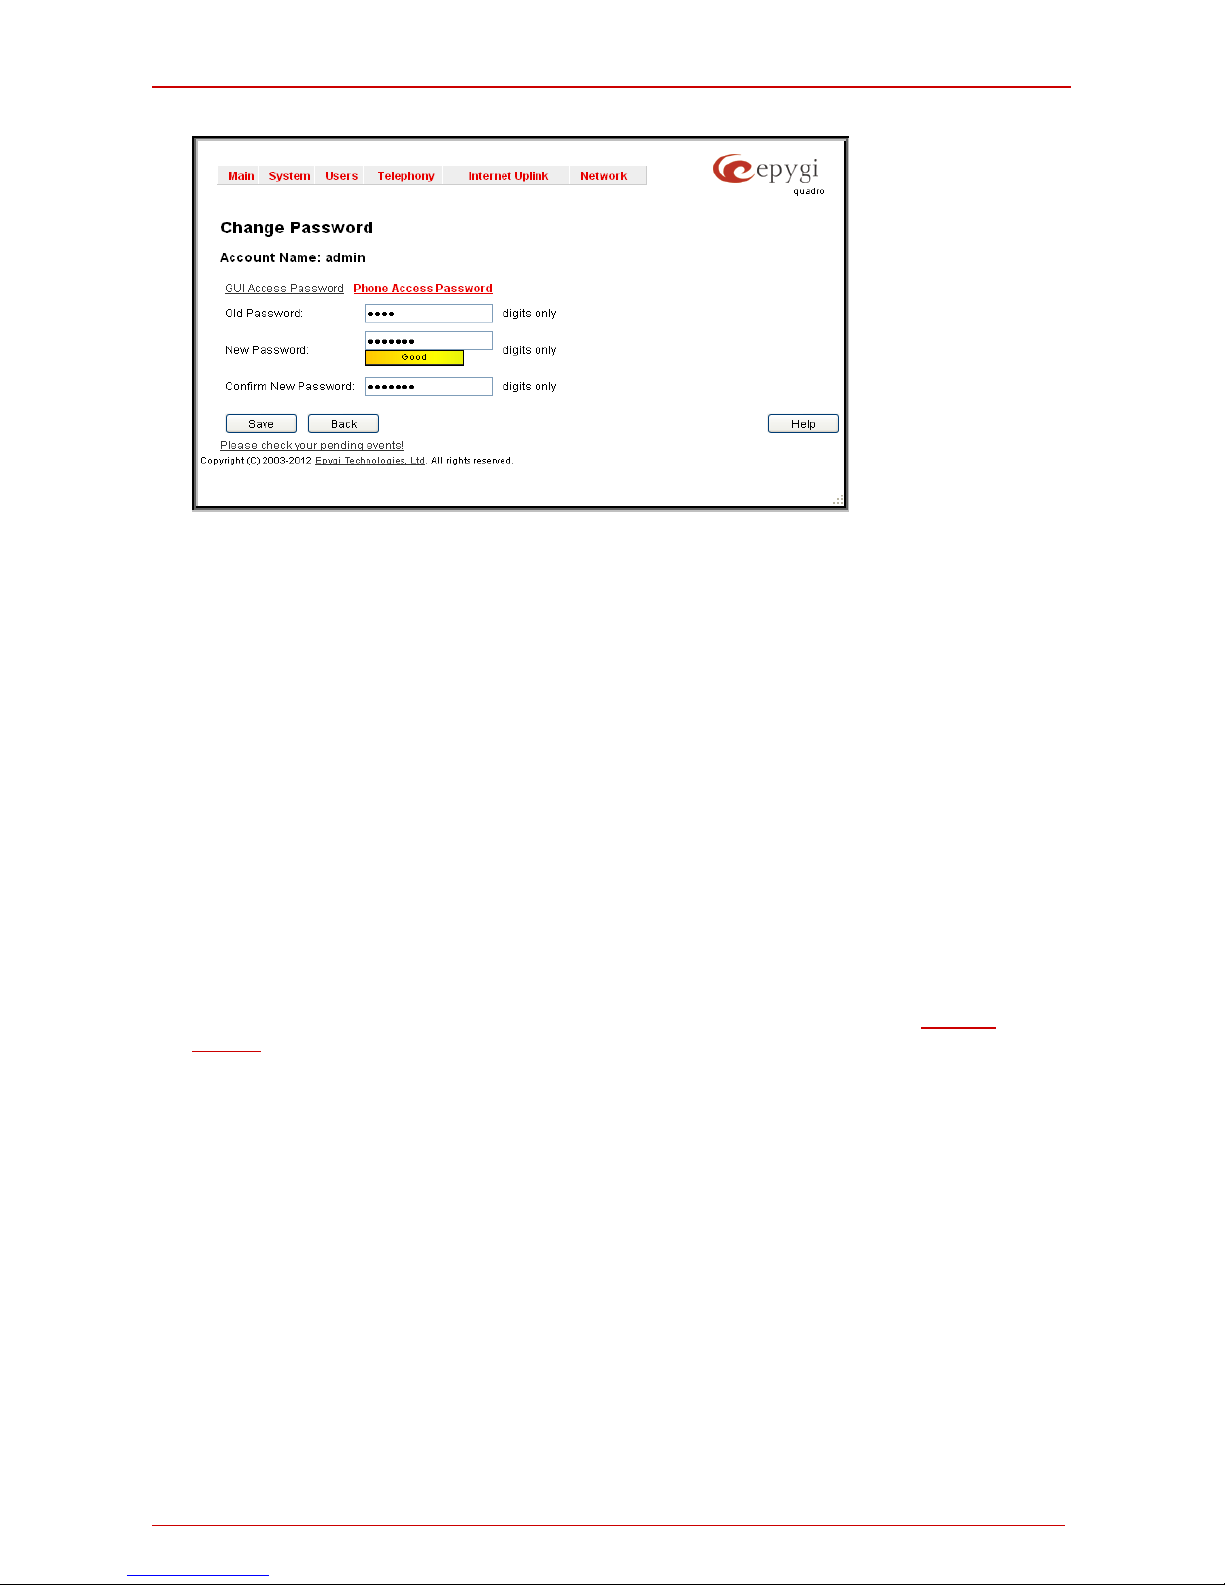
Quadro Manual I: Installation Guide Appendix: Changing the Admin Password
Quadro2x, 2xi; Quadro4x, 4xi; Quadro16x, 16xi (SW Version 5.3.x) 51
Fig. I-41: Change Password page
The Phone Access Password offers the following components:
• The Old Pa ss wor d field requires the current password of the Administrator. An
error message prevents entering the wrong password.
• The New Password field requires a new password f or th e Administrator. Reen-
tering the new passwor d in the Confir m N e w Pass wor d field will confirm the
new password. The New Password field is checked ag ainst its str ength and y ou
may see how strong is your inserted password right below that field. The password can consist of numeric values only. Up to twenty (0-20) di git s ar e allowed. A
corres p on ding war ni ng ap p ear s if any other sym b ols are insert ed.
Please Note: If Administrator is changing the Lo cal Ad ministr ato r or Extension pass-
words or L oc al Adm ini stra tor is changing the Extension password then the Ol d Pa s sword field is not displaying.
Attention: It is hig hl y rec om m ended t o defi ne a proper and non-empty password on this
page if the extension is being used for the Call Relay service from the Quadro's
Auto At-
tendant.
W rite dow n the pas s word s om ew h ere and keep i t in a secure plac e. If the pas s w or d i s l os t,
a fact or y r eset wil l b e requir ed on t h e u nit ( see Administ r ator's G ui d e, Hardware Overview) .
Al l set t i n gs ar e l os t af t e r a f ac t o r y r e s et. Aft er a f ac t ory r es e t th e d efa ul t p as sw or d (1 9 ) w i ll
be restored.
Page 52

Quadro Manual I: Installation Guide Appendix: Configuring NAT Traversal
Quadro2x, 2xi; Quadro4x, 4xi; Quadro16x, 16xi (SW Version 5.3.x) 52
Appendix : C onfiguring NAT Traversal
NAT or Net wor k Add r ess T ransl ation is a c ommon f eatur e us ed t o e xpan d th e us e of c onnected PCs and other networked devices without having to use multiple global Internet
public IP addr ess es. Most ISP ’s will ass ign one pub lic IP addr ess to each custom er that is
connec ted to the In ternet. Th e cust omer can us e a rout er to provid e NAT c apabili ty and
create a private network of PCs and other devices not visible from the Internet. This
method offers s ecurit y and als o elimin ates th e need to ass ign glob al Int ernet pu blic IP addresses to each device on th e LAN .
The Qu adr o ini tiat es an d r ecei ves SIP c alls fr om t he In t ernet ( or t h e net work c onn ect ed to
the W AN port). T o r ec eive S IP c alls , th e Qu adr o mus t b e abl e to r e cei ve p ackets fr om t he
SIP server or any other device that is trying to make an incoming call. If the Quadro is
placed b ehind a router with NAT , like m ost basic rout ers on the m arket t oday, th e Quadr o
will n ot be abl e t o recei v e calls. To resolve t his issue, eith er STUN must be enabled on t he
Quadro or SIP NA T t r aver sal mus t b e s et up in th e router and in the Quadro to r ou t e t h e incoming calls properly.
Please Note: NAT traversal only works with Int ernet connections that have static IP ad-
dress es. Verif y fr om your pr ovider t hat this is the c ase f or your Int ern et connec tion . Some
ISPs provi d e d yn am ic IP ad dress es th at may c hang e f rom tim e t o t i m e, and ar e not appr opriate for SIP NAT traversal.
Pleas e Note: If you have more t han on e router in s eries bet ween t he Qu adro an d the I n-
ternet, the same port forwarding setup must be configured on each router.
NAT Traversal Setup
• Ins t all th e Qu adro b eh ind th e rou ter. If th e Qu adr o is c onf igur ed with it s f act ory d ef ault
setti ngs, it is alread y conf igured f or DHC P and w ill obt ain an IP addr ess autom atic ally
from the router.
• Connect a PC to the Quadro LAN port and power it up.
• Verify the Quadro can connect to th e Internet b y openin g a br owser win d ow and br ow s-
ing t o a famili ar WEB s ite. If th e Q u adro c ann ot reac h the Int ernet, v er ify the LA N/WAN
LEDs and t h e cabl ing. Ver if y the Q uadr o is s et up for DHCP on th e WAN and th at th e
router h as t h e DHC P s er ver en ab led for the devices behind it.
• Find th e ad dress of t he rout er and l og into t h e router . Refer to th e router’s user m an u al
on how to open the router configuration.
• S et up port f orwar ding on th e router to f orward UDP p orts 5060 , 6000-6099 to the IP
address assigned to th e Q u adro. You can see t h e IP add r ess of the Qu adr o i n th e Sys-
tem menu u nder Status, submenu Netw ork Stat us. The IP address will be list ed as
the WAN IP address. Your router also may indicate the IP address assigned to the
Quadro.
• Fin d out th e public I nt ernet ad dress (WAN IP addr ess ) of t h e rout er. To d o s o, open a
brows er and go to
www.whatismyip.com. The sit e will r etur n your pu blic In ter net IP ad-
dress. Record this IP address.
• Fr om t he Telephony m enu of the Q uadr o Man agem ent g o to t h e NAT T rav ers al Set-
tings page, go t o General Sett ings an d set t he enable NAT Traversal for SIP radio
buttons selection to Force. Save the selection.
Page 53
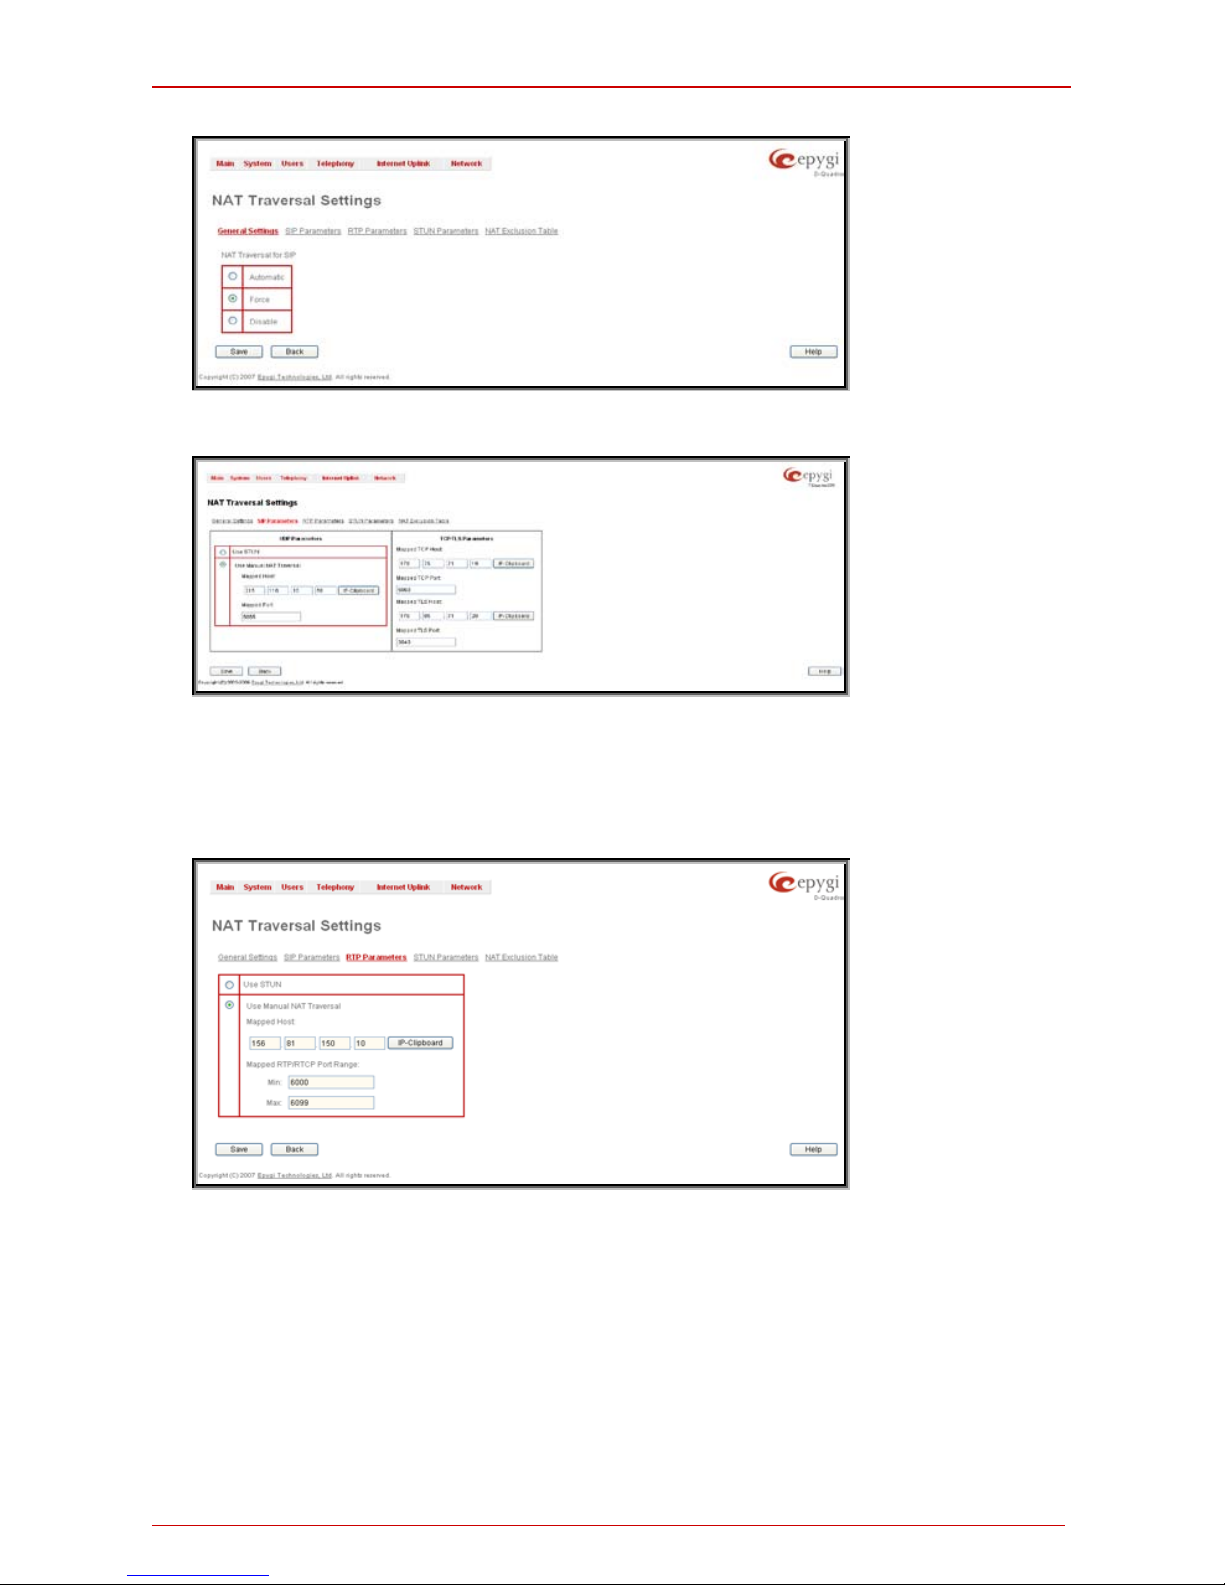
Quadro Manual I: Installation Guide Appendix: Configuring NAT Traversal
Quadro2x, 2xi; Quadro4x, 4xi; Quadro16x, 16xi (SW Version 5.3.x) 53
Fig. I-42: NAT Traversal Settings – General Setting
Go to SIP Para meters page.
Fig. I-43: NAT Traversal Settings - SIP Parameters
Select Use Manual NAT Traversal and enter the WAN IP address of the router into the
Mapp ed Host text f ield. For Mapped Port, enter t he rout er's c orresponding port number, in this case 5060. Save the entr ies.
• Go to the RTP Parameters page and select Use Manual NAT Traversal.
Fig. I-44: NAT Traversal Settings - RTP Parameters
• Enter the WAN IP address of the router into the Mapped Host text field. Set the
Mapped RT P/R T CP Por t R ange acc or di ng to the v al u es s p ecified on th e r ou t er , in this
cas e to 6000 (Min) and 6099 (Max), respectively. Click the Save butt on to save the
contents.
The Qu adro will act ivate t he setti ngs and regis ter the extens ions on the Ep ygi SIP Server
after a few min utes. You can verif y th e s et ti n gs from th e m ain Qu adr o Management menu
under Status in the SIP Registration Status section.
Page 54
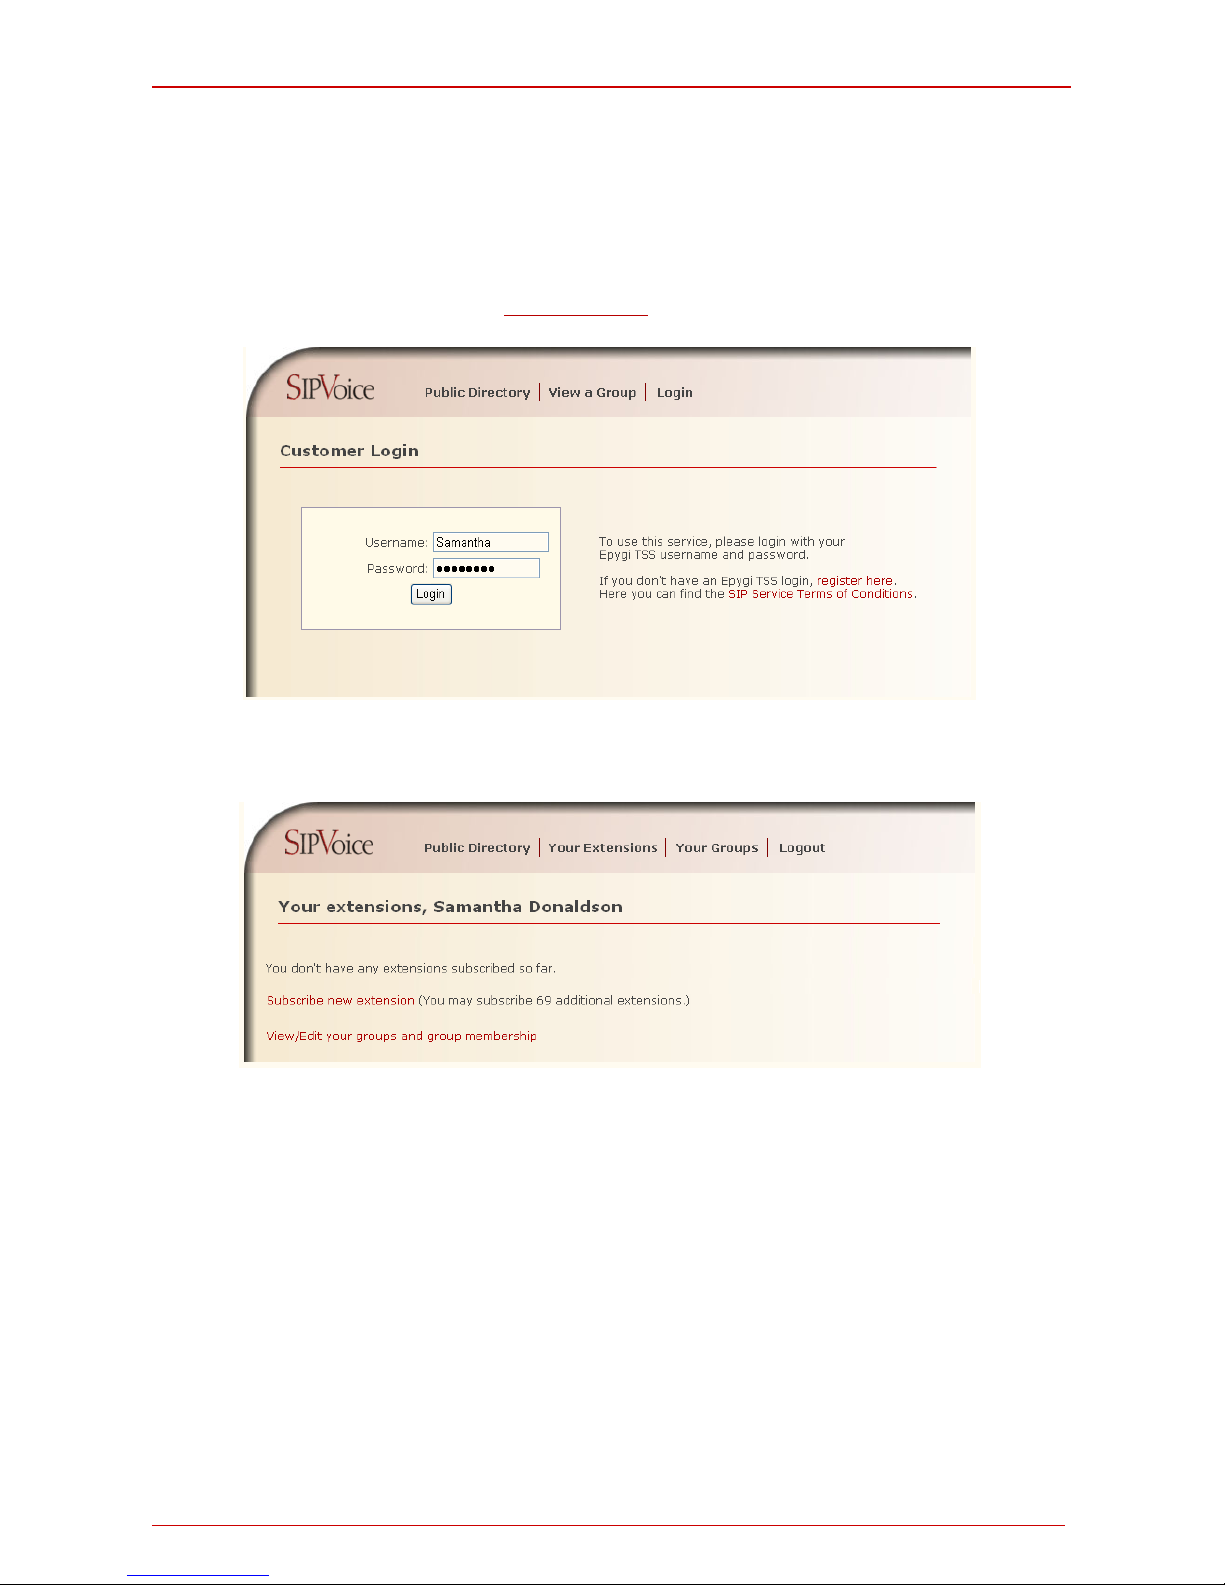
Quadro Manual I: Installation Guide Appendix: Registering on Epygi’s SIP Server
Quadro2x, 2xi; Quadro4x, 4xi; Quadro16x, 16xi (SW Version 5.3.x) 54
Appendix: Registering on Epygi’s SIP Server
You m ay log in dir ectl y t o Epyg i’s S IP S erver if you h ave reg ist ered your Q uad r o at Epygi’s
Technic al Support Center. If you have not registered with Epygi Technical Support, you
cannot login to the Epygi SIP Server.
Log in t o the Ep ygi S IP S erver at
www.epygi.com.Clic k on SIP, Login here . Us e t h e sa m e
login name and p assword you used for Ep ygi Su pport for Customer L ogi n.
Fig. I-45: SIP Services Login page
Read the SIP Service Terms and Conditions an d acc ept it t o proceed. The displayed
page now w elcomes you an d all ow s you to S ubs cr ibe a New Ext e nsion.
Fig. I-46: SIP Services Welcome page
Selecting Sub scrib e a New Exten sion lead s you to a pag e where you c an enter the us er
infor mat i on as s h own b elow. T he Exten sion Nr . is th e eight-di git SI P number assign ed to
your extens ion. Th e firs t five are fi xed by the SI P Ser ver an d cann ot be c hanged and th e
last t hree ar e us er defi ned. Notic e the c hec k box t o enab le this e xtensi on to b e sh own in
the Epygi Public SIP Dire ctor y .
Pleas e Note: If you en abl e th is extens ion t o b e show n i n the E p ygi Public S IP Dir ectory,
all inf orm ation r elated t o this ext ensi on will be p ublis hed in the P ubli c S IP Dir ect ory, wh ich
is accessible by anyone from the Internet. To maintain privacy, do not check this box.
Page 55
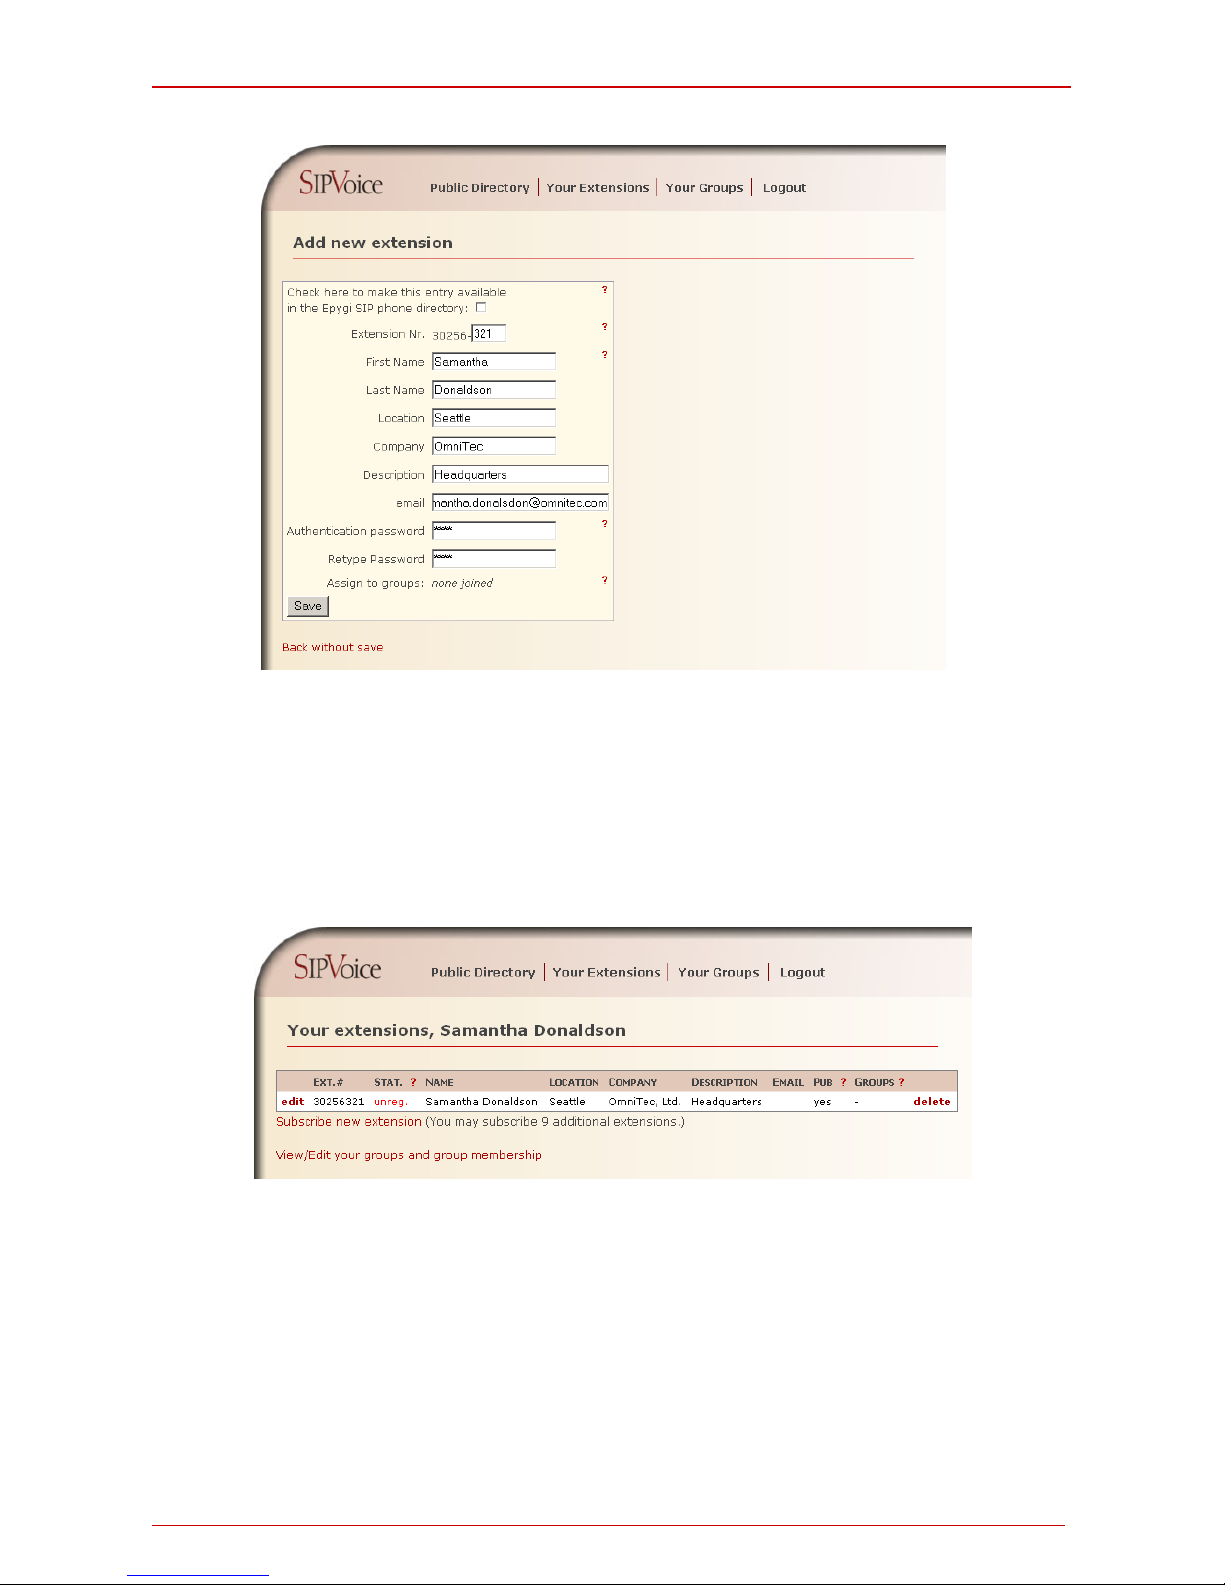
Quadro Manual I: Installation Guide Appendix: Registering on Epygi’s SIP Server
Quadro2x, 2xi; Quadro4x, 4xi; Quadro16x, 16xi (SW Version 5.3.x) 55
Fig. I-47: SIP Services Add New Extension page
The Auth enticatio n passwor d vali dates the entr y and must match the password enter ed
on th e Qu adr o lat er. Mak e s ure t o r ecor d t he n ame, Aut hen ticat ion P assword and SIP extension number for entry into the Quadro later.
Save will s tore the ent ered inf ormation and conclud e the b as ic S IP registrati on. The following page then will be displayed:
Fig. I-48: SIP Services Your Extension page
This table shows unreg. in the Stat. c olumn. T his entr y will ch ange t o reg. when the re-
quir ed settings in the Q uadro are compl ete and t he Quadr o succ essfull y reg isters on the
SIP Server.
Repeat this for all four extensions on the Quadro and the Auto Attendant.
Page 56
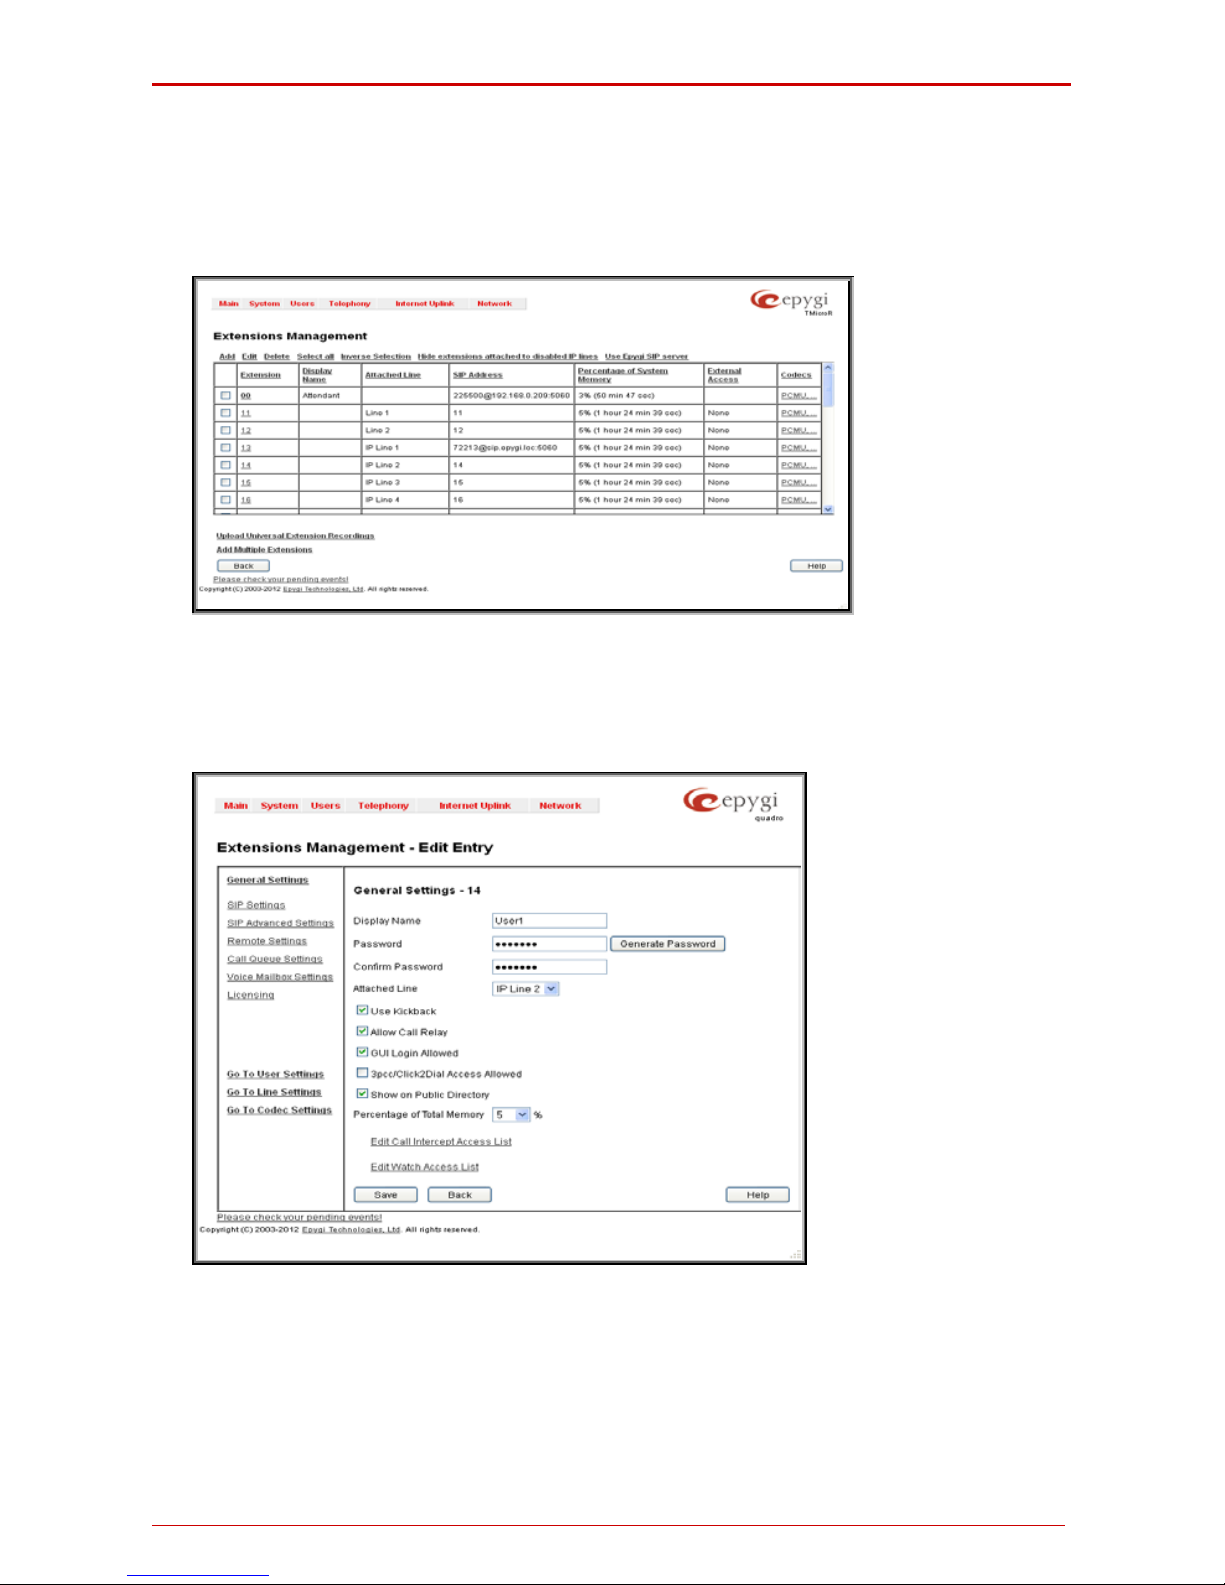
Quadro Manual I: Installation Guide Configuring Quadro Extensions
Quadro2x, 2xi; Quadro4x, 4xi; Quadro16x, 16xi (SW Version 5.3.x) 56
Configurin g Q ua dr o Extensions
Onc e th e S IP server has t h e created ext ens ions w ith the user informati on, cr eate thes e extensions in th e Qu adro devic es. Onc e they ar e ent ered in th e Quadr o, th ey will be r egistered and can then be used.
Login into the Quadro and go to Extensions Management.
Fig. I-49: Extensions Management page
Select the first extension to ch ange by clic king the appropriate checkbox and press Edit
functional button. The Extensions Management – Edit Entry page will be dis played.
Go to the General Settings p ag e and adjust the Display Name as needed.
Fig. I-50: Extensions Management - Edit Entry – General Settings page
Go to th e SI P Setti ng s page t o ent er th e SIP Registration S ettings you rec ei ved from th e
Epygi SIP server.
Page 57
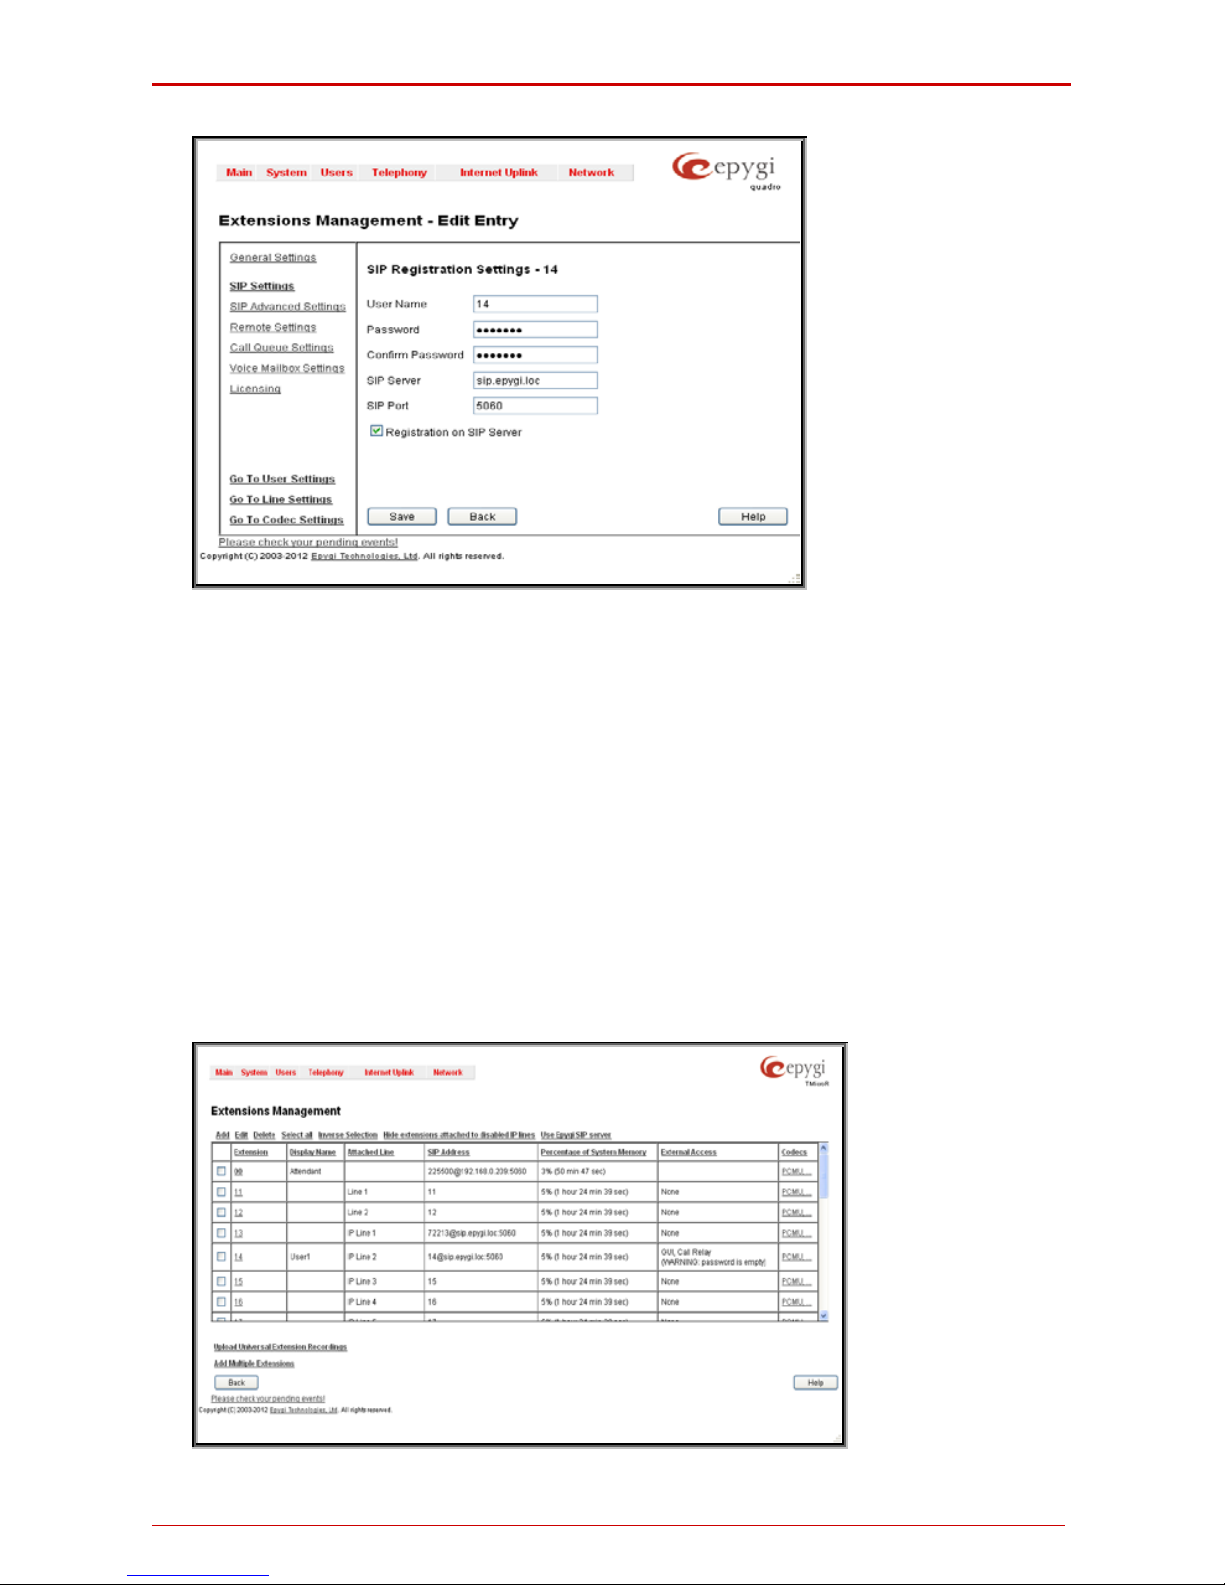
Quadro Manual I: Installation Guide Configuring Quadro Extensions
Quadro2x, 2xi; Quadro4x, 4xi; Quadro16x, 16xi (SW Version 5.3.x) 57
Fig. I-51: Extensions Management - Edit Entry – SIP Settings page
• Enter th e S IP r eg istration nu mb er d isplayed in th e c olu m n Ext# into t h e t ext f i eld Reg-
istration User Name.
• In th e Password f ield, enter the passwor d you spec ified when regi stering at th e SIP
server and c onfirm it in the f i eld b el ow .
• In Regi stra tio n SI P S erv er, th e select ed SIP ser ver addr ess must be entered . If you
use the Epygi SIP server, you m ay en ter sip.epygi.com.
• Most SIP server provid ers, including Ep ygi, use port 50 60 as the Regi stration SI P
Port. You may leave the default entry as is.
• Select Registration on SIP Server if you wan t t o es t abl is h and recei ve IP calls.
• Click th e Save button to activate the settings.
Other settings of the extension might be also modified from Exten sions Manag ement –
Edit Entry page (refer to the Manual II - Administrator’s Guide).
Your s ettings wil l be verif i ed, th en af ter a f ew sec onds th e Ext en sions M an agem ent page
is u pdated with t he changes as shown in the belo w exa m ple, Fig.I-52.
Fig. I-52: Extensions Management page
Page 58

Quadro Manual I: Installation Guide Configuring Quadro Extensions
Quadro2x, 2xi; Quadro4x, 4xi; Quadro16x, 16xi (SW Version 5.3.x) 58
If you g o bac k to Ep ygi’s SIP S erv er, you will f in d the valu e reg. f or this num ber in th e column Stat. Reg. This will ind icate th at th e Q u adro has s uc cessf ull y regist ered t h e n ew n umber. If this d oes not h appen aft er a f ew minut es, again ver ify th e SIP Num ber and passwords.
Page 59
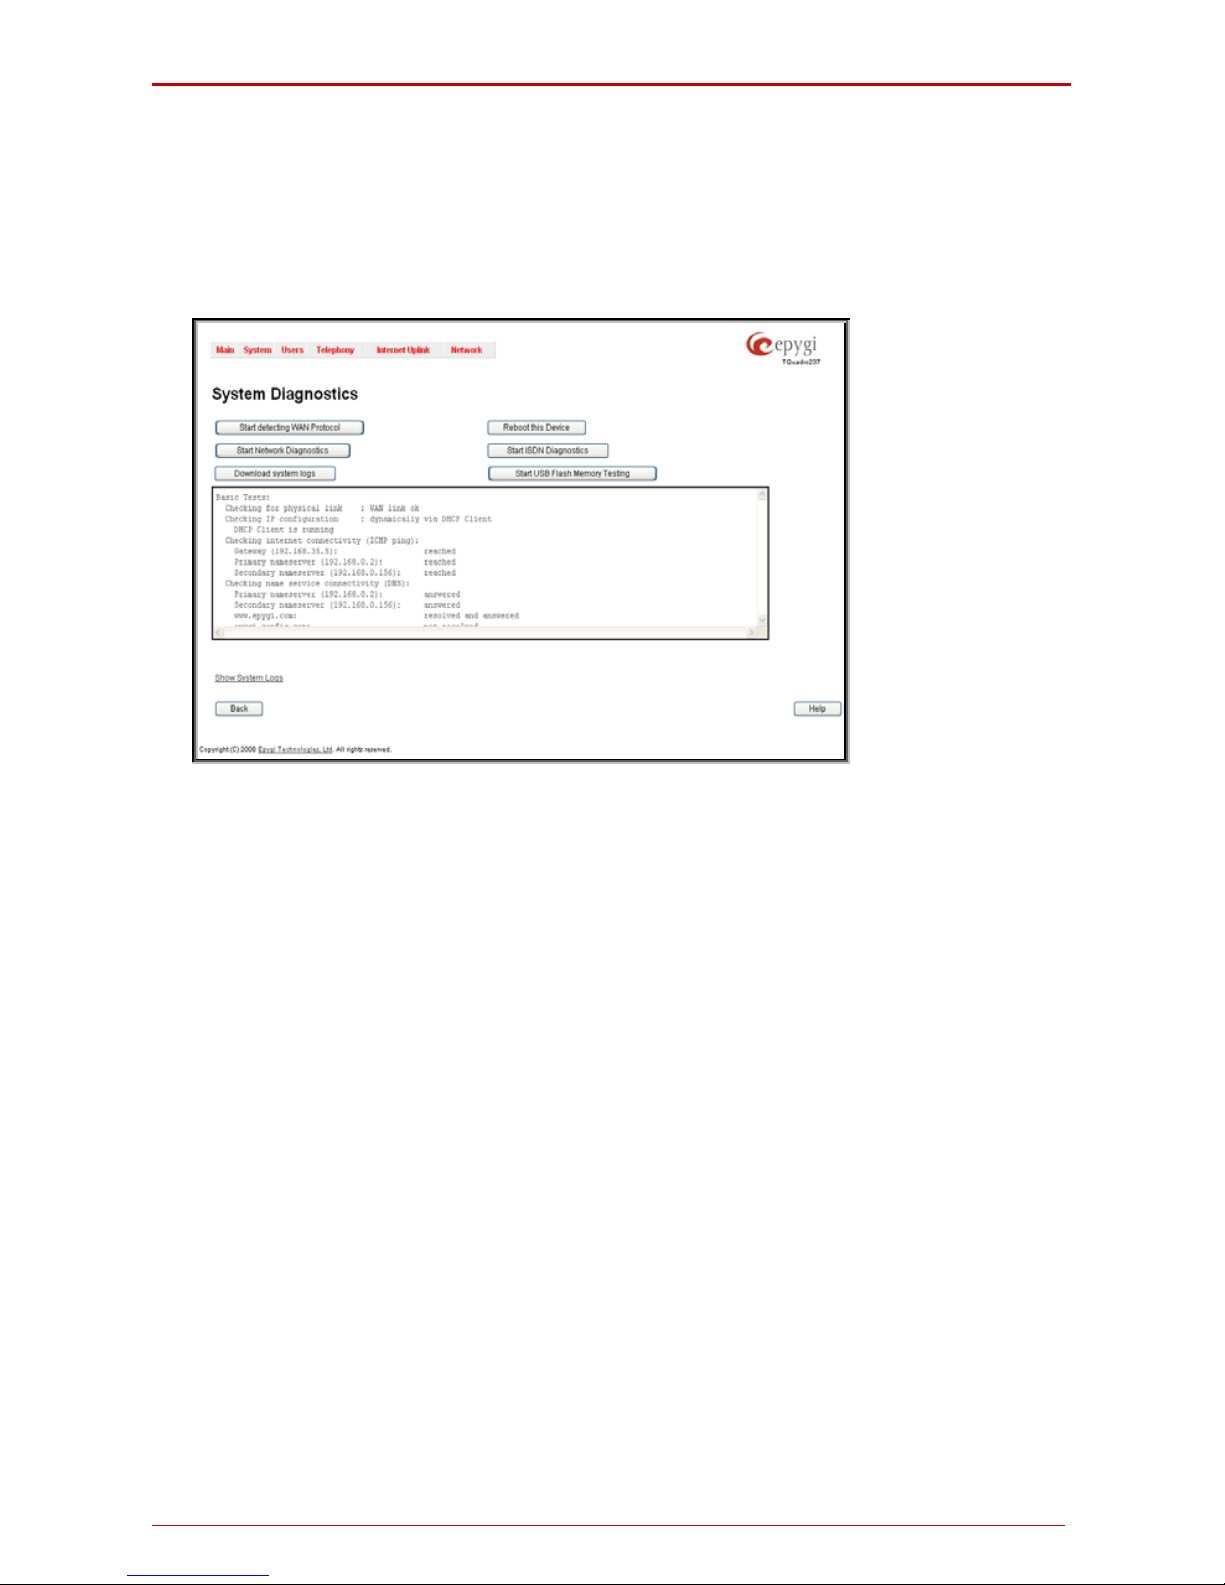
Quadro Manual I: Installation Guide Appendix: Checking the Connections
Quadro2x, 2xi; Quadro4x, 4xi; Quadro16x, 16xi (SW Version 5.3.x) 59
Appendix: Checking the Connections
If th e s yst em d oesn’t seem t o b e w or k in g proper l y, even wh en all th e c ables ar e connected
prop erly, it m ay b e hel pful t o St art Net work Dia gnosti cs: The WAN link, IP configuration,
gateway, DNS server, and STUN-NAT will all be checked.
T o st ar t d ia gn os ti cs , op en t h e System's menu item Diagnostics and click Start Network
Diagnostics.
Fig. I-53: System Diagnostics - Network Diagnostics page
If the test p asses, th e out pu t of th e s yst em m ay l ook as follows:
Basic Tests:
Checking for physical link: WAN link ok
Checking IP configurati on: dynamically via DHCP Client
DHCP Client is running
Checking internet connect ivity (ICMP ping):
Gateway: reached
Primar y na meserv er : reached
Second ar y namese rv er: not co nfigured
www.epygi.com: reached
STUN Network Addres s Transl ation (NAT) Check:
External visibible ad dress: 212.126.210.179
Detected NAT type : Restricted cone
Performing MTU Disc overy:
prepar in g system
Sendin g UD P Datagr am of size 150 0 got answer
clean up
Largest usable MTU size is: 1500 Bytes
Test successful.
Depending on where the test is failing, the diagnostic can give some advice on how to
solve the problem. See the example below of a failed test:
Basic Tests:
Checking for physical link: no WAN li nk
Please check the physical connection of the WAN interface. Cable not
plugged or broken?
Test failed.
Page 60
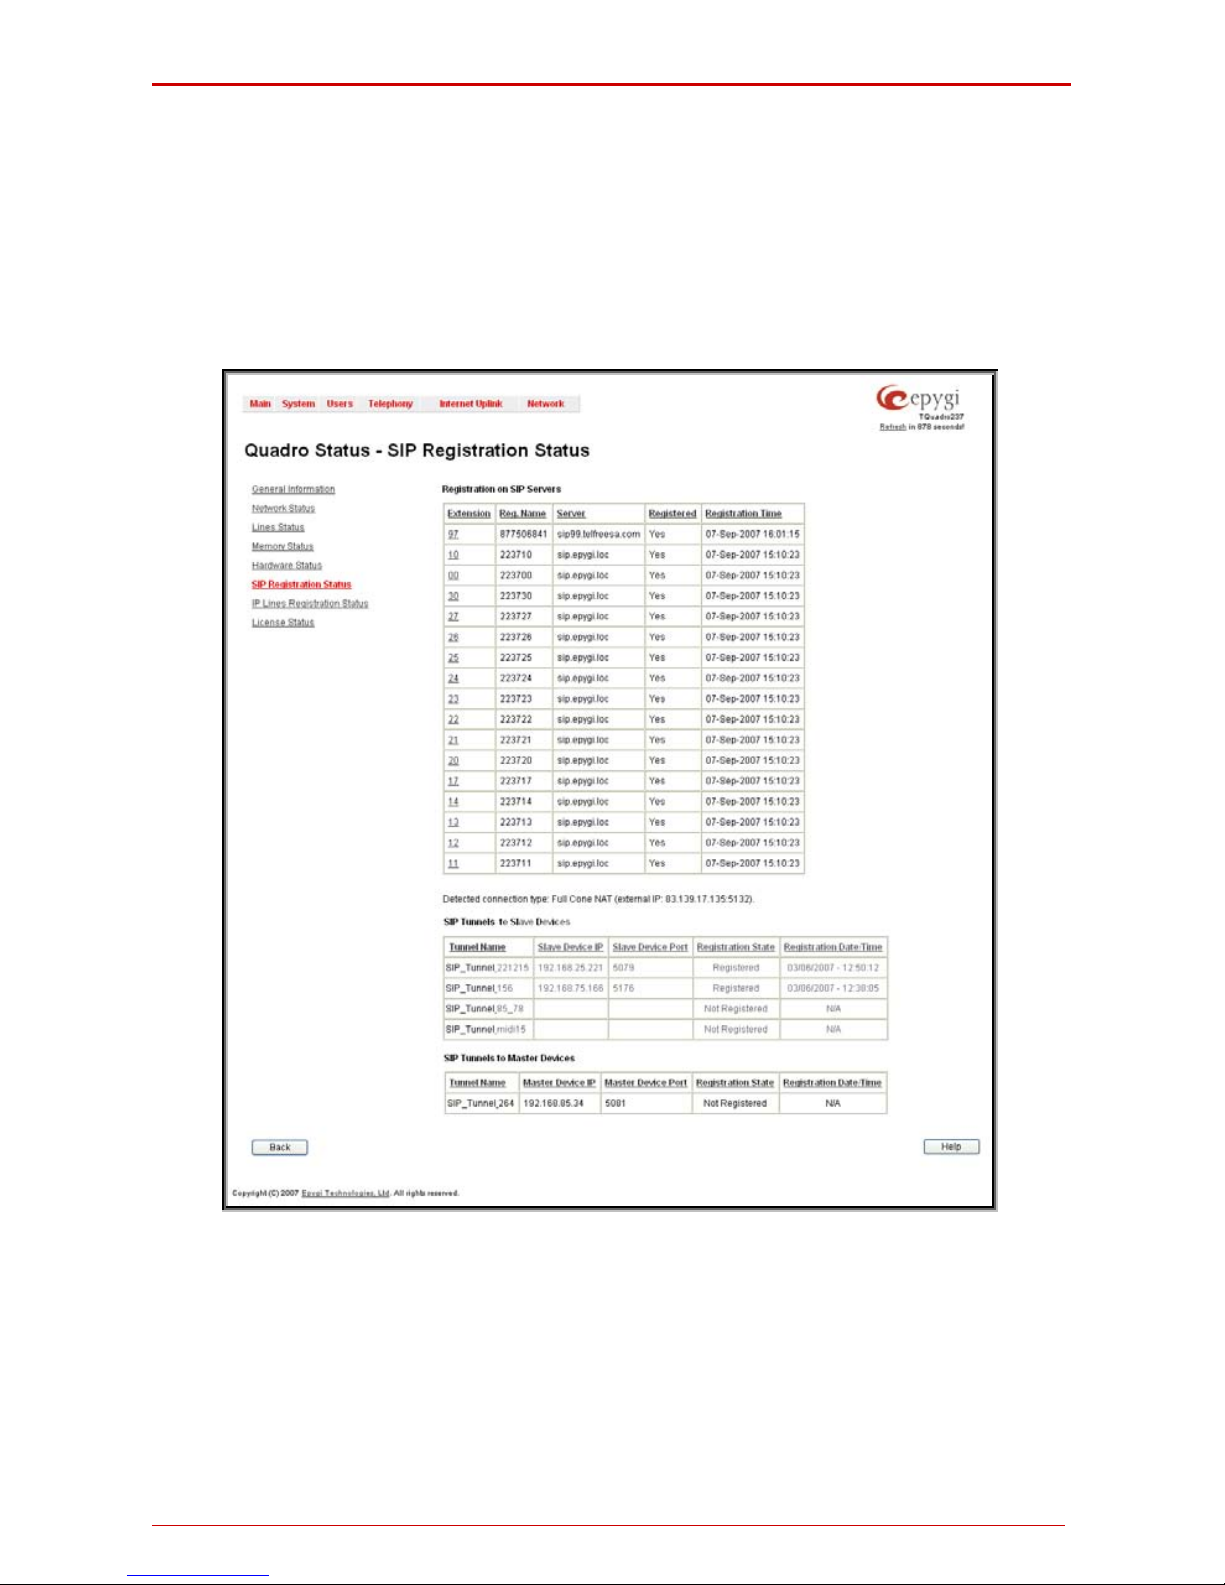
Quadro Manual I: Installation Guide Appendix: Checking the Connections
Quadro2x, 2xi; Quadro4x, 4xi; Quadro16x, 16xi (SW Version 5.3.x) 60
If di agnostic s are succ ess ful, bu t you are st ill un abl e to pl ace a c all to 89 9# th en ch eck t he
SIP registration status.
Open t he SIP R egi s tr ation S tatus p ag e us ing t h e Q u adro m an ag em ent System menu item
Status. Bes id es t h e SIP registration information f or t h e auto atten d ant and each c onnected
extens ion, the Det ected Connection Type is s hown. If Q uadro is placed behind a NAT
router and the STU N is enabled, the detec ted conn ection typ e and the IP address of this
router's WAN port are displayed.
Fig. I-54: SIP Registration Status page
Quadr o cann ot wor k b ehind your r out er if Dete cted Con necti on Type i s on e of t h e f o llo wing:
• Unknown connection - un exp ec ted error
• Symmetric NAT
• Symmetric Firewall
• Blocked UDP
If you g et on e of th e ab ove menti oned D et ect ed C onnec tion T ypes , eith er conn ect t he Q u-
Page 61

Quadro Manual I: Installation Guide Appendix: Checking the Connections
Quadro2x, 2xi; Quadro4x, 4xi; Quadro16x, 16xi (SW Version 5.3.x) 61
adro in front of t he r outer, or conf igur e NAT tr avers al manually as explained in Appendix:
Configuring NAT Traversal.
If you are un able to res olve you r probl ems, pleas e send us a t echnical su pport req uest on
the Support s ection of http://www.epygi.com/. P lease prep are a system log file and at-
tach it to your request.
To d ownl oad th e system l ogs , op en t h e S yst em Diagn ost ics page System m enu item Di-
agnostics and click Download System Logs.
Page 62
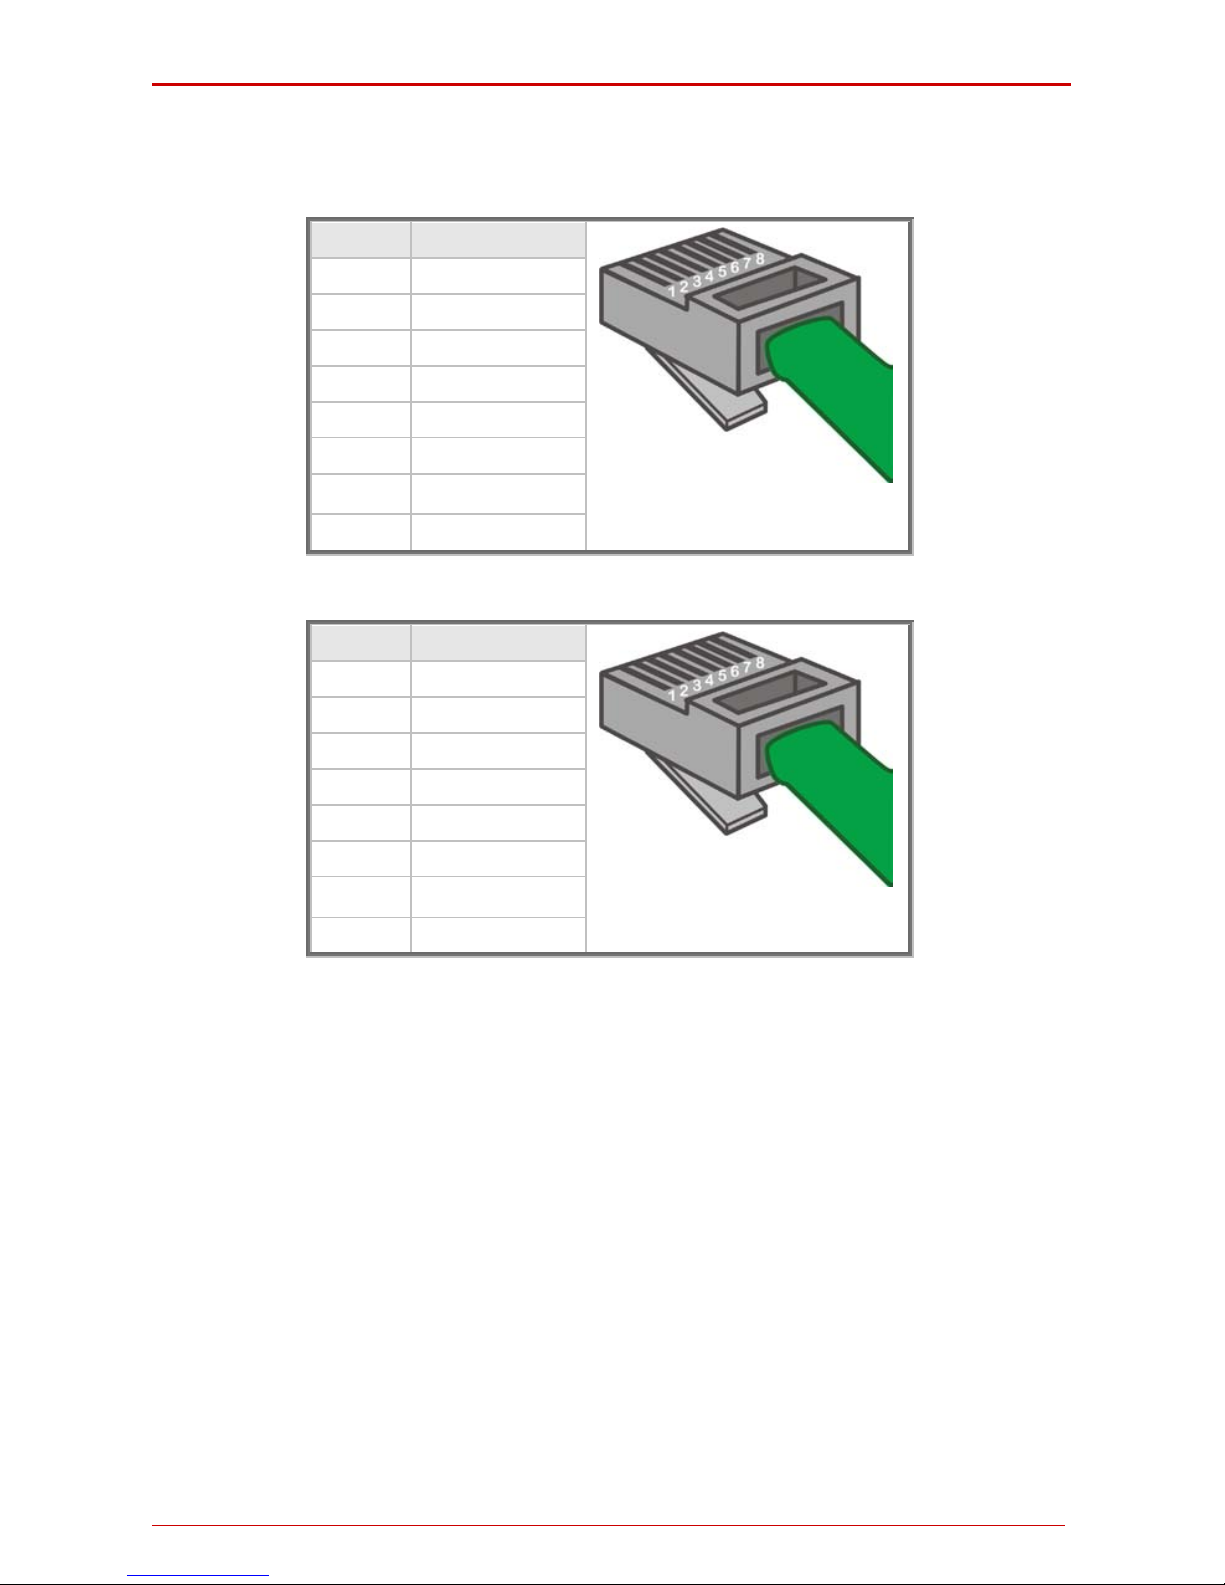
Quadro Manual I: Installation Guide Appendix: Pin Assignment of ISDN
Quadro2x, 2xi; Quadro4x, 4xi; Quadro16x, 16xi (SW Version 5.3.x) 62
Appendix : Pin Assig nmen t of ISDN
Pin Signal
1 N.C.
2 N.C.
3 SSR1
4 SSX1
5 SSX2
6 SSR2
7 N.C.
8 N.C.
Fig. I-55: Pin Assignment of ISDN in User mode
Pin Signal
1 N.C.
2 N.C.
3 SSX1
4 SSR1
5 SSR2
6 SSX2
7 N.C.
8 N.C.
Fig. I-56: Pin Assignment of ISDN in Network mode
Page 63

Quadro Manual I: Installation Guide Appendix: Checking the Connections
Quadro2x, 2xi; Quadro4x, 4xi; Quadro16x, 16xi (SW Version 5.3.x) 63
CCooppyyrriigghhtt 22000033 -- 22001133
EEppyyggii TTeecchhnnoollooggiieess,, LLttdd..
AAllll rriigghhttss rreesseerrvveedd
 Loading...