

Page 1

EPIC OPTIX, LLC
i
Preface
Copyright
Epic Optix is a pending trademark of Epic Optix, LLC. Other trademarks are the properties of
their respective owners and are hereby recognized.
Disclaimer
This document is subject to change without notice. The manufacturer makes no
representations or warranties with respect to the contents hereof and disclaims any implied
warranties of merchantability or fitness for any particular purpose. The manufacturer reserves
the right to review this guide and make content modifications when necessary without
obligation of the manufacturer to notify any person of such revision or changes.
Trademark Recognition
HDMI, the HDMI Logo, DLP®, the DLP® logo, and High-Definition Multimedia Interface are
trademarks or registered trademarks of HDMI Licensing LLC in the United States and other
countries.
All other product names used in this manual are the properties of their respective owners
and appropriately acknowledged.
Page 2

EPIC OPTIX, LLC
ii
Critical Safety Information
It is imperative that you carefully read this section before using the PROJECTOR. Safety and use
instructions will ensure that you experience the approved use of the PROJECTOR. It is important to keep
this manual for future reference.
Warning Symbols
Warning symbols are used on the unit and in this manual to warn you of potential
hazardous situations.
The following warnings are used in this manual to notify you of important information:
Note: Provides additional information on the topic at hand.
Important: Provides additional information that should not be overlooked.
Caution: Alerts you to situations that may damage the unit.
Warning: Alerts you to situations that may damage the unit, create a hazardous
environment, or cause personal injury.
Throughout this manual, component parts and items in the OSD (On-Screen Display) menus
are noted in bold font as in this example:
“Press the Menu button on the remote control to open the Main menu.”
General Safety Information
• Never open the sealed projector case/enclosure. For servicing, contact qualified
service personnel, because self-service is not an option.
• Follow all warnings and cautions stated in this manual and designated on the unit case.
• Be design, the projection light source is extremely bright. To avoid damage to eyes,
NEVER look directly into the lens when the Projector is on.
• Do not place the unit on an unstable surface or stand.
• Avoid using the system near water, in direct sunlight, or near a heating device.
• Do not place heavy objects such as books or bags on the unit.
Page 3
EPIC OPTIX, LLC
iii
PROJECTOR Installation Notice
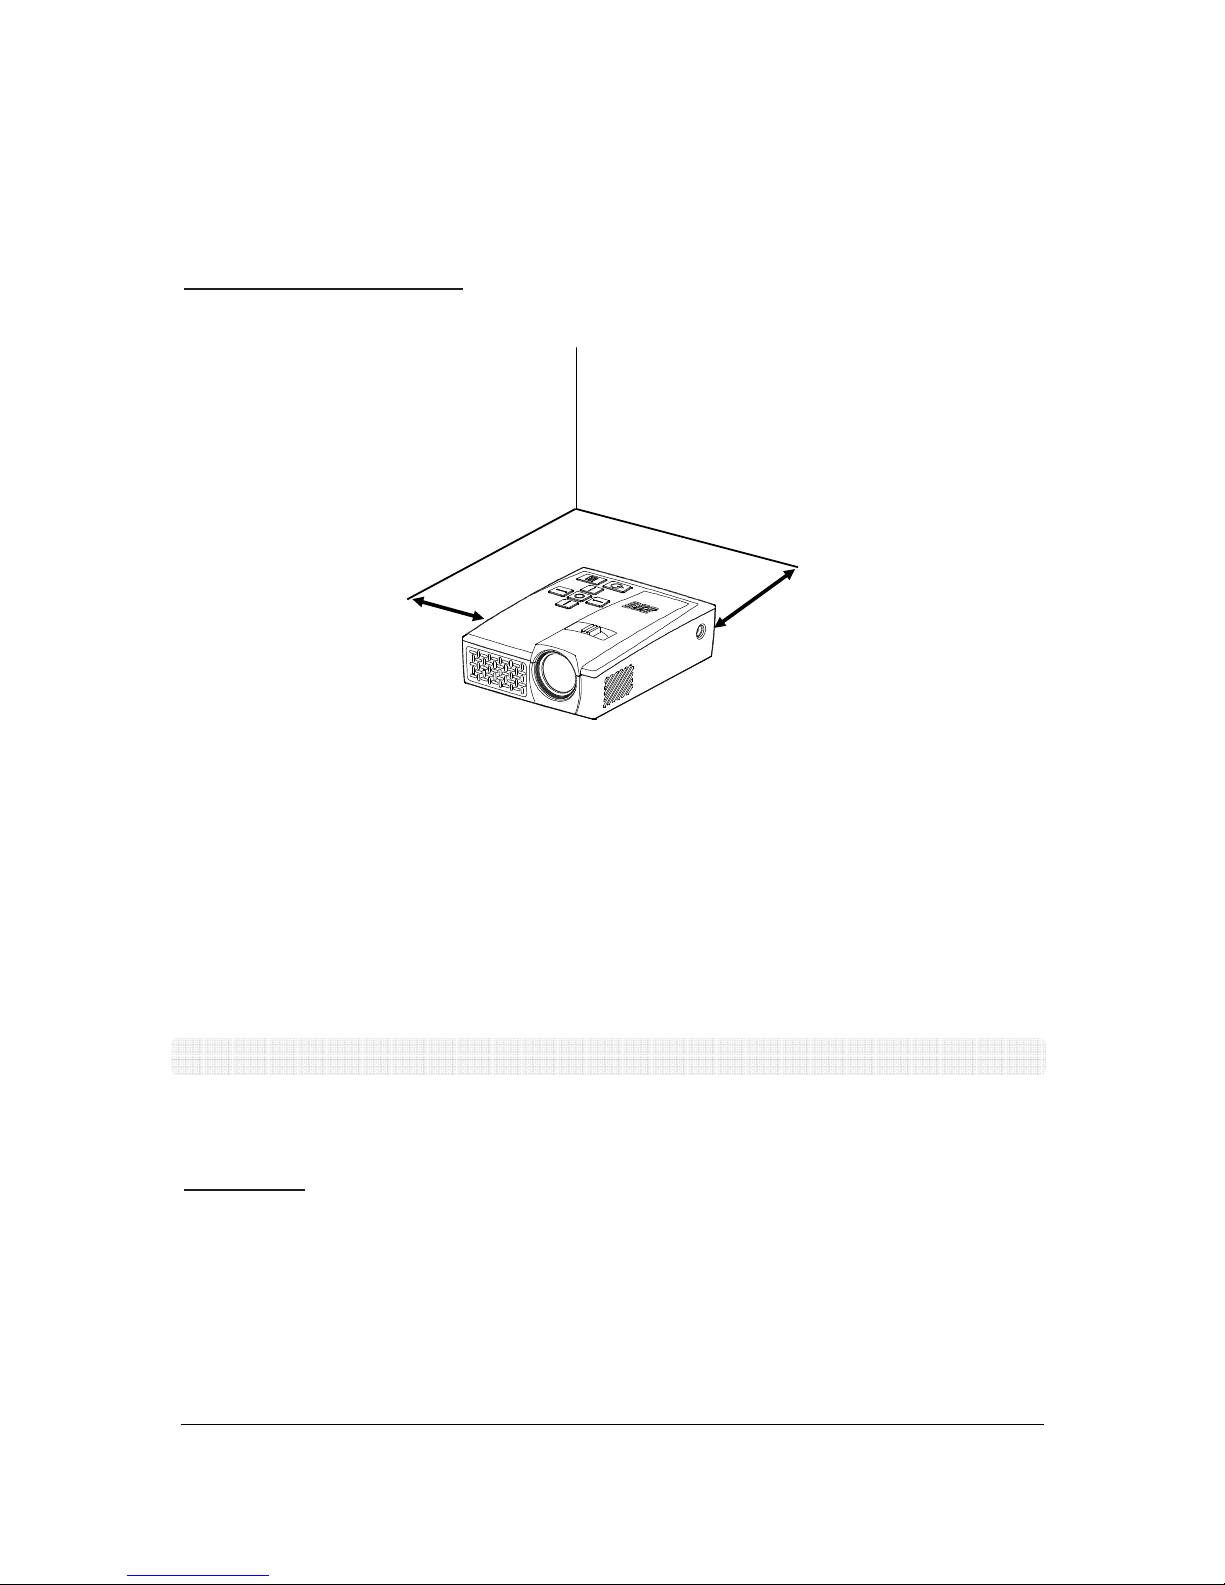
• Allow at least a 50cm clearance around the exhaust vents.
• Make sure intake vents do not recycle hot air from the exhaust vent.
• When operating the PROJECTOR in an enclosed space, make sure that the surrounding
air temperature within the enclosure does not exceed operating temperature while the
PROJECTOR is running, and the air intake and exhaust vents are unobstructed.
• All enclosures should pass a certified thermal evaluation to make sure that the
PROJECTOR does not recycle exhaust air, as this may cause the device to shut down
even if the enclosure temperature is with the acceptable operating temperature range.
• If the temperature of the PROJECTOR feels “hot” to the touch, discontinue use immediately.
Caution: Avoid using the PROJECTOR in dusty environments.
Power Safety
• Use the supplied adapter ONLY.
• The adapter cable should be unencumbered. Therefore, do not place anything on the
adapter cable and place it where it will not be in the way of foot traffic.
• When not in use for long periods of time, please remove the battery from the remote
control.
Minimum 50
cm
Minimum 50cm
Page 4

EPIC OPTIX, LLC
iv
PROJECTOR Maintenance
• Always unplug the cable before cleaning. See Cleaning the PROJECTOR.
Note: The PROJECTOR will be warm after usage. Allow PROJECTOR to cool down before
storing in an enclosed compartment.
Regulatory Warnings
Before installing and using the PROJECTOR, read the regulatory notices in the Regulatory
Compliance section.
Symbol Explanations
DISPOSAL: Do not use household or municipal waste collection services for
disposal of electrical and electronic equipment. EU countries require the use of
separate recycling collection services. Consult your local regulations before
disposing of this product.
Main Features
• Lightweight and easy to pack away and transport.
• Compatible with all major video standards including NTSC, PAL, and SECAM.
• High brightness rating allows for presentations in daylight or in lit rooms with
adjustments in projected image size.
• Supports data resolution up to UXGA at 16.7 million colors for impressively clear images.
• Flexible setup allows for front, rear, ceiling and rear ceiling projection positions.
• Direct projections are undistorted, with advanced keystone correction for angled
projections.
• Input sources are automatically detected.
About this User Manual
This publication is intended for end users and describes how to install and operate the
PROJECTOR. Wherever possible, relevant information—such as an illustration and its
description—has been kept on one page. This printer-friendly format is both for your
convenience and to help save paper, thereby protecting the environment. It is suggested that
you only print sections that are relevant to your needs or consult the Manual via online links.
Page 5

EPIC OPTIX, LLC
v
Table of Contents
Preface..................................................................................................................................................... i
Chapter 1. At a Glance............................................................................................................................
1
Overview............................................................................................................................................. 1
Accessories.......................................................................................................................................... 2
Remote Control................................................................................................................................... 4
PROJECTOR and Remote Control Buttons ............................................................................................ 4
Media Player Screen............................................................................................................................ 5
Chapter 2. Getting started......................................................................................................................
6
What You Need ................................................................................................................................... 6
Setting Up the PROJECTOR .................................................................................................................. 7
Chapter 3. PROJECTOR Media suite ......................................................................................................
13
Overview........................................................................................................................................... 13
Movies........................................................................................................................................... 14
Photos ...........................................................................................................................................15
Settings.......................................................................................................................................... 16
Chapter 4. On-Screen Display (OSD) Settings ........................................................................................
20
OSD Menu Controls ........................................................................................................................... 20
Chapter 5. Taking Care of Your PROJECTOR ..........................................................................................
24
Cleaning the PROJECTOR and Lens..................................................................................................... 24
Troubleshooting ................................................................................................................................ 24
Specifications ....................................................................................................................................26
Projection Distance vs. Projection Size............................................................................................... 27
PROJECTOR Dimensions..................................................................................................................... 27
Regulatory Compliance...................................................................................................................... 28
Disposal and Recycling....................................................................................................................... 28
Chapter 6 - Warranty Statement...........................................................................................................
29
Page 6
EPIC OPTIX, LLC
1
Chapter 1. At a Glance
Overview
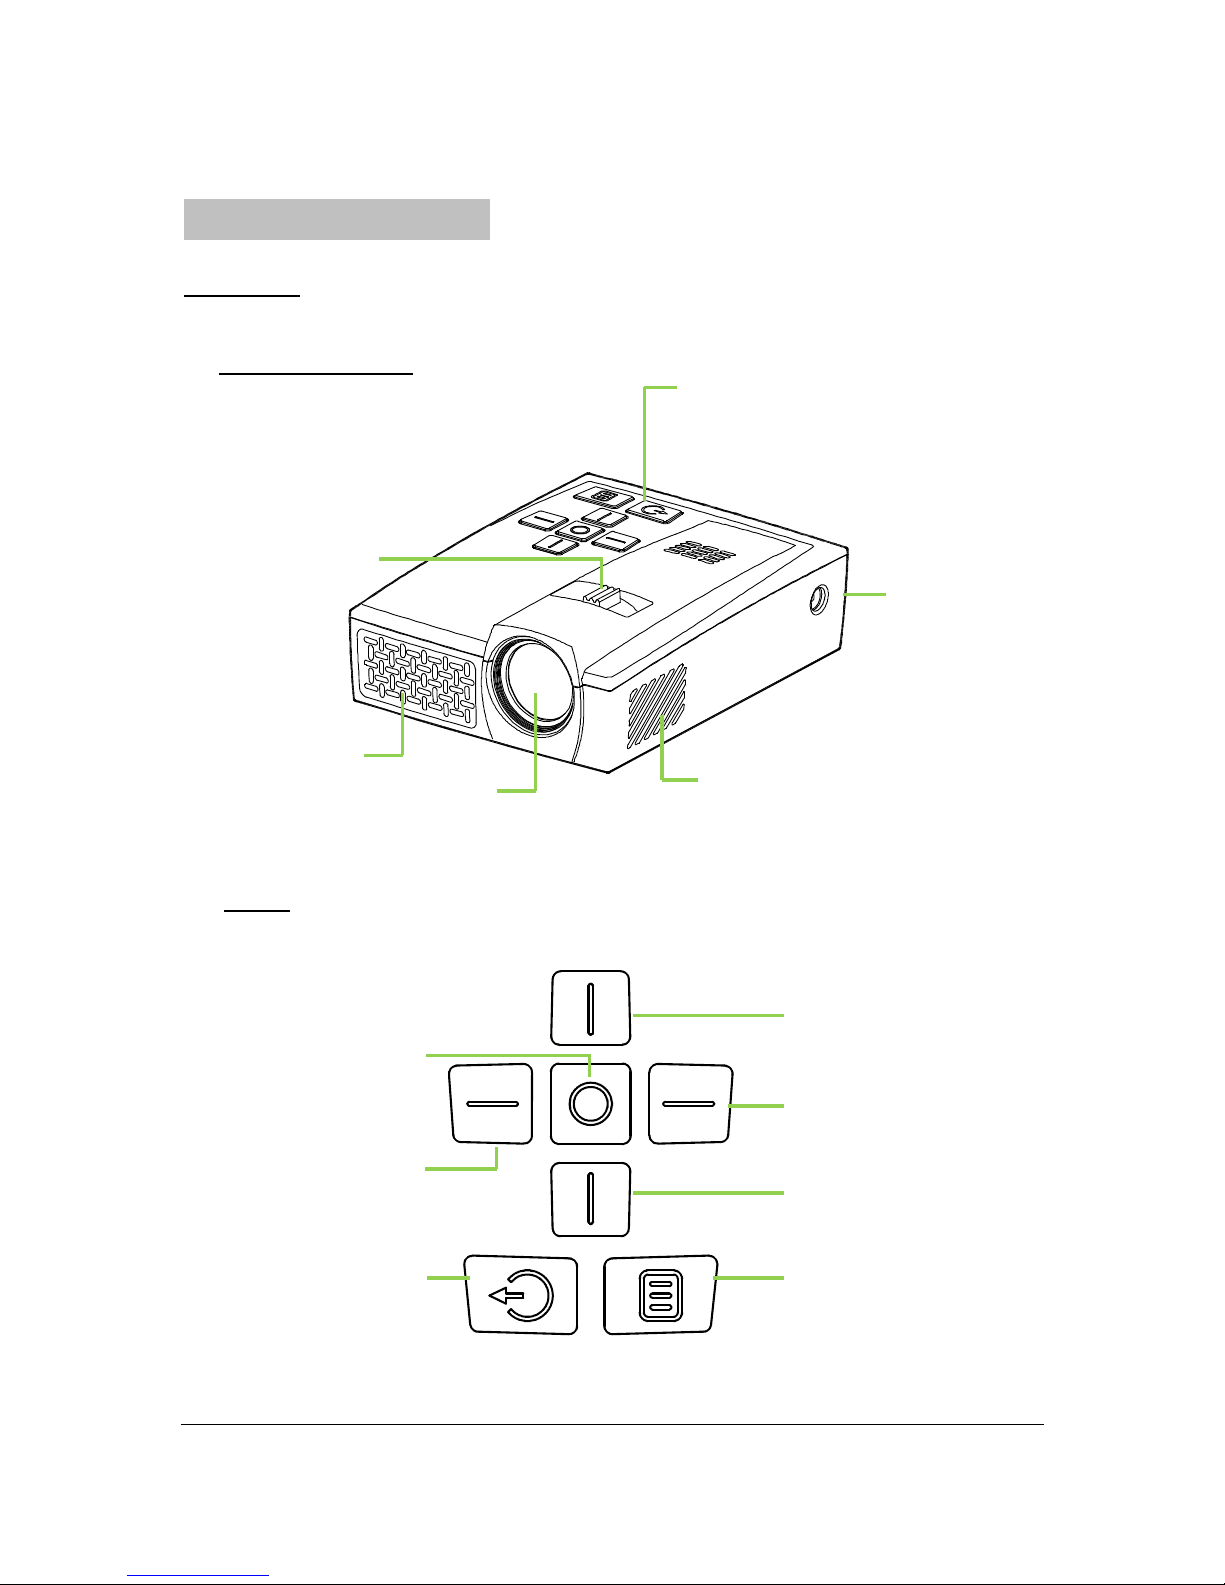
Front/Top/Right View
Keypad
Cooling Vent
Do not obstruct
Cooling Vent
Do not obstruct
DC IN
Connect the supplied power
adapter
Lens
Projection Lens
Focus Lever
Focus the
projected image
Keypad
Show the On-Screen Display (OSD)
Up Button
Navigate, change Source Menu and
increase Volume
Right Button
Navigate and change Mode Menu
Down Button
Navigate, change Source Menu and
decrease Volume
Menu Button
Show the On-Screen Display (OSD)
Select Button
Change settings
Exit Button
Exit or Go Back
Left Button
Navigate and change Mode
Menu
Page 7
EPIC OPTIX, LLC
2
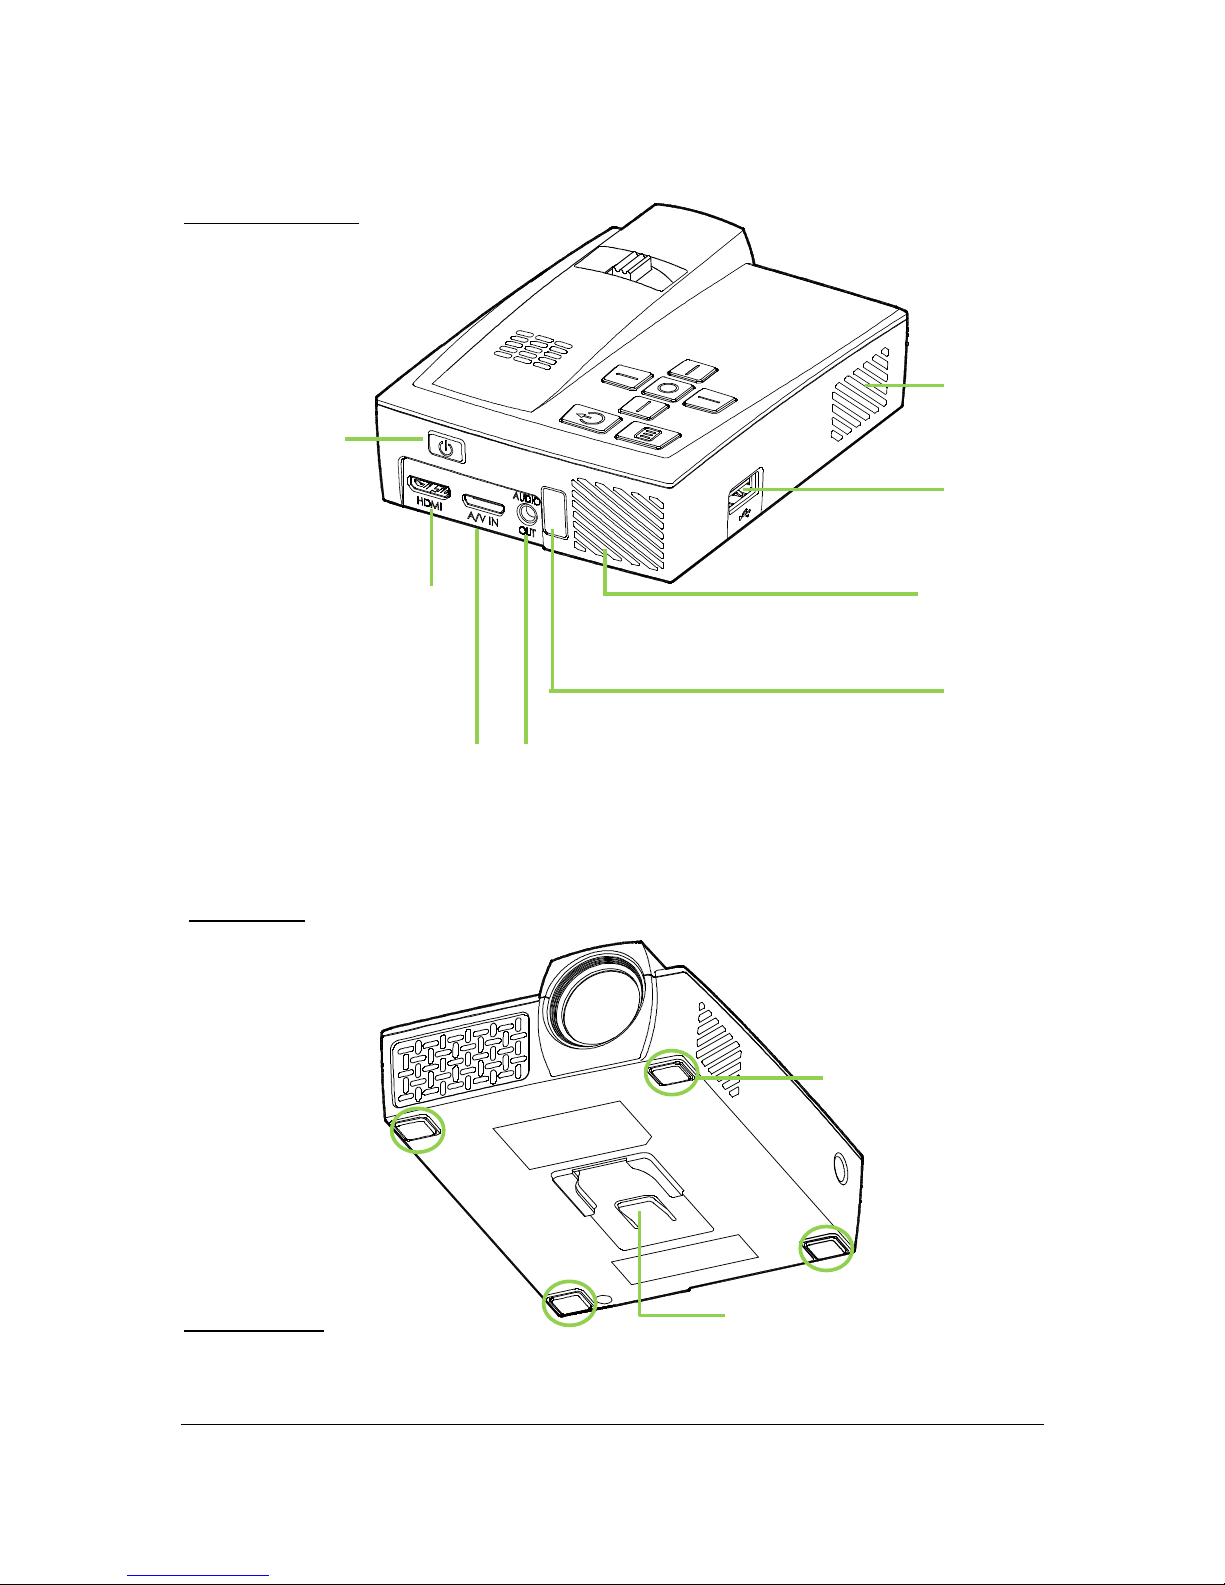
Rear/Top/Left View
Bottom View
Accessories
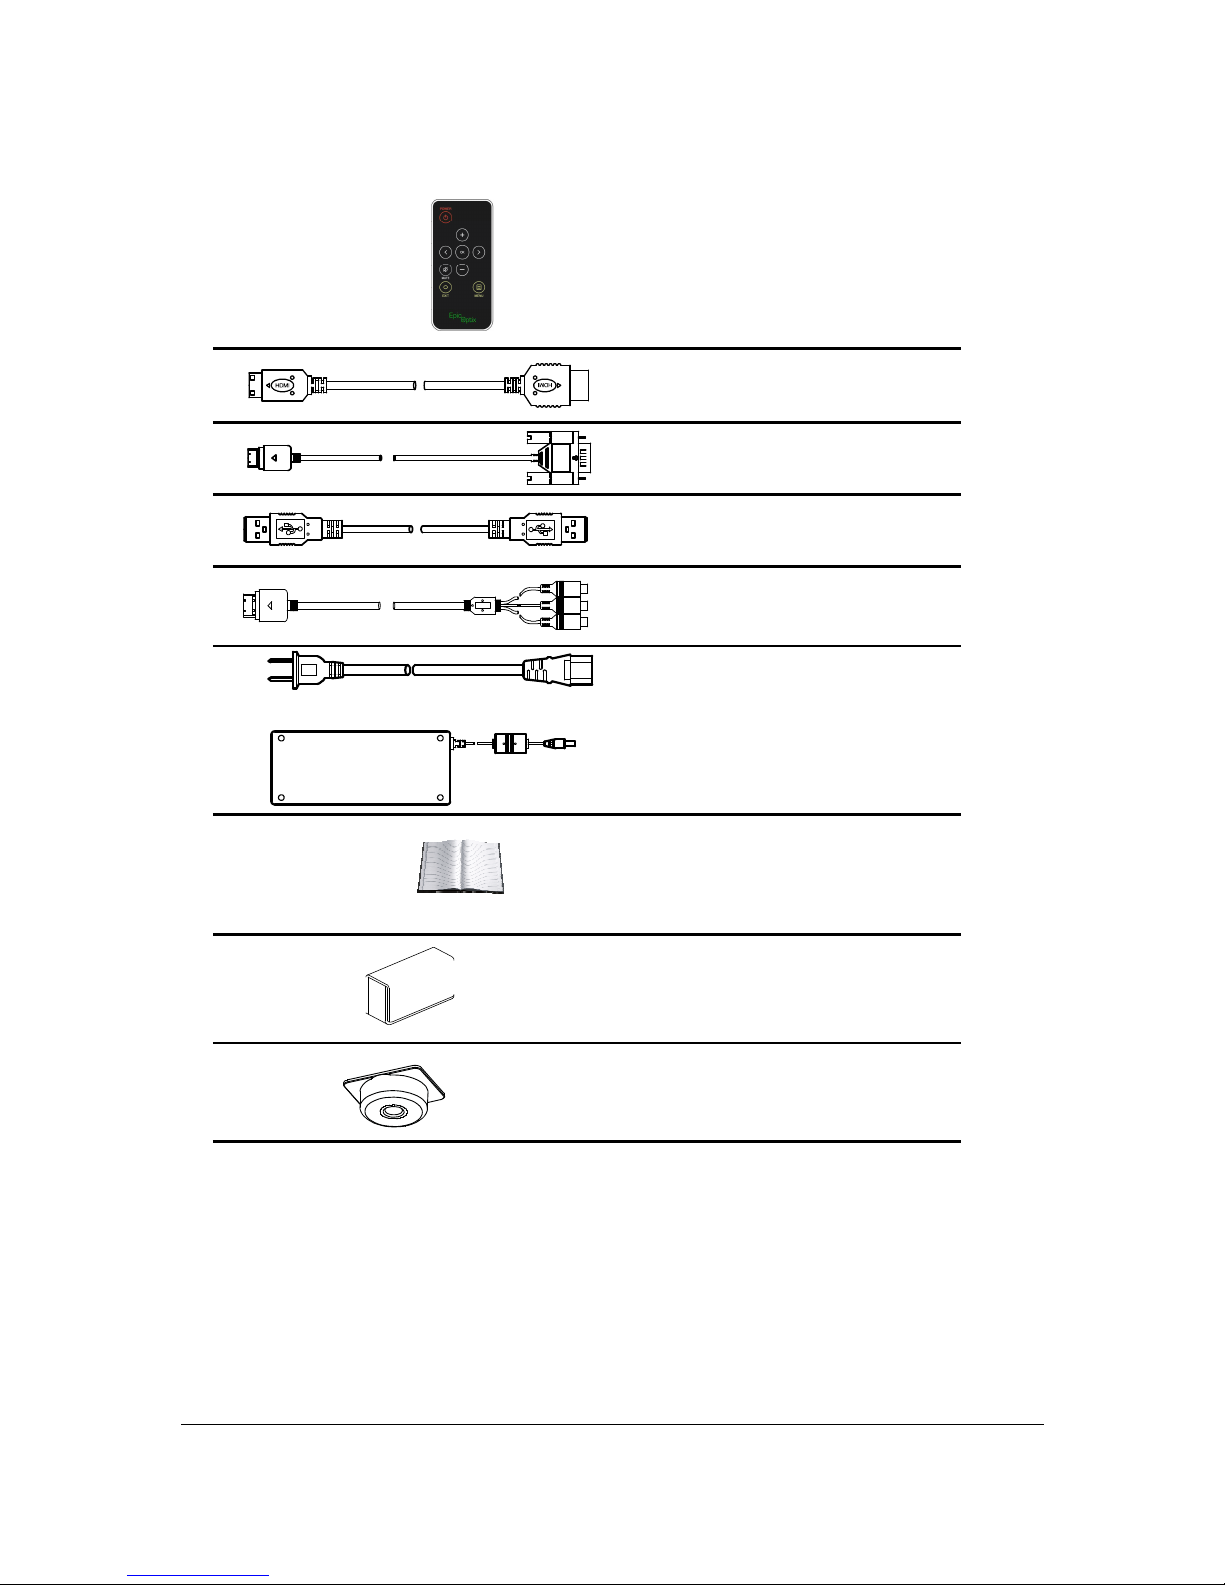
The following accessories are included with the PROJECTOR:
Cooling Vent
Do not obstruct
USB
Connect USB drive or
Device
Cooling Vent
Do not obstruct
IR Receiver
Receive IR signal from
remote control
Audio Out
Connect audio cable to speakers or
headphones
Power Button
Turn on/off the
PROJECTOR
A/V IN
Connect VGA or A/V cable from a
device
Mini HDMI
Connect Mini HDMI cable
from HDMI device
Rubber Foot Pad
Stabilize and vent
Tr
ipod Adaptor
Slot
Stabilize and vent
Page 8
EPIC OPTIX, LLC
3
Remote Control
(One 3V CR2025 battery included)
Mini HDMI to Standard HDMI Cable
VGA Cable
USB Cable
Audio / Video Cable
Regional Power Cord and
Power Adapter
Documentation Kit
(Quick Start Guide, Warranty Card)
Carrying Case
Tripod Adapter
If any items are missing, appear damaged, or if the unit does not work, please contact your dealer
immediately . It is recommended that you keep the original packing material should you ever need
to return the equipment for warranty service.
Page 9
EPIC OPTIX, LLC
4
Remote Control
PROJECTOR and Remote Control Buttons
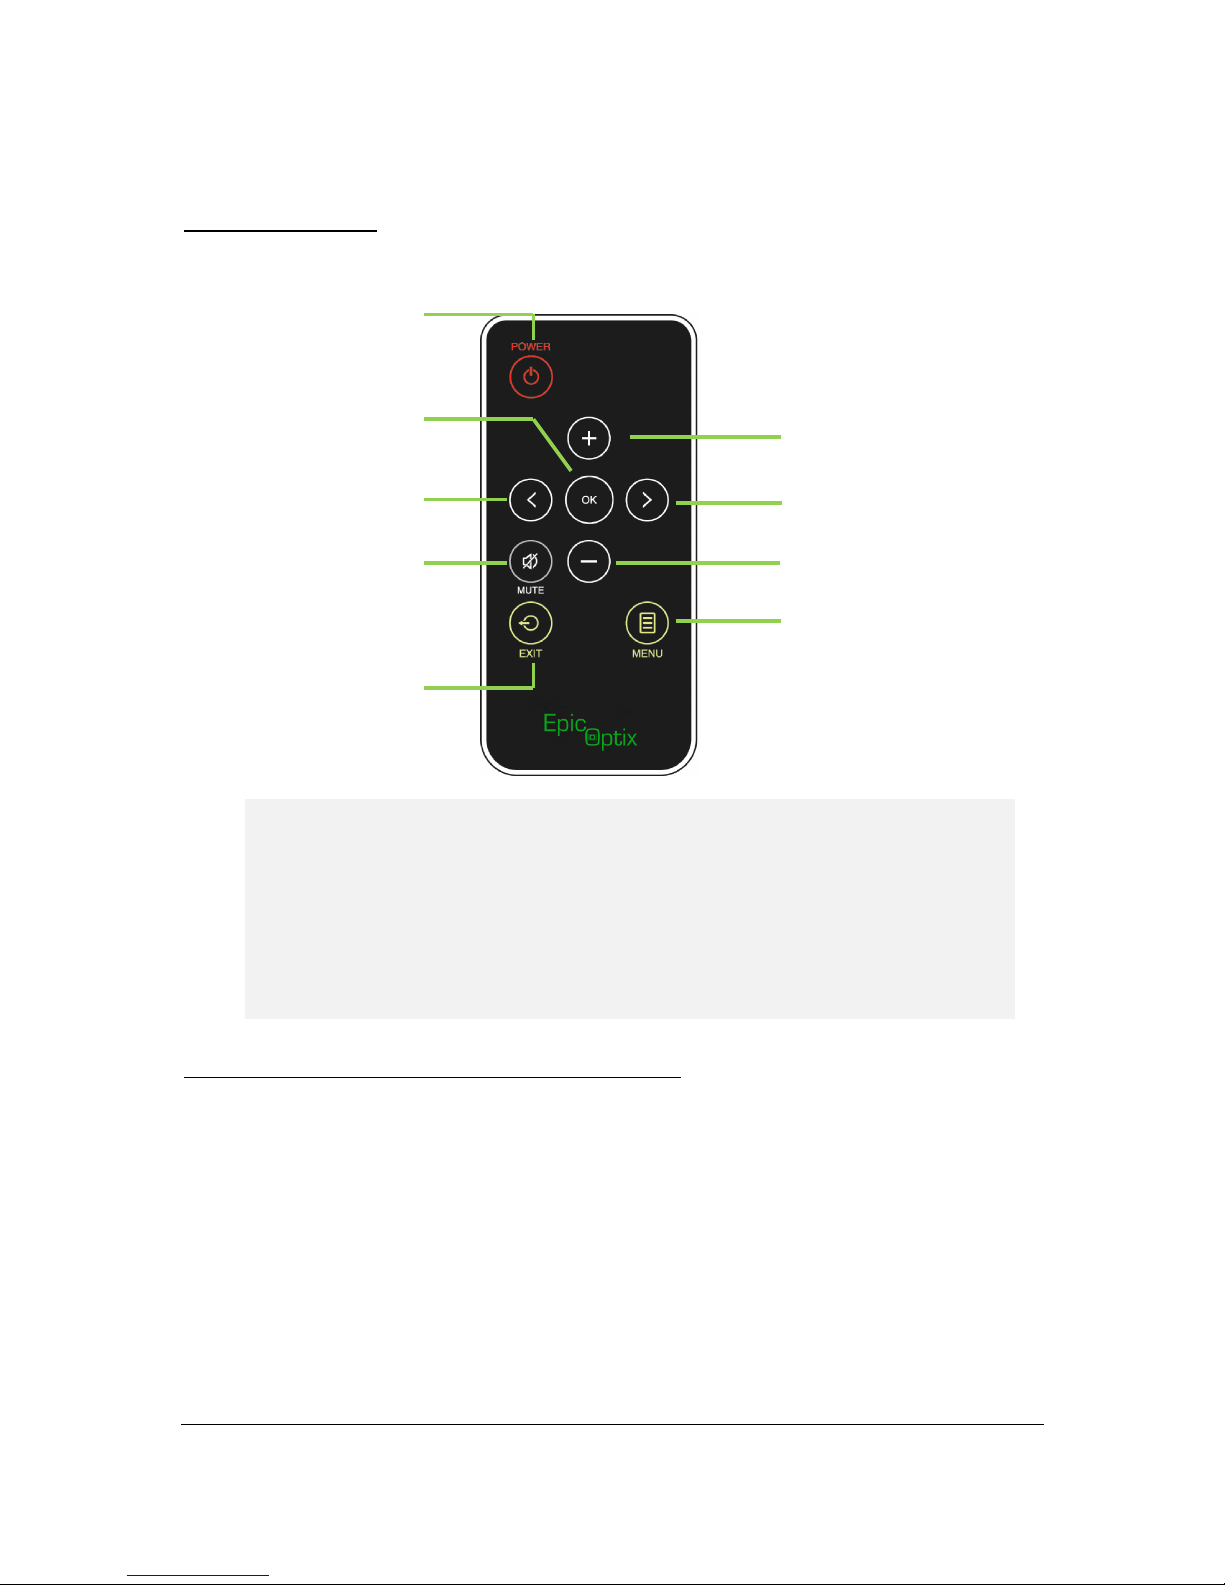
The PROJECTOR can be operated using the remote control or the keypad located on top of
the PROJECTOR. All operations can be performed with the remote control.
The remote control is used to navigate the cursor in the menus and can also be used to
operate the media functions. For more details regarding how to control the media
functions using the remote control, please refer to “Remote Control” section above.
Up Button
Navigate, change Source Menu and
increase Volume
Right Button
Navigate and change Mode Menu
Down Button
Navigate, change Source Menu and
decrease Volume
Menu Button
Show the On-Screen Display (OSD)
Select Button
Change settings
Exit Button
Exit or Go Back
Left Button
Navigate and change Mode
Menu
Power Button
Turn on/off the
PROJECTOR
Mute Button
Mute built-in
speaker
Important:
1. Be sure nothing obstructs the path between the remote control and the PROJECTOR. If
the path between the remote control and the PROJECTOR is obstructed, the signal may be
blocked.
2. The buttons and keys on the PROJECTOR have the same layout and similar functions as
the corresponding buttons on the remote control. This User Manual describes the
functions based on the remote control.
Page 10

EPIC OPTIX, LLC
5
Media Player Screen
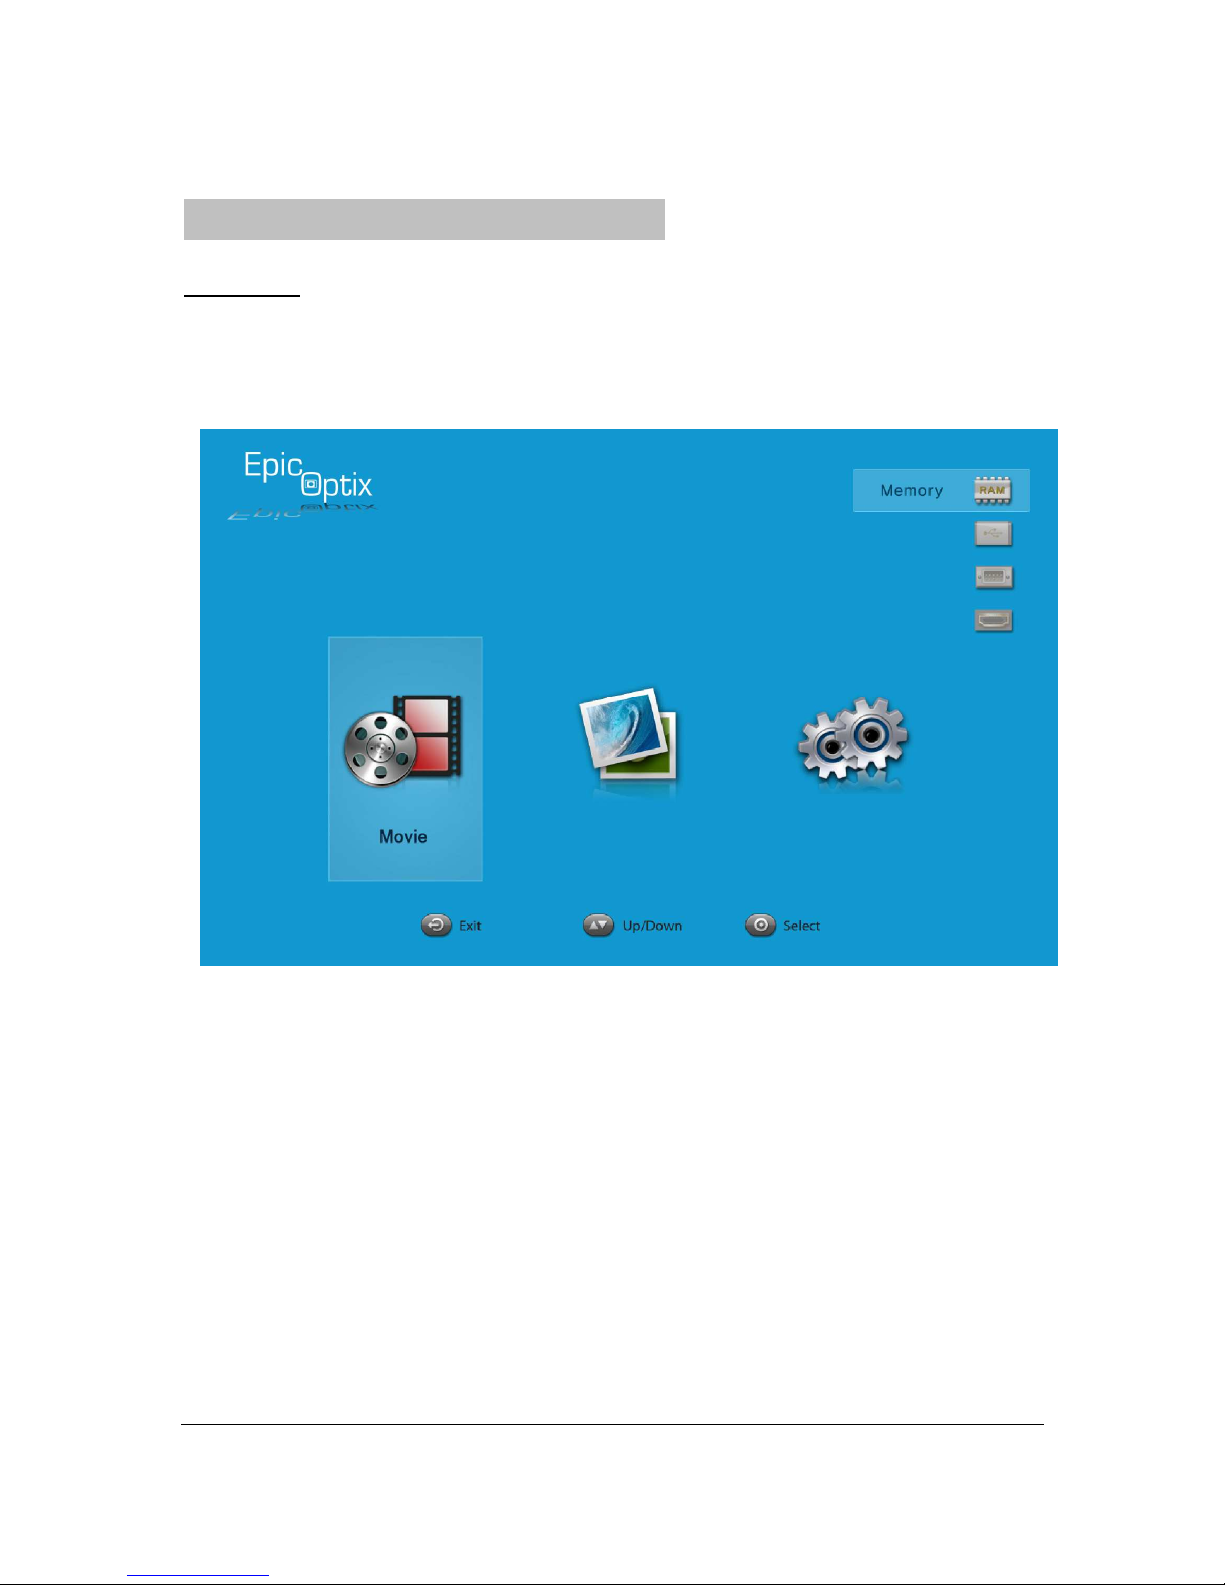
The media player screen is the main user interface for the PROJECTOR.
When the power cable is plugged into the PROJECTOR, the media player screen will appear.
In the media player screen, you can choose the type of media to exhibit by selecting:
• Movie – Supports multiple movie formats.
• Photo – Contains slide show functionality.
• Settings – Adjusts PROJECTOR media choice.
Page 11
EPIC OPTIX, LLC
6
Chapter 2. Getting started
What You Need
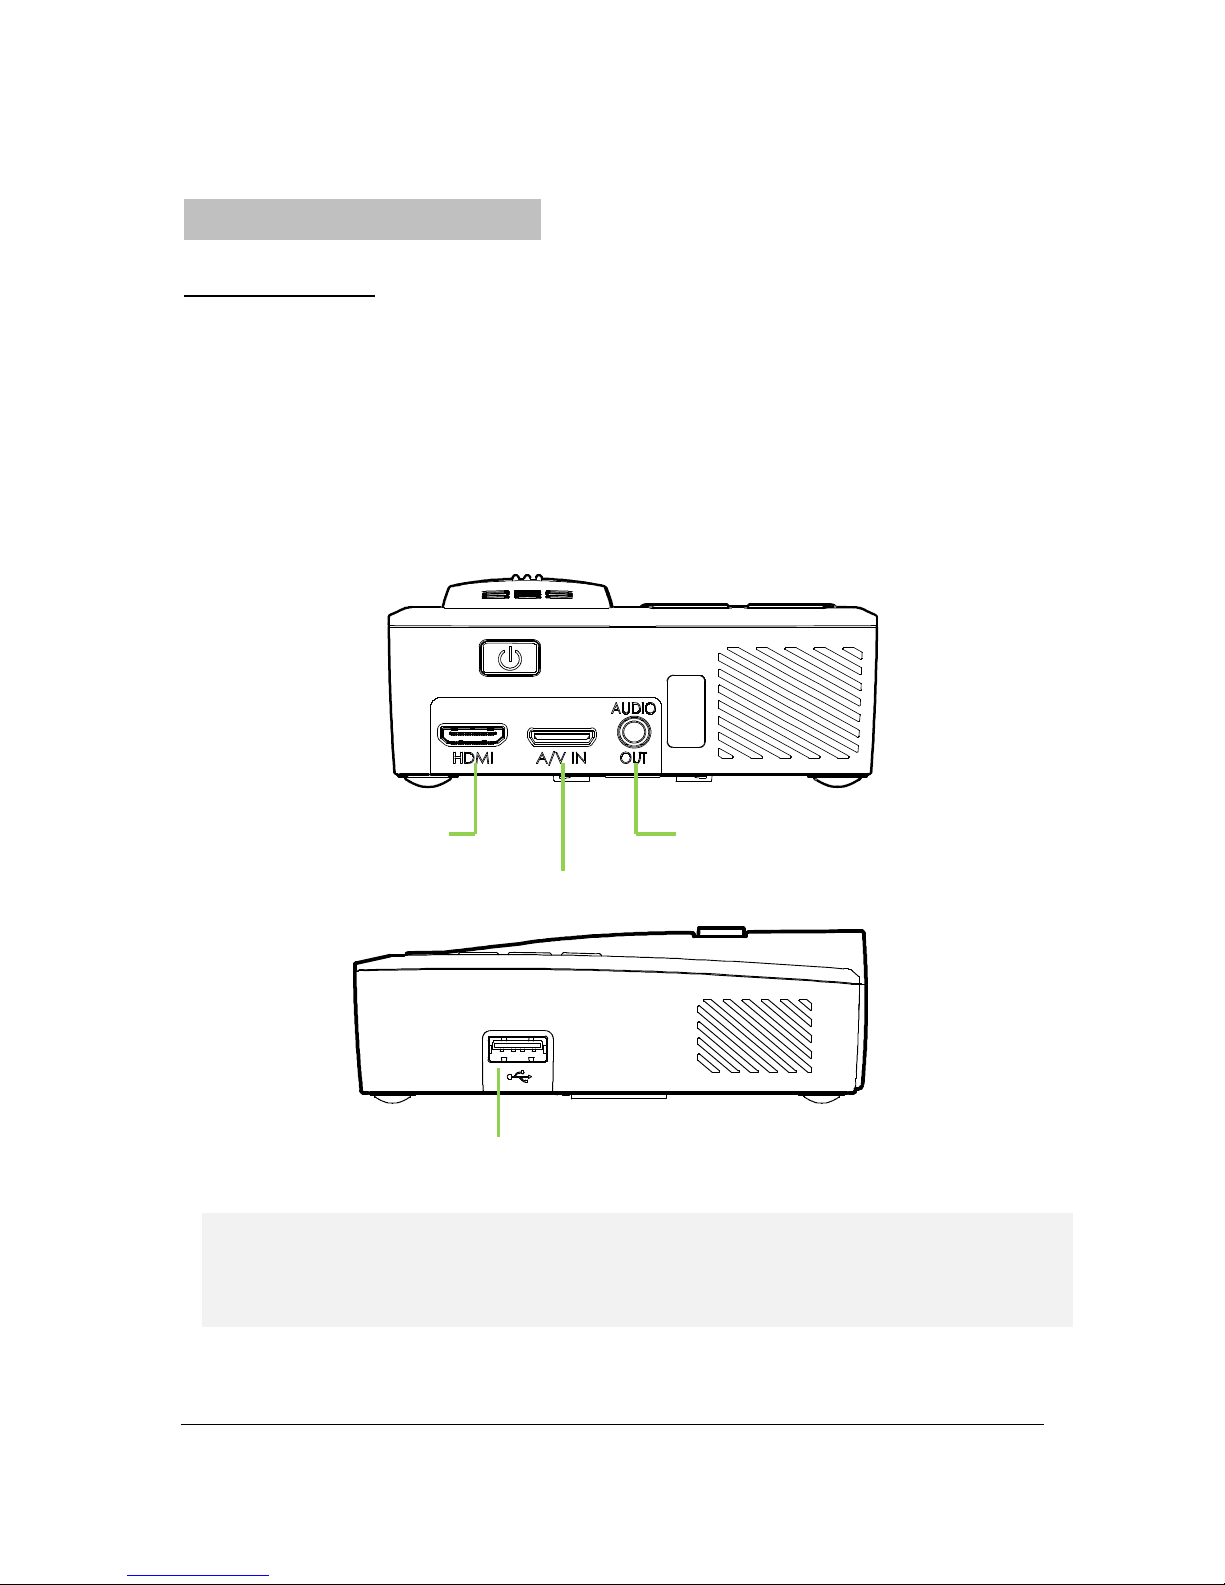
Several external devices and peripherals can be connected to the PROJECTOR. DVD, VCD
and VHS players can be connected to play movies/video. Camcorders and digital cameras
can also be used to play videos and display photos. Computers and peripherals, such as USB
drives, can be connected to show documents, presentations and other types of media.
These devices can be connected to the PROJECTOR by using the appropriate cable. Make
sure the connecting device has an appropriate output connector.
Connect HDMI
peripherals
Connect video or
Personal Computers (PC)
Connect audio
Connect USB device
Warning:
As a safety precaution, disconnect all power and devices to the PROJECTOR before making
connections.
Page 12
EPIC OPTIX, LLC
7
Setting Up the PROJECTOR
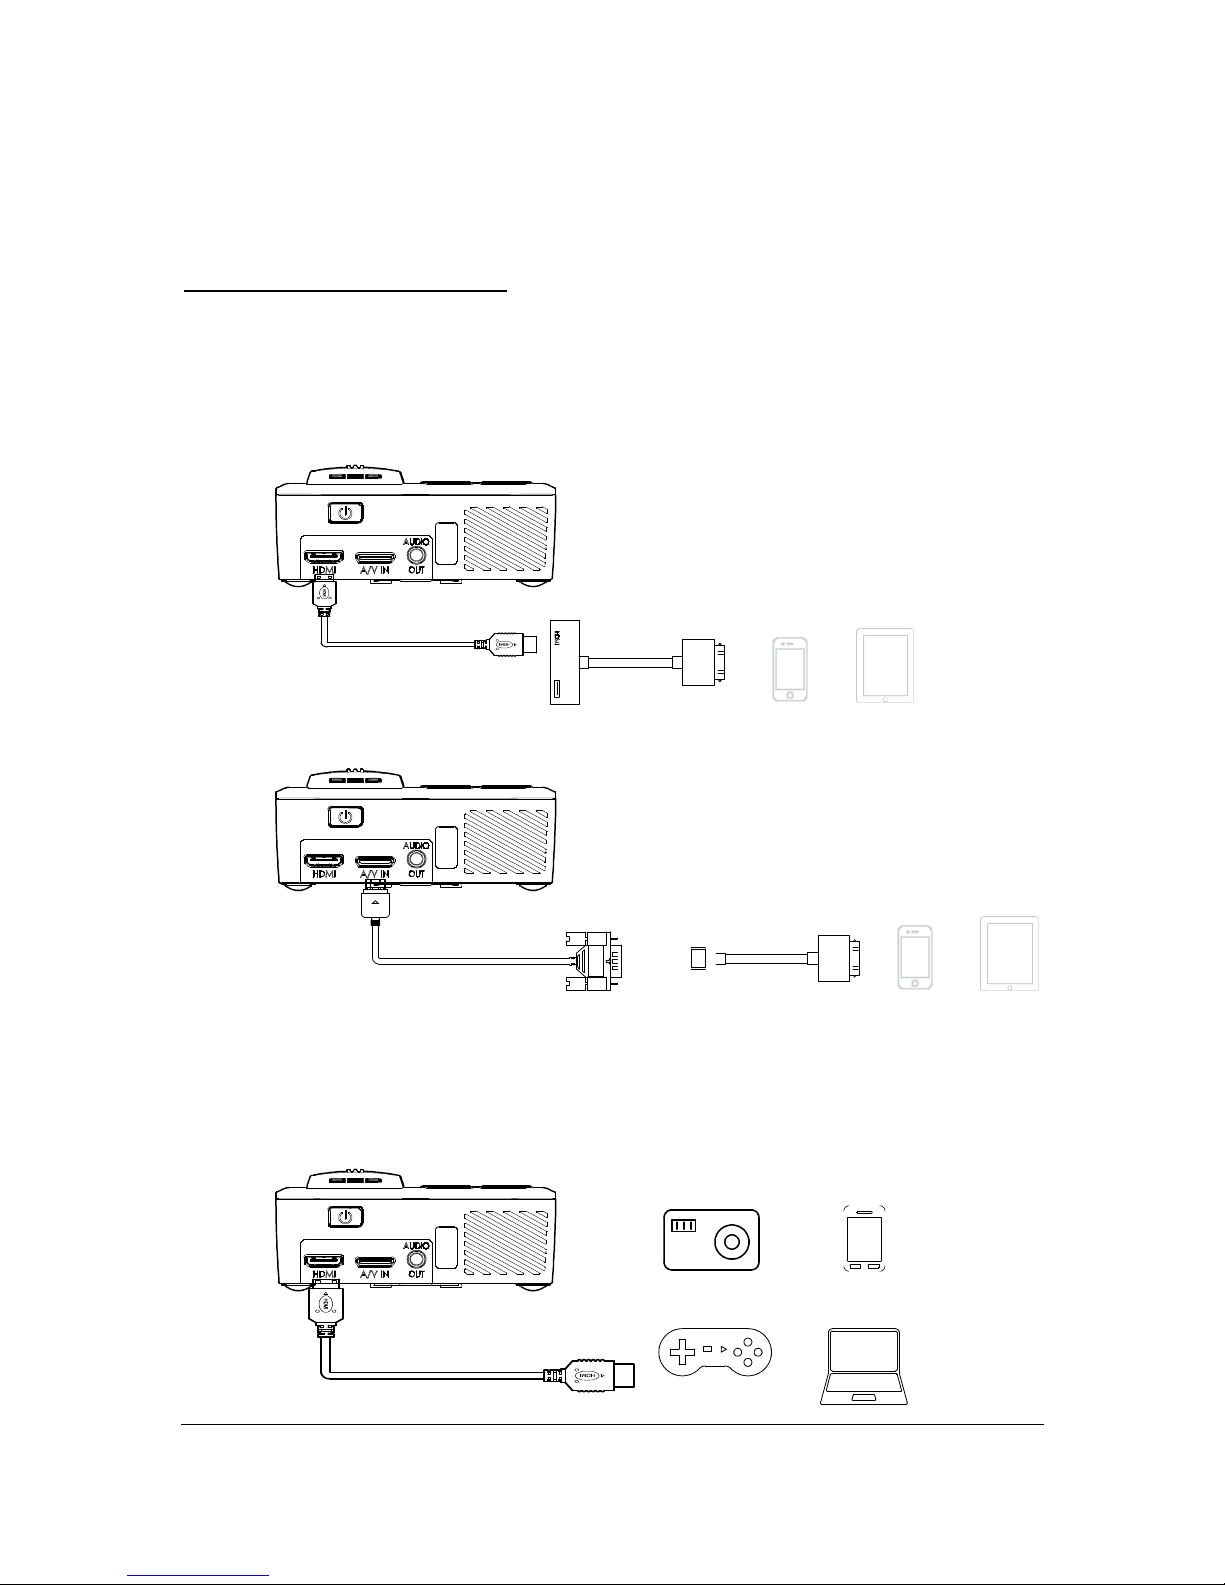
- Connecting Apple® Devices
Connect an Apple® device to the PROJECTOR by using the following:
Mini HDMI to Apple® HDMI Adapter (not included)
VGA to Apple® Video Adapter (not included)
- Connecting Peripherals by HDMI
Connect HDMI-compatible peripherals to the PROJECTOR using the Mini HDMI to
Standard HDMI cable.
iPhone® iPad®
iPhone® iPad®
Digital Camera
Smart Phone
Game Console
Personal
Computer (PC)
Page 13
EPIC OPTIX, LLC
8
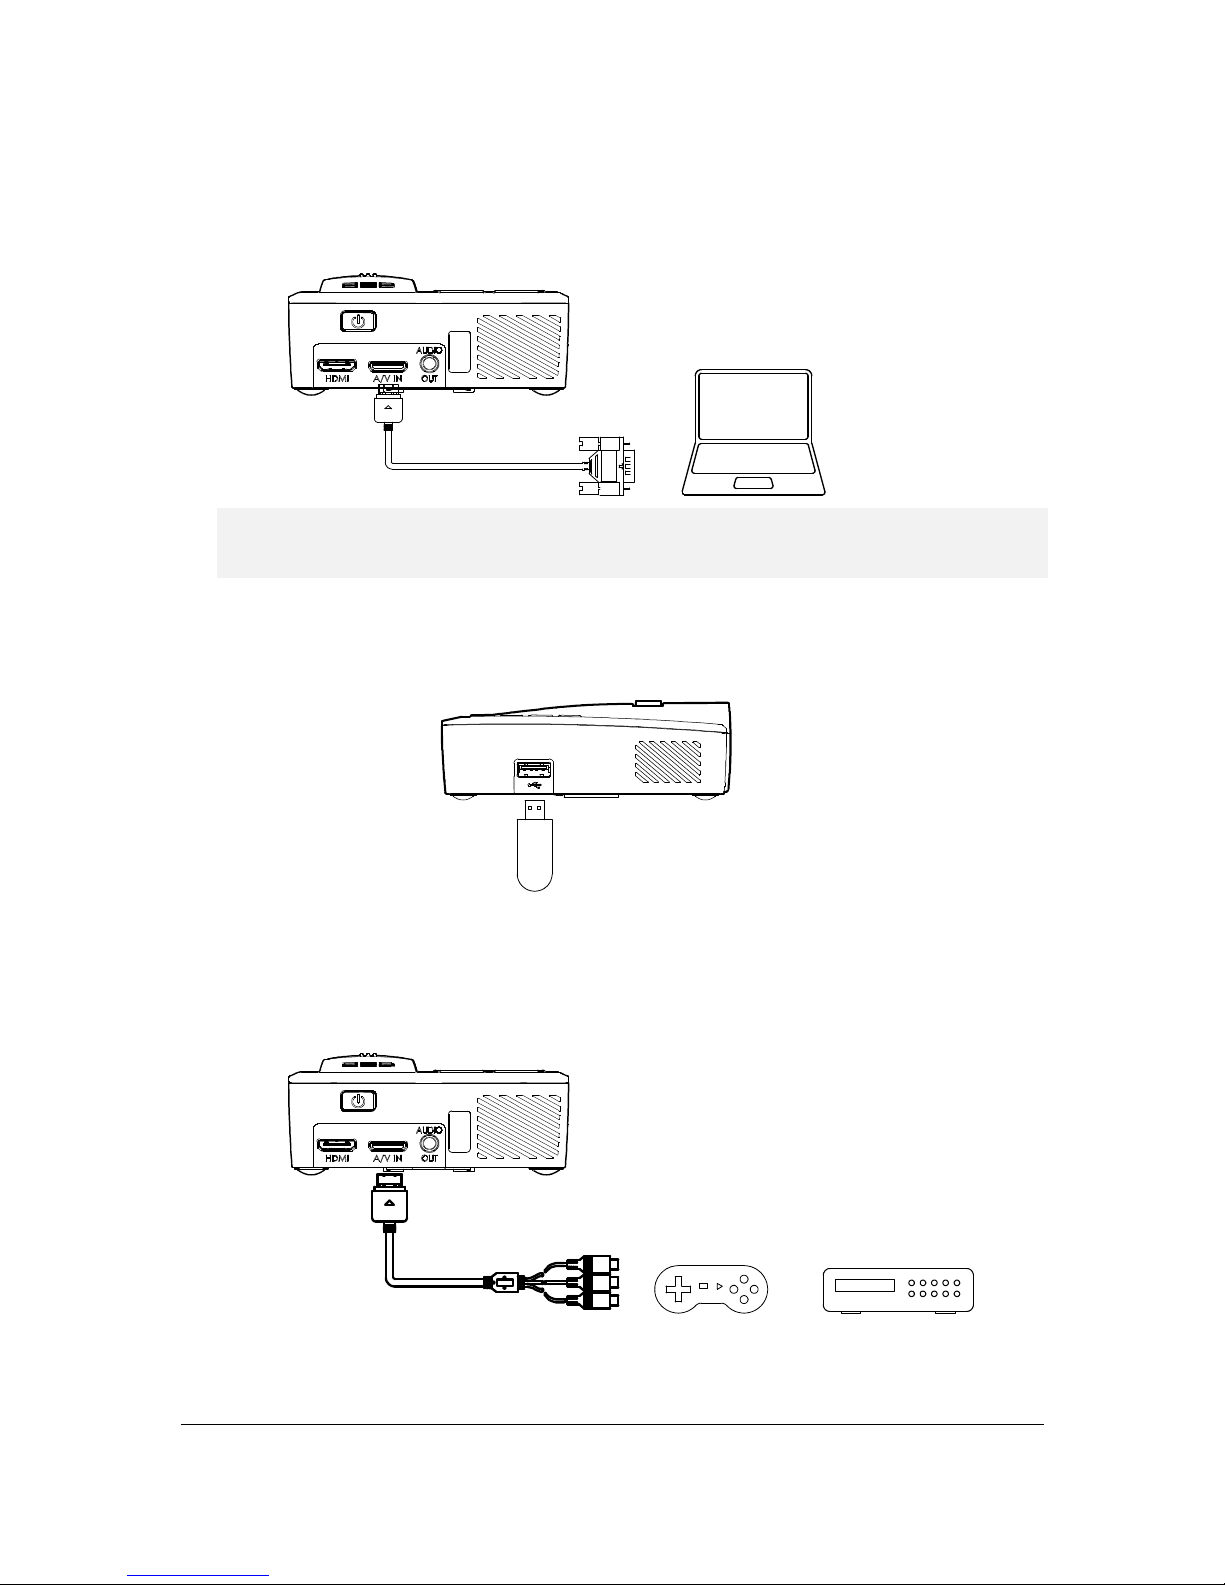
- Connecting Your Personal Computer (PC)
Connect a personal computer (PC) to the PROJECTOR by using the VGA cable.
- Inserting a USB Drive
Connect a USB drive to the PROJECTOR by inserting the storage device into the USB port.
- Connecting Video
Connect video devices to the PROJECTOR by using the audio/video cable.
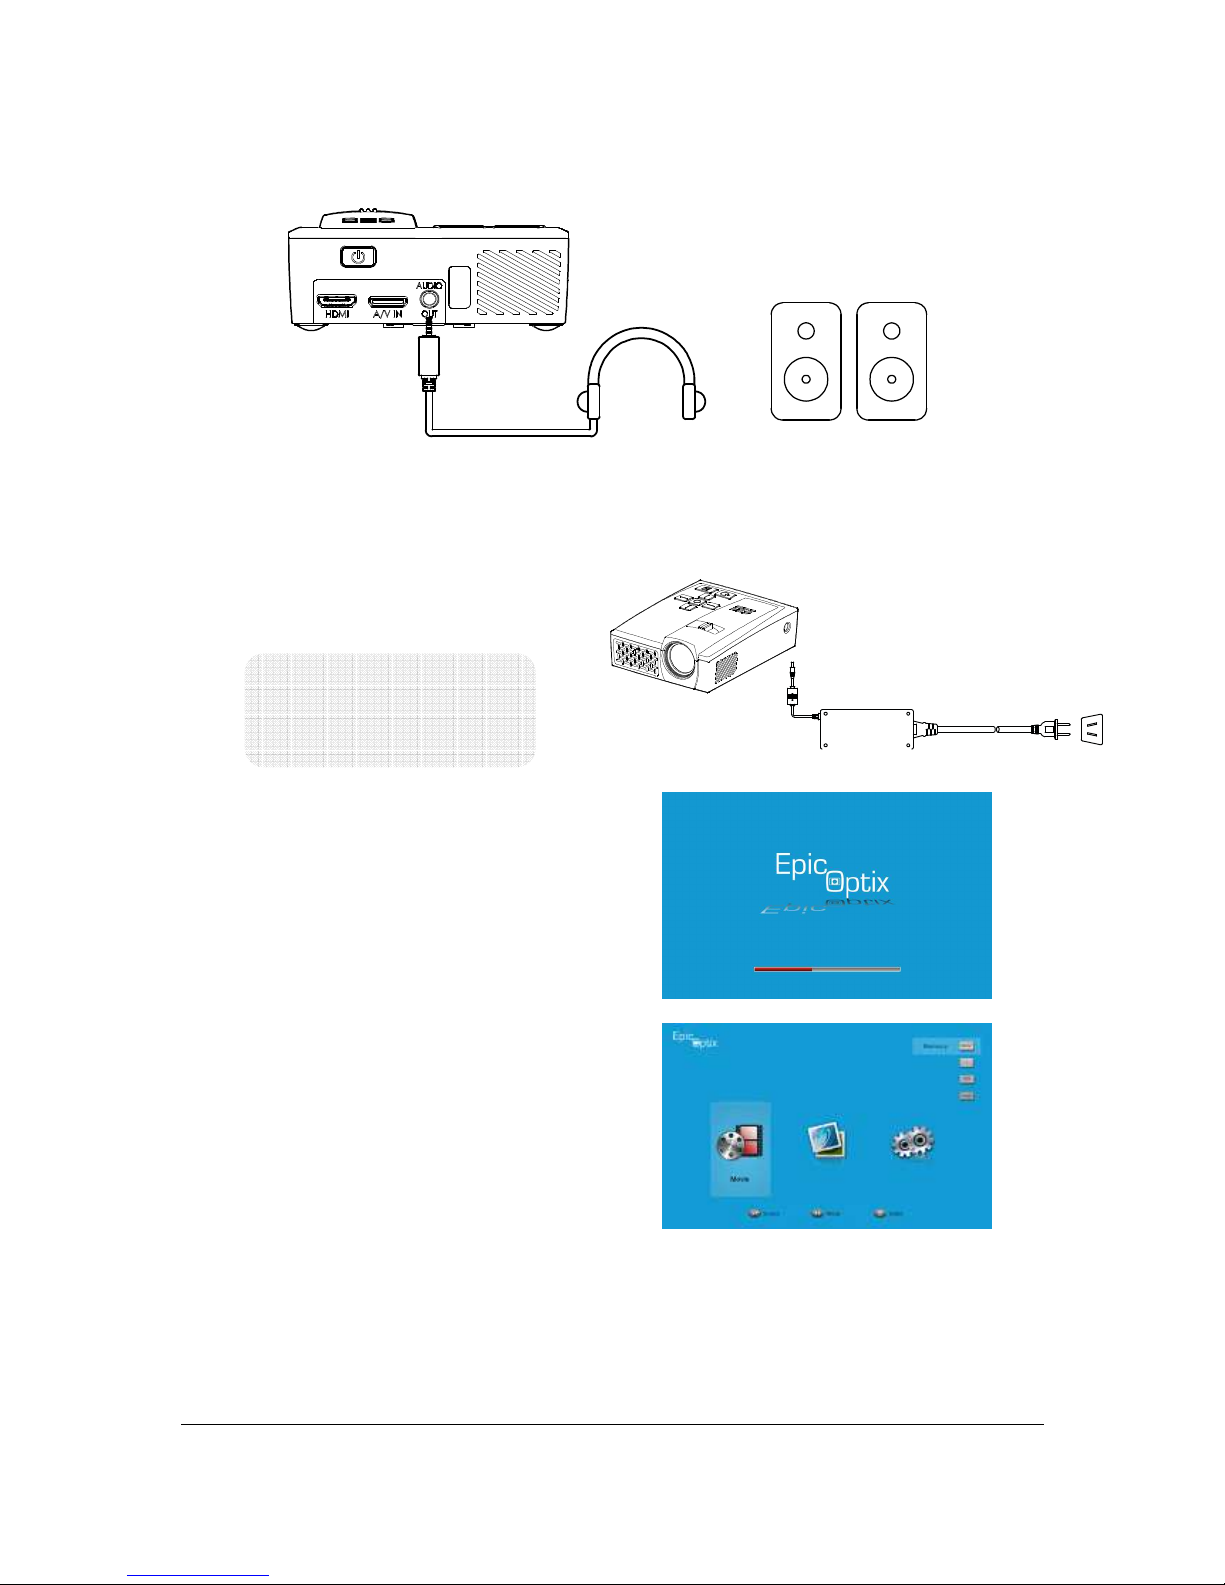
- Connecting Audio
Connect earphones or speakers to the PROJECTOR via the Audio Out port.
Personal Computer (PC)
Game Console
Video or DVD
player
Note:
The personal computer (PC) must have a VGA output port.
Page 14
EPIC OPTIX, LLC
9
- Starting and turning off the PROJECTOR
1.
Connect the AC power adapter to
the PROJECTOR. Connect the opposite end
of the AC power adapter to a wall
outlet.
Note:
Adapter models may vary
between regions.
2.
The PROJECTOR splash screen will appear,
followed by the Media Player screen.
The Media Player screen will show which
connected device is detected.
Earphone
Speaker
Page 15
EPIC OPTIX, LLC
10
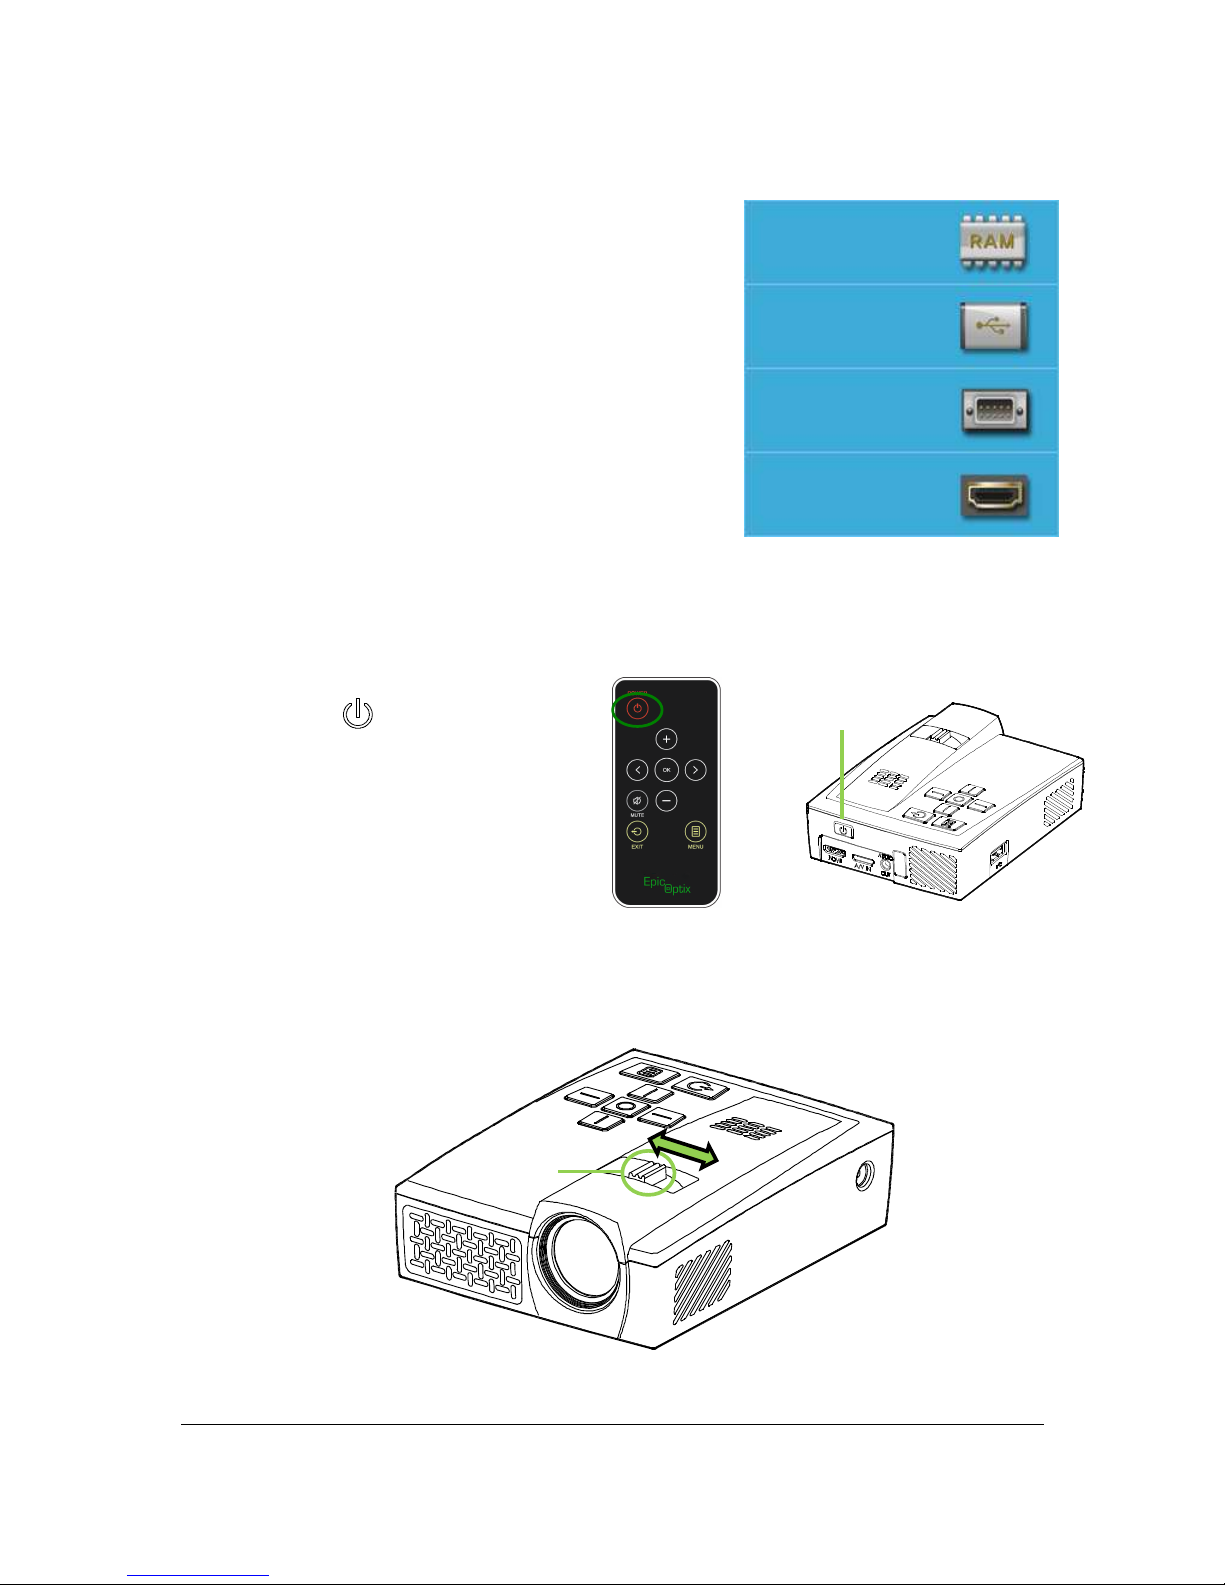
3.
If more than one input device is
connected, press the ▲ or ▼ buttons
either on the remote control or on the Keypad
to make your selection.
• Memory : 2 Gb Internal Memory in the PROJECTOR.
• USB : USB device.
• PC/Video : A/V(Composite Video) and VGA
• HDMI : HDMI / DVI
4.
Press the POWER button
on the remote control or the power
button on the back of the projector
to turn off the PROJECTOR.
- Adjusting the Image
If the projected image is not in focus, the image can be adjusted by moving the focus lever
left or right until the image is clear.
POWER
off
button
Focus Lever
Memory
USB
PC/Video
HDMI
Page 16
EPIC OPTIX, LLC
11
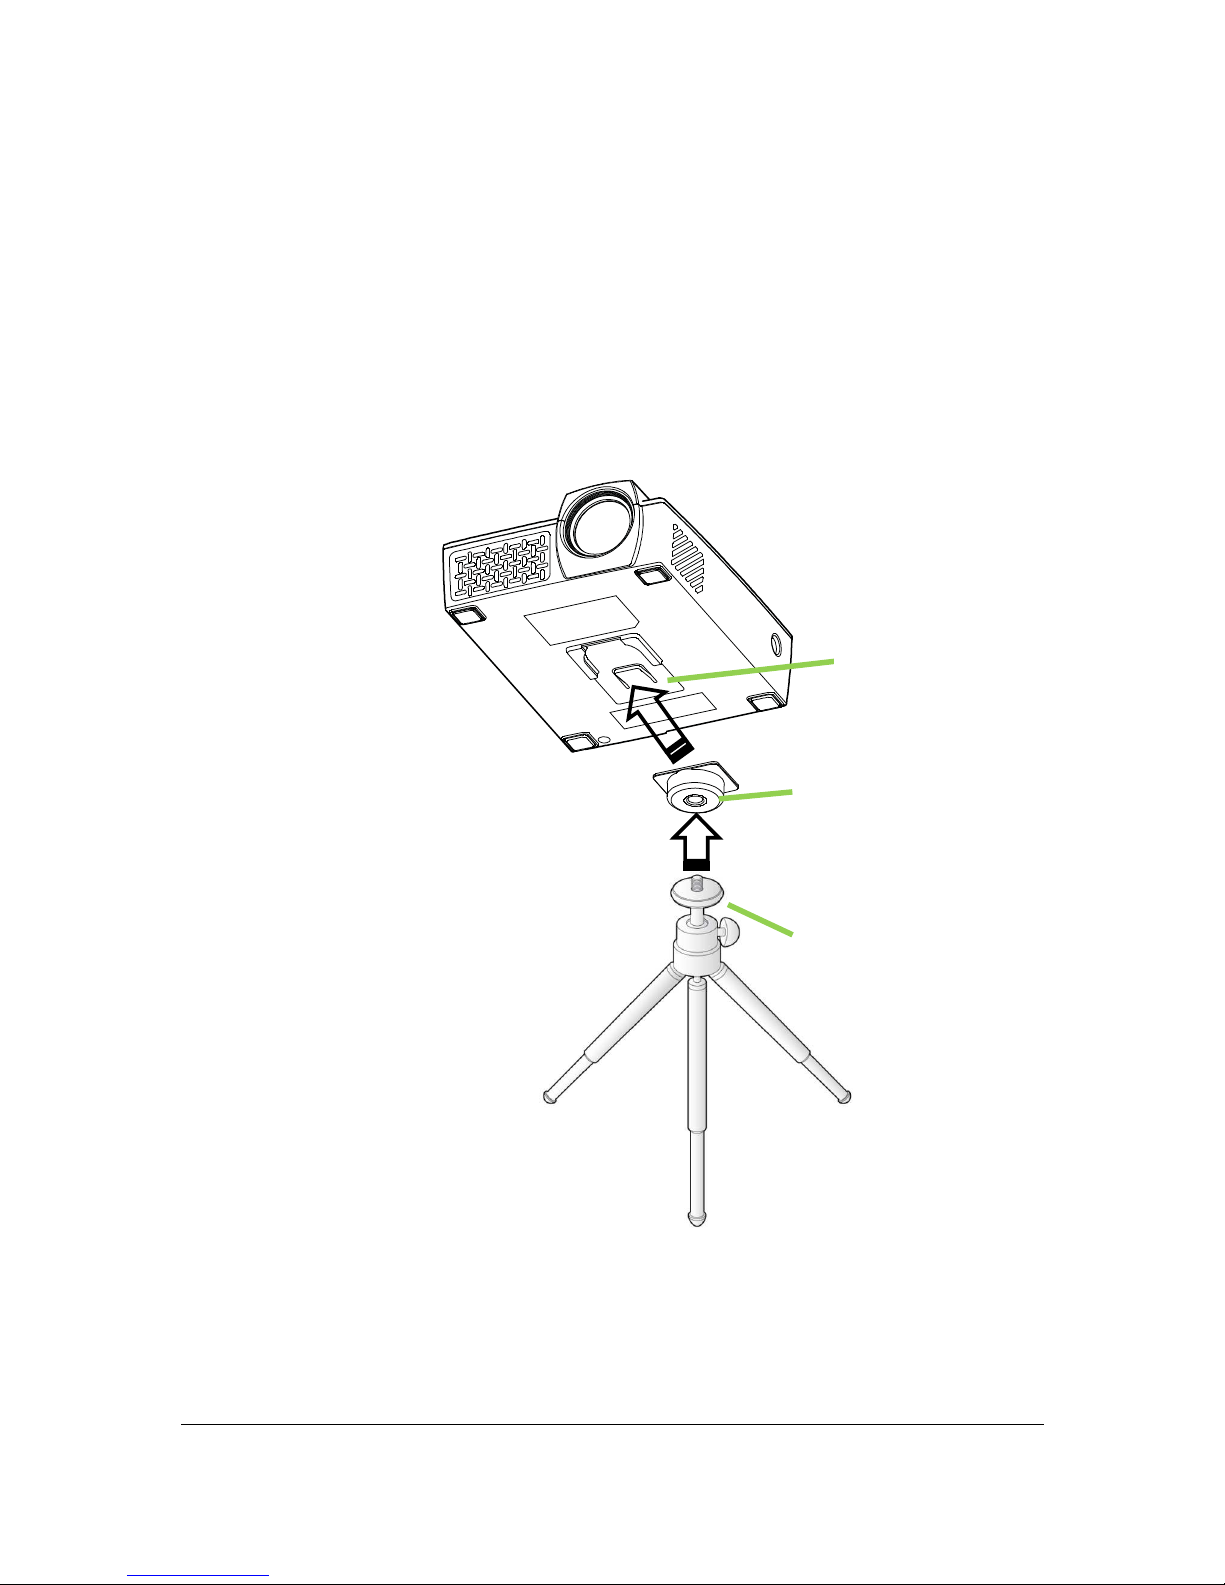
- Using a Tripod
The PROJECTOR can be used with a tripod. Connect the tripod adapter accessory
(included ) to the bottom of the projector by sliding it into the Tripod Adapter Slot until it
locks in place.
Several universal tripods can then be threaded in place*.
*Supported Tripod Specifications:
• Type: Mini tripod
• Slot size: 1/4-20 L6.3 mm
Tripod adapter accessory
Your tripod
Tripod Adapter Slot
Page 17
EPIC OPTIX, LLC
12
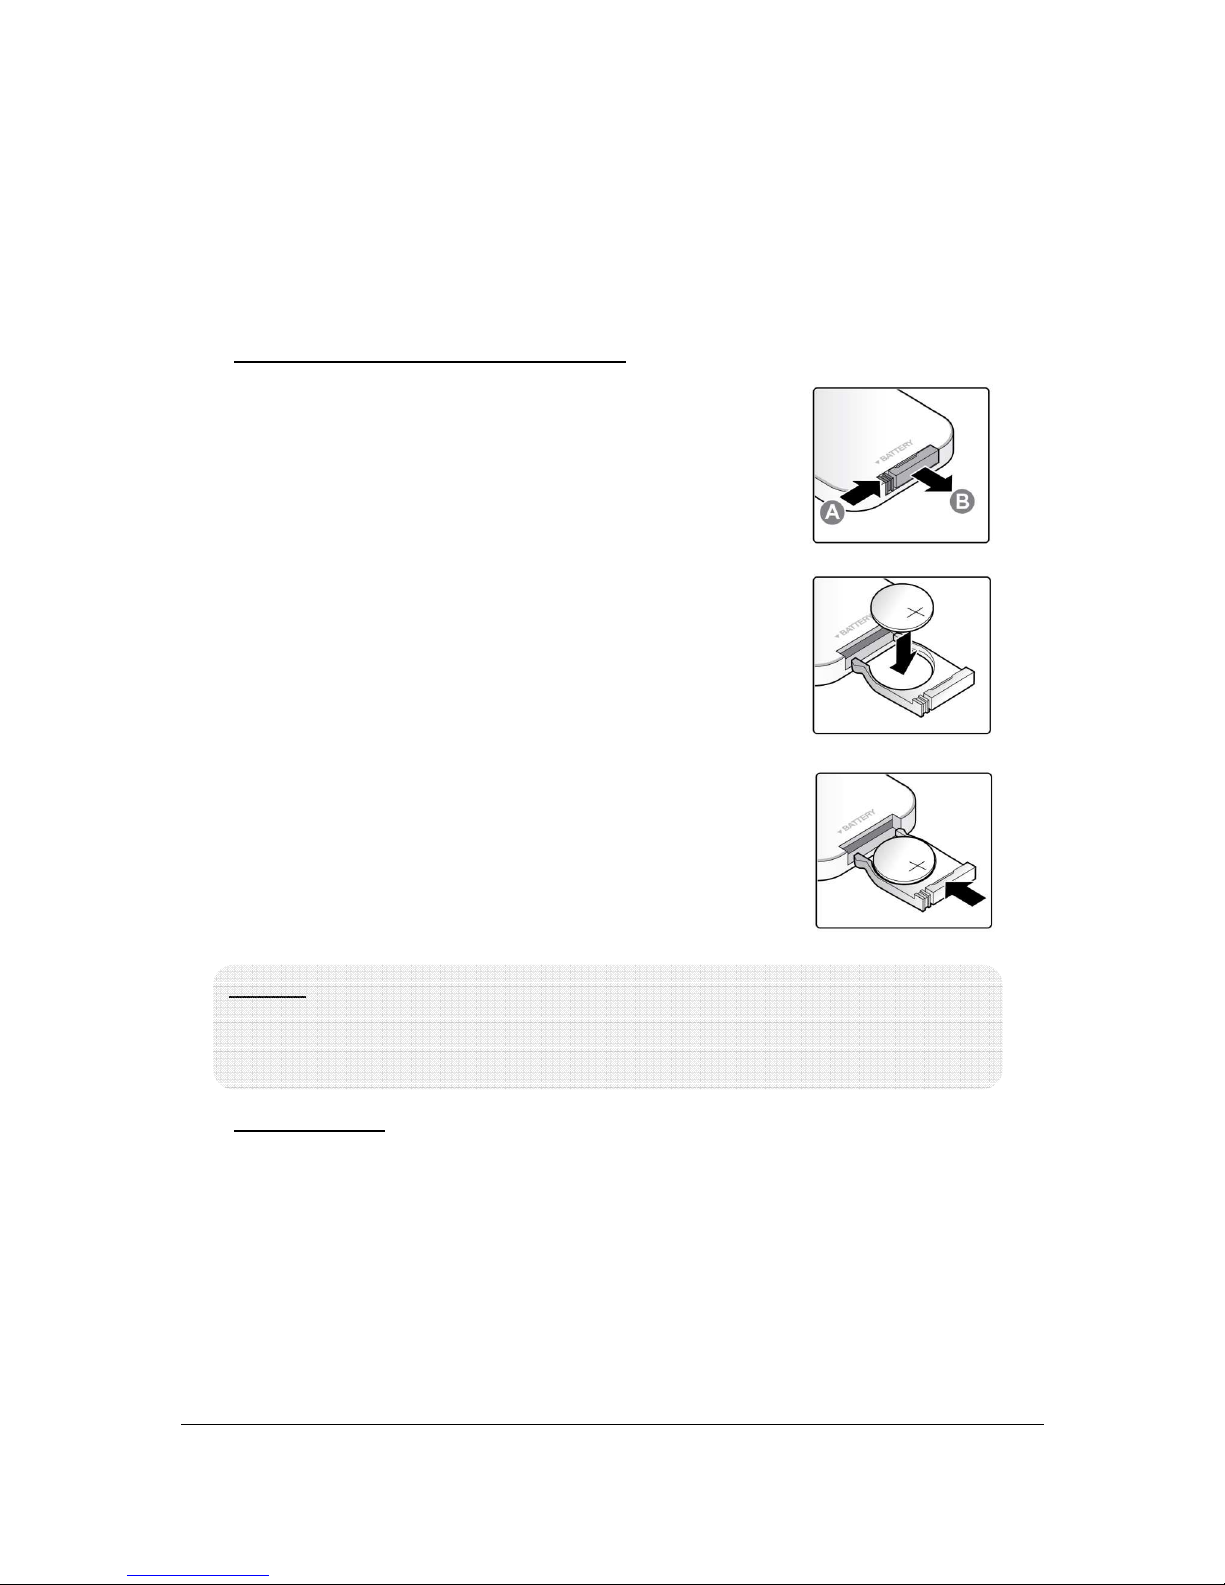
- Setting Up the Remote
The remote control comes with one (1) 3V lithium battery (CR2025).
Installation of battery in the remote control.
1.
Remove the battery compartment cover
by very gently sliding the cover in the direction of arrow (A).
Then very gently pull the cover in the direction of arrow (B).
2.
Insert the battery with the positive side facing up.
3.
Reinsert the battery unit.
Caution:
1. Use only a 3V lithium battery (CR2025).
2. Dispose of used batteries according to local ordinance regulations.
3. Remove the battery when not using the PROJECTOR for prolonged periods.
Operating Range
The remote control uses infrared (IR) transmission to control the PROJECTOR.
It is not necessary to point the remote directly at the PROJECTOR. The remote control
functions properly within a radius of approximately 7 meters (23 feet) and 15 degrees
above or below the PROJECTOR level. It is most effective when held perpendicular to the
sides or in back of the PROJECTOR. If the PROJECTOR is unresponsive, the operator should
move closer towards the PROJECTOR.
Page 18
EPIC OPTIX, LLC
13
Chapter 3. PROJECTOR Media Suite
Overview
The PROJECTOR Media Suite is designed to provide easy access to your files via
USB drive or Internal Memory. Movies/video and pictures can be displayed.
The Media Suite menu contains 3 applications that can be accessed:
• Movie – Supports multiple movie formats.
• Photo – Contains slide show functionality.
• Settings – Adjusts PROJECTOR media choice.
Page 19
EPIC OPTIX, LLC
14
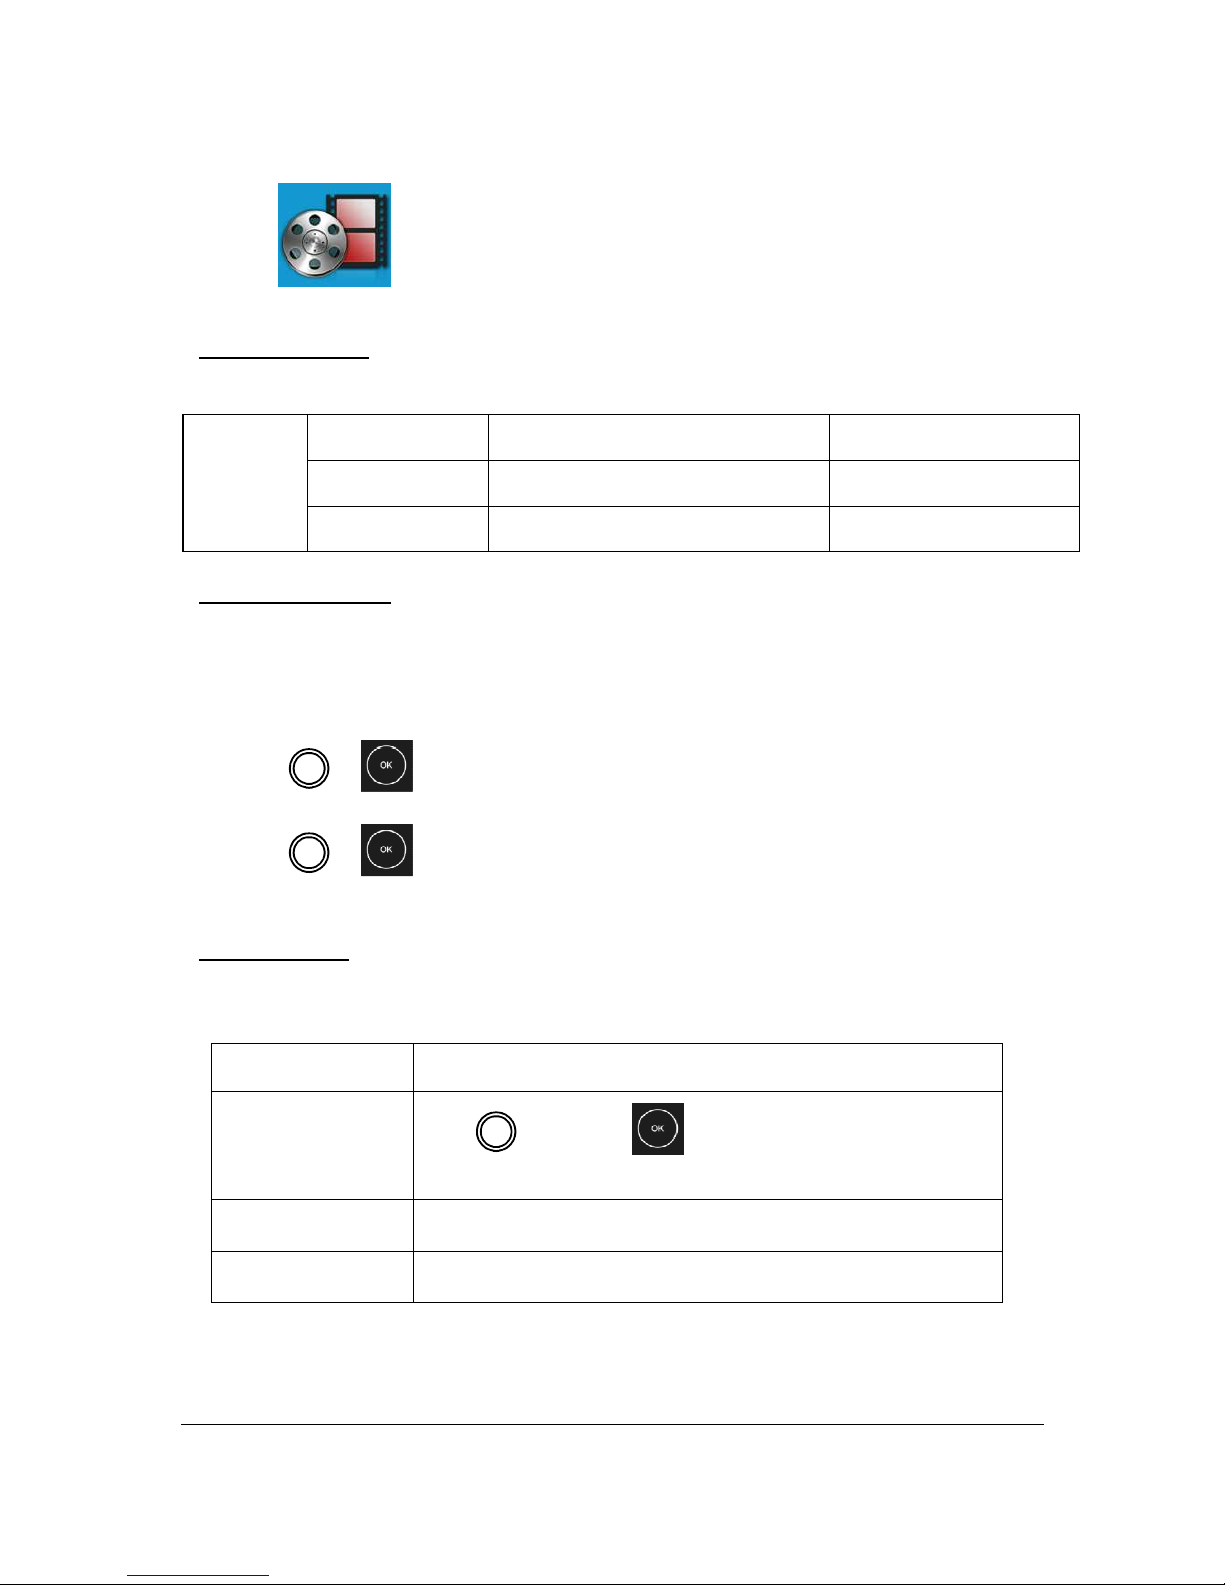
Movie
Supported Formats
The following video formats are supported:
File Compatibility
AVI, MP4, ASF, MPG,
MKV, 3GP, VOB, MOV
Max. 30fps @ HD (1280 x 720)
Video Codec H.263, MPEG, VC-1, RV, H.264
Movie
Audio Codec MP3, MP2, WMA, FLAC, APE
Watching Your Movie
When using a USB storage drive or Internal Memory, the Storage Folder icon will display
in the file directory.
To open a list of movies, perform the following:
1. Press the ◄ or ► key to select the Movie icon in the media suite menu.
2. Press or to open the file directory.
3. Select the folder containing the desired movie file.
4. Press or to play the desired movie file.
Control Interface
The following playback functions are controlled by the remote control, which are shown in
the table below:
ACTION DESCRIPTION
Pause/Resume
Press (Keypad) or (Remote Control) to pause or
resume a movie
Forward Press the ► key to change the forward speed (2X, 4X, 8X,16X)
Backward Press the ◄ key to rewind.
Page 20
EPIC OPTIX, LLC
15
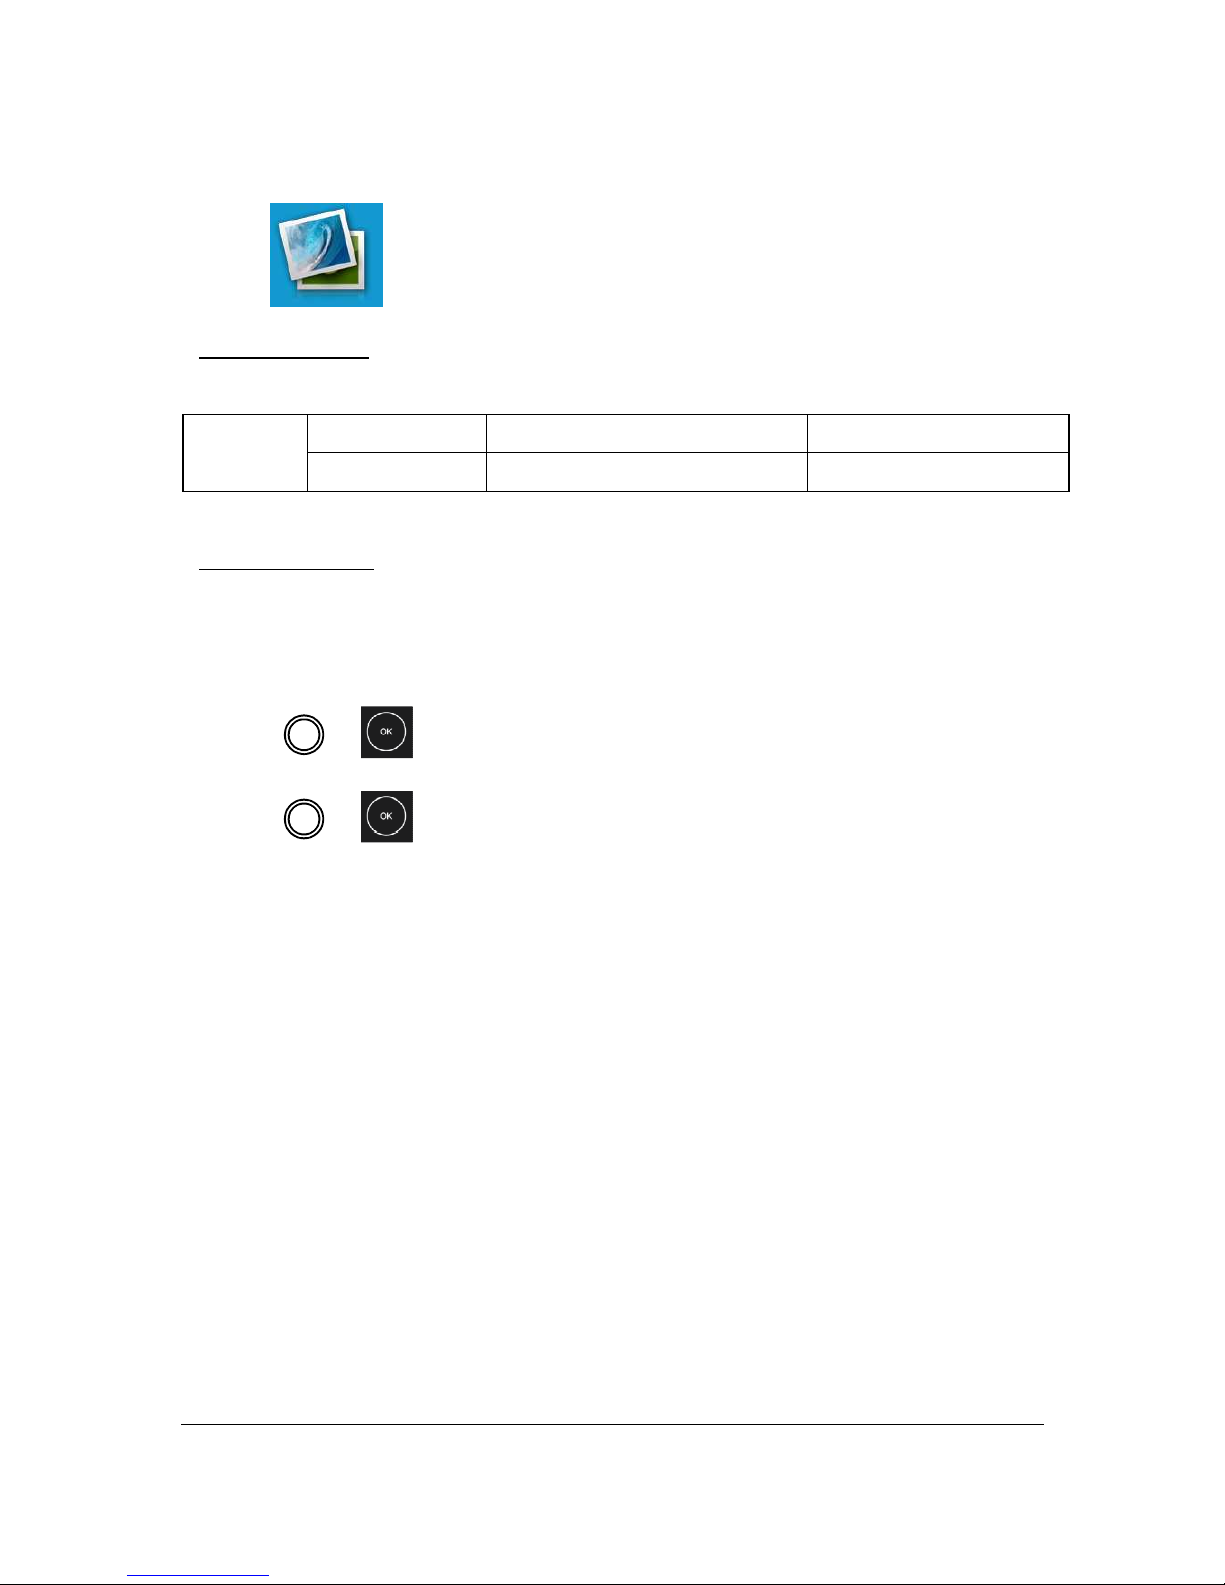
Photo
Supported Formats
The photo viewer can open the following types of image files:
File Compatibility JPEG, PNG, BMP, GIF Max. 12Mpixels
Photo Player
Transition Effect Slide Show 3s, 5s, 7s, 10s
Viewing Your Photo
When using a USB storage drive or Internal Memory, the Storage Folder icon will display
in the file directory.
To open a photo in photo viewer, perform the following:
1. Press the ◄ or ► key to select the Photo icon in the media suite menu.
2. Press or to open the file directory.
3. Select the folder containing the desired photo.
4. Press or to display the desired photo.
Page 21
EPIC OPTIX, LLC
16
Settings
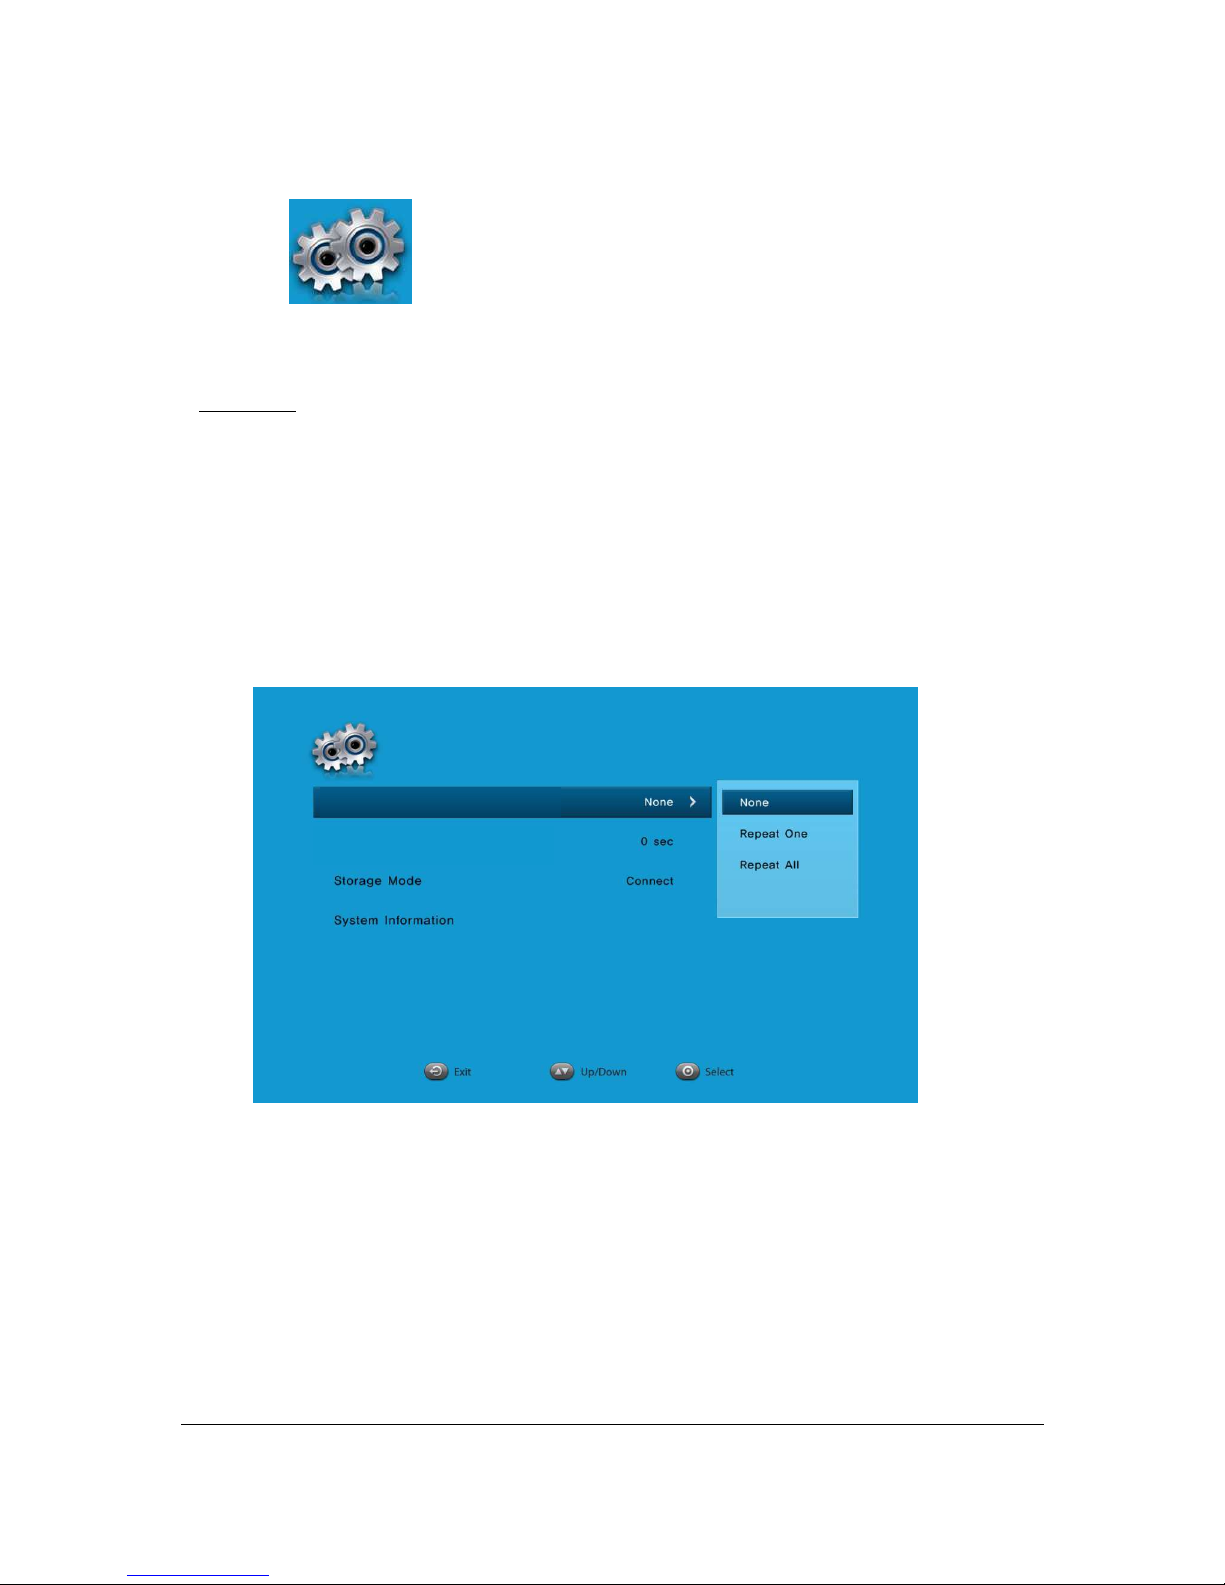
Play Mode
The Play Mode menu displays settings for video player options. The following settings
are available:
• Repeat None – The videos will not repeat after it is completed.
• Repeat One – A selected video will continuously repeat after it is completed.
• Repeat All – All videos in a playlist will repeat after all of the files in the playlist
have been completed.
Play Mode
Slide show Mode
Page 22
EPIC OPTIX, LLC
17
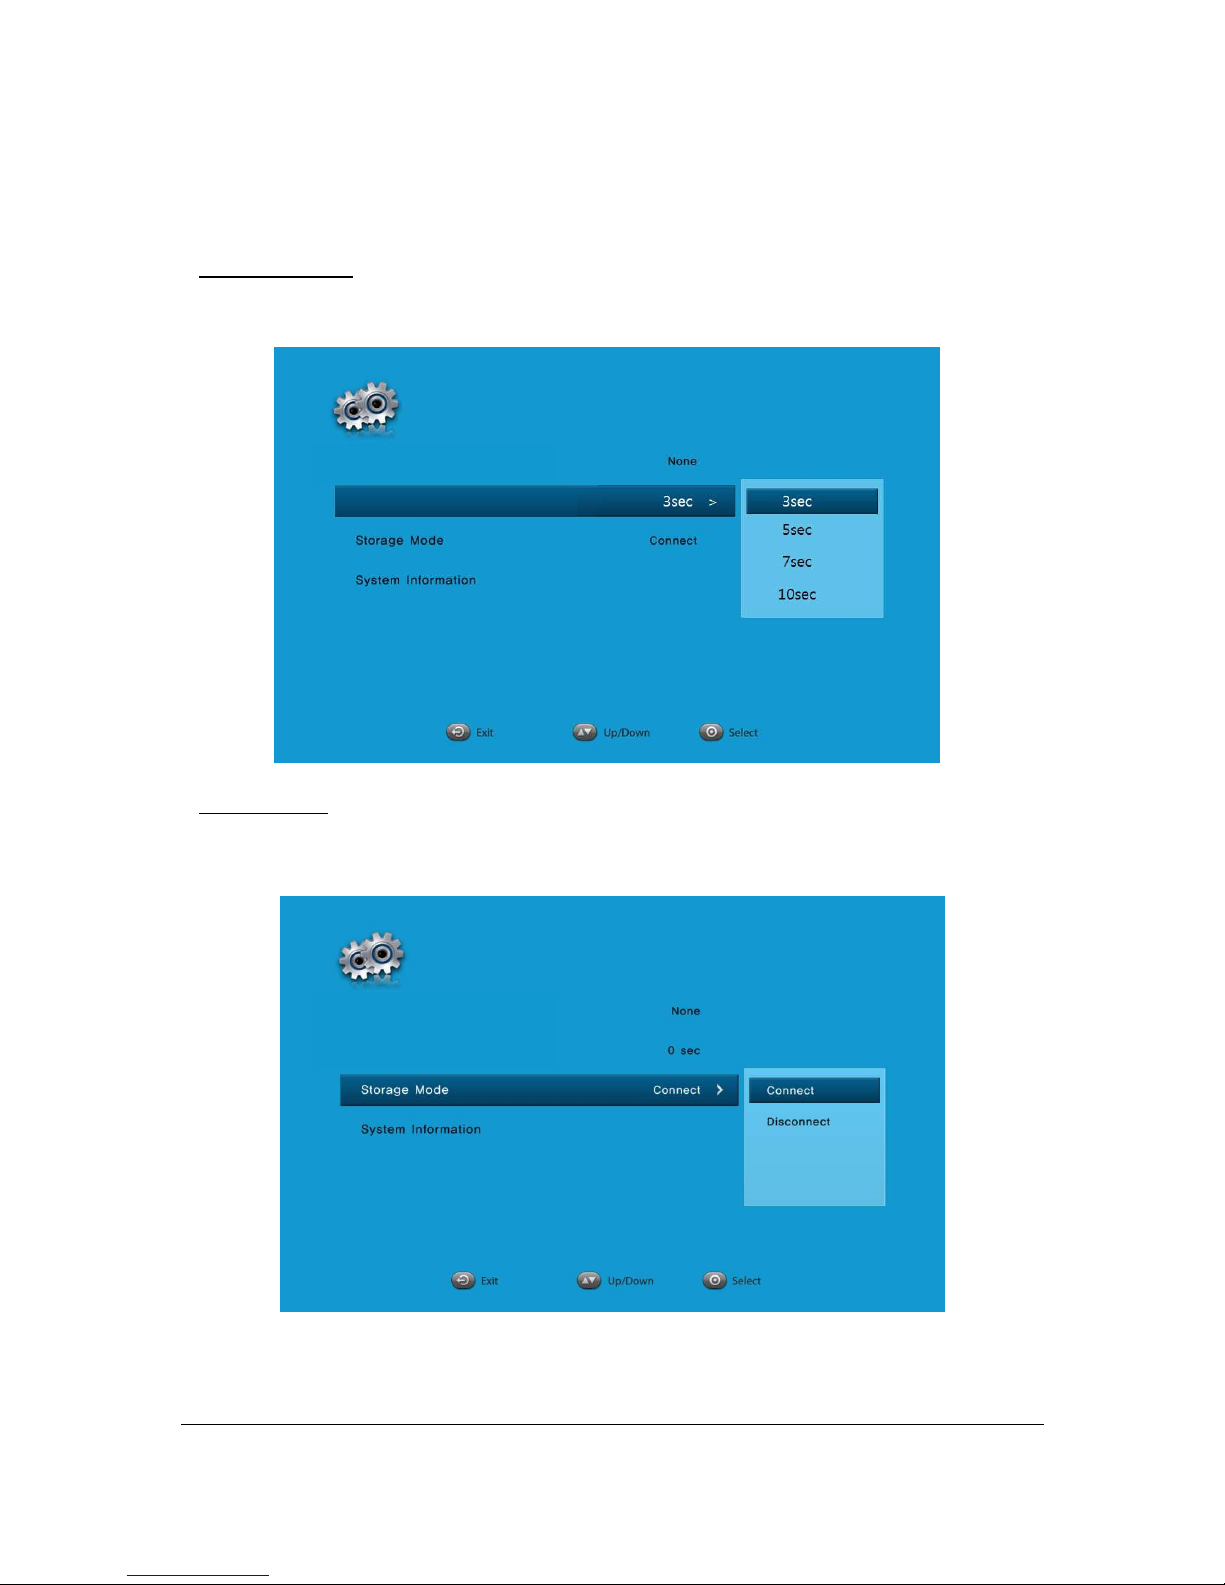
Slide show Mode
The Photo Setup menu displays settings for slide show options.
Setting time choices are 3, 5, 7 and 10 seconds.
Storage Mode
The Projector comes with 2GB of onboard internal memory for
storing and playing videos and pictures directly from the PROJECTOR.
Slide show Mode
Play Mode
Play Mode
S
lide show Mode
Page 23

EPIC OPTIX, LLC
18
Saving content to the Internal Memory:
1. With your Projector powered on, connect to your PC via the included full USB to full USB
cable.
2. In the Projector User Interface, navigate to the Settings icon and press “Select”.
3. Scroll down to “Storage Mode”, and select “Connect”.
4. Your PC will now recognize the PROJECTOR as an external storage device. You
may drag and drop compatible files using Windows® or Mac® Operating Systems.
5. When complete, disconnect the USB cable.
System Information
View your PROJECTOR’s firmware version and the space remaining on your USB’s Internal
Memory.
How to Upgrade your Firmware:
- Method 1
1. Visit www.scramtech.com, and download the latest Firmware upgrade to your
computer.
2. Copy the latest Firmware upgrade onto the Main (Root) directory of your USB storage
device.
3. Turn on the PROJECTOR, and connect your USB storage device to the PROJECTOR.
4. Press “Settings” on the Main Menu of the Settings menu. Scroll down to
System Information and press “Select” to enter System Information.
5. Press “Select” on the PROJECTOR, or press the “OK” button on the remote control.
6. When the pop message box asks, “Upgrade? “, either press “Select” on the PROJECTOR,
or “OK” on the remote control.
Page 24

EPIC OPTIX, LLC
19
7. Wait until the firmware upgrade is complete. Then, restart PROJECTOR.
- Method 2
1. Visit www.epicoptix.com, and download the latest Firmware upgrade via your
personal computer (PC).
2. With your PROJECTOR powered on, connect to your PC via the full USB to full USB
cable (included).
3. Via the PROJECOTR User Interface, navigate to the Settings icon and press “Select”.
4. Scroll down to Storage Mode, and select “Connect”.
5. Your PC will now recognize the PROJECTOR as an external storage device. You can copy
the latest firmware upgrade file onto the Main (Root) directory of the PROJECTOR.
6. When complete, disconnect the USB cable and Restart PROJECTOR.
7. Press the “Settings” icon on Main Menu. Scroll down to System Information and press
“Select”.
8. You may either press the “Select” button on PROJECTOR, or press the “OK” button via
the remote control.
9. When the pop up message box asks, “Upgrade? “, either press “Select” on the
PROJECTOR, or “OK” on the remote control.
10. Wait until the firmware upgrade is complete. Then, restart PROJECTOR.
Page 25
EPIC OPTIX, LLC
20
Chapter 4. On-Screen Display (OSD) Settings
OSD Menu Controls
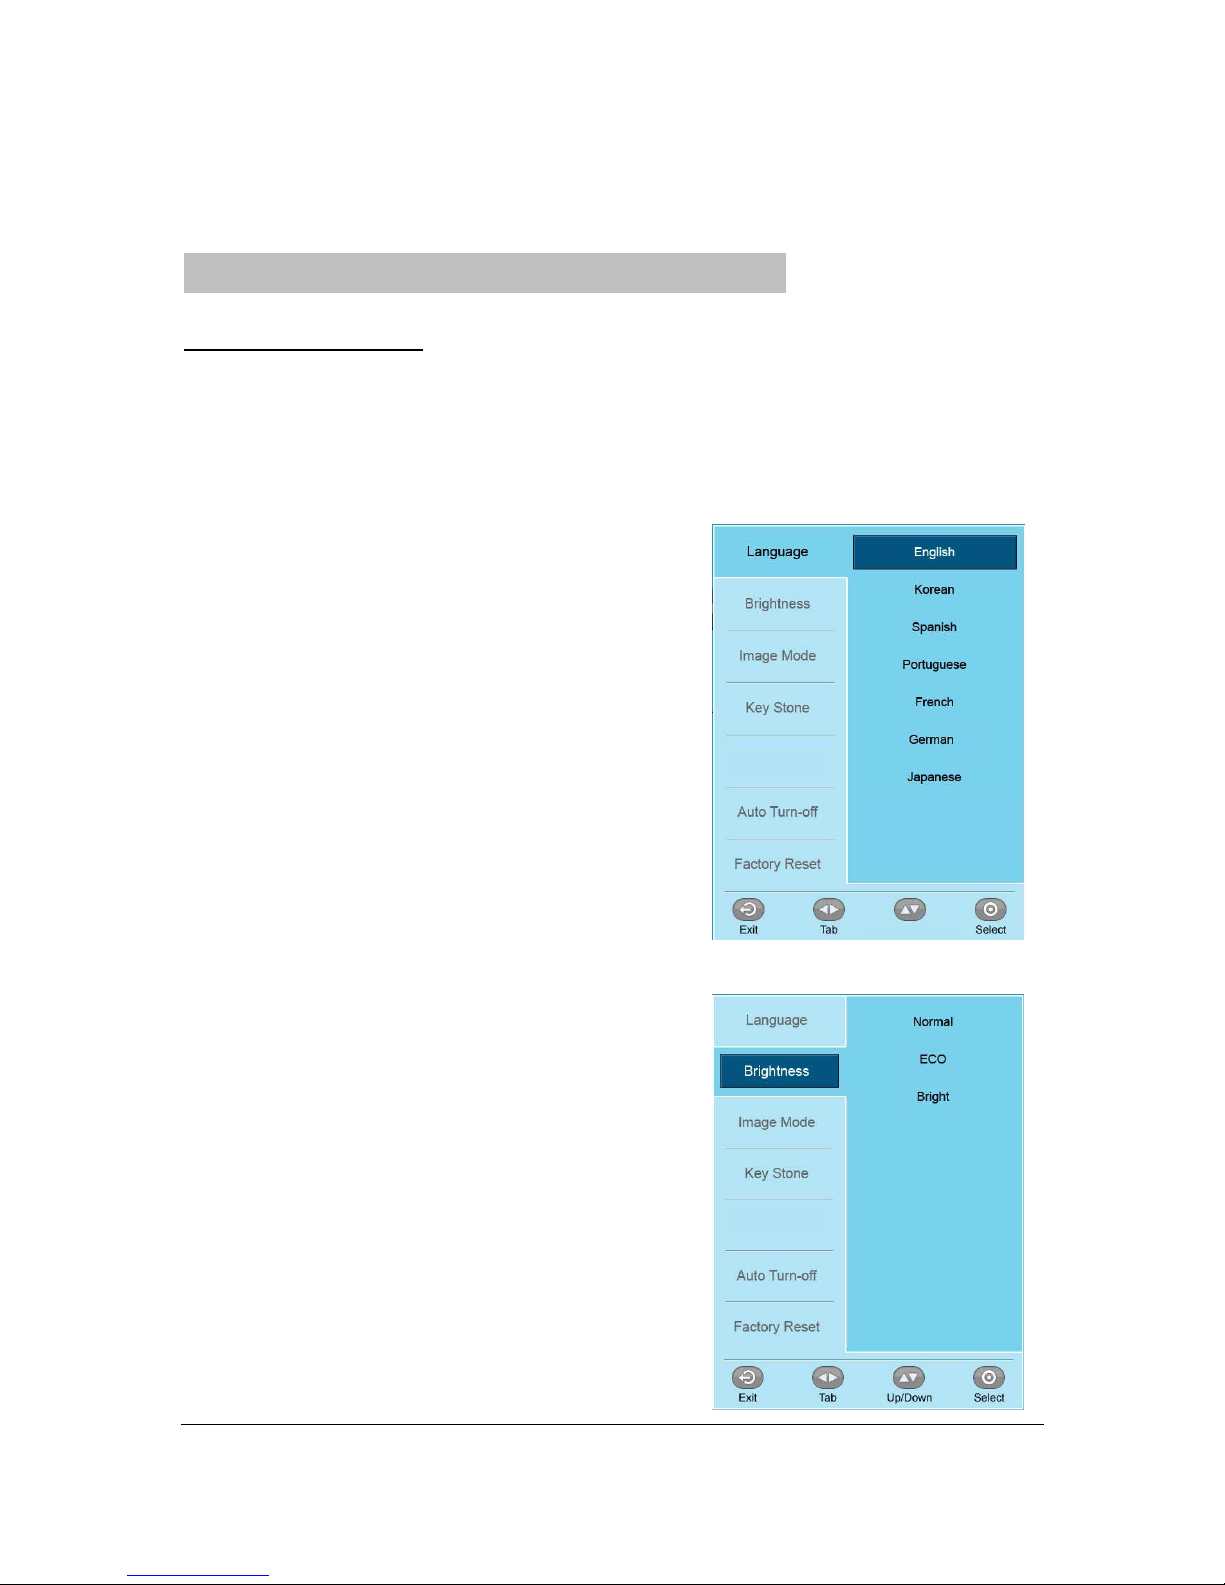
The PROJECTOR has an On-Screen Display (OSD) settings menu that allows you to make
adjustments and changes to Settings, such as Display Settings. There are 7 menus within
the OSD menu:
• Language – Change the user interface language.
Options are English, Korean, Spanish,
Portuguese, French, German, Japanese
and Chinese.
• Brightness – Adjust the brightness settings.
Options are Normal, ECO, Bright.
Simplified Chinese
Traditional Chinese
Projection
Scroll
Projection
Page 26
EPIC OPTIX, LLC
21
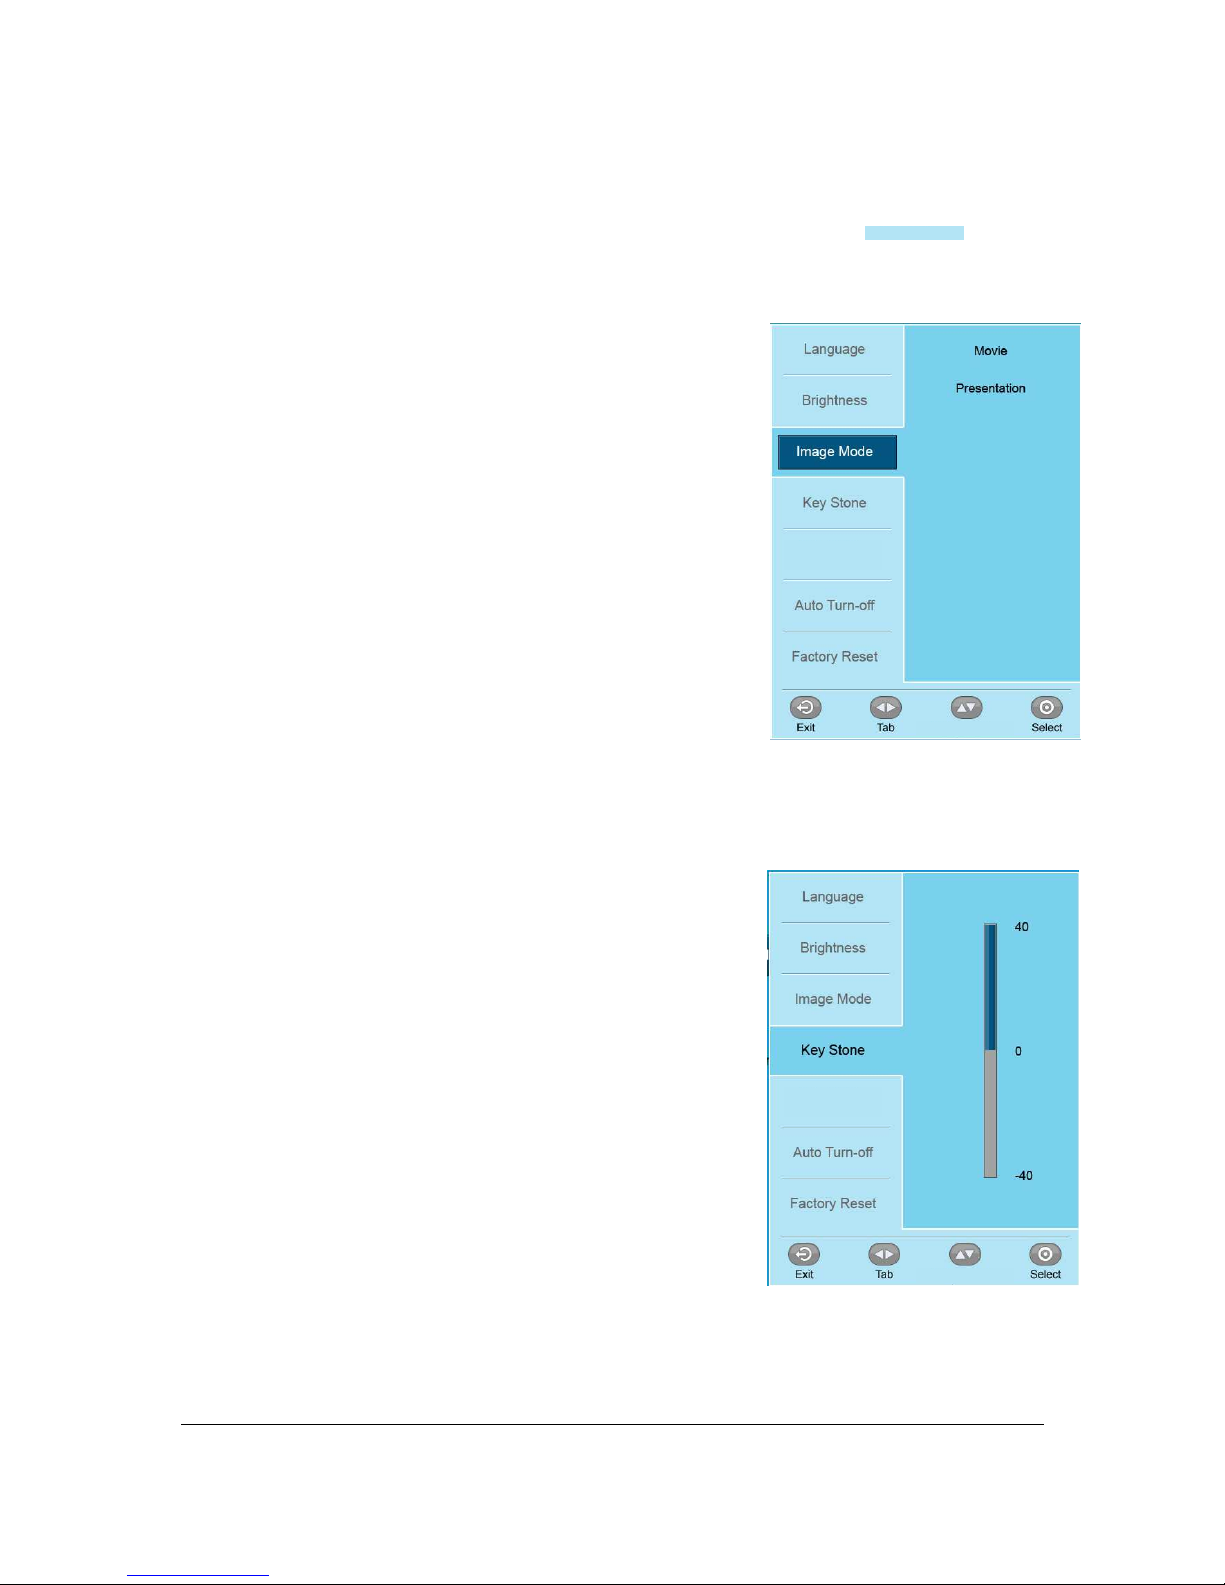
• Image Mode – The PROJECTOR is programmed with
two default image modes - Movie
and Presentation - to
optimize your desired use.
• Keystone – The PROJECTOR adjusts the image shape when
the projector and screen/wall are not
perpendicular.
Scroll
Projection
Scroll
Scroll
Projection
Page 27
EPIC OPTIX, LLC
22
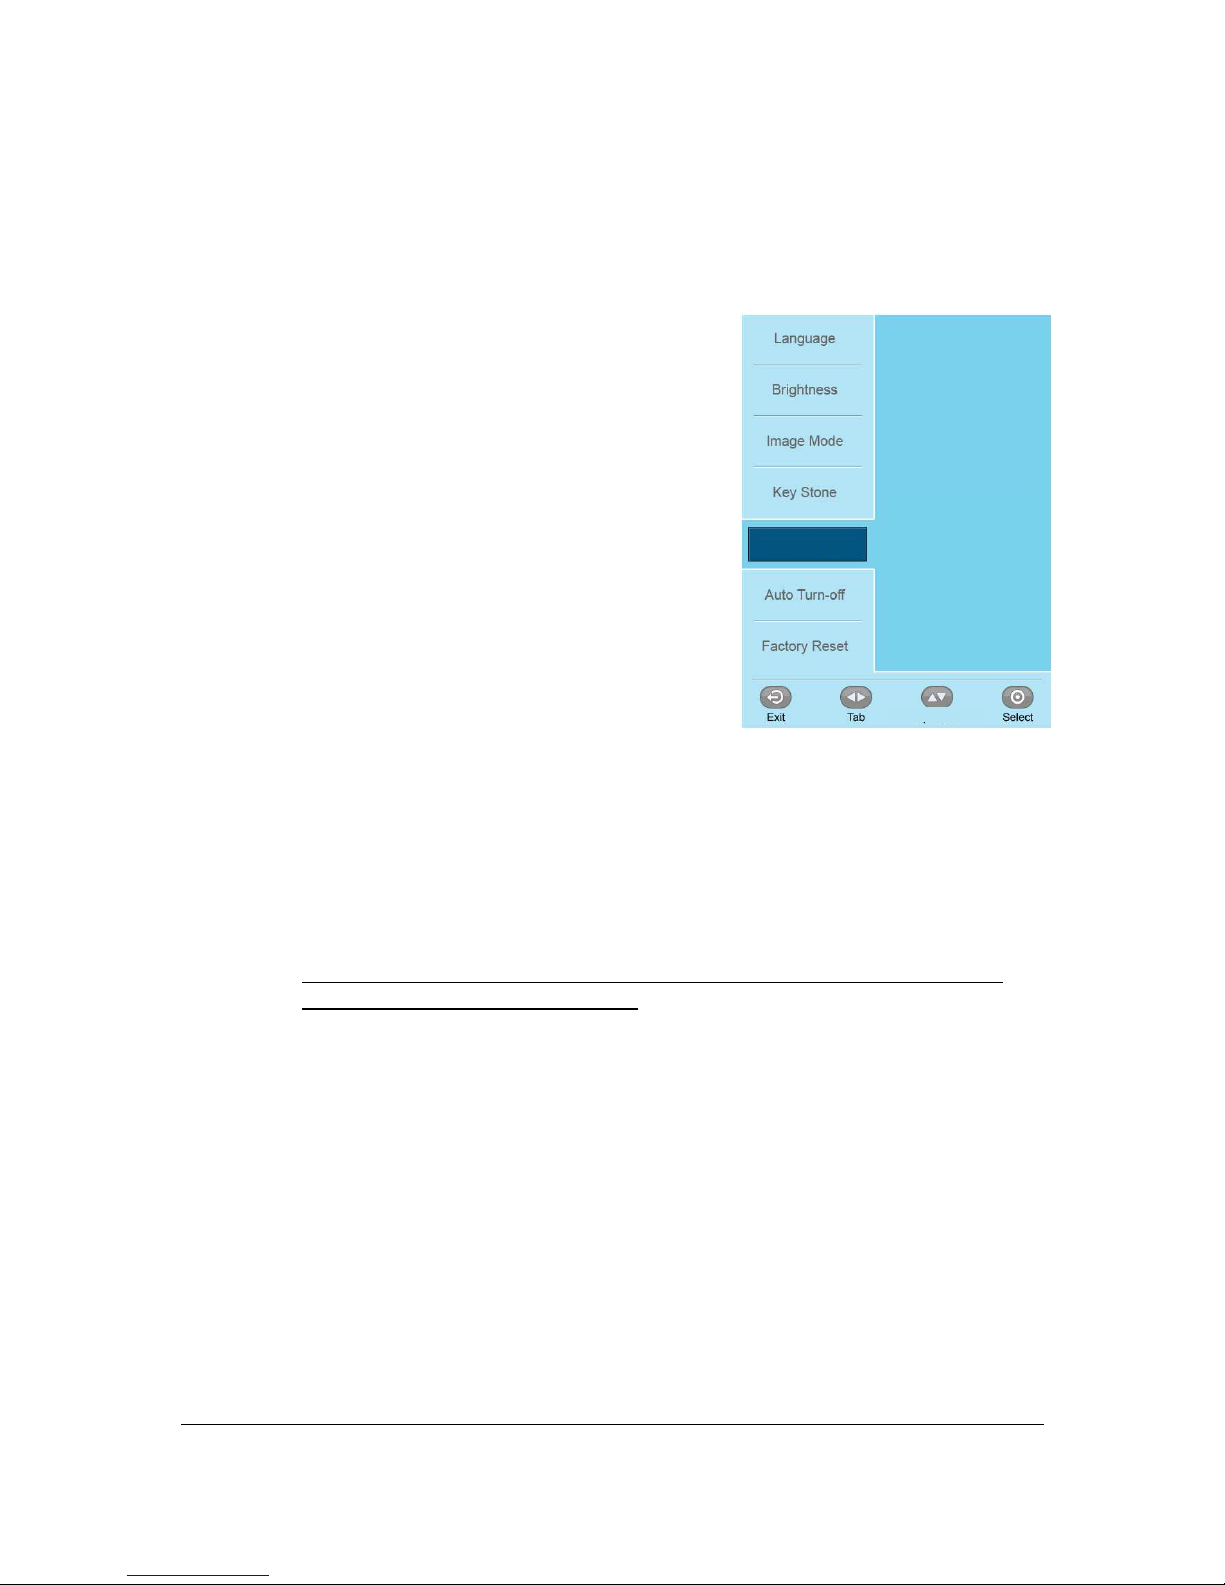
• Projection – Change the image 180° (mirror
image) depending on your set up.
Ceiling Mounting
For a home theater feel, mount your PROJECOTR from the ceiling in your home.
You will need a ceiling mount kit which can be purchased from most AV outlets.
After you have mounted your PROJECTOR to the ceiling, you will need to invert
the image being displayed. To do this:
1. Press “Menu”
2. Navigate down to Projection
3. Select “Ceiling-Front”.
4. To revert back to the original orientation, highlight and select “Front”.
Projection
Scroll
Front
Rear
Ceiling-Front
Ceiling
-
Rear
Page 28
EPIC OPTIX, LLC
23
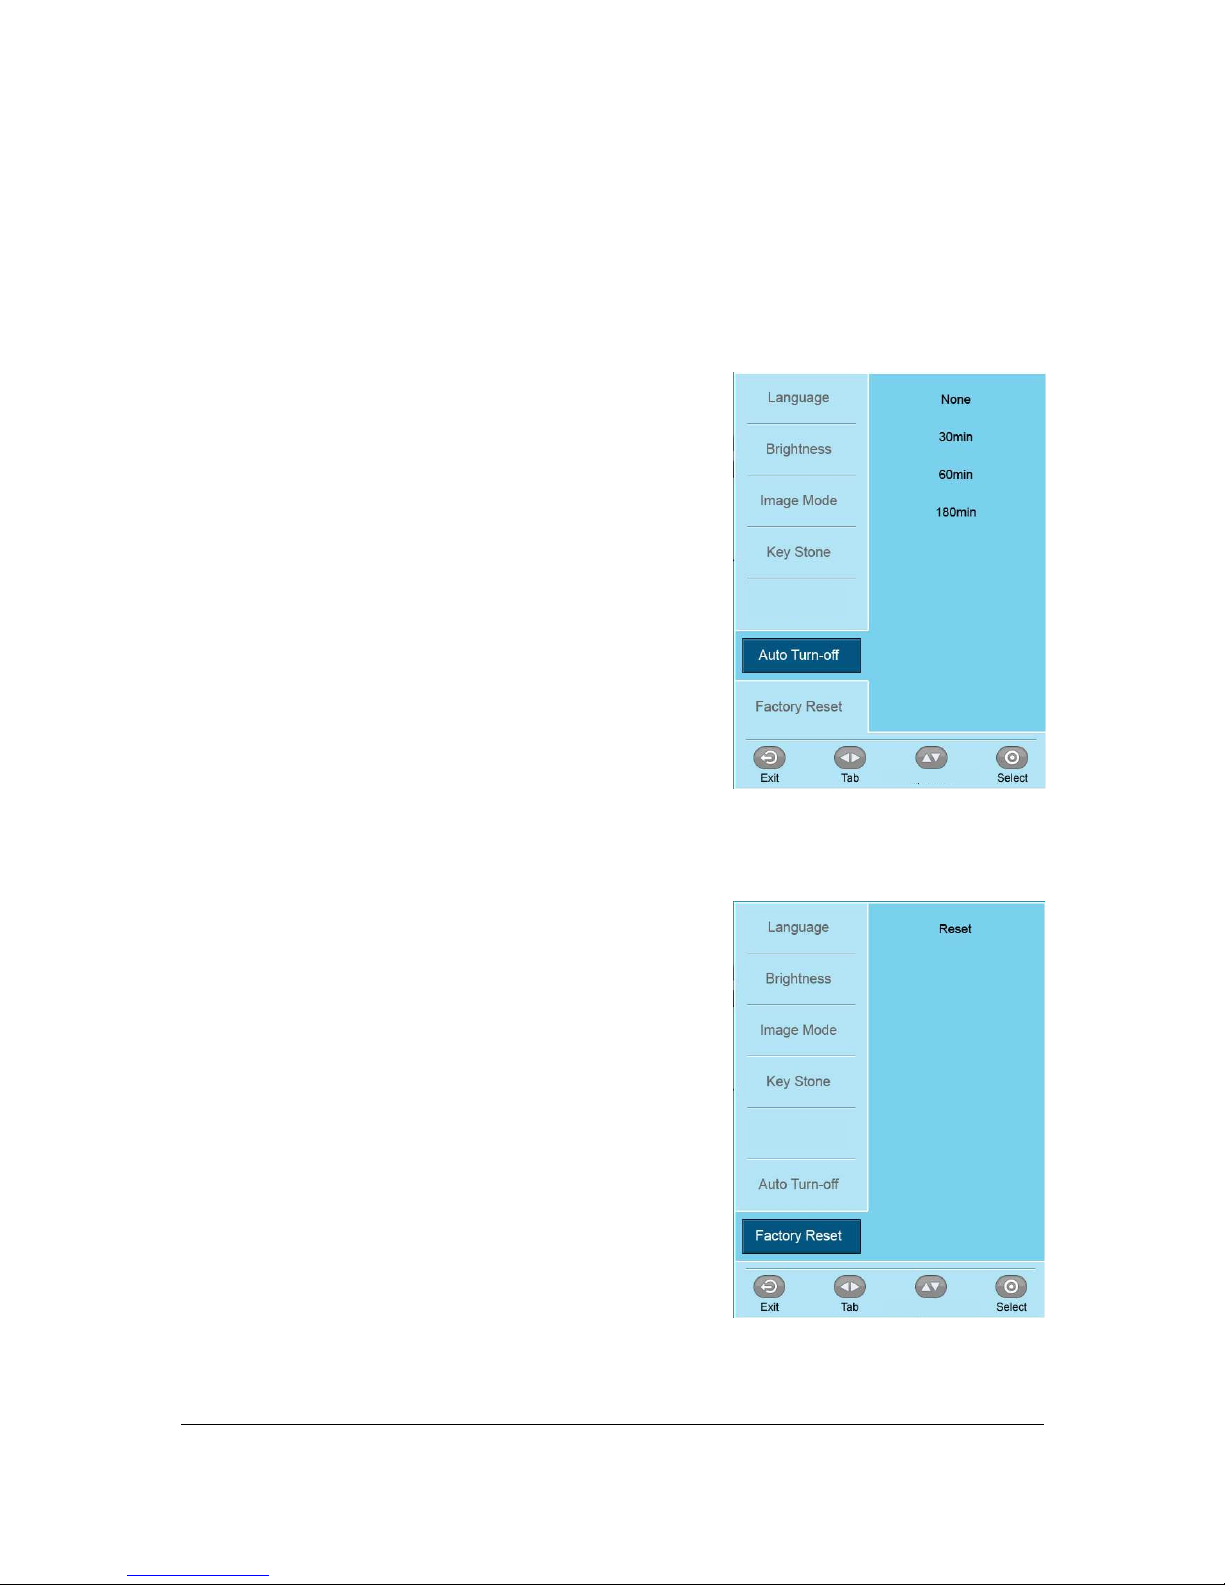
• Auto Turn-off – Customize the Auto Turn-off
by selecting the length of inactivity
before auto turn off occurs.
• Factory Reset – Reset your PROJECTOR back to
default factory settings.
Scroll
Projection
Projection
Sc
roll
Page 29

EPIC OPTIX, LLC
24
Chapter 5. Taking Care of Your PROJECTOR
Cleaning the PROJECTOR and Lens
It is only necessary to gently wipe your PROJECTOR when dust or dirt accumulates. When cleaning the
lens, use an optical lens cloth and enough cleaning solution just to dampen the cloth.
Troubleshooting
Problem Possible Solutions
My PROJECTOR will not
power on
Check to make sure the power cables are
securely connected and completely plugged into
the correct port on the device
My picture is fuzzy
Use the Focus dial on the top of the PROJECTOR
to clarify the image
My image is upside down or
reversed
Go to Menu > Projection > Projector Position
I cannot play a video from the
Internal Memory
Make sure that the source file is compatible with
your PROJECTOR.
Make sure that all cables and connections are
tightly secured
Make sure your device is connected to the
correct input.
Image Problems
My PROJECTOR will not
detect my content source
Refer to your device's documentation for further
assistance
Warning:
Your PROJECTOR should be not be connected to any electrical outlet when cleaning.
Use only a damp, lint-free cloth. NEVER USE WATER. Using water, which could enter the case, may
VOID your warranty.
Do not apply abrasive cleansers, solvents or cloths at any time.
Page 30

EPIC OPTIX, LLC
25
Problem Possible Solutions
No image appears on the
screen
1. Verify that the settings on your personal
computer are properly configured
.
2. Turn off all of the equipment and power up
the equipment again in the correct order.
Image Problems
The image is wider at the top
or bottom (trapezoid effect)
1. Position the PROJECTOR so that it is
perpendicular to the screen as much as
possible.
2. Adjust the Keystone settings in the OSD to
correct the problem.
Remote Control
Problems
PROJECTOR does not respond
to the remote control
1. Aim the remote control towards remote
Sensor on the PROJECTOR.
2. Make sure the path between remote and
Sensor is not obstructed.
3. Turn off any fluorescent lights in the room.
4. Check to see if the battery polarity is correct.
5. Replace the batteries.
6. Turn off other Infrared-enabled devices in the
vicinity.
7. Have the remote control serviced.
There is no sound
1. Adjust the volume of the audio source.
2. Check the audio cable connection.
3. Test the output of the audio source with
other speakers.
4. Have the PROJECTOR serviced.
Audio Problems
The sound is distorted
1. Check the audio cable connection.
2. Test the output of the audio source with
other speakers.
3. Have the PROJECTOR serviced.
System Error
If a PROJECTOR System Error occurs (i.e. over-heating, fan cut-off, LED thermistor error,
etc.), an Error Message box will appear on-screen for approximately 10 seconds. The
backlight on the Keypad will then blink before the PROJECTOR automatically turns off.
Immediately disconnect the AC power cord and wait for at least 1 minute before restarting
the PROJECTOR.
If an event occurs other than what is listed in the chart above, please contact a qualified
Page 31

EPIC OPTIX, LLC
26
service center.
Specifications
Features Spec. Remarks
Resolution WXGA True HD(720p up to 1080p)-1280*800
Projection System 0.45" DLP TP Reflective, Color sequential
Aspect ratio 16 : 10
Light source LED (R/G/B) > 30,000 hrs
Contrast 3000:1
Zoom None
Focus Manual
Image size 30"~150" 50"@1.6m
Throw Ratio 1.4:1
Image offset 100%
Optical
engine
Image Slanting <1.0 deg.
Brightness 300 Lumens Typical Lumens
Composite MMI 20Pin connector NTSC/PAL/SECAM
A-RGB MMI 20Pin connector Up to UXGA 60Hz
HDMI Mini-HDMI HDMI Ver1.3a
Audio Out 3.5Φ Stereo Jack Audio Out: 70mW ( 35mW + 35mW )
USB A-Type USB Port Data Transfer (USB 2.0 client)
I/O
Terminal
Power input DC 12V AC adapter(12V, 3A)
Power 1EA Power On/Off
Key
Function 7EA Up, Down, Left, Right, Select, Menu, Exit
Internal 2GB Dynamic
Memory
External USB Memory Up to 16GB
File Compatibility
AVI, MP4, ASF, MPG, MKV, 3GP,
VOB, MOV
Max. 30fps @ HD (1280 x 720)
Video Codec H.263, MPEG, VC-1, RV, H.264
Movie
Player
Audio Codec MP3, MP2, WMA, FLAC, APE
File Compatibility JPEG, PNG, BMP, GIF Max. 12Mpixels
Photo
Player
Transition Effect Slide Show 3s, 5s, 10s
User control Function Key, Remote control
Power consumption < 20 W
Cooling Fan 1 EA
Noise < 30 dB
Speaker 1W, Mono
Dimensions (W*H*D, mm) 84.5mm x 110.0 mm x 30.0 mm <300 cc
Weight (grams) 245g
Operating Temperature
0℃ ~ 40℃
Page 32
EPIC OPTIX, LLC
27
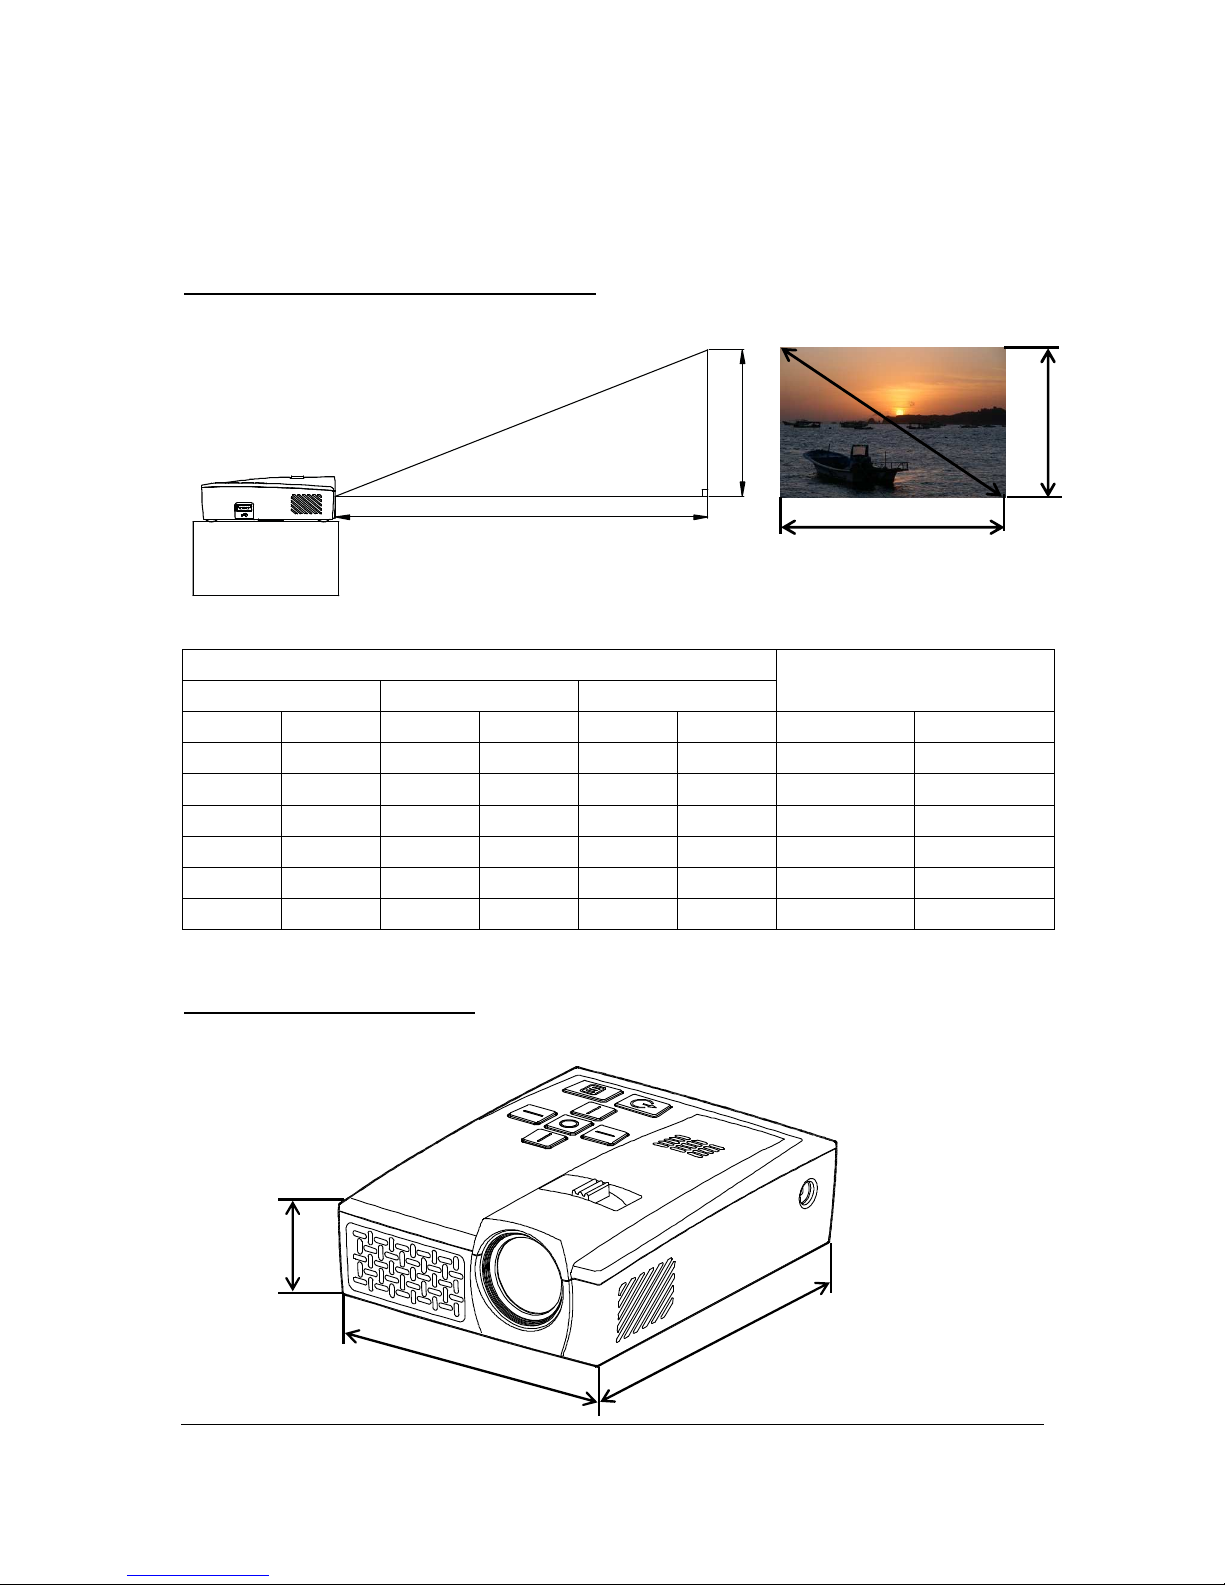
Projection Distance vs. Image Size
If the picture is not clear, use the focus ring for adjustments or move the projector forward or backward.
SCREEN SIZE
M X Y
THROW DISTANCE
(Z)
INCHES CM INCHES CM INCHES CM INCHES CM
35.0 88.9 30.5 77.5 19.1 48.4 45.8 116.2
50.0 127.0 43.6 110.7 27.2 69.2 65.4 166.0
65.0 165.1 56.7 143.9 35.4 89.9 85.0 215.8
80.0 203.2 69.7 177.1 43.6 110.7 104.6 265.6
95.0 241.3 82.8 210.3 51.7 131.4 124.2 315.5
110.0 279.4 95.9 243.5 59.9 152.2 143.8 365.3
PROJECTOR Dimensions
M
X
Y
Y
Z
Z: Throw Distance
90
ºººº
W : 84.5mm
(3.3”)
Screen : Side view
Screen : Front view
L : 110.0mm
(4.3”)
H :
30.0mm
(1.2”)
Page 33

EPIC OPTIX, LLC
28
Regulatory Compliance
This equipment has been tested and found to comply with the limits for a Class B digital device
pursuant to Part 15 of the FCC Rules. These limits are designed to provide reasonable protection
against harmful interference when the equipment is operated in a commercial environment.
This equipment generates, uses, and can radiate radio frequency energy and, if not installed and used
in accordance with the instruction manual, may cause harmful interference to radio communications.
Operation of this equipment in a residential area is likely to cause harmful interference, in which case,
the user will be required to correct the interference at his/her own expense.
Changes or modifications not expressly approved by the parties responsible for compliance could void
the user’s authority to operate the equipment.
Disposal and Recycling
This projector may have components that contain hazardous waste products that require proper
disposal. Be responsible and recycle or dispose accordingly. Consult your local, state or federal laws
or for more information, the Electronic Industries Alliance at www.eiae.org.
Page 34

EPIC OPTIX, LLC
29
Chapter 6 - Warranty Statement
1. Epic Optix, LLC. warrants hardware products against defects in materials and workmanship for a
period of one (1) year from date of purchase (“Warranty Period”). The customer is responsible for
keeping all original proof of purchase documents during this time.
2. Epic’s Limited Warranty covers only those defects which arise as a result of normal use of the product,
and does not apply to:
a. Improper or inadequate maintenance or modification
b. Software, interfacing, media, parts, and supplies not provided or supported by Epic
c. Other user incurred damage resulting from misuse or neglect
3. If Epic receives, during the applicable Warranty Period, notice of a defect in any hardware product
which is covered by Epic’s warranty, Epic will either repair the product using new or refurbished
replacement parts, or replace the defective product with new or like-new product of the same model
with the same functionality as the original unit. If Epic is unable to repair or replace the defective
product, the customer will be offered a comparable model, if available. When a product is exchanged,
any replacement item becomes the property of the customer and the replaced item becomes Epic’s
property.
4. Epic shall have no obligation to replace or refund a defective product until the customer returns the
defective product to Epic.
5. Epic is not responsible for:
a. any data stored on the returned products. Customers should backup his/her data prior to shipping
the unit back to VM. Hard drives and devices which include a hard disk or other memory storage system
will be reformatted during the repair process (even if the repair is not related to the hard drive itself)
and will not include the customer’s data when it is returned.
b. protecting the confidentiality of any data on a product sent in for repair.
6. Epic’s limited warranty is only valid in the country of purchase.
7. To the extent allowed by local law, neither Epic nor its third party suppliers make any other warranty
or condition of any kind, whether expressed or implied, with respect to the Epic products, and
specifically disclaim the implied warranties of conditions of merchantability, satisfactory quality, and
fitness for a particular purpose.
8. This Warranty Statement gives the customer specific legal rights. The customer may also have other
rights that vary from state to state in the United States. To the extent that this Warranty Statement is
inconsistent with such local law, this Warranty Statement shall be deemed modified to be consistent
with such local law. Under such local law, certain disclaimers and limitations of this Warranty Statement
may not apply to the customer. For example, some states in the United States may: preclude the
disclaimers and limitations in this Warranty Statement from limiting the statutory rights of a consumer;
restrict the ability of a manufacturer to enforce such disclaimers or limitations; or grant the customer
additional warranty rights, specify the duration of implied warranties which the manufacturer cannot
disclaim, or not allow limitations on the duration of implied warranties.
 Loading...