

Page 1
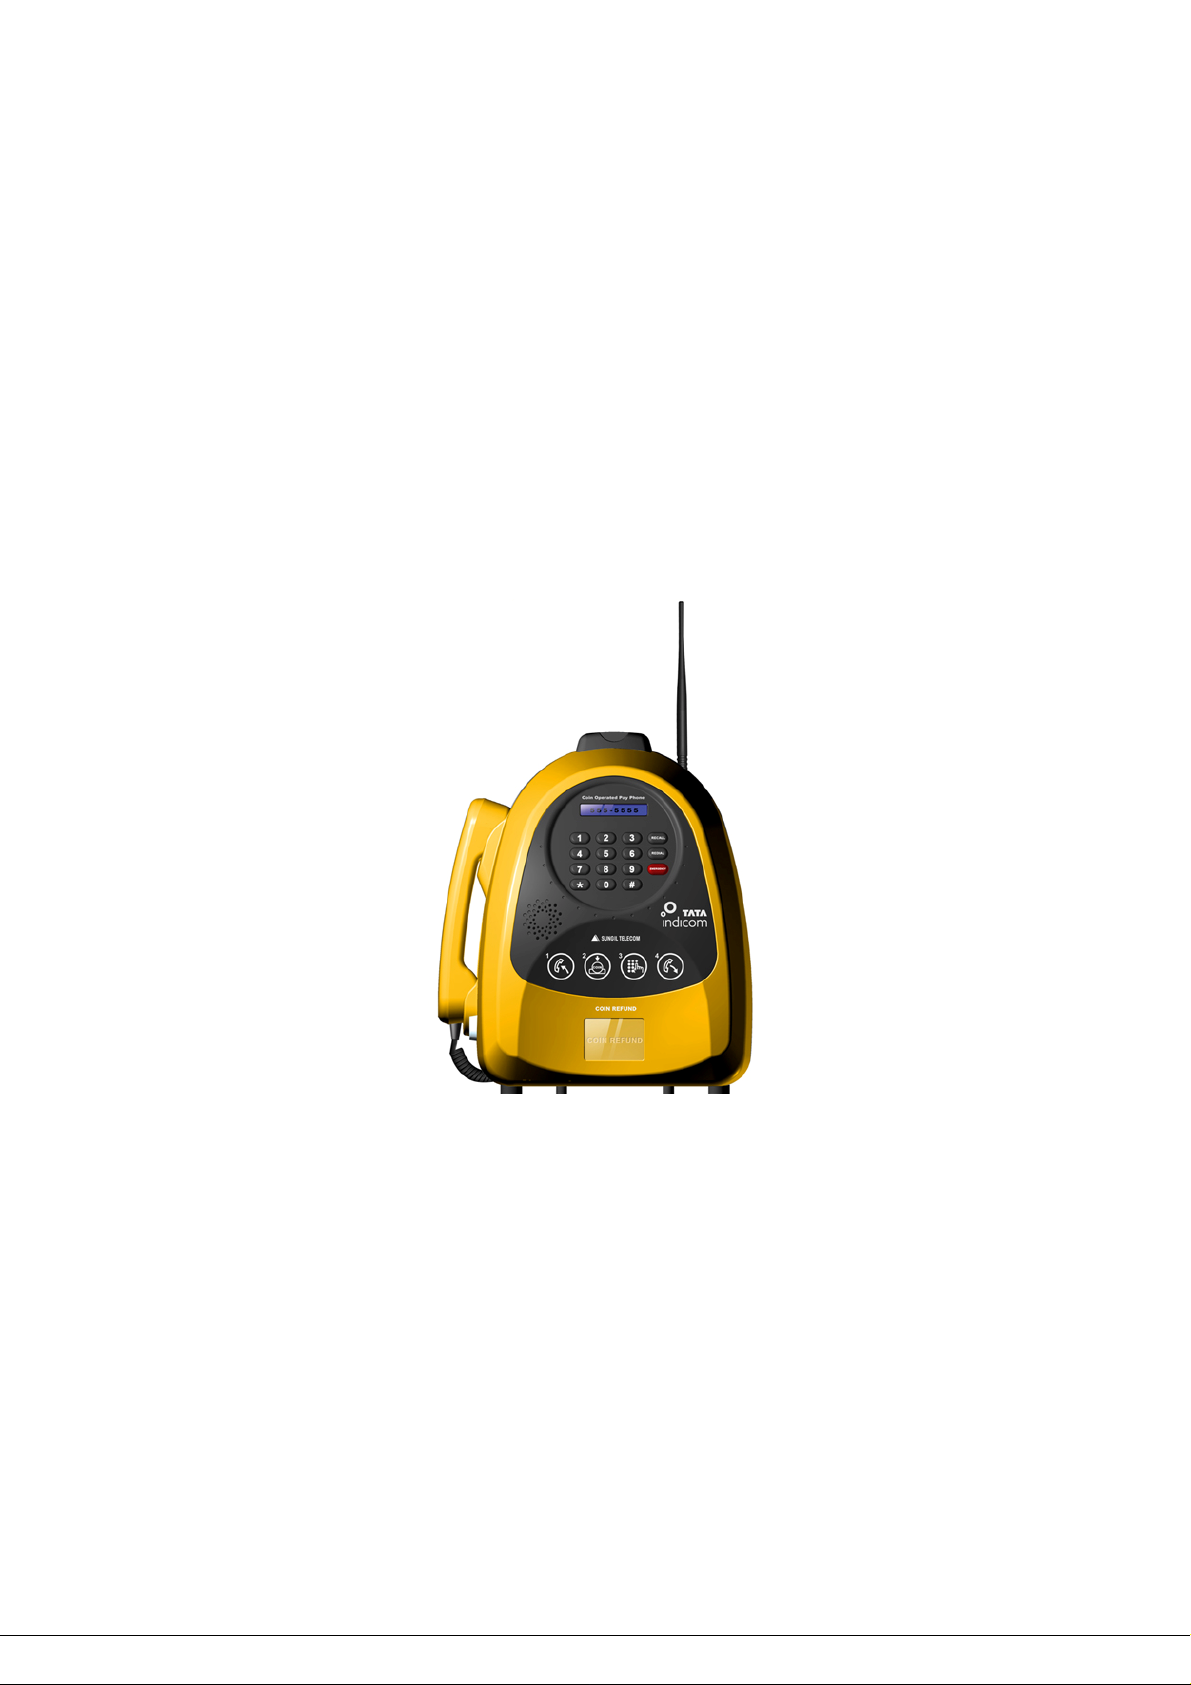
SXP-2280 CDMA 1XRTT
FIXED WIRELESS PHONE
800 MHz CDMA
TECHNICAL MANUAL
Copyright@2007 SungilTelecom Co.,Ltd
Page 2
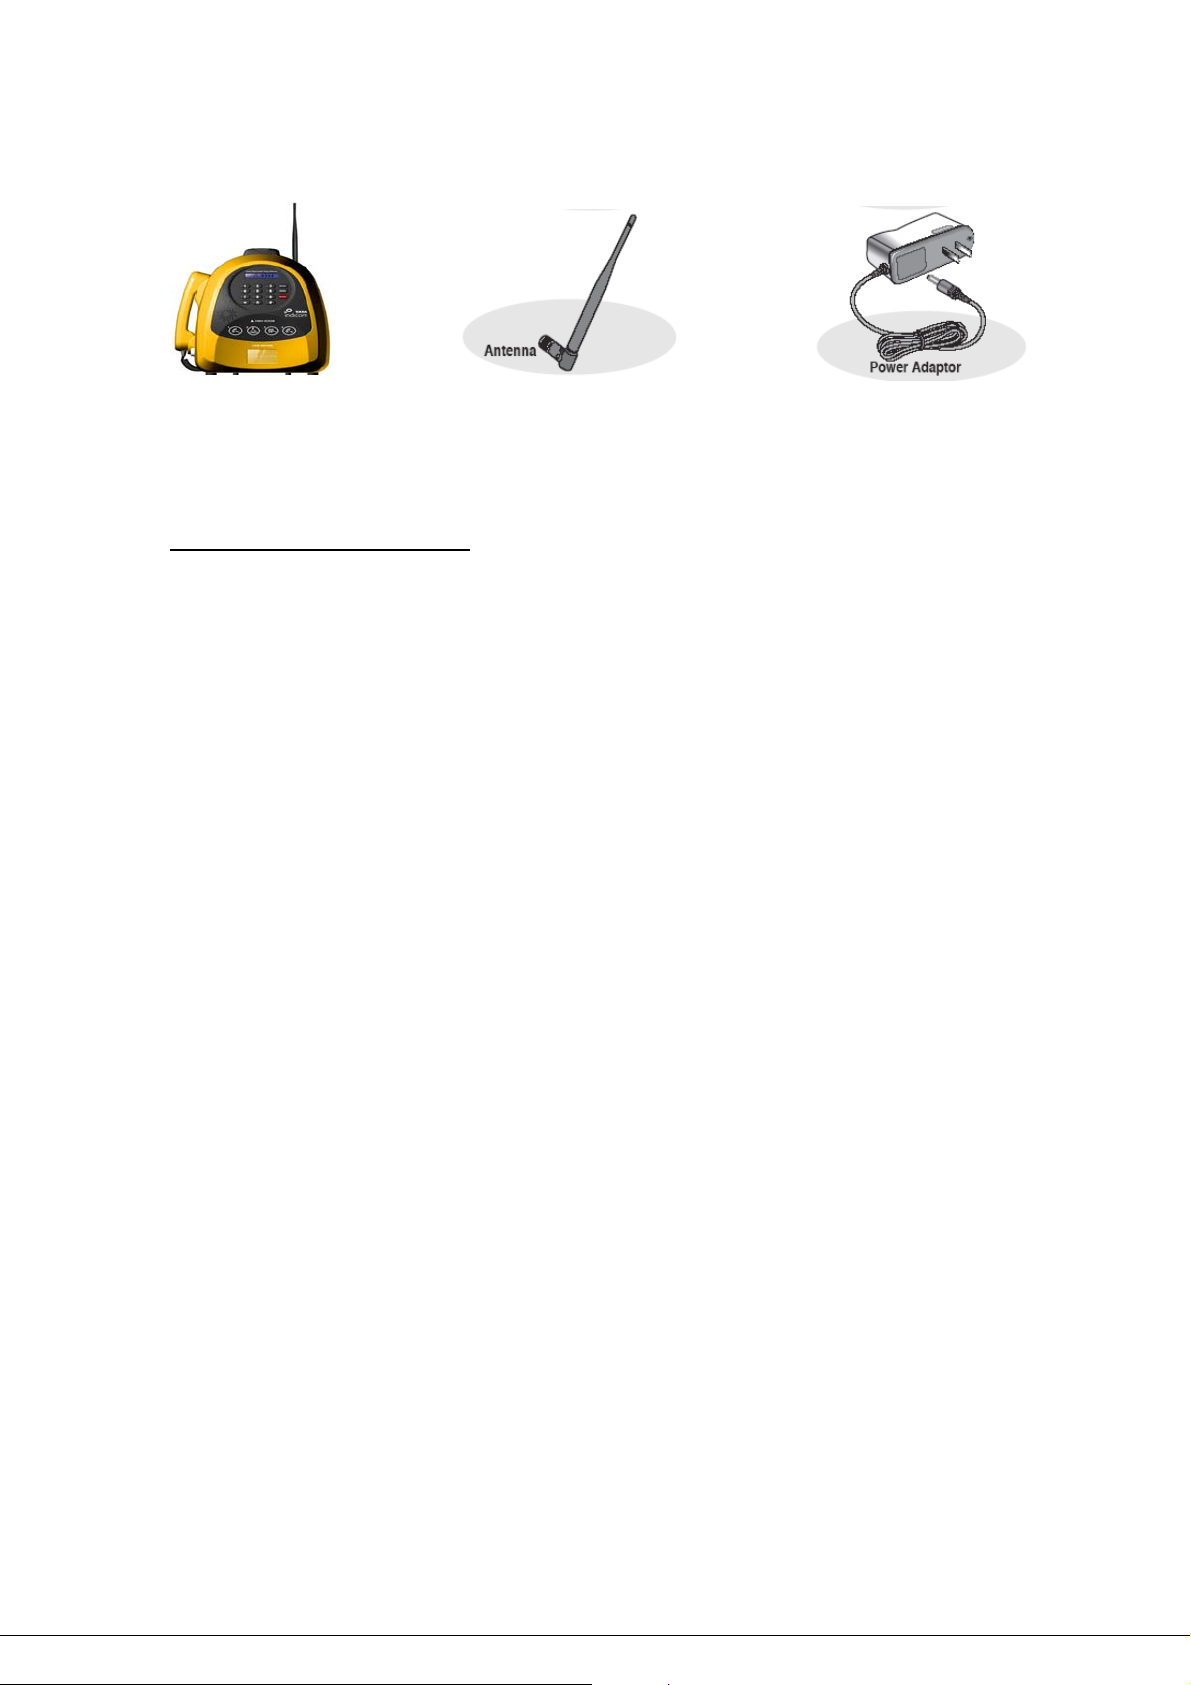
Before installing your SXP-2280, carefully remove the contents from the shipping carton and check
for evidence of shipping damage. If damage is found, contact your Authorized Sungil Distributor or
shipping agent immediately.
SAFE OPERATION INSTRUCTIONS
IMPORTANT! Before installing or operating this product, read the SAFETY AND GENERAL
INFORMATION section of this guide.
9 Install the unit indoors.
9 Install the unit on a hard, flat surface for proper ventilation.
9 Do not expose the unit to rain or moisture
9 Do not place the unit on or close to sources of heat.
IMPORTANT NOTICES
TERMS AND CONDITIONS FOR USE OF SXP-2280 PRODUCTS ("Product")
These Terms and Conditions are a legal contract between you and Sungil Corporation for the title to and
use of the Product.
BY RETAINING AND USING THE PRODUCT AFTER RECEIPT OF IT, YOU AGREE TO THE TERMS
AND CONDITIONS INCLUDING WARRANTY DISCLAIMERS, LIMITATIONS OF LIABILITY AND
INDEMNIFICATION PROVISIONS BELOW. IF YOU DO NOT AGREE TO THE TERMS AND
CONDITIONS, DO NOT USE THE PRODUCT AND IMMEDIATELY RETURN THE UNUSED PRODUCT
FOR A COMPLETE REFUND. You agree to accept sole responsibility for any misuse of the Product by
you; and, in addition, any negligent or illegal act or omission of your or your agents, contractors, servants,
employees, or other users of the Product so long as the Product was obtained from you, in the use and
operation of the Product.
Sungil Telecom Ltd.
Corporate Headquarters
321 Gongdan-dong, Gumi City, Kyongbuk
730-030, Korea
Sales and Technical Support
Tel: +82-31-714-0038 · Fax: +82-31-714-9174
E-mail: [email protected] · http://www.sungiltel.com
2006 Sungil Telecom Co. Ltd., All Rights Reserved
Page 3
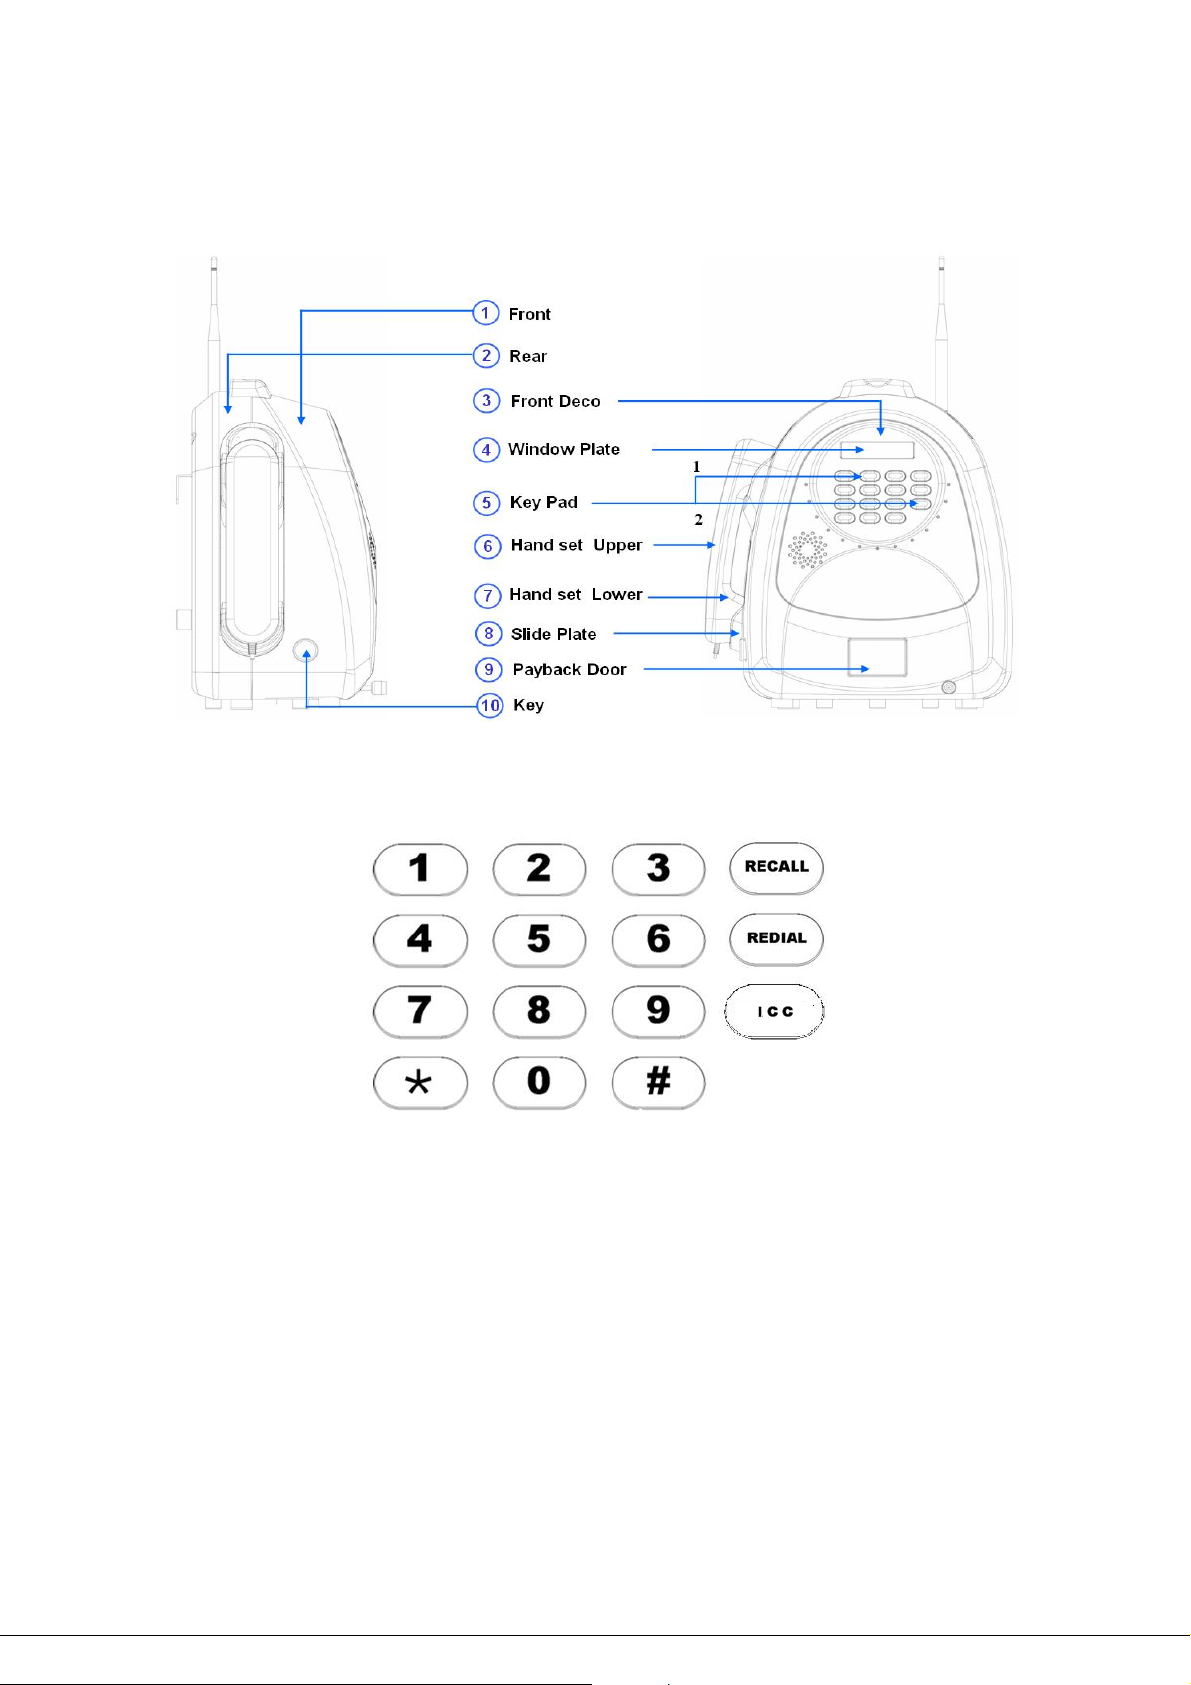
1.1 ICCB Construction
1.2 Button Layout
ICCB has 15 keys which are numeric keys(0-9), *, # , Recall , Redial and ICC key. Each key is
used to make call but under specific menu internally, *, #, Redial, Recall and ICC key could be
used as function key.
0-9 : Number Button
*,#,Recall,Redial and ICC : Used at not only making call but also operation as follows,
*: The Cancel / Previous key to cancel what a user did or go previous menu.
#: The S t ore/Confirmation key to store/confirm what a user did like editing in editor.
Recall: The up key for item selection on the menu.
Page 4
Redial: The down key for item selection on the menu.
ICC: ICC stands for Indian Calling Card and this key has specific number for each region. This
key is able to work only under “Insert Coin” status on LCD and don’t work at other status.
1.3 Coin Selector
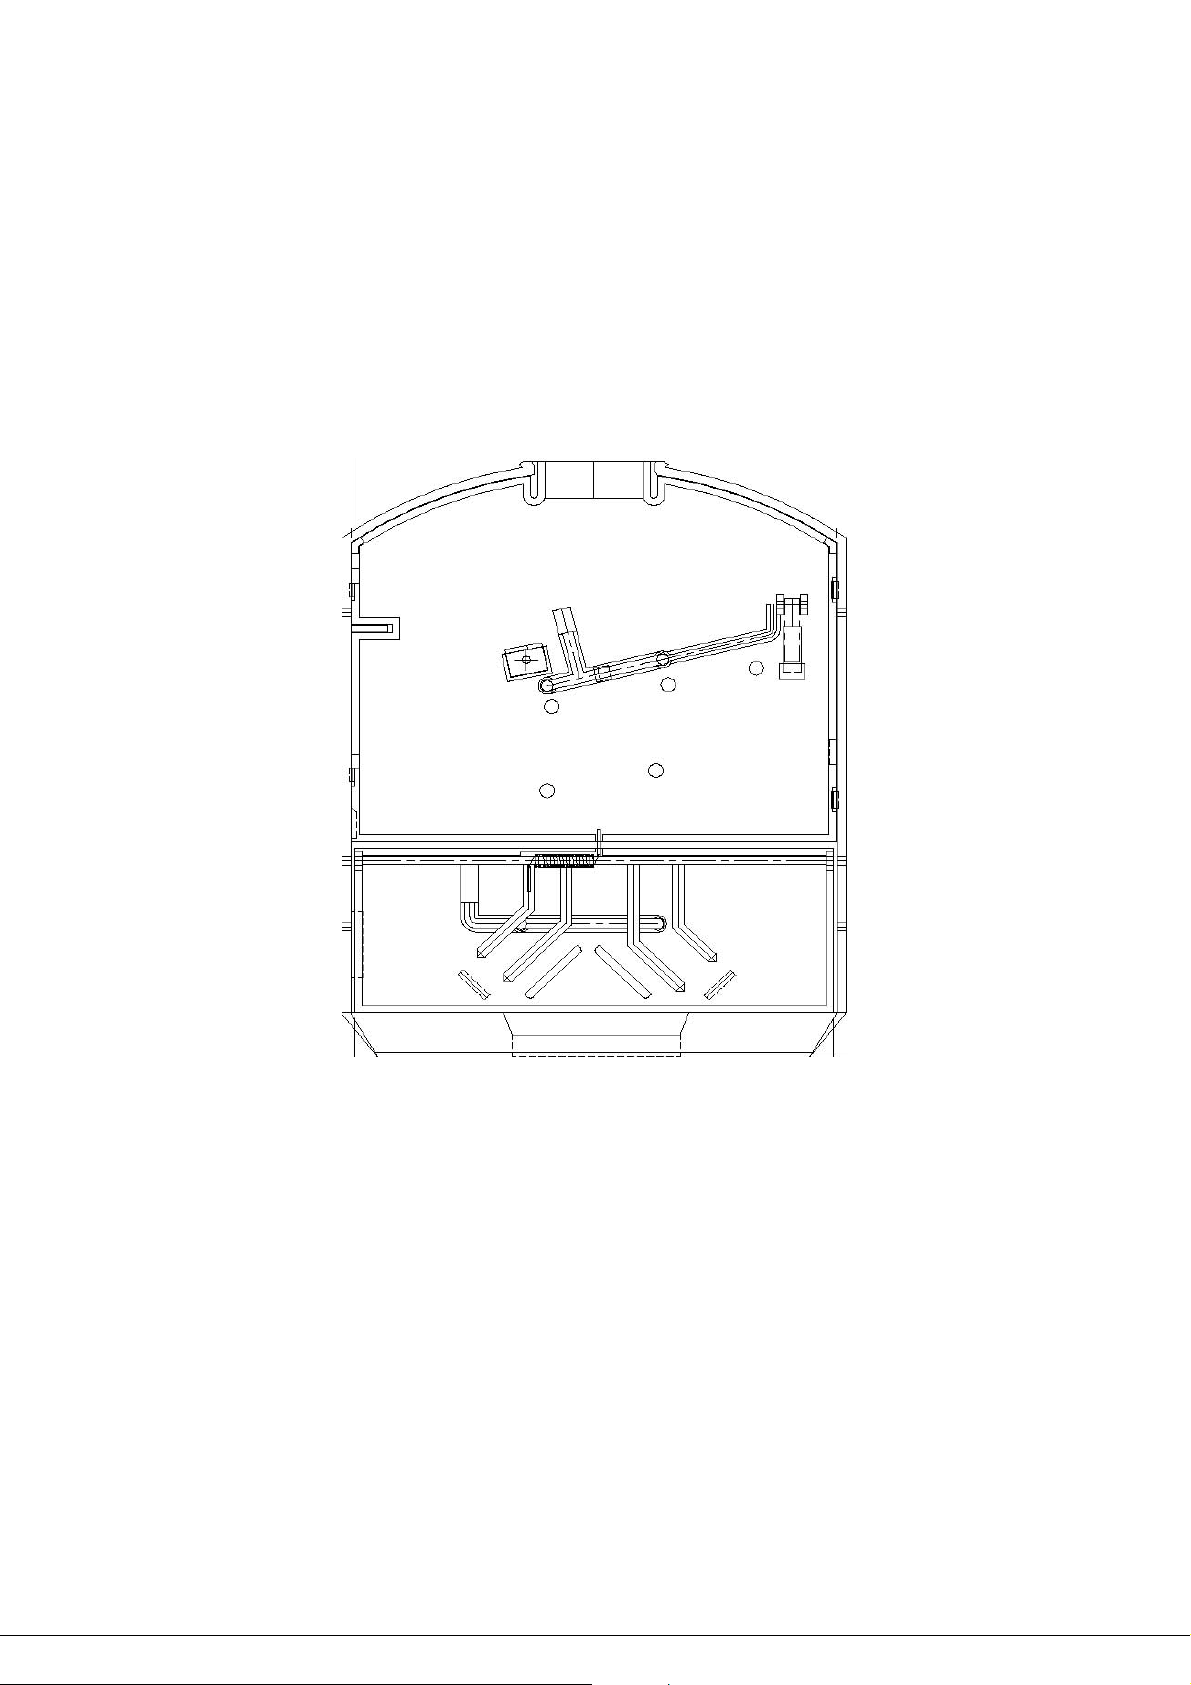
The below picture is shown coin selector structure. The specificati on of it is as follows.
- Supports 1 Rs and 5 Rs.
- Maximum two coins for 1Rs and 5Rs. Under maximum insertion like two 1Rs and two 5Rs,
when a user inserts coin, it will be refunded.
- If a user inserts coins within 1 sec between coins, they will be just refund to avoid coins
jam.
1.4 Coin Box
A coin box installed at bottom of ICCB can store 500 coins for 5Rs. internally, whenever coins
drop into coin box, Coin Counter increase by one and it let “Box Full” message come out when it
would reach 500 coins and a user cannot make a call under this message. At this moment, a
shop keeper (an operator ) can initial this coin counter with removing coins from coin box. To
Page 5
initialize coin counter, a operator should go “Programming Mode” menu and make counter zero.
2. Menu Construction
2.1 Menu Tree
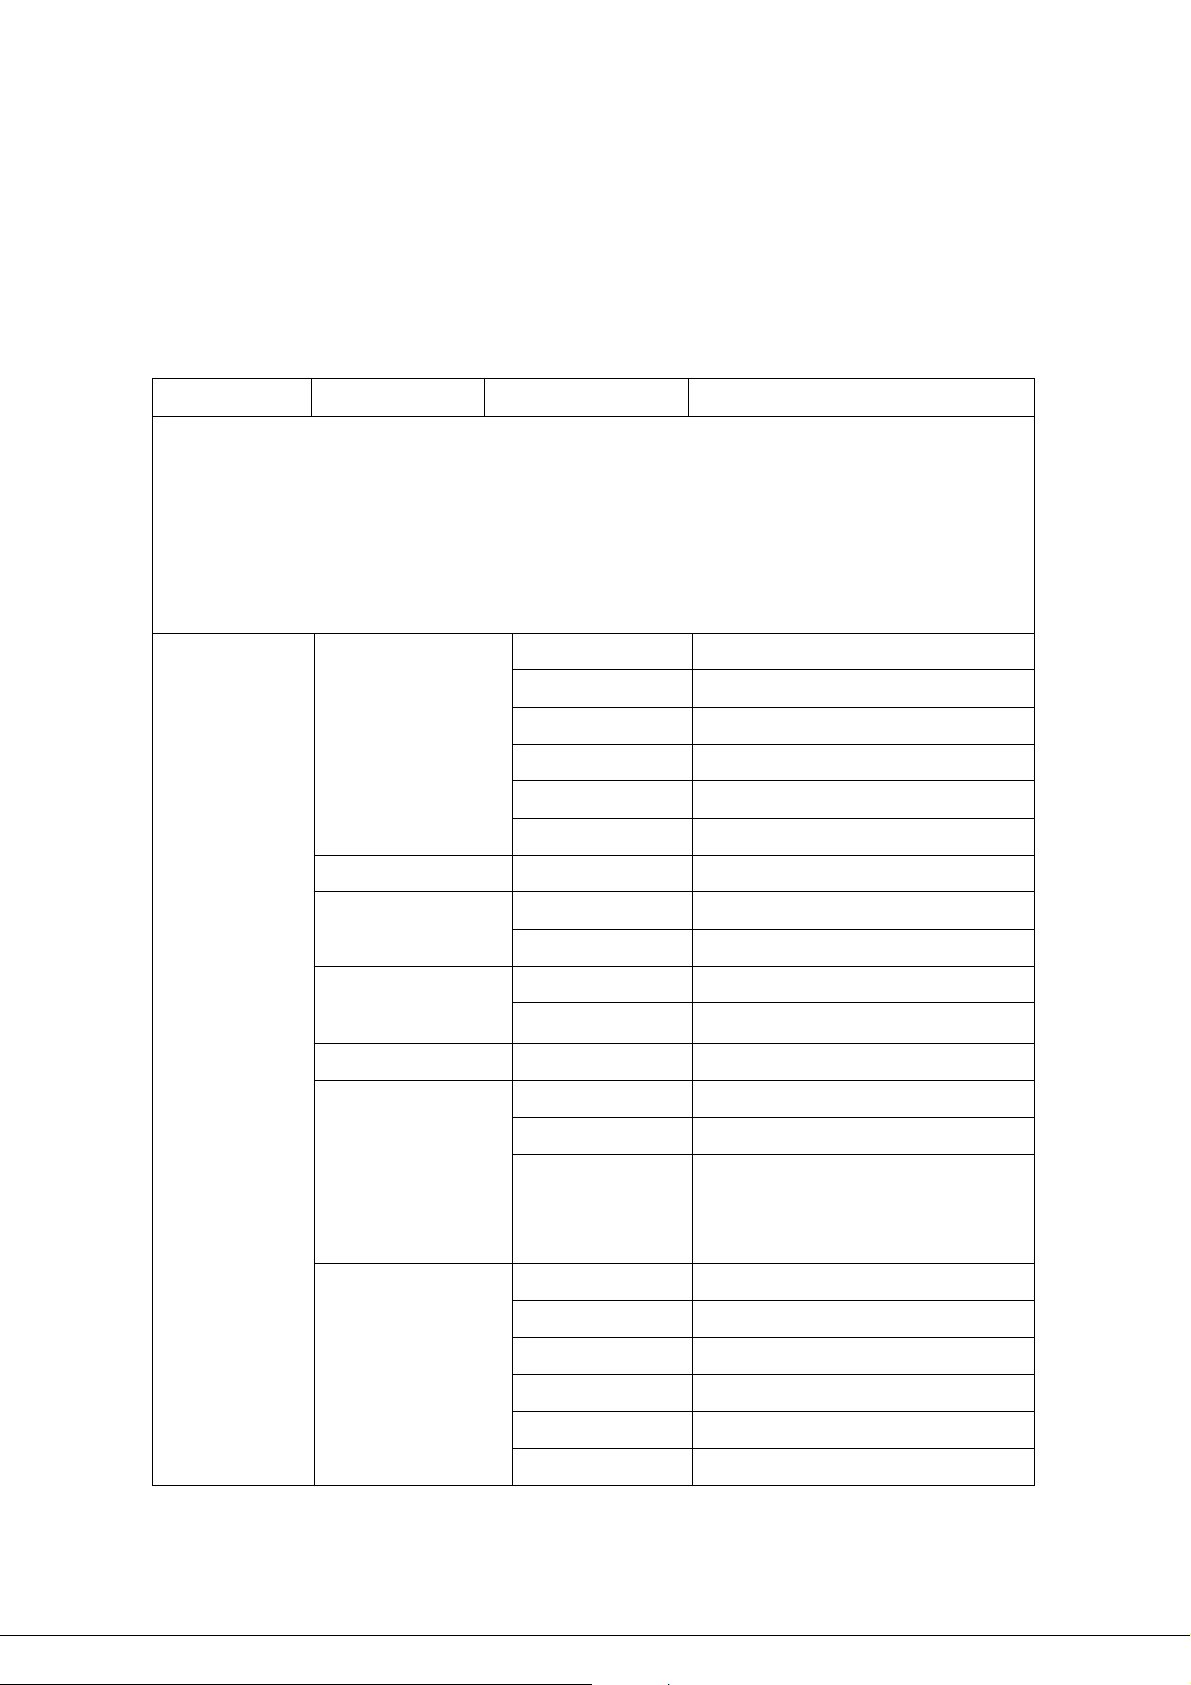
Root Menu Sub Menu Description
To enter to the programming mode (ICCB Mode)
1) Open the ICCB.
2) To enter to this menu, Please follow below instructions.
On-Hook handset -> Press Programming mode button on the main board -> Off-Hook handset.
3) First menu, “1.Cash Record” will be displayed (ICCB Mode).
Programming
Mode
(ICCB
Mode)
1:Cumu. Coins
2:Current Coins
3:Cumu. Reset
1:Cash Record
4:Current Reset
5:Daily Coins
6:Last Call List
2:Local Prefix 92 CODE ______
MT code YES
3:MT code option
MT code NO
1:Enter code
4:Tariff
2:Tariff View
5:ICC NUMBER
1:Show Option
2:Banner
6:Display
3:Date&Time
Show to Cumulative Coins
Show to Current Coins
Reset Cumulative Coins
Reset Current Coins
Show to Daily Coins
Show to list for last call
Selection to Banner or Date&Time
Editing the Banner “TATA Indicom”
a) AM/ PM Type
b) 24 Hours Type
7:Sound
1:Earpiece Vol
2:Ringer Vol
3:Speaker Vol
4:Key beep Vol
5:Ring Tone
6:Service Alert
c) Day of Week Type
Page 6
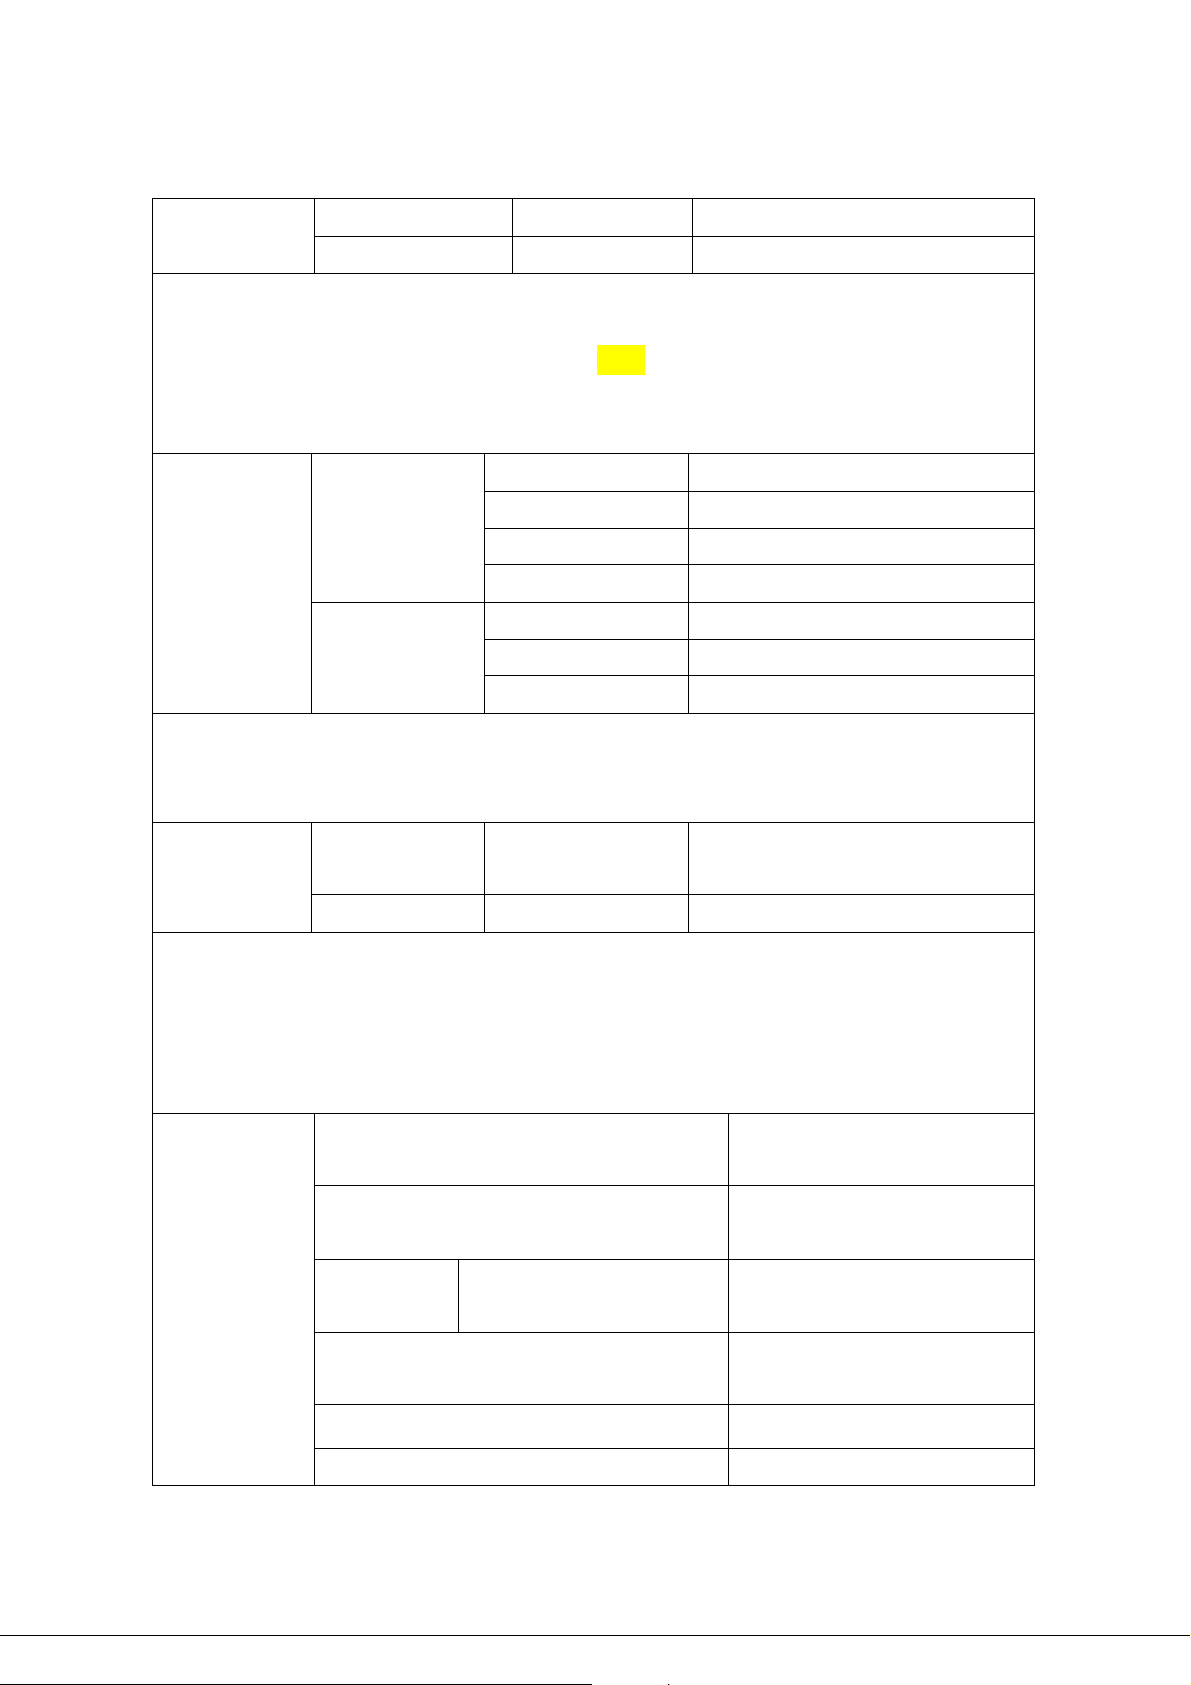
8:S/W Version
9:Password
To enter to the CDMA mode
1) Press the short keys follows “624709247*2690”
2) The message on LCD will be displayed “Enter Code ****”.
3) Enter your password “0000” ( It can be changed )
4) First menu, “1.Setting” will be displayed.
1:Setting 1:Voice Privacy
2:DTMF Tone
3:Password
CDMA Mode
4:AutoCall Time
Menu
1:S/W Version
2:Version
2:H/W Version
3:PRL ID
1) To enter to Conversation Menu.
2) Press the “Redial” Button on Conversation
3) You can show the LCD message “1.Voice Priv acy”
Tariff Password
Conversation
1.Voice Privacy
Menu
2.DTMF Tone
To enter to NAM Mode Menu.
1) Press the short keys follows “47*869#*75259#”
2) The message on LCD will be displayed “PASSWORD ______”.
3) Enter your password “000000” ( It can be changed )
4) First menu, “1.GENERAL” will be displayed.
01. ESN
(Electronic Serial Number)
02. CAI Ver
(Common Air Interface)
01. General
03.SO
(Service Option)
04. SCM
(Station Control Mark)
EVRC
(Enhanced Variable Rate Codec)
Read Only
Read Only
MSM6000 Chip just supported the
EVRC.
.
05. LOCK CODE
06. SLOT MODE
Read Only
Page 7
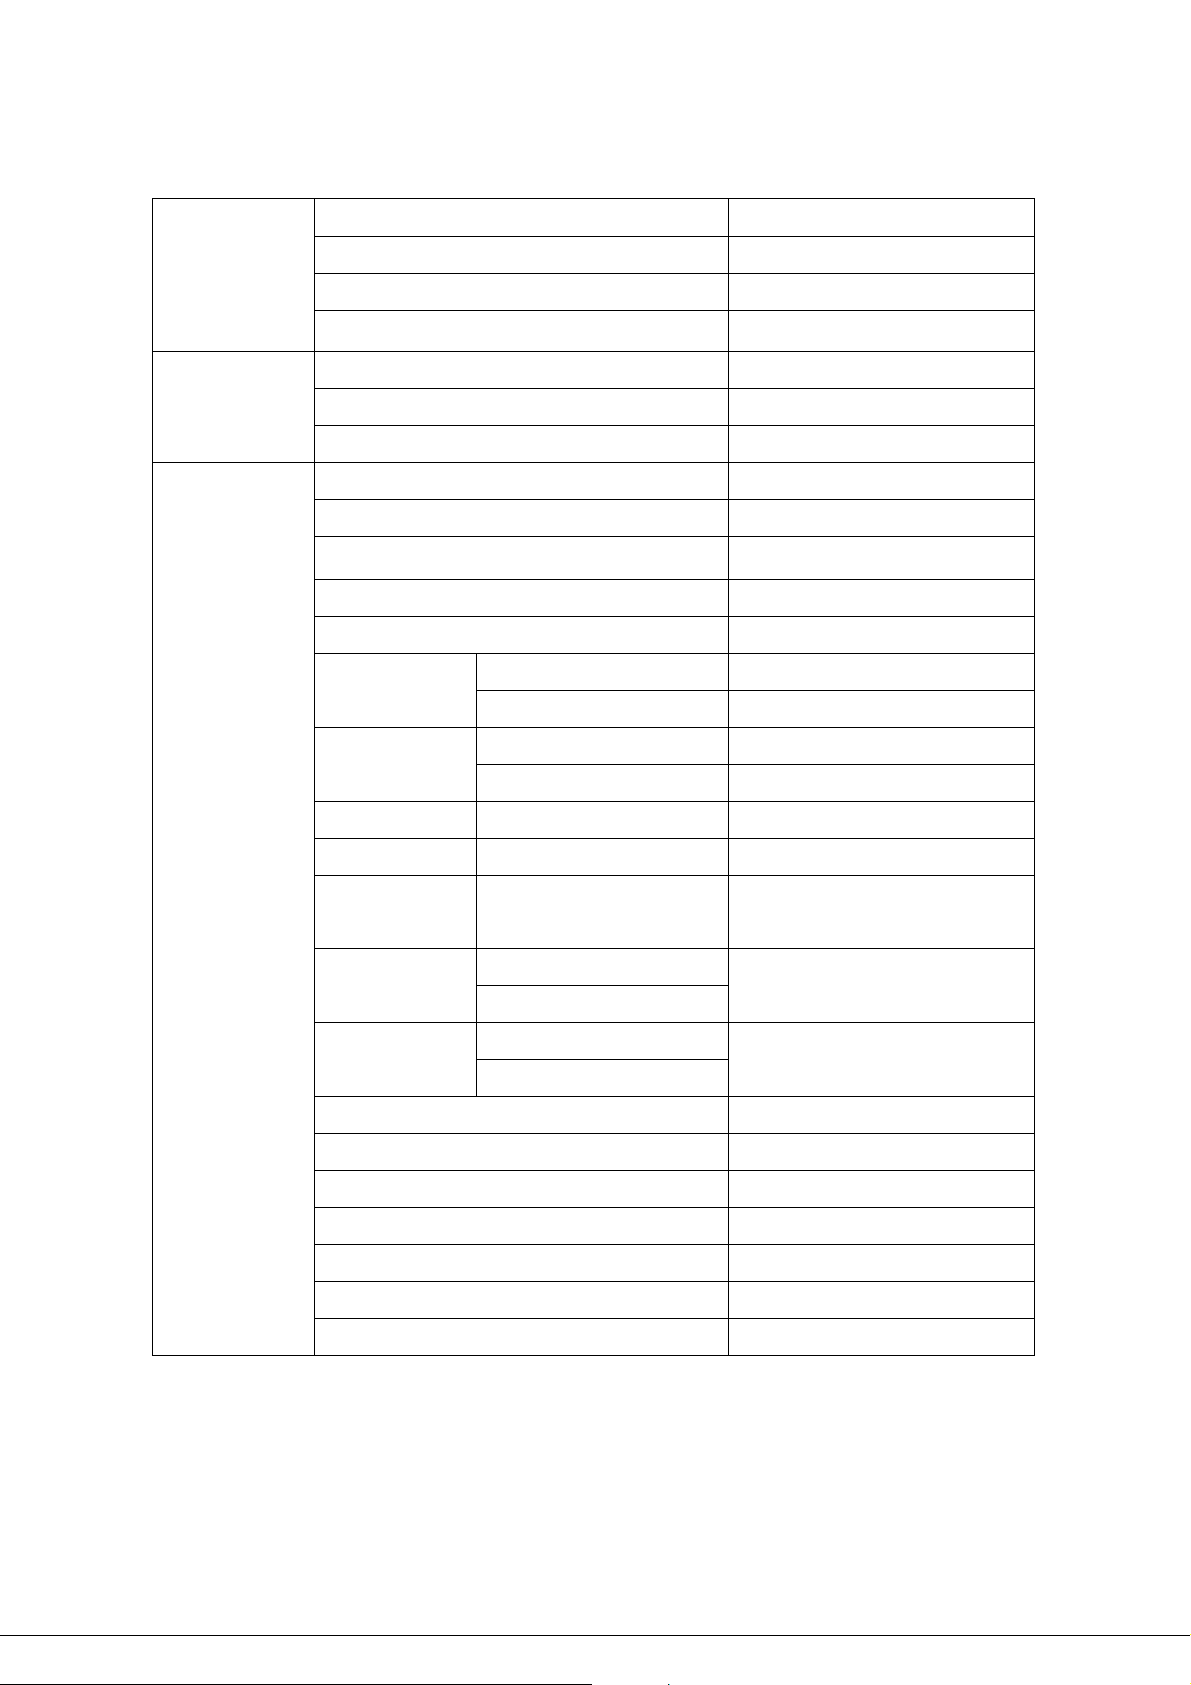
07. SLOT CYCLE INDEX
08. RC (Radio Configuration) For CDG2 Testing
09. SPC CHANG
10. SPC VALUE
01. Current NAM You can selection the NAM1 or NAM2
02. Setup NAM
01. NAM 1
or
02. NAM 2
02. NAM 1
03. NAM 2
01. MCC (Mobile Country Code) * 3 digit
02. MNC (Mobile Network Code) * 2 digit
03.MIN *10 digit
04.PHONE NO# (Directory Number) * 10 digit
05. ACCOLC (ACCess OverLoad Class) 0~ 15
06.PRIMARY CH.
07.SECOND CH.
08. ACQ SID
09. LOCK SID
10.H-S/NID Enable
11. HOME SID/NID
01. Primary CH System A
02. Primary CH System B
01. Secondary CH System A
02. Secondary CH System B
CDMA HOME SID Enable
Yes or No
Home SID1~20
Home NID1~20
12.SID/NID LOCK
LOCK Home SID1~20
LOCK Home NID1~20
13. CDMAPREF SYSTEM
14. PRL ENABLE
15. PRL ID
16. OTAPA ENABLE
17. MOB_TERM_HOME
18. MOB_TERM_FOR_SID
19. MOB_TERM_FOR_NID
Page 8
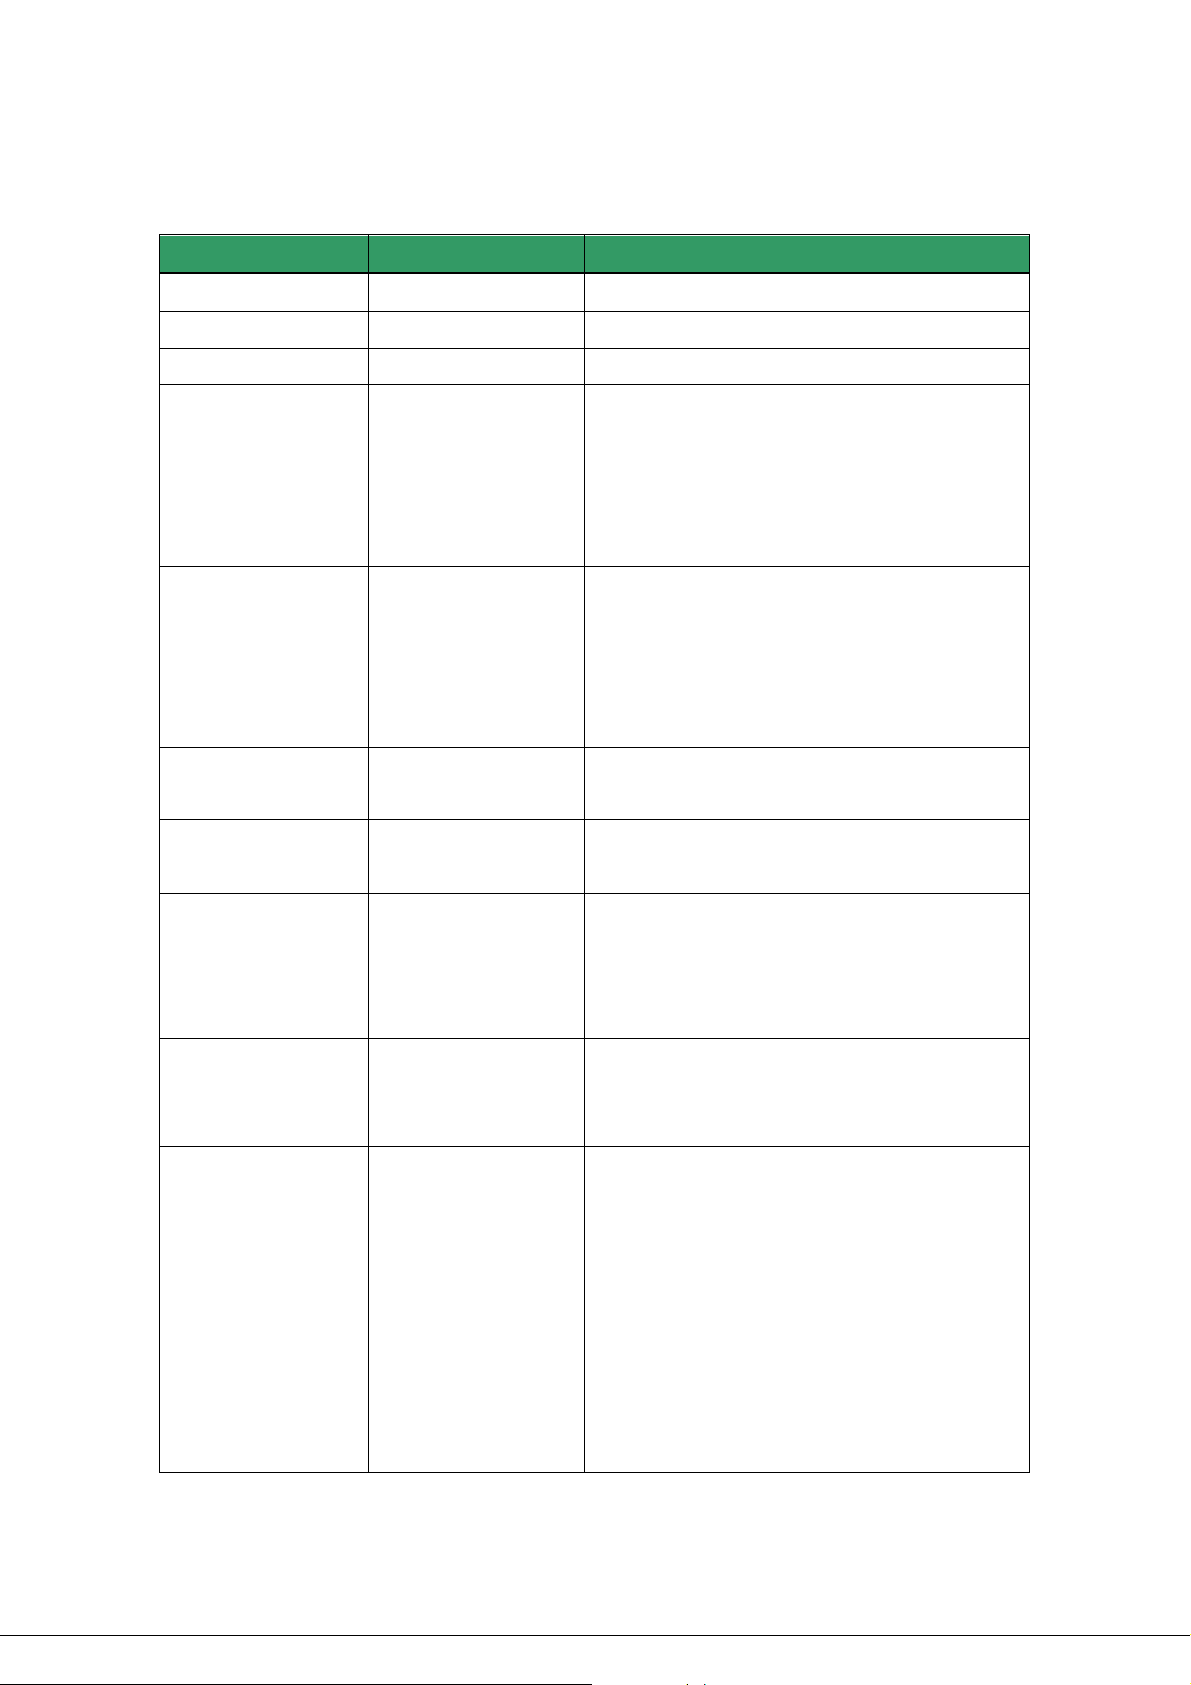
2.2 Short Key List
Key Items Action Keys Description
A-Key *75259#147*359#
CDMA Mode Menu 624709247*2690
NAM Mode Menu 47*869#*75259#
Set ICCB Password
to default value.
Program mode
push button + 5
times pressing
To enter A-Key.
To enter to CDMA Menu.
To enter to NAM Mode Menu.
Whenever Shop keeper would forget ICCB
Password, he can use it to make a password
as default “3842”
emergency button +
'1036'
Set CDMA Menu
Password to
default values.
Program mode
push button + 5
times pressing
Whenever Shop keeper would forget CDMA
mode Password, he can use it to make a
password as default “0000”
emergency button +
'4263'
Master Clear ##**90 or
##**47*869#90
Current Coin Count *1*
In the factory, for product’s initialization for
menu’s values.
It will display how many coins are there in box
Conversation Menu Conversation state
+ Redial button
Conversation
Emergency button
Volume for
earpiece
NAM Mode Menu 47*869#*75259#
currently.
To see the conversation menu on conversation
as follows
1) Voice Privacy
2) DTMF Tone
To adjust earpiece volume level.
To enter NAM mode
1) General
2) Setup NAM
A. Current NAM
B. NAM1 => JUST USED
C. NAM2
For examples, you can change to the PRL
enabled/Disable, HOME SID/NID or MIN
number.
Page 9
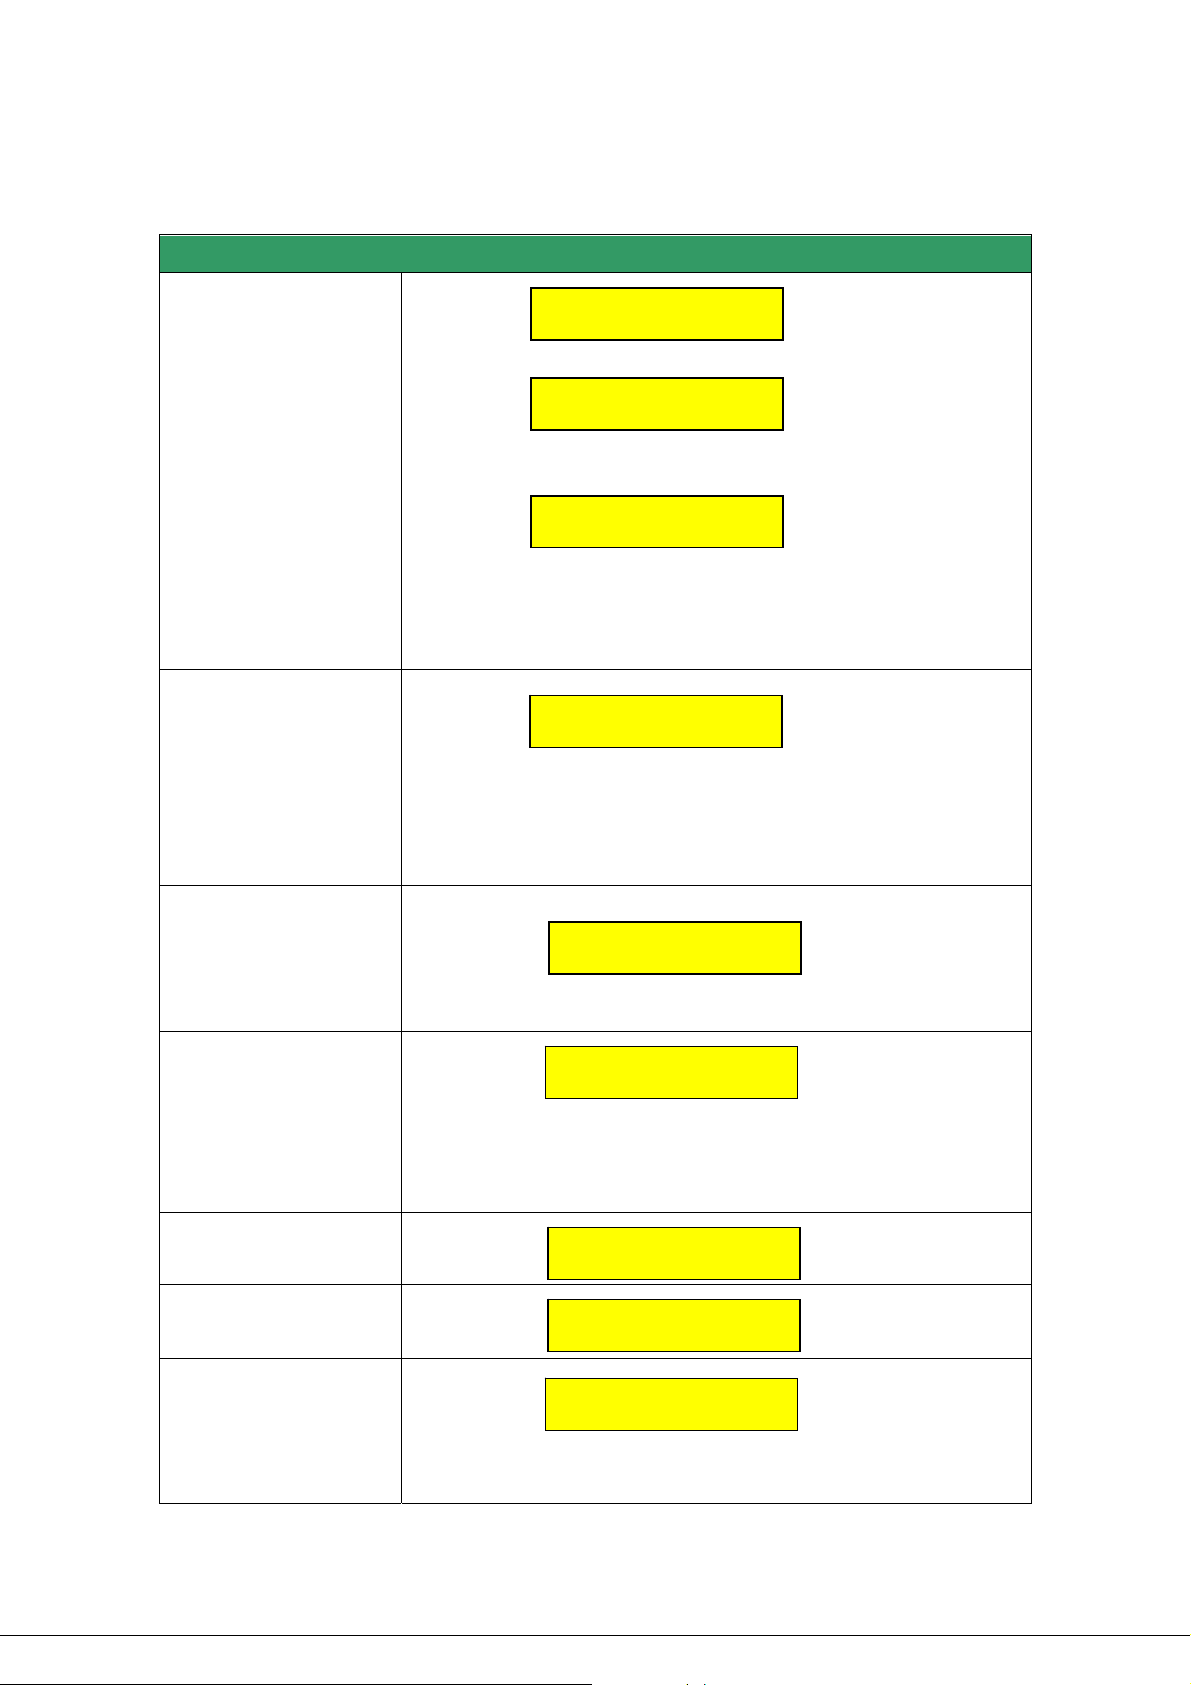
2.3 ICCB User Mode Display
1 Handset On-Hook
or
ICCB User Mode (Normal Call)
TATA Indicom
2 Handset Off-Hook
3 After Insertion coin.
or
According to Display Menu in CDMA Menu, you can change display type
like the upper. Default is logo as “TATA Indicom”.
- This screen request for insertion coin to make call. But registered free call
numbers are available.
- During 45 secs, you didn’t anything. Some alarm will be occurred on
handset.
MM/DD/YY hh:mm
INSERT COIN
PLEASE DIAL
4 Dial numbers
5 Not match with Tariff
6 Making Call
(In case of Ordinary Call)
7 Connected Call.
(in case of Ordinary Call)
- From Left, what you dialed will be displayed. Automatically it will make a
call in 4 secs after dialing numbers.
114
Not Available
Calling…
- On conversation, Value, time will be displayed( 00Rs Time 0:00 )
- Will display remained time and coin will be dropped in the inside bo x. At
00Rs Time 00:60
Page 10
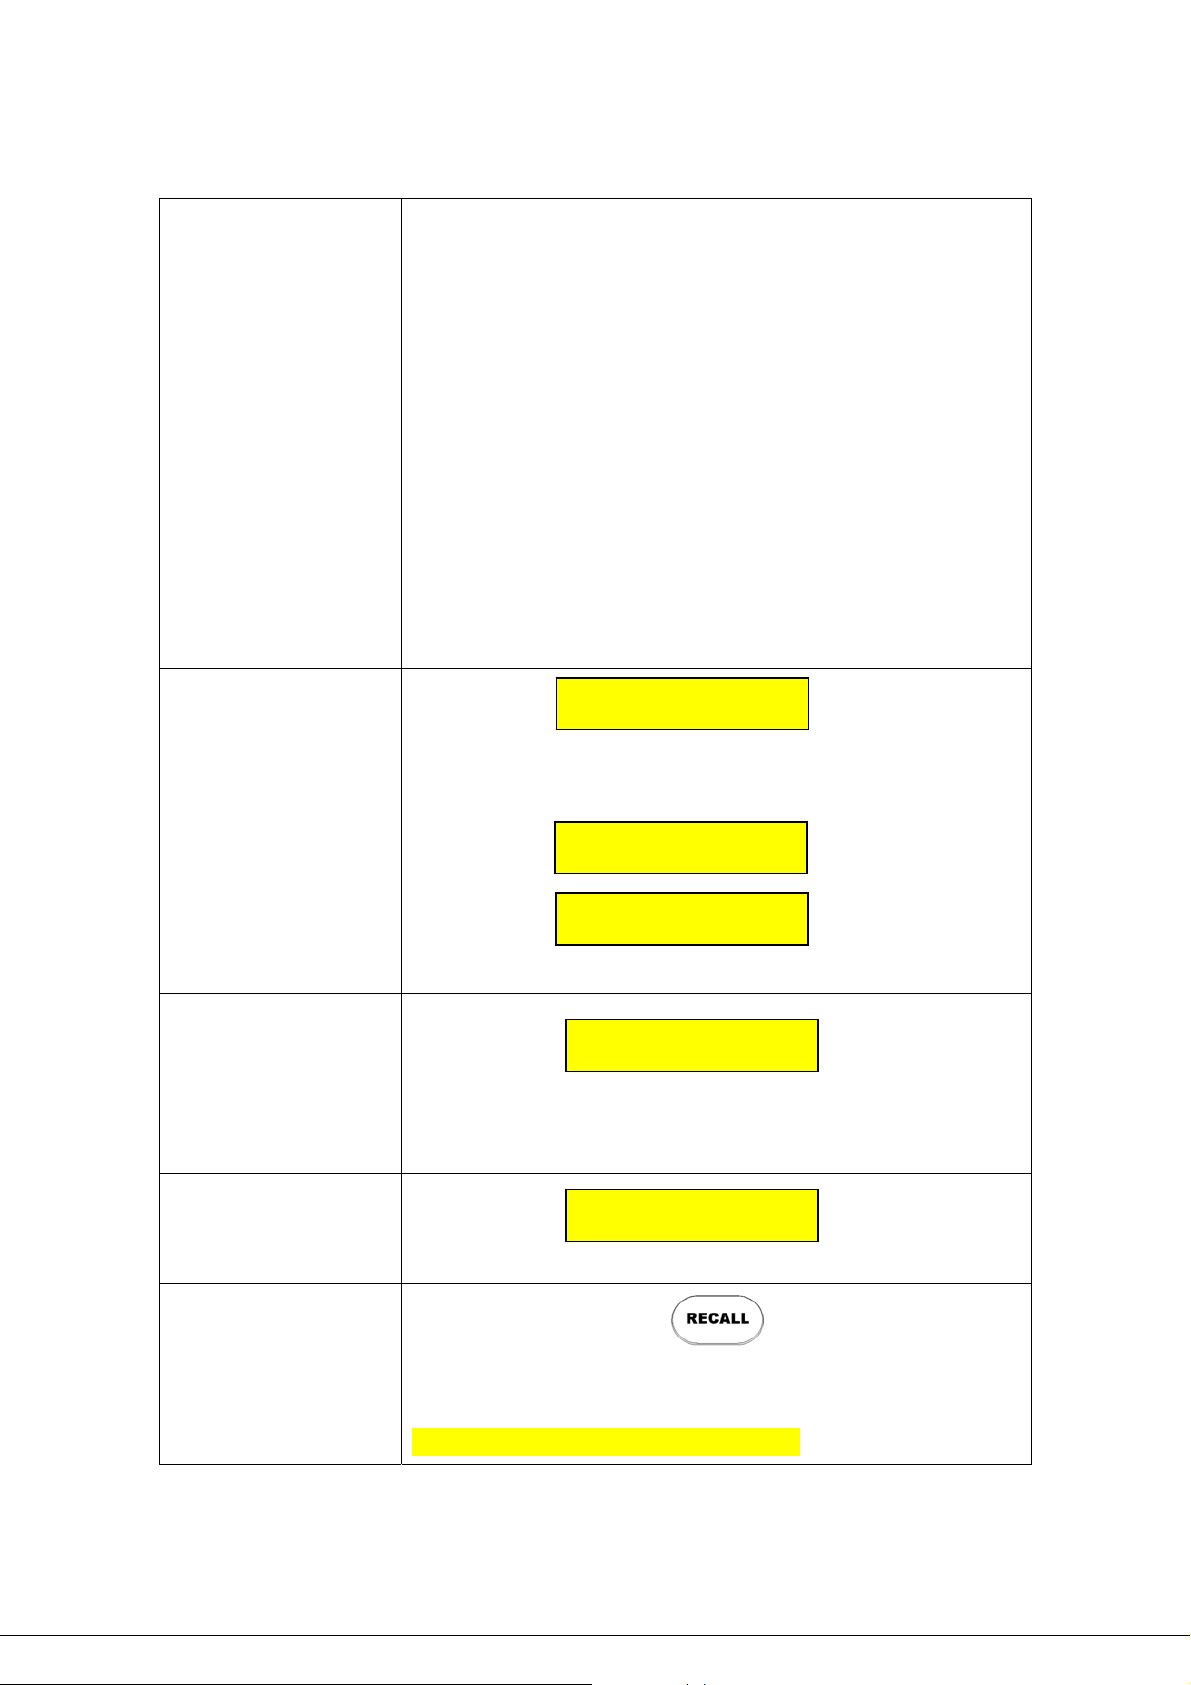
this time, whenever every 10 is remained, Alarm will be made one tim e
and after then after 2 secs until call ends, Alarm will be made.
- During alarm sound, If you would insert coin, Alarm sound will disappeare d
no more.
- In case of local call, After current 60 secs would be used up, just inserted
coin will be dropped to the box and new 60 secs will be displayed and
you can keep talking without stoping..
- If you don’t insert coin at this time, Call will end and screen will go to
“Insert Coin” screen.
( INSERT COIN )
- Available talking time for each inserted coin will be displayed as much as
value which was set on Call duration menu on ICCB mode.
% In case of international call, it is 10 secs.
8 Conversation Menu
(by Pressing Redial Button)
9 Ending call
10 Incoming
Conv. Menu
- On the conversation, If you press Redial Button, Conversation Menu
will come up as follows.
1.Voice Privacy
2.DTMF T one
- Totally elapsed time will be displayed during 15 sec. ( Need to be
discussed with PTB team )
00:00
Incoming Call.
11 Recalll
- In case ICCB has remained time after call.
Disaply text should be discussed with PTB team.
Page 11
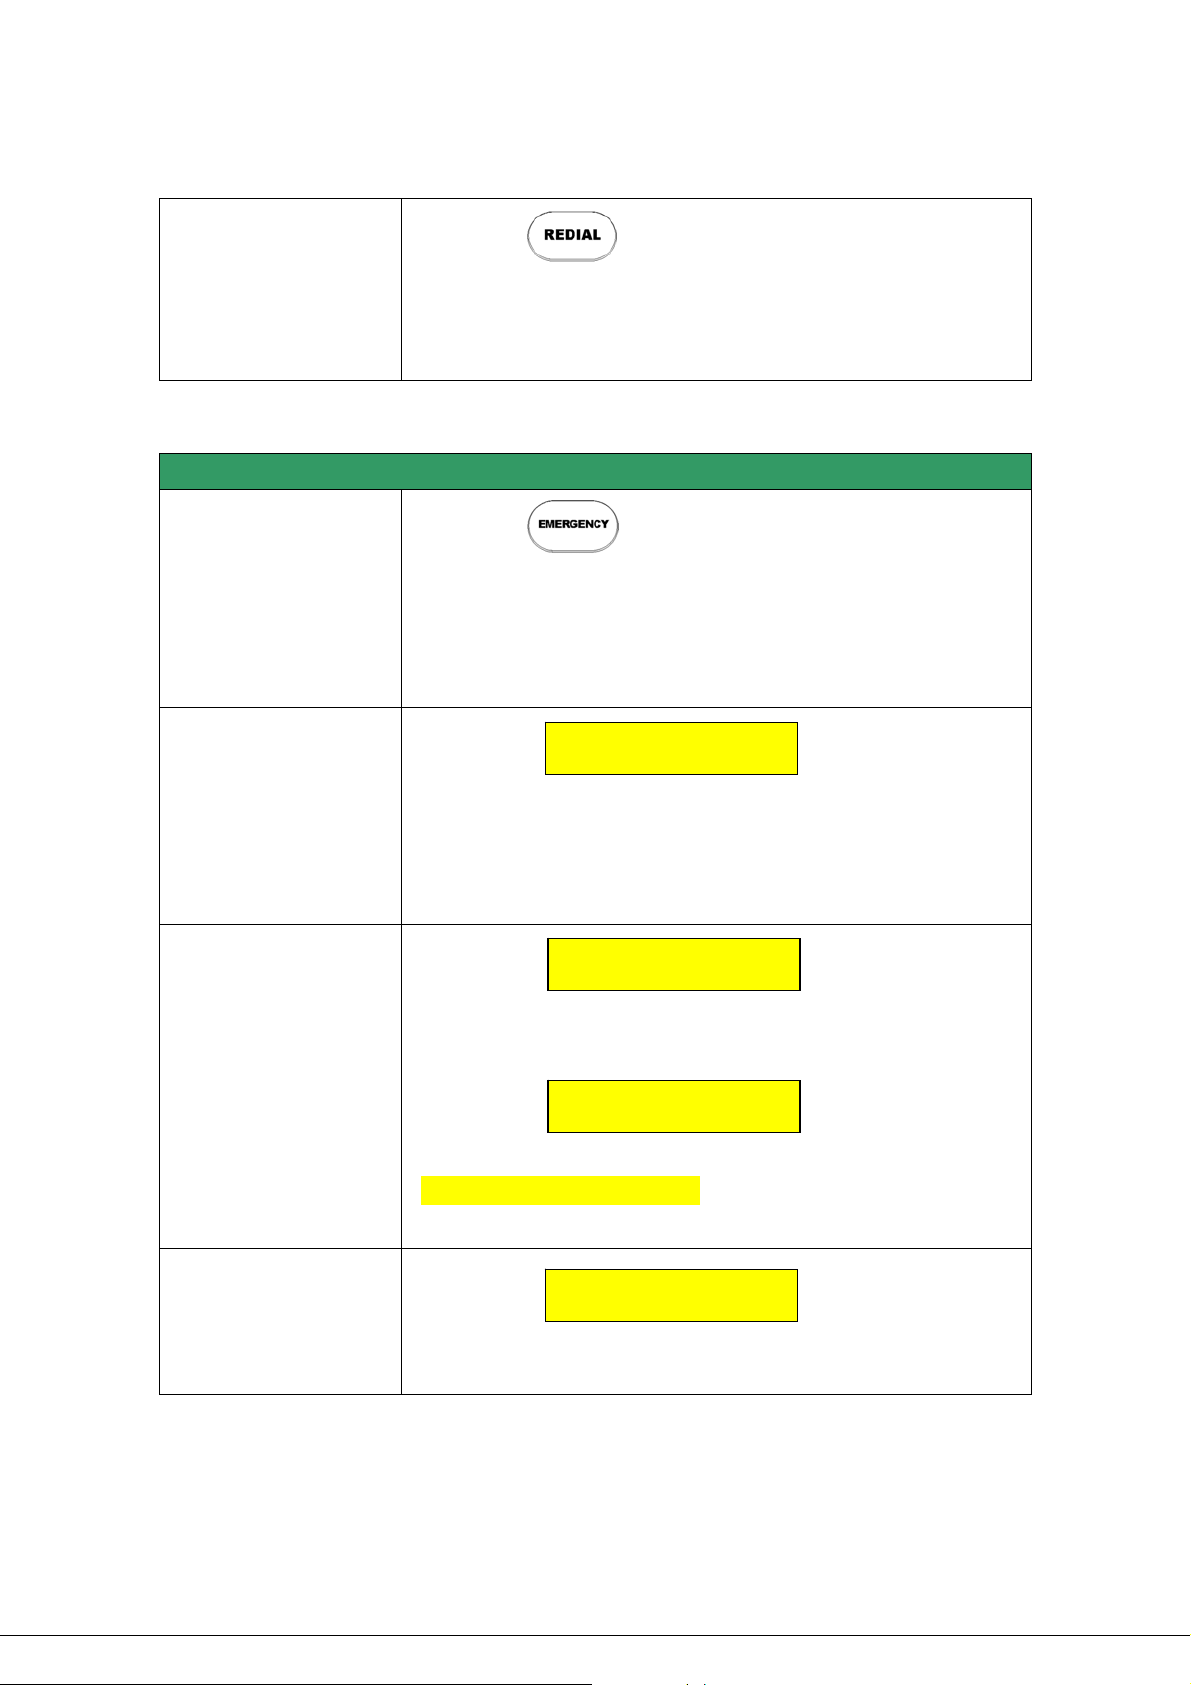
12 Redial
- in case of only IDLE state, Pressing Redial key can dialed last numbre
which was made successfully.
- In case of no history, nothing is happened.
2.4 ICCB User Mode Display for Emergency Call and Toll Free
ICCB User Mode (Emergency Call)
1 Emergency button
2 Dial numbers
3 Try to make call
- If you press Emergency button, “Please Dial…” will be displayed in
stead of “Insert Coin” message on LCD
- Be used at Virtual calling card number and real emer gency number
like 100,101.
- Available emergency numbers are 100, 101, 102.
- If dialed number is not emergency number, “Not available..” message
will be displayed.
- On Calling, "Emergecny Call…" will be displayed
- In case of Toll free number, “Toll Free Call…” will be displayed
100
Emergency Call…
Toll Free Call…
4 During Conversation
( It should be discussed with JP)
- Only Time will be displayed. ( Time 0:00 )
Time 00:60
Page 12
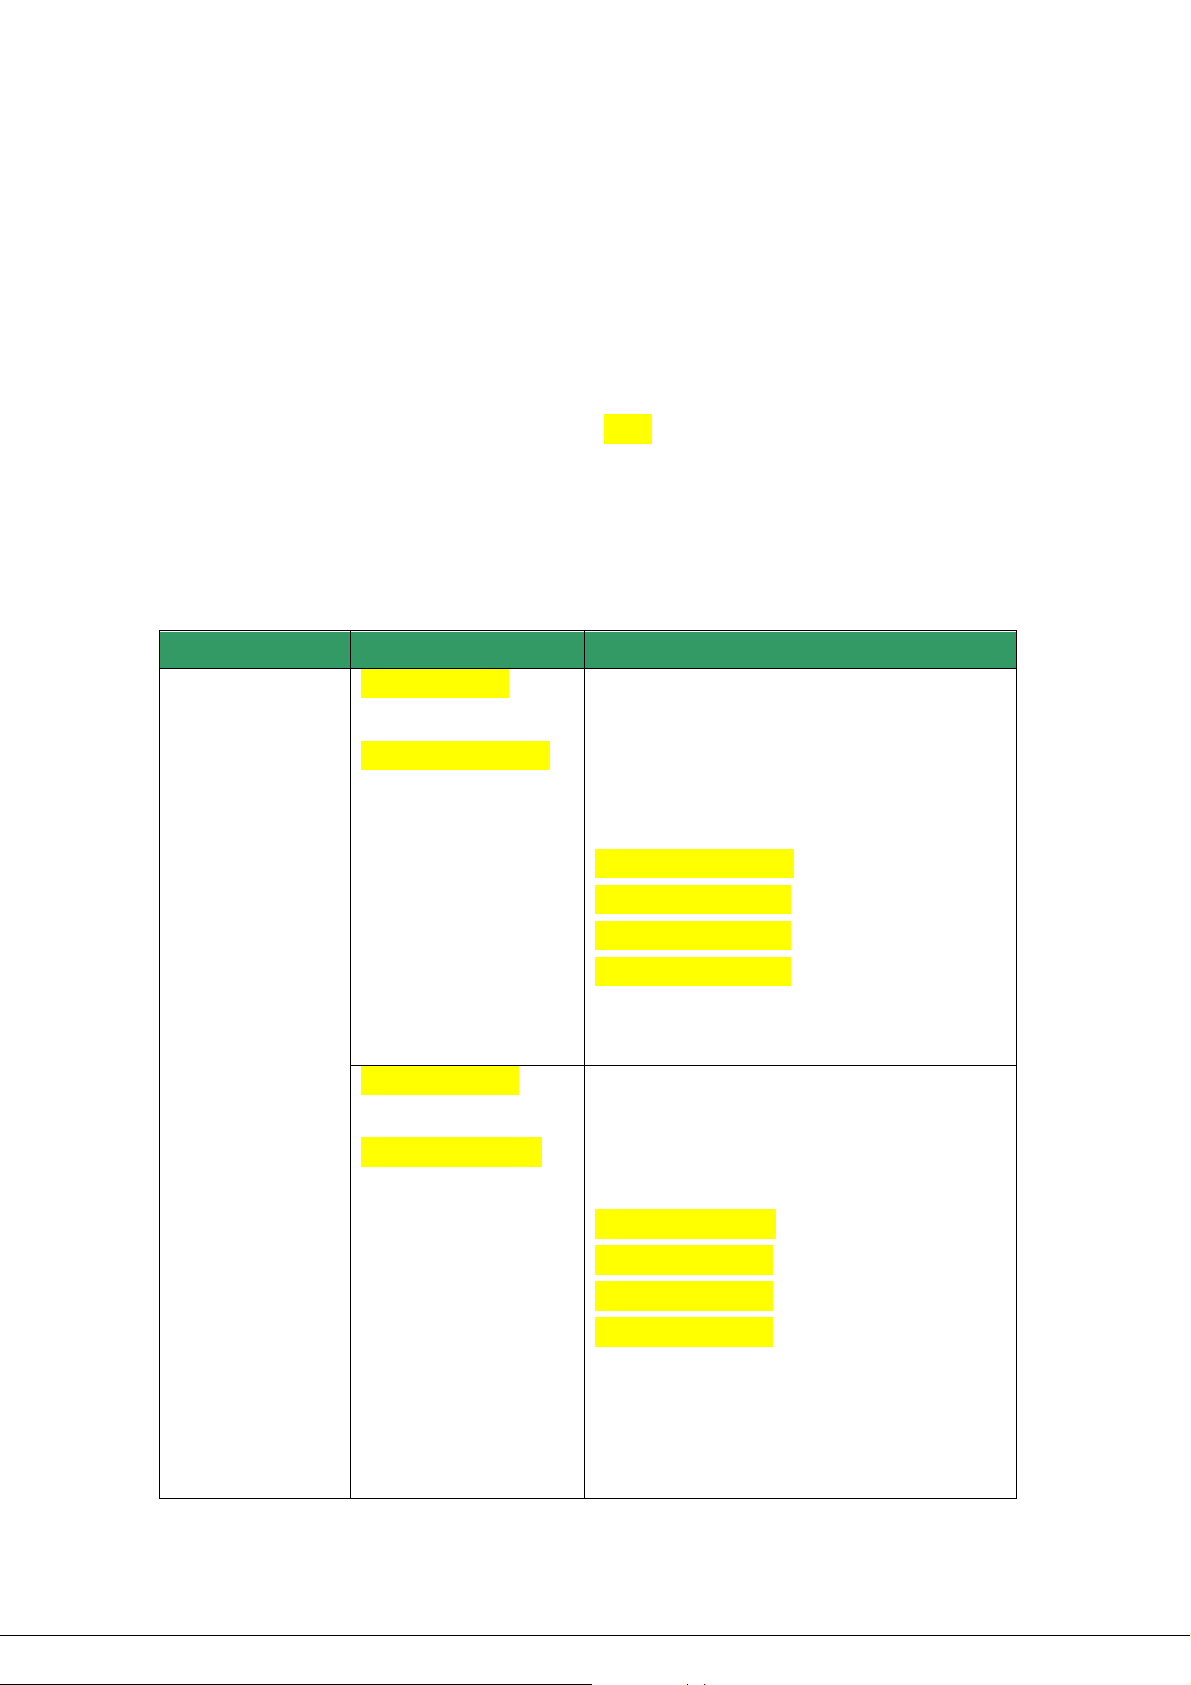
2.5 ICCB Menu ( Programming Mode)
To enter to the ICCB Programming Mode
1) Open the Coin Box
2) To enter to this menu, Please follow below instructions.
On-Hook handset -> Press Programming mode button on the board -> Off-Hook handset.
3) The message on LCD will be displayed “Enter Code ****”.
4) Enter your password “3842” ( it can be changed )
5) First menu, “1.Local Prefix” will be displayed (ICCB Mode)
Press '#': Saved and go back to the programming mode.
Press ‘*’: Go back to the programming mode.
Menu Display Sub Menu Display Description
1:Cash Record 1: Cumu. Coins
Press ‘#’
Cumu.Tot 0000000
Press ‘Recall’ or
‘Redial’
Press ‘*’ or ‘#’
2: Current Coins
Press ‘#’
Curr.Tot 00000
Press ‘Recall’ or
‘Redial’
Press ‘*’ or ‘#’
Press ‘1’, show to cumulative coins collected since
installation.
Press ‘Recall’, Menu Next Up as follows
Press ‘Redial’. Menu Next Down as follows
Cumu.Tot 0000000
Cumu.Use 0000000
Cumu.5Rs 0000000
Cumu.1Rs 0000000
Press ‘*’, Go back to the root menu.
Press ‘#’,Saved and go back to the root menu
Press ‘2’, show to current coins collected in the cash
box.
Press ‘Recall’, Menu Next Up as follows
Press ‘Redial’. Menu Next Down as follows
Curr.Tot 00000
Curr.Use 00000
Curr.5Rs 00000
Curr.1Rs 00000
Press ‘*’, Go back to the root menu.
Press ‘#’,Saved and go back to the root menu
% It counts the collected coins upto 700, After it shows
BOXFULL.
Page 13
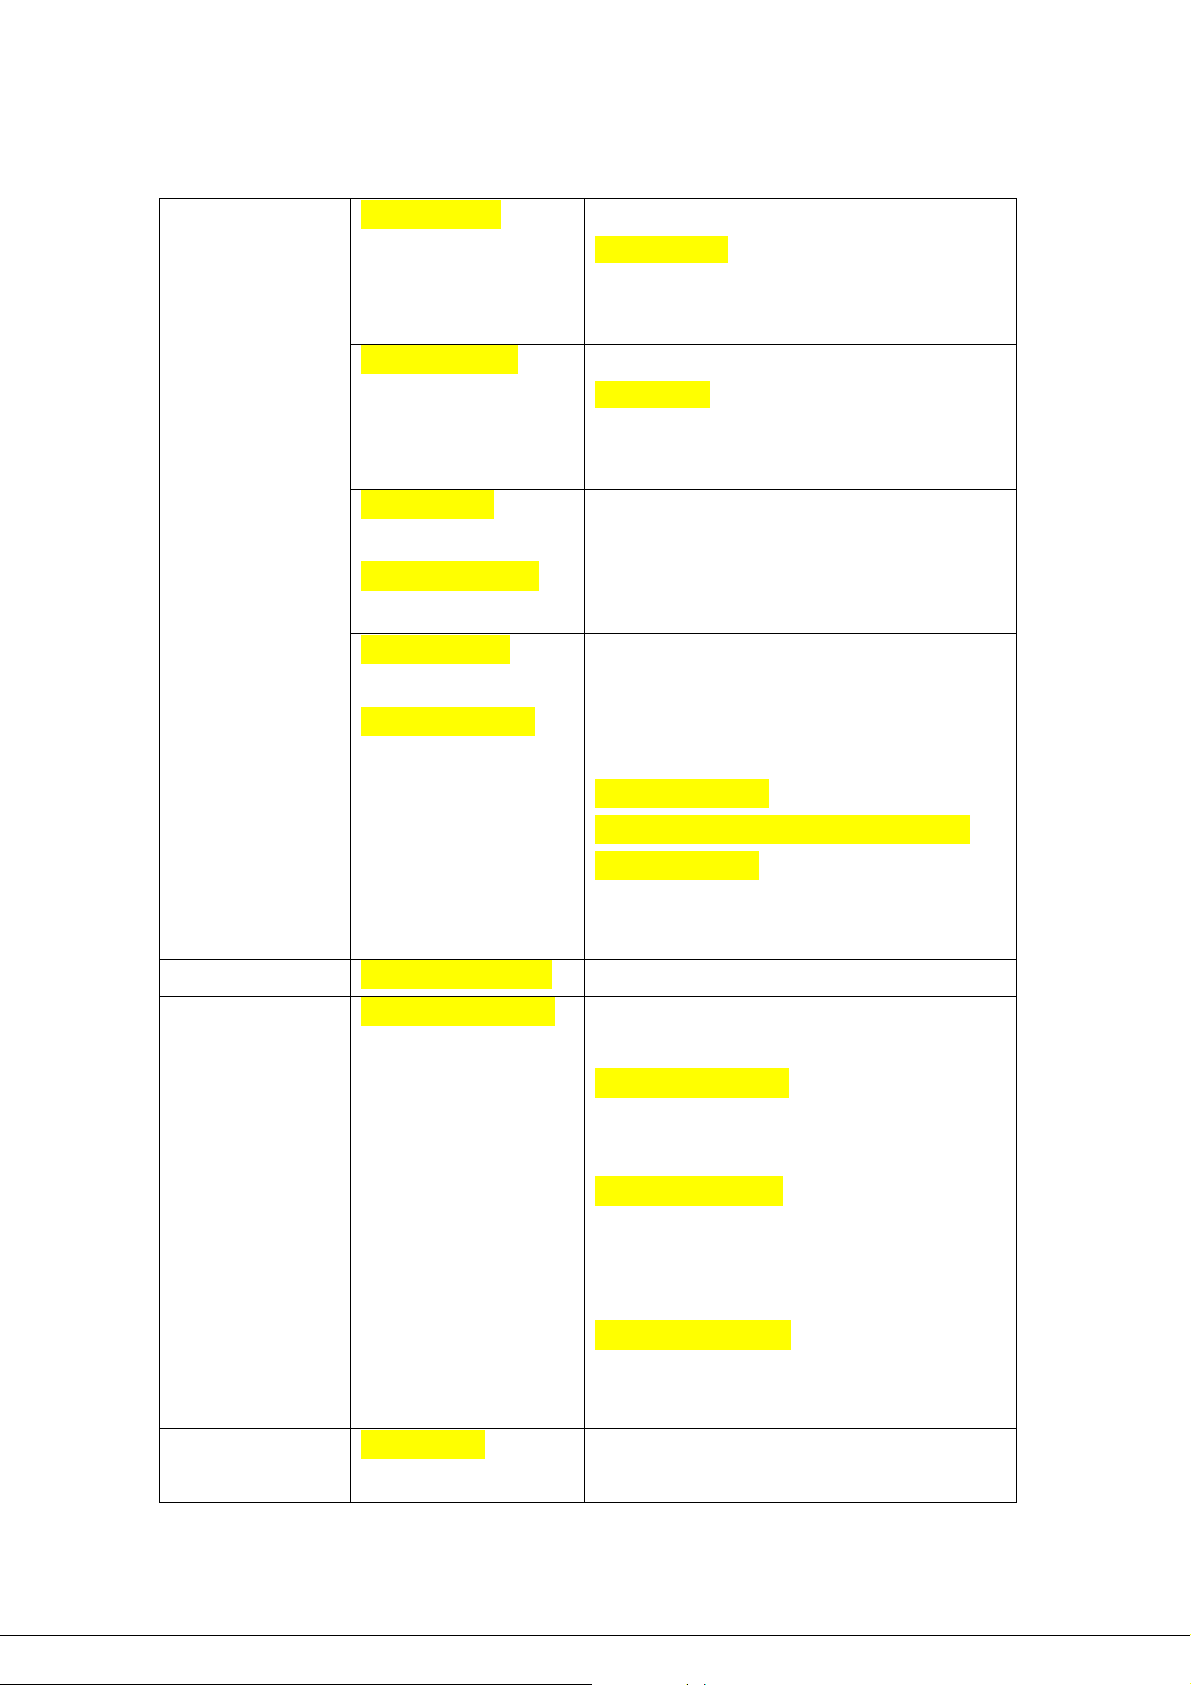
3:Cumu. Reset
Press ‘3’, You can erase cumulative coin counter
Press ‘#’
4: Current Reset
Press ‘#’
5: Daily Coins
Press ‘#’
Day 0000Rs 000Cn
Press ‘*’ or ‘#’
5: Last Call List
Press ‘#’
01: Phone number
Press ‘1’ or ‘2’, ‘#’
Del Cumu.Coins?
Press ‘*’, Go back to the root menu.
Press ‘#’,resetting the current coin counter.
Press ‘4’, You can erase current coin counter.
Del Cur.Coins?
Press ‘*’, Go back to the root menu.
Press ‘#’,resetting the current coin counter.
Press ‘5’, show to day total rupee with coin counts.
Press ‘*’, Go back to the root menu.
Press ‘#’,Saved and go back to the root menu
Press ‘5’, show to last calls information with number, time
and rupee about up to 10 calls.
Press ‘1’, Move Next Up for last calls.
Press ‘2’, Move Next Down for last calls.
01: Phone number
2:Local Prefix 92 Code XXXXXXX
3:
MT Code Option
MT code Yes
Press ‘Recall’, ‘Redial’
Press ‘*’ or ’#’
Press ‘#’ => Show to the information as follows
Rs 0000 Coin 000
Press ‘*’, Go back to the root menu.
Press ‘#’,Saved and go back to the root menu
Press ‘Recall’, Move up to the next mode.
Press ‘Redial’, Move Down to the next mode.
MT code Yes
Press ‘*’, Go back to the root menu.
Press ‘#’
Enter Code 56
Press ‘1~9,0’, If you want to change the MT code, press
the number.
Press ‘#’, Updated the option
MT code No
Press ‘*’, Go back to the root menu.
Press ‘#’, Updated the option
4:Tariff
Press ‘#’
1:Enter Code
Press ‘#’
You can make tariff
Page 14
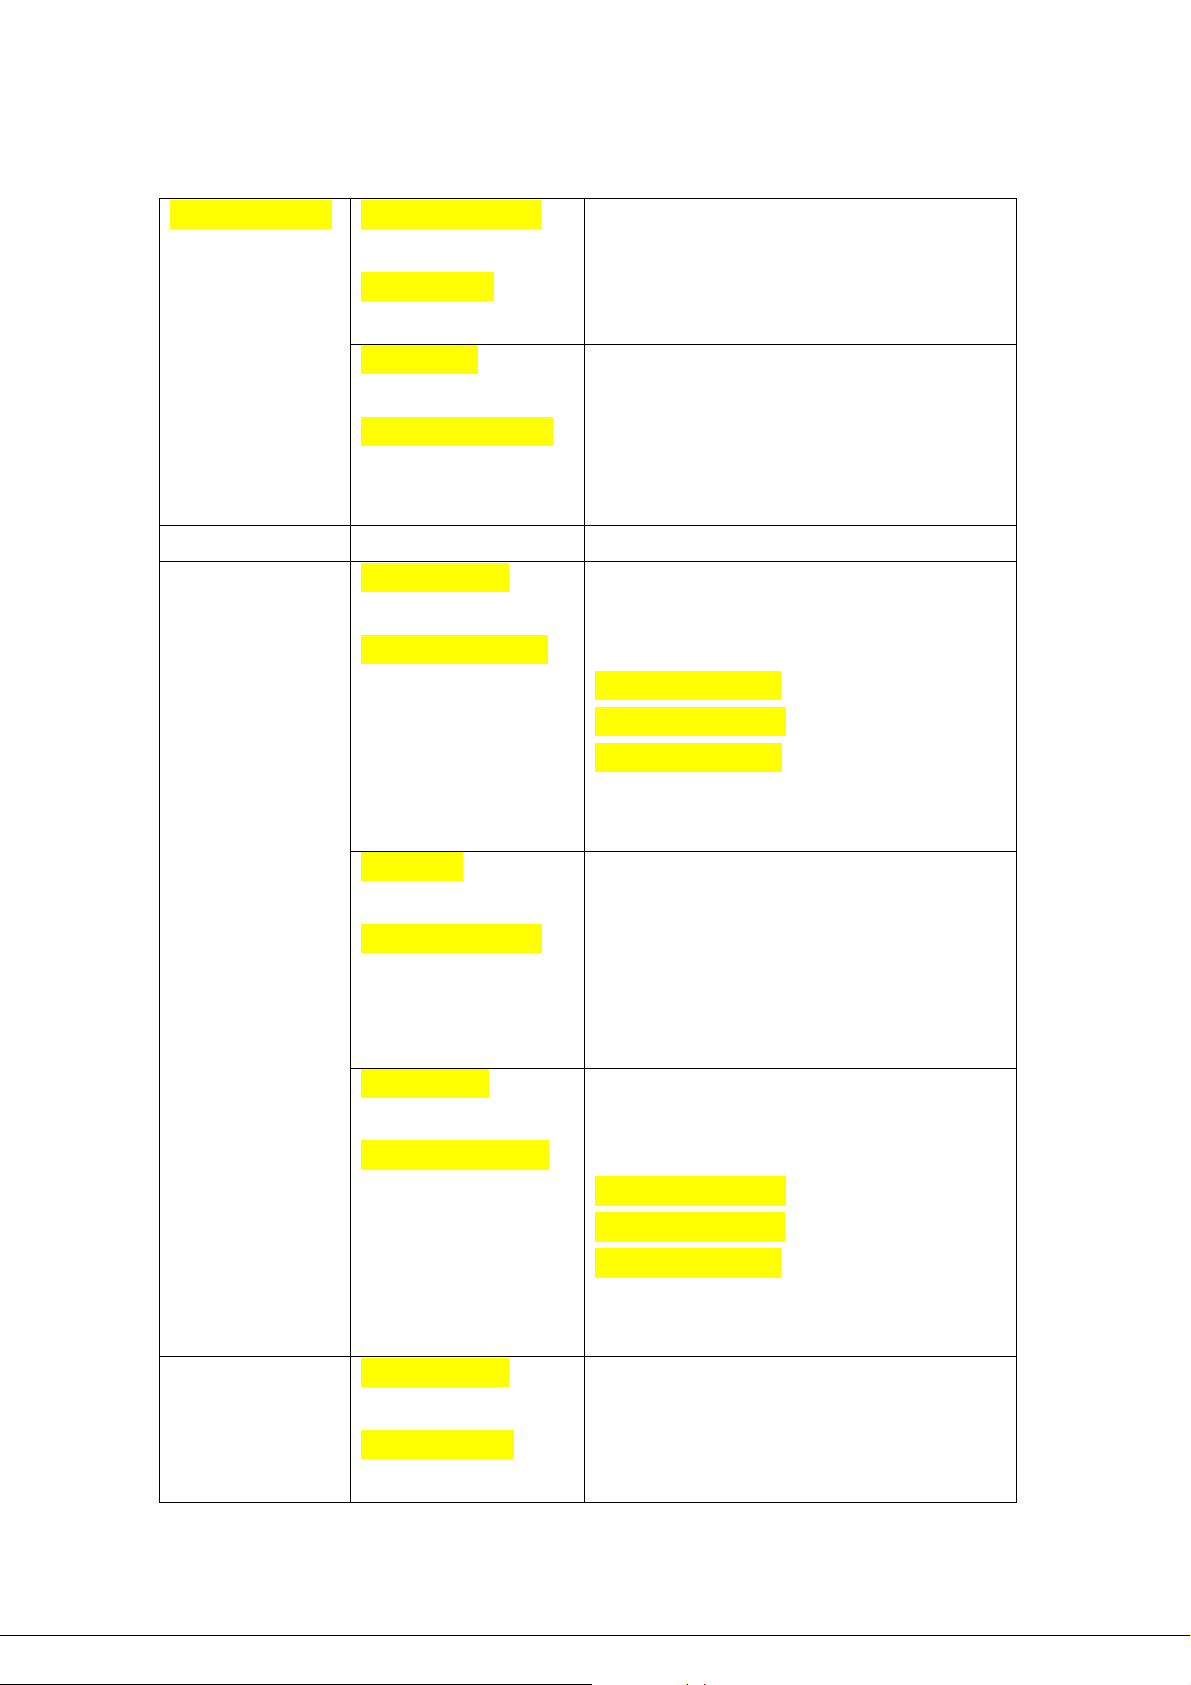
Enter PWD XXXX Input No XXXXXXX
Press ‘#’
Input sec XXX
5:ICC Number
Press ‘*’ or ’#’
2:View Tariff
Press ‘#’
01:91 20s
Press ‘Recall’, ‘Redial’
Press ‘*’ or ’#’
1: Show Option
Press ‘#’
Show Date&Time
Press ‘Recall’, ‘Redial’
Press ‘*’ or ’#’
2: Banner
Press ‘#’
You can show Tariff
press free call number
Press ‘1’. Entering the Show Option menu.
Press ‘Recall’, Move up to the next mode.
Press ‘Redial’, Move Down to the next mode.
Show Blank
Show Banner
Show Date&Time
Press ‘*’, Go back to the root menu.
Press ‘#’, Updated the option
Press ‘2’, You can show to currently banner.
Press ‘#’, Entering the editing mode
6:Display
7:Sound
‘ TATA Indicom ’
Press ‘*’ or ‘#’
3: Date&Time
Press ‘#’
DTSet DayOfWeek
Press ‘Recall’, ‘Redial’
Press ‘*’ or ‘#’
1: Earpiece V ol.
Press ‘#’
EarVol. >>>>
Press ‘Recall’, ‘Redial’
Press ‘Redial’, insert space
Press ‘Emergency.’, Big or Small alpha mode
Press ‘*’, Go back to the root menu.
Press ‘#’, Updated the option
Press ‘3’, Entering the Date&Time menu
Press ‘Recall’, Move up to the next mode.
Press ‘Redial’, Move Down to the next mode.
DTime DayOfWeek
DTime 24Hours
DTime AM/PM
Press ‘*’, Go back to the root menu.
Press ‘#’, Updated the option.
Press ‘1’, Entering the volume of earpiece menu
Press ‘Recall’, Volume Up
Press ‘Redial’. Volume Down
Press ‘*’, Go back to the root menu.
Page 15
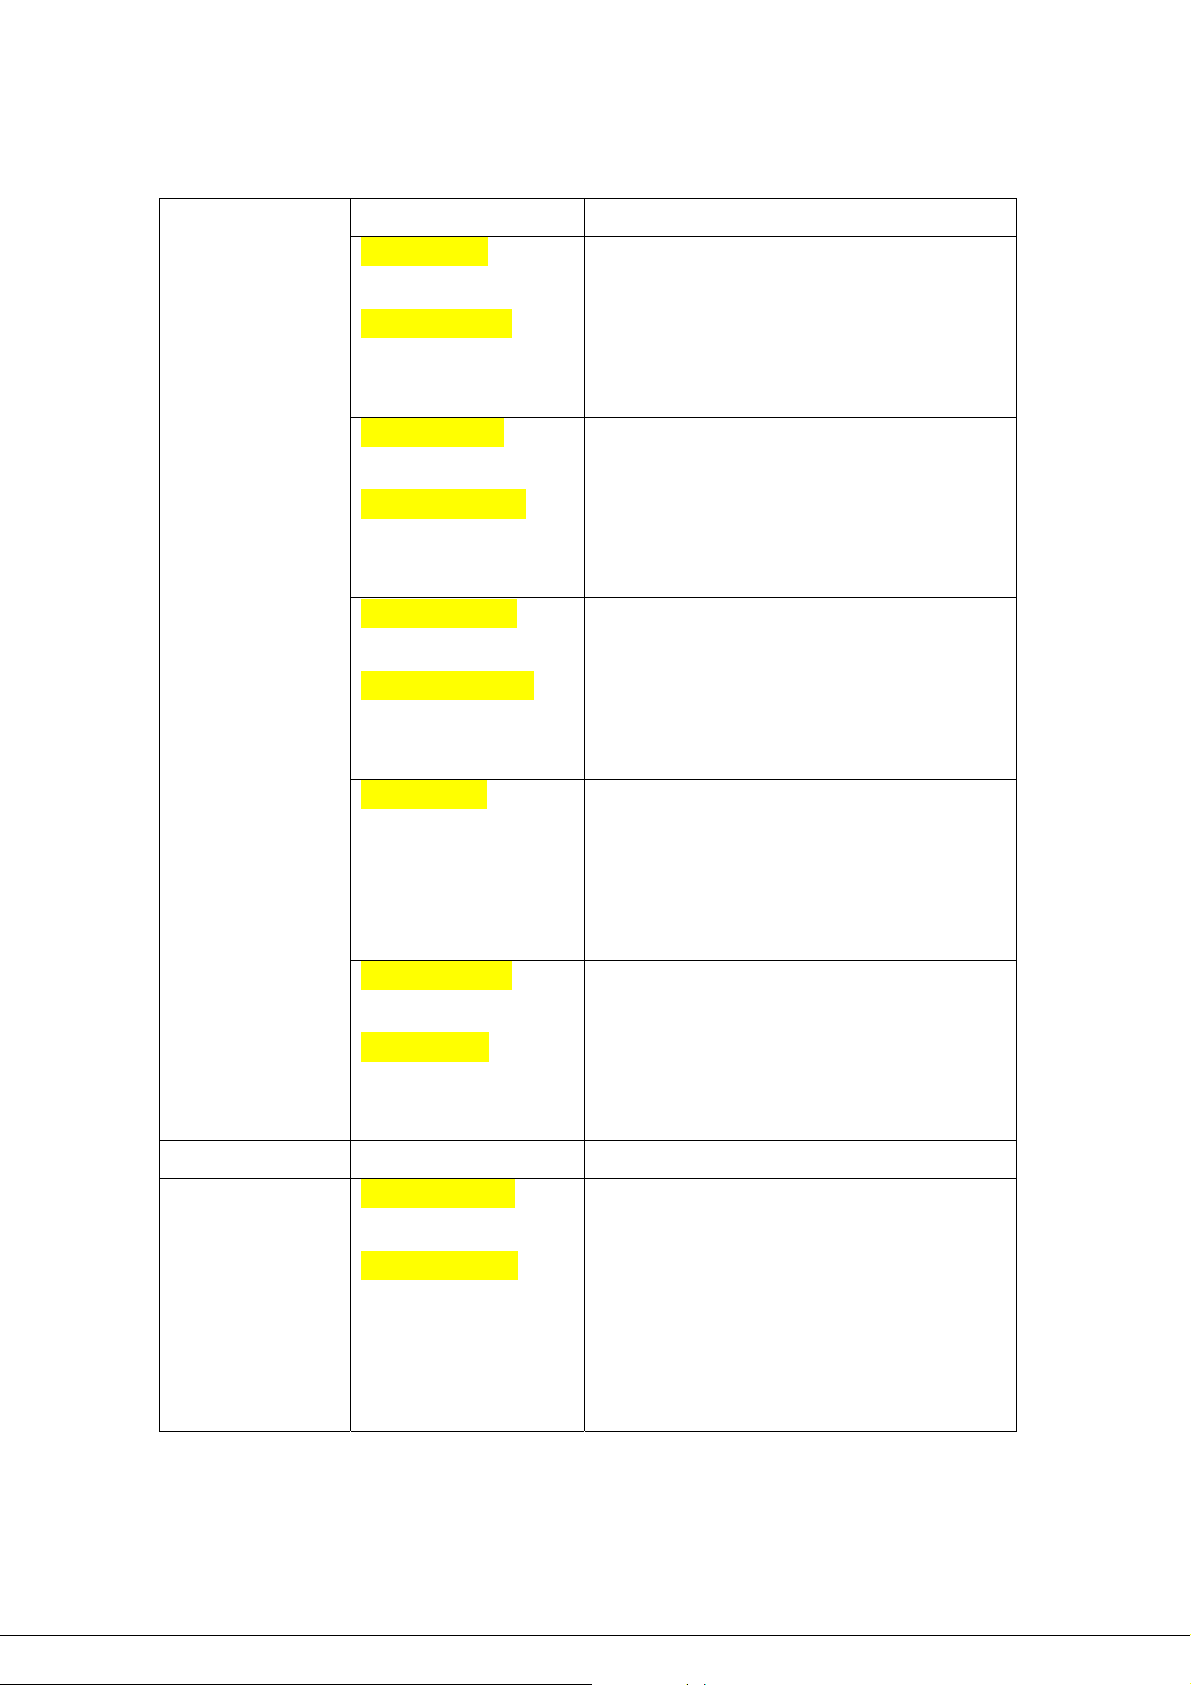
Press ‘*’ or ‘#’
Press ‘#’, Updated the volume level.
2: Ringer Vol.
Press ‘#’
RingerVol. >>>>
Press ‘Recall’, ‘Redial’
Press ‘*’ or ‘#’
3: Speaker Vol.
Press ‘#’
SpeakerVol. >>>>
Press ‘Recall’, ‘Redial’
Press ‘*’ or ‘#’
4: Key Beep Vol.
Press ‘#’
KeyBeepVol. >>>>
Press ‘Recall’, ‘Redial’
Press ‘*’ or ‘#’
5: Ring Tone.
Press ‘#’
Press ‘2’, Entering the volume of ringer menu
Press ‘Recall’, Volume Up
Press ‘Redial’. Volume Down
Press ‘*’, Go back to the root menu.
Press ‘#’, Updated the volume level.
Press ‘3’, Entering the volume of speaker menu
Press ‘Recall’, Volume Up
Press ‘Redial’. Volume Down
Press ‘*’, Go back to the root menu.
Press ‘#’, Updated the volume level.
Press ‘4’, Entering the volume of key beep menu
Press ‘Recall’, Volume Up
Press ‘Redial’. Volume Down
Press ‘*’, Go back to the root menu.
Press ‘#’, Updated the volume level.
Press ‘5’, Entering the ring tone selection menu
Press ‘Recall’, Up
Press ‘Recall’, ‘Redial’
Press ‘*’ or ‘#’
6: Service Alert.
Press ‘#’
SvcAlert On
Press ‘Recall’, ‘Redial’
Press ‘*’ or ‘#’
8:S/W Version
You can show to the s/w version.
9:Password New xxxx
Press ‘#’
Re-Enter xxxx
Press ‘*’ or ‘#’
Press ‘Redial’. Down
Press ‘*’, Go back to the root menu.
Press ‘#’, Updated the ring tone items.
Press ‘6’, Entering the Service Alert menu
Press ‘Recall’, Service Alert is On
Press ‘Redial’, Service Alert is Off
Press ‘*’, Go back to the root menu.
Press ‘#’, Updated the option
You can sho w to the current password, default -> 3842
Press ‘#’, Entering the next mode for entering the new
password
Press ‘1~9,0’, If you want to change the new password,
press the number.
We should be re-enter the new password.
Press ‘#’, Updated the new password.
Page 16
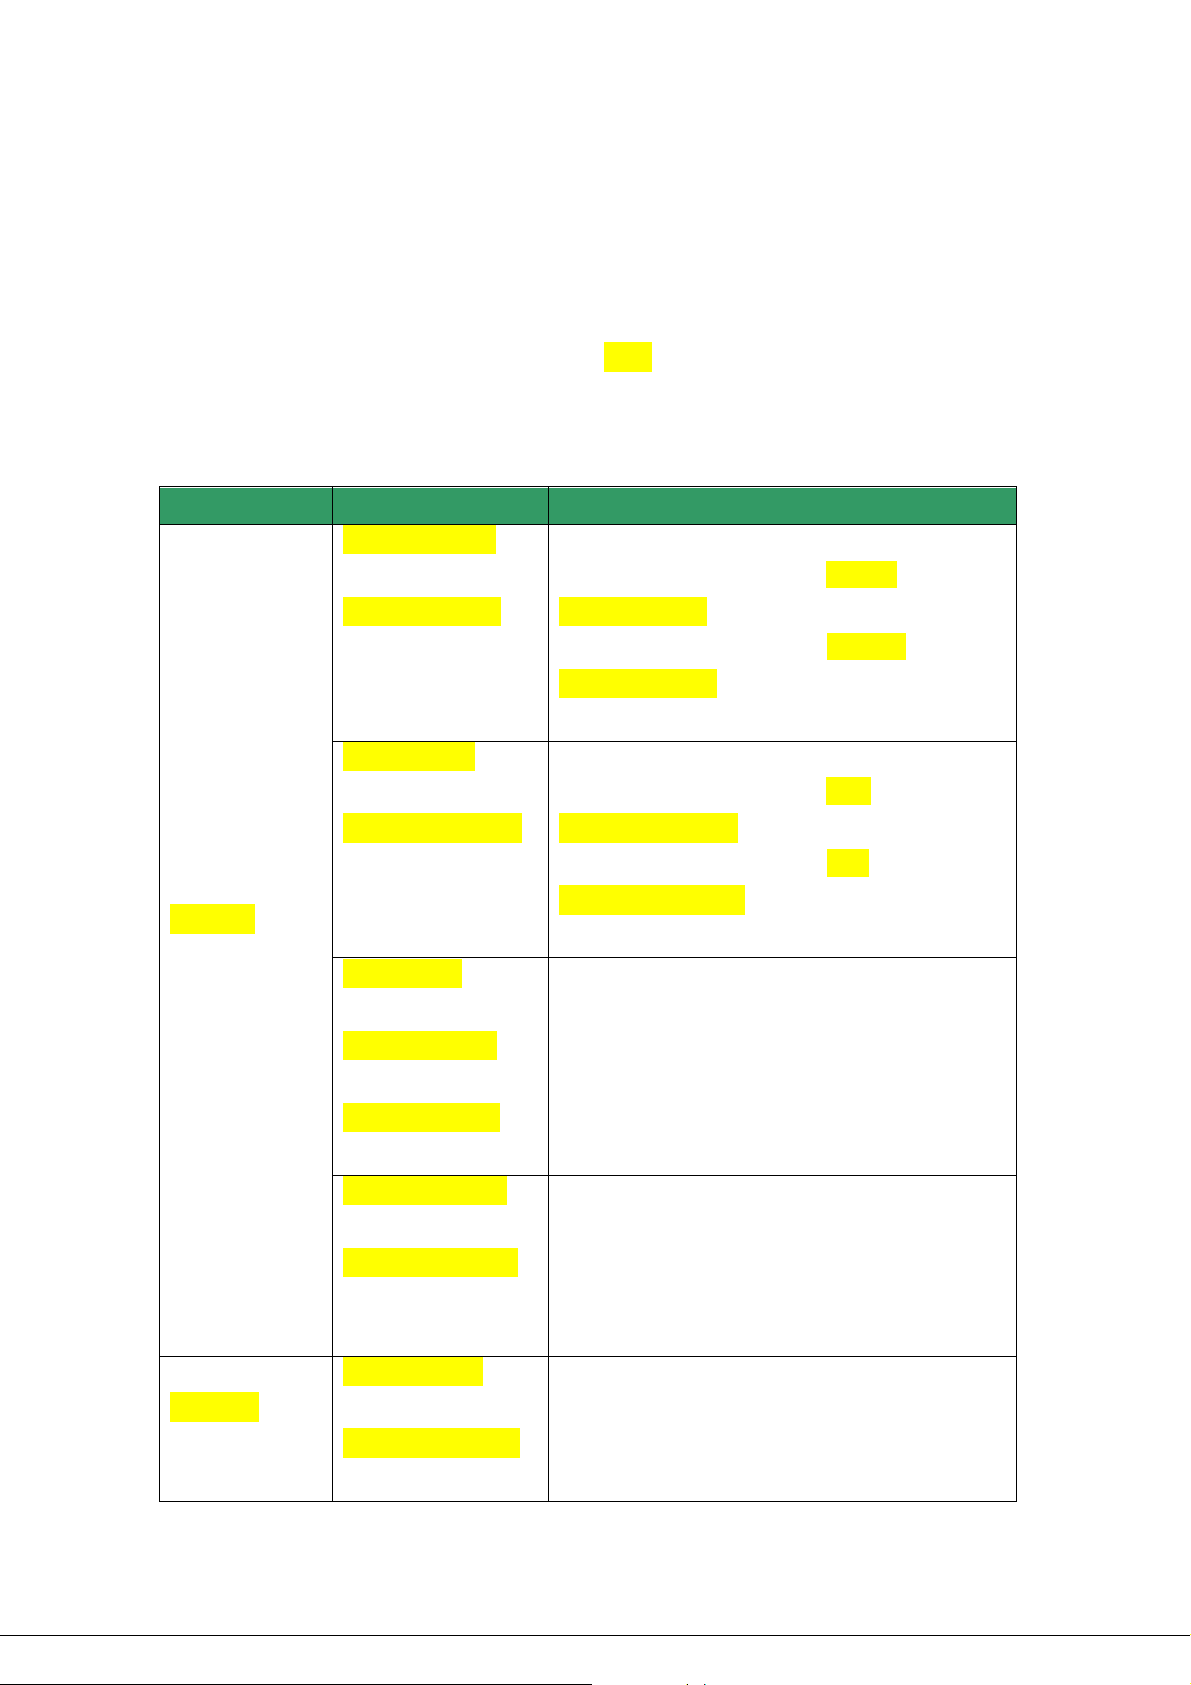
2.5 CDMA Mode Menu
To enter to the CDMA mode
1) Press the short keys as follows “624709247*2690”
2) The message on LCD will be displayed “Enter Code ****”.
3) Enter your password “0000” ( It can be changed )
4) First menu, “1.Setting” will be displayed.
Menu Display Sub Menu Display Description
1.Setting
Press ‘1’
1: Voice Privacy
Press ‘#’
V.P. Enhanced
Press ‘Recall’, ‘Redial’
Press ‘*’ or ‘#’
2: DTMF Tone
Press ‘#’
DTMF Tone Short
Press ‘Recall’, ‘Redial’
Press ‘*’ or ‘#’
3: Password
Press ‘#’
New xxxx
Press ‘#’
Re-Enter xxxx
Press ‘1’, Entering the Voice Privacy Menu.
Press ‘Recall’, Changed the option to ‘Standard’ as follows
V.P. Standard
Press ‘Redial’, Changed the option to ‘Enhanced’ as follows
V.P. Enhanced
Press ‘#’, Go back to the root menu.
Press ‘2’, Entering the DTMF Tone Menu.
Press ‘Recall’, Changed the option to ‘Short’ as follows
DTMF Tone Short
Press ‘Redial’, Changed the option to ‘Long’ as follows
DTMF Tone Long
Press ‘#’, Go back to the root menu.
Press ‘3’, Entering the next mode for entering the new
password.
Press ‘1~9,0’, If you want to change the new password, press
the number.
We should be re-enter the new password.
2.Version
Press ‘2’
Press ‘*’ or ‘#’
4: Auto Call Time
Press ‘#’
AutoCallTime XX
Press ‘Recall’, ‘Redial’
Press ‘*’ or ‘#’
1: S/W Versi on
Press ‘#’
S/W:XXXXXXXXXX
Press ‘*’
Press ‘#’, Updated the new password.
Press ‘4’, Entering the auto send time menu for orig. call
Press ‘Recall’, Up for time count
Press ‘Redial’. Down for time count
Press ‘*’, Go back to the root menu.
Press ‘#’, Updated the auto send time.
Press ‘1’, Entering the S/W Version menu.
Press ‘*’, Go back to the root menu.
Page 17
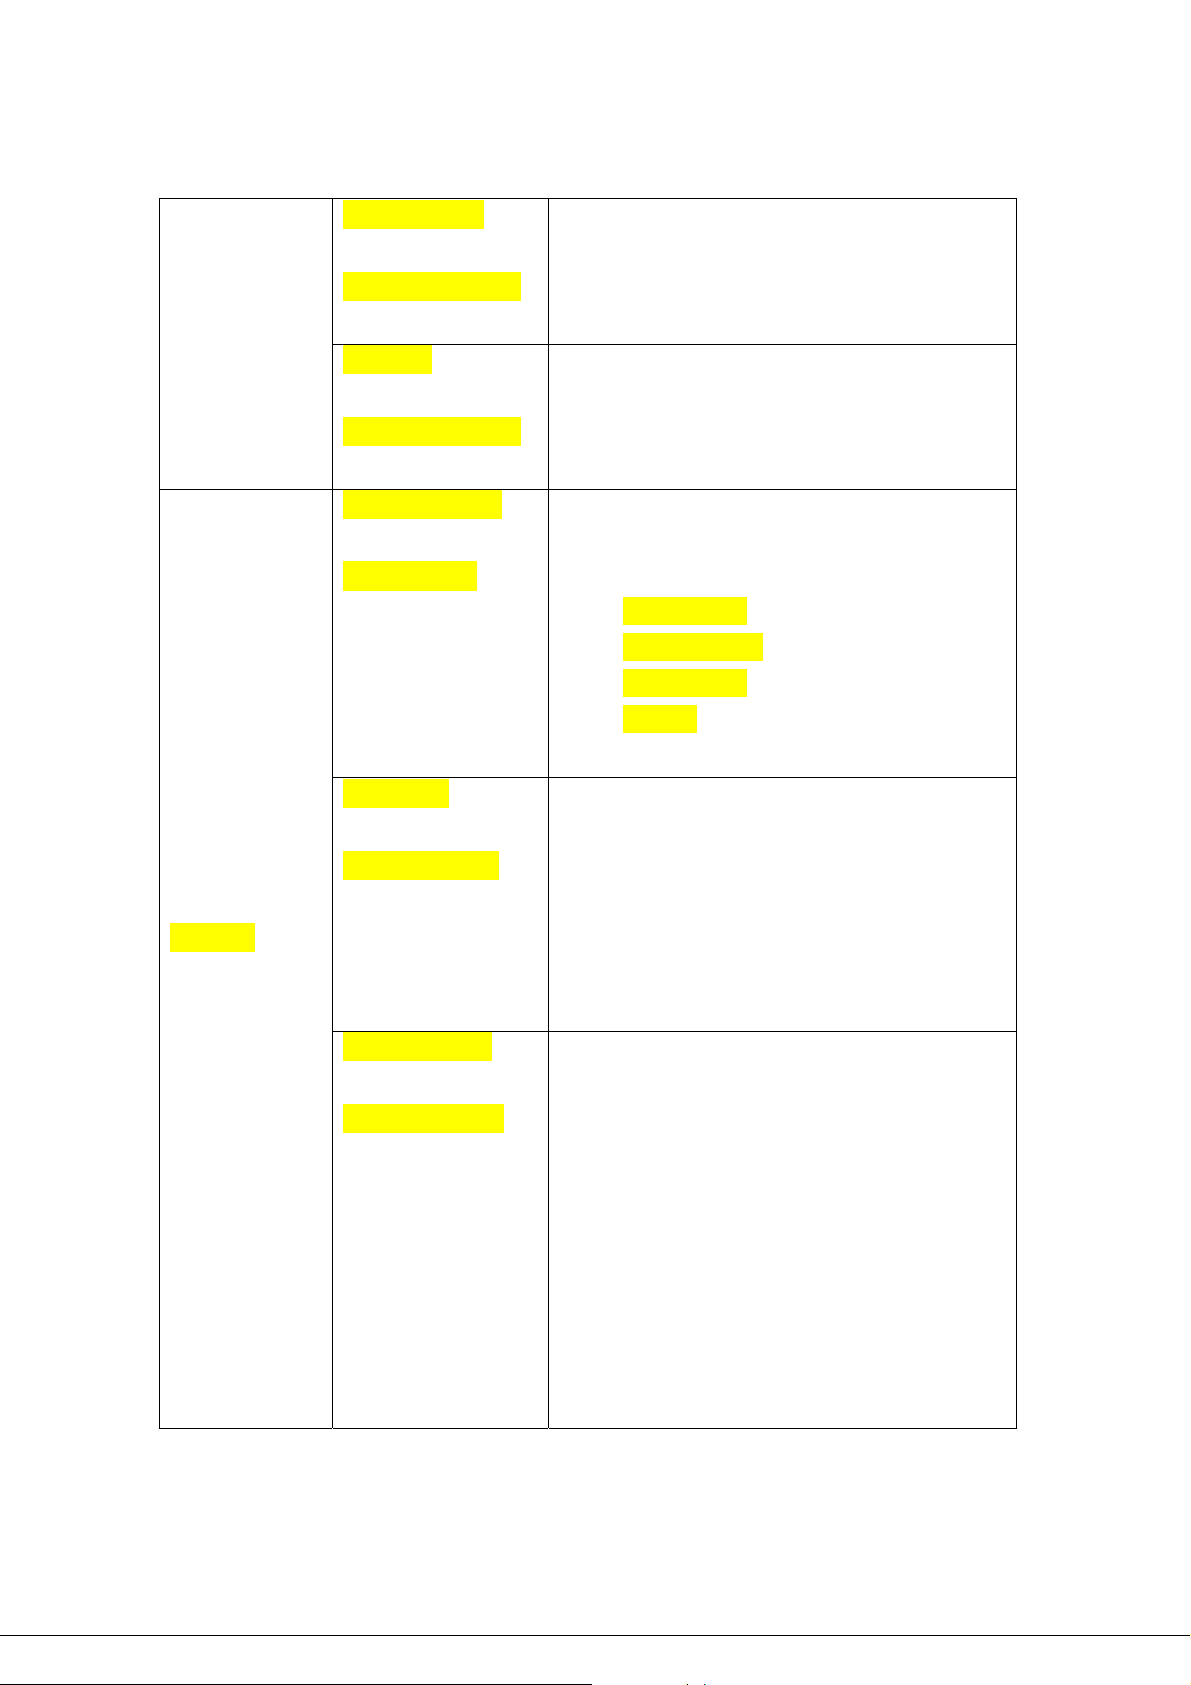
2: H/W Version
Press ‘2’, Entering the H/W Version menu.
Press ‘#’
H/W:XXXXXXXXXX
Press ‘*’
3: PRL ID
Press ‘#’
PRL ID:XXXXXXXX
Press ‘*’
1: Debug Screen
Press ‘#’
Debug Screen
Press ‘#’
2: Test Call
Press ‘#’
Press ‘*’, Go back to the root menu.
Press ‘3’, Entering the PRL ID menu.
Press ‘*’, Go back to the root menu.
Press ‘1’, Entering the Debug Screen menu.
You can enter the debug mode and you can show to the
system information on CDMA network as follows.
R 100 E 07 T 00
S 01243 N 00012
C 1011 PN 122
B 3.998V
Press ‘*’, Go back to the root menu.
Press ‘2’, Entering the Test Call menu.
Press ‘Recall’, Move up to the test call item.
0.Hidden
Press ‘0’
TCall xxxxxxx
Press ‘Recall’, ‘Redial’
Press ‘recall’
Press ‘*’ or ‘#’
3: Audible Tone
Press ‘#’
A.Tone xxxxxxxx
Press ‘Recall’, ‘Redial’
Press ‘*’ or ‘#’
Press ‘Redial’, Move down to the test call item.
Press ‘recall’, We can call on the selected option item.
Press ‘*’, Go back to the root menu.
% Below show to the selected item,
Markov~Loopback
Press ‘3’, Entering the Audible Tone menu.
Press ‘Recall’. Move up to a tone item.
Press ‘Redial, Move down to a tone item.
Press ‘#’, Updated the tone item.
% Below show to the selected item.
Korea,
LatinAmerica,
East Europe,
China/Siri,
Nicaragua,
India
Page 18
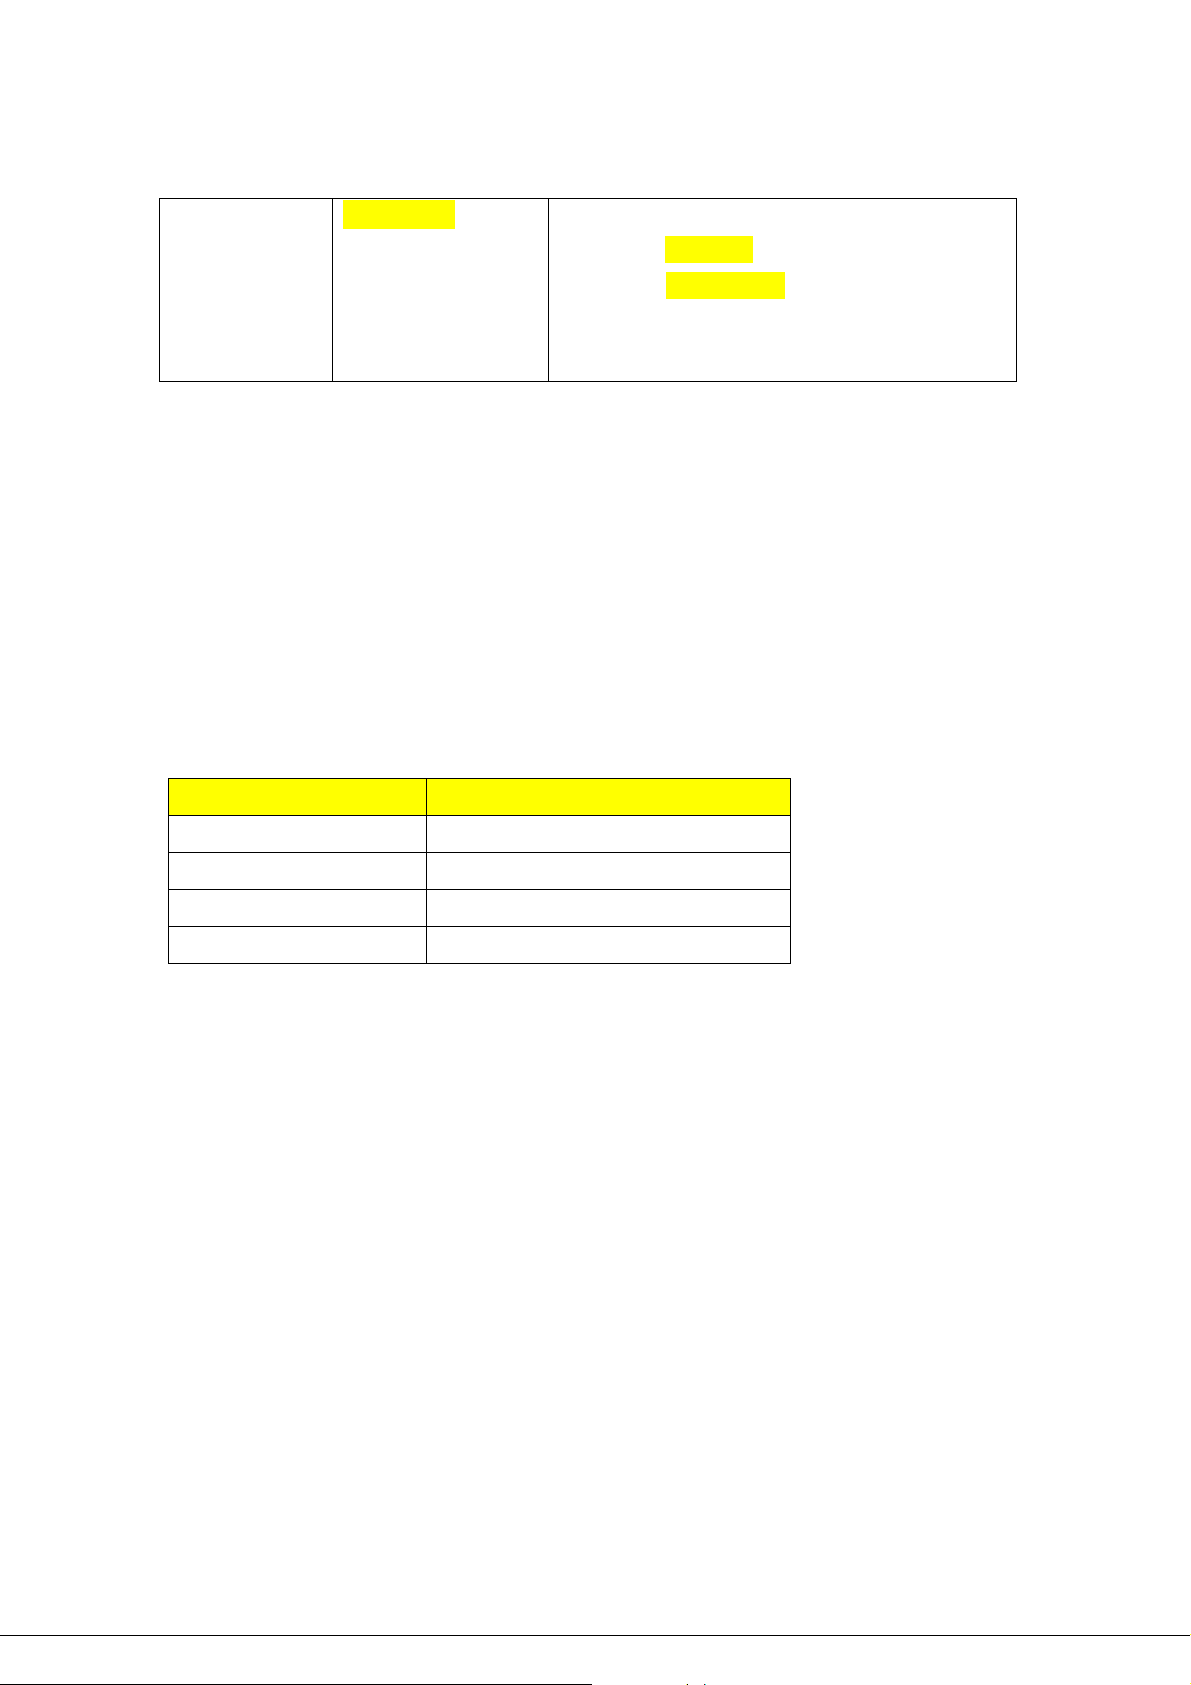
4: Mirroring
Press ‘4’, Entering the mirroring menu.
Press ‘#’
Do Mirroring
Press ‘Recall’, ‘Redial’
Press ‘Recall’, Do mirroring
Press ‘Redial’, RestoreMirroring
Press ‘#’, Updated the selected item.
Press ‘*’ or ‘#’
Battery Backup Failure
If you’re using the battery, the unit must be connected to AC power for at least 3 hours to fully charge
the battery before it will provide back-up power to your SXP-2280. Verif y that the batter y has been
charged for at least 3 hours and that the power source and its corresponding circuit breaker are
functioning properly. Then, examine the battery for physical damage and corrosion. Replace the battery
if necessary.
Item Description
Capacity 3.7V Li-ion(Nominal) / 1700mAh
Talk Time Duration Over 3 Hours (Min) ( on SCI = 2)
Standby Time Duration Over 140 Hours ( on SCI = 2)
Charging Time Duration 3 Hours (Max) ( on SCI = 2)
GENERAL INFORMATION AND SAFETY
Your SXP-2280 Fixed Wireless Phone (FWP) functions as both a radio transmitter and receiver. When it
is ON, the FWP receives and sends out radio frequency (RF) energy. The CDMA 800 unit operates in
the frequency range between 824 and 894 MHz. When you use your SXP-2280, the cellular system
handling your call controls the power level at which your unit transmits. Nominal power output is 230
mW.
WARNING!
Only Authorized Service Personnel should remove the cover of your SXP-2280. For further assistance,
contact your Authorized Sungil Representative. Please have your unit’s model and serial number ready.
The duration of your calls and operate your phone in the most power-efficient manner.
Page 19

Temperature Environment
Operating Temperature: From -20°C to +60°C ; Up to 95% relative humidity (non-condensing).
Storage Temperature: From -25°C to +75°C; Up to 95% relative humidity (non-condensing).
Antenna Care and Replacement
Do not use the SXP-2280 with a damaged antenna. If a damaged antenna comes into contact with the
skin, a minor burn may result. Have your antenna replaced by a qualified technician immediately.
Use only a manufacturer-approved antenna. Unauthorized antennas, mod ifications, or attachments could
damage the SXP-2280 .
Driving
Check the laws and regulations on the use of cellular products in the areas where you drive. Some
jurisdictions prohibit your using a cellular device while dr iving a vehicle. Even if your jurisdiction does not
have such a law, we strongly suggest that, for safety reasons, the driver use extreme caution when
operating the cellular device while the vehicle is in motion. Always obey the law.
Exposure to electronic Devices
Most modern electronic equipment is shielded from RF energy. However, RF energy from cellular devices
may affect inadequately shielded electronic equipment.
RF energy may affect improperly installed or inadequately shielded electronic operating and entertainment
systems in motor vehicles. Check with the manufacturer or its representative to determine
if these systems are adequately shielded from external RF energy. You should also check with the
manufacturer of any equipment that has been added to your vehicle.
Consult the manufacturer of any personal medical devices (such as pacemakers, hearing aids, etc.) to
determine if they are adequately shielded from external RF energy.
Turn your SXP-2280 OFF in health care facilities when any regulations posted in the areas instruct you to
do so. Hospitals or health care facilities may be using equipment that could be sensitive to external RF
energy.
Aircraft
Turn OFF your SXP-2280 before boarding any aircraft.
• Use it on the ground only with crew permission.
• Do not use it in the air.
To prevent possible interference with aircraft systems, U.S. Federal Aviation Administration (FAA)
regulations require you to have permission from a crew member to use your cellular phone (or any other
cellular product) while the plane is on the ground. To prevent interference with aircraft systems,
FCC regulations prohibit using your cellular device while the plane is in the air.
Children
Page 20

Do not allow children to play with your SXP-2280 to prevent damage to the unit.
Blasting Areas
Construction crews often use remote control RF devices to activate off explosives. Therefore, to avoid
interfering with blasting operations, turn your SXP-2280 OFF when in a "blasting area" or in areas posted:
"Turn off two-way radio."
FCC WARNI NG
This equipment may generate or use radio frequency energy. Changes or modifications to this
equipment may cause harmful interference unless the modifications are expressly approved in
the instruction manual. The user could lose the authority to operate this equipment if an
unauthorized change or modification is made.
RF Exposure Guidelines
During transmitter operation, in order to meet RF Maximum Permissible Exposure Safety
Guidelines, a minimum distance of 20cm shall be maintained between ante nna and personnel.
 Loading...