

Page 1
Boiler Plus
Page 1 of 4
RFRP-OT Room Thermostat Wireless
RFRP-OT Room Thermostat Wireless
Contents
1. Factory default settings
2. Specications
3. Mounting
4. Installation
5. Frost protection
6. LCD symbol / buttons description
7. Resetting the thermostat
8. Keypad lock and unlock
9. Setting the date, time and operating mode
10. Factory program settings
11. Adjusting the program settings for 5/2d
12. Copy Function
13. Temporary override
14. Permanent override
15. Boost function
16. Holiday function
17. To connect the RFRP-OT thermostat to an RF1A-OT receiver
18. To disconnect the RFRP-OT thermostat from an RF1A-OT receiver
19. Backlight mode selection
20. Battery low warning
21. Replacing the batteries
22. Installer Menu (without OpenTherm® connected)
How your programmable thermostat works
When the thermostat is in the AUTO mode, it will operate according to the
times and temperatures that have been programmed. The user can select
from 6 dierent programs per day - each with a time and a temperature.
There is no OFF time, only a higher and a lower temperature.
If the user wants the thermostat to be OFF at a certain time, set the
temperature for this time to be low. The thermostat will turn ON if the room
temperature is lower than the setpoint for the current period.
Example: If P1 is set to be 21˚C at 6am, and if P2 is set to be 10˚C at 8am, the
thermostat will look for the temperature to be 21˚C between 6am and 8am.
3. Mounting
The mounting height should be 1.5 metres above the oor level.
The thermostat should be wall mounted in the room where the heating is to
be controlled.
The place of installation should be chosen so that the sensor can measure the
room temperature as accurately as possible.
Choose the mounting location to prevent direct exposure to sunlight or other
heating / cooling sources when mounted.
The unit can be tted to:
1. Directly on walls.
2. Table mounting with stand provided.
Operating Instructions
CAUTION!
The thermostat must not be left unsupervised
when open. (Prevent non specialists and especially
children from gaining access to it.)
Only qualied electricians or authorised service
sta are permitted to open the thermostat.
If the thermostat is used in a way not specied by
the manufacturer, its safety may be impaired.
Impor tant: Kee p this document
Prior to setting the thermostat, it is neccessary to
complete all required settings described in this section.
1. Factory default settings
Temperature indicator: °C
Switching dierential: 0.4°C
In built frost protection: 5°C - Not adjustable
Clock: 24 hours
Keypad lock: O
Operating mode: 5/2 day
2. Specications
Power supply: 2 x AA Alkaline Battery
Power consumption: 2 mW
Battery replacement: Once a year
Temp. control range: 5 ... 35°C
Ambient temperature: 0 ... 45°C
Dimensions: 130 x 99 x 25mm
Temperature sensor: NTC 100K Ohm @ 25°C
Temperature indication: ˚C
Switching dierential: 0.4˚C
Frost protection: Only operational in OFF mode
Pollution degree: Pollution degree 2
4. Installation
Lower the ap at the front of the thermostat.
There is a battery compartment located below the buttons.
Apply downward pressure to remove the cover.
Insert the 2 x AA batteries and the thermostat will turn on.
Close the battery compartment.
5. Frost protection
Frost protection is built into this thermostat.
It is pre xed at 5°C and is not adjustable.
It will only be activated when the thermostat is in the OFF mode and the
room temperature falls below 5°C.
5°C
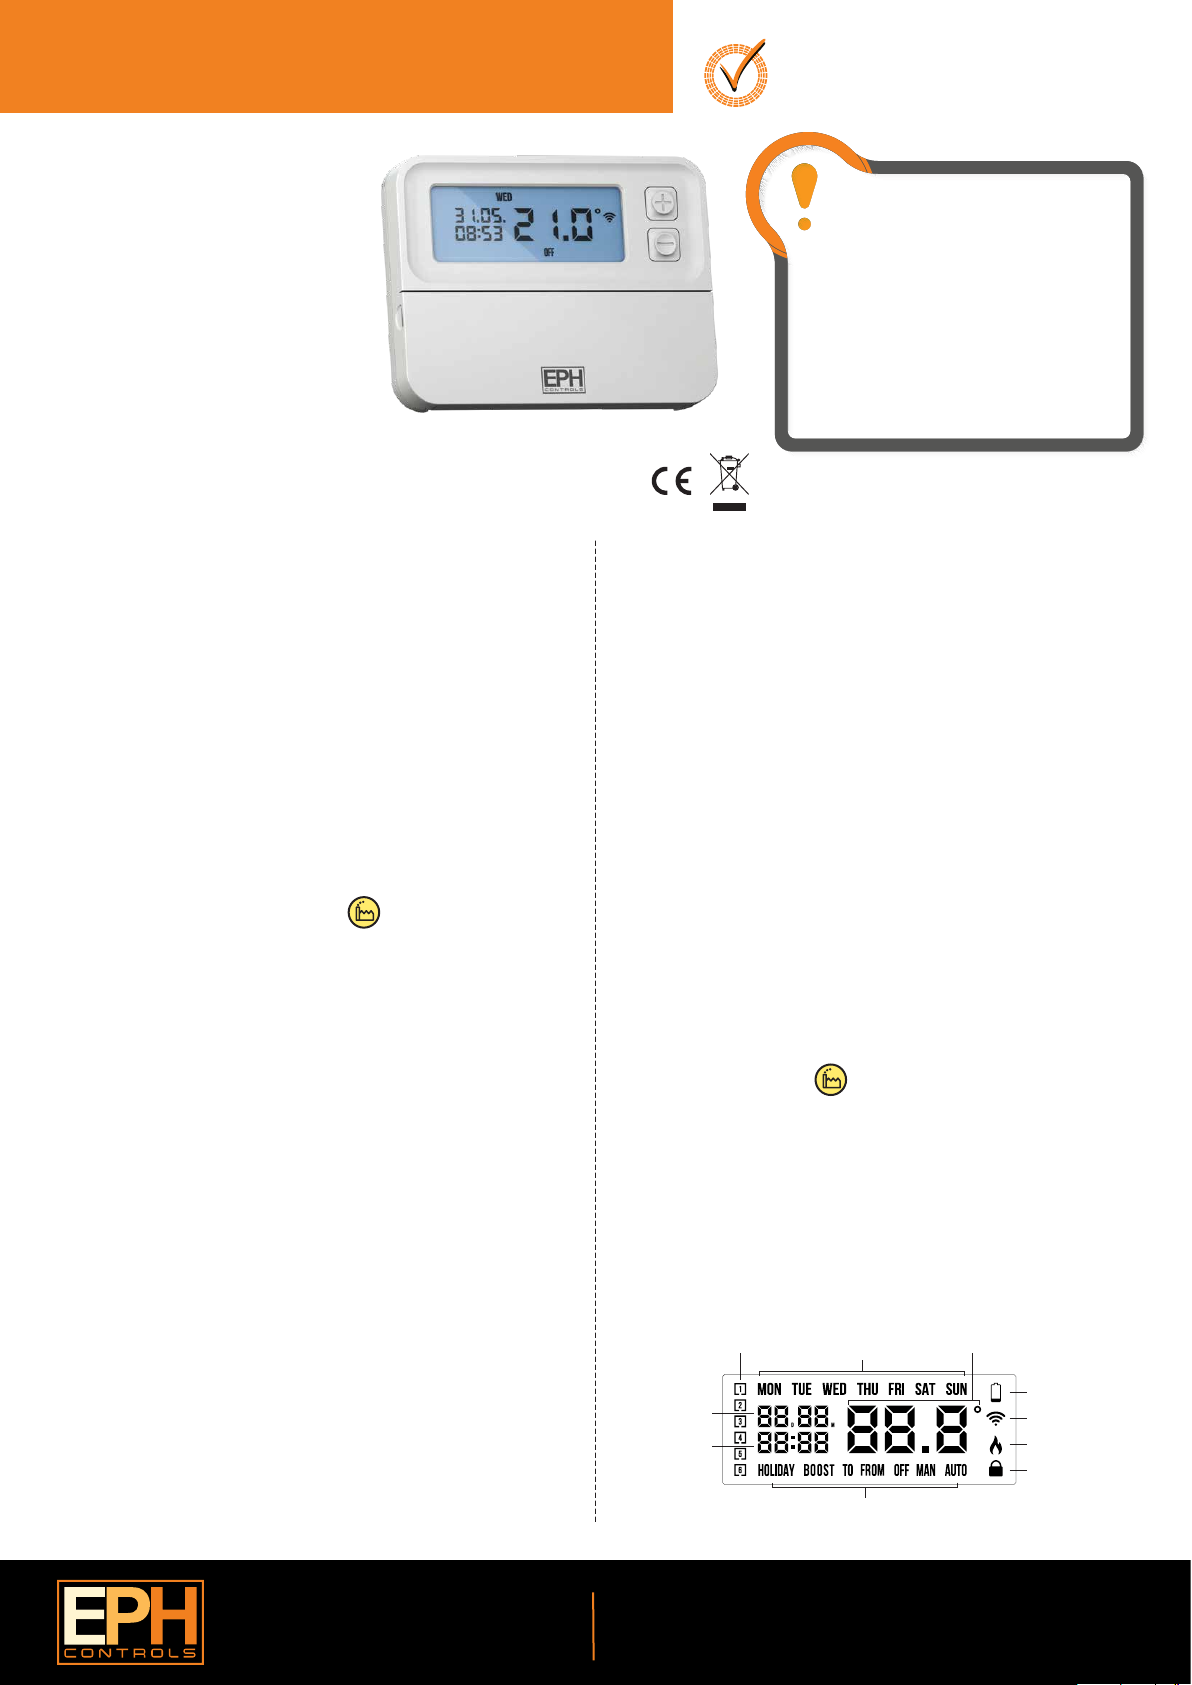
6. LCD Symbol / button description
6.1 LCD Symbol description
Day / Month
Current Time
(Boost to time)
Current program
Day of the week
Temperature
Battery low symbol
Wireless symbol
Heating on symbol
Keypad lock symbol
EPH Controls Ireland
sales@ephcontrols.com www.ephcontrols.com
Operating mode
EPH Controls UK
sales@ephcontrols.co.uk www.ephcontrols.co.uk
20190627_RFRP-OT_OpIns_JW
Page 2
Boiler Plus
Page 2 of 4
RFRP-OT Room Thermostat Wireless
RFRP-OT Room Thermostat Wireless
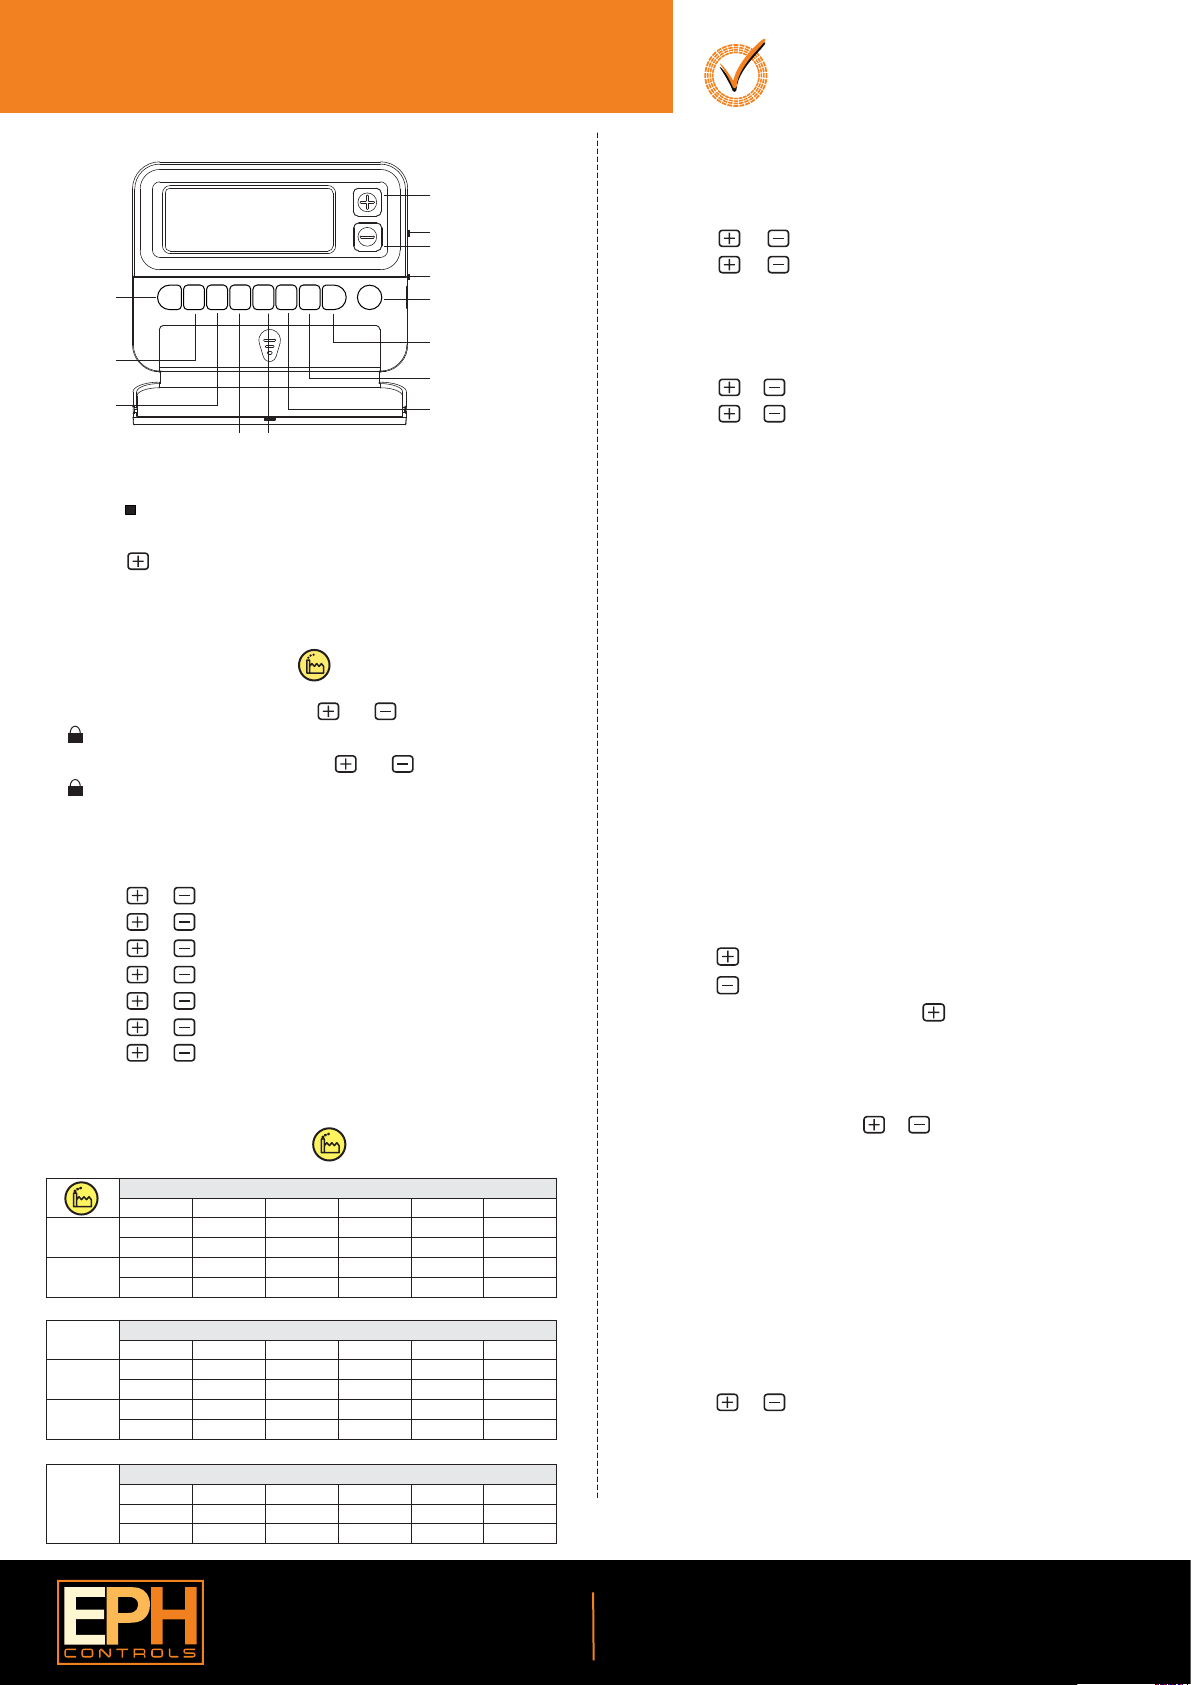
6.2 Button description
Automatic
mode
(Back)
Manual
mode
O mode
AUTO MAN OFF PROG TIME HOL COPY BOOST
Program mode Set Date/ Time
Set point increase
Wireless connect button
Set point decrease
OK
Reset button
OK conrm button
Boost mode
Copy function
Holiday mode
11. Adjusting the program settings for 5/2d
7. Resetting the thermostat
Press the button on the side of the thermostat.
‘rst no’ will appear on the screen.
Press the button.
‘rst yes’ will appear on the screen.
Press the ‘OK’ button to reset the thermostat.
8. Keypad lock and unlock
To lock the keypad, press and hold the and buttons for 10 seconds.
will appear on the screen. The keypad is now locked.
To unlock the keypad, press and hold the and buttons for 10 seconds.
will disappear from the screen. The keypad is now unlocked.
RESET
OFF
12. Copy function
9. Setting the date, time and operating mode
Press the ‘TIME’ button once, the day will begin ashing.
Press the or buttons to adjust the year. Press the ‘OK’ button.
Press the or buttons to adjust the month. Press the ‘OK’ button.
Press the or buttons to adjust the day. Press the ‘OK’ button.
Press the or buttons to adjust the hour. Press the ‘OK’ button.
Press the or buttons to adjust the minute. Press the ‘OK’ button.
Press the or buttons to adjust from 5/2d to 7d or 24h mode.
Press the or buttons to turn DST (Day Light Saving time) On or O.
Press the ‘AUTO’ button or wait 5 seconds and the thermostat will return to
normal operation.
13. Temporary override
10. Factory program settings 5/2d
Mon-Fri
Sat-Sun
P1 P2 P3 P4 P5 P6
06:30
21˚C 10˚C 10˚C 10˚C 21˚C 10˚C
08:00 10:00 12:00 14:00 17:30 23:00
21˚C 10˚C 10˚C 10˚C 21˚C 10˚C
08:00
12:00
5/2D
14:00
17:30
22:00
Operating Instructions
Press the ‘PROG’ button once.
Programming for Monday to Friday is now selected.
Press the or buttons to adjust the P1 time. Press the ‘OK’ button.
Press the or buttons to adjust the P1 temp. Press the ‘OK’ button.
Repeat this process to adjust P2 to P6 times and temperatures.
Press the ‘OK’ button.
Programming for Saturday to Sunday is now selected.
Press the or buttons to adjust the P1 time. Press the ‘OK’ button.
Press the or buttons to adjust the P1 temp. Press the ‘OK’ button.
Repeat this process to adjust P2 to P6 times and temperatures.
Press the ‘AUTO’ button to return to automatic mode.
While in PROG Mode pressing the ‘PROG’ button will jump from P1-P2 etc
without changing the temperature.
While in PROG Mode pressing the ‘TIME’ button will jump to the next Day
(block of days).
If 7 D mode is selected, you can program each day of the week with 6
individual times and temperatures.
If 24H mode is selected, you can only program each day of the week with
the same 6 times and temperatures.
Copy function may only be used if the thermostat is in the 7d mode.
Set the times and temperatures for the day that you wish to copy from in
PROG Mode.
When still on the day press the ‘COPY’ button.
The day of the week that you have selected will be shown with ‘COPY’
below it.
The next day will begin to ash on the top of the screen.
Press the button to copy the times and temperatures to that day.
Press the button to skip a day.
You can copy to multiple days using the button.
Press the ‘OK’ button when copying has been completed.
When in AUTO mode, press the or buttons to adjust the
temperature setpoint.
‘OvEr’ will appear on the screen.
Press ‘OK’ or after 5 seconds the thermostat will operate in this temporary
override, util the next switching time.
To cancel temporary override, press the ‘OFF’ buttton and then press the
‘AUTO’ button to return to the automatic mode.
Mon-Fri
Sat-Sun
Everyday
P1 P2 P3 P4 P5 P6
06:30
21˚C 10˚C 10˚C 10˚C 21˚C 10˚C
08:00 10:00 12:00 14:00 17:30 23:00
21˚C 10˚C 10˚C 10˚C 21˚C 10˚C
P1 P2 P3 P4 P5 P6
06:30
21˚C 10˚C 10˚C 10˚C 21˚C 10˚C
08:00
08:00
12:00
12:00
7D
24H
14:00
14:00
17:30
17:30
22:00
22:00
EPH Controls Ireland
sales@ephcontrols.com www.ephcontrols.com
14. Permanent override
Press the ‘MAN’ button to enter Manual Mode (Permanent Override).
‘MAN’ will appear on the screen.
Press the or buttons to adjust the temperature setpoint.
Press ‘OK’ to conrm the temperature selection or after 5 seconds the
thermostat will operate in this permanent override.
The thermostat will operate in MAN mode until the mode is changed.
To cancel permanent override, press the ‘OFF’ button and then press the
‘AUTO’ button to return to automatic mode.
EPH Controls UK
sales@ephcontrols.co.uk www.ephcontrols.co.uk
20190627_RFRP-OT_OpIns_JW
Page 3

Boiler Plus
Page 3 of 4
RFRP-OT Room Thermostat Wireless
RFRP-OT Room Thermostat Wireless
15. Boost function
The thermostat can be boosted to a specic temperature for 1, 2 or 3
hours while the thermostat is operating in all modes except for holiday
mode.
Press the ‘BOOST’ button 1, 2 or 3 times, the time that the boost will be
activated to will ash on the screen.
If you do not press any other button the boost will activate to the
temperature displayed on the screen after 5 seconds.
If you press the ‘OK’ button the temperature will now ash. You can edit
the temperature if you press the or buttons.
Press the ‘OK’ button or wait for 5 seconds to enter BOOST Mode.
‘BOOST TO’ will now be displayed on the screen with the time that it is
activated to displayed above this text.
Press the ‘BOOST’ button again to deactivate the boost.
18. To disconnect the RFRP-OT thermostat from an
RF1A-OT receiver
16. Holiday function
This will switch your heating system o between the start and end times
you select .
Press the ‘HOL’ button, ‘HOLIDAY FROM’ will appear on screen.
Press the or buttons to adjust the day. Press the ‘OK’ button.
Press the or buttons to adjust the month. Press the ‘OK’ button.
Press the or buttons to adjust the year. Press the ‘OK’ button.
Press the or buttons to adjust the hour. Press the ‘OK’ button.
‘HOLIDAY TO’ will appear on screen.
Press the or buttons to adjust the day. Press the ‘OK’ button.
Press the or buttons to adjust the month. Press the ‘OK’ button.
Press the or buttons to adjust the year. Press the ‘OK’ button.
Press the or buttons to adjust the hour. Press the ‘OK’ button.
19. Backlight mode selection
Operating Instructions
This can be done from either the thermostat or the receiver.
18.1 On the RFRP-OT thermostat:
Press the button.
The thermostat will begin to search through the RF channels.
Press and hold the ‘Copy’ button for 10 seconds.
‘Adr’ will appear on the screen of the thermostat.
Press the ‘OK’ button twice to complete the unpairing process.
The thermostat RFRP-OT is now disconnected from the receiver RF1A-OT.
18.1 On the RF1A-OT receiver:
Press the button, the red light will ash.
Red & green lights if using as a hub receiver.
Press and hold connect for about 10 seconds, the receiver will then stop
ashing.
The RF connection is now cleared.
There are two settings for selection. The factory default setting is AUTO.
OFF The backlight is permanently OFF.
AUTO On pressing any button the backlight stays on for 5 seconds.
To adjust the backlight setting, lower the cover on the front of the unit.
Press the ‘OK’ button for 5 seconds.
Press either the or buttons to select the OFF or AUTO mode.
Press the‘OK’ button.
Connect
Connect
AUTO
The thermostat will now return to the mode it was in before the Holiday
settings were entered.
To cancel Holiday mode, press the ‘HOL’ button.
17. To connect the RFRP-OT thermostat to an
RF1A-OT receiver
Please note, If you are installing a CombiPack4 the RFRP-OT thermostat and
the RF1A-OT receiver will have a pre-established RF connection so it is not
necessary to carry out the RF connection process below.
On the RF1A-OT receiver:
Press the button on the RF1A-OT receiver.
The red light will begin to ash.
On the RFRP-OT thermostat:
Press the button.
The thermostat will show “nOE” followed by “---”
Once an RF connection has been established the thermostat will show ‘r01’
on the LCD screen.
Press the ‘OK’ button to nish the process.
The thermostat is now connected to the RF1A-OT receiver.
Connect
Connect
20. Battery low warning
When the batteries are almost empty, the symbol will appear on
the screen.
The batteries must now be replaced or the unit will shut down.
21. Replacing the batteries
Lower the ap at the front of the thermostat.
There is a battery compartment located below the buttons.
Apply downward pressure to remove the cover.
Insert the 2 x AA batteries and the thermostat will turn on.
Close the battery compartment.
EPH Controls Ireland
sales@ephcontrols.com www.ephcontrols.com
EPH Controls UK
sales@ephcontrols.co.uk www.ephcontrols.co.uk
20190627_RFRP-OT_OpIns_JW
Page 4

Boiler Plus
Page 4 of 4
RFRP-OT Room Thermostat Wireless
RFRP-OT Room Thermostat Wireless
22. Installer menu (without OpenTherm® connected)
To access the installer menu, you must hold Prog and OK for 5 seconds.
When in the installer menu, press + - and OK to navigate and select. Use
AUTO, MAN or OFF to go back a step.
P0 1: Mode (Normal / Optimum Start / Tpi)
P0 2: Hi Lo (limiting the thermostat)
P0 3: Hysteresis (dierential)
P0 4: Calibration
P0 5: Frost Protection
P0 6: Exit
P0 1: Mode (Normal / Optimum Start / Tpi)
Normal Mode (Nor)
When the thermostat is in Normal mode, the thermostat will try to reach the
target temperature after the program changes.
Example: Program 1 on the thermostat is 21°C for 06:30am and the room
temperature is 18°C. The thermostat will start the heating at 06:30am and the
room temperature will start to increase then.
Optimum Start Mode (OS)
When the thermostat is in Optimum Start mode, the thermostat will try to
reach the target temperature by the start time of the next switching time.
This is done by setting the Ti (time interval) on the thermostat in this menu
to 10, 15 or 20. This will allow the thermostat 10 mins, 15 mins or 20 mins to
increase the room temperature by 1°C.
Ti can be set when OS is selected in the installer menu.
To achieve the target temperature when the program starts, the thermostat
will read:
1. The Room Temperature (RT)
2. The Setpoint Temperature (ST)
3. The Target Temperature Dierence (TTD) is the dierence between
the setpoint temperature and the room temperature .
The time (in minutes) that it will take to overcome (TTD) is called Optimum
Start Time (OST) and its maximum value is 3 hours = 180 mins. This is
subtracted from the start time.
As the temperature increases the thermostat will recalculate the OST if the
temperature is increasing too quickly.
Optimum Start Control Graph with Ti = 20
0
20
40
60
80
100
120
140
Optimum Start Time (Mins)
160
180
89 7 6 5 4 3 2 1
Target Temperature Dierence ˚C
Example when Ti = 20
Program 1 on the thermostat is 21°C for
06:30am and the room temperature is 18°C.
The thermostat will start the heating at
05:30am to reach 21°C for 06:30am @ Ti=20.
Example when Ti = 10
Program 1 on the thermostat is 21°C for
06:30am and the room temperature is 18°C.
The thermostat will start the heating at
06:00am to reach 21°C for 06:30am @ Ti=10.
TTD
Boiler Plus
Optimum Start Control Graph with Ti = 15
0
15
30
45
60
75
90
105
Optimum Start Time (Mins)
120
135
89 7 6 5 4 3 2 1
Target Temperature Dierence ˚C
Optimum Start Control Graph with Ti = 10
0
10
20
30
40
50
60
70
Optimum Start Time (Mins)
80
90
89 7 6 5 4 3 2 1
Target Temperature Dierence ˚C
TTD
TTD
20˚C
P0 2: Hi Lo (limiting the thermostat)
P0 3: Hysteresis HOn and HOFF
P0 4: Calibration
P0 5: Frost Protection
P0 6: Exit
Operating Instructions
Time Proportional Integral Mode (TPi)
When the thermostat is in TPi mode and the temperature is rising in the
zone and falls into the Proportional Bandwidth section, TPi will start to
aect the thermostats operation. The thermostat will turn on and o as it
gains heat so that it doesn’t overshoot the setpoint by too much. It will also
turn on if the temperature is falling so it doesn’t undershoot the setpoint
which will leave the user with a more comfortable level of heat.
There are 2 settings that will aect the thermostats operation:
1. The Number of Heating Cycles Per Hour
2. The Proportional Bandwidth
CyC - Number of Heating Cycles per Hour:
This value will decide how often the thermostat will cycle the heating on
and o when trying to achieve the setpoint temperature. You can select
2/3/6 or 12.
Pb - Proportional Bandwidth:
2˚C
This value refers to the temperature below the setpoint at which the
thermostat will start to operate in TPi Control. You can set this temperature
from 1.5˚C to 3.0˚C in 0.1˚C increments.
TPi Control
Temp
22˚C
21˚C
20˚C
19˚C
18˚C
17˚C
200 40 60 80 100
Heating On Heating O
Example – Program 1 on the thermostat is 21°C for 06:30am and the room temperature is
18°C. The thermostat will start the heating at 06:30am and the heat will start to increase
then but will switch itself o before it reaches temperature and allow the room temperature
to increase naturally – this cycle may begin again if the thermostat isn’t reaching
temperature.
This menu allows the installer to change the minimum and maximum
temperature range that the thermostat can be set at. Defaults are 35°C for
Hi and 5°C for Lo.
This menu allows the installer to change the switching dierential of the
thermostat when the temperature is rising and falling.
HOn is the fall in temperature – Default – 0.4°C. This will allow a fall of 0.4°C
from the setpoint before the thermostat turns on again.
HOFF is the rise in temperature – Default – 0.0°C. This will allow the
temperature to rise 0°C above its setpoint.
This menu allows the installer to re-calibrate the thermostat. The current
temperature will be displayed on the screen and can be adjusted by
pressing the up and down buttons.
ON
This menu allows the installer to activate or de-activate frost protection.
When frost protection is activated the thermostat will switch on the boiler
when the temperature drops below 5˚C.
This menu allows the installer to return to the main interface. It is also
possible to exit the installer menu by pressing AUTO, MAN or OFF whilst in
the installer menu.
6 Cycles
Setpoint Temperature
Proportional Bandwidth
Time Minutes
EPH Controls Ireland
sales@ephcontrols.com www.ephcontrols.com
EPH Controls UK
sales@ephcontrols.co.uk www.ephcontrols.co.uk
20190627_RFRP-OT_OpIns_JW
 Loading...