

EPG InsuJet Instructions For Use Manual

Insulin - Jet Administration System
Instructions
for use


Please read this entire
booklet before rst use
If you have any questions, contact your local
distributor or visit the InsuJet™ website:
www.insujet.com


TABLE OF CONTENTS
Introduction 6
Clarication of intended use 6
Product description 7
Product overview 8
Warnings 10
Precautions 13
Good injection practices 14
Contraindications 15
Operating instructions - Preparation 16
» Installing the Nozzle 16
» Installing the Adaptor 18
» Installing a 3mL Adaptor 20
» Installing a 10mL Adaptor 21
Preparations for administration 22
» Charging the InsuJet™ 22
» Priming the InsuJet™ 24
» Re-charge the InsuJet™ 29
» Connecting the Adaptor to the Nozzle 31
» Taking up insulin 33
» Administer insulin 37
Replacing the Nozzle 42
Additional information 46
» Using a Comfort Ring 47
» Using insulin from a disposable penll 48
» Different types of Nozzles & Adaptors 50
Administration site selection guide 53
Frequently asked questions & answers 55
Troubleshooting 58
Maintenance 66
Storage 67
Symbol glossary 68
Product specications 69
Replacement 70
» Date of manufacture 70
» Use-by date 70
Contact details InsuJet™ dealer 72

Introduction
Thank you for choosing the InsuJet™
insulin-jet administration system. Be sure to
read this entire manual and become familiar
with the system before using it for any
injections.
Clarication of intended use
The InsuJet™ system is intended for the
subcutaneous jet injection of U-100 insulin in
adults and children. The injector is designed
for the administration of U-100 insulin, or
saline solution for practice purposes. The
InsuJet™ can be used to inject 4 to 40 units
per administration, and is for single patient
use only. Insulin in not provided with the
injector.
6
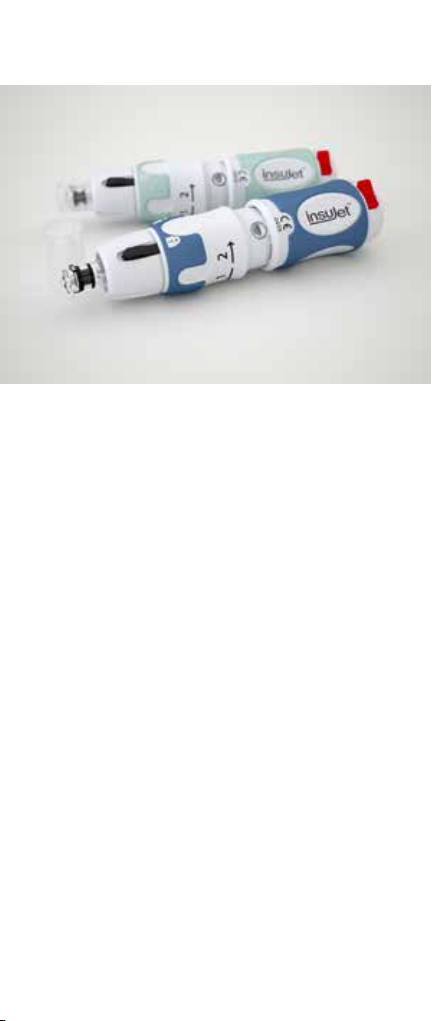
Product description
The InsuJet™ system is for people with
diabetes and is used to administer insulin.
The system works by positive displacement,
i.e. by forcing insulin through a small orice
of a special Nozzle. This creates a thin, high
pressure stream of insulin that penetrates the
skin. In this manner the insulin is deposited
into the subcutaneous tissue.
All pictures in this manual are shown for
right-handed operation. From experience, it is
known that left handed people can handle the
InsuJet™ safely and comfortable as well.
7
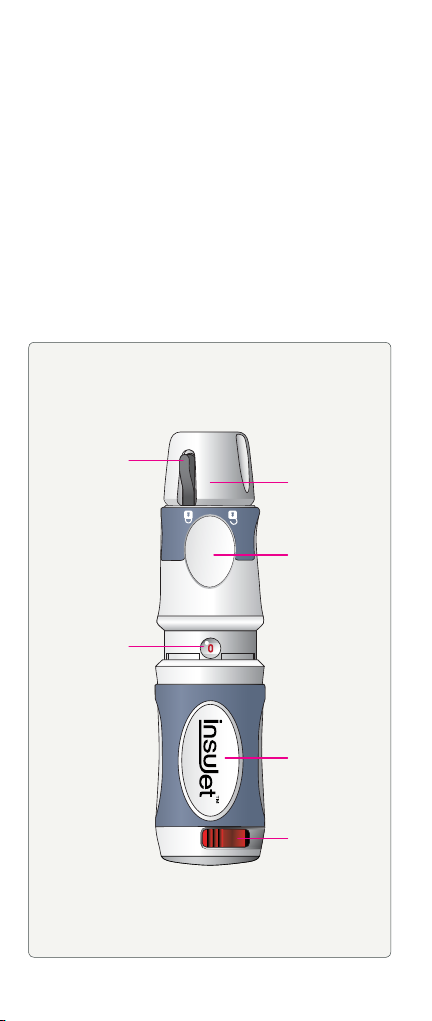
Product overview
The InsuJet™ package contains the
following items:
• InsuJet™ device
• Comfort Ring
• Carry Case
• Instruction For Use booklet
• Warranty Card
InsuJet™
Nozzle
Lock
Switch
Nozzle
Lock
Front
Side
Dosage
Window
Back
Side
Safety
Switch
8

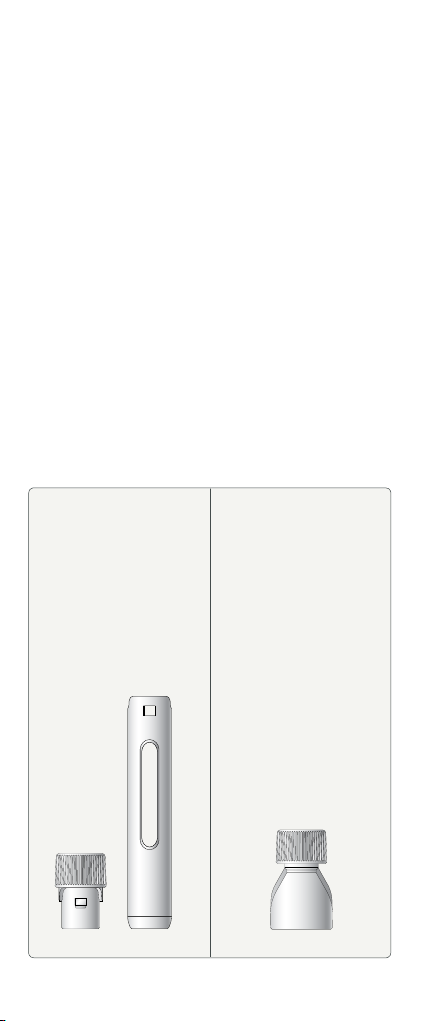
Consumables and accessories
InsuJet™ consumables:
NOTE: not included in the InsuJet™ package
Nozzle
REF 01075
Nozzle
Cap
Nozzle
10mL Adaptor
REF 01065
Adaptor
Cap
10mL
Adaptor
3mL Adaptor
REF 01055
Adaptor
Cap
3mL
Adaptor
3mL
Cartridge
Holder
(not sterile)
InsuJet™ accessories:
Comfort Ring
REF 01223
(not sterile)
9

Warnings
• The InsuJet™ should only be used for
the administration of U100 insulins
• The InsuJet™ should only be used
with InsuJet™ Nozzles and Adaptors.
• Check the expiration dates of your
insulin. Do not use insulin past its
expiration date.
• Check the expiration dates of the
InsuJet™ consumables on the outer
packaging. Do not use consumables
past its expiration date.
• Check the integrity of the InsuJet™
consumables packaging. Do not use if
the package is breached.
• Never use the same Nozzle for
different types of insulin.
• Never use the same cartridge- or vial
Adaptor for different insulin cartridges
or vials. Discard the Adaptor with the
empty insulin cartridge or vial.
• Be careful not to touch the needle
inside the Adaptor.
• Never discharge the InsuJet™ without
a Nozzle attached, or air inside the
Nozzle. This is called DRY-FIRING and
may damage the device beyond repair.
• Replace the Nozzle whenever the
InsuJet™ has not been used for more
than 3 days.
• Never use the same Nozzle or
cartridge or vial Adaptor for different
patients.
• Adult supervision is highly
recommended when a child uses the
10
InsuJet™. Make sure that children are
told that the InsuJet™ is not a toy.
• Keep all medications and injection
devices out of the reach of children.
• Never use, or attempt to repair a
damaged or broken InsuJet™ or
consumable.
• Temperature limits for use:
40°C
5°C
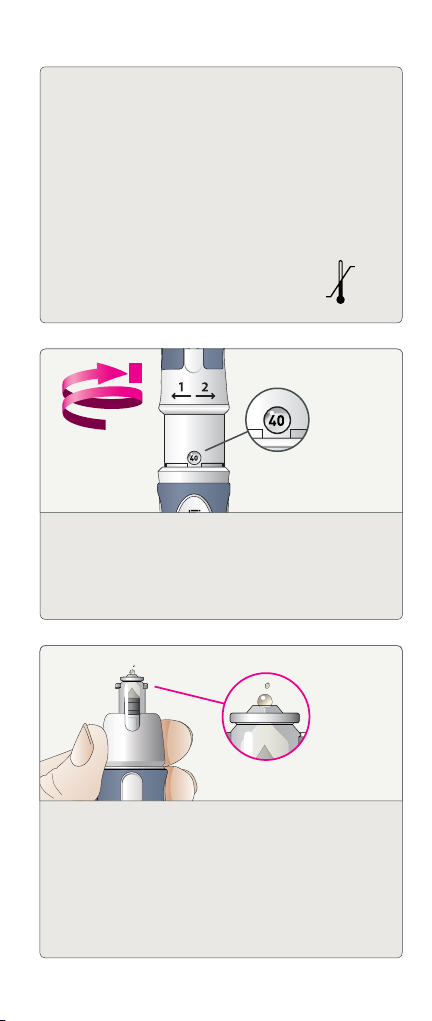
Do not attempt to force the InsuJet™
beyond the mechanical stop past the 40
IU indication. It may damage the device
and potentially cause injury.
Ensure that the Nozzle is completely
lled, and free of air bubbles before each
administration. If not, you will administer
less insulin than shown on the dosage
window, which will affect your anticipated
blood glucose level.
11
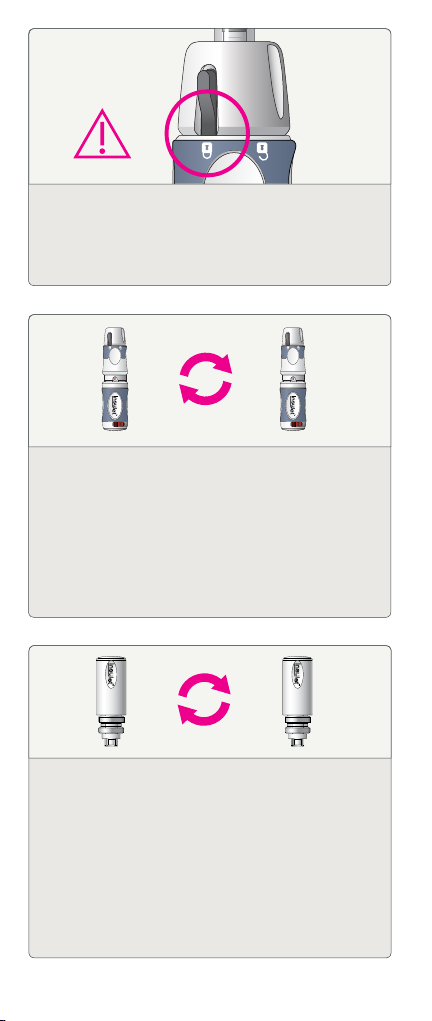
Before administration, ensure that the
Nozzle Lock Switch points to the locked
position. This indicates that the Nozzle is
secured.
Replace the InsuJet™ in time. The same
device should never be used for more
than 5000 injections. Do not use the
device past the indicated expiry date.
Device performance and safety may be
affected when using the device beyond the
indicated lifetime.
Replace the Nozzle regularly. The same
Nozzle should never be used for more
than 56 injections, or longer than 14
days. It is advised to replace the Nozzle
every time a new cartridge or vial is used.
Using the Nozzle beyond the indicated
lifetime will cause insulin leakage and
device malfunction, with loss of warranty.
12

Precautions
• Do not use the InsuJet™ other than
described in this instruction for use.
The manufacturer is not responsible for
potential problems with products that are
used in violation with this instruction for
use.
• Please consult your Diabetes Care
Specialist when you change your insulin
administration system. Make sure to
carefully monitor your blood glucose
levels before using the InsuJet™, and for
an appropriate amount of time thereafter.
• Always have a “BACK UP METHOD”
available to take your insulin, in case your
InsuJet™ gets lost or broken.
13

Good injection practices
• Wash your hands thoroughly before using
the InsuJet™
• Clean the injection site as directed by
your Diabetes Care Specialist.
• Avoid unnecessary contact with
the Nozzle tip or the areas on the
consumables that come into contact
with the insulin, to prevent possible
contamination.
• Monitor your blood glucose levels
regularly as instructed by your Diabetes
Care Specialist.
14

Contraindications
This product is not recommended for
patients who are:
• Severely visually impaired;
• Physically unable to operate the system;
• Not able to understand or memorize
the operating instructions for using the
InsuJet™;
• Have a special skin type (e.g. psoriasis
patients), which might impair a successful
use of the InsuJet™. In case of doubt
please consult your Diabetes Care
Specialist.
Patients who bruise or bleed easily (e.g.
people using antithrombotic drugs) may use
the device with caution.
If you experience any prolonged or severe
bruising or bleeding, it is recommended to
stop using the system.
15

Operating instructions - Preparation
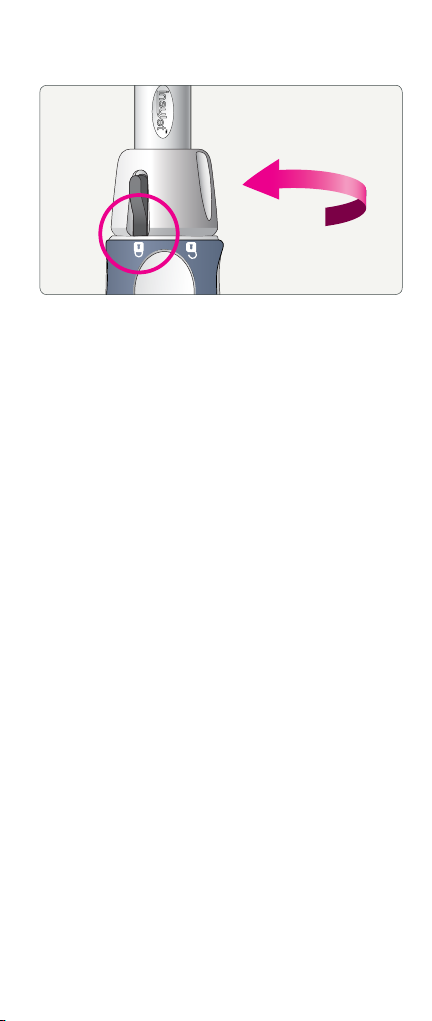
Installing the Nozzle
While pushing the Nozzle Lock Switch
upward, rotate the Nozzle Lock
counterclockwise until the Nozzle Lock
Switch points to the ´padlock unlocked´ icon.
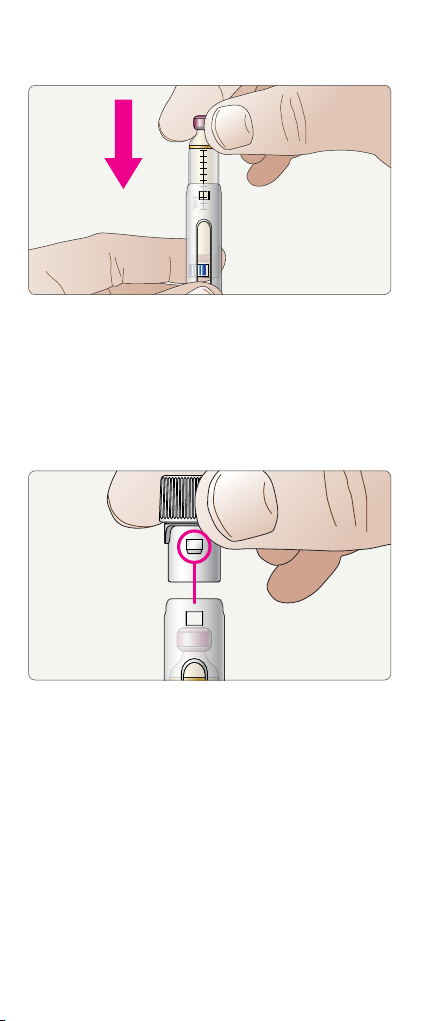
Remove the Nozzle from its packaging. Push
the back of the Nozzle rmly into the open
end of the device, until it cannot go further.
16
Turn the Nozzle Lock clockwise. Make sure
that the Nozzle Lock Switch points to the
padlock locked position.
NOTICE:
If you cannot turn the Nozzle Lock to the locked
position, please check if the Nozzle is installed
correctly.
Ensure that the Nozzle is pushed rmly into the
device until it cannot go further. Next, turn the
Nozzle Lock clockwise until the Nozzle Lock
Switch points to the padlock locked position.
17
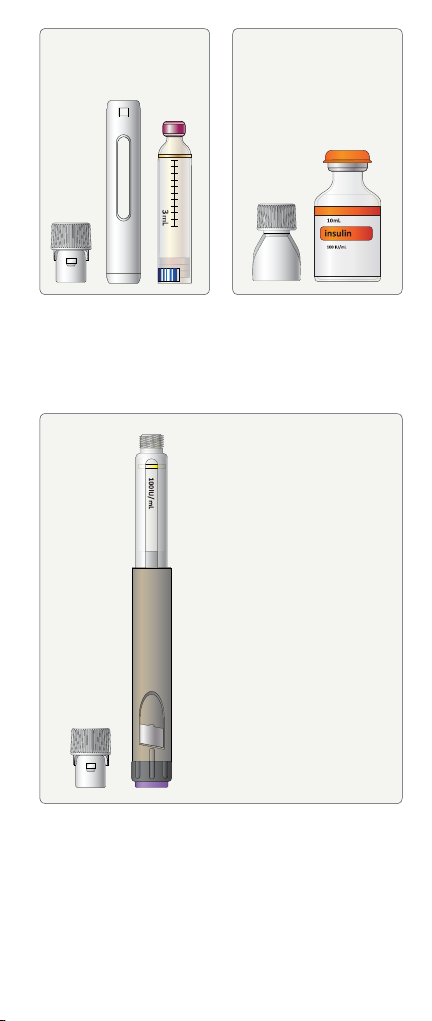
Installing the Adaptor
There are different types of Adaptors
available for the InsuJet™. These Adaptors
are used to transport the insulin from an
insulin cartridge or insulin vial into the
Nozzle.
• Use a 3mL Adaptor and Cartridge Holder
if you want to use insulin from a 3mL
cartridge.
• Use a 3mL Adaptor if you want to use
insulin from a disposable prelled pen.
• If you want to use insulin from a 10mL
vial, please use the 10mL Vial Adaptor.
The Adaptors are sterile packed. Remove the
Adaptor from the packaging after identifying
the correct content.
3mL Adaptor
REF 01055
10mL Adaptor
REF 01065
18
Example of a 3mL
Adaptor with a 3mL
cartridge
Example of a 3mL Adaptor with a Disposable
penll
NOTICE: For disposable penll users, please
refer to page 48 - 49 for instructions to install a
3mL Adaptor on a disposable penll.
Example of a 10mL
Adaptor with a 10mL
Vial
19
Installing a 3mL Adaptor
Slide the 3mL cartridge into the Holder, with
the bottom of the cartridge downward.
Take the Adaptor and place it into the
Holder. Make sure that the protrusions on
the Adaptor and corresponding holes in the
Holder are properly aligned.
20
Push rmly until the Adaptor snaps in place.
The Adaptor remains on the Holder.
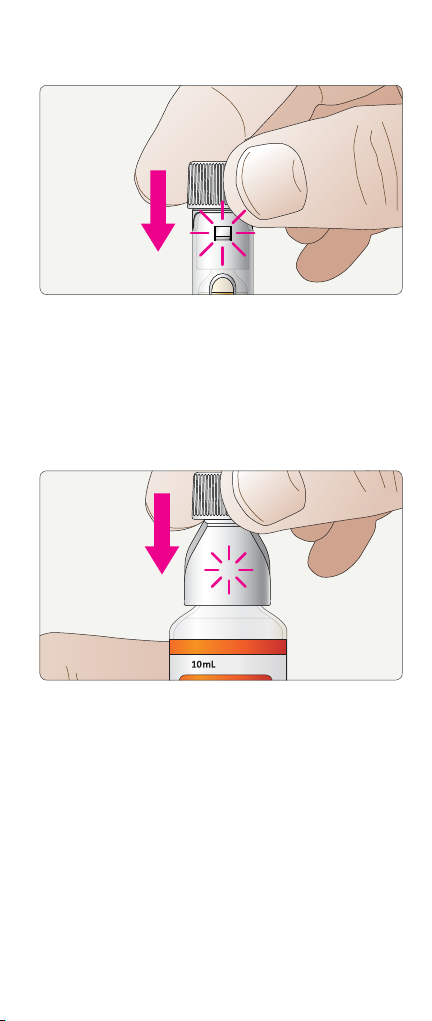
Installing a 10mL Adaptor
Remove the protective cap from the insulin
vial.
Push the 10mL Adaptor rmly onto the 10mL
vial, until the Adaptor snaps in place.
The Adaptor remains on the vial.
21
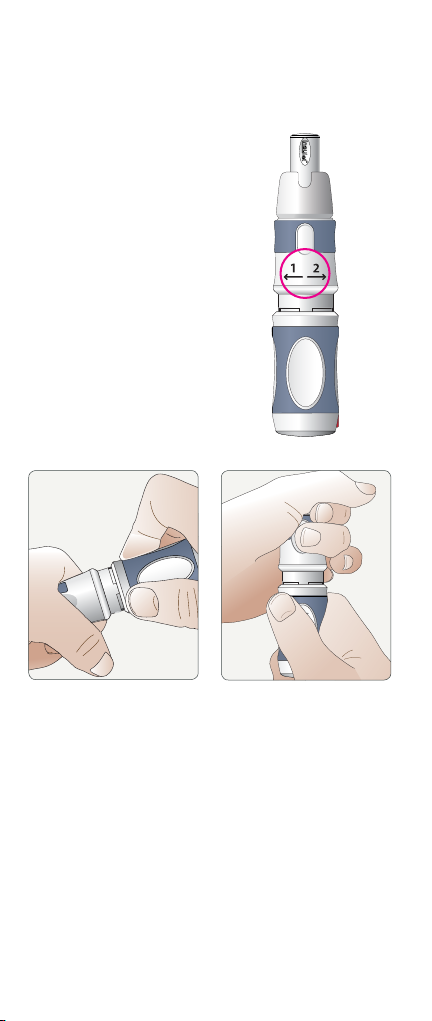
Preparations for administration
Charging the InsuJet™
Notice the Nr1 and Nr2
arrows on the front of
the device.
Hold the device in both hands, one hand
holding the front of the device, the other
holding the back.
It is advised to hold the device in one of the
two ways shown above.
22
 Loading...