

EP Equipment PB2000 User Manual

Important Information
-- This manual is designed to help you to install, operate and maintain Perfect Binding Machine
PB2000. Read, understand and keep this manual in a safe and convenient place.
-- Do not operate PB2000 until you read and understand the instructions in this manual.
-- E-P Equipment Co., Ltd. should not be liable for incidental consequential damages resulting
from : improper or inadequate maintenance by customer; unauthorized modification or misuse;
operation outside of the environment specifications for the product.
-- EP Equipment Co.,Ltd pursues a policy of continuing improvement in design and performance
of the product. Therefore, the product design and specifications are subject to change without
prior notice and without our legal obligation.
-- All rights are reserved. No part of the manual may be photocopied, reproduced or translated to
another language without the prior written consent of EP Equipment Co.,Ltd.
GB-6210

EP
( 1 )
GB-6210 Manual
Contents
1. Specifications
1-1 Major Specifications ........................................................................................ 2
1-2 Accessories ...................................................................................................... 3
2. Guide to Components
2-1 Main Frame ...................................................................................................... 4
3-2 Control Panel .................................................................................................... 5
3. Before Operation
3-1 Installation Precautions ................................................................................... 7
3-2 Operating Precautions ..................................................................................... 7
3-3. Knowledge of how to bind a good book ....................................................... 8
4. Operation Procedure
4-1 Preadjustments for operation ......................................................................... 9
4-2 Auto Mode ......................................................................................................... 11
4-3 Manual Mode .................................................................................................... 13
5. Maintenance
5-1 Glue Supply ...................................................................................................... 16
5-2 Clear the Waste tank ........................................................................................ 17
5-3 Unload glue ....................................................................................................... 18
6. Troubleshooting
................................................................................................................................... 22

( 2 )
GB-6210 Manual
1-1 Major Specifications
Model PB2000
Maximum Spine Length 330 mm (12.4’’)
Maximum Binding Thickness 38 mm (1.5’’), 380 Sheets
Minimum Binding Thickness 3 Sheets
Cover Weight range 70 to 180 gsm (Paper only)
Production Speed 1 Book / 35s, Up to 100 books/hour
Binding Glue Type Hot Melt Glue (170 to 190 Deg C)
Warming Up Time 25 Minutes
Power 220 ~230V - 50~60 Hz
Power Consumption 1050 W
Machine Dimensions
580x550x270 mm
25.6''x21.7''x10.6''
Machine Weight 60 Kg (120lbs.)
1. Specifications

( 3 )
GB-6210 Manual
2
6
5
3
4
1
1-2 Accessories
Name Quantity
1
Hot melt Glue 2 KG
2
Fuse 1 PC
3
Waste Box
1 PC
4
Power Cord
1 PC
5
Hexagonal wrench 1 PC
6
Hexagonal wrench 1 PC
( 4 )
GB-6210 Manual
5
6
4
7
8
2
3
1
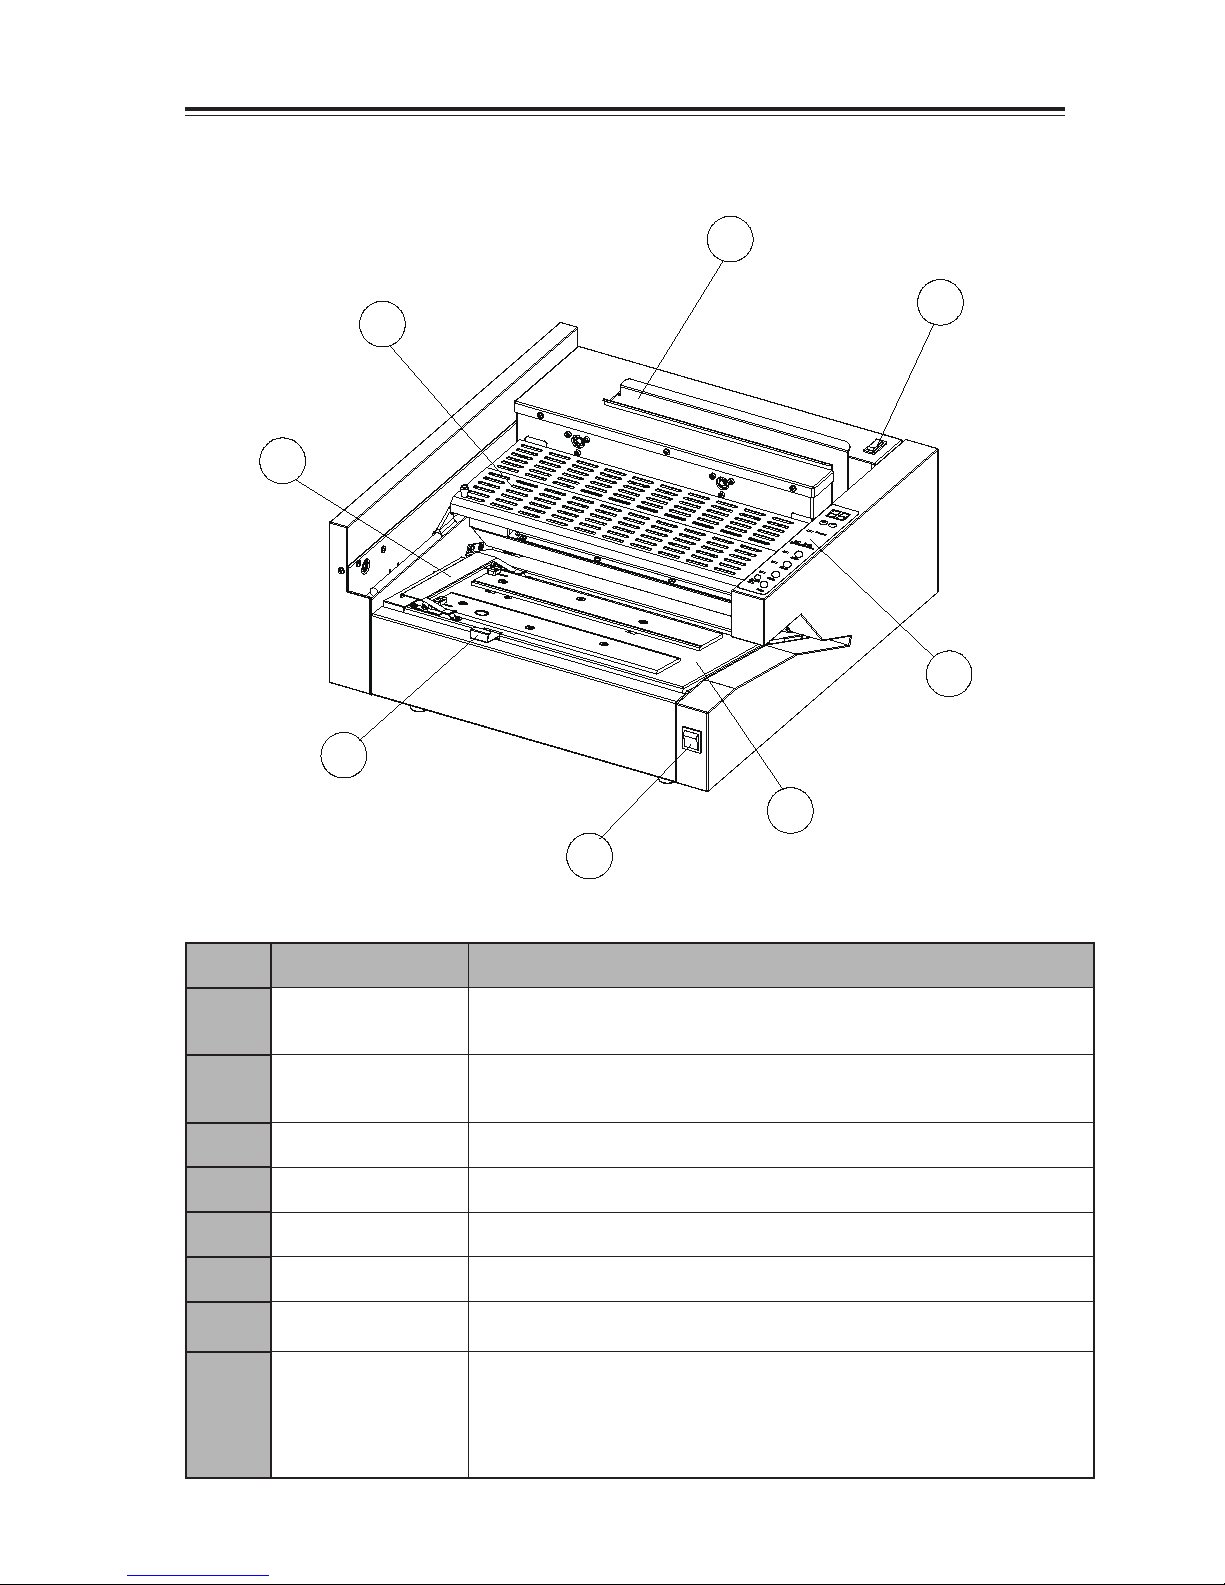
2-1 Main Frame
Name Function
2-1-1
Clamper
This clamps sheets to be bound and carries to the Roughing
cutter and the melt tank
2-1-2
Clamper Open/
Close Switch
Used to open / close the clamper, used only in Hand mode
2-1-3
Control Panel The control panel
2-1-4
Nipper Used to nip cover and sheets to form spine
2-1-5
Main Switch Used to turn ON / OFF main power
2-1-6
Cover Gauge Used to regulate cover position
2-1-7
Cover Set Guide Used to fix cover
2-1-8
Melt Tank Cover
Used to cover the melt tank and roughing cutter. Keep your
hands off from the melt tank and glue application roller and
roughing cutter when the cover is open
2. Guide to Components

( 5 )
GB-6210 Manual
9
13
10
11
12
7
8
6
5
1
4
3
2
2-2 Control Panel

( 6 )
GB-6210 Manual
Name Function
2-2-1
Nipping Time Display Shows the length of nipping time
2-2-2
Nipping Time Control
Button
Depress +/- button to set the length of nipping time
2-2-3
Start Lamp This Lamp turns on when the machine is ready to bind
2-2-4
Preparation Lamp This Lamp turns on when glue is not melted for binding
2-2-5
Auto Mode Select Button Used to select Auto mode
2-2-6
Auto Mode Lamp This Lamp turns on when Auto mode is selected
2-2-7
Hand Mode Select Button Used to select Hand mode
2-2-8
Hand Mode Lamp This Lamp turns on when Hand Mode is selected
2-2-9
Stop Button Used to stop the binding procedure at anytime
2-2-10
Stop Lamp This Lamp turns on when the stop button is depressed
2-2-11
Step Button
The binding procedure will carry on step by step, it will
go to the next step when you press the step button.
Can be only used in hand mode.
2-2-12
Reset Lamp
This Lamp turns on when the reset button is depressed
and it turns off when reset progress is over
2-2-13
Reset Button
Used to bring back the nipper and clamper to their
home position when stop button is depressed during
binding procedure;
2-2-14
Reset (Function) Button
In Manual Mode, depress this button for 5 seconds, the
clamper will travel forward and stop at nipper position.
 Loading...