

Page 1
USER MANUAL
EUHF3PK 80 Channel UHF
hand held CB radio
NOTE: Please read these instructions carefully before using the
equipment and retain for future consultation
Page 2

Page 3

TABLE OF CONTENTS
Introduction..............................................4
Box contents.....................................................4
Safety information and warnings.......................4
Battery and belt clip installation.......................10
Radio layout....................................................11
LCD display icons...........................................12
Radio operation...............................................13
Main menu......................................................16
Function-CTCSS............................................17
Function-VOX.................................................18
Function-CALL TONE.....................................18
Function-TURN OFF TIME (TO)....................19
Function-ROGER BEEP.................................19
Function-REPEAT...........................................20
Duplex operation via repeaters.......................20
Function-Using the UHF radio.........................22
Transmitting range..........................................23
Channel and frequency...................................25
38 CTCSS code list.........................................27
Technical specifications..................................28
Technical assistance.......................................28
3
Page 4

INTRODUCTION
Thank you for purchasing this EOSS CB Radio.
Please ensure that you have read the product manual
and instructions in full, prior to installation and use.
Failure to do so may result in product failure/damage
or incorrect operation and therefore impact the product
performance.
There are many government rules and regulations
surrounding the use of UHF radio so please familiarise
yourself with local legislation and the safety
information contained within this product manual
before use.
BOX CONTENTS
Parts supplied include:
3 x Hand held UHF radios
3 x Belt clips
SAFETY INFORMATION AND WARNINGS
Information on Safe Operation
Read This Information Before Using Your EOSS
Radio. The operation of your UHF radio in Australia is
subject to conditions in the following license: In
Australia the ACMA Radio communications (Citizen
Band Radio Stations) and in New Zealand by MED the
General User Radio License for Citizen Band Radio.
4
Page 5

Radio antenna
Do not use any radio that has a damaged antenna.
If a damaged antenna comes in contact with the skin,
a minor burn may result. Unauthorized antennas,
modifications, or attachments could damage the radio
and violate compliance. Do NOT change or modify the
antenna. Do NOT hold the antenna when the radio is
“IN USE.” Holding the antenna reduces range and may
cause bodily harm.
Safety and general use whilst in a vehicle
Check the State and Federal laws and regulations
regarding the use of two-way radios in the area where
you drive, and always obey them.
For Vehicles fitted with Airbags
Do not place your radio in the area over an air bag or
in the air bag deployment area. Air bags inflate with
great force. If a radio is placed in the air bag
deployment area and the air bag inflates, the radio
may be propelled with great force and cause serious
injury to the occupants of the vehicle.
Batteries
All batteries can cause property damage and/or bodily
injury such as burns if conductive material such as
jewelery, keys, or beaded chains touches exposed
terminals. The material may complete an electrical
circuit (short circuit) and become quite hot. Exercise
care in handling any charged battery, particularly when
5
Page 6

placing it inside a pocket, purse, or other container
with metal objects. Do not replace or charge batteries
in a potentially explosive atmosphere. Contact
sparking may occur while installing or removing
batteries and cause an explosion.
Potentially Explosive Atmospheres
Turn your radio OFF when in any area with a
potentially explosive atmosphere. Sparks in such
areas could cause an explosion or fire resulting in
injury or even death. NOTE: Areas with potentially
explosive atmospheres are often, but not always
clearly marked. They include fuel-ling areas such as
below deck on boats; fuel or chemical transfer or
storage facilities; areas where the air contains
chemicals or particles, such as grain, dust, or metal
powders; and any other area where you would
normally be advised to turn off your vehicle engine.
Blasting Caps and Areas
To avoid possible interference with blasting operations,
turn your radio OFF near electrical blasting caps or in
a “blasting area” or in areas posted: “Turn off the two
way radio.” Obey all signs and instructions.
Exposure to Radio Frequency Energy
Your CRYSTAL two-way radio complies with Australian
Communications Authority Radio communications
(Electromagnetic Radiation-Human Exposure)
Standard, 2003. To assure optimal radio performance
6
Page 7

and make sure human exposure to radio frequency
electromagnetic energy is within the guidelines set out
in the above standards always adhere to the following
procedures.
Transmit and Receive Procedure
Your two-way radio contains a transmitter and a
receiver. To control your exposure and ensure
compliance with the general population/uncontrolled
environment exposure limits, always adhere to the
following procedure:
• Transmit no more than 50% of the time.
• To receive calls, release the PTT button.
• To transmit (talk), press the Push to Talk (PTT) button.
Transmitting 50% of the time, or less, is important
because the radio generates measurable RF energy
exposure only when transmitting (in terms of
measuring standards compliance). Always hold the
radio approximately 5cm in front of your mouth with
the antenna pointing away from your head.
Radio Operation and EME Exposure
Unauthorized antennas, modifications, or attachments
could damage the radio and violate compliance. Do
NOT hold the antenna when the radio is “IN USE.”
Holding the antenna reduces the effective range. Do
not use the radio if the antenna is damaged. If a
damaged antenna makes contact with your skin, a
minor burn can result. If you wear a radio on your body
when transmitting, always fit the radio on the belt clip
7
Page 8

(supplied). Always ensure the radio and it's antenna
are at least 5cm from your body when transmitting.
Electromagnetic Interference/Compatibility
Nearly every electronic device is susceptible to
electromagnetic interference (EMI). To avoid the
possibility of electromagnetic interference and/or
compatibility conflicts, turn off your radio in any
location where posted notices instruct you to do so
such as health care facilities.
Aircraft
When instructed to do so, turn off your radio when
on-board an aircraft. Any use of a radio must be in
accordance with applicable regulations per airline crew
instructions.
Medical Devices – Pacemakers
The Advanced Medical Technology Association
recommends that a minimum separation of 6 inches
(15cm) be maintained between a handheld wireless
radio and a pacemaker. These recommendations are
consistent with the independent research by and
recommendations of the U.S. Food and Drug
Administration.
People with pacemakers should: •ALWAYS keep the
radio more than 15cm from their pacemaker when the
radio is turned ON.•Not carry the radio in the breast
pocket. •Use the ear opposite the pacemaker to
minimize the potential for interference.
8
Page 9

minimize the potential for interference.
•Turn the radio OFF immediately if there is any reason
to suspect that interference is taking place.
Medical Devices ‐Hearing Aids
Some radios may interfere with some hearing aids. In
the event of such interference, you may want to
consult your hearing aid manufacturer to discuss
alternatives.
Other Medical Devices
If you use any other personal medical device, consult
the manufacturer of your device to determine if it is
adequately shielded from RF energy. Your physician
may be able to assist you in obtaining this information.
General warnings
Never use your radio outdoors during a thunderstorm.
Keep the radio out of reach of babies and young
children.
General Warnings
Never use your radio outdoors during a thunderstorm.
Keep the radio out of reach of babies and young
children.
9
Page 10
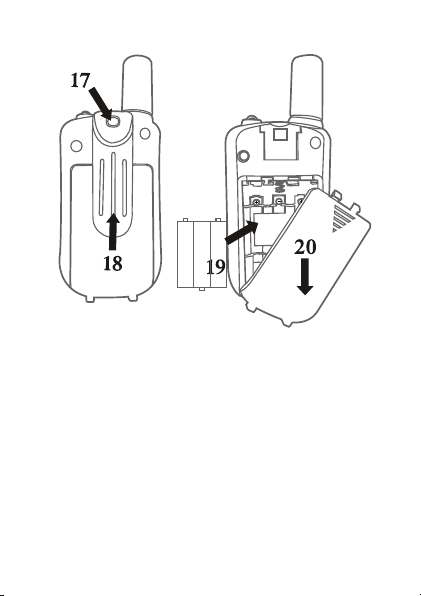
BATTERY AND BELT CLIP INSTALLATION
17. Belt attachment clip
18. Belt attachment
19. Batteries (not supplied)
20. Battery compartment
The supplied belt clip simply slides into the back of the
main radio and clicks in place to lock. If fitted, remove
the belt clip by lifting the top tab away from the main
unit and slide the belt clip up. Slide the battery cover
down approximately 5mm, then lift away the cover.
Slide down the battery compartment cover.
Insert 3 x AAA batteries (not supplied).
Position the batteries according to the polarity marking
on the battery compartment. After placing batteries into
correct positions, replace the battery cover.
10
Page 11
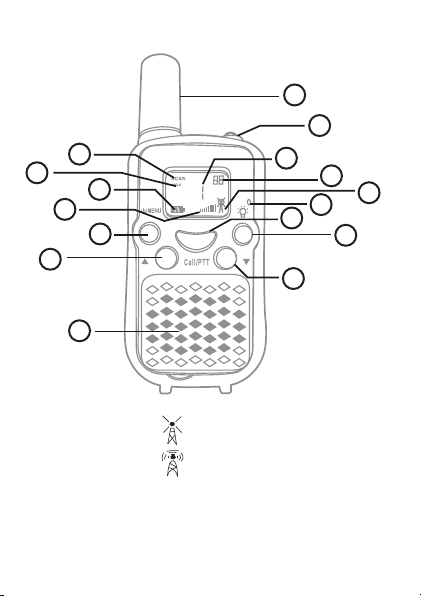
RADIO LAYOUT
12
11
10
3
6
4
7
1
16
13
14
2
8
9
15
5
1. Antenna
2. RX icon - displayed
when receiving
TX icon - displayed
when transmitting
3. Volume level indicator
4. Adjuster button UP
5. Adjuster button Down
6. On/Off/Menu button
7. Loudspeaker
8. Microphone
9. Call Button (CALL/TALK)
10. Battery level indicator
11. VOX indicator
12. Scanning indicator
- displayed during scanning
13. Channel Menu
14. CTCSS/Menu option
15. Lamp button
16. Lamp
11
Page 12
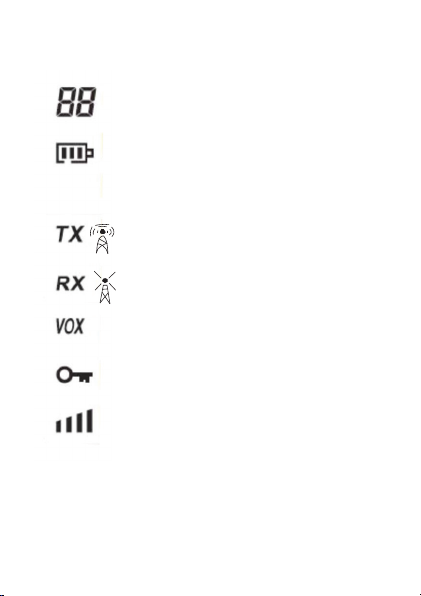
LCD DISPLAY ICONS
CTCSS Code. Changes from 1 to 38
as selected by the user.
Displays the Battery charge level.
When the bars are reduced, the
batteries need replacing.
Symbol displayed when transmitting
a signal
Symbol displayed when receiving a
signal
Displayed when the VOX feature is
enabled.
Displayed when the KEY LOCK
feature is enabled.
Displays the current speaker volume
level
12
Page 13

RADIO OPERATION
Turning unit on/off
1- Switching on
Press and hold the POWER/On/Off button until you
hear a beep sound and the display will light up.
2- Switching off
Press and hold the POWER/On/Off until you hear a
beep sound and the display will turn off.
Adjusting the Volume
You have 8 preset volume levels. They are displayed
on the LCD screen. To raise the volume press the UP
button and to decrease the volume, press the DOWN
button. Once the desired volume level has been
selected, press the UP & DOWN buttons and this will
save the selected volume and the radio will return to
the default screen.
Changing Channels
You have a maximum of 80 channels at your disposal.
To communicate with another device, you must both
be on the same channel. Press the MENU button once
the channel number on the display will start flashing.
Press the UP & DOWN buttons” to scroll to the desired
channel. Once the desired channel has been selected,
press the PTT button to confirm and this will save the
selected channel and the radio will return to the default
screen with the new channel displayed.
13
Page 14

This model UHF radio is simplex, “one way at a time”.
While you are speaking, you cannot receive a
transmission. This model is an open-license band.
Always identify yourself when transmitting on the same
channel.
NOTE: Channels 05 and 35 are reserved for
emergency use only.
Scanning
The scan feature will enable the radio to automatically
scan through selected channels at 20 channels per 3
seconds. To scan, press and hold the UP button for 3
seconds the unit will scan through all 80 channels.
The word SCAN will appear in the top left of the
screen to indicate it is scanning. The direction of the
scan can simply be changed by using the UP button or
DOWN button. To stop scanning, press the PTT button
and the radio will go back to the original channel set
before scanning. The user can still transmit on the
selected channel at anytime by pressing the PTT
button on the radio, once the transmission is complete
the radio will continue scanning after 20 seconds.
IMPORTANT: Before transmitting on a UHF channel
listen to ensure it is not already in use.
14
Page 15

Transmitting (sending speech)
The unit is continuously in the Receive mode when the
unit is turned ON and not transmitting. When a signal
is received on the current channel, RX icon will be
displayed on the LCD screen. A. Press and hold the
PTT button (Push to Talk) button to transmit your
voice. The transmit signal icon TX will display on the
LCD screen. B. Hold the unit in a vertical position with
the Mic (Microphone) 5 cm away from the mouth.
While holding the PTT button, speak into the
microphone in a normal tone of voice. C. Release the
PTT button when you have finished transmitting.
For others to receive your transmission, they must be
on the same channel as you.
Squelch control
The radio has automatic squelch control, which
silences the constant background noise during periods
of inactivity. The radio will still receive transmissions
when a signal is present, however it will eliminate
background noise when a signal is not present.
To open the squelch (turn off automatic squelch
control), press and hold down the DOWN button, RX
receive symbol will appear on the display and a
constant static noise can be heard. The radio is now
allowing all signals to be heard.
Low Battery Meter Indicator
The radio can detect the low battery level when the
battery voltage goes low. The battery icon will display
15
Page 16

the low battery status. When battery voltage is low, the
empty battery symbol will appear and continue to blink.
The battery symbol will continuously blink until it totally
drains the battery voltage where then you will have to
recharge or replace the batteries.
MAIN MENU
To access the main menu, while the radio is powered
on, press the MENU button. To navigate through each
menu option, press the MENU button multiple times
until the desired feature is reached. Use the UP &
DOWN buttons to make changes.
Menu options include:
1. Channel selection
2. CTCSS code settings
3. Voice operated exchange (oF)
4. Call tone (CA)
5. Turn Off Time (to)
6. Roger beep (ro)
7. Repeat (rP)
NOTE: Duplex Mode also known as Repeater is only
available/displayed on selected channels (1-8 and
41-48). It will not display on the menu as an option
when the radio is on another channel. To exit the menu
press the PTT button and the default channel screen
will reappear, this will also save any settings you
changed. Alternatively, do not press any buttons for 8
seconds and the radio will automatically exit the menu
and automatically save any changed settings.
16
Page 17

FUNCTION-CTCSS
What is CTCSS
CTCSS (Continuous Tone-Coded Squelch System)
modifies the transmission signal to allow multiple users
to share the same channel without disturbing each
other. This is an important feature on a radio when
there are many radio users in the same area.
CTCSS continuously superimposes any one of about
50 low-pitch audio tones on the transmitted signal,
ranging from 67 to 254 Hz. When CTCSS is enabled,
incoming signals must be on the same CTCSS sub
channel as the receiving radio or they will be filtered
out.
Setting CTCSS function
Press the MENU/PWR button twice, the CTCSS
channel number on the LCD will start flashing.
To enable CTCSS, press the UP button or DOWN
button until CTCSS appears on the screen, channel
selection can be made between 1-38. Once the
desired setting is selected, press the MENU button to
save the setting. The unit will automatically change
back to the default screen with the CTCSS sub
channel now on display. To turn off CTCSS, press the
UP button or DOWN button until “00” appears. Press
the MENU button” to save the setting. The unit will
automatically change back to the default screen and
CTCSS will no longer be displayed.
17
Page 18

FUNCTION-VOX
What is VOX?
VOX stands for Voice Operated Exchange, the feature
allows a user to transmit simply by talking into the
radio without having to press the PTT BUTTON.
Setting VOX Mode
To access VOX mode, press the MENU button three
times, VOX will display at the top of the LCD. Press
the DOWN button or UP button to select an option,
“OFF-1-2-3” (1 is low voice sensitivity and will only
pick up load noises, while 3 is high sensitivity and will
pick up soft noises). Once the desired option has been
selected, press the PTT button and this will save the
selected channel and the radio will return to the default
screen with the “VOX” displayed at the top. When
VOX is activated, every time the radio detects a noise
it will automatically transmit.
NOTE: The use of VOX is not recommended in
environments where noise is present (wind
or general loud background noise).
FUNCTION-CALL TONE
What is CALL TONE?
A call tone is a 2 second signal that is sent out from
the radio to let other users know you would like to talk
to them. It is an alternative option from just speaking
into the MIC. The radio has 10 call tone options.
To transmit a call tone, quick press the PTT button.
18
Page 19

NOTE: Legislation only allows the call tone to be
used once per minute, if the call button is pressed
more than once in a minute, the radio simply will
not resend the call tone again.
Setting Call Tone
Press the MENU button four times, “CA” will appear on
the LCD. Press the DOWN button or UP button to
select an option, “1-10”. Once the desired option has
been selected, press the PTT button and this will save
the selected channel and the radio will return to the
default screen.
FUNCTION-TURN OFF TIME (TO)
Setting Key Tone (TO)
To access the TO feature, press the MENU button five
times, “TO” will display on the screen. Press the UP
button or DOWN button to turn on or off. Once the
desired option has been selected, press the PTT
button and this will save the selected option and the
radio will return to the default screen.
FUNCTION-ROGER BEEP
What is Roger Beep?
When the PTT is released after transmission, the radio
will send a short beep to indicate the transmission has
finished. This is known as a roger beep.
19
Page 20

Setting Roger Beep
To access the roger beep feature, press the MENU
button six times, “RO” will display on the screen. Press
the DOWN button or UP button to select an option ON
or OFF. Once the desired option has been selected,
press the PTT button and this will save the selected
option and the radio will return to the default screen.
FUNCTION- REPEAT
What is Repeat?
Repeater stations allow your CB radio to operate over
a greater distance (where your CB has Duplex mode).
The radio has repeat as default on.
Selecting Repeat
To access the repeat feature, press the MENU button
seven times, “RP” will display on the screen. Press the
DOWN button or UP button to select an option ON or
OFF. Once the desired option has been selected,
press the PTT button and this will save the selected
option and the radio will return to the default screen.
DUPLEX OPERATION VIA REPEATERS
This feature allows to use local repeater stations that
are designed to automatically re-transmit your
broadcast over a large area thus giving you increased
range. For example, if you wish to access a repeater
station in your area which operates on Channel 2 you
only need to set the Duplex access on this channel. So
if you are in the range of a local repeater which
20
Page 21
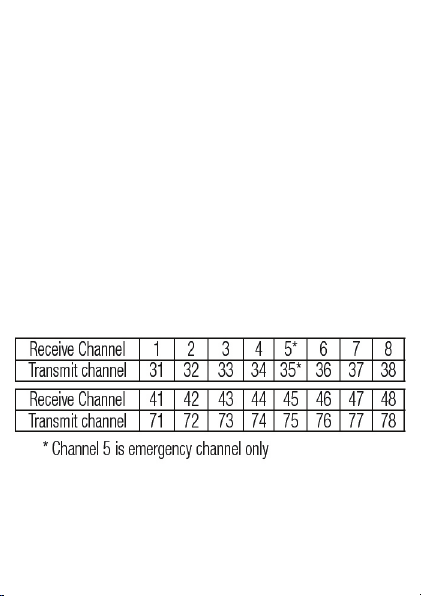
transmits on Channel 2, after setting your radio to
allow access of the repeater on that channel, you will
select Channel 2 as normal, but during transmit
operation your radio will automatically transmit to the
repeater on Channel 32.
Turning on/off Duplex on channels
a. Select the required channel to suit the repeater
station you wish to access (Channels 1- 8 and 41- 48).
b. Press the MENU button twice, RPT icon will display
on screen
c. Press the UP or DOWN button to set the Duplex
function to ON or OFF
d. Press the PTT button to confirm your setting
e. The RPT icon will display to indicate that Duplex is
set on that channel
INPORTANT: Channel 5 and 35 (paired for Duplex
repeaters) are reserved as emergency channels
and should be used only in an emergency. CTCSS
and DCS will not operate on channels 5 and 35.
21
Page 22

A list of currently authorised channels can be obtained
from the ACMA website in Australia and the MED
website in New Zealand. Channel 11 is a calling
channel generally used to call others and channel 40
is the customary road vehicle channel.
Once contact is established on the calling channel,
both stations should move to another unused
“SIMPLEX” channel to allow others to use the calling
channel. Channels 22 and 23 are for Telemetry and
Telecommand use, voice communications are not
allowed on these channels by law. Channel 9 and
above are the best choices for general use in Simplex
mode.
FUNCTION- USING THE UHF RADIO
Transmit & receive procedure
Your UHF radio contains a transmitter and receiver.
To control your exposure and ensure compliance with
the general population/uncontrolled environment
exposure limits, always adhere to the following
procedure: Transmit no more than 50% of the time.
To receive calls, release the PTT button on the
microphone handpiece. To transmit (talk), press the
PTT button on the microphone handpiece.
When powered on and not transmitting, the radio is
always in receive mode. When a signal is received an
RX full antenna symbol will display on the screen,
when transmitting TX display on the LCD.
22
Page 23

For others to receive your transmission, they must be
on the same channel as you and if CTCSS or DCS is
enabled, the same sub channel must also be selected.
NOTE: Before transmitting on a UHF channel, always
listen to ensure it is not already in use.
NOTE: Transmitting 50% of the time, or less, is
important because the radio generates measurable RF
energy exposure only when transmitting (in terms of
measuring standards compliance).
NOTE: Do not transmit between two radios that are
less than 1.5m apart, otherwise you may experience
interference.
NOTE: The UHF radio is simplex “one way at a time”.
While you are speaking, you cannot receive a
transmission.
NOTE: The UHF radio is an open licence band.
Always identify yourself when transmitting.
TRANSMITTING RANGE
The transmitting range will depend on the antenna,
terrain, surroundings and environment, it will be
affected by obstructions such as hills, buildings and
foliage. The use of duplex mode will extend the
transmission range in areas where a repeater station
is present. Channel 5 and 35 (paired for Duplex
repeaters) are reserved as emergency channels and
should be used only in an emergency. CTCSS will not
operate on channels 5 and 35.
23
Page 24

A list of currently authorised channels can be obtained
from the ACMA website in Australia and the MED
website in New Zealand. Channel 11 is a calling
channel generally used to call others and channel 40
is the customary road vehicle channel. Once contact is
established on the calling channel, both stations
should move to another unused “SIMPLEX” channel to
allow others to use the calling channel. Channels 22
and 23 are for Telemetry and Telecommand use, voice
communications are not allowed on these channels by
law. Channel 9 and above are the best choices for
general use in Simplex mode.
Radio communications (Citizen Band Radio
Stations) Class Licence 2002
No licence is required to own or operate this radio in
Australia and New Zealand. The Radio
communications (Citizen Band Radio Stations) Class
Licence 2002 contains the technical parameters,
operating requirements, conditions of licence and
relevant standards for Citizen Band (CB) radios. CB
radios must comply with the class licence for their use
to be authorised under the class licence.
UHF channels and frequencies
IMPORTANT NOTE: The operation of your UHF radio
in Australia and New Zealand is subject to conditions
in the following licenses: In Australia the ACMA Radio
communications (Citizen Band Radio Stations) and in
New Zealand by MED the General User Radio License
for Citizen Band Radio.
24
Page 25
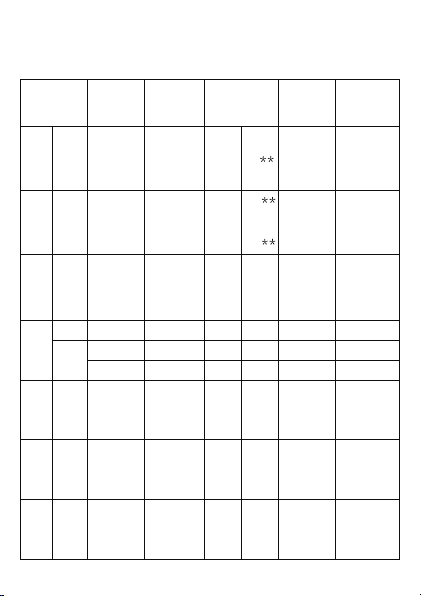
CHANNEL AND FREQUENCY (MHZ)
Australia (80CHS)
TX
RX
Channel
01*
41*
02*
42*
0*3
43*
04*
44*
05*
45*
06*
46*
07*
47*
08*
48*
9
49
10
50
11
Freq
MHZ
476.4250 476.4250 476.9250 476.9250
- 476.4375
476.4500 476.4500 476.9500 476.9500
- 476.4625
476.4750 476.4750 476.9750 476.9750
- 476.4875
476.5000 476.5000 477.0000 477.0000
- 476.5125
476.5250 476.5250 477.0250 477.0250
- 476.5375
476.5500 476.5500 477.0500 477.0500
- 476.5625
476.5725 476.5750 477.0750 477.0750
- 476.5875
476.6000 476.6000 477.1000 477.1000
- 476.6125
476.6250 476.6250 477.1250 477.1250
476.6375 476.6375
476.6500 476.6500 477.1500 477.1500
476.6625 476.6625
476.6750 476.6750 477.1750 477.1750
Freq
MHZ
Channel
21
61
22*
62
23
63
24
64
25
65
26
66
27
67
28
68
29
69
30
70
31*
25
TX
- -
- -
- -
RX
Freq
MHZ
Freq
MHZ
477.0125 477.0125
477.0375 477.0375
477.0625 477.0625
477.0875 477.0875
477.1125 477.1125
477.1375 477.1375
477.1625 477.1625
Page 26
476.6875 476.6875
51
12
13
14
15
16
17
18
19
20
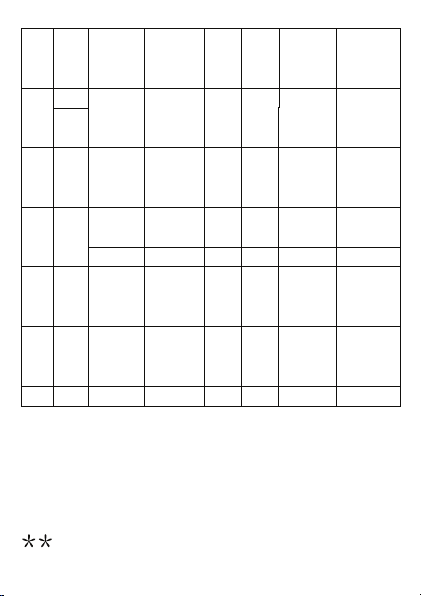
The primary use for these channels is repeater
*
operation using 750kHz offset. Channels 1-8 and
476.7000 476.7000 477.2000 477.2000
476.7125 476.7125
52
476.7250 476.7250 477.2250 477.2250
53
476.7375 476.7375
476.7500 476.7500 477.2500 477.2500
476.7625 476.7625
54
476.7750 476.7750 477.2750 477.2750
476.7875 476.7875
55
476.8000 476.8000 477.3000 477.3000
476.8125 476.8125
56
476.8250 476.8250 477.3250 477.3250
476.8375 476.8500
57
476.8500 476.8500 477.3500 477.3500
58 476.8625 476.8625
476.8750 476.8750 477.3750 477.3750
476.8875 476.8875
59
476.9000 476.9000 477.4000 477.4000
476.9125 476.9125
60
32*
33
34*
35*
36*
37*
38*
39
40
477.1875 -
71*
477.2125 -
72*
477.2325 -
73*
477.2625 -
74*
477.2875 -
75*
477.3125
76*
477.3375
77*
477.3625
78*
477.3875 477.3875
79*
477.4125 477.4125
80
41-48 inclusive are used for mobile reception and
channels 31-38 and 71-78 for mobile transmission.
In addition, any designated repeater channel maybe
used for simplex operation in areas where it is not
used for repeater operation.
Speech telephony shall be inhibited on these
channels. Guard channels and are not available.
26
Page 27

38 CTCSS CODE LIST
Radio communications (Citizen Band Radio Stations)
Code Frequency(Hz) Code Frequency(Hz)
OFF OFF 20
1 67.0 21 136.5
2 71.9 22 141.3
3 74.4 23 146.2
4 77.0 24 151.4
5 79.7 25 156.7
6 82.5 26 162.2
7 85.4 27 167.9
8 88.5 28 173.8
9 91.5 29 179.9
10 94.8 30 186.2
11 97.4 31 192.8
12 100.0 32 203.5
13 103.5 33 210.7
14 107.2 34 218.1
15 110.9 35 225.7
16 114.8 36 233.6
17 118.8 37 241.8
18 123.0 38 250.3
19 127.3
131.8
27
Page 28

TECHNICAL SPECIFICATIONS
Channels 80
Frequency 400-470MHz
Range Up to 3 Km (Open field)
Battery 3AAA
Transmission Power => 500mW
Modulation Type FM-F3E
Channel spacing 12.5/25kHz
TECHNICAL ASSISTANCE
If you need assistance setting up or using your EOSS
product call EOSS Support Australia.
TEL: 03 – 8587 8898
FAX: 03 – 8587 8866
Mon-Fri 9am – 5pm AEST
Please retain this user guide for future reference.
This manual is considered correct at time of printing
but is subject to change. For latest manuals and
updates refer to the website.
Copyright © 2017 by TDJ Australia
All rights reserved. No part of this publication may be
reproduced, distributed, or transmitted in any form or
by any means, including photocopying, recording,
copying or other electronic or mechanical methods,
without the prior written permission of the author.
28
 Loading...