

Page 1

HD 720P DVR with 4.3”TFT bluetooth mirror and wireless
back side camera systerm
USER’S MANUAL
Thank you for purchasing from our company. In order to help
you operate it correctly. Please read this user’s manual
carefully before using.
Page 2
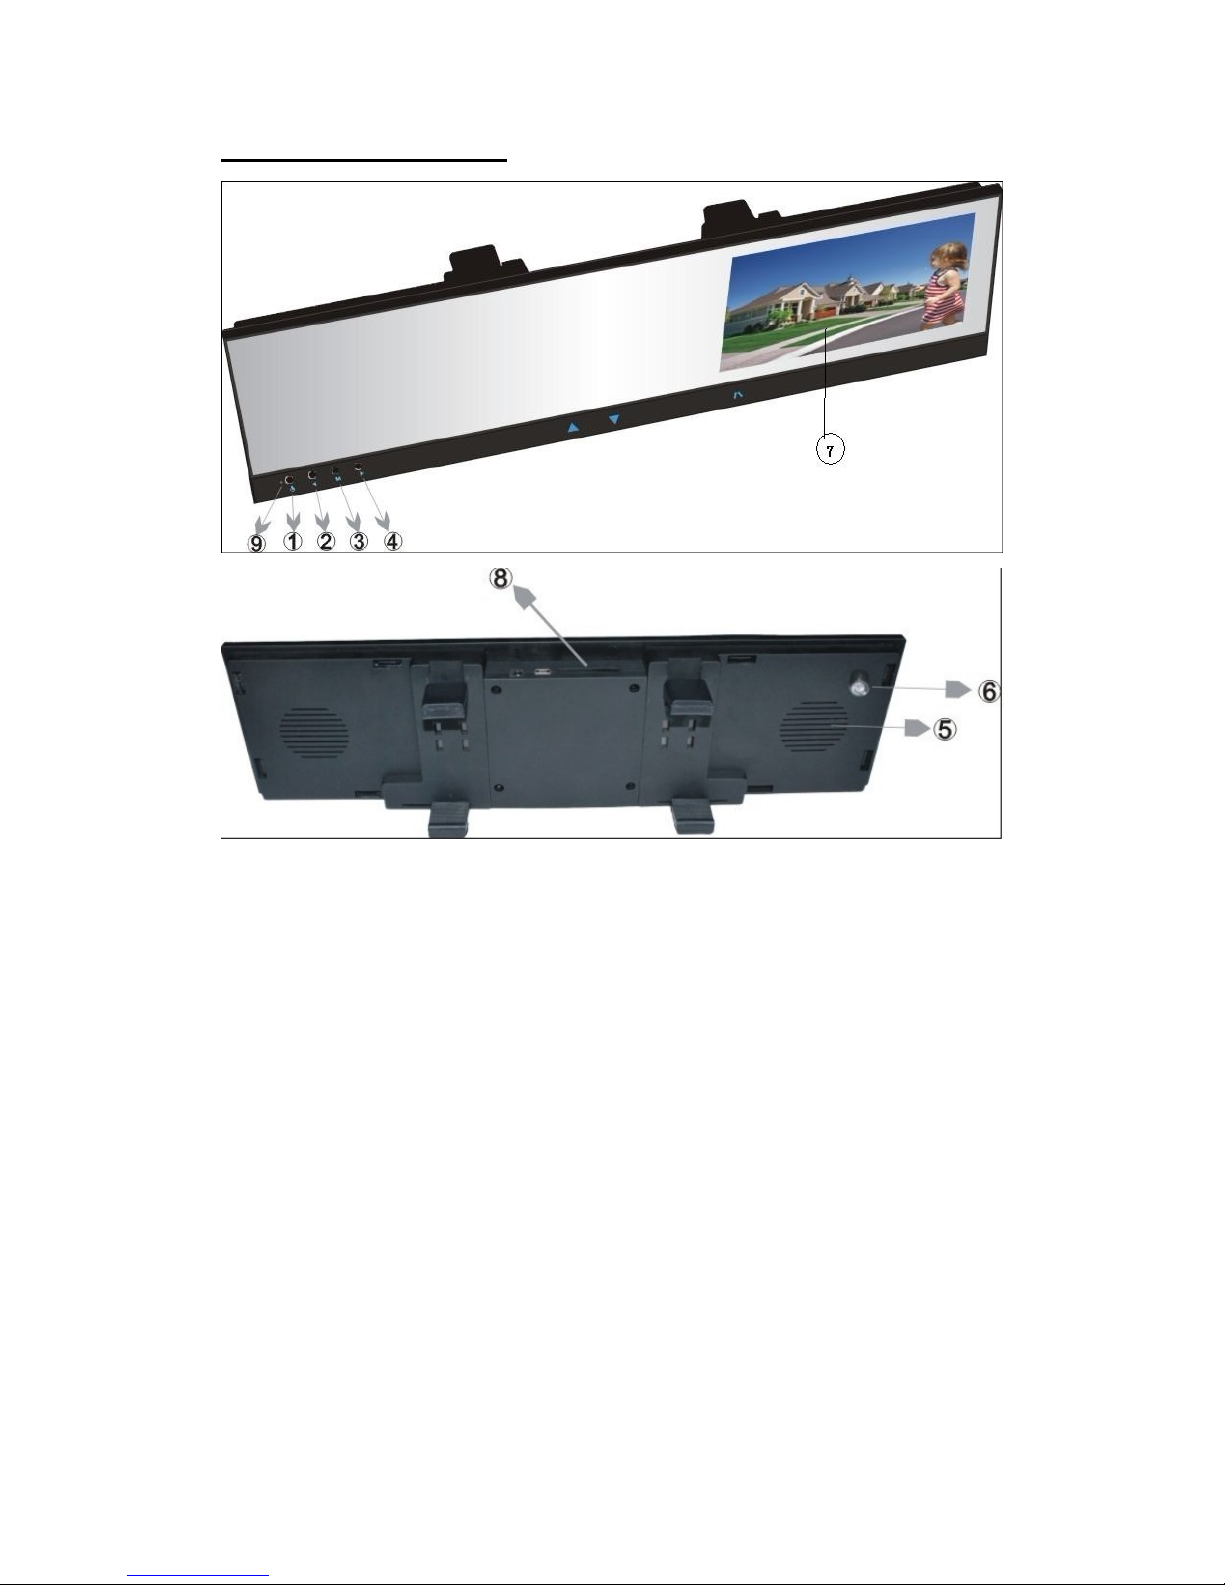
☞Appearance of DVR
1. Power Button:
*Short press used for starting up or Opening menu,
*Long press used for Shutting down DVR.(for 3 seconds)
2. Video Button:
*Short press used for Video or entering next option.
3. Menu Button:
*Short press used for “Select/Play/Pause”,
*Long press used for changing work mode between video mode and
playback mode.
4. Snapshot Button:
*Short press used for snapshot or entering last option.
5. Speaker
6. Lens
7. 4.3” color TFT LCD
8. TF Card Slot
9. working lights
Page 3

☞DVR Description
Power supply:
● Use build-in rechargeable lithium battery.
NOTE: built-in battery just for delay recording 1hour (capacity—600mAH)
● Use external DC 12V power supply:
When the mirror getting the power . it will open automatically
when it is connected to the power cable. You need touch and hold “▼”to make DVR in
video mode
When you remove the power cable, DVR will automatically shut down after 10 seconds.
Working mode:
DVR has three working mode: video mode, snapshot mode and playback mode.
You can choose anyone as you like.
After connecting to the power cable, you need touch and hold “▼”to make
DVR in video mode. You can press power button for more than two seconds to
shutdown DVR in any working mode.
(Note: Please insert TF card before using, or else have been prompted to "NO CARD" word)
●Video mode:
When DVR is working in video mode:
1. Press snapshot button to enter snapshot mode.
2. Press “M” button for more than two seconds to enter playback mode.
3. Press video button to start recording if DVR is not in recording, and press video button
again to stop recording.
4. Press power button less than two seconds to open VIDEO menu while DVR is not in
recording.
●Snapshot mode:
When DVR is working in snapshot mode:
1. Press video button to enter video mode.
2. Press “M” button for more than two seconds to enter playback mode.
3.
Press snapshot button to take a picture if the TF card is inserted.
4.
Press power button less than two seconds to open CAPTURE menu.
●Playback mode:
When DVR is working in playback mode:
1. Press video button to preview next film/picture.
2. Press snapshot button to pewview last film/picture.
3. Press “M” button less than two seconds to play/stop current film.
4. Press “M” button for more than two seconds to enter video mode.
5. Press Power button less than two seconds to open PLAYBACK menu if DVR is not in
playing films.
Page 4
☞DVR Settings Menu Functions
Parameter setting description:
In one of the working modes, you can press power button to show
corresponding menu and items setting. Secondly press power button to show setup
menu. Thirdly press power button to close menu.
When menu is open:
1. Video button is used to select next item.
2. “M” button is used to enter current item setting or select the item function.
3. Snapshot button is used to select last item.
The following content introduce all items functions.
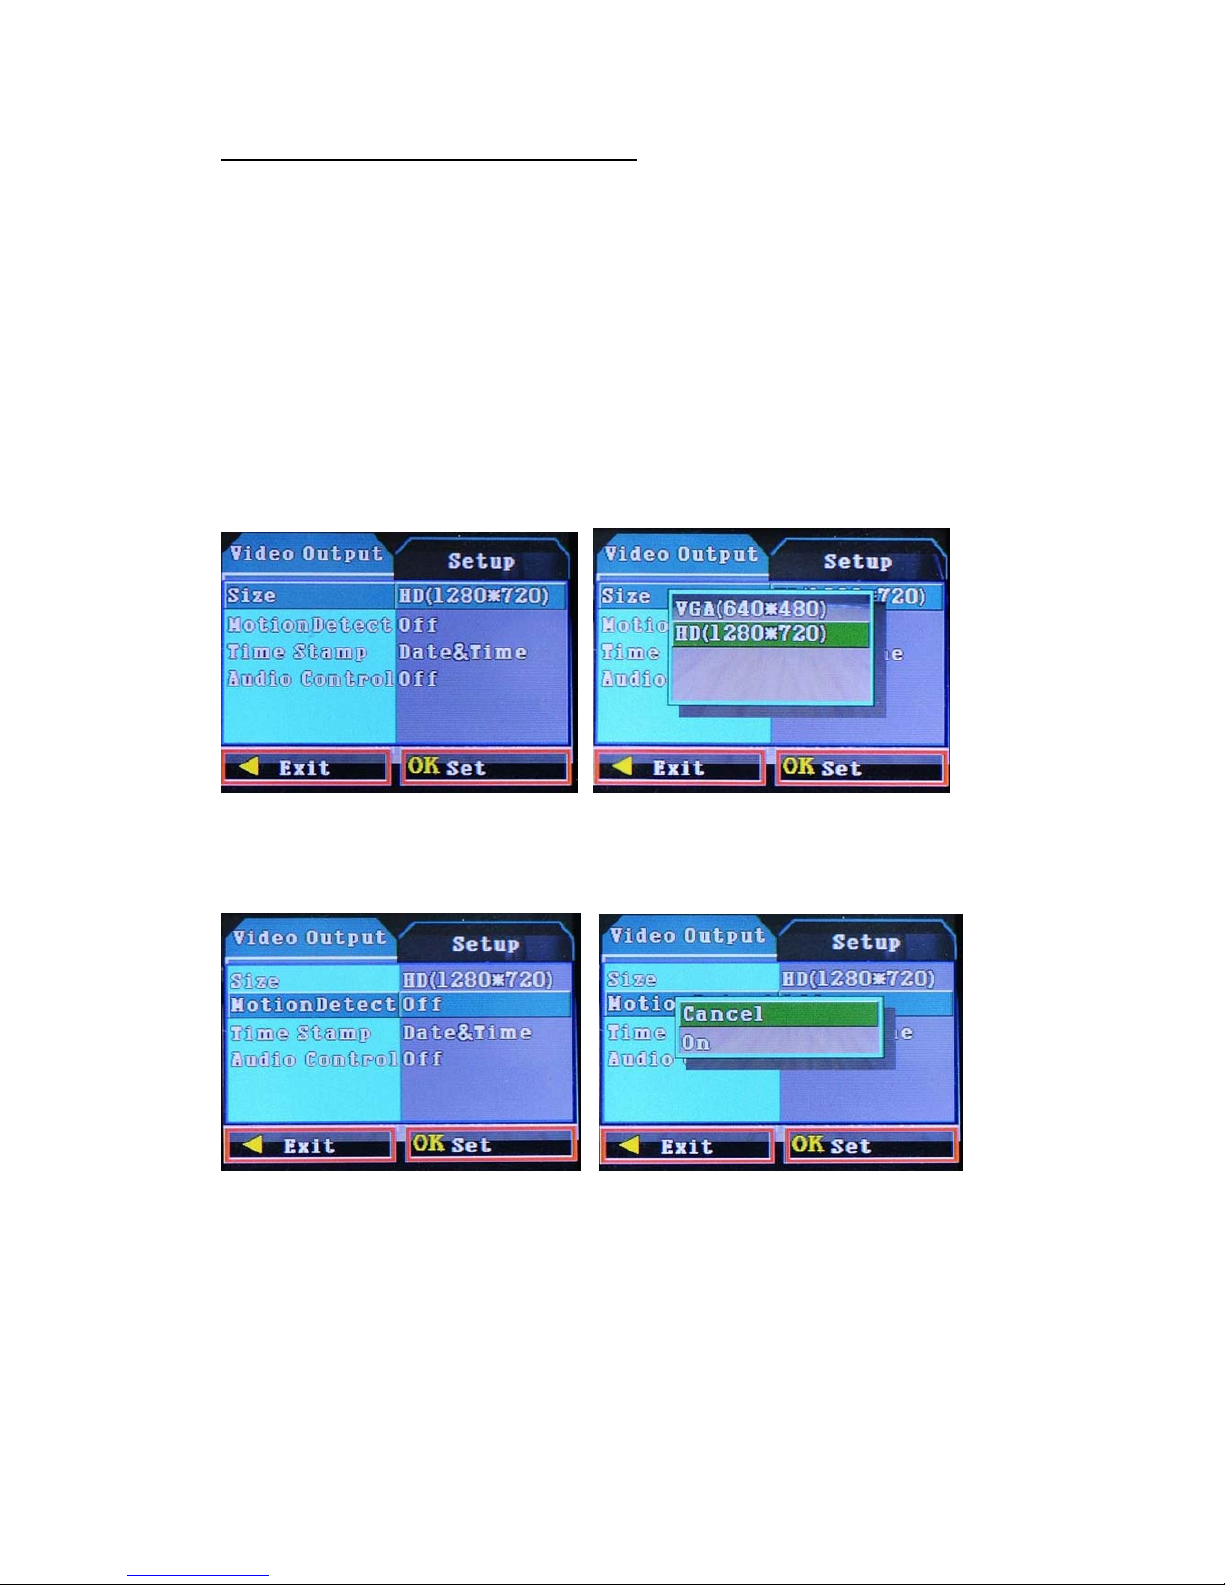
● Video Menu:
○ Image Size: select a video resolution of 1280 * 720 (HD), 640 * 480 (VGA) pixels.
○ Motion Detection: Cancel / On.
When you select "On", the picture changes if the DVR front, the machine will
automatically start recording.
Page 5
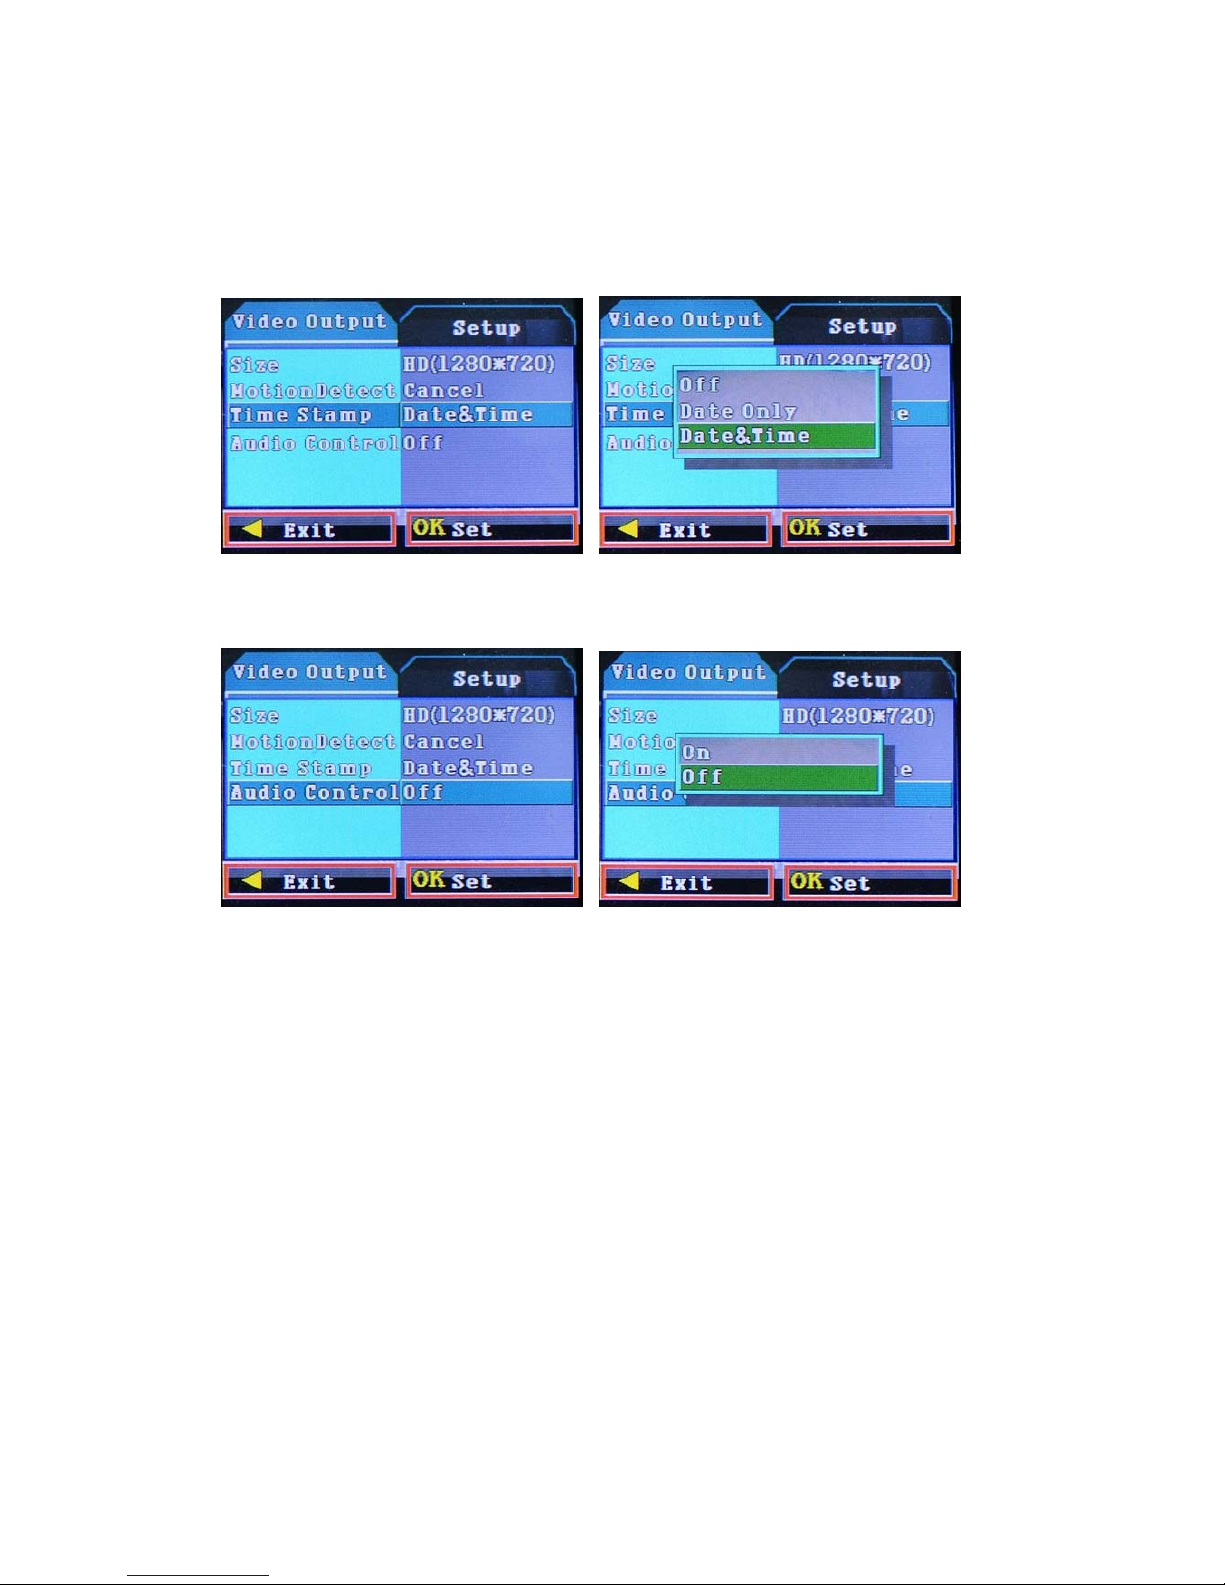
○ Time stamp: Off / Date Only / Date and Time
When you select "Off", the video file does not display the recorded date
When you select "Date Only", the video only shows the current time of the shooting year
- month - day.
When you select "Date and time", the video file to display the captured year - month -
day - hours - minutes - seconds.
○ Audio switch: Off/ On
When you select "Off" when, DVR photography will no longer be recorded.
Page 6

● Capture mode -> capture:
○ Image size: 1.3M/VGA.
○ Quality : Fine/Stand/Economy.
○ EV(Exposure Values) : +1/3 +0.0 -1/3 -2/3 -1.0
You can according to need to modify exposure value.
Page 7

○ White Balance :Auto /Daylight /Cloudy /Tungsten /Fluorescent
○ Time mark: OFF / Date / Date and Time
When you select "Off", the camera does not display the picture taken date.
When you select "Date", the camera's image only shows the time of the shooting year -
month - day.
When you select "Date and time", the picture shows photographs taken year - month -
day - hours - minutes – seconds
● Play mode -> Playback:
○ Delete: Single / All / Select
Page 8

○ Thumbnail: Executive
○ Volume:1-8 volume
○ Protection: Single / All / Select
Page 9

● Set: In any mode, continuously press the Menu key twice to enter the setup menu
○ Format: Cancel / Execute.
When you select " Execute ", the machine will format the card slot of TF card.
○ Language: Portuguěs / Traditional Chinese / Simplified Chinese / Japanese / Русский /
English / Francais / 한글.
○ Auto power off: 1 minute / 3 / min 5 min / off
When you select a time-sharing, power one minute, the device automatically turns off.
When 3 points prior to start three minutes later, the device automatically turns off.
When 5-sharing, power-five minutes later, the device automatically turns off.
When you select "Off", the device automatically shut off.
○ Optical frequency: 50HZ/60HZ.
Page 10

○ The Date setting: Off / Set
When you select the "Settings", press the OK button ③ to enter, select Settings time
format of the cursor, hold down the ① mode button to switch cursor, hold down the ②
page up key or ④page down key can change the time, press the OK button ③save
settings on exit.
Page 11

○ IR LED: On / Off
When you select "On", the lighting is dark, light up automatically.
☞ Download
● Take out the TF card
● put the TF card in computer
● DCIM/100DSIM folder download the file.
☞! Note
● In the video before you insert the TF card.
● The camera in video mode can automatically loop recording, when the TF card storage is full,
the camera automatically from the TF card to start recording the first part of the content, and the
first photography covering the original file.
(Note: In order to avoid all of the original photo files deleted in its entirety, save the file is
about 2 minutes or so for a section, when the TF card storage is full and sometimes
re-recording each of the original photo files will be overwritten).
● When the battery is low, DVR display "low battery", the display left corner of the battery
symbol flashes.
☞Accessories
●User Manual ● 4.3” TFT mirror ● 12V Power cable
●Giftbox
Page 12

☞Technical Parameters
Video recording resolution VGA / HD (1280x720), archived in AVI format
Capture mode 1.3M/VGA, in JPG format archive
Optional language
1) English 2) French 3) German 4) Italian 5) Spanish
6) Portuguese 7) Traditional Chinese 8) Simplified
Chinese 9) Japanese 10) Russian
11) Korean
Optical frequency
50HZ/60HZ
Seamless video Video file time difference between less than 1 second
Built-in 1 / 4 inch low-noise high-quality optical components salty
Built-in recording function while charging side
Motion detection recording function
Loop recording function, automatically delete the old file and record a new file
DVR automatically starts recording when the car is start-up.
When the car is off, DVR will automatically shut down after 10 seconds.
BACK-up CAMERA :
1: touch and hold “▲” to backup camera system
2: touch and hold “▼” to DVR system
3: touch to Cancel the parking line
NOTE: touch and hold ▲/▼ changing to between DVR mode and
reversing Cam mode.
Cam Specification :
Image sensor: 4/1’’ COMS Image Sensor
Image resolution: NTSC: 588H*553V
Viewing angle: 120/170 degrees
Power: DC12V ± 4V
Storage Temperature : -30℃-85℃
Working Temperature: -30℃-85℃
Waterproof Grade: IP67
Page 13

Bluetooth Functions:
A . Power ON/OFF
*The mirror will automatically turn on when it is connected to a power souce
B . Pairing / Linking
*Pairing Bluetooth enabled devices like mobile phones with the Reavi
mirror Speakerphone authorizes the devices to work with each other.
This step only needs to be performed once
* Before pairing the mirror
Ensure the Bluetooth on your mobile phone is activated
Ensure the mirror is plugged into a 12V power source
Follow the steps below to pair your mirror with your mobile phone:
*Power ON the device
*Touch and hold
for 3 seconds to enter pairing mode directly
*Screen will indicate Pairing Mode
NOTE: Mirror is now in pairing mode
*Activate the Bluetooth*settings of your mobile phone
NOTE: The following steps are general procedure; to access Bluetooth*Menu for your mobile
phone,please refer to your phone user manual.
*Select SET-UP or CONNECT from your mobile phone menu
*Find and select OPTION to discover Bluetooth*devices; establishing a connection may take
several minutes
*If found, phone display should indicate VC100B device was detected or Select “VC100B”
from the list
*Phone should give you a prompt asking if you want to pair the device
*Select OK or ACCEPT and wait for prompt to enter passkey or PIN
*Enter the code “0000”
*Select “OK”to pair and connect the VC100B and the handset
*When pairing is complete, the“VC100B”LCD will show Connected (Phone’s ID)
NOTE: The VC100B can pair with more than one phone, however it can only connect to one
phone at a time. If you wish to pair to a second phone, disable or turn OFF Bluetooth*on the
phone already paired.
Page 14

NOTE: If the VC100B and mobile handset did not successfully pair, follow the steps below to
retry
pairing:
*Turn the VC100B OFF & ON
*Turn OFF all other Bluetooth*devices before starting the pairing process
*Repeat the pairing instructions from the beginning .
To Link VC100B to your mobile phone after pairing:
*Touch
of your VC100B or Establishing the connection via your mobile phone
NOTE: Make sure Bluetooth*has been activated on your mobile phone before you touch
(Please refer to your mobile’s operation manual about connecting Bluetooth*devices)
C. Phonebook
VC100B Rearview Mirror Speakerphone can store up to 950 phone numbers. If you are
trying to transfer 1100 contacts to the VC99, only the first 950 contacts will be successfully
transferred.
AT Command and OPP (Object Push Profile) function can automatically transfer the contacts
in your mobile phone to the VC100B Rearview Mirror Speakerphone.
NOTE: Not all mobile phones support OPP or AT Command features, please refer to your
phone manual to determine if phone supports one of these.
Phonebook Set-up via AT Command
To transfer the Phonebook from your mobile phone via AT Command:
*Make sure the VC100B and mobile phone is connected
*Touch
to enter the sub-menu as right
* select Download contact and touch the
to download the phonebook automatically
It will display pb loading
Total XXX
* The LCD will display the alphabet “ A---Z “ as you want the connect name ‘s the first
alphabet –selecting the alphabet and touch
to your phonebook listing .
If touch
, it will return to the last interface.
*Once transfer is successful, LCD will display Completed
Total XXX
NOTE:
*If there is an incoming call during phonebook transfer via AT Command, the transfer
Page 15

process will beplaced on hold. Phonebook transfer will resume after the call ends.
Phonebook Set-up via OPP
The VC100B supports single contact or group contacts transfer via OPP function. For details
on operating procedures, please refer to your mobile phone’s user manual.
To transfer the Phonebook from your mobile phone via OPP:
*Disconnect Bluetooth*link from the VC100B setting (if it is connected)
*Setup mobile phone to transfer contacts from the mobile phone to your VC100B
NOTE: Please refer to your mobile phone’s user manual for detailed instructions.
Deleting Phonebook entries
To delete Phonebook entry:
*Touch
and Contacts will appear on the screen
*still touch
to enter the sub-menu
* select Delete Contacts and one touch to confirm
*LCD will display [Yes] [No]
*Select [Yes] and one touch to confirm
*LCD will display Pb Deleted when phonebook is cleared
NOTE: VC100B does not allow deleting of a single entry, ALL entries will be deleted after
confirmation.
. Speed Dial Set-up
NOTE: Phonebook should be set up first to activate speed dialing.
To set up speed dialing:
*Touch
and Contacts will appear on the screen
*touch
agian to enter the sub-menu
* select Quick Dial and one touch to confirm
*Browse for an empty memory slot by touch
. There are a total of 3 memory slots for
speed dialing
with each slot represented by the ▲/▼ and
*one touch to set contact number
*Browse the initials by ▲/▼
*one touch to enter
*Browse the phone number that you wish to set to speed dial by ▲/▼
*one touch to confirm
NOTE: Memory slot will automatically replace old contacts with new contacts are set to that
D. Display Setting
Selecting “ Display “ and touch
to the LCD menu function..
*Touch ▲/▼ to browsing up and down and touch
to implement the function of
the selected menu item.
Page 16

*Touch ▲/▼ to adjusting the LCD brightness. Touch to last interface,
*touch again to enter the sub-menu
*The status bar is shown on the screen.
This indicates the settings level of the LCD display
E. Volume Adjustments
To adjust ring volume:
*touch ▲/▼ to adjust ring volume
touch ▲/▼ to adjust call volume during a call:
If you cannot hear the person you are talking to on the other line, do the following steps while
conversation is in progress:
*Request the person on the other line to adjust his/her mobile phone’s volume level to
maximum
If there is a strong echo when the person on the other line talks:
*Transfer the call to your mobile phone
*If echo disappeared, transfer the call to your VC100B again and lower the loud speaker
volume until echo is reduced/eliminated
*If the echo remains, the problem might be with the network provider or the mobile phone itself
If the loudspeaker volume of the VC100B is too low or too high and you are unable to adjust it:
*Adjust the volume directly on the mobile phone
*Fine tune it using the volume control of the VC100B
Mute/Un-mute Functions
To mute the VC100B during an active call:
*Touch and hold the key ≡/▲ at the same time
*LCD will show MIC OFF
To cancel mute:
* Touch and hold the key ≡/▲ at the same time again
*LCD will show MIC ON
F. Call Operations
Making a Call
To make a call using the phonebook:
*touch
and Contacts will appear on the screen
*one touch to enter the sub-menu
*touch again to select Contact List
*Browse the initials by▲/▼
*one touch to enter
*Browse the phone numbers by ▲/▼
*one touch to dial
Last Number Re-dial:
*Touch once
Page 17

*Touch ▲/▼ until you find the desired number (Total 20 records including missed calls,
outgoing &incoming calls)
1) front of the English name “ →”this key is the incoming number.
2) “←” this key is the calling number .
3) “Ⅹ”this key is the missed call number.
4) Touch
again to dial current number
To make a call using the Speed Dial function:
*Touch
.Phone will automatically dial the number set to Speed Dial for that particular
button
To make a call using the Voice Dial function:
To enter voice dialing mode:
*Touch and Hold
for 3 seconds
*Say the name after you hear the tone
NOTE: If the VC100B failed to recognize the voice/name. Press to exit and repeat the above
steps for voice dialing.
NOTE: Voice Dialing is a feature of your mobile phone. Please refer to your phone’s user
manual for voice command operation.
Answering Calls
To answer calls via theVC100B:
*Touch
when ring tone is heard or Answer the call via the mobile handset
To end a call:
*Touch
or End call using the mobile handset
To reject a call:
*Touch
twice quickly to reject the call or reject the call via your mobile phone in the
normal way. when ring tone is heard or Caller ID Display
NOTE: Caller ID Display is a network service, please consult your network provider for
details.
Caller ID can be displayed in 3 ways:
a) By Name & Phone Number
VC99 can display the caller’s name when receiving call. To display caller’s name, the name
must be stored in the phonebook
b) By Phone Number
Phone number will be displayed if there is no record of that number in the phonebook
c) Withheld Number
When a caller withholds his number, nothing will be displayed
Call Waiting
NOTE: Call Waiting is a network service, please consult your network provider for details.
To answer an incoming call during a conversation:
Page 18

*Touch to hold Line 1 & accept the incoming call (Line 2) or
*Touch
to end Line 1 & accept the incoming call
To switch calls between the two lines:
*Touch to switch between lines
Hold the call
*When you on phone , Touch
to hold the call . the screen will display “ ON HOLD”
Interchanging VC100B and Handset
You may interchange the call between your handset and VC100B while conversation is
ongoing.
To shift fromVC100B to handset or vice versa:
*Touch
and hold for 3 seconds
* Disconnect the device
Selecting “ Desconnect ” and Touch .the LCD will display “ Disconnect device?
“ selecting the (YES) and Touch
to disconnect the device with the mobile phone.
Selecting the ( NO) and Touch
return to the last interface.
G. Parking Assistant
To turn the on-screen display guideline ON/OFF:.
Touch to show and cancel the parking line on the screen
NOTE: Interference may occur if Bluetooth*function & Backup Camera function are activate
at the same time.
Parking / Avin
Touch and hold to parking
Touch and hold
to Avin
BUTTON FUNCTIONS AND OPERATION
Page 19

SAFE OPERATIN TIPS
* There is a plastic cover over the camera. Do not scratch the cover when cleaning dirt or snow
from the cover.
* The camera has a water resistant construction. Do not detach, disassemble or modify it. This
may cause incorrect operation. Camera is water resistant but not waterproof.
* Do not submerged camera in water, which can cause internal damage to the camera.
* If the temperature changes rapidly, such as when hot water is poured on the vehicle in cold
weather, the system may not operate normally. Camera can withstand the effects of rain, snow,
and inclement weather.
* When the temperature is extremely high or low, the screen may not clearly display objects.
* When strong light directly enters a camera, objects may not be displayed clearly.
* The screen may flicker under fluorescent light.
* The colors of objects on the rear view monitor may differ somewhat from those of the actual
object.
* If dirt, rain or snow attaches to the camera, the monitor may not clearly display objects. If water
droplets, snow or mud adhere to the camera lens, rinse with water and wipe with a dry cloth.
* Do not use alcohol, benzene or thinner to clean the camera. This will cause discoloration. To
clean the camera, wipe with a clean a cloth dampened with mild cleaner diluted with water and
then wipe with a dry cloth.
* Will work up to 30 feet. Working distance varies depending on the interference between the
monitor and the camera.
* The system is only designed for backup/reserving purposes. IT is not responsible for damages on
the system or the vehicle if used for other purposes.
*ALWAYS engage Parking/Emergency/Hand Brakes of the vehicle when testing the system.
* Like most wireless device devices, the system may cause interference to other wireless devices
or vice versa. Wireless devices such as WIFI routers, Bluetooth*devices, and mobile handsets
may cause interference with the monitor. If this happens you will notice rolling lines, blurry
images, or static images on the monitor.
*The system is designed to ADD safety and protection. The device was NOT designed to replace
other safe driving habits. Double checking and looking around before backing up is STILL the
Page 20

safest way.
SAFETY AROUND AND BEHIND OTHER VEHICLES
Using a rear-view camera is not enough to completely overcome a vehicle’s blind spot. Many
preventable injuries and deaths occur in driveways or parking lots when drivers do not see
children, pets, or others near their vehicles. Here are a few safety tips that will help you to avoid
a backover accident.
* Walk completely around your vehicle before getting in. Check for kids, toys, and pets before
entering the vehicle and starting the engine.
* Know where children are. Have children stand in a place where they are in full view.
* Be aware of young children. Young children are small and hard to see.
* Parents, caregivers and all adults need to be vigilant in supervising children, especially when
children are in the yard, driveway or parking lot playing near parked cars.
* Roll down your window so you will be able to hear what is happening outside your vehicle.
* Owners of SUVs, trucks, and vans need to take extra care to avoid hitting or running over a
child.
* Teach children to move away from a vehicle whenever it is started.
TESTING AND TROUBLESHOOTING
Testing:
1. Connect vehicle battery cables
2. Turn ignition to“ON”position without starting the engine
3. Engage parking brakes and put the car in reverse
4. Wait for monitor to show rear view image.
 Loading...