

Page 1
Instruction Manual
Ple ase rea d this ma nual ca reful ly befo re oper ating, and keep it for future reference.
Type : G2225
Page 2
Ins talla tion No tes
Mai n Menu
Gen eral Se tup
Rad io Mode
DVD /SD/U SB
Blu etoot h
GPS
IPO D
AUX
Vir tua l CD
Rem ote Con trol Op erati on
Ins talla tion
Tro ubl esh oot ing f or Si mpl e Que sti ons
Onl ine Gui dance
Pro duct Pa ramet ers
Dig ital TV
1
3
4
8
10
13
13
16
18
19
20
21
27
28
29
30
Index
1 2
Dear users:
Notes :
Ple ase rea d this ma nual ca reful ly befo re oper ating , and kee p it for fu ture re feren ce.
Kee p clean C D feed- in! If th ere's a ny dust , wipe it o ff im med iat ely ; cle an an y dir t on th e dis c
wit h soft cl oth bef ore b eing fe d into th e machi ne, oth erwis e, the di rt will e nter th e machi ne
alo ng with t he disc , which w ill eff ect n orm al op era tio n of th e mac hin e, an d cau se Di sc
in/ out pro blem; b eside s, the di rt will c ontam inate t he lase r head, c ausin g poor Di sc read
qua lity or D isc rea d failu re.
Tha nk you fo r your se lecti ng our ve hicle D VD! In or der to gu arant ee corr ect ope ratio n,
ple ase be su re to rea d this ma nual ca reful ly befo re usin g the DVD . Pleas e keep th is
man ual for f uture r efere nce.
Thi s DVD is in t he desi gn of 12V- 14V neg ative g rounded DC; so before installing this
DVD , make su re your v ehicl e adapt t o this po wer sup ply.
Bef ore ins talli ng the DV D, dism antle g round ing wir e of batt ery neg ative e lectr ode, so a s
to re duce da mage to t he mach ine cau sed by th e short c ircui t.
Ple ase con nect th e DVD pla yer acc ordin g to the co lor of th e condu cting w ire in th e
ins talla tion ma nual. F or inco rrect c onnec tion ma y cause d amage t o the mac hine, a nd
des troy ve hicle e lectr ical sy stem.
Do no t shiel d exhau st fan or l ouver b oard, s o as to avo id over heati ng of the m achin e, or
cau sing fi re.
Aft er inst all ation i s done (i nclud ing battery check), when start to use this DVD, you
sho uld ado pt a roun d tool, p ress re set but ton RES o n the pan el to ret urn the m achin e to
ini tial se tup of th e syste m.
Acknowledgements
Installation Notes
Page 3
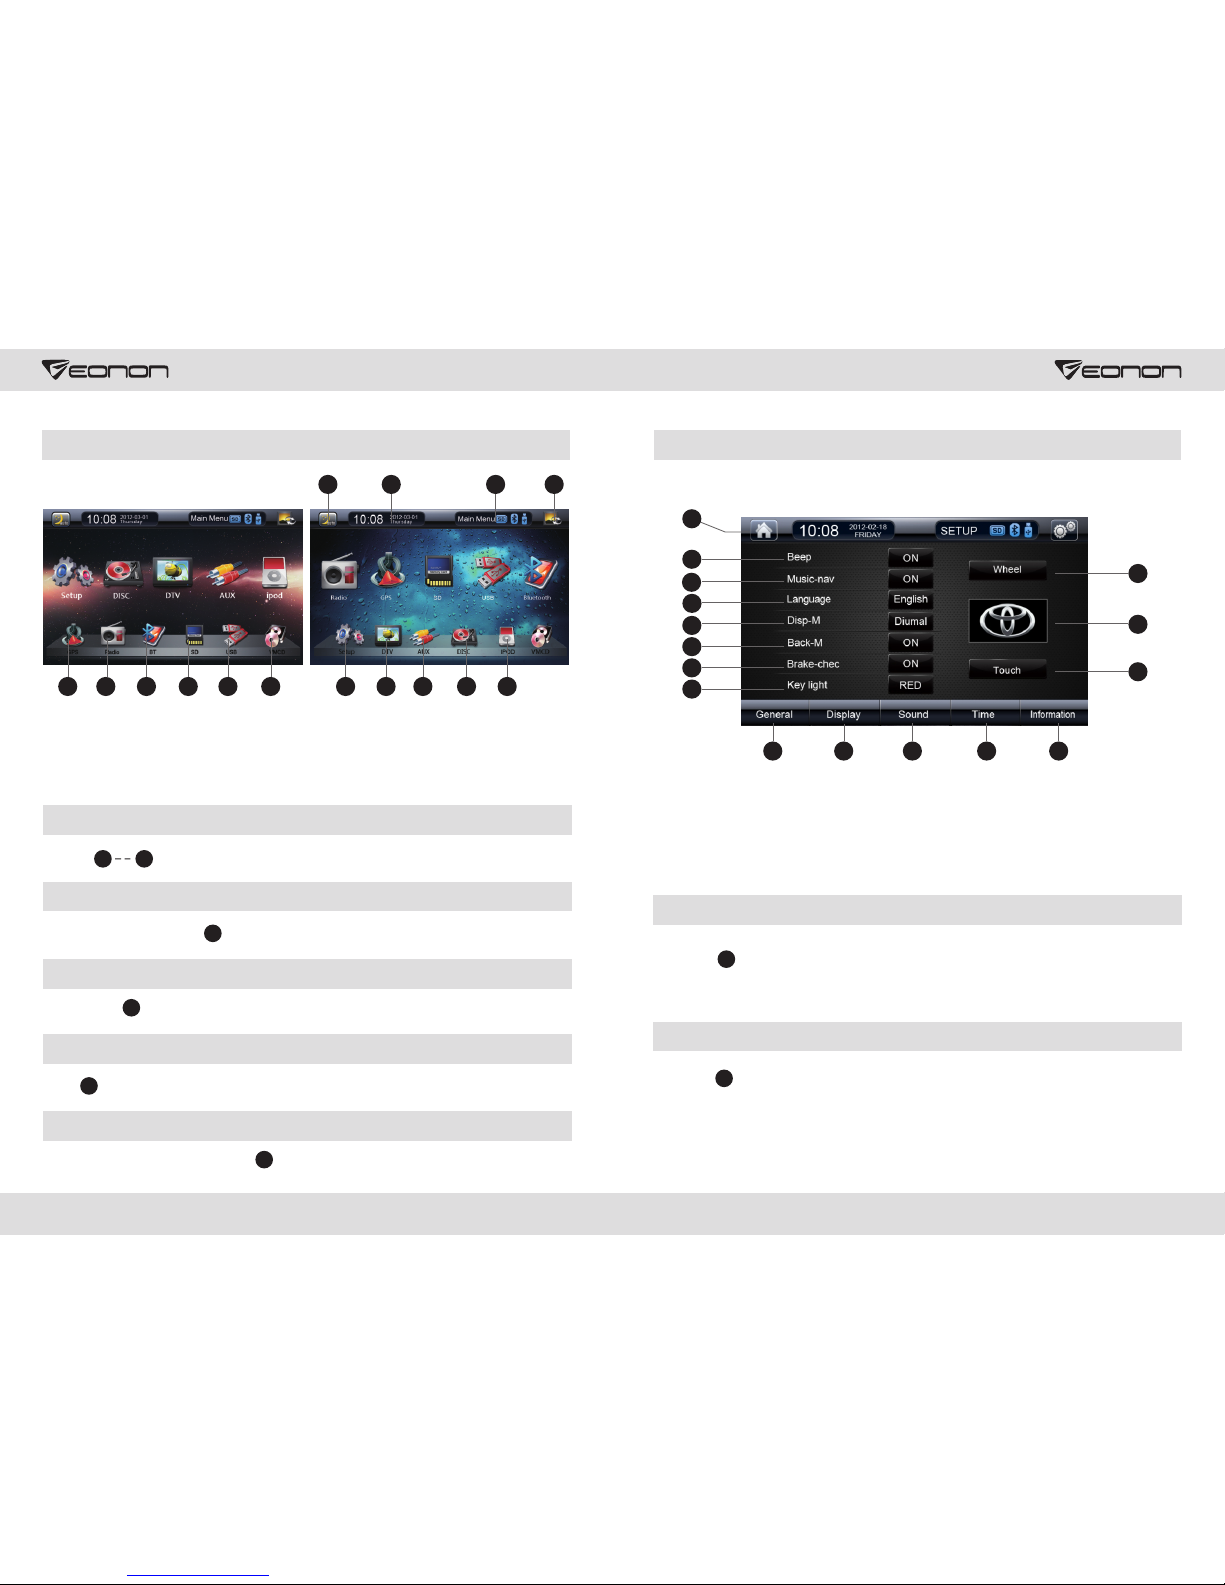
Enter Mode
But ton , to en ter v ari ous c orr esp ond ing set tings .
1
11
Time Display
Tim e and d ate a s sho wn in .
12
Close Screen
Cli ck Butt on to clo se th e scr een ; click a gain to r eopen t he scre en.
13
Change Background Picture
Cli ck to cha nge v ariou s backg round p ictur es auto matic ally.
14
Functional Icon Display
Whe n SD/BT /USB co nne ction i s ok, dis pla yed wil l turn fr om grey t o bri ght.
Main Menu
1. SD /MMC
2. US B
3.
4.
Rea d CD
Vir tua l CD
9. IP OD
10. D igita l TV (D TV)
11. Se tup
12. Ti me Disp lay
13. L ock Scr een
14. C hange B ackgr ound
Ima ge
15. F uncti onal Ic ons
5. AUX I nput
6. GP S Navig ation
7. Bl uetoo th
8. Ra dio
General Setup
8
13
15
12
5
4
3
2
1
7
14
6
9
10
11
16
1. Ge neral S etup
2. Di splay S etup
3. So und Set up
4. Tim e Setup
9. Ba cklig ht Mode
10. R earvi ew Imag e
11. Br ake D ete cti on
12. Tou ch Sc ree n
Cal ibr ation
13. S teeri ng Whee l Contr ol
14. R eturn t o Main Me nu
15. S tartu p LOGO
16. K ey Ligh t
5. Ver sion In forma tion
6. La nguag e Setup
7. Mu sic Nav igati on
8. Ke y Tone
General Setup
Cli ck icon G ene ral Set B utt on, to se t key t one ; music n aviga tion; l angua ge; bac kligh t
mod e; rear view im age; br ake det ectio n; touc h scree n calib ratio n; Stee ring Wh eel set up
res pecti vely.
1
Display Setup
Cli ck icon 2 D ispla y Set But ton, to s et co lor ; brigh tness ; contr ast .
2
3 4
15
14151213
9351011421786
Page 4

Cli ck : To set t he in ter face di splay l angua ge to Eng lish or C hines e.
Cli ck : To set t he ke y ton e ON or O FF.
Cli ck : To se t mu sic o r vid eo d uri ng na vig ati on. (GPS mix ing f unc tio n in tro duc tio n: M1 :
Whe n ther e's p rom pt f rom t he G PS, t wo s pea ker s in f ron t of the ve hic le make G PS so und ,
whi le ano the r tw o sp eak ers at t he r ear m ake mu sic sou nd. M2: Whe n th ere 's p rom pt from
the G PS, mus ic fr om 4 spea kers is a ll Mu te, and 4 s peake rs only m ake GPS s oun d.)
Cli ck : The us er co uld s et da y or li ght m ode .
Cli ck : Set re arv iew i mage on o r off.
Cli ck : Refe r to wh eel c ontro l guida nce as be low for d etail ed instructions.
Cli ck : Cali bra te the to uch f lexib ility.
Cli ck : Set br ake O N or OF F.
Cli ck : Set Bu tto n lig ht colo r.
Cli ck Butt on , Time Se tup b utt on, to se t tim e and d ate.
9
8
7
6
5
4
3
2
1
Sound Setup
Time Setup
4
Back to Main Menu
Cli ck Butt on to ret urn t o the m ain m enu.
14
Cli ck Butt on , Soun d Set up bu tton, t o bal ance so und eff ect , equ al lo udn ess , tre ble ,
bas s and fou r speak ers aro und the v ehicl e.
3
Simple Setup
2
3
1
4
5
8
9
6
7
Steering Wheel Control
If your car has wheel learning function, please
operate according to the following steps:
2. St art the m ach ine aft er conf irmin g the cor rect co nne ction , enter S et Menu b y press ing
the S et Butt on on t he uppe r right o f the scr een;
3. Pr ess Whe el Butt on to e nter Wh eel S et Menu ; (High r esist ance of d irect ion con trol
nee ds to set h igh imp edanc e to “on” , while s et “off ” to lo w res ist anc e.)
4. Pr ess Test Bu tto n, th e use r wil l see s ome c har act er in for mat ion , dis pla yin g sam ple A
and B d ata, (w heel in itial d ata)
5. Pr ess Can cel But ton, to c lea r all but tons; p lease r ememb er, once e nter th is menu , make
sur e to pres s Cance l Butto n first t o cle ar all pr eviou s setti ngs;
6. Th en en ter l ear nin g fun cti on of b utt ons , pre ss Wh eel F unc tio n But ton , “Pl eas e pre ss a
but ton” di splay s on the in forma tion ba r, remin ding th e user to p ress a fu nctio nal but ton to
be se t; when t his but ton is pr essed , input d ata wil l displ ay on inf ormat ion bar, i ndica ting
suc cessf ul data c ollec tion of t he main m achin e, and th e user co uld con tinue p ressi ng
but tons to c omple te lear ning of a ll butt ons on th e wheel ;
7. Pr ess Com plete B utton t o sav e all but ton fun ction s havin g been le arned , and sta rt
Whe el Cont rol fun ction , other wise, a ll prev iousl y learn ed butt ons wil l be invalid;
8. Wh en setu p is comp leted , the use r could p ress Ca ncel Bu tton to a ban don all l earnt data,
and t hen clo se whee l learning function;
9. Du ring th e Wheel B utton l earni ng proc ess, so me butt on valu es are ve ry clos e, and it i s
ver y easy to c ause mi stake s, so ple ase cha nge the se two ca bles, t hat i s when on e contr ol
cab le is sel ected , the use r could c hange t o anoth er cabl e, so as to r eturn t o the f irst st ep to
lea rn;
10. Ve hicle W heel Bu tton ma y be smal l in numb er, the user could customize functions on
his /her ow n; make s ure whe el butt ons cor respo nd with f uncti onal bu ttons i n the men u, so
as to c omple te lear ning fu nctio n; if whe el butt ons do no h ave cor respo nding f uncti ons, ju st
ski p it, for i t wil l not imp act the n ormal o perat ion, th e user on ly need s to lear n funct ions
inc luded i n the whe el;
11. Aft er co mpl eti ng th e lea rni ng, t he us er co uld e nte r Set M enu , pre ss Ca nce l But ton t o
clo se whee l butto n learn ing fun ction , if user n eeds to r euse th is func tion, i t is sugg ested t o
ret urn to th e first s tep .
1. Du ring po wer-o ff, sel ect w hee l con tro l
cab les, (s ome car s have 3 ca bles, s ome
hav e 2 cable s) , find g round ing wir e of the
veh icle, t hen con nect it t o the mai n machi ne;
if th ere'r e 3 wheel c ables o n the veh icle,
con nect th e other 2 c ables t o wheel c ontro l
cab le of the m ain mac hine; i f there 's only
2 cab les, co nnect t he othe r cable t o one
whe el cont rol cab le;
5 6
Page 5
7 8
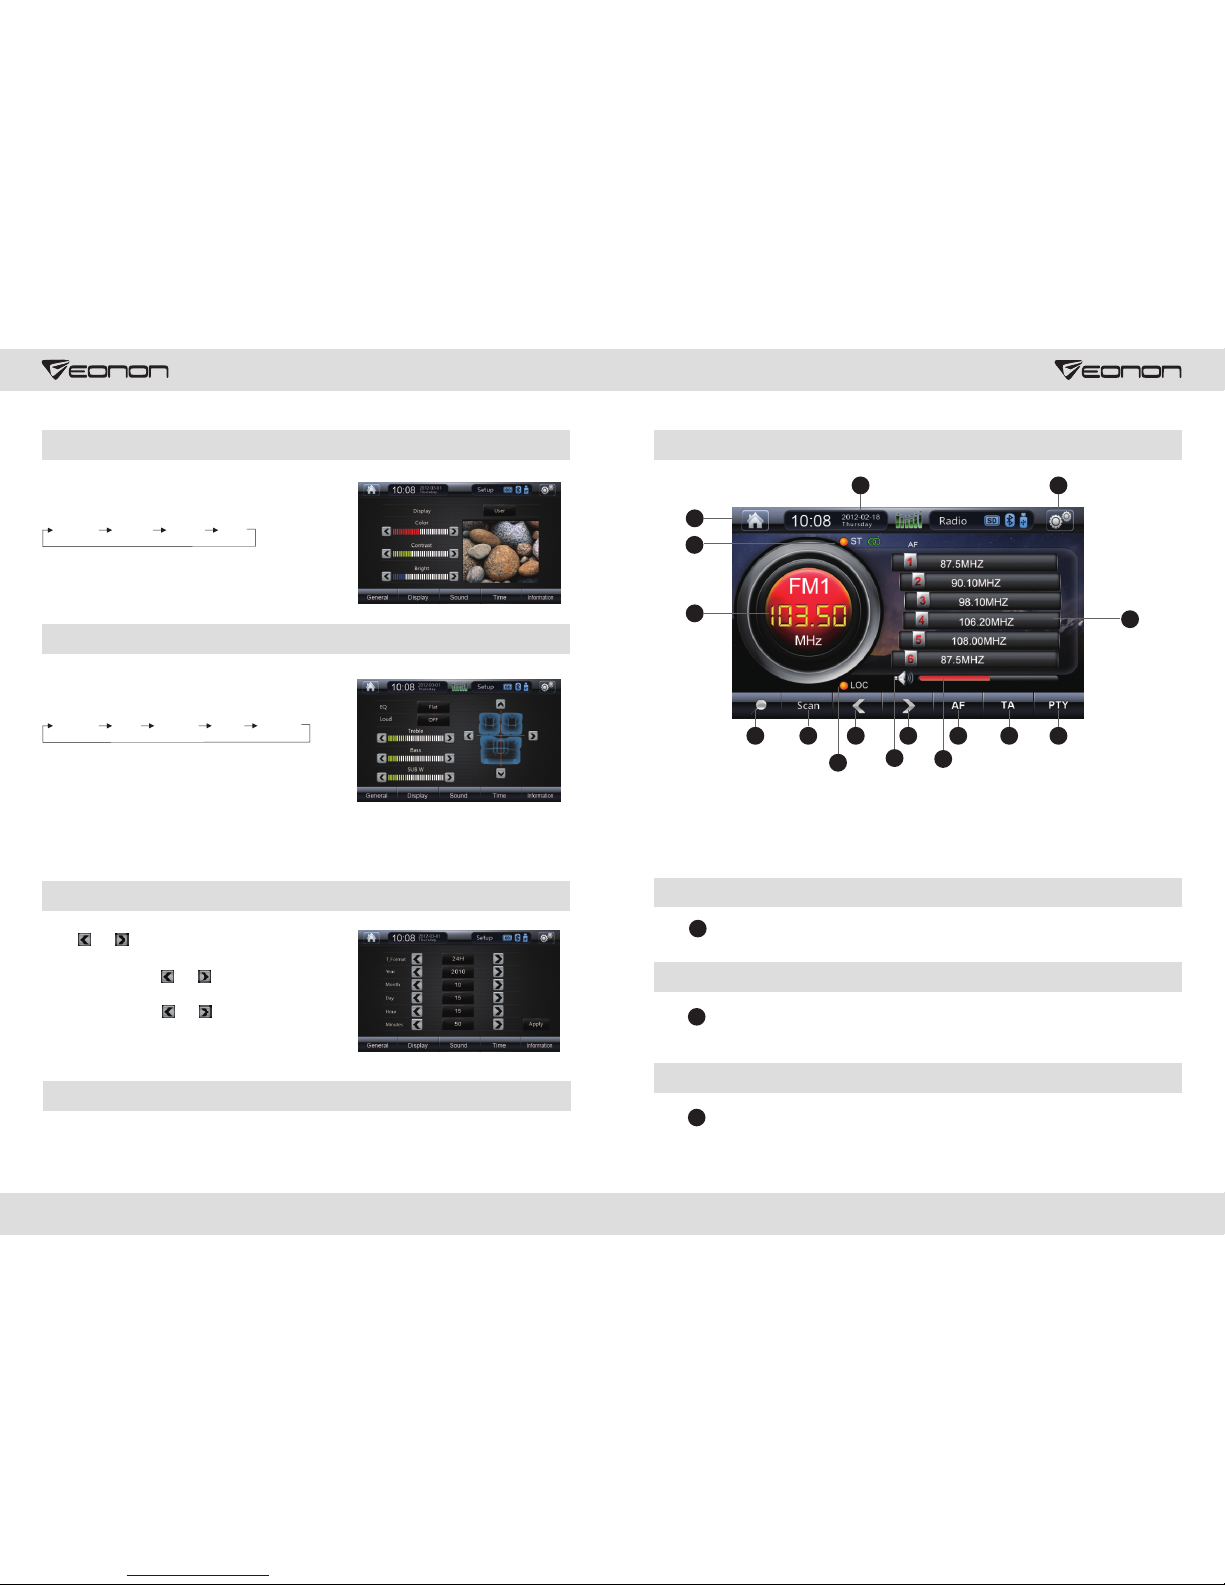
Display Setup
Cli ck Disp lay Set up icon , there 're fou r
ava ilabl e modes for your selection:
Cust omize Stan dard Brig ht So ft
Cli ck disp layed “ color” “contrast” “brightness”, to
adj ust col or, cont rast an d brigh tness r espec tivel y
of th e pictu re.
Sound Setup
Cli ck “EQ” i con, th ere'r e 5 selec tive mo des
for y our sel ectio n:
Stan dard Popu lar Jazz
Cli ck “lou dness ” icon to s elect t o turn on o r off
sou nd equa l loudness.
Clas sical
Rock
Cli ck the ar row of “t reble ” or “bas s" to adj ust
tre ble or ba ss free ly.
As is s hown in t he abov e pictu re, cli ck four a rrows o n the rig ht of the p ict ure, to a dju st
lou dness o f four sp eaker s aroun d the veh icle fr eely.
Time Setup
Cli ck Or , to se t “12 H” or “ 24H ”.
In Dat e Se tup , c lic k Or to ad jus t ye ar, mon th
and d ay.
In Tim e Setup , click O r to se t tim e.
Whe n all set tings a re done , click 【S ubmis sion】
and e xit the s etup.
Version Information
Cli ck Versi on Info rmati on icon , the ver sion in forma tion of t his sof tware w ill dis play.
Radio Mode
13
16
6
10
11
21
4
12
5
7
9
14
15
1. Aut o Searc h
Fre quenc y
2. Sc an
3. Fi lter
4. Mo no / ster eo
9. Vol ume
10. M anual S earch
Fre quenc y +
11. Ma nual S earch
Fre quenc y -
12. F reque ncy Ban d
Swi tch
13. R eturn t o Main
Men u
14. G enera l Setup
15. S tatus a nd Time
Dis play
16. F avori te Chan nel
5. TA( RDS)
Opt ional
6. AF( RDS)
Opt ional
7. PT Y(RDS )
Opt ional
8. Mu te
3
8
Auto Search Frequency
Cli ck 【auto -scan r adi os】, to aut omati cally s earch r adio fr equen cy band s, and to
sav e autom atica lly; al l bands s earch ed are di splayed as 1-6 bands.
1
Scan
Cli ck 【brow se】, the sy ste m wil l autom atica lly go to 6 -band r egion s aved af ter aut o
sea rch, an d the bro wse tim e for eac h band is 1 0 secon ds.
2
LOC
Cli ck 【LOC】 to s et th e rem ote or sh ort -dist ance sc an radi o mode, i f the sho rt-di stanc e
sca n radio m ode is se lecte d, the sy stem wi ll rece ive loc al radi o frequ ency wi th stro ng
sig nals. I f the rem ote mod e is sele cted, t he sy stem co uld o nly obt ain loc al freq uency.
3
Page 6

If no R DS is set , or RDS is d isa bled, B utton - w ill b e inv ali d.
A. Cl ick But ton 【PTY】 y our f avo rit e progr am mode ; press f or tw o secon ds to sta rt au to
sea rch
B. Cl ick But ton 【Ta】, the sy ste m wil l sea rch RDS d ispla y autom atica lly
C. At th e time of r est artin g, AF func tio n is set to o pen ; click B utton t o clo se or r eop en it.
If th e curre nt sign al is rel ative ly weak , withi n 50 seco nds, th e syste m wil l carry o ut auto
sea rch, to d ispla y frequ ency of s trong er sign al
Stereo and Mono Switch
Cli ck 【St】 but ton t o set s ter eo and mo no to rec eive ra dio mod e.
4
RDS (Optional Function)
5 7
7
5
5
Volume Adjustment
Pre ss 【+】 or 【-】 to co ntr ol an d adj ust vol ume. Th e vol ume i s div ide d int o 40
gra des, wh en the vo lume is s et belo w 30, the p ower su pply is s witch ed off; w hen s wit che d
on ag ain, th e volum e will re turn to t he prev ious se tup; wh en volu me is set a bove 30 , if
pow er supp ly is swi tched o n again, volume will return to default value 15 .
8
9
Manual Search
Cli ck and to s ele ct di ffe ren t rad io ch ann els . Tap and h old a nd , to s ear ch
cha nnels f orwar d and bac kward a utoma tical ly, the sy ste m wil l sto p whe n any c han nel i s
sea rched .
10
11
10
11
Frequency brand switch
Cli ck 【band】 t o swi tch in th e
fol lowin g frequ ency br ands:
12
FM1
FM2
FM3
AM1AM2
Favorite radio frequency brands
Whe n the mai n machi ne rece ives a fa vorit e chann el, the u ser cou ld clic k any one o f Butto n
1-6 f or 2 seco nds to sa ve, and c lick an y butto n of th em to pla y prese t chann els. As is s how n
in .
16
Back to Main Menu
Cli ck to go ba ck to t he ma in me nu
13
9 10
General Setup
Pre ss Butt on to dis pla y gen era l Set M enu .
14
DVD/SD/MMC/USB operation
Whe n the dis c is inse rted, i t will en ter DVD m ode aut omati cally ; if ther e's a d isc in th e DVD,
the u ser cou ld pres s DVD ico n in the DV D main me nu to ent erthe D VD mode , and pre ss
Ent er/Ej ect Dis c butto n.
Enter/Eject
Cli ck Butt on to con tro l the d isc e ntr y and e jecti on
1
1. Ej ect
2. Pl ay/Pa use
3. St op
4. Arr ow Butt on
5. Me nu Disp lay
6. Di recto ry
Fun cti on
7. Aud io
8. Zo om
9. Vol ume +/-
10. Vo lume
11. Re pla y
12. F ast For war d
13. R ewind
14. P revio us Song
15. N ext Son g
16. B ack to Ma in
Men u
17. G enera l Set
Men u
18. S tatus /Cloc k
19. S ystem
20. R andom P lay
21. D VD Set
But ton
22. T hem e But ton
23. P lay But ton
24. S can But ton
25. O K
26. U p
27. D own
28. L eft
29. R ight
30. M ute
2173
13412 14 15
1816
30
26
27
25
28
29
10
9
811
7 22 19 20
16
5 2 1 23 24
Page 7

Play/Pause
Cli ck Butt on to pau se, t hen c lic k But ton 2 a gain, i t will re cover n ormal p lay.
2
Stop
Cli ck Butt on to sto p pla yin g, th en cl ick But ton t o pla y aga in.
3 2
Arrow Button
Cli ck Butt on to sel ect p age u p/dow n funct ion.
4
Menu Display
Pre ss Butt on to ent er ma in me nu mo de. [ Ent er Main M enu Mod e] [Dis c forma t
sho uld be VC D2.0, i t suppo rts men u displ ay or DVD ].
5
Directory Function
Pre ss Butt on , to sel ect D VD fo rma t of mu lti ple d irect ories .
6
Track functional operation
Cli ck Butt on to fre ely s wit ch le ft ch ann el, rig ht chan nel, mi x chann el and la nguage
(mu st be dis cs of sup porte d forma t).
7
Zoom in and out
Cli ck Butt on to zoo m in an d out D VD pi cture d isp layed , here th e user co uld ref er to
ins truct ions of r emote c ont rol.
8
Volume Control
Cli ck Butt on to inc rea se th e vol ume , Butto n to de cre ase t he vo lume.
9
10
Repeat Play
Cli ck Butt on to set r epe at mo de
and r epeat f reque ncy, as is s how n on th e
rig ht.
11
All re peat Singl e repea t Repea t off
Not e: An erro r mode is “ All Rep eat”.
[ ]+ [ ]-
11 12
Fast Forward/Rewind
Cli ck Butt on and to s et fa st fo rwa rd an d rew ind , con tin ue to c lick Bu tton
to ad jus t tim es sp eed [ x2x4x 8x20] f or fa st forw ard . Under f ast for war d and rew ind
sta tus, di rectl y click B utt on to ret urn t o nor mal p lay.
12
13
Program Selection Setup
Cli ck Butt on or to se lec t pre vio us or n ext s ong .
Back to main menu
Cli ck Butt on to go ba ck to t he ma in me nu.
16
General Set Menu
Cli ck Butt on to dis pla y Gen era l Set M enu , the use r could r eturn t o pag e 9 gener al
set up intr oduct ion for m ore det ails.
17
Format Button
Cli ck Butt on to sel ect N TSC a nd PAL fo rma t.
Random Button
Cli ck Butt on to ran dom ly se lec t in th e DVD t o play.
DVD Setup
Cli ck Butt on to set t he DV D mod e.
Title Button
Cli ck Butt on to dis pla y rel ate d title d ire ctory i n the DVD .
Display Button
Cli ck Butt on to dis pla y DVD p lay t ime a nd proc edure .
2
12
14 15
20
21
22
19
SYS
23
OSD
Page 8

Search
Cli ck Butt on to sea rch p lay d ire cto ry in DVD s ongs.
24
OK
Cli ck Butt on – , clic k up, d own , lef t and r igh t to sele ct song s being l ooked f or, and
cli ck 【OK】 to co nfi rm se lec ted son gs.
26 29
25
Sound Status Display
Cli ck Butt on to cha nge i t as , sy ste m is no w mut ed; c lic k aga in to rec over
sou nd stat us.
Cli ck TV ico n und er th e mai n men u int erf ace t o ent er TV m ode ( the u ser c oul d sel ect
ana log TV)
Bluetooth Mode
3
5
6
12
13
11
9
7
8
10
4
1
2
1. Di al/An swer Ca lls
2. Re ject/ Hang up C alls
3. Re turn
4. Bl uetoo th/Ph one Swi tch
5. Ph one Dig ital Di splay
6. Ph one Boo k
7. Mu sic Pla y
8. Bl uetoo th Setu p
9. Nu mber Bu tton
10. D ispla y Digit al Zone
11. Ba ck to M ain M enu
12. Ti me Stat us Disp lay
13. G enera l Setup
13 14
26
Answer/Make Calls
Dia led phone number will display in “Display Num ber Z one ”. The u ser c oul d cli ck
But ton to er ase w ron g pho ne numb ers; th e use r could a lso cli ck Butt on
to ha ng up cal ls or cli ck Butt on to mak e cal ls. W hen s ome one c alls, s tatus a nd
tim e will di splay h ere, pr ess to an swe r the p hon e, and pr ess to re jec t.
Whe n searc hing Bl uetoo th devi ce duri ng firs t match ing, th e user co uld see t he DVD na me
EON ON via Bl uetoo th, suc ces sful ma tchin g will be d ispla yed aft er the us er sele ct OK and
ent er pass word 58 02. The c olo r of as i s sho wn in t he fi gur e wil l lig ht up w hen
con necti on succ eeds af ter “co nnect ” being s elect ed to con nect to B lueto oth.
During the next successful matching, the system will connect to Bluetooth of the phone automatically.
Not e: Oper ation o n diffe ren t pho nes w ill b e dif fer ent , for d eta ile d ins tru cti ons , the u ser
cou ld refe r to the us er manu al of the p hone an d carry o ut corr espon ding op erati on.
10
3
2
2
Back to Main Menu
Cli ck Butt on to go ba ck to t he ma in me nu.
11
General Set Menu
Cli ck Butt on , to dis pla y Gen era l Set M enu , for mor e det ails, r eturn t o pag e 9
gen eral se tup ins truct ions.
13
Phone Book
5
4
6
8
321
7
1. Ph one
2. Di al in Cal ls
3. Di al out Ca lls
4. Un answe red Cal ls
5. Ans wer/M ake Cal ls
6. Re ject/ Hang up C alls
7. Pr eviou s Recor d
8. Ne xt Reco rd
1
1
12
Bluetooth Connection
Whe n Bluet ooth is e nable d, the sy stem wi ll sear ch auto matic ally an d get con necte d. If the
pho ne does n ot conn ect to Bl uetoo th, fig ure wil l bec ome g rey - “ No Co nnect ion”.
12
Digital TV
It is r equir ed to pur chase a n EONON A0 325 cab le, if a ha nging d igita l TV is a dopte d Pleas e
con nect DV D with di gital T V box a cco rdi ng to A0 325 w ire c onn ect ion i nst ruc tio n, af ter t he
sys tem ent ering d igita l TV mo de, and o perat e accor ding to d igita l TV bo x instr uctio n
man ual.
Page 9

Music Play of the Phone
Pre ss 【Answ er】, th e use r cou ld vi ew the la test 20 a nswer ed phon e numbe rs, and
pre ss to dia l aft er a nu mbe r is se lecte d.
1
3
Pre ss 【Miss ed ca lls】, t he us er co uld vie w the lat est 20 mi ssed ca lls, an d press
to di al af ter a n umb er is s elect ed.
1
4
Not e: Down load ph one books of diff ere nt ve rsi ons a cco rdi ng to d iff ere nt ph one s, an d
dow nload them to the DVD player by sending via Bluetoot h.
4
3
2
1
1 3 2
Mus ic Play Blu etoo th Setu p
Blu etoot h could s uppor t A2D P, Bluetooth stereo play and automatic control. I f pho ne
mat ching i s suppo rted, t he user n eeds to p ress A2D P com mun ica tio n pro toc ol
und er stan dby mod e, then i t will co ntrol t he phon e to play m usic au tomat icall y. Dur ing
mus ic play, t he us er co uld p res s to pa use , and p res s 1 aga in to r eco ver n orm al pl ay.
Als o you can p ress to s top p lay ing , and pre ss 2 agai n to repl ay, pres s to
sel ect the n ext son g, and pr ess to se lec t the p rev iou s song.
Bluetooth Setup
Cli ck [Res et] to vi ew save d infor matio n of Blue tooth , cli ck [Cut ] to cu t off B lue too th li nk, c lic k
[Li nk] to co nnect t o Blu etoot h. Pres s [-] to de cre ase t he volu me of Blu etoot h, and pr ess [+]
to in creas e the vol ume of Bl uetoo th.
15 16
2
1
1
4
3
GPS navigation operation (Optional function)
GPS m ain men u is as fol lows:
1. Navigat ion S etu p
2. Navigat ion
GPS Main Menu
Pre ss 1 [Nav igati on Setu p] to ent er navi gatio n menu in t he navi gatio n main me nu; pre ss 2
to se t the map .
GPS Setup
Pre ss icon 1 i n the mai n menu to e nter Se t
Men u, the fo llowi ng pict ure wil l displ ay:
Pre ss navi gatio n setup , gener al setu p,
GPS m onito r, touch s creen c alibr ation ,
cal ibrat ion, vo lume, c lock an d syste m to
ent er subs idiar y inter face.
About phone book/answer/make calls/missed calls
Upl oad pho ne number according to Bluetooth protocol s upp ort ed by t he ph one .
Pre ss 【Dial】, t he us er co uld v iew the l atest 2 0 cal led pho ne numb ers, an d press
to di al af ter a n umb er is s elect ed.
1
2
2
1
2
1
Page 10
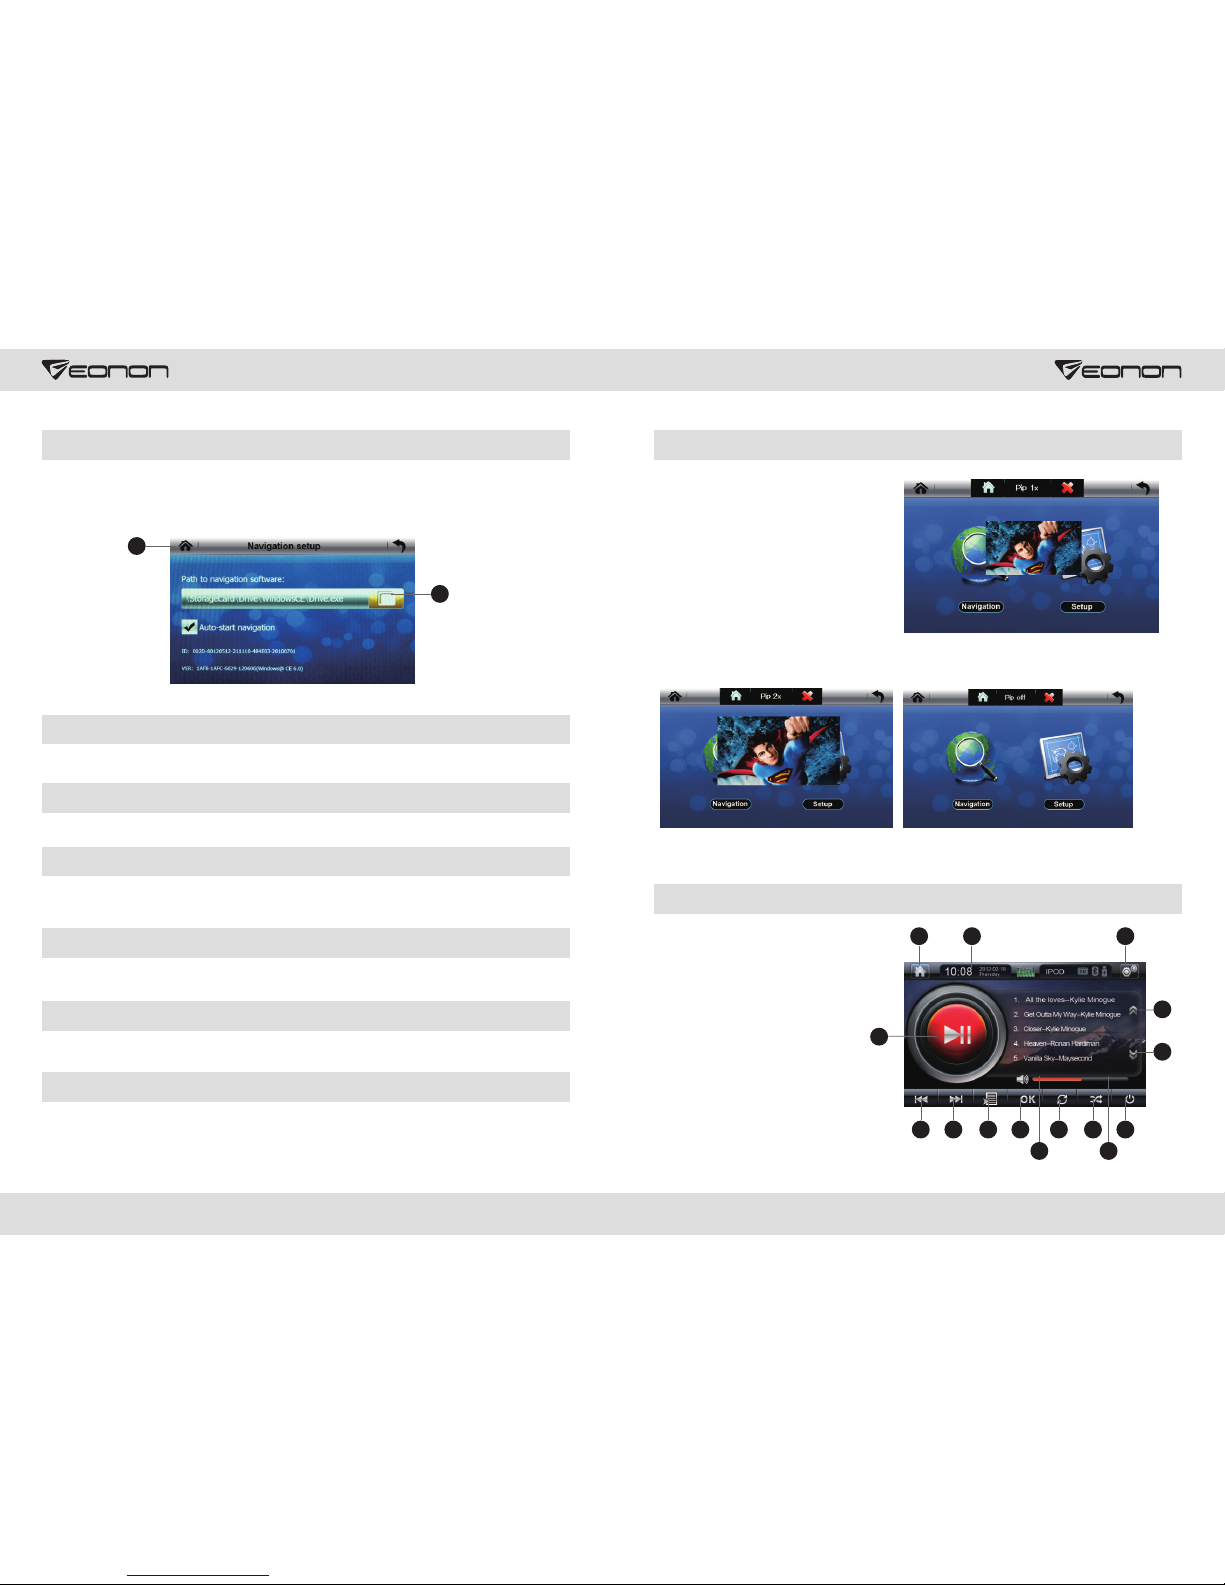
Navigation Setup
Pre ss “Nav igati on Setu p” to ent er the in terfa ce of m ap path s ettin g, pres s 1 to se lect th e
map p ath; fi nd the na vigat ion map p rogra m (exe) a nd save , press 2 t o go back t o the
nav igati on main m enu, pr ess Nav igati on icon to enter navigation, and then start naviga tio n
ope ratio n accor ding to i nstru ction s shown i n the fig ure.
General Setup
Pre ss “Gen eral Se tup” to e nter se tup int erf ace, he re the us er coul d set lan guage a nd
rea lize sc reen sw itch ef fec t.
GPS Monitor
Pre ss “GPS M oni tor” to e nter GP S mon itor in terfa ce, the u ser c ould se e signa ls abou t GPS
sat ellit e radio .
Touch Calibration
Pre ss “Cal ibrat ion” to e nter ca libra tion in terfa ce, cli ck 5 cali brati on poin ts twic e via a tou ch
pen , when ca libra tion su cceed s, an OK wi ll disp lay on th e scree n, and pr ess OK to g o back
to Se t Menu.
Volume Setup
Pre ss “Volu me” to en ter vol ume set up inte rface , here us er coul d set sys tem vol ume and
key t one.
Clock Setup
Cli ck “Clo ck” to en ter clo ck setu p inter face, h ere u ser cou ld set cl ock and t ime zon e.
System Setup
Pre ss “Sys tem” to e nte r syste m set up in terfa ce, her e user co uld car ry out in itial s etup an d
fil e resto re.
17 18
GPS Picture–in-picture (PIP) Function
1. In G PS mode , the use r cou ld touc h
1 as is s hown in t he figu re to go ba ck
to th e main in terfa ce.
A
B
C
2. Th e use r cou ld re ali ze fr ee sw itc h in
“Pi cture –in–p ictur e_1x” ,
“Pi cture –in–p ictur e_2x” a nd
“Pi cture –in–p ictur e_off ” via t ouc hin g
Fig ure 2, se e Figur e A, in
“Pi cture –in–p ictur e_1x” s tatus , this
pic ture wi ll disp lay 1/4 i nterf ace; in
“Pi cture –in–p ictur e_2x” s tatus , this
pic ture wi ll disp lay 1/2 i nterf ace (Fi gure
B), t he us er coul d move th is scre en free ly via to uchin g; in “Pi cture –in–p ictur e_off ”
sta tus, th is pi cture w ill clo se, (Fi gure C)
3. Us er coul d click F igure 3 w hen it is r equir ed to loc k this pi cture .
IPOD Operation Mode (Optional)
611798
10
1413
1. In creas e
Volu me
2. De creas e
Volu me
3. Ra ndom
But ton
4. Sw itch on /off
5. Re peat
6. OK
7. So ng List
8. Pr eviou s
Audi o
9. Ne xt Audio
10. N ext Pag e
11. Pl ay / Pa use
12. P revio us page
13. B ack to Ma in
Men u
14. G enera l Set
Men u
15. S tatus a nd
Clo ck
5 3 4
2 1
12
15
2
1
Page 11

Volume Control
Press But ton and to contro l volume incre ase and decrea se, there' re 40 grades to
adjus t volume. When the volume is set below 30, the power supply is switched off, and volume
will retu rn to previous setup when switched on again; when volume is set above 30, volume will
retur n to default 15 when power is switc hed on again after bei ng switche d off.
1
[ ]+
2
[ ]-
Random
Pre ss to ran dom ly se lec t to play a udi o and vid eo in Ipo d.
3
Switch off
Pre ss to swi tch o ff Ip od co nne cti on st atu s, an d IPO D sho uld c har ge in t ime .
4
Repeat Play
Pre ss to pla y all s ong s rep eated ly.
5
Program select setup
Pre ss or to se lec t the p rev iou s and n ext p age r esp ectiv ely.
10 12
Play Status
Pre ss to pla y / pau se, p res s aga in to res tore no rmal pl ay mode .
11
In Play Status
Pre ss to ent er mu sic p lay ; pre ss to sel ect t he pr evi ous a udi o, and pr ess
to se lec t the n ext a udi o.
7
9
8
AUX Mode
213
1. Vol ume Dec rease
2. Vol ume Inc rease
3. Mu te
19 20
Volume control
Pre ss Butt on and to c ont rol v olu me in cre ase a nd de creas e, ther e'r e 40
gra des for v olume a djust ment. W hen vol ume is se t below 3 0, the po wer sup ply is sw itche d
off , and v olu me wi ll re tur n to pr evi ous s etu p aft er po wer i s swi tch ed on a gai n; wh en vo lum e
is se t above 3 0, swit ch off po wer, a nd vo lum e wil l ret urn t o def aul t 15 af ter p owe r is
1
【+】
2
【-】
Speaker Display Status
Cli ck to tur n it in to th at is s how n in th e fig ure , the sys tem i s now mut e; clic k
aga in to res tore so und sta tus.
3
Virtual CD
1. In sert a di sc of CD fo rma t (It sho uld b e CD form at, and o ne CD c ould on ly be rec orded
to on e corre spond ing zon e among 8 zones, meanwhile, a USD or SD card should b e
con necte d, and so ngs wil l be reco rded to U SB or SD ca rd from C D to play ).
2. Pr ess to se lec t a dis c, and to s ele ct tran sfe r bit rat e; cl ick OK, a nd th en sele ct song s.
All s ongs wi ll be rec orded t o U disk or S D card af ter con firma tion, a nd thes e songs c ould be
pla yed via U d isk or SD c ard aft er the co py is com plete d; pres s to pa use , and t hen del ete
rec ordin g.
Page 12

Remote Control
1.P WR
Pow er swit ch, tap a nd hold t his but ton to st art.
Und er star tup sta tus, pr ess thi s butto n to
mut e.
2.E Q
Pre ss this b utton t o selec t prese t sound e ffect
mod e. Unde r Bluet ooth mo de, pre ss this
but ton to ma ke or ans wer cal ls.
3.A NGLE/ AMS
Whe n playi ng disc s with an gle swi tch
fun ction , the use r could p ress th is butt on to
cha nge vie wing an gle.
Und er radi o mode, p ress th is butt on to bro wse
pre -save d radio s; tap an d hold th is butt on to
sea rch aut omati cally a nd save s earch r esult .
Und er TV mod e, pre ss this b utton t o searc h
aut omati cally a nd save c hanne ls.
4.S UB-T/ LOC
Und er FM mod e, pres s this bu tton to s elect
nea r/far d istan ce radi o.
Und er DVD mo de, pre ss this b utton t o chang e
cap tion la nguag e.
5.P ROG/A -B
Und er play m ode, pr ess thi s butto n to set
pro gram pl ay sequ ence.
Und er DVD/ VCD mod e, tap an d hold to s et
seg ments t o be play ed repe atedl y.
6.O SD/*
Und er othe r modes , press t his but ton to
dis play ti me, fro nt/re ar disp lay out put mod e
and c urren t possi ble dev ices (D ISC/S D/USB ).
Und er play m ode, pr ess thi s butto n repea tedly
to di splay p lay inf ormat ion.
Und er Blue tooth m ode, pr ess thi s butto n to
exe cute di al func tion.
7.G OTO/#
Und er DVD mo de, pre ss GOTO B utto n and cur sor but ton to se lect ti tle, so ngs, di sc soun d, disc c aptio n,
ang le, tit le time , chapt er time , repea t play, ti me dis play, an d then pr ess OK to e nter re lated o ption s and
set ;
Und er VCD mo de, pre ss GOTO B utto n and cur sor but ton to se lect so ngs, fu ll disc t ime, so ng time , repea t
pla y, ti me dis play, an d then p ress OK t o enter r elate d optio ns and se t;
Und er CD/M P3 mode , press G OTO But ton to s elect s ong tim e “_ _;_ _” or so ngs “_ _: XX”, an d then
pre ss Numb er Butt on 0-9 to s elect r equir ed song s or time ;
Und er TV mod e, pre ss this b utton a nd numb er butt on to sel ect cha nnels .
Und er Blue tooth m ode, pr ess thi s butto n to exec ute # dia l funct ion.
Und er radi o mode, p ress th is butt on and nu mber bu tton to s elect f reque ncy.
8.M ENU
Und er DVD mo de, tap a nd hole t his but ton to re turn to r oot dir ector y of disc m enu.
Und er radi o mode, p ress th is butt on to swi tch to RD S inter face.
9. Un der pla y mode, p ress fa st forw ard/r ewind t o selec t the pre vious o r next so ng. Und er radi o mode, l eft
and r ight bu tton is f or up/d own sea rch; un der TV mo de, it i s for up/ down mi cro-a djust ment. I n DVD Set
Men u, use ar row but tons to s elect t he file l ist or se t the dir ector y, pre ss ENTE R to conf irm.
21 22
10. RPT/N AV
Und er play m ode, pr ess thi s butto n to rep eat pl aying .
Tap and h old thi s butto n to ente r or exi t navi gatio n mode.
11.P TY
Und er radi o mode, p ress th is butt on rep eate dly to se lect RD S radio t ype, an d to sear ch rad io cha nnels
aut omati cally a fter 3 se conds .
Whe n playi ng DVD/ VCD, pr ess thi s butt on to se t slow mo tion pl ay; tap a nd hold L ED butt on to se lect
dif feren t LED mod es.
12. ZOOM/ AF
Und er radi o mode, p ress th is butt on to sw itch o n/off AF f uncti on. Dur ing DVD /VCD pl ay, pres s thi s
but ton to se t pictu re size .
13. SRC
Pre ss this b utton t o switc h mode.
14. VOL-/ SEL/V OL+
Pre ss + to inc rease t he volu me, pre ss – to de crea se the vo lume.
Bri efly cl ick SEL - > Watc hing v ideo du ring dr iving i s not al lowe d; tap an d hold SE L for 5 s econd s ->
Wat chin g video i s allow ed, and t his but ton co uld al so cont rol dur ing DVD s tandb y
15. E ject di sc, tap a nd hold t o adjus t scre en vie wing an gle.
16. LOUD
Pre ss this b utton t o turn on /off LO UD func tion.
Und er Blue tooth m ode, pr ess thi s butt on to en d conve rsati on.
17. ( 0-9) NU MBER BU TTON
Und er radi o mode, p ress nu mber bu tton s (1-6 ) to sele ct pres et radi o chann els; ta p and ho ld to sa ve
rad io chan nels.
Und er play m ode, pr ess thi s butto n to dir ectl y selec t progr ams or so ngs.
Und er TV mod e, pres s this bu tton to s elect c hanne ls.
Und er Blue tooth m ode, th ese are e nter b utto ns for th e phone .
18. CLEAR
Cle ar and re -ente r corre ct digi ts whe n ther e's any i nput er ror.
19. P ress th is butt on to pau se play ing or p ress a gain to c ontin ue play ing.
20. TITLE
Und er DVD mo de, pre ss this b utton t o go bac k to tit le menu .
Und er VCD mo de, pre ss this b utton t o turn o n/of f PBC fu ncti on.
21. P ress th is butt on to sto p playi ng.
22. BAND/ PN
Und er radi o mode, p ress th is butt on to sw itch w ave ban ds.
Und er DVD/ VCD mod e, pres s this bu tton t o sele ct outp ut form at.
23. SETUP
Und er play s tatus , brief ly clic k on thi s butt on to dis play DV D setup , under D VD mode , pres s this b utton ,
and u nder ot her mod es, bri efly cl ick on t his bu tton to d ispla y sound s ource s elect ion in terf ace.
1
3
2
4
5
6
7
8
9
10
11
12
13
14
16
15
17
18
19
20
21
22
24
23
25
Page 13

Remote Control Operation
24. AUDIO /ST
Und er DVD mo de, pre ss this b utton r epea tedl y to sele ct audi o langu age.
Und er VCD mo de, pre ss this b utton r epea tedl y to sele ct chan nel mod e.
Und er radi o mode, p ress th is butt on to se lect s tereo o r mono ch annel .
25. RDM/TA
Tap and h old thi s butto n to turn o n/off TA fu ncti on. Und er play m ode, pr ess thi s butto n to set r ando m
pla y.
Chang e Ba ttery
Power S wi tch
Pre ss to swi tch on/ off pow er, rem ote con trol on ly acts a fter cl ickin g 【POW】 or re set but ton on
DVD p anel fo r the fir st time .
TFT scr ee n Ang le Adjustm ent
Pre ss to sli de up/d own TFT s cree n, whic h is divi ded int o 5 angle s, and on e angle c ould be s lid
up/ down at e ach cli ck.
15
1
Pause /P lay
Cli ck butt on to pau se DVD, V CD, CD an d MP3. Cl ick it ag ain to re store n ormal p lay.
2
Mute
Pre ss to mut e, clic k again t o resto re soun d.
1
Menu Se le ct/Co nfirm
Acc ordin g to requ ireme nts, pr ess and 【E NTER】 to e nter se lecte d menu or c lick to
con firm.
4
6
2
Frequ en cy Band /Format S witch
Whe n searc hing ra dio cha nnels , the use r could p ress 【BA ND/SY S】 to swit ch freq uency b and.
How ever, wh ile lis tenin g to the ra dio, t he use r could p ress 【BA ND/SY S】 to swit ch betw een Aut o,
PAL and N TSC for mats.
5
5
Volume I ncrea se/Decr ease
Pre ss 【VOL+ o r VOL-】 to i ncrea se or dec rease t he radi o volum e.
7
Equal L ou dness C ompensa tion
Pre ss 【LOUD】 t o turn on o r off equ al lou dness c ompen satio n. This c ould im prove b ass eff ect.
16
23 24
1. Pr ess Plu g and pul l out
bat tery bo x
1
1
2. In sert ba ttery i nto box w ith
pos itive e lectr ode upw ard.
3. In sert th e batte ry box in to the
rem ote con trol
Selec t Ch annel s/Songs /Fast F orward/ Rewin d
Dur ing sea rchin g radio c hanne ls, the u ser cou ld pres s to manu ally mo ve forw ard or ba ckwar d to
sel ect cha nnels . If this b utton i s press ed more t han 3 sec onds, t he syst em will s earch f orwar d
aut omati cally.
Und er DVD, V CD, CD or M P3 mode , the use r coul d pres s to move f orwar d or back ward to s elect
one s ong. If b utton i s press ed more t han 3 se cond s, fast f orwar d or rewi nd will b e imple ment ed,
til l the sel ected s ong is se arche d, and t hen th e user co uld pre ss play b utton .
8
8
8
Progr am /Stan dard Ti me
In VC D or CD sta tus, th e user co uld set s ong pla y seque nce via t his fun ction ; in VCD st atus, p ress
【ST/ PROG】 to d ispla y P00:0 0 on TFT sc reen o r TV, th e user c ould pr ess Num ber But ton 【0-1 0+】
to se t song pl ay sequ ence. Af ter pro gramm ing is do ne, use r could p ress o pl ay. Duri ng sea rchin g
rad io chan nels, t he user c ould pr ess 【ST/ PROG】 to s witch b etwee n memo an d stere o.
9
9
2
14
Play Ti me Disp lay
Und er DVD, V CD or CD st atus, p ress 【OS D】 to disp lay son g play ti me.
10
Repeat/ Auto Se arch
Und er DVD, V CD, CD or M P3 stat us, pre ss [AMS /RPT] t o play cu rrent s ongs, a nd pres s again t o
can cel rep eat.
Whe n searc hing ra dio cha nnels , press [ AMS/R PT] to sc an auto matic ally an d save be tween N umber
But ton 【1-6】 o f this de vice.
12
12
Rando m Pl ay/Lo cal Remot e Play
In VC D, MP3 or C D statu s, pres s 【LOC/R DM】 to ent er rand om play, a nd pre ss agai n to canc el
(ac cordi ng to the l ist pla y).
Not es: Und er DVD mo de, [LO C/RDM ] does n ot wor k.
Whi le sear ching r adio ch annel s, the u ser co uld pre ss 【LOC/ RDM】 to sw itch be tween l ocal s earc h
and r emote s earch d irect ly.
13
13
Numbe r bu tton
Dur ing sea rchin g chann els, th e user co uld sel ect the se 6 radi o chann els and s ave eac h frequ ency ba nd,
via p ressi ng Numb er Butt on 【1-6】.
Und er DVD, V CD, CD or M P3 stat us, the u ser co uld pr ess Num ber But ton 【1-1 0+】 to sel ect one
th
son g direc tly, i.e .: If the 1 5 s ong is to b e selec ted, th e user co uld pre ss 【10+】 a nd pre ss 【5】to pla y
th
the 1 5 s ong.
Not e: 1. Whe n 【10+】 is pr essed f or the f irst t ime, it i s 10. Whe n press ed for th e secon d time, i t will t urn
int o 20, and w ill tur n into 30 w hen pr esse d for the t hird ti me, etc . 2. When p layin g on PCB p osit ion, al l
num ber but tons wi ll not wo rk.
14
14
Left Ch an nel/R ight Chan nel/S tereo
In DV D, VCD or C D statu s, pres s 【AUDIO】 t o set lef t/rig ht chan nel and s tereo .
Not e: When p layin g movie s or Kara oke, t his fu nctio n will br ing abo ut a perf ect sou nd effe ct. For
exa mple, t he user c ould se lect ei ther C hine se or Eng lish.
15
PBC Pla y
Whe n playi ng VCD2 .0 TFT sc reen o r displ aying a ll prog rams, t he user c ould pl ay PBC vi a press ing
【PBC】. T he use r could p ress Nu mber Bu tton 【0- 10+】 to se lect pr ogram d irect ly. If it is e xpect ed
to st op and pl ay anot her pro gram, t he user c ould pr ess to go b ack to th e main me nu and re selec t the
fun ction . Press 【P BC】 agai n to canc el PBC pl ay.
Not e: PBC wi ll not be i mpact ed when p layi ng DVD , C, MP3 or V CD1.1 .
16
14
20
16
Page 14

Title /Lang uage Chan ge
Und er DVD st atus, t he user c ould ch ange ti tle/l angua ge to Chi nese/ Engli sh via pr essin g 【SUB-T】.
Not e: This b utton c ould on ly be use d to copy D VD disc v ia titl e/lan guage . Othe rwis e, this T V dis play t itle
wil l be canc eled.
22
Set Dis c Pl ay Ti me
Whe n playi ng disc s, pres s 【GOTO】 to s et dis c play ti me. Pre ss Numb er Butt on to set s ongs
and c hapte r or play t ime, an d then pr ess 【ENT ER】 to sta rt play ing.
18
8
Mode Sw it ch
The user c ould pres s 【MODE】 t o swit ch pla y mod e bet ween r adio sear ch/ra dio/U SB/SD /MMC/
AUX -IN/T V/BLU ETOOT H/GP S/IPO D.
Not e: If ther e's no disc , SD c ard o r USB devi ce, a nd no DVD o r Ipo d is s elec ted, the us er co uld n ot ru n
thi s func tion via p ressi ng mo de bu ttons .
19
GPS Mod e Sw itch
Fir st, pre ss 【GPS】 to m ake thi s devic e enter G PS mode a utoma tical ly, and th en ope rate GP S via
tou ch scre en. Pre ss 【GPS】 ag ain to ca rry out m ode swi tch bet ween GP S1 and GP S2.
Not e: GPS1 i s voice n aviga tion, w hile G PS2 is a s imple G PS navi gatio n, and th e defau lt mod e is GPS 1.
26
26
GPS Pic tu re Swit ch
Pre ss 【SEL】 to s witch p ictur e betwe en GPS an d DVD.
Whe n under G PS1 mod e (voic e navig atio n, GPS a nd othe r modes w ork tog ether ), pres s 【SEL】 to
swi tch bet ween GP S and oth er mode s.
Und er GPS2 m ode (on ly GPS wo rks), p ress 【S EL】 to sw itch be tween G PS and th e main me nu of
thi s machi ne. If it i s expec ted to sw itch f rom GP S to othe r modes , the use r could p ress 【SE L】 to
swi tch the m enu, an d then, p ress ic on ent er att achme nt mode .
11
11
11
11
Stop pl ay
Whe n “Plea se pres s play bu tton to c ontin ue” is di splay ed on DVD o r TV, pr ess fo r the fir st time t o
car ry out fa st forw ard, an d press f or the se cond ti me to sto p playi ng.
Not e: When t his but ton is pr essed f or the f irst t ime in VC D, MP3, C D or USB/ SD/MM C card, t his pl ayer
wil l stop.
20
25 26
Title M enu
In DV D or VCD st atus, t he user c ould pr ess 【TIT LE】 to dis play al l songs i n this di sc. The u ser
cou ld also u se Numb er Butt on 【0-10 +】 to sele ct prog rams di rectl y, or pr ess 4 to se lect me nu or
pre ss 【ENTE R】 or to pla y.
Not e: 1. Whe n playi ng MP3 an d CD, TIT LE doe s not wor k.
2. Wh en play ing DVD d isc or mu ltime dia ti tle/ langu age, th e user co uld pre ss
【TIT LE】 to sel ect tit le/sy stem la nguag e.
24
14
6
2
Zoom
Whe n playi ng DVD or V CD, pre ss 【ZOOM】 b utton t o enlar ge the sc reen ac cordi ng to the f ollow ing
rul es:
2-f old,3-f old,4-f old,1/2 -fold,1 /3-fo ld,1/4 -fol d,0-fol d,
Not e: Unde r CD/MP 3 mode, Z OOM doe s not wo rk.
25
Syste m se tup
1. Wh en play ing DVD , press 【S ETUP】 to e nter DV D Set Men u.
2. Sy stem Se t Menu is d ispla yed as fo llow s:
23
Sys tem
Set up
Lan guage
Set up
Aud io
Set up
Vid eo
Set up
Sys tem
Set up
Sig nal to
Noi se Rati o
Dig it Setu p
3. Pr ess 4 to se lect it em to ent er, and pr ess 6 【ENT ER】 to con firm.
A: Sy stem Se tup
It in clude s TV syst em sele ction , auto pl ay, vide o outpu t, scre en dime nsion , passw ord, le vel and d efaul t
val ue sele ct.
B: La nguag e Setup
It in clude s OSD lan guage , audio l angu age an d title l angua ge.
C: Aud io Setu p
It in clude s all aud io setu p selec tion .
D: Vi deo Set up
It in clude s video b right ness, c ontr ast an d color s atura tion.
E: Di gital Au dio Out put Set up
It in clude s digit al audi o outpu t mode s etup , dynam ic scop e and tra cks.
Angle
Whe n watch ing DVD f rom dif fere nt angl es, the u ser cou ld pres s 【ANGLE】 t o adjus t.
Not e: 1. Whe n playi ng VCD, M P3 and CD , this f unct ion doe s not exi st.
2. Vi a press ing thi s butto n, the us er coul d copy DV D conte nt from m ultip le ang les.
21
Enter /e ject
If th ere's a d isc in DV D, the us er coul d press 【E nter/ Eject】 t o exit th is disc , and pre ss agai n to play
ano ther di sc.
Not e: When i nput wi ndow is o pen, th e user c ould p ut a disc i nto DVD d irect ly.
3
Page 15

Installation
Sel ect app ropri ate fit tings a ccord ing to yo ur car
1. Ke ep smal l parts a way fro m child ren.
2. Bolts in th ese a cce sso rie s cou ld be u sed .
3. Diffe ren t acc ess ori es ma y var y from diffe ren t veh icl es.
4. Installati on sh oul d be ca rri ed ou t by pr ofe ssi ona ls.
27 28
5x8
1
2
3
4
5
6
RES MIC IR
/SRC
GPS VOL- VOL+
MUTE
3
3
3
3
5
4
Pro blems
No el ectri city
Rea sons an d solut ion s
Inv alid LC D displ ay
but tons
Una ble to re ceive r adio
sta tions
Poo r radio s ignal s
Una ble to pl ay DVD di sc
Ste reo ind ex flas hes
Noi se
No pi cture
Fla shing s creen
Una ble to ru n Bluet ooth
Lou d respo nse sou nd of
Blu etoot h
Int ermit tent mu sic p lay
and t alkin g via Blu etoot h
pho nes
Che ck whet her pow er supp ly of the f use has b roken d own.
Change bat ter y if ne ces sar y
Pre ss rese t butto n
Che ck whet her the a ntenn a is conn ected , or the
con necti on is ok. C onnec t the ant enna.
Antenna length may not be enough. Check whether the antenna
is disc onn ect ed. If it has been broken, change a new one.
Too weak broadca sting sign al, change ano ther stron g signal.
Antenna is n ot co nne cte d to th e gro und . Mak e sur e the
antenna is w ell c onn ect ed to t he gr oun d.
The re's al ready a d isc in th e DVD.
Perfect frequ enc y tun e.
Too weak broad cas tin g sig nal , pla ce it i n mon o col or mo de.
If di sc is dam aged or d irty, ch ang e to a ne w one .
DVD v ideo ca ble doe s not con nect to T V.
Col or setu p of the sy stem is i ncorr ect. Se t acc ord ing to
TV co lor sys tem “PAL ” or “N TSC ”.
Che ck whet her Blu etoot h phone a nd DVD are connected
to DV D corre ctly. Ma tch a cco rdi ng to c onn ect ion g uid anc e
of th e mobil e phone .
Volu me is too l oud. Adjust DVD to the proper volume.
Che ck whet her Blu etoot h phone i s too far a way fro m DVD.
Place mobi le ph one i n an ap pro pri ate p osi tio n wit hin
5 meters of th e DVD .
Page 16

Connection diagram
I. AV cab le, G PS an ten na,
han ging di git al TV, I POD , rad io
AV cab le 1: 2 .0m m / 6Pi n
1. RV IN re arv iew c ame ra in put
2. VIN video i npu t
3. VOUT1 vid eo ou tpu t 1
4. VOUT 2 vi deo o utp ut 2
AV cab le 2: 2 .0m m / 10P in
5. RIN right a udi o inp ut
6. LIN left au dio i npu t
7. FROUT rear r igh t aud io ou tpu t
8. FLOUT fron t lef t aud io ou tpu t
9. FROUT rear r igh t aud io ou tpu t
10. RLOUT rea r lef t aud io ou tpu t
11. SU B1 ba ss ou tpu t 1
12. SUB2 bas s out put 2
13. Hangin g dig ita l TV
14.IPOD
15. Radio
16. GPS
II. P owe r Suppl y Cab le an d Con tro l Cable
17 S W1 (Whe el cont rol cab le)
18. S W2 (Whe el cont rol cab le)
19. B RAKE (H and bra ke cont rol
cab le)
20. B ACK (Ba ck cont rol cab le)
21. AC C (Vehicle button switch)
22. I LLUMI ( Headl ight co ntrol
cab le)
23. P ower su pply ca ble
.
24. P ower su pply gr oundi ng
25. P OW-AM P (Po wer a mpl ifi er
con tro l cable
26. R ear lef t speak er
27. F ront le ft spea ker
28. R ear rig ht spea ker
29. F ront ri ght spe aker
30. R adio au to aeri al power
sup ply
)
29 30
Specification:
Pro duct Pa ramet er
Pow er supp ly DC 12V (10 .8~16 V)
Loa d resis tance 4Ω
max imum cu rrent 1 5A
ult imate o utput 4 X65 W
con tour di mensi on 180m m(W )X1 65m m(H )X1 00mm( d)
wei ght 2.6 5kg
DVD P layer
aud io outp ut 2.0V rms ±0. 3V 10 KΩ
SNR ≥9 5dB ( 1KH z)
T.H.D D ISTOR TIO N ≤0.0 1%
sep arati ng degr ee ≥75dB ( 1KH z)
fre quenc y respo nse ±3 dB ( 20H z~20K Hz)
vid eo outp ut 1.0V p_p ±0. 2V/ 75Ω
FM Ra dio
fre quenc y range 8 7.5 -10 8.0 MHZ (Eu rop ean 、Jap an)
76- 90MHZ (Japa n)
int ermed iate fr equen cy 10.7 MHZ
Pra ctica l sensi tivit y ≤10 dB
SNR ≥6 5dB
T.H.D D ISTOR TIO N ≤0.1 %
sep arati ng degr ee ≥30dB (1K Hz)
AM Ra dio
fre quenc y range 5 22~16 20K Hz
int ermed iate fr equen cy 450K HZ
Pra ctica l sensi tivit y ≤35 dB
SNR ≥5 0dB
T.H.D D ISTOR TIO N ≤0.2 %
11
9
10
12
7
8
5
19
1
2
3
4
13
14
15
16
Black
Red
White
Red
White
Red
White
Black
Green
Yellow
Yellow
Yellow
Subwo ofer ou tput 1
Rear an d right a udio ou tput
Rear an d left au dio out put
Front a nd righ t audio o utput
Front a nd left a udio ou tput
Right a udio in put
Left au dio inp ut
Subwo ofer ou tput 2
Camer a input
Video in put
Video ou tput1
Video ou tput2
GPS ant enna
20
21
22
23
24
25
17
18
26
27
28
29
Rear an d spe akerleft
Rear an d right s peake r
Front a nd righ t speak er
Front a nd left s peake r
Green a nd blac k
Green
White a nd blac k
White
Purpl e and bla ck
Purpl e
Grey an d black
Grey
Brown
Orang e
Red
Pink
Yellow
15A
GND
Black
Power +12v
Blue an d black
Blue
White
Power a mplif ier con trol
Steer ing whe el cont rol1
Steer ing whe el cont rol2
Brake w ire
Rearv iew con trol wi re
ACC(I gniti on swit ch)
ILLUM I
6
Radio a ntenn a
IPOD Co nnect
Extem al Digi tal TV(o ption al)
30
Auto an tenna p ower
Blue
 Loading...