

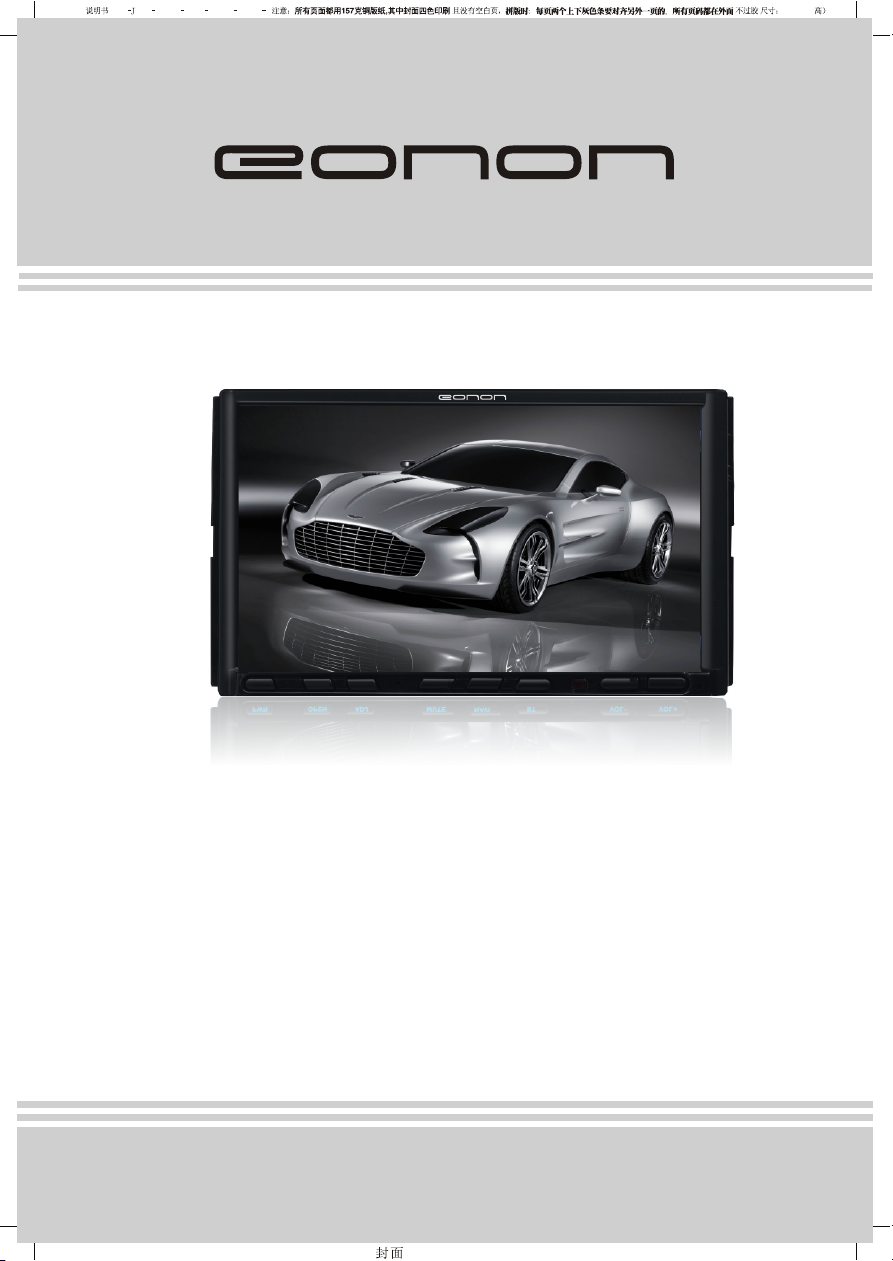
Page 1
Sb02 9201N 4301 1616 0 /4301 J1617 0 /4301 J16179 0 145x210( mm
G2203
PWRPWR
OPENOPEN
ADJADJ MUTEMUTE
NAVINAVI
BTBT
--
VOL+VOL+VOLVOL
Model:G2203
User Manual
Please read this manual before using and
save this manual for furture reference.
Page 2

Page 3
Warnings and Precautions
Warnings
1
Page 4
Warnings and Precautions
Precautions
Never disassemble or service the unit without professional guidance. For details, please
consult a professional car shop/dealer.
If the front panel or display is dirty, use a clean silicone cloth and neutral detergent and wipe
any moisture from discs.Using a rough cloth and non-neutral detergent such as alcohol for
cleaning may result in scratching or discoloration to the unit.
If the unit malfunctions, please refer to troubleshooting section of this manual.
If the vehicle has been parked in hot or cold weather for a long time, please wait until the
temperature in the car becomes normal before operating the unit.
Using an in-car heater in a low-temperature environment may cause condensation to form
inside the unit and upon any disc in theunit, and therefore prevent any disc inside the unit
from playing. If this happens, eject and dry wipe off the disc, then try playing it again. If a
disc fails to play after a few hours, then turn the unit off and contact an after-sales service
center.
To prevent damage to the unit, avoid hard impacts to the display when it is in the open
position.
To prevent damage to the display, avoid touching it with sharp objects.
The display has its own motor. To prevent damage to that motor, do not push, pull, or swivel
the display by hand.
During operation of the unit, if " " is displayed, that operation is unavailable
Operate the unit according to this manual to prevent damaging the unit. The warranty will be
void if problems are the result of improper use.
2
Page 5
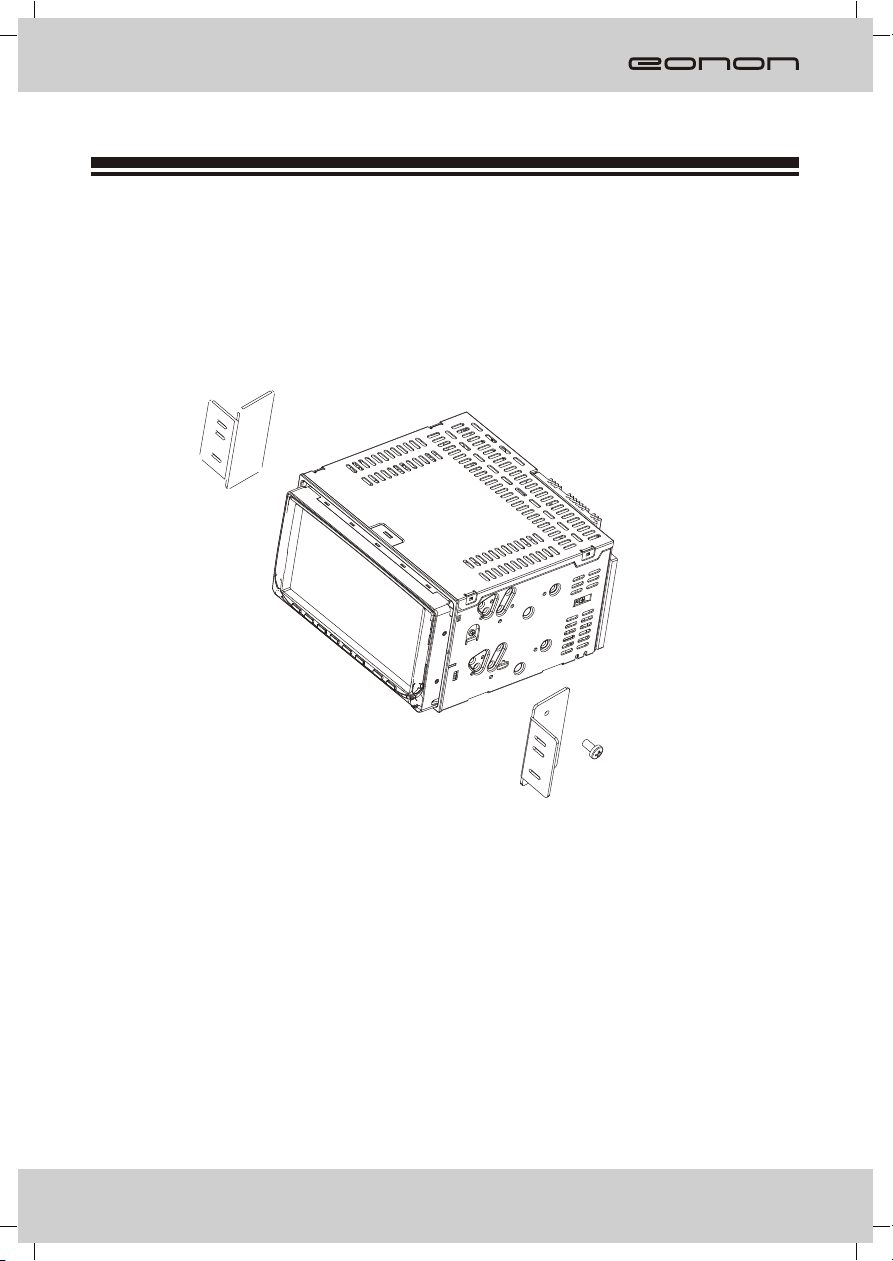
Install
Before installing the receiver, fit it in the approximate place in your car and connect the equipment
according to the speakers and electrical connections. When your system is operated properly,
follow the instructions for permanent installation of your system.
1. MOUNTING BRACKETS
2. screw
INSTALL THE UNIT
1. Install the snapclose.
2. Lock up the unit in a car through screwdriver.
REMOVE THE UNIT
1. Remove the unit through screwdriver.
2. Remove the snapclose . Make the unit
deviate from the car, then take the connecting pin down.
3
Page 6
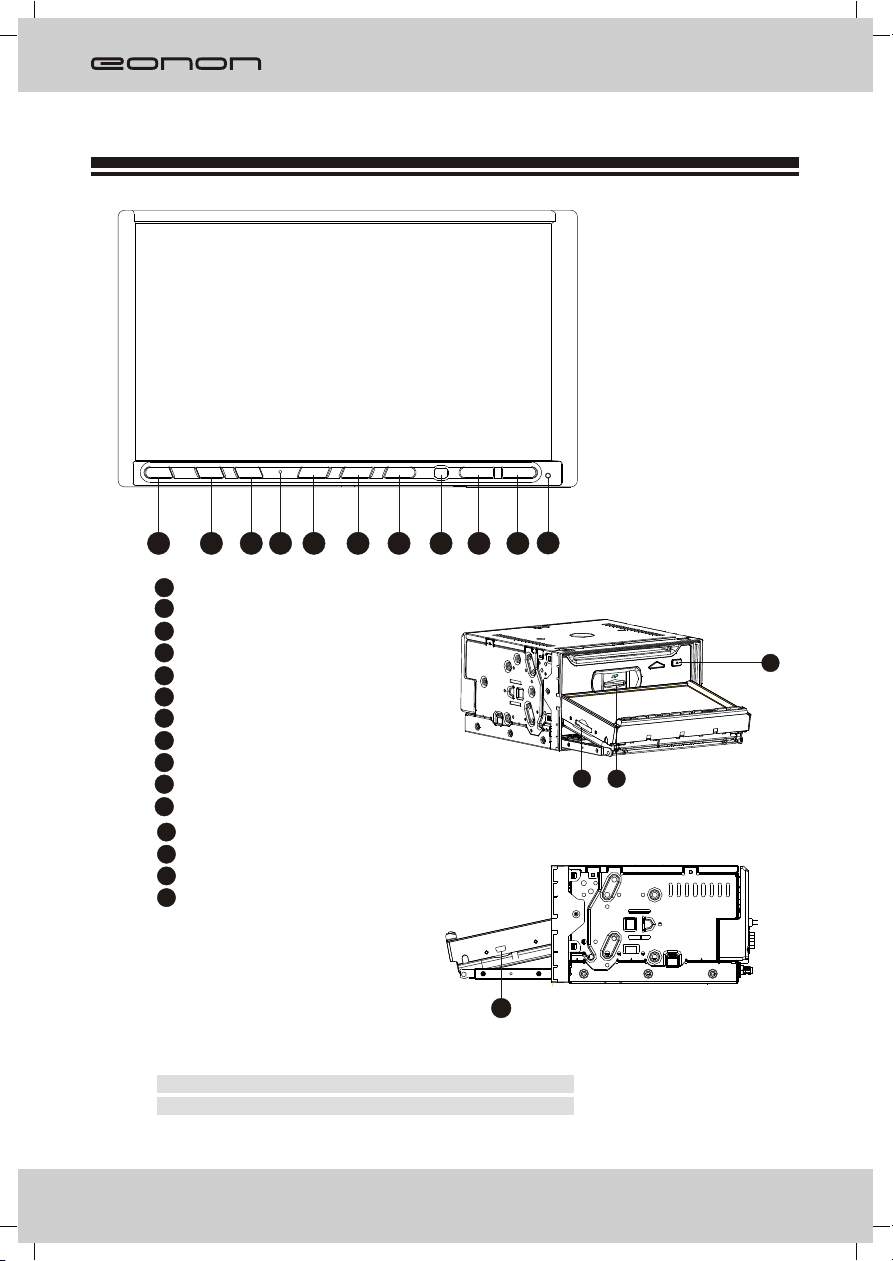
General Features
MIC
PWR OPEN
1
1
Power on/ off
2
Panel ejection button
3
Position adjustment button
4
The microphone
5
Mute button
6
Navigation button
7
Bluetooth button
8
Remote control sensor
9
Reduce volume button
10
Increase volume button
11
The reset button
12
Map SD card slot
13
SD card slot
14
Disc eject button
15
USB port
ADJ MUTE NAVI BT
3 4
2
5
6 7 8 9
-
VOL+
VOL
11
10
14
13
12
15
Note: If this unit does not have bluetooth function,
there will be no MIC on the panel.
4
Page 7
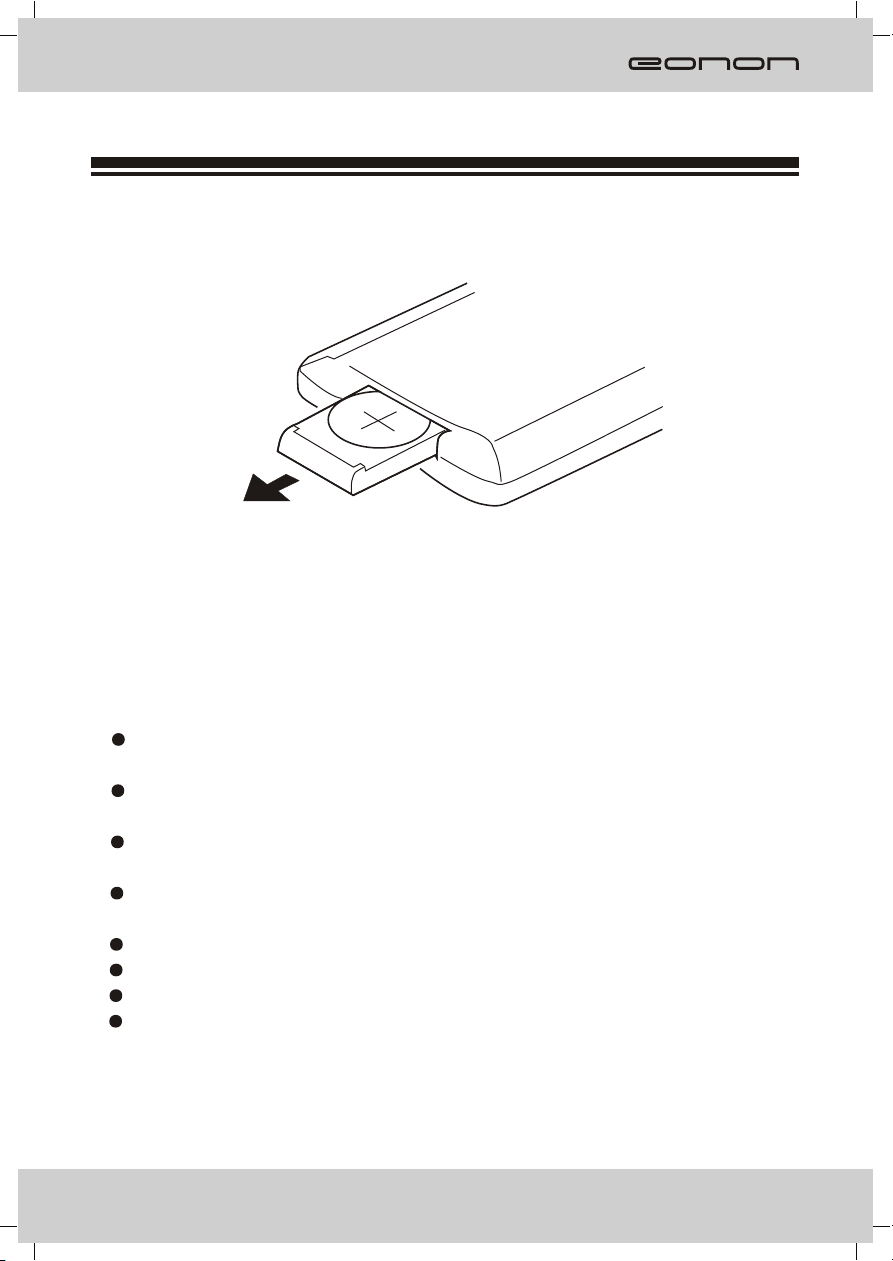
Remote Control
Loading and replacing the battery
Pull out
Notes for using the remote control :
The remote control uses infrared signals, not radio signals,so you must aim the remote
at the unit when using it.
If the battery will not been used for a month or longer, then remove the battery from the
remotecontrol or insert a battery insulator.
DO NOT store the remote control under direct sunlight or in a high temperature
environment,otherwise it may malfunction.
The battery can work for 6 months under normal conditions.I
doesn't work, change the battery.
Only use the lithium, button cell battery CR-2025.
DO NOT recharge, disassemble, heat or expose the batteryto fire.
Insert the battery in proper direction according to the
Store the battery out of the reach of children to avoid accidents. Should a
child swallow a button cell battery, seek medical attention immediately!
f the remote control
(+) and ( - ) poles.
5
Page 8
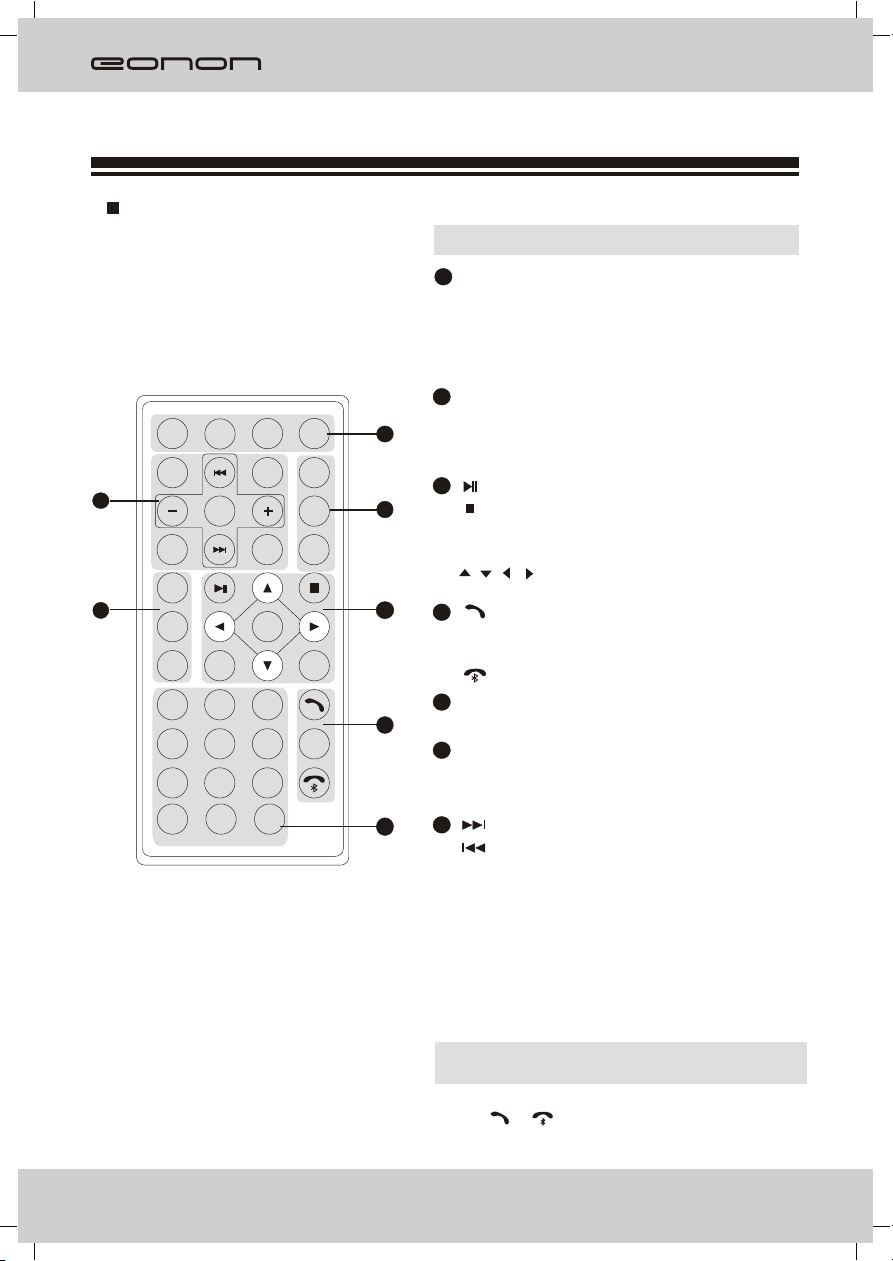
Remote Control
Button and Function
PWRPWR
R/LR/L
LanguageLanguage
7
CLKCLK
AFAF
6
TATA
PTYPTY
11
44
GHIGHI
77
PQRSPQRS
**
10+10+
MuteMute
RECREC
Sub-TSub-T
SELSEL
EnterEnter
22
ABCABC DEFDEF
55 66
JKLJKL
MNOMNO
88 99
WXYZWXYZ
TUVTUV
0 0
RO/SNRO/SN
EQEQEQEQ S TS T
33
##
SRC SRC
BandBand
APSAPSAPSAPSAPSAPS
RPTRPT
TitleTitleTitleTitle
PBCPBC
OSDOSD
I D3I D 3
Note: Remote picture just for confernce.
[PWR] Button: Power
1
[REC/Sub-T]Button: Transfer recording
/Language switch
[MUTE] Button: Mute
[SRC] Button: Play source switch
[BAND] Button: Band switch
2
1
2
[APS] Button: Scan
[ST/RPT] Button: Stereo switch/Repeat
[ ]Button: Play/Pause
3
[ ]Button: Stop
[Title] Button: Title Menu
[ENTER] Button: Play/Confirm
[ ][ ][ ][ ]Button: Up/down/left/right button
3
[ ] Button: Ring on
4
[OSD/ Id3] Button: Screen Display/ Id3
information
[ ] Button: Ring off
[0~9]Button:0~9
5
4
[RO/SN] Button: Radio scan
[AF] Button: Search stations automatically
6
[TA] Button: Traffic broadcast
[PTY] Button: Program style
[ ]Button: Forward/Next chapter
7
5
[ ]Button: Rewind/Last chapter
[+/-]Button: Increase/recluce volume
[SEL] Button: System setting
[CLK] Button: Clock display
[EQ] Button: Sound effect
[R.L/LANGUAGE] Button: Left/right sound
track switch dialogue language.
Note: If this unit doesn't have RDS function, AF/
TA/PTY are invalid.
If this unit doesn't have bluetooth function,
[ ] / [ ] are invalid.
6
Page 9
Basic Operation
SRC
Press [SRC] button shortly will turn the unit on.
Press [SRC] button shortly turn off.
Volume
Increasing Volume:
Press the [VOL+]button to increase the
volume.
Decreasing Volume:
Press the [ VOL- ]button to decrease the
volume
MUTE
Press this button to turn off volume and again
to resume.
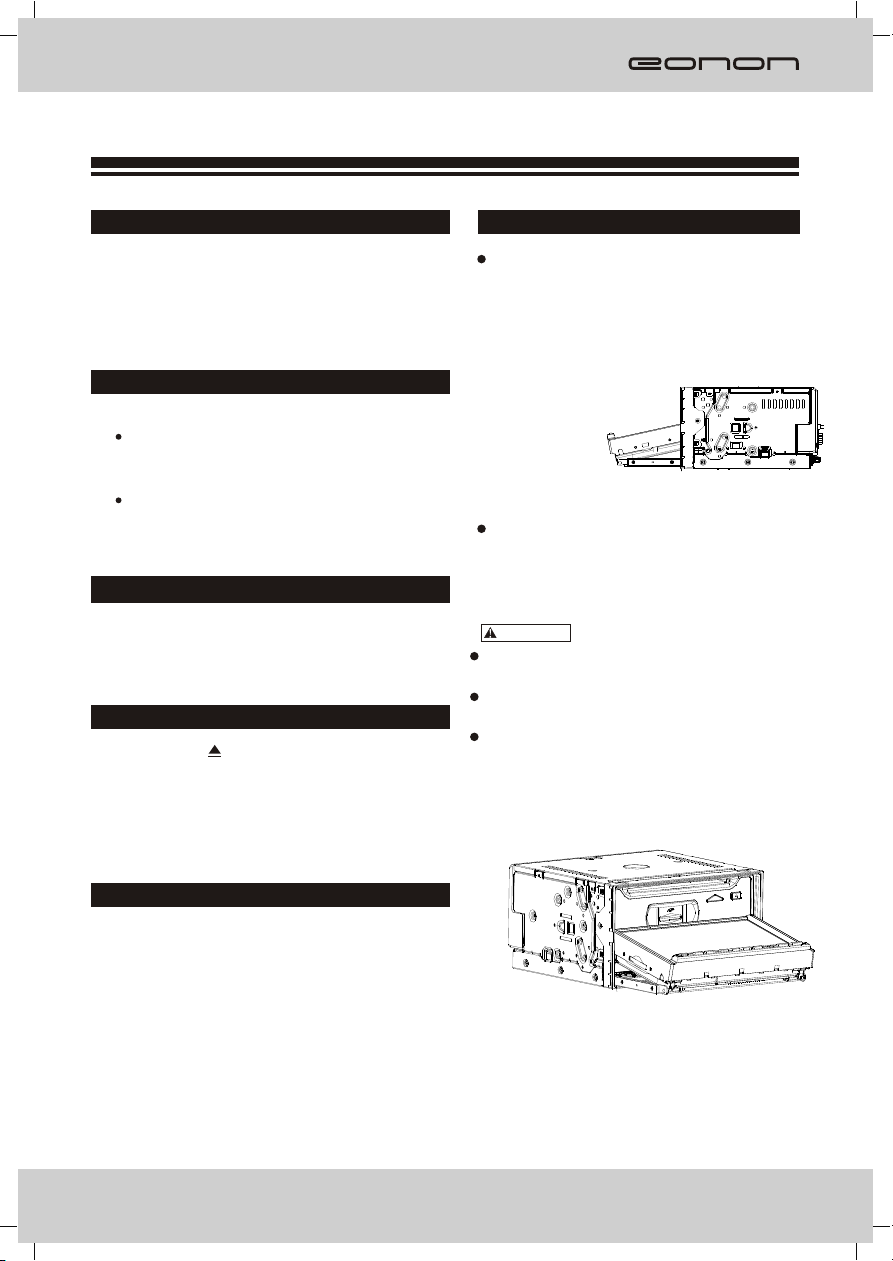
Eject
EJECT: Press [ ] to exit the disc.
NOTE: About 10 seconds after the disc ejected, if not
taken out, the disc will be absorbed in again.
Display position adjustment
Press [ADJ] button can adjust angle of screen:
Press [ADJ] button repeatedly can adjust
the screen angle gradually. The unit has 3
angles for adjustment. Each time you press
thebutton, the screen will move from one
angle to another angle on the same
direction. The
screen angle will
move on the
opposite
direction
if you operate it again.
Turn on the unit again, theangle will back to
original setting.
CAUTION
Do not place any object on the screen, or
push it rudely.
Do not move the screen rudely.The movable
range of the
screen may be limited to different types of car
and install positions, etc.
OPEN
Press [OPEN] button, the screen will turn down,
press again,it will back to originality.
Adjust Angle
7
Page 10

Setup Operation
SETUP
Enter the main menu, touch the setup
button will display:
Video mode:
VIDEO
BRIGHT 14
14
COLOR
13
CONTRAST
USER
MODE
Video setup
Bright Color Contrast.
Mode
STAD USER
Menu operation
Touch [ ]/[ ] to choose menu.
Touch [ ]/[ ]to adjust parameter.
Touch [ ] to back main menu.
Audio mode:
AUDIO
BASS 0
- 07
TREBLE
R 06
BALANCE
R 06
FADER
FLAT
EQ
Menu operation
Touch [ ]/[ ] to choose menu.
Touch [ ]/[ ]to adjust parameter.
Touch [ ] to back main menu.
Basic mode:
BASIC
RADIO USA
ON
BEEP
00:00
CLOCK
BRIG SOFT
Audio setup
Audio setup Bass Treble Balance Fader
setup between 7.
+
EQ setting
NORM
FLAT
ROCK
POPCLAS
Basic setup
Loud ON and OFF
Beep ON and OFF
Time Adjust press [ ] or[ ] button to
select hour/minute then press [ ]or [ ]
button to setup.
Menu operation
Touch [ ]/[ ] to choose menu.
Touch [ ]/[ ]to adjust parameter.
Touch [ ] to back main menu.
8
Page 11

Radio Operation
AF TA PTY
Band Tune
Manually Tune
Press[ ] button: adjust to higher
frequency.(such as 87.5,87.55...)
Press[ ] button: adjust to lower frequency
(such as 105.5,105.0...)
Automatically Tune
Holding down the [ ] button: search higher
frequency
station, and will stop when meeting one.
Holding down the [ ] button: search lower
frequency
station, and will stop when meeting one.
Select station
Press [APS] icon
Seek Tune:
Under radio playing mode, long touch
[APS] icon can seek and store strong
frequency stations automatically.
BAND
Press [BAND] on the screen to select among
three FM or two AM bands.
(FM1-FM2-FM3-AM1-AM2)
FM1 FM2
Note: If the unit doesn't have RDS function,
the touch-screan won't show "AF, TA and PTY".
FM3
AM1AM2
9
Page 12

Radio Operation
AF(Alternative Frequency)
Turn "AF",the unit will switch to the stronger signal of thesame station automatically.
TA(Traffic announcement)
Press TA, the unit will prior to seek the traffic information. If the machine receives the traffic
information, it will choose this signal and quit other radio signal or CD program. If press TA
again, other program will recover and the traffic information program will quit.
PTY(Program type)
Turn on PTY , then press PTY and 1-6 buttons to choose one certain program style .
After this, the unit will scan the same style programs automatically. Such as select News
programs. The unit will only scan News programs.
Among AF, TA and PTY, TA has the absolute priority to be chosen.
Note: If the unit is without RDS function, pls skip this page.
10
Page 13
Play operation
Insert DVD disc, touchscreen will show
menu as follows:
DVD-V
T 001/003
C 002/025
TITLE
DVD-V
1/2
OFF
OFF
00:33:11/01:45:44
REP
BACK
00:33:11/01:45:44
REP
Note: Because the different situation of Disc REC,
some of the CD-R,CD-RW,DVD-R,DVD-RW,
DVD+R,DVD+RW Disc may can not be readed.
And the Disc without final treatment can not be
readed too. Regarding the final treatment,
please make conference to the guide of REC
set or REC manual.
TITLE
TITLE: In play mode, press [TITLE] on the screen
or remote control to back to the title menu,
and re-select the items needed.
REP
Repeat mode:
When playing DVD, press [REP], you can
switch on
CHAPTER/OFF/TITLE /CANCEL.
BACK
Back to Mutimedia:
When playing DVD, press [BACK], it will
back to player media.
BACK
You can choose any icon to play or setup.
Caption choose
OFF
Caption choose: If DVD contain several
langrage you can switch
caption.
Note: when play DVD not have multi caption this
function invalidation.
Choose angle
OFF
Choose angle: If DVD support multi angle
function, touch [ ]or press
OFF
[ANGLE] icon or remote, you
can switch different angle.
Note: when play DVD not have multi angle, this
function invalidation.
1/3
Volume Control
Volume control: Touch [ ], can switch,
1/3
between 1, have volume and
music ; 2, not have volume
but have music;
3, volume and music separate.
Note: general DVD only have two mode.
11
Page 14

Play operation
Insert MP3 disc, touchscreen will show
menu as follows:
MUSIC
001
001 001 MP3
002 002 MP3
003 003 MP3
004 004 MP3
005 005 MP3
Media
Back
Play/pause: Press [ ] button to play or pause.
Select chapter or section:
In the DVD mode,
press [ ] to choose the last chapter; press [ ]
to choose the next chapter.
MUSIC
NONE
ALBUM: NONE
00:00:30/00:04:12
PLAYING
REPEAT
BACK
FILE NAME: 004 MP3
Insert CD disc, touchscreen will show
menu as follows:
MUSIC
001 CD
MUSIC
001 001 MP3
002 002 MP3
003 003 MP3
004 004 MP3
005 005 MP3
CDDA
PLAYING
TRACK12
00:00:30/00:04:12
REPEAT
Back
BACK
REPEAT
Repeat mode:
you can switch on
Insert VCD disc, touchscreen will show
menu as follows:
When playing DVD, press [REP],
TRACK/OFF/FOLDER/ALL.
PBC
REP
VCD
T 001/003
00:33:11/01:45:44
STEREO
BACK
PBC
PBC menu: when playing VCD, press [PBC],
you can switch between ON/OFF/CANCEL.
REP
Repeat mode: when playing VCD, press [REP],
you can switch between TRACK/OFF/
ALL/CANCEL.
Track switch
Track switch: you can switch STEREO/LEFT/
RIGHT by touch the right up letter.
Chapter choose: When play CD/MP3,
press[ ] to choose the pre music, press [ ]
to next music.
12
Page 15

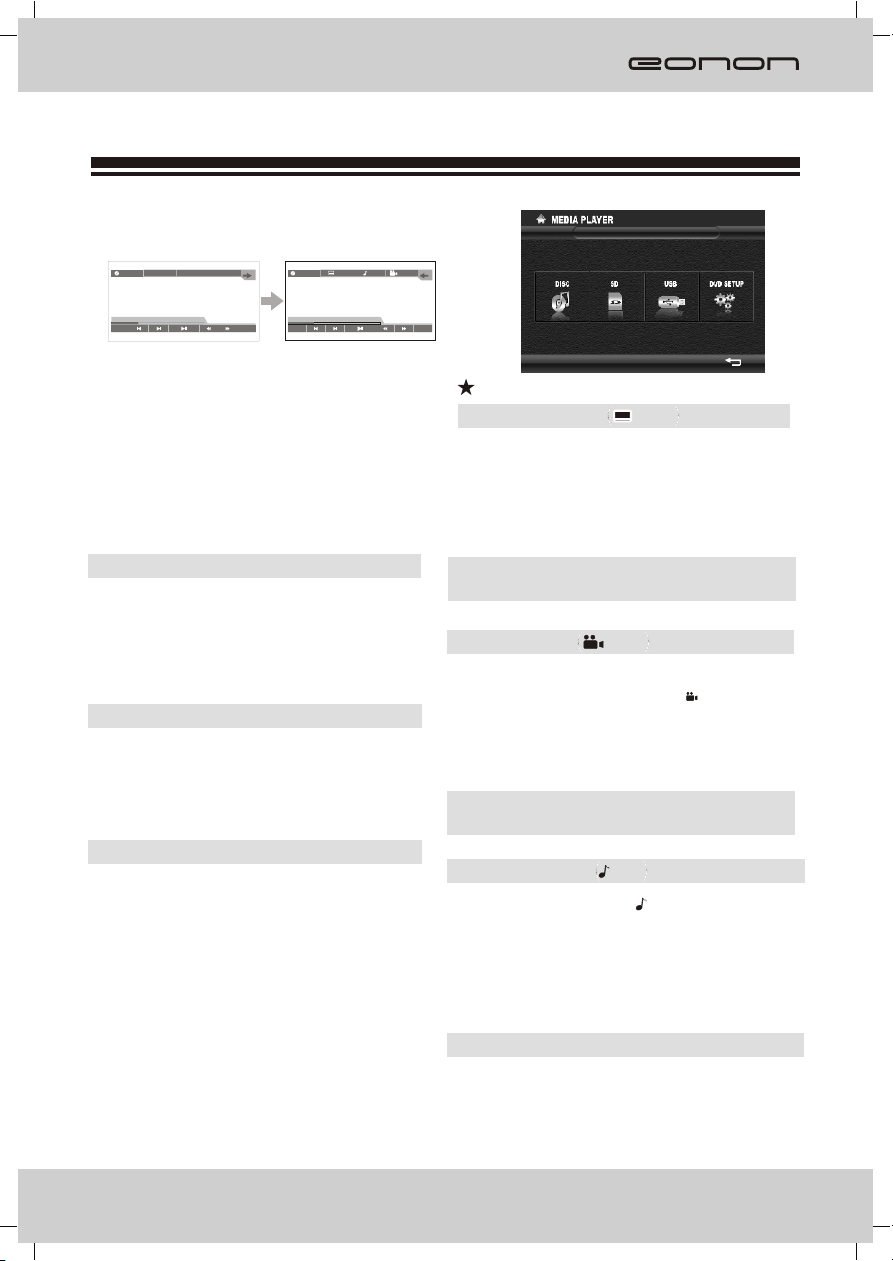
USB/SD operation
USB
USB/SD mode
USB/SD mode
Inset USB/SD,the play will to the USB/SD playing mode
antomaticly.
USB/SD play opration
PLAY/PAUSE:
Press [ ] button to play or pause.
,
Select:
Under USB or SD play mode, press[ ] button to select
tracks.
Repeat mode:
When playing, you can switch the function by touch
[REPEAT].
CHAPTER
TITLE
OFF
CANCEL
SD
Note: when playing, press [BAND] to radio mode.
13
Page 16

Bluetooth
The Bluetooth is wireless mode of transmission in short distance.Through Bluetooth function,
the DVD unit establishes connection with Bluetooth handset. And then, these units can
realize mutually contrdling and file transfering.
BT Choose
BT Choose:
Press [BT] or touch BT icon, can enter BT mode when calling.
Working mode of Bluetooth
Bluetooth has the following functions:
A: Paring
Make DVD Bluetooth function as handsets facility through pairing.
B: Connecting
After connecting with the handset,you can operate the mobile phone through
DVD unit(such as H,F, call, call record etc.)
'
Paring
Phone set pairing step as follows:
A: Turn on Bluetooth, then touch On/Off icon to turn on this function.
B: Turn on Bluetooth function .
C: When the mobile phone set finds the signal, input pairing number. Initial Pairing
Code Number 0000
D: After pairing, TFT screen shows pairing succeed and quit the pairing.
handsets
'
NO.2
(NO.1)
(NO.2)
14
Page 17

Bluetooth
Mobile phone
After connected, you can make phone call through,
touch screen or phone record.
A: Making mobile phone call
After making phone call, the [ ]will shining.
B: Making touch screen call
Input the numbers on the screen, press [ ]
con can correct the numbers;
Press [ ] icon to answer phone call;
Press[ ] icon to cancel or hang up.
13590201359020
Answering
Answering functions as follows:
A: After connected, the unit can use the
telephone function.
B: When there is a phone call, the Bluetooth
will switch to phone function and show the
calling number automatically.
C: Touch Transfer icon can switch to phone
answer mode. Touch it again can return to
Bluetooth function of the unit.
13590201359020
Hang up
You can press the [ ]button to hang up.
13590201359020
Note: If the unit does not have this function,
pls skip it.Some models of mobile phones are
not supported by the Bluetooth module of this
unit.
15
Page 18

TV tuner
TV operation
You need install TV antenna, when receive program.
TV mode:
Press [MENU] enter into main menu, then press TV icon to enter.
TV
Channel seek:
Press [AMS] can seek TV programs and restore them
automatically.
Channel choose:
[PREV]: choose channel up.
[NEXT]: choose channel down.
Back:
[ESC] prss [ESC] back TV mode to main menu.
Without touch function, without these icons.
TV
AMS
Note: If the unit does not have this function, please skip this page.
16
PREV NEXT
ESC
Page 19

Navigation Operation
Enter Navigation
Enter Navigation menu:
Insert the SD card with map, touch [GPS] icon or press [NAVI], enter Navigation
menu, as follows:
TV
Navigaton Set:
Touch [ ], Set the Navigation Path, then press confirmation button back to the
Navigation Manu, as follows:
Enter Navigation :
Touch [ ], enter the face of statement, press "Accept" to enter navigation,
press "unaccept" to back to navigation menu.
Satellite monitoring
Touch [ ], then will appear the following image, that can show the satellite
signal process data and the signal condition
[ ]: show the satellite signal process data.
[ ]: show the satellite signal .condition
17
Page 20

Electric Connection
Front right RCA out(RED)
Front left RCA out(WHITE)
Back a car video in(YELLOW)
Subwoofer(BROWN)
Back right RCA out(BLUE)
Back left RCA out
(PURPLE)
AUX left in(WHITE)
AUX right in(RED)
Video in(YELLOW)
Video out(YELLOW)
ParkingConnect to switched side of
parking brake circuit(-)
Reverse
Remote control for amplifier.
Connect control for antenna
Ignition key
sw tchi
Car fuse box
(main fuse)
Battery
GRAY
GRAY
BLACK
GRAY
GRAY
GRAY
BLACK
BLACK
BLACK
GRAY
GPS Antenna
Radio Antenna
GRAY
BROWN
PINK
BLUE
Ignition wire (RED)
Battery wire+12V (YELLOW)
Ground wire(BLACK)
Fuse(10A)
ORANGE
WHITE
FRONT.L
WHITE/BLACK
GRAY
FRONT.R
GRAY/BLACK
GREEN
REAR.L
GREEN/BLACK
PURPLE
REAR.R
PURPLE/BLACK
TV antenna plug
Dimmer
To front left speaker
To front right speaker
To rear left speaker
To rear right speaker
18
Page 21

Accessories
The included attachments of the unit are as below sheet:
GPS antenna.......... ..........................one piece
USB connected wire ..........................one piece
Mounting brackets............................two pieces
Screw............................................... six pieces
The use of any accessories except
of those provided might result in damage
to the unit .Make sure only to use the
accessories shipped with the unit ,as
shown above.
Troubleshooting
What appears to be trouble is not always serious. Please check the following points
before calling a service center.
Familiar characters and their meanings
Characters
NO Disc
Bad Disc
Unkown Disc
Region Error
Disc is too dirty.
Disc is inserted upside down.
No disc in the unit.
Disc is extreme dirty.
Disc is inserted upside down.
The disc is not compatible with
the unit.
The disc's region code is not the
same as the unit's.
Causes
Remedies
Clean the disc or change the disc.
Insert the disc correctly.
Insert a disc.
Clean the disc or change the disc.
Insert the disc correctly.
Clean the disc.
Clean the disc.
19
Page 22

Troubleshooting
General problems
Symptoms
The unit cannot be
powered on.
Remote controller
does not work.
No sound comes out
or it 's hard to hear.
Poor sound quality or
sound distortion.
User preset information
is lost when ACC is off.
Causes
The fuse of the unit has been broken.
The fuse of car battery has been broken.
False operations and etc.
Battery has been exhausted.
Battery is not installed correctly.
Audio output connection is not
correct.
The volume level is set to the
minimum level.
The speakers have been damagedl.
The audio channel outputs are not
balanced.
The speaker cord is contacted with the
bodywork.
Piratic disc is used.
The speakers power rating d oes not fit into
the unit output po wer.
The speakers are connected incorrectly.,
Remedies
Install a new fuse with correct rating.
Install a new fuse with correct rating.
Reset the unit.
Change the battery.
Install the battery correctly.
Correct the connection according to
(Electrical Connections Overall Diagram).
Adjust the volume to the optimum level.
Check the speakers.
Adjust the balance of audio channel
outputs.Pleaserefer to (Audio control).
Use insulating cord for connection.
Use original copy disc.
Change the speakers.
Correct the connection according to
(Electrical Connections Overall Diagram).
20
The speaker cord is contacted with the
bodywork.
ACC and BATT are connect ed incorrectly.
Use insulating cord for connection.
Correct the connection according to
(Electrical Connections Overall Diagram).
Page 23

Troubleshooting
TFT Monitor
Symptoms
No image appears on
the monitor and warning
information is shown at
all times.
Abnormal display like
as pulsatile stripes on
the image and on.
Characters are
abnormal.
Causes
Incorrect connection of
Breaking wire.
The color system of DVD
disc is not suited with the
monitor.
The actual color system is not the
same as the marked color system
on the labelfor some piratic discs.
The video cord is broken.
The video cord is not connected
correctly.
False operations.
Remedies
Correct the connection according to
(Electrical Connections Overall Diagram).
Adjust the color system of the DVD disc
or the monitor.
Use original copy disc.
Change the video cord.
Connect the video cord correctly.
Turn off the power and then turn on the
power again, or change to other playing
source and then go back.
21
Page 24

Troubleshooting
Radio Tuner
Symptoms
Causes
Remedies
It's hard to
receivestations.
Mp3 playback
Symptoms
Disc cannot be played
back.
Interruption occurred
duringplayback.
MP3's name cannot
be displayed correctly.
Auto antenna is not extended
completely.
Auto antenna is not connected with
the unit firmly.
LOCAL function is on.
Causes
Disc is scratched.
Disc is too dirty or wet.
The pickup is dirty.
Disc is inserted upside down.
Disc is scratched.
Disc is too dirty or wet.
Some contents are damaged.
Disc is not recorded correctly.
The name of Mp3 is not regular.
Correct the connection according to
(Electrical Connections Overall Diagram).
Correct the connection according to
(Electrical Connections Overall Diagram).
Close the LOCAL function.
Remedies
Change the disc.
Clean the disc.
Clean the pickup with cleaning disc.
Insert the disc correctly.
Change the disc.
Clean the disc.
Change the disc.
Record the disc again.
Use the regular characters.
22
Page 25

Troubleshooting
DVD player
Symptoms
Disc cannot be inserted.
Disc cannot be played
back.
Subtitle cannot be shown.
Audio language/subtitle
cannot be changed.
View angle cannot be
changed.
Image distortion.
PBC is invalid when
playing back VCD.
Repeat playback or GOTO
searchis invalid when playing
back VCD.
Causes
There is a disc in the unit already.
Disc is scratched.
Disc is too dirty or wet.
The pickup is dirty.
Disc is not compatible with the unit.
Parental lock class is too high.
Disc is inserted up side down..
The disc 's region code is not the
same as the unit 's.
There is no subtitle file in the disc.
There is only one audio
language/subtitlein the disc.
There is just one view angle in
the disc.
Multi-angle view is not available
for the segment playing back now.
The disc is protected by the
copyright.
The disc does not support PBC.
PBC is on..
Remedies
Eject the disc then insert another one.
Change the disc.
Clean the disc.
Clean the pickup with cleaning disc.
Change the disc.
Change the parental lock class.
Insert the disc correctly.
Change the disc.
Change another disc containing
subtitle files.
Change another disc containing
multi-languageaudio or subtitle.
Change another disc containing
multi-angle.
Select another segment to play back.
The unit is compatible with copy
system; hencesome discs contained
the informationof copying prohibited
cannot be played back.
Change another disc with PBC function.
Close PBC function.
23
Page 26

Specifications
Specifications subject to change without notice.
Monitor sector
TFT screen size...... ......................................................................................7.0
Dot distance .................................... 0.107*0.370mm
Analysis ..................................... 1440*234 dots
Background illuminatio.... ...
DVD sector
D/A convert................. ............................................................................24 Bit
Decode......................................................linearity PCM/Dolby digital/MP3/WMA
Quiver and shake.............................................................less than measure limit
Frequency effect
(sample frequency;96k).................................................................20~44.000Hz
(sample frequency;48k).................................................................20~22.000Hz
(sample frequency;44.1k)..............................................................20~20.000Hz
Distortion 1K ........................................................... .....0.010%
Signal/Noise radio................................................................ . 100db(DVD 96k)
Dynamic range..........................................................................100db(DVD 96k)
CD format..............................................................DVD-Video/Video-CD/CD-DA
Sample frequency.......................................................................44.1KHz,96KHz
Ration Bit number.............................................................................16/20/24 Bit
............................. ..............
...................................... ..............
............................................................................... ....LED
..........................
.... .
Audio sector
largest power..........................................................................................45WX4
Audio
Low..............................................................................................100Hk 10db
Middle..............................................................................................1Hk 10db
High.............................................................................................100Hk 10db
Common
Operating power.......................................................................14.4V(11V~16V)
Electricity consume.....................................................................................10A
Stand-by electricity.................................................................................<10MA
Dimensions....................................................................
Working temperature range.................................................................-10 -60
Store temperature range.....................................................................-20 -85
Weight
........................................................................................................ 2.9 Kg
24
198mmX178mmX104mm
Page 27
Specifications
Specifications subject to change without notice.
RECEVING FREQUENCY FIGURE
AREA BAND
FM
EUROPE
AM
FM
AMERICA
AM
SOUTH
AMERICA
RUSSIA
FM
AM
FM
FM
12
AM
FREQUENCY
RANGE HZ
87.5-108.0M
522-1620K
87.5-107.9M
530-1710K
87.5-108.0M
520-1620K
87.5-108.0M
65.0-74.0M
3
522-1620K
Auto
Stepping
KHZ
100
9
200
10
100
10
100
30
9
Tiny
Stepping
KHZ
50
9
200
10
100
10
50
30
9
25
Page 28

 Loading...