

Page 1

Page 2

SPECIFICATION:
UNIT
operating power.............................................. DC 13.8V
Operating power range ................................. 10.8-16V DC
Maximum operating current............................. 10A
Weight............................................................. 1.75 KGS
Ground system............................................... car power cathode
AM TUNER
Frequency range............................................... 522-1620KHZ
Noise limit sensitivity.................................... (S/N-20db)32dB
Middle frequency................................. 450KHZ
FM TUNER
Frequency range........................................ 87.5-108 MHZ
Signal/Noise tatio.................................... 50dB
Stereo separation............................................. (1KHZ) 30dB
Frequency Response................................. +-3db 40Hz-10.000hz
Antenna Impedance...................... 75
.............................................................................
..............................................
............................................
........................................................
................................................
...................................
.......................................
.........................................
..............................................................
.............................................
..............................................................
.........................................
.................................
DVD PLAYER
............................................................................................................................
Track 2
Frequency response 5Hz-20.000Hz
less than limited value
...............................................................................
29
Page 3

WIRING DIAGRAM
This product collocates ISO connector, please connnect correctly follw the instruction:
Red-ACC ON(+12V)
Yellow-battery anode(+12V)
Black-ground wire
Blue-power antenna control wire
Line output-white/red left/right track
Grey/ Grey black-right front speaker anode/cathode
Wite /White black-left front speaker anode/cathode
Green/Green black-left rear speaker anode/cathode
Green/Green black-left rear speaker anode/cathode
For Your Safety
1. You must connect wiring according to the installation instructions. Any error in wiring
may result in the failure in or damage to the eletric system for the vehicle.
2. The lead for the horn (-) must be connected to the terminal of the speaker (-). Never
connect it to the car or to other speakers.
3. Switch on the unit after you make sure that all connetion is correct.
4. While changing the burnt fuse, please change the fuse of the same specification.
5. Pleade block up the vent or the board for heat dissipation so as not to lead to a fire due
to internal overheating of the unit.
6. After installation, you can start using the unit for your car (including the replacement of
batteries for your car). Please dismantle the front panel and then use sharp head tools
(other sharp matters are strictly prohibited) to press the RESET button on the base so
that the system is in the initial setup state.
About these Operation Instructions
This unit has a series of superior functions to ensure the efficient reception and operation.
All these functions are designed for the simplification of operation. However, there are no
instructions for most of the functions. These operation instructions will help you to
understand the performance operations of this product.
These operation instructions mainly introduce the operation of the remote control. Some
functions relationg to the operations of DVD/VCD/CD/MP3 can only be implemented by
the remote control. But some functions can also be implemented by the host.
128
Page 4

IMPORTANT SECURITY MEASURE
This machine only adapts the follow disc:
The following table is helpful in solving the problems which possibly meet when using the
unit. if problem cannot be solved,pls contact careerman or dealer. Do not repair the unit
by yourself .That is danger.
DISC CATEGORY
DVD
VCD
CD
MP3
DISC MARK
DISC SIZE
DISC CONTENT
Sound and picture
Sound and picture
Only sound
Only sound
12CM
12CM
12CM
12CM
Note: This unit is compatible with VCD1.0/1.1/2.0/3.0 DVCD disc.
Please do not rebuild the machine, if do so, possibly causes accident.
Any operation may affect driving, please stop the vehicles in the safe place to operate.
Please do not work in extremely high or low temperature, before turn on the unit, please
confirm the temperature in range of -10℃ to +60℃ in the vehicle.
When playing disc, to obtain excellent picture and the sound effect, please note the
following items when playing.
Pls hold the disc edge, do not touch the face to keep it clean.
Do not use disc with glue or ink.
PROBLEM
NO POWER
Poor performance
of radio station
Can not load disk
Image flop
No image
CAUSE
Fuse burn out
CPU broken by operate
falsely or other reason
Car auto- antenna do
not pull out
Poor conncetion of
radio antenna
There is a disk inside
TV system setting is
wrong
Poor connection of
video line
CORRECT ACTION
Change specified fuse
Press REST button at the botton right
corner of panel by using pointed object
to make system to be at the initial setting
status, then turn on the unit
Check radio auto- antenna connection
Properly connect antenna
Eject disk,then slot in new disk
Wrong color system setting. Pls
rest to PAL or NTSC.
Properly connect video line
Pls do not put any sticker on the program side of disc.
Pls use soft cloth to wipe face of dsic from the conter ot out side before play it .
2
Sound jumping
Disk is dirty
Disk is destroyed
Clean disk
Pls change a new disk
27
Page 5

Operation of RDS function
In Radio mode,press the number button 7 once on the remote to change to TA mode,press
8 to change to AF mode,and press 9 to change to PTY mode.
In other modes,press longer the number button 7 to change to TA mode,and press longer
the 8 to change to AF mode:
Note:this function can only be access by remote control.
Operation of AF
In AF mode,press the number button 8 on remote control once,the unit will scan to search
the RDS radio station automatically,and the"AF" on the LCD display twinkling all the
time.
When the unit searched one RDS radio station,the LCD display will show ”TP” on it.
Press the number button 8 again,the “AF” on the LCD display will disappear. The unit will
in normal radio mode.
The default of the system is “AF ON”.
Operation of TA
In TA mode,press the number button 7 on remote control once, the TA mode is switch on,
and LCD display will show “TA” on it. Then the unit will transfer the traffic radio station
information, it make the EON system scan and search the traffic radio station, the LCD
display will show”TP” when searched the radio station.Press the unmber button 7 again
to switch off the TA mode, and the"TA"on the LCD display disappear at the same time.
In any mode, the traffic radio station is in priority any other radio stations.
Operation of PTY
When searched the PTY programs, press the button PTY all the time, and at the same
time to use VOL+/- buttons to choose the program.The different kinds PTY programs are
as following:
NEWS
SPORT
CULTURE
POP M
LIGHT M
WEATHER
SOCIAL
TRAVEL
COUNTRY
FOLK M
AFFAIRS
EDUCATEE
SCIENCE
ROCK M
CLASSICS
FINANCE
RELIGION
LEISURE
NATION M
DOCUMENT
INFO
DRAMA
VARIED
EASY M
OTHER M
CHILDREN
PHONE IN
JAZZ
OLDIES
TEST
ALARM
INSTALLATION
NOTE:
- Before install the unit permanently, pls connect it to your
car temporary to see whether your unit and system can
operate properly lor not. To ensure connect installation,
pls use sttached accessory of this unit. If use others, it
may lead to damage.
- Pls drill or change is needed, pls contace your dealer.
- Pls do not install the unit at the place which it will
influence drive or hurt passenger. Do not install the unit
under high temperature, or else the laser may be damager.
- If the installation angle is larger than 60 degrees, unit
may not reach best performance.(A1)
-To ensure cool enough, pls leave enough place and
bundle and wires.
DIN FRONT BACK INSTALLATION
The unit can be installed at FRONT(traditional DIN front
installation)and BACK(DIN back installation,using two side
screw hole of down-lead).Pls refer to the following
diagramming:
DIN FRONT INSTALLATION
Use rubber pad to intall (A2):
1. Fender
2. Fixer
After insert fixer into fender, choose proper slice to bend
according to the thickness of fender material. (Use silde
at the top and button if possible to fix, pls bend slice to 90
degree angle for saftey reason.)
3. Rubber pad
4. Srew
Disassemble this product. (A3.A4)
5. Framework
6. Insert the loosing insert pin into the buttom hole of
framework and pull it out to disassenble framework.
(When install framework, pls level the flute.)
26
3
Page 6

7. Following the diagrammatic representation to insert the key
to product to fit properly. Press the key at the side of product
to pull out the product.
DIN BACKWORD INSTALLATION
Disassemble framework
8. Framework
9. Insert the loosing insert pin into the buttom hole of
framework and full it out to disassemble framework. (When
install framewoek, pls level the flute)
Fix the product on the installation rack of wireless equipment.
10. Choose screw hold on produxt which is the same as that
of installation rack, then screw on 2pcs of screw at the side of
products. Choose proper screw according to the screw hold
of the installation rack.
11. Screw
12. Factory wireless equipment installation rack.
13. Fender or bracket.
PBC (MENU) PLAY
In (VCD) mode, press this button then play the PBC and display will show whole menu in
disc, work with number button to choose song. when you are playing either song of the
PBC, and you want to stop to select another song, press the button to turn off.
Note:
1. This function can be worked by the remote control.
2. PBC is suitable for the SVCD and VCD 2.0 disc.
3. In PBC mode, you can not press number button only to choose song.
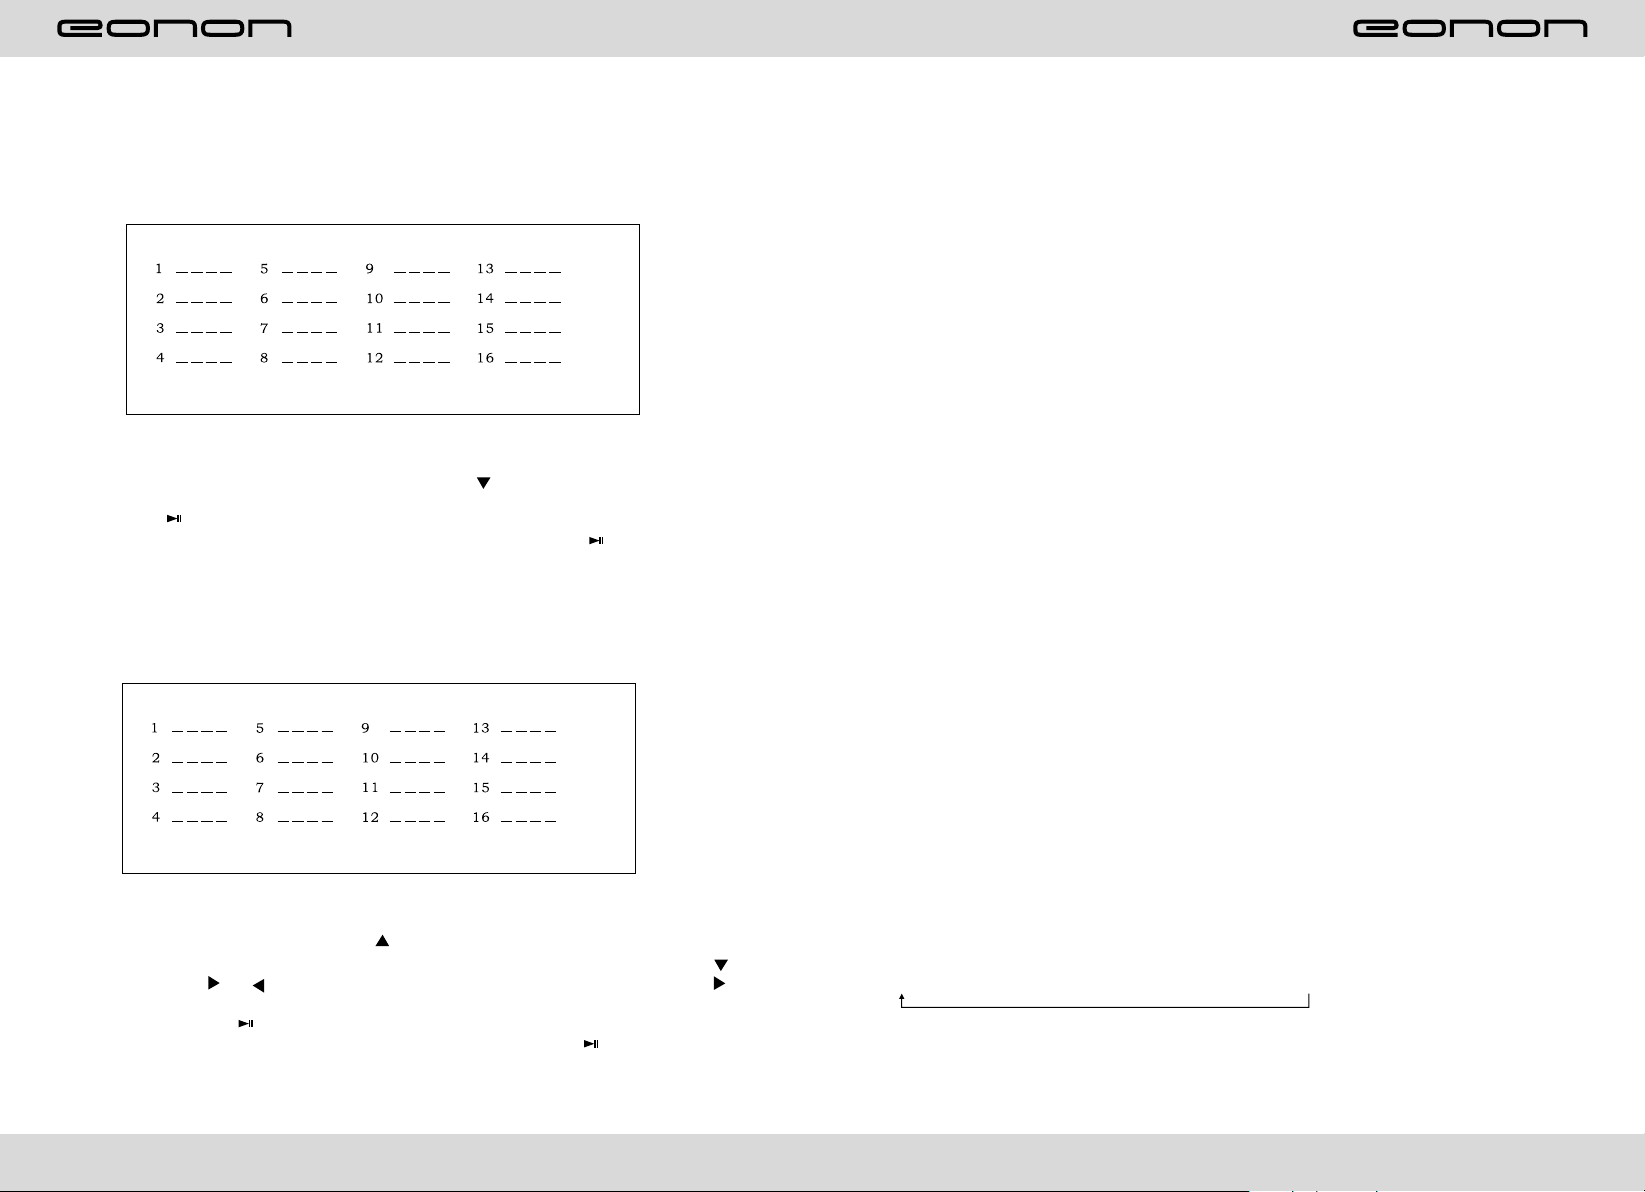
VCD program playing
In VCD mode, you can set playing sequence of songs by program play function. The
program playing operation steps are as follows:
In VCD mode, press ST/PROG button, display will show
PROG
PLAY
PROG
Input the songs which you want to programmed by the number buttons on remote control.
For example: Program the first song, unput your desired song, for example, the sourth
song, and press number button 4 on the remote control. Program the second song, press
button move the cursor to 2_ _ _ _ , input your desired song, for,
example, the eighth song, press number button 8 on the remote control. Press button
to program play.
Back to the normal mode, press the ST/PROG button, then press button.
Note: This function can only be worked by the remote contrl.
4
25
Page 7

OSD
In the VCD state, press APS button on the host to display the location and playing time of
the current music being played.
NUMBER BUTTON
In VCD mode, press any number to input song. For example, you want to choose 16th
song, press 10+ button, and then press 6 button once to play 16th song.
Note: This function can only be worked by the remote control.
REPEATEDLY PLAY
In VCD mode, press 1(INT) number button on the unit to instantly play each song for 15
seconds. The song will twinkling on the display. Press again to back to the normal play.
RANDOMLY PLAY
In VCD mode, press the button on the remote control. PAUSE will appear on LCD.
Press again to back to normal play.
Note: Press 6(PLAY) number on the unit is the same.
STOP PLAY
In VCD mode, press button on remote control once to enter pause mode. Press
again to back to normal play. Press button twice to stop playing. Here, press
button ,unit will play from the first song.
SWITCH TRACK
In VCD mode, press AUDIO button repeatedly to switch track as following sequence:
Left → Stereo → Right
Note: Press 4(L/R) number button on the host to execute the same function.
FEATURES
1. International advanced MPEG-4 DECODE TECHNOLOGY
2. COMPATIBLE WITH MP4 (AVI / DIVX / 5.X), DVD (DVD-R/DVD-RW), VCD, SVCD,
CD-RW, WMA, MP3, JPG
3. 2 CHANNEL AUDIO OUTPUT MODE
4. PASUSE, PLAY, UP/DOWM, STOP, ZOOM, REPEAT, SCAN, RANDOM, PBC
FUNCTION
5. FM/AM RADIO TUNER
30 RADIO STATION (18FM, 12AM)
MANUAL TUNING, AUTO TUNING, RPESET MEMORY STATION
BASE
24
25
FRONT PANEL
24
5
Page 8

1. PWR Button
Press this button to power on. Press it shortly to switch audio source mode. At AUX IN
mode, press it longer to power off.
2. MUTE Button
Press this button to shut off sound, press again to resume volume.
3. EQ Button
Short press this button to select the preset equalizer playing mode:
FLAT → ROCK → CLASS → POP
REL Button
4.
Press this button to release the panel.
5. MBP Button
Press this button can start MBP function, it can make you enjoy the comfortable sound
effects.
Press this button each time to select the position you need as follows;
MBP L →MBP R→ MBP OFF
VCD BASIC OPERATION
Slot in VCD dsic, unit will play it automaticalll. If disc is in slot, press SOURCE button to
play.
SWITCH SYSTEM
In the VCD mode, press the BAND/P/N button on the remote control to select the preset
PAL, AUTO, NTSC TV systems.
Note: Press M5 (N/P) button on the host to execute the same function.
PREVIOUS/NEXT SONG
In VCD mode, press SEEK+/SEEK- to choose previous/next song.
Note: Press SEEK+ /SEEK- button on the nuit is the same.
SPEED FORWARD/BACKWARD
While playing, long press seek+ or seek- button to activate the fast forward of fast rewind
fundction. When the mode is activated, make selection in the following levels and orders:
FAST FORWARD x 2 FAST FORWARD x 4 FAST FORWARD x 8
FAST FORWARD x 16 FAST FORWARD x 20
FAST REWIND x 2 FAST REWIND x 4 FAST REWIND x 8
FAST REWIND x 16FAST REWIND x 20
NOTE: Long press SEEK+ /SEEK- button to execute the same unction.
SLOW PLAY
In VCD mode, press SLOW button to slow play. The level of slow playing is as follows.
Sequence is:
SLOW1/2 SLOW 1/3 SLOW 1/4 SLOW 1/5
PALY
SLOW 1/6SLOW 1/7
NTOE: It just can be worked by the remote control.
The best listening position mode will be shown on the display according to the above sheet.
ZOOM IN/ZOOM OUT
6. BAND Button
At radio playing state, repeat press this button to select the band as following:
Fm1 → FM2 → FM3 → AM1→ Am2
7. DISP Button
In any state, click on this button to convert into the clock display state, and 5 seconds later,
it will automatically return to the current state.
In the clock display state, long press this button to enter the time setup mode and click on
the button again to move between hours and minutes. After that, by using the VOL+/-, you
Press ZOOM button on remote control to zoom in / zoom out the ipcture. The levels are
as follows:
ZOOM IN 2 ZOOM IN 3 ZOOM IN 4 ZOOM IN1/2
ZOOM IN 1/3 ZOOM IN 1/4 ZOOM IN OFF
NOTE:
1. This function can only be worked by the remote control.
2. Image which is zoomed in can be moved by up/dowm/left/right cursor to move.
3. Image which is zoomed out cannot be moved.
.
can adjust the required time and then click on SEL button for confirmation.
8. DBAS Button
Press this button to execute DBAS function, you will enjoy the strongest bourdon effect.
6 23
Page 9
CD PROGRAM PLAY
In CD mode, you can set the sequence of playing by the program function, the operation i
s as follow:
When CD is playing, press ST/PROG button, then the display shows:
PROGRAM
9. 1/INT Button
At radio state, press this button to select pre-saved frequency radio channels; At disc
playing state, press this button to execute scanning & playing.
10. 2/RPT Button
At radio state, press this button to select pre-saved frequency radio channels; At disc
playing state, press this button to select repeat playing.
11. 3/RDM Button
At radio state, press this button to select pre-saved frequency radio channels; At disc
playing state, press this button to select random playing.
PLAY
CLEAN
Input the NO. of the song you want to program by the remote control. program the first
song, input your desired song, for example, the sixth song, and press number button 6 on
the remote control. Program the second song, press button move the cursor to ,
2[__]
input your desired song, for example, the ninth song, press number button 9 on the remote
control. Press button to program play.
Back to the normal mode, press the ST/PROG button, then press button.
Note: This function can only be worked by the remote control.
MP3 PROGRAM PLAY
In MP3 mode, you can set the sequence of playing by the program function, the operation
is as follow:
When MP3 playing, press ST/PORG button, then the display shows:
PROGRAM
PLAY
CLEAN
Then, input desired song by remote control.
Fox example:
Program the first song, input 01, press button move the cursor to the second lattice,
input desired song, for example, the third song. Program the second song.Press
button, work with / button, move the cursor to 2_ _ : _ _ input 01, press
button move the cursor to the second lattice, input desired song, for example, the third
song (press 6). Press button to program play.
Back to the normal mode, press the ST/PROG button, then press button.
Note: This function can only be worked by the remote control.
12. 4/L.R Button
At radio state, press this button to select pre-saved frequency radio channels; At disc
playing state, press this button to select left or right track switching.
13. 5/N/P Button
At radio state, press this button to select pre-saved frequency radio channels; At disc
playing state, press this button to switch video system.
14. 6/Play Button
At radio state, press this button to select pre-saved frequency radio channels; At disc
playing state, press this button to play/pause playing.
15. AUX-IN (AUX Input)
AUX Input jack.
16. LCD
Display present mode.
17. Disc Loading Slot
18. Remote control receiver
It is able of receiving infrared signals launched by the remote control matching the unit.
19. SEEK + Button
At radio state, short press this button to manually increase modulation frequency; At disc
playing state, short press this button to skip to the next music for playing and long press
this button to execute fast forward function.
20. VOL/SEL Button
Short press this button to select the following mode:
VOL → BAS → TRE → BAL → FAD → 00:00(AM12:00)
Shortly press this button, when appear 00:00(AM12:00), turn VOL+/VOL- button to adjust
the time.Turn right this button to increase the volume, turn left this button to decrease the
volume.
22
7
Page 10

21. SEEK – Button
At radio state, short press this button to manually decrease modulation frequency; At disc
playing state, short press this button to skip to the last music for playing and long press
this button to execute fast rewind function.
CD/MP3 BASIC OPERATION
Slot in CD/MP3 disc, unit will play it automatically. If disc is in slot, press SOURCE button to
play.
22. Disc eject button
Press this button to eject the disc.
23. USB Slot
Connect the USB memory to this socket, and the unit can play music format files
supported by this unit in the USB memory.
24. SD Slot
Connect the SD memory card to this socket, and the unit can play MP3 music.
25. RESET Hole
Press this button to reset the unit and the unit will resume to initial s
REPEAT PLAY
Press the AMS/RPT button on remote control to startup the single song repeat function,
press again to cancel that function.
Note: Press 2 number button (RPT) on unit is the same. Default is disc repeat.
SPEED FORWARD/BACKWARD
While playing, long press SEEK+ or SEEK- button to activate the fast forward of fast rewind
function. When the mode is activated, make selection in the following levels and orders:
FAST FORWARD x 2 FAST FORWARD x 4 FAST FORWARD x 8
FAST FORWARD x 16 FAST FORWARD x 20
FAST REWIND x 2 FAST REWIND x 4 FAST REWIND x 8
FAST REWIND x 16FAST REWIND x 20
NOTE: Long press SEEK+ /SEEK- button to execute the same function.
PREVIOUS SONG/NEXT SONG
In CD/MP3 mode, press the SEEK+ SEEK- to play previous song or next song.
NOTE: Press SEEK+ SEEK- button on the host to execute the same function.
RANDOMLY PLAY
In CD/MP3 mode, press LOC/RDM button on remote control. RDM will appear on LCD, unit
will randomly play any song in disc. Press again to back to normal play.
Note: Press 3 number button (RDM) on the unit is the same.
STOP PLAY
In CD/MP3 mode, press button on remote control once to enter pause mode.
Press again to back to normal play. button twice to stop playing. Here,
press
press button ,unit will play from the first song.
PAUSE PLAY
In CD/MP3 mode, press the button on remote control, PAUSE will appear on LCD.
Press again to back to normal play.
Note: Press 6 number button (PLAY) on the unit is the same.
INSTANTLY PLAY
In CD mode, press the 1 (INT) button to instantly play each song for 10 seconds.
The number of the song will be twinkled, press the 1 (INT) button again to back to the
normal playing.
8
21
Page 11

SD CARD OPERATION
In radio or audio mode, insert SD card, unit will read SD card and play automatically. If
there is a card in the slot .please press SOURCE button to play.(NOTE: in power off
mode,insert SD card, power will be turn on and read the card.)
REPEATEDLY PLAY
when playing SD card, press AMS/RPT button on remote control, unit will play repeatedly
the current song, press it again to cancel the repeated play function.
Note: Press 2(RPT)button on the unit is the same.
REMOTE CONTROL FUNCTION
4. SOURCE Button
Press this button to choose audio sources.
5. EQ Button
Press this button to choose POP, LAS ROCK
A2 MODE(E1-E4).
SPEED FORWARD/BACKWARD
Press longer the SEEK+/SEEK- button on the remote control to speed forward or
backward play.
Note:Press longer the SEEK+/SEEK- button on the unit is the same.
SELECT SONG TO PLAY DIRECTLY
Press the number button on remote control to select the song to play directly.
PREVIOUS SONG/NEXT SONG
When playing SD card, press SEEK+.SEEK- button on the remote control to play previous
song or next song.
Note: Press longer the SEEK+/SEEK- button on the unit is the same.
RANDOMLY PLAY
When playing the SD card,press LOC/RDM button on the remote control, unit will play the
current song randomly .press LOC/RDM button again to stop the function.
Note: press 3(RDM)button on the unit is the same.
STOP PLAY
When playing SD card, press button on the remote control once to enter pause mode.
Press again to back to normal play.
Press button
twice to stop playing.Here,press button,unit will play from the
first song.
Note: Press 6 number button(PLAY) on the unit is the same.
PAUSE PLAY
When play SD card, press the button on remote control, PAUSE will appear on LED,
press again to back to normal play.
Note: Press 6 number button(PLAY) on the unit is the same.
USB PLAY OPERATION
in radio or audio mode, insert SD card or USB ,the unit will read USB and play
automatically.
Note:
1)In any mode , insert USB,unit will play USB preferentially.
2) In power off mode, insert the USB ,unit will be turn on and read USB/SD card is same
as above.
POWER ON/OFF
MUTE
TITLE
SOURCE
EQ
SEEK+/SEEK-
VOL+/VOL-
SEL
LOUD
BAND/ P/N
LOC/RDM
STOP
PLAY/PAUSE
ST/PROG
0-10+
AMS-RPT
ZOOM
AUDIO
SUBTITLE
UP/DOWN/L R ENTER
PBC/MENU
ANGLE
SETUP
SLOW
/
1. POWER
Press once to switch on, press again
to switch off.
2. MUTE Button
Press once to turn off audio output,
press again to resume volume level.
3. TITLE Button
In DVD mode, press this buftton to
play back to the top menu of disc.
6. SEEK + ( ) /SEEK - ) Button
(
Press this button lto manual turning, spees or
quick back, previous song and next song.
7. VOL + ( ) / VOL - ( )
Press this button to increase or decrease
volume level.
8. SEL Button
Press this button to choose sound feature.
9. LOUD Button
Press this button lto startup LOUD function.
10. BAND / P/N Button
In radio mode, press this button to choose band.
In VCD, DVD mode, press this button to choose
AUTO, PAL or NTSC system.
11. LOC/RDM Button
In radio mode, press this button to switch
butween local and direction. In VCD, CD mode,
press this key to randomly play.
12.STOP Button
Press this button to stop playing.
13. PLAY/PAUSE Button
Press this button to switch between play and
pause. In stop mode, press this button to play.
14. ST/PROG Button
In radio mode, press this button to choose
stereo or mono station. In audio mode, it can
help STOP button to programmed play.
920
Page 12

15. 0-10+ Button
Press this button lto choose desired song,
section, preset stations.
* Decimal numbers, for example the 19th
song, press 1,9 button.
* Centesimal numbers, for example, the
120th song, press 1,2,0 button.
16. AMS/RPT Button
In radio mode, press this button to browse
stored stations. In audio mode, press this
button to play repeatedly.
17. ZOOM Button
Press this key to zoom the image.
18. AUDIO Button
In DVD mode, press this button to switch
language of dialogue. In VCD mode, press
this button to choose left track, right track,
and stereo.
19. SUBTITLE Button
In DVD mode, press this button to switch
language of subtitle.
20. UP/DOWN/LEFT/RIGHT/ENTER Button
In DVD mode, press this button to move
cursor up/down/left/right to choose item in
menu. Press enter button to confirm choice.
BATTERY CHANGE
When control distance of remote
control become shorter or no function,
pls change battery. Pls confirm polarity
before change.
One hand press stopper, then pull out
attery.
Put battery into controller
SPEAKER SETUP
DOWN MIX
FRONT SPEAKER
EXIT SETUP
DOWN MIX
FRONT SPEAKER
EXIT SETUP
LT/RT
STEREO
VSS
BIG SPEAKER
SMALL SPEAKER
DIGITAL SETUP
OP MODE
DYNAMIC RANGE
DUAL MONO
EXIT SETUP
DIGITAL SETUP
OP MODE
DYNAMIC RANGE
DUAL MONO
EXIT SETUP
LINE OUT
RF REMOD
DIGITAL SETUP
OP MODE
DYNAMIC RANGE
DUAL MONO
EXIT SETUP
NOTE: SAME AS ABOVE
21. PBC/MENU Button
In VCD mode, press this button to display
all song menu. work with number button to
choose songs.
22. ANGLE Button
In DVD mode, press this button to change
play angel.
Insert battery holder into controller
SPEAKER SETUP
DOWN MIX
FRONT SPEAKER
DIGITAL SETUP
OP MODE
DYNAMIC RANGE
DUAL MONO
STEREO
MONO L
MONO R
MIX MONO
23. SETUP Button
In audio mode, press this button to choose
different set items.
EXIT SETPUT
EXIT SETUP
24. SLOW Button
In the playing state, press this button for slow
forward.
10 19
Page 13

VIDEO SETUP
DVD BASIC OPERATION
BRIGHTNESS
CONTRAST
HUE
SATURATION
SHARPENESS
EXIT SETUP
VIDEO SETUP
BRIGHTNESS
CONTRAST
HUE
SATURATION
SHARPENESS
EXIT SETUP
VIDEO SETUP
BRIGHTNESS
CONTRAST
HUE
SATURATION
SHARPENESS
EXIT SETUP
VIDEO SETUP
BRIGHTNESS
CONTRAST
HUE
SATURATION
SHARPENESS
EXIT SETUP
VIDEO SETUP
BRIGHTNESS
CONTRAST
HUE
SATURATION
SHARPENESS
EXIT SETUP
NOTE:SAME AS ABOVE
Slot in DVD disc, unit will play it automatically. If disc is in slot, press SOURCE button to
play.
SPEED FORWARD/BACKWARD
While playing, long press seek+ or seek- button to activate the fast forward of fast rewind
fundction. When the mode is activated, make selection in the following levels and orders:
FAST FORWARD x 2 FAST FORWARD x 4 FAST FORWARD x 8
FAST FORWARD x 16 FAST FORWARD x 20
FAST REWIND x 2 FAST REWIND x 4 FAST REWIND x 8
FAST REWIND x 16FAST REWIND x 20
NOTE: Long press SEEK+ /SEEK- button to execute the same function.
PREVIOUS SONG/NEXT SONG
In DVD mode, press the SEEK+ /SEEK- to play previous song or next song.
NOTE: Press SEEK+ /SEEK- button on the host to execute the same function.
SYSTEM SWITCH
In DVD mode, press P/N button on the remote control to select the preset PAL, AUTO,
NTSC TVsystem.
NOTE: Press M5 (N/P) button on the host to execute the same function.
SLOW PLAY
Press SLOW button on remote control to play slowly. The level of slow playign is as follows.
Sequence is :
SLOW1/2 SLOW 1/3 SLOW 1/4 SLOW 1/5
PALY
SLOW 1/6SLOW 1/7
NTOE: It just can be worked by the remote control.
STOP PLAY
In VCD mode, press button on remote control once to enter pause mode. Press
)again to back to normal play. Press button twice to stop playing. Here, press
button ,unit will play from the first song.
ZOOM IN/ZOOM OUT
Press ZOOM button on remote control to zoom in / zoom out the ipcture. The levels are
as follows:
ZOOM IN 2 ZOOM IN 3 ZOOM IN 4 ZOOM IN1/2
ZOOM IN 1/3 ZOOM IN 1/4 ZOOM IN OFF
NOTE:
1. This function can only be worked by the remote control.
2. Image which is zoomed in can be moved by up/dowm/left/right cursor to move.
3. Image which is zoomed out cannot be moved.
18
11
Page 14

OSD
In DVD mode, press the 1 number button on the unit to display all lthe informations of the
disc.
NOTE: It just can be worked by the APS button on unit.
REPEATEDLY PLAY
Press the RPT button on the remote control to startup the follow repeat functions.
REPEAT(CHAPTER) → REPEAT(TITLE) → REPEAT(OFF)
NOTE: Press mumber 2 button on the unit is the same.
DIGITAL
KEY
AUDIO SETUP
SPDIF /OFF
SPDIF/RAW
SPDIF/PCW
Note: when above lists appear ,press button and button to select your
favor items, then press ENTER button save the format, press SETUP button
to exite.
ANGLE SWITCH
If the DVD disc is recorded with multi-angles, you can press the ANGLE button to switch
the angle during playing. The sedquence is as follow:
ANGLE 1→ ANGLE 2 → ANGLE 3
NOTE:
1. It just can be worked by the remote control.
2. It is only for the DVD disc which has multi-angle.
3. If there is a sign on the cover of the DVD disc. The number is the sign
means how many angles the disc has.
4. You can not switch the angle when slow playing.
MULTI-AUDIO
There are different languages of dialogue and audio systems in DVD disc. If the DVD disc
is recorded with multi-audio, you can switch the language of dialogue and the audio
systems whtn paying.
Press the AUDIO button repeatedly to change the language of dialouge.
NOTE:
1. Press M4 number button (L/R) on the host to exexute the same function.
2. It is only for the DVD disc which is recorded with multi-language.
3. If there is a sign on the cover of the DVD disc, means that it was
recorded by multi-language/audio system.
4. In VCD mode, press the AUDIO button to select the L/R or STEREO track.
MULTI-SUBTITLE
If the DVD disc is recorded with multi-subtitle, you can switch the languages of subtitle.
Press the sub-t button repeatedly to change the language.
NOTE:
1. It just can be worked by the remote control.
2. It only for the DVD disc which is recorded with multi-subtitle.
3. If there is a sign on the cover of the DVD disc, means that it has several
subtitle.
EXIT SETUP
AUDIO SETUP
DIGITAL
KEY
EXIT SETUP
AUDIO SETUP
DIGITAL
KEY
TITLE SELECT
In DVD mode, press TITLE button to back to the title menu. Display shows all the titles of
the disc. You can select the chapter you want by the cursor, press play button to play the
chapter.
NOTE: It just can be worked by the remote control.
12
EXIT SETUP
17
Page 15

LANGUAGE SETUP
OSD LANGUAGE
AUDIO LANG
SUBTITLE LANG
MENU LANG
EXIT SETUP
ENGLISH
GERMAN
SPANISH
FRENCH
PORTUGUESS
ITALIAN
RUSSIAN
OSD LANGUAGE
AUDIO LANG
SUBTITLE LANG
MENU LANG
ENGLISH
JAPAN
FRENCH
SPANISH
PORTUGUESE
LATIN
GERMAN
MENU SELECT
In the DVD state, press PBC button to return to the disc music menu, and then you can
select music by using the cursor button. If you want to stop playing PBC, you can press
PBC button to cancel PBC playing and start playing from the very beginning. After you
select the favorite music and then press PLAY button /OK key for playing.
PROGRAM PLAY
In DVD mode, you can set the sequence of playing by the program function, the operation
is as follow:
PROGRAM
LANGUAGE SETUP
OSD LANGUAGE
AUDIO LANG
SUBTITLE LANG
MENU LANG
EXIT SETUP
LANGUAGE SETUP
OSD LANGUAGE
AUDIO LANG
SUBTITLE LANG
MENU LANG
EXIT SETUP
ENGLISH
JAPAN
FRENCH
SPANISH
PORTUGUESE
LATIN
GERMAN
ENGLISH
JAPAN
FRENCH
SPANISH
PORTUGUESE
LATIN
GERMAN
EXIT SETUP
OSD LANGUAGE
AUDIO LANG
SUBTITLE LANG
MENU LANG
EXIT SETUP
Note: when above lists appear, press button
and button to select your favor items,then
press ENTER button ,save the format ,press
SETUP button to exit.
PLAY
CLEAN
When DVD is playing, press st/prog button, then display shows:
For example, program the first song, input 01, press button move the cursor to the
second lattice, input desired song,for example, the third song,Program the second song,
press button, move the cursor to 2 ,input 01, press buftton move the cursor
to the second lattice, input desired song, for example, the 6th song (press 6).Press
button to program play.
Back to the normal mode, press the ST/PROG button, then press button.
NOTE: This function can only be worked by the remote control.
DIGITAL ALBUM
Play the disc contains JPEG pictures, read the picture menu first.
1. Press button on the remote control, the pictures will be browsed automatically. (It
also can be worked to press number 6 button on the unit.)
2. Press ENTER button on the remote control, it can be manual browaeed by SEEK+
and SEEK- .
3. ZOOM in picture function: During auto browsing, press pause button stop the screen,
press ZOOM button to zoom in or zoom out picture directly.
4. Under zoom in picture, you can move the picture by .
NOTE: You can not move picture in normal mode.
SETUP
Press SETUP button, display will show the system setup menu and the submenu, select
the item you want by / , after selectiong the proper item, press
/
to press ENTER to confirm.
/ / / /
NOTE:
1. It just can be worked by the unit.
2. Some function setting maybe different because of the different model or disc.
3. If the selected language is not recorded in the disc, then unit will show the appointed
language.
4. About the SETUP, please read the follow.
1316
Page 16

SYSTEM SETUP
TV SYSTEM
AUDIO PLAY
VIDEO
TY TYPE
PASSWORD
RATING
DEFAULT
EXIT SETUP
LANGUAGE SETUP
OSD LANGUAGE SETUP
AUDIO LANG
SUBTITLE LANG
MENU LANG
EXIT SETUP
AUDIO SETUP
AUDIO OUT
KEY
PRESS
PRESS
VIDIO SETUP
BRIGHTNESS
CONTRAST
HUE
SATURATION
SHARPNESS
EXIT SETUP
SPEAKER SETUP
DOWN MIX
FRONT SPEAKET
EXIT SETUP
DIGITAL SETUP
OP MODE
DYNAMIC RANGE
DUAL MONO
PRESS
PRESS
PRESS
SYSTEM SETUP
TV SYSTEM
AUDIO PLAY
VIDEO
TV TYPE
PASSWORD
RATING
DEFAULT
EXIT SETUP
PRESS
SYSTEM SETUP
TV SYSTEM
AUDIO PLAY
VIDEO
TV TYPE
PASSWORD
RATING
DEFAULT
NTSC
PAL
AUTO
EXIT SETUP
Note: when above lists appear, press button
and button to select your favor items,then
press ENTER button ,save the format ,press
SETUP button to exit.
SYSTEM SETUP
TV SYSTEM
AUDIO PLAY
VIDEO
TV TYPE
ON
OFF
PASSWORD
RATING
DEFAULT
YSTEM SETUP
TV SYSTEM
AUDIO PLAY
VIDEO
TV TYPE
INTERLACE-YUV
PASSWORD
RATING
DEFAULT
EXIT SETUP
NOTE: THE OPERATEION ARE SAME AS ABOVE.
SYSTEM SETUP
TV SYSTEM
AUDIO PLAY
VIDEO
TV TYPE
PASSWORD
RATING
DEFAULT
4:3PS
4:3LB
16:9
EXIT SETUP
NOTE: THE OPERATEION ARE SAME AS ABOVE.
SYSTEM SETUP
TV SYSTEM
AUDIO PLAY
VIDEO
TV TYPE
PASSWORD
0 0 0 0
RATING
DEFAULT
SYSTEM SETUP
TV SYSTEM
AUDIO PLAY
VIDEO
TV TYPE
PASSWORD
RATING
DEFAULT
EXIT SETUP
SYSTEM SETUP
TV SYSTEM
AUDIO PLAY
VIDEO
TV TYPE
PASSWORD
RATING
DEFAULT
EXIT SETUP
SYSTEM SETUP
TV SYSTEM
AUDIO PLAY
VIDEO
TV TYPE
PASSWORD
RATING
DEFAULT
1 KID SAFE
2 G
3PG
4 PG13
5 PG-R
6R
7 NC-17
8 ADUL
RESUME
EXIT SETUP
14
EXIT SETUP
EXIT SETUP
NOTE:THE OPERATEION ARE SAME AS ABOVE.
EXIT SETUP
Note:
1)input the unlock code,press ENTER button ,turn
on the child-lock.
2)Move the cursor to the level item, select the level
you need.
3)only in the unlock mode you can select the level.
EXIT SETUP
15
 Loading...