

Page 1
Page 2

Page 3
CONTENT
1. PRECAUTIONS……………………………………………………………01
2. CAUTIONS ON USING THIS PRODUCT………………………………….01
3. CHECKING ACCESSORIES………………………………………….01
4. SPECIFICATIONS…………………………………………………………… ..01
5. PARTS NAME AND FUNCTIONS………………………………………... ..02
5.1PART IN THE FRONT OF THE PLAYER........................................................... .02
5.2PART IN THE BACK OF THE MAIN UNIT...............................................................02
5.3PART IN THE LEFT OF THE PLAYER…………………………………………… ….03
5.4PART IN THE RIGHT SIDE OF THE PLAYER................................................. .....04
5.5 REMOTE CONTROL UNIT................................................................................ .04
6. USING REMOTE CONTROL UNIT……………………………………… …05
6.1 PRECAUTIONS BEFORE USING REMOTE CONTROL UNIT....................... ...05
6.2 REMOTE CONTROL UNIT OPERATING RANGE.................................................05
6.3 INSTALL BATTERY FOR REMOTE CONTROL UNIT..................................... ...07
7. CONNECTING THE PLAYER TO OTHER COMPONENTS……………….07
7.1 CONNECTING TO AC-DC ADAPTER....................................................................07
7.2 CONNECTING EARPHONE...................................................................................07
7.3CONNECTING TO A TV SET..................................................................................07
7.4 CONNECTING TO AN AUDIO/VIDEO PLAYER SYSTEM.....................................08
8. BASIC OPERATIONS………………………………………………………….08
8.1 TURNING ON/OFF THE MAIN UNIT.......................................................................08
8.2 MODE SETTINGS……………………………………………………………………….08
9. ATV MODE………………………………………………………………….….08
9.1 INSTALL ANTENNA..............................................................................................08
9.2 ATV FORMAT........................................................................................................08
9.2.1 AUTO SEARCH..................................................................................................09
9.2.2 ATV SETUP........................................................................................................09
9.2.3 FINE TUNE…………………………………………………………………………. .09
9.3 HOW TO SELECT ATV PROGRAM......................................................................10
9.4 HOW TO CONTROL THE VOLUME.....................................................................10
10. DVB-T MODE……………………………………………………………...…..10
10.1 INSTALL ANTENNA..............................................................................................10
10.2 DVB-T SETUP.......................................................................................................10
10.3 CHANNEL MANAGER..........................................................................................11
10.3.1 CHANNEL ORGANIZER………………………………………………………..…..11
10.3.2 CHANNEL SORTING…………………………………………………….……….….12
10.3.3 CHANNEL GROUPING…………………………………………………………......12
10.3.4 EDIT CHANNEL.................................................................................................13
10.3.5 DELETE ALL......................................................................................................14
10.4 INSTALLATION.....................................................................................................15
10.5CONFIGURATION……………………………………………………………………....15
10.5.1 OSD...................................................................................................................15
11.1 Playing MOVIE / MUSIC
1) Select the MOVIE / MUSIC and press ENTER if you want to playback MOVIE / MUSIC,
the files stored on the USB storage device or card will be shown.
2) Use the cursor key to Select a file and press ENTER if you want to playback the file.
3) Press to pause the playing during playback
4) Press again to continue playback
5) Change the playing speed to X2, X4, X8, X20 and normal by pressing the /
button on the remote control unit or the main unit.
6) Press / to Skip previous / next track/chapter
11.2 Playing PHOTO
1) Select the PHOTO and press ENTER if you want to playback PHOTO, the files stored
on the USB storage device or card will be shown.
2) Use the cursor key to Select a file and press ENTER if you want to playback the file.
3) Change the playing angle and normal by pressing the / button on the remote
control unit or the main unit.
4) Press / to Skip previous / next track/chapter
5) Press to play sequence
6) Press to pause the playing during playback
7) Press again to continue playback
Note: 1) USB in this unit is USB 1.1.
2) The SD, MMC, MS formats can be read in this unit.
3) The main unit can read the contents of a USB storage device when the main
unit is in no card mode.
4) The main unit can read the contents of card when the main unit is in no USB
mode.
5) Because of the large diversity of products with USB, SD, MMC and MS-ports
and the specific manufacturer specifications we can not guarantee that all
devices will be recognized or that all possible configurations will function
properly.
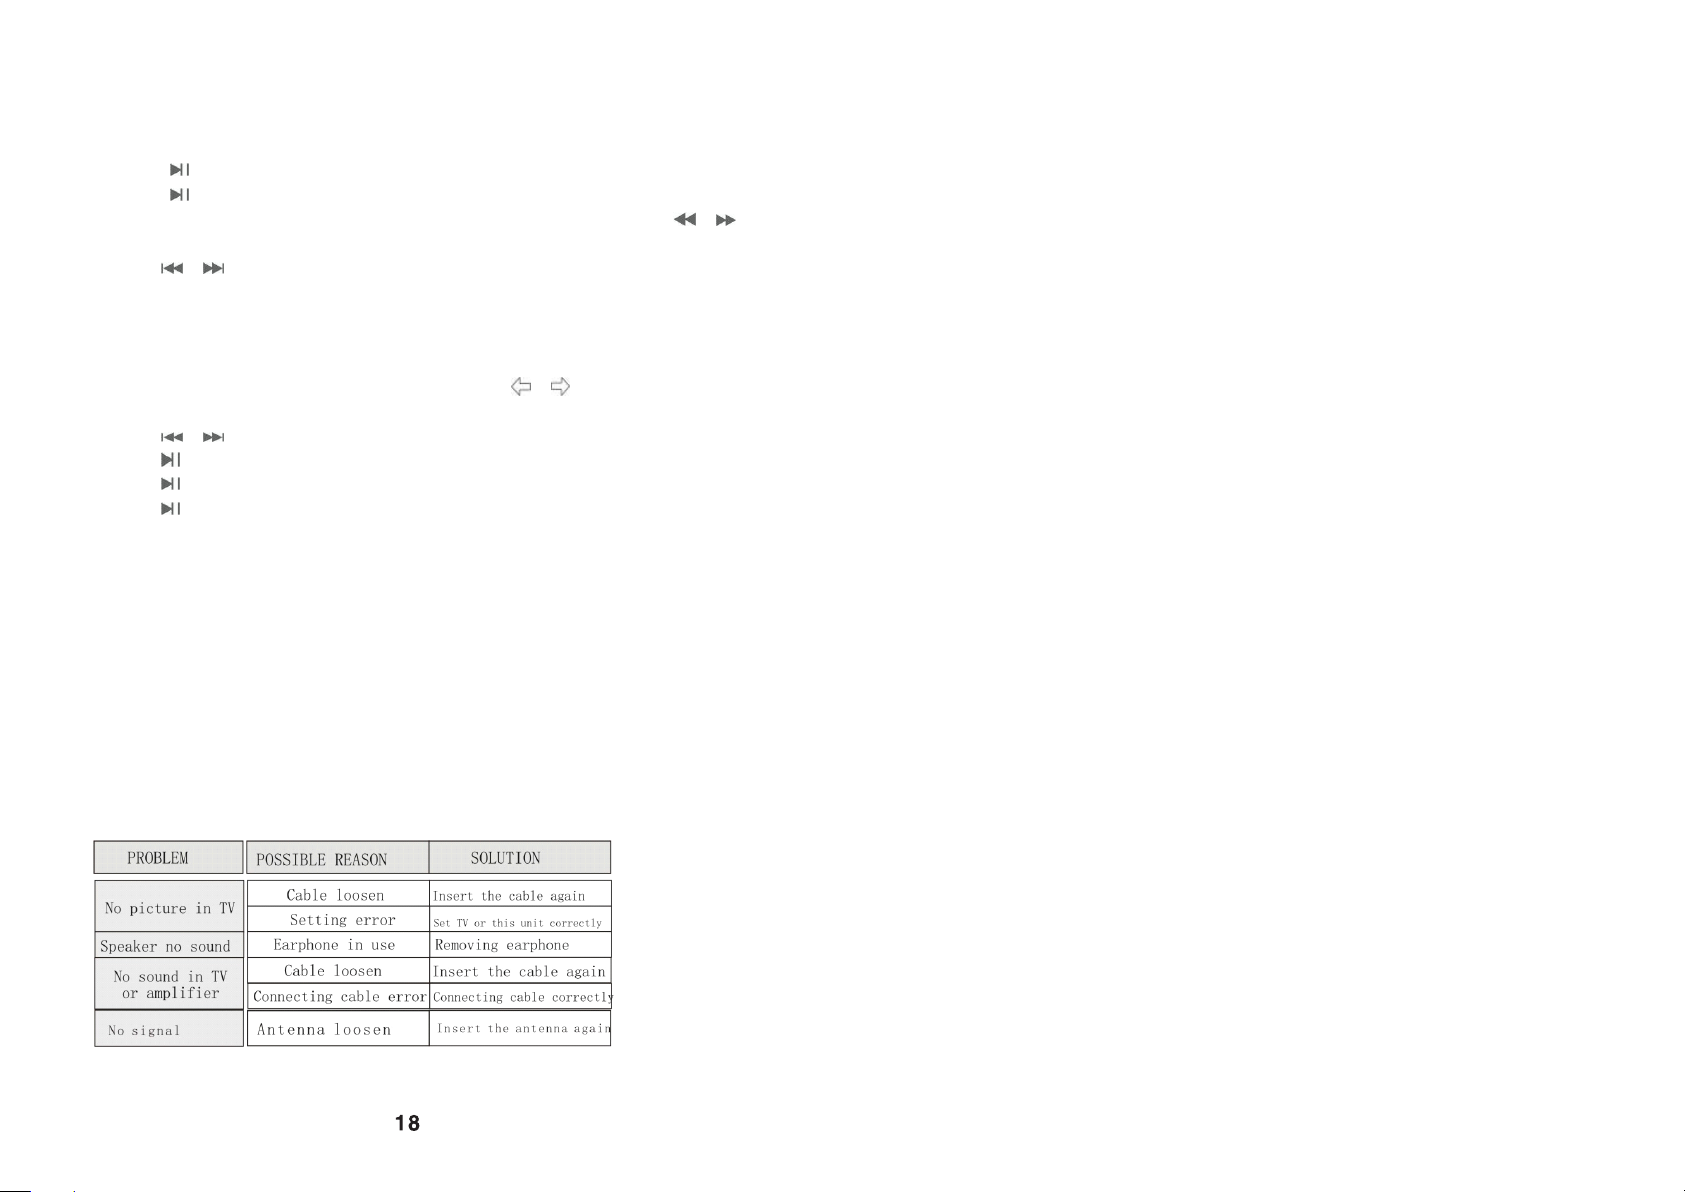
12. Trouble shooting
Please refer the following instruction when there are some problem with this unit.
If the problem still exit, please consult your nearest service center.
18
Page 4
10.5.2 TV………………………………………………………………………………….…..16
10.5.3 SYSTEM SETUP……………………………………………………………………. 16
10.6 FACTORY DEFAULT……………………………………...……………………………17
10.7 VERSION……………………………………………………………………………..…17
10.8 HOW TO SELECT DVB-T/RADIO PROGRAM……………………………… …17
10.9 HOW TO SELECT DVB-T/RADIO FAVORITE PROGRAM……………………… 17
10.10 HOW TO CONTROL THE VOLUME………………………………………………..17
11 HOW TO OPERATE CARD OR USB…………………………………...…..17
11.1 PLAYING MOVIE / MUSIC…………………………………….……………………… 18
11.2 PLAYING PHOTO……………………..………………………………………………..18
12. TROUBLE SHOOTING………………………………………………………18
You could use cursor Up/Down to select EQ Setup, Surround, Display off. Use cursor left/
right to select the correct setup which you want. You could use MENU or ENTER to
return .
You could use cursor Up/Down to select Area. Use LEFT/RIGHT to enter list, and use
up/down to select the correct setup which you want, then press ENTER to confirm your
choice. You could use MENU or ENTER to return .
10.6 Factory Default
When you select Factory default, please enter password 0000, then select YES to perform
factory default, or select No to exit.
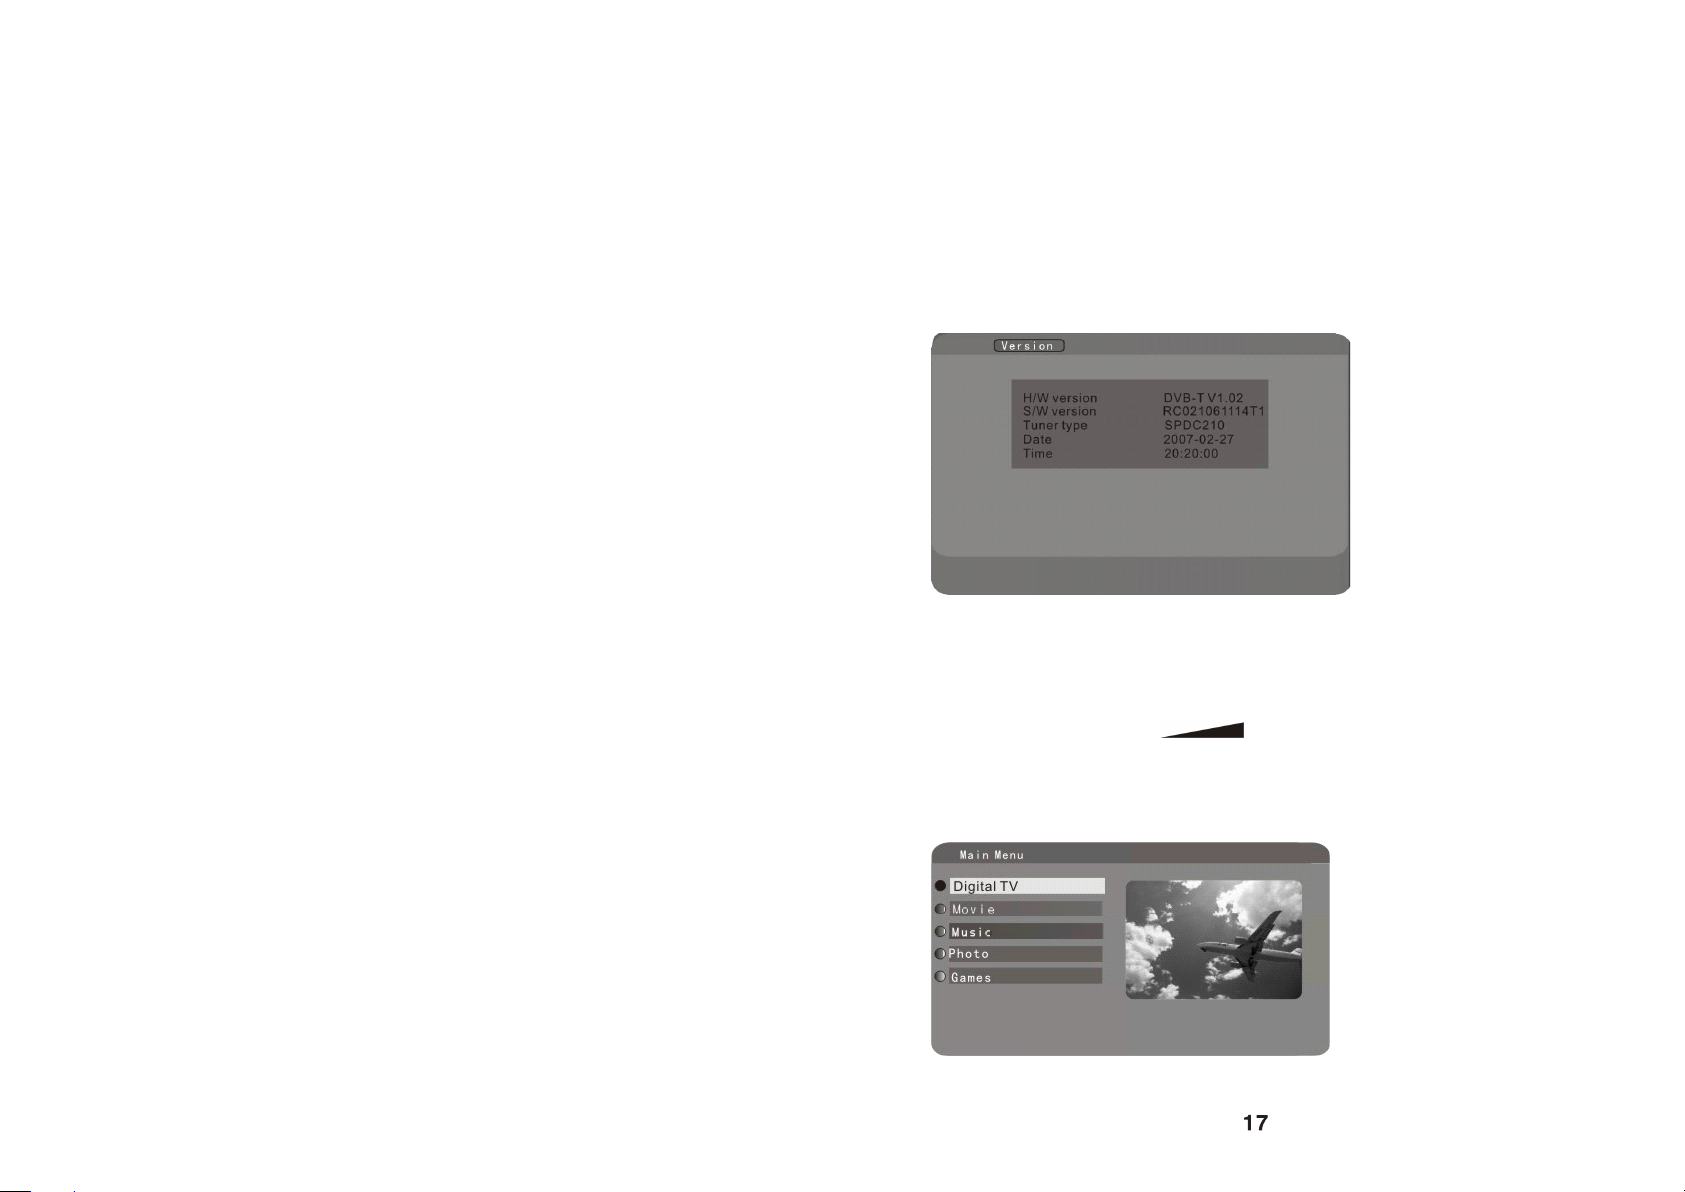
10.7 Version
When you select Version, and press enter to confirm. The unit will be shown as following:
10.8 How to select DVB-T/radio program
You could use CH+/CH- (the main unit or the remote controller) to select the program.
10.9 How to select DVB-T/radio favorite program
You could use favorite (the remote controller) to select the favorite program.
10.10 How to control the volume
You could use VOL+/VOL- or to control the volume.
11. How to operate card or USB
(1) Please press MODE to select DVB-T mode.
(2) When press MENU (the remote controller or the main unit) in DVB-T mode, main menu
is as following:
You could use cursor key and ENTER to select Movie /Music./photo. And the
Movie/Music/photo in the card or USB will be read .You could use MENU to return.
17
Page 5

You could use cursor Up/Down to select OSD, Position, OSD Trans. Use cursor left/ right
to select the correct setup which you want. You could use MENU or ENTER to return .
You could use cursor Up/Down to select OSD language, 1st Audio language, 2nd Audio
language. Use LEFT/RIGHT to enter list, and use up/down to select language, then press
ENTER to confirm your choice. You could use MENU or ENTER to return .
10.5.2 TV
When you select TV, the unit will be shown as following:
You could use cursor Up/Down to select Display mode, Aspect Ratio. Use cursor left/ right
to select the correct setup which you want. You could use MENU or ENTER to return .
You could use cursor Up/Down to select Brightness, Contrast, Hue, Saturation. Use
LEFT/RIGHT to enter list, and use up/down to select the correct setup which you want,
then press ENTER to confirm your choice. You could use MENU or ENTER to return .
10.5.3 System Setup
When you select System setup, the unit will be shown as following:
16
1.Precautions
Thank you for purchasing this product.
Please read this manual carefully before operating this product.
Please keep this manual for future use. It will be helpful to you if you are
encounter any operational problem.
WARNING:
TO REDUCE THE RISK OF FIRE OR ELECTRIC SHOCK, DO NOT USE THE
UNIT IN THE RAIN OR MOISTURE ENVIRONMENT.
ONLY USE ACCESSORIES SPECIFIED BY THE MANUFACTURE.
PLEASE KEEP THE UNIT IN THE TEMPERATURE 10~50.
PLEASE TURN THE POWER SWITCH OFF WHEN DON'T USE THE UNIT.
CLEAN ONLY WITH A DAMP CLOTH.
2.Cautions on Using this product
1)Ensure a minimum distance of 5cm around the apparatus for sufficient
ventilation.
2)Ensure that the ventilation is not impeded by covering the ventilation
openings with items such as newspapers, table-cloths, curtains, etc.
3)Do not place naked flame sources, such as lighted candles on the
apparatus.
4) Use the apparatus only in moderate climates(not in tropical climates).
5)Do not expose the apparatus to dripping or splashing.
6)Do not place objects filled with liquids, such as vases ,on the apparatus.
3. Checking the Accessories
4. Specifications
01
Page 6

10.4 Installation
When you select installation, and press enter to confirm, then input the password:0000.
The unit will be shown as following:
You could use UP/DOWN to select Area Search or Manual Search. And press enter to
confirm. The unit will be shown as following:
Using up/down to select Freq or bandwidth, then use digit to modify Freq and use
LEFT/RIGHT to select bandwidth .Using MENU to return .
10.5 Configuration
When you select Configuration, the unit will be shown as following:
You could use cursor key and ENTER to select the correct settings. Using MENU to
return .
10.5.1 OSD
When you select OSD, the unit will be shown as following:
15
5. PARTS NAME AND FUNCTIONS
5.1 Part in the front of the player
1. IR receiver window
2. LCD display
5.2 Part in the back of the main unit
1. Speakers
2. PVC paster
3. support
Pull out the support to the proper position in order to let the unit stand.
5.3 Part in the left of the player
1. Antenna socket connecting to DVB-T/ATV antenna
2. USB (1.1) socket connecting to USB storage
3. Audio/video output Output audio/video signal
4. Audio/video input Input audio/video signal
5. Earphone jack connecting to earphone
6. Connecting to the AC-DC adapter
02
Page 7

1) EDIT CHANNEL
When you press SKIP/E, the unit will be shown as following:
Note:
Please refer to the detailed operation of add channel .
10.3.5 Delete All
When you select delete all, and press enter to confirm, then input the password:0000.
The unit will be shown as following:
You could use UP/DOWN to select all TV channels or all Radio channels. And press enter
to confirm. The unit will be shown as following:
or
Please select YES to delete all TV channels or all Radio channels, or select No to exit.
14
5.4 Part in the right side of the player
1.
When press this in card or USB play mode, pause mode is set. Press again to
resume playback.
2. MENU
Set the system information when the unit is in DVB-T/ATV mode
3.
1) Moving cursor right
2) Press this to fast forward play when the unit in USB or card play mode
4.
1) Moving cursor left
2) Press this to fast backward play when the unit in USB or card play mode
5.
Press this to confirm settings in DVB-T/ATV mode
6.
1) Channel subtract
2) Moving cursor down
3) Skip previous track/chapter in USB or card play mode
7.
1) channel addition
2) Moving cursor up
3) Skip next track/chapter in USB or card play mode
8.
Press this buttons to adjust LCD mode or to decrease/ increase the volume when the
main unit is in play
9. / MODE
1) Press the button for 1.5 seconds to power on/off the unit
2) Press mode to switch LCD mode: Brightness, Contrast, Color, HUE, LCD display
mode, Reverse, ATV/AV IN mode. and then press Cursor left / Cursor right to adjust.
(1) Brightness: level 0 level 32
(2) Contrast: level 0 level 32
(3) Color: level 0 level 32
(4) HUE: level 0 level 32
(5) LCD display mode: switch screen size 16:9 4:3
03
3
Page 8

You could use UP/DOWN to select program which you want to group, and using digit
(from one to eight) to select different channel grouping.
Press TV/ RADIO ( the remote controller) to switch TV or RADIO mode.
Using MENU to return .
10.3.4 Edit Channel
When you select Edit Channel. the unit will be shown as following:
Note: Without TV /radio PROGRAM, the edit channel can not be select.
1) ADD CHANNEL
When you press ZOOM, the unit will be shown as following:
You could use UP/DOWN to select option which you want to add.
(1) Use LEFT/RIGHT to enter area name list, and use up/down to select area name, then
press ENTER to confirm your choice.
(2) Use LEFT/RIGHT to enter carrier list, and use up/down to select carrier, then press
ENTER to confirm your choice.
(3) Using LEFT/RIGHT to enter rename menu, then using the remote controller to choice
character, and press ENTER to finish rename.
(4) Using digit (from one to eight) to modify Audio PID, Video PID, PCR PID.
After setting these options, then press ENTER to confirm your setting.
Press TV/ RADIO( the remote controller) to switch TV or RADIO mode.
Using MENU to return . 13
(6) Reverse: switch screen normal or reverse
(7) ATV mode: press Cursor left / Cursor right in ATV mode
(8) AV in mode: press Cursor left / Cursor right in AV in mode
10. Memory card socket
Only for SD, MMC or MS card
5.5 Remote control unit
1. Power on/off the unit
2. MODE Press this to switch LCD mode
3. TV/RADIO Select TV or Radio program
4. Audio Press this to select the audio channel or audio language
5. DIGIT INPUT
6. MENU set the system information when the unit is in DVB-T/ATV mode
7. Skip next track/chapter in USB or card play mode
8. /CH+ Moving cursor Up / Channel addition.
9. Skip previous track/chapter in USB or card play mode
10. Moving cursor left
11. Moving cursor Right
12. Enter this to confirm settings
13. Press this to fast backward play when the unit in play mode
Page 9

12. Enter this to confirm settings
13. Press this to fast backward play when the unit in play mode
14. Press this to fast forward play when the unit in play mode
15. /CH- Moving cursor down / Channel subtract
16. VOL+ Increasing the volume
17. VOL- Decreasing the volume
18. Press this to play or pause
19. MUTE Switch off the speakers or earphone
20. SKIP Skip the DVB-T program
21. FAVORITE select favorite DVB-T program
22. Zoom Zooming the picture
23. LOCK Lock the DVB-T program
24. SUBTITLE Selecting sub-title
25. EPG Display electron program guidance.
26. INFO display program information in DVB-T/ATV mode
27. TELETEXT Display Tele-text
6. USING REMOTE CONTROL UNIT
6.1 Recautions before using remote control unit
1) Please pull out the PVC when the remote control unit is first using
2) Don't drop or step on the remote control unit or subject it to shocks
3) Note that it may not be possible to operate the main unit if there are obstacles
between it and the remote sensor
4) Don't expose the remote sensor to strong light.
5) Using the remote control unit within the specified operating range.
6.2 Remote control unit operating range
1) Horizontal: 30°
2) Vertical: 30°
3) Distance: 5M
05
4) Lock
You could use UP/DOWN to select program which you want to lock.
Using LOCK (the remote controller) to LOCK program, then press ENTER to confirm,
finally please enter password 0000 to lock.
Press LOCK again to cancel your choice.
5) Delete
You could use UP/DOWN to select program which you want to delete.
Using ZOOM (the remote controller) to delete program, and press ENTER to confirm.
Press TV/RADIO ( the remote controller) to switch TV or RADIO mode.
You could use MENU to return.
10.3.2 Channel sorting
When you select channel sorting, the unit will be shown as following:
Note: Without TV/radio PROGRAM, the channel sorting can not be select.
Before sorting, you must confirm your option (first option or second option or third option).
You could use UP/DOWN to select option and use LEFT/RIGHT to select sort mode. then
press ENTER to confirm your choice.
Press TV/RADIO( the remote controller) to switch TV or RADIO mode.
You could use MENU to return.
10.3.3 Channel Grouping
When you select Channel grouping, the unit will be shown as following:
Note: Without TV /RADIO PROGRAM, the channels class can not be select.
12
Page 10

Note:
Most of the player's functions can be performed from the remote control unit. Some
operations, however, only be performed from the main unit.
6.1 INSTALL BATTERY FOR REMOTE CONTROL UNIT
Insert your finger nails into A and B on the diagram below, press A according to the
direction, then pull out the battery holder.
Remove the old battery, then insert the new battery into the battery holder with the + side
facing upwards.
Fit the battery holder back to its place.
06
You could use cursor key and ENTER to select the correct settings. You could use MENU
to return.
10.3 Channel Manager
When you select channel manager, the unit will be shown as following:
10.3.1 Channel Organizer
When you select channel organizer, the unit will be shown as following:
Note: Without TV/radio PROGRAM, the channel organizer can not be select.
1)Rename program
You could use UP/DOWN to select program which you want to rename, and using
LEFT/RIGHT to enter rename menu.
Then using the remote controller to choice character, and press ENTER to finish rename.
Press TV/RADIO ( the remote controller) to switch TV or RADIO mode.
You could use MENU to return.
2) Favorite
You could use UP/DOWN to select program which you want to define as favorite.
Using FAVORITE (the remote controller) to define as favorite program, and press ENTER
to confirm, then please enter password 0000.
Press FAVORITE again to cancel your choice.
3) Skip
You could use UP/DOWN to select program which you want to skip.
Using SKIP (the remote controller) to SKIP program, and press ENTER to confirm. Press
SKIP again to cancel your choice.
11
Page 11

9.2.4 FINE TUNE
The unit will tune the program finely if you select fine tune.
Using left/right (the main unit or remote controller) to tune.
And the main unit will be shown as following:
9.3 How to select ATV program
You could use CH+/CH- (the main unit or remote controller) to select the program.
Using digit to select the program what you want.
9.4 How to control the volume
You could use VOL+/VOL- or to control the volume.
10. DVB-T MODE
Please press MODE to select DVB-T mode.
10.1 Install antenna
Plug the antenna to the antenna socket
10.2 DVB-T SETUP
When press MENU (the remote controller or the main unit) in DVB-T mode, main menu is
as following:
When select digital TV, the unit will be in DVB-T setup status. DVB-T setup menu is as
following:
10
Note:
To prevent leakage of fluid from the lithium battery, remove the battery when not using the
remote control unit for long periods of time (one month or more). If the battery leaks fluid,
carefully wipe it out of the battery case, then change to a new lithium battery.
7. CONNECTING THE PLAYER TO OTHER COMPONENTS
7.1connecting to AC-DC adapter
1) Please plug the AC-DC adapter to AC power socket;
2) Connecting the DC output of adapter to DC in of the main unit.
Note:
AC-DC adapter specification: 12V/1.5A. Please using the adapter that is the standard
accessory of the main unit.
7.2 Connecting to earphone
Connect the earphone plug securely to the earphone jack on the main unit.
To listen to the audio, using Vol+ / Vol- to adjust the volume to a comfortable level.
Note:
Please do not use DTS disc. Strong noise is produced when DTS discs is played.
Note:
Insert the earphones plug securely. No sound will be heard unless the earphones are
securely connected.
7.3 Connecting to a TV set
Before connecting
Turn off the power of the player and the devices to be connected.
07
Page 12

You could use Up/Down (the main unit or remote controller) to select the TV format or auto
search, skip switch, fine tune and press ENTER (remote controller or the main unit) to
confirm.
You could use MENU (the main unit or remote controller) to exit.
9.2.1 TV FORMAT
You could select the correct TV format where you are. Using Up/Down (the main unit or
remote controller) to select. and press ENTER (remote controller or the main unit) to
confirm.
You could use MENU (the main unit or remote controller) to exit.
9.2.2 AUTO SEARCH
The unit will search the program automatically if you select AUTO SEARCH. And the main
unit will be shown as following:
or
or
9.2.3 SKIP SWITCH
The unit will setup the program which you are want to skip ON/OFF if you select skip
switch. And the main unit will be shown as following:
Using Up/Down (the main unit or remote controller) to select. and press ENTER (remote
controller or the main unit) to confirm.
If you want to resume the program which you skip on, please press the digit key to select
the number of program which you skip on, then setting the resumed program to skip off.
09
7.4 Connecting to a Audio/Video player system
Note:
Please set the main unit to AV input mode.
8. BASIC OPERATIONS
8.1 Turning on/off the main unit
1) Turn power on
The main unit is turn on when the unit is powered.
2) Turn power off
Press POWER for 1.5 seconds to turn off the unit. Then press POWER for1.5
seconds to turn on the unit.
8.2 Mode settings (Brightness/Contrast/Color /HUE /LCD display /TFT overturn
mode)
Please press MODE (remote control or in the main unit) to select a suitable mode for
your favorite when the main unit is in play mode.
1) Press MODE, setting brightness;
2) Press MODE, setting color;
3) Press MODE, setting contrast;
4) Press MODE, setting HUE;
5) Press MODE, setting LCD display mode;
6) Press MODE, setting reverse mode;
9. ATV MODE
Please press mode (in the main unit or in the remote controller) to select ATV mode .
9.1 Install antenna
Plug the antenna to the antenna socket.
9.2 ATV SETUP
When press menu (the main unit or the remote controller) in ATV mode, the unit will be
in ATV setup status. ATV setup main menu is as following:
08
 Loading...