

Page 1
E0853
DVD/MP4/VCD/MP3/WMA/TV/GPS/JPEG
7 DOUBLE DIN DVD+TOUCH SCREEN
MP4/MP3/JPEG/WMA PLAYER WITH AM/FM
RADIO/TV TUNER/AMPLIFIER/USB/SD MMC
CARD SLOT/BLUETOOTH
Page 2
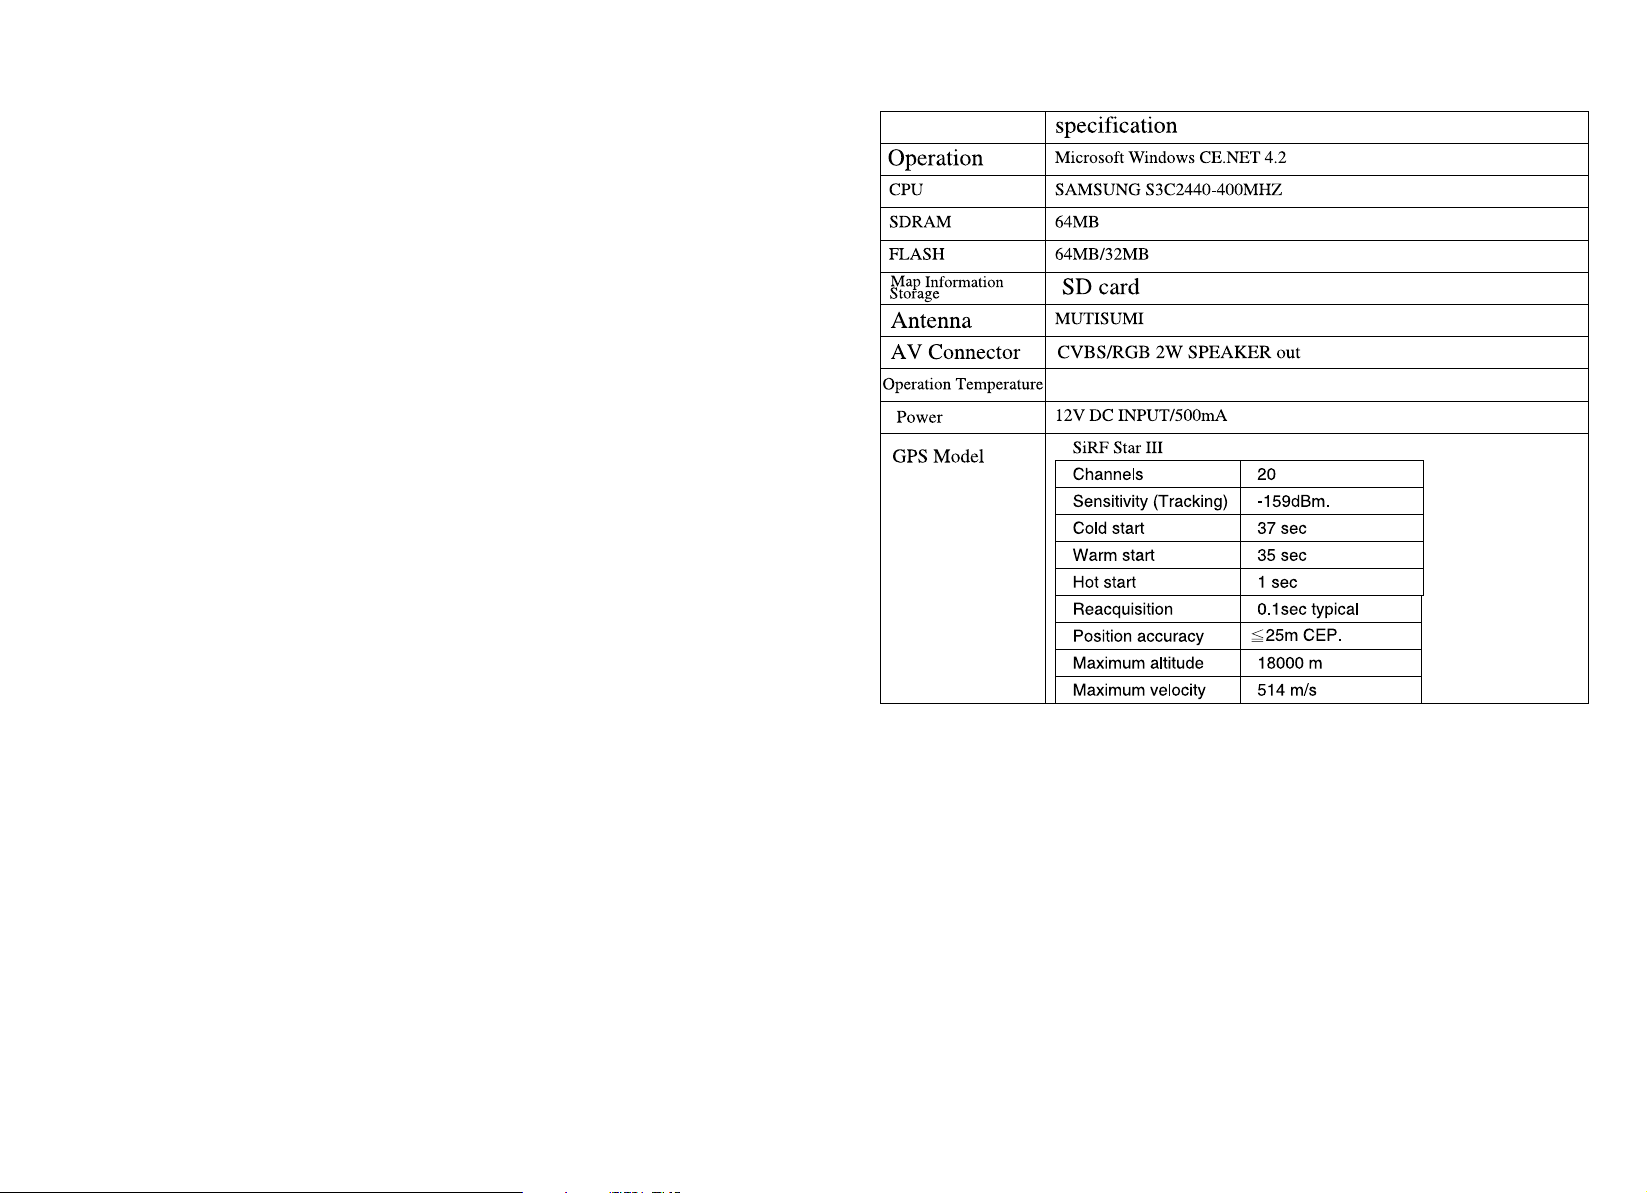
GPS SPECIFICATION
Read before using
1.About Map Information
The GPS uses the newest electronic navigation map. However, due to the
development of traffic system, after the unit is sold, there may be slightly
different with reality. Drive according to the current situation and the traffic
regulation.
2.Navigation
This GPS unit provides the navigated path for reference. Please decide to
follow the path or not. Driver who is familiar with the map may select the
path better than the one GPS selected.
3.About the receipt
The factors such as tall and intensive buildings (e.g.: in tunnel, underground car park, under flyover), changing of the climates and satellite signals
close, may cause the receipt of the GPS signals. The result may be unable
to positioning, inaccurate positioning, navigation operation failure and
worse operation, etc.
16
Page 3

Notice for GPS
When the car is stopped, DO NOT place the unit under the wind screen
or sunlight to avoid the battery being over heat and causing malfunction
or danger.
Global Positioning System is built and operated by the Department of
Defense (US). The accuracy and maintenance is fully in charged by the
department. The changes from the department can affect the accuracy
and performance of the GPS unit.
Please use this GPS unit carefully. The function of this unit is to provide
navigation reference. DO NOT use this unit for accurate measurement
such as direction, distance, location and landform, etc.
Please stay in the same place when the first usage of this unit. Spacious
place is better and no barrier on the top. The time for the positioning may
need more than 10 minutes, depending on the current situation and the
satellite signals.
For your safety, DO NOT operate the GPS while driving. To avoid accident,
operate this GPS unit after the car is stopped.
Other wireless signals (e.g.: from mobile phone and speed detector) may
affect the receipt of satellite signals and causing unstable receipt.
If there is heat insulation or prevent broken film, the satellite signals may
be affected. It is recommended that the installment of car antenna can
stabilize the receipt of the signals.
Every region has its traffic regulation according to the traffic condition
there. Please follow the traffic regulation.
The advice for the path is only for reference, because the traffic regulation
and the road status are set up by the related department. Please decide
the most suitable path if there is different between the real road condition
and the map.
While the GPS unit is set in the car by holding stand, DO NOT place it
carelessly.
Please DO NOT place the unit that the view of driver would be blocked.
DO NOT place it without fixing
DO NOT place it at the safety air bag.
DO NOT place it at the region that the safety air bag would inflate.
Insert the car charger after the car is ignited. This can avoid the instant
current destruct the GPS unit.
Due to the various periods of the research and production, the software
may be updated. If the version of the software you use is different from
that in the manual, then the version you use is proper.
Please keep the accessory such as CD, SD card, SD/MMC card reader.
There is important information labeled on the poly bag of CD, such as
the installment of the electronic map and the reboot code of free update.
NOTICE FOR DISC USAGE
SPECIFICATIONS
PANEL DESCRIPTION
REMOTE CONTROL OPERATION
TV OPERATION
TOUCH SCREEN OPERATION PROCEDURE
BLUETOOTH OPERATING PROCEDURE
TV OPERATION
SETUP
NOTICE FOR GPS
GPS SPECIFICATION
1
2
3
4
5
6-7
8
10
11-14
15
16
15
Page 4

Type of disc Label on the disc Recorded material Size of disc
DVD
Sound and moving
pictures
12cm
VCD
Sound and moving
pictures
12cm
MP3
Sound only
12cm
M P4 /DIV X
M P 4/D IV X
Sound and moving
pictures(AVI format)
12cm
CD
Sound only
12cm
NOTICE FOR DISC USAGE
1.Do not use the disc with irregular shape .
2.Disc can not be placed in the following place
-under direct sunlight,
-near the car heater,
-dusty/wet place and on seat or instrument panel.
3.Clear the disc:
wipe the disc toward outside by soft and dry cloth.
4.New disc:
the edge of the new disc may be too rough. The edge
can be wiped by pencil.
1
14
Page 5

FM TUNER
Frequency Range
USA:87.5~107.9MHZ
EURO:87.5~108.0MHZ
Intermediate Frequency
Signal/Noise Ratio
Stereo Separation@1KHz
10.7MHz
60dB
40dB
AM TUNER
Frequency Range
Intermediate Frequency
Usable Sensitivity
USA:530~1710KHz
EURO:522~1620KHz
450KHz
33dB
CD PLAYER
Signal/Noise Radio
Frequency Response
Channel Separation
80dB
20Hz~20KHz
70dB
AMPLIFIER
Total system power
Power output
Load impendence
Install size
180Watts
4 60W
4~8 Ohms
163 180 101MM(L W H)
13
2
Page 6

PANEL DESCRIPTION
13 4 52 6 78 9 101112
SD MMC CARD
AUTO PLAY
DVD/MP4/VCD/MP3/WMA/TV/GPS/JPEG
AUTO PLAY
13
14
1.POWER
2.MODE
3. /BAND
4. /APS
5.
6.UP
7.DOWN
8.
9.
10.USB SLOT
11.IR
12.BLUETOOTH MIC
13.DISC SLOT
14.SD MMC CARD SLOT
3
12
Page 7

AUTO PLAY
AUTO PLAY
NTSC
PAL
AUTO
AUTO PLAY,
AUTO PLAY
TV TYPE
4:3PS
4:3LB
16:9
AUTO PLAY
AUTO PLAY
NO
OFF
3
5
7
9
11
13
15
4
6
8
10
12
14
EJECTEJECT
2
11
44
77
00
TITLETITLE
SUBTITLESUBTITLE
RETURNRETURN
DVDDVD
MENUMENU
PROGRAMPROGRAM
AUDIOAUDIO
A-BA-B
BAND
16 34 35 36
3322
55 66
9988
NEXTNEXT
10+10+
AMS
STOPSTOP
FRFR
BACKBACK
SLOWSLOW
SETUPSETUP
ENTERENTER
ANGLEANGLE
CH-CH-
VOLVOL
MUTEMUTE
--
TA AF PTY
1
POWERPOWER
MODEMODE
DISPDISP
PLAY/PAUSEPLAY/PAUSE
ZOOMZOOM
FFFF
REPEATREPEAT
GOTOGOTO
CH+CH+
TFT TFT
MENUMENU
VOLVOL
++
33
32
31
29
27
25
23
21
19
17
30
28
26
24
22
20
18
1.POWER ON/OFF
2.EJECT
3.NUMERIC BUTTON
4.FAST BACKWARD
5.TITLE
6.SLOW
7.SUBTITLE
8.SETUP
9.RETURN
10.LEFT
11.DVD MENU
12.ANGLE
13.PROGRAM
14.MUTE
15.AUDIO
16.A-B/BAND
17.VOL+
18.VOL-
19.TFT MENU
20.DOWN(in DVD mode)/CH-
21.RIGHT(in DVD mode)/ CH+
22.ENTER
23.GOTO
24.UP(in DVD mode)
25.REPEA T
26.PREVIOUS CHAPTER
27.FAST FORWARD
28.STOP
29.ZOOM
30.NEXT CHAPTER
31.PLAY/PAUSE/ AUTO
32.DISP
33.MODE
34.TA
35.AF
36.PTY
11
4
Page 8

AV IN
(YELLOW)
RED(R) IN
WHITE(L) IN
VIDEO OUT
(YELLOW)
RED(R) OUT
WHITE(L) OUT
GPS VIDEO
(YELLOW)
LINE(R) IN
LINE(L) IN
GPS CONTROL
(ORANGE)
Wiring Diagram
BLUETOOTH
Antenna
ORANGE
BACK UP CAR SINGAL(+12V)
PICPICPIC
AUDIOAUDIOAUDIO
FORMAT
PRESET
MANUAL
AUTO SEARCH
SKIP
49.75MHZ
USERUSERUSER
TV SETUPTV SETUPTV SETUP
PAL I
008
SCAN
OFF
BACKBACKBACK
Press the up/ down buttons on the remote control or touch the
icons on the touch screen panel to select the item needed to adjust.
Touch the icons to adjust the volume of the parameter of the
selected item and press ENTER to confirm.
FORMAT: to adjust the TV system. The default system is PAL I.
PRESET: to store the searched TV stations
MANUAL: to search the TV stations manually. The system can search and
store the TV stations automatically.
SKIP: to open or close the TV stations searching function.
Touch the icon to go back to the previous menu.
BACKBACKBACK
5
10
Page 9

Press LEFT/RIGHT in the following interface to select the list of
Touch sereen Operating Procedure
MP3 01
MP3 02
JPEG 01
MP4 01
DIVX 01
01/ MP3 0001
01/ MP3 0002
01/ MP3 0003
01/ MP3 0004
01/ MP3 0005
01/ MP3 0006
Select and press ENTER to enter the list of the WMA/MP3 playback.
Press PLAY to play the files continuously.
MP3
Select and press ENTER to enter the list of the JEPG playback.
Press PLAY to play the files continuously.
The main menu is shown as the icons on the touch screen panel. The icons are
representing:
DVD RADIO TV AUX GPS BLUETOOTH
Main Menu
DVD/CDDVD/CDDVD/CD
RADIORADIORADIO
TVTVTV
AUXAUXAUX
NAVINA VINAVI
BLUETOOTHBLUETOOTHBLUETOOTH
FM1 98.00MHZ
Sub-menu for
present mode
Adjustment for the
selected parameter
1 87.50MHZ
3 98.00MHZ
5 108.00MHZ
PRE NEX LCD MON BAN AMS
VOL 17
2 90.00MHZ
4 106.00MHZ
6 87.50MHZ
Touch the DVD/CD icon to change to the DVD mode. If there is a disc already in
the unit, the content would be directly played. You can make adjustment through
the below sub-menu.
WAR HUNT
PREV
NEXT
PLAY
STOP
MENU
LEFT
RIGHT
RPT
RDM
UP
PROG
DOWN
SUBP
ENTER
AUDIO
Touch the RADIO icon to change to the radio mode. You can make adjustment
through the below sub-menu.
Select and press ENTER to enter the list of the MP4 playback. Press
PLAY to play the files continuously.
9
DVD/CDDVD/CDDVD/CD
RADIORADIORADIO
TVTVTV
AUXAUXAUX
NAVINA VINAVI
BLUETOOTHBLUETOOTHBLUETOOTH
FM1 98.00MHZ
1 87.50MHZ
3 98.00MHZ
5 108.00MHZ
PRE NEX AF TA PTY AMS
VOL 17
2 90.00MHZ
4 106.00MHZ
6 87.50MHZ
Press “MENU” to enter the following menu in the radio mode.
AUDIOAUDIOAUDIO
BASS
TREBLE
BALANCE
FADER
EQ
PICPICPIC
USERUSERUSER
0
0
C0
C0
FLAT
BACKBACKBACK
AUDIOAUDIOAUDIO
BRIGHT
CONTRAST
SHARP
COLOR
HUE
PICPICPIC
USERUSERUSER
6
BACKBACKBACK
50
50
50
0
50
Page 10

AUDIOAUDIOAUDIO
BEEP
SAFETY
AREA
CAMERA
PICPICPIC
USERUSERUSER
ON
ON
EURD
ON
BACKBACKBACK
Touch the TV or AUX icon and change to TV mode or AUX mode. You can make
adjustment through the below sub-menu.
Bluetooth Operating Procedure
TEL:
BLUETOOTHBLUETOOTHBLUETOOTH
1 2 3 4
5
6
9 0
RADIORADIORADIO
BLUETOOTHBLUETOOTHBLUETOOTH
TEL:00000000000
RADIORADIORADIO
1 2 3 4
7
8
5
7
6
8
9 0
AUDIOAUDIOAUDIO
BASS
TREBLE
BALANCE
FADER
EQ
AUDIOAUDIOAUDIO
BEEP
SAFETY
AREA
CAMERA
PICPICPIC
PICPICPIC
TV SETUPTV SETUPTV SETUP TV SETUPTV SETUPTV SETUP
USERUSERUSER
0
0
C0
C0
FLAT
USERUSERUSER
TV SETUPTV SETUPTV SETUP
ON
ON
EURD
ON
BACKBACKBACK
BACKBACKBACK
PICPICPIC
AUDIOAUDIOAUDIO
BRIGHT
CONTRAST
SHARP
COLOR
HUE
PICPICPIC
AUDIOAUDIOAUDIO
FORMAT
PRESET
MANUAL
AUTO SEARCH
SKIP
49.75MHZ
USERUSERUSER
USERUSERUSER
50
50
50
0
50
TV SETUPTV SETUPTV SETUP
PAL I
008
SCAN
OFF
BACKBACKBACK
BACKBACKBACK
Touch the GPS icon and the screen would switch to GPS mode automatically.
Then you can set up the navigation.
BLUETOOTHBLUETOOTHBLUETOOTH
CALLING OUT.......
RADIORADIORADIO
1 2 3 4
5
7
6
8
9 0
1) First turn on the Bluetooth of the cell phone and search for an accessory “BIGSOUND”.
Enter password “8888” and connect the call phone to the DVD device.
2)Touch the upper central part of the screen to display the main menu.
Touch the “Bluetooth” logo on the right corner to enter Bluetooth mode.
3) once in Bluetooth mode and with cell phone connected, user can dial calls and
receive calls.
4)Press the green “ ” to receive in-coming calls, numbers will be displayed on the
screen.
5)Press the red “ ” to end calls.
6)Press the “Bluetooth” logo on left corner to switch the conversation form speaker to
cell phone .Bluetooth connection will end (To re-connect, touch the "BLUETOOTH"
icon on the main menu. After about 8 second, it will automatically re-connect.)
7)When enter the worng phone number.
Press the red “ ” to delete and re-enter.
Press green “ ” to re-dial the last number dialed.
**For some cell phones, you must exit all sub-menu and return to the
front page first. Then dial call by the touch screen of the DVD device.
7
8
 Loading...