

Page 1

TOUCH SCREEN WITH AV/DVD/USB/GPS/BLUETOOTH
INSTRUCTIONS
Page 2

CONTENT
1、Chapter
2、Chapter 2 Basic Operation.........................................................................................................
2.1 Remote control ....................................................................................................................
2.1.1Remote control showing....................................................................................................
2.1.2 Remote control using Illustration…………………………………………………
2.2 Back out/input Illustration.......................................................................................
2.2.1 Back out/input Illustration.............................................................................
2.3 Keystoke Illustration....................................................................................................
3、Chapter 3 Main function illustration..........................................................................
3.1 Basic Operation.........................................................................................
3.2 Basic Operation of Touchscreen............................................................................
3.2.1 DVD Function ......................................................................................................
3.2.2 TV Function.................................................................................................
3.2.3 Radio Fucntion................................................................................
3.2.4 AV Function...................................................................................................
3.2.5 USB/SC Function.....................................................................................................................
3.2.6 GPS System.........................................................................................................
3.2.7 Bluetooth Function............................................................................................................
3.3 Setting Function................................................................................................
3.3.1 Setting Audio............................................................................................................................
3.3.2 Setting picture...........................................................................................................................
3.3.3 Setting Clock................. ..........................................................................................................
3.3.4 Buzzer on/off...... .....................................................................................................................
3.3.5 Black Screen.............................................................................................................................
3.3.6 Exit............................................................................................................................................
3.4 Operation of DVD Function...................................................................................
3.5 Illustration for Backward a Car.............................................................................................
4、Chapter 4 Installation Illustration..................................................................................
5、Chapter 5 Safety for Using............................................................................................................
5.1 Warning.............................................................................................................................
5.2 Safety for Using...............................................................................................................
5.3 Note for Using Disc........................................................................................................
6、Chapter 6 Main Capability Illustration……………………………………………..
7、Chapter 7 Troubleshooting…………………………………………………………..
1 Function Description……………………………………………………..
3.2.2.1 TV Function Operation Illustration...............................................................
3.2.3.1 FM/AM Radio Operation showing........................................................
3.2.4.1 AV Operation showing...................................................................................
Page 3

Chapter 1 Introduction
1. Function
1> Built-in DVD,FM.AM,TV,AV, Bluetooth AND connection outside GPS
2> Compatible for DVD, SVCD,VCD,DVCD,MP3,CD,CD-R,DVD-R,DVD-RW,DVD+RW,DIVX,XIVD and MPEG4
3> Adoption TFT LCD Monitor, 16:9 High Definition Wide Screen
4> Touch screen Could be individuation Operation for OSD
5> One Stereo Audio and two Video output, It’s convenience for connection input of front Audio of outside ( FR、FL、RR、RL)
Combination whole Car entertainment system
7> TV receiving from antenna input of two so it’s enhance to the sensitivity of receiving TV Program
8> DVD could be memory latest program
9> Clock function could be see about present time
10> Automatically Switch the rear-view condition in LCD Screen, when moving backward.
11> The function of control for outside connection AMP in order to avoid voice of impact
13> 在 GPS System
1> When on driving, please close the Monitor
2> When watching the car, please don’t let the product exposure outside, otherwise it will possible be wet and
lead to short circuit, fire and other risk
3> When your car are exposured under sunlight in a long time, Please decrease the inside car temperature before
use the machine.
4> This product is power by 12V DC., please do not use paranormal adaptor
5> Please do not put other abject into the disk slot
6> In order to your safety driving, please try best to keep low volume and close the screen.
7> Please don’t put a dirty, scratched, distortion disk into the slot
8> To avoid any scratch, please don’t put the disk on the spiny object
9> Please don’t put the disk under circumstance of sunlight, dust and wet
10> Please don’t use nonstandard disk
11> Please use wet & soft with propel cloth to swab the disk surface slightly.
12> Unit using High Definition TFT color LCD Monitor, built-in DVD, FM, AM, TV ,Bluetooth,GPS Backward a Car Front of
four sound track Audio output, and it’s more convenience for installation Simply for connection radiationless generation low
consumption not twinkle color is floweriness of reality, The Characteristics of shape is small and exquisite suitable for installation
any kind of Car
3. Warning
1> To avoid fire or short circuit, please do not exposure the machine in sunlight and wetting place
2> In safety for your driving, please do not watch the machine when you are on driving
3> This product is belong to laser light products, please do not put your eyes towards to the beam of light
4> Non-professional please do not open the machine, when occur failure, please find a professional or appointed repaired station
to repair it, please never try to do it personally.
4. Installation Illustration
Page 4

1> Set up all spare parts same like as above picture
2> Check every connection if correct.
3> Use the tool to setting the screws.
▲ Attentions :
Please try best to install the machine by professional. If you have difficulty in installation, please consult with your local
authorized organization.
1> Power supply is from 10 to 1V
2> Please comply to the menu connect the cables, any wrong connection with cable will lead to damage the machine
3> Please check up carefully all cable connection and then connect the power cable
4> In order to avoid any damage of your machine, Please insulate all exposure cables before use
5> Please fix up all power connector before installation the machine
6> Please read this menu carefully before connect the machine
7> Due to this product is a high precision equipment, please keep away from below site:
A、place of strong sunlight or other high temperature
B、unsafe and vibrative place
C、Wet and dusty place
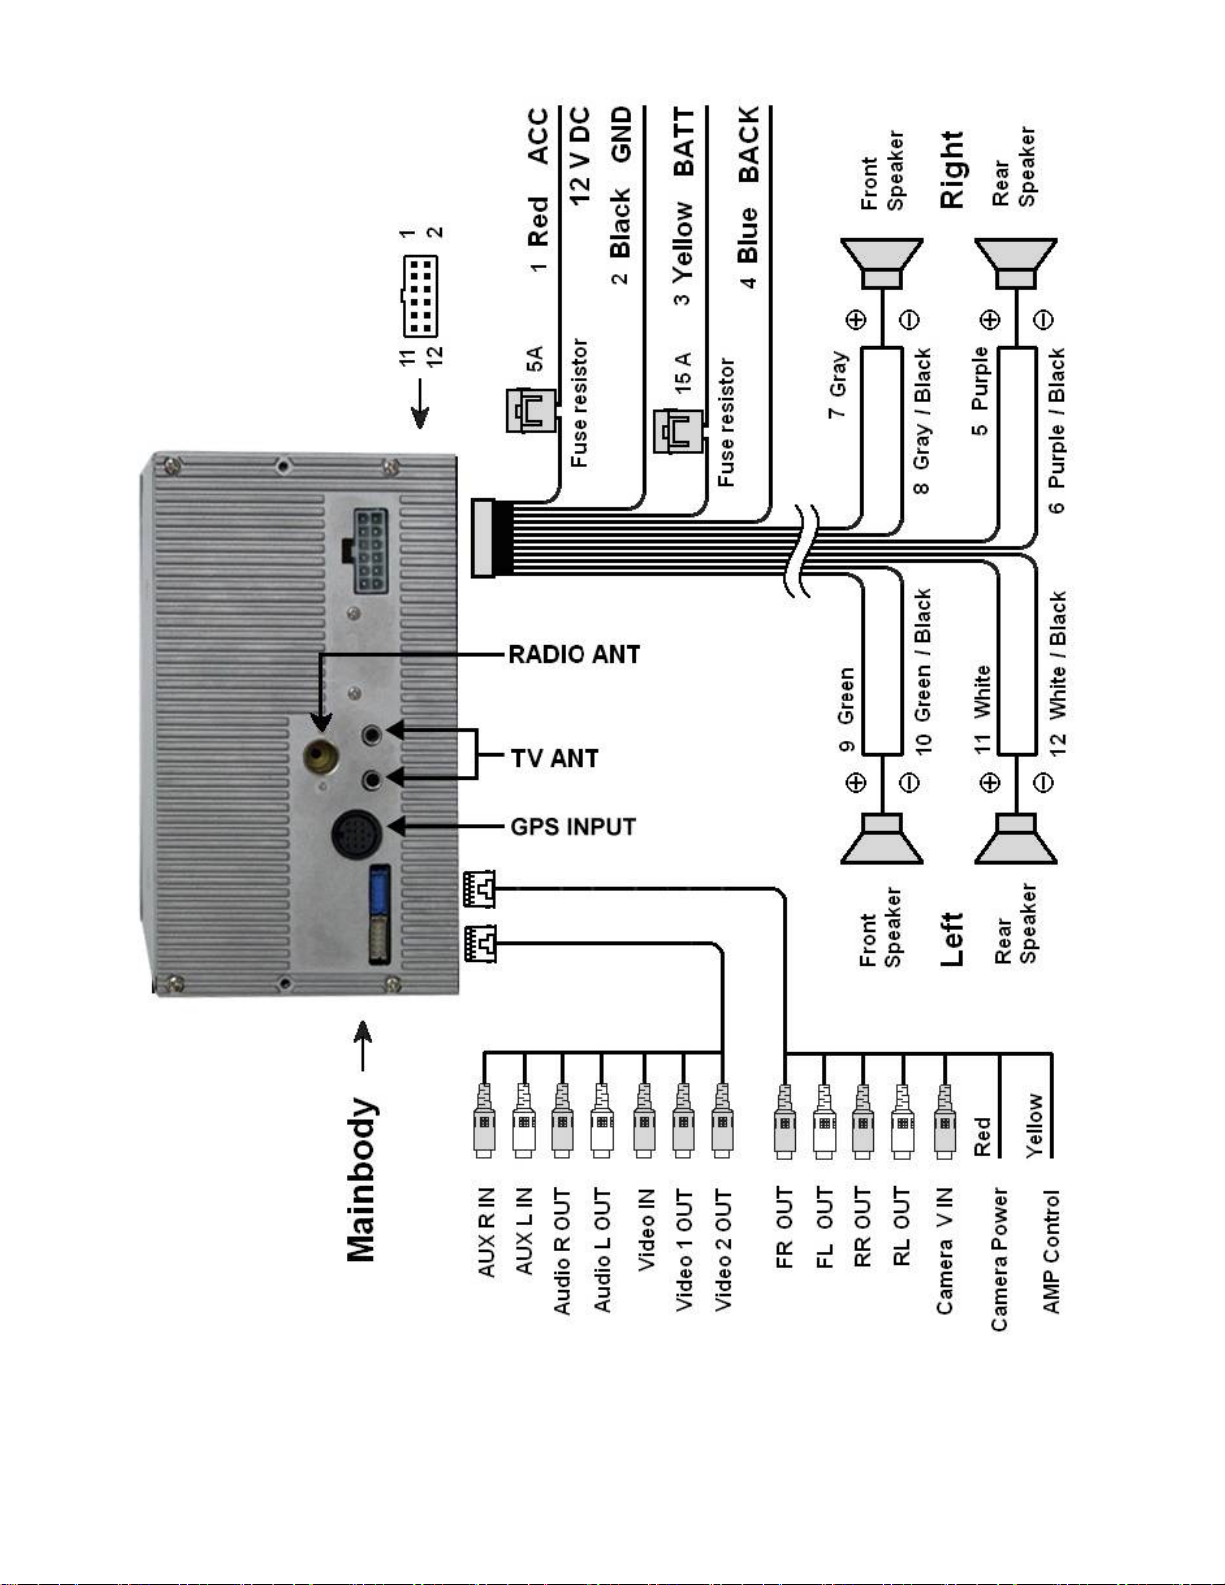
Chapter 2 Basic Operation
2.1 Illustration for Power and Signal
Page 5
2.2 Illustration for Remote Control Console
Page 6

1> “VOLUME” Button: control volume minish or accretion
2> “MODE” Button: Mode Switch DVD, FM/AV, TV, AV, USB, BT, GPS
3> “
4> “ZOOM” Botton: Zoom in Only DVD mode
5> “
6> “
” Button: On/off for power
/Search” Botton: pass in and out disc
/BACK MAP ” Botton: In DVD mode Play or Pause; In Bluetooth mode Play or Pause; in GPS mode back map
7> “ /Terminal ” botton: press one time memory stop, press two times stop whole/ Quick view “Destination setting”
interface
8> “
9> “
10> “SETUP” Botton:
11> “
12> “
13> “R / L” Botton: Switch sound track
14> “EQ” Botton: Switch effect of sound
15> “
16> “0~9 ” Botton: Directely choice programe
17> “MENU” Botton: Enter main function menu for setting
18> “
19> “
20> “
21> “DISP” Botton:
22> “TITLE” Botton: In the DVD could be choice for skip of programe or chapter
23> “P . P” Botton: Switch different picture; SHARP MILD STANDARD and PERSONAL
24> “
25> “SYS/Band” Botton: In the TV state could be setting PAL-DK、PA L- I、PA L- BG 、SECAM-DK、SECAM-BG 或 NTSC-M、
/ CH-” Botton:
/ CH+” Botton:
/ Destination” Botton: Speediness back
/ Locus” Botton:
” Botton: In the TV mode return former programe, In the DVD mode repeat present programe
、 、 、 ” ENTER Botton: Moving cursor and change option parameter of direction botton, Be sure and save setting
/ Back” Botton: buzz off or backing out
/ Console” Botton: receiving call or
” Botton: Switch whisht or sound
Page 7

PAL -N 、PAL-M;
3.2 DVD Function
Touch icon, enter into below OSD-002 interface
OSD-002
1> “
2> “
3> “
4> “
5> “ ” Previous button: Return to previous track when press each time
6> “
7> “
8> “ + & - ” Volume Adjustment Button: Press + to increase the volume and Press “– “ to decrease the volume.
9> “ ”Mute Button: Switch current volume statue to MUTE mode.
10> “R / L ” Right or Left track Button: shift to right track or left track when press
11> “ EQ ” Sound Effect Quality Button: Shift the sound effect
12> “
” Open button: Press to open the inspection to put DVD dish.
” Play/Pause Button: The DVD player will play /Pause and the screen will show The current state on the left.
” Stop Button: Stop playing DVD
” Next Button: Go to next track when press each time
” 执行 DVD 快进播放
” 执行 DVD 快退播放
“Exit Button: Exit current OSD interface (It has the same function on different interfaces)
3.3 TV Function
Press on the main interface enter into follow OSD-003 interface, read 3.4 chapter
on specific TV operation instruction
Page 8

1> SYSTEM Shift SYSTEM Button: Shift systems upon yours needs. PAL I/DK/BG, NTSC, SECOM DK/BG/L/LL or PAL-N,
PAL- M , NT S C-M
2>
output. ( It has the same function on different interfaces)
3> Play TV function: Touch the “ TV ” icon, press the “ AV/TV ” button on the panel, or press the MODEL button on the remote
controller all can switch current system status to TV playing status.
4> Search TV programs function: Touch the “
searching the TV program. It will automatic memory all programs and turn to playing the first TV program after finish searching.
5> Select channels function: Directly touch the screen “ CH+ ,CH- ” or press “ /
program which you like.
6> Sl
the current program
7> “ EQ ” Sound Effect Quality Button: Shift the sound effect
8> “ + & - ” Volume Adjustment Button: Press “ + ”to increase the volume and Press “– ” to decrease the volume.
Mute Button: First touch icon, the system will turn to mute status, Second touch, it will resume the sound
” icon on the screen or press the “ ”button on the panel to automatic
ight Modulation function: when the program not as clear as you want, you can touch “
” button on the panel to select the
, ”button to modulate
3.4 Radio Function
Touch Icon on main Menu interface go to Radio interface as follow picture OSD-004
1> FM/AM BAND select: Touch “ BAND ” or “
band can store 6 channels.
2>
output. ( It has the same function on different interfaces)
3> Automatically search stations: Touch “
4> “ EQ ” Sound Effect Quality Button: Shift the sound effect
5> Select channels function: Directly touch the screen “
program which you like.
6> c
Mute Button: First touch icon, the system will turn to mute status, Second touch, it will resume the sound
” or “ ” on front panel can search program automatically.
lick the P1-P6 and can directly receive the current programs.
” on front panel can select the channel on the band upon his favor, Every
OSD-004
, ” or press “ / ” button on the panel to select the
3.5 AV function
Press on main Menu, go to AV input interface, as picture OSD-005, specific introduction is as follow
Page 9

OSD-005
1> Connect well the “VIN、AIN-L、AIN-R” and so on AV cables
2> Go into main Menu, touch AV Icon or use remote control, or press Mode directly, the system will switch into AV status.
3.6 USB Functions
Press on main Menu, go to USB input interface, as picture OSD-006, specific introduction is as follow
OSD-006
1> “
2> “
3> “
4> “
5> “ ” Previous button: Return to previous track when press each time
6> “
7> “ ” fast return
8> “ + & - ” Volume Adjustment Button: Press + to increase the volume and Press “– “ to decrease the volume.
9> “
10> “R / L ” Right or Left track Button: shift to right track or left track when press
11> “ EQ ” Sound Effect Quality Button: Shift the sound effect
12> “
” Open button: Press to open the inspection to put DVD dish.
” Play/Pause Button: The DVD player will play /Pause and the screen will show The current state on the left.
” Stop Button: Stop playing DVD
” Next Button: Go to next track when press each time
” fast ahead
”Mute Button: Switch current volume statue to MUTE mode.
“Exit Button: Exit current OSD interface (It has the same function on different interfaces)
3.7 GPS Function Instruction
Press on the main page, enter into GPS interface (different GPS NAVI Software will have different interfaces) as follow
Picture
3.7.1 Software Request
1> The operating system is wince.net 4.2 CORE;
2> Software edit type is ARMV4, if yu need SDK, please contact us;
3> Composite video output required the resolution of navigation software should be 320*240
4> If you want to use the remote or touch control operation, then yo just need to provide the code of the remote or touch
controller and the corresponding code value of the navigation software.
3.7.2 Software Install
1> Insert the SD card with navigation software.
2> After starting, click the “Option” button, enter into the option interface.
3> Click “Navigation setting” button to set up te navigation path
4> In “Navigation setting”, click the “Open file” button to select a navigation application (usually is EXE. file), then you can
select the option of “Activate navigation software automatically when start”, so that you can run the navigation software directly
when system starts;
5> After select the navigation application, exit the “Navigation setting” interface, click the “Navigation” button and run the
navigation software
Page 10

3.8 Bluetooth Function
Press
1> Press “ ” icon: receive the phone.
2> Press “
3> Press “
4> Press “
5> Press “
6> Press “
7> Press “
8> Press “
9> Press “
10> Press “
11> Press “
12> Press “
Warni ng]、
on main menu interface, go to blue tooth function interface, as picture: OSD-007
OSD-007
” icon: hang up the phone.
” icon: match and cut off the connection with the Bluetooth mobile
” icon: Delete one character.
” icon: match the blue tooth and mobile again.
” icon: Increase the sound.
” icon: Decrease the sound.
” icon: Play previous song.
” icon: Play next song;
” icon: Connect MP3 and Play songs.
” icon: Secede blue tooth mode
” icon: can hear the voice from the blue tooth when use the mobile and return to mobile also.
a. If “
b. when different mobile connected, will have reminding sound etc.
” appears means no connection to blue tooth.
3.9 SETUP FUNCTION
Press icon on main page interface, go to setup interface as picture OSD-008. It can adjust audio, setup
picture, setup clock, Buzz sound switch and black screen etc.
OSD-007
3.9.1 Audio Adjustment
1
Page 11

1> Press “ ” icon, can increase or decrease the sound.
2> Press “
3> Press “
” icon, can adjust the output of high sound.
” icon, can adjust output of low sound.
4> Press “
and back front/back.
5> Press “
3.9.2 Picture setup
1> Press “
2> Press “
3> Press “
4> Press “
3.9.3 CLOCK SET
On SETUP interface, press“
” icon, can adjust the track, can increase or decrease the speakers sound on front left/right
” icon, can shift sound effect output to popular, rock, classicality, cinema and hall etc.
” icon, can adjust the brightness.
” icon, can adjust contrast.
” icon, can adjust color;
” icon, shift picture mode: sharp, mild standard or personal.
”go to time set interface (as OSD-008)
1> 按“
2> 按“
3.9.4 Buzz Sound Switch
Press “
when open, it will output Buzz Sound.
.5 Black Screen
3.9
Press “
Reset the system.
3.9.6 Exit
Press “
”键,可进行年月日和时间设置功能
”键可移动年月日与时间设置,选各项目为红色,可按“ ”进行调整年月日与时间。
” icon on setup interface, it can realize Buzz sound open or close (Picture OSD-009 and OSD-010),
” icon on setup interface, the screen will close. Touching any places on the screen can
” icon, exit OSD interface and return to current playing status.
OSD-008
OSD-009
OSD-010
2
Page 12

3.10 DVD Operation Instruction
Press the SETUP button on the remote control enter DVD menu, with direction buttons “ , , , ” go to
the section which you need to set, then press ENTER to confirm it. Press SETUP button again to exit DVD menu.
3.10.1 Language
1> OSD Language: Set languages and select Chinese, English, Russian, Spanish, Italian, Portuguese, German,
French, Arabic
2> Subtitle: Chooses DVD playback captions language, there are English, Russian, Spanish, Italian, Portuguese,
German, French, Arabic and it needs DVD dish support and auto close function.
3> DIVX subtitle: Setup DVD menu, choice the language of middle Europe
4> Audio: Chooses DVD playback sound language, in the table of contents, options includes English, French,
German, Poland. Original edition, this function need DVD source support.
5> DVD menu Chooses DVD playback sound language, in the table of contents, options includes English, French,
German, Poland, Original edition, this function need DVD source support.
3.10.2 Video
1> Examine mode: when playing DVD, choice the screen size of TV system, could select fill in, original size,
automatic adapt, full of screen.
2> TV system: establish the output model is PAL of NTSC
3.10.3 Audio
3
Page 13

1> When playing DVD, allow to select ON or OFF for the bourdon.
2> When playing DVD, allow to select OFF, PCM or ALL for the digital output.
3.10.4 Grade
1> The factory default password is 8888
2> Set the rating for video content playback. Limiting violent and sexually explicit contents playback when
during unauthorized playback。
3> If the disc has not been given a rating, then the display will show "Not rating", Kid Safe ,G ,PG ,
PG-13 ,PG-R ,R ,NC-17 ,Adult. This unit requires you to input the password if you’re chosen rating is lower
than the playback disc.
3.10.5 Other
1> Use default settings. There are two selections: Yes/No.
Yes = Return to use default setting
No = Close setup menu, play disc
2> Screen saver: Selection the saver setting allows the user to enable/disable the screen saver. The following
options are available:
OFF=Disable screen saver
ON=Enable screen saver
3>、Auto play DVD setup off/on
4
Page 14

3.11 Illustration for Backward a Car
1> Connect well the back sight input line (CAM-VIN), the back sight power supply (CAM+12V)
2> Display the monitor. (can choice manual control or motorized)
3> Connect the power blue line +12V, when on any menu, will automatically appear the rear view condition in
LCD screen when moving backward.
4. Specifications
Item Specification
Supply voltage DC 10~15V
Current consumption 4~15A
Working temperature 0℃~60℃
I/O option 1-channels video input,2-channels video output
Screen dimensions 5.8 inches(diagonal)
Weight 2 Kg
Dimensions 178(W)×210(L)×50(H)
Resolutions 480(H)X 3(RGB)X 234(V) pixels
Pixel dot pitch 0.107(H)×0.370(V)
DVD parameters
Disc compatible DVD / VCD / SVCD / CD / CD-R / MP3 / WMA
Signal noise ratio >90dB
Distortion <0.05%
Definition >500 lines
System PAL/ NTSC
RADIO parameter
Range of frequency FM: 87.5~108MHz AM: 520~1710KHz
Tuning mode Phase-locked loop Frequency synthesis tuning
Display mode LCD Panel display or OSD
Memory capacity 40 FM stations / 9 AM stations
Search mode Automatic / Manual
TV parameters
Receiving system PAL、NTSC、SECAM、SECAM –L、PA L- M、PAL -N
Search mode Automatic/manual
Memory capacity 125 channels
VHF-L : 48.25~170.00MHz
Channel parameters
Video output 1.0 V(p-p)、75Ω
Test voltage 12 V
Max power output 4×45W
Speaker resistance 4~8Ω
Output parameters
Range of audio output 1.0 App.
Impedance of video output 75Ω
Impedance of audio output 600Ω
Video system PAL / NTSC / SECAM
VHF-H : 170.00~450.00MHz
UHF : 450.00~863.25MHz
5
Page 15

5. Troubleshooting
_ Symptom Cause Action(see)
No power.
Unit not able to operate
No response to Remote
Control.
level not responding
The playback image stops
(hangs), also this machine is
unable to operate.
The playback video is out of
proportion.
Lead wire connect mistake. Make
sure Red (+) and black (-)
Fuse Blown Check fuse and replace fuse of
Remote control operation mode
is improper.
Battery is weak. Replace new battery.
Some disc forbids operations. Check with other disc.
Disc become dirty. Clean disc. Not able to play disc
Disc formats not supported. Re-confirm the disc format is
Cable connection improper. Reconnect the cable. No playback Sound. Volume
In pause mode or in slow motion
playback mode
When Playback is unable to read
the data.
The display monitor screen
proportion (ratio) set is improper.
Re-Confirm power supply wires
connection.
identical rating if blown
Switch to correct remote control
pattern.
supported by this player.
When in Pause mode or slow
motion Playback. No sound will be
playback
Re-insert the disc, and replay the
disc.
For display monitor choice suitable
hypothesis.
6. Problems during DVD playback
_ Symptom Cause Action(see)
Not able to play Disc is of different Region Code
not supported on this machine.
Display locking information,
moreover unable to playback.
fixed function unable cancel. Password is not correct. Inputs correct password.
Unable to select Dialogue
language (captions language).
Non-captions display.
Not able to regulate out the
PBC(control playing)
function
Not able to replay and search
for time
fixed function already started. Close locking function or changes
No captions burnt into the DVD
disc
Cut only may carry on the item
which dish piece function table
instructs.
No PBC function burnt into the
DVD disc
The DVD with the PBC function It’s invalidation with PBC function
Exchange the Disc with another disc
coded with the code supported by
this machine.
its rank.
Playback DVD does not have
sub-title language option burnt-in.
Try with other DVD disc with
caption burnt-in
Use disc function table cuts.
It’s invalidation without PBC
function
6
 Loading...