

Page 1

Lilith Banshee
AGP/PCI
User Guide
Page 2

Technical Support Services
Phone Assistance: 1-800-859-9569 or 1-714-990-6889
Monday - Friday: 9 am - 5 pm Pacific Standard Time
If you need additional information or help during installation or normal use of this product, please contact your retailer. If this is not
possible, call EONtronics Technical Support. Our customer support staff will attempt to solve your installation problem by phone or
issue a service authorization number for repair or replacement of your product. Unauthorized returns will not be accepted.
On Line Services: http://www.eontronics.com
Email Support: [email protected]
Fax Support: 1-714-990-6960
For your convenience, please record your EONtronics Lilith Banshee serial number in the area below:
Lilith Banshee S/N:
i
Page 3

FCC Compliance Statement
ii
This equipment has been tested and found to comply with the limits for a Class B digital device, pursuant to Part 15 of the FCC Rules.
These limits are designed to provide reasonable protection against harmful interference in residential installation. This equipment
generates, uses and can radiate radio frequency energy and, if not installed and used in accordance with the instructions, may
cause harmful interference to radio communications. However, there is no guarantee that interference will not occur in a particular
installation. If this equipment does cause interference to radio or television, which can be determined by turning the equipment off
and on, the user is encouraged to try to correct the interference by one or more of the following measures:
• Reorient or relocate the receiving antenna.
• Increase the separation between the equipment and receiver.
• Connect the equipment into an outlet on a circuit different from that to which the receiver is connected.
• Consult the dealer or an experienced radio/TV technician for help.
Page 4

Table of Contents
iii
Technical Support Services i
FCC Compliance Statement ii
Table of Contents iii
Introduction 1-1
Resolution and Color Depth Table 1-3
Hardware Installation 2-1
Before You Start 2-2
Card Layout for Lilith Banshee AGP 2-6
Figure A - Lilith Banshee AGP Layout 2-7
Card Layout for Lilith Banshee PCI 2-8
Figure B - Lilith Banshee PCI Layout 2-9
Installing the EONtronics Lilith Banshee 2-10
System Setup 2-13
Software Installation 3-1
Software Overview 3-2
Windows 95 and 98 Driver Installation 3-3
Windows NT 4.0 Driver Installation 3-5
Windows 2000 Notes 3-5
Appendices A-1
Appendix A - Systems With Built In Video A-2
Appendix B - Microsoft Operating System Updates A-3
Appendix C - Socket 7 AGP Motherboards A-7
Appendix D - Hardware Specifications A-8
Appendix E - Trouble Shooting A-9
Software License and Copyright Agreement B-1
Page 5

Introduction
The EONtronics Lilith Banshee is a
powerful 2D/3D video card that comes in
both AGP and PCI versions. Both cards
support a full 128 bit 2D graphics engine,
with every Windows GDI feature supported
in hardware, the Lilith Banshee is one of
the fastest 2D accelerators for the PC that
has ever been made. This makes for the
fastest and most powerful 2D windows
acceleration for many business,
educational, and entertainment
applications.
The Lilith Banshee also supports one of
the most powerful 3D feature sets in the
industry with its fully 3Dfx Voodoo2
compatible 3Dfx Voodoo Banshee graphics
chip.
The EONtronics Lilith Banshee is fully
supported in Windows 95, Windows 98,
and Windows NT 4.0; and takes full
advantage of the Microsoft Direct X set
of APIs, the OpenGL API, and the famous
3Dfx Glide API.
The Lilith Banshees features include:
• Ultra High Performance - The ×1 AGP
and the PCI 2.1 Lilith Banshee provide for
excellent bus throughput, with each
capable of operating at as high as 66 MHz.
• 16 MB of Memory - The 16 MB of fast
memory allows the card to run in high
resolutions with excellent color depths.
And its unified memory structure allows it
to dynamically set frame buffer and texture
memory as needed.
• Flicker-free Refresh Rates - With refresh
rates as high as 110 MHz, you will be
assured a clear, flicker free, non-interlaced
image.
• Photo-Realistic Images - Full True Color
displays at resolutions up to 1280 × 1024
means brilliant business presentations,
CAD and graphics displays, and incredible
gaming.
• Impressive 3D Features
-Integrated Voodoo2 pixel unit
-High Precision 16 bit Z Buffer
-Transparency Effects
-Chroma-key with Color Mask
-Source and Destination Alpha Blending
-Fog and Haze Effects
-Per Pixel MIP Mapping
-Per Pixel Tri-Linear Filtering
1-1
Page 6

-Full Scene and Edge Anti Aliasing
-Bump Mapping
-Perspective Correction
• Full Driver Support - The EONtronics
Lilith Banshee is fully supported in
Windows 95, Windows 98, and Windows
NT 4.0.
•Continuing Support - Upcoming support
for Windows 2000
• Superior Customer Service
-Five Year Warranty
-Fast Response to Technical Issues
-World Wide Web and Email support for
fast driver updates and technical bulletins
-Technical Support Hotline
Note: Please refer to the inside front cover
for the complete list of technical services
available.
1-2
Page 7

noituloseR
lexiPrePstiB/sroloCforebmuN
ycneuqerF
)zH(
tib4/61tib8/652tib61/K46tib23/noilliB4
084×046
seYseYseYseY
021,001,58,57,06
006×008
seYseYseYseY
021,001,58,57,06
867×4201
seYseYseYseY
021,001,58,57,06
4201×0821
seYseYseYseY
001,58,57,06
0021×0061
seYseYseYseY
58,57,07,56,06
4431×2971
seYseYseYseY
27,06
2931×6581
seYseYseYseY
06
0441×0291
seYseYseYseY
06
1-3
Page 8

Page 9

Hardware Installation
2-1
Page 10

Before You Start
Package Contents
Your EONtronics Lilith Banshee box should
contain the following:
•The Lilith Banshee AGP or PCI Card
•One EONtronics Driver Installation CD
•One User Manual
•One Product Registration Card
•Optional Bundled Software
Installation Overview
This section provides the following
information and instructions for installing
your EONtronics Lilith Banshee card.
• System Requirements
• Gather necessary supplies
• Identify your system and monitor
• Handling Procedures
• Locate important components on the
video card
• Remove or disable existing video
hardware
• Install the EONtronics Lilith Banshee
video card
Note: Refer to the Software Installation
section for information on installing and
configuring video drivers for the
EONtronics Lilith Banshee video card.
System Requirements
Before attempting to install your
EONtronics video card into a computer,
make sure that there is an available AGP
or PCI expansion slot, as appropriate, on
the motherboard. Additionally, it is
recommended that your computer meet
the following requirements:
-A Pentium II based system
-A minimum of 32 MB of Memory
-Microsoft Windows 95 or 98, Microsoft
Windows NT 4.0
-Microsoft Direct X 5 or later
2-2
Page 11

Note: If you are installing the EONtronics
Lilith Banshee AGP video card on a
Windows 95 based system, you need to
have the following items installed.
- Direct X 5.0 or later
- USB Supplement for OSR2
Note: If you are installing the EONtronics
Lilith Banshee video card on a Windows
NT 4 based system, you need to have the
following items installed.
- Service Pack 3 for Windows NT 4
Note: If you are installing the EONtronics
Lilith Banshee AGP video card on a Socket7 AGP motherboard you will need to make
sure that you have the necessary AGP
drivers from your motherboard
manufacturer. For more information
please contact your motherboard
manufacturer.
Gather Necessary Supplies
- No. 2 Phillips screwdriver
- User manuals for your computer
- User manuals for your monitor
- User manuals for Windows 9X or NT
Identify Your System & Monitor
Your system must be an AGP bus
compatible system (Pentium II i440LX, or
i440BX, or Socket-7 AGP) to use the
EONtronics Lilith Banshee AGP video card.
Any PCI 2.1 compatible expansion slot may
be used for the Lilith Banshee PCI.
Determine whether your analog VGA
monitor is an interlaced or non-interlaced
monitor. You will need to know its vertical
and horizontal refresh frequencies. This
information should be found in your
monitor user guide.
Additionally, make sure that you have the
latest drivers for Windows 95/98.
For questions about your monitor
2-3
Page 12

capabilities and other monitor related
questions, please contact your dealer or
your monitor manufacturer.
Handling Procedures
Static electricity can severely damage your
equipment. Handle the EONtronics PCI or
AGP video card and any other device in
your system with care and avoid contact
with components on the card.
Handle the EONtronics PCI or AGP card
by its metal bracket and edges where
there are no contacts.
Always work on an antistatic surface to
avoid possible damage to the card from
static discharge. The packing material
placed on a table top makes a good anti-
static work surface.
We assume no responsibility for any
damage to the EONtronics Lilith Banshee
which results from failure to follow
installation instructions or failure to
observe safety precautions.
2-4
CAUTION
The enclosed device is electrostatic
sensitive. Do not open or handle
without following proper procedures.
Page 13

2-5
Page 14

Card Layout for the EONtronics Lilith Banshee AGP
Figure 1 (on the next page) shows the
following significant components of the
EONtronics Lilith Banshee AGP video card.
• Video Connector: The monitor is
connected to this 15 pin female connector.
• Video Feature Connector: These
connectors and their associated circuits
are for the video feature connectors that
are used for connecting video capture
cards, DVD decoders, and other compliant
devices.
• AGP-bus Slot Connector: The
EONtronics Lilith Banshee AGP video card
communicates with the computer through
its AGP-bus connector that plugs into the
AGP-bus expansion slot on your computer
motherboard.
The EONtronics Lilith Banshee AGP MUST
be installed in the AGP slot of the
motherboard. It will not work or fit in a
PCI slot.
• Memory: These memory chips provide
high speed 100 MHz SGRAM to the 3Dfx
Banshee chip.
• Bios: This Bios chip provides the basic
instructions for the operation of the
EONtronics Lilith Banshee AGP video card.
• The 3Dfx Banshee Chip: This is the
brain of the video card. This high
performance graphics chip provides all of
the powerful graphics processing
capabilities that make the EONtronics Lilith
Banshee such a high performance card.
2-6
Page 15
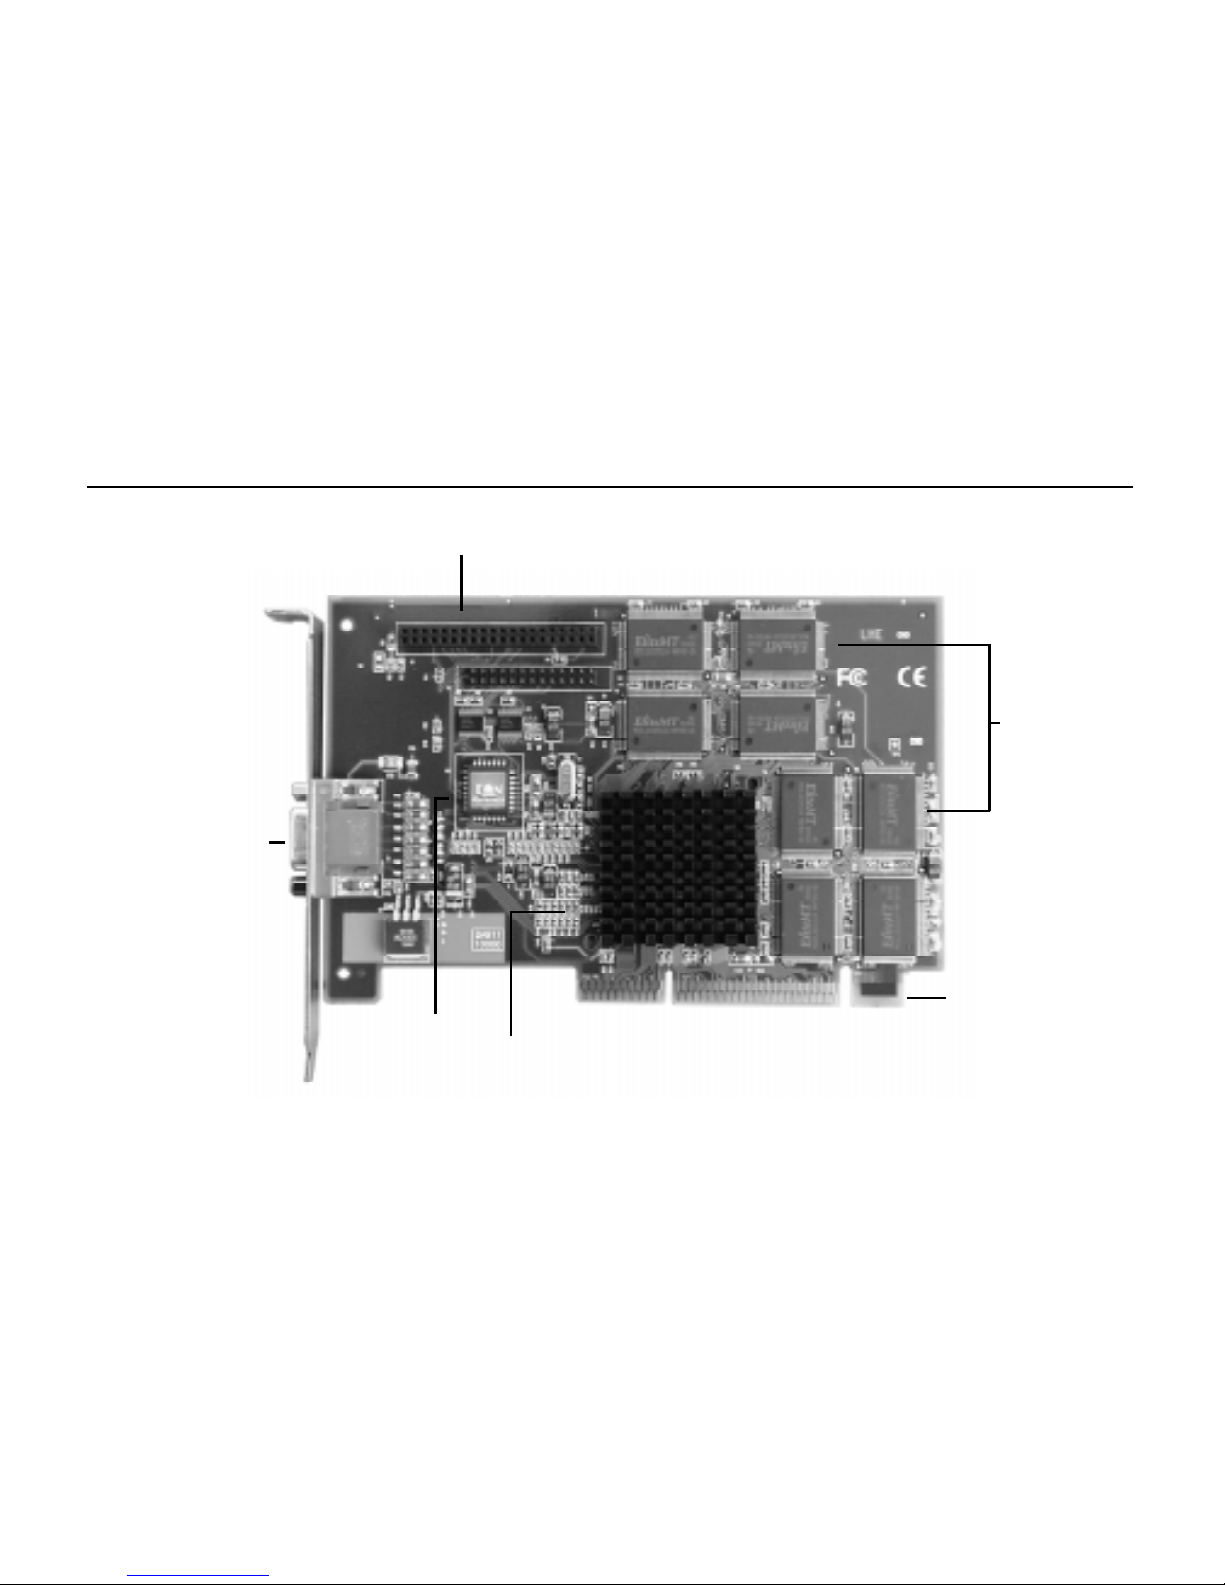
Figure 1 - EONtronics Lilith Banshee AGP Layout (Picture May Vary)
2-7
Memory
Video Feature Connector
AGP
Connector
3Dfx Banshee Chip
BIOS
Video
Connector
Page 16

2-8
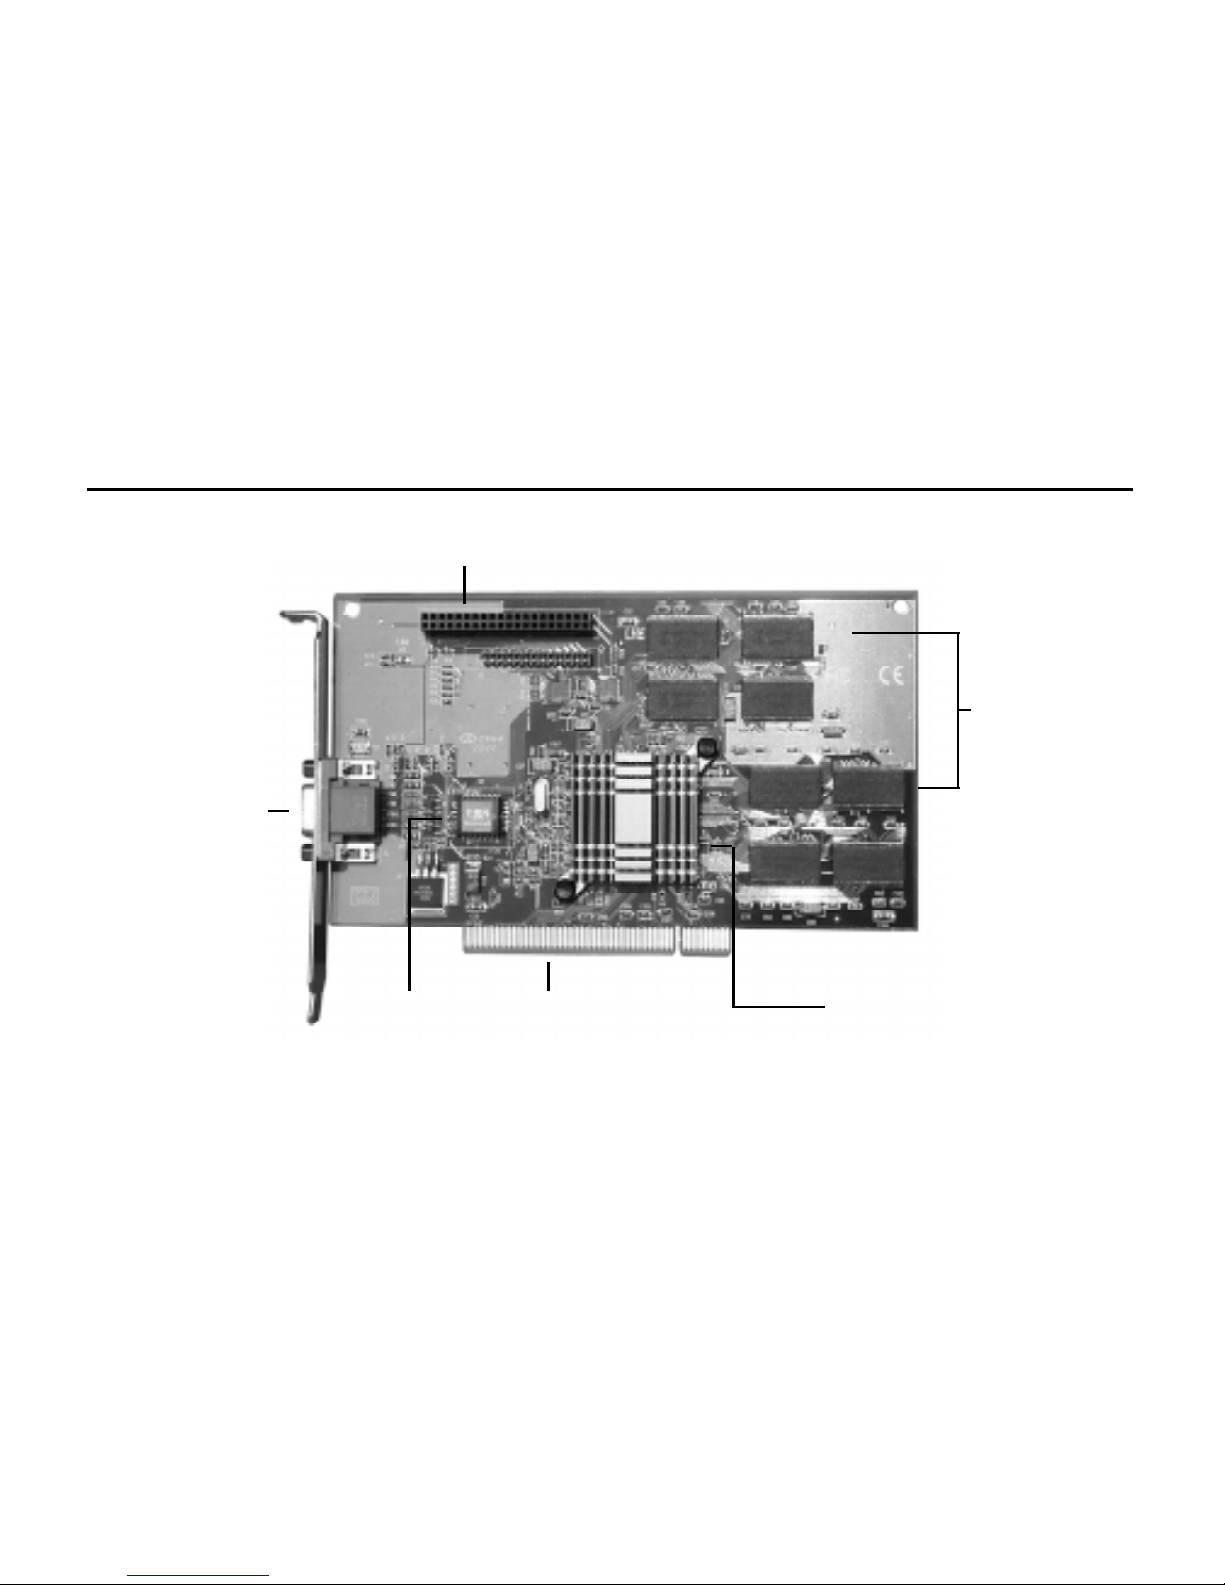
Card Layout for the EONtronics Lilith Banshee PCI
Figure 2 (on the next page) shows the
following significant components of the
EONtronics Lilith Banshee PCI video card.
• Video Connector: The monitor is
connected to this 15 pin female connector.
• Video Feature Connector: These
connectors and their associated circuits
are for the video feature connectors that
are used for connecting video capture
cards, DVD decoders, and other compliant
devices.
• PCI-bus Slot Connector: The EONtronics
Lilith Banshee PCI video card
communicates with the computer through
its PCI-bus connector that plugs into the
PCI-bus expansion slot on your computer
motherboard
The EONtronics Lilith Banshee PCI MUST
be installed in the PCI slot of the
motherboard. It will not work or fit in an
AGP slot.
• Memory: These memory chips provide
high speed 100 MHz SDRAM to the 3Dfx
Banshee chip.
• Bios: This Bios chip provides the basic
instructions for the operation of the
EONtronics Lilith Banshee PCI video card.
• The 3Dfx Banshee Chip: This is the
brain of the video card. This high
performance graphics chip provides all of
the powerful graphics processing
capabilities that make the EONtronics Lilith
Banshee such a high performance card.
Page 17
2-9
Figure 2 - EONtronics Lilith Banshee PCI Layout (Picture May Vary)
Video Feature Connector
Memory
3Dfx Voodoo
Banshee
PCI
Connector
Video
Connector
BIOS
Page 18
Installing the EONtronics Lilith Banshee
Installation Procedures
1. Turn off the system power. We
recommend that you also unplug the
power cord from the computer.
2. Remove the system cover according to
the manufacturers instructions.
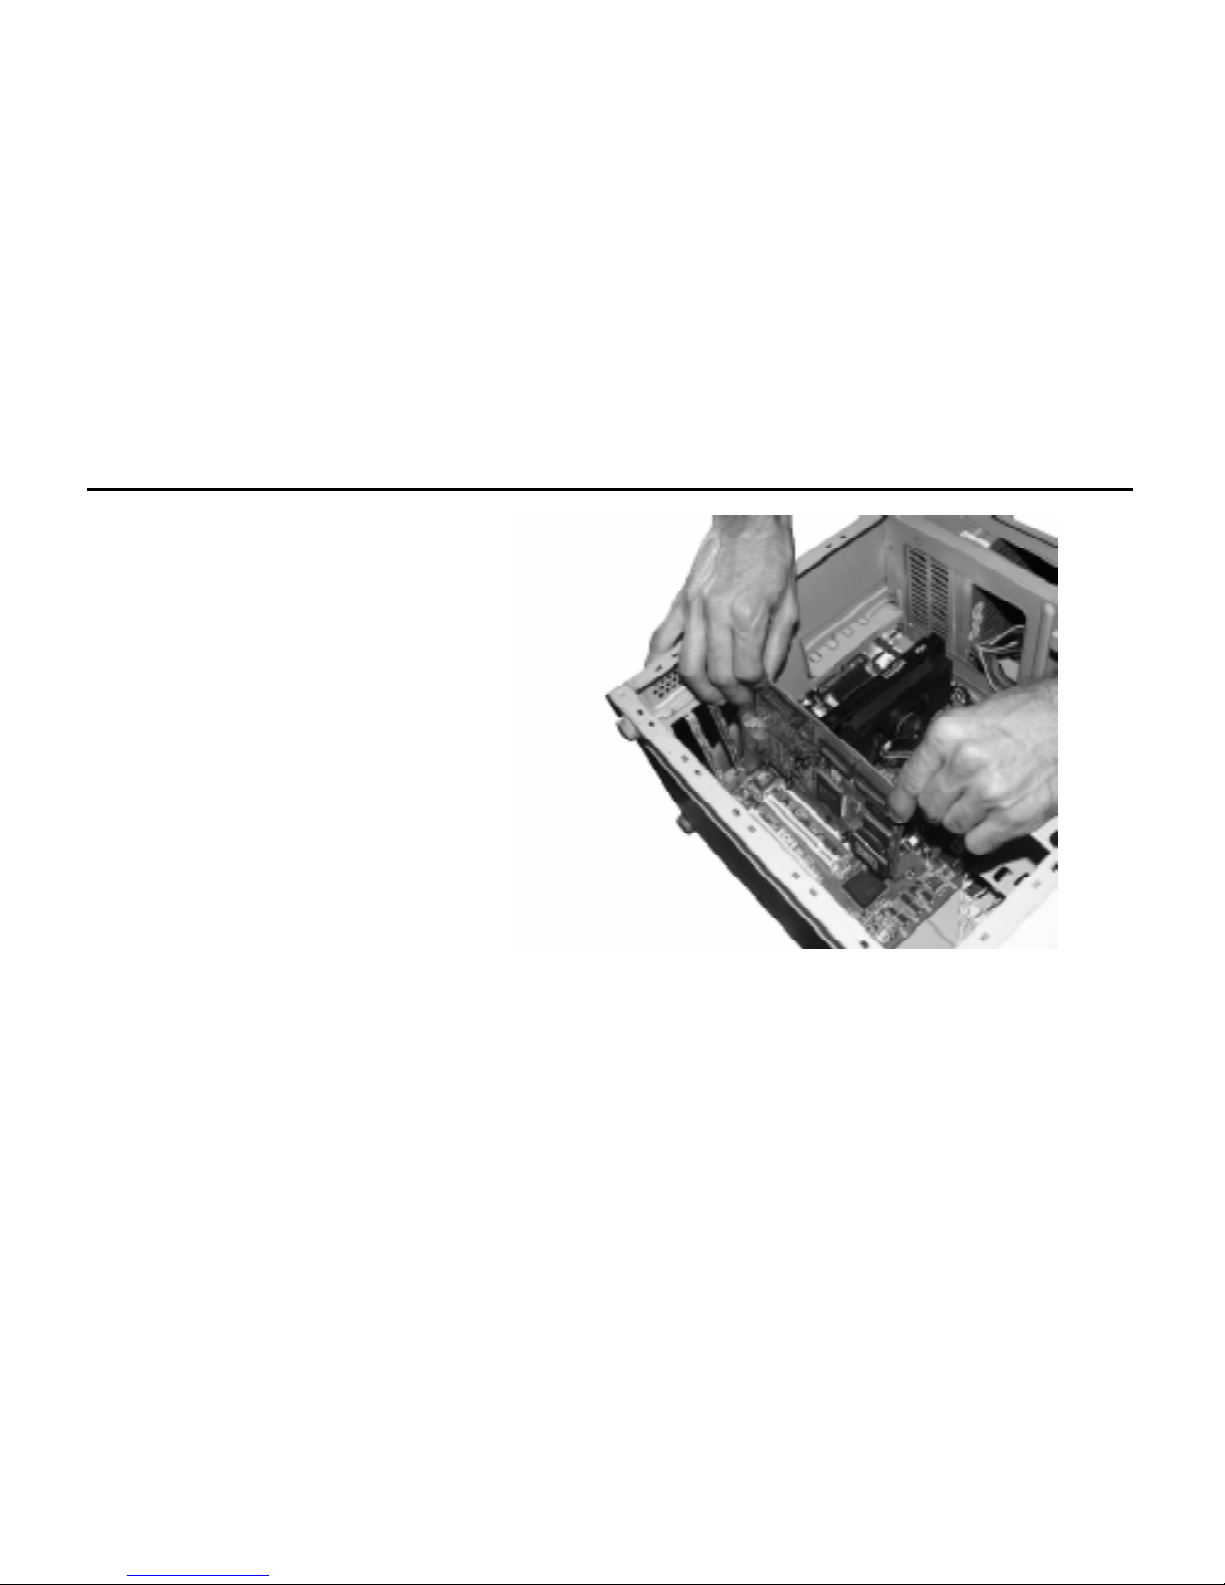
3. Remove any other video card in the
system or disable any video adapter that
is built into the motherboard. Please refer
to Appendix A for more information on built
in video adapters.
Step 3 Illustration
2-10
Page 19
4. If necessary, remove the expansion slot
cover to gain access to the AGP slot. Do
this by removing its screw and lifting out
the slot cover. Retain the screw for later
use in securing the EONtronics PCI or AGP
video card.
5. Verify that any video switches for the
computer are correctly set. Please refer
to your motherboard or system information
to determine if you need to do this.
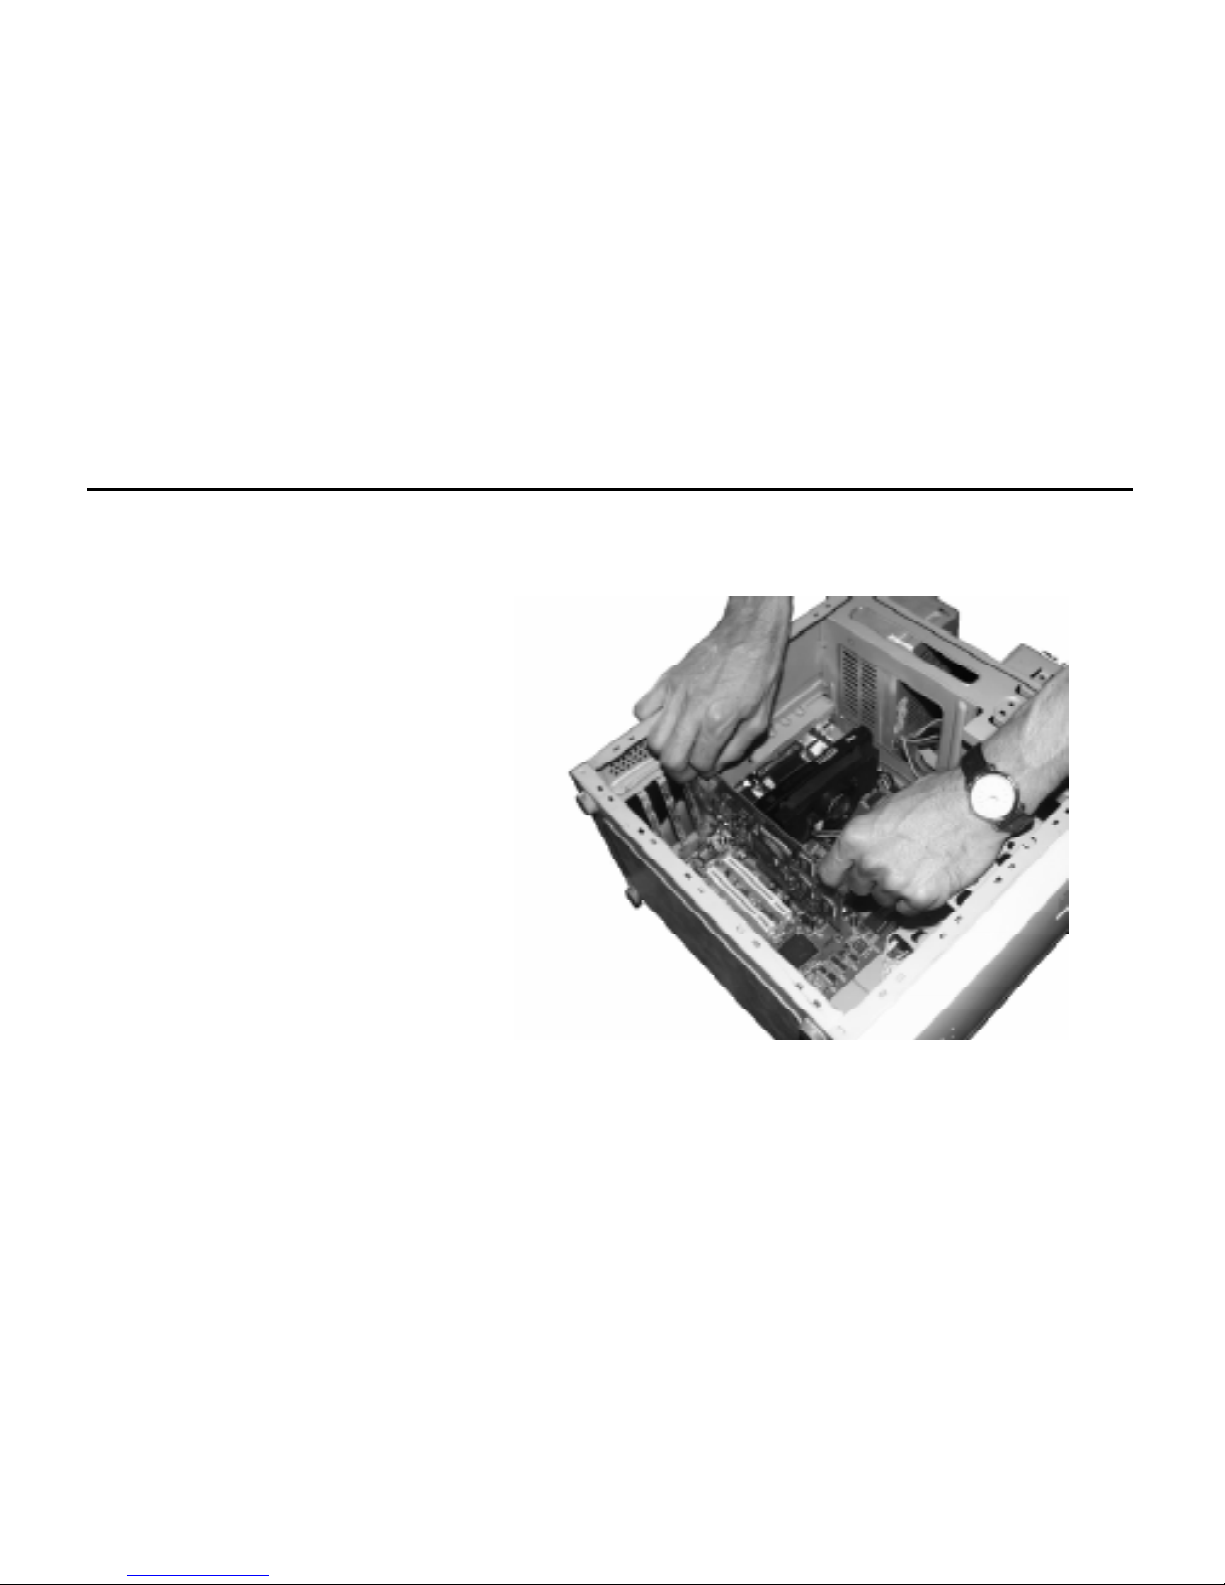
6. Hold the EONtronics video card by its
top corners and slide it into the AGP
expansion slot (refer to your system
manual). Line up the card so that it fits
into the slot guides at either end. The
board connector pins should line up this
the expansion slot underneath. Press
down on the card until it is firmly seated
in the expansion slot. The bracket should
be flush with the screw hole.
Step 6 Illustration
2-11
Page 20

7. Verify that the EONtronics video card
(except for the connector and bracket)
does not touch any components on the
motherboard or adjacent to the card.
Then, secure the card with the screw that
was previously removed in step 4.
8. Replace and secure the system cover.
9. Plug the monitor connector into the 15pin, D-shaped, analog video connector on
the EONtronics video card and secure it
with the mounting screws.
10. Place the monitors ON/OFF switch in
the ON position. This ensures that when
you turn on your system it can properly
identify the monitor type.
You are now ready to turn on your system.
2-12
Identification Notes
When installing your EONtronics video
card, it is useful to note the quantity and
type of expansion slots on your
motherboard.
With the motherboard in front of you, and
the expansion slots running left to right,
they typically are as follows:
Far left and black in color, the ISA slots
are 16 bit expansion slots used for older
legacy devices like modems and sound
cards.
To the right of the ISA slots, and typically
white in color, the PCI slots are 32 bit
expansion slots that are used for many of
todays modern expansion cards.
To the very right of PCI slots there is one
single brown slot that is set off center
when compared to the other slots. This is
the AGP slot. Please note that if you do
not have an AGP motherboard, that you
will not have this slot.
Page 21

After physically installing the EONtronics
Lilith Banshee video card in your computer
system, the computer must be set up to
recognize and take advantage of the new
card.
The methods of setup vary from operating
system to operating system. In the
Software Installation section, detailed
instructions are given for each of the
major operating systems that are
supported by the EONtronics Lilith
Banshee.
Please read the section that corresponds
to your operating system very carefully and
follow the instructions that are presented
there.
System Setup
The EONtronics Lilith Banshee is currently
supported in Microsoft Windows 95,
Windows 98, and Windows NT 4.0. If you
have an operating system other than
these, then you will need to consult your
operating system literature for instructions
and driver availability.
2-13
Page 22

Page 23

Software Installation
3-1
Page 24

The Software Installation section is divided
into installation procedures sections for
the following operating systems:
• Windows 95 and 98
• Windows NT 4.0
Please refer to the installation section that
matches your operating system and
carefully follow the installation instructions.
Software Overview
3-2
Page 25
Windows 95 and Windows 98 Driver Installation
General Instructions
Turn the computer on and allow the
operating system to start. Microsoft
Windows should automatically detect the
presence of the EONtronics PCI or AGP
graphics card and prompt you to install
the display driver for it.
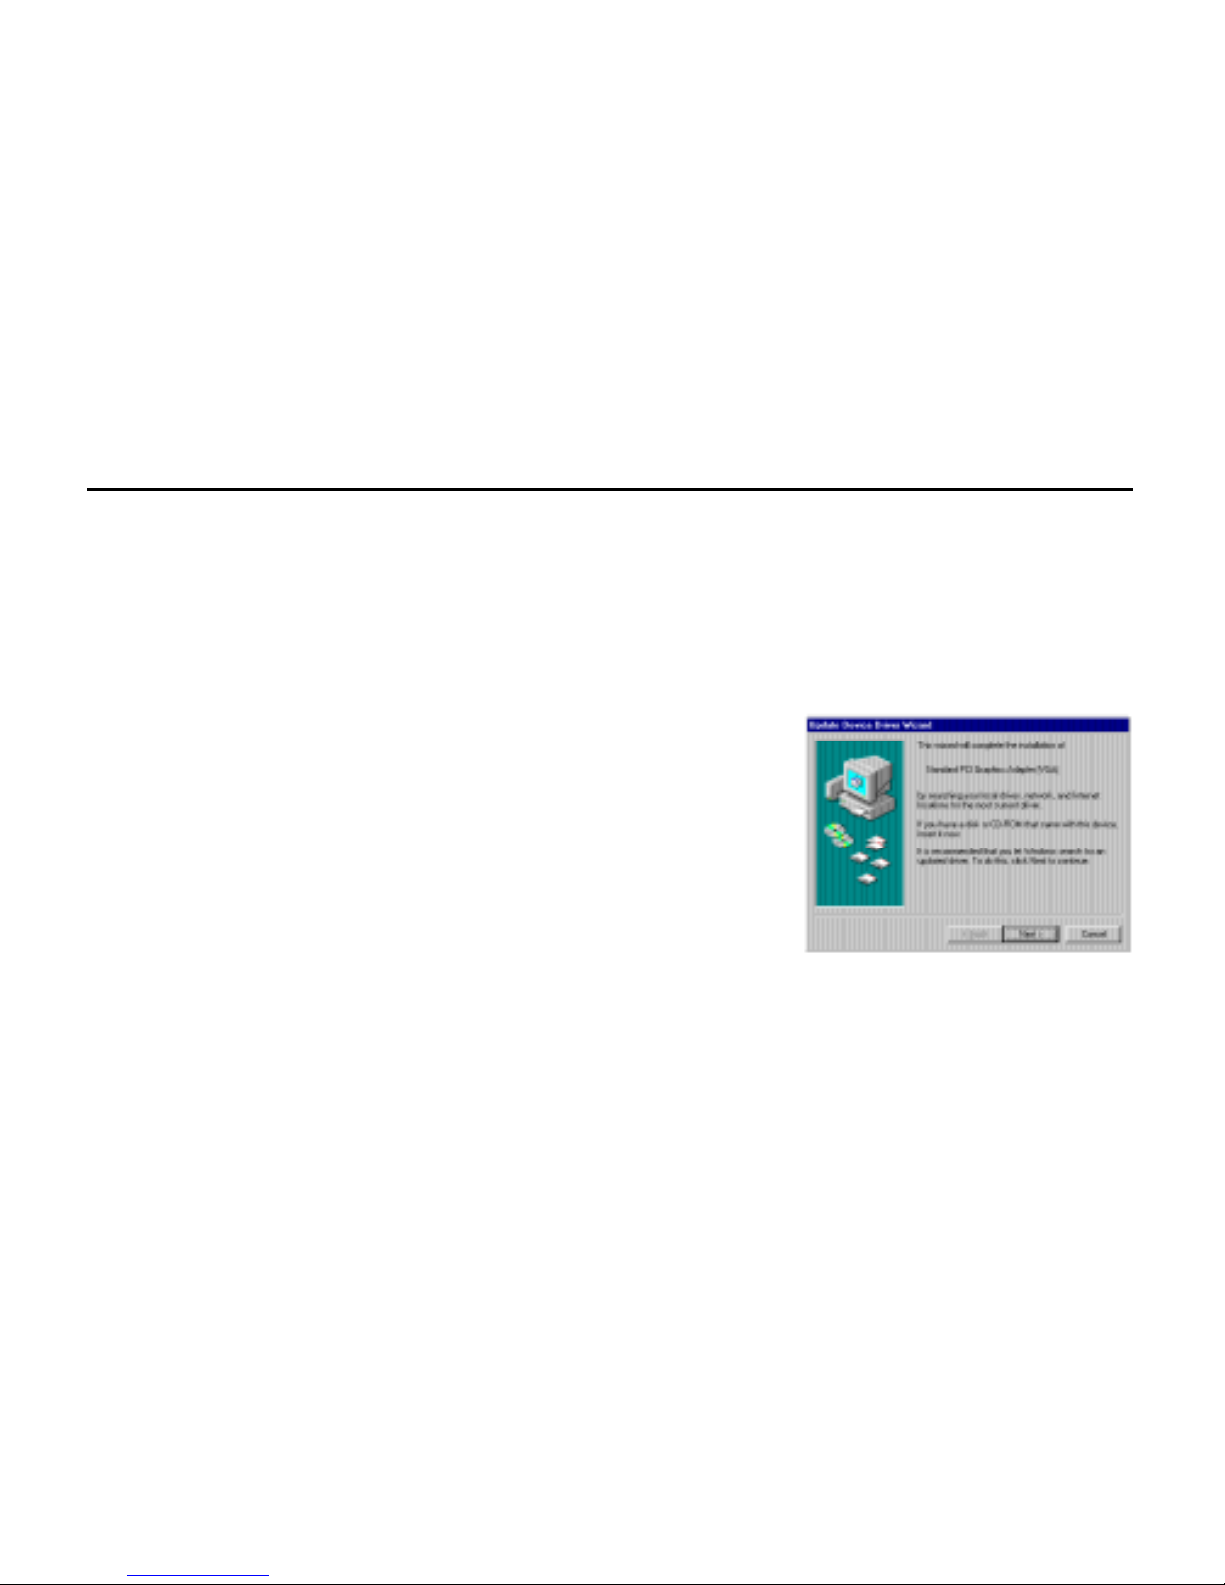
Windows will prompt you to install the
Standard PCI Graphics Adapter (VGA)
driver. Click Next and Finish to install the
standard driver, and then restart the
system when asked.
After the computer restarts, insert your
EONtronics EASi driver CD.
The CD should now autorun and bring up
the EASi installation menu. Choose the
Install Drivers button by clicking on it.
The automatic installation program will
then install the new video drivers and
configure your system to use the
EONtronics Lilith Banshee video card.
You will then be prompted to restart your
system. This may take a few moments,
especially if you are connected to a
network.
After your computer restarts you should
be able to change your video settings to
suit your tastes by using the Display
Control Panel. You can get to this control
panel by choosing the Start button, the
Settings, then Control Panel, then Display,
then the Settings Tab.
Windows 95
When installing in Windows 95, you will
want to follow these steps when setting
the system to use the Standard PCI
Graphics Adapter.
3-3
Figure 1-1: This is the screen that you will see as soon as the card is
detected. Click next until you get to the screen shown in Figure 1-2.
Page 26
3-4
Installation Note
If you receive a message that says that
the display adapter is not configured
correctly and you cannot get it to display
in anything greater than 640×480×16
colors then you may need to install AGP
drivers for the motherboard. Please see
Appendix C for more information.
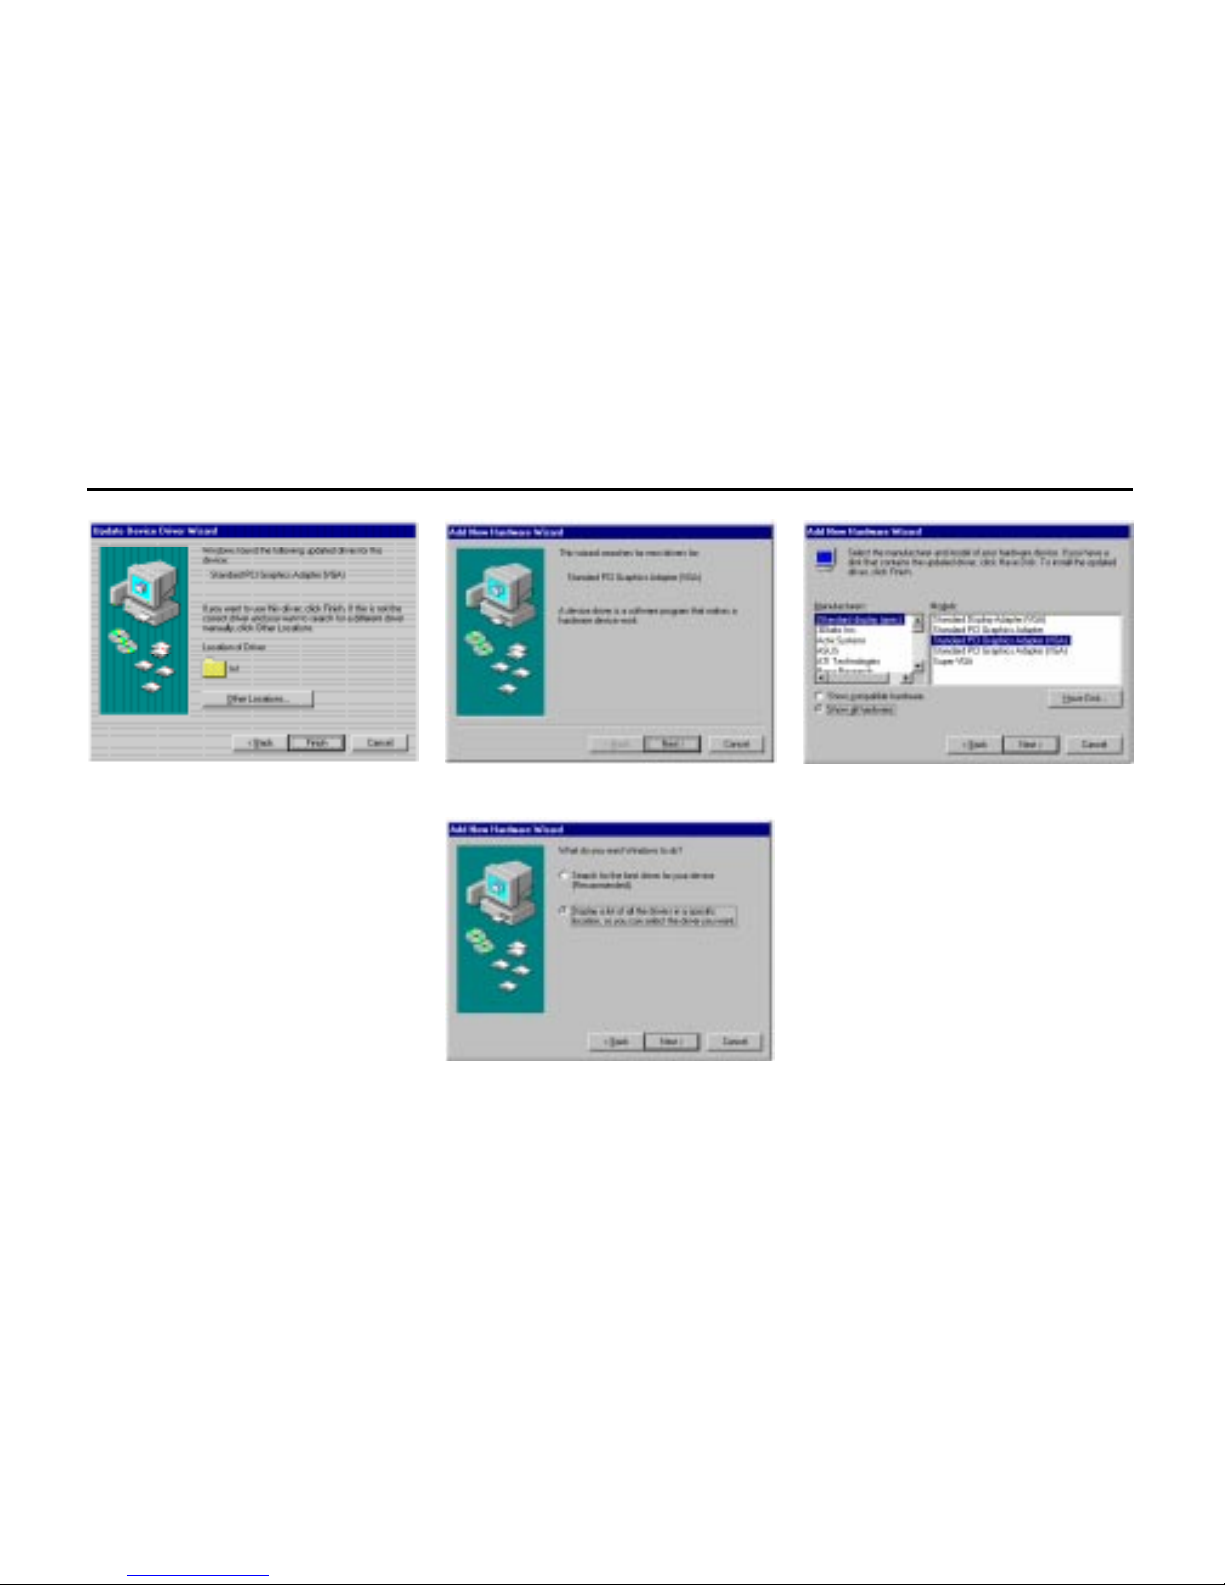
Figure 2-1: This is the display that you will see when the card is first
detected. Click Next until you get to the screen in Figure 2-2.
Figure 2-2: Choose Display a List of Drivers and click Next until you
get to the screen in Fig. 2-3.
Figure 2-3: Select and install the Standard PCI Graphics Adapter
(VGA) and click next to complete installation.
Windows 98
When installing the Standard PCI VGA
drivers in the Windows 98 operating
system, please refer to the following
images and information.
Figure 1-2: The system will now load the Standard VGA driver, click
Finish to complete the installation.
Page 27

3-5
Windows NT 4.0 Driver Installation
Start the computer in VGA mode. After
you have logged on, you will want to insert
the EONtronics EASi driver CD. The CD
will then autorun and display the EASi
installation menu.
Select the Install NT Drivers button by
clicking on it and then select the
EONtronics Lilith Banshee from the menu.
The drivers will then automatically install
into your system.
After this reboot, start your computer in
the regular mode, not the VGA mode as
before.
You should now be able to configure your
display properties to suit your needs.
Installation Note
If Windows NT says that it cannot
recognize the drivers or that the drivers
are old and you need to update them, then
it is very likely that you do not have Service
Pack 3 or 4 installed. Please see
Appendix B for more information of
installing this update to Windows NT.
Windows 2000 Note
Windows 2000, formerly Windows NT 5.0
is scheduled to be released some time in
1999. There will be many changes to the
installation instructions for this new
operating system. In general however, you
will be able to use the instructions for
Windows NT 4.0. Please note that any
changes to the drivers or the instructions
for Windows 2000 will be found on our
web site when the actual product is
released. Please refer to our website
(http://www.eontronics.com) for more
information.
Page 28

Page 29

Appendices
A-1
Page 30

Appendix A - Systems With Built In Video
If your computer system has a built-in
video adapter, that is, one that is integral
to the motherboard or system processor,
you will need to take special care to disable
it prior to installing another video card into
the system.
Many systems with built-in video have a
hardware jumper or switch that can be
used to disable the built-in video.
Other systems use a BIOS routine to
disable the onboard video, if a new video
card is placed in the system.
In either case, you will need to refer to
your motherboard, or computer system,
documentation to see what preparations
and procedures that you will need to follow
in order to disable the onboard video for
your system, as the different methods
used by various manufacturers are far to
numerous to detail here.
If you have any questions as to how to
proceed or if you encounter any problems
in disabling the onboard video, please
contact your motherboard or system
manufacturer for more detailed
assistance.
A-2
Page 31

Appendix B - Microsoft Operating System Updates
Windows 95
Since its release in 1995, there have been
numerous and sometimes revolutionary
changes in the computer world. Microsoft
has released updates and patches in an
effort to keep the operating system up to
date and to work with as much of the new
technology as possible.
The following are several of the most
common patches and updates, as well as
what they do, and why they are so needed.
PIIX4 Patch
The newer Intel chipsets such as the
i430TX, i440LX, and i440BX use a new
controller chip called the PIIX4 (this stands
for PCI IDE ISA eXcellerator version 4).
This chip is responsible for controlling the
PCI and ISA slots as well as controlling the
onboard IDE functions of the
motherboard.
Because of how new these chipsets are,
Windows 95 cannot recognize them, and
requires a patch to function correctly.
Without this patch, any device (such as a
video card) that would rely on this PIIX4
chip will not function correctly.
This patch is the responsibility of the
motherboard manufacturer, and tends to
show up in a variety of forms from
manufacturer to manufacturer.
In general, it tends to be called PIIX4.EXE
but can come under a variety of names.
This patch should be included on a floppy
disk or CD that comes with the
motherboard.
If you did not receive it with the
motherboard, or if you have questions
concerning its installation or use, please
contact your motherboard or system
manufacturer for more detailed
information.
USB Support For OSR2
This is a patch that Microsoft included with
newer versions of OSR2 (the OEM Service
Release 2 of Windows 95). The patch is
located on the Windows 95 installation CD
and must be installed to enable support
for USB devices and AGP video cards.
A-3
Page 32

The primary reason for needing this patch
to use AGP is the fact that it installs a new
memory manager that allows the AGP
DIME (DIrect Memory Execute) functions
to work correctly.
DIME essentially enables the AGP video
card to take advantage of, and use, system
memory to store bitmap textures and
other graphics information.
Without this patch installed, the EONtronics
Lilith Banshee will not be able to properly
initialize and will not operate in AGP mode.
This patch is available on your Microsoft
Windows 95 OSR2 with USB Support CD,
or on your Microsoft Windows 95 OSR/2.5
CD.
For OSR2 with USB, it is located in the
other/usb directory and is called
USBSUPP.EXE.
For OSR/2.5 it is located in the other/
updates/usb directory and comes in two
parts, USBSUPP.EXE and USBSUPP2.EXE.
Both of these need to be run.
For more information on installing the USB
Supplement please refer to your Microsoft
documentation. If you encounter a
problem installing this patch, please
contact your system manufacturer for
assistance.
Microsoft Direct X
Direct X is a standardized API (Application
Programming Interface) for the Microsoft
Windows family. It is what allows the
operating system to translate its
commands to your hardware drivers.
The primary advantage of the Direct X API
is the fact that it allows programmers to
write a single program independent of
your system devices and allow the
operating system to translate the
programs needs into the appropriate
commands to your hardware.
With the release of Direct X 5.0, Microsoft
included support for AGP graphics cards.
This is the primary reason that it is
important to installing the EONtronics Lilith
Banshee.
Without Direct X 5.0, the drivers for your
Lilith Banshee will not be correctly
A-4
Page 33

understood by the operating system, and
this can result in unsatisfactory
performance as well as errors and
aberrant operation.
EONtronics has included the newest
dristributable release of Microsoft Direct
X 5.0 on the EONtronics EASi driver CD. It
can be found in the DirectX directory.
Simply double click the dxsetup.exe icon
and your system will be updated.
Bus Master Drivers
With changes in technology, a form of IDE
control called Bus Mastering has come to
be developed.
Its most recent form is Ultra DMA/33.
The primary point behind bus mastering
IDE is to lower the CPU processing
requirements that occur when an IDE hard
drive or device is accessed. It is important
to remember that this method lowers the
CPU overhead for drive operations, and
that in and of itself does not make the
drive access any faster than traditional
methods. Bus master IDE finds its true
place in multi tasking systems where CPU
power is at a premium.
While this has little to do with AGP graphics
cards, it is included here because a
significant number of users experience
problems with these drivers, namely their
CD ROM drive stops working after they
install them.
This can cause problems if you need to
install drivers for the EONtronics PCI or
AGP graphics card from your installation
CD.
Before you install any bus mastering driver,
carefully read all of the attached
documentation to make sure that all of
your system components are compatible.
If they are not, or you are not sure, DO
NOT install them.
If you have installed them and need to
get rid of them, there are several ways
that are available, and much information
can be found on the internet regarding
this subject.
The simplest and surest way is,
unfortunately, to reinstall Windows 95.
A-5
Page 34

Windows NT
As with Windows 95, Windows NT 4 has
undergone changes in order to keep pace
with technology, as well as, to fix or refine
parts of the operating systems.
Microsoft has released these fixes in the
form of Service Packs that are used to
update and add functionality to your
Windows NT 4 system.
Most users either have no Service Packs
or just Service Pack 1 installed, as this is
how the operating system was shipped.
The most recent Service Pack, at the time
this manual was written, is Service Pack
4.
The important change in Service Pack 3
or 4, as far as it applies to AGP video cards,
is that Service Pack 3 or 4 allows Windows
NT 4 to use Direct X 5 drivers (for more
information on Direct X 5 please see the
preceding section on Direct X 5).
Without Service Pack 3 or 4, Windows NT
will be unable to correctly use your display
drivers, and you will be forced to use
640×480×16 colors.
If this happens to you, you can download
Service Pack 3 or 4 from the Microsoft
web site and install it on your system.
Then, reinstall the video drivers and your
computer should be working correctly.
A-6
Page 35

Appendix C - Socket 7 AGP Motherboards
The EONtronics Lilith Banshee AGP video
card is designed to work optimally with a
Pentium II processor. There are, however,
several Socket-7 AGP solutions that are
available in the market.
Because Intel chose not to make the
details of AGP available to other chipset
manufacturers, these other manufacturers
have reverse engineered AGP with varying
degrees of success.
The most important thing to remember
about the non-Intel AGP implementations
is that you MUST load a special AGP driver
that is provided by the chipset or
motherboard manufacturer in order to get
AGP to function correctly.
This driver is typically included on a CD or
floppy with the motherboard.
Another important point is that while you
may have this AGP driver installed, you may
not have a recent enough version of the
driver to support the AGP slot with your
system configuration.
Read your driver documentation carefully
to determine if your version supports the
3Dfx Banshee chip correctly. If you have
any questions or are unsure, contact your
motherboard manufacturer for more
information.
The most common Socket-7 AGP chipset
makers and their internet web site
addresses are listed to the right:
A-7
VIA:
http://www.via.com.tw
ALI:
http://www.ali.com.tw
SiS:
http://www.sis.com.tw
Please contact your respective chipset
manufacturer for more information
regarding AGP drivers for your
motherboard and operating system.
Note: Windows 98 does not ship with or
automatically install these drivers!
Page 36

Appendix D - Hardware Specifications
Generic Classification
Lilith Banshee (AGP DA911)
Lilith Banshee (PCI DP913)
Bus Type
AGP (DA911)
PCI (DP913)
Video Connectors
VGA standard 15-pin analog RGB
VESA Feature Connector
Display Memory
8/16 MB of 100 MHz SGRAM (DA911)
8/16 MB of 100 MHz SDRAM (DP913)
Graphics Chip
3Dfx Voodoo Banshee
RAMDAC
250 MHz
Maximum Resolution
1900 × 1440 × 16 bit colors @ 85 Hz
DCC Monitor Support
DDC-2B
A-8
Page 37

Appendix E- Trouble Shooting
Gathering Information
Troubleshooting starts with diagnosis and
progresses to solution. Before diagnosis
can begin, you will need to collect some
information. This is especially important
if you dont already know the contents of
your computer and are planning to call
technical support.
Some of the basic steps you need to take
before making a call to technical support
are as follows:
• See if the monitor cable is securely
attached to the video card. Loose cables
are the most common cause of board
problems. If it is loose, secure it now and
see if the graphics card is functioning
correctly.
• See if the video card is seated correctly
on the motherboard. If the card is not
seated correctly, remove it and reseat it,
making sure that the entire connector is
inside the slot.
• Check to make sure that you installed
all of the necessary updates and patches
to your operating system. This can be
especially important when installing new
hardware. Please refer to the installation
sections of this user guide for more
information.
• Find out what other cards are in the
computer. Cards can conflict with one
another, and resolution of these conflicts
varies depending on what boards are
present.
• Find out what versions of the drivers,
operating systems, and related software
are installed on your computer.
• Gather some history. Did the graphics
card ever work in this computer? If so,
was anything changed or added to the
computer just before it stopped working?
Was the graphics card moved from a
different computer where it was working
fine? Is the graphics card new?
The answers to these questions will speed
up the diagnosis process dramatically and
may even enable you to correct a problem
without resorting to technical support.
A-9
Page 38

Solutions to Common Problems
Listed below are some of the most
common problems that are encountered
with graphics cards, as well as solutions
for them. Please refer to this section
before calling technical support.
The graphics card stopped working when
a software package was added to the
computer.
Verify that the monitor cable is still
attached to the connector on the back of
the video card.
Direct X 5 may not be installed, or an older
version of Direct X may be installed. Most
programs that use Direct X install it as
part of their installation, but some do not.
Also, some older programs may install an
earlier version of Direct X, overwriting the
later version.
The graphics card stopped working
without apparent cause.
Verify that the monitor cable is still
attached to the connector on the back of
the video card.
The graphics card stopped working
when another board was added to the
computer.
Verify that the monitor cable is still
attached to the connector on the back of
the video card.
Some computers may not properly detect
the addition or change of an internal PCI
or AGP card. On start up, the computer
may beep differently from normal to
indicate this error. Reset your computers
CMOS. This is usually done through a
switch or jumper on the motherboard of
your computer. Check your system manual
or contact your motherboard or system
manufacturer for instructions on how to
do this.
An application stopped working since the
graphics card was added.
There could be a conflict between the
application and the card. Make sure that
you have installed the latest drivers that
are available for your graphics card. Try
disabling Hardware Acceleration in the
Advanced Graphics Setting of the system
A-10
Page 39

application in the Windows Control Panel
if the problem is specific to a single
application.
Direct X 5 may not be installed, or an older
version of Direct X may be installed. Most
programs that use Direct X install it as
part of their installation, but some do not.
Also, some older programs may install an
earlier version of Direct X, overwriting the
later version.
The computer will not boot after installing
the graphics card.
Verify that the monitor cable is still
attached to the connector on the back of
the video card.
Some computers may not properly detect
the addition or change of an internal PCI
or AGP card. On start up, the computer
may beep differently from normal to
indicate this error. Reset your computers
CMOS. This is usually done through a
switch or jumper on the motherboard of
your computer. Check your system manual
or contact your motherboard or system
manufacturer for instructions on how to
do this.
Your computer beeps during POST or the
AGP card is detected incorrectly.
If another graphics card is plugged into
an expansion slot, remove it. If a graphics
chip is built in to your motherboard, your
system may not have automatically
disabled it. Check your system manual
for instructions on how to manually disable
it or contact your motherboard or system
manufacturer.
The files containing the driver may have
become corrupt. Reinstall the driver and
try again.
The monitor doesnt display correctly
after installing the graphics card.
The driver may be trying to use settings
that your monitor doesnt support. This
often happens with older monitors. This
could also happen if a monitor was never
selected in Windows and you changed the
resolution to one that your monitor does
not support correctly, or if you changed
the monitor connected to your computer
without changing the monitor setting.
A-11
Page 40

The enclosed program(s) ar e proprietary products of EONtronics Corporation and are protected by copyright law. EONtronics Corporation
retains title and ownership of the program(s).
The enclosed software pr ogram(s) is provided for retail and end-user
customers only. Unauthorized duplication of the enclosed pr ogram(s)
is prohibited.
Carefully read the following terms and conditions before opening the
diskette or CD-ROM (media) package. Opening this media package
indicates your acceptance of these terms and conditions. If you do not
agree with these terms, you should promptly return the unopened
product to the place of purchase for a full refund.
License
You may:
License and Copyright Agreement
Use the program(s) on a single machine.
Copy the program(s) into any machine reada ble for m only for backup
or modification purposes in the suppor t of your authorized use of the
program(s) on a single machine; and
Transfer all copies of the program(s) and this license to another party
if the other par ty agrees to accept the terms and conditions of this
agreement. If you make such a transfer, you must at the same time
either transfer all the copies of the program(s) to the same party or
destroy any copies not transferred; this inc ludes all modifications and
portions of the program(s) contained or mer ged into other programs.
Upon transfer of the program(s) and the license, your license under
this agreement is automatically terminated.
You Must Not:
Copy the program(s) UNLESS you also reproduce and include all
copyright notices on your copy, modification or portion merged into
other programs;
Use, copy or transfer the program(s) EXCEPT as expr essly provided in
this agreement;
Translate, reverse engineer, decompile or disassemble the program(s);
Rent, sublicense, assign or transfer this license or the program(s)
EXCEPT as expressly provided in this agreement. Any attempt otherwise
to rent, sublisence, assign or transfer any of your rights, duties or
obligations under this agreement is void; and
Ship or transmit (directly or indir ectly) any copies of this program(s),
or any technical data in the program(s) or its media, or any direct
product thereof, to any country or destination prohibited by the United
States Government.
case where significant damage or injury to persons, property or
business may happen if an er ror occurs. You expressly assume all risk
for such use. Your license does not include any assumption of risk by
EONtronics Corporation. The program(s) is licensed with all faults.
EONtronics makes no warranties, either expressed or implied, with
respect to the program(s) or as to its quality, performance,
merchantablility, or fitness for any par ticular purpose. The entire risk
as to the quality and performance of the program(s) is on you. If the
program(s) proves defective following its purchase, you (and not
EONtronics Corporation or its distributors or dealers) assume the
entire cost of all necessar y corrections. In any event, any warranties
required by law or implied under this agreement are extended only to
you.
In no event will EONtronics Corpor ation be liable to you for any damages,
including any lost profits, lost savings or other incidental or
consequential damages arising out of your use or inability to use the
program(s) even if a representative of EONtronics Corporation itself
has been advised of the possibility of such damages, or for any claim
by any other party. Some states do not allow limitations or exclusion of
liability for incidental or consequential damages in which case this
limitation may not apply to you.
Exclusions and Limitations of Liability
If media in this package is defective, EONtronics Corpor ation will replace
it at no charge, if the defective media is returned within 90 days of the
date of acquisition.
EONtronics Corpor ation does not warrant that the functions contained
in the program(s) will meet your requirements, or will operate in the
hardware or software combinations that you may select, or that the
operation of the program(s) will be uninterrupted or error free. Do
not use the program(s) in any
Disclaimer of Warranties:
Warranty:
B-1
Page 41

 Loading...