

EO Tempod 20B, Tempod 50XB, Tempod 100XB, Tempod 200XB Quick Manual
QG_180709 REV. A
Quick Guide
1> Connect to Data Logger via Bluetooth
Open TempSen Go App on your smart device, tap any data logger shown on Device page to connect
to this data logger. When in Device page, TempSen Go will automatically scan and search all TempSen
Bluetooth loggers within communication range (30 meters sight range).
You need to enter correct AccessKey if current data logger was protected with AccessKey with protection
level 2. You could scan the QR code on front side of logger to connect to this logger directly.
2> Conguration (3 options)
▼ Congure Device via TempSen Go App
App changes to Device Connected page after successfully connecting to data logger, tap button at
bottom bar to enter into Configure Device page, in which you could select and enter parameters you
need for configuration, and then tap at bottom to apply these configurations to data logger connected.
▼ Congure Device Online
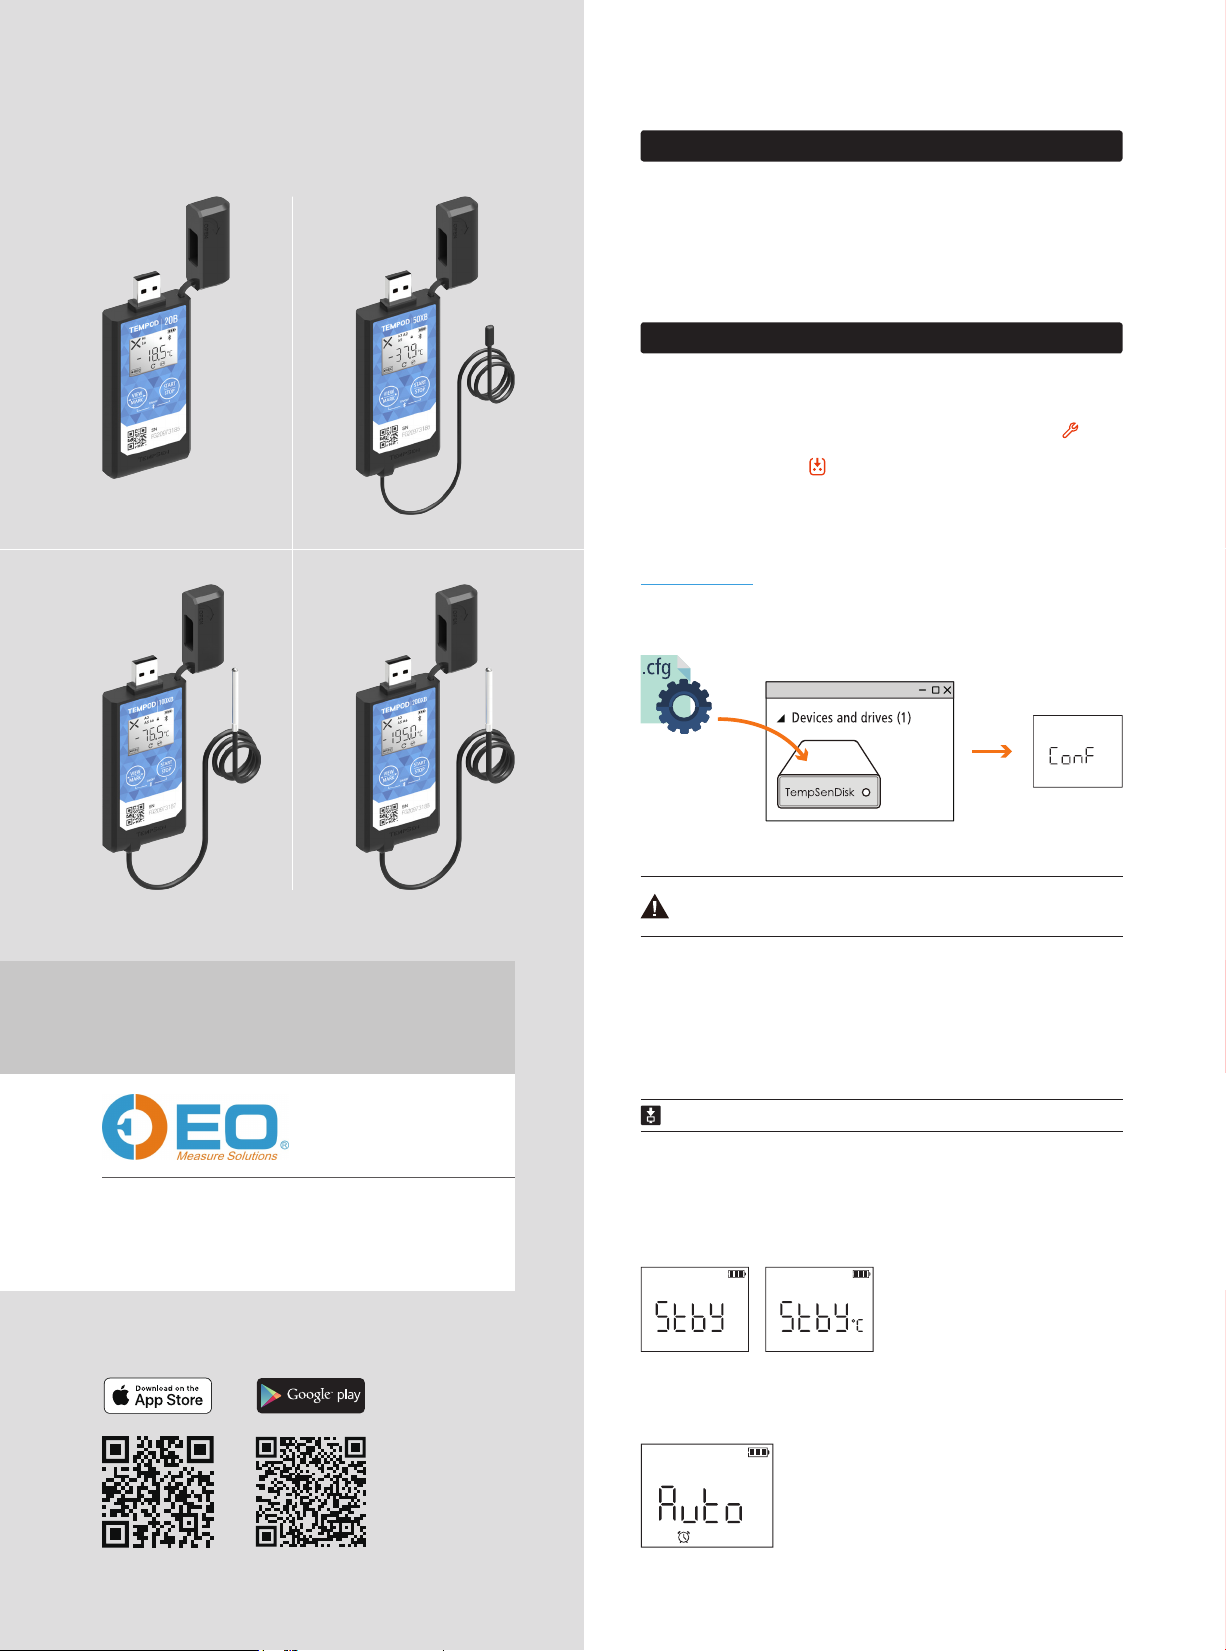
Connect Tempod® data logger to PC via USB connection, open online configuration portal
www.tempodlogger.com in internet browser, then select the device you are going to configure, input
configuration parameters, download configuration profile (.cfg) and save it to the logger created
Removable Storage Device "TempSenDisk" .
↑Configuration
success
Configuration profile created contains Local Time Zone information, so please download
new configuration profile when you are in different time zone to avoid time error.
Tempod® 20B / 50XB / 100XB / 200XB
Bluetooth® Temperature Data Logger
T: +86 755 8420 0058
F: +86 755 2571 2314
E: sales@eofirm.com
W: www.eofirm.com
▼ Congure Device via TempCentre
Connect logger to computer, open TempCentre software, move to Configure Device mode, enter
configuration parameters, and click on Apply to complete configuration. Please DO NOT remove logger
from PC before you are prompted of configuration success.
Please download TempCentre software from www.tempsen.com/software/tempcentre
▼ LCD After Conguration
↑Standby
Ready for Manual Activiation after configuration
(Press Start button to activate device). Temperature
unit appears in right indicating device was set to
condition start (After device manually activited,
recording begins after temperature meets preset
temperature conditions).
←Auto
Wait for recording begins at preset time automatically after
configuration.

Quick Guide
3> Start Recording
Press and hold button for 3 seconds to activate device and start recording.
Meanwhile (go) flashing on LCD reminds you to keep current button action.
←Start Delay (12.5 days)
LCD changes to time countdown if device was set to a start delay after
successful activation.
appears on downleft corner of LCD indicating recording begins.
You could also start recording via TempSen Go App on your mobile device, tap at bottom bar in
Device Connected page to start recording.
4> Stop Recording
Press and hold button for 3 seconds to manually stop recording, meanwhile (stop)
flashing on LCD reminds you to keep current button action until becomes static, recording stopped
successfully. You could also stop recording through TempSen Go App, tap at bottom bar in Device
Connected page to stop recording.
6> AccessKey
You could enable and apply AccessKey (Device Password) to data logger after connecting to logger
via App or during configuration, once applied, user will be required to provide correct AccessKey when
connecting to or programming data logger.
shows on LCD once AccessKey was enabled.
▼ Protection Levels
Protection level determines what actions user could take when connecting to an AccessKey protected
data logger through Bluetooth communication.
1 (Normal), AccessKey is not required when connecting to and downloading an AccessKey protected
logger, but AccessKey is required when performing further control actions like configuring, starting or
stopping logger.
2 (High), AccessKey is required when connecting to an AccessKey protected logger.
• AccessKey will be automatically synced to cloud after user logged into TempSen Cloud
on TempSen Go App, and users in the same organization with permission of Share
AccessKey will receive AccessKey automatically when connecting to this logger.
• Please contact us by sending email to support@tempsen.com if Accesskey was lost.
7> Other Actions
▼ Time Mark
5> Download Data (3 options)
▼ Download Data via TempSen Go App
Connect to Tempod® bluetooth logger via TempSen Go App, and then tap on bottom bar in Device
Connected page to download data from logger. Data downloaded will be saved in local database on
your smart phone, you could view all stored data files in Data Files pages, tap on title bar of App
screen to expand main menu, in which please tap Data Files to enter into Data Files page.
▼ Download PDF Report
Connect Tempod® logger to USB port, logger begins to generate PDF report automatically, and it would
take couple of seconds to complete. The PDF report will be available in logger created removable
storage device "TempSenDisk". Please copy the PDF report and save it to your computer.
↑Generating PDF ↑Connecting to USB
• Please DO NOT perform any "Save" or "Save as" actions within any PDF reader
software, otherwise content of PDF file will be reorganized by PDF reader and raw data
embedded in PDF file becomes unrecognizable.
• Please DO NOT remove Tempod from USB port while it's still in process of generating
PDF report.
Press button for 3 seconds to add a time stamped mark. Up to 9 marks available.
▼ Repeat Start
If device was set to Repeat Start during programming, then user could press to start a new
recording again directly after recording stops, no need to program device again.
8> Flight Mode
▼ Enable Flight Mode
You could let Tempod Bluetooth logger enters into flight mode in occasions where radio-frequency
signal transmisstion is not allowed. Connect to Tempod bluetooth logger via TempSen Go App, and then
enable Flight mode in Device Connected page. Logger in flight mode will suspend Bluetooth signal
transmisstion, so it will not be found or connected by TempSen Go App, but recording continues. User
could have logger quit Flight Mode by turnning on Bluetooth on logger manually or wake logger up
remotely.
shows on LCD after flight mode was enabled, meanwhile icon disappears.
• Please note logger with remaing battery of one bar (or lower) or in Stopped or Error
status could not enter into Flight mode.
• Please note logger in flight mode consumes more power than normal mode and
shorten battery life as result , so please DO NOT use flight mode frequently.
▼ Wake Up
You could wake logger up from flight mode by using Wake Up function. Tap Wake Up at bottom bar
of Devices page on TempSen Go App, TempSen Go will automatically wake up ALL nearby TempSen
Bluetooth loggers in flight mode, loggers waken up will turn on Bluetooth service.
▼ Download Data via TempCentre
You could also download Tempod using TempCentre software, connect device to computer, open
TempCentre software, and then TempCentre starts searching USB data logger and then downloading
data automatically.
• Please note Wake Up function NOT applicable on all mobile devices.
 Loading...