

Page 1
QG_180709 REV. A
Quick Guide
1> Connect to Data Logger via Bluetooth
Open TempSen Go App on your smart device, tap any data logger shown on Device page to connect
to this data logger. When in Device page, TempSen Go will automatically scan and search all TempSen
Bluetooth loggers within communication range (30 meters sight range).
You need to enter correct AccessKey if current data logger was protected with AccessKey with protection
level 2. You could scan the QR code on front side of logger to connect to this logger directly.
2> Conguration (3 options)
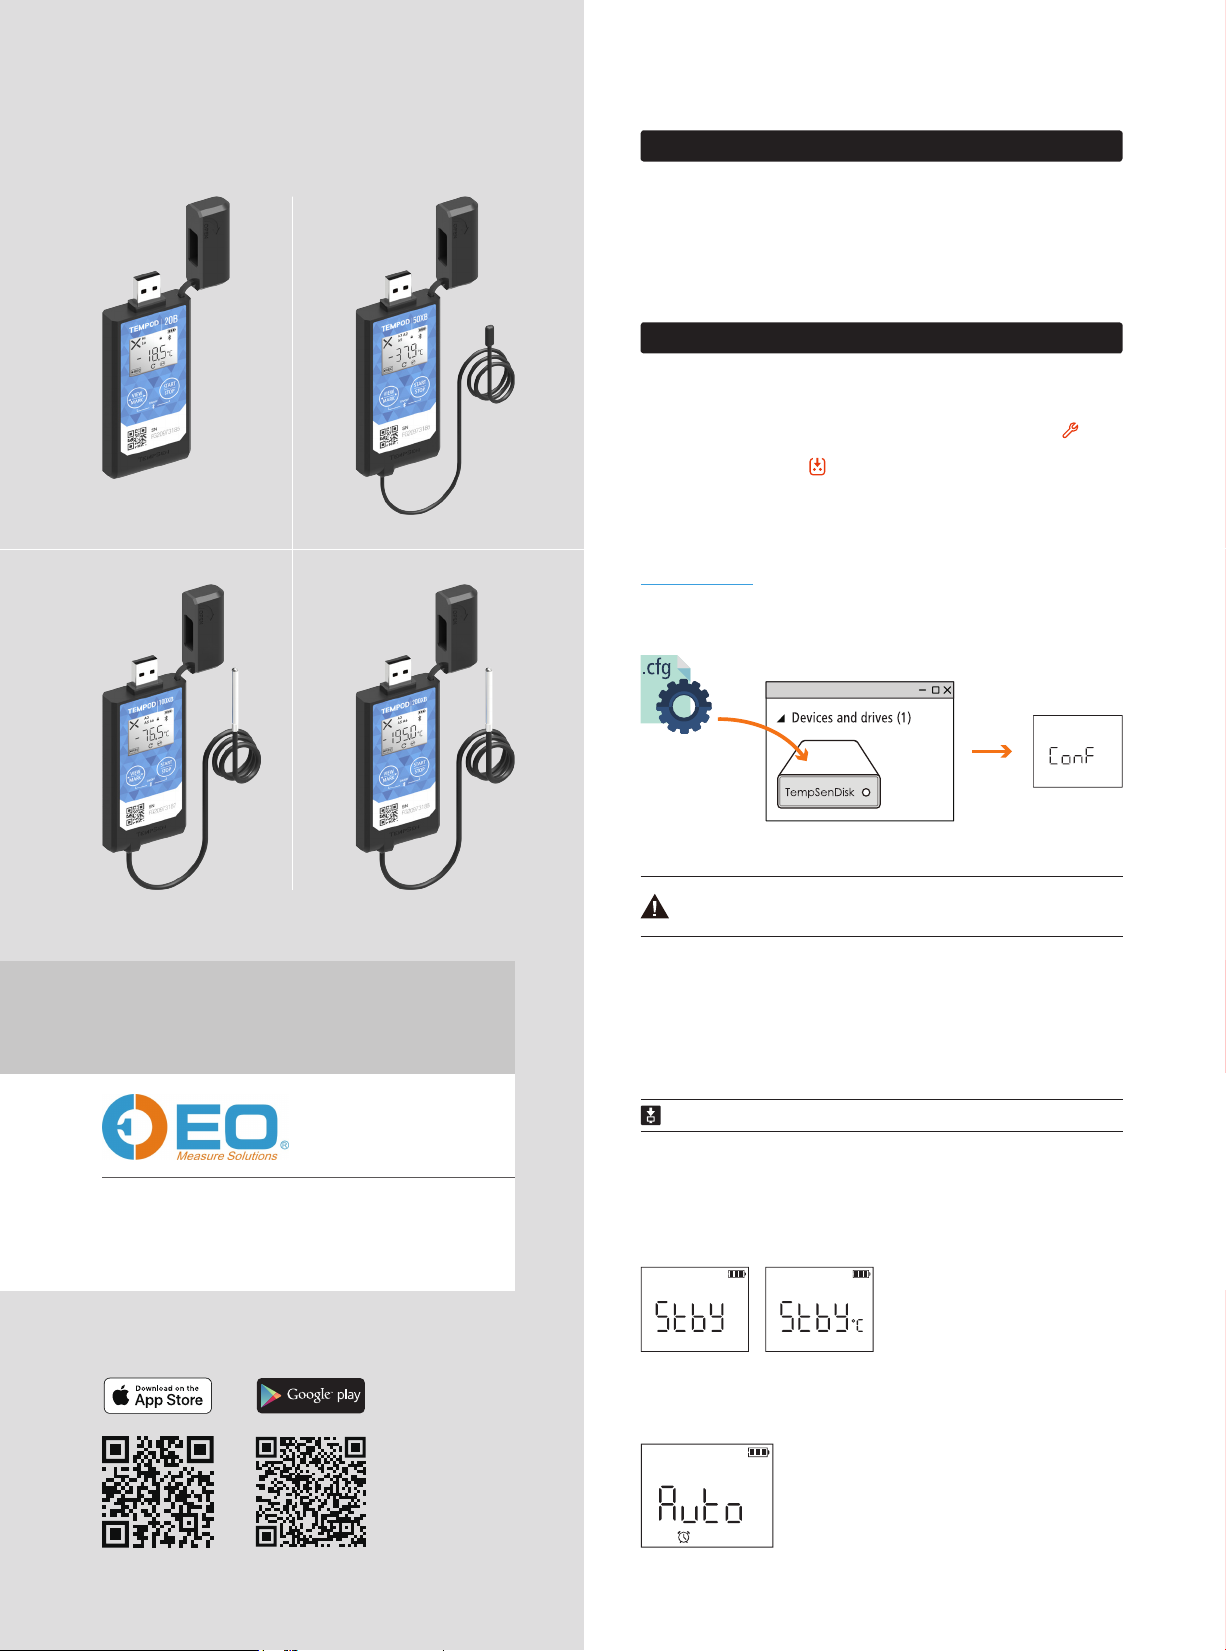
▼ Congure Device via TempSen Go App
App changes to Device Connected page after successfully connecting to data logger, tap button at
bottom bar to enter into Configure Device page, in which you could select and enter parameters you
need for configuration, and then tap at bottom to apply these configurations to data logger connected.
▼ Congure Device Online
Connect Tempod® data logger to PC via USB connection, open online configuration portal
www.tempodlogger.com in internet browser, then select the device you are going to configure, input
configuration parameters, download configuration profile (.cfg) and save it to the logger created
Removable Storage Device "TempSenDisk" .
↑Configuration
success
Configuration profile created contains Local Time Zone information, so please download
new configuration profile when you are in different time zone to avoid time error.
Tempod® 20B / 50XB / 100XB / 200XB
Bluetooth® Temperature Data Logger
T: +86 755 8420 0058
F: +86 755 2571 2314
E: [email protected]
W: www.eofirm.com
▼ Congure Device via TempCentre
Connect logger to computer, open TempCentre software, move to Configure Device mode, enter
configuration parameters, and click on Apply to complete configuration. Please DO NOT remove logger
from PC before you are prompted of configuration success.
Please download TempCentre software from www.tempsen.com/software/tempcentre
▼ LCD After Conguration
↑Standby
Ready for Manual Activiation after configuration
(Press Start button to activate device). Temperature
unit appears in right indicating device was set to
condition start (After device manually activited,
recording begins after temperature meets preset
temperature conditions).
←Auto
Wait for recording begins at preset time automatically after
configuration.
Page 2
Quick Guide
3> Start Recording
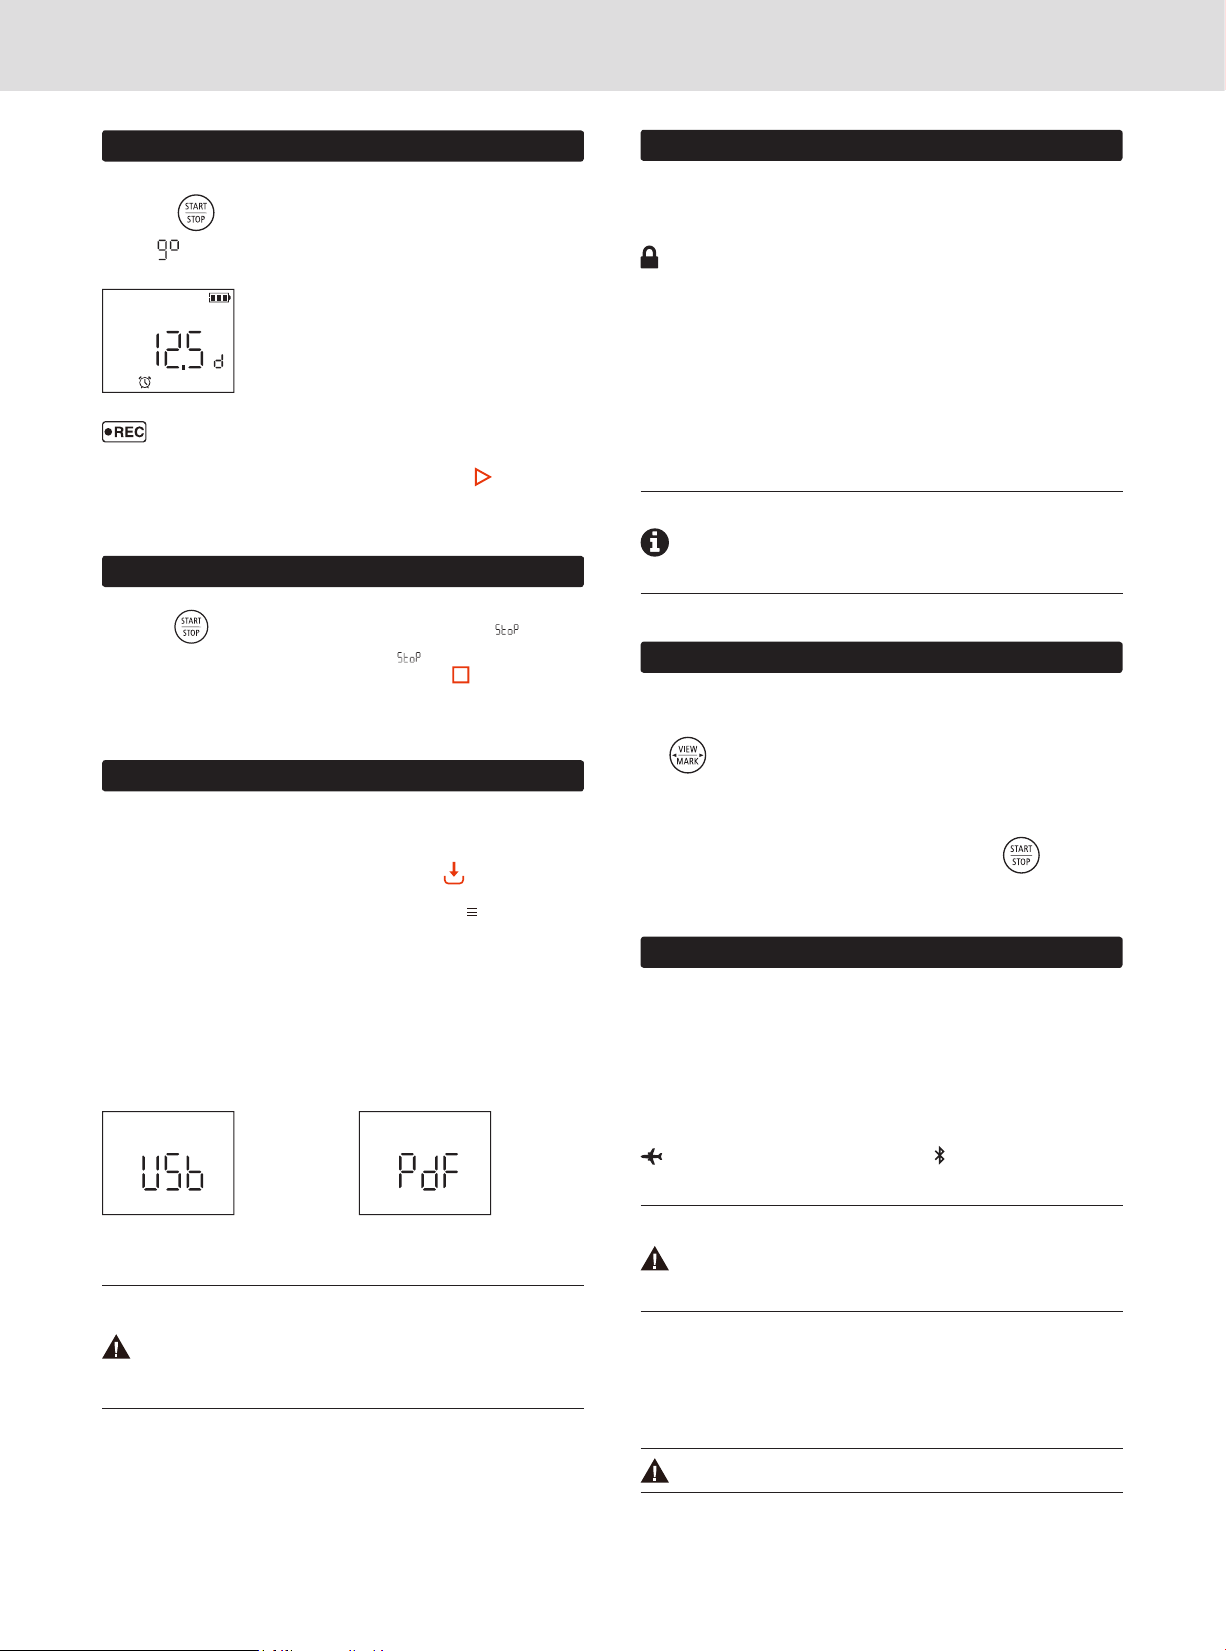
Press and hold button for 3 seconds to activate device and start recording.
Meanwhile (go) flashing on LCD reminds you to keep current button action.
←Start Delay (12.5 days)
LCD changes to time countdown if device was set to a start delay after
successful activation.
appears on downleft corner of LCD indicating recording begins.
You could also start recording via TempSen Go App on your mobile device, tap at bottom bar in
Device Connected page to start recording.
4> Stop Recording
Press and hold button for 3 seconds to manually stop recording, meanwhile (stop)
flashing on LCD reminds you to keep current button action until becomes static, recording stopped
successfully. You could also stop recording through TempSen Go App, tap at bottom bar in Device
Connected page to stop recording.
6> AccessKey
You could enable and apply AccessKey (Device Password) to data logger after connecting to logger
via App or during configuration, once applied, user will be required to provide correct AccessKey when
connecting to or programming data logger.
shows on LCD once AccessKey was enabled.
▼ Protection Levels
Protection level determines what actions user could take when connecting to an AccessKey protected
data logger through Bluetooth communication.
1 (Normal), AccessKey is not required when connecting to and downloading an AccessKey protected
logger, but AccessKey is required when performing further control actions like configuring, starting or
stopping logger.
2 (High), AccessKey is required when connecting to an AccessKey protected logger.
• AccessKey will be automatically synced to cloud after user logged into TempSen Cloud
on TempSen Go App, and users in the same organization with permission of Share
AccessKey will receive AccessKey automatically when connecting to this logger.
• Please contact us by sending email to [email protected] if Accesskey was lost.
7> Other Actions
▼ Time Mark
5> Download Data (3 options)
▼ Download Data via TempSen Go App
Connect to Tempod® bluetooth logger via TempSen Go App, and then tap on bottom bar in Device
Connected page to download data from logger. Data downloaded will be saved in local database on
your smart phone, you could view all stored data files in Data Files pages, tap on title bar of App
screen to expand main menu, in which please tap Data Files to enter into Data Files page.
▼ Download PDF Report
Connect Tempod® logger to USB port, logger begins to generate PDF report automatically, and it would
take couple of seconds to complete. The PDF report will be available in logger created removable
storage device "TempSenDisk". Please copy the PDF report and save it to your computer.
↑Generating PDF ↑Connecting to USB
• Please DO NOT perform any "Save" or "Save as" actions within any PDF reader
software, otherwise content of PDF file will be reorganized by PDF reader and raw data
embedded in PDF file becomes unrecognizable.
• Please DO NOT remove Tempod from USB port while it's still in process of generating
PDF report.
Press button for 3 seconds to add a time stamped mark. Up to 9 marks available.
▼ Repeat Start
If device was set to Repeat Start during programming, then user could press to start a new
recording again directly after recording stops, no need to program device again.
8> Flight Mode
▼ Enable Flight Mode
You could let Tempod Bluetooth logger enters into flight mode in occasions where radio-frequency
signal transmisstion is not allowed. Connect to Tempod bluetooth logger via TempSen Go App, and then
enable Flight mode in Device Connected page. Logger in flight mode will suspend Bluetooth signal
transmisstion, so it will not be found or connected by TempSen Go App, but recording continues. User
could have logger quit Flight Mode by turnning on Bluetooth on logger manually or wake logger up
remotely.
shows on LCD after flight mode was enabled, meanwhile icon disappears.
• Please note logger with remaing battery of one bar (or lower) or in Stopped or Error
status could not enter into Flight mode.
• Please note logger in flight mode consumes more power than normal mode and
shorten battery life as result , so please DO NOT use flight mode frequently.
▼ Wake Up
You could wake logger up from flight mode by using Wake Up function. Tap Wake Up at bottom bar
of Devices page on TempSen Go App, TempSen Go will automatically wake up ALL nearby TempSen
Bluetooth loggers in flight mode, loggers waken up will turn on Bluetooth service.
▼ Download Data via TempCentre
You could also download Tempod using TempCentre software, connect device to computer, open
TempCentre software, and then TempCentre starts searching USB data logger and then downloading
data automatically.
• Please note Wake Up function NOT applicable on all mobile devices.
Page 3
Tempod® 20B / 50XB / 100XB / 200XB
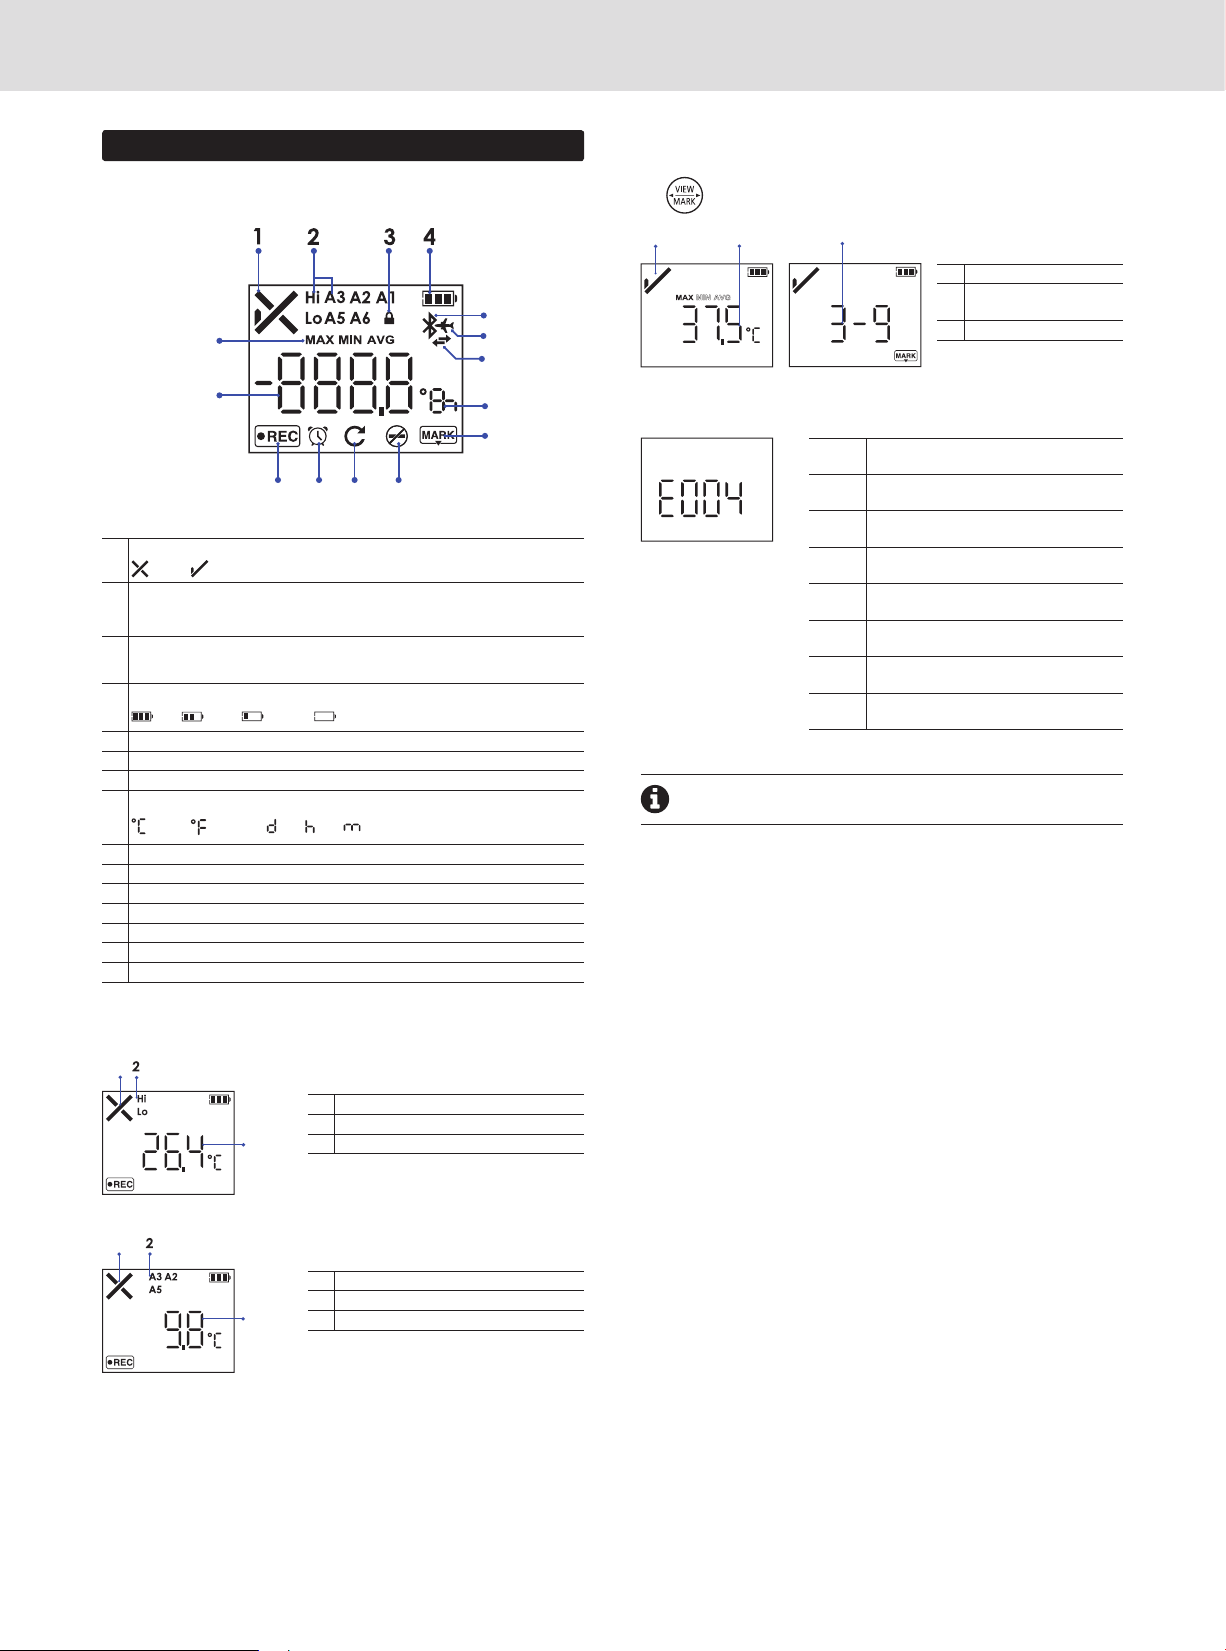
9> LCD
▼ Full Screen
15
14
13
Overall Alarm Status
1
Alarm, OK
Alarm Zones
2
Hi (High), Lo (Low)
A1, A2, A3, A5, A6
3 Password (AccessKey) Protected
Remaining battery level
4
Full Good Medium Low
5 Bluetooth
6 Flight mode
7 Bluetooth communicating
Units
8
Celsius , Fahrenheit , day , hour, minute
9 Mark
10 Stop Button Disabled
11 Repeat Start Enabled
12 Clock
13 Running Status: Recording
14 Reading
15 Statistics
...
▼ Logging Statistics
Click button to step through following recording statistics screens.
1
2
5
6
3
1 Status: OK
Statistics
2
Max: 37.5°C
3 Marked events: 3
7
8
9
101112
▼ Errors
↖Error: 004
Error message appears
on device LCD when error
condition occurs.
Please re-configure device to eliminate error.
Error 004
E004
Device reset
Error 006
E006
Start time error
Error 009
E009
Start failure due to low battery
Error 101
E101
CFG file checksum error
Error 102
E102
CFG file error, incorrect device model
Error 104
E104
CFG file error, incompatible device version
Error 105
E105
CFG file error, missing or incorrect AccessKey
Error 106
E106
CFG file error, incorrect auto start time
▼ Home Screens
1
1
1 Status: Alarm
2 Alarmed Zones: High, Low
3
3
3 Current Reading: 26.4°C
1 Status: Alarm
2 Alarmed Zones: A2, A3, A5
3 Current Reading: 9.8°C
Page 4
Quick Guide
10> Battery
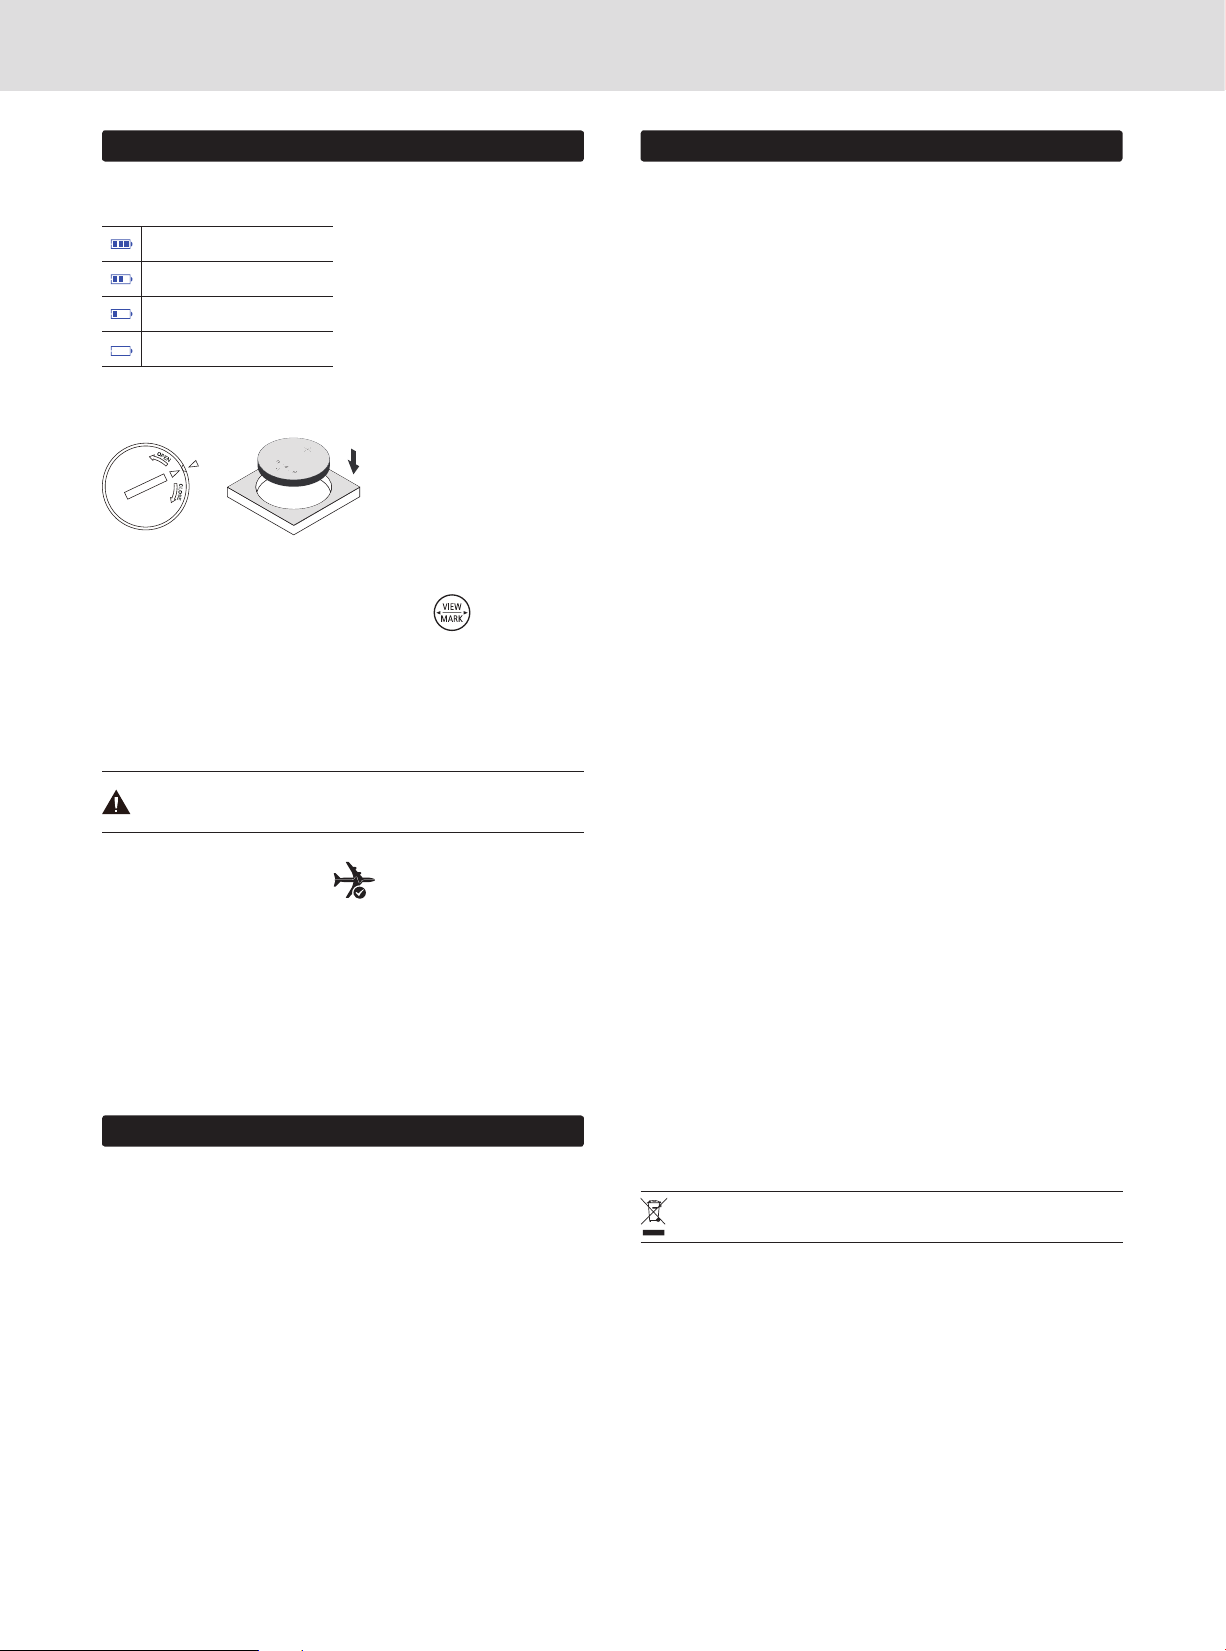
▼ Battery Indicator
Full
Good
Medium
LOW
Please raplace battery ASAP
Battery indicator may not accurately reflect actual
remaining battery in different low temperature
conditions.
▼ Replace Battery
• Please insert a coin in the groove on battery compartment cover to spin it in the direction of OPEN
to open battery cover, and take battery out, then please press button several times
until LCD changes to blank, otherwise volume of new battery would not be correctly recognized
within one hour after battery replacement.
• Place a new Panasonic CR2450 battery into battery compartment with positive side upward.
• Put cover back to compartment in the position where triangle on cover points to the triangle on
logger, then spin cover in the direction of CLOSE to close battery cover.
Please DO NOT remove battery during recording or after configuration, otherwise error
will occur.
Qualified for Air Transportation Monitoring
Battery supplied with Tempod passed the Part III, SubSection 38.3 of the UN Manual of Tests and
Criteria. Tempod® data logger is also certified to meet requirements in General Requirements and
Section II of Packaging Instruction 970, IATA Dangerous Goods Regulations 58th Edition. Tempod®
complies with RTCA-DO160G Environmental Conditions and Test Procedures for Airborne Equipment,
it's allowed to used in air freight in active status.
11> Important Usage Information
12> Warranty
TempSen warrants this TempSen-branded hardware product against defects in materials
and workmanship under normal use for a period of ONE (1) YEAR from shipment date
(“Warranty Period”). If a hardware defect arises and a valid claim within the Warranty
Period, as its option and to the extent permitted by law, TempSen will either (1) repair the
hardware defect at no charge, using new parts or parts equivalent to new in performance
and reliability, (2) exchange the new product with a product is new or equivalent to new in
performance and reliability and is at least functionally equivalent to the original product, or (3)
refund the purchase price of this product. TempSen may request that you replace defective
parts with new or refurbished user-installable parts that TempSen provides in fulfillment
of its warranty obligation. A replacement product or parts, including a user-installable part
that has been installed in accordance with instructions provided by TempSen, assumes the
remaining warranty of the original product or ninety (90) days from the date of replacement
or repair, whichever provides longer coverage for you. When a product or part is
exchanged, any replacement item becomes your property and the replaced item becomes
TempSen’s property. Parts provided by TempSen in fulfillment it’s warranty obligation must
be used in products for which warranty service is claimed. When a refund is given, the
product for which the refund is provided must be returned to TempSen and becomes
TempSen’s property.
EXCLUSIONS AND LIMITATIONS
This Limited Warranty applies only to the hardware product manufactured by or for
TempSen that can be identified by the “TempSen” trademark, trade name, or logo affixed
to it. The Limited Warranty does not apply to any non-TempSen hardware product or
any software, even if packaged or sold with the TempSen hardware. Manufacturers,
suppliers, publishers, other than TempSen, may provide their own warranties to the end
user purchaser, but TempSen, in so far as permitted by law, provides their products “as
is”. Software distributed by TempSen with or without the TempSen brand name (including,
but not limited to system software) is not covered under this Limited Warranty. Refer to the
licensing agreement accompanying the software for details of your rights with respect to its
use.
TempSen does not warrant that the operation of product will be uninterrupted or errorfree. TempSen is not responsible for the damage arising from failure to follow instructions
relating to the product’s use.
This warranty does not apply: (a) to consumable parts, such as batteries, unless damage
has occurred due to a defect in materials or workmanship; (b) to cosmetic damage,
including but not limited to scratches, dents, and broken plastic on ports; (c) to damage
caused with non-TempSen products; (d) to damage caused by accident, abuse, misuse,
flood, fire, earthquake, or other external causes; (e) to damage caused by operating the
product outside the permitted or intended uses described by TempSen; (f) to damage
caused by service (including upgrades and expansions) performed by anyone who is not
a representative of TempSen or TempSen Authorized Service Provider; (g) to a product or
part that has been modified to alter functionality or capability without the written permission
of TempSen; or (h) if any TempSen serial number has been removed or defaced.
IMPORTANT: DO NOT OPEN THE HARDWARE PRODUCT. OPENING THE HARDWARE
PRODUCT MAY CAUSE DAMAGE THAT IS NOT COVERED BY THIS WARRANTY. ONLY
TEMPSEN OR AN AUTHORIZED SERVICE PROVIDER SHOULD PERFORM SERVICE ON
THIS HARDWARE PRODUCT.
• Please open the cap of battery compartment and remove battery isolation strip before use.
• You could choose to Show Tabular Data in PDF report during configuring device, but please note
that it will take at around one minute to create PDF report with 28800 data points in tabular data
pages after device connected to computer. Computer is not able to discover device connected until
PDF report generation completes.
• Please DO NOT use the device if LCD no response or shows error (i.e E004) after activated.
• If error occurs after configuration, please try to re-configure data logger to eliminate error.
• Please DO NOT place device but only external probe (if any) in environment lower than -30°C to
avoid possible damage to device.
Please follow local regulations when recycling or disposing of wasted electronics.
 Loading...