

Page 1
Quick Start Guide
eo™ a7330 Ultra-Mobile PC
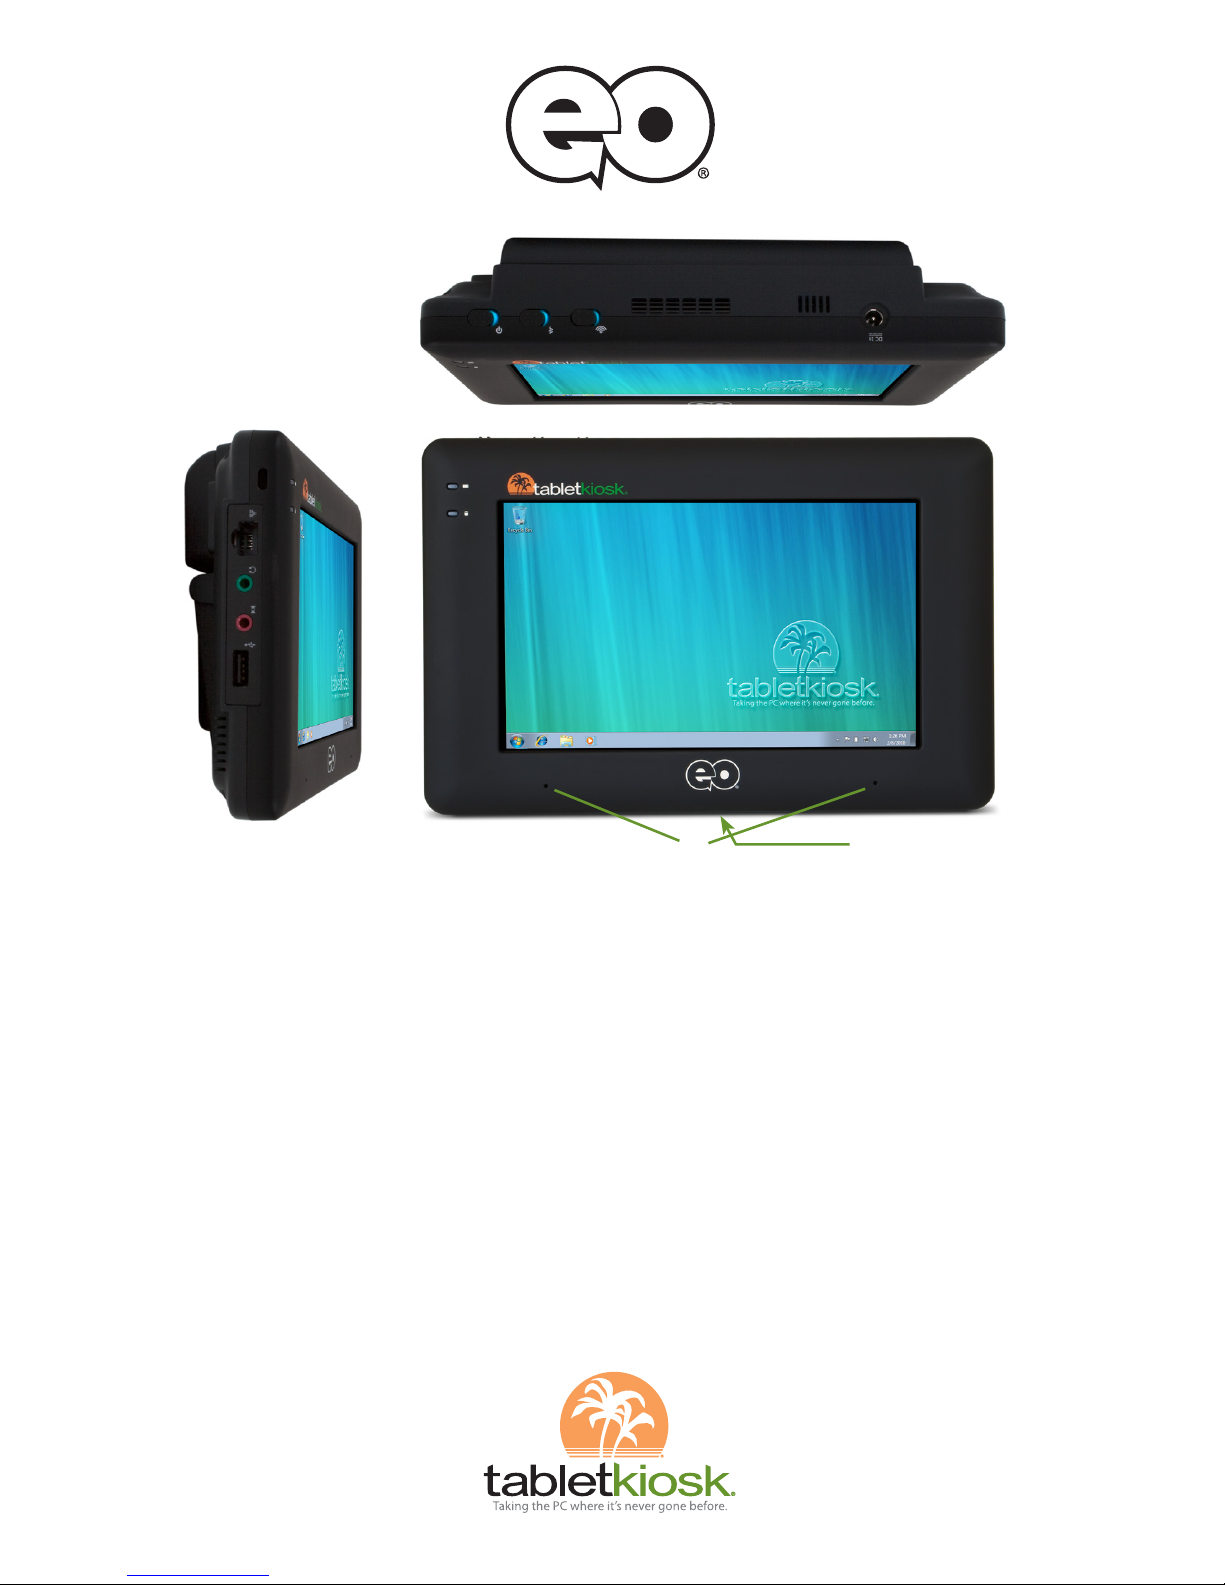
Left Side
1. Kensington Lock Port
2. Gigabit Ethernet (RJ45)
3. Headphone Jack
4. Audio In Jack
5. USB 2.0 Port
Top Side
6. Power Switch
7. Bluetooth Switch
8. WiFi Switch
9. Fan Exhaust Port
10. Audio Speaker
11. DC In (Power In)
Front
12. Battery LED
13. Hard Drive Activity LED
14. Microphone Array
Left Side
Right Side
Top Side
!
@
#
$
%
BN
BO
BQ
BR
BS
BT
BU
^ & * ( BL BM
BP
Right Side (not pictured)
15. SAS Button
16. Screen Rotation Button
17. Programmable Button
18. Programmable Button
19. Expansion Module Port
20. Stylus Pen
Bottom (not pictured)
21. Docking Connector Port
CM
CL
Page 2
Congratulations on your purchase of an eo™ a7330 Ultra-Mobile PC. This guide was designed
to help you get up and running with your new system as quickly and easily as possible.
For more information on setting up and using your eo a7330, please consult the digital PDF
User’s Guide located on your Windows desktop, or visit our website at www.tabletkiosk.com.
What’s in the Box
Your eo Ultra-Mobile PC should come securely packaged in its shipping container along with
the items listed below. Contact your dealer immediately if you find that anything is missing or
damaged. Note, however, that contents may have changed without notice.
1. AC Adapter and Power Cord
2. Microfiber Cleaning Cloth
3. Neoprene Slip Case
4. This Quick Start Guide (a high-res PDF of the User’s Guide is included on the desktop)
5. Applicable Operating System Getting Started Guide
1
6. System Restore Disc
2
7. Standard Lithium-Ion Battery Pack
8. Secondary Lithium Polymer Battery Pack (comes standard with a7330D only)
9. Stylus Pen
Setting Up Your eo Ultra-Mobile PC
Please read the following steps to help you begin using your new eo a7330 Ultra-Mobile PC.
Refer to the Getting Started chapter in the User’s Guide for more detailed information.
Step 1: Insert the Battery Pack(s)
Turn the eo Ultra-Mobile PC over and place it, screen down on a solid, clean, flat surface to
prevent damaging the touch screen. The included slip case works well for this.
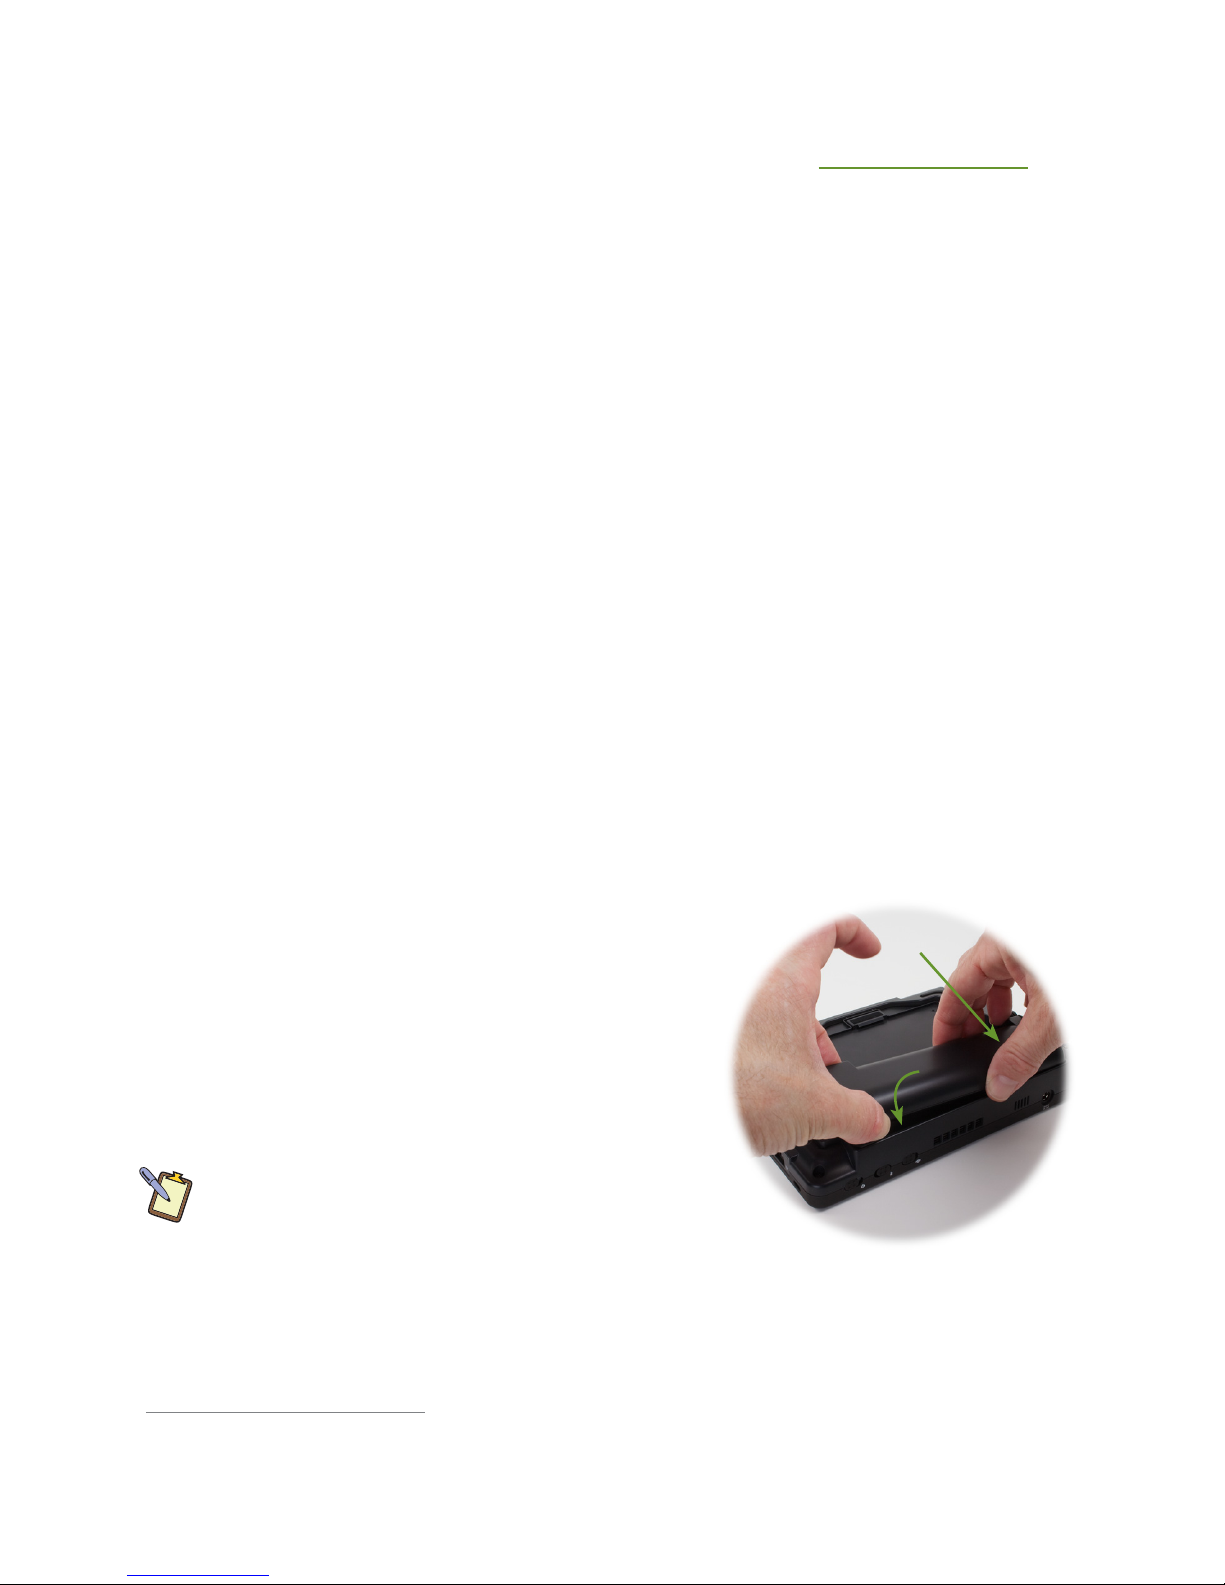
Inserting the Main Lithium-Ion Battery Pack
Align the battery so that the power output port on the
bottom of the battery matches up with the power input
pins on the back of the eo a7330. Angle the battery
slightly down and place it in the battery slot so that
the battery’s small retaining tabs fit into the matching
grooves on the eo just beside the power input pins. Then
lay down the opposite side of the battery into the slot
until it “clicks” into place.
NOTE: Make sure to write down the Product Key located
on the Windows 7 COA sticker in the battery bay before
inserting the Main battery as you’ll need it to Activate
Windows 7 later in the set-up.
Inserting the Secondary Lithium-Polymer Battery Pack
Align the battery so that the power output port on the bottom of the battery matches up with
the power input pins on the back of the eo a7330. Angle the battery slightly down and place
1
There will not be a Getting Started Guide included if you ordered your Ultra-Mobile PC with openSUSE™
Linux or without an OS.
2
There will not be a System Restore Disc included if you ordered your Ultra-Mobile PC without an OS
option. Some units may include a restore image on the internal hard drive in addition to, or in lieu of, a
system restore disc.
!
@
Page 3
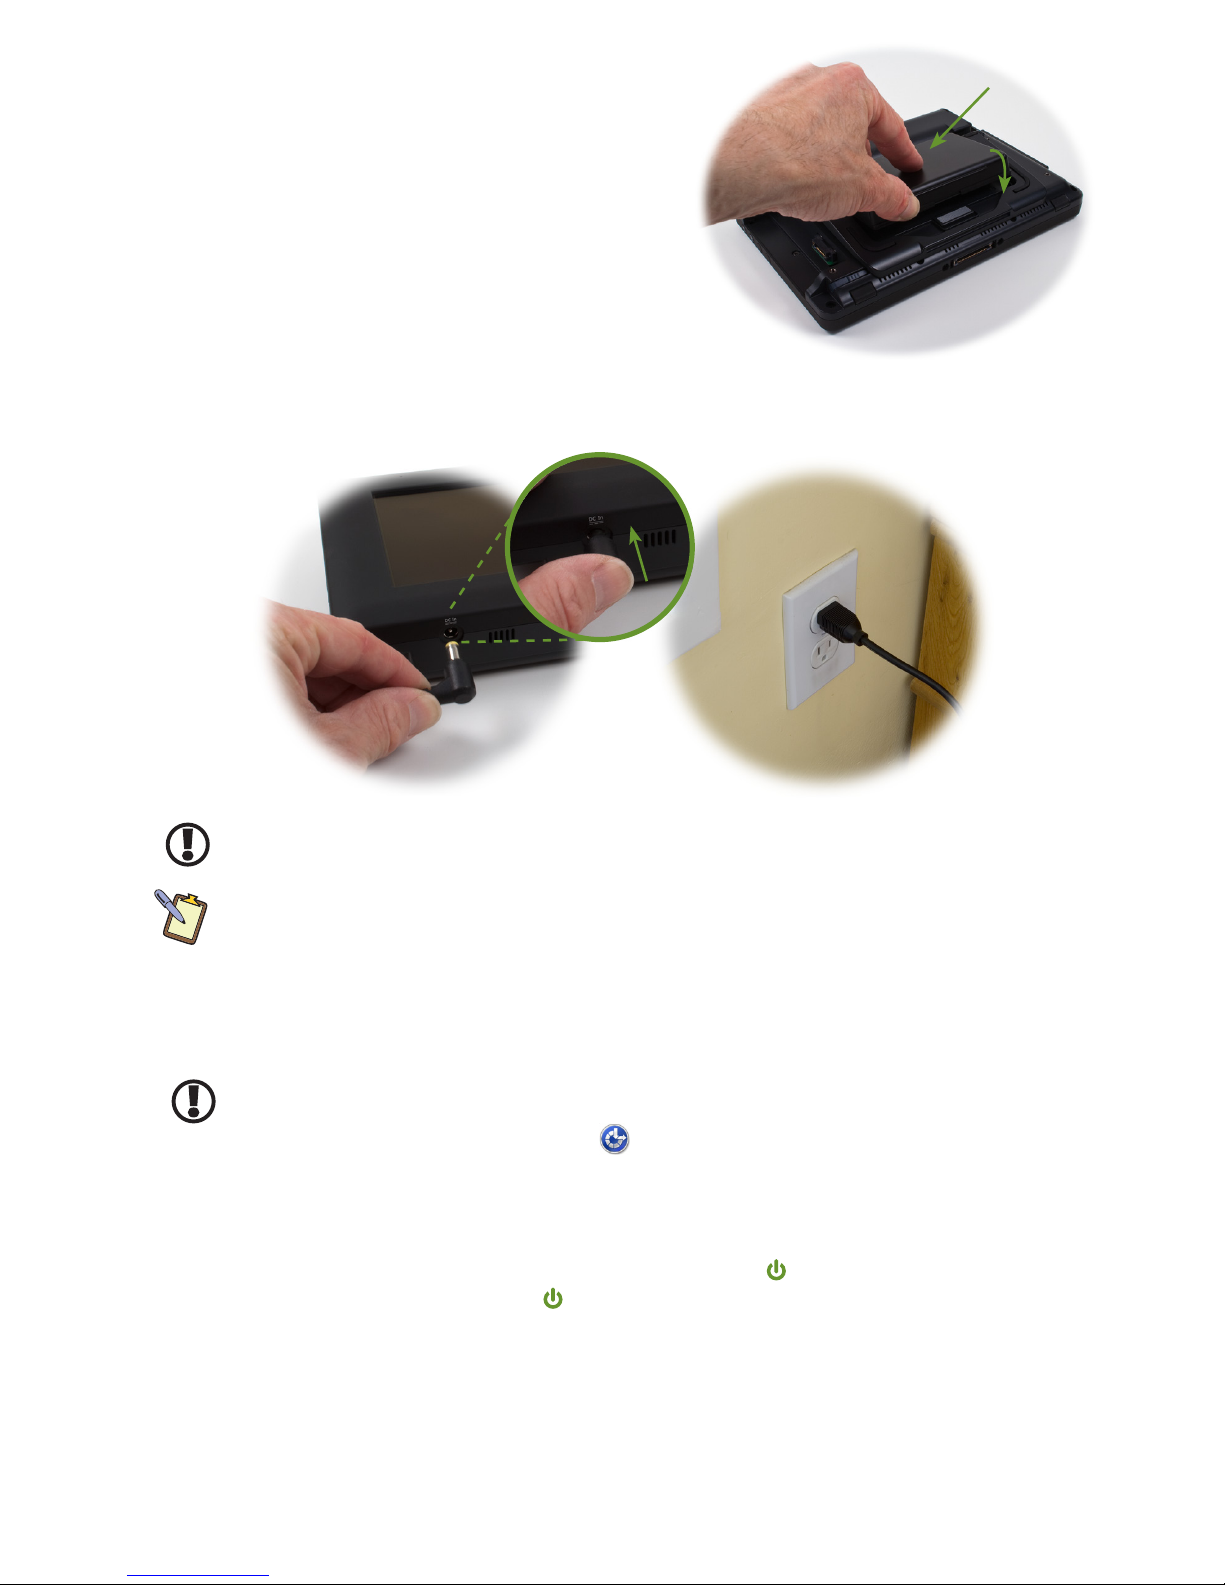
it in the battery slot so that the battery’s small
retaining tabs fit into the matching grooves on the
eo just above the power input pins. Then lay down
the opposite side of the battery into the slot until it
“clicks” into place.
Step 2: Connect the eo Ultra-Mobile PC to an
External Power Source
Locate the AC adapter and the power cord. Plug
the power cord securely into the AC adapter. Plug
the AC adapter’s connection cable into the “DC In”
port on the top of the eo a7330. Once the adapter
plug is securely in place, plug the power cord into an external power socket.
IMPORTANT: You should allow the battery to charge fully before disconnecting the eo a7330
and running it on battery power for the first time.
NOTE: When you first connect the eo a7330 to an external power source, the battery charge
indicator will glow orange. When the battery is fully charged the indicator will turn green. See
the chapter Battery Usage and Care in the User’s Guide for tips on maximizing battery life.
Step 3: Connect Applicable Peripherals
If you would like to use any external peripherals with your eo Ultra-Mobile PC (i.e. USB mouse,
USB keyboard, etc.), you can connect them now.
IMPORTANT: When you power on the eo a7330 for the first time, you will need to have an
external USB keyboard connected in order to complete the Windows XP Professional welcome
screens. In Windows 7, you can tap on the icon and check “Type without the keyboard” to
open the on-screen keyboard. The eo a7330D can answer questions using the stylus and the
on-screen keyboard in Windows XP Tablet PC Edition.
Step 4: Power on the eo Ultra-Mobile PC
Locate the three power switches on the top on the tablet. The
switch is the computer’s
main power toggle. Slide it toward the
icon and hold it there until it emits a blue glow
(about 1-2 seconds) and then release it. The system should now boot up.
Step 5: Complete the Operating System Installation
When your system powers on for the first time, you might need to wait for Windows to
configure your machine for set-up (Windows 7 only). This can take a few minutes, so be
patient. After it finishes, your system will restart and you will be prompted to accept the
licensing terms.
!
@
Page 4

Windows (all versions) will then have a few questions for you to answer in order to localize
and finish your installation. Refer to your operating system’s manual for information on any
of the questions you are unsure how to answer. If your system came with Windows 7, it may
prompt you Activate Windows by entering your Product Key (that you wrote down in Step 1).
Step 6: Navigating with the Stylus Pen or your Fingers
Unlike a standard laptop or desktop PC, navigating the operating system’s user interface on
an Ultra-Mobile PC is performed using the stylus pen, or your fingers. While the a7330T is
touch screen only, the a7330D features a dual mode screen that switches from a touch screen
to a digitizer automatically, depending upon if the tip of the stylus is near the screen.
Touch Screen: Navigating with a touch screen is different from navigating with a mouse. Hold
the stylus pen as if you were writing with a standard pen. Instead of sliding the pen around
the screen, just tap on what you want to interact with. Sliding the pen while lightly touching
the tip to the screen will move the on-screen pointer around as if you were using a mouse and
holding down the left mouse button. In other words, you would be performing what is known
as a drag operation. Also, remember that since the screen is sensitive to the touch, resting
your hand on the screen while using the pen might make the pointer react unpredictably.
NOTE: Due to the auto-switching dual mode screen on the a7330D, if you want to use the stylus
instead of your fingers while in touch screen mode you will have to use the top end instead
of the writing tip. When the tip of the stylus nears the screen it will automatically switch into
Active Digitizer mode. When the tip moves away, it will switch back to Touch Screen mode.
Active Digitizer (a7330D only): In this mode, the pen doesn’t even need to touch the screen
to activate and move the pointer. Hold the stylus pen as if you were writing with a standard
pen. Place the tip of the stylus just above the screen and move it around. The pointer should
follow the tip of the pen. In this mode your hand may rest on the screen, since this will not
affect the behavior of the pointer.
TIP: When trying to select or activate something on the screen—in either mode—with the
stylus pen, pay attention to the position of the pointer icon on the screen instead of the tip of
the pen. When using a touch screen, the icon will be the standard arrow pointer. In digitizer
mode the pointer icon is a diamond shaped target.
With both a touch screen and an active digitizer, tapping lightly on the screen will perform
a standard left mouse button click. Tapping twice in rapid succession will perform a doubleclick. Holding the tip of the pen against the screen without moving it for about a second or so
will perform a standard right mouse button click.
Inputting Data: You can use the Tablet PC Input Panels in Windows 7 Professional and
Windows XP Tablet PC Edition to enter information via the On-Screen Keyboard, Character
Pad or Writing Pad. You’ll find the edge of the Tablet PC Input Panel docked on the left-hand
side of your screen. When in digitizer mode, hovering the pointer over the panel will cause it
to slide outward a bit making it easier to access. Tap on it once to activate the panel and slide
it to the center of your desktop. When finished, tap the “close” icon in the upper right corner of
the panel to re-dock it.
When using a touch screen, tap once on the input panel’s edge to activate it and slide it to the
center of your desktop. For more information about using the input panels, see the Windows
Getting Start guide that came with your eo or check out the Tablet PC Tutorials in Windows.
NOTE: When in active digitizer mode, animated cues, or floating tips, will appear when
performing a right-click operation or when text input is required in tablet aware applications.
EyesBoard Virtual Keyboard: Another option for inputting data is the Eyesboard Virtual
Keyboard application included with all eo a7330 Ultra-Mobile PCs. This resizable, on-screen
virtual keyboard will allow you to type on the screen as you would with a standard laptop
Page 5

keyboard. Just double-tap on the application’s short-cut icon located on the desktop to begin
using it. You can access the Eyesboard user’s manual by tapping on the “?” button in the upper
right hand corner of the keyboard. You can use the Eyesboard in both Digitizer and Touch
mode on your eo a7330D.
NOTE: If your system came with Windows XP Tablet PC Edition, you may have to install the
Eyesboard Virtual Keyboard application before you can use it. To install, first double-tap on the
.NET Framework installer located on the desktop to install the .NET Framework. Once installed,
double-tap on the Eyesboard installer icon on the desktop to install the Eyesboard application.
Calibrating the Touch Screen and Active Digitizer
If you find that the pointer isn’t properly following the touch of your finger or stylus pen, you
might need to calibrate the touch screen or the active digitizer.
1. Launch the Panel Control Panel by tapping and holding on the
icon in the system tray
and tap the “Configure...” button from the Launch Button Quickshow menu.
2. From the Panel Control Center, tap the “Pen” button, then tap the “Calibrate...” button
from the screen that appears.
3. Choose the input panel you’d like to calibrate by tapping on its corresponding button.
4. Follow the on-screen instructions by tapping on each target that appears until you
are told to lift to proceed. To quit this routine without saving the data, tap the “Cancel”
button. When finished, tap “OK” to save the data and return to the Calibrate menu.
Programming the Function Buttons
To program the function buttons located on the right side of the eo a7330, simply open
the Panel Control Panel by tapping and holding on the
icon in the system tray. Tap the
“Change” button next to the button you wish to program and choose to assign a pre-defined
action or to launch an application, document or internet URL. Tap the “Next” button and make
your choice from the screen that appears.
NOTE: The top function button cannot be reprogrammed from its default SAS function. So,
button “P1” in the panel actually corresponds to the second (Rotate Screen) button, etc.
Adding Functionality with TK Expansion Modules
Unique, thus far, to the eo a7330 Ultra-Mobile PCs are TabletKiosk’s proprietary expansion
modules. They enable your eo to perform additional tasks simply by plugging in a variety of
these hot swappable modules.
By default, your eo a7330D should have come with the USB 2x2™ module installed in the
expansion port. The eo a7330T comes with the blank module installed. To swap out the
default module for, say a magnetic stripe reader or 3G/3.5G WWAN modem, simply:
1. Unscrew the two Phillips head retaining screws on the back of the module and then slide
the module out and away from the side of the eo Ultra-Mobile PC.
2. Slide the module you wish to use into the expansion port and tighten its Phillips head
retaining screws to keep the module connected and secure.
Based upon the built-in USB architecture of the eo a7330, the expansion modules are hot
swappable, which means you do not have to power off or restart your system in order to use a
newly attached module.
Contact your dealer for a list of available, and soon to be released, TK Expansion Modules.
Connecting to a Wireless Network
1. Turn on the WiFi transmitter using the toggle switch (
*) on the top of your eo a7330.
Make sure the switch lights up blue.
Page 6

2. In the System Tray, tap on the Intel PROSet icon ( ) and choose “Configure WiFi” from
the pop-up menu that appears.
3. When the Intel® PROSet/Wireless WiFi Connection Utility opens, choose the network from
the list that you wish to connect to and tap the “Connect” button. If no wireless networks
appear after a few moments, tap on the “Refresh” button located just below the list.
4. If the wireless network you are attempting to connect to is security-enabled, you will see
a dialog box requesting either a network key or, if the wireless network supports WiFi
Protected Setup (WPS), a PIN.
Most failures to connect to a wireless network occur because the network key has been
improperly entered. Be very careful when entering this key. If you do not know the correct
key to enter, or still can’t connect after entering the key properly, contact your network
administrator or the technical support line of your Internet Service Provider.
NOTE: If your network access point or router uses WiFi Protected Set-up, the WPS Wizard will
appear on the screen. Choose your access point from the drop-down list, enter your PIN when
prompted. Unless you need to configure your access point/router for the first time, just tap on
the “No” button when asked. If you entered your PIN properly, you should see the same pop-up
window informing you that you are connected. Check with your Network Administrator or the
instructions that came with your access point/router for locating the PIN.
Restoring Your System Using the System Restore Disc
What you will need before you begin:
1. The Windows 7 Professional, Windows XP Professional, or Windows XP Tablet PC Edition
System Restore DVD for the eo a7330 Ultra-Mobile PC.
2. External USB DVD drive with its own power supply (not USB Bus powered)
3. USB keyboard
4. USB mouse (you will also need a USB hub if you don’t have the USB 2x2™ module)
To Restore Your System:
IMPORTANT: This process is destructive to the data stored on your hard drive. All existing
data will be lost. It is vital you back-up any files on your hard drive to an external storage
device or disk that you wish to keep before you proceed.
Step 1: Set up the required hardware:
1. Plug the mouse and keyboard into the USB 2x2 module. Plug the DVD drive into the USB
port on the left side of the eo. If you don’t have the USB 2x2 module installed, you’ll need
to plug everything into the USB Hub and plug the Hub into the USB port on the left side
of the eo. Power on the DVD drive and insert your eo a7330 System Restore Disc.
To Restore Using the Windows 7 Professional Restore Disc:
Step 2: Booting the eo a7330 to the Recovery Application
1. Power up your eo a7330 Ultra-Mobile PC.
2. If your drive has an existing partition (overwriting existing OS):
When prompted press any key to boot to the recovery DVD.
If your drive doesn’t have an existing partition (new drive, no OS):
It will automatically load the recovery application.
3. Select the “Tools” Button and then the “Reset Partition” Button to continue.
4. Enter the partition size you wish to create for your OS. In general, you should use the
number from the “Free Space” box as this will provide you with the largest system partition possible.
Page 7

5. Select the File System desired: FAT32 or NTFS (recommended). Click “Next” to continue.
6. Select “OK” to proceed with partition creation.
7. Select “OK” if you understand that this process will PERMANENTLY DELETE ALL OF THE
EXISTING DATA ON THE DRIVE.
8. Select “OK” once the drive has been partitioned and then “Cancel” to return to the
main menu.
9. Select the “Restore Now!” Button.
10. Select “OK” to prepare the partition you created above, and then select “OK” again to re-
store the operating system.
11. Select “Quit” once the restore process completes to reboot your eo a7330. Immediately
eject the DVD or unplug the USB DVD drive from your eo Ultra-Mobile PC so the system
will reboot from the restored hard drive.
To Restore Using the Windows XP Professional or Tablet PC Edition Restore Discs:
Step 2: Partitioning the Hard Drive (required for a new Hard Drive only)
If you are simply attempting to restore your eo Ultra-Mobile PC using the hard drive that came
with your system, you can skip this step and proceed to Step 3.
You will need to use the software that came with your new hard drive—or another third
party program of your choosing that is designed to partition hard drives—in order to
create a primary system partition to house the restored OS.
NOTE: At a minimum, any bootable disc containing Microsoft’s “FDISK.EXE” utility should be
sufficient. If you attempt to start the restore utility before successfully partitioning the drive, the
Windows installer will crash with a B.S.O.D. displaying a “STOP: 0x07” error.
Step 3: Booting the eo a7330 to the Recovery Application
1. Power up your eo a7330 Ultra-Mobile PC.
2. It will start from the DVD and automatically load the recovery application.
3. Select “OK” to proceed with partition creation.
4. Select “OK” if you understand that this process will PERMANENTLY DELETE ALL OF THE
EXISTING DATA ON THE DRIVE.
5. Select “Quit” once the restore process completes to reboot your eo a7330.
6. Immediately eject the DVD or unplug the USB DVD drive from your eo UMPC so the system
will reboot from the restored hard drive.
What To Do After Successfully Restoring Your System:
After your system successfully boots to your newly restored operating system, you will have to
copy back any of your data that you backed up before attempting the restore procedure. You
will also have to reinstall any applications you had installed yourself after receiving your eo
a7330 Ultra-Mobile PC. Before you begin either of these tasks, we suggest going to “Windows
Update” and installing any updates it finds that are labeled “Critical” or “Important”.
Where to Go From Here
Please consult the on-screen, PDF version of the eo a7330 Ultra-Mobile PC User’s Guide located
on your Windows desktop for more information on using and maintaining your Ultra-Mobile PC.
If you have any questions after reading the User’s Guide, or would like to check for updated or
replacement device drivers, please go to our website at www.tabletkiosk.com and check out the
“Support” section.
Page 8

2832 Columbia Street, Torrance, CA 90503
310.782.1201 tel 310.782.1205 fax
www.tabletkiosk.com
©2010 Sand Dune Ventures, Inc. All Rights Reserved. eo, the eo logo, TabletKiosk, and the TabletKiosk logo are registered trademarks or
trademarks of Sand Dune Ventures, Inc. in the United States and other countries. Windows and the Windows logo are registered trademarks of
Microsoft Corporation in the United States and other countries.
rev 03.01.10
 Loading...