

Page 1

best
and
,
Page 2

Table of Contents
Safety Precautions
1.1 Safety Precautions………………………………………….......................…………..
Introduction to the Product
2.1 Features…………………………………………………………….........................…..
2.2 Important Information……………………………………………….........................…
2.3 The Device and Accessories………………………………………….....................…
Functional Overview
3.1 Device Overview……………………………………………………….........................
3.2 Remote Control…………………………………………………….........................…..
3.3 Power Supply Connection…………………………………………….....................…
3.4 Rechargeable Internal Battery……………………………………….....................….
Digital TV
4.1 First Time Installation………………………………………………........................….
4.2 Switch Channels………………………………………………........................……….
4.3 View Program(Guide)Information…………………………….......................……
4.3 Manage Channels(Favorite CH list)……………………………….......................
4.4 Adjust Settings………………………………………………………........................…
4.5 View Closed Captions(Subtitles)…………………………….....................………
4.6 Closed Captioning……………………………………………………..........................
DVD/CD Player
5.1 DVD Playback…………………………………………………….........................……
5.2 Information Display……………………………………………….........................……
5.3 Audio Function………………………………………………………........................…
5.4 Subtitles Function………………………………………………….......................……
5.5 Repeat Function……………………………………………………........................….
5.6 Guide Function………………………………………………………........................…
5.7 General Setup Menu………………………………………………......................……
5.8 Audio Setup Menu……………………………………………………..........................
5.9 Video Setup Menu……………………………………………………..........................
5.10 Preference Setup Menu……………………………………………….......................
USB/CARD Reader
6.1 USB/Card……………………………………………………………............................
AV Output
7.1 AV Output Connection………………………………………………........................…
Troubleshooting………………………………………………………….............................
Technical Specifications…………………………………………………...........................
Warranty Service………………………………………………………...........................…
1
3
4
5
6
7
8
8
9
11
11
11
12
14
14
16
17
18
18
19
20
21
24
24
26
30
31
32
33
34
Page 3

store
By doing
a
celsius
purchased.
higher
Page 4

Use and safety precautions for this appliance
both
for the unit.
as long as the player is
stored between
c
Page 5

AV out - outputs your TV program or DVD movie to big screen TVs
swivel widescreen display
headphone output
7
3
(SD/MMC/MS)
resume play
Manufactured under license from Dolby Laboratories.Dolby and the double-D symbol are
trademarks of Dolby Laboratories.
Page 6

Important Information
Page 7

ED8850B
Quick Start Guide
Carry
best
and
,
Remote Control
Page 8
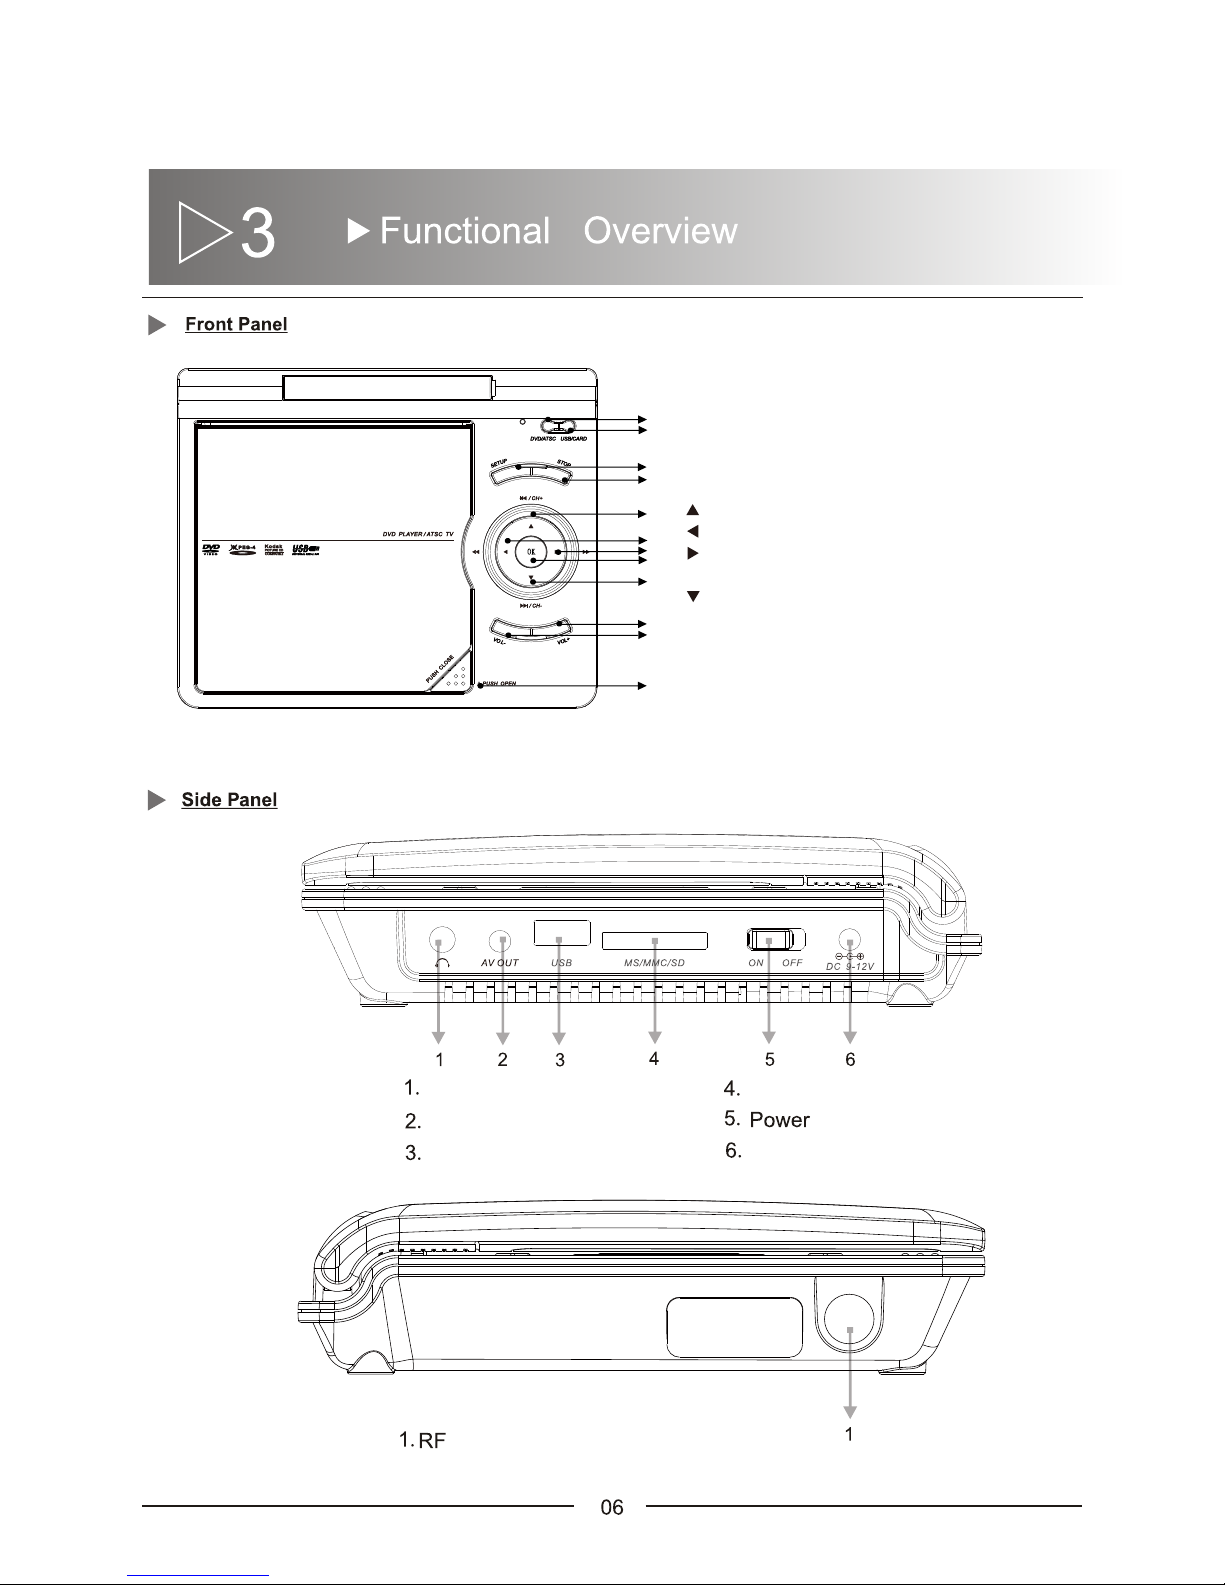
AV Out
USB
Port
Card Reader
Headphone Port
Antenna
••
1.
2.
3.
4.
5.
6.
7.
8.
9.
10.
11.
12.
DC 9-12V
1.Switch DVD / ATSC
2.Switch USB / CARD
3.Accesses / Exits the setup menu
4.Stop disc play
5. : Next Chapter / Channel Selection
6. : Rewind / Left Navigation
7. : Fast Forward / Right Navigation
8.OK : Play (DVD) / Confirm your selection (ATSC )
9. : Previous Chapter / Channel Selection
10.Vol +
11.Vol –
12.Push Open
Page 9

Remote Control Functions
Remote Control Use
/
1. Switch DVD / DTV
2. Numeric Keypad 0-9
19. Menu playback ( DVD mode)
Program Guide ( ATSC mode)
20. Zoom in or out the current picture ( DVD mode)
21. Copy / Delete the files ( DVD mode)
22. Stop disc play ( DVD mode)
23. : Skip Backward / Forward
/
/
15
19
18
20
21
22
23
16
17
5
7
5
6
7
8
10
9
12
11
13
4
1
2
3
4
14
3. Setup : accesses or exits the setup menu
4. CH+/- : switch to the next / previous channel
5. : Navigation
6. Play ( DVD mode)
Confirm your selection ( ATSC mode)
7. Vol -/+ : decrease / increase volume
8. Switch USB / Card ( DVD mode)
Preview Channel List ( ATSC mode)
9. Display program information ( ATSC mode)
Display playback information ( DVD mode)
10. Switch languages that the disc supports
11. Switch OSD languages ( DVD mode)
Closed Caption ( ATSC mode)
12. Repeat play ( DVD mode)
Recall channel playback ( ATSC mode)
13. Play / Pause
14. : Fast Backward / Forward
15. Mute
16. Repeat Chapter (DVD mode)
17. Exit
18. GOTO: Search progress ( DVD mode)
FAV: Setup favorite programs ( ATSC mode)
Page 10
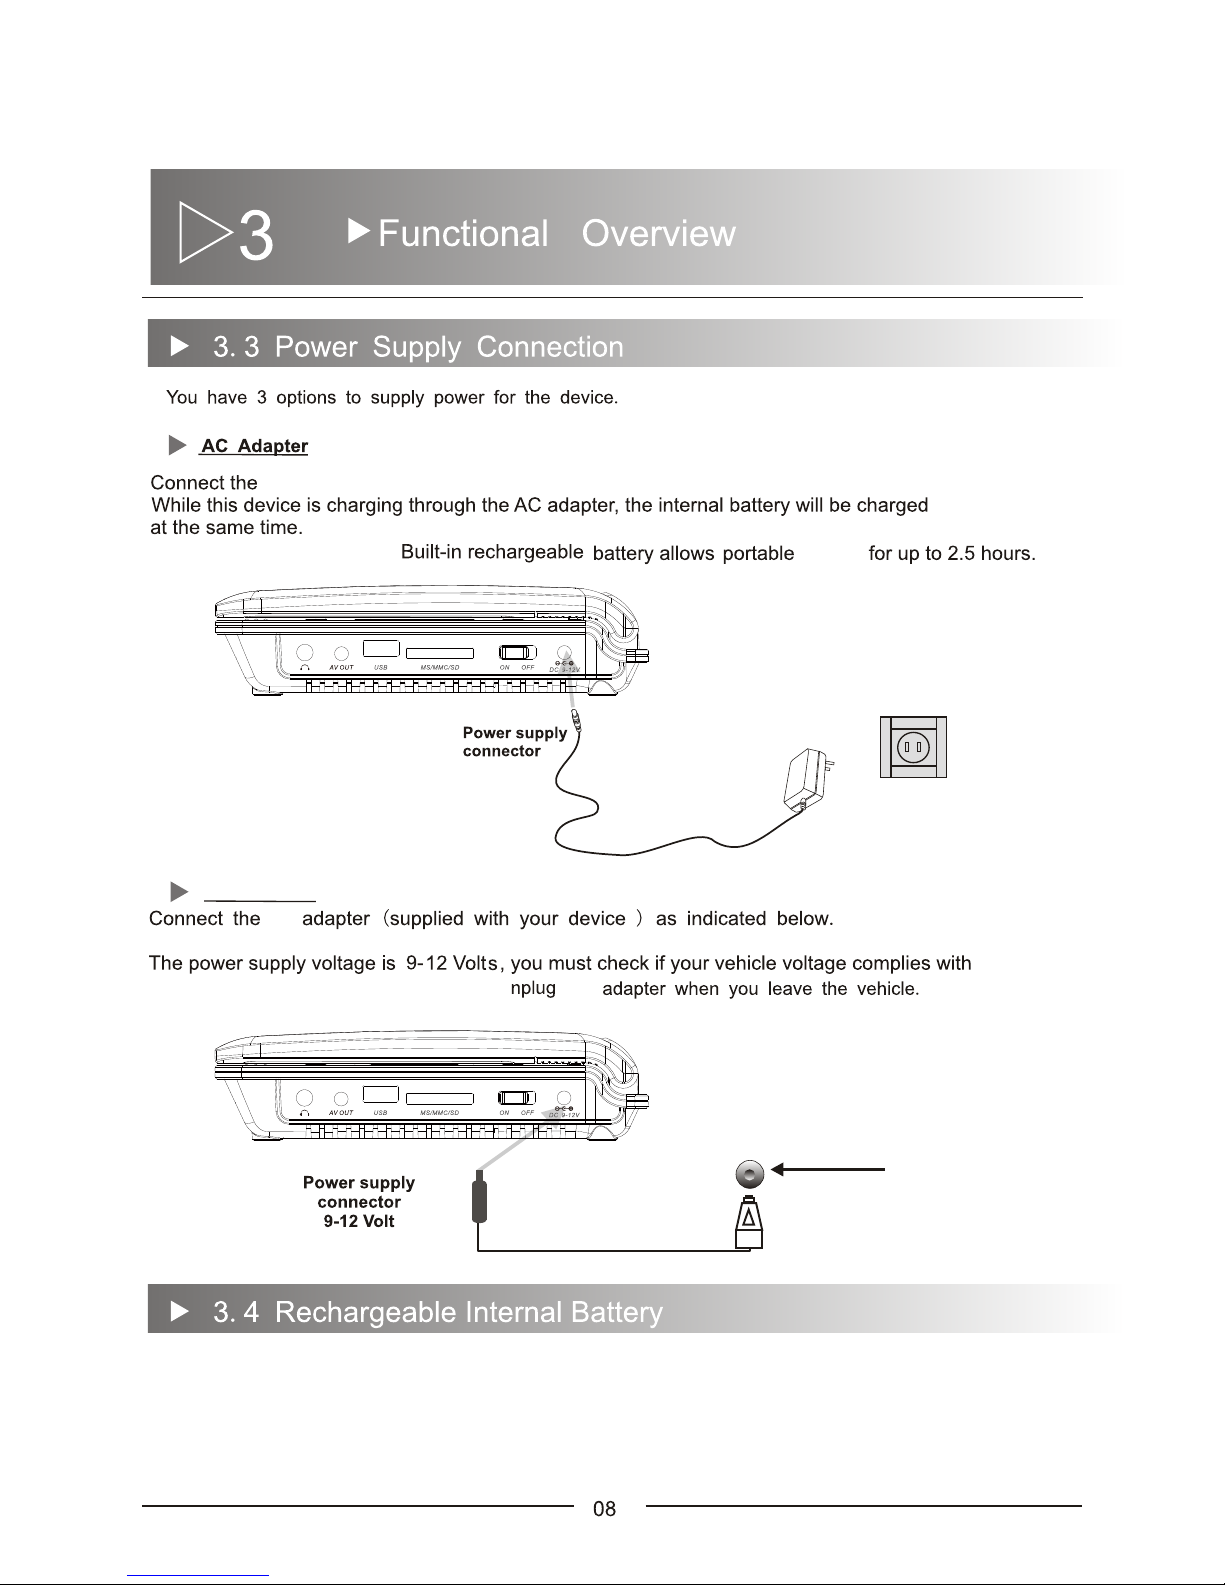
Operating instructions: The internal battery automatically charges when the device is connected to the AC adapter
through a main power outlet. The internal rechargeable battery lasts up to 2.5 hours while fully charged.
Warning: To prevent fire or shock hazard, do not expose the device to water, rain, or moisture.
Never expose battery pack to temperature above 140 ° F.
Do not disassemble.
Do not incinerate.
Power outlet
Car Adapter
The
usage
The charge indicator turns red while charging, the charge indicator turns off when the
supplied 9-12 volts AC adapter to the player and to the power outlet.
battery is fully charged.
this range
Be sure to
u
the
Car Adapter
car
Caution!
Voltage before connecting.
Do not use any other cords but the one supplied with your product.
Page 11

best
Quartet
quartet.
(866)709-1999.
provide
maximize
First time installation
When the unit is turned on for the first time, follow the on-screen Setup Wizard.
. Press / to select your language, then press to select [Go to next step:] and press OK to
confirm.
Page 12

. Press / to select antenna type. Select the [Air], then press to select [Go to next step:]
and press OK to confirm.
. You are prompted to select the time zone and daylight saving time.
. Select the time zone, DST and timer format, then press to select [Go to next step:] and press
OK to confirm.
Page 13

. Auto channel search [Air] starts and will take a few minutes.
. When auto channel search is complete, the total number of TV and radio channels found is
displayed.
To view the programs of the first found channel, press OK.
Switch channels
. Press CH+/CH- or Number keys on the remote control.
. Press RECALL to return to the previously viewed channel.
View program information
. Press INFO to view brief information of the current program.
Note:
When you want to awake your portable TV from sleep mode, turn off Power Switch and turn it
on again after a few seconds.
Manage channels
Press MENU under DTV mode, press / to select different tags below. Press MENU to confirm
your setting and go back to previous menu level.
Page 14

Adjust settings
1. Picture
[Picutre Mode] Press / to select the desired setting. ([Personal], [Standard], [Dynamic] and
[Soft]).
[Contrast] Adjusts the intensity of bright areas, keeping dark areas unchanged.
[Brightness] Adjusts the intensity and details of dark areas.
2. Audio
[Audio language] Select default audio language of multi-language TV program.
[Balance] Adjusts the sound balance.
[Sharpness]
[Tint]
[Color] Adjusts color saturation.
[Color Mode] To set the color temperature to [Personal] [Normal], [Warm] or [Cool].
[Zoom Mode] Select different zoom mode. [Normal], [Wide], [Zoom], [Cinema].
Adjusts the level of sharpness in image details.
Adjusts the color balance in an image.
Page 15

Set the Daylight Saving Time.
3. Time
[Sleep Timer]
[Time zone] Select current time zone.
[DST]
[On]: If it is summer time, select this option.
[Off]: If it is not summer time, select this option.
[Time format]
[Auto Sync]
Switches the TV to standby after a pre-defined period of time.
Sync the time with TV channels.
Select the time format.
4. Setup
[Menu language] Select menu display language.
[Transparent] Select transparency of on-screen-display.
[OSD Time Out] Select the auto-off time of on-screen-display.
[Closed Caption] Select closed caption services.
[CC Mode]
[Basic Selection]
[Advanced Selection]
[Option]
[Restore default] Restore original settings.
Page 16

5. Channel
[Air/Cable] Select the antenna type.
[Auto scan] Search TV channels automatically.
[Favorite] Add channels to your favorite list.
[Show/Hide] Show or hide specific channels.
[Channel No.]
[Channel label] Change channel name.
[DTV signal]
Signal intensity and quality of current channel.
View Closed Captions (subtitles)
The caption service displays transmitted CC- and T- text. The caption text can be displayed
permanently or only when the TV is muted.
Note
. This device provides a display of television closed captioning that conforms with the EIA-608
standard and in accordance with Sections 15.119 of the FCC rules.
. Not all TV programs and product commercials include closed caption information. Refer to your
area TV program listings for the TV channels and times of closed caption shows. The captioned
programs are usually noted in the TV listings with service marks such as ‘CC’.
Closed captioning
Closed captioning is an assistive technology that allows persons with hearing disabilities to access
television programming. Closed captioning displays the audio portion of programming as text
superimposed over the video.
1. Display CC Mode
. Press MENU.
. Switch to Setup by pressing key.
Page 17

Select [Setup] > [Closed Caption] > [CC mode], and press to turn on.
. Press MENU to exit.
2. Select Basic Selection or Advanced Selection
. Press MENU and select [Setup] > [Closed Caption] > [Basic selection], then Press or to
select one of the listed caption services, and press OK to confirm.
. Press MENU to exit.
Note
. Not all caption services are used by a TV channel during the transmission of a closed caption
program.
Page 18

Remove the plastic cover
Turn on the power
etc.
Open the cover of the DVD player
or
player then press ENTER.
••
OK
Page 19

Page 20

between
this
languages.
AUDIO 1/8 Dolby D 2CH ANGLAIS
AUDIO 1/7 Dolby D 2CH FRANCAIS
AUDIO 1/6 5 1 CH FRANCAIS
Page 21

the chapter, title or film again.
Displayed are the following options.
Page 22

1. Press the INFO key once to display the current title, chapter number and the elapsed time.
2. Press the INFO key twice to display the chapter elapsed time.
3. Press the INFO key three times to display the chapter remaining time.
4. Press the INFO key four times to display the title elapsed time.
5. Press the INFO key five times to exit that menu.
Page 23

The setup menu consists of four sub-menus, General Setup, Audio Setup, Video Setup,
and Preference Setup.
The setup menu consists of four sub-menus, General Setup, Audio Setup, Video Setup,
and Preference Setup.
TV DISPLAY 16:9
ANGLEMARK ON
OSD LANGUAGE ENG
CLOSED CAPTIONS ON
SCREEN SAVER ON
LAST MEMORY OFF
MP3 LYRIC ON
1. TV DISPLAY: This option allows you to switch among 4:3 letter Box and 16:9 Large.
2. ANGLEMARK: Change the angle of the disc.
3. OSD LANGUAGE: This option allows you to select the menu display language.
4. CLOSED CAPTIONS: Display the closed captions.
5. SCREEN SAVER: This option allows you to activate the screen saver to prevent damage to the TV screen.
6. LAST MEMORY: Last memory allows you to resume the playback of a film where you last stopped it.
7. MP3 LYRIC: Display the lyric.
Page 24

TV DISPLAY 16:9
ANGLEMARK ON
OSD LANGUAGE ENG
CLOSED CAPTIONS ON
SCREEN SAVER ON
LAST MEMORY OFF
MP3 LYRIC ON
TV DISPLAY
ANGLEMARK
OSD LANGUAGE
CLOSED CAPTIONS
SCREEN SAVER
LAST MEMORY
MP3 LYRIC
16:9
ON
ENG
ON
ON
OFF
ON
Page 25

ENGLISH
SPANISH
FRENCH
French, English, and Spanish.
TV DISPLAY 16:9
ANGLEMARK ON
OSD LANGUAGE ENG
CLOSED CAPTIONS ON
SCREEN SAVER ON
LAST MEMORY OFF
MP3 LYRIC ON
TV DISPLAY
ANGLEMARK
OSD LANGUAGE
CLOSED CAPTIONS
SCREEN SAVER
LAST MEMORY
MP3 LYRIC
16:9
ON
ENG
ON
ON
OFF
ON
TV DISPLAY 16:9
ANGLEMARK ON
OSD LANGUAGE ENG
CLOSED CAPTIONS ON
SCREEN SAVER ON
LAST MEMORY OFF
MP3 LYRIC ON
TV DISPLAY
ANGLEMARK
OSD LANGUAGE
CLOSED CAPTIONS
SCREEN SAVER
LAST MEMORY
MP3 LYRIC
16:9
ON
ENG
ON
ON
OFF
ON
Page 26

TV DISPLAY
ANGLEMARK
OSD LANGUAGE
CLOSED CAPTIONS
SCREEN SAVER
LAST MEMORY
MP3 LYRIC
16:9
ON
ENG
ON
ON
OFF
ON
TV DISPLAY 16:9
ANGLEMARK ON
OSD LANGUAGE ENG
CLOSED CAPTIONS ON
SCREEN SAVER ON
LAST MEMORY OFF
MP3 LYRIC ON
DOWNMIX STR
DYNAMIC
HDCD 1X
Page 27

Page 28

TV TYPE NTSC
PBC ON
AUDIO ENG
SUBTITLE ENG
DISC MENU ENG
PARENTAL 8 ADULT
PASSWORD
DEFAULT
1. TV TYPE: This option allows you to switch from the PAL colour standard to NTSC.
2. PBC : Access / Exit the PBC playback.
3. AUDIO: This option allows you to select the default audio track when starting a video DVD. You can
choose between English, French, and Spanish.
4. SUBTITLE: This option allows you to select the default subtitles language. You can choose between
English, French, and Spanish.
5. DISC MENU: This option allows you to select the default language of the DVD menu.
This option can only be operated if the DVD has a menu.
6. PARENTAL: This option allows you to parameteize the parental language of the DVD menu.
7. PASSWORD: This option allows you to change the password of the parental lock.
8. DEFAULT: This option allows you to reboot the default settings of the appliance.
Page 29

between English, French, and Spanish.
between English, French, and Spanish.
the
SPANISH
FRENCH
SPANISH
FRENCH
OFF
AUTO
TV TYPE NTSC
PBC ON
AUDIO ENG
SUBTITLE ENG
DISC MENU ENG
PARENTAL 8 ADULT
PASSWORD
DEFAULT
TV TYPE NTSC
PBC ON
AUDIO ENG
SUBTITLE ENG
DISC MENU ENG
PARENTAL 8 ADULT
PASSWORD
DEFAULT
TV TYPE NTSC
PBC ON
AUDIO ENG
SUBTITLE ENG
DISC MENU ENG
PARENTAL 8 ADULT
PASSWORD
DEFAULT
TV TYPE NTSC
PBC ON
AUDIO ENG
SUBTITLE ENG
DISC MENU ENG
PARENTAL 8 ADULT
PASSWORD
DEFAULT
TV TYPE NTSC
PBC ON
AUDIO ENG
SUBTITLE ENG
DISC MENU ENG
PARENTAL 8 ADULT
PASSWORD
DEFAULT
TV TYPE NTSC
PBC ON
AUDIO ENG
SUBTITLE ENG
DISC MENU ENG
PARENTAL 8 ADULT
PASSWORD
DEFAULT
Page 30

different
SPANISH
ITALIAN
TV TYPE NTSC
PBC ON
AUDIO ENG
SUBTITLE ENG
DISC MENU ENG
PARENTAL 8 ADULT
PASSWORD
DEFAULT
TV TYPE NTSC
PBC ON
AUDIO ENG
SUBTITLE ENG
DISC MENU ENG
PARENTAL 8 ADULT
PASSWORD
DEFAULT
TV TYPE NTSC
PBC ON
AUDIO ENG
SUBTITLE ENG
DISC MENU ENG
PARENTAL 8 ADULT
PASSWORD
DEFAULT
TV TYPE NTSC
PBC ON
AUDIO ENG
SUBTITLE ENG
DISC MENU ENG
PARENTAL 8 ADULT
PASSWORD
DEFAULT
TV TYPE NTSC
PBC ON
AUDIO ENG
SUBTITLE ENG
DISC MENU ENG
PARENTAL 8 ADULT
PASSWORD
DEFAULT
TV TYPE NTSC
PBC ON
AUDIO ENG
SUBTITLE ENG
DISC MENU ENG
PARENTAL 8 ADULT
PASSWORD
DEFAULT
Page 31

TV TYPE NTSC
PBC ON
AUDIO ENG
SUBTITLE ENG
DISC MENU ENG
PARENTAL 8 ADULT
PASSWORD
DEFAULT
TV TYPE NTSC
PBC ON
AUDIO ENG
SUBTITLE ENG
DISC MENU ENG
PARENTAL 8 ADULT
PASSWORD
DEFAULT
Page 32

back
as above picture.
arrows
with the
MS
MS
Page 33

AV Output Connection
AV Output
AV connect
Ye ll ow
Red
wh ti e
Notice: Please turn off all devices before connection.
As shown in the picture, use the A/V cable to connect the unit with other devices. Switch the unit to AV mode.
Page 34

supported?
-Is the other disc dirty or scratched?
Page 35

UHF
7
1.8 lbs
7.8 x 6.3 x1.6
R
C
T
P
Page 36

34
b
Page 37

1-866-709-1999
1-866-709-1999.
1-866-709-1999
will answer
35
 Loading...