

Page 1
4Sight
Administrator Guide
Version 5.0 rev.4
May 17, 2006
P/N 01000002
Page 2

© 2005-2006 Envivio Inc. All rights reserved.
4Sight Administrator Guide 5.0
This manual and the software described in it are furnished under license and may be used or copied only
in accordance with the terms of such license. The content of this manual is provided for information only.
It is subject to change without notice and should not be construed as a commitment by Envivio Inc.
Envivio Inc. assumes no responsibility or liability for any errors or inaccuracies that may appear in this
book.
Except as permitted by such license, no part of this publication may be reproduced, stored in a retrieval
system, or transmitted, in any form or by any means, electronic, mechanical, recording, or otherwise,
without the prior written permission of Envivio.com Inc. Please remember that existing media that you
may want to include in your project may be protected under copyright law. Incorporating such material
into your new work could violate the rights of the copyright owner. Please be sure to obtain any required
permissions from the copyright owner.
Envivio and the Envivio logo are registered trademarks of Envivio Inc. EnvivioTV, 4Caster, 4Coder,
4Manager, 4Sight, Mindshare and 4View are trademarks of Envivio Inc.
Microsoft, Windows, Windows 2000 Pro, Windows 2000 Server, Windows 2000 Advanced Server, and
Windows Server 2003 are registered trademarks of Microsoft Corporation in the U.S and/or other
countries. Apple, Macintosh, Power Macintosh, QuickTime, and TrueType are trademarks of Apple
Computer, Inc. registered in the U.S. and other countries. QuickTime and the QuickTime logo are
trademarks used under license. Helvetica and Times are trademarks of Linotype-Hell AG and/or its
subsidiaries. Pentium is a registered trademark of Intel Corporation. Flash is a trademark of Macromedia,
Inc. Sun is a trademark or registered trademark of Sun Microsystems, Inc. in the United States and other
countries. Linux is a registered trademark of Linus Torvalds. Red Hat is a registered trademark of Red Hat,
Inc. All other trademarks are the property of their respective owners.
Protected by U.S. Patents [patents pending]. Envivio Incorporated, 400 Oyster Point Blvd., Suite 325,
South San Francisco, California 94080 USA.
Notice to U.S. government end users. The software and documentation are “commercial items,” as that
term is defined at 48 C.F.R. §2.101, consisting of “commercial computer software” and “commercial
computer software documentation,” as such terms are used in 48 C.F.R. §12.212 or 48 C.F.R. §227.7202, as
applicable. Consistent with 48 C.F.R. §12.212 or 48 C.F.R. §§227.7202-1 through 227.7202-4, as applicable,
the commercial computer software and commercial computer software documentation are being
licensed to U.S. government end users (A) only as commercial items and (B) with only those rights as are
granted to all other end users pursuant to the terms and conditions set forth in the Envivio Incorporated
standard commercial agreement for this software. Unpublished rights are reserved under the copyright
laws of the United States.
Page 3

Acknowledgments
Envivio Incorporated acknowledges use of software from the following sources and includes their
copyright notices and required statements. here.
This software is based in part on the code of the Darwin Streaming Server (for which the source code is
available under the terms of the Apple Public Source License Version 1.2 at
http://www.opensource.apple.com/projects/streaming/).
The modifications applied to the original code are available at: http://www.envivio.tv/downloads/qtss.
Page 4

Page 5

v
Contents
Chapter 1 Introduction . . . . . . . . . . . . . . . . . . . . . . . . . . . . . . . . . . . . . . .11
Overview . . . . . . . . . . . . . . . . . . . . . . . . . . . . . . . . . . . . . . . . . . . . . . . . . . . . . . . . . . . . . . . 12
VOD functions . . . . . . . . . . . . . . . . . . . . . . . . . . . . . . . . . . . . . . . . . . . . . . . . . . . . . . . 12
Networking . . . . . . . . . . . . . . . . . . . . . . . . . . . . . . . . . . . . . . . . . . . . . . . . . . . . . . . . . 12
Monitoring and administration. . . . . . . . . . . . . . . . . . . . . . . . . . . . . . . . . . . . . . . 13
Performance . . . . . . . . . . . . . . . . . . . . . . . . . . . . . . . . . . . . . . . . . . . . . . . . . . . . . . . . 13
Error Resilience . . . . . . . . . . . . . . . . . . . . . . . . . . . . . . . . . . . . . . . . . . . . . . . . . . . . . . 13
Supported standards . . . . . . . . . . . . . . . . . . . . . . . . . . . . . . . . . . . . . . . . . . . . . . . . 13
Envivio Professional Services and Support . . . . . . . . . . . . . . . . . . . . . . . . . . . . . . . 15
Chapter 2 WebAdmin . . . . . . . . . . . . . . . . . . . . . . . . . . . . . . . . . . . . . . . .17
Overview . . . . . . . . . . . . . . . . . . . . . . . . . . . . . . . . . . . . . . . . . . . . . . . . . . . . . . . . . . . . . . . 18
Restricting access to the WebAdmin. . . . . . . . . . . . . . . . . . . . . . . . . . . . . . . . . . . . . 19
Using the WebAdmin configuration file. . . . . . . . . . . . . . . . . . . . . . . . . . . . . . . 19
Using the WebAdmin user interface . . . . . . . . . . . . . . . . . . . . . . . . . . . . . . . . . . 19
Changing the WebAdmin default user name and password . . . . . . . . . . . 20
Chapter 3 Video Server. . . . . . . . . . . . . . . . . . . . . . . . . . . . . . . . . . . . . . . 23
Setting up Movie folders . . . . . . . . . . . . . . . . . . . . . . . . . . . . . . . . . . . . . . . . . . . . . . . . 24
Using 4Sight as a reflector. . . . . . . . . . . . . . . . . . . . . . . . . . . . . . . . . . . . . . . . . . . . . . . 26
Overview . . . . . . . . . . . . . . . . . . . . . . . . . . . . . . . . . . . . . . . . . . . . . . . . . . . . . . . . . . . . 26
Basic setup . . . . . . . . . . . . . . . . . . . . . . . . . . . . . . . . . . . . . . . . . . . . . . . . . . . . . . . . . . 26
Configuration examples . . . . . . . . . . . . . . . . . . . . . . . . . . . . . . . . . . . . . . . . . . . . . 26
Using 4Sight as a relay . . . . . . . . . . . . . . . . . . . . . . . . . . . . . . . . . . . . . . . . . . . . . . . . . . 28
Overview . . . . . . . . . . . . . . . . . . . . . . . . . . . . . . . . . . . . . . . . . . . . . . . . . . . . . . . . . . . . 28
Basic setup . . . . . . . . . . . . . . . . . . . . . . . . . . . . . . . . . . . . . . . . . . . . . . . . . . . . . . . . . . 28
Configuration examples . . . . . . . . . . . . . . . . . . . . . . . . . . . . . . . . . . . . . . . . . . . . . 30
Page 6

vi 4sight Administrator Guide
Conte nts
Relay a UDP stream . . . . . . . . . . . . . . . . . . . . . . . . . . . . . . . . . . . . . . . . . . . . . . . 30
Relay an RTSP requested stream. . . . . . . . . . . . . . . . . . . . . . . . . . . . . . . . . . . 32
Relay an SAP announced stream . . . . . . . . . . . . . . . . . . . . . . . . . . . . . . . . . . 34
Connection to the output stream using an SDP file . . . . . . . . . . . . . . . . . . . 36
Connection to the output stream using SAP . . . . . . . . . . . . . . . . . . . . . . . . . . 37
Status of the configured relays . . . . . . . . . . . . . . . . . . . . . . . . . . . . . . . . . . . . . . . 37
Stream Switching . . . . . . . . . . . . . . . . . . . . . . . . . . . . . . . . . . . . . . . . . . . . . . . . . . . . . . . 38
Overview . . . . . . . . . . . . . . . . . . . . . . . . . . . . . . . . . . . . . . . . . . . . . . . . . . . . . . . . . . . . 38
Basic setup . . . . . . . . . . . . . . . . . . . . . . . . . . . . . . . . . . . . . . . . . . . . . . . . . . . . . . . . . . 38
Configuration example . . . . . . . . . . . . . . . . . . . . . . . . . . . . . . . . . . . . . . . . . . . . . . 39
Connection to the output stream . . . . . . . . . . . . . . . . . . . . . . . . . . . . . . . . . 41
Status of the configured switchers . . . . . . . . . . . . . . . . . . . . . . . . . . . . . . . . . . . 42
Chapter 4 Playlist Broadcaster . . . . . . . . . . . . . . . . . . . . . . . . . . . . . . . .43
Overview . . . . . . . . . . . . . . . . . . . . . . . . . . . . . . . . . . . . . . . . . . . . . . . . . . . . . . . . . . . . . . . 44
Basic setup . . . . . . . . . . . . . . . . . . . . . . . . . . . . . . . . . . . . . . . . . . . . . . . . . . . . . . . . . . . . . 45
Setting up a playlist using the WebAdmin . . . . . . . . . . . . . . . . . . . . . . . . . . . . 46
Restrictions. . . . . . . . . . . . . . . . . . . . . . . . . . . . . . . . . . . . . . . . . . . . . . . . . . . . . . . . . . . . . 49
Chapter 5 Load Balancer . . . . . . . . . . . . . . . . . . . . . . . . . . . . . . . . . . . . .51
Overview . . . . . . . . . . . . . . . . . . . . . . . . . . . . . . . . . . . . . . . . . . . . . . . . . . . . . . . . . . . . . . . 52
Basic setup . . . . . . . . . . . . . . . . . . . . . . . . . . . . . . . . . . . . . . . . . . . . . . . . . . . . . . . . . . . . . 53
Adding a slave server . . . . . . . . . . . . . . . . . . . . . . . . . . . . . . . . . . . . . . . . . . . . . . . . 53
Deleting a slave server . . . . . . . . . . . . . . . . . . . . . . . . . . . . . . . . . . . . . . . . . . . . . . . 54
Chapter 6 Authentication and Authorization . . . . . . . . . . . . . . . . . .55
Overview . . . . . . . . . . . . . . . . . . . . . . . . . . . . . . . . . . . . . . . . . . . . . . . . . . . . . . . . . . . . . . . 56
Basic Setup . . . . . . . . . . . . . . . . . . . . . . . . . . . . . . . . . . . . . . . . . . . . . . . . . . . . . . . . . . . . . 57
User, Group, and Access files . . . . . . . . . . . . . . . . . . . . . . . . . . . . . . . . . . . . . . . . . . . . 59
User file . . . . . . . . . . . . . . . . . . . . . . . . . . . . . . . . . . . . . . . . . . . . . . . . . . . . . . . . . . . . . 59
Group file . . . . . . . . . . . . . . . . . . . . . . . . . . . . . . . . . . . . . . . . . . . . . . . . . . . . . . . . . . . 59
Page 7

4sight Administrator Guide vii
Conten ts
Access file . . . . . . . . . . . . . . . . . . . . . . . . . . . . . . . . . . . . . . . . . . . . . . . . . . . . . . . . . . . 60
The qtpasswd utility . . . . . . . . . . . . . . . . . . . . . . . . . . . . . . . . . . . . . . . . . . . . . . . . . . . . 62
Configuration example . . . . . . . . . . . . . . . . . . . . . . . . . . . . . . . . . . . . . . . . . . . . . . . . . 63
Chapter 7 External authorization module . . . . . . . . . . . . . . . . . . . . . 65
Overview . . . . . . . . . . . . . . . . . . . . . . . . . . . . . . . . . . . . . . . . . . . . . . . . . . . . . . . . . . . . . . . 66
Installing the authorization module . . . . . . . . . . . . . . . . . . . . . . . . . . . . . . . . . . . . . 67
Basic example of external authorization module . . . . . . . . . . . . . . . . . . . . . . . . . 68
Chapter 8 SNMP monitoring . . . . . . . . . . . . . . . . . . . . . . . . . . . . . . . . . .69
Using SNMP monitoring . . . . . . . . . . . . . . . . . . . . . . . . . . . . . . . . . . . . . . . . . . . . . . . . 70
Monitoring 4Sight using MG-SOFT MIB Browser. . . . . . . . . . . . . . . . . . . . . . . . . . 71
Enabling SNMP trap reception . . . . . . . . . . . . . . . . . . . . . . . . . . . . . . . . . . . . . . . . . . 75
Appendix A How-To. . . . . . . . . . . . . . . . . . . . . . . . . . . . . . . . . . . . . . . . . . . .79
How to update an SDP file . . . . . . . . . . . . . . . . . . . . . . . . . . . . . . . . . . . . . . . . . . . . . . 80
How to link to a streamable content in a web page. . . . . . . . . . . . . . . . . . . . . . . 81
How to embed a streamable content in a web page. . . . . . . . . . . . . . . . . . . . . . 82
What is a hint track . . . . . . . . . . . . . . . . . . . . . . . . . . . . . . . . . . . . . . . . . . . . . . . . . . . . . 83
Can I use multicast over Internet? . . . . . . . . . . . . . . . . . . . . . . . . . . . . . . . . . . . . . . . 84
Appendix B The Video Server configuration file parameters . . . . . .85
General parameters. . . . . . . . . . . . . . . . . . . . . . . . . . . . . . . . . . . . . . . . . . . . . . . . . . . . . 86
Thinning parameters . . . . . . . . . . . . . . . . . . . . . . . . . . . . . . . . . . . . . . . . . . . . . . . . 88
More general parameters . . . . . . . . . . . . . . . . . . . . . . . . . . . . . . . . . . . . . . . . . . . . 89
Reliable UDP parameters. . . . . . . . . . . . . . . . . . . . . . . . . . . . . . . . . . . . . . . . . . . . . 90
RTSP debugging parameters . . . . . . . . . . . . . . . . . . . . . . . . . . . . . . . . . . . . . . . . . 91
Specific parameters. . . . . . . . . . . . . . . . . . . . . . . . . . . . . . . . . . . . . . . . . . . . . . . . . . . . . 92
Reflector module parameters . . . . . . . . . . . . . . . . . . . . . . . . . . . . . . . . . . . . . . . . 92
Access Log module parameters . . . . . . . . . . . . . . . . . . . . . . . . . . . . . . . . . . . . . . 92
Error Log modules parameters . . . . . . . . . . . . . . . . . . . . . . . . . . . . . . . . . . . . . . . 93
Page 8

viii 4sight Administrator Guide
Conte nts
Access module parameters. . . . . . . . . . . . . . . . . . . . . . . . . . . . . . . . . . . . . . . . . . . 93
WebAdmin parameters . . . . . . . . . . . . . . . . . . . . . . . . . . . . . . . . . . . . . . . . . . . . . . 94
File module parameters. . . . . . . . . . . . . . . . . . . . . . . . . . . . . . . . . . . . . . . . . . . . . . 94
Flow control module parameters. . . . . . . . . . . . . . . . . . . . . . . . . . . . . . . . . . . . . 95
Multiple movie folders parameters . . . . . . . . . . . . . . . . . . . . . . . . . . . . . . . . . . . 96
Relay parameters . . . . . . . . . . . . . . . . . . . . . . . . . . . . . . . . . . . . . . . . . . . . . . . . . . . . 96
Switcher parameters. . . . . . . . . . . . . . . . . . . . . . . . . . . . . . . . . . . . . . . . . . . . . . . . . 96
Licensing module parameters. . . . . . . . . . . . . . . . . . . . . . . . . . . . . . . . . . . . . . . . 97
Load balancing module parameters . . . . . . . . . . . . . . . . . . . . . . . . . . . . . . . . . . 97
External authentication parameters . . . . . . . . . . . . . . . . . . . . . . . . . . . . . . . . . . 97
Recorder module . . . . . . . . . . . . . . . . . . . . . . . . . . . . . . . . . . . . . . . . . . . . . . . . . . . . 97
Appendix C The Playlist Broadcaster configuration file . . . . . . . . . . .99
Appendix D The Web Admin configuration file. . . . . . . . . . . . . . . . . .103
Appendix E Video Server access log file . . . . . . . . . . . . . . . . . . . . . . . .105
Glossary . . . . . . . . . . . . . . . . . . . . . . . . . . . . . . . . . . . . . . . . . . . . . . . . . . . . . .109
Index . . . . . . . . . . . . . . . . . . . . . . . . . . . . . . . . . . . . . . . . . . . . . . . . . . . . . . . . .115
Page 9

Chapter 1
Introduction
Page 10

12 Chapter 1
Introduction
Overview
VOD functions
The 4Sight Video Server from Envivio provides MPEG-4 and H.264
streaming capabilities for small, medium and large scale enterprise,
broadband and broadcast deployments. It has been designed and
optimized to meet the needs of professional video distribution
applications.
Broadcasters and cable operators can use the 4Sight Video Server to
manage and distribute interactive multimedia content through IP
networks to EnvivioTV or any other MPEG-4 compliant player
Networking
The 4Sight Video Server can stream any MPEG-4 file that conforms to
the ISO standard, whether the file is generated by the Envivio 4Coder or
some other MPEG-4 encoding tool.
Both Advanced Video Coding (AVC/H.264) and Advanced Simple
Profile (ASP) are supported.
Files need to be hinted before being served by the 4Sight Video Server.
The 4Sight Video Server supports trick play features (fast forward, fast
backward) on all MPEG-4 content. The rendering of content played in
fast forward or fast backward depends on the way the content is encoded
(more specifically on the key frame frequency).
The 4Sight Video Server sends media to the network using the IETF
defined suite of protocols based on IP for real-time streaming, and
supports HTTP tunnelling to support firewall configurations. It also uses
Version 5.0
Page 11

the associated IETF recommendations dedicated to MPEG-4 transport
over IP.
Monitoring and administration
Monitoring of the 4Sight Video Server can be done while it is online using
either the 4Sight WebAdmin which is a web-based interface or using
SNMP.
When the 4Sight Video Server is offline, monitoring can be done using
the log files.
Performance
4Sight 13
Administrator Guide
In streaming, 4Sight can support up to 400 simultaneous users, at
1.5 Mbps.
Error Resilience
4Sight offers error resilience so that EnvivioTV can receive content
smoothly under severe network packet loss conditions (up to 2% packet
loss rate).
Both 4Sight and EnvivioTV provide a rebuffering management policy
that improves the user experience when traffic is congested.
Supported standards
The following protocols and standards are implemented in the 4Sight
Video Server:
• RTSP (Real Time Streaming Protocol), IETF RFC 2326
• SDP (Session Description Protocol), IETF RFC 2327
Version 5.0
Page 12

14 Chapter 1
Introduction
• UDP (User Datagram Protocol), IETF RFC 769
• TCP (Transmission Control Protocol), IETF RFC 793
• IP (Internet Protocol), IETF RFC 791
• RTP (Transport Protocol for Real-Time Applications), IETF RFC
3550
• SAP (Session Announcement Protocol), IETF RFC 2974
• IGMP v2 (Internet Group Management Protocol), IETF RFC 2236
• SNMP (Simple Network Management Protocol), IETF RFC 1157
Version 5.0
Page 13

Envivio Professional Services and Support
You may contact us for specific projects requiring customized options or
specific development, available through our service organization. For
contact information, see the Envivio website at
http://www.envivio.com.
If you have support questions, contact Envivio Customer Services.
4Sight 15
Administrator Guide
Version 5.0
Page 14

16 Chapter 1
Introduction
Version 5.0
Page 15

Chapter 2
WebAdmin
Page 16

18 Chapter 2
Web Admi n
Overview
4Sight WebAdmin is a web based administration tool that allows the
administrator to monitor and configure the 4Sight Streaming Server.
Using this tool, you can setup and monitor relays, switcher and playlists.
You can also setup movie folders, authorization and streaming ports.
In order to connect to this administration tool, you can either:
Version 5.0
Page 17

Restricting access to the WebAdmin
Using the WebAdmin configuration file
To restrict access to the WebAdmin, you can use the two keywords, allow
deny, in your streamingadminserver.conf.
or
For example, at the end of the file, add the following:
allow=192.168.105.187 127.0.0.1
deny=192.168.105.113
This allows access to the WebAdmin from local host and
192.168.105.187 and explicitly denies it from 192.168.105.113.
4Sight 19
Administrator Guide
Using the WebAdmin user interface
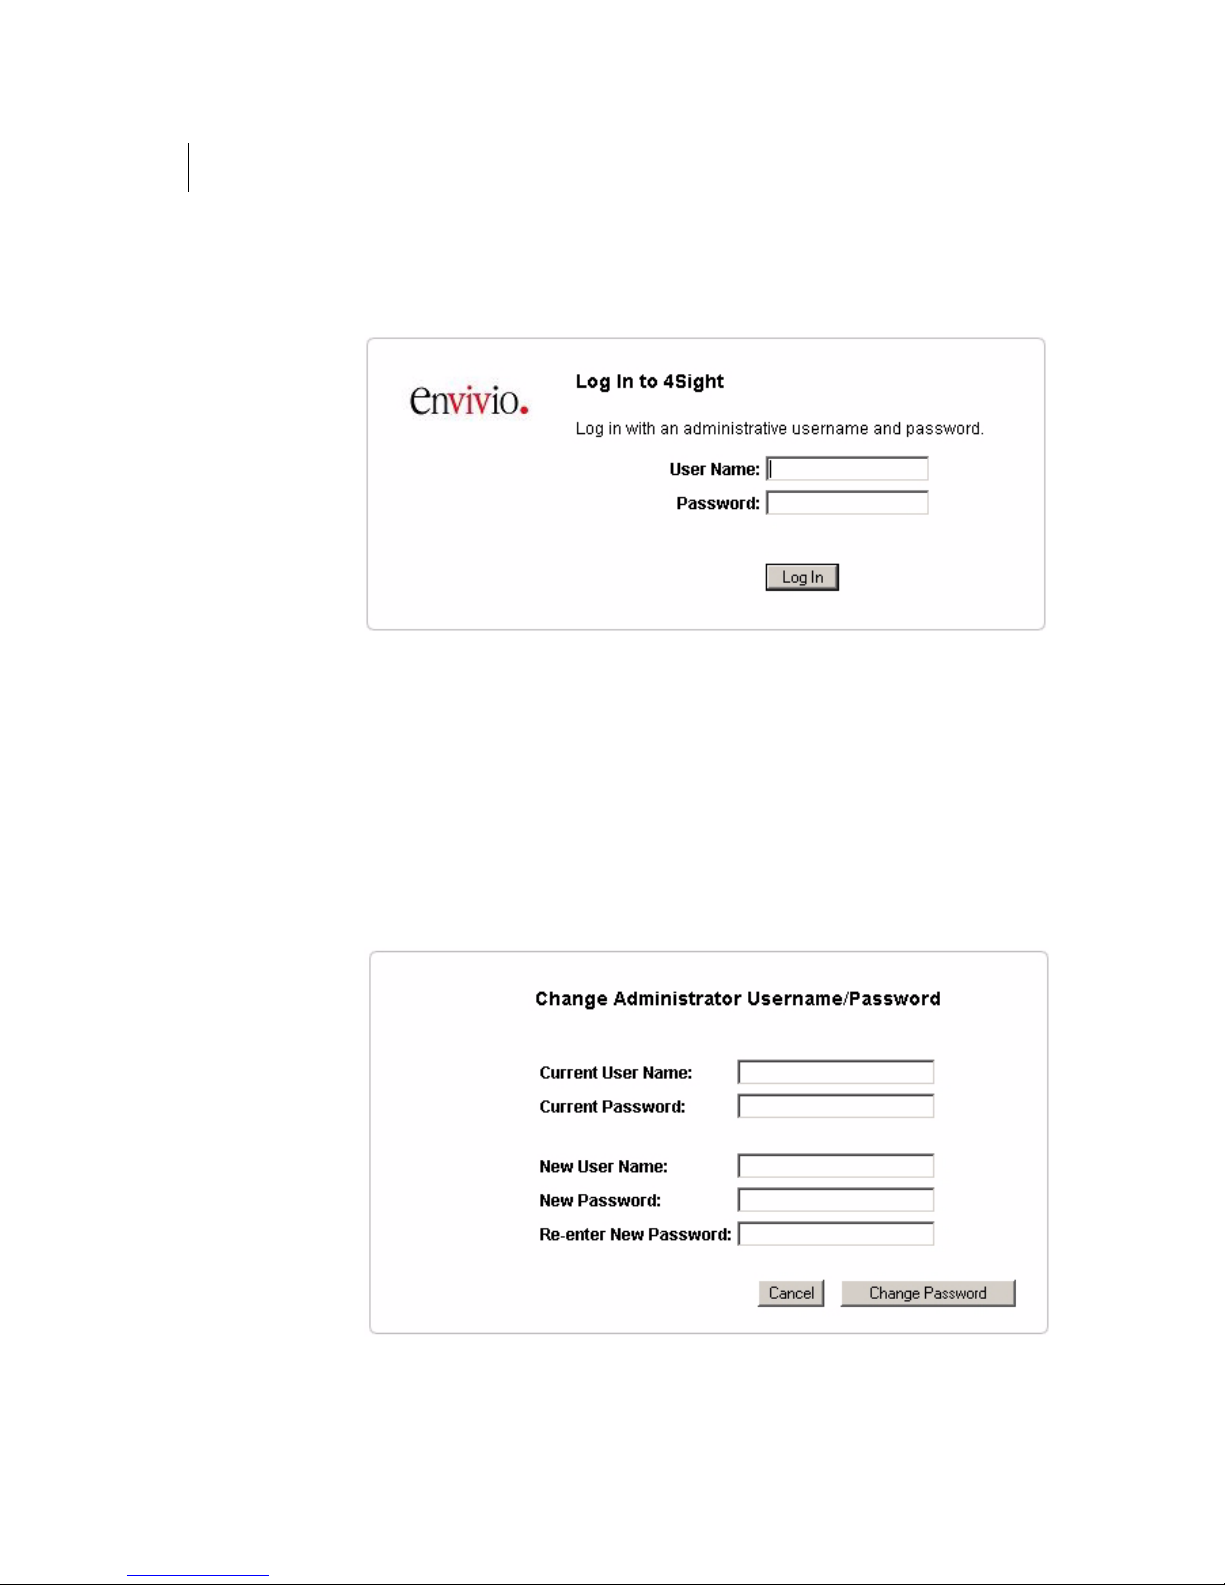
You can restrict access to the WebAdmin by using a login screen. The user
will have to provide a user name and password to connect to the
WebAdmin.
1. Using a web browser, connect to the WebAdmin (see “WebAdmin” on
page 17).
2. Click on the
3. Select the
to the WebAdmin, then click the Save changes button. You will be
disconnected from theWebAdmin.
Server Configuration>General Settings menu item.
Authentication for the web admin check box to restrict access
Version 5.0
Page 18
20 Chapter 2
Web Admi n
4. Reconnect to the WebAdmin using the default user name (admin) and
password (admin).
Changing the WebAdmin default user name and password
5. Using a web browser, connect to the WebAdmin: (see “WebAdmin”
on page 17).
6. Select the Server Configuration>General Settings menu item.
7. Click the Change Admin Username/Password... link. The following
page should be displayed:
Version 5.0
Page 19

4Sight 21
Administrator Guide
8. Fill the different fields, then click the Change password button. You
will be disconnected from the WebAdmin.
9. Reconnect to the WebAdmin using the new user name and password.
Version 5.0
Page 20

22 Chapter 2
Web Admi n
Version 5.0
Page 21

Chapter 3
Video Server
Page 22
24 Chapter 3
Video Server
Setting up Movie folders
To serve on-demand MPEG-4 files stored on your server, 4Sight needs to
know where your files are located.
You can change the default movie folder or add new ones using the
WebAdmin:
1. Open a web browser and connect to your WebAdmin (see
"WebAdmin" on page 17 for further details).
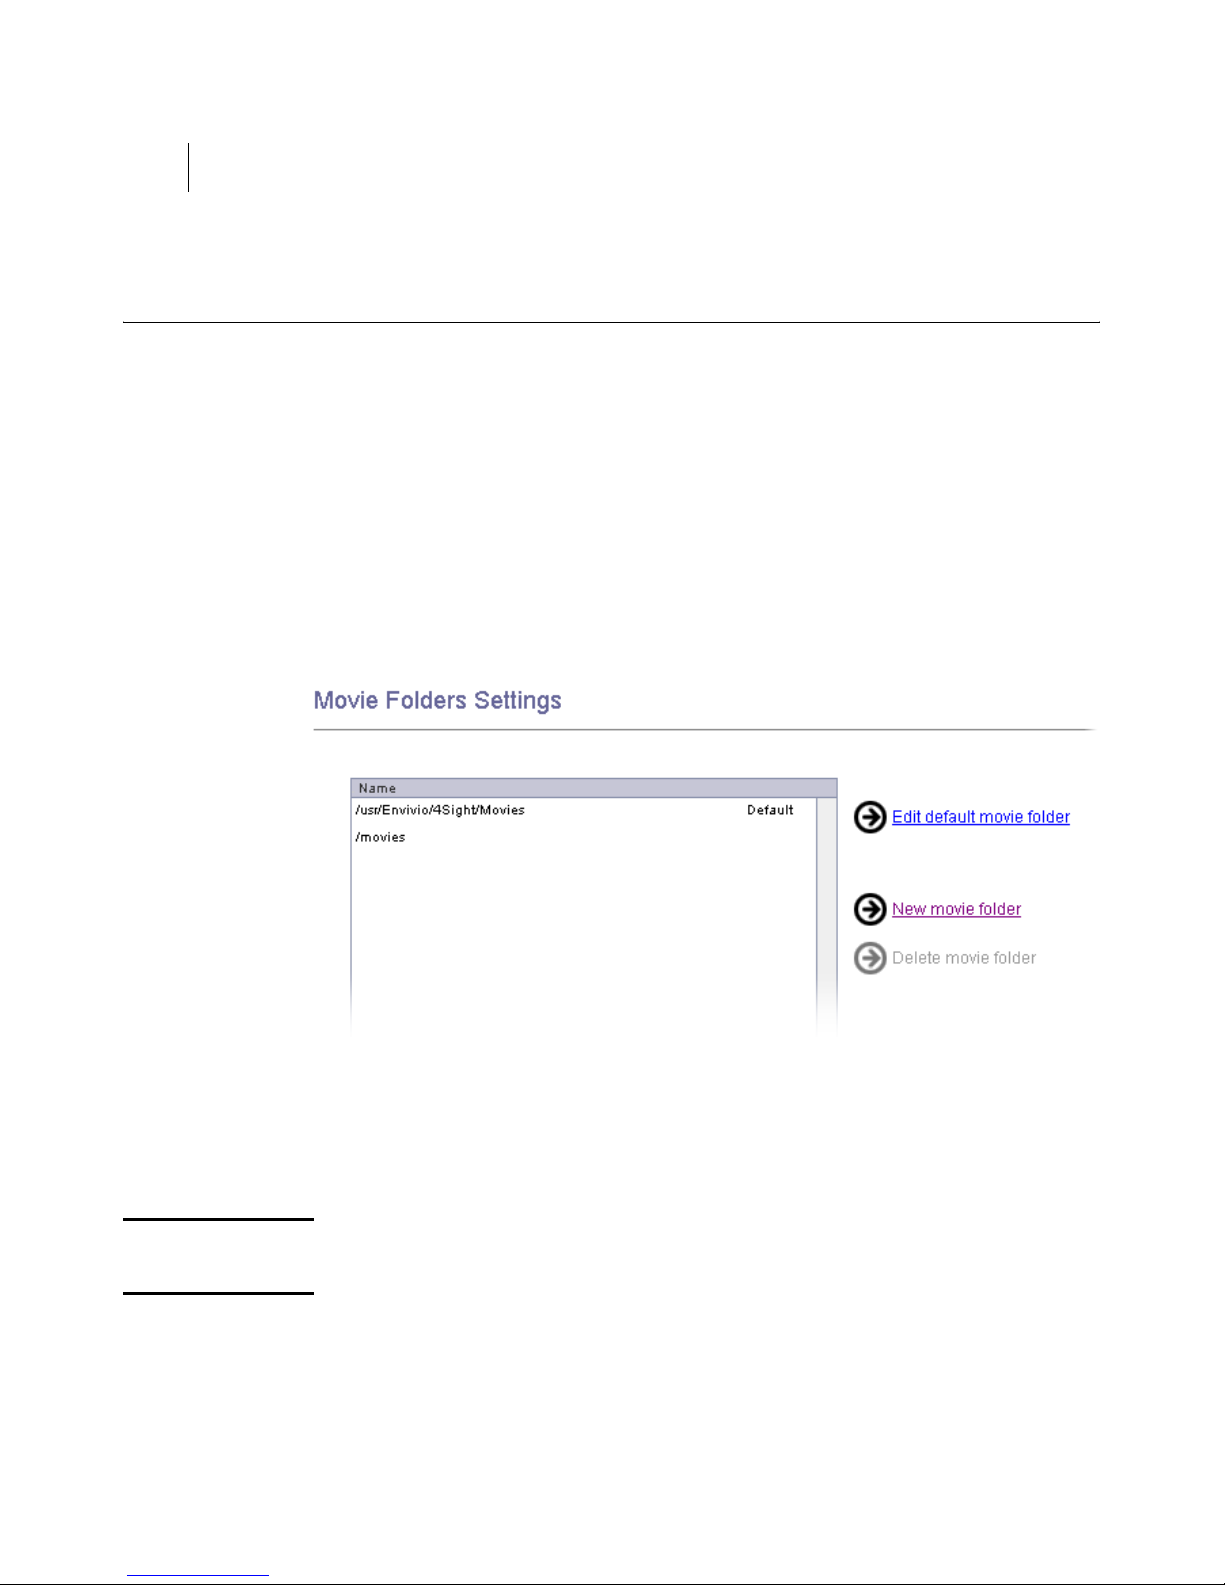
2. Click the Movie Folders menu item. You will see a list of movie folders
as shown in the figure below:
3. To change the default movie folder, click the
button.
4. To add a movie folder to your list, click the
Then enter the complete path of your folder.
NOTE The path to the movie folder must respect the path format of the
operating system where 4Sight is installed.
Edit default movie folder
New movie Folder button.
Version 5.0
Page 23
4Sight 25
Administrator Guide
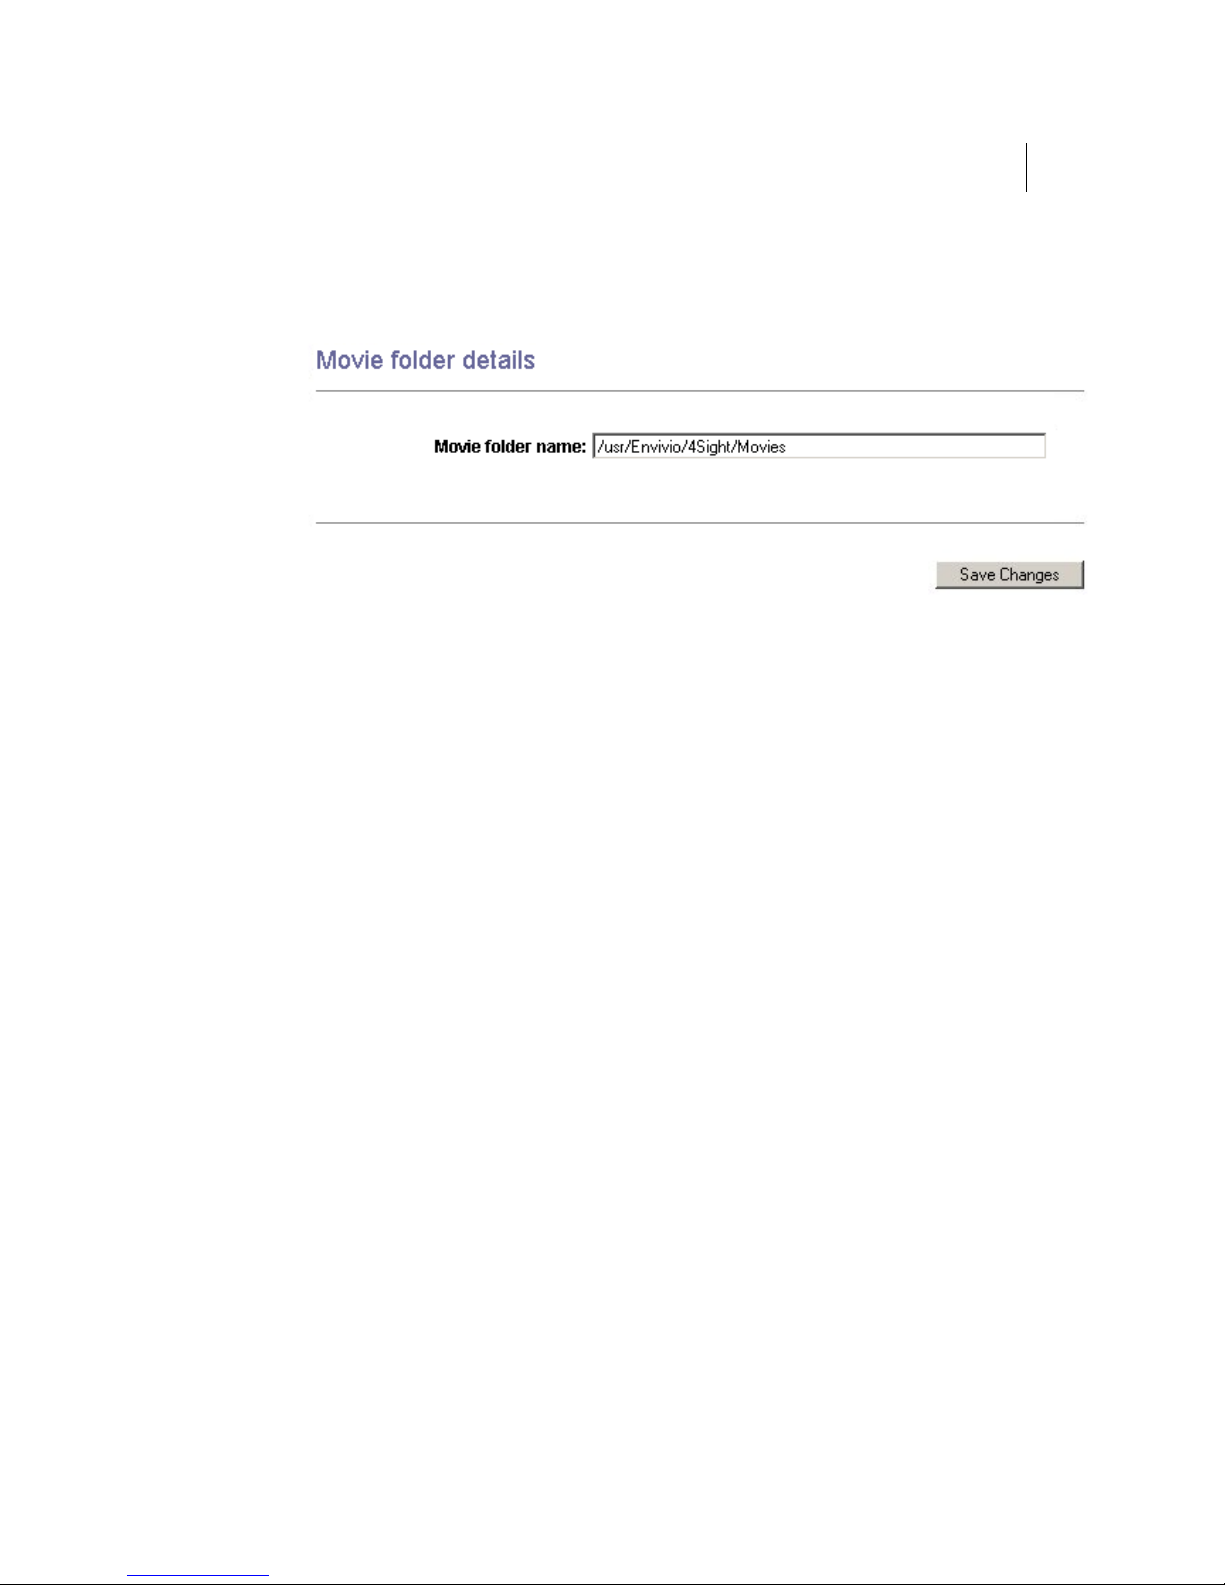
5. Click the Saves Changes button to add this new folder, as shown in the
figure below.:
Version 5.0
Page 24

26 Chapter 3
Video Server
Using 4Sight as a reflector
Overview
Most routers on the Internet cannot properly interpret multicast
information as they are set up to transfer traditional Internet Protocol (IP)
unicast packets that have a single, specific destination.
A reflector is a built-in mechanism of the server that converts one
multicast stream to a series of individual unicast streams. The server's
reflector module feeds each client with an individual stream.
Basic setup
In most cases, the reflector receives either a multicast or unicast stream
from a broadcaster (an application which sends RTP packets) such as
4Caster. The reflector forwards the RTP streams upon request, in real
time. The SDP file generated by the broadcaster must be placed in one of
the movie folders of 4Sight.
Configuration examples
Once your broadcaster is setup and has started to broadcast to a multicast
address, you can get the SDP associated with the multicast stream. Then,
without changing anything in the SDP file, you can copy it into one of
the server's movie folders. You are then ready for accessing the multicast
stream using the 4Sight Video Server reflecting capabilities.
Version 5.0
Page 25
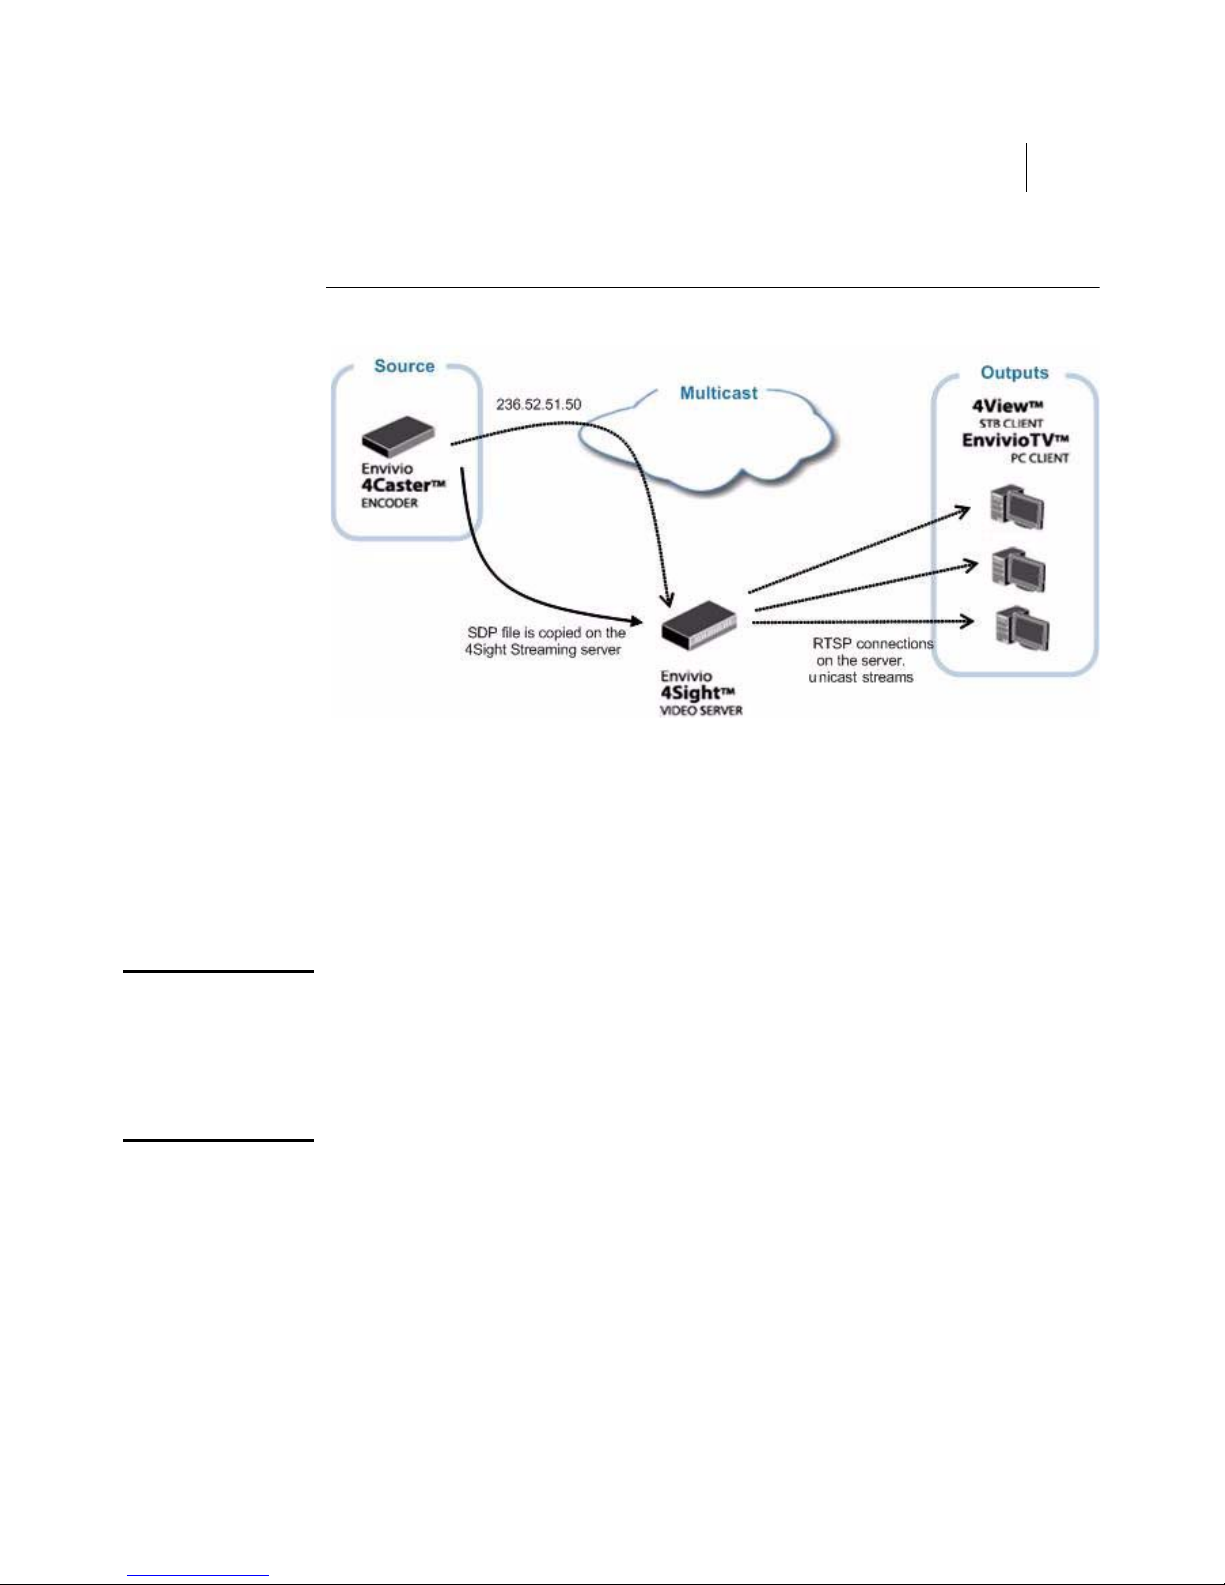
Figure 1. Example of reflecting
4Sight 27
Administrator Guide
For example, if the SDP file referring to the multicast stream is called
live.m4e, once it is copied on the server, you can access the multicast
stream using the following URL:
e-rtsp://server_name:7070/live.m4e
A unicast session will then be created for your client that will be a reflected
copy of the multicast stream.
WAR NIN G If you use reliable UDP (see "reliable_udp" on page 90), check that the
M4E file does not contain the following line:
b=RR:0
This may prevent the player from sending the RTCP packets that are
mandatory for using reliable UDP.
Version 5.0
Page 26
28 Chapter 3
Video Server
Using 4Sight as a relay
Overview
A relay is a built-in mechanism of the server that accepts a stream from
another video server or a broadcaster and sends it or "relays" it to one or
more unicast or multicast destinations.
Basic setup
To set up the relay using the WebAdmin, follow these steps:
1. Using a web browser, connect to the WebAdmin (see "WebAdmin" on
page 17).
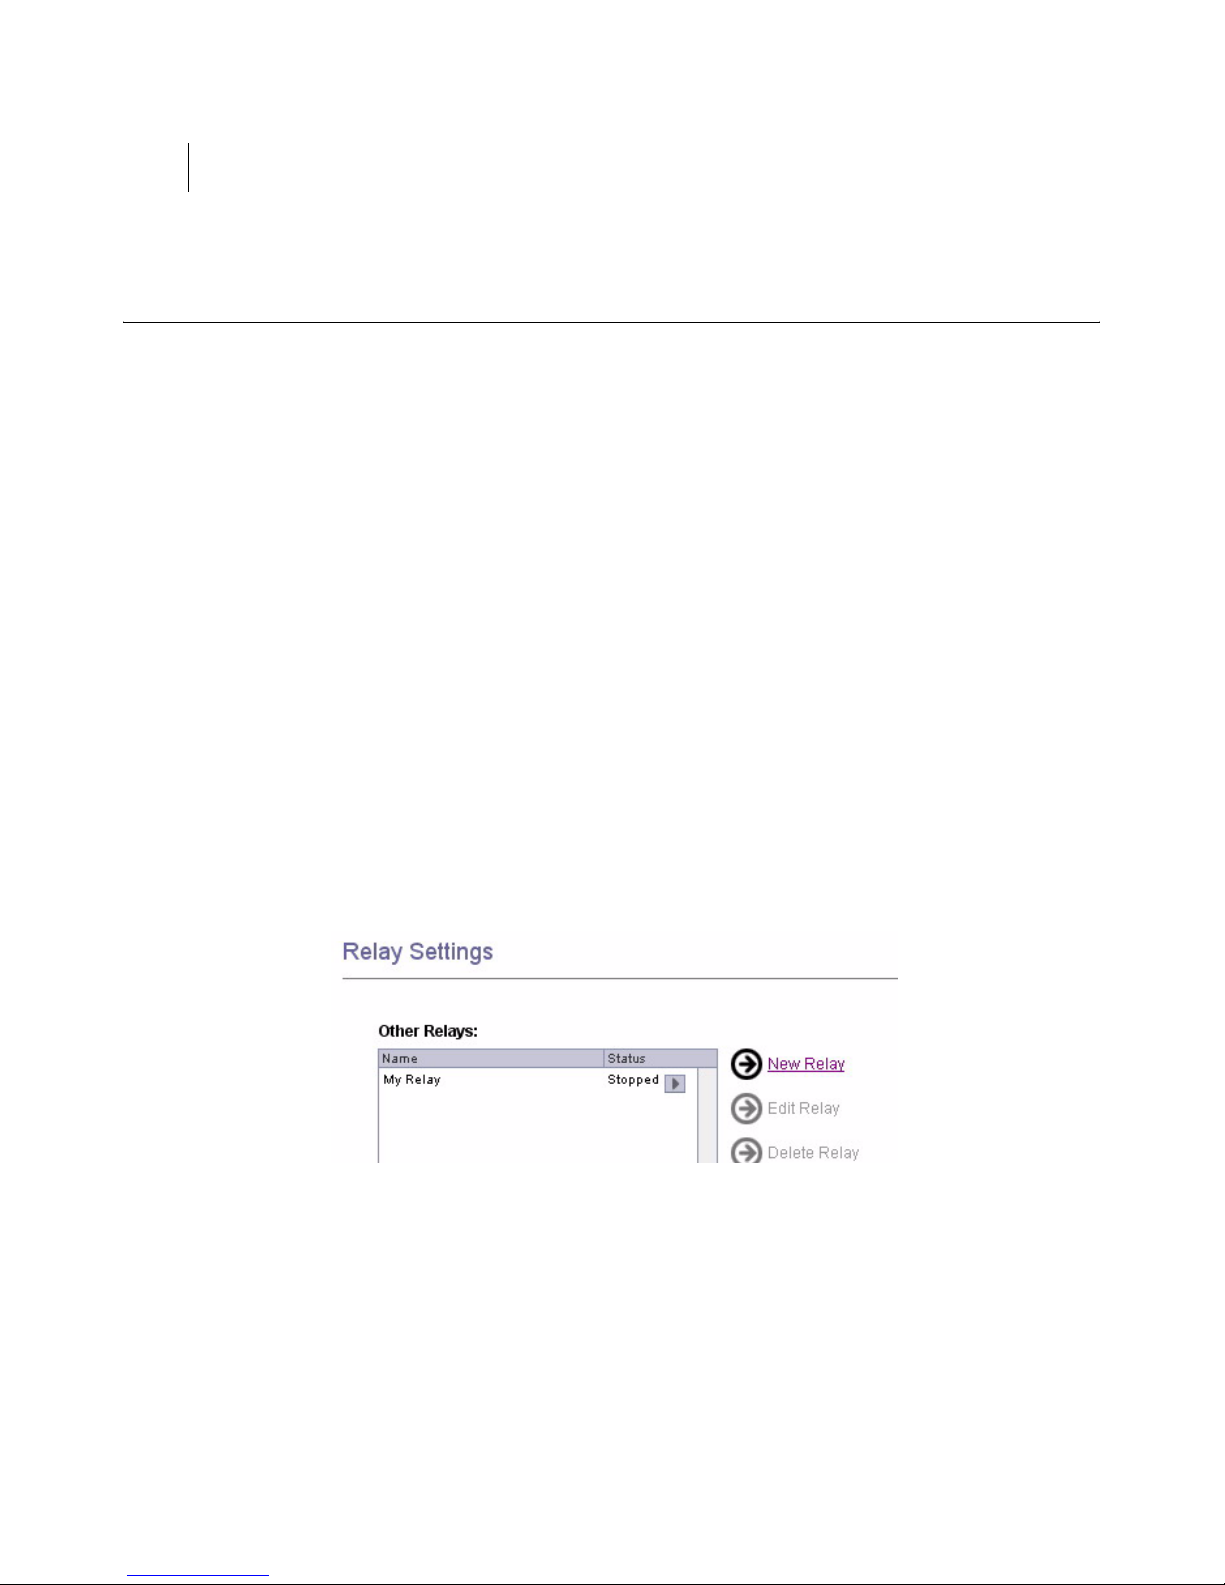
2. Select the Relay Settings menu item. You will see a list of your
configured relays.
3. Click on New Relay to create a new relay. The following page is
displayed:
4. Fill in the different fields, then click the Save Changes button.
Version 5.0
Page 27
4Sight 29
Administrator Guide
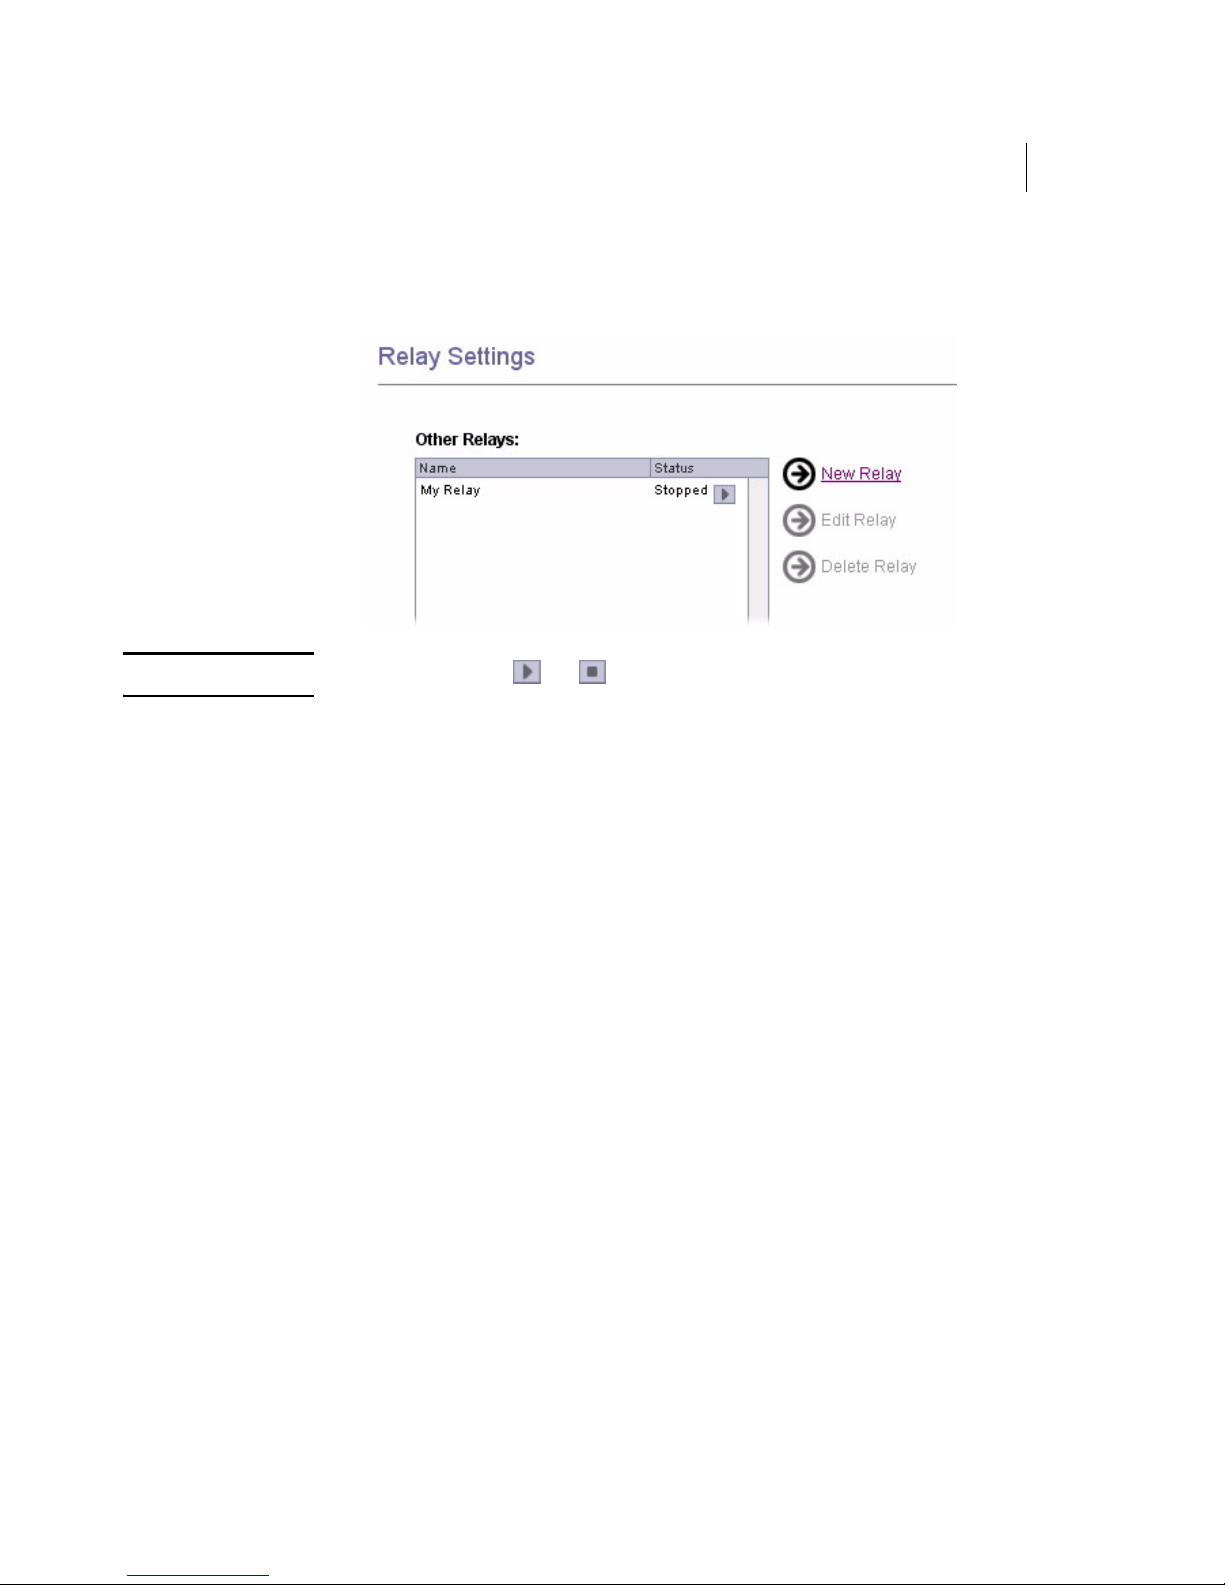
5. Your relay will then be listed in the relay list, followed by its status that
can be either Started or Stopped.
NOTE You can click the or buttons to respectively start or stop the relay.
Version 5.0
Page 28
30 Chapter 3
Video Server
Configuration examples
Relay a UDP stream
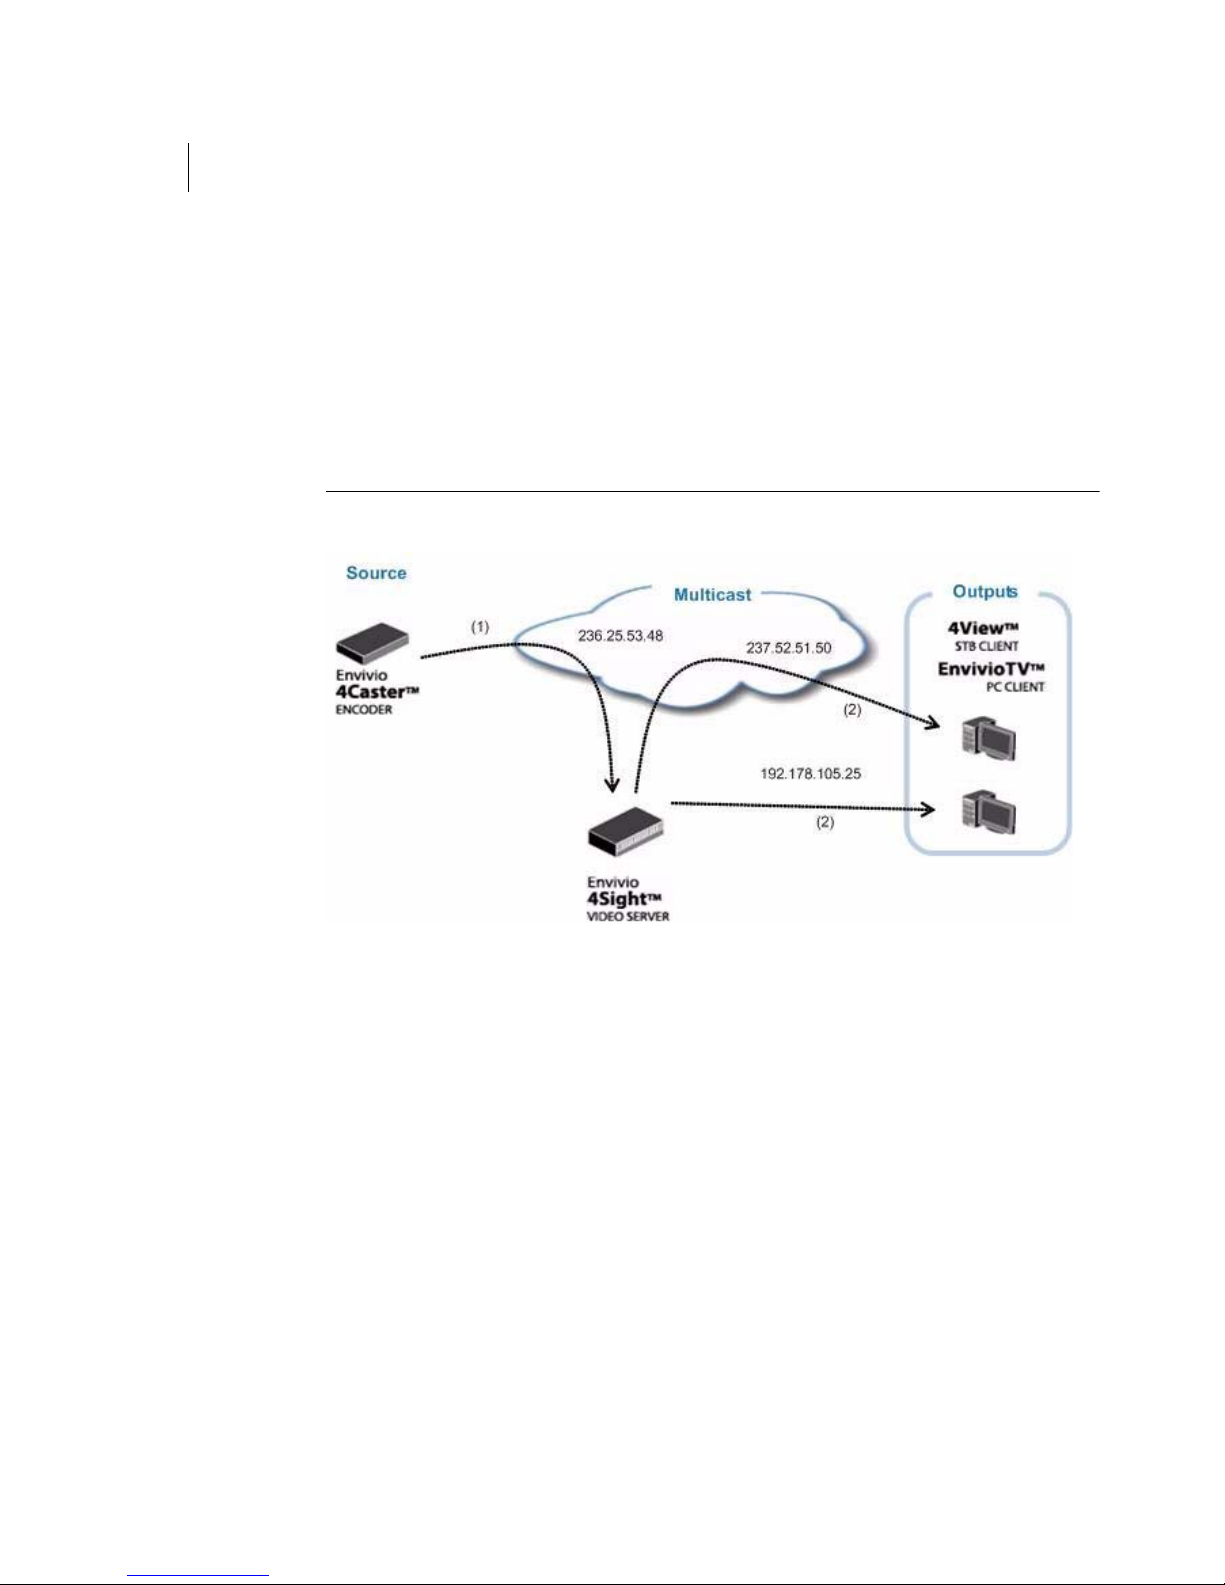
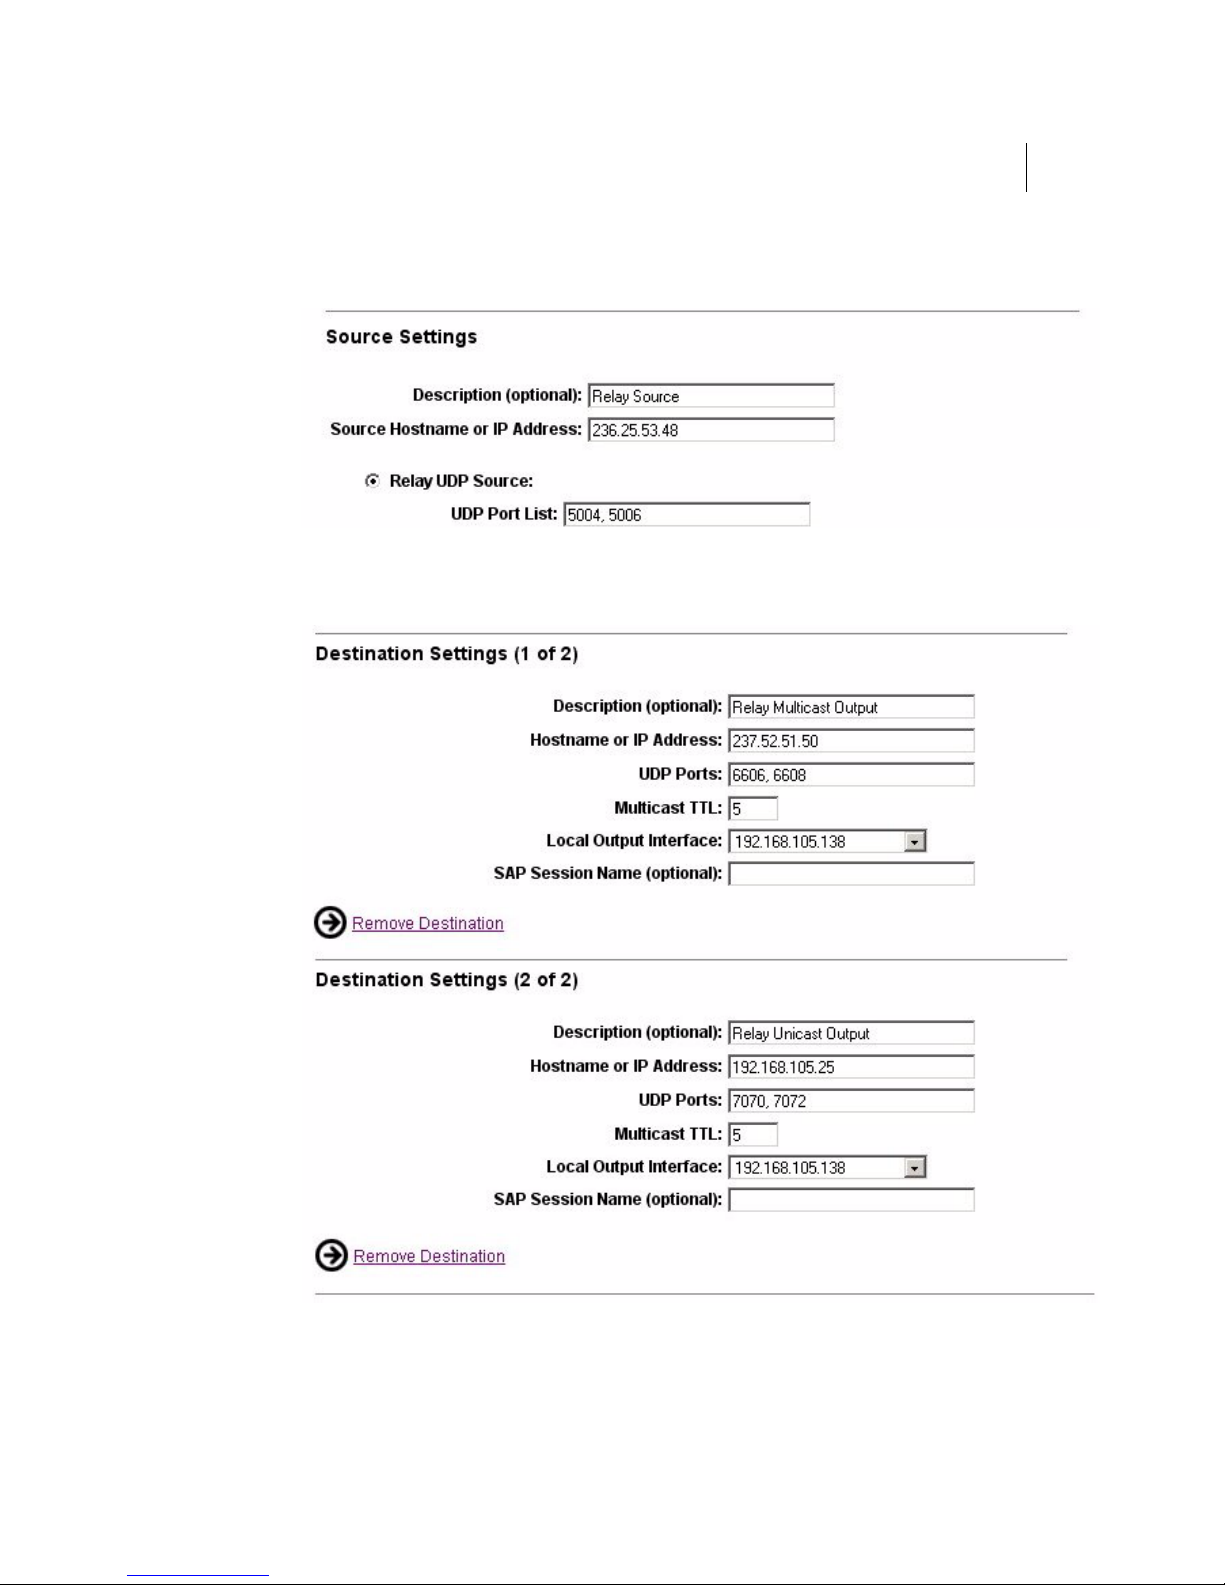
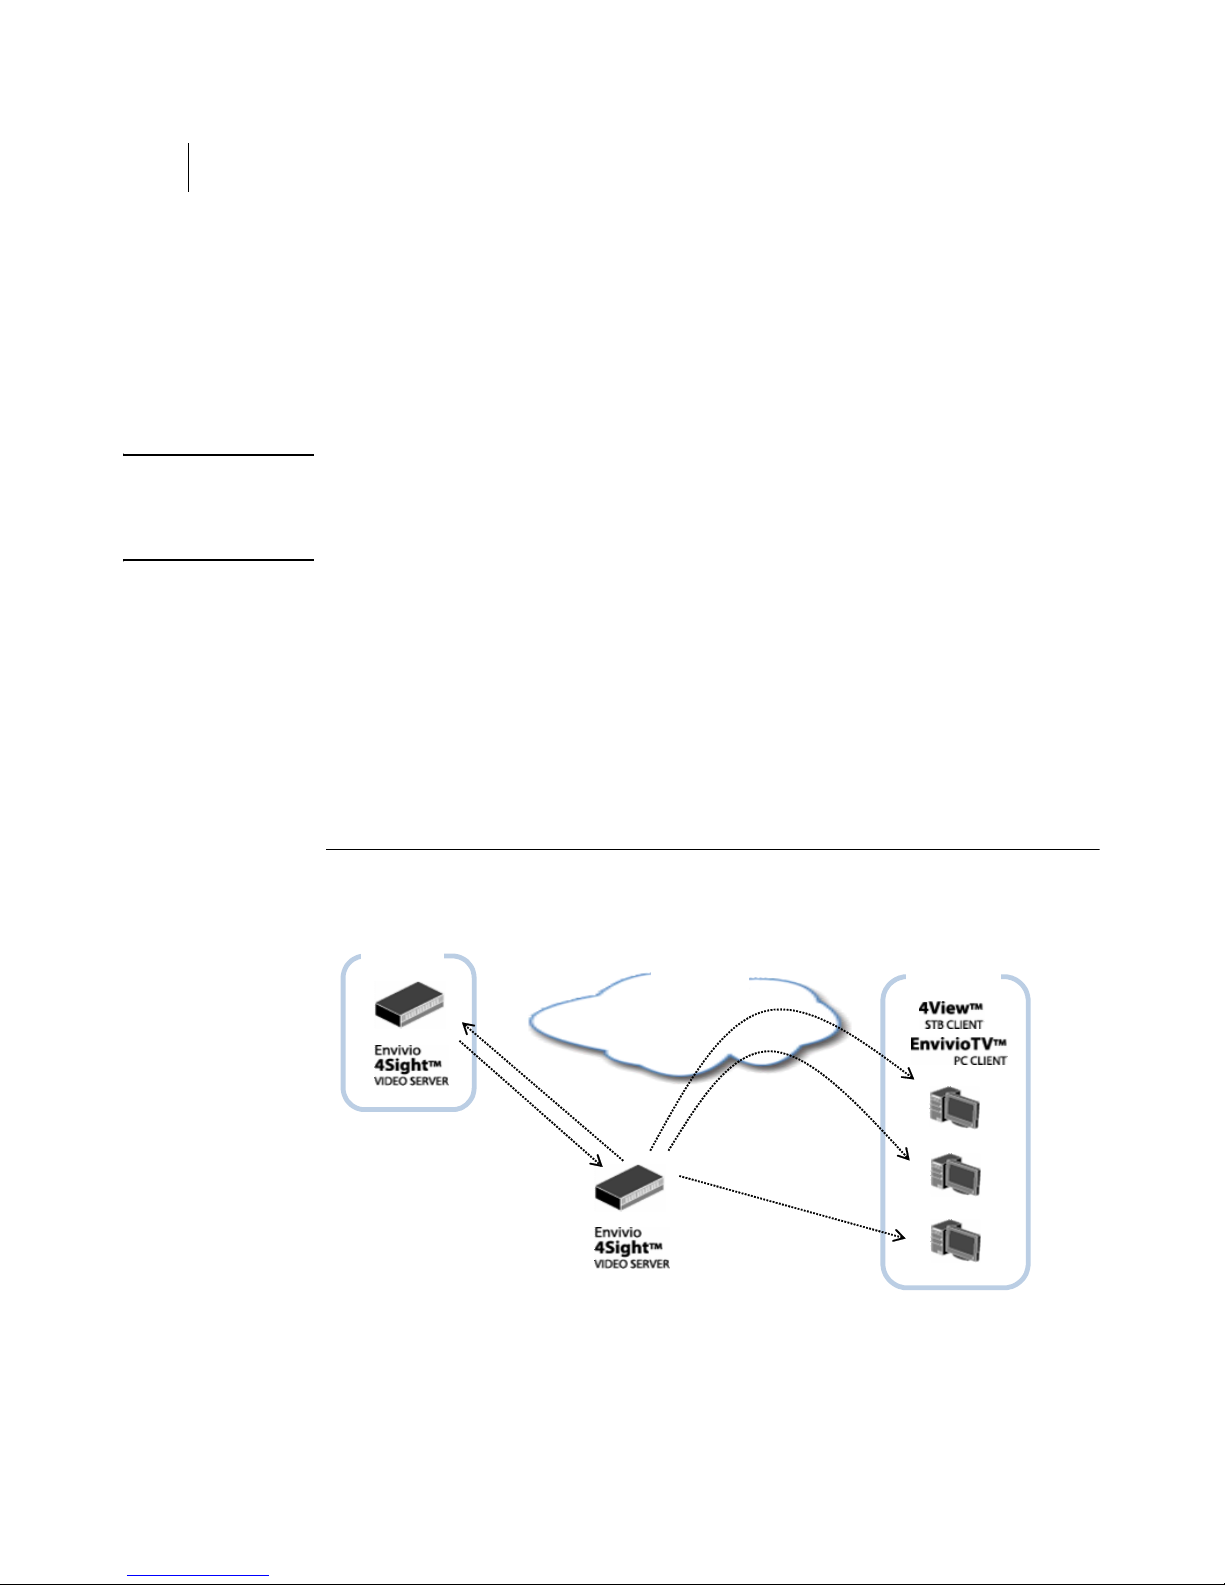
Consider the following graph where the user wants to relay a multicast
stream to another multicast address and simultaneously to a unicast client.
Figure 2. Relaying a UDP stream
In this case, the relay module of the 4Sight Video Server Streaming Server
will fetch the multicast stream coming from the broadcaster
(1) and send
it to both the multicast address and the unicast client (2).
To relay a UDP stream, you need to follow these steps:
1. Specify the source address (this address can be either multicast or
unicast to the server).
2. Select the Relay a UDP Source radio button.
3. Specify the ports you want to listen to (ports number can be separated
by commas, semicolons or spaces).
4. Provide the information about the destination (you can add more
destinations if needed).
Version 5.0
Page 29
4Sight 31
Administrator Guide
5. Click the Save Changes button.
4Sight will then start relaying the source address to the configured
destination addresses:
Version 5.0
Page 30
32 Chapter 3
Video Server
You can define the network interface card that you want to use for
sending packets by specifying the Local Output Interface parameter in the
Destination section.
The SAP session name for outputs is only available when relaying an SAP
source.
NOTE The multicast time to live (TTL, see "Glossary" on page 109) is
mandatory if you relay towards a multicast address, and it must be greater
than 0. It can be omitted if relaying to a unicast address.
Relay an RTSP requested stream
This configuration is for the scenario where you have a server configured
and running that you would like to relay, but the server is not
broadcasting anything, it is just accepting and handling requests from
clients. In order to relay requests, you will need to have an incoming
stream.
Figure 3. Relaying an RTSP requested stream
Source
Multicast
(1)
(2)
Version 5.0
Outputs
SAP
(4)
237.52.51.50
(3)
192.178.105.25
(3)
Page 31
4Sight 33
Administrator Guide
The 4Sight Video Server Video Server will request a stream from the
RTSP server specified in the source settings (1), get the video stream back
(2) and relay it to the destinations (3). If an output SAP session is
specified, then the relay will also announce the new session using SAP (4).
A player will then be able to connect using SAP to the relayed stream.
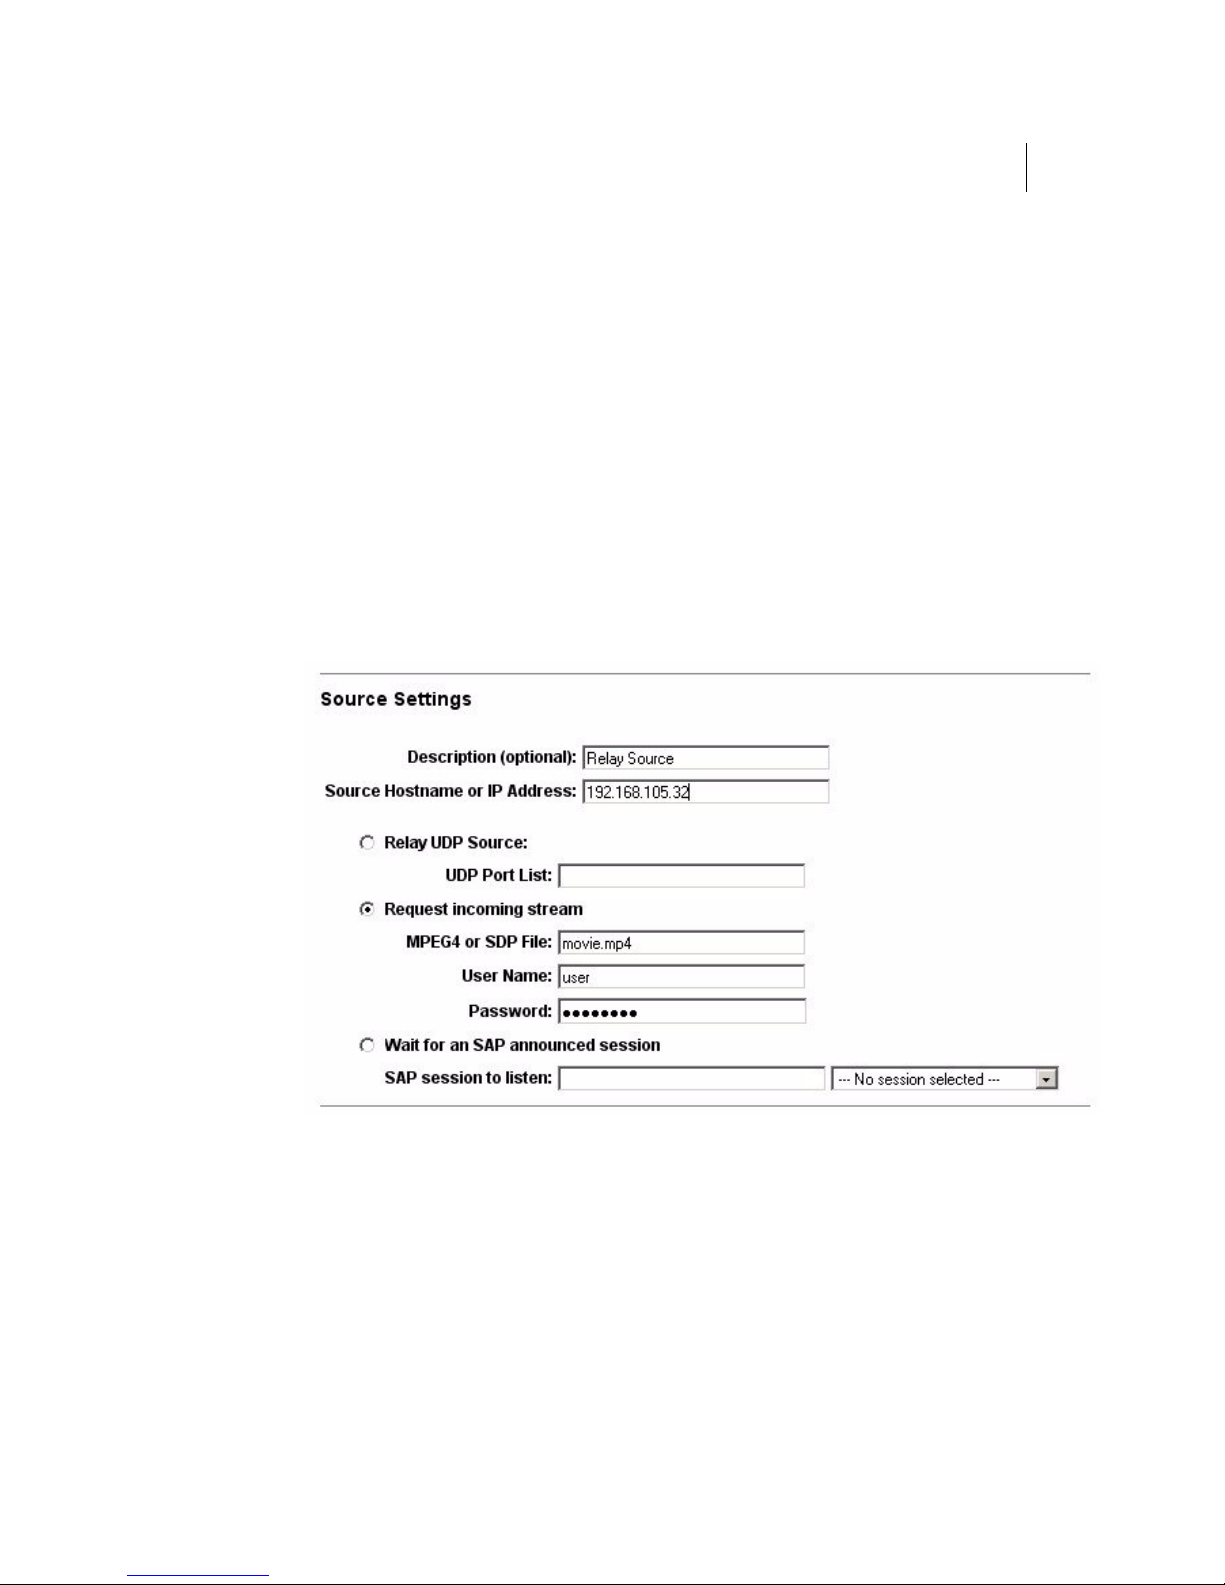
By setting the IP address and the filename of the movie you want to relay,
and selecting the Request Incoming Stream radio button, your server will
get the stream as if it was a client and relay it to the destinations you
configured.
If the origin server needs authorization, provide a user name and password
in your relay configuration as shown in the figure below:
Let's consider the same use case than in the previous paragraph, but
instead of having a broadcaster as a source, we have a second video server
that is able to handle RTSP requests and serve videos. In this case, we can
configure our relay to request the video on the source server and relay it
the different outputs we set up.
Version 5.0
Page 32
34 Chapter 3
Video Server
Relay an SAP announced stream
Figure 4. Relaying an SAP announced stream
In this last case, we suppose that we have a broadcaster that is able to
announce the session to the SAP address. In this case, the 4Sight's relay
module is able to connect to the announced stream and to send it to the
different outputs we set up.
Source
(1)
(2)
SAP
Multicast
236.25.53.48
Outputs
SAP
(4)
237.52.51.50
(3)
192.178.105.25
(3)
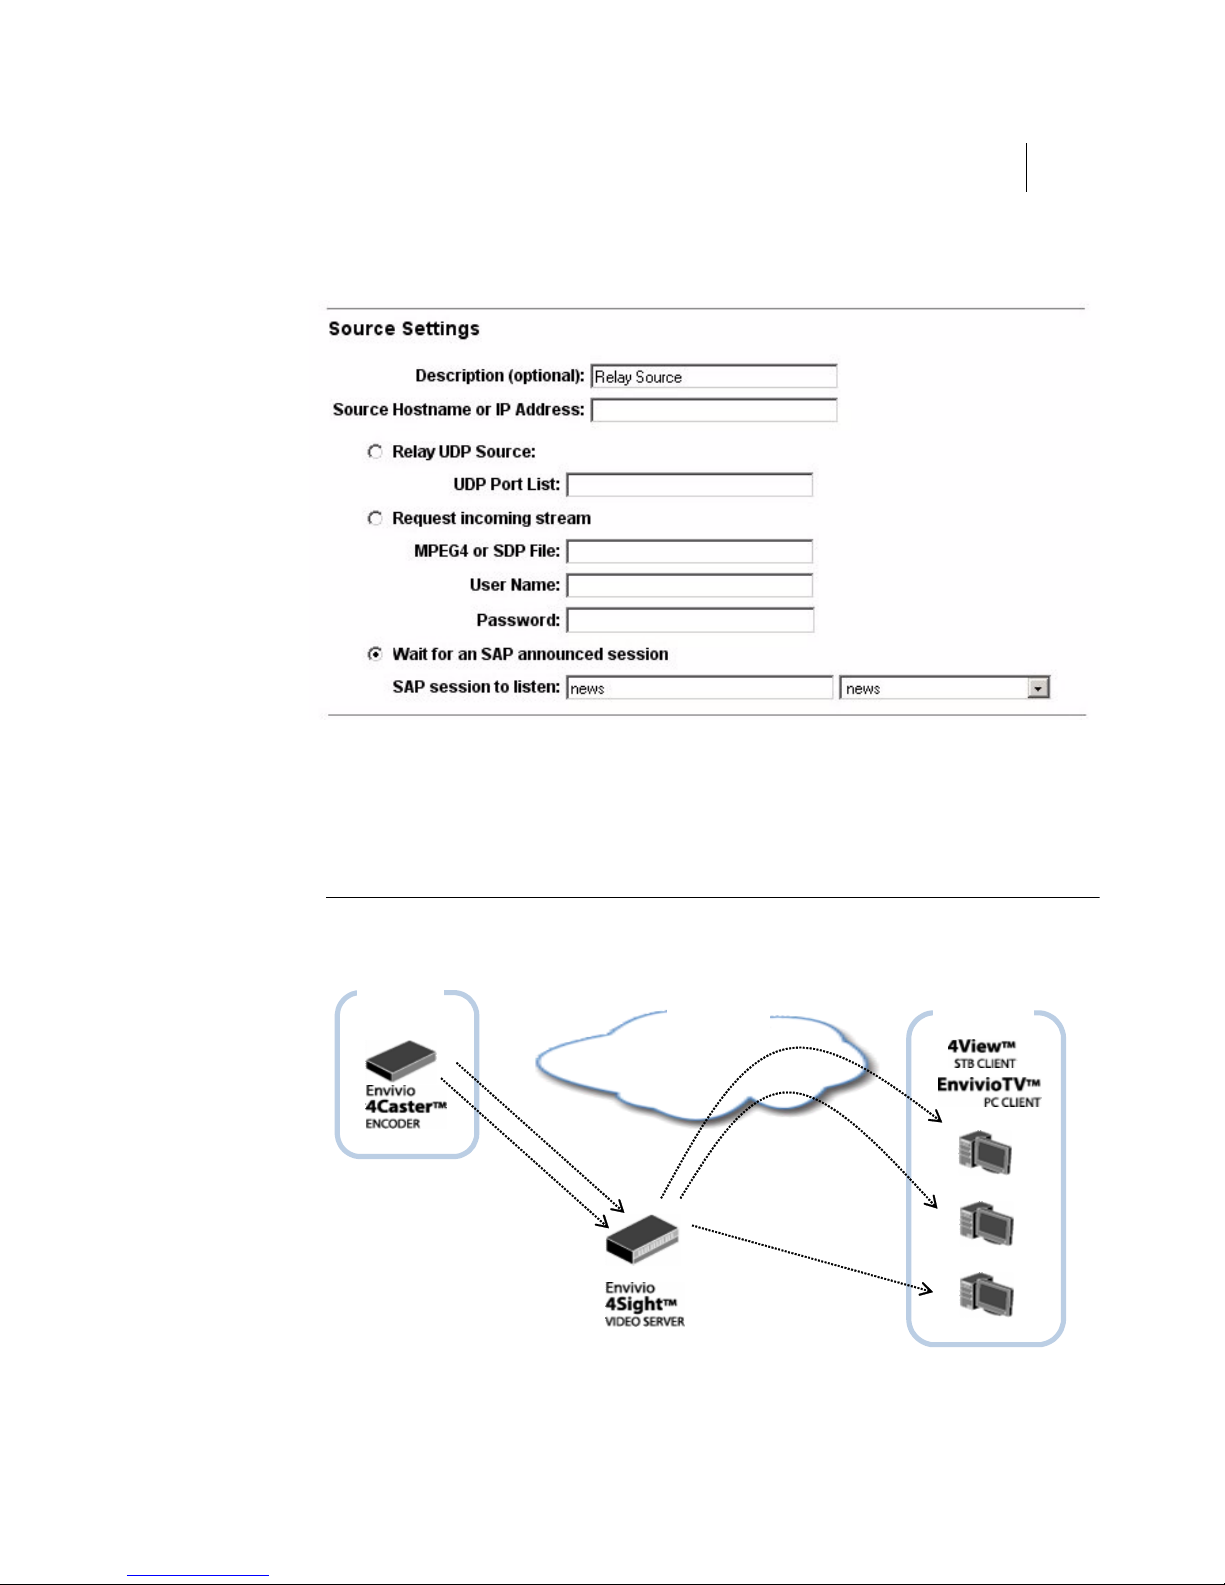
The 4Sight Video Server will wait till it gets the announcement specified
in the source settings
(1), then, it will connect to the announced
stream (2) and relay it to the destinations (3). If an output SAP session is
specified (as shown in the screen capture below), then the relay will also
announce the new session using SAP (4). A player will then be able to
connect to the relayed stream using SAP.
Version 5.0
Page 33
4Sight 35
Administrator Guide
The following capture shows the source setup for an SAP relay:
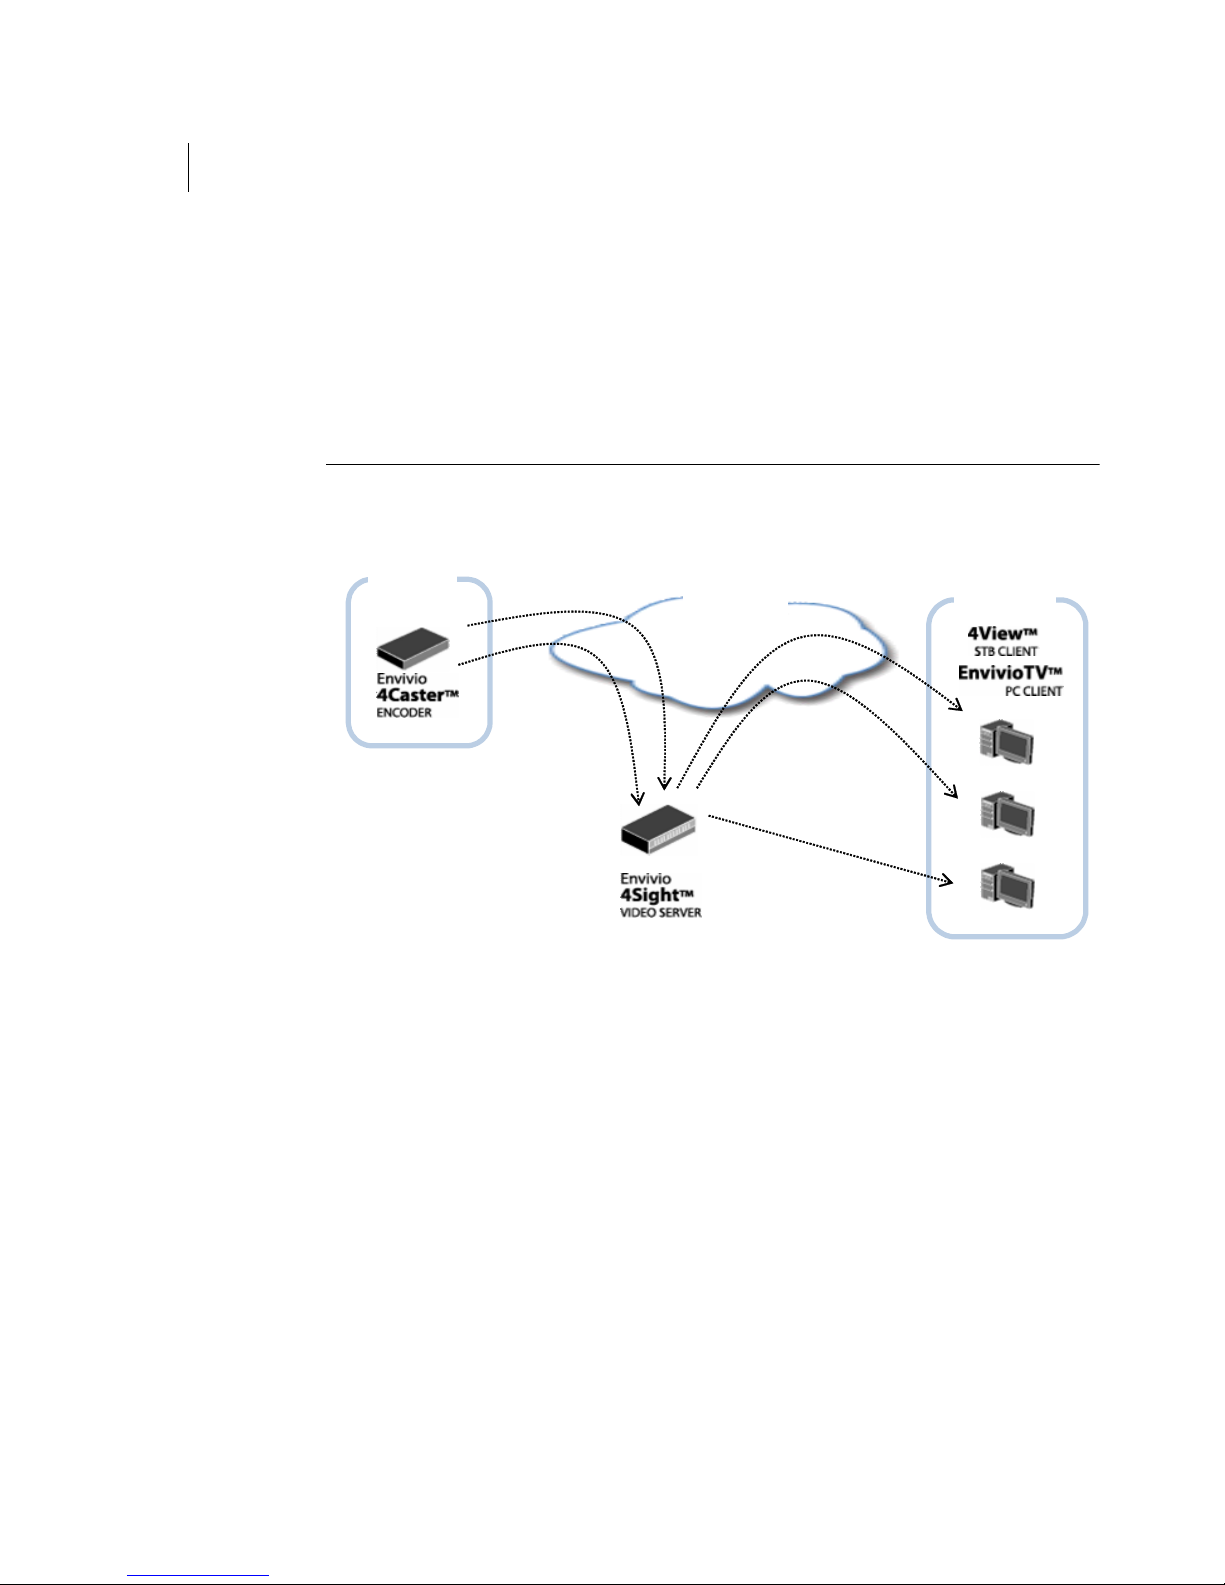
When the 4Caster sends a unicast stream to the 4Sight Video Server
Video Server, it also sends a unicast stream with the connection SDP. This
stream is interpreted as an SAP stream by the 4Sight Video Server which
acts exactly the same way than in the setup described above.
Figure 5. Relaying a 4Caster unicast stream
Source
(1)
SDP
(2)
Multicast
Outputs
SAP
(4)
237.52.51.50
(3)
192.178.105.25
(3)
Version 5.0
Page 34

36 Chapter 3
Video Server
Connection to the output stream using an SDP file
To connect to an output stream of the relay, you will need to provide the
description file of the stream (SDP file). The easiest way to do it is to get
the SDP file from the source and modify it according to the output
address and ports values that you set in the relay.
Once the SDP file is modified, you can feed it directly to the client or put
it in the movie folder of the 4Sight Streaming Server and access it using an
RTSP request.
For further details on how to modify the SDP file, see "How to update an
SDP file" on page 80".
Version 5.0
Page 35
Connection to the output stream using SAP
In the case of an SAP relay, there is a simpler way to connect to the output
stream. In the destination settings of your relay, you can specify an SAP
session name. The relay will then forward the SAP messages containing
the new connection settings for the relayed stream.
Then, if your player supports SAP URLs, you can feed it with an URL
such as the following:
sap://session_name
Status of the configured relays
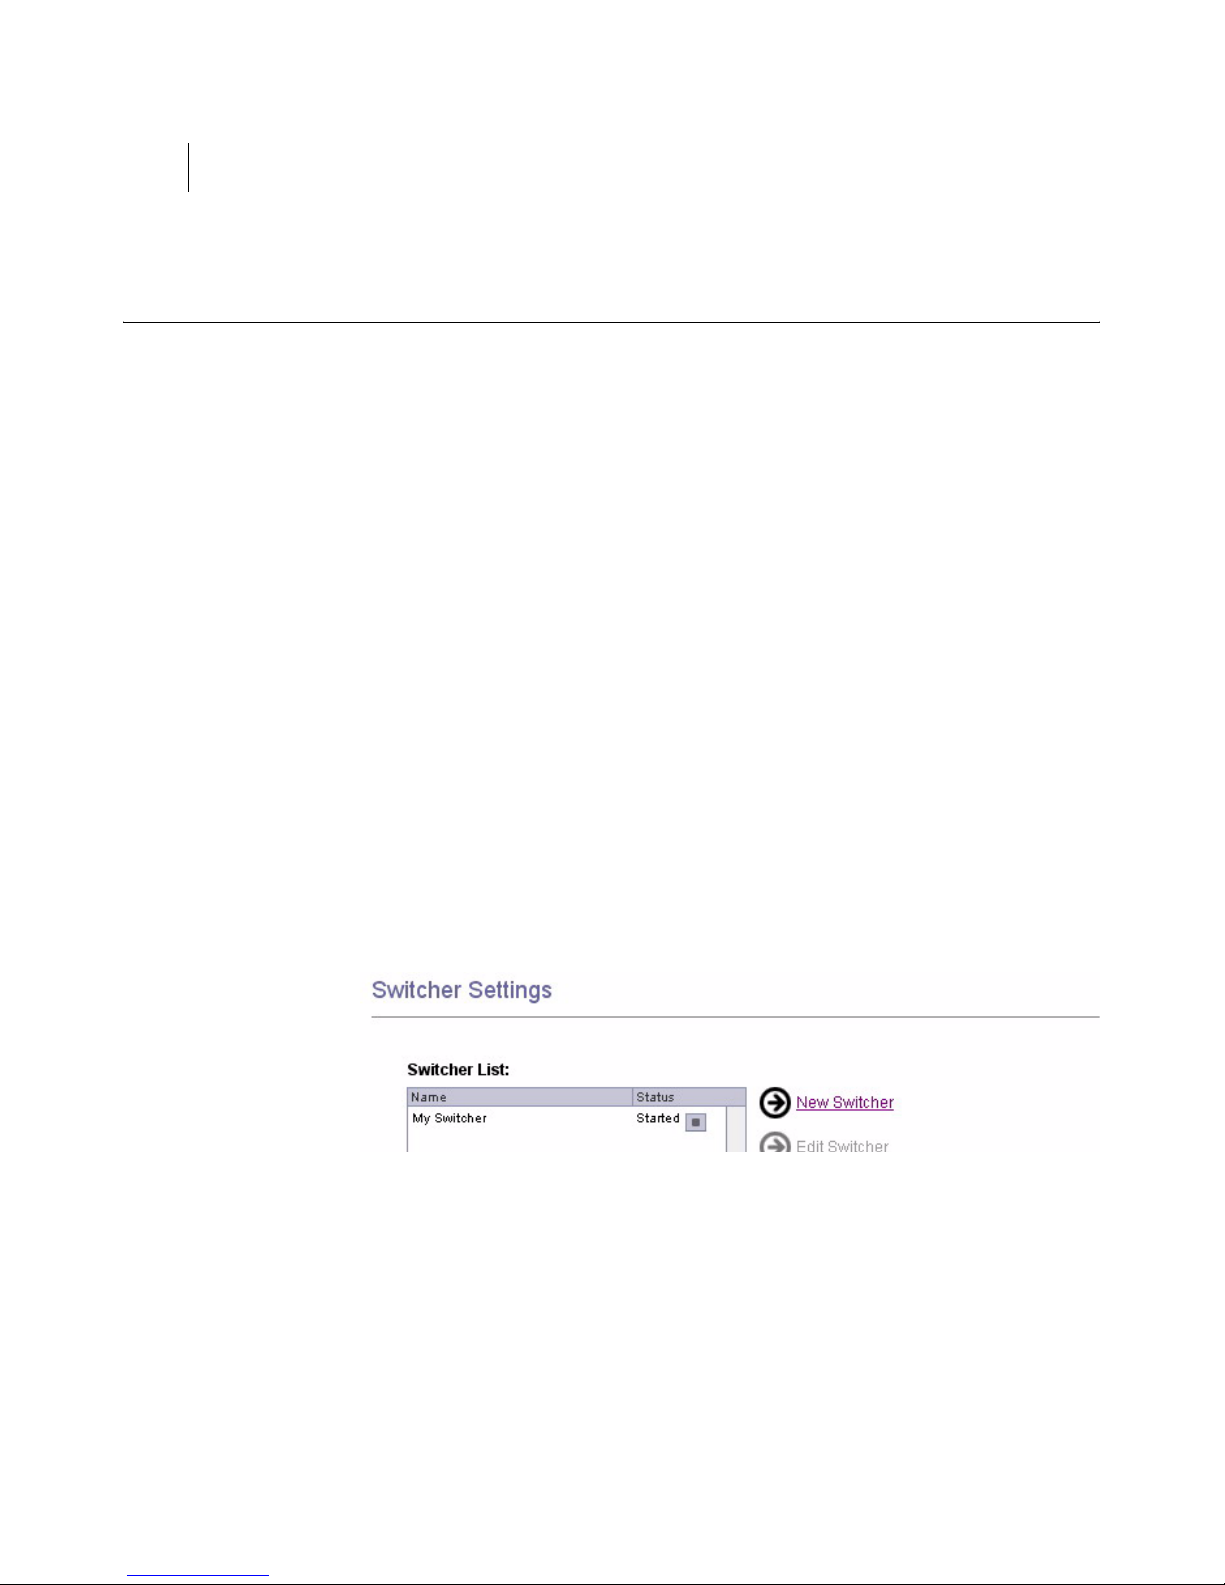
Once everything is configured, you can check that the source stream is
effectively relayed by going to the Relay status page.
4Sight 37
Administrator Guide
The following window should be displayed:
Version 5.0
Page 36
38 Chapter 3
Video Server
Stream Switching
Overview
The Stream Switcher is a tool for relaying one stream out of a number of
sources towards one output with the ability to select the source to be
relayed using a control tool such as the WebAdmin. The switch operation
is seamless for the clients connected to the output of the switcher.
Basic setup
To set up the Stream Switcher using the WebAdmin, follow these steps:
1. Using a web browser, connect to the WebAdmin (see "WebAdmin" on
page 17 for more details).
2. Select the Switcher Settings menu item. You will see a list of your
configured switchers.
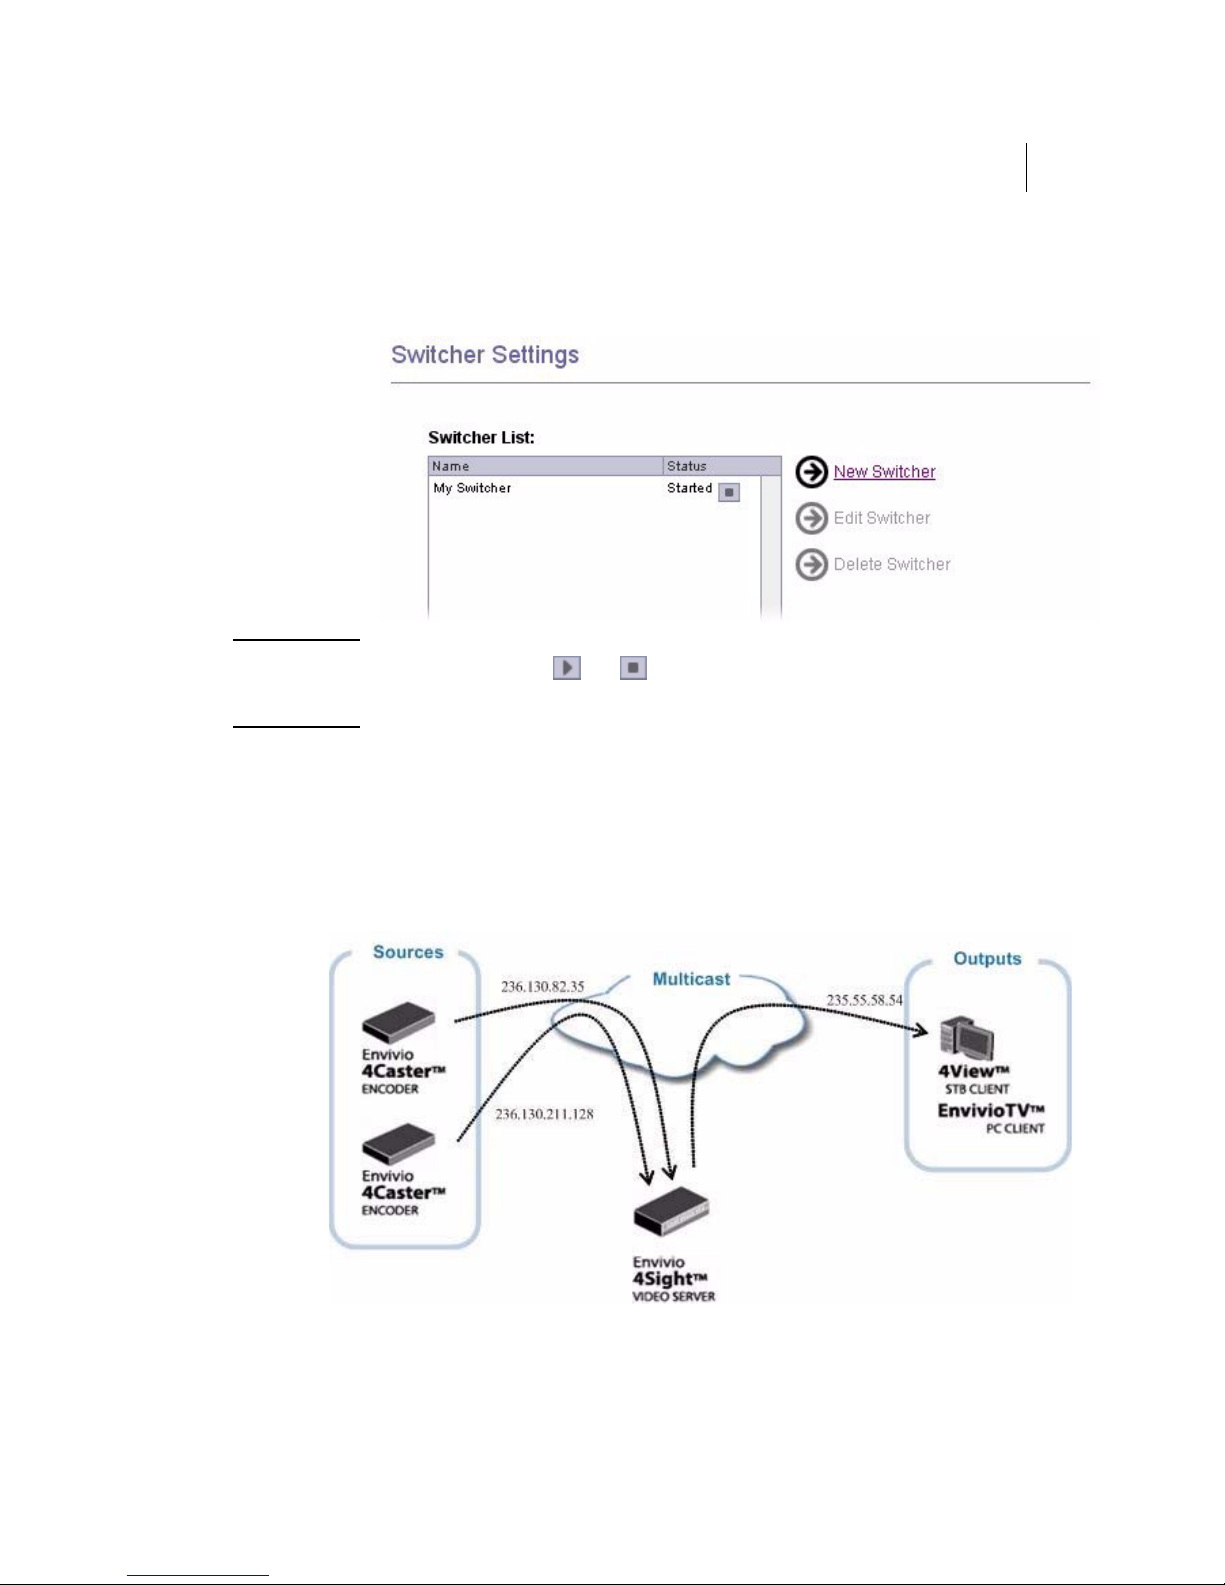
3. Click on New Switcher to create a new switcher. The following page is
displayed:
4. Fill in the different fields you need to set up your Stream Switcher and
then click the Save Changes button.
Version 5.0
Page 37
4Sight 39
Administrator Guide
5. Your switcher will then be listed in the switcher list, followed by its
status that can be either Enabled or Disabled.
NOTE You can click the or buttons to respectively start or stop the
relay.
Configuration example
We will use the following network topology to demonstrate the
configuration of a switcher.
To setup this switcher, you need to follow these steps:
Version 5.0
Page 38
40 Chapter 3
Video Server
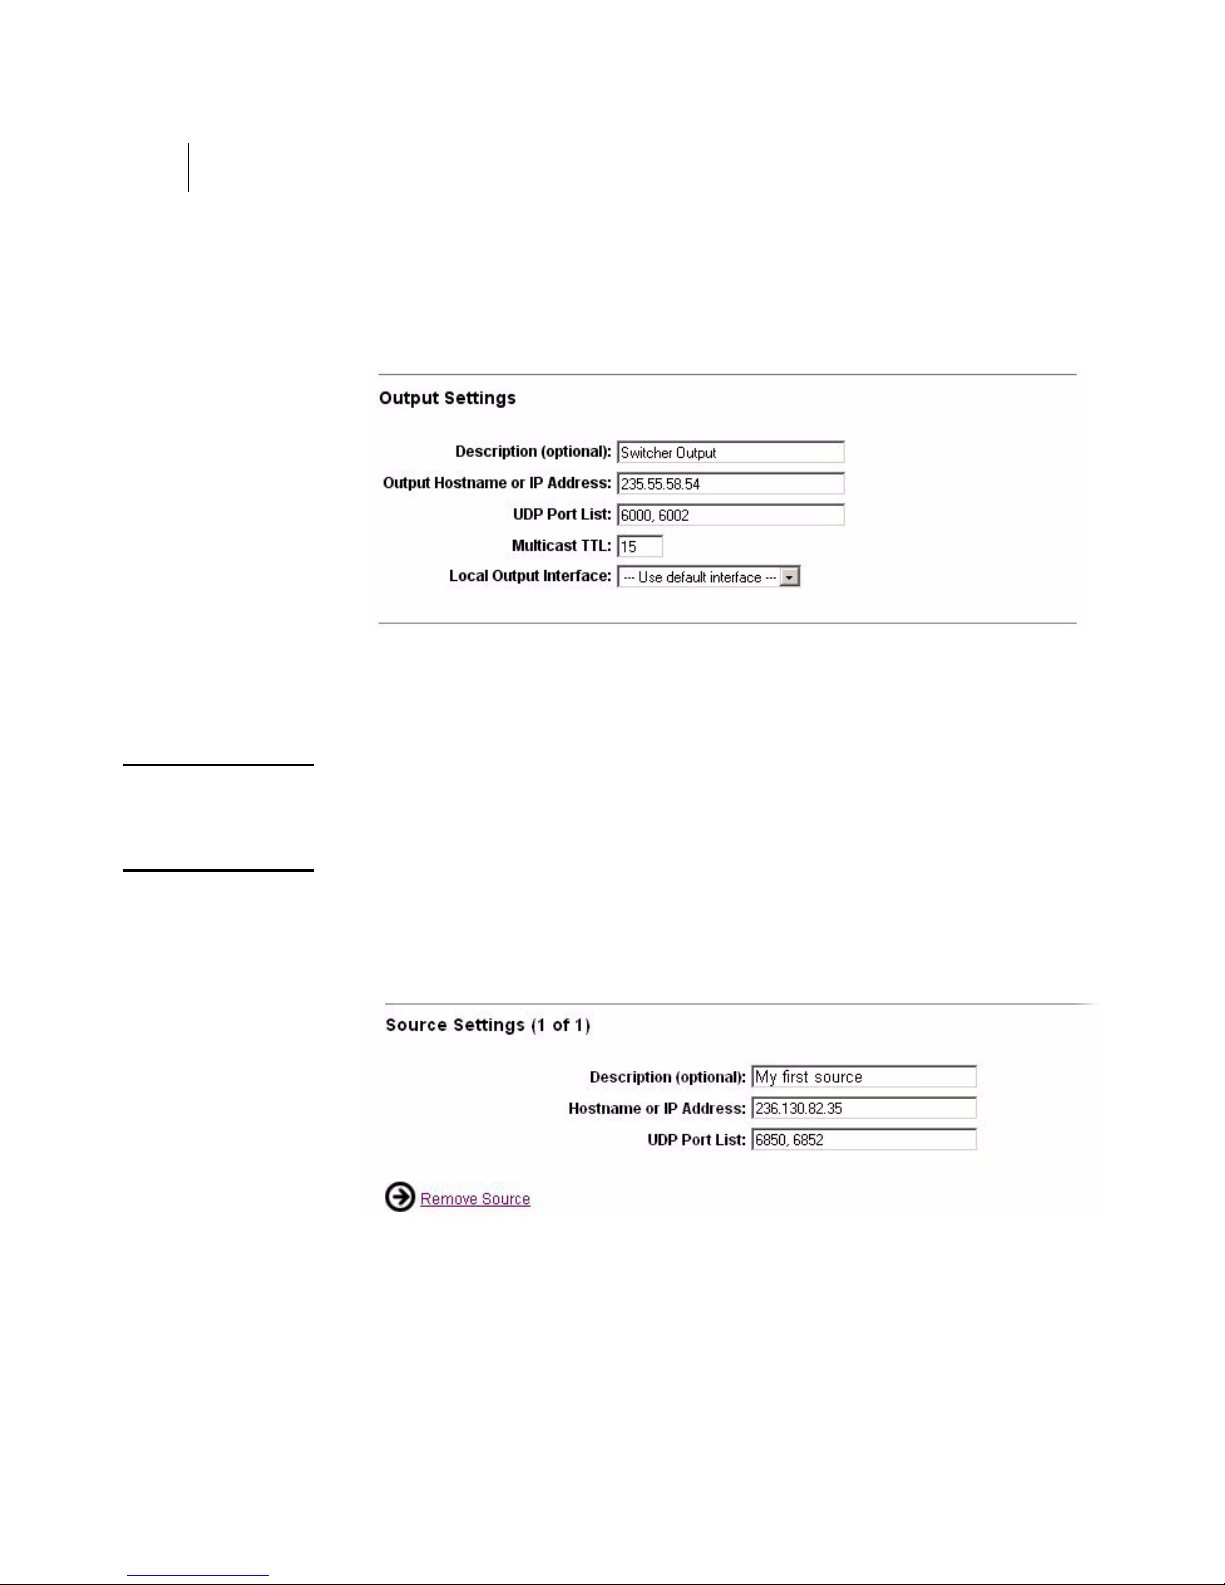
1. Specify the output address (this address can be either multicast or
unicast), the description, the local output interface, the UDP port list
and the multicast TTL.
You can define the network interface card that you want to use for
sending packets by specifying the Local Output Interface parameter in the
Destination section.
NOTE The multicast time to live (TTL, see "Glossary" on page 109) is
mandatory if you relay towards a multicast address, and it must be greater
than 0. It can be omitted if relaying to a unicast address.
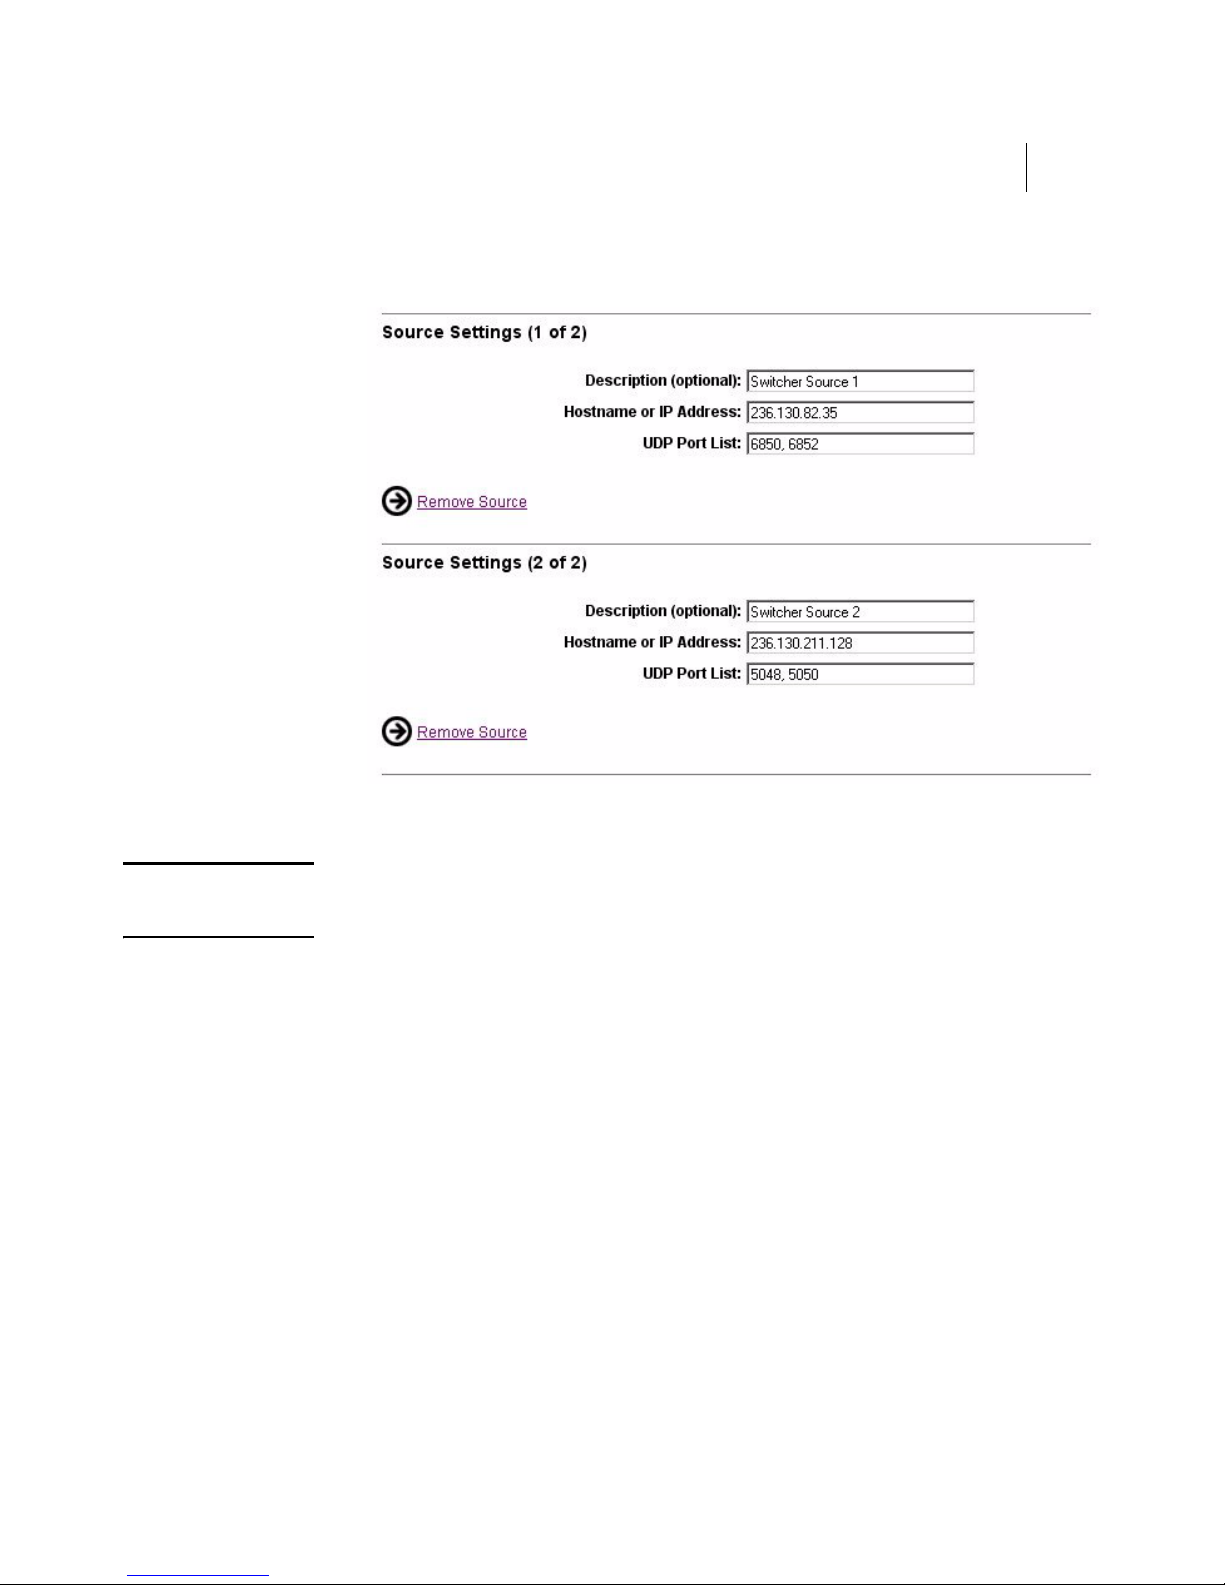
2. Provide the information about the input. Enter the hostname or IP
address, then specify the ports you want to listen to (ports number can
be separated by commas, semicolons or spaces).
Version 5.0
Page 39
Administrator Guide
3. You can add more sources by clicking the Add source link.
4Sight 41
4. Then click the Save Changes button.
WAR NIN G If you change an existing active switcher, when saving the modifications,
the active source will switch to the first source declared in the switcher.
Connection to the output stream
To connect to the output stream of the switcher, you will need to provide
the description file of the stream (SDP file). The easiest way to do it is to
get the SDP file of one of the sources and modify it according to the
address and port values that you set in the switcher.
Once the SDP file is modified, you can feed it directly to the client or put
it in the movie folder of the 4Sight Video Server Streaming Server and
access it using an RTSP request.
For further details on how to modify the SDP file, see "How to update an
SDP file" on page 80.
Version 5.0
Page 40
42 Chapter 3
Video Server
Status of the configured switchers
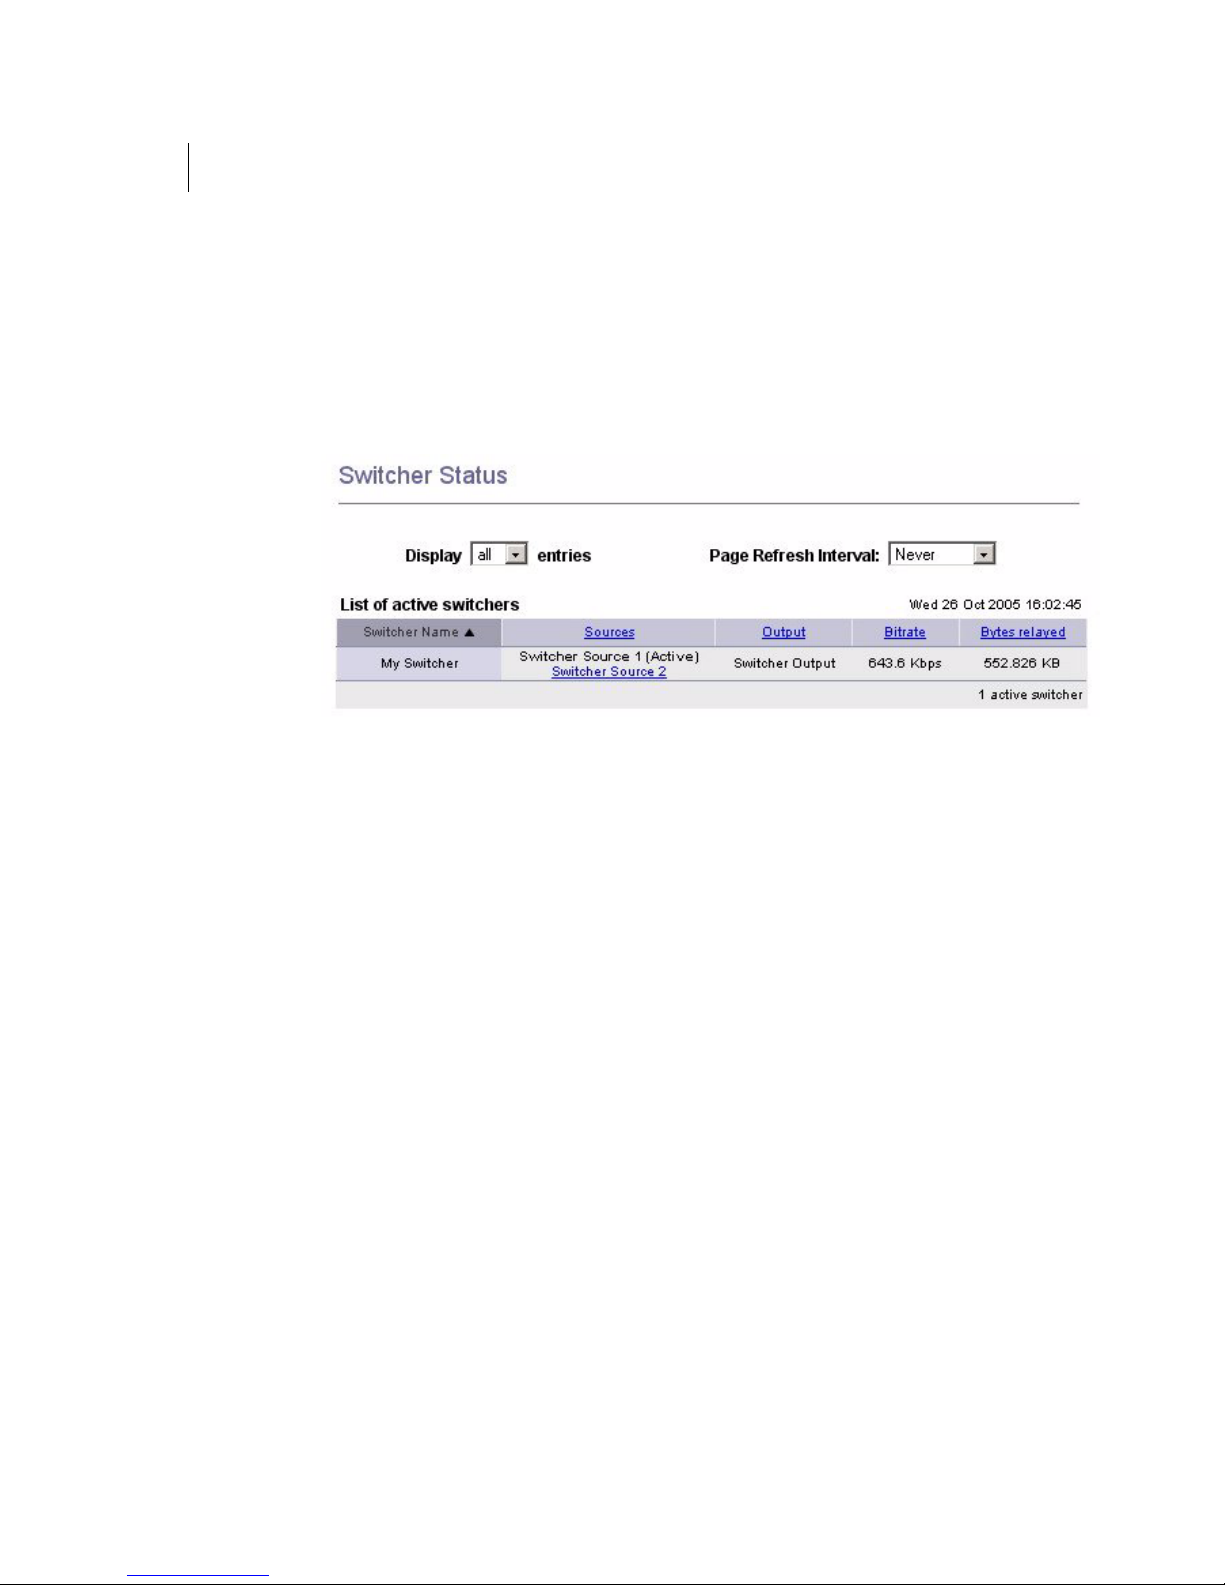
Once everything is configured, you can check that the source stream is
effectively relayed by going to the Switcher status page.
The following window should be displayed:
You can switch to the other source by clicking the link Switcher source 2.
Connection to the output stream using an SDP file
To connect to the output stream of the switcher, you will need to provide
the description file of the stream (SDP file). The easiest way to do it is to
get the SDP file of one of the sources and modify it according to the
output address and ports values that you set in the switcher.
Once the SDP file is modified, you can feed it directly to the client or put
it in the movie folder of the 4Sight Streaming Server and access it using an
RTSP request.
For further details on how to modify the SDP file, see "How to update an
SDP file" on page 80.
Version 5.0
Page 41

Chapter 4
Playlist Broadcaster
Page 42

44 Chapter 4
Playlist Broadcaster
Overview
The Playlist Broadcaster is a tool for broadcasting a set of movies.
This section describes how to configure and start a playlist. It also
describes simple use cases and applications of the Playlist Broadcaster.
A detailed description of the config file parameters is provided along with
troubleshooting hints.
Version 5.0
Page 43

Basic setup
4Sight 45
Administrator Guide
There are two ways to set up a playlist and broadcast it using the Playlist
Broadcaster:
• using the WebAdmin,
• or by editing the playlist configuration files and running the Playlist
Broadcaster in command line mode.
These two methods are not mutually exclusive and can be combined for
advanced use of the Playlist Broadcaster.
Version 5.0
Page 44
46 Chapter 4
Playlist Broadcaster
Setting up a playlist using the WebAdmin
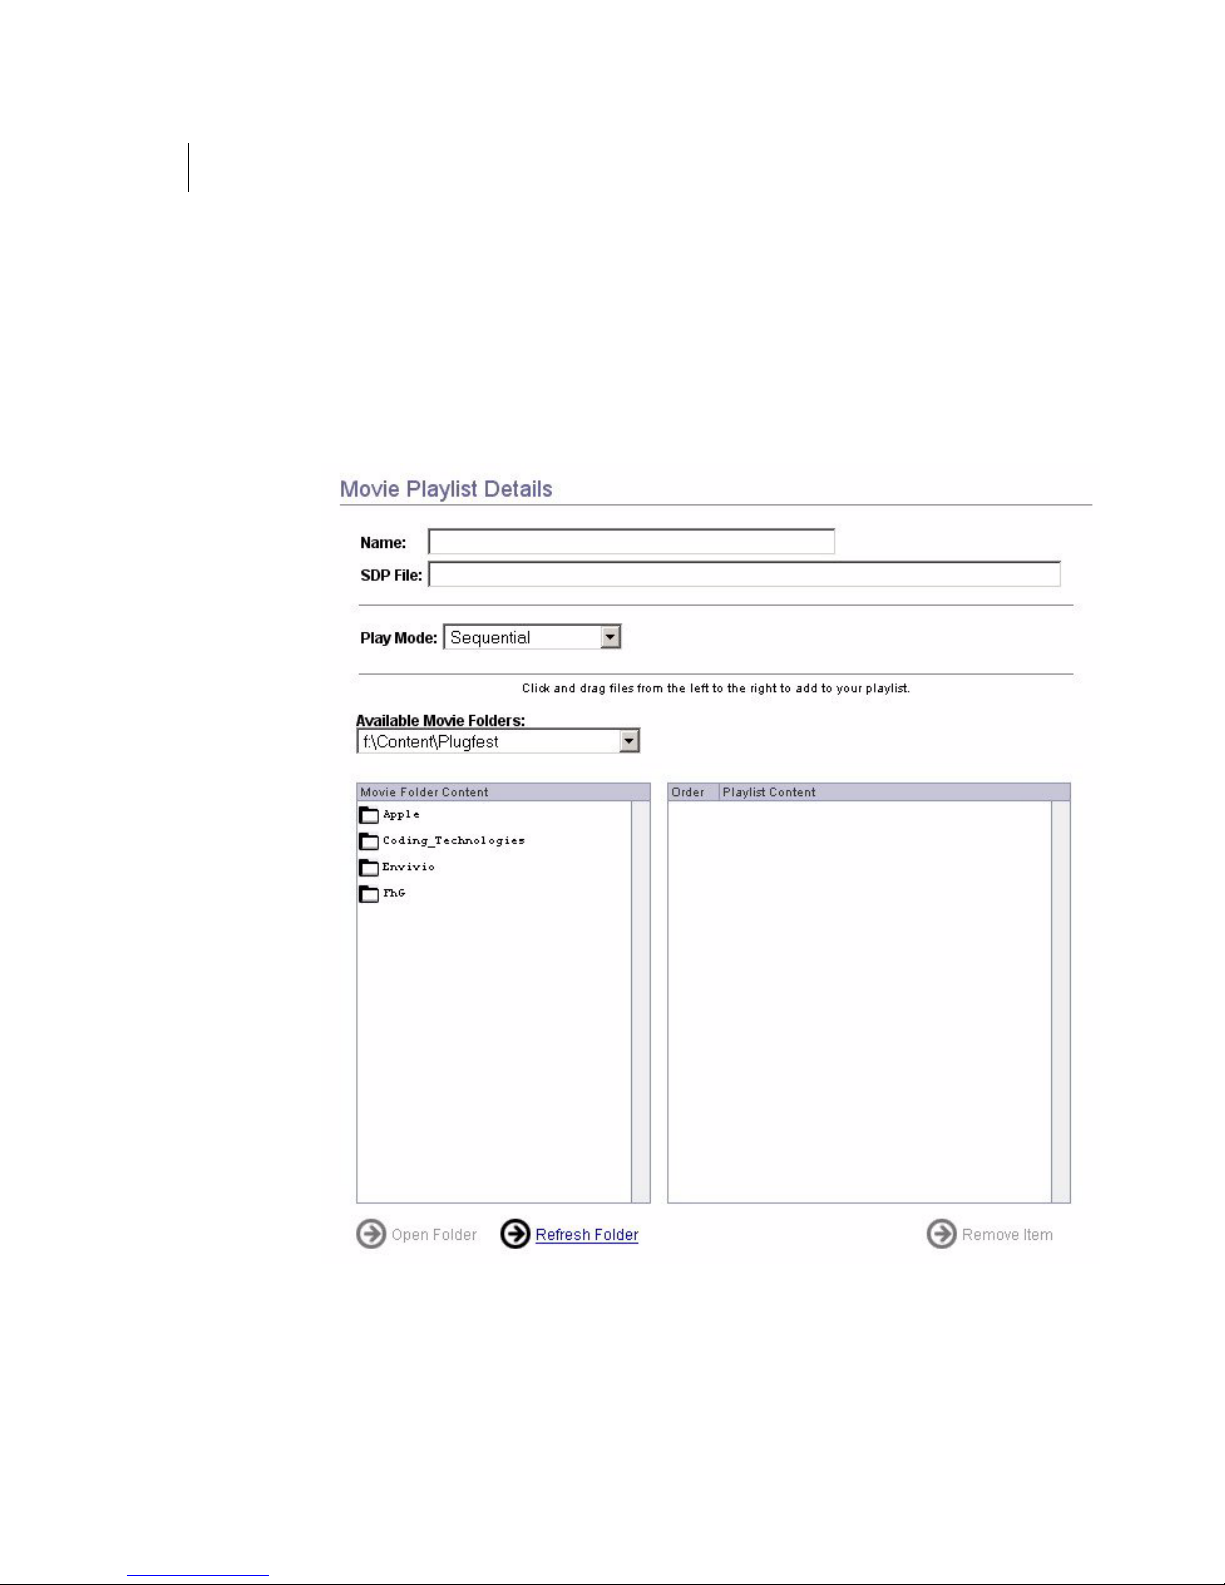
Using a web browser, connect to the WebAdmin (see “WebAdmin” on
page 17 for more details). Click the Playlists menu item. You will see a list
of your configured playlists. Click New MPEG4 Movie Playlist to create a
new playlist. The following page is displayed:
Drag and drop the content you want to broadcast from the left panel to
the right list.
Version 5.0
Page 45
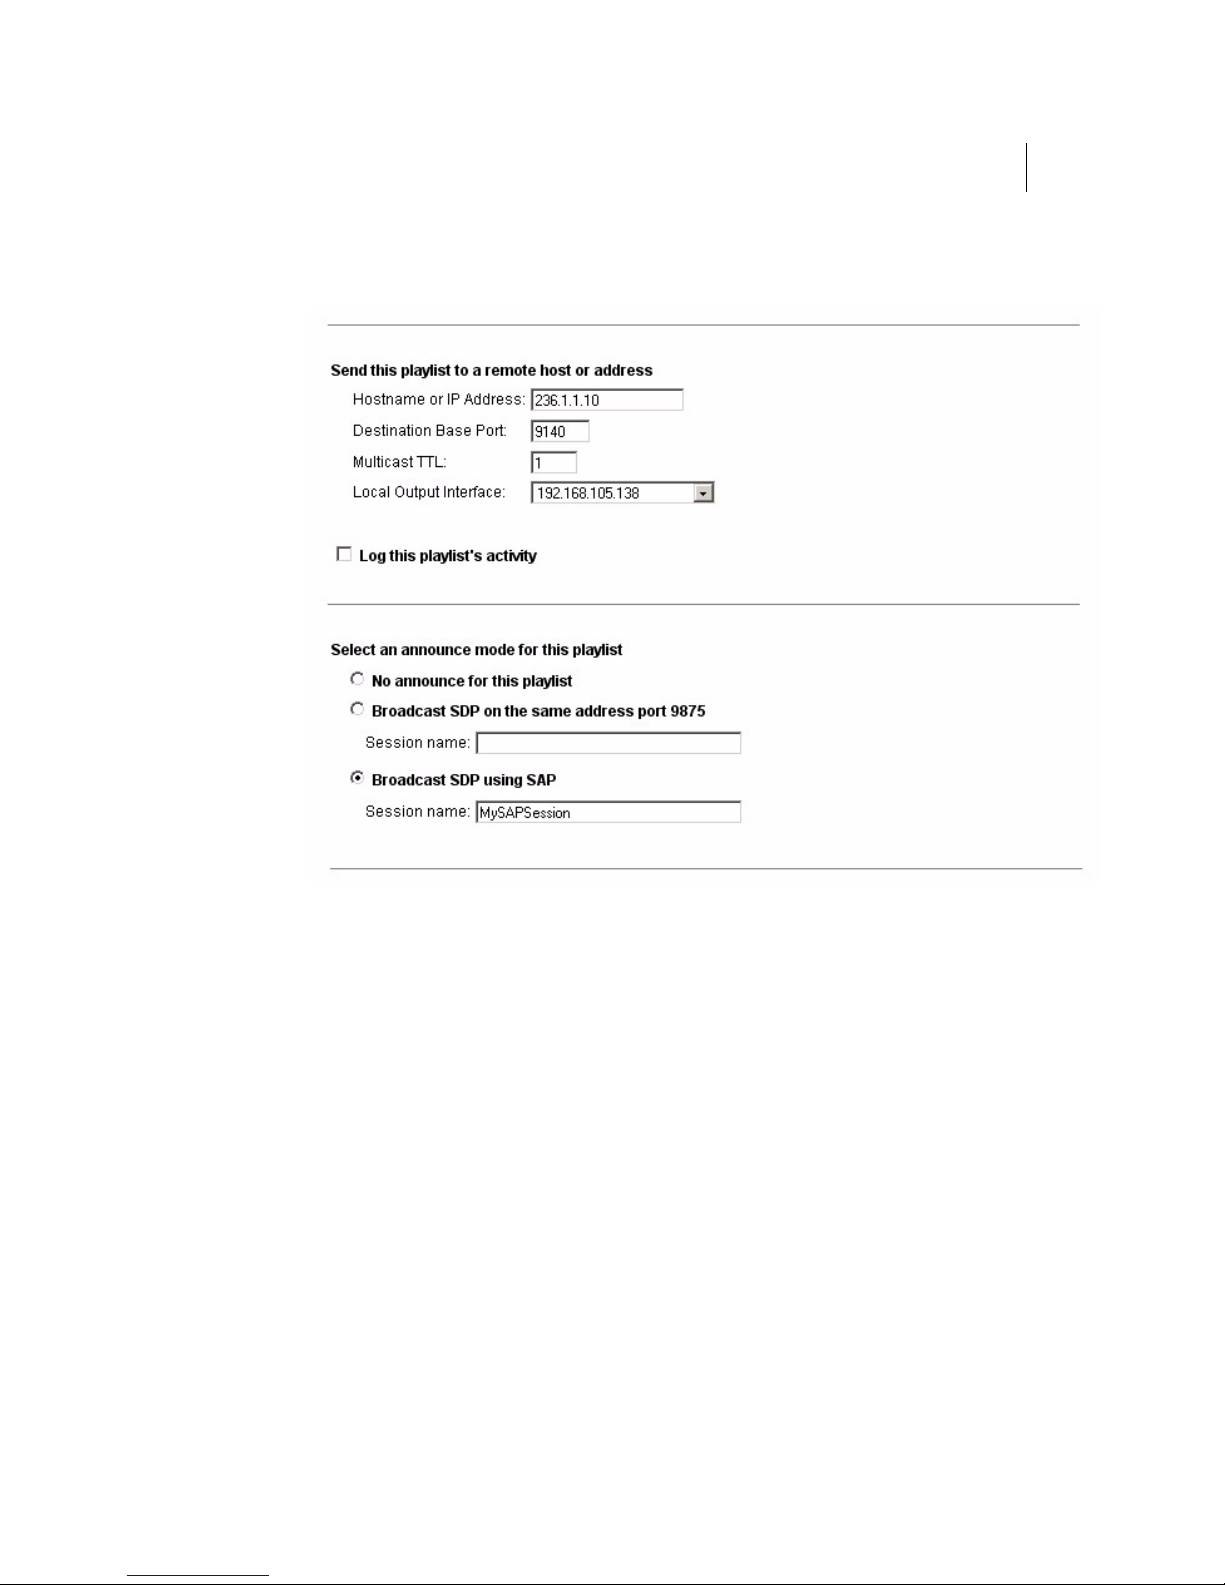
Second part of the page lists the broadcast parameters
4Sight 47
Administrator Guide
Fill in the different fields you need to set up your playlist and then click on
the Save Changes button.
Example:
To broadcast the mp4profile.mp4 file in continuous loop mode, you should
follow these steps:
1. Name the playlist: myPlaylist
2. Give a path to the SDP file: myPlaylist.m4e
3. In the Play Mode combo box, select Sequential Looped
4. Click and drag the mp4profile.mp4 file from the list of files to the
Playlist items
5. Then click the Save Changes button
Version 5.0
Page 46
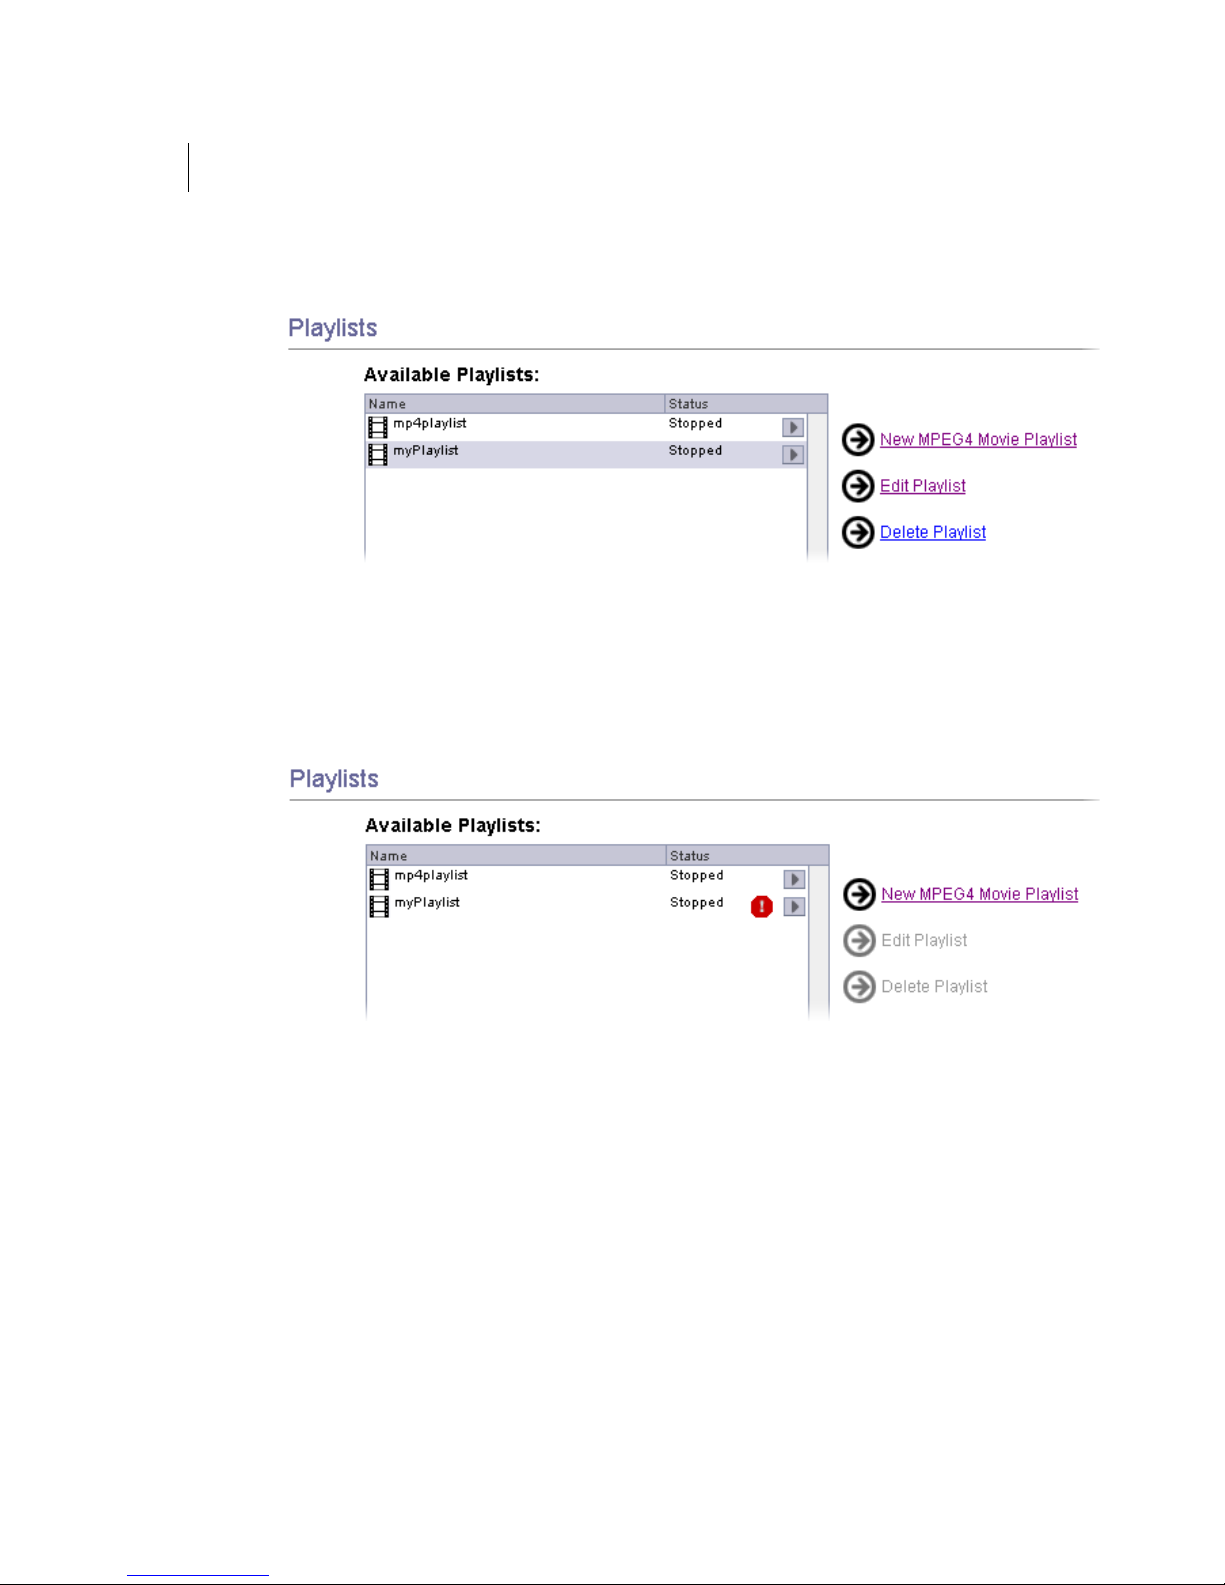
48 Chapter 4
Playlist Broadcaster
Your playlist will then appear in the list of available playlists.
You can then start and stop it directly by clicking on the play/stop icon on
the right of the playlist.
If an error occurs, a red stop sign appears near the play icon. You can click
on it to look at the log file.
You can test that your playlist is working by opening the SDP file in your
player.
Version 5.0
Page 47

4Sight 49
Administrator Guide
Restrictions
All the MPEG-4 files that you hint and include in your playlist must be
ISMA-compliant and have exactly the same characteristics:
• contain one audio plus one video that have the same duration
• same video properties (video size, frames per second)
• same audio encoding parameters (frequency, stereo/mono).
NOTE You can put files encoded at different bit rate in your playlist only if the
sdp_reference_movie or the first movie in the list has the highest bit rate.
If they do not have the same characteristics, EnvivioTVTM client will play
the first stream fine and will probably stop whenever the video size, the
number of streams, or any parameter is different in the next MPEG-4 file.
This is due to the fact that the SDP file is generated only with regard to
one MPEG-4 file (either the sdp_reference_movie or the first movie in the
list).
Version 5.0
Page 48

50 Chapter 4
Playlist Broadcaster
Version 5.0
Page 49

Chapter 5
Load Balancer
Page 50
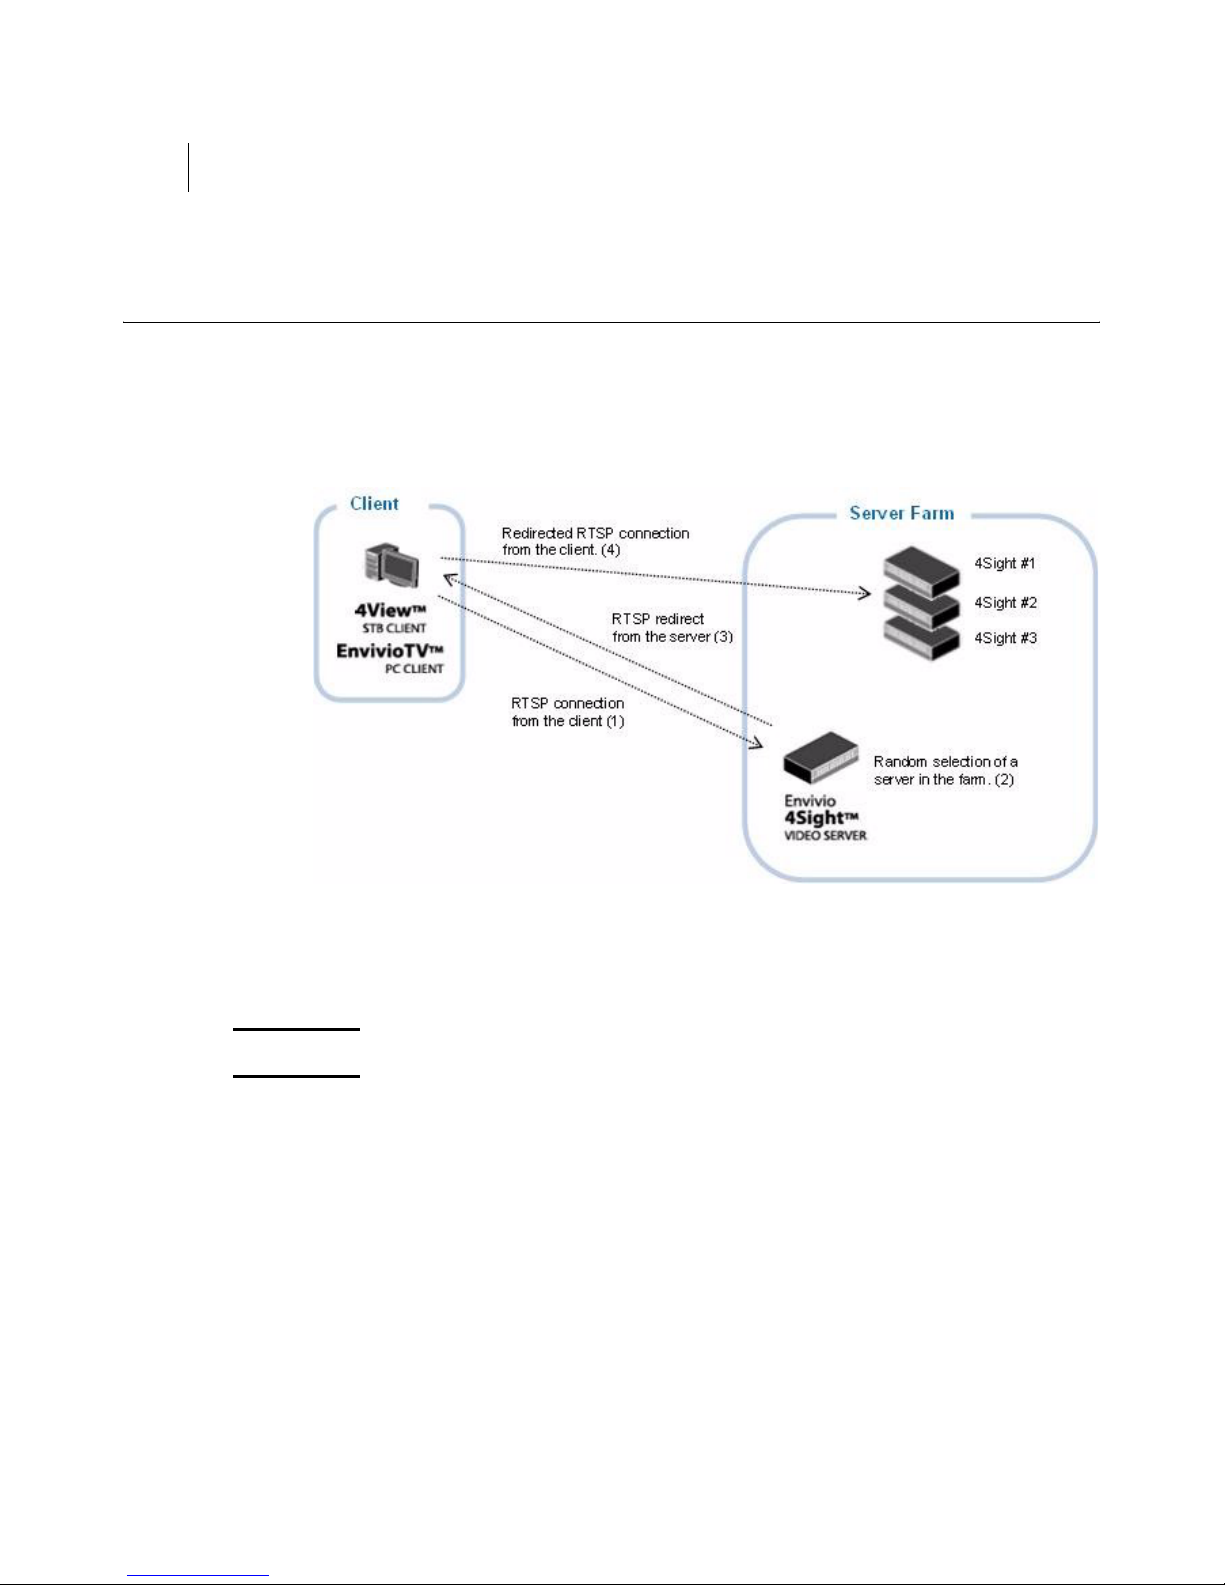
52 Chapter 5
Load Balancer
Overview
The Load Balancer distributes traffic efficiently among video servers so
that no individual server is overburdened. The master server redirects the
player towards a randomly chosen slave server.
1. The player connects to the server.
2. The master server makes a random selection, and redirects the player
to another server (4Sight #2).
NOTE The master server can also accept connections acting as a slave server.
Version 5.0
Page 51
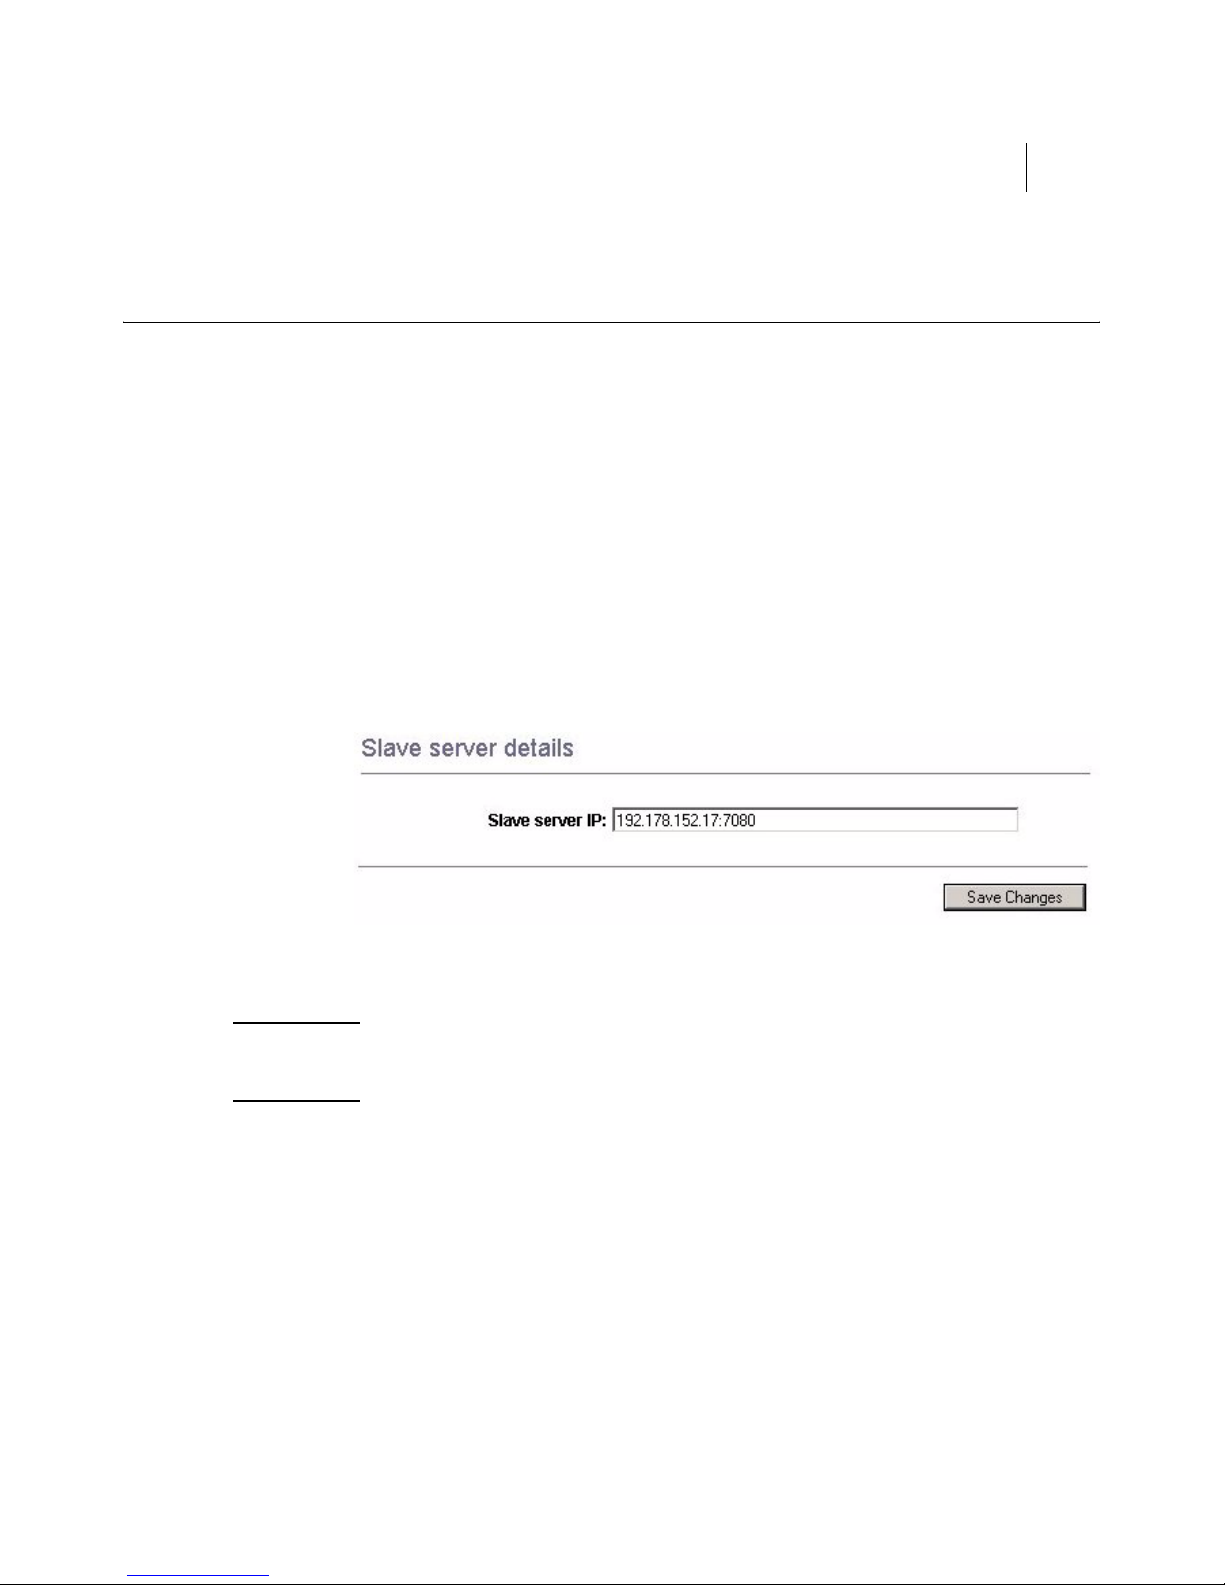
Basic setup
Adding a slave server
To set up the load balancing using the WebAdmin, follow these steps:
4Sight 53
Administrator Guide
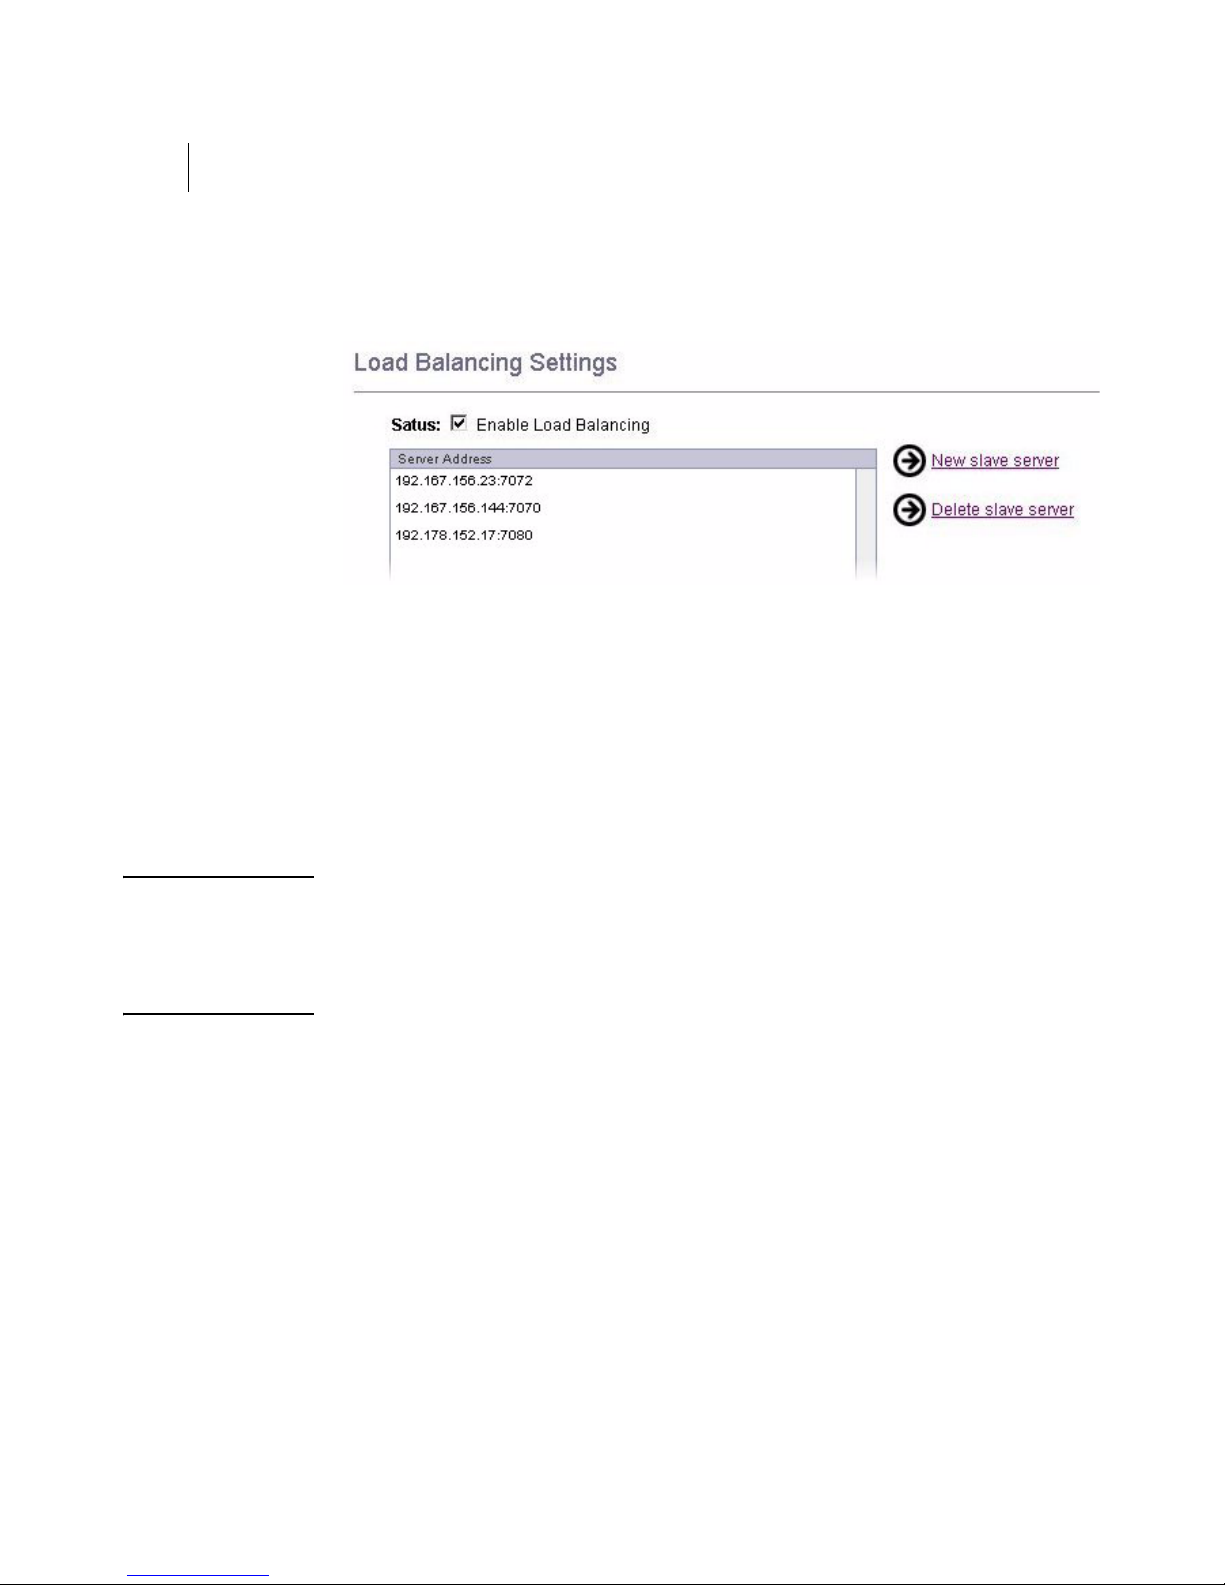
1. Click the
configured servers.
2. Check the
balancing mechanism on the server.
3. Click New Slave server to add a slave server to the list. The following
page is displayed:
4. Enter the IP address, followed by the port number of your slave server,
then click the
NOTE If you do not specify the port number, the server will use the default
streaming port.
Load Balancing menu item. You will see a list of your
Enable Load Balancing check box to activate the load
Save Changes button.
Version 5.0
Page 52
54 Chapter 5
Load Balancer
5. The slave server will then be listed, followed by its status (either
Enabled or Disabled).
6. Click Save Changes to confirm your modifications.
Deleting a slave server
To remove a server from the server list, select the IP address of the server
you want to delete and click the Delete Slave server link. The server is
removed from the list after your confirmation.
NOTE If you remove all the servers from the server list, the default server IP
address will be automatically added to the server list.
To remove the default server IP address, add a new address, then delete the
default server IP address.
Version 5.0
Page 53

Chapter 6
Authentication and
Authorization
Page 54

56 Chapter 6
Authentication and Authorization
Overview
4Sight provides authentication and authorization services. This is
configured using three types of configuration files:
• Access file (for example, qtaccess)
• User file (for example, qtusers)
• Group file (for example, qtgroups)
and the
qtpasswd executable.
Version 5.0
Page 55

Basic Setup
4Sight 57
Administrator Guide
If you want the end user to be prompted for a user name and password
when he/she tries to stream a content from the server, follow the steps
described below:
1. Create a user file and/or a group file to define the users and groups
allowed on your video server.
2. Create passwords for the new users using the qtpasswd utility.
3. Create an access file.
The content of each file and the use of the qtpasswd utility is described in
the following sections.
Before going further, you should check that the two properties
modAccess_groupsfilepath and modAccess_userfilepath are set correctly.
The modAccess_qtaccessfilename property specifies the name given to the
access files. By default, access files are called qtaccess.
Here is the QTSSAccessModule section of the streamingserver.xml file:
<MODULE NAME="QTSSAccessModule" >
<PREF NAME="modAccess_qtaccessfilename" >qtaccess </PREF>
<PREF NAME="modAccess_groupsfilepath" >/usr/Envivio/4Sight/
Config/qtgroups</PREF>
<PREF NAME="modAccess_usersfilepath" > /usr/Envivio/4Sight/Config/
qtusers</PREF>
</MODULE>
Version 5.0
Page 56

58 Chapter 6
Authentication and Authorization
The streamingserver.xml file also contains two parameters that are used for
authentication and authorization:
• default_authorization_realm
The text to display by default in the password dialog boxes
• authentication_scheme
The default authentication scheme to be used by the server (basic,
digest, or none)
Version 5.0
Page 57

User, Group, and Access files
By default, three files are provided as examples in/usr/Envivio/4Sight/
Config
name
User file
The user file contains the list of users and their encrypted passwords. The
first line of this file is the realm to be used. This file should not be
modified manually (unless you want to modify the realm); use the
qtpasswd utility to edit it.
: qtusers, qtgroups and qtaccess. These files create a user with user
admin, password admin and group admin.
4Sight 59
Administrator Guide
This is an example of a user file with only one user called admin:
realm Envivio Streaming Server
admin:$dufr$.S5.....$DCUFFaEjQuyqcFbq9XXEk0:e7b400d4a5bb4e1020621ab
84d7c5ed1
NOTE User names cannot be more than 255 characters long and must not
include a colon.
Passwords cannot be more than 80 characters long.
Group file
The group file is a list of groups, each of which lists the users in that
group.
To add, remove or modify a group, use a simple text editor and modify
the group file.
The syntax of a line in the group file is:
groupname : <username> <username> … <username>
Version 5.0
Page 58

60 Chapter 6
Authentication and Authorization
Access file
An access file is a text file containing parameters to control access to a
directory for a specific realm, a specific user or a specific group.
There is one access file per protected directory. If an access file is placed in
a directory, all the subdirectories are protected in the same way, unless
another access file is present in the subdirectory.
The following is a list of parameters accepted in the access file and their
possible values.
Parameter name Value
AuthName This is the realm name.
Realm name is displayed in the
password dialog boxes.
AuthScheme Can be either "basic" or "digest".
• If basic is selected, a simple
authentication is done with realm,
user and password (base64 encoded).
• If digest is selected, a MD5 based
authentication system is used.
AuthUserFile The user file to use in this directory.
AuthGroupFile The group file to use in this directory.
Version 5.0
Page 59

Parameter name Value
4Sight 61
Administrator Guide
require user
require group
A space separated list of user names or
group names. This parameter specifies
which users and/or groups are allowed
to access the media in this folder.
Two specific cases can be used:
• require any-user
any user is allowed
• require valid-user
any authenticated user is allowed
<Limit [READ|WRITE]>…</Limit> Specifies access control for read and/or
write privileges.
If this parameter is not present or set,
all parameters apply for read
privileges.
The parameters AuthName,
AuthUserFile, AuthGroupFile and
require can be defined between the
two "Limit" tags.
NOTE Parameter names and values are case sensitive. Respect the case for the
following words:
AuthName, AuthScheme, AuthUserFile, AuthGroupFile, require, Limit, basic,
digest
Version 5.0
Page 60

62 Chapter 6
Authentication and Authorization
The qtpasswd utility
The qtpasswd utility lets you create a user file, and to add and delete users.
To create a user, the name of the user is mandatory.
The syntax is the following:
qtpasswd -f filename [-F] [-c] [-r realm] [-p password] [-d] username
The following are optional flags that can be used:
[-f] Password file to modify (defaults to the value set in
streamingserver.xml)
[-F] Does not confirm when deleting users or overwriting existing
files
[-c] Creates a new user file
[-r] Realm to use when creating a new file with "-c"
Default: "
[-p] Allows entry of the password at command line rather than
prompting for it
[-P] File to read the password from rather than prompting for it
[-d] Deletes the specified user
[-h] Displays usage
Envivio Streaming Server"
Version 5.0
Page 61

Configuration example
You can have multiple access files, user files, and group files. One way to
configure your server is to have one movie folder associated to each realm.
For example, if you want to serve both Europe and US from your video
server, follow the steps below:
1. Create two movie folders, one called Movie_US, and one called
Movie_Europe.
2. Create a qtaccess file in each of those movie folders with the following
parameters:
4Sight 63
Administrator Guide
Parameter
AuthName 4Sight for US 4Sight for Europe
AuthUserFile path_to_qtusers_US path_to_qtusers_EU
require user user_US1 user_US2 …
Value for US Value for Europe
user_EU1 user_EU2 …
user_USN
user_EUN
3. Create the password file with a specific realm by running:
qtpasswd -f _to_qtusers_US -c -r "4Sight US" user_US1
qtpasswd -f _to_qtusers_EU -c -r "4Sight EU" user_EU1
4. Then create a password entry for all the other users by running:
qtpasswd -f qtusers_US user_USx
qtpasswd -f qtusers_EU user_EUx
Version 5.0
Page 62

64 Chapter 6
Authentication and Authorization
Version 5.0
Page 63

Chapter 7
External authorization
module
Page 64

66 Chapter 7
External authorization module
Overview
The Authorization module allows you to develop your own access control
for the movies stored on the server.
By adding specific information into the URL, you will be able to apply
your own dedicated authorization mechanism.
4Sight calls a function in the Authorization module for every incoming
RTSP request:
bool ESSRequestAuthorization(char* inURL, char* inIPAddress, char*
inQueryString);
where:
• inURL is the path to the movie – for example, if the request is
rtsp://192.178.155.10/tutorial1/file.mp4, the URL is tutorial1/
file.mp4.
• inIPAddress is the IP address of the player requesting the movie,
• inQueryString is extra information from the player that is included in
the URL after '?'. This information can include a user name and any
specific information that you need. The field is
NULL if nothing has
been specified in the URL.
• The return value is true if you want to accept the RTSP request or
false to refuse the RTSP request.
URL example:
rtsp://192.178.155.10/tutorial1/file.mp4?user=julien&auth=123
See “Basic example of external authorization module” on page 68.
Version 5.0
Page 65

Installing the authorization module
This document explains how to install the external authorization module.
1. Stop 4Sight.
2. Create a new directory called plugins in your server directory.
3. Copy your authorization library into the plugins directory.
4Sight 67
Administrator Guide
4. Open the server configuration file,
5. Update the following lines in the
<MODULE NAME="ESSExternalAuthModule">
<PREF NAME="enabled" TYPE="Bool16" >true</PREF>
<PREF NAME="auth_lib_file">path_to_your_library</PREF>
</MODULE>
streamingserver.xml.
ESSExternalAuthModule section:
6. Restart the server.
Version 5.0
Page 66

68 Chapter 7
External authorization module
Basic example of external authorization module
AuthModuleTestLib.h
extern "C"
{
bool ESSRequestAuthorization(char* inURL, char* inIPAddress, char* inQueryString);
}
AuthModuleTestLib.cpp
#include "AuthModuleTestLib.h"
#include <stdio.h>
bool ESSRequestAuthorization(char* inURL, char* inIPAddress, char* inQueryString)
{
char buf[256];
bool authorize = false;
if(inQueryString != NULL) {
sprintf(buf, "IP Address : %s\nRequested URL: %s\nQuery String: %s\nAuthorize ?",
inIPAddress, inURL, inQueryString);
} else {
sprintf(buf, "IP Address : %s\nRequested URL: %s\nAuthorize ?", inIPAddress, inURL);
}
char c;
int result;
printf( "%s (y)es (n)o ?", buf);
do {
c = getchar();
} while ( c!='y' && c!='n' );
if ( c == 'y') {
authorize = true;
}
else {
authorize = false;
}
return authorize;
}
Version 5.0
Page 67

Chapter 8
SNMP monitoring
Page 68

70 Chapter 8
SNMP monitoring
Using SNMP monitoring
The 4Sight Video Server supports monitoring using the SNMP protocol.
This makes 4Sight Video Server plugable into any of the network
monitoring software like HP OpenView for example.
You can also use an SNMP browser like the one from MG-SOFT
monitor one or more 4Sight Video Server at the same time. Open source
solution like NET-SNMP
During the installation, all the necessary MIBs are copied to the
c:\Envivio\snmp\mibs directory (or /usr/Envivio/snmp/mibs for Linux
and MacOSX). You can find them there.
Two MIBs are necessary for monitoring a 4Sight Video Server using
SNMP:
(2)
can also be used.
(1)
to
• ENVIVIO-COMMON-MIB.txt that is needed for all Envivio products
• ENVIVIO-4SIGHT-MIB.txt that is specific for 4Sight
1. MG-SOFT MIB Browser, http://www.mg-soft.com
2. NET SNMP, http://net-snmp.sourceforge.net
Version 5.0
Page 69

4Sight 71
Administrator Guide
Monitoring 4Sight using MG-SOFT MIB Browser
NOTE This example is for windows only.
Once you have downloaded and installed the MIB Browser, follow these
steps to compile the two MIBs mentioned above:
1. From the
Compiler
Start>Program Files>MG-Soft MIB Browser menu, select MIB
.
2. Compile the MIB: go to the Tools>Batch Compile menu, select the
C:\Envivio\snmp\mibs folder and click OK.
3. Click the Save All button, then click OK. This will save all the
compiled MIBs in the correct folder for MIB Browser.
4. Exit the MIB compiler.
Your MIBs are now ready to be used in the MIB Browser.
Follow these steps to tell the MIB Browser which MIBs to use:
5. From the Start>Program Files>MG-Soft MIB Browser menu,
select MIB Browser.
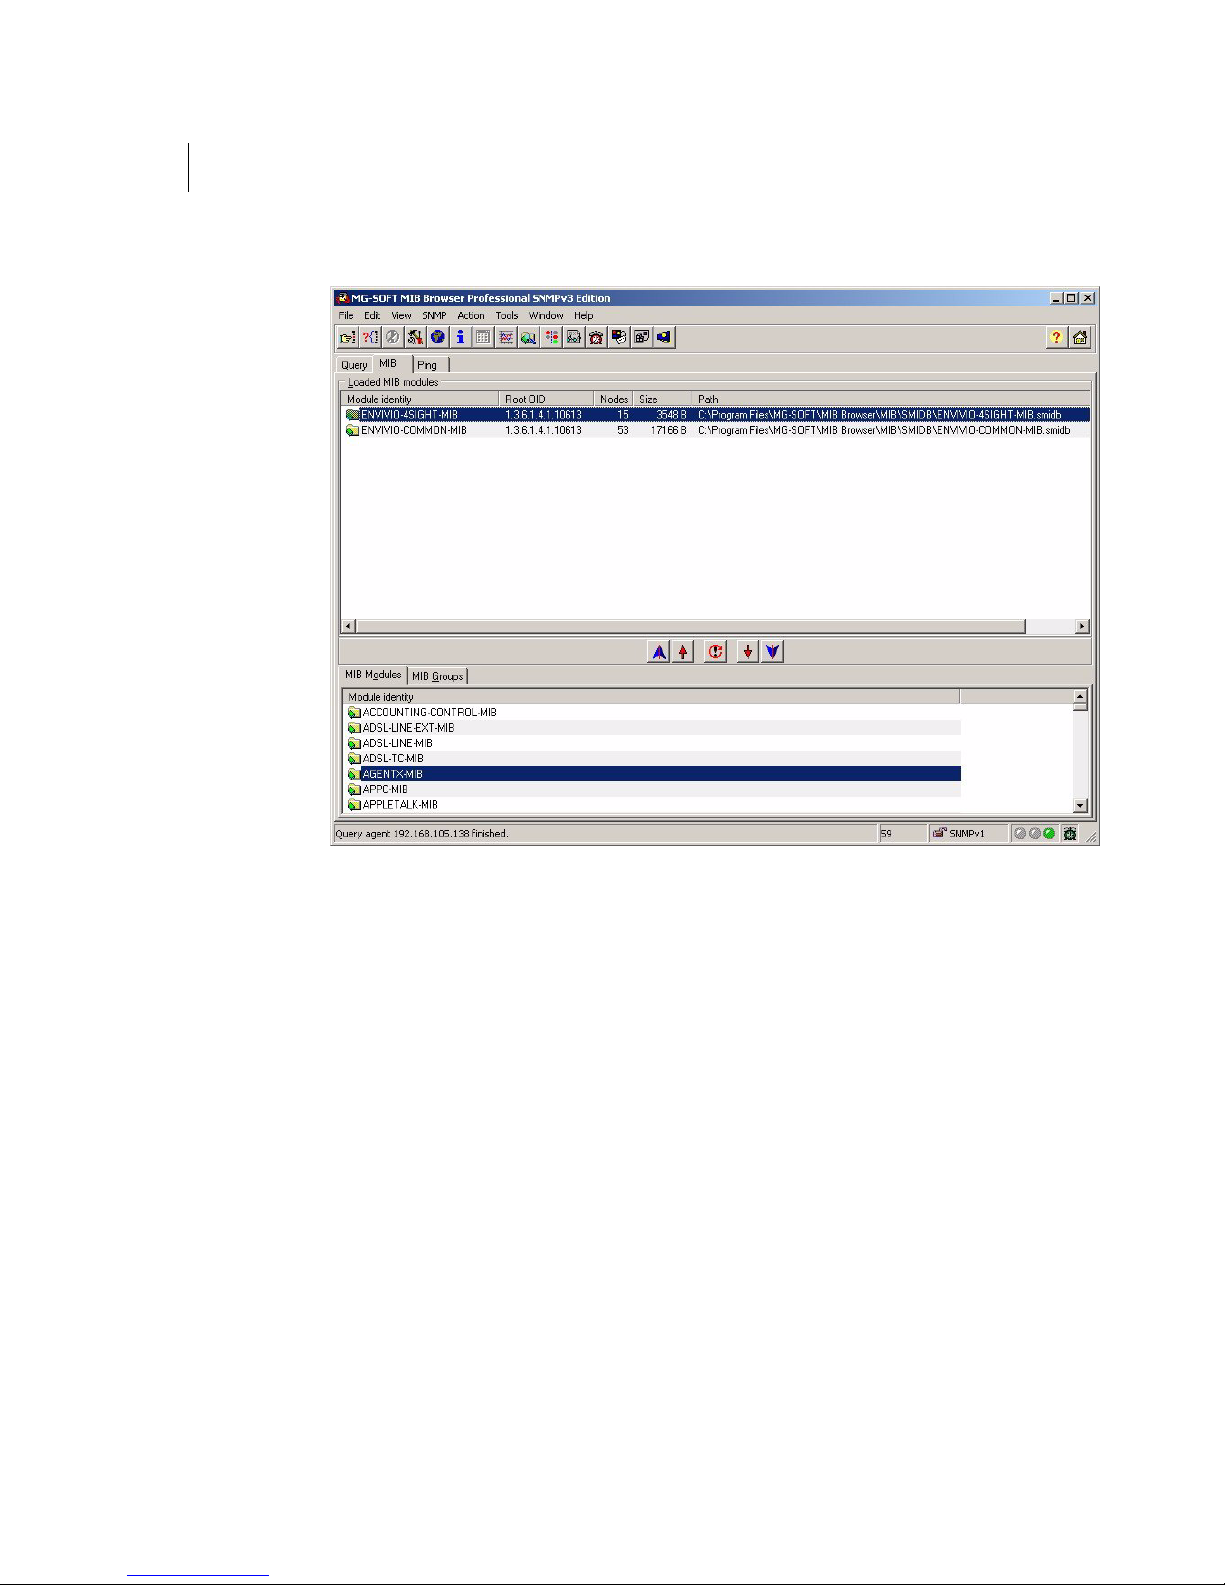
6. From the
MIB tab, select the MIBs that you want to load from the
bottom panel, then click the up arrow to load them.
You need to select at least
4SIGHT-MIB.txt
.
ENVIVIO-COMMON-MIB.txt and ENVIVIO-
Version 5.0
Page 70
72 Chapter 8
SNMP monitoring
Version 5.0
Page 71
4Sight 73
Administrator Guide
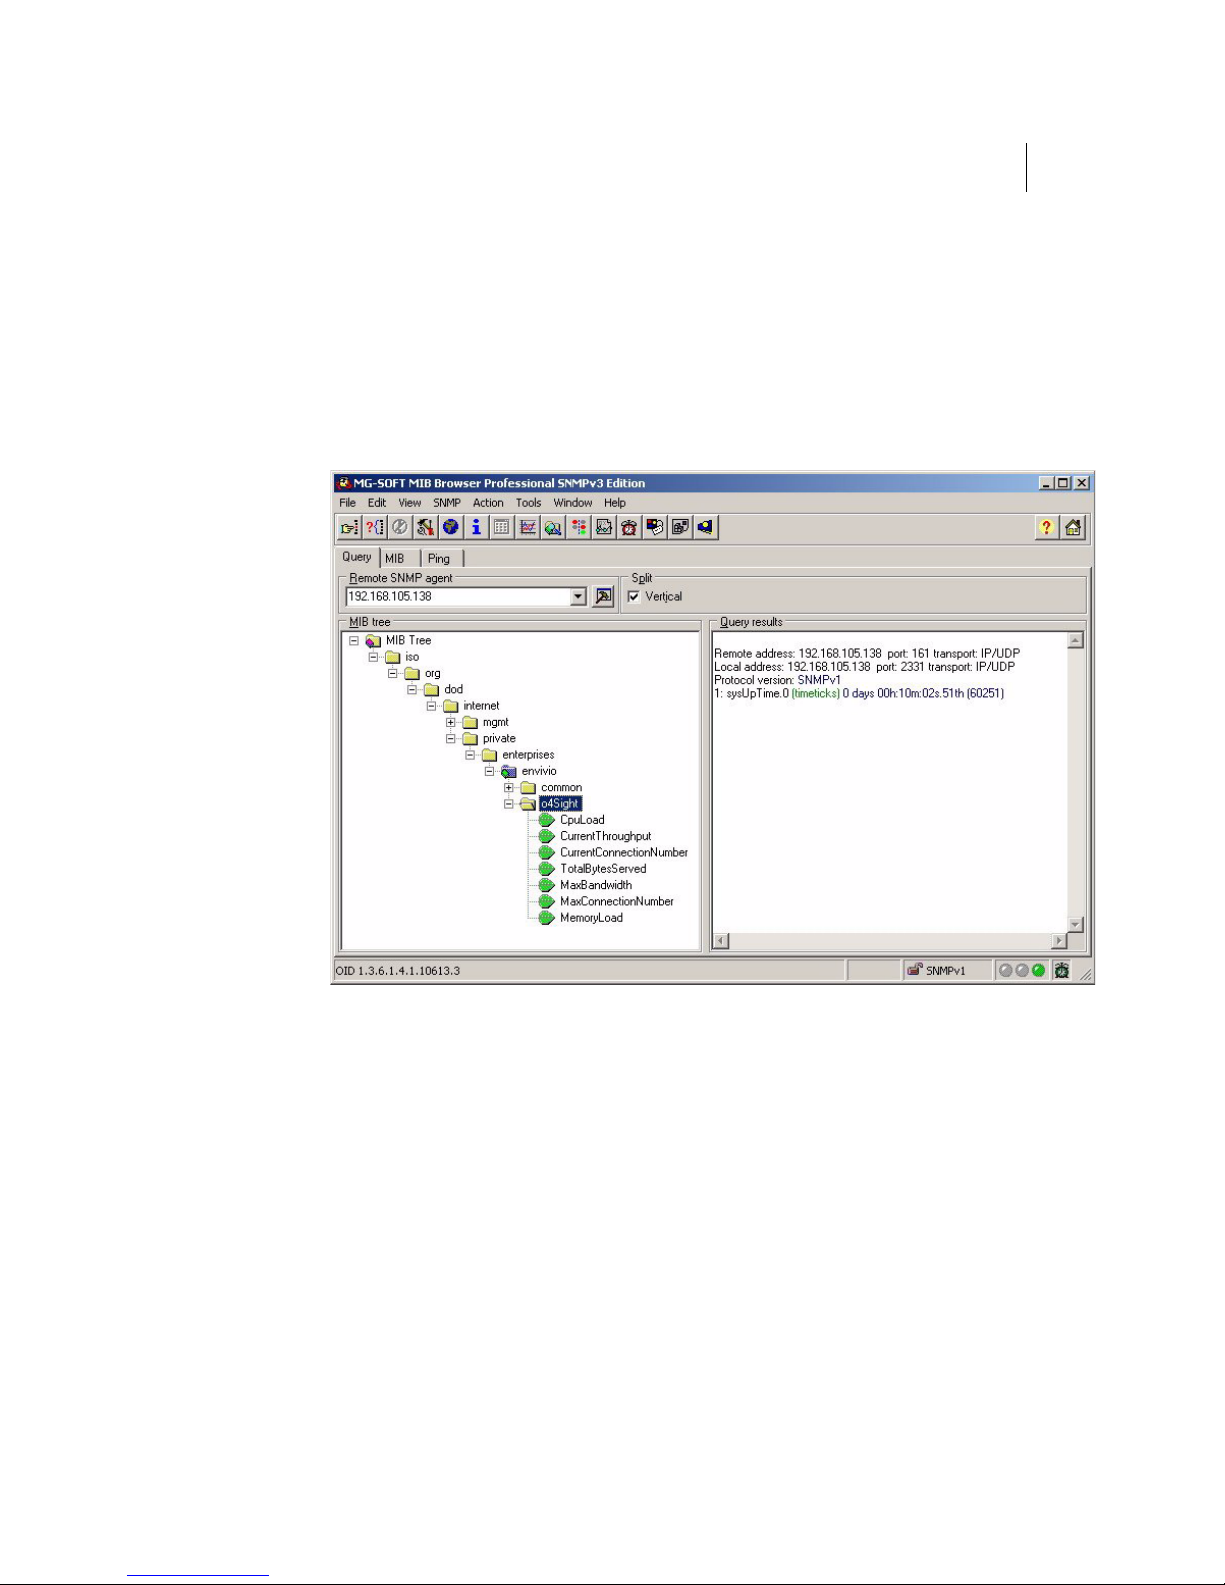
Your MIB Browser is now ready to be used with the 4Sight Video Server:
7. In the MIB Browser, return to the Query tab and enter the 4Sight IP
address in the Remote SNMP agent field and select in the menu. Select
SNMP>Contact, then expand the MIB tree to see the 4Sight Video
Server.
Version 5.0
Page 72
74 Chapter 8
SNMP monitoring
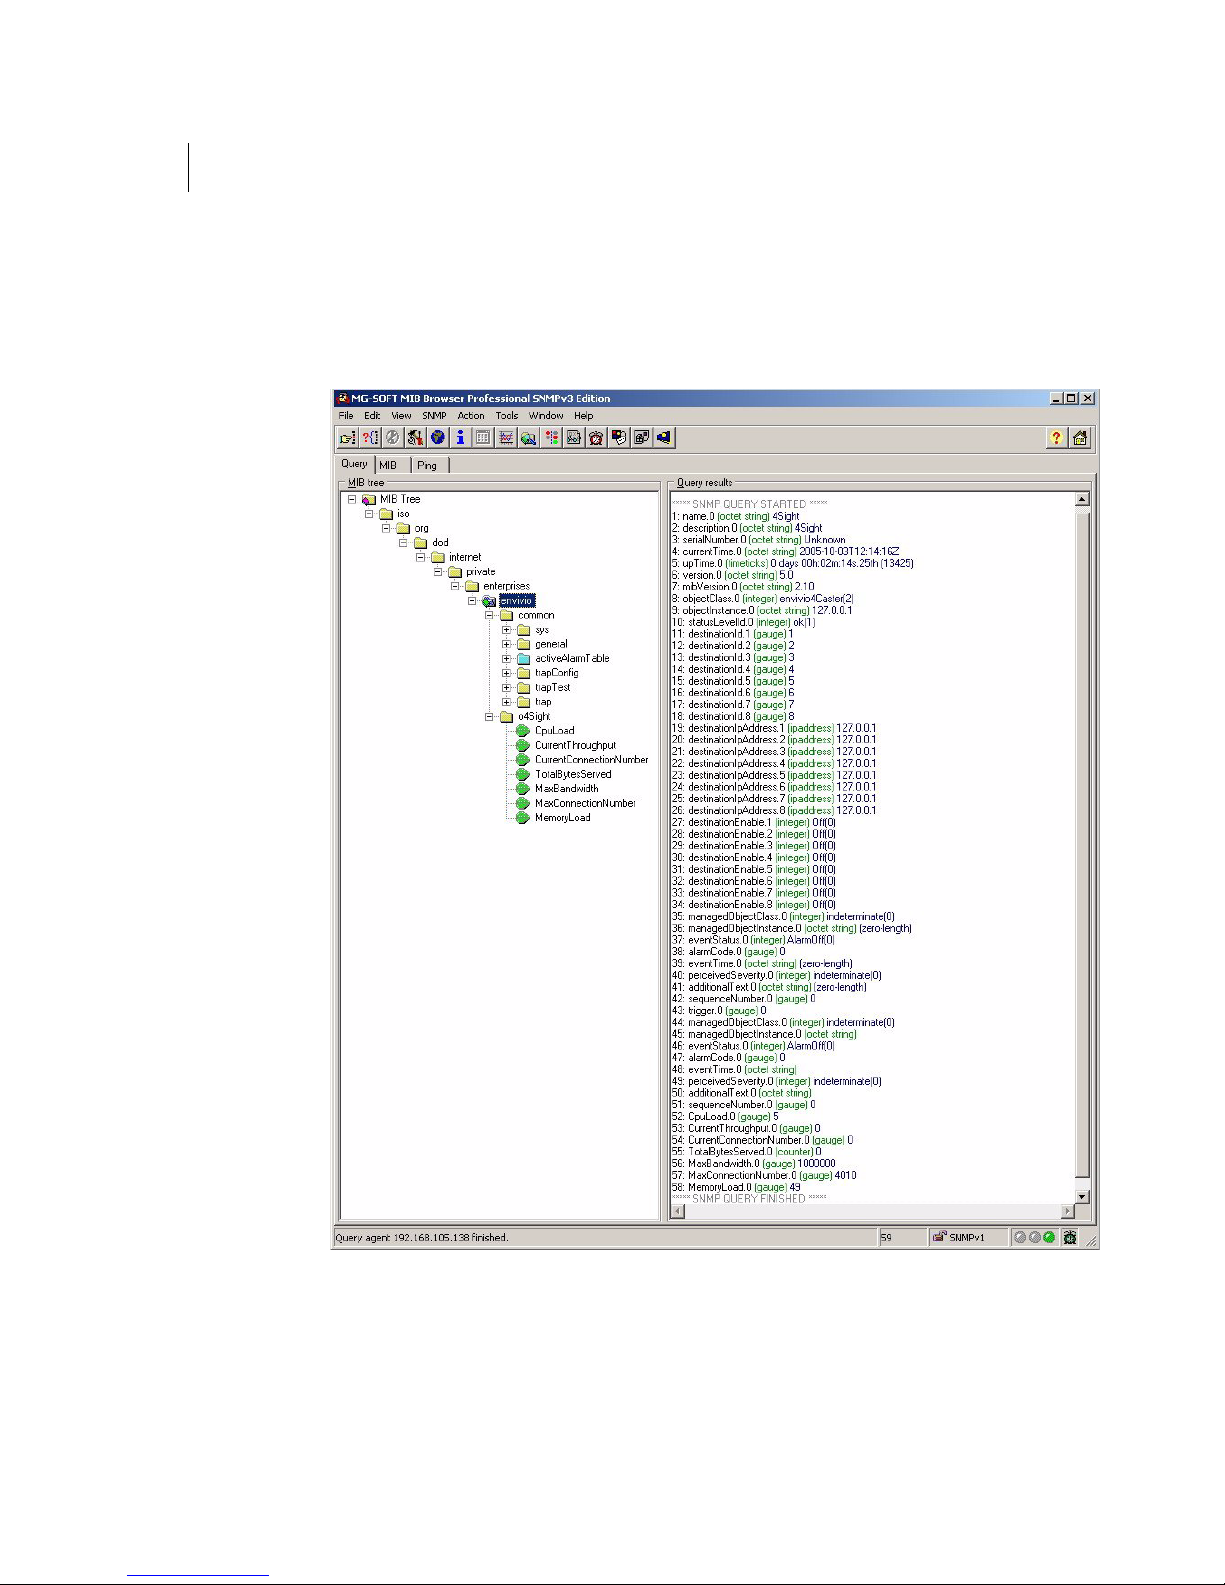
You can now query all the fields available in the 4Sight Video Server MIB.
The following graphic gives the output of a "walk" query on the envivio
node.
Version 5.0
Page 73
Enabling SNMP trap reception
The 4Sight Video Server uses traps to notify the SNMP monitor of events
and alarms. To receive those traps, the monitor needs to be registered as a
trap listener for 4sight. Each 4Sigth Video Server can send traps to up to
ten trap listeners
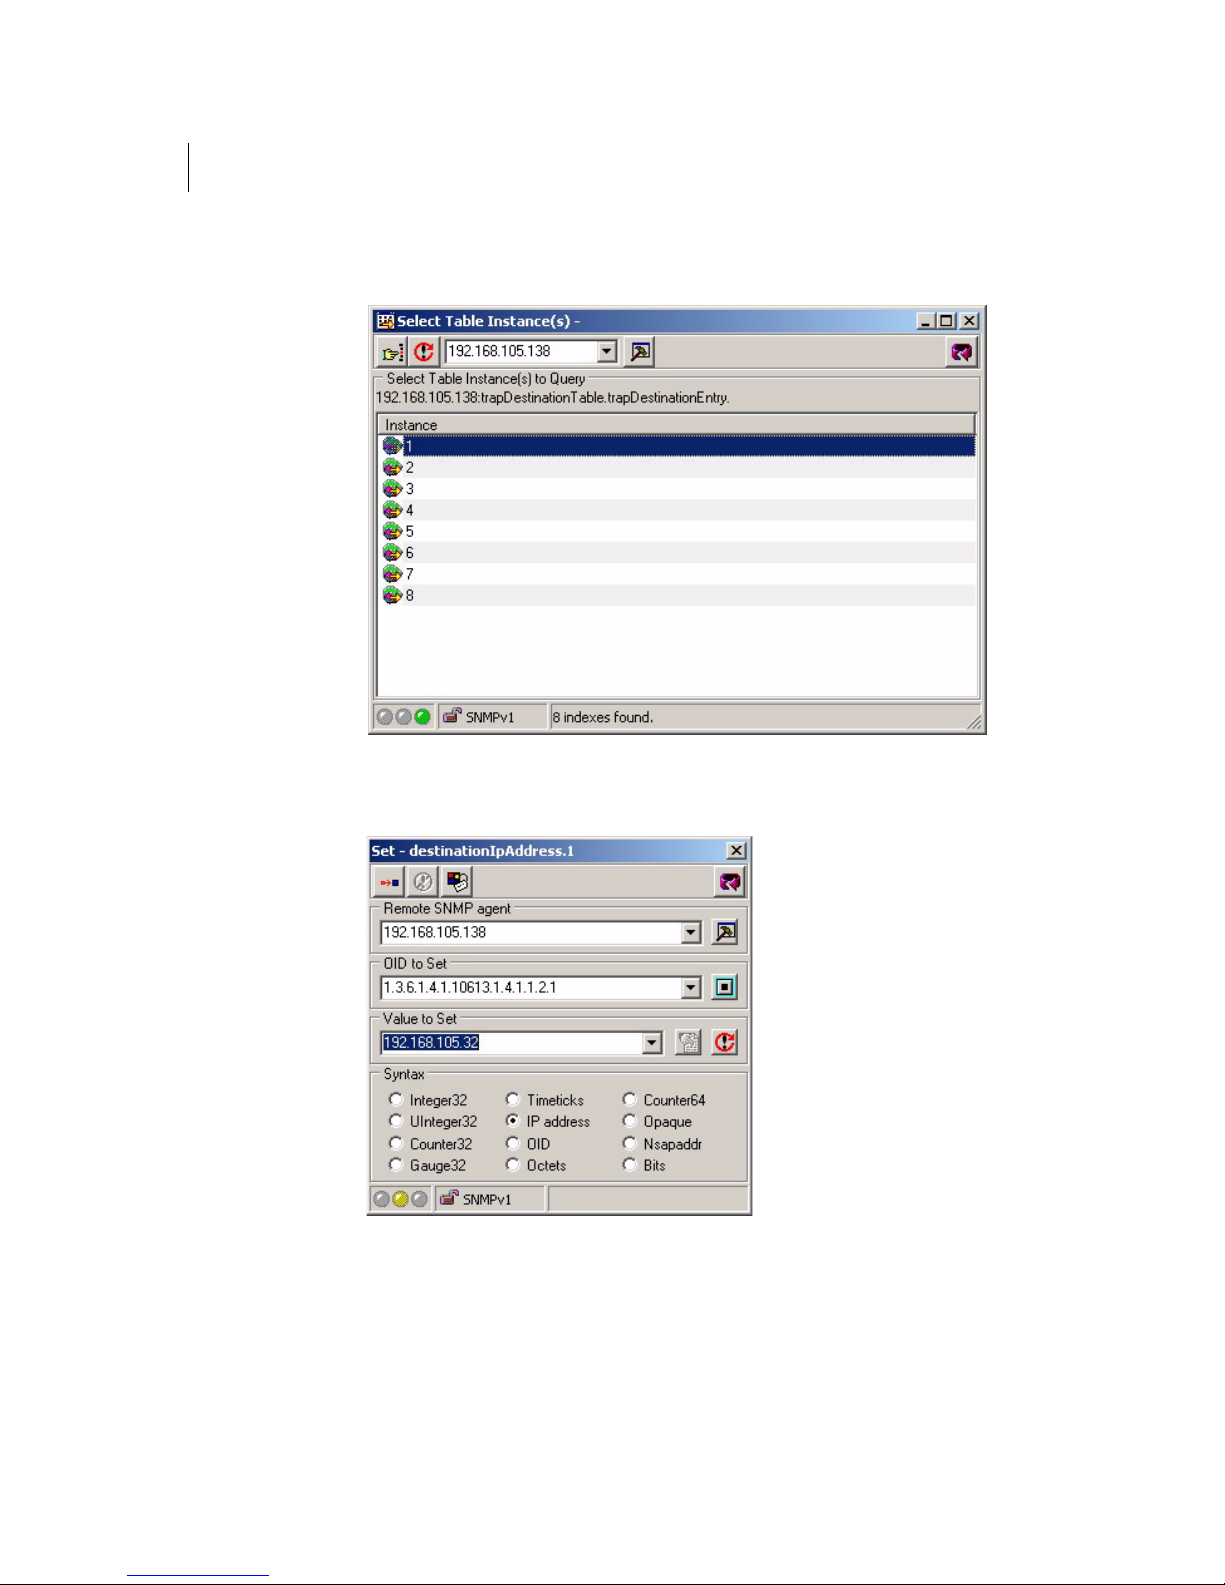
Follow the steps below to register the MIB Browser (IP Address
192.168.105.32) as a trap receiver for 4Sight Video Server (IP Address
192.168.105.138):
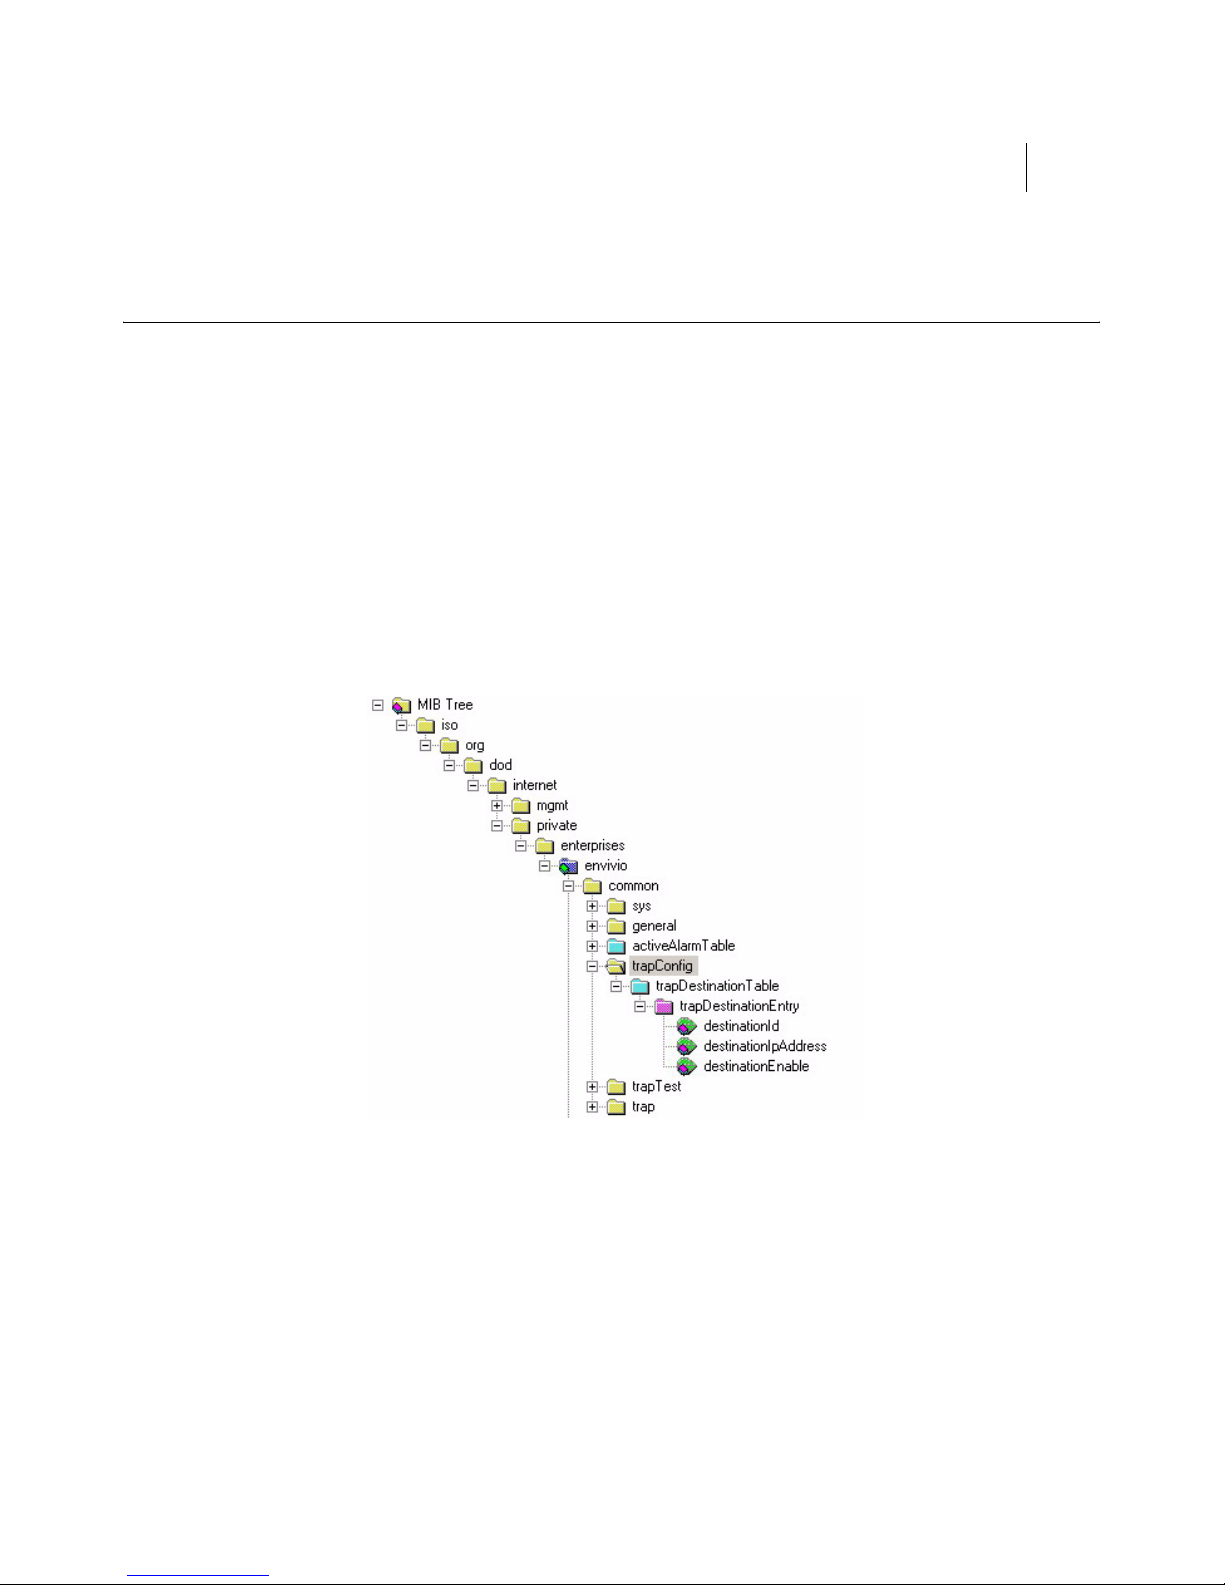
1. In the MIB Browser look for the TrapConfig node in the common
MIB.
4Sight 75
Administrator Guide
Version 5.0
Page 74
76 Chapter 8
SNMP monitoring
2. Right click on the destinationIpAddress node and select Set.
3. Double click on the first instance and specify the IP address of the
MIB Browser
Version 5.0
Page 75
4Sight 77
Administrator Guide
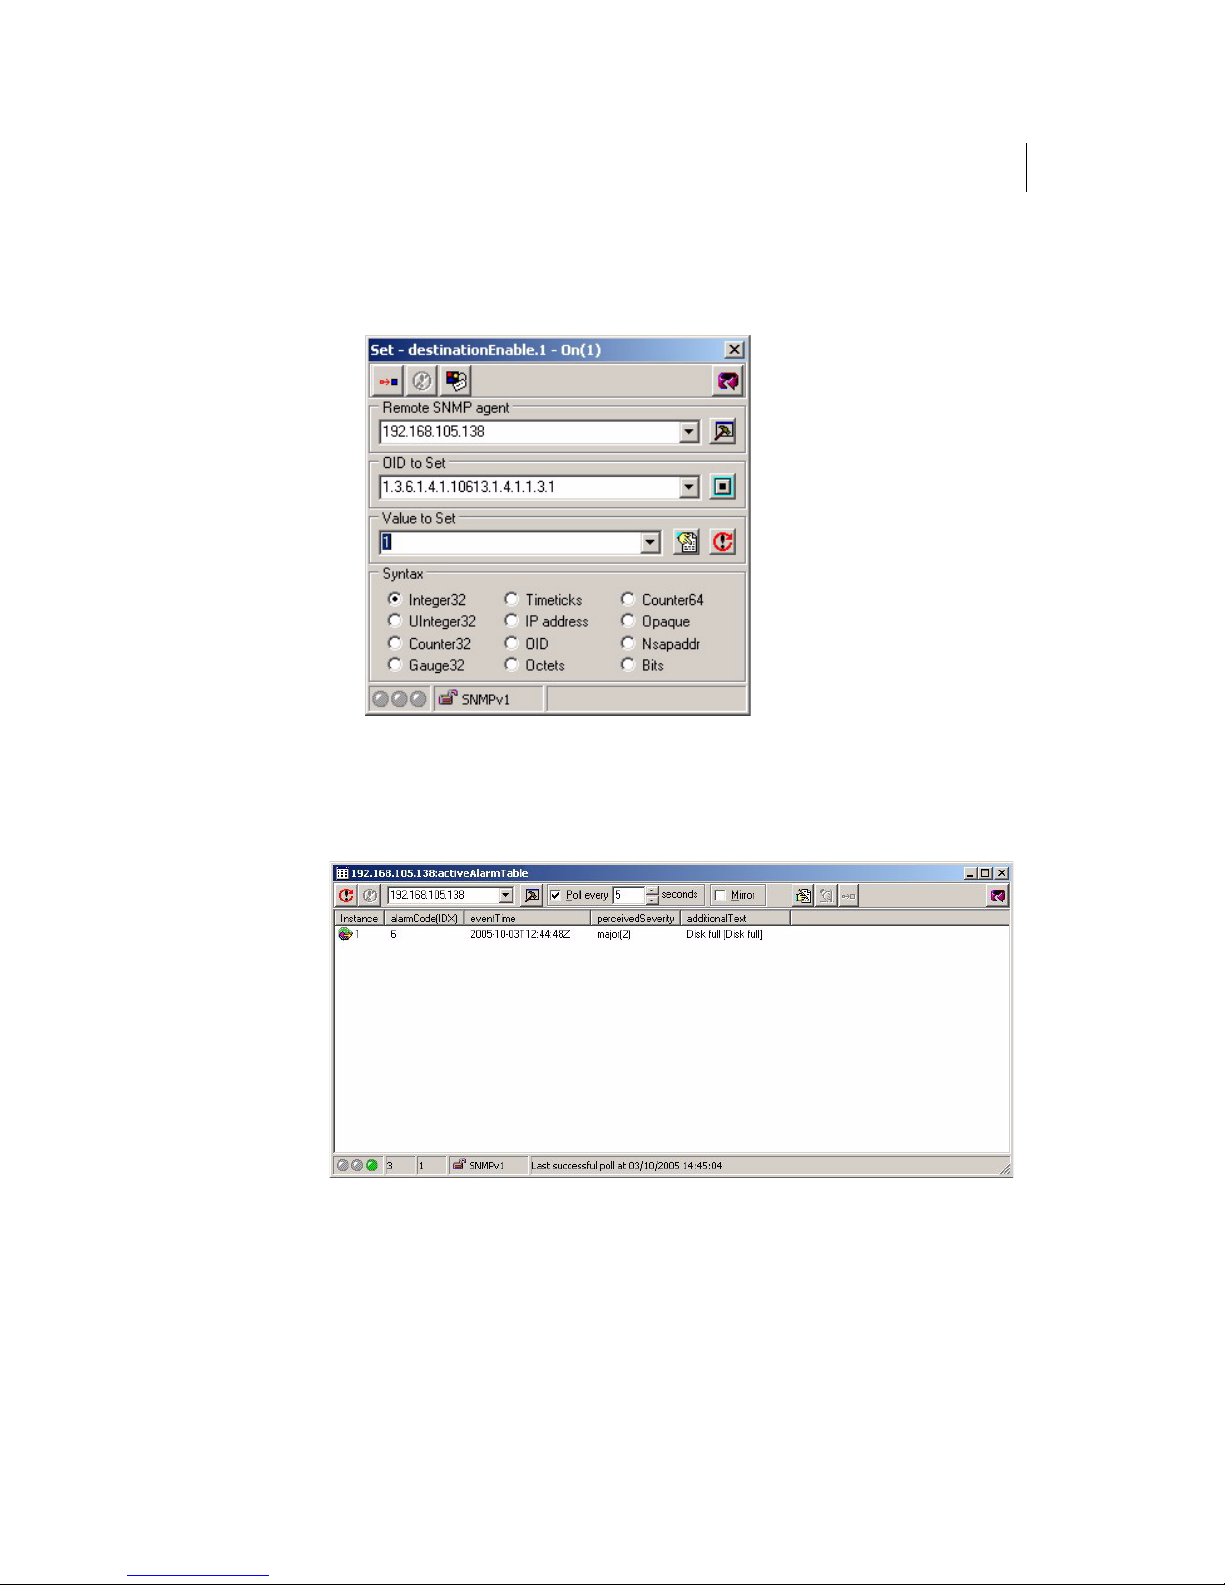
4. Repeat the operation for the first instance of the destinationEnable
node and set it to On.
Your MIB Browser is now configured to receive the traps generated by the
4Sight Video Server.
The following graphic is an example of a "Disk Full" alarm.
Version 5.0
Page 76

78 Chapter 8
SNMP monitoring
Version 5.0
Page 77

Appendix A
How-To
Page 78

80
How to update an SDP file
In order to successfully open a multicast stream, you simply need to open
the associated SDP file in a player. In the case of a relay or a switcher, you
will need to update the information contained in the SDP file before
opening it.
For example, let's say we are relaying multicast address 236.130.82.35,
ports 6850 and 6852 towards address 235.55.58.54 ports 6002 and 6004.
You will need to follow these steps to visualize the final stream:
1. Retrieve the SDP file created by one of the sources, for example,
Envivio 4Caster.
2. Change the IP address (c=) and port (m=) to those defined in the
output settings.
In our example, change:
• c=IN IP4 236.130.82.35/1 to c=IN IP4 235.55.58.54 for the IP
address,
• m=video 6850 RTP/AVP 96 to m=video 6002 RTP/AVP 96,
• m=audio 6852 RTP/AVP 97 to m=audio 6004 RTP/AVP 97 for the port
numbers and so on for each m= line.
Page 79

4Sight 81
Administrator Guide
How to link to a streamable content in a web page
You can link to an MPEG-4 streamed file directly into an HTML page.
Opening the link will start an external player that will be used to read the
file.
The two ways of doing that are listed below:
1. Use an anchor element pointing to an M4E file:
<a href="movie.m4e">Movie</a>
where movie.m4e contains: url=rtsp://server/movie.mp4
2. Or use an anchor with an RTSP URL:
<a href="e-rtsp://server/movie.mp4">Movie</a>
Page 80

82
How to embed a streamable content in a web page
When you embed a content in a web page, no external player is used and
the content is played directly in the web page.
This can be done either with the Windows Media Player or with
EnvivioTV ActiveX plugin:
• With the Windows Media Player
<object id="vidplayer"
standby="Loading file in Windows Media Player..."
classid="clsid:22D6F312-B0F6-11D0-94AB-0080C74C7E95"
codebase="http://activex.microsoft.com/activex/controls/mplayer/en/
nsmp2inf.cab#Version=6,0,02,902"
type="application/x-mplayer2">
<param name="src" value="e-rtsp://server/movie.mp4">
<param name="autostart" value="true">
</object>
• With the EnvivioTV ActiveX plugin
<object ID="ActiveX" CLASSID="CLSID:9272C6BB-41DD-4111-9B9E-
91D48AE1F4D1" >
<param name="url" value="e-rtsp://server/movie.mp4">
<param name="refresh_rate" value="40">
</object>
You can display an MPEG-4 streamed file directly into an HTML page.
Page 81

What is a hint track
To be streamed, an MPEG-4 file has to be hinted. The server uses hint
tracks in an MPEG-4 file to packetize the media into RTP streams.
During the preparation of the MPEG-4 file for streaming, one hint track
is added to the MPEG-4 file for each track whose media will be streamed
over RTP. The hint tracks within the MPEG-4 file provide the
information needed to turn the media into RTP packets.
These hint tracks are part of the MPEG-4 atom structure, and are similar
to Apple QuickTime file format.
4Sight 83
Administrator Guide
Page 82

84
Can I use multicast over Internet?
Multicast will work on a LAN if multicast forwarding is enabled on the
routers between the network segments (unless your router does not
support multicast mode). However, this will not usually work across the
Internet since most of the routers are not configured to support multicast,
and you cannot be sure which routers will be used by your streams.
Clients that are located behind routers, that do not implement
multicasting can still receive a multicast by requesting the stream from a
reflector.
Page 83

Appendix B
The Video Server
configuration file parameters
Page 84

86
General parameters
The following are general parameters, valid across all modules of the
server:
Keyword Value
rtsp_port
default_authorization_realm
authentication_scheme Set this to be the authentication scheme
do_report_http_connection_ip_address When behind a DNS round robin, the client
Port(s) for accepting client connections
NOTE: Add port 80 to this list if you are
streaming across the Internet and want
clients behind firewalls to be able to
connect to the Video Server.
The text to display as the login entity "realm"
in the client is defined by
default_authorization_realm. If the default
realm is not defined here, then the default
realm is set to "Streaming Server". The realm
used in a response can also be dynamically
set by authorizing modules.
you want the server to use. "basic", "digest",
and "none" are the currently supported
values.
needs to be told the specific IP address of
the server handling its request. This
preference tells the server to report its IP
address in the reply to the HTTP GET request
when tunneling RTSP through HTTP.
tcp_seconds_to_buffer
The "scaling factor" to appropriately scale
the buffer size.
Using the bitrate of the movie as a guide,
the server will set the TCP send buffer to fit
this number of seconds of data.
Page 85

4Sight 87
Administrator Guide
max_tcp_buffer_size
min_tcp_buffer_size
error_logging
screen_logging
logs_folder
module_folder
pid_file
safe_play_duration
Maximum size the send buffer can be set to.
Minimum size the send buffer can be set to.
Either "true" or "false".
This toggles error logging on and off.
If screen_logging is true, all error messages
will be written to the terminal window.
Note that in order to see these messages on
screen, the server must be launched from
the command-line, and must be launched in
foreground mode (triggered by the addition
of the -d flag).
Path to the folder containing the log files.
Path to the folder containing dynamic
loadable server modules.
Path to the pid file.
If the server discovers it is serving more than
its allowed maximum bandwidth (using the
average bandwidth computation) it will
attempt to disconnect the most recently
connected clients until the average
bandwidth drops to acceptable levels.
However, it will not disconnect clients if they
have been connected for longer than this
time, in seconds. If this value is set to 0, it will
never disconnect clients.
average_bandwidth_update
total_bytes_update
This is the interval in seconds between
computations of the server's average
bandwidth.
The interval in seconds between updates of
the server's total bytes and current
bandwidth statistics.
Page 86

88
bind_ip_addr
rtp_timeout
maximum_bandwidth
maximum_connections
real_rtsp_timeout
This tells the server what IP address(es) it
should accept client connections on.
A value of 0 means all IP addresses currently
enabled for the machine.
Amount of time in seconds the server will
wait before disconnecting idle RTP clients.
This timer is reset each time the server
receives an RTCP status packet from the
client.
Maximum amount of bandwidth (in kbps)
the server is allowed to serve.
If this limit is exceeded, new client requests
for additional streams will receive the RTSP
error 453, "Not Enough Bandwidth"
Maximum number of concurrent
connections allowed by the server.
rtsp_timeout is the time-out that gets
reported to the client.
This is the actual time-out value.
rtsp_timeout
Thinning parameters
The following preferences configure the server thinning algorithm. They
are all in milliseconds.
Keyword Value
drop_all_packets_delay If a packet is only sent this far ahead of when
drop_all_video_delay If a video packet passes this delay, it is dropped.
Amount of time in seconds the server will
wait before disconnecting idle RTSP clients.
This timer is reset each time the server
receives a new RTSP request from the client.
the client needs to play it, it is dropped
Page 87

4Sight 89
Administrator Guide
always_thin_delay If a packet passes this delay, thin some more.
thin_all_the_way_delay If a packet is only sent this far ahead of when
the client needs to play it, the server thins the
stream as much as possible.
start_thinning_delay If a packet is this late, we might thin some more.
start_thicking_delay If the server is sending packets this far ahead of
when the client needs them, it will attempt to
add a little bandwidth to the stream
thick_
quality_check_interval The server checks packet delay differences at
all_the_way_delay
More general parameters
Keyword Value
append_source_addr_in_transport If this is true, the server will add its source
alt_transport_src_ipaddr The server appends its own IP address into the
send_interval Minimum time in msec the server will wait
If a packet is this late, restores full quality.
this interval.
address to its transport headers.
This is necessary on certain networks where the
source address is not necessarily known.
transport header.
If you want an alternate address placed there,
use this preference to specify the address.
between sending packet data to a client.
max_send_ahead_time The server tries to get ahead of clients.
overbuffer_rate Rate at which to overbuffer the
This is the farthest ahead in seconds that the
server can go.
max_send_ahead_time.
Page 88

90
Reliable UDP parameters
Keyword Value
max_retransmit_delay Maximum interval between when a retransmit
small_window_size If the client does not explicitly say what its
medium_window_size If the client does not explicitly say what its
is supposed to be sent and when it actually
gets sent.
Lower values means smoother flow but slower
server performance.
window is, the server will use this as a default
value. Specified in kilobytes.
window is, the server will use this as a default
value. Specified in kilobytes.
large_window_size If the client does not explicitly say what its
window is, the server will use this as a default
value. Specified in kilobytes.
window_size_threshold Bit rate (in kbps) at which the server switches to
medium window size.
window_size_max_threshold Bit rate (in kbps) at which the server switches to
large window size.
rtcp_poll_interval Time in msec between server checks for
incoming RTCP packets.
Longer interval means better server
performance but less accurate estimates of
packet round-trip-times.
rtcp_rcv_buf_size Size in kilobytes for the RTCP UDP socket
receive buffers.
This needs to be large to absorb bursts of RTCP
ACKs. Lower value may mean ACKs will get
dumped by the kernel.
reliable_udp Enable/disable reliable UDP protocol.
Page 89

reliable_udp_dirs If reliable UDP is enabled, specify the
reliable_udp_slow_start Enables or disables reliable UDP slow start.
RTSP debugging parameters
Keyword Value
4Sight 91
Administrator Guide
directories in which it is enabled.
Directories should be relative to the movies
folder, with a leading slash but no trailing slash.
For example: /reliable_udp_dir
Disabling this may lead to an initial burst of
packet loss due to the misestimation of the
client's available bandwidth. Enabling this may
lead to early thinning.
RTSP_error_message Enable debugging error messages in RTSP error
response.
RTSP_server_info Enable the server to send informations about
itself.
Page 90

92
Specific parameters
These parameters are module-specific.
Reflector module parameters
Keyword Value
enforce_static_sdp_port_range Turns on or off checking static ports in SDP files
against a valid range.
If an SDP file is played and it contains a port outside
the static SDP range, then an invalid media error is
returned to the client.
Announced broadcasts will also receive the invalid
media error from the server for setups on an invalid
static port.
maximum_static_sdp_port The maximum value for a static port.
minimum_static_sdp_port The minimum value for a static port.
Access Log module parameters
Keyword Value
enabled
filename
rotation_size
enforce_static_sdp_port_range.
See
enforce_static_sdp_port_range.
See
Either "true" or "false".
This toggles access logging on and off.
Name of the access log file (default is 4SightAccess)
Maximum allowed size in bytes for the access log. A value
of 0 means unlimited
Page 91

rotation_interval Amount of time in days between rolls of the access
use_gmt_time Either "true" or "false". Log date time field in GMT if
Error Log modules parameters
Keyword Value
enabled Either "true" or "false".
filename Name of the access log file (default is 4SightAccess)
rotation_size Maximum allowed size in bytes for the access log. A
4Sight 93
Administrator Guide
log. A value of 0 means unlimited.
true and in local time if false
This toggles access logging on and off.
value of 0 means unlimited
rotation_interval Amount of time in days between rolls of the access
verbosity Verbosity of the logger (between 0 and 10)
Access module parameters
Keyword Value
modAccess_qtaccessfilename The file name for the Access module access file as it
modAccess_groupsfilepath The default path and file name for the Access module
modAccess_usersfilepath The default path and file name for the Access module
log. A value of 0 means unlimited.
appears in controlled directories.
group list.
user list.
Page 92

94
WebAdmin parameters
Keyword Value
RequestTimeIntervalMilli The minimum delay (in milliseconds) between
LocalAccessOnly Only requests from 127.0.0.1 are allowed if
Authenticate Require admin requests to authenticate with the server.
enable_remote_admin Turn on or off remote admin request processing.
IPAccessList A list of IP addresses that are allowed to make admin
processing each admin request.
LocalAccessOnly is true
If set to false, then IP addresses as defined by the
IPAccessList may make requests.
requests.
LocalAccessOnly must be set to false before network
addresses will be accepted.
A wildcard of * is allowed for designating ranges.
*.*.*.* means all addresses.
AdministratorGroup The user has to belong to this group in order to be
File module parameters
Keyword Value
sdp_url This URL will be included in the
admin_email This email address will be included in the
authorized by the admin module for admin requests.
dynamically generated SDP returned to
the client. Typically, this should be set to
your default web URL.
dynamically generated SDP returned to
the client.
Page 93

4Sight 95
Administrator Guide
max_allowed_speed
max_allowed_scale Maximum scale for fast forward and fast
flow_control_probe_interval When sending packets to the client, the
enable_shared_file_buffers
enable_private_file_buffers
num_shared_buffer_increase_per_session
shared_buffer_unit_k_size
private_buffer_unit_k_size
num_shared_buffer_units_per_buffer
num_private_buffer_units_per_buffer
max_shared_buffer_units_per_buffer
max_private_buffer_units_per_buffer
add_seconds_to_client_buffer_delay
record_movie_file_sdp
enable_movie_file_sdp
File module accepts the RTSP Speed
header, which controls the overall play
rate. This is the maximum rate it will allow.
backward.
connection may sometimes get flow
controlled.
When that happens, the server
periodically checks to see if the condition
has been lifted. This is how often it checks.
Parameters used for file management.
Flow control module parameters
Keyword Value
loss_thin_tolerance
num_losses_to_thin
If a client reports loss percentages greater than
loss_thin_tolerance, over the course of
num_losses_to_thin consecutive RTCP (status) packets,
the server will drop the bitrate of stream.
Page 94

96
loss_thick_tolerance
num_losses_to_thick
num_worses_to_thin After this number of RTCP packets where the client is
If a client reports loss percentages l
loss_thick_tolerance, over the course of
num_losses_to_thick consecutive RTCP (status) packets,
the server will increase the bitrate of the stream.
reporting degrading quality, the server will drop the
bitrate of the stream.
Multiple movie folders parameters
Keyword Value
movies_folders List of extra movie folders.
Relay parameters
Keyword Value
ess than
relay_prefs_file Path to the relay preferences file.
Switcher parameters
Keyword Value
switcher_prefs_file
time_to_wait_for_synchro
switch_timeout
Path to the stream switcher preferences file.
After this amount of time (in ms), the switcher will try to
force the switch.
If switch did not occur by this time (in ms), it will be
cancelled.
Page 95

Licensing module parameters
Keyword Value
4Sight 97
Administrator Guide
license_file_dir
Path to the license file.
Load balancing module parameters
Keyword Value
enabled
slave_server
Enable/disable load balancing.
List of server IP addresses for load balancing.
External authentication parameters
Keyword Value
enabled
auth_lib_file
Enable/disable an external authentication library.
Path to the authentication library.
Recorder module
Keyword Value
record_folder
Location of the recorder movies
Page 96

98
Page 97

Appendix C
The Playlist Broadcaster
configuration file
Page 98

100
Figure 1. Playlist configuration file parameters
Keyword Value
playlist_file
play_mode
sdp_reference_movie
broadcast_name
destination_ip_address
destination_base_port
Playlist filename and path.
The path can be absolute or relative.
Three modes are available
• sequential: The media is broadcast in the order it
appears in the playlist file. When the last media file is
done playing, the broadcast stops.
• sequential_looped: The media is broadcast in the order it
appears in the playlist file. When the last media file is
done playing, the playlist repeats in the same order.
Reference movie file path and name.
The absolute or relative pathname of the reference
movie, which can be one of the media files you are
broadcasting.
Name of the playlist
The default value is the loopback address 127.0.0.1.You
can also specify a unicast or multicast IP address
The base port number for the broadcast must be an
even number. If you do not specify a port number, the
default port (5004) is used.
sdp_file
destination_sdp_file
announce_type
session_name
broadcast_SDP_is_dynamic
Path and name of the SDP file. The path can be absolute
or relative path. This parameter is mandatory.
Needs to be set to the same value as sdp_file.
Specify the announce type for this playlist. Value can be
"SAP", "RTSP" or "None". If not specified, value will be
"None"
Name of the SAP session if announce_type is SAP.
Can be either "enabled" or "disabled".
Page 99

Keyword Value
4Sight 101
Administrator Guide
broadcaster_name
broadcaster_password
multicast_ttl
pid_file
logging
log_file
sap_session_name
User name if one needs to be provided to the
destination address.
Password to be provided to the destination address.
Time to live of the multicast packets in the case of a
multicast playlist.
PID file of the broadcaster.
This file is mandatory if you want to use the Playlist
Broadcaster in both command line and WebAdmin.
Can be either "enabled" or "disabled".
If you enable logging, the Playlist Broadcaster records
information about the broadcast in the log file, including
error messages.
Path and name of the log file.
If you enable logging but do not specify a file, then the
Playlist Broadcaster creates a file with the name of the
playlist followed by "." in the same directory as the
playlist configuration file.
In case of an SAP announce, use this session name
output_interface
Use this local interface to broadcast the playlist
Page 100

102
 Loading...