

Page 1
V-CAM
WebCam
User Manual
www.ENVISIONdisplay.com
Page 2

FCC COMPLIANCE
FCC Compliance and Advisory Statement. This hardware device complies with Part 15 of the FCC
Rules. Operation is subject to the following two conditions: 1) this device may not cause harmful
interference, and 2) this device must accept any interference received, including interference that may
cause undesired operation. This equipment has been tested and found to comply with the limits for a Class
B digital device, pursuant to Part 15 of the FCC Rules. These limits are designed to provide reasonable
protection a gainst harmf ul interferen ce in a residential in stallation. This equipment gen erates, u ses, and
can ra diate radio frequency ener gy a nd, if not in stalled or used in accordance with the instruc tions, may
cause ha rmful int erfer ence to radio commun ication s. Howeve r, there is no gu arantee tha t interf erenc e wil l
not occur in a particular installation. If this equipment does cause harmful interference to radio or television
reception, which can be determined by turning the equipment off and on, the user is encouraged to try to
correct the interference by one or more of the following measures: 1) reorient or relocate the receiving
antenna; 2) increase the separation between the equipment and the receiver; 3) connect the equipment to
an outlet on a circuit different from that to which the receiver is connected; 4) consult the dealer or an
experienced radio/TV technician for help. Any changes or modifications not expressly approved by the
party responsible for compliance could void the user's authority to operate the equipment. Where shielded
interface cables have been provided with the product or specified additional components or accessories
elsewhere defin ed to be used with the instal lation of the produ ct, they must be used in order to ensu re
compliance with FCC regu lations.
©2007 Envision Peripherals, Inc. All rights reserved.
All specifications are subject to change without notice. Some pictures are simulations and are not actual
screen shots.
The Envisio n logo and V-Cam are t rademarks of Envis ion Peripherals, Inc. All other br ands are the
trademarks of their respective holders.
1
Page 3

INTRODUCTION
Thank you for purchasing the Envision V-Cam, a high-performance web c amera
(webcam). The V-Cam produces high-quality images with smooth frame rates
thanks to its 1.3-Megapixel CMOS image sensor and High-Speed USB 2.0
compatibility.
FEATURES AND SPECIFICATIONS
• 1.3-Megapixel CMOS image sensor
• Maximum video resolution: 1280 x 1024
• Maximum still image resolution: 2304 x 1728 (so ftware enhanced)
• Video modes: RGB24, I420
• Frame rates: 30fps at 640 x 480, 15fps at 1280 x 1024
• Interface: High-Speed USB 2.0, backwards compatible with USB 1.1
• Signal to noise ratio: >48dB
• Dynamic range: >72dB
• Image focus: 20cm to infinity
• AWB (Automatic Whiteness Balance)
• AE (Automatic Exposure)
• 5-glass element (5G) lens
• Automatic face tracking
SYSTEM REQUIREMENTS
• Windows 2000, Windows XP, or Windows Vista
• Minimum: Intel Pentium 4 1.4GHz or AMD Athlon 1GHz
• Recommended: Intel Pentium 4 2.4GHz or faster
• 128MB RAM minimum, at least 256MB recommended
• 200MB free hard drive space
• CD-ROM drive
• 16-bit color display adapter
• Available USB 1.1 or High-Speed USB 2.0 port
• NOTE: Windows 2000 Service Pack 4 with DirectX 9.0 installed or
Windows XP Service Pack 2, and High-Speed USB 2.0 are required for
1.3-Megapizel video and snapshot.
2
English
Page 4
DRIVER INSTALLATION – Windows 2000 / XP
Do not plug in V-Cam into USB port before installing driver.
If V-Cam is already plugged in, please unplug it and follow the steps below.
Full-size CD can be loaded in all CD-ROM drives. Mini-CD can only be
used with typical tray-loading driv es.
If you have a mini-CD, do not insert it into slot-loading CD-ROM drives; inste ad,
please visit www.ENVISIONdisplay.com
to download the driver.
1. Insert the Driver/Application CD into CD-ROM. The splash screen will
appear. Alternatively, open the drive directly and double-click autorun.exe
to load the splash screen. From the splash screen select INSTALL
DRIVER then select V-CAM.
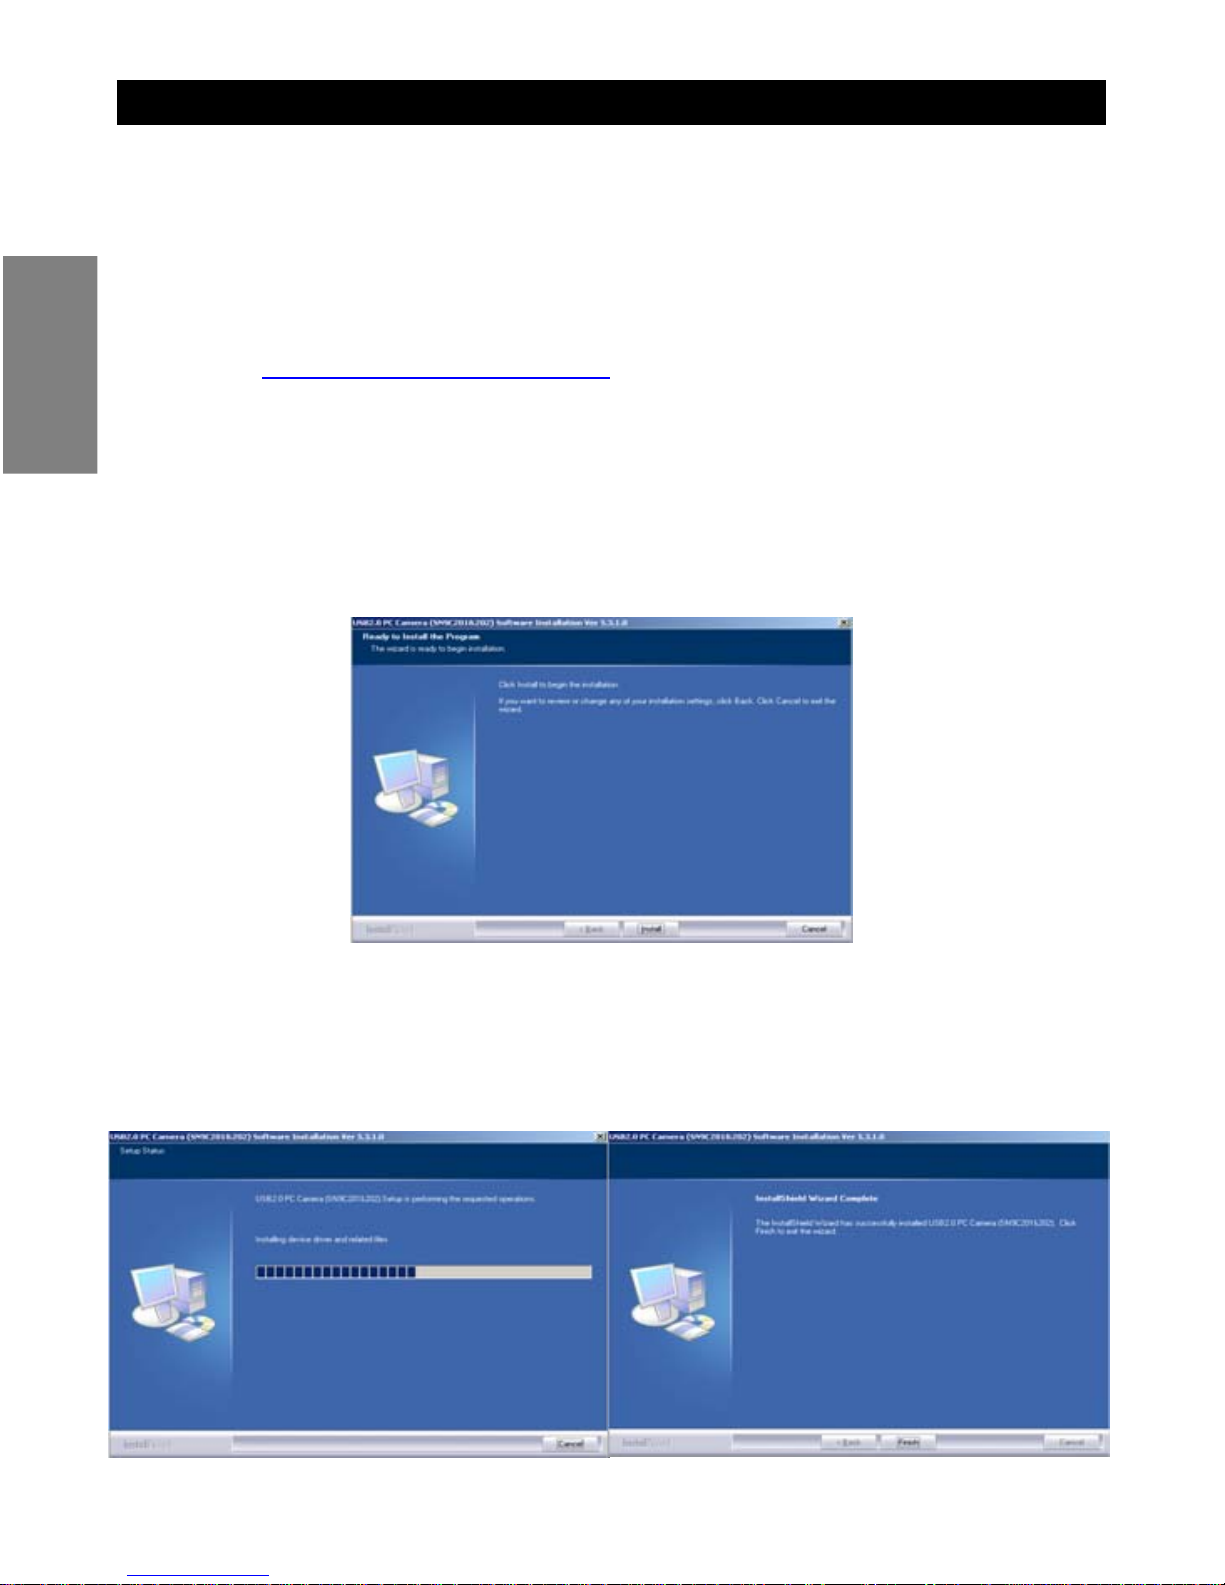
2. At the installation wizard, click Install and follow the onscreen instructions
to install driver and software applications.
:
NOTE: If a Digital Signature Not Found or Not Passed Windows Logo
Testing dialog box appears, please choose the option to continue with
installation.
3. When the installation wizard has completed, click Finish to exit the wizard.
3
English
Page 5
DRIVER INSTALLATION – Windows 2000/XP – Continued
4. Plug V-Cam into USB port. The system will detect the device and complete
the installation automatically. When installation has completed successfully,
the Camera Icon in the Taskbar will show “Web Camera is plugged in”.
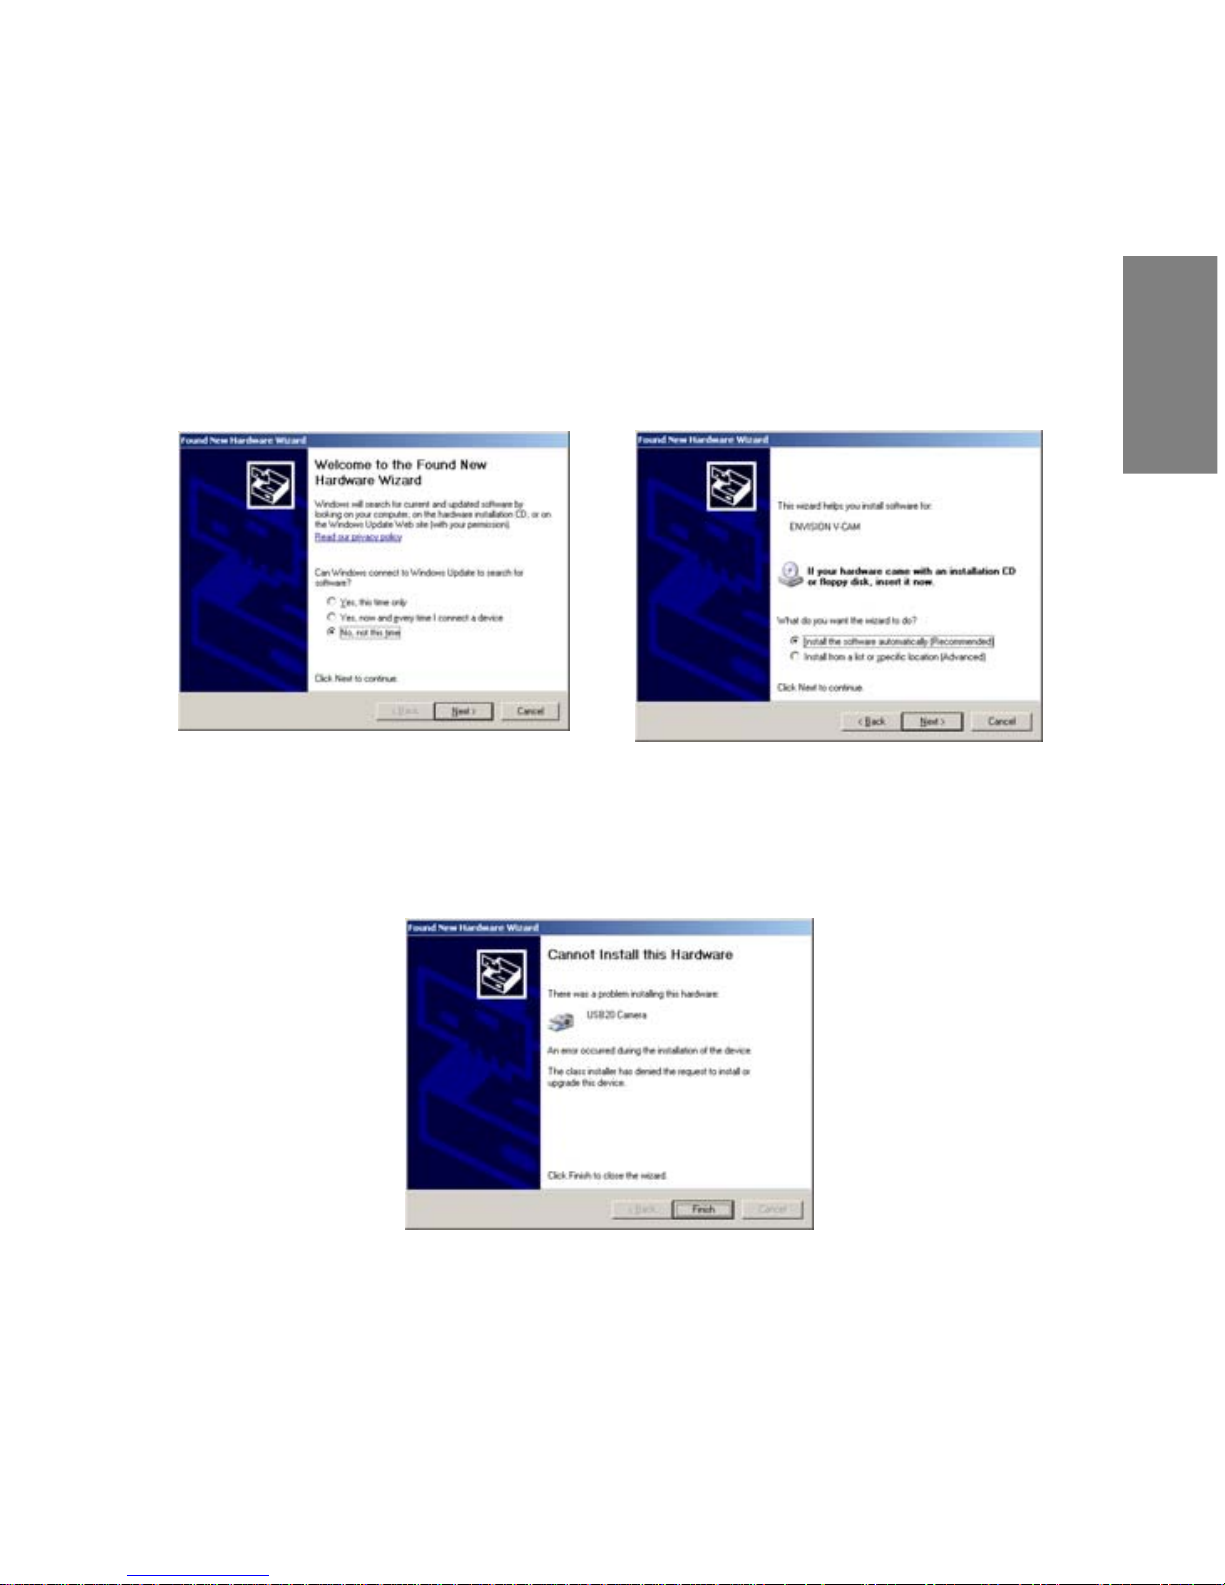
NOTE: If the Found New Hardware Wi zard dialog box appears when V-
Cam is plugged into USB port for the first time, first s elect No, not this time
when asked whether to connect to Windows Update to search for s oftware.
Next, select Install the software automatically (Recommended).
Follow the onscreen inst ructions. If a Digital Signature Not Found or Not
Passed Windows Logo Testing dialog box appears, please choose the
option to co ntinue with installation. When the wizard has completed, click
Finish to exit .
When installation has completed successfully, the Camera Icon in the
Taskbar will show “Web Camera is plugged in”.
4
English
Page 6
DRIVER INSTALLA TION – Windows Vista
Do not plug in V-Cam into USB port before installing driver.
If V-Cam is already plugged in, please unplug it and follow the steps below.
Full-size CD can be loaded in all CD-ROM drives. Mini-CD can only be
used with typical tray-loading driv es.
If you have a mini-CD, do not insert it into slot-loading CD-ROM drives; inste ad,
please visit www.ENVISIONdisplay.com
to download the driver.
1. Insert the Driver/Application CD into CD-ROM. The splash screen will
appear. Alternatively, open the drive directly and double-click autorun.exe
to load the splash screen. From the splash screen select INSTALL
DRIVER then select V-CAM.
NOTE: If An unidentified program wants access to you computer dialog
box appears, choose Allow.
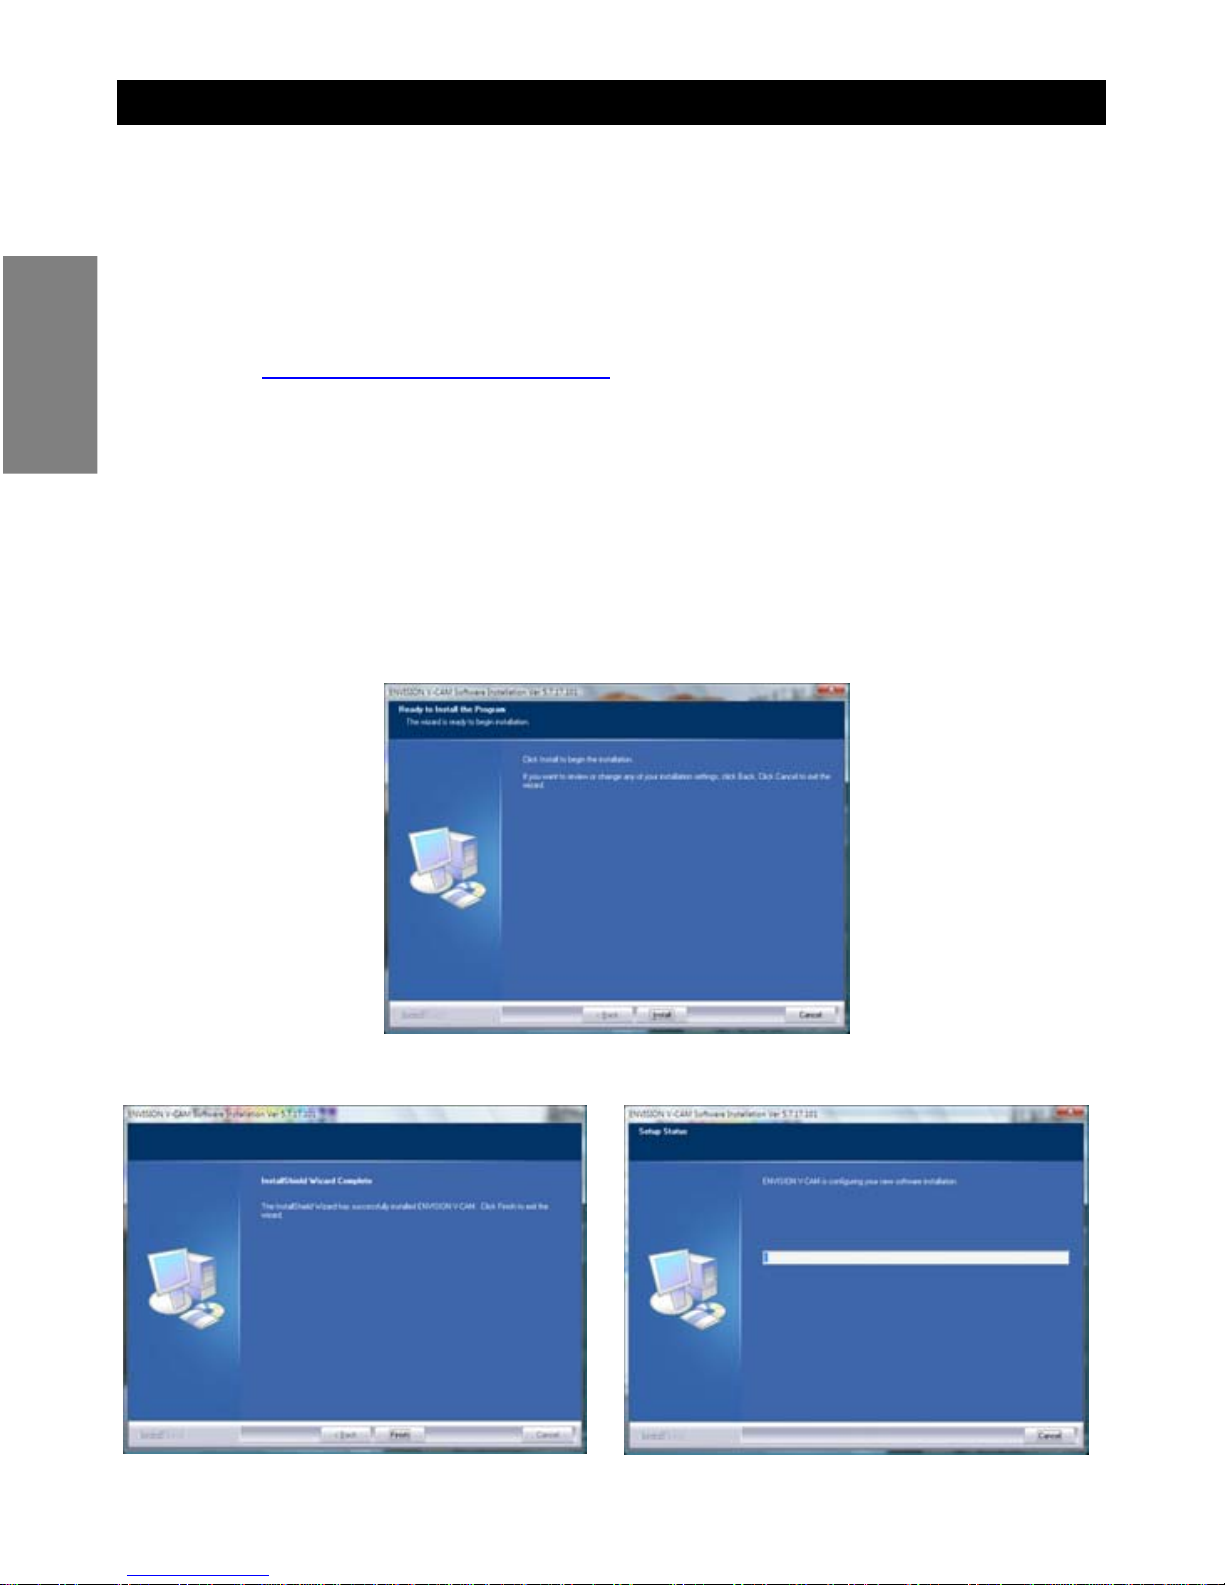
2. At the installation wizard, click Install and follow the onscreen instructions
to install driver and software applications.
3. When the installation wizard has completed, click Finish to exit the wizard.
5
English
Page 7

DRIVER INSTALLATION – Windows Vista – Continued
NOTE: If a dialog box appears asking Would you like to install this device
software?, choose Install.
4. Plug V-Cam into USB port. The system will detect the device and complete
the installation automatically. When installation has completed successfully,
the Camera Icon in the Taskbar will show “Web Camera is plugged in”.
NOTE: If a dialog box appears informing you Windows needs to install
driver software for you ENVISION V-VAM, choose Locate and install driver
software (recommended ). If a Windows needs your permission to continue
dialog box appears, choose Continue.
When d river in stall ation is comp leted, the I nstal lation Ic on in the Taskb ar
will show, “ENVISION V-CAM, Devise driver software installed
successfully.”
The Camera Icon in the Taskbar will also show “Web Camera is plugged
in”.
6
English
Page 8

VERIFYING INSTALLATION
Windows 2000 / XP
1. Plug in V-Cam into USB port. The Camera Icon in the Taskbar should
show “Web Camera is plugged in”.
2. Right-click on the My C omp ut e r icon in the desktop or Windows Start
menu. From the menu that appears, select Properties.
3. In the System Properties dialog box, click on the Hardware tab, then
click on Device Manager.
4. Click on the (+) sign next to Imaging devices icon, and make sure
there is an entry for “ENVISION V-CAM”
Windows Vista
1. Plug in V-Cam into USB port. The Camera Icon in the Taskbar should
show “Web Camera is plugged in”.
2. Right-click on the Computer icon in the desktop or Windows Start
menu. From the menu that appears, select Properties.
3. In windo w that appears, loo k in the left pan e under Tasks and click on
Device Manager.
4. Click on the (+) sign next to Imaging devices icon, and make sure
there is an entry for “ENVISION V-CAM”
USING THE ENVISION V-CAM
1. Left-double-click on the Camera Icon in the Taskbar to launch the video
playback application. Alternatively:
Windows 2000/XP: click Start → Programs → ENVISION V-CAM →
AMCap
Windows Vista: click Start → All Pro grams or Programs → ENVISION V-
CAM → AMCap
7
English
Page 9
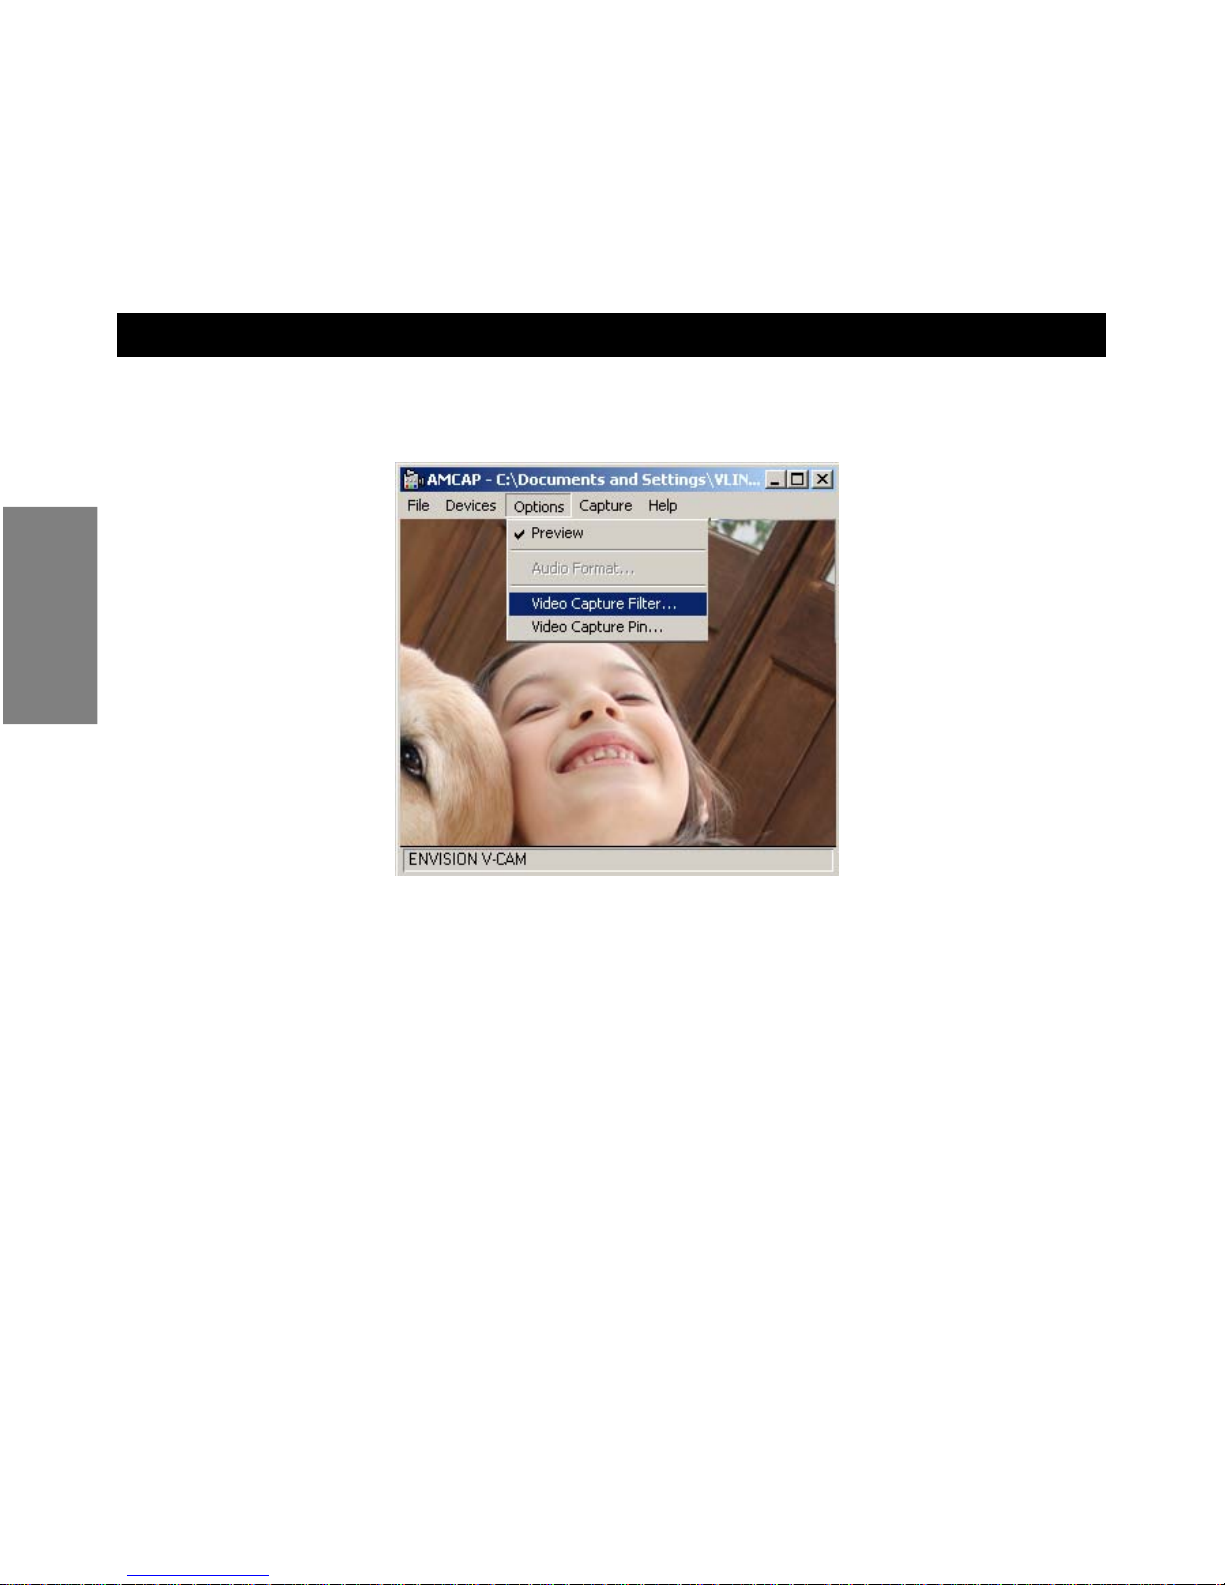
USING THE ENVISION V-CAM – Continued
2. If no video appears, make sure Options → Preview is checked to enable live
video playback.
NOTE: If you wish to use V-Cam with internet chat programs such as Yahoo!®
Messenger, Windows Live
TM
or M SN® Messe nger, or SkypeTM, please close the
AMCap video playback application by selecting File → Exit. Follow the instructions
of your chat application for enabling webcam functions.
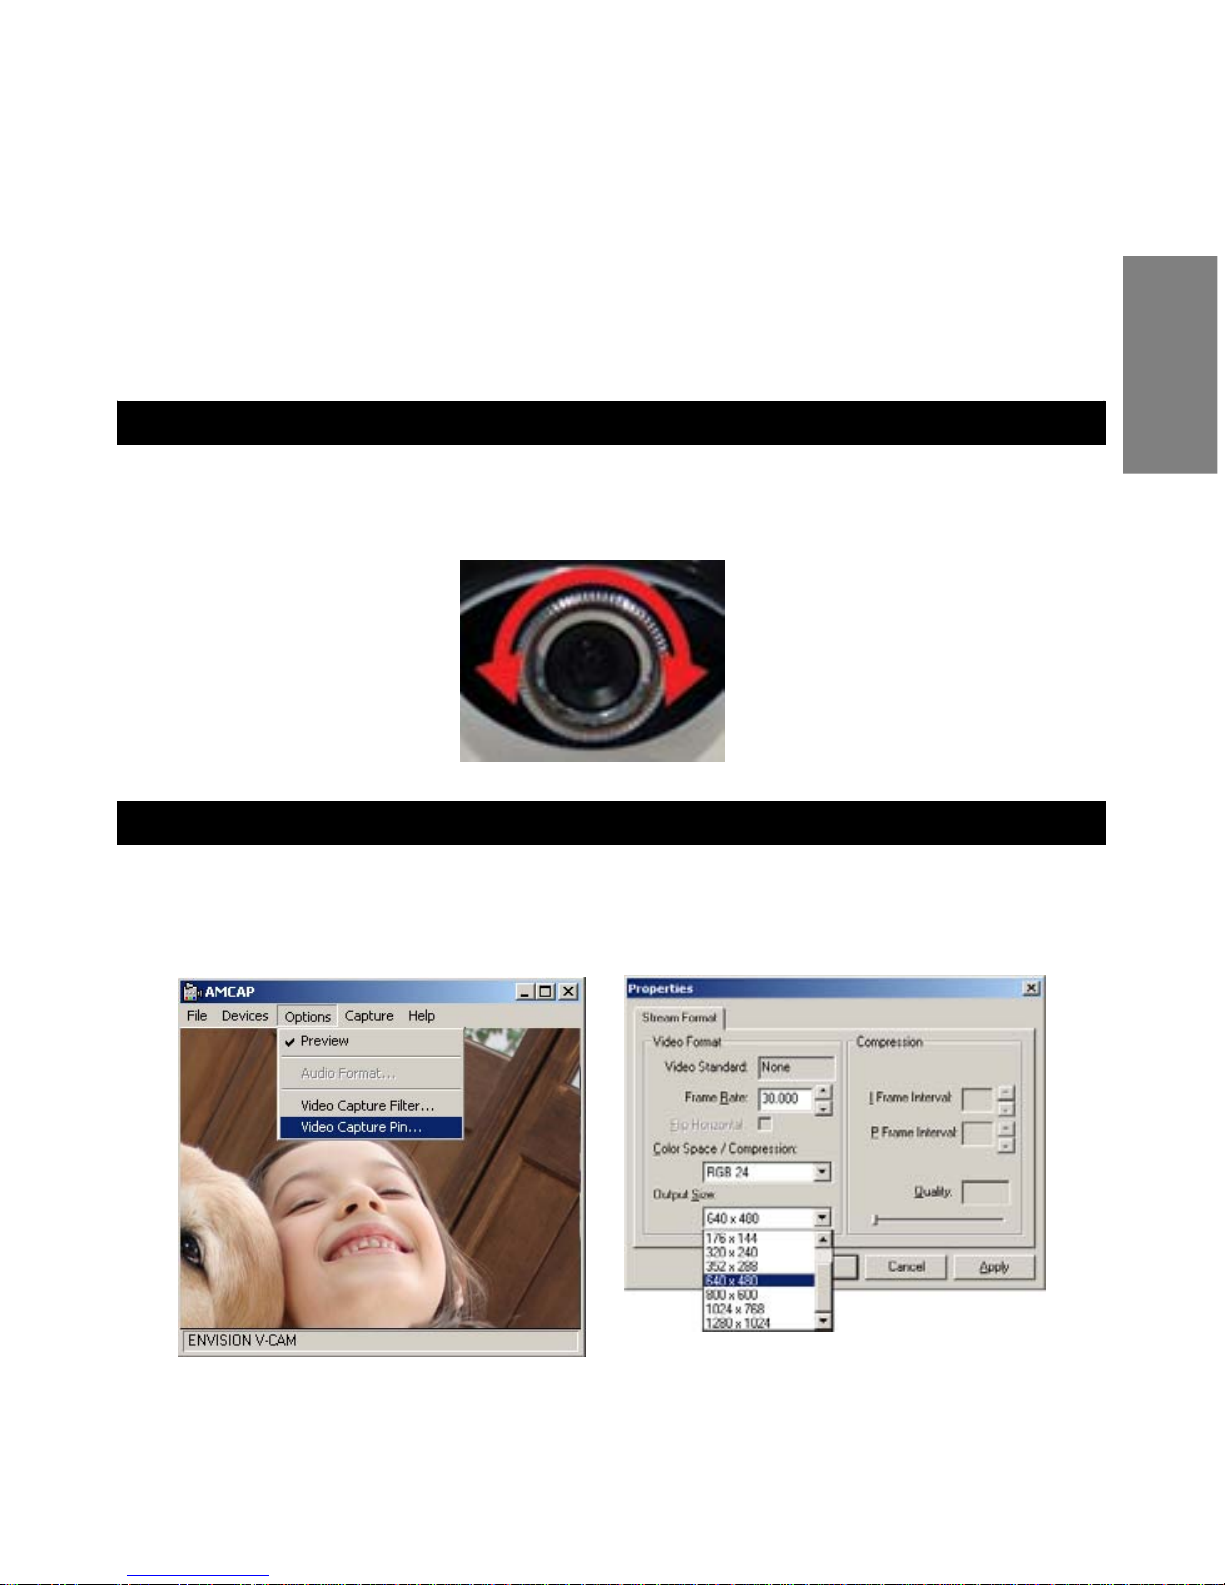
ADJUSTING FOCUS
The focus of the camera lens can be manually adjusted by turning the silver focus
ring clockwise or counter-clockwise. The lens can focus from 8” (20cm) to infinity .
CHANGING VIDEO RESOLUTION
To chang e the li ve video resoluti on, select Options → Video Capture Pin. In the
Properties dialog box, select the desired resoluti on from the Output Size drop-
down box
NOTE: Windows 2000 Service P ack 4 with DirectX 9.0 installed or Windo ws XP
Service Pack 2, and High-Speed USB 2.0 are required for resolutions above
640 x 480.
8
English
Page 10
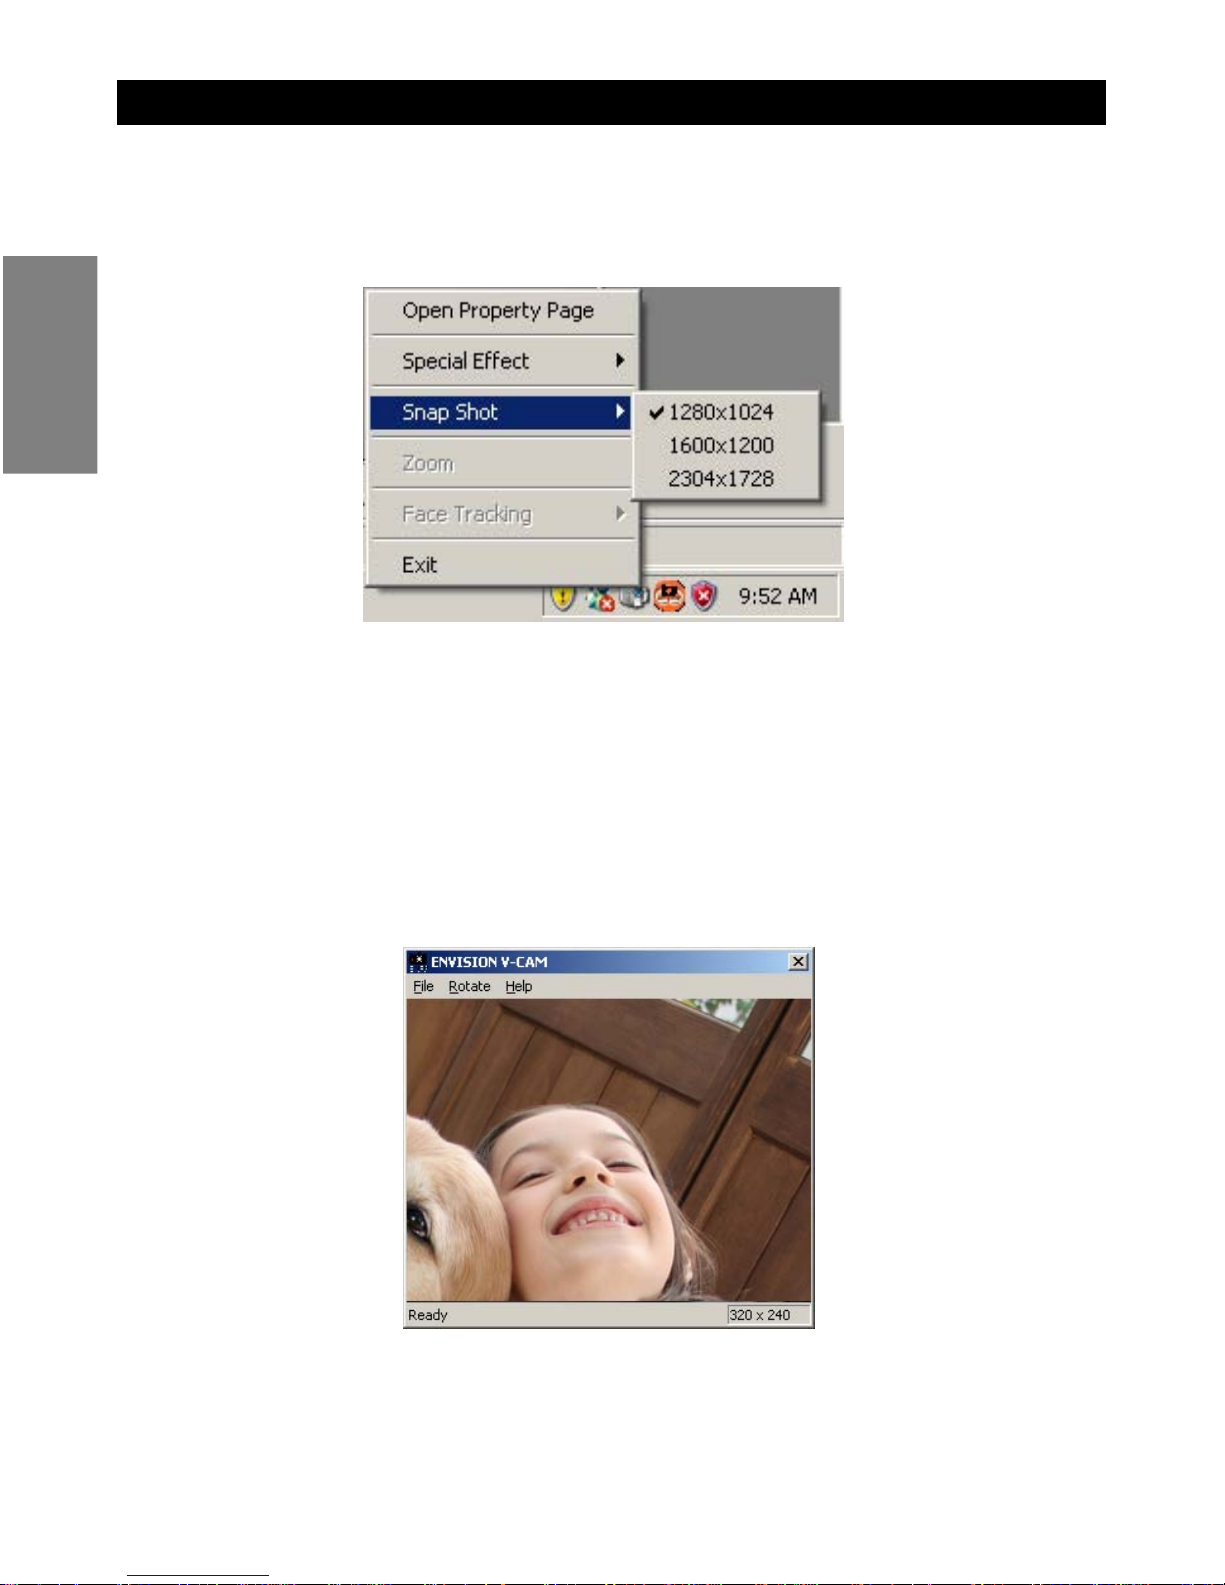
TAKING A PHOTO
1. With the video playback application running, ri ght -cli ck on the Cam era I con
in the Taskbar, select Snapshot, then select the desired snapshot
resolution.
NOTE: The available snapshot resolution depends on the currently
selected video resolution. You can always take a snapshot at the same
resolution as the current video resolution. Furthermore, higher snapshot
resolutions via software enhancement may be available for certain video
resolutions.
2. Still Image application opens when a snap shot is taken. To save the
image, from the top menu, select File → Save As.
9
English
Page 11
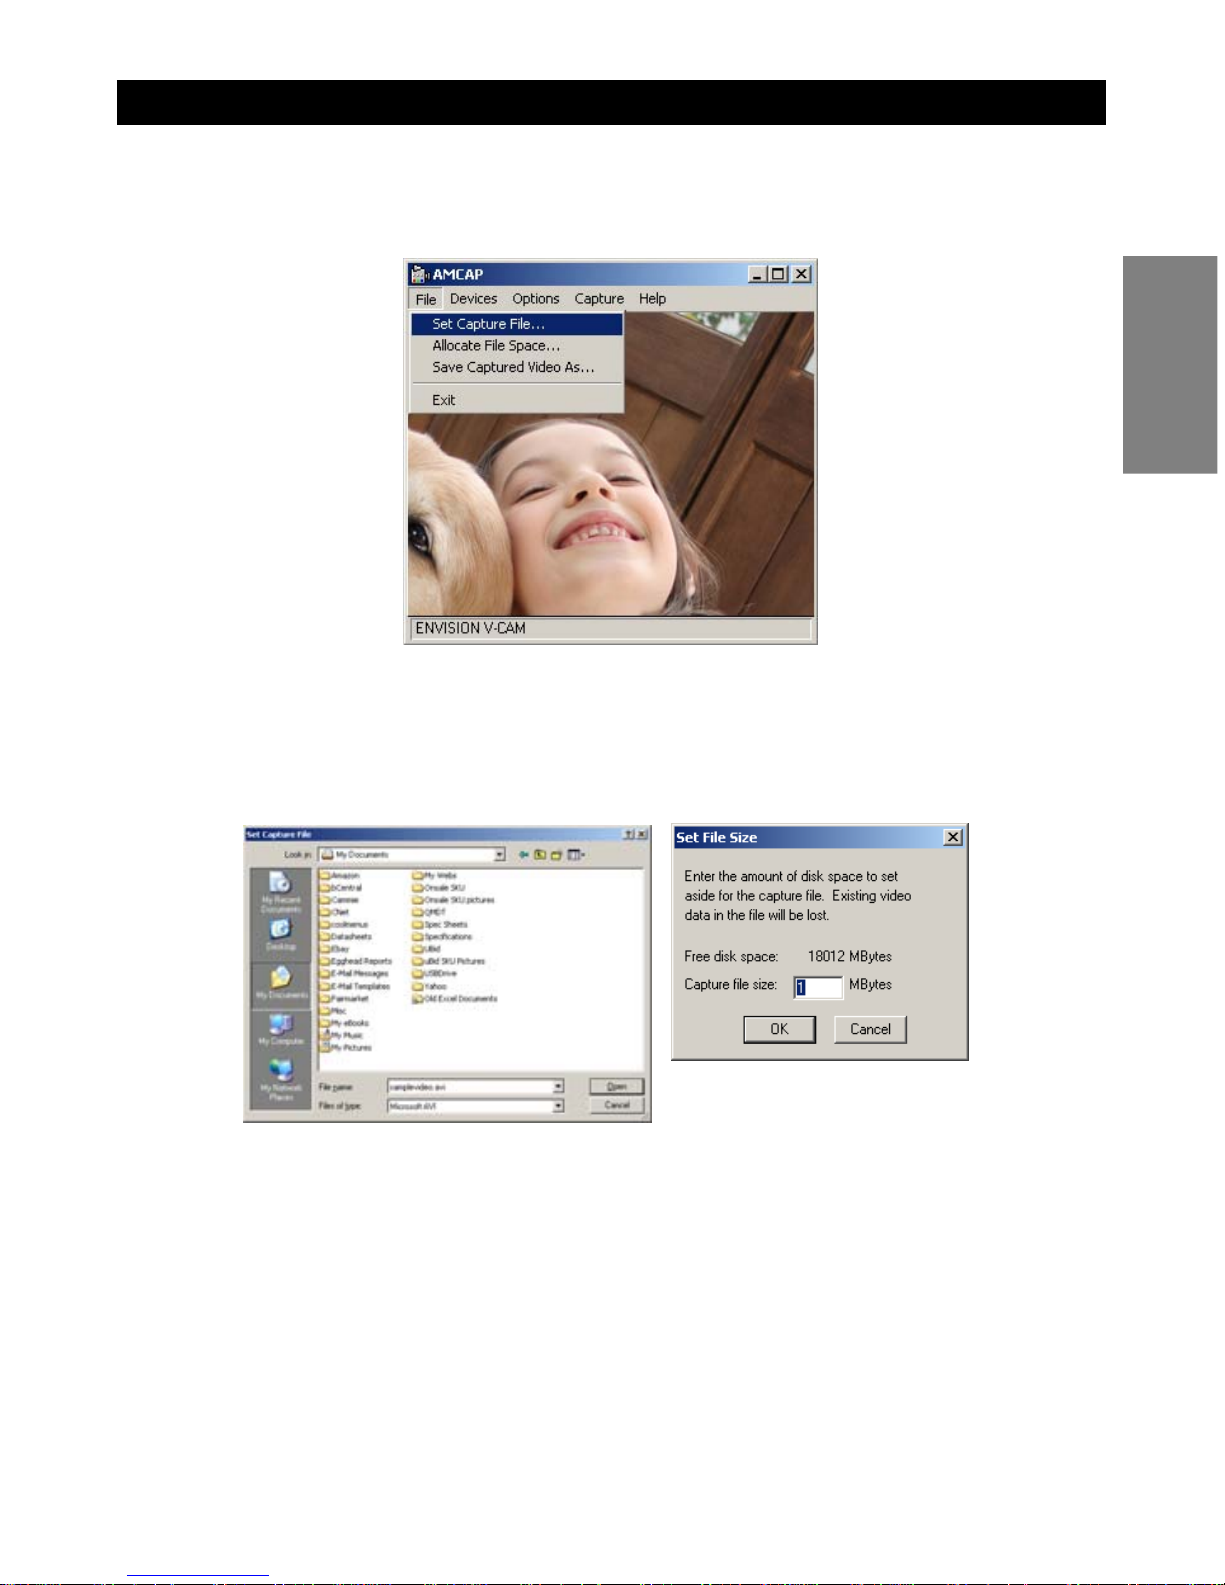
RECORDING A VIDEO
1. Make sure the live video playback application is running. Next, set the file
to which the video will be saved. From the top menu, select File → Set
Capture File.
2. In the Set Capture File dialog box enter a filename with the extension AVI,
for example “samplevideo.avi”, then click Open. In the Set File Si ze dialog
box, enter the amount of disk space to set asid e for the video capture and
then click OK.
10
English
Page 12
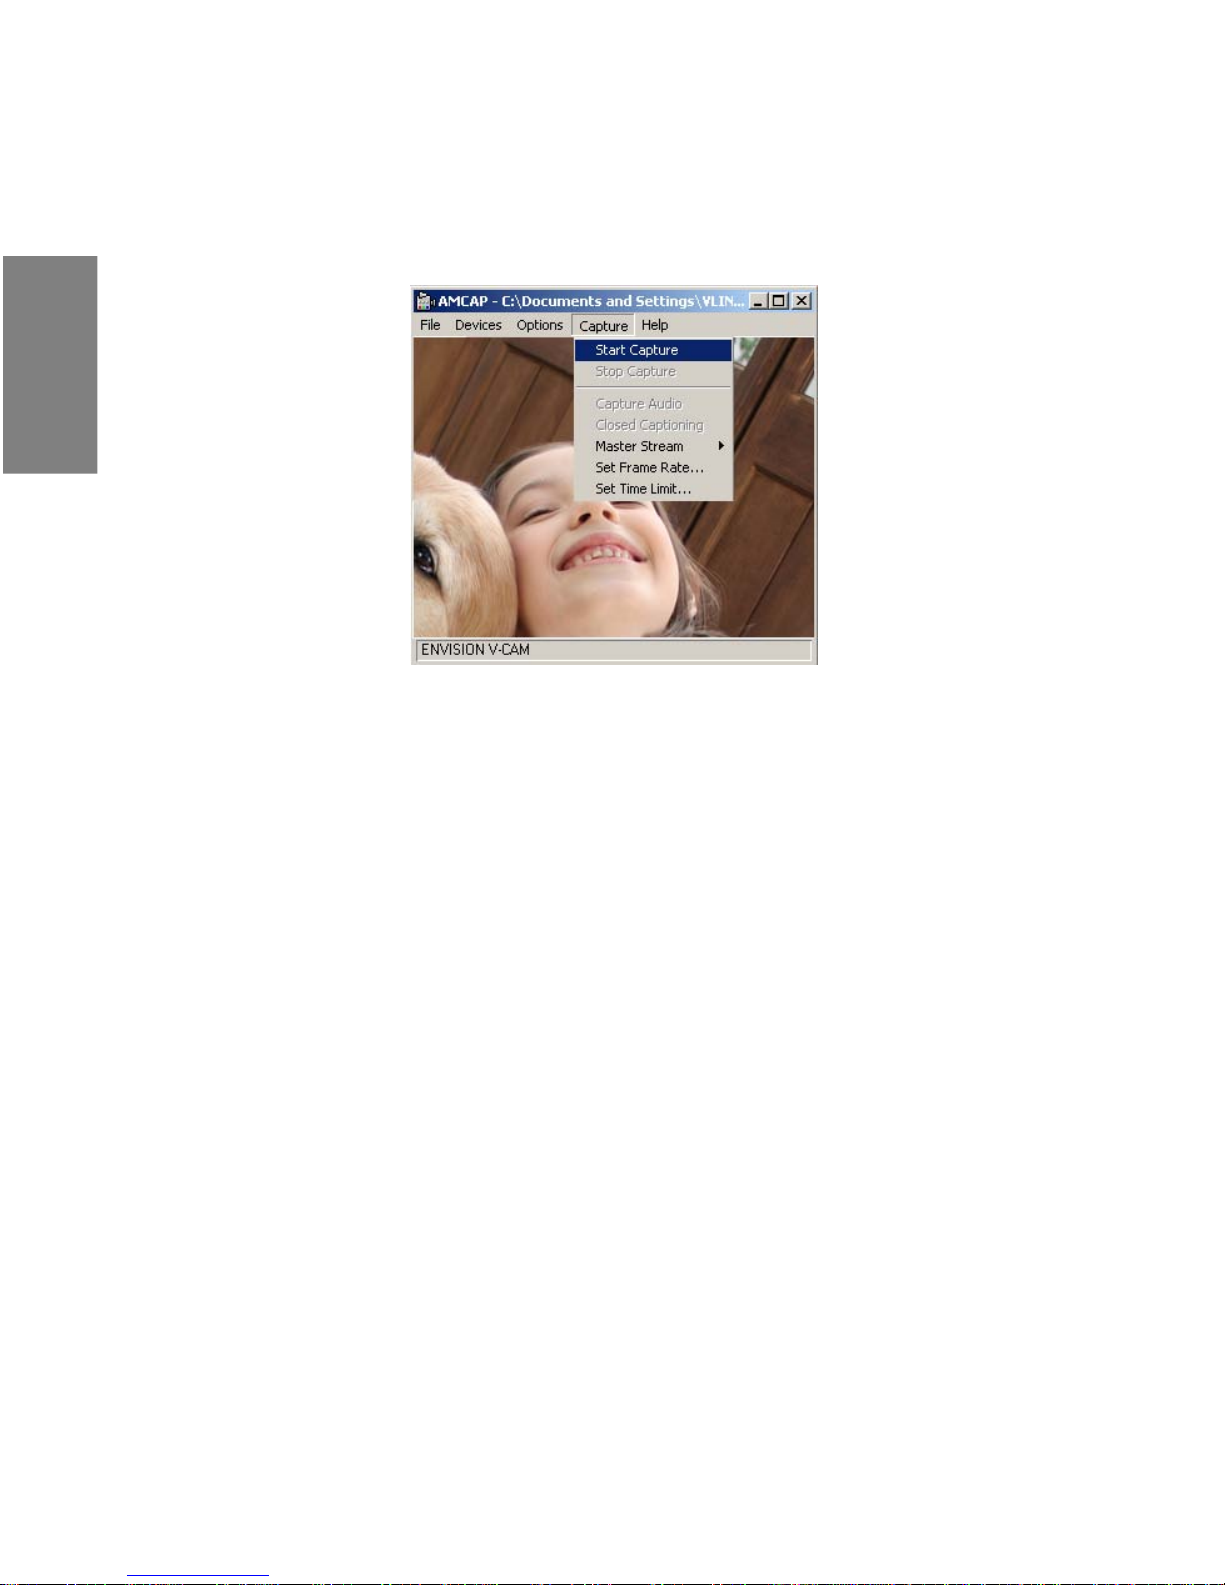
RECORDIN G A VIDEO – Cont inued
3. To start recording, select Capture → Start Capture. If a file was not set in
Steps 1 and 2 above, enter a file name and se t the amount of disk space
as described above. Clic k OK in the Ready to Capture dia log box to start
recording.
4. Recording will stop when the file has reached the size limit that was set in
Step 2.
5. To stop the recording early before the file size limit has been reached,
select Capture → Stop Capture.
6. The recorded video can be viewed using Windows Media Player .
7. To record another video, follow Steps 1 and 2 above to set another file name.
Otherwise, the new re cor din g will o verw rite th e previou sly saved vide o.
NOTE: Recording a video can take up a significant percentage of system
resources, including the CPU, memory, and hard disk usage. Select ing a lower
resolution will help reduce resource usage and result in a smoother recorded
video.
11
English
Page 13
ADVANCED FEATURES
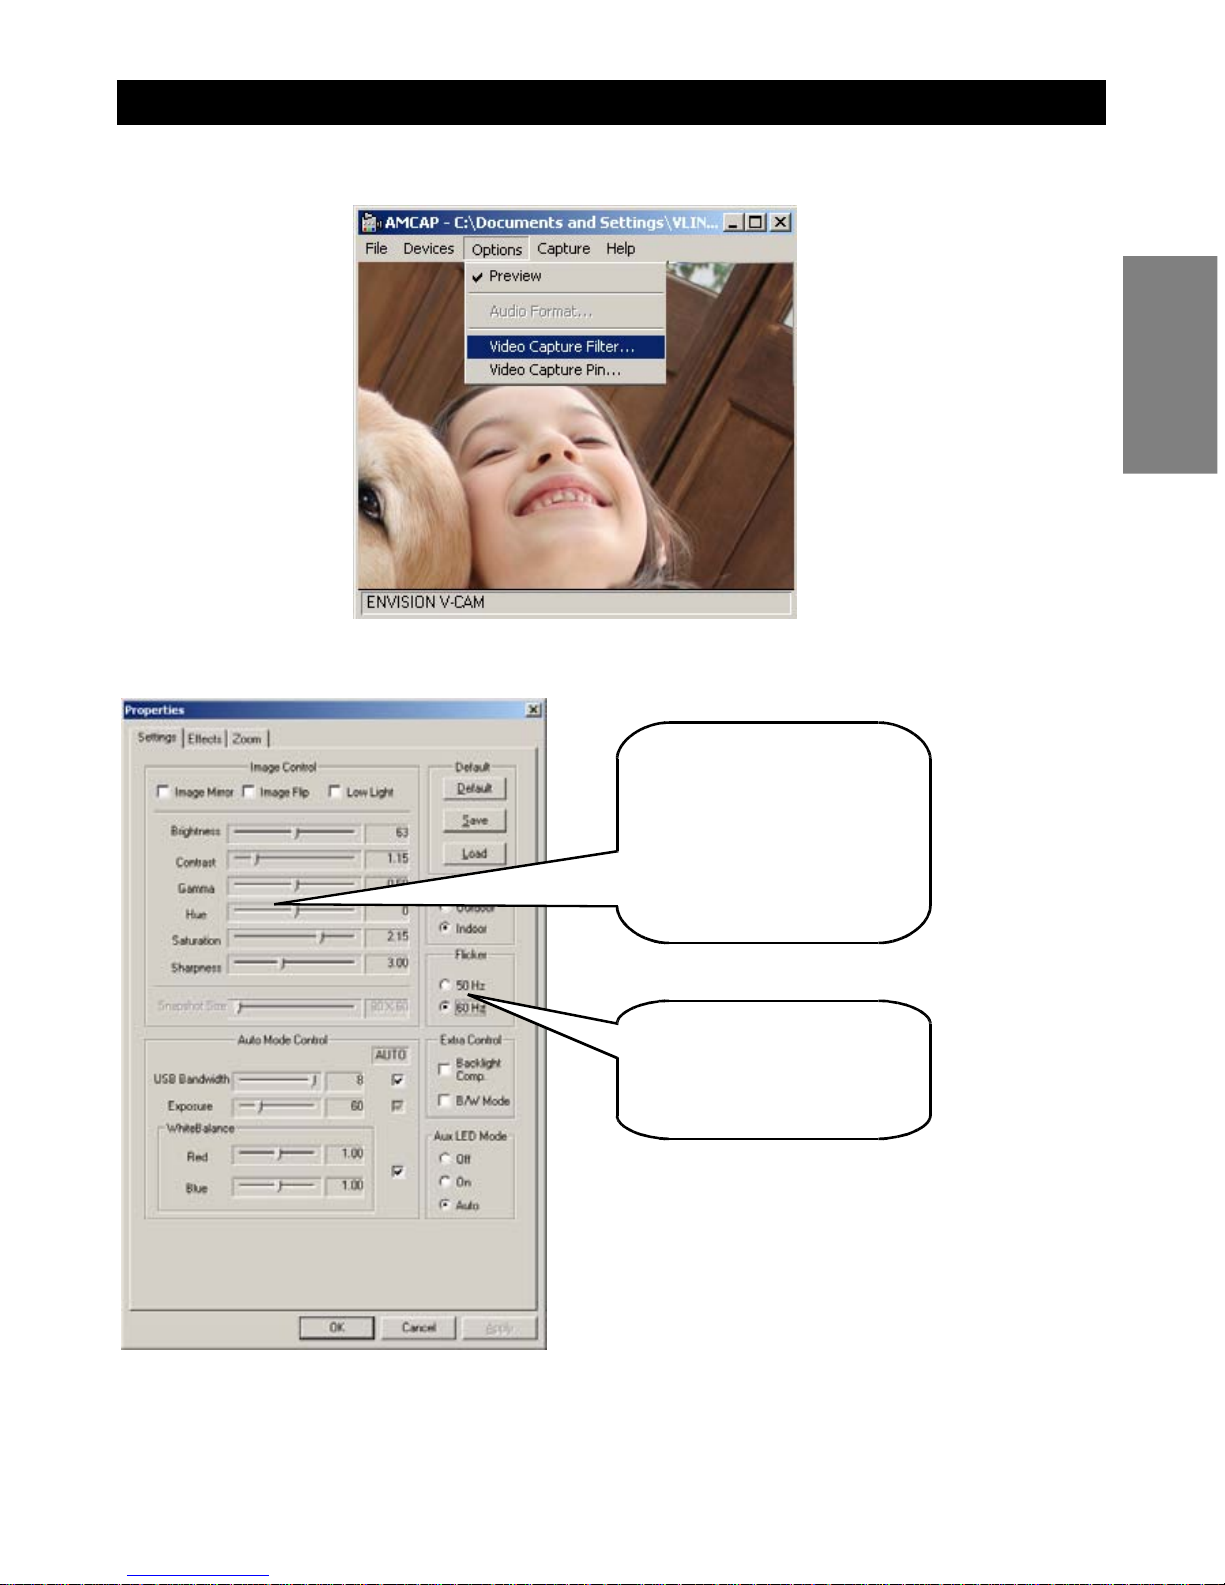
To access the advanced featur es, sele ct Options → Video Fil ter Pin
Settings Tab
12
A
djust the Brightness,
Contrast, Saturation,
Sharpness, etc. to suit
your personal
preferences
Set the Flicker to 60Hz
if in North Americ a and
50Hz if in Europe.
English
Page 14

ADVANCED FEATURES – Settings Tab – Continued
• Image Mirror – Changes into mirror image.
• Image Flip – Turns the image upside down.
• Low Light – Optimizes the image in low-light situations
• In/Out Door – Optimizes the image for indoor or outdoor lighting.
• USB Bandwidth – Decreasing the value will leave more bandwidth for
other USB devices, but will slow down frame rate. Leaving the Auto box
checked is recommended.
• Exposure – Adjusts the ex posure time o f the image s ensor. Increasing
exposure will slow down frame rate. Leaving the Auto box checked is
recommended.
• White Balance – Increase/decrease the amount of Red color and
increase/decrease the am ount o f Blue color in the image for manual white
balance adjustment. Leaving the Auto box checked is recommended.
• Flicker – Helps to reduce image flicker when V-Cam is used under
fluorescent lighting. Select the value that most closely matches you r local
electrical AC frequency. For North America, choose 60Hz.
• Backlight Comp. – Check this bo x to enable backlight compensation in
situations where there is strong light in the background, such as when
there is a sun-lit window behind you.
• B/W Mode – Check this box to set the image in black and white mode.
• Auto LED Mode – Changing these settings will have no effect since this
particular webcam model does not have LED functions.
• Default – Click on this button to restore all values in the Settings tab to
default factory settings.
• Save – Saves the current settings to the camera. Previously saved settings
will be overwritten.
• Load – Loads the most recently saved settings.
13
English
Page 15
ADVANCED FEATURES –Effects Tab – Continued
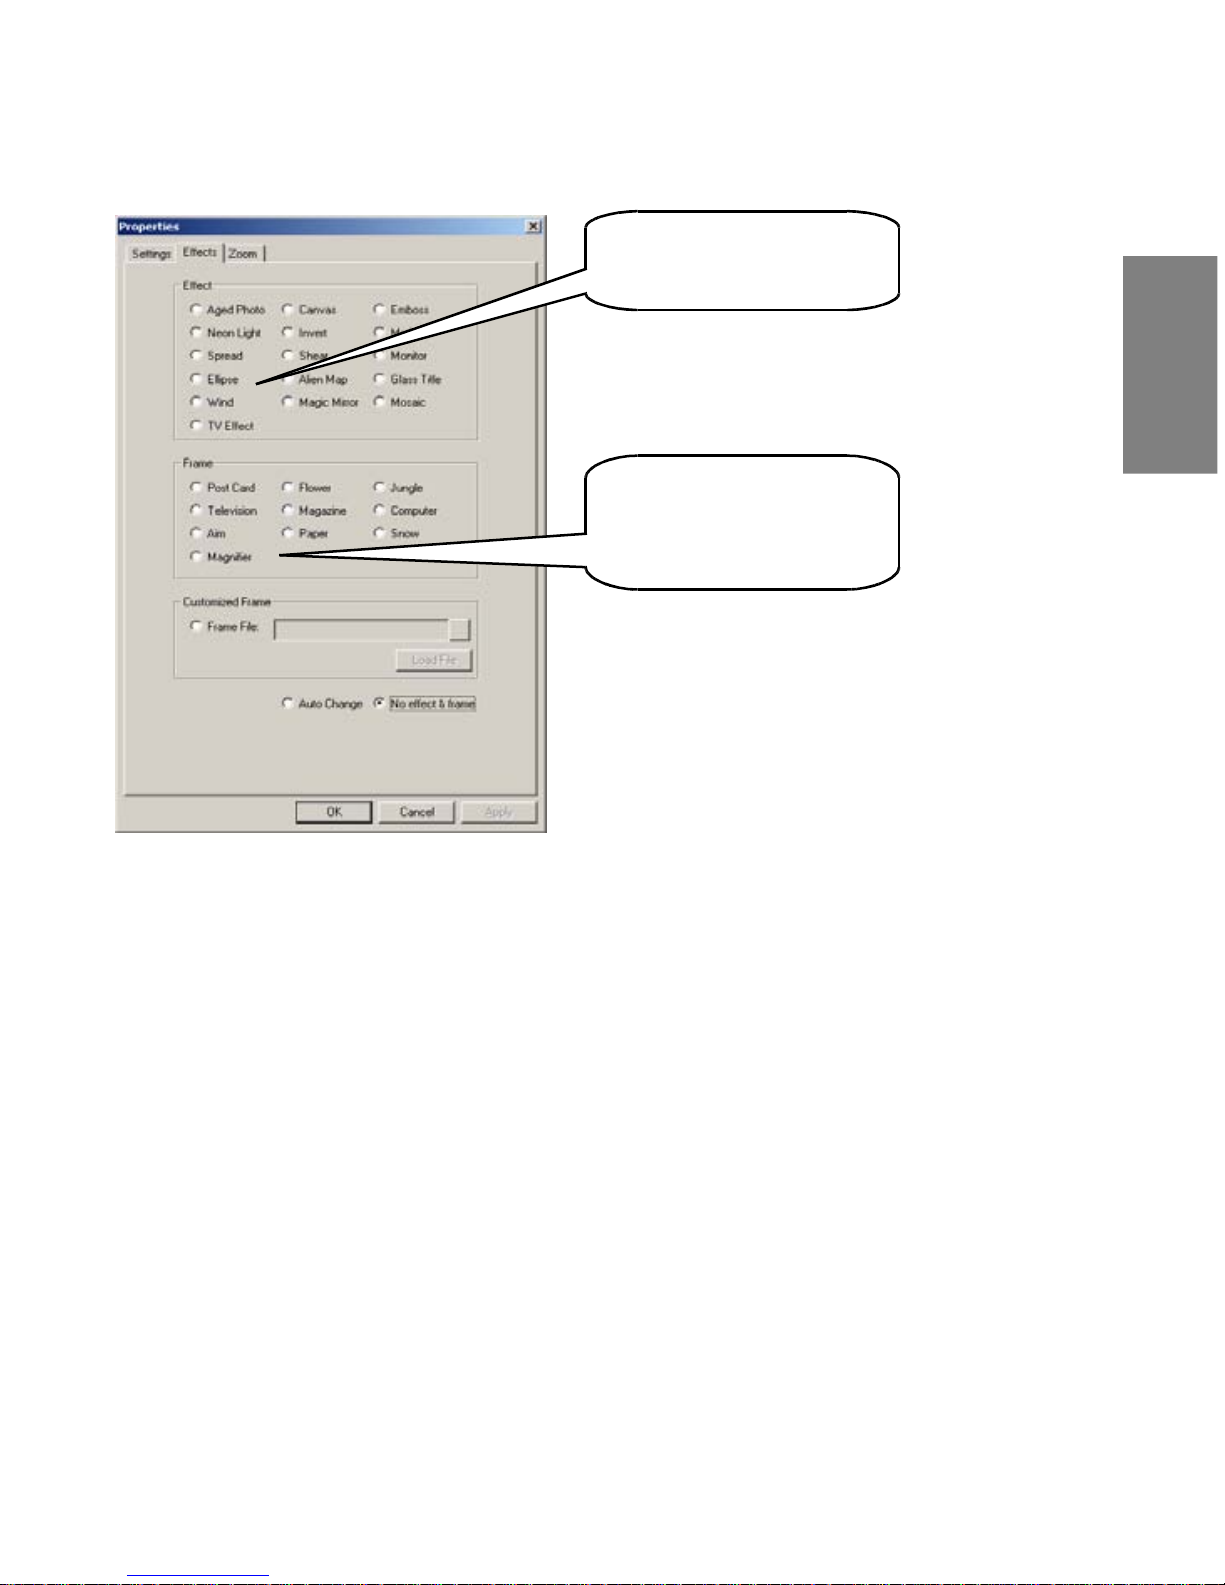
Effects Tab
• Customized Frame – Use a custom g raphic overlay on the video image.
Select the Frame File radio button, clic k on (…) to brows e for your graphic
file, and then click on the Load File button. The graphic file should be a
bitmap (BMP) and VGA (640 x 480) or lower in resolution.
• Auto C ha nge – Automatically cycle through each of the Effect and Frame
selections every few seconds.
• No effect & frame – turns off any selected Effect or Frame.
14
Select special effects
and picture dis tortions.
Selec t frames and
graphic overlay s to
add to the video image.
English
Page 16
ADVANCED FEATURES –Zoom Tab – Continued
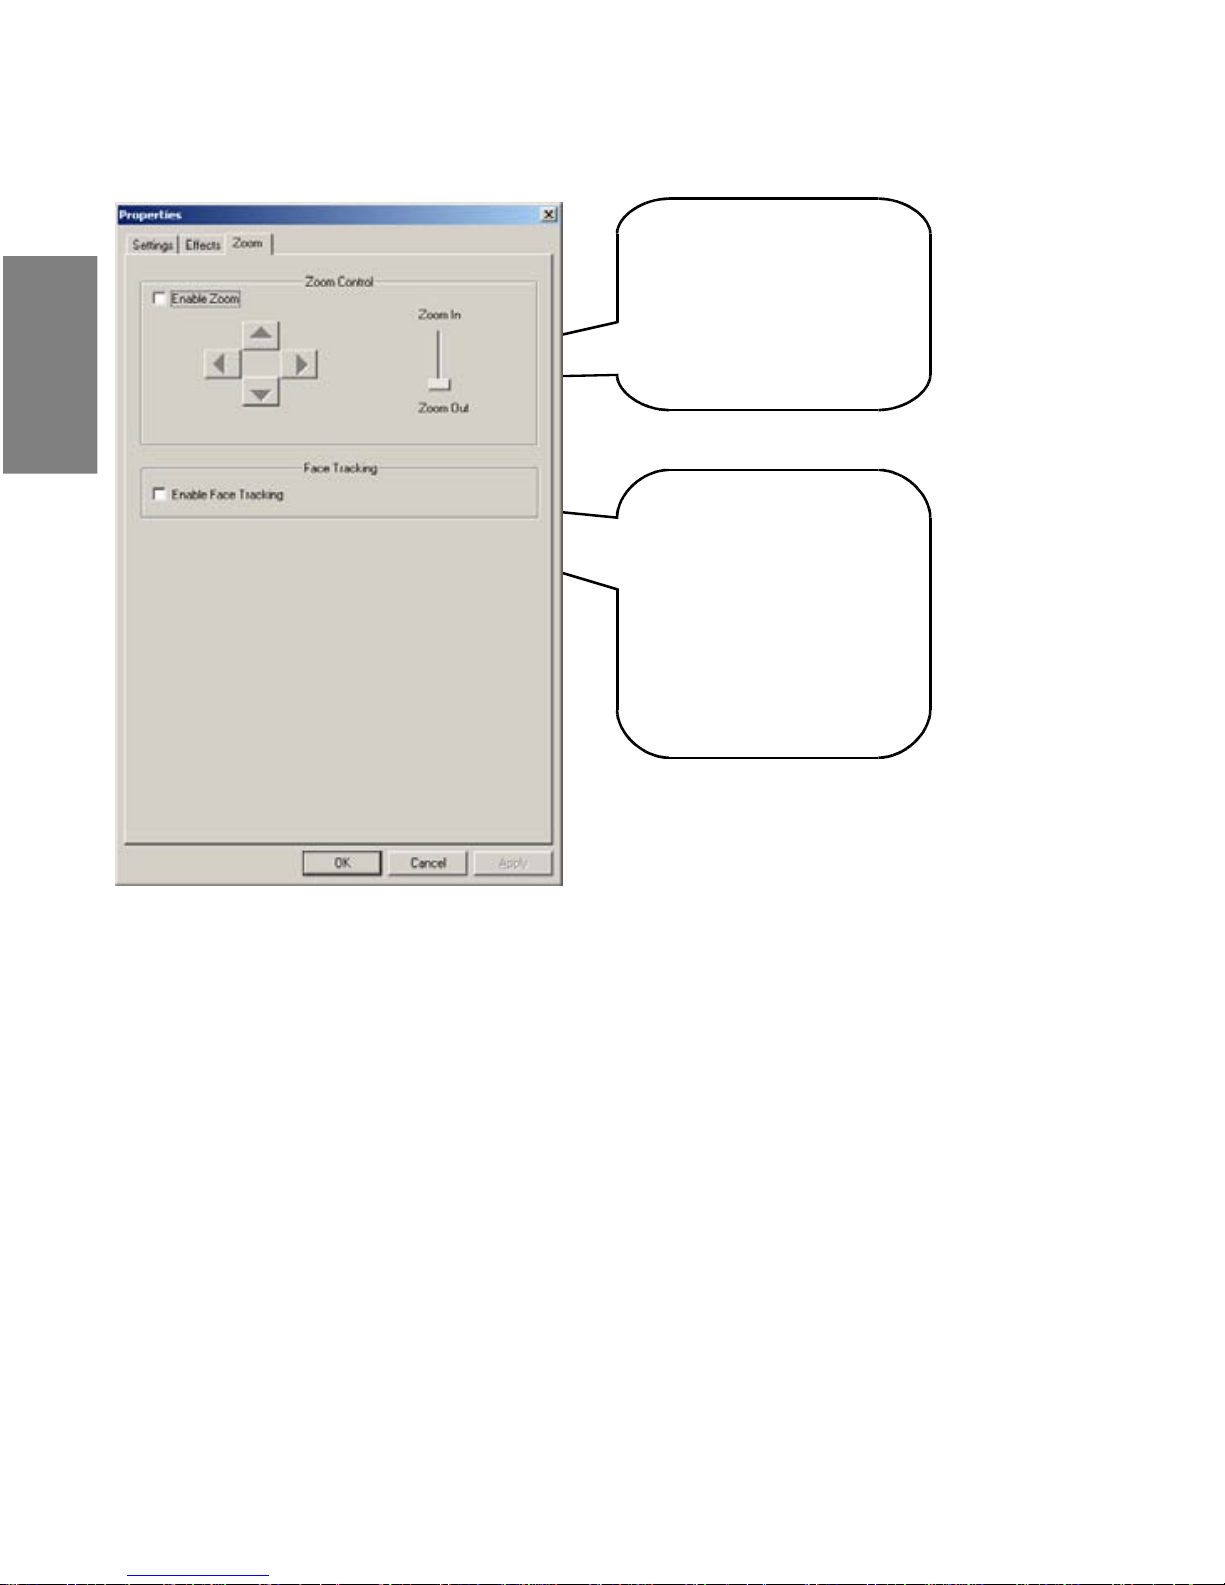
Zoom T ab
NOTE: Certain advanced features are not available at higher video resolutions.
Effect, Frame, Zoom Control, and Fac e Tracking are enabled only in re solutions
640x480 and below. Furthermore, Effect and Frame settings are not available if
Zoom Control or Face Tracking is enabled.
15
Enables digital z oom.
Use the arrow buttons
to pan around the
image, and the slider
bar to zoom in and out.
Enables face tracking.
The camera w ill detect
your face and digitally
zoom in and
automatically pans the
image to keep y ou
face within view.
English
Page 17
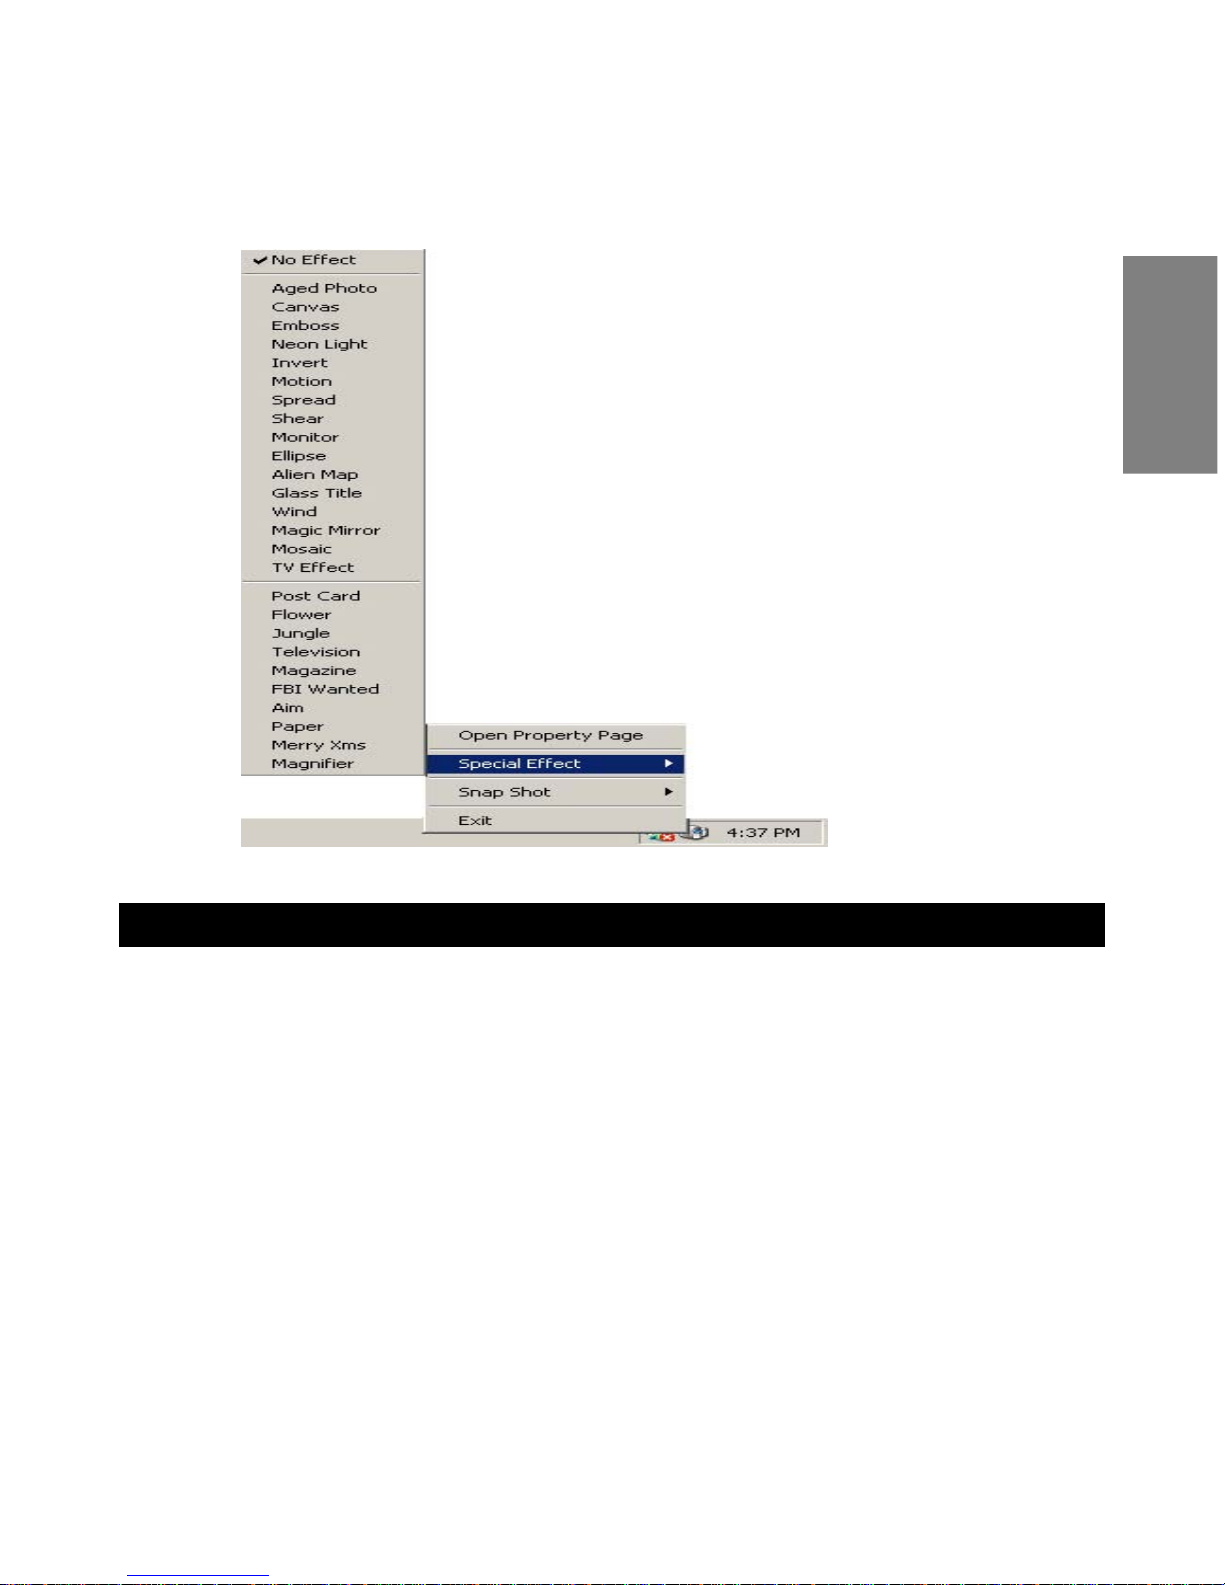
ADVANCED FEATURES – Continued
The advanced settings can also be accomplished simply by right -clicking on the
Camera Icon in the Taskbar.
CAUTION
• If V-Cam becomes hot after being on for a long period of time, please
stop the camera for a short while.
• Avoid touching the len s with your hands or with sha rp or coarse objects.
Use a clean soft cloth for cleaning.
• Do not use V-Cam in extremely hot, cold, dusty, or humid environments.
• Avoid dropping V-Cam as much as possible. Severe drops may damage
the lens, cause camera malfunction, or scratch the surface.
16
English
Page 18

WARRANTY
Envision warrants this product to be free from defects in material and workmanship for a period of one (1)
year for parts & labor after the original date of consumer purchase. During this period, Envision will, at its
option, either repair the defective product with new or rebuilt parts, or replace it with a new or rebuilt
product at no charge except as stated below. The parts or product that are replaced become the property
of Envision
This limited warranty does not cover any losses or damages that occur as a result of: shipping or improper
installation or maintenance; misuse; neglect; any cause other than ordinary commercial or industrial
application; adjustm ent by no n-au tho rized s ou rce; rep air, modif icat ion, o r inst alla tion of options or parts by
anyone other than an EnvisionBrand Authorized Service Center; improper environment; excessive or
inadequate heating or air conditioning or electrical power failures, surges, or other irregularities.
This one-year limited warranty does not cover any of the product’s firmware or hardware that you or any
third party ha ve modified o r altered; you bear the sole respo nsibility and liability for any such modificati on
or alteration.
ALL EXPRESS AND IMPLIED WARRANTIES FOR THIS PRODUCT (INCLUDING THE WARRANTIES OF
MERCHANTABILITY AND FITNESS FOR A PARTICULAR PURPOSE) ARE LIMITED IN DURATION TO A
PERIOD OF ONE (1) YEAR FROM THE ORIGINAL DATE OF CONSUMER PURCHASE. NO
WARRANTIES (EITHER EXPRESSED OR IMPLIED) APPLY AFTER THIS PERIOD. IN THE UNITED
STATES OF AMERICA, SOME STATES DO NOT ALLOW LIMITAT IONS ON HOW LONG AN IMPLIED
WARRANTY LASTS, SO THE ABOVE LIMITATIONS MAY NOT APPLY TO YOU.
ENVISI ON’S OBL IGATIONS AND YOUR REMEDI ES HERE UNDER ARE SOLE LY AND EXCL USIVELY
AS STATE D HERE. ENVISION’S LIA BILITY, W HETHER BASED ON CONTRACT, TORT, WARRANTY,
STRICT LIA BILIT Y, OR OT HER THEORY, SHALL NOT EXCEE D THE P RICE O F THE IND IVID UAL UNIT
WHOSE DEFECT OR DAMAGE IS THE BASIS OF THE CLAIM. IN NO EVENT SHALL Envision
Peripherals, Inc. BE LIABLE FOR ANY LOSS OF PROFITS, LOSS OF USE OR FACILITIES OR
EQUIPMENT OR OTHER INDIRECT, INCIDENTAL, OR CONSEQUENTIAL DAMAGE. IN THE UNITED
STATES OF AMERICA, SOME STATES DO NOT ALLOW THE EXCLUSION OR LIMITATION OF
INCIDENTAL OR CONSEQUE NTIAL DAMAG ES, SO THE ABOVE LIMITAT ION MAY NOT APPLY TO
YOU. ALT HOUGH THIS LIMITED WARRANTY GIVES YOU SPECIFIC LEGAL RIGHTS, YOU MAY HAVE
OTHER RIGHTS WHICH MAY VARY FROM STATE TO STATE.
17
English
Page 19

NOTES
Date code: Mar. 6, 2007 Version 3.12
18
English
Page 20

CONFORMIDAD DE LA FCC
Conformidad de la FCC y declaración consultiva. Este dispositivo de hardware se conforma con la
parte 15 de las regla s de la FCC. La ope ración está conf orme a las do s condicion es siguiente s: 1) este
dispositivo puede no causar interferencia dañosa, y 2) este dispositivo debe aceptar cualquier interferencia
recibida, incluyendo interferencia que pueda causar la operación indeseada. Este equipo se ha probado y
se ha en con trado pa ra c onf ormarse con lo s lím ites para un di spositi vo digit al de l a clas e B , confo rme a la
parte 15 de las reglas de la FCC. Estos límites se diseñan para proporcionar la protección razonable
contra interferencia dañosa en una instalación residencial. Este equipo genera, las aplicaciones, y puede
irradiar energía de la radi of recuencia y, si no instalado o utilizado de acuer do con las instr ucciones, puede
causar interferencia dañosa a las comuncaciones por radio. Sin embargo, no hay garantía que
interferencia no ocurrirá en una instalación particular. Si este equipo causa interferencia dañosa a la radio
o la recepción de televisión, que puede ser determinada girando el equipo apagado y, se anima al usuario
que intente corregir la interferencia por una o más de las medidas siguientes: 1) reorienta o vuelve a poner
la antena de recepción; 2) aumenta la separación entre el equipo y el receptor; 3) conecta el equipo con
un enchufe en un circuito diferente de el con las cuales el receptor esté conectado; 4) consulta al
distribuidor o a técnico experimentado de radio/TV para la ayuda. Cualesquiera cambios o modificación no
no expreso aprobados por el partido responsable de conformidad podían anular la autoridad del usuario
para funcionar el equipo. Donde los cables de interfaz blindados se han proporcionado el producto o los
componentes o l os accesorio s adicionales e specificado s a otra parte definidos para ser utilizado con la
instalación del produc to , deben ser uti l iz ad os para as eg urar conf ormidad con regulaciones de la FCC.
©2007 Envision Peripherals, Inc. Todos los derechos reservados.
Todas las especificaciones están conforme a cambio sin el aviso. Algunos cuadros son simulaciones y no
son tiros reales de la pantalla.
La insignia de Envision y la V-Cam son marcas registradas de Envision Peripherals, Inc. El resto de las
marcas de fábrica son las marcas registradas de sus sostenedores respectivos.
19
Page 21

INTRODUCCIÓN
Gracias por comprar la Envision V-Cam, una cámara fotográfica de alto
rendimiento de la tela (webcam). La V-Cam produce las imágenes de alta
calidad con gracias lisos de las tarifas del marco a su sensor de la imagen de
1.3-Megapixel Cmos y compatibilidad de alta velocidad del USB 2.0.
CARACTERÍSTICAS Y ESPECIFICACIONES
• Sensor de la imagen de 1.3-Megapixel Cmos
• Resolución video máxima: 1280 x 1024
• Todavía del máximo resolución de la imagen: 2304 x 1728 (software
realzado)
• Modos video: RGB24, I420
• Tarifas del capítulo: 30fps en 640 x 480, 15fps en 1280 x 1024
• Interfaz: High-Speed USB 2.0, al revés compatible con USB 1.1
• Cociente de la señal/interferencia: 48dB
• Gama dinámica: 72dB
• Foco de la imagen: os 20cm al infinito
• AWB (Equilibrio Automático De la Blancura)
• AE (Exposición Automática)
• Lente del elemento 5-glass (5G)
• El seguir automático de la cara
REQUISITOS DEL SISTEMA
• Windows 2000, Windows. XP, o Windows Vista
• Mínimo: Pentium 4 1.4GHz de Intel o 1GHz de AMD Athlon
• Recomendado: Pentium 4 2.4GHz de Intel o más rápidamente
• Mínimo del RAM 128MB, por lo menos 256MB recomendado
• 200MB liberan el espacio de la impulsión dura
• Impulsión de CD-ROM
• Adaptador de exhibición 16-bit de color
• USB disponible 1.1 o puerto de alta velocidad del USB 2.0
• NOTA: Windows 2000 Service Pack 4 con DirectX 9.0 instalado o
Windows XP Service Pack 2, y el USB High Speed 2.0 se r equieren pa ra
el vídeo 1.3-Megapizel y la foto.
20
Español
Page 22

INSTALACIÓN DE LOS CONTROLADORES – Windows
2000 / XP
No enchufe la V-Leva en puerto del USB antes de instalar los
controladores.
Si se enchufa la V-Leva ya, desenchúfela por favor y siga los pasos abajo.
El CD del mismo tamaño se puede cargar en todas las impu lsione s de CDROM. Mini-CD se pued e utilizar solamente con las im pulsiones típicas del
bandeja-cargamento.
Si usted tiene un mini-CD, no lo inserte en impulsiones de CD-ROM del ranuracargamento; en lugar, visite por favor www.ENVISIONdisplay.com
para
descargar los controladores.
1. Inserte el Driver/App lication CD en el CD-ROM. La pantalla del chapoteo
aparecerá. Alternativomente, abra la impulsión directamente y el dobletecleo autorun.exe para car gar la pantalla del chapoteo. De la pantalla del
chapoteo selecta INSTALL DRIVER después seleccione V-CAM.
2. En el mago de la instalación, el tecleo Install y sigue onscreen
instrucciones de instalar usos del conductor y del software.
NOTA: Si apa rece la caja d e diálogo Digital Signature Not Found o Not
Passed Windows Logo Testing, satisfaga eligen la opción para cont inuar
con la instalación.
21
Español
Page 23

INSTALACIÓN DE LOS CONTROLADORES – Windows 2000 / XP –
Continuados
3. Cuando el mago de la instalación ha terminado, chasque Finish para salir
del mago.
4. Tape la V-Leva en puerto del USB. El sistema detectará el dispositivo y
terminará la instalación automáticamente. Cuando la instalación ha
terminado con éxito, el icono de la cámara fotográfica en el Taskbar
demostrará que la " Web Camera is plugged in "
NOTA: Si la nueva caja de diálogo Found New Hardware Wizard aparece
cuando la V-Cam se tapa en el puerto del USB para la primera vez, primero
seleccione No, not this time cuando está preguntado si conectar con la
actualización de Win dows con la búsqueda para el software. Después, selecto
Install the software automatically (Recommended).
22
Español
Page 24

INSTALACIÓN DE LOS CONTROLADORES – Windows 2000 / XP –
Continuados
Siga onscreen instrucciones. Si aparece la caja de diálogo Digital Signature
Not Found o Not Passed Windows Logo Testing, satisfaga eligen la opción
para continuar con la instalación. Cuando el mago ha terminado, chasque
Finish para salir.
Cuando la instalación ha terminado con éxito, el icono de la cámara fotográfica
en el Taskbar demostrará que la " Web Camera is plugged in".
INSTALACIÓN DE LOS CONTROLADORES – Windows
Vista
No enchufe la V-Leva en puerto del USB antes de instalar los
controladores.
Si se enchufa la V-Leva ya, desenchúfela por favor y siga los pasos abajo.
El CD del mismo tamaño se puede cargar en todas las impu lsione s de CDROM. Mini-CD se pued e utilizar solamente con las im pulsiones típicas del
bandeja-cargamento.
Si usted tiene un mini-CD, no lo inserte en impulsiones de CD-ROM del ranur acargamento; en lugar, visite por favor www.ENVISIONdisplay.com
para
descargar los controladores.
1. Inserte el Driver/App lication CD en el CD-ROM. La pantalla del chapoteo
aparecerá. Alternativomente, abra la impulsión directamente y el dobletecleo autorun.exe para car gar la pantalla del chapoteo. De la pantalla del
chapoteo selecta INSTALL DRIVER después seleccione V-CAM.
NOTA: Si An un identified p rogram wants access to you computer la caja
de diálogo aparece, elige Allow.
23
Español
Page 25

INSTALACIÓN DE LOS CONTROLADORES – Windows Vista –
Continuados
2. En el mago de la instalación, el tecleo Install y sigue onscreen
instrucciones de instalar usos del conductor y del software.
3. Cuando el mago de la instalación ha terminado, tecleo Finish a salir.
NOTA: Si una caja de diálogo aparece que pide Would you like to install
this device software?, elegir Install.
24
Español
Page 26

INSTALACIÓN DE LOS CONTROLADORES – Windows Vista –
Continuados
4. Tape la V-Leva en puerto del USB. El sistema detectará el dispositivo y
terminará la instalación automáticamente. Cuando la instalación ha
terminado con éxito, el icono de la cámara fotográfica en el Taskbar
demostrará que la " Web Camera is plugged in "
NOTA: Si una caja de diálogo aparece que te informa que Windows needs
to install driver software for you ENVISION V-VAM, elegir Locate and
install drive r software (recommended) . Si Windows needs your permission
to continue la caja de diálogo aparece, elige Continue.
Cuando se termina la instalación del conductor, el icono de la instalación
en el Taskbar demostrará, “ENVISION V-CAM, Devise driver software
installed successfully”.
El icono de la cámara fotográfica en el Taskbar también demost rará que
la“Web Camera is plugged in”.
25
Español
Page 27

VERIFICAR LA INSTALACIÓN
Windows 2000 / XP
1. Enchufe la V-Cam en puerto del USB. El icono de la cámara
fotográfica en el Taskbar debe demostrar que la " Web Camera is
plugged in ".
2. Derecho-tecleo en el icono de My Computer en el tablero del
escritorio o el menú de Windows Start. Del menú que aparece,
seleccione Properties.
3. La caja de diálogo de System Properties, chasque encendido la
lengüeta del Hardware, después chasque encendido a Device
Manager.
4. Chasque encendido (+) la muestra al lado de icono de Imaging
devices, y cerciórese de que ha y una entrada para " ENVISION VCAM "
Windows Vista
1. Enchufe la V-Cam en puerto del USB. El icono de la cámara
fotográfica en el Taskbar debe demostrar que la " Web Camera is
plugged in ".
2. Derecho-tecleo en el icono de la Computer en el tablero del
escritorio o el menú de Windows Start. Del menú que aparece,
seleccionar las Properties.
3. En la ventana que aparece, la mirada en el cristal i zqu ierdo bajo Tasks
y chasca encendido a Device Manager.
4. Chasque encendido (+) la muestra al lado de icono de Imaging
devices, y cerciórese de que ha y una entrada para " ENVISION VCAM "
USAR LA ENVISION V-CAM
26
Español
Page 28

1. Izq uierdo-doble-tecl eo en el icono de la cámara fotog ráfica en el Taskbar
para lanzar el uso video del aparato de lectura. Alternativomente:
Windows 2000/XP: tecleo Start → Programs → ENVISION V-CAM →
AMCap
Windows Vista: tecleo Start → All Programs o Programs → ENVISION V-
CAM → AMCap
2. Si aparece ningún vídeo, se cerciora de las Options → Preview se
comprueba para permitir ap ara to de lectu ra vide o vivo
NOTA: Si usted desea utilizar la V-Cam co n programas de la charla del Internet
tales como mensajero de Yahoo!® Messenger, Windows Live
TM
or MSN®
Messenger, or Skype
TM
, cierre por favor el uso video del apa rato de lec tura de
AMCap seleccionando File → Exit. Siga las instru cciones de su uso de la c harla
para permitir funciones del webcam.
AJUSTE DEL FOCO
El foco de la lente de cámara fotográfica puede se r ajustado manualmente
dando vuelta al anillo de plata del foco a la derecha o a la izquierda. La lente
puede enfocarse a partir de la 8"(los 20cm) al infinito.
27
Español
Page 29

RESOLUCIÓN VIDEO QUE CAMBIA
Para cambiar la resolución video viva, seleccione Options → Video Capture Pin.
En la caja de diálogo de Properties, seleccione la resolución dese ada de la caja
drop-down del Output Size.
NOTA: Windows 2000 Service Pack 4 con DirectX 9.0 instalado o el
Windows.XP Service Pack 2, y el High-Speed USB 2.0 se requieren para las
resoluciones sobre 640 x 480.
TOMAR UNA FOTO
1. Con el funcionamiento video del uso del aparato de lectura, el derecho-
tecleo en el icono en el Taskbar, seleccionar Snapshot, entonces
selecciona la resolución deseada de la foto.
28
Español
Page 30

TOMAR UNA FOTO – Windows Vista – Continuados
NOTA: La resolución disponible de la foto depende de la reso lución video
actualmente seleccionada. Usted puede tomar siempre una foto en la
misma resolución que la resolución video actual. Además, para ciertas
resoluciones video, las resolucione s realzadas software de la foto pueden
estar disponibles.
2. Todavía el uso de la imagen se abre cuando encaje a presión el tiro se
toma. Ahorrar la imagen, del menú superior, selecciona File → Save As.
REGISTRACIÓN DE UN VÍDEO
1. Cerciórese de que el uso video vivo del aparato de lectura esté
funcionando. Después, fije el archivo a el cual el v ídeo será ahorrad o. Del
menú superior, seleccione File → Set Capture File.
29
Español
Page 31

REGISTRACIÓN DE UN VÍDEO – Cont inua d o s
2. En la caja de diálogo del sistema del Set Capture File incorpore un nombre
de fichero con la extensión AVI, por ejemplo "samplevideo.avi", entonces
chascan Open. En la caja de diálogo del sistema del Set File Size,
incorpore la cantidad de espacio de disco para poner a un lado para la
captura video y después para chascar OK.
3. Para comenzar a registrar, captura selecta Capture → Start Capture. Si un
archivo no fue fija do en los pasos 1 y 2 arriba, incorpo re un nombre del
archivo y fije la cantidad de espacio de disco según lo descrito arriba.
Chasque OK en el Ready to Capture la caja de diálogo para comenzar a
registrar.
4. La grabación parará cuando el archivo ha alcanzado el límite del tamaño
que fue fijado en el paso 2.
5. Para parar la grabación temprano antes de que se haya alcanzado el
límite del tamaño del archivo, seleccione Capture → Stop C ap t ur e.
6. El vídeo registrad o se p ued e ve r u s an do Windows Media Play er.
7. Para registrar otro vídeo, siga los pasos 1 y 2 arriba para fijar otro nombre
del archivo. Si no , la nueva grabación sobre escribirá el vídeo previamente
ahorrado.
30
Español
Page 32
REGISTRACIÓN DE UN VÍDEO – Cont inua d o s
NOTA: L a registración de un víde o puede tomar un porcent aje significativo de los
recursos de sist ema, incluyendo la CPU, la m emoria, y el uso del disco duro .
Seleccionar u na resolución más baja ayud ará a reducir al mínimo uso y resu ltad o
del recurso en un vídeo registrado más liso.
CARACTERÍSTICAS A VANZADAS
Para tener acceso a las características avanzadas, seleccione Options → Video
Filter Pin.
31
Español
Page 33

CARACTERÍSTICAS AV ANZADAS – Continuados
Lengüeta de Settings
• Image Mirror – Cambios en imagen del espejo
• Image Flip – Vueltas el upside de la imagen abajo
• Low Light – Optimiza la imagen en situaciones de la bajo-luz
• In/Out Door – Optimiza la imagen para la iluminación de interior o al aire
libre
• USB Bandwidth – Disminuir el valo r dejará más anchura de banda para
otros dispositivos del USB, pero retrasará tarifa del marco. Se recomienda
dejar la caja Auto comprobada.
• Exposure – Ajusta la época de la exposición del sensor de la imagen. La
exposición de aumento retrasará t arifa d el marco. Se recomienda dejar la
caja Auto comprobada.
• White Balance – Increase/decrease la cantidad de color rojo y de
increase/decrease la cantidad de color azul en la imagen para el ajuste
blanco manual del balance. Se recomienda dejar la caja Auto comprobada
32
A
juste el brillo, el
contraste, la
saturación, la
agudeza, el etc. para
satisfacer sus
preferencias
personales
Fije el parpadeo a
60Hz si en
Norteaméric a y 50Hz
si en Europa.
Español
Page 34

CARACTERÍSTICAS AV ANZADAS – Continuados
• Flicker – Ayudas para reducir el parpadeo de la imagen cuando bajo
iluminación fluorescente. Seleccione el valor que empareja lo más de
cerca posible su frecuencia eléctrica local de la CA. Para Norteamérica,
elija 60Hz.
• Backlight Comp. – Compruebe esta caja para permitir la remuneración
del contraluz en situaciones donde h ay luz fuerte en el fondo, por ejemplo
cuando hay sol-encendio' la ventana detrás de usted.
• B/W Mode – Compruebe esta c aja para fijar la imagen en modo negro y
blanco.
• Auto LED Mode – Cambiar estos ajustes no tendrá ningún efecto puesto
que este modelo particular del webcam no tiene funciones del LED.
• Default – Chasque encendido est e botón para res taurar todos los valores
en la lengüeta de Settings a los ajustes de la fábrica del defecto.
• Save – Ahorra los ajustes actuales a la cámara fotográfica. Los ajustes
previamente ahorrados serán sobreescritos.
• Load – Cargas de los ajustes. lo más recientemente posible ahorrado.
Lengüeta de
Effects
33
Seleccionar los
efectos y las
distor siones
especiales del cuadro.
Seleccionar los
marcos y los
recubrimientos del
gráfico para agr egar a
la imagen v ideo
Español
Page 35

CARACTERÍSTICAS AV ANZADAS – Continuados
• Customized Frame – Utilice un recubrimiento gráfico de encargo en la
imagen video. Seleccione el botón de radio del Frame File, chasque
encendido (...) para hojear para su archivo gráfico, y después chasque
encendido el botón del Load File. El archivo gráfico debe ser una bitmap
(BMP) y VGA (640 x 480) o bajar en la resolución.
• Auto Change – Complete u n ciclo a utomát ica mente co n cada un o de l as
selecciones del Effect y del Frame cada pocos segundos.
• No effect & frame – Da vuelta apagado a cualesquiera selecciona Effect o
Frame.
Lengüeta de
Zoom
NOTA: Ciertas características avanzadas no es tán disponibles en resoluciones
video más altas. Effect, Frame, Zoom Control, y Face Tracking se permiten
solamente en las resoluciones 640x480 y abajo. Además, los ajustes del Effect
y del Frame no están disponibles si se permite la Zoom Control o el Face
Tracking.
34
Permite el zumbido
digital. Utilizar los
botones de la flecha
para filtrar alrededor
de la imagen, y la
barra del resbalador
para enfocar adentr o
y hacia fuera.
Permite seguir de la
cara. La cámara
fotográfica detectará
tu cara y digital
enfocará adentro y
filtra automáticamente
la imagen para
guardarte cara dentro
de la v isión.
Español
Page 36

CARACTERÍSTICAS AV ANZADAS – Continuados
Los ajustes avanzados se pueden también lograr simplemente por la derecha chascando en el icono de la cámara fotográfica en el Taskbar
PRECAUCIÓN
• Si la V-CAM llega a ser caliente después de ser encendido por un
período del tiempo largo, pare por favor la cámara fotográfica para
mientras que del cortocircuito.
• Evite de tocar la lente con sus manos o con los objetos agudos o
gruesos. Utilice un paño suave limpio para la limpieza.
• No utilice la V- CAM en los ambientes extremadamente calientes, fríos,
polvorientos, o húmedos.
• Evite de caer la V- CAM tanto como sea posible. Las gotas severas
pueden dañar la lente, causar el malfuncionamiento de la cámara
fotográfica, o rasguñar la superficie.
35
Español
Page 37

GARANTÍA
Envision las autorizaciones este producto para estar libre de defectos en material y la ejecución por un
período de un (1) año para las piezas y trabaje después de la fecha original de la compra del consumidor.
Durante este período, Envision, en su opción, cualquier reparación el producto defectuoso con las nuevas
o reconstruidas piezas, o substituirlo por un producto nuevo o reconstruido en ninguna carga excepto
según lo indica do ab ajo. Las p iez as o e l producto se s ubst it u ye n que s e conviert en en la caract e ríst i ca de
Envision.
Esta garantía limitada no cubre ningunas pérdidas o daños como resultado de los cuales ocurra: enviando
o instalación o mantenimiento incorrecta; uso erróneo; negligencia; cualquier causa con excepción del uso
comercial o industrial ordinario; ajuste por fuente no-autorizada; la reparación, la modificación, o la
instalación de opciones o de partes por cua lquier persona con excepción de una marca de fábrica de la
Envision autorizaron el centro de servicio; ambiente incorrecto; calefacción o faltas excesivas o
inadecuadas del aire acondi cio nad o o de la corriente eléctrica, oleadas, u otr as irreg ularidades.
Esta garantía limitada anual no cubre cualesquiera de los soportes lógico inalterable del producto o el
hardware que usted o cualquier tercero ha modificado o ha alterado; usted lleva la responsabilidad y la
responsabilidad únicas por cualquier modificación o alteración.
TODOS EXPRESAN E IMPLICARON Las GARANTÍAS PARA ESTE PRODUCTO (GARANTÍAS
INCLUYENDO Del MERCHANTABILITY Y La APTITUD PARA Un PROPÓSITO PARTICULAR) SE
LIMITAN EN La DURAC IÓN A un PE RÍODO De UN (1) AÑO A PARTIR De la FEC HA ORIG INAL De la
COMPRA De l CONSUMIDOR. NINGUNAS GARANTÍAS (EXPRESA DO O IMPLICA DO) SE APLICAN
DESPUÉS DE ESTE PERÍ ODO. EN LOS ESTADOS UNIDOS DE AMÉRICA, ALGUNOS ESTADOS NO
PERMITEN LIMITACIONES ENCE NDIDO CUÁNTO TIEMPO UNA GARANTÍA IMPLICADA DURA, ASÍ
QUE LAS LIMITACIONES ANTEDICHAS PUEDEN NO APLICARSE A USTED.
LAS OBLIGACIONES DE ENVISION Y SUS REMEDIOS ABAJO ESTÁN SOLAMENTE Y
EXCLUSIVAMENTE SEGÚN LO INDICADO AQUÍ. LA RESPONSABILIDAD DE ENVISION, ESTABA
BASADO EN EL CONTRATO, EL AGRAVIO, LA GARANTÍA, LA RESP ONSABILIDAD TERMINANTE, O
LA OTRA TEORÍA, NO EXCEDERÁ EL PRECIO DE LA UNIDAD INDIVIDUAL QUE DEFECTO O DAÑOS
ES LA BASE DE LA DEMANDA. NUNCA Envision Peripherals, Inc. SE A OBLIGADO PARA CUALQUIER
PÉRDIDA DE BENEFIC IOS, PÉRDIDA DE USO O LAS INSTALACIONES O EQ UIPO U OTRA DAÑOS
INDIRECTA, FORTUITA, O CONS ECUENTE. EN LOS ESTADOS UNIDOS DE AMÉRICA, ALGUNOS
ESTADOS NO PERMITEN LA EXCLUSIÓN O LA LIMITACIÓN DE DAÑOS FORTUITOS O
CONSECUENTES, ASÍ QUE LA LIMITACIÓN ANTEDICHA PUEDE NO APLICARSE A USTED. AUNQUE
ESTA GARANTÍA LIMITADA LE DA LAS DERECHAS LEGALES ESPECÍ FICAS, USTED P UEDE TENER
OTRAS DERECHAS QUE PUEDAN VARIAR DE ESTADO AL ESTADO.
Date code: Mar. 6, 2007 Version 3.12
36
Español
Page 38

CONFORMITÉ DE FC C
Conformité de FCC et rapport de Bulletin de renseignements. Ce dispositif câblé est confo rme à la
partie 15 des règles de FCC. L'opération est sujette aux deux conditions suivantes : 1) ce dispositif peut ne
pas causer l'interférence nocive, et 2) ce dispositif doit accepter n'importe quelle interférence reçue, y
compris l'interférence qui peut causer l'opération peu désirée. Cet équipement a été examiné et avéré pour
être conforme aux limites pour un dispositif numérique de la classe B, conformément à la partie 15 des
règles de FCC. Ces limites sont conçues pour assurer la protection raisonnable contre l'interférence nocive
dans une installation résidenti elle. Cet équipement se produit, des ut ilisations, et peut rayonner l'énergie de
fréquence par radio et, si non ins tallé ou ut ilisé selon le s instru ctio ns, peut cau ser l' inte rféren ce noci ve au x
communicat ion s par radio. Cependan t, il n'y a aucune garant ie qu e l'inte rfér ence ne se produi ra pas dans
une installation particulière. Si cet équipement cause l'interférence nocive à la radio ou la réception des
émissions télévisées, qui peut être déterminé e en mettant l'é quipement au loin et en marche, l'utilisateur
est encouragé à essayer de corriger l'interférence par un ou plusieurs des mesures suivantes : 1)
réorientent ou replac ent l'antenne de récepti on ; 2) augmentent la séparat ion entre l'équipement et le
récepteur ; 3) relient l'équipement à une sortie sur un circuit différent de celui auquel le récepteur est relié ;
4) consultent le revendeur ou un technicien expérimenté de radio/TV pour l'aide. Tous les changements ou
modifications pas expressément approuvés par la partie responsable de la conformité ont pu vider
l'autorité de l'utilisateur pour actionner l'équipement. Là où des câbles d'interface protégés ont été équipés
de produit ou composants ou accessoires additionnels indiqués ailleurs définis pour être employé avec
l'installation du produit, ils doivent être employés afin d'assurer la conformité aux règlements de FCC.
©2007 Envision Peripherals, Inc. Tous droits réservés.
Toutes les caractéristiques sont sujettes au changement sans communication préalable. Quelques images
sont des simulations et ne sont pas les projectiles réels d'écran.
Le logo d’Envision et la V-Cam sont des marqu es déposées d’Envision Peripher als, Inc.Toutes autres
marques sont les marques déposées de leurs supports respectifs.
37
Page 39

INTRODUCTION
Merci d'acheter l’Envision V-Cam, un appareil-photo à rendement élevé
d'enchaînement (webcam). Le V-Cam produit les images de haute qualité avec
grâce douce de taux d'armature à sa sonde d'image de 1.3- Megapixel C M OS et
compatibilité à grande vitesse d'USB 2.0.
DISPOSITIFS ET CARACTÉRISTIQUES
• Sonde d'image de 1.3-Megapixel CMOS
• Résolution visuelle maximum : 1280 x 1024
• De maximum toujours résolution d'image : 2304 x 1728 (logiciel augmenté)
• Modes visuels : RGB24, I420
• Taux de vue : 30fps à 640 x à 480, 15fps à 1280 x à 1024
• Interface : High-Speed USB 2.0, vers l'arrière compatible avec USB 1.1
• Rapport de signal-bruit : 48dB
• Gamme dynamique : 72dB
• Foyer d'image : 20cm à l'infini
• AWB (Équilibre Automatique De Blancheur)
• AE (Exposition Automatique)
• objectif de l'élément 5-glass (5G)
• Cheminement automatique de visage
CONDITIONS DE SYSTÈME
• Windows 2000, Windows XP, ou Windows Vista
• Minimum: Intel Pentium 4 1.4GHz ou AMD Athlon 1GHz
• Recommandé: Intel Pentium 4 2.4GHz ou plus rapidement
• Minimum de la RAM 128MB, au moins 256MB recommandé
• 200MB libèrent l'espace d'entraînement dur
• Commande de CD-ROM
• Adapteur de 16 bits d'ecran couleur
• Port disponible d’USB 1.1 ou High-Speed USB 2.0
• NOTE: Windows 2000 Service Pack 4 avec DirectX 9.0 installé ou
Windows XP Service Pack 2, et le High-Speed USB 2.0 sont exigés pour la
vidéo 1.3-Megapizel et l'instantané.
38
Français
Page 40

INSTALLATION DE PILOTE – Win dows 2000 / XP
Ne branchez pas dedans le V-CAM au port d'USB avant d'installer le pilote.
Si le V-Cam est déjà branchée, débranchez et suivez les étapes ci-dessous.
Le CD normal peut être chargé dans toutes les com mandes de CD-ROM.
Mini-CD peut seulement être employé a vec les commandes typiques de
plateau-chargement.
Si v ous avez un mini-CD, ne l'insérez pas dans des commandes de CD-ROM
de fente-chargement ; au lieu de cela, visitez www.ENVISIONdisplay.com
pour
télécharger le pilote.
1. Insérez le Driver/Application CD dans le CD-ROM . L'écran d'éclaboussure
apparaîtra. Alternativement, ouvrez la commande directement et doublecliquer autorun.exe pour charger l'écran d'éclaboussure. À partir de l'écran
d'éclaboussure choisi INSTAL L DRI V ER puis choisissez V-CAM. .
2. A l’assistant d'installation, cliquez Install et suivent onscreen des
instructions d'installer des applications de pilote et de logiciel.
NOTE: Si la Digital Signature Not Found ou Not Passed Windows Logo
Testing de dialogue apparaît, veuillez choisissez l'option pour continuer
l'installation.
39
Français
Page 41

INSTALLATION DE PILOTE – Windows 2000 / XP – Continuées
3. Quand l’assistant d'installation a accompli, cliquez Finish pour sortir
l’assistant.
4. Branchez le V-Cam au port d'USB. Le système détectera le dispositif et
accomplira l'installation automatiquement. Quand l'installation a accompli
avec succ ès, l'icône d'appareil-photo dans le Taskbar montrera que '" Web
Camera is plugged in ".
NOTE: Si le Found New Hardware Wizard apparaît quand le V-Cam est
branchée au port d'USB pour la première fois, choisissez d'abord No, not this
time où demandé si se relier à la mise à Windows Update à la recherche du
logiciel. Après, choisi Install the software automatically (Recommended).
40
Français
Page 42

INSTALLATION DE PILOTE – Windows 2000 / XP – Continuées
Suivez onscreen des instructions. Si la Digital Signature Not Found ou Not
Passed Windows Logo Testing de dialogue appar aît, veuillez choisir l'option
pour continuer l'installation. Quand l’assistant a accompli, cliquez Finish pour
sortir.
.
Quand l'installation a accompli avec succès, l'icône d'appareil-photo dans le
Taskbar montrera que "Web Camera is plugged in ".
INSTALLATION DE PILOTE – Windows Vista
Ne branchez pas dedans le V-CAM au port d'USB avant d'installer le pilote.
Si le V-Cam est déjà branchée, débranchez et suivez les étapes ci-dessous.
Le CD normal peut être chargé dans toutes les com mandes de CD-ROM.
Mini-CD peut seulement être employé a vec les commandes typiques de
plateau-chargement.
Si v ous avez un mini-CD, ne l'insérez pas dans des commandes de CD-ROM
de fente-chargement ; au lieu de cela, visitez www.ENVISIONdisplay.com
pour
télécharger le pilote.
1. Insérez le Driver/Application CD dans le CD-ROM . L'écran d'éclaboussure
apparaîtra. Alternativement, ouvrez la commande directement et doublecliquer autorun.exe pour charger l'écran d'éclaboussure. À partir de l'écran
d'éclaboussure choisi INSTAL L DRI V ER puis choisissez V-CAM.
NOTE: Si An unidentified program wants access to y ou co mputer la zone
de dialogue apparaît, choisit Allow.
41
Français
Page 43

INSTALLATION DE PILOTE – Windows Vista – Continuées
2. A l’assistant d'installation, cliquez Install et suivent onscreen des
instructions d'installer des applications de pilote et de logiciel.
3. Quand l’assistant d'installation a accompli, cliquez Finish pour sortir
l’assistant.
NOTE: Si une zone de dialogue semble demandante Would you like to
install this device software?, choisir Install..
42
Français
Page 44

INSTALLATION DE PILOTE – Windows Vista – Continuées
4. Branchez le V-Cam au port d'USB. Le système détectera le dispositif et
accomplira l'installation automatiquement. Quand l'installation a accompli
avec succ ès, l'icône d'appareil-photo dans le Taskbar montrera que '"Web
Camera is plugged in ".
NOTE: Si une zone de dialogue semble vous informant que Windows
needs to install driver software for you ENVISION V-VAM,, chois ir Locate
and install driver software (recommended). Si Windows needs your
permission to continue la zone de dialogue apparaît, choisit Continue.
Quand l'installation de conducteur est accomplie, l'icône d'installation
dans le Taskbar montrera, “ENVISION V-CAM, Devise driver software
installed successfully.”
L'icône d'appareil -photo dans le Taskbar montrera également que le “Web
Camera is plugged in”.
43
Français
Page 45

VÉRIFICATION DE L'INSTALLATION
Windows 2000 / XP
1. Branchez dedans le V-Cam au port d'USB. L'ic ône d'appareil-photo
dans le Taskbar devrait montrer que “Web Camera is plugged in”.
2. Droit-cliquez sur la ic ône My Comp ut e r dans le dessus d e bureau ou
le menu de Windows Start. À partir du menu q ui apparaît, c hoisissez
Properties.
3. Dans la zone d e dialogue de System Prope r ties, cliquez sur l'étiquette
de Hardware, puis cliquez sur le Device Manager.
4. Cliquez sur le signe (+) à côté de l'icône de Imaging devices, et
assurez-vous qu'il y a une entrée pour " ENVISION V-CAM "
Windows Vista
1. Branchez dedans le V-Cam au port d'USB. L'ic ône d'appareil-photo
dans le Taskbar devrait montrer que “Web Camera is plugged in”.
2. Droit-cliquez sur la icône Computer dans le dessus de bureau ou le
menu de Windows Start. À partir du menu qui apparaît, choisissez
Properties.
3. Dans la fenêtre qui apparaît, le regard dans le carreau gauche sous
Tasks et clic sur le Device Manager.
4. Cliquez sur le signe (+) à côté de l'icône de Imaging devices, et
assurez-vous qu'il y a une entrée pour " ENVISION V-CAM "
44
Français
Page 46

EMPLOYER L' ENVISION V-CAM
1. Gauche-double-cliquez sur l'icône d'appareil-photo dans le Taskbar pour
lancer l'application visuelle de playback. Alternativement:
Windows 2000/XP: cliquez Start → Programs → ENVISION V-CAM →
AMCap
Windows Vista: cliquez Start → All Programs ou Programs → ENVISIO N
V-CAM → AMCap
2. Si aucune vidéo n'apparaît, s'assurer que Options → Preview est vérifiées
pour permettre le playback visuel de phase.
NOTE: Si vo us souhaitez utiliser Yahoo!® Mess enge r, Windows Liv e
TM
ou MSN®
Messenger, ou Skype
TM
, clôturent s’i l vous plaît l'application visuelle de pla yback
d'AMCap en choisissant File → Exit. Suivez les instructions de vo tre demande de
causerie de permettre des fonctions de webcam.
AJUSTEMENT DU FOYER
Le centre de l'objectif d'appareil-photo peut être manuellement ajusté en
tournant l'anneau argenté de foyer dans le sens des aiguilles d'une montre ou
dans le sens c ontraire des aiguilles d'une montre. L'objectif peut se focaliser de
8"(20cm) à l'infini.
45
Français
Page 47

RÉSOLUTION VISUELLE CHANGEANTE
Pour changer la résolution visuelle de phase, choisissez Options → Video
Capture Pin .. Dans la zone de dialogue de Properties, choisissez la résolution
désirée à partir de la boîte d ro p-dow n d’ Output Size.
NOTE: Windows 2000 Service Pack 4 avec DirectX 9.0 installé ou Windows XP
Service Pack 2, et le High- Speed USB 2.0 sont exigés p our des résolu tions audessus de 640 x de 480.
PRISE D'UNE PHOTO
1. Avec le fonctionnement visuel d'application de playback, droite-clique z sur
l'icône d'appareil-photo dans le Taskbar, choisissez Snapshot, choisissez
alors la résolution désirée d'instantané.
46
Français
Page 48

PRISE D'UNE PHOTO – Windows Vista – Continuées
NOTE: La résolution disponible d'instantané dépend de la résolution
visuelle actuellement choisie. Vous pouvez toujours prendre un instantané
à la même résolution que la résolution visuelle courante. En outre, pour
certaines résolutions visuelles, les résolutions d'instantané augmentées
par logiciel peuvent être disponibles.
2. L'application d'image s'ouvr e toujours quand cassez le projectile est pris.
Sauver l'image, du menu supérieur, choisissez File → Save As.
ENREGISTREMENT D'UNE VIDÉO
1. Assurez-vous que l'application visuelle de phase de playback fonctionne.
Après, placez le dossier auquel la vidéo se ra sauvée. À partir du menu
supérieur, choisissez File → Set Capture File
47
Français
Page 49

ENREGISTREMENT D'UNE VIDÉO - Continuées
2. Dans la zone de dialogue de Set Capture File écrivez un nom de fichier
avec la prolongation AVI, par exemple "samplevideo.avi", cliquez alors
Open. Dans la zone de dialogue de Set File Size, écrivez la quantité
d'espace disque pour mettre de côté pour la capture visuelle et puis pour
cliquer OK.
3. Pour commencer enregistrer, choisissez Capture → Start Capture. Si un
dossier n'était pas placé dans les étapes 1 et 2 ci-dessus, écrivez un nom de
fichier et placez la quantité d'espace disque comme décrit ci-dessus. Cliquez
OK dans la zone de dialogue de Ready to Capture pour commencer à
enregistrer.
4. L'enregistrement s'arrêtera quand le do ssier a atteint la limite de taille qui a
été fixée dans l'étape 2.
5. Pour arrêter l'enregis trement tôt avant que la limite de volume de fichier ait
été atteinte, choisissez Capture → Stop Capture.
6. La vidéo enregistrée peut être regardée en utilisant le Windows Media
Player .
7. Pour enregistrer une autre vidéo, suivez les étapes 1 et 2 ci-dessus pour
placer un autre nom de fichier. Autrement, le nouvel enregistrement
recouvrira la vidéo précédemment sauvée.
48
Français
Page 50

ENREGISTREMENT D'UNE VIDÉO - Continuées
NOTE: L'enregist rement d'une vidéo peut p rendre un pourcen tage significa tif des
ressources de système, y compris l'unité centrale de traitement, la mémoire, et
l'utilisation de disque dur. Le choix d'une résolution inférieure aidera à réduire au
minimum l'utilisation et le résultat de ressource dans une vidéo enregistrée plus
douce.
DISPOSITIFS AV ANÇÉS
Pour accéder aux dispositifs avançés, choisissez l Options → Video Filter Pin.
49
Français
Page 51

DISPOSITIFS AVA NÇÉS - Continuées
Étiquette de Settings
• Image Mirror – Changements dans l'image de miroir.
• Image Flip – Tours l'amont d'image vers le bas.
• Low Light – Optimise l'image dans des situations de bas-lumière.
• In/Out Door – Optimise l'image pour l'éclairage d'intérieur ou extérieur.
• USB Bandwidth – Diminue la valeur laissera plus de largeur de bande
pour d'autres dispositifs d'USB, mais ralentira le taux d'armature. Laisser la
boîte Auto vérifiée est recommandé.
• Exposure – Ajuste la période d'exposition de la sonde d'image.
L'exposition croissante ralentira le taux d'armature. Laisser la boîte Auto
vérifiée est recommandé.
• White Balance – Augmente/diminue la quantité de couleur rouge et
augmente/diminue la quantité de couleur bleue dans l'image pour
l'ajustement blanc manuel d'équilibre. Laisser la boîte Auto vérifiée est
recommandé
50
A
justez l'écla t, le
contraste, la
saturation, l'acuité, etc.
pour convenir à vos
préférences
personnelles
Placez le clignotement
à 60Hz si en Amérique
du Nord et 50Hz si en
Eur ope.
Français
Page 52

DISPOSITIFS AVANÇÉS – Continuées
• Flicker – Aide pour réduire le clignotement d'image quand sous l'éclairage
fluorescent. Choisissez la valeur qui assortit le plus étroitement votre
fréquence électrique locale à C.A.. P our l'Amérique du nord, choisiss ez
60Hz.
• Backlight Comp. – Vérifiez cette boît e pour permettre la compensation de
contre-jour dans les situations où il y a lumière forte dans le fond, comme
quand il y a soleil-a allumé la fenêtre derrière vous.
• B/W Mode – Vérifiez cette boîte pour placer l'image en mode noir et blanc.
• Auto L ED Mo de – Changer ces arrangements n'aura aucun effet puisque
ce modèle particulier de webcam n'a pas des fonctions de LED.
• Default – Cliquez sur ce bouton pour reconstituer toutes les valeurs dans
l'étiquette d'arrangements aux arrangements d'usine de défaut.
• Save – Sauve les arrangements courants à l'appareil-photo. Des
arrangements précédemment sauvés seront recouverts.
• Load – Charge les arrange ments le plus récemment sauvés.
Étiquette d’
Effects
51
Choisissez les effets
et les déformations
spéciaux d'image.
Choisissez les
armatures et les
recouvrements de
graphique pour
s'ajouter à l'image
visuelle.
Français
Page 53

DISPOSITIFS AVANÇÉS – Continuées
• Customized Frame –Utilisez un recouvrement graphique fait sur
commande sur l'image visuelle. Choisissez le bouton par radio de Frame
File, cliquez dessus (...) pour passer en revue pour votre dossier
graphique, et cliquez alors sur le bouton de Load File. Le dossier
graphique devrait être une carte binaire (BMP) et VGA (640 x 480) ou
s'abaisser dans la résolution.
• Auto C hange – Faites un cycle automatiquement par chacun des choix
d'effet et de vue toutes les quelques secondes
• No effect & frame – En tourne au loin choisit l'effet ou la vue.
Étiquette de Zoom
52
Permet le
bourdonnement
numérique. Employez
les boutons de flèche
pour filtrer autour de
l'image, et la barre de
glisseur pour
bourdonner dedans et
dehors.
Permet le cheminement
de visage. L'appareilphoto détectera votre
visage et bour donnera
digitalement dedans et
panoramique
automatiquement
l'image pour vous
garder visage dans la
vue.
Français
Page 54

DISPOSITIFS AVANÇÉS – Continuées
NOTE: Certains dispositifs avançés ne sont pas disponibles à des résolutions
visuelles plus élevées. Effect, Frame, Zoom Control, et Face Tracking sont
permis seulement dans les résolutions 640x480 et ci-dessous. En outre, les
arrangements d' Effe ct et de Frame ne sont pas disponibles si le Zoom Control
ou Face Tracking est permise.
L’arrangements avançés peuvent également être accomplis simplement par
droite - cliquez sur l'icône d'appareil-photo dans le Taskbar.
ATTENTION
• Si le V-CAM devient chaude après avoir été allumé pendant une longue
période, arrêtez l'appareil-photo pour tandis que de short
• Evitez de toucher l'objectif avec vos mains ou avec les objets pointus ou
bruts. Employez un tissu mou propre pour le nettoyage.
• N'utilisez pas le V-CAM dans les environnements extrêmeme nt chauds,
froids, poussiéreux, ou humides
• Evitez de laisser tomber le V-CAM autant que possible. Les baisses
graves peuvent endommager l'objectif, causer le défaut de
fonctionnement d'appareil-photo, ou rayer la surface.
53
Français
Page 55

GARANTIE
Envision les garanties ce produit pour être exempt des défauts dans le matériel et l'exécution pendant une
période d'un (1) an pou r des pièces et travailler ap rès la date originale de l'ac hat du consommateur.
Pendant cette période, Envision, à son option, l'une ou l'autre réparation le produit défectueux avec les
pièces nouvelles ou reconstruites, ou le remplacer avec un produit nouveau ou reconstruit à aucune
charge excepté comme indiqué ci-dessous. Les pièces ou le produit qui sont remplacés deviennent la
propriété d’Envision.
Cette garan tie lim itée ne cou vre aucun es per tes ou domm age en ra ison dont se pro duire : embarqu an t ou
installation ou entretien inexacte ; abus ; négligence ; toute cause autre que l'application commerciale ou
industrielle ordinaire ; ajustement par source non-autorisée ; la réparation, la modification, ou l'installation
des options ou des parties par n'importe qui autre qu'une marque d'Envision ont autorisé le centre
commercial ; en vironnem en t ine xact ; chauffa ge ou éch ecs exc essif s ou in sati sfais an ts de cli mati sati on ou
de courant électrique, montées subites, ou d'autres irrégula rités.
Cette garantie limitée d'une année ne couvre pas les progiciels ou le matériel du produit l'un des que toi ou
n'importe que l tiers a mod ifiés ou a cha ngés ; vous soute nez la re sponsabilité et la responsa bilité uniqu es
pour une telle modification ou changement.
TOUS EXPRIMENT ET ONT IMPLIQUÉ DES GARANTIES POUR CE PRODUIT (GARANTIES Y
COMPRIS DE VALEUR MARCHANDE ET LA FORME PHYSIQUE PO UR U N BUT PARTICULIER) SONT
LIMITÉS DANS LA DURÉE À UNE PÉRIODE D'UN (1) AN DE LA DATE ORIGINALE DE L'ACHAT DU
CONSOMMATEUR. GARANTIE (EXPRIMÉ OU IMPLICITE) NE S'APPLIQUE PAS APRÈS CETTE
PÉRIODE. AUX ETATS-UNIS D'AMÉRIQUE, QUELQUES ÉTATS NE PERMETTENT PAS DES
LIMITATIONS SUR COMBIEN DE TEMPS UNE GARANTIE IMPLICITE D URE, AINSI LES L IMITATIONS
CI-DESSUS PEUVENT NE PAS S'APPLIQUER À VOUS.
LES ENGAGEMENTS D‘ENVISION ET VOS REMÈDES SONT CI-DESSOUS SEULEMENT ET
EXCLUSIVEMENT COMME INDIQUÉ ICI. LA RESPONSABILITÉ D’ENVISION, SI BASÉ SUR LE
CONTRAT, L'ACTE DÉLICTUEL, LA GARANTIE, LA RESPONSABILITÉ SANS FAUTE
INTENTIONNELLE, OU TOUTE AUTRE THÉORIE, N'EXCÉDERA PAS LE PRIX DE L'UNITÉ
INDIVIDUELLE DONT DÉFAUT OU LES DOMMAGES SONT LA BASE DE LA RÉCL AMATION. DANS
AUCUN CAS Envision Peripherals, Inc. SOIT RESPONSABLE DE N'IMPORTE QUEL MANQUE À
GAGNER, PERTE d'UTILISATION OU ÉQ UIPEMENTS OU ÉQUIPEM ENT O U d'AUT RES DOMMAGES
INDIRECTS, FORTUITS, OU CONSÉC UTIFS. AUX ETATS-UNIS D'AMÉ RIQUE, QUELQUES ÉTATS NE
PERMETTENT PAS L'EXCLUSION OU LA LIMITATION DES DOMMAGES FORTUITS OU
CONSÉCUTIFS, AINSI LA LIMITATIO N CI-DESSUS PEUT NE PAS S'APPLIQUER À TOI. BIEN QUE
CETTE GARANTIE LIMITÉE TE DONNE DES DROITS LÉGAUX SPÉ CIFIQUES, VOUS POUVEZ AVOIR
D'AUTRES DROITS QUI PEUVENT CHANGER DE L'ÉTAT À L'ÉTAT.
Date code: Mar. 6, 2007 Version 3.12
54
Français
 Loading...