


EST-1000
EST-1000
EST-1000
EST-1000
Handheld
Handheld
Handheld
Handheld Intelligent
Intelligent
Intelligent
Intelligent Toxic
Toxic
Toxic
Toxic Gas
Gas
Gas
Gas Detector
Detector
Detector
Detector
User
User
User
User Manual
Manual
Manual
Manual
(
Please read this manual carefully before using
)
ENVIRONMENTAL
ENVIRONMENTAL
ENVIRONMENTAL
ENVIRONMENTAL SENSOR
SENSOR
SENSOR
SENSOR TECHNOLOGY
TECHNOLOGY
TECHNOLOGY
TECHNOLOGY CO
CO
CO
CO .
.
.
. INC.
INC.
INC.
INC.

Contents
Contents
Contents
Contents
I. Product Overview ................................................................................... 1
II. Product Description ................................................................................ 1
III. Performance Parameters ....................................................................... 3
IV.
Notes ................................................................................................... 4
V.
Operational Processes ............................................................................. 4
VI. Menu Description ................................................................................ 6
VII. Calibration Method .............................................................................. 9
VIII. Troubleshooting ................................................................................. 10
IX. Instrument Supporting ........................................................................ 11
Appendix Type & Specification of the Sensor ............................................. 11

1 /11
ENVIRONMENTAL SENSOR TECHNOLOGY CO. INC.
I.
I.
I.
I. Product
Product
Product
Product Overview
Overview
Overview
Overview
EST -1 000 series handheld intelligent toxic gas detector is an intelligent hand-held alarm that
detects the concentration of toxic gas in the target gas with high precision and low power
consumption by an advanced electrochemical technology.
EST- 1 000 series adopt a natural gas diffusion testing method (external handheld pump for
option ). The sensor is the advanced electrochemical toxic gas ones, which are of high
sensitivity and excellent repeatability. It is equipped with a LCD liquid crystal display, which
can observe the concentration of the target gas online, check the time, date and week, It has
two levels of alarm output. When it exceeds the pre-set alarm point, the sound and light alarm
signal will be started immediately. It has two kinds of calibration methods, i.e. the software
and hardware. The calibration can be finished without opening the cover.
This instrument has the following features:
1. Advanced electrochemical sensor makes the performance stable and reliable.
2. External power supply of DC5V, a rechargeable 3.7V lithium battery built inside and
chargeableness upon connected to the external power supply are all provided.
3. Large-screen LCD can display various parameters, with two methods of viewing, i.e. with
data and curves.
4. The time, date and week can be set and displayed. All the time information can be checked
by a.
5. It is of the intelligent design, full functions, zero setting, alarm settings and convenient
calibration.
6. The shell is compact and lightweight, which can be put in the pocket or bag and also can be
hung on the body and is easy to carry.
7. Two levels of the sound and light alarm are available. The four bright LEDs alert the user
when alarming.
II.
II.
II.
II. Product
Product
Product
Product Description
Description
Description
Description
There are five functions, an LCD display and 4 LED lights in the front of the product, which is
shown as follows:
2 /11
ENVIRONMENTAL SENSOR TECHNOLOGY CO. I NC.
Among them, the LCD screen is used to display the gas concentration, time and various
information parameters. The two LED lights on the top are alarm lamps, which flash
alternately when the gas alarms. The LED at the left side of the bottom of the LCD is the
power light, which is green and lights when the battery voltage is not enough. While the LED
at the right side is the communication light that becomes red and flashes once when
communicating one set of the data ( applicable for EST-2000 series only) .
The five buttons on the panel respectively are Power/Confirm, Menu/Shift, Back, Plus/Up and
Minus/Up.
1. Power/Confirm: long press (for about 3 seconds) facilitates the power and the instrument
switches the on-and-off machine. Short press facilitates the Confirm.
2. Menu/Shift: after booting, long press (for about 3 seconds) facilitates the menu to enter the
menu mode. Short press facilitates the shift.
3. Back: long/short press will both facilitate the Back and it will return to the last menu or exit
the menu mode.
4. Plus/Up: add a displayed unit to the value or turn upward for an option. Long press
facilitates the continuous operation.
5. Minus/Up: reduce a displayed unit to turn downward for an option. Long press facilitates
the continuous operation
In addition, there is a power connector on the left side of the product and the battery is
installed in the back cover of the product. The parts and names of the products are shown in
the following figure.

3 /11
ENVIRONMENTAL SENSOR TECHNOLOGY CO. I NC.
III.
III.
III.
III. Performance
Performance
Performance
Performance Parameters
Parameters
Parameters
Parameters
Product name Gas detection alarm Sensor name
Optional (electrochemical
sensor)
Type of product EST-2000 Type of sensor Optional
External power
supply
5VDC/500mA Detecting target Toxic gas (optional)
Type of battery Lithium ion battery Detection principle Electrochemical
Battery voltage 3.7V (charge limitation 4.2V) Detection method Diffusion
Battery capacity 800mAh Detection range Optional
Shutdown current < 0.1mA Accuracy ± 5%FS
Startup current < 10mA Resolution Optional
Alarm current < 50mA
Operating
temperature
-10 ℃ -40 ℃
Protection class IP65 dustproof and waterproof Humidity 0-95%RH
Way of display LCD liquid crystal display Pressure range 860-1060hpa
Way of alarm Two levels of the sound and light alarm Preheat time 60 seconds
Alarm error ≤± 10% alarm set value Response time T90 ≤ 30S (most)
Data storage N/A Service life 2 years (in the air)
Signal output N/A Zero drift ≤± 2%FS/6h
Dimensions of
appearance
120*60*35mm Span drift ≤± 5%FS/6h
Weight of
machine
≤ 250g (including batteries) Repeatability ≤± 2%FS
Note:
Note:
Note:
Note: Please
Please
Please
Please refer
refer
refer
refer to
to
to
to the
the
the
the corresponding
corresponding
corresponding
corresponding sensor
sensor
sensor
sensor technical
technical
technical
technical manual
manual
manual
manual for
for
for
for the
the
the
the sensor
sensor
sensor
sensor parameters.
parameters.
parameters.
parameters.

4 /11
ENVIRONMENTAL SENSOR TECHNOLOGY CO. I NC.
IV.
IV.
IV.
IV. Notes
Notes
Notes
Notes
The use, maintenance and calibration of the instrument shall be taken by special people.
1. Both of the zero point and full scale shall be calibrated once every three months;
2. The detection probe shall be cleaned on a regular basis. Otherwise, the dust and impurities
will plug into the gas hole, which will make the sensitivity of the sensor decreased.
3. Since the date of the delivery to the user, if the instrument fails to operate normally within a
year due to the quality problems, our company will repair or replace it for the user for free. If it
is over a year, the labor cost will be charged.
4. Since there is the acid solution in the electrochemical sensor, the users shall not disassemble
it by themselves. Be careful not to damage the film. If the acid solution contacts the skin, the
users shall wash immediately with water in 10 minutes and then go to a doctor.
V.
V.
V.
V. Operational
Operational
Operational
Operational Processes
Processes
Processes
Processes
1. Instrument Booting
Connect to the battery (if it is connected, long press the Power/Confirm for about 3 seconds)
and the alarm light is on, as well as the buzzer sounds, which means the instrument boots
successfully. The LCD shows “ POWER ON ” for about 0.5 seconds, which is shown as follows.
(The display is for reference only. Please be subject to the actual object. The same below)
Then the LCD shows the company LOGO “ ” for about 0.5 seconds, which is
shown as follows. And then it shows the type of the instrument and the program version for
about 0.5 seconds, which is shown as follows:

5 /11
ENVIRONMENTAL SENSOR TECHNOLOGY CO. I NC.
Next, enter the sensor and wait for the warm-up for about 60 seconds. Accompanied by the
sound of the buzzer, the LCD shows the countdown time, which is shown as the following left
picture. After the completion (it shows 00 seconds), the LCD shows “ Turn on ” for about 1
second, the alarm light is on, the buzzer sounds and it waits for the completion, which is
shown as the following right picture.
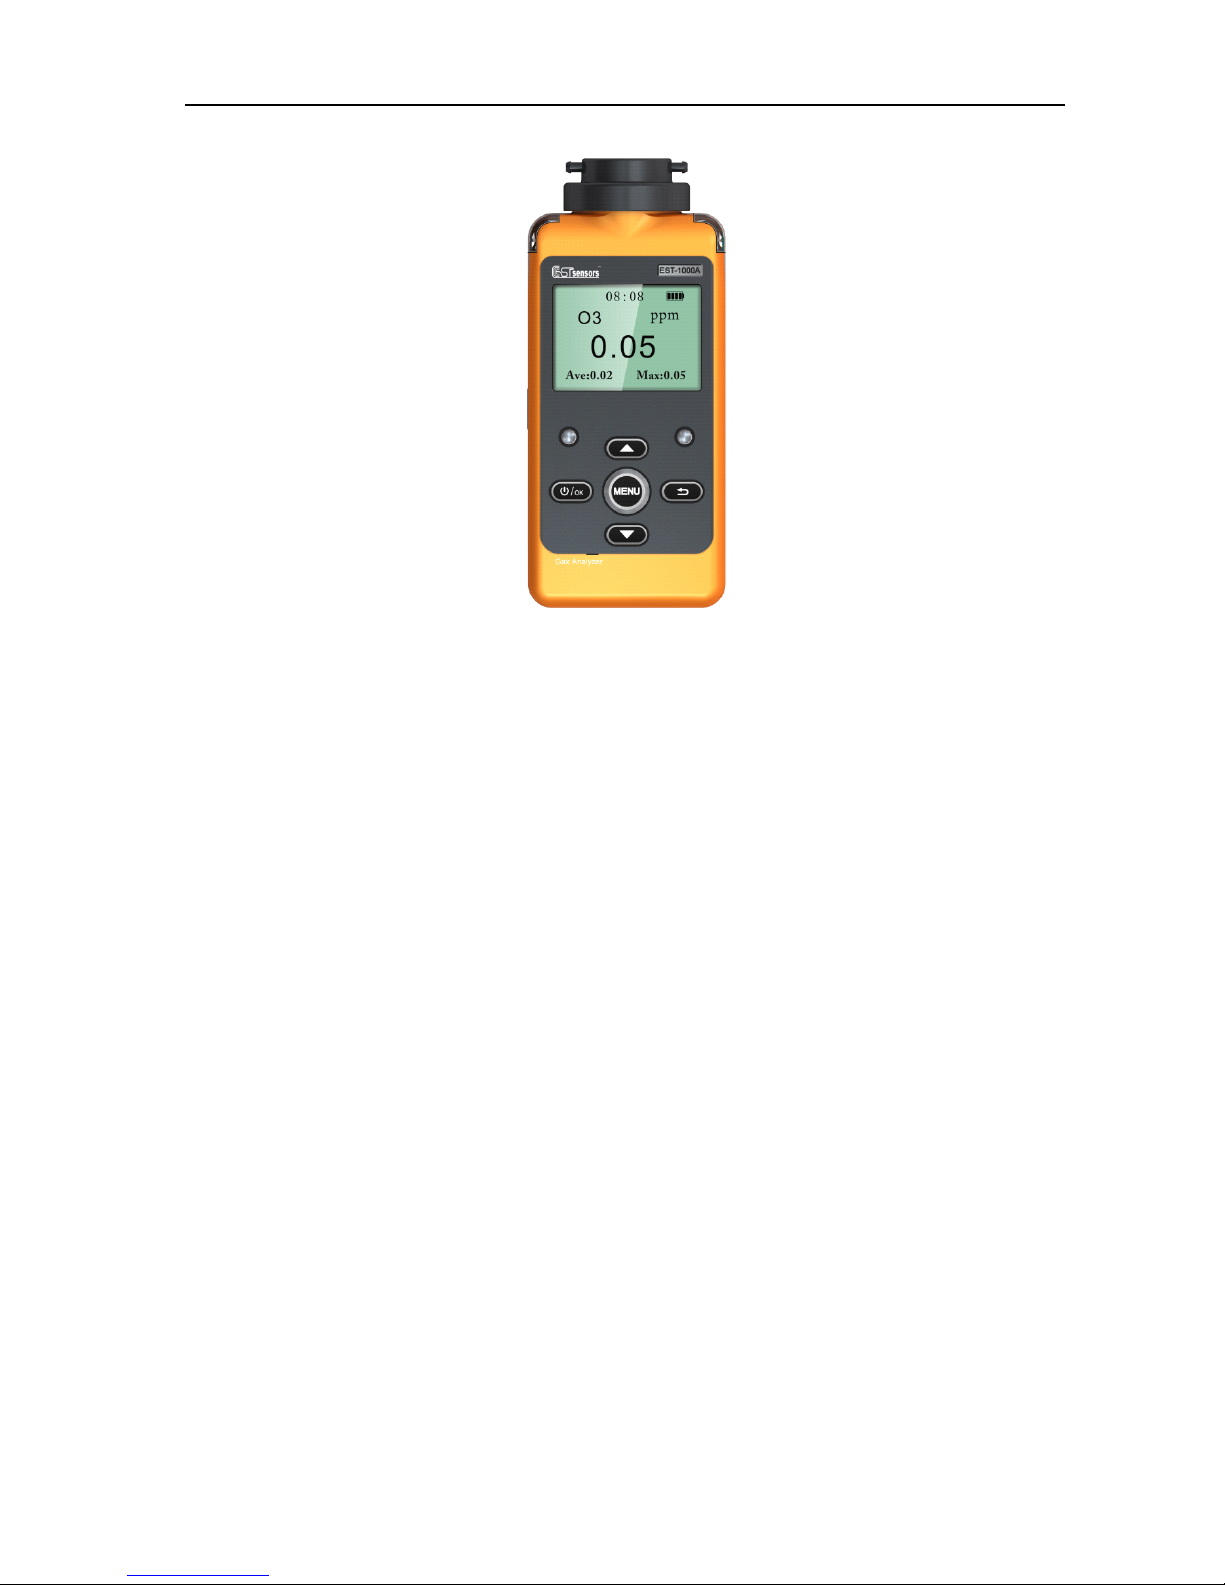
2. Detection Status
After the successful booting, the instrument enters the detection status automatically and the
LCD shows all kinds of information at real time, which is shown as follows:
The top of the LCD shows the time, battery
capacity and other signs at real time, such as the
alarm status, buzzer status and link status of the
communication.
The left side of the LCD shows the types of
gases.
The right side of the LCD shows the
measurement unit.
The large figure in the middle of the LCD is the
real-time gas concentration.
The lowest line of the LCD shows the average
and maximum value measured since this booting.
3. Time Check and Graphics Status:
In the detection state, press the Confirm (shortly press “ Power/Confirm ” ) to enter the state of
checking the time and date. The LCD shows as the following left picture shows. Then press
the Back and exit and return to the detection state;
In the detection state, press the shift (shortly press “ Menu/Shift ” ) to enter the state of checking
the graphics. The LCD shows the gas concentration at real time in the curve. The types of the
gases and concentration value are shown beneath the curve. Then press the Back to exit and
return to the detection state, which is shown as the following right picture.

6 /11
ENVIRONMENTAL SENSOR TECHNOLOGY CO. I NC.
4. Instrument Shutdown
There are three ways of shutting down the instrument, which are the automatic shutdown when
the battery capacity is too low, the automatic shutdown when the set time is up and the manual
shutdown when pressing the power (long press the “ Power/Confirm ” for about 3 seconds). The
buzzer sounds when shutting down, the LCD shows the “ POWER OFF ” for about 0.5 seconds
(shown as the following left picture) and then all are off. The instrument is shut successfully
and enters the low power consumption standby mode. If it automatically shuts down because
the power capacity is too low, it will show “ Battery Low ” first before showing “ POWER OFF ” ,
which is shown as the following right picture.
VI.
VI.
VI.
VI. Menu
Menu
Menu
Menu Description
Description
Description
Description
1. Main Menu
In the detection state, press the Menu (long press “ Menu/Shift ” for about 3 seconds) to enter
the Main Menu. LCD shows the “ Main Menu ” and six options divided by two screens. Use the
Up/Down to scroll through the options and the two screens will be switched automatically. The
highlighted option is the current selected option as bellow:

7 /11
ENVIRONMENTAL SENSOR TECHNOLOGY CO. I NC.
2. Timepiece Setting
Select the first option “ 1. Timepiece ” in the Main Menu and then press the Confirm to enter
the setting of timepiece. There are three options in the sub-menu of Timepiece: “ 1. Time: ” , “ 2.
Date: ” and “ 3. Y (W): ” the first option is to set the hour and the minute, the second option to
set the month and the date and the third option to set the year and the week. Press the
Up/Down to scroll through the options and press the Back to return to the Main Menu and
pressing the Confirm again could enter the parameter altering status. Press the Shift to select
the parameter to be altered and press the Plus and Minus to make the alteration and then press
the Confirm to save it and return to the Main Menu. Pressing the Back will not save the
alteration but return directly. The highlighted option is the current selected option as bellow:
3. Alarm Setting:
Select the second option “ 2. Alarm ” in the Main Menu and then press the Confirm to enter the
setting of alarm. There are three options in the sub-menu of Alarm: “ 1. Low: ” , “ 2. High: ” and
“ 3. Mode: ” ; the first option is to set the low value, the second option to set the high value and
the third option to set the mode of the alarm. Press the Up/Down to scroll through the options
and press the Back to return to the Main Menu and pressing the Confirm again could enter the
parameter altering status. Press the Shift to select the value to be altered and press the Plus and
Minus to make the alteration and then press the Confirm to save it and return to the Main
Menu. Pressing the Back will not save the alteration but return directly. The highlighted option
is the current selected option as bellow:

8 /11
ENVIRONMENTAL SENSOR TECHNOLOGY CO. I NC.
4. Software Calibration:
Select the third option “ 3. Calibration ” in the Main Menu and then press the Confirm to enter
software calibration. There are three options in the sub-menu of Calibration: “ 1. Zero: ” , “ 2.
Span: ” and “ 3. Clear: ” ; the first option is to set zero calibration, the second option to set gain
calibration and the third option to clear the parameter of the calibration. Press the Up/Down to
scroll through the options and press the Back to return to the Main Menu and pressing the
Confirm again could enter the altering status. Press the Shift to select the value to be altered
and press the Plus and Minus to make the alteration and then press the Confirm to confirm the
calibration or the clearing and return to the Main Menu. Pressing the Back will not calibrate or
clear the value but return directly. The highlighted option is the current selected option as
bellow (the 4-digit data with the unit is the value after calibration and the 4-digit data without
the unit is current concentration value):
5. Parameter Setting:
Select the fourth option “ 4. Parameter ” in the Main Menu and there are only two options in the
sub-menu of Parameter: “ 1. Type: ” and “ 2. Rage: ” ; the first option is to set the type of the gas
and the second option to set the sensor; the last line indicates the ADC value of the gas and the
amount of the battery level and is for reference only. Press the Up/Down to scroll through the
list of the options (the last line could not be selected) and press the Back to return to the Main
Menu and pressing the Confirm again could enter the altering status. Press the Shift to select
the value to be altered and press the Plus and Minus to make the alteration and then press the
Confirm to confirm the alteration or the clearing and return to the Main Menu. Pressing the
Back will not alter or clear the value but return directly. The highlighted option is the current
selected option as bellow:

9 /11
ENVIRONMENTAL SENSOR TECHNOLOGY CO. I NC.
6. Instrument Setting:
Select the fifth option “ 5. Setting ” in the Main Menu and there are six options in the sub-menu
of Setting: “ 1.BLT: ” , “ 2. AOT: ” , “ 3. AOV: ” , “ 4. MAD: ” , “ 5.
LRV:
” and “ 6. Reset: ” ; the first
option is backlight time, the second option auto power off time, the third option the voltage of
auto power off, the fourth option the communication address of the module, the fifth option the
reference voltage of LCD (LCD grey scale) and the sixth option resetting (restoring to the
default values). Press the Up/Down to scroll through the list of the options and press the Back
to return to the Main Menu and pressing the Confirm again could enter the parameter altering
status. Press the Shift to select the value to be altered and press the Plus and Minus to make the
alteration and then press the Confirm to confirm the alteration or the clearing and return to the
Main Menu. Pressing the Back will not save the alteration or the clearing but return directly.
The highlighted option is the current selected option as bellow:
(Note: if the BLT is 0, it indicates the backlight is not turned off; if the AOT is 0, it indicates
non-auto power off)
VII.
VII.
VII.
VII. Calibration
Calibration
Calibration
Calibration Method
Method
Method
Method
To ensure the measurement accuracy of the instrument, calibration should be conducted on a
regular basis (it is recommended to calibrate once every three months) and recorded strictly.
During
During
During
During calibration,
calibration,
calibration,
calibration, calibration
calibration
calibration
calibration cap
cap
cap
cap should
should
should
should be
be
be
be added
added
added
added to
to
to
to the
the
the
the sensor
sensor
sensor
sensor (except
(except
(except
(except for
for
for
for zero
zero
zero
zero
calibration).
calibration).
calibration).
calibration). After
After
After
After installing
installing
installing
installing the
the
the
the calibration
calibration
calibration
calibration cap,
cap,
cap,
cap, import
import
import
import the
the
the
the standard
standard
standard
standard gas
gas
gas
gas through
through
through
through the
the
the
the end
end
end
end
of
of
of
of standard
standard
standard
standard gas
gas
gas
gas cap
cap
cap
cap of
of
of
of the
the
the
the gas
gas
gas
gas pipe
pipe
pipe
pipe and
and
and
and the
the
the
the other
other
other
other end
end
end
end of
of
of
of the
the
the
the gas
gas
gas
gas pipe
pipe
pipe
pipe is
is
is
is connected
connected
connected
connected with
with
with
with a
a
a
a
safe
safe
safe
safe place.
place.
place.
place. The instrument could be calibrated in 2 methods: the soft and hard. If hardware
calibration required the opening of battery cap of the instrument, use a small slotted
screwdriver to rotate the knob of calibration potentiometer (to avoid shock resulting in the
knob loosening which will bring errors to the measurement, the knob should be fixed by soft

10 /11
ENVIRONMENTAL SENSOR TECHNOLOGY CO. I NC.
silicone gel; when using it, you should only take the soft silicone and please apply silicone gel
on it after the calibration). If you don ’ t want hardware calibration, you could press the relevant
button to enter the menu-calibration mode in the detection state to realize the calibration of the
concentration of the gas with software.
1. Hardware Zero Calibration
Power on the instrument for 30 minutes in clean air or pure nitrogen (the power on time of
polarization during the first use of the instrument should be over 2 hours). After the display is
stable, open the battery cap and adjust the zero calibration potentiometer in the instrument with
the screwdriver to make the value displayed on the LCD to be 0, which means that the
calibration is succeeded.
2. Hardware Gain Calibration
Import the standard gas of known concentration through the flow-meter, reducing the voltage
to 1.1 times of the normal atmospheric pressure and controlling the flow rate within the range
of 300ml/min to 500ml/min, and then direct the gas to the sensor through gas pipe and
standard gas covering. After the display of the instrument is stable (in about 3-5 minutes),
check whether the displayed value is in conformity with the concentration of the standard gas
passed. If not, open the upper covering and adjust the span potentiometer of the outer covering
of the instrument to make the displayed value in the panel to be in conformity with the
concentration of the standard gas. After the adjustment, the gas could be stopped. Then see
whether the value of the instrument could be returned to zero quickly in clean air. Repeat the
above action and contrast the result with the last one. If the results are pretty much the same
(within the basic error range), the adjustment could be stopped and the standard gas could be
turned off and the calibration is ended. If not, the above calibration should be repeated again
till the result is satisfied.
3. Software Zero Calibration
The calibration condition is same with that of hardware zero calibration. Press the relevant
button to adjust the instrument to zero calibration condition (please refer to the 4
th
point of the
6
th
section for detailed method). After the display is stable, if the value displayed on the LCD
is not 0, adjust the instrument till it is 0. Press the Confirm to save the data and then complete
software zero calibration.
4. Software Gain Calibration
The calibration condition is same with that of hardware gain calibration. Press the relevant
button to adjust the instrument to gain calibration condition (please refer to the 4
th
point of the
6
th
section for the detailed method). After the display is stable (in about 3-5 minutes after
importing the gas), if the value displayed on the LCD is not in conformity with the standard
gas, adjust the value till it is in conformity with the concentration of the standard gas. Press the
OK to save the data. After the data is saved, the gas could be stopped. And then see whether
the value of the instrument could be returned to zero quickly in clean air. Repeat the above
action once and contrast the result with the last one. If the results are pretty much the same
(within the basic error range), the adjustment could be stopped and the standard gas could be
turned off and the calibration is ended. If not, the above calibration should be repeated again
till the result is satisfied and then software zero calibration is completed.
Remark:
Remark:
Remark:
Remark: the
the
the
the calibration
calibration
calibration
calibration is
is
is
is of
of
of
of great
great
great
great importance
importance
importance
importance and
and
and
and non-professional
non-professional
non-professional
non-professional technicians
technicians
technicians
technicians should
should
should
should
not
not
not
not operate
operate
operate
operate at
at
at
at random.
random.
random.
random.

11
/11
ENVIRONMENTAL SENSOR TECHNOLOGY CO. I NC.
VIII.
VIII.
VIII.
VIII. Troubleshooting
Troubleshooting
Troubleshooting
Troubleshooting
Troubles Reasons Treatment
Can not Start
Insufficient battery level
Circuit faults
Recharge or change the battery
Senditback to the factory to repair
High/Low
Readings
Zero point or high/low gain
calibration
Disabled sensor
Re-calibrate
Change the sensor
Unstable Readings
Not enough polarization time
Disabled sensor
Circuit faults
Self-excitation generated in the circuit
AC interference
Keep polarizing
Change the sensor
Senditback to the factory to repair
Adjust Span potentiometer to reduce the gain
Turn off high-frequency devices around (such as frequency
converter and interphone)
Slow Response
Time
Probe clogged with dust
Disabled sensor
Circuit faults
Clean up the dust on the protective covering
Change the sensor
Senditback to the factory to repair
IX.
IX.
IX.
IX. Instrument
Instrument
Instrument
Instrument Supporting
Supporting
Supporting
Supporting
1. One set of EST- 1 000 Hand-held Intelligent Toxic Gas Detector
2. One General 5V Power Adaptor
3. One Standard 3.7V Rechargeable Lithium Battery
4. One copy of EST- 1 000 Instructions for Use
5. One copy of Verification Certificate
6. One package of the product
Statement:
Statement:
Statement:
Statement:
The
The
The
The parameters
parameters
parameters
parameters described
described
described
described in
in
in
in the
the
the
the Instruction
Instruction
Instruction
Instruction may
may
may
may change
change
change
change in
in
in
in subsequent
subsequent
subsequent
subsequent
versions.
versions.
versions.
versions. Please
Please
Please
Please take
take
take
take the
the
the
the actual
actual
actual
actual object
object
object
object as
as
as
as the
the
the
the standard.
standard.
standard.
standard.
Appendix
Appendix
Appendix
Appendix Type
Type
Type
Type &
&
&
& Specification
Specification
Specification
Specification of
of
of
of the
the
the
the Sensor
Sensor
Sensor
Sensor
 Loading...