

Page 1
BY JOHNSON CONTROLS
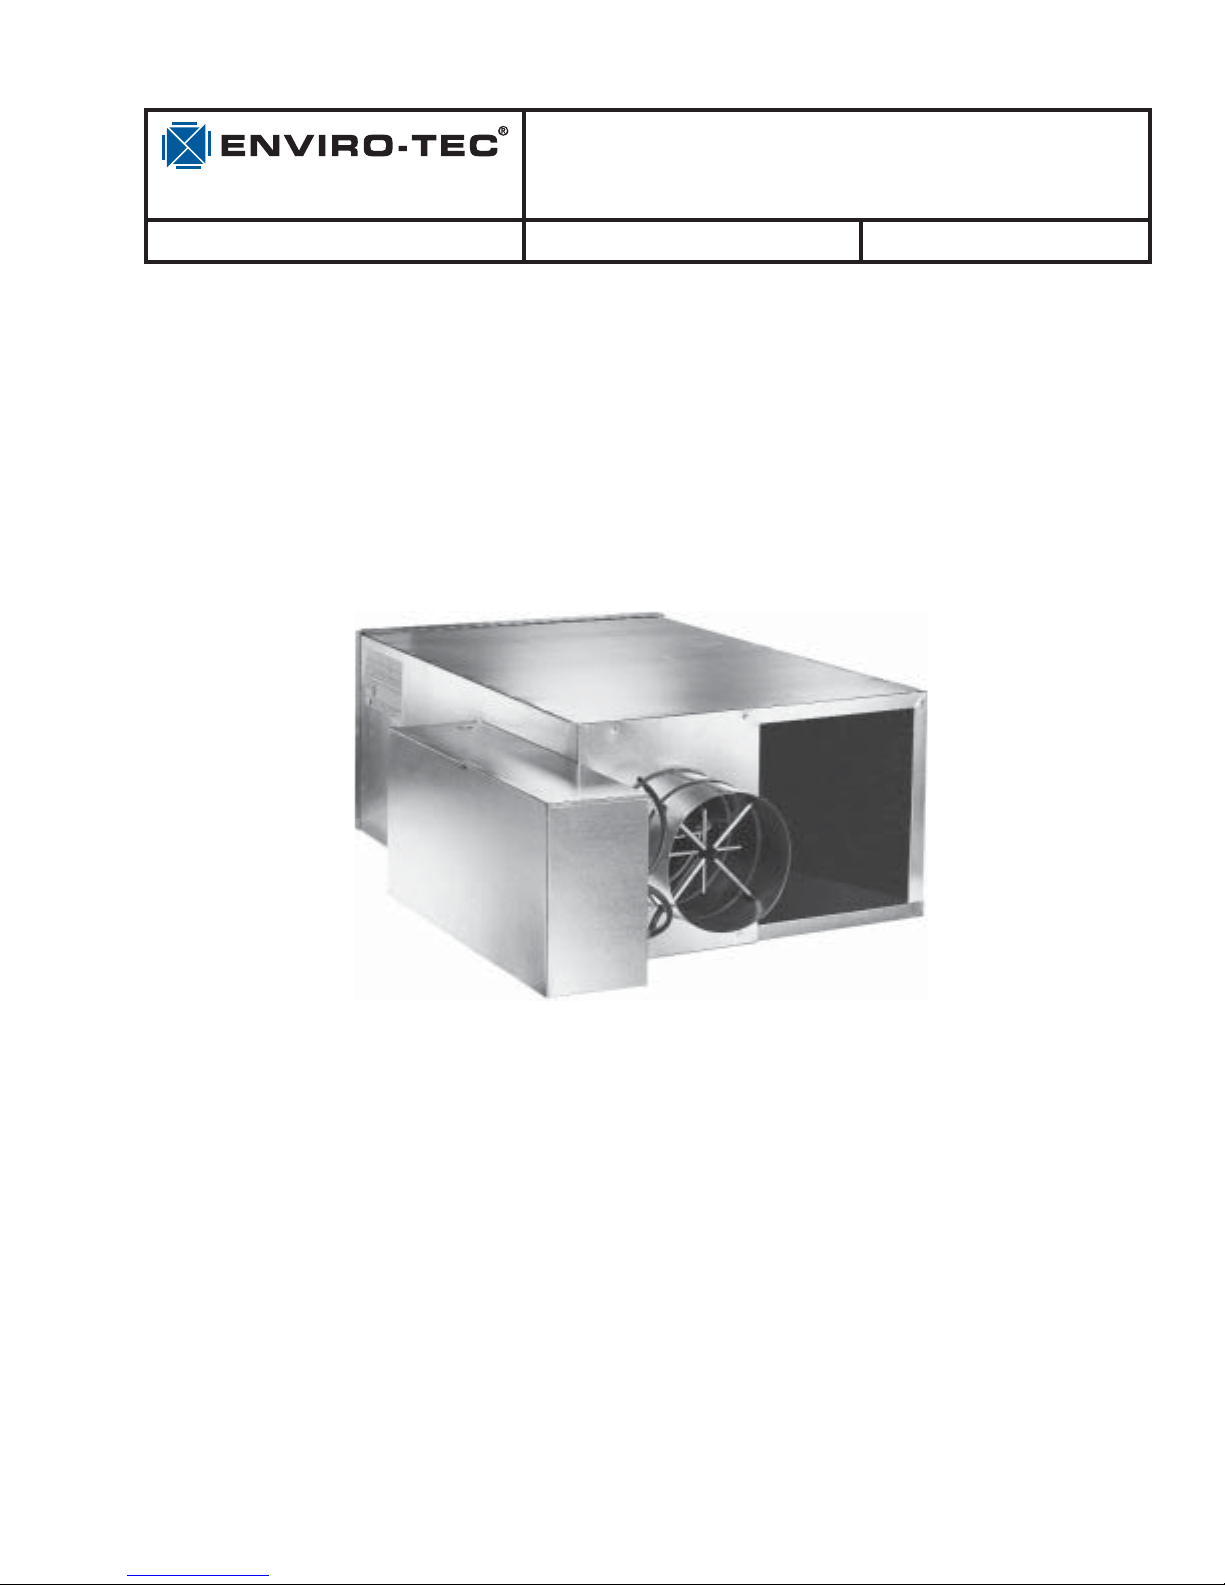
FAN POWERED VAV TERMINALS
INSTALLATION, OPERATION & MAINTENANCE
MODELS CFR, CFRQ, CFL, VFR & VFL
New Release
Form ET130.13-NOM3 (708)
LD13847
Page 2

FORM ET130.13-NOM3 (708)
TABLE OF CONTENTS
SAFETY CONSIDERATIONS ........................................................................................................................4
INSPECTION .................................................................................................................................................5
STORAGE .....................................................................................................................................................5
PRE-INSTALLATION INSPECTION ..............................................................................................................5
SEQUENCE OF OPERATION .......................................................................................................................6
Parallel Flow ...........................................................................................................................................6
Series Flow .............................................................................................................................................6
INSTALLATION .............................................................................................................................................6
Clearances .............................................................................................................................................7
Hanging and Mounting Equipment Overhead ....................................................................................7
Duct Connections ..................................................................................................................................7
Critically Sound Applications ...............................................................................................................7
Coil Connections ...................................................................................................................................8
Electrical .................................................................................................................................................8
OPERATION ..................................................................................................................................................8
Start-Up ..................................................................................................................................................8
Power Requirements ...........................................................................................................................8
Primary Air Damper and Fan Adjustment ...........................................................................................8
Series Flow, PSC Motor with SCR .......................................................................................................9
Parallel Flow, PSC Motor with SCR .....................................................................................................9
Series Flow ECM Motor Balancing ....................................................................................................10
Commissioning ....................................................................................................................................10
Balancing .............................................................................................................................................10
Manual Fan CFM Adjustment ............................................................................................................. 11
Remote Fan CFM Adjustment ............................................................................................................11
Status LED ...........................................................................................................................................11
MAINTENANCE ..........................................................................................................................................11
Factory Provided Damper Actuator ...................................................................................................11
Damper Shaft .......................................................................................................................................11
Motor/Blower ........................................................................................................................................11
Cleaning ..........................................................................................................................................12
Replacement ...................................................................................................................................12
Coil ........................................................................................................................................................12
Cleaning ..........................................................................................................................................12
Replacement ...................................................................................................................................12
Electric Heat .........................................................................................................................................13
Replacement ...................................................................................................................................13
TROUBLESHOOTING GUIDELINES .........................................................................................................14
ECM SPECIFIC TROUBLESHOOTING GUIDELINES ...............................................................................15
Checking ECM Cables .........................................................................................................................15
VALVE CALIBRATION CHARTS ...............................................................................................................17
FAN CFM CALIBRATION CURVES - TABLE 3 ..........................................................................................18
IN-WARRANTY RETURN PROCEDURE ...................................................................................................19
SERIES FLOW TERMINAL UNIT WEIGHTS -TABLE 4 .............................................................................19
PARALLEL FLOW TERMINAL UNIT WEIGHTS - TABLE 5 ......................................................................20
REPLACEMENT PARTS LIST ....................................................................................................................20
2
JOHNSON CONTROLS
Page 3
FORM ET130.13-NOM3 (708)
SAFETY SYMBOLS
The following symbols are used in this document to alert the reader to areas of potential hazard:
DANGER indicates an im mi nent ly
hazardous situation which, if not
avoid ed, will re sult in death or se ri ous
injury.
WARNING indicates a potentially
haz ard ous sit u a tion which, if not
avoid ed, could result in death or se ri ous in ju ry.
CAUTION identifi es a hazard which
could lead to damage to the ma chine,
damage to other equip ment and/or
en vi ron men tal pollution. Usually an
in struc tion will be given, together with
a brief ex pla na tion.
NOTE is used to highlight ad di tion al
information which may be helpful to
you.
JOHNSON CONTROLS
3
Page 4
FORM ET130.13-NOM3 (708)
SAFETY CONSIDERATIONS
The equipment covered in this manual is designed for
safe and reliable operation when installed and operated
within its’ design specifi cation limits. To avoid personal
injury or damage to equipment or property while
installing or operating this equipment, it is essential
that qualifi ed, experience personnel familiar with local
codes and regulations, perform these functions using
good judgment and safe practices. See the following
cautionary statements.
ELECTRICAL SHOCK HAZARDS
All power must be disconnected prior
to installation and servicing this equipment. More then one source of power
may be present. Disconnect, tag and
lock out all power sources to avoid
electrocution or shock hazards.
ROTATING EQUIPMENT HAZARD
Fans may start automatically. Disconnect all power and control circuits
prior to servicing to avoid injury.
Caution should be exercised due to the
possibility of fans “free wheeling” due
to connected duct air movement.
HOT PARTS HAZARD
Electric heaters may start automatically. Disconnect all power and control circuits prior to servicing to avoid
burns.
Check that rigging and lifting equipment can safely support the equipment
assembly and component weights.
All assemblies must be adequately
secured during lifting and rigging
by temporary supports and restraints
until equipment is permanently fastened and set in its’ fi nal location per
manufacturer’s guidelines.
All temporary and permanent equipment supports must be capable of
safely supporting the equipment’s
weight as well as any additional live,
seismic or dead loads that may be
encountered. All supports must be
designed to meet applicable local codes
and ordinances.
All fastening devices must be designed
to mechanically lock the assembly in
place without the capability of loosening or breaking away due to system
operation and vibration.
Dampers may activate automatically.
Disconnect the control circuits or
pneumatic control systems and secure
all dampers when servicing damper,
actuators or linkage to avoid injury.
Wear the appropriate personal protective equipment (gloves, safety glasses,
leather closed toe shoes, etc) when
handling this equipment recognizing
that sheet metal components are being
handled.
4
JOHNSON CONTROLS
Page 5
FORM ET130.13-NOM3 (708)
INSPECTION
Upon receipt of equipment, carefully check all items
against the bill of lading to ensure that all equipment has
been received (including shipped loose items). Note any
discrepancy on the bill of lading before signing. Note
that “ship loose” items may be included with the base
unit or shipped (bulk) on a separate pallet.
Inspect all equipment for any signs of damage caused
during transit. On equipment with electric heat, make
sure to check the coil fi ns and/or make sure that the
resistance heat coils are not damaged. Note any
visual damage on the bill of lading before signing.
Immediately report all visual and concealed damage
to the carrier and fi le a claim with the carrier.
Locate the model number on the nameplate and check
that the correct equipment has been received. Verify
that all options have been included, such as controls,
fi lters, heating coils, etc. Also check that equipment
voltage agrees with the building parameters. If a
discrepancy is discovered between what was ordered and
received, contact your local Enviro -Tec representative
immediately.
Do not use fl ow sensor, connecting
tubes, coil stubouts or damper shaft
as a handle when lifting or moving
equipment as damage may occur.
Do not handle by equipment’s heating elements, as permanent damage
will occur.
Do not work on damper until associated actuator is disconnected.
Never pressurize equipment above
specifi ed test pressure.
Protect adjacent fl ammable materials
when brazing. Use fl ame and heat
protection barriers where need. Have
a fi re extinguisher at hand and ready
for immediate use.
STORAGE
If equipment is to be stored prior to installation, observe
the following precautions:
1. Choose a dry storage site that is reasonably level
and sturdy to prevent undue stress or permanent
damage to the equipment. Set equipment off
ground if in moisture prone areas.
2. Cover entire equipment with protective tarp or
moisture proof cover. Extend cover under equipment if stored on ground. Secure cover with
adequate tie downs. Be sure that piping connections have protective shipping caps installed.
3. Do not stack equipment any higher than how
it was shipped. If equipment has been unpackaged since receipt from the factory, do not stack
without equivalent support between units as was
supplied from the factory.
Check assembly and component
weights to be sure that the rigging
equipment can handle them safely.
Note; also check the centers of gravity
and any specifi c rigging instructions.
Check for adequate ventilation so
fumes do not migrate through ductwork
to occupied spaces when welding or
cutting around the equipment.
JOHNSON CONTROLS
PRE-INSTALLATION INSPECTION
Do not use fl ow sensor, connecting
tubes, coil stubouts or damper shaft
as a handle when lifting or moving
equipment as damage may occur.
Do not handle by equipment’s heating elements, as permanent damage
will occur.
5
Page 6
FORM ET130.13-NOM3 (708)
While viewing the damper from the discharge of the
equipment, disengage the actuator by depressing the
manual override button on the side of the actuator and
rotate the shaft fully. The damper should close fully and
there should be no gaps between the damper gasketing
and the inside of the valve.
Units equipped with ECM or 1 horsepower motors will
ship from the factory with a removable motor / wheel
support installed in the fan housing. It is imperative that
this shipping support be removed prior to equipment
startup or damage may result to both the motor and the
wheel. A label will be affi xed to the outside of the unit
next to the power entry point, to identify the presence
of this shipping insert.
Manually rotate the fan wheel to assure that there are
no obstructions within the fan housing.
Equipment supplied with ECM motors, backward or reverse rotation of
the blower is detrimental to the ECM
motor.
SEQUENCE OF OPERATION
All fan-powered equipment is supplied with a rectangular
discharge and comes in one of two confi gurations:
1. Parallel fl ow with hot water coils mounted on the
plenum induction air opening.
2. Series fl ow with hot water coils mounted on the
discharge opening.
Either the primary air valve, fan or
both can deliver airfl ow to the occupied
space. A back draft damper is provided,
when the fan is not operating. The effi ciency of this system is the same as
standard single duct VAV equipment.
In a typical control sequence applied to parallel fl ow
equipment, the air valve is closed to a zero minimum
airfl ow before the fan is energized. After the fan has
been energized, the reheat will be energized upon a
further drop in space temperature. Therefore, little
primary air is mixed with the heated air stream.
Series Flow
Fan must be energized prior to introduction of air through the primary
air valve or the possibilities exist that
the fan wheel will operate backwards
/ counter rotation.
On series fl ow equipment, the fan runs continuously
whenever the central air handler is in operation.
In response to the space temperature, the air valve
modulates the volume of primary air. The re-heat is
typically off during the air valve’s modulation. Should
the space temperature decrease to the point at which a
decrease in primary air will not maintain the desired
temperature, the reheat will be activated to increase the
discharge air temperature.
INSTALLATION
Note that for either confi guration, electric heaters (if
supplied) are always mounted on the unit discharge
opening.
Parallel Flow
On parallel flow equipment, the primary air valve
delivers cooled air to the equipment’s outlet. When the
space temperature decreases beyond the control of the
primary air valve, the fan is started along with the fi rst
stage of heat. The fan delivers warm plenum air from
the controlled space to the equipment’s outlet, which
is mixed with the primary air prior to being delivered
to the space.
6
Do not use fl ow sensor, connecting
tubes, coil stubouts or damper shaft
as a handle when lifting or moving
equipment as damage may occur.
Do not handle by equipment’s heating elements, as permanent damage
will occur.
JOHNSON CONTROLS
Page 7

FORM ET130.13-NOM3 (708)
Terminal equipment with electric heat must be installed
in a horizontal plane with respect to the air stream. Low
height equipment can be flipped over in the field to vary
or change control section handing.
Consult factory for application utilizing mercury contactors.
Clearances
All equipment covered in this document, including
those with electric heat, are ETL listed for 0.0”
clearance to combustibles. Refer to NEC and/or local
codes for minimum electrical clearances required for
service. Equipment should not make contact with any
structure located above or below the equipment without
appropriate isolation. Equipment supplied with bottom
access panels requires sufficient clearance to remove
access panels for service.
Duct Connections
All duct connections should be configured and installed
in accordance with SMACNA guidelines and all local
code requirements. Check to see that duct fasteners are
appropriate for the application and do not impinge any
internal components. Pay particular attention to internal
electrical components.
Fasten and seal all ductwork connections in accordance
with project specifications.
Allow a minimum of 1½ duct diameters of straight
duct prior to equipment inlet and after equipment
discharge.
The diameter of the inlet duct for round valves must
be equal to the listed size of the equipment. The round
air valve inlet collar of the equipment is 1/8” smaller
then listed size in order to allow the round ductwork to
slip over the air valve inlet collar.
DO NOT INSERT
DUCTWORK INTO AIR VALVE INLET COLLAR.
Hanging and Mounting Equipment Overhead
Johnson Controls strongly recommends that all
equipment be suspended from the upper most ceiling or
a structural element of the building, independent of the
false ceiling grid. Suspension devices are field supplied,
sized and designed by others. Johnson Controls will not
accept responsibility for equipment mounting supports.
Equipment must be installed in a level horizontal plane.
Failure to level equipment properly may prevent proper
operation of controls. See Tables 3 and 4 for equipment
weights.
When requested, equipment is supplied with optional
hanger brackets for use with (up to) a 3/8” [10mm]
diameter hanger rod. See submittal drawings for hanger
bracket locations.
Hanger straps may be utilized as an alternate means of
suspending the equipment. Do not secure hanger straps
to electric heaters, coils or control enclosures. Hanger
straps can be mounted directly to the sides and bottom
of equipment casing, such that they do not interfere with
working components or access panels using screws that
are no longer than 1” [25mm].
When hanging equipment, always use the support
method as prescribed for rectangular duct in the job
specifications.
When making ductwork connection to air valve inlet
collar and insulating air valve inlet, take caution not to
damage or remove the flow sensor connections, which
are vital to equipment control.
Provide insulation around entire inlet collar (all the way
to the equipment casing).
Cut “slits” in the insulation for the flow tubes and secure
with duct tape.
Permissible discharge duct connections are straight
flanged, slip and drive or drive and screw.
If equipment is to be installed in a location with high
humidity, external insulation around the heating coil
should be installed.
After all connections are made, check that the entire
ductwork system is airtight. In some high-pressure
systems, duct sealer may be necessary.
Sound Critical Applications
Flexible duct connectors are not recommended on
equipment discharge. The sagging membrane of
these fittings can cause turbulence and locally high
air velocities that generate noise. Also, lightweight
membrane material allows noise to breakout, which can
increase sound levels in the space below.
JOHNSON CONTROLS
7
Page 8
Coil Connections
FORM ET130.13-NOM3 (708)
Power Requirements
Hot water and steam coils are male sweat connection.
Use appropriate brazing alloy for system temperature
and pressure. Refer to equipment construction submittal
drawing for specifi c connection size. MAXIMUM
HYDRONIC SYSTEM OPERATING PRESSURE
MUST NOT EXCEED 300 PSIG. MAXIMUM
STEAM SYSTEM PRESSURE MUST NOT
EXCEED 15 PSIG.
If necessary, you can change coil connection handing on
one and two row coils from left-hand to right-hand (and
vice-versa) by rotating the coil “like a steering wheel”
180° about its central axis when facing the fi ns. For
three and four row coils, consult factory.
Electrical
All fi eld wiring must comply with NEC and all local
codes. Electrical and control diagrams are affi xed to the
interior of the control enclosure box.
Minimum circuit ampacity (MCA) designates the
maximum operating load of the equipment for sizing
wire feeders. Supply Circuit Protection designates the
largest breaker in the electrical service panel that can
be used to protect the equipment.
Use Copper conductors only.
OPERATION
Start-Up
Thorough safety precautions should always be taken
when performing startup and service. Refer to safety
considerations at the beginning of this Operation
Manual. Only qualifi ed individuals should perform
these tasks.
Prior to start-up, the project control sequence/wiring
diagram should be obtained and thoroughly understood.
If factory supplied analog or DDC controls are utilized,
refer to the applicable Operation Manual for start-up
and balancing information. Check that all electrical
work is fi nished and properly terminated. Check that
all electrical connections are tight and that the proper
voltage is connected.
Three Phase AC power imbalance must not exceed 2%.
Be sure that the following guides are met:
1. AC power is within 10% of rated voltage at rated
frequency. (See equipment nameplate for rat-
ings)
2. AC power is within 5% of rated frequency at rated
voltage.
3. A combined variation in the voltage and frequency
of 10% (sum of absolute values) of rated values
provided the frequency variation does not exceed
5% of rated frequency.
Primary Air Damper and Fan Adjustment
Unit should not be balanced until the incoming power
supply is at the permanent voltage condition. All
discharge ductwork must be connected. The minimum
recommend discharge static pressure for all fan-powered
equipment is 0.1” wg. and 0.2” on 3/4hp and larger
(see fan curves located on the Enviro -Tec web site for
specifi cs). All foreign materials should be removed
from the duct system. Optional filters should be
installed as required.
Unless otherwise specifi ed, the fan motor has three
speeds. Fan speed is selected in the electrical control
enclosure by one of two methods. For units with dual
motors, see Figure 1A showing how the fan speed is
selected by placement of a factory supplied jumper
wire on a terminal strip. Otherwise see Figure 1B
which shows the wire to wire fan speed selection
method. Simply insert the male quick connect (from
control circuitry) into the female quick connect which
corresponds to high (black), medium (blue), or low (red)
motor speeds. Units are set to low speed at the factory
as standard in order to optimize energy effi ciency. A
three position rotary switch is optional.
ELECTRICAL SHOCK HAZARD
All power must be disconnected prior
to changing jumper or serious injury
or death will result.
Check to make sure that heater elements are not
damaged, free of all foreign material and proper control
interlocks have been made before energizing the electric
heater.
8
All fan-power equipment is shipped with an electronic
solid state fan speed controller (SCR) for PSC motors.
The SCR is located in the control enclosure. Using
a 1/8” fl at blade screwdriver, adjusting the manual
potentiometer clockwise will increase the motor speed;
adjusting the potentiometer counterclockwise will
decrease the motor speed.
JOHNSON CONTROLS
Page 9

FORM ET130.13-NOM3 (708)
LD13840
LD13848
JUMPER
LD13840
FIGURE 1A - FAN SPEED CONTROL WITH JUMPER
LD13848
FIGURE 1B - WIRE TO WIRE FAN SPEED SELECTION
Series Flow, PSC Motor with SCR
1. Make sure that the motor speed is at maximum by
turning the potentiometer located on the Fan Speed
Control (SCR) all the way clockwise.
2. Energize motor and let motor operate for a minimum of 15 minutes. During this run-in, check
ductwork for any leaks and repair as necessary.
3. If remote balancing dampers are present set them
to full open.
4. Attach a manometer or magnehelic to the differential pressure ports in the pneumatic tubing leading
to the high and low side of the inlet air probe and
measure the velocity pressure. Adjust and set the
primary maximum airfl ow as necessary to meet
job site requirements. See Table 2, Airfl ow vs.
Velocity Pressure chart. This chart, with different
inlet sizes, is also located on the side of the equipment.
5. If balancing dampers are present, adjust and set
proportionally to desired position. To minimize
noise levels, leave these dampers in the most open
position possible.
6. If total airfl ow is too low, de-energize unit and
move jumper to next higher speed.
7. Energize unit and adjust Fan Speed Control (SCR)
for desired total airfl ow.
8. The maximum primary air balance may be checked
using the optional radiated sound damper, or by
suspending a sheet of notebook paper over the
inlet using a small piece of tape. If the damper or
notebook paper is blowing out of the unit, the primary maximum airfl ow is too high. If the paper or
damper is being pulled into the unit, the maximum
primary airfl ow is too low. Optimum balance is
achieved when the damper or paper hangs straight
down.
Parallel Flow, PSC Motor with SCR
1. Make sure that the motor speed is at maximum by
turning the potentiometer located on the Fan Speed
Control (SCR) all the way clockwise.
2. With primary air valve in the closed position, energize motor and let motor operate for a minimum
of 15 minutes. During this run-in, check ductwork
for any leaks and repair as necessary.
3. If balancing dampers are present, adjust and set
proportionally to desired position. To minimize
noise levels, leave these dampers in the most open
position possible.
4. If fan airfl ow is too low, de-energize unit and move
jumper to next higher speed.
5. De-energize motor and perform minimum and
maximum primary air balance. See Table 2, Air-
fl ow vs. Velocity Pressure chart. This chart, with
different inlet sizes, is also located on the side of
the equipment.
An extra jumper is required on units
with 480 VAC motors. See wiring diagram attached to unit.
JOHNSON CONTROLS
9
Page 10

Remote
j
Manual
umper
24 volts A/C
15A&B
24 volts AC
16A&B
FORM ET130.13-NOM3 (708)
Analog input 2-10 VDC
VDC test loop
Common test loop
FIGURE 2 - ETPWM BOARD LAYOUT
Series Flow ECM Motor Balancing
Fan must be energized prior to introduction of air through the primary
air valve or the possibility exists that
the fan wheel will operate backward
(counter rotation). Reverse / counter
rotation of the blower over a period of
time will damage the ECM motor.
See Figure 2 for ETPWM Board Layout.
Commissioning
1. If remote balancing dampers are present set them
to full open.
2. Make sure there are no obstructions in the discharge
ductwork and/or at the plenum opening. If the unit
has a radiated sound damper at the plenum opening,
make sure it swings freely.
3. With unit de-energized, disable fan by disconnecting one of the wires leading to fan relay coil or
contacts.
4. Energize unit.
5. Verify that there is 22 to 28 VAC across terminals
15 and 16 of ETPWM board.
6. Verify that there is 15 VDC across terminals G (+)
and COM (-) of ETPWM board.
7. Connect voltmeter to wire loop VDC (+) and wire
loop COM (-) of ETPWM board. Verify DC voltage is between 5.1 and 9.9 VDC.
8. De-energize unit and reconnect wire to fan relay
removed in step 3. Make sure that all wires are
reconnected per electrical schematic shipped with
unit.
“G” activation line
Signal common
PWM outputManual speed
adjustment
LD13841
9. Energize unit and let motor operate for a minimum
of 15 minutes. During this run-in, check ductwork
for any leaks and repair as necessary.
Balancing
1. Adjust fan to the design CFM using either the
Manual or Remote Fan CFM Adjustment method
listed below.
2. Attach a manometer or magnehelic to the differential pressure ports in the pneumatic tubing leading
to the high and low side of the inlet air probe and
measure the velocity pressure. Adjust and set the
primary maximum airfl ow as necessary to meet
job site requirements. See Table 2, Airfl ow vs.
Velocity Pressure chart. This chart, with different
inlet sizes, is also located on the side of the equipment.
3. If balancing dampers are present, adjust and set
proportionally to desired position. To minimize
noise levels, and prevent premature ECM motor
failure, leave these dampers in the most open position possible.
4. The maximum primary air balance may be checked
using the optional radiated sound damper, or by
suspending a sheet of notebook paper over the
inlet using a small psiece of tape. If the damper or
notebook paper is blowing out of the unit, the primary maximum airfl ow is too high. If the paper or
damper is being pulled into the unit, the maximum
primary airfl ow is too low. Optimum balance is
achieved when the damper or paper hangs straight
down.
10
JOHNSON CONTROLS
Page 11

FORM ET130.13-NOM3 (708)
Manual Fan CFM Adjustment
1. Verify that the jumper on ETPWM board is in the
“MAN” position (shipped from factory in Manual
mode)
2. Connect voltmeter to wire loop VDC (+) and wire
loop COM (-).
3. Determine the DC voltage for required airfl ow from
the Fan Calibration Curve supplied on the side of
the equipment. Use the bottom (5 to 10 volts DC)
scale on the chart. An example Fan Calibration
curve is shown in Table 3; however, the curve on
the side of the equipment should be used in determining the voltage.
4. Using a 1/8” fl at bladed screwdriver, adjust the
manual speed potentiometer, labeled SPD, to
obtain the required voltage. Clockwise increases
airfl ow, counterclockwise decreases airfl ow.
5. Do not set the voltage lower than 5.1 VDC or
higher than 9.9 VDC or motor may experience
starting problems.
6. Do not set the balance voltage outside limits of the
voltage/CFM curve or erratic motor operation and
eventual failure may result.
Remote Fan CFM Adjustment
1. Relocate the jumper on ETPWM board to the REM
position.
2. Determine the DC voltage for required airfl ow from
the Fan Calibration Curve supplied on the side of
the equipment. Use the top (2 to 10 Analog Input
Volts DC) scale on the chart. An example Fan
Calibration curve is shown in Table 3; however,
the curve on the side of the equipment should be
used in determining the voltage.
3. Remotely adjust the external voltage source to the
desired volts DC for required airfl ow.
4. Do not operate motor at control voltage lower than
2.1 VDC or higher than 9.9 VDC or motor may
experience starting problems.
5. Do not operate motor at control voltage outside
limits of the voltage/CFM curve or erratic motor
operation, and eventual failure may result.
Status LED
When the motor is running, the LED alternates between
CFM and RPM indications. In the RPM mode, LED
turns on for a period of approximately 220 microseconds
at a rate of 36 pulses per revolution. This mode lasts
for ten seconds. Due to the rapid rate, LED will appear
to be dimly lit, not fl ashing. As RPM is increased,
brightness will increase. In the CFM mode, the LED
will fl ash slowly, and at maximum brightness, once for
every 100 CFM. Accuracy is +/- one fl ash. LED will
then return to RPM mode, and cycle will repeat.
MAINTENANCE
Factory Provided Damper Actuator
Equipment may be supplied with a fi eld
or factory mounted damper actuator.
If actuator is factory provided, see
ACT24 Actuator IOM available at
www.enviro-tec.com. See Table 1 for
maximum wire lengths for control
voltage.
TABLE 1 - MAXIMUM WIRE LENGTHS
WIRE SIZE MAX FEET
16 GA 1225 FT
18 GA 725 FT
20 GA 400 FT
22 GA 200FT
Damper Shaft
There is an indicator on the end of the damper shaft that
can be used to determine the position on the damper
blade. If the indicator is horizontal, the damper is
completely open.
Motor/Blower
Fan powered terminal unit motors are equipped with
permanently lubricated bearings and require little or
no maintenance. The frequency of required cleaning
is dependent on the operating hours of the system,
fi lter maintenance and effi ciency as well as dirt load.
Periodically inspect the motor and blower-housing wheel
for accumulation of dust and clean as necessary.
JOHNSON CONTROLS
11
Page 12

FORM ET130.13-NOM3 (708)
Cleaning
1. Disconnect all electrical power to the equipment,
tag and lock out power source.
2. Gain access to motor housing through access
panel.
3. Use soft brush and vacuum to remove loose debris
from motor housing.
4. Replace access panels and restore electrical power
to equipment.
5. Use caution to assure that any contaminated material does not contact other areas of the equipment or
building. Properly dispose of all contaminated
materials.
Replacement
1. Disconnect all electrical power to the equipment,
tag and lock out power source.
2. Remove bottoms access doors by removing the
screws from the access door and then remove side
rail screws to access to the motor.
3. Disconnect fan motor wiring.
4. Remove securing fan assembly to discharge
5. Loosen fan wheel set screw.
6. Remove nuts securing motor to housing and remove motor.
7. Remove fan cut off.
8. Remove fan wheel and clean as needed.
9. Reinstall wheel, cut off, motor, and housing.
Coil
The frequency of required cleaning is dependent on the
operating hours of the system, fi lter maintenance and
effi ciency as well as dirt load.
Fin edges are sharp. Fins are fragile;
care must be exercised to avoid damaging fi ns. Do not use solutions to clean
coils; drain pans are not present to
remove collected solution.
Cleaning
1. Disconnect all electrical power to the equipment,
tag and lock out power source.
2. Put on appropriate personal protective equipment.
3. Gain access to coil either through ductwork or
optional coil access panel.
4. Use soft brush and vacuum to remove loose debris
from sides of coil.
5. Straighten any coil fi ns that may have been damaged during cleaning process with fi n comb.
6. Replace ductwork or access panel and restore
electrical power to equipment.
7. Use caution to assure that any contaminated material does not contact other areas of the equipment or
building. Properly dispose of all contaminated
materials.
Replacement
1. Disconnect all electrical power to the equipment,
tag and lock out power source.
2. Disconnect all ductwork, if applicable.
3. Remove fi lter rails/ fi lter clips, if applicable.
4. Cut or un-braze water connection at coil.
5. Disconnect coil from equipment by removing
screws on the exterior perimeter of the coil. Low
height equipment only has mounting screws located on the sides of the equipment.
Important: Coils may become externally fouled as result of normal
operation. Dirt on the surface of the
coil reduces its ability to transfer heat
that can result in reduced performance
and increased operating energy cost.
If the dirt on the surface of the coil
becomes wet, microbial growth (mold)
can result, possibly causing unpleasant odors and serious health related
indoor air quality problems.
12
JOHNSON CONTROLS
Page 13

FORM ET130.13-NOM3 (708)
Electric Heat
Electric heat requires a minimum of
0.1” W.G. downstream static pressure
for proper operation.
Electric heaters come equipped with a primary auto-reset
limit switch to provide protection against overheating.
The primary auto-reset limit switch automatically cuts
the heater off when overheating occurs, and turns the
heater back on when the elements have cooled down.
Should the secondary one-time trip limit switch trip,
they will need to be replaced with a limit switch that
has the same trip temperature as the one-time trip limit
switch originally supplied with the electric heater.
Optional secondary manual reset limit switches are
available.
Electric heaters may be equipped with optional
disconnect switch, fuses and airfl ow proving switch.
Replacement
1. Disconnect all electrical power to the equipment,
tag and lock out power source.
2. Disconnect discharge ductwork from unit.
3. Remove electric heat assembly from equipment.
4. Before removing wires from the element rack
T-Plate, mark where the wires are connected so
that they can be reconnected correctly on the new
element rack.
5. Remove the wires and screws holding the heater
T-plate in the control enclosure and remove element rack.
6. Insert new element rack into control enclosure and
replace screws to secure the element rack to control
enclosure.
7. Replace wires.
8. Close control enclosure cover before turning on
the power.
JOHNSON CONTROLS
13
Page 14

TROUBLESHOOTING GUIDELINES
PROBLEM POSSIBLE CAUSE CORRECTIVE ACTION
Replace fuse or reset circuit breaker; verify and correct
source of overload.
Compare actual supply power with motor nameplate
recommendations. Contact power company for adjustments.
Remove fan cover, clean fan and replace cover. May be
necessary to replace motor.
Select lower tap to Reduce motor speed and re-adjust
fan SCR.
Check transformer and transformer fusing (if applicable)
replace if necessary.
Replace limits or reset as applicable.
Check for continuity across limit to determine if open,
replace as necessary.
Check sensing tube, red tube = high and black tube =
low, rotate if needed.
Increase airfl ow to obtain a minimum of .1 in. w.c. external static.
Check for open or damaged elements and replace as
necessary.
Check Wiring.
Check for compatibility.
Check location of thermostat; might be installed in a
“too hot” or “too cold” location. Check heat outputs on
controller.
Check contactors for open coil.
Check for damaged elements.
Motor Fails to Start
Motor Overheats
Excessive Motor
Noise
Low Coil Capacity
Heater Does Not
Operate
Low or High Tem-
perature Rise
Heater with SSR
Does Not Operate
Blown fuse or open circuit breaker
Shipping Cardboard insert in fan wheel Remove insert and restart.
Improper wiring connections Check wiring with diagram supplied on unit.
Improper current supply
Mechanical failure Check motor and confi rm rotates freely.
Overloaded motor Reduce load or replace with a larger motor (refer factory).
Motor fan is clogged with dirt preventing
proper ventilation
Lack of required external static pressure Add required external static pressure.
Motor mounting bolts loose Tighten motor mounting bolts.
Fan wheel rubbing on fan housing Align wheel in housing.
Loose fan wheel Align and tighten.
SCR set too low
Incorrect airfl ow Check fan’s operating conditions.
Incorrect GPM Check water pumps, valves and lines for obstructions.
Dirty coil fi ns Clean coil Fins.
Dirty fi lter (where applicable) Replace fi lter.
Incorrect water temperature Provide proper water temperature.
No Power Check Disconnect.
No Control Voltage
Blown Fuse Replace fuse.
Open Limit (primary or secondary)
Airfl ow Incorrect Direction
Low External Static Pressure
Damaged elements
Incompatible Thermostat or Controller
Problems with Additional Stages
Incorrect CFM Check for blocked duct or location of heater.
Incorrect Signal Applied Verify signal input.
Interface Board Fuse Blown Replace fuse.
FORM ET130.13-NOM3 (708)
14
JOHNSON CONTROLS
Page 15

ECM SPECIFIC TROUBLESHOOTING GUIDELINES
PROBLEM POSSIBLE CAUSE CORRECTIVE ACTION
Motor Fails to Start
Motor Surges
Excessive Motor
Noise
Poor Performance
Motor Runs in
Reverse, Doesn’t
Respond to Speed
Adjustment
CFM Adjustment voltage above 9.9
VDC or below 5.1 VDC
ECM cables improperly seated at motor
ECM cables open or intermittent Replace cable(s). See section on checking cables below.
Mechanical failure Check motor and confi rm it rotates freely.
Electrical failure Replace motor.
Fan Relay Contacts Oxidized/Sulfi dized Replace fan relay.
Fan CFM adjustment voltage outside
range of Fan Calibration Curve
ESP (external static pressure) too high
Motor mounting bolts loose Tighten motor mounting bolts.
Fan wheel rubbing on fan housing Align wheel in housing.
Loose fan wheel Align and tighten.
Lack of required external static pressure Add required external static pressure.
Wrong Program Contact Factory.
Motor Failure Replace.
Properly adjust CFM voltage.
Unplug cables from motor and re-install, making sure
plugs on cables are fully seated in motor receptacles.
Adjust voltage to value within range of Fan Calibration
Curve.
Verify balancing dampers as open as possible (at least
one should be fully open). Verify radiated sound damper
(if supplied) swings freely. Verify plenum opening is unobstructed. Verify fi lter (if supplied) is not dirty and does
not obstruct fl ow of plenum air.
FORM ET130.13-NOM3 (708)
Checking ECM Cables
Remove power from the unit. Unplug signal cable at
motor, but leave quick connects attached to ETPWM
board and fan relay or quick connect terminal block (see
Figure 3 and 4). Use ohmmeter to check continuity.
Repeat process for three wire power cable if signal cable
does not appear to be defective (see Figure 3 and 5).
Only very light force is required when
inserting meter probe into plug. Excess force will damage contacts.
JOHNSON CONTROLS
15
Page 16

FIGURE 3
FORM ET130.13-NOM3 (708)
LD13842
Black wire to P3 (PWM)
of ETPWM board
Green wire to P2 (Fan On/Off*)
of Fan Relay or Curtis Block
Red wire to P6 (LED)
of ETPWM board
FIGURE 4
10
12
13
14
15
16
11
9
1
2
3
White wire to P2 (COM)
of ETPWM board
BLACK
WHITE
4
5
6
7
8
Blue wire to P7 (LCOM)
of ETPWM board
GREEN
RED
BLUE
LD13843
FIGURE 5
16
LD13844
JOHNSON CONTROLS
Page 17

FORM ET130.13-NOM3 (708)
VALVE CALIBRATION CHARTS
Applicable calibration charts are affi xed to each unit or may be downloaded from the ENVIRO -TEC® website at
www.enviro-tec.com.
TABLE 2
JOHNSON CONTROLS
LD13845
17
Page 18

FAN CFM CALIBRATION CURVES - TABLE 3
FORM ET130.13-NOM3 (708)
18
LD13846
JOHNSON CONTROLS
Page 19

FORM ET130.13-NOM3 (708)
IN-WARRANTY RETURN PROCEDURE
Refer to ENVIRO -TEC Warranty Parts Policy at www.enviro-tec.com.
SERIES FLOW TERMINAL UNIT WEIGHTS -TABLE 4
CFR (22 GA)
BASE UNIT WEIGHT ADDERS TO BASE UNIT WEIGHT
SIZE
0506 58 13 5 7 10 13 20
0606 57 13 5 7 10 13 20
080658135 7101320
061159135 7101320
081160145 7101320
101161145 7101320
0818 75 16 7 11 16 22 23
1018 77 17 7 11 16 22 23
1218 79 17 7 11 16 22 23
1021 79 17 9 11 16 22 23
1221 81 18 9 11 16 22 23
1421 83 18 9 11 16 22 23
1224 108 24 11 23 34 45 27
1424 111 24 11 23 34 45 27
1230 174 38 21 42 63 84 42
1430 177 39 21 42 63 84 42
1630179392142638442
1440 181 40 21 42 63 84 42
1640 184 40 21 42 63 84 42
1644194422142638452
1844 209 46 21 42 63 84 52
SINGLE
WALL
DOUBLE
WALL
1 ROW 2 ROW 3 ROW 4 ROW
WATER COIL
ELEC.
HEAT
JOHNSON CONTROLS
19
Page 20

FORM ET130.13-NOM3 (708)
PARALLEL FLOW TERMINAL UNIT WEIGHTS - TABLE 5
VFR (22 GA)
BASE UNIT WEIGHT ADDERS TO BASE UNIT WEIGHT
SIZE
444
5 44 1014182218
6 46 1014182218
8 48 1014182220
10 85 14 19 25 30 27
12 87 14 19 25 30 31
14118 1621293426
16120 1621293431
SINGLE
WALL
DOUBLE
WALL
PENDING
1 ROW 2 ROW 3 ROW 4 ROW
10 14 18 22 18
WATER COIL
ELECTRIC
HEAT
REPLACEMENT PARTS LIST
SERIES FLOW TERMINALS
MOTORS AND BLOWERS, MODEL CFR
SIZE H/P
XX04 1/12 PM-02-1412 PM-02-1413 PM-02-1414 5.75-7 PM-06-0005
XX06 1/6 PM-02-0026 PM-02-0030 PM-02-0032 9-4T PM-06-0119
XX11 1/4 PM-02-0046 PM-02-0051 PM-02-0052 9-7T PM-06-0122
XX18 1/2 PM-02-0068 PM-02-0072 PM-02-0076 9-9R PM-06-0124
XX21 3/4 PM-02-0098 PM-02-0104 PM-02-0106 10-10T PM-06-0135
XX24 1 PM-02-0124 PM-02-0126 PM-02-0128 10-9R PM-06-0134
XX30 2 @ 1/2 PM-02-0068 PM-02-0072 PM-02-0076 2 @ 9-9R PM-06-0124
XX40 2 @ 3/4 PM-02-0098 PM-02-0104 PM-02-0106 2 @ 10-10T PM-06-0135
XX44 2 @ 1 PM-02-0124 PM-02-0126 PM-02-0128 2 @ 10-9R PM-06-0134
120 208/230 277
MOTOR
BLOWER
SIZE
PART NO.
MOTORS AND BLOWERS, MODEL CFRQ
SIZE H/P
XX06 1/6 PM-02-0026 PM-02-0030 PM-02-0032 9-4T PM-06-0119
XX11 1/4 PM-02-0046 PM-02-0051 PM-02-0052 9-7T PM-06-0122
XX17 1/2 PM-02-0068 PM-02-0072 PM-02-0076 10-8T PM-06-0132
XX19 3/4 PM-02-0098 PM-02-0104 PM-02-0106 10-9T PM-06-0133
XX21 1 PM-02-0124 PM-02-0126 PM-02-0128 10-10T PM-06-0135
XX24 1 PM-02-0124 PM-02-0126 PM-02-0128 10-9R PM-06-0134
XX30 2 @ 1/2 PM-02-0068 PM-02-0072 PM-02-0076 2 @ 9-9R PM-06-0124
20
MOTOR
120 208/230 277
BLOWER
SIZE
PART NO.
JOHNSON CONTROLS
Page 21

FORM ET130.13-NOM3 (708)
ECM MOTOR OPTION FOR MODELS CFR AND CFRQ
SIZE H/P
120/240 277
MOTOR
XX11 1/3 PM-02-1334 PM-02-1302
XX18 1/2 PM-02-1335 PM-02-1303
XX19 1/2 PM-02-1335 PM-02-1303
XX21 3/4 PM-02-1336 PM-02-1304
XX24 1 PM-02-1337 PM-02-1305
XX40 2 @ 1/2 PM-02-1335 PM-02-1303
MOTORS AND BLOWERS, MODEL CFL
SIZE H/P
MOTOR
120 208/230 277
BLOWER
SIZE
PART NO.
XX06 1/6 PM-02-0026 PM-02-0030 PM-02-0032 9-4R PM-06-0118
XX08 1/4 PM-02-1404 PM-02-1403 PM-02-1402 10-4R PM-06-0145
XX10 1/4 PM-02-1404 PM-02-1403 PM-02-1402 10-5R PM-06-01
XX19 2 @ 1/4 PM-02-1404 PM-02-1403 PM-02-1402 2 @ 10-4R PM-06-0145
ECM MOTOR OPTIONS FOR MODEL CFL
SIZE H/P
120/240 277
MOTOR
XX06 1/3 PM-02-1405 PM-02-1406
XX08 1/3 PM-02-1405 PM-02-1406
XX10 1/2 PM-02-1407 PM-02-1408
XX19 2 @1/3 PM-02-1405 PM-02-1406
PARALLEL FLOW TERMINALS
MOTORS AND BLOWERS, MODEL VFR
SIZE H/P
120 208/230 277 SIZE
MOTOR BLOWER PART NO.
XX04 1/12 PM-02-1412 PM-02-1413 PM-02-1414 5.75-7 PM-06-0005
XX06 1/6 PM-02-0026 PM-02-0030 PM-02-0032 9-4T PM-06-0119
XX11 1/4 PM-02-0046 PM-02-0051 PM-02-0052 9-7T PM-06-0122
XX18 1/2 PM-02-0068 PM-02-0072 PM-02-0076 10-9T PM-06-0133
XX21 3/4 PM-02-0098 PM-02-0104 PM-02-0106 10-10T PM-06-0135
XX24 1 PM-02-0124 PM-02-0126 PM-02-0128 10-9R PM-06-0134
ECM MOTOR OPTIONS FOR MODEL VFR
SIZE H/P
120/240 277
MOTOR
XX06 1/3 PM-02-1334 PM-02-1302
XX11 1/2 PM-02-1335 PM-02-1303
XX18 1/2 PM-02-1335 PM-02-1303
XX21 3/4 PM-02-1336 PM-02-1304
XX24 1 PM-02-1337 PM-02-1305
JOHNSON CONTROLS
21
Page 22

FORM ET130.13-NOM3 (708)
MOTORS AND BLOWERS, MODEL VFL
SIZE H/P
MOTOR
120 208/230 277
BLOWER
PART NO.
XX04 1/8 PM-02-0001 PM-02-0003 PM-02-0005 PM-06-00148
XX09 1/4 PM-02-1367 PM-02-1368 PM-02-1369 PM-06-00148
XX15 1/2 PM-02-1376 PM-02-1377 PM-02-1378 PM-06-00150
MAGNETIC CONTACTORS
AMPS # OF POLES
24 120 240 277 480
COIL VOLTAGE
1 PE-05-1251 PE-05-1252 PE-05-1256 PE-05-1255 PE-05-1257
25
2 PE-05-2251 PE-05-2252 PE-05-2256 PE-05-2255 PE-05-2257
3 N/A N/A N/A N/A N/A
1 PE-05-1301 PE-05-1302 PE-05-1306 PE-05-1305 PE-05-1307
30
2 PE-05-2301 PE-05-2302 PE-05-2306 PE-05-2305 PE-05-2307
3 PE-05-3301 PE-05-3302 PE-05-3306 PE-05-3305 N/A
1 N/A N/A N/A N/A N/A
35
2 PE-05-2351 PE-05-2352 PE-05-2356 PE-05-2355 N/A
3 PE-05-3351 PE-05-3352 PE-05-3356 PE-05-3355 N/A
1 PE-05-1401 PE-05-1402 PE-05-1406 PE-05-1405 N/A
40
2 PE-05-2401 PE-05-2402 PE-05-2406 PE-05-2405 N/A
3 PE-05-3401 PE-05-3402 PE-05-3406 PE-05-3405 N/A
1 PE-05-1501 N/A PE-05-1506 N/A N/A
50
2 PE-05-2501 PE-05-2502 PE-05-2506 PE-05-2505 N/A
3 PE-05-3501 PE-05-3502 PE-05-3506 PE-05-3505 N/A
AMPS # OF POLES
1 PE-26-1351 PE-26-1352 PE-26-1356 PE-26-1355 PE-26-1357
35
2 PE-26-2351 PE-26-2352 PE-26-2356 PE-26-2355 PE-26-2357
3 PE-26-3351 PE-26-3352 PE-26-3356 PE-26-3355 PE-26-3357
1 PE-26-1501 PE-26-1502 PE-26-1506 PE-26-1505 PE-26-1507
50
2 PE-26-2501 PE-26-2502 PE-26-2506 PE-26-2505 PE-26-2507
3 PE-26-3501 PE-26-3502 PE-26-3506 PE-26-3505 PE-26-3507
MERCURY CONTACTORS
COIL VOLTAGE
24 120 240 277 480
22
JOHNSON CONTROLS
Page 23

FORM ET130.13-NOM3 (708)
CAPACITORS
µf PART # VOLTAGE
3 PE-12-0499 370
4 PE-12-0500 370
5 PE-12-0501 370
6 PE-12-0502 370
7.5 PE-12-0503 370
10 PE-12-0504 370
12.5 PE-12-0505 370
15 PE-12-0506 370
20 PE-12-0508 370
3 P E - 1 2 - 0 5 0 9 4 4 0
TRANSFORMERS
120 208/240 277 480 575
VA TO 24 VAC TO 24 VAC TO 24 VAC TO 24 VAC TO 24 VAC
50 PE-10-2105 PE-10-6105 PE-10-5105 PE-10-7105 PE-10-9105
75 PE-10-2107 PE-10-6107 PE-10-5107 PE-10-7107 PE-10-9107
FUSES
TYPE CC AMPS STANDARD TIME DELAY
600 VOLT 1 PE-06-0001 N/A
2 PE-06-0002 PE-06-0035
3 PE-06-0003 PE-06-0037
4 PE-06-0004 PE-06-0039
5 PE-06-0005 PE-06-0040
MINI
6 PE-06-0006 PE-06-0041
10 PE-06-0010 PE-06-0044
15 PE-06-0015 PE-06-0046
20 PE-06-0020 PE-06-0047
25 PE-06-0025 PE-06-0048
30 PE-06-0030 PE-06-0049
JOHNSON CONTROLS
23
Page 24

©2008 Johnson Controls, Inc.
P.O. Box 423, Milwaukee, WI 53203
www.johnsoncontrols.com
Printed in USA ET130.13-NOM3 (708)
New Release
 Loading...