

Page 1
AP200
MANUAL
Read and save these instructions
Lesen und behalten Sie diese Anleitung
Lisez et enregistrez ces instructions
Leggere e salvare queste istruzioni
Lea y guarde estas instrucciones
Прочтите и сохраните эти инструкции
阅读并保存这些说明
Page 2

DE Beachten Sie unbedingt alle Sicherheitshinweise (separat im Lieferumfang enthalten).
EN Always observe all safety notes (included separately in delivery).
FR Veuillez respecter impérativement l’ensemble des consignes de sécurité
(fournies séparément dans le contenu de la livraison).
IT È indispensabile osservare tutte le indicazioni sulla sicurezza (contenute separatamente nel volume di fornitura).
NL Lees alle veiligheidsinstructies (afzonderlijk in de levering).
ES Tenga en cuenta siempre todas las indicaciones de seguridad (se suministran aparte junto con el producto).
PT Respeite sempre todas as notas de segurança (incluídas separadamente no fornecimento).
HU Feltétlenül ügyeljen az összes biztonsági útmutatóra (a szállítási terjedelem külön tartalmazza).
PL Należy koniecznie przestrzegać wszystkich wskazówek bezpieczeństwa (zawartych osobno w zakresie dostawy).
SE Följ alltid alla säkerhetsanvisningar (bifogas separat i leveransen).
FI Noudata ehdottomasti kaikkia turvallisuusohjeita (sisältyvät eriilisenä osana toimituslaajuuteen).
DK Overhold altid alle sikkerhedsanvisninger (medfølger separat).
Page 3

NO Alle sikkerhetsanvisningene (følger med separat) må følges strengt.
LV Obligāti ievērojiet visus drošības norādījumus (atsevišķi iekļauti piegādes komplektā).
LT Būtinai atsižvelkite į saugumo nurodymus (atskirai pridėti komplektacijoje).
EE Järgige tingimata kõiki ohutusjuhised (sisalduvad tarnekomplektis eraldi).
CZ Bezpodmínečně dodržujte všechny bezpečnostní pokyny (samostatně součástí dodávky).
SK Bezpodmienečne dodržiavajte všetky bezpečnostné pokyny (samostatná súčasť dodávky).
SI Obvezno upoštevajte varnostna navodila (vključena v obseg dobave kot ločen dokument).
HR Obavezno obratite pozornost na sve sigurnosne napomene (odvojeno se nalaze u opsegu isporuke).
GR Τηρείτε πάντα όλες τις οδηγίες ασφαλείας (περιλαμβάνονται ξεχωρι- στά στο παραδιδόμενο υλικό).
RU Изучите все указания по технике безопасности (входят в комплект поставки).
CN 务必注意所有安全规章 (在供货范围中单独提供)。
3
Page 4

4
DE Gebrauchsanweisung 5
EN Instructions for use 17
FR Mode d’emploi 29
IT Istruzioni per l’uso 41
NL Gebruiksaanwijzing 53
ES Instrucciones de uso 65
PT Instruções de utilização 77
HU Használati útmutató 89
PL Instrukcja obsługi 101
SE Bruksanvisning 113
FI Käyttöohje 125
DK Brugsanvisning 137
NO Bruksanvisning 149
LV Lietošanas instrukcija 161
LT Naudojimo instrukcijos 173
EE Kasutusjuhend 185
CZ Návod k použití 197
SK NÁVOD NA POUŽÍVANIE 209
SI Navodila za uporabo 221
HR Upute za uporabu 233
GR Οδηγίες χρήσης 245
RU Руководство по эксплуатации 257
CN 使用说明 269
Page 5

GEBRAUCHSANWEISUNG
5
de
Page 6

6
de
INHALTSVERZEICHNIS
Technische Daten 7
Einleitung 8
Produktvorteile 9
Hauptkomponenten 10
Betrieb des Allergy Pro® AP200 11
Sicherheit 11
Ein-/Ausschalten 12
Steuerung der Ventilatorgeschwindigkeit 12
Reinigung und Wartung 13
Filter austauschen 13
Oberflächen reinigen 14
Fehlerbehebung 15
Page 7

7
TECHNISCHE DATEN
Technische Daten*
Typenbezeichnung AP200
Leistungsaufnahme 45 W
Netzspannung 220 – 240V ~ 50 Hz
Reinigungsleistung (CADR) – Staub — Rauch — Pollen 265 m3/h — 233 m3/h — 335 m3/h
Betriebsgeräusch 62 dB(A)
Abmessungen 224 x 176 x 647 mm
Gewicht 4,2 kg
Ersatzteile Filter – AAP200
* Änderungen vorbehalten
de
Page 8
8
de
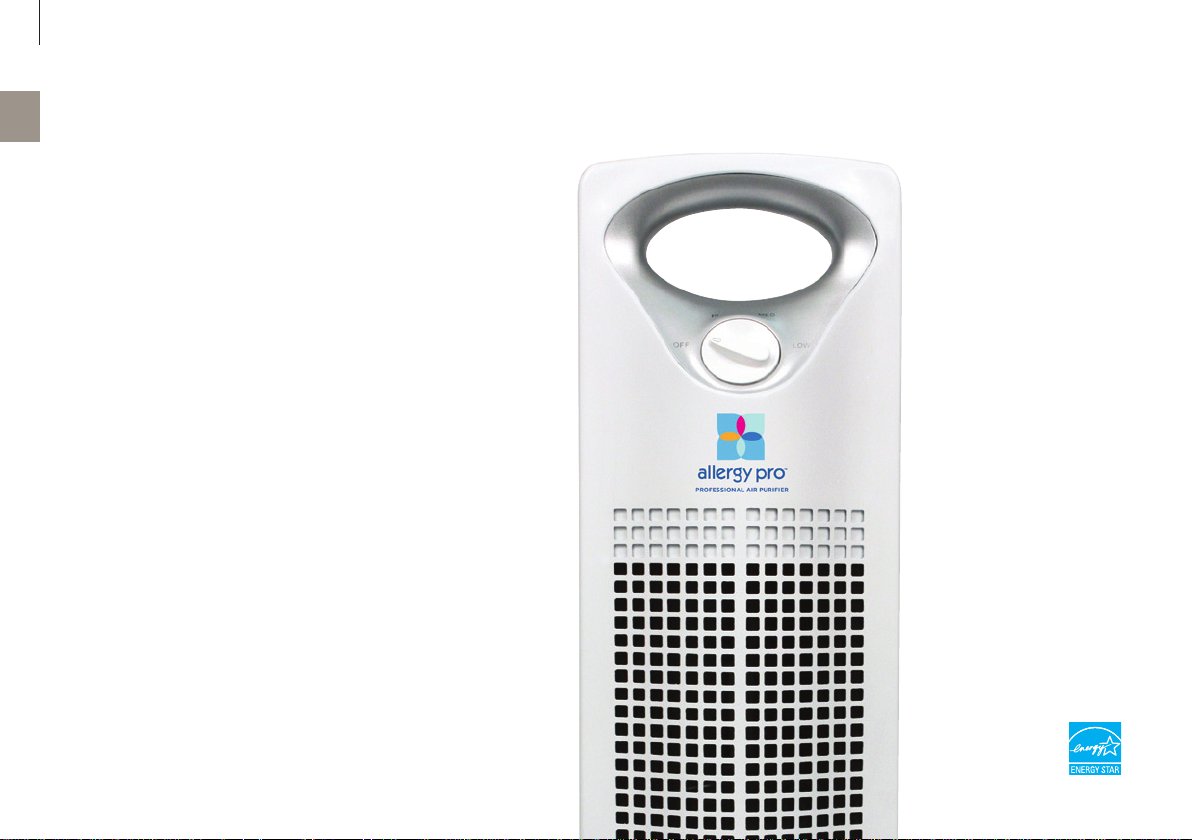
EINLEITUNG
Vielen Dank für den Kauf des Luftreinigers Allergy Pro™
AP200. Der Luftreiniger Allergy Pro™ AP200 erhöht
deutlich die Luftqualität in Ihrem Zuhause, Büro oder
anderen Umgebungen. Wir wollen, dass Sie mit Ihrem
Allergy Pro™ AP200 vollauf zufrieden sind. Deshalb gilt
für Ihren Allergy Pro™ AP200 eine einjährige eingeschränkte Garantie.
Wenn Sie die durch den Allergy Pro™ AP200 erzeugte
Luftreinheit erlebt haben, besuchen Sie unsere Website, um weitere Möglichkeiten zu entdecken, mit
unseren hochwertigen Produkten und Upgrades Ihre
Luftqualität und Ihre Lebensqualität zu erhöhen.
Lesen Sie die folgenden Anweisungen sorgfältig durch,
um eine optimale Leistung und Sicherheit zu gewährleisten.
envion.com
Page 9
9
PRODUKTVORTEILE
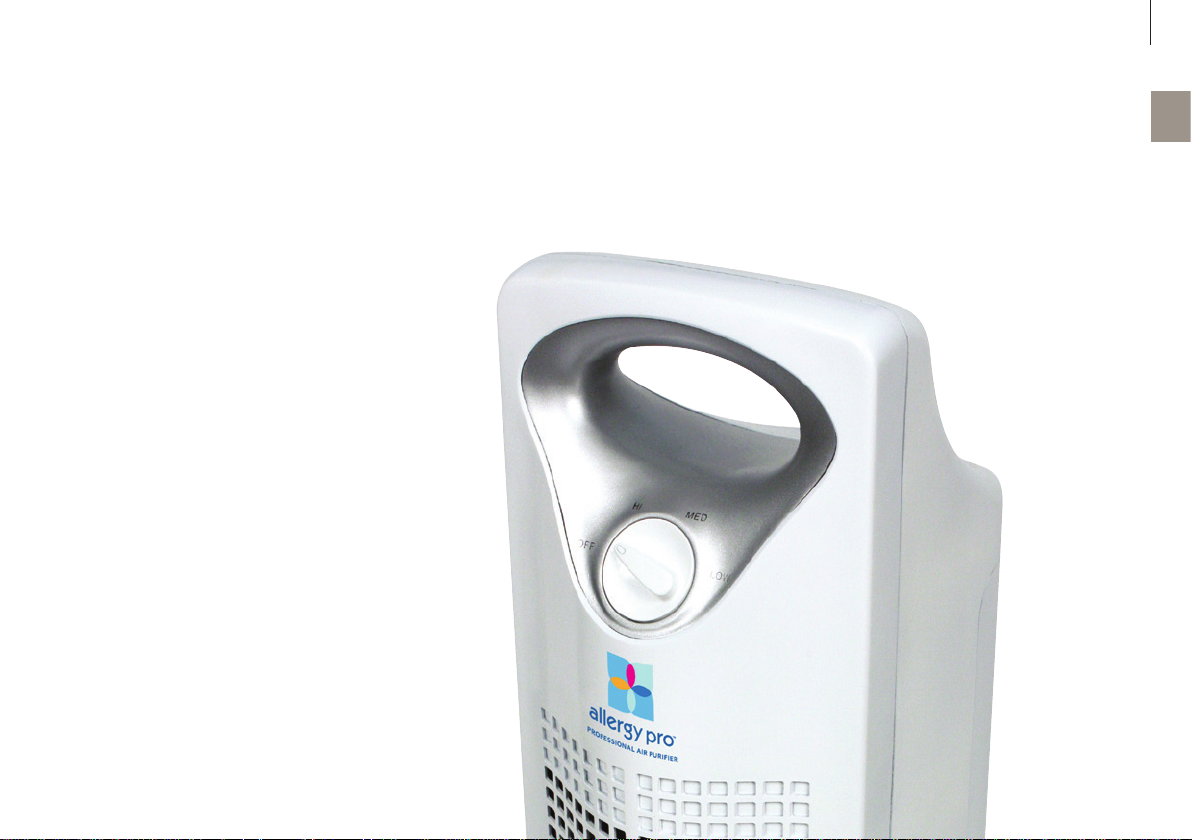
• Luftreinigung: Der Filter entfernt Partikel aus der
Luft und reinigt sie somit.
• Entfernt effektiv Rauch, Pollen, Staub, Tierhautschuppen, Staubmilben, Schimmel und Bakterien.
• 3 Geschwindigkeitsstufen des Ventilators – zum
Auswählen der gewünschten Reinigungsintensität.
de
Page 10
10
de
HAUPTKOMPONENTEN
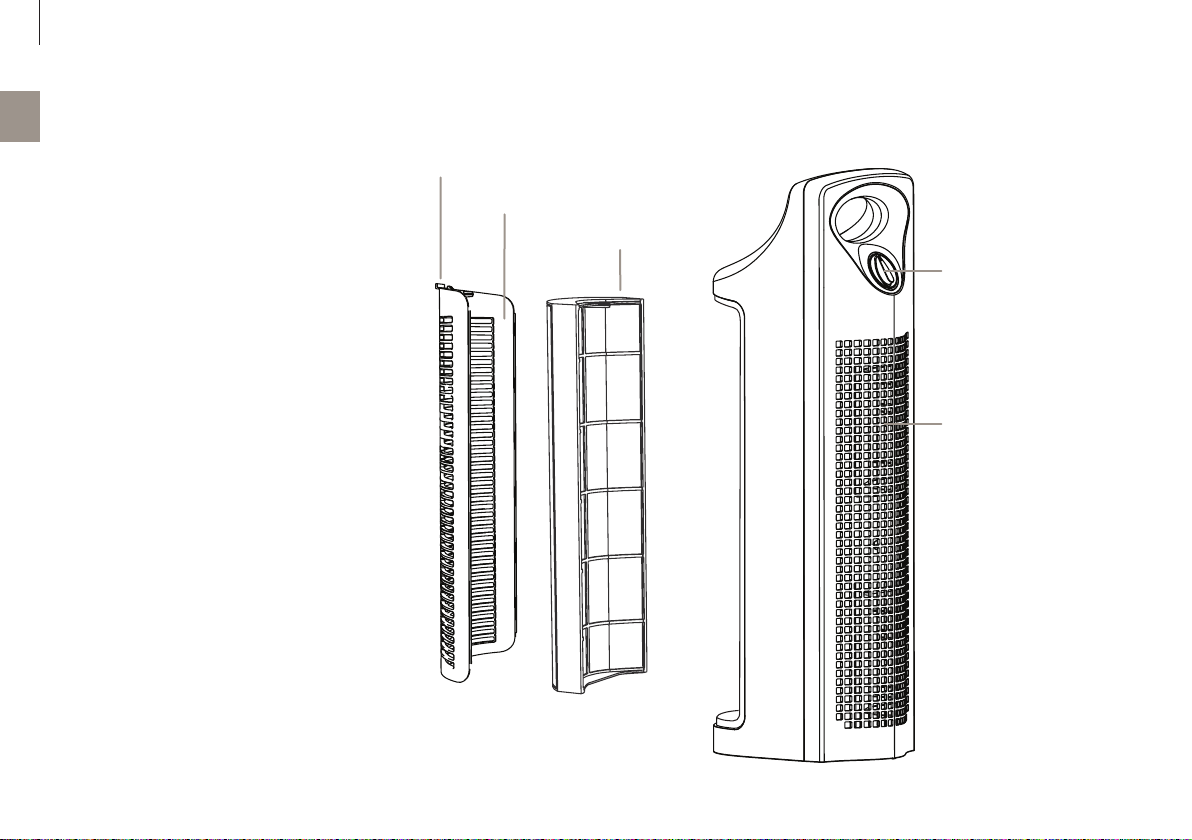
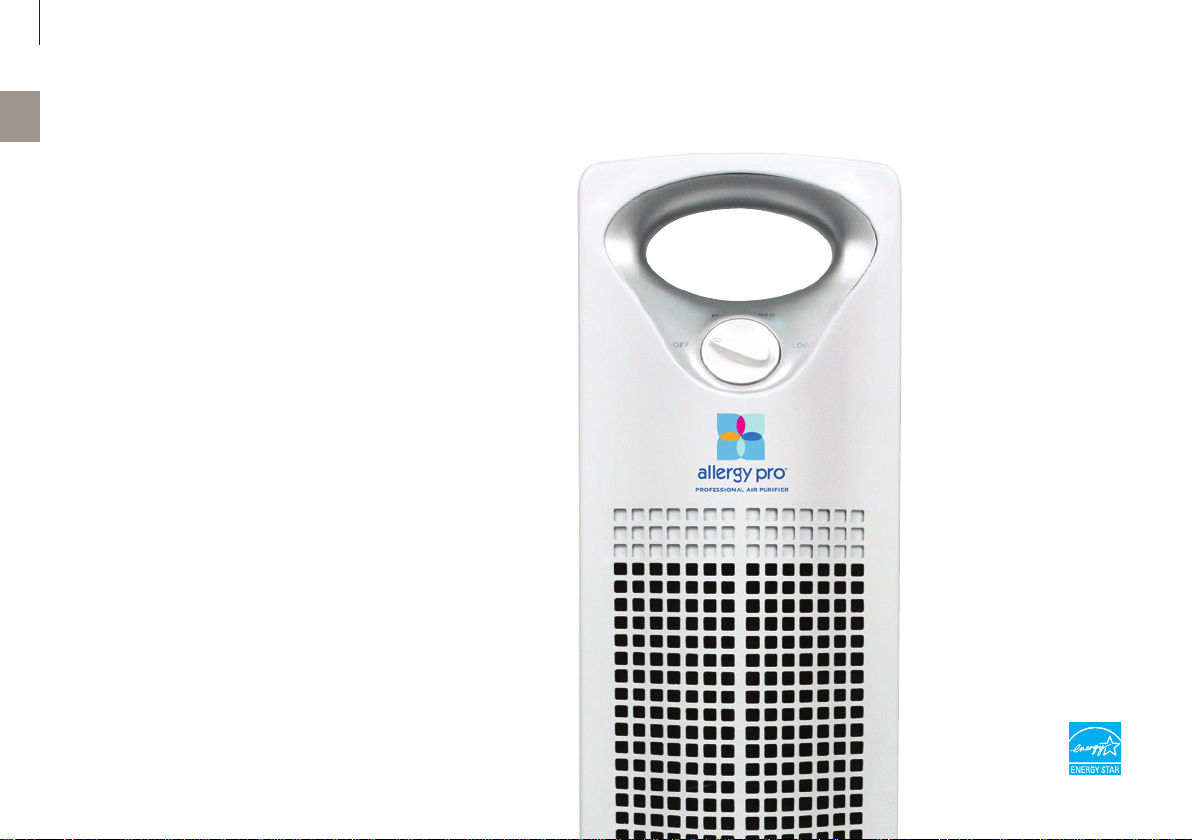
1. Verriegelung
2. Lufteintrittsgitter
3. Filter
4. Drehregler: OFF, HI, MED, LOW
5 Luftaustrittsgitter
1
2
3
4
5
Page 11
11
BETRIEB DES ALLERGY PRO® AP200
SICHERHEIT
Bitte lesen Sie die folgenden wichtigen Informa-
tionen, bevor Sie den Luftreiniger Allergy Pro™
AP200 nutzen.
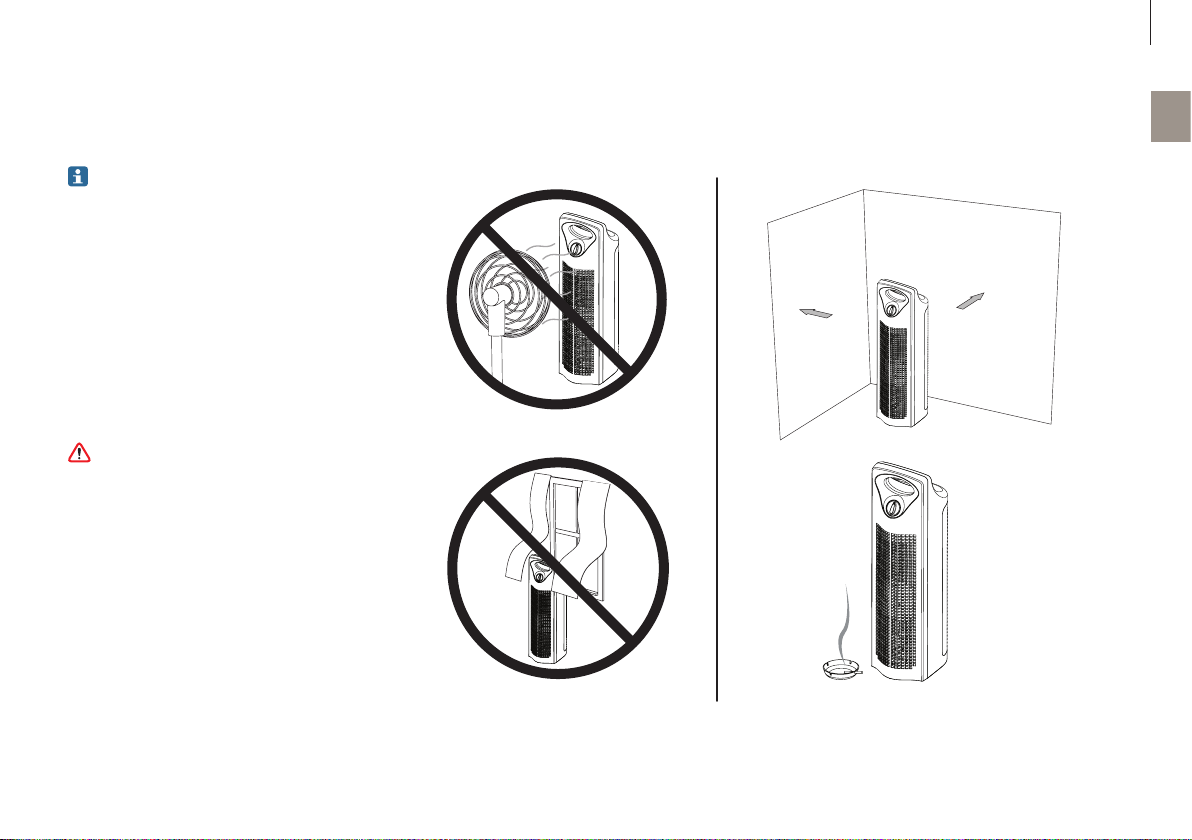
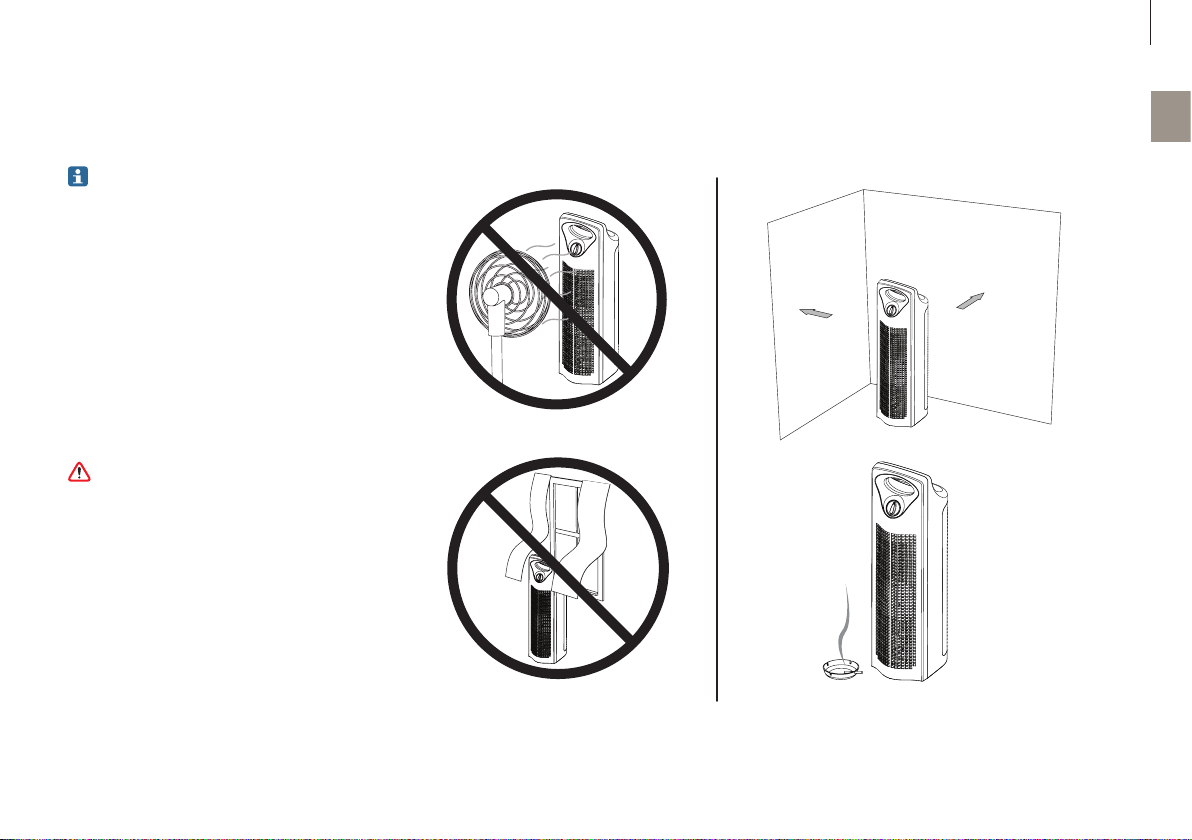
1. Nicht in der Nähe von Ventilatoren aufstellen.
2. Auf beiden Seiten des Geräts mindestens 30 Zentimeter Abstand von der Wand einhalten.
3. Nicht in der Nähe von Gardinen aufstellen.
4. Das Gerät in der Nähe der Luftverschmutzungsquelle aufzustellen, ist eine effektive Möglichkeit,
die Raumluftqualität zu erhöhen.
Den Allergy Pro™ AP200 nicht mit einem beschä-
digten Filter betreiben. Eingerissenen oder löchrigen Filter ersetzen.
de
1
30 cm
2
30 cm
3
4
Page 12
12
de
BETRIEB DES ALLERGY PRO® AP200
EIN-/AUSSCHALTEN
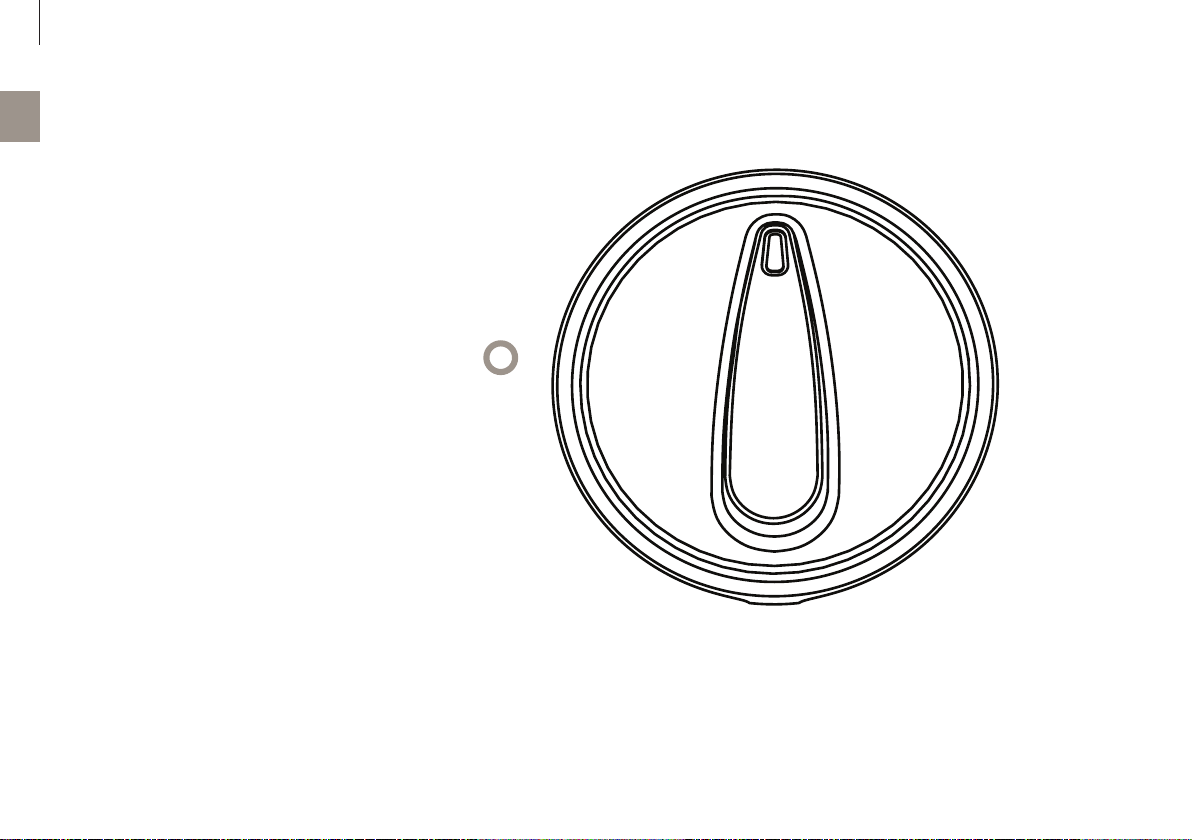
Schalten Sie den Luftreiniger Allergy Pro™ AP200 durch
Drehen des Reglers im Uhrzeigersinn ein. Durch Drehen
des Reglers gegen den Uhrzeigersinn in die Position OFF
schalten Sie ihn aus.
STEUERUNG DER VENTILATORGESCHWINDIGKEIT
Der Allergy Pro™ AP200 hat drei Reinigungsgeschwindigkeiten, HI (Hoch), MED (Mittel) und LOW (Niedrig). Drehen
Sie den Regler im Uhrzeigersinn zur gewünschten Geschwindigkeitsstufe.
HI MED
LOW
Drehregler
Page 13
13
REINIGUNG UND WARTUNG
Der professionelle Luftreiniger Allergy Pro™
AP200 ist nahezu wartungsfrei! Unser Filter hält,
je nach Nutzung und Umgebungsbedingungen, bis
zu zwölf Monate. Ein Filterwechsel alle zwölf Monate wird empfohlen.
Bevor Sie den Filter Ihres professionellen Luftrei-
nigers Allergy Pro™ AP200 austauschen, schalten
Sie das Gerät aus, ziehen den Stecker aus der
Steckdose und lesen alle Sicherheitshinweise und
wichtigen Warnungen in diesem Benutzerhandbuch.
1.
2. 3. 4.
de
FILTER AUSTAUSCHEN
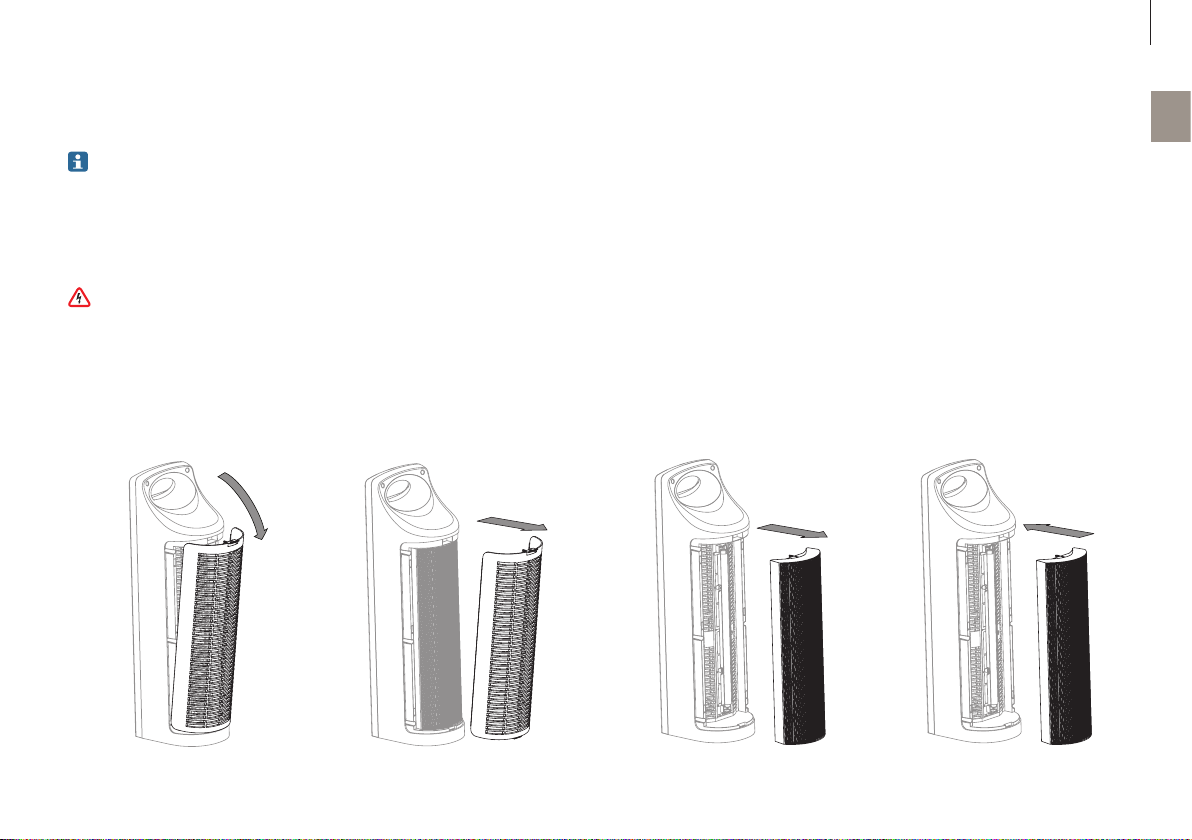
1. Das Gerät ausschalten und ausstecken.Lufteintrittsgitter durch Drücken auf die Verriegelung lösen (siehe Diagramm der „Hauptkomponenten“).
2. Lufteintrittsgitter wie nachfolgend abgebildet aus
dem Gerät entnehmen.
3. Linke und rechte Seite des Filterrahmens durch
die Einkerbungen an den Seiten des Filtergehäuses greifen und Filter herausnehmen.
4. Neuen Filter einsetzen und Lufteintrittsgitter wieder hineindrücken.
Page 14

14
de
REINIGUNG UND WARTUNG
OBERFLÄCHEN REINIGEN
Es darf kein Wasser ins Innere des Geräts eindrin-
gen, da es dadurch beschädigt werden könnte,
wodurch für Sie die Gefahr von Stromschlägen
und Verletzungen entstehen könnte.
1. Gerät ausschalten und ausstecken.
2. Mit einem mit Wasser und Spülmittel leicht angefeuchteten Tuch die Außenflächen des Gehäuses
abwischen.
3. Vor der Nutzung das Gerät gründlich trocknen lassen.
Page 15

15
FEHLERBEHEBUNG
Problem Ursache Lösung
Gerät läuft nicht Drehregler nicht in Position ON. Regler im Uhrzeigersinn drehen.
Gerätestecker ist nicht eingesteckt. Netzanschluss überprüfen.
Das Lufteintrittsgitter ist nicht eingesetzt und eingerastet. Prüfen, ob Filter und Eintrittsgitter richtig eingesetzt wurden und eingerastet sind.
Verminderter Luftstrom
oder schlechte Filterung
Eintritts- oder Austrittsgitter ist möglicherweise blockiert. Sicherstellen, dass Eintritts- und Austrittsgitter durch nichts blockiert werden.
Filter kann verstopft sein. Ggf. durch neuen Filter ersetzen.
de
Page 16

de
16
Page 17

INSTRUCTIONS FOR USE
17
en
Page 18

18
en
TABLE OF CONTENTS
Technical data 19
Introduction 20
Product benefits 21
Main parts 22
Operating the Allergy Pro® AP200 23
Safety 23
Power control 24
Fan speed control 24
Cleaning & Maintenance 25
Replacing the filter 25
Cleaning external surfaces 26
Trouble shooting 27
Page 19

19
TECHNICAL DATA
Technical data*
Type designation AP200
Power consumption 45 W
Power supply voltage 2 20 – 240V ~ 50Hz
Cleaning output (CADR) – dust — smoke — pollen 265 m3/h — 233 m3/h — 335 m3/h
Operation noise level 62 dB (A)
Dimensions 224 x 176 x 647 mm
Weight 4.2 kg
Replacement Parts Filter – AAP200
* Subject to change
en
Page 20
20
en
INTRODUCTION
Thank you for purchasing the Allergy Pro™ AP200 air
purifier. The Allergy Pro™ AP200 air purifier will greatly
improve the quality of the air in your home, office or
other environments. We want you to be fully satisfied
with your Allergy Pro™ AP200. That’s why your Allergy
Pro™ AP200 comes with a one-year limited warranty.
Once you’ve experienced the purity of Allergy Pro™
AP200 air, visit us at our website to find out more ways
to improve the quality of your air and your life with our
premium products and upgrades.
Please be sure to read the following instructions carefully to ensure optimal performance and safety.
envion.com
Page 21
21
PRODUCT BENEFITS
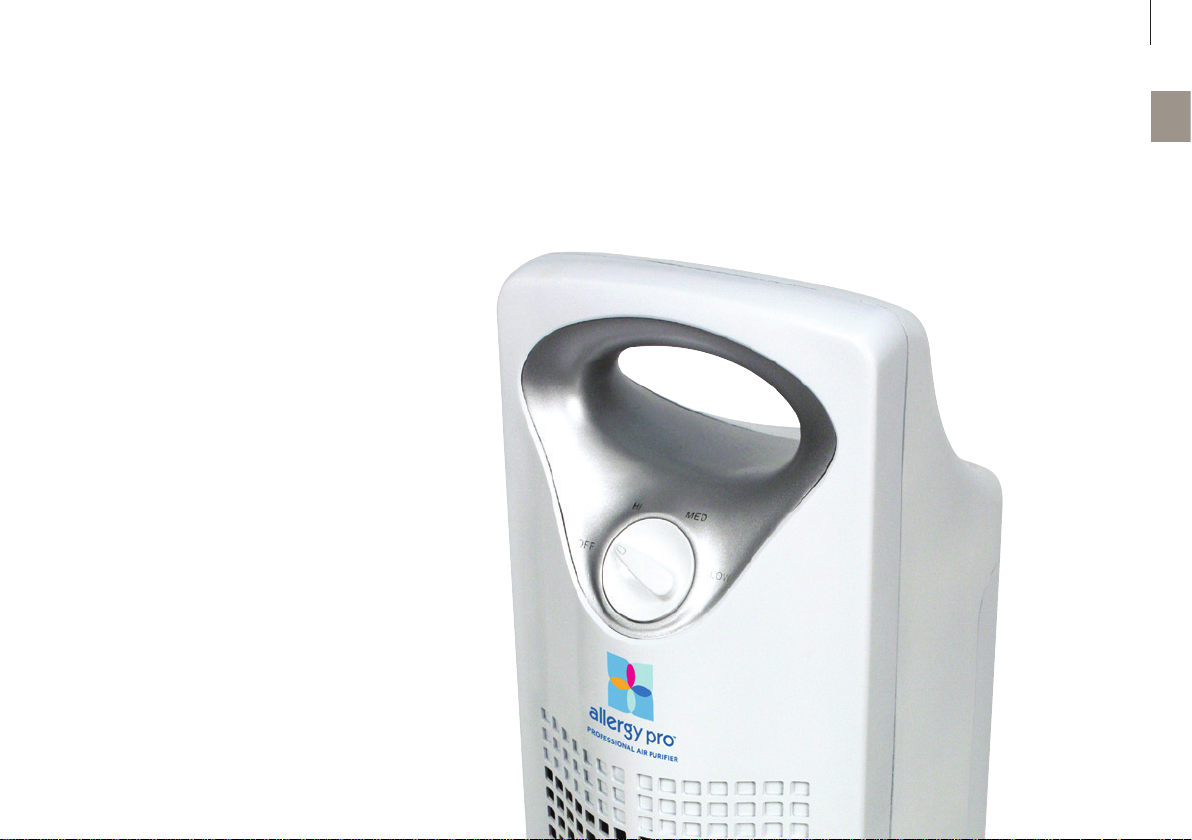
• Air purification: Filter takes particles out of the air,
purifying it.
• Effectively removes smoke, pollen, dust, animal
dander, dust mites, mold and bacteria.
• 3 speed fan setting – lets you select the desired
cleaning level.
en
Page 22
22
en
MAIN PARTS
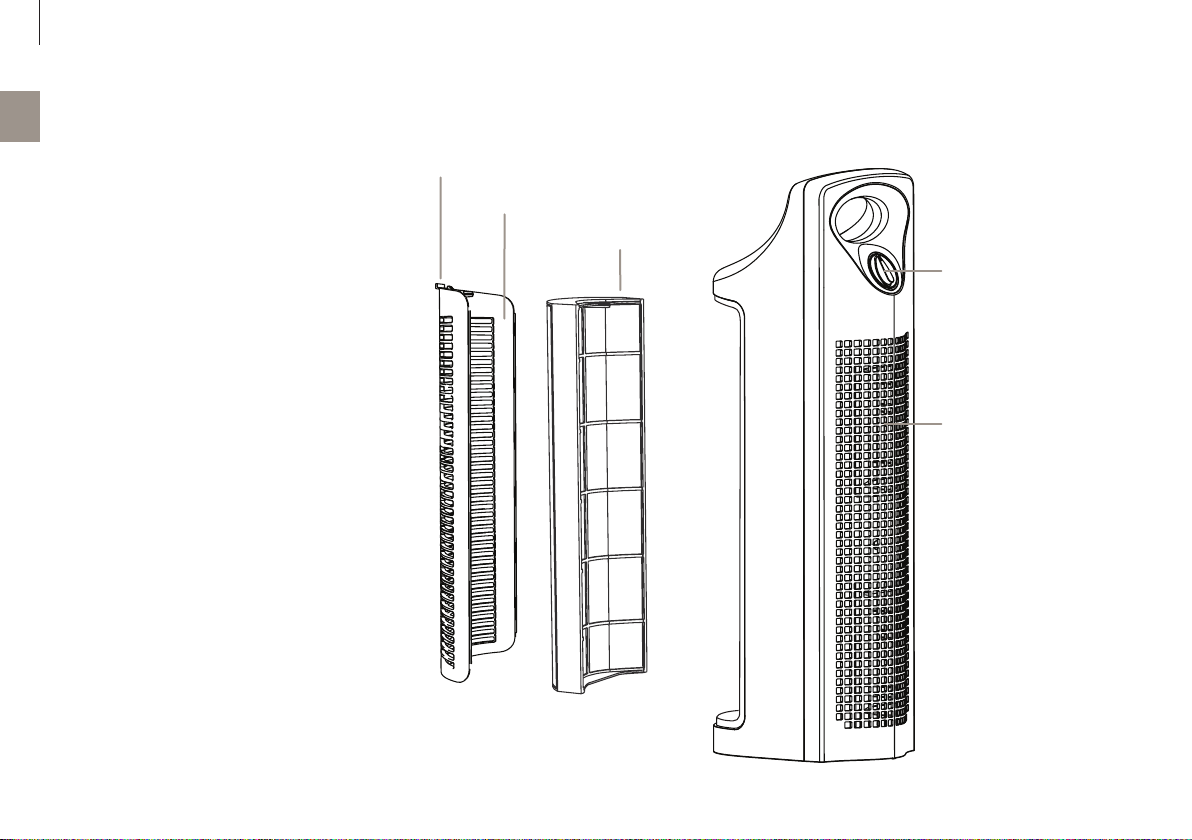
1. Locking Latch
2. Air Inlet Grill
3. Filter
4. Control Dial: Off, HI, MED, LOW
5. Air Outlet Grill
1
2
3
4
5
Page 23
23
OPERATING THE ALLERGY PRO® AP200
SAFETY
Before using the Allergy Pro™ AP200 air purifier,
please read the following important information.
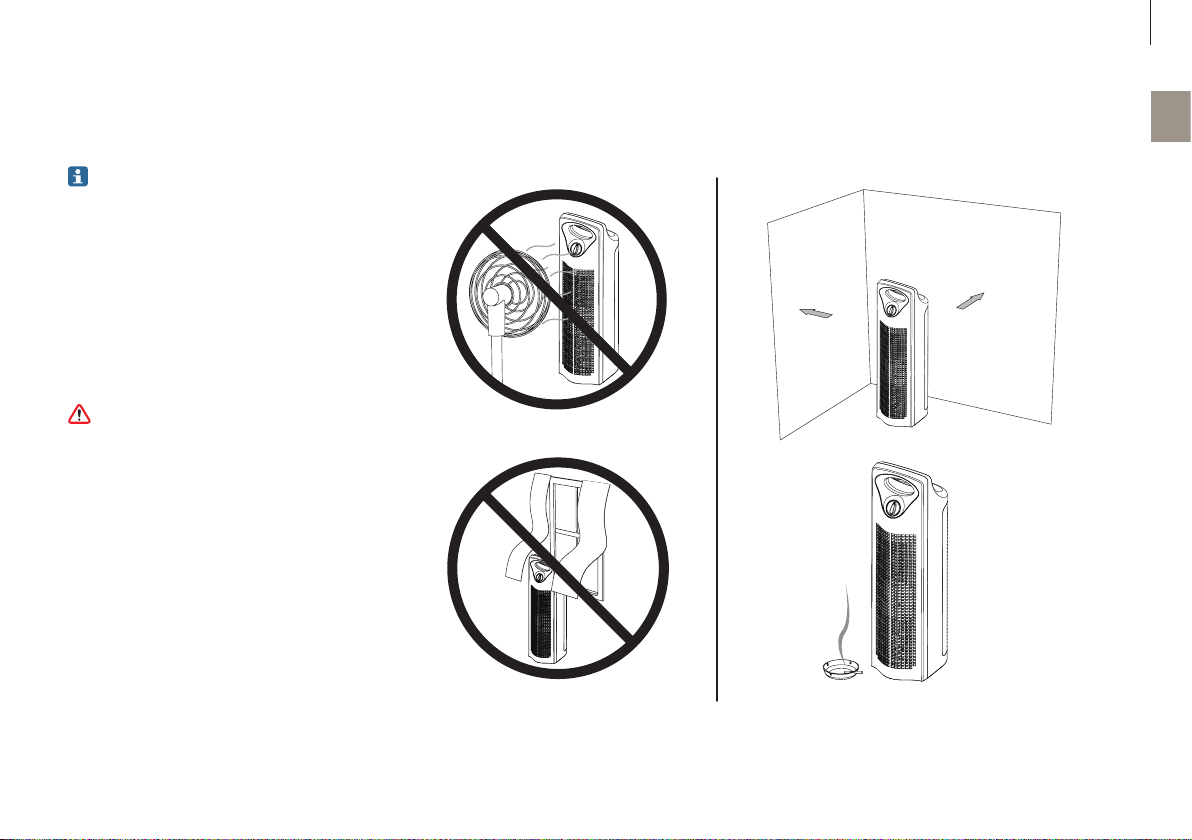
1. Do not place near fans.
2. Keep both sides of the unit at least 30 centimeters
away from a wall.
3. Do not place the unit near curtains.
4. Placing the unit close to the source of air pollution
is an effective way to improve indoor air quality.
Do not run the Allergy Pro™ AP200 with a broken
filter. Replace the filter if the filter has a tear or a
hole in it.
en
1
30 cm
2
30 cm
3
4
Page 24
24
en
OPERATING THE ALLERGY PRO® AP200
POWER CONTROL
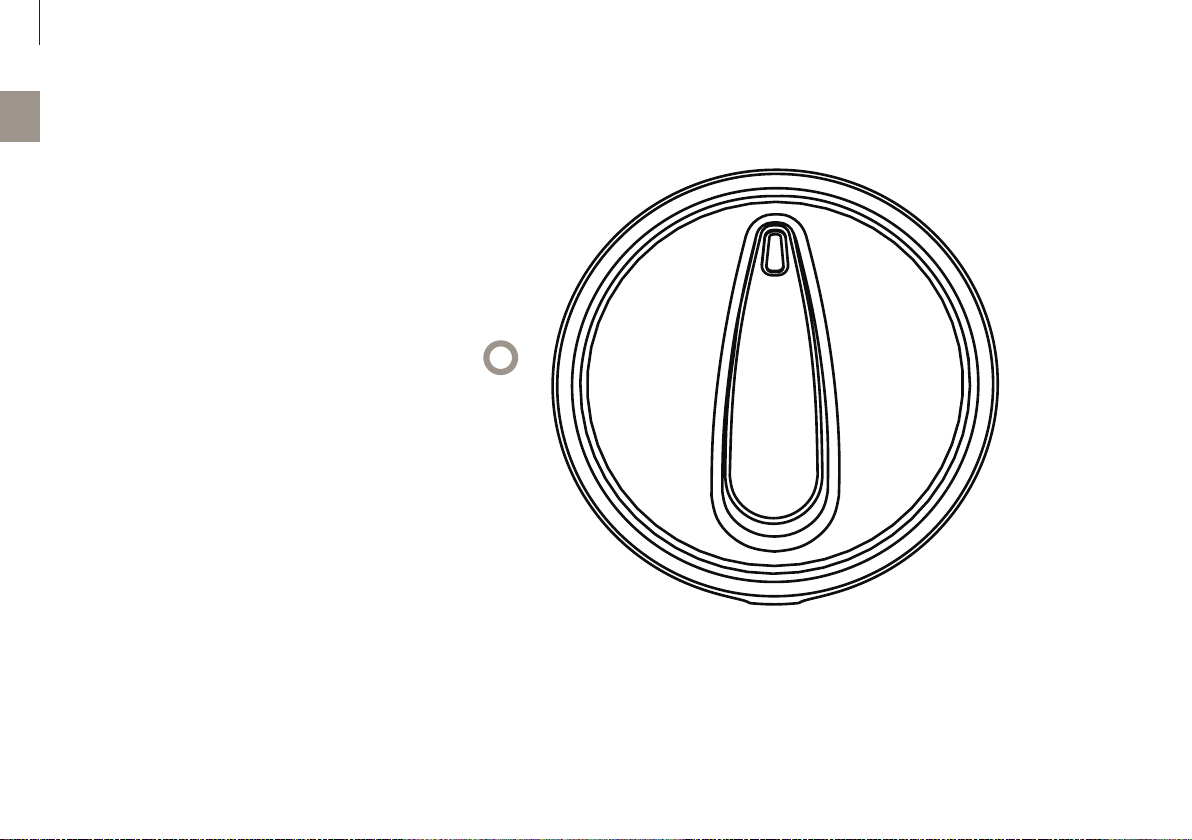
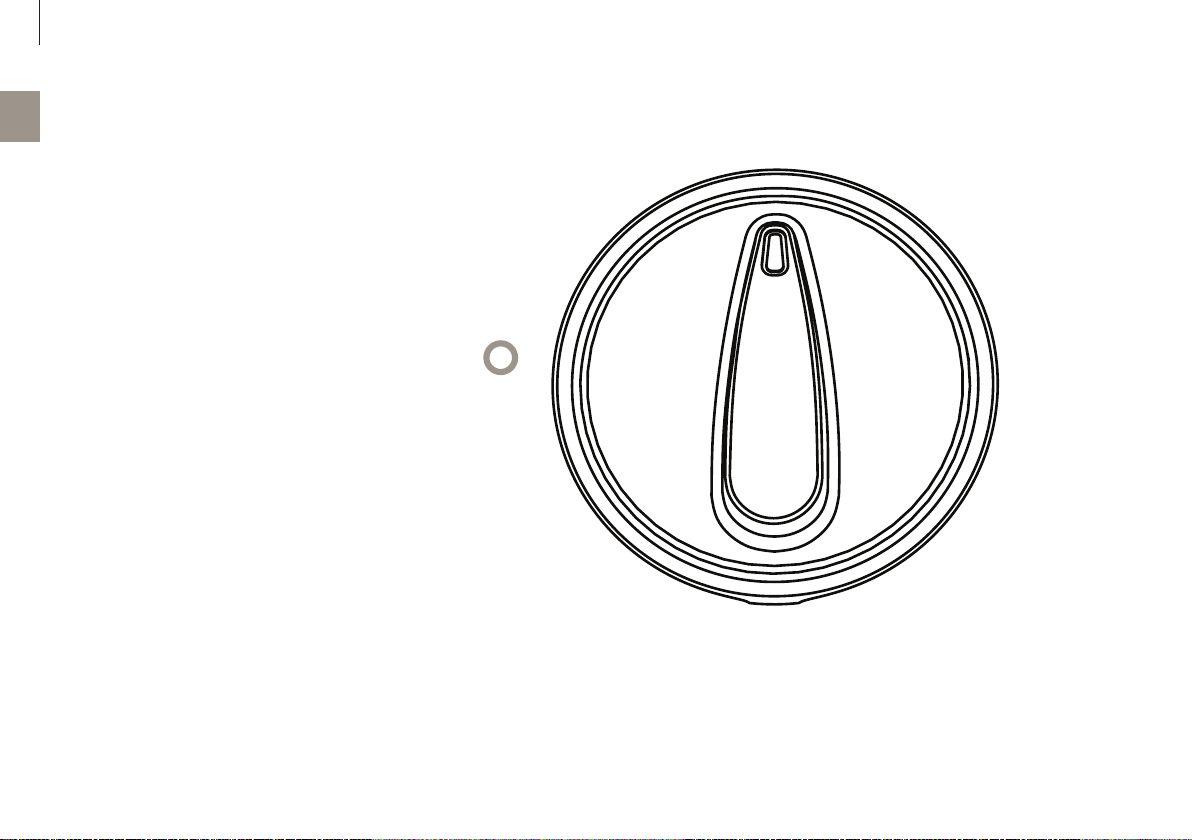
To operate the Allergy Pro™ AP200 air purifier, turn dial
clockwise to turn on the air purifier. Turn dial counterclockwise to OFF position to turn the unit off.
FAN SPEED CONTROL
The Allergy Pro™ AP200 has three different speeds of
cleaning, HI, MED and LOW. Turn the control dial clockwise to your desired speed.
HI MED
LOW
Control dial
Page 25
25
CLEANING & MAINTENANCE
The Allergy Pro™ AP200 professional air purifier
is almost maintenance free! Our filter lasts up to
twelve months, depending on use and environment conditions. It is recommended to replace the
filter every twelve months.
Before replacing the filter of your Allergy Pro™
AP200 professional air purifier, turn off and unplug the unit from the electrical outlet and read all
safety instructions and important warnings in this
owner’s manual.
1.
2. 3. 4.
en
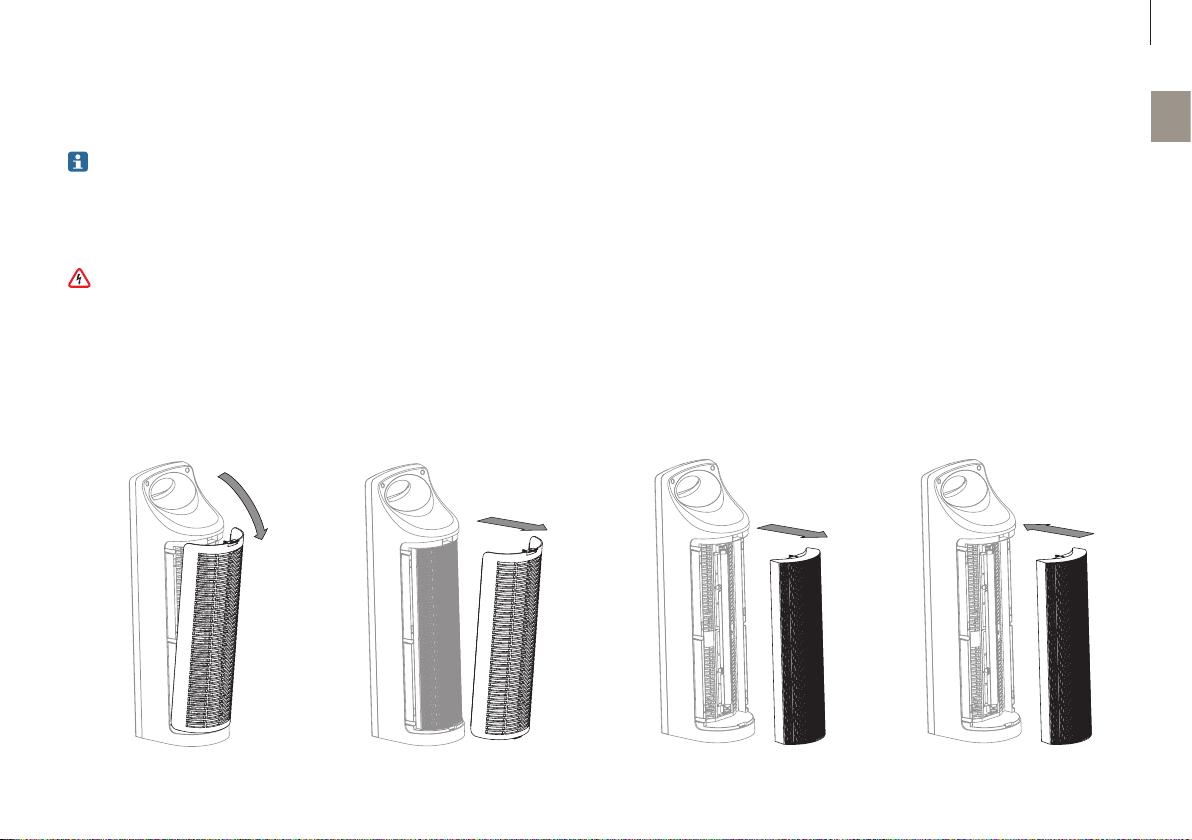
REPLACING THE FILTER
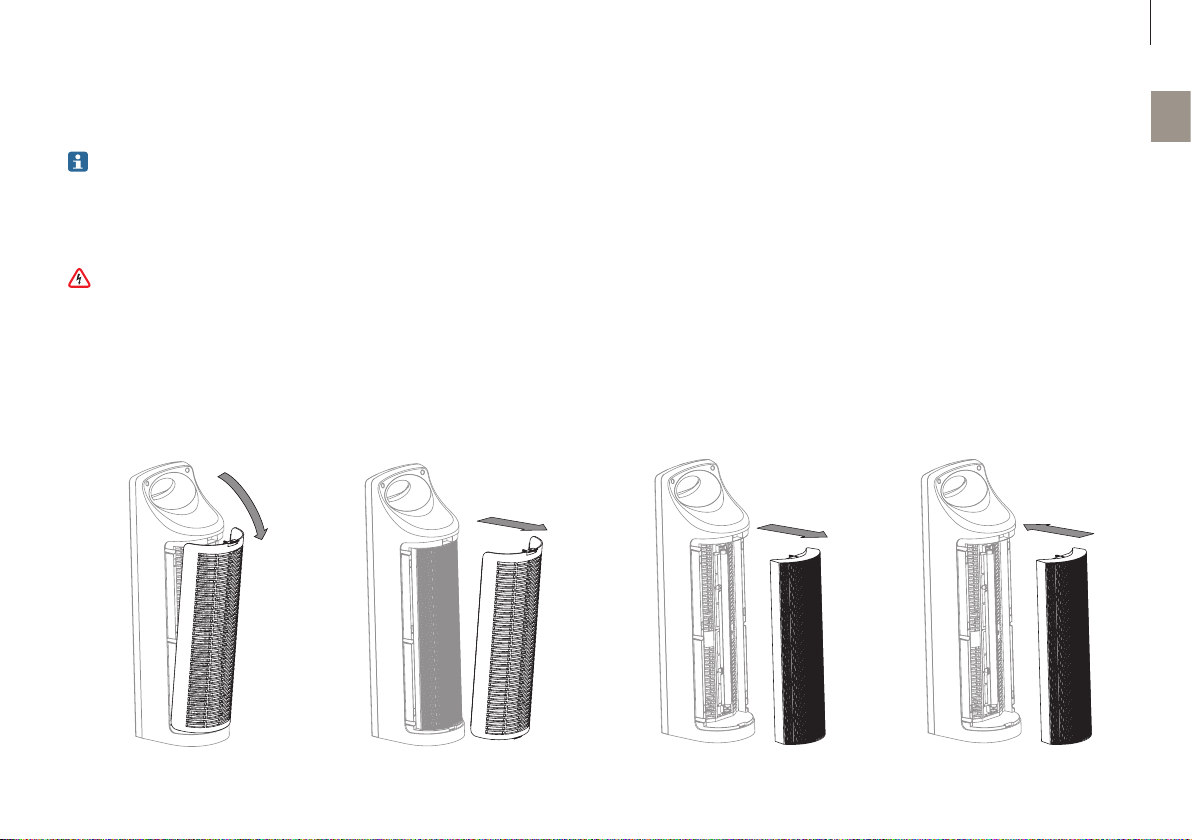
1. Make sure unit is turned off and unplugged. Release the inlet grill by pressing on the locking latch
(see diagram of “Main parts”).
2. Remove the inlet grill from the unit as shown below.
3. Grasp the left and right frames of the filter through
the indentations on the sides of the filter enclosure
and remove the filter.
4. Insert a new filter, then snap the inlet grill back into
position.
Page 26

26
en
CLEANING & MAINTENANCE
CLEANING EXTERNAL SURFACES
Do not allow water to slip into the internal parts as
this could damage your unit and result in electrical
shock and injury to you.
1. Turn off and unplug unit.
2. Use a washcloth slightly dampened with a little
water and dishwashing soap to wipe the outer
case surfaces.
3. Allow the unit to thoroughly dry before use.
Page 27

27
TROUBLE SHOOTING
Problem Reason Solution
Unit will not operate Control Dial not turned to ON position. Turn the control dial clockwise.
Unit is unplugged. Check to ensure unit is plugged in.
The inlet grill has not been installed & locked into place. Check to make sure filter and inlet grill is properly installed & locked into place.
Reduced airflow
or poor filtering
The inlet or outlet grill may be blocked. Check to ensure nothing is blocking the air inlet & outlet.
Filter may be clogged. Replace with a new filter, if necessary.
en
Page 28

en
28
Page 29

MODE D’EMPLOI
29
fr
Page 30

30
fr
SOMMAIRE
Caractéristiques techniques 31
Introduction 32
Avantages du produit 33
Pièces principales 34
Fonctionnement de l’Allergy Pro® AP200 35
Sécurité 35
Commande de puissance 36
Commande de vitesse de ventilation 36
Nettoyage et maintenance 37
Remplacement du filtre 37
Nettoyage de surfaces externes 38
Dépannage 39
Page 31

31
CARACTÉRISTIQUES TECHNIQUES
Caractéristiques techniques*
Désignation de modèle AP200
Consommation électrique 4 5 W
Tension de réseau 220 – 240 V ~ 50 Hz
Rendement du nettoyage (CADR) – poussière — fumée — pollen 265 m3/h — 233 m3/h — 335 m3/h
Niveau sonore 62 dB(A)
Dimensions 224 x 176 x 647 mm
Poids 4,2 kg
Pièces de rechange Filtre – AAP200
* Sous rés erve de modifications
fr
Page 32
32
fr
INTRODUCTION
Nous vous remercions d’avoir opté pour le purificateur
d’air Allergy Pro™ AP200. Le purificateur d’air Allergy
Pro™ AP200 améliorera considérablement la qualité
de l’air de votre domicile, de votre bureau ou d’autres
environnements. Nous espérons que vous serez entièrement satisfait de votre Allergy Pro™ AP200. C’est
pourquoi votre Allergy Pro™ AP200 comprend une garantie d’un an.
Après avoir testé la pureté de l’Allergy Pro™ AP200 air,
rendez-vous sur notre site Web afin de découvrir plusieurs moyens d’améliorer la qualité de votre air et de
votre vie avec nos produits haut de gamme et mises
à jour.
Veuillez lire attentivement les instructions suivan tes qui
garantissent à votre produit une performance et une
sécurité optimales.
envion.com
Page 33
33
AVANTAGES DU PRODUIT
• Purification de l’air : Le filtre élimine les particules
de l’air et le purifie.
• Élimine efficacement la fumée, le pollen, la poussière, les squames animales, les acariens, les
moisissures et les bactéries.
• Réglage de ventilation à 3 vitesses – vous permet
de sélectionner le niveau de nettoyage souhaité.
fr
Page 34
34
fr
PIÈCES PRINCIPALES
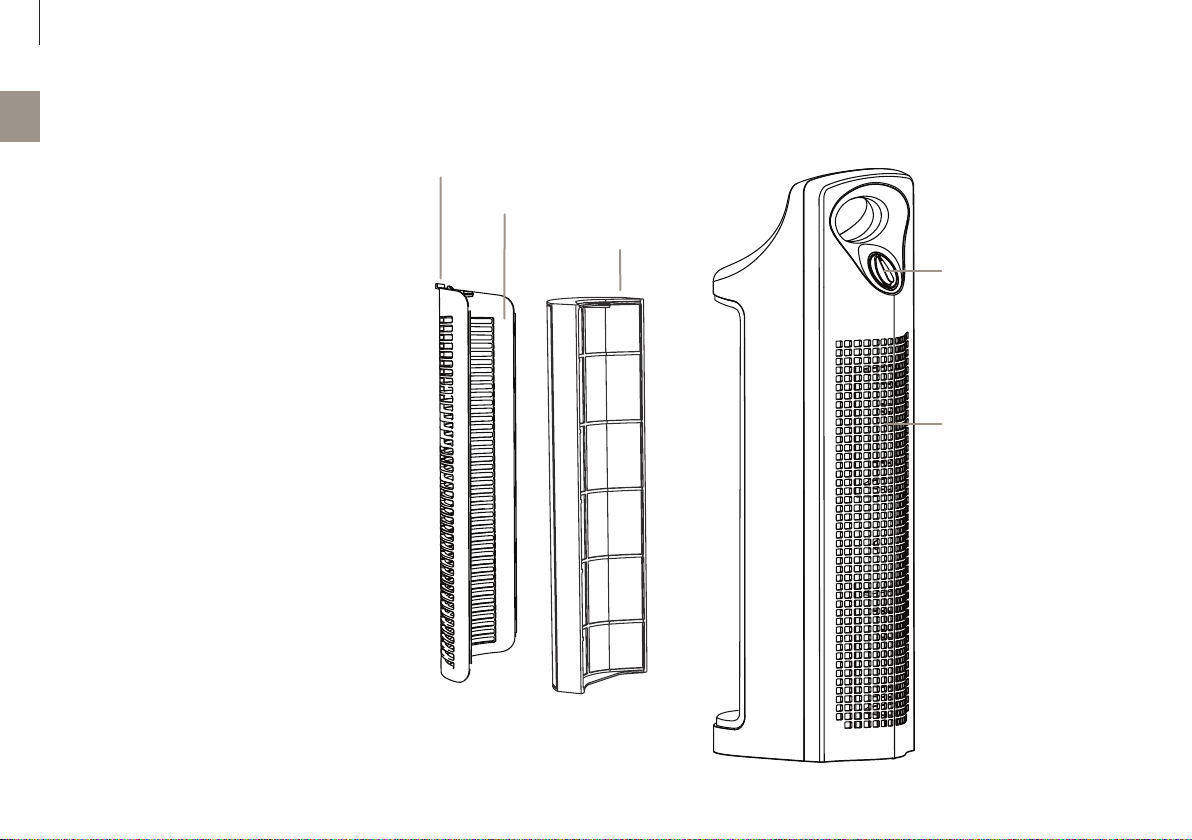
1. Loquet de verrouillage
2. Grille d’entrée d’air
3. Filtre
1
2
4. Cadran de réglage : Off, HI, MED, LOW
5. Grille de sortie d’air
3
4
5
Page 35
35
FONCTIONNEMENT DE L’ALLERGY PRO® AP200
SÉCURITÉ
Avant d’utiliser le purificateur d’air Allergy Pro™
AP200, veuillez lire les informations importantes
qui suivent.
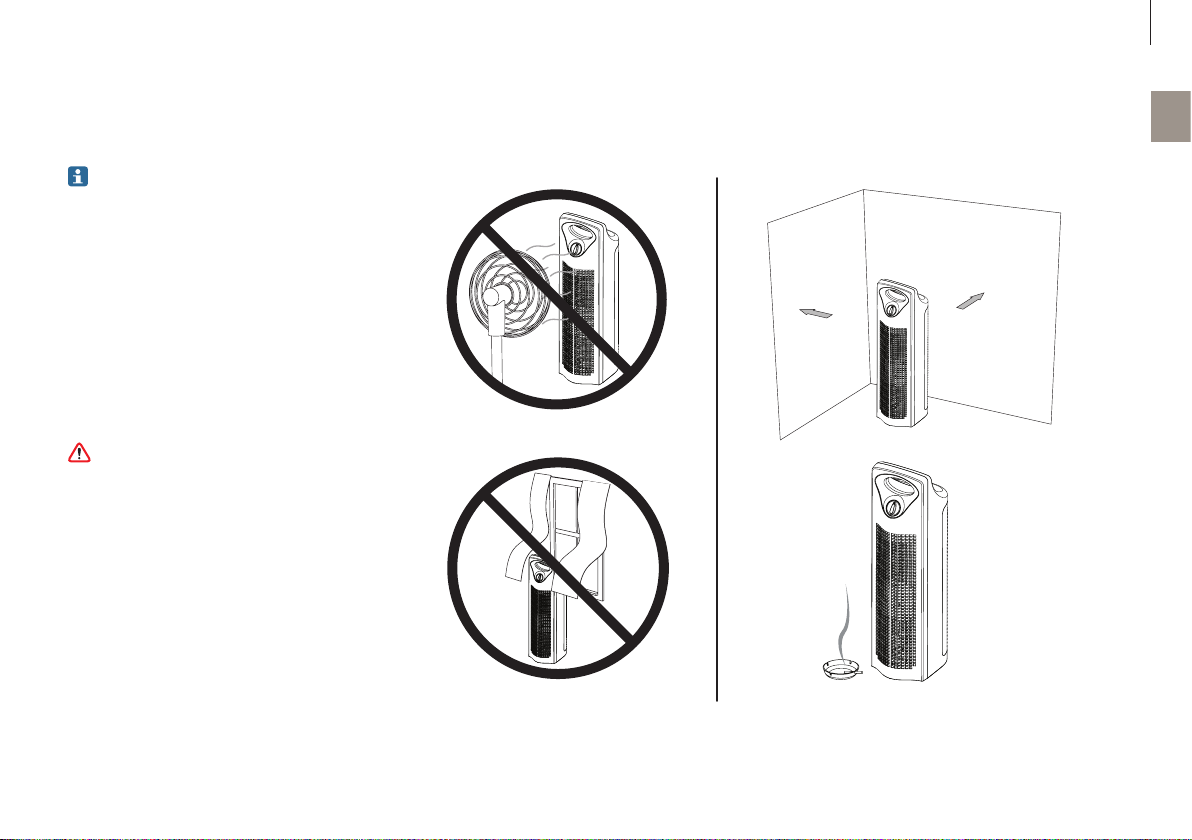
1. Ne pas l’installer à proximité de ventilateurs.
2. Les deux côtés de l’appareil doivent être placés à
une distance d’au moins 30 centimètres d’un mur.
3. Ne pas installer l’appareil à proximité de rideaux.
4. Le fait de placer l’appareil à proximité de la source
de pollution de l’air est un moyen efficace d’améliorer la qualité de l’air intérieur.
Ne pas utiliser l’Allergy Pro™ AP200 avec un filtre
cassé. Remplacez le filtre si celui-ci présente une
déchirure ou une perforation.
fr
1
30 cm
2
30 cm
3
4
Page 36
36
fr
FONCTIONNEMENT DE L’ALLERGY PRO® AP200
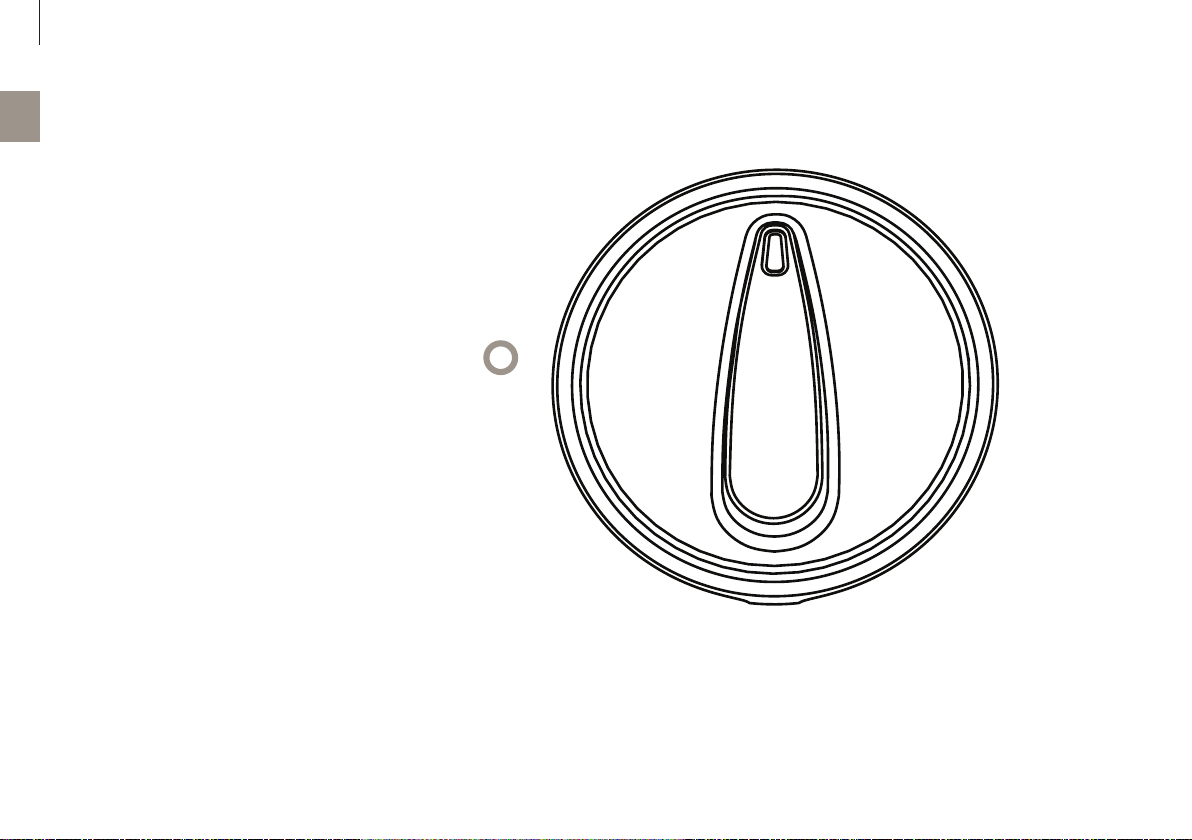
COMMANDE DE PUISSANCE
Pour utiliser le purificateur d’air Allergy P ro™ AP20 0, tournez le cadran dans le sens des aiguilles d’une montre afin
d’allumer le purificateur d’air. Tournez le cadran dans le
sens inverse des aiguilles d’une montre en position OFF
pour éteindre l’appareil.
COMMANDE DE VITESSE DE VENTILATION
L’Allergy Pro™ AP200 est dotée de trois vitesses de nettoyage : HI, MED et LOW. Tournez le cadran de réglage
dans le sens des aiguilles d’une montre pour régler la
vitesse souhaitée.
HI MED
LOW
Cadran de réglage
Page 37
37
NETTOYAGE ET MAINTENANCE
Le purificateur d’air professionnel Allergy Pro™
AP200 est presque sans maintenance ! Notre filtre
dure jusqu’à douze mois, selon l’utilisation et les
conditions environnementales. Il est recommandé
de remplacer le filtre tous les douze mois.
Avant de remplacer le filtre de votre purificateur
d’air professionnel Allergy Pro™ AP200, éteignez
l’appareil et débranchez-le de la prise électrique,
puis lisez toutes les instructions de sécurité et
mises en garde importantes figurant dans le présent mode d’emploi.
1.
2. 3. 4.
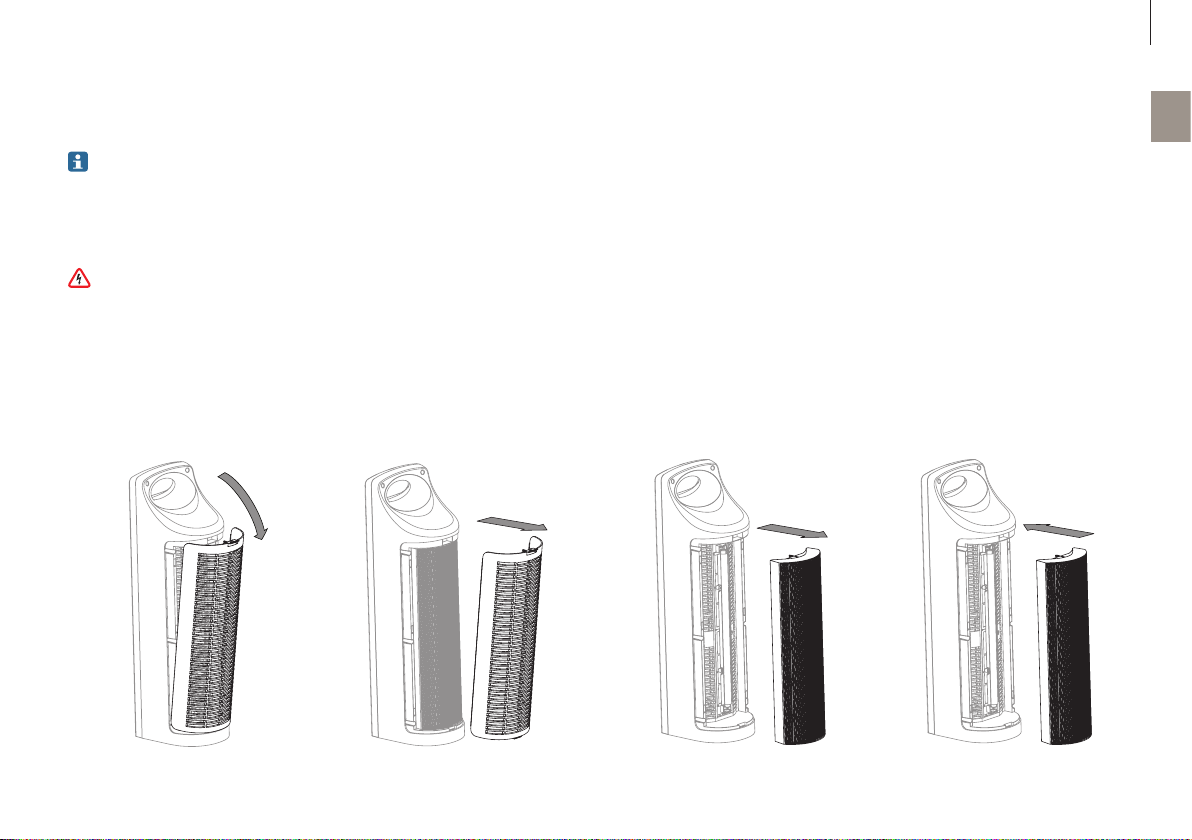
REMPLACEMENT DU FILTRE
1. Veillez à ce que l’appareil soit éteint et débranché.
Retirez la grille d’entrée en appuyant sur le loquet
de verrouillage (voir le schéma des «Pièces principales«).
2. Retirez la grille d’entrée de l’appareil comme illustré ci-dessous.
3. Saisissez les cadres gauche et droit du filtre par
les indentations sur les côtés de l’enceinte du filtre
et retirez le filtre.
fr
4. Insérez un filtre neuf, puis remettez la grille d’entrée en place.
Page 38

38
fr
NETTOYAGE ET MAINTENANCE
NETTOYAGE DE SURFACES EXTERNES
Ne laissez pas d’eau s’infiltrer dans les parties
internes, car cela pourrait endommager votre
appareil et vous causer un choc électrique et des
blessures.
1. Éteignez et débranchez l’appareil.
2. Utilisez un chiffon légèrement humidifié avec un
peu d’eau et du savon vaisselle pour essuyer les
surfaces extérieures du boîtier.
3. Laissez l’appareil sécher entièrement avant de
l’utiliser.
Page 39

39
DÉPANNAGE
Problème Raison Solution
L’appareil ne fonctionne pas Le cadran de réglage n’est pas en position ON. Tournez le cadran de réglage dans le sens des aiguilles d’une montre.
L’appareil est débranché. Vérifiez que l’appareil est branché.
Débit d’air réduit
ou mauvais filtrage
La grille d’entrée n’a pas été installée ni verrouillée en
place.
La grille d’entrée ou de sortie est peut-être bloquée. Vérifiez que rien ne bloque l’entrée et la sortie d’air.
Le filtre est peut-être obstrué. Remplacez par un filtre neuf, si nécessaire.
Vérifiez que le filtre et la grille d’entrée sont correctement installés et verrouillés en place.
fr
Page 40

40
fr
Page 41

ISTRUZIONI PER L’USO
41
it
Page 42

42
it
INDICE
Dati tecnici 43
Introduzione 44
Vantaggi del prodotto 45
Parti principali 46
Utilizzo di Allergy Pro® AP200 47
Sicurezza 47
Gestione della potenza 48
Gestione della velocità ventilatore 48
Pulizia e manutenzione 49
Sostituzione del filtro 49
Pulizia delle superfici esterne 50
Risoluzione dei problemi 51
Page 43

43
DATI TECNICI
Dati tecnici*
Denominazione modello AP200
Potenza assorbita 45 W
Tensione di alimentazione 220 – 240 V ~ 50 Hz
Potenza di depurazione (CADR) – Polvere – Fumo – Pollini 265 m3/h – 233 m3/h – 335 m3/h
Livello di rumore di funzionamento 62 dB(A)
Dimensioni 224 x 176 x 647 mm
Peso 4,2 kg
Parti di ricambio Filtro – AAP200
* Con riserva di modifiche
it
Page 44
44
it
INTRODUZIONE
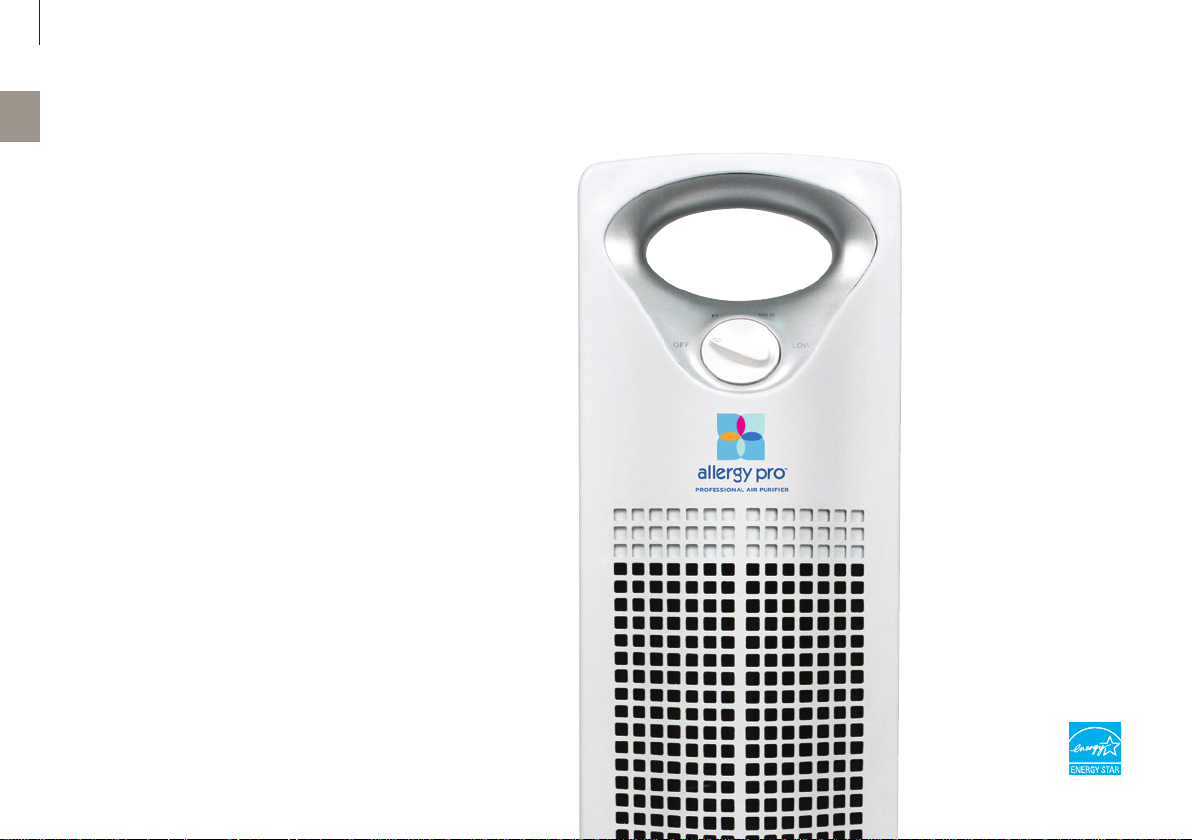
Grazie per avere acquistato il depuratore d’aria Allergy
Pro™ AP200. Il depuratore d’aria Allergy Pro™ AP200
migliorerà sensibilmente la qualità dell’aria nella vostra casa, in ufficio o in altri ambienti. Desideriamo che
siate pienamente soddisfatti del vostro Allergy Pro™
AP200: a tale scopo, Allergy Pro™ AP200 è corredato
da una garanzia limitata di un anno.
Quando avrete sperimentato la purezza dell’aria di Allergy Pro™ AP200, visitate il nostro sito web, per scoprire ulteriori modi per migliorare la qualità della vostra
aria e della vostra vita con i nostri prodotti di fascia
Premium e le nostre novità.
Vi preghiamo di leggere con attenzione le seguenti
istruzioni, per ottenere prestazioni e sicurezza ottimali.
envion.com
Page 45
45
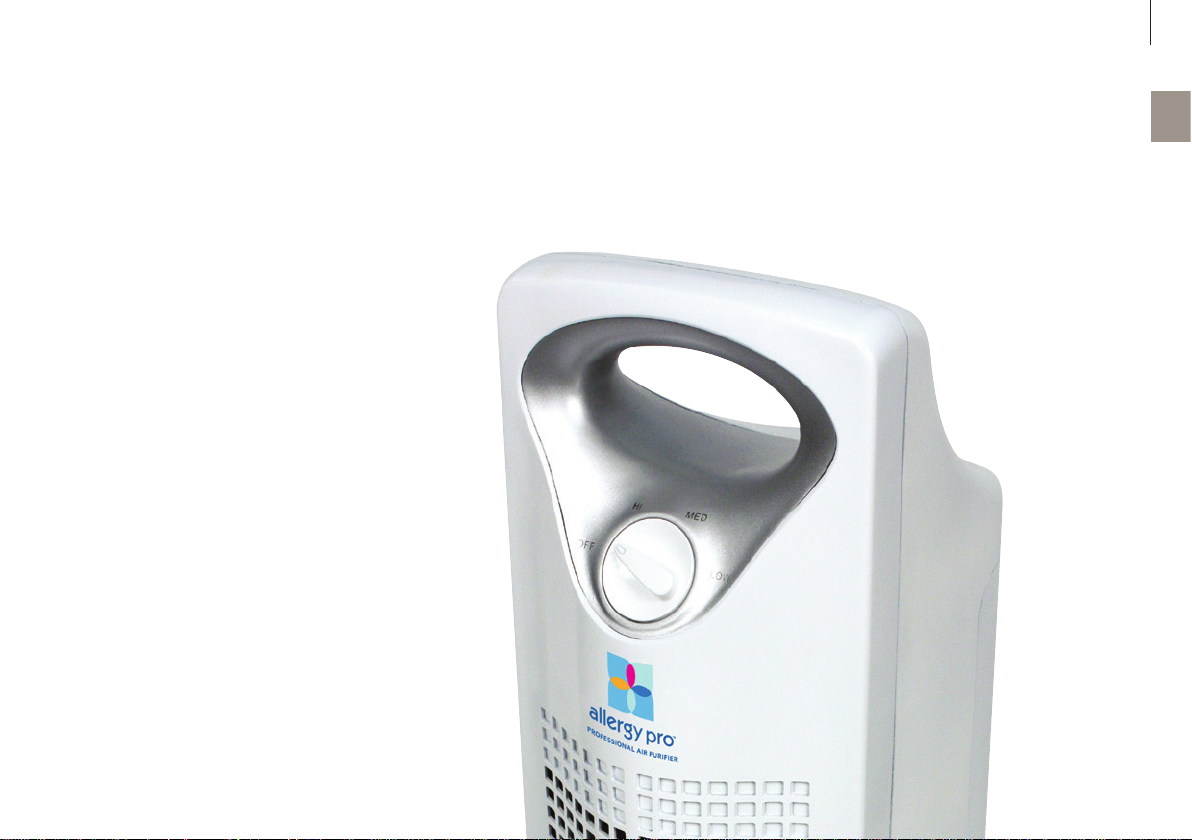
VANTAGGI DEL PRODOTTO
• Depurazione aria: il filtro elimina le particelle
dall’aria, depurandola.
• Rimuove efficacemente fumo, pollini, polvere, peli
di animali, acari della polvere, muffe e batteri.
• 3 impostazioni di velocità vent ilatore, per scegliere
il livello di depurazione desiderato.
it
Page 46
46
it
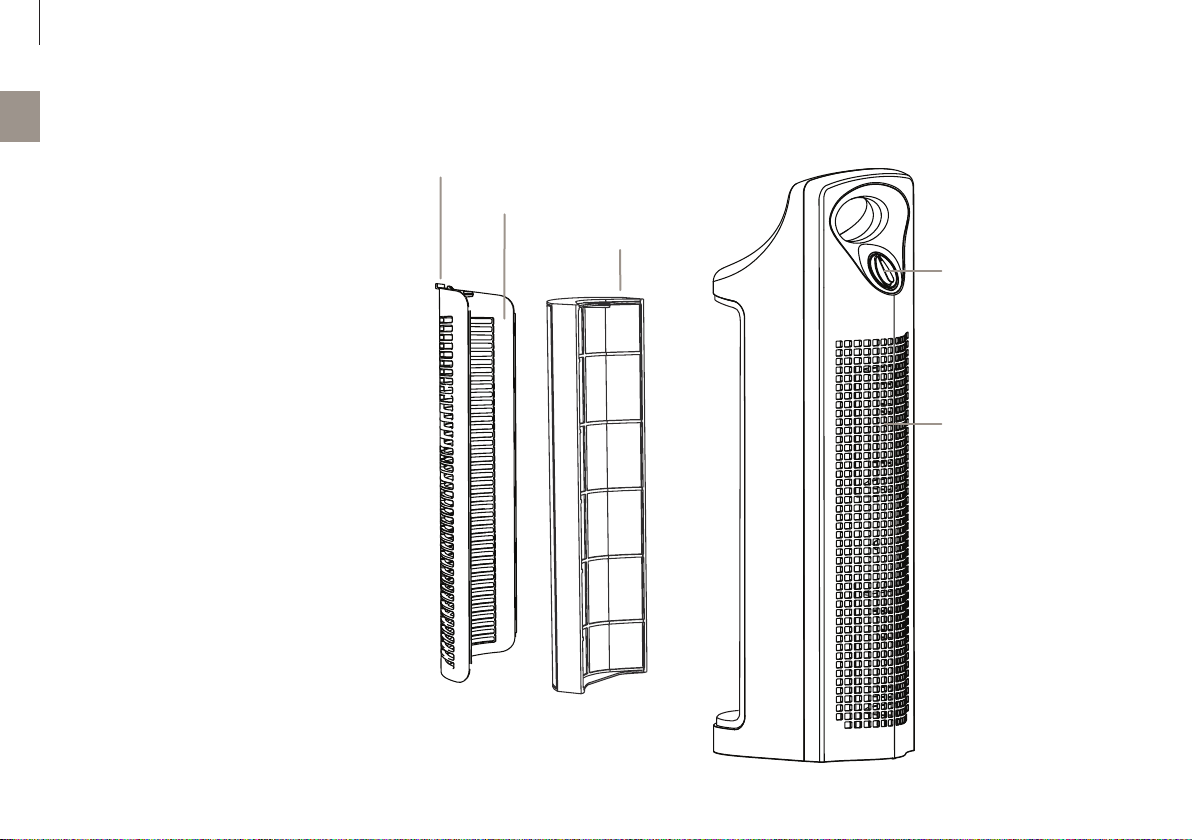
PARTI PRINCIPALI
1. Chiusura a scatto
2. Griglia d’ingresso aria
3. Filtro
1
2
4. Manopola di comando: OFF, HI, MED, LOW
5. Griglia di uscita aria
3
4
5
Page 47
47
UTILIZZO DI ALLERGY PRO® AP200
SICUREZZA
Prima di utilizzare il depuratore d’aria Allergy Pro™
AP200, vi preghiamo di leggere le seguenti importanti informazioni.
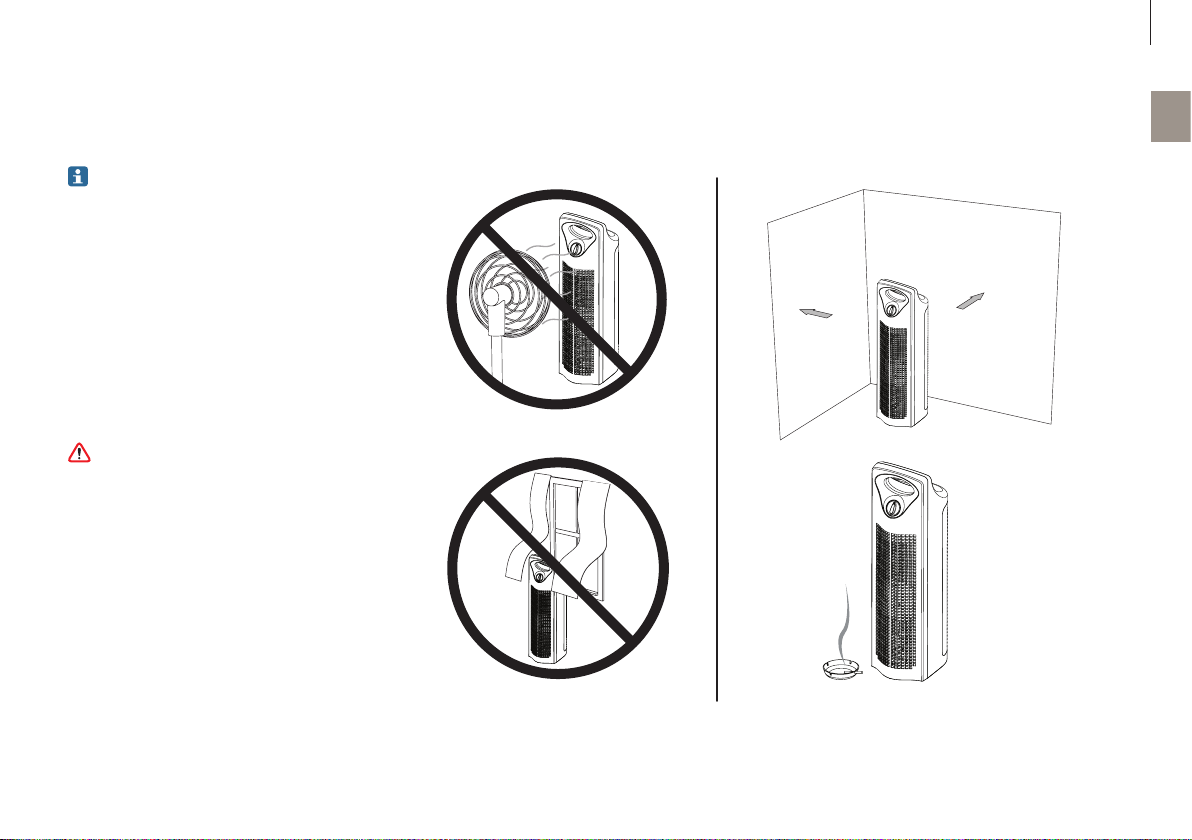
1. Non posizionare in prossimità di ventilatori.
2. Mantenere entrambi i lati dell’unità ad almeno 30
cm dalle pareti.
3. Non posizionare l’unità in prossimità di tende.
4. Posizionando l’unità vicino alla fonte d’inquinamento dell’aria, si migliorerà efficacemente la
qualità dell’aria interna.
Non utilizzare Allergy Pro™ AP200 se il filtro è dan-
neggiato. Sostituire il filtro, qualora sia lacerato o
forato.
it
1
30 cm
2
30 cm
3
4
Page 48
48
it
UTILIZZO DI ALLERGY PRO® AP200
GESTIONE DELLA POTENZA
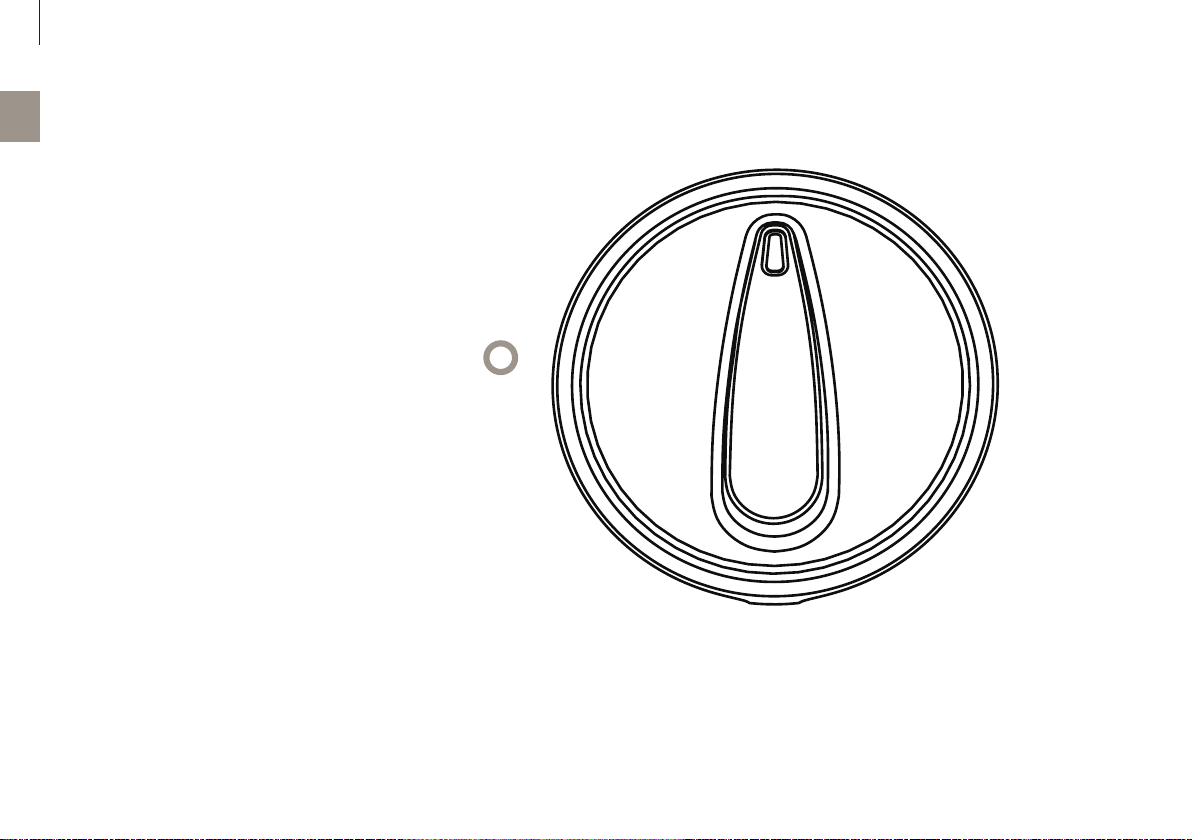
Per utilizzare il depuratore d’aria Allergy Pro™ AP200,
ruotare la manopola in senso orario per accendere l’unità.
Ruotare la manopola in senso antiorario, sulla posizione
OFF, per spegnere l’unità.
GESTIONE DELLA VELOCITÀ VENTILATORE
Allergy Pro™ AP200 offre tre diverse velocità di depurazione: HI, M ED e LOW. Ruotare la manopola di comando in
senso orario per ottenere la velocità desiderata.
HI MED
LOW
Manopola di comando
Page 49
49
PULIZIA E MANUTENZIONE
Il depuratore d’aria professionale Allergy Pro™
AP200 è pressoché esente da manutenzione! Il
nostro filtro dura fino a dodici mesi, in base all’utilizzo e alle condizioni ambientali. Si consiglia di
sostituire il filtro ogni dodici mesi.
Prima di sostituire il filtro del depuratore d’aria
professionale Allergy Pro™ AP200, spegnere e
scollegare l’unità dalla presa di alimentazione
elettrica e leggere tutte le istruzioni di sicurezza
e le importanti avvertenze del presente manuale
d’uso.
1.
2. 3. 4.
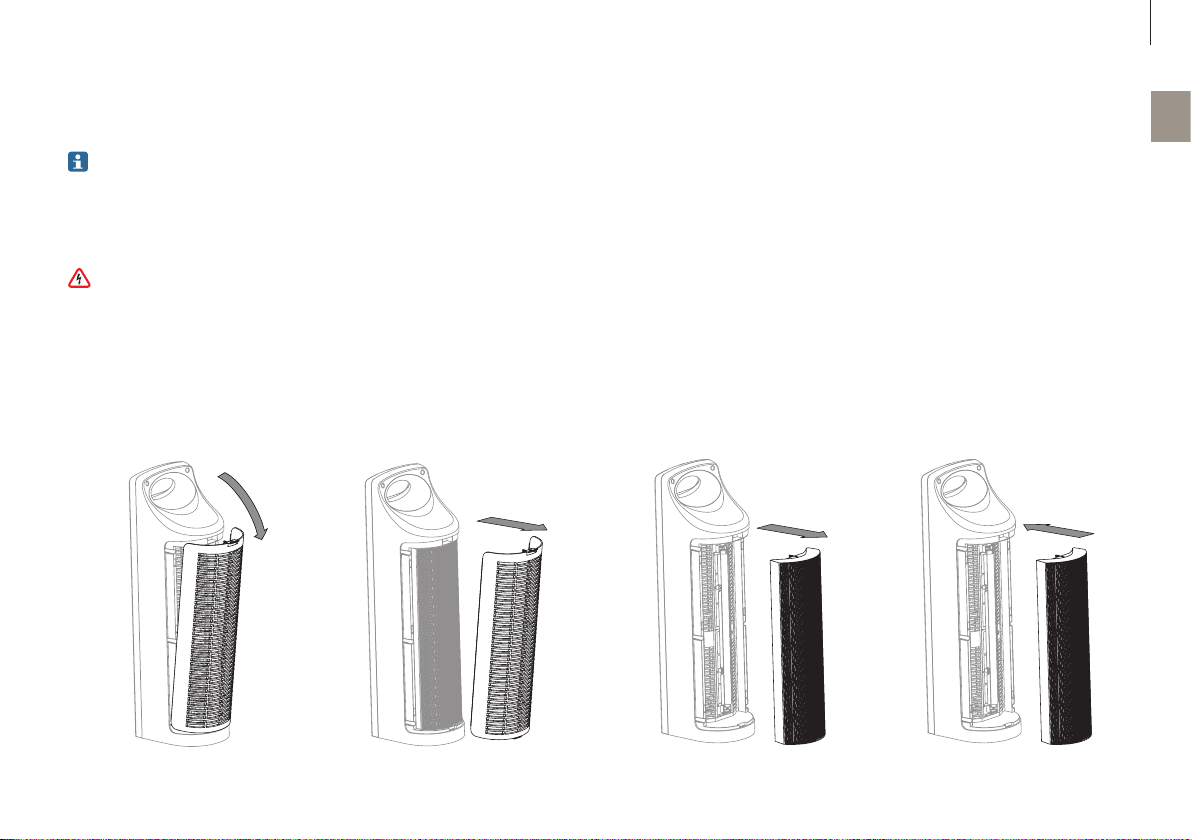
SOSTITUZIONE DEL FILTRO
1. Accertarsi che l’unità sia spenta e scollegata.
Sbloccare la griglia d’ingresso, premendo sulla
chiusura a scatto (vedere lo schema della sezione
“Parti principali”).
2. Rimuovere la griglia d’ingresso dall’unità come
illustrato di seguito.
3. Afferrare i telai sinistro e destro del filtro attraverso gli incavi sui lati dell’alloggiamento filtro e
rimuovere il filtro stesso.
it
4. Inserire un nuovo filtro, quindi reinnestare in posizione la griglia d’ingresso.
Page 50

50
it
PULIZIA E MANUTENZIONE
PULIZIA DELLE SUPERFICI ESTERNE
Evitare infiltrazioni d’acqua nelle parti interne: ciò
potrebbe causare folgorazione e lesioni, oltre che
danni all’unità.
1. Spegnere e scollegare l’unità.
2. Per tergere le superfici dell’alloggiamento esterno,
utilizzare una salvietta leggermente inumidita con
acqua e detergente per piatti.
3. Attendere che l’unità sia completamente asciutta
prima di utilizzarla nuovamente.
Page 51

51
RISOLUZIONE DEI PROBLEMI
Problema Causa Soluzione
L’unità non funziona Manopola di comando non ruotata in posizione ON. Ruotare la manopola di comando in senso orario.
L’unità è scollegata. Accertarsi che l’unità sia collegata.
Portata d’aria ridotta,
oppure filtraggio insufficiente
La griglia d’ingresso non è stata montata e bloccata in
posizione.
La griglia d’ingresso o quella di uscita potrebbero essere
ostruite.
Il filtro potrebbe essere intasato. Sostituire con un nuovo filtro, se necessario.
Accertarsi che filtro e griglia d’ingresso siano correttamente montati e bloccati in posizione.
Accertarsi che l’ingresso e l’uscita aria non siano ostruiti.
it
Page 52

52
it
Page 53

GEBRUIKSAANWIJZING
53
nl
Page 54

54
nl
INHOUDSOPGAVE
Technische gegevens 55
Inleiding 56
Voordelen van het product 57
Belangrijkste onderdelen 58
Bediening van de Allergy Pro® AP200 59
Veiligheid 59
Inschakelen/uitschakelen 60
Ventilatorstand 60
Reiniging & onderhoud 61
Filter vervangen 61
Externe oppervlakken reinigen 62
Problemen oplossen 63
Page 55

55
TECHNISCHE GEGEVENS
Technische gegevens*
Typeaanduiding AP200
Opgenomen vermogen 45 W
Netspanning 220 – 240 V ~ 50 Hz
Reinigingsvermogen (CADR) – stof — rook — pollen 265 m3/h — 233 m3/h — 335 m3/h
Bedrijfsgeluid 62 dB(A)
Afmetingen 224 x 176 x 647 mm
Gewicht 4,2 kg
Vervangingsonderdelen Filter – AAP200
* Wijzigingen voorbehouden
nl
Page 56
56
nl
INLEIDING
Hartelijk dank voor de aankoop van de luchtreiniger
Allergy Pro™ AP200. De luchtreiniger Allergy Pro™
AP200 zal de kwaliteit van de lucht in uw huis, kantoor
of andere omgevingen sterk verbeteren. We willen dat
u volledig tevreden bent met uw Allergy Pro™ AP200.
Daarom wordt uw Allergy Pro™ AP200 geleverd met
een beperkte garantie van één jaar.
Geniet van uw Allergy Pro™ AP200 en bezoek onze
website om meer te weten te komen over manieren om
de kwaliteit van uw lucht en uw leven te verbeteren met
onze eersteklas producten en upgrades.
Lees de volgende instructies zorgvuldig door zodat u
zeker bent van optimale prestaties en een optimale
veiligheid.
envion.com
Page 57
57
VOORDELEN VAN HET PRODUCT
• Luchtreiniging: een filter haalt deeltjes uit de luch t,
waardoor de lucht wordt gereinigd.
• Verwijdert effectief rook, pollen, stof, dierlijke
huidschilfers, huisstofmijten, schimmels en bacteriën.
• 3 ventilatorstanden, zodat u het gewenste reinigingsniveau kunt kiezen.
nl
Page 58
58
nl
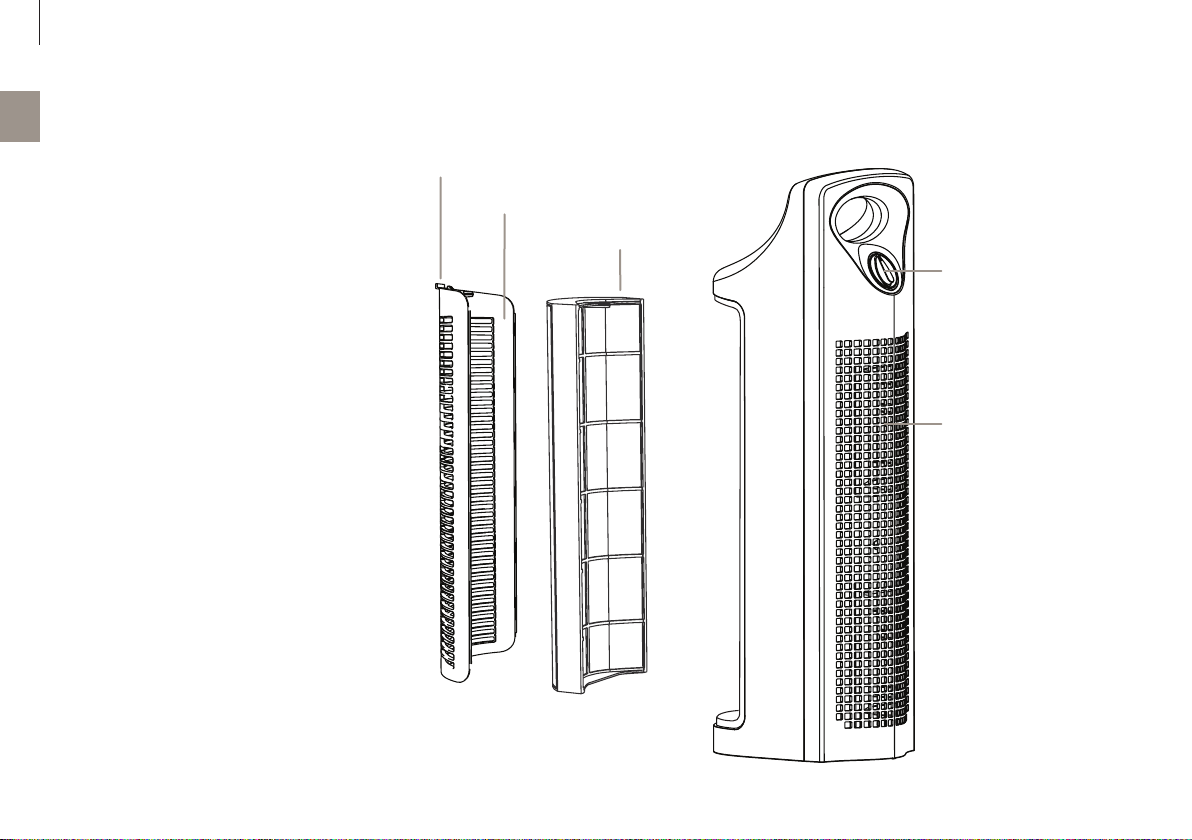
BELANGRIJKSTE ONDERDELEN
1. Vergrendelingslip
2. Luchtinlaatrooster
3. Filter
1
2
4. Draaiknop: UIT, HI, MED, LOW
5. Luchtuitlaatrooster
3
4
5
Page 59
59
BEDIENING VAN DE ALLERGY PRO® AP200
VEILIGHEID
Voordat u de luchtreiniger Allergy Pro™ AP200
gaat gebruiken, dient u de volgende belangrijke
informatie te lezen.
1. Plaats het apparaat niet in de buurt van ventilators.
2. Plaats het apparaat op minimaal 30 cm afstand
van een muur.
3. Plaats het apparaat niet in de buurt van gordijnen.
4. Plaats het apparaat in de buurt van de bron van de
luchtverontreiniging. Dit is de beste manier om de
kwaliteit van de lucht binnenshuis te verbeteren.
Gebruik de Allergy Pro™ AP200 niet als het filter
kapot is. Vervang het filter als er een scheur of een
gat in zit.
nl
1
30 cm
2
30 cm
3
4
Page 60
60
nl
BEDIENING VAN DE ALLERGY PRO® AP200
INSCHAKELEN/UITSCHAKELEN
Draai de draaiknop rechtsom om de luchtreiniger Allergy
Pro™ AP200 in te schakelen. Draai de draaiknop linksom
tot in de UIT-stand om het apparaat uit te schakelen.
VENTILATORSTAND
De Allergy P ro™ AP2 00 heeft drie verschillende ventilat orstanden: HI, MED en LOW. Draai de draaiknop rechtsom
en kies de gewenste ventilatorstand.
HI MED
LOW
Draaiknop
Page 61
61
REINIGING & ONDERHOUD
De professionele luchtreiniger Allergy Pro™ AP200
is nagenoeg onderhoudsvrij! Het filter gaat tot
twaalf maanden mee, afhankelijk van het gebruik
en de omgevingsomstandigheden. Het wordt aanbevolen om het filter elke twaalf maanden te vervangen.
Voordat u het filter van uw professionele lucht-
reiniger Allergy Pro™ AP200 vervangt, dient u
het apparaat uit te schakelen, de stekker uit het
stopcontact te halen en alle veiligheidsinstructies
en belangrijke waarschuwingen in deze gebruiksaanwijzing te lezen.
1.
2. 3. 4.
FILTER VERVANGEN
1. Schakel het apparaat uit en haal de stekker uit het
stopcontact. Maak het luchtinlaatrooster los door
op de vergrendelingslip te drukken (zie de afbeelding bij “Belangrijkste onderdelen”).
2. Verwijder het luchtinlaatrooster van het apparaat
zoals hieronder weergegeven.
3. Pak de linker- en rechterzijde van het filter vast via
de uitsparingen aan de zijkant van de filterbehuizing en verwijder het filter.
nl
4. Plaats een nieuw filter en klik het luchtinlaatrooster weer op zijn plaats.
Page 62

62
nl
REINIGING & ONDERHOUD
EXTERNE OPPERVLAKKEN REINIGEN
Mors geen water op de interne onderdelen, want
dit kan uw apparaat beschadigen en leiden tot
elektrische schokken en letsel.
1. Schakelaar het apparaat uit en haal de stekker uit
het stopcontact.
2. Gebruik een washandje dat bevochtigd is met een
beetje water en afwasmiddel om de buitenste oppervlakken van de behuizing af te vegen.
3. Laat het apparaat voor gebruik goed drogen.
Page 63

63
PROBLEMEN OPLOSSEN
Probleem Oorzaak Oplossing
Het apparaat werkt niet De draaiknop is niet in de stand ON gedraaid. Draai de draaiknop rechtsom.
Verminderde luchtstroom
of slechte filtering
De stekker van het apparaat is niet in het stopcontact gestoken.
Het luchtinlaatrooster is niet goed geplaatst of niet goed
vergrendeld.
Het luchtinlaat- of luchtuitlaatrooster wordt wellicht geblokkeerd.
Het filter is wellicht verstopt. Vervang indien nodig het filter.
Steek de stekker van het apparaat in het stopcontact.
Zorg ervoor dat het filter en het luchtinlaatrooster goed zijn geplaatst en dat
het luchtinlaatrooster goed is vergrendeld.
Zorg ervoor dat niets het luchtinlaat- en luchtuitlaatrooster blokkeert.
nl
Page 64

64
nl
Page 65

INSTRUCCIONES DE USO
65
es
Page 66

66
es
ÍNDICE
Datos técnicos 67
Instrucciones 68
Ventajas del producto 69
Componentes principales 70
Funcionamiento del Allergy Pro® AP200 71
Seguridad 71
Control de la potencia 72
Control de la velocidad del ventilador 72
Limpieza y mantenimiento 73
Sustitución del filtro 73
Limpieza de las superficies exteriores 74
Resolución de problemas 75
Page 67

67
DATOS TÉCNICOS
Datos técnicos*
Denominación del modelo AP200
Consumo de energía 45 W
Tensión de la red 220 – 240V ~ 50Hz
Capacidad de purificación (CADR) – polvo — humo — polen 265m3/h — 233m3/h — 335m3/h
Nivel de ruido en funcionamiento 62 dB(A)
Dimensiones 224 x 176 x 647 mm
Peso 4,2kg
Componentes de sustitución Filtro – AAP200
*Se reserva el derecho a realizar modificaciones
es
Page 68
68
es
INSTRUCCIONES
Le agradecemos la confianza depositada en el purificador de aire Allergy Pro™ AP200. El purificador de aire
Allergy Pro™ AP200 mejorará de forma considerable
la calidad del aire de su hogar, oficina y otros entornos. Esperamos que el purificador de aire Allergy Pro™
AP200 cumpla sus expectativas. Por ello, Allergy Pro™
AP200 ofrece una garantía limitada de un año.
Cuando ya haya comprobado la pureza del aire del
Allergy Pro™ AP200, no dude en acceder a nuestra página web para descubrir otras maneras de aumentar la
calidad del aire y mejorar su vida con nuestros productos y actualizaciones de primera calidad.
Le rogamos que lea con detenimiento las siguientes
instrucciones con el fin de asegurar un rendimiento y
seguridad óptimos.
envion.com
Page 69
69
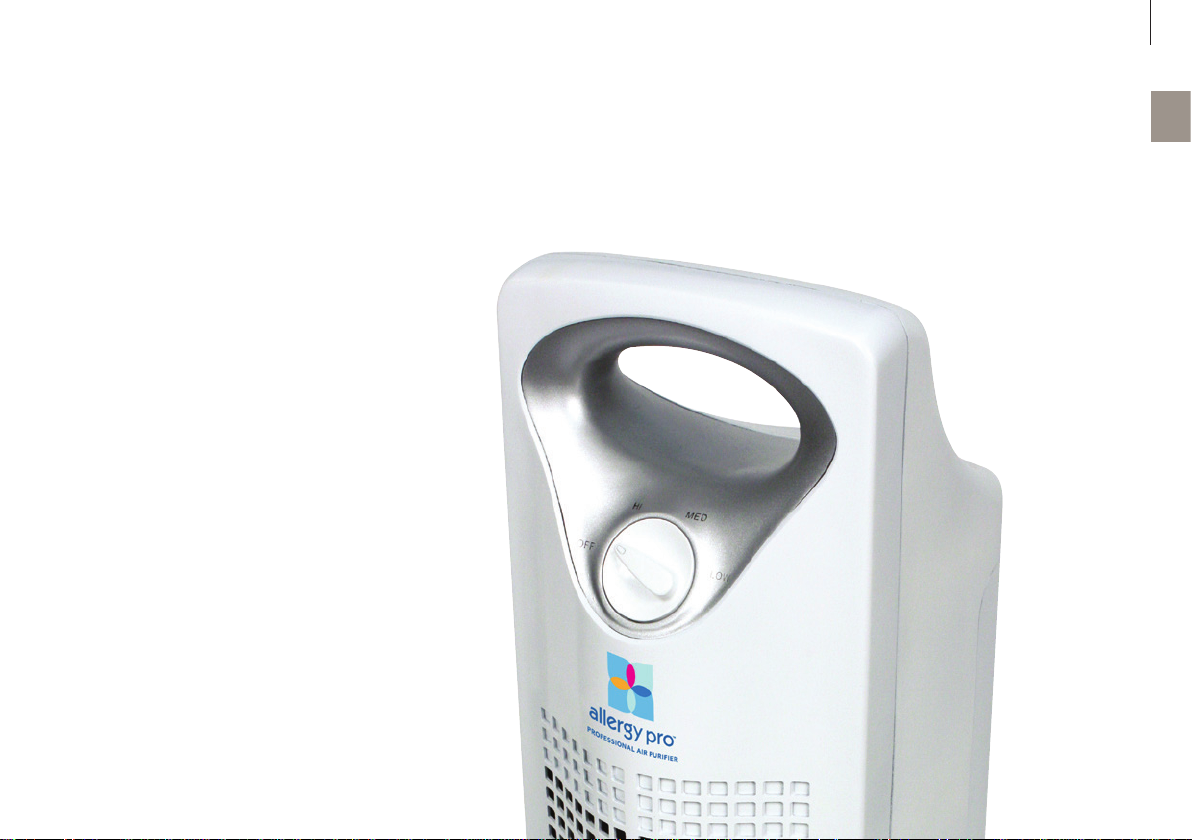
VENTAJAS DEL PRODUCTO
• Purificación del aire: El filtro elimina las partículas
del aire y lo purifica.
• Elimina de forma eficaz el humo, el polen, el polvo,
la caspa animal, los ácaros, el moho y las bacterias.
• Las tres velocidades del ventilador permiten seleccionar el nivel de limpieza que desee.
es
Page 70
70
es
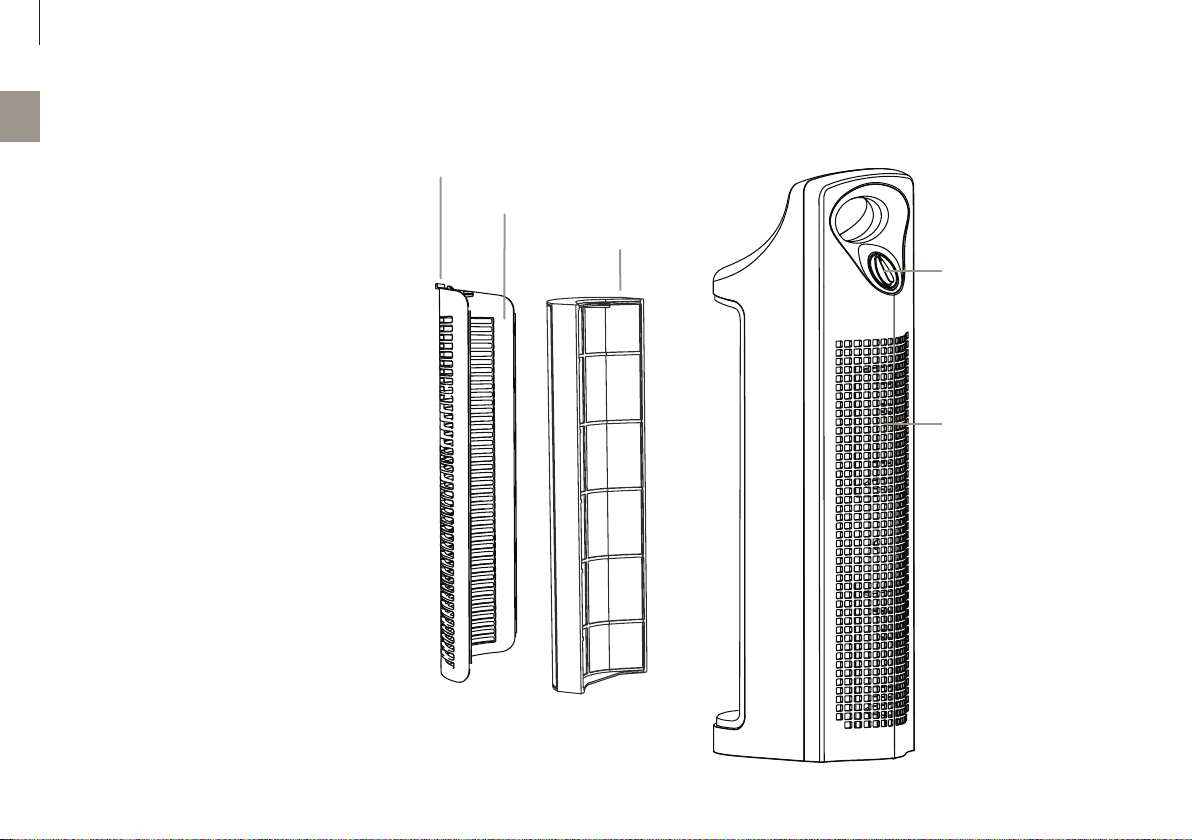
COMPONENTES PRINCIPALES
1. Cierre
2. Rejilla de entrada de aire
3. Filtro
1
2
4. Selector de control: Off, HI, MED, LOW
5 Rejilla de salida de aire
3
4
5
Page 71
71
FUNCIONAMIENTO DEL ALLERGY PRO® AP200
SEGURIDAD
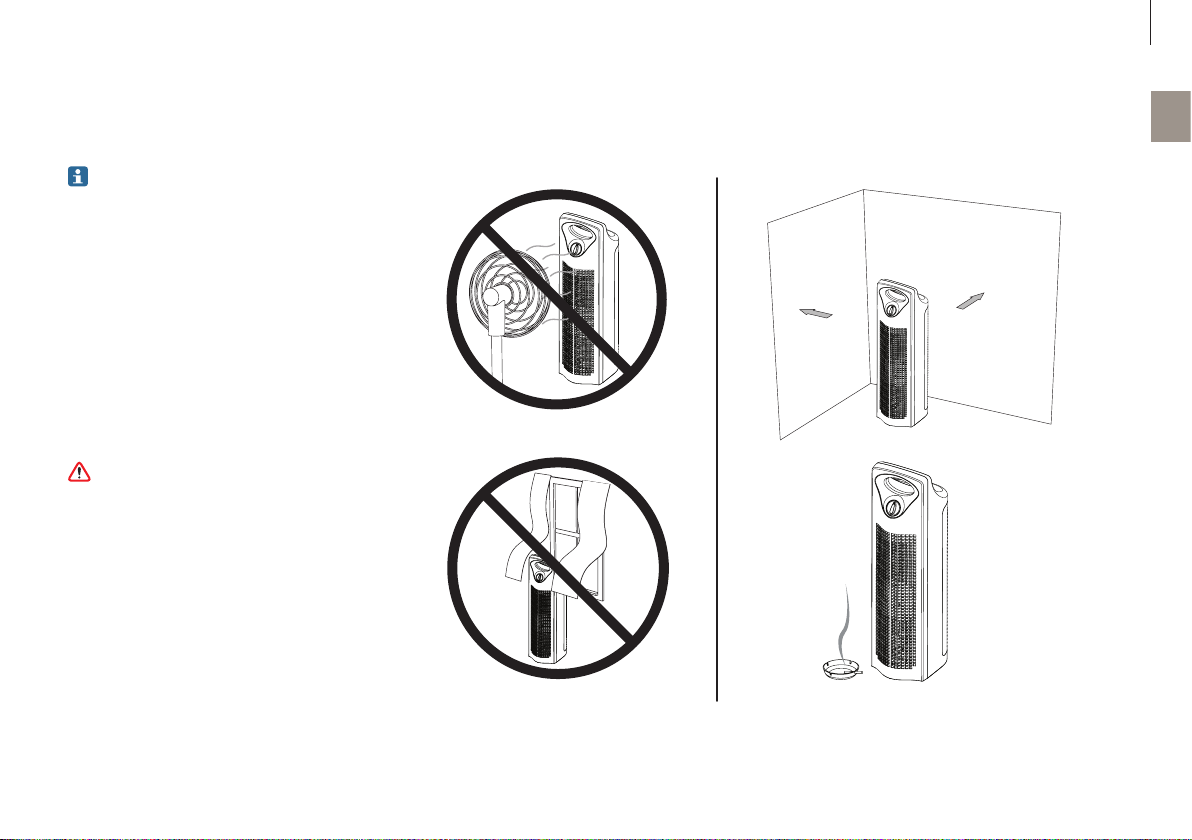
Antes de utilizar el purificador de aire Allergy Pro™
AP200, lea estas impor tantes indicaciones en materia de seguridad.
1. No lo coloque cerca de ventiladores.
2. Mantenga ambos lados de la unidad a una distancia mínima de 30cm con respecto a cualquier
pared.
3. No coloque la unidad cerca de cortinas.
4. Colocar la unidad cerca de la fuente de contaminación del aire es una forma eficaz de mejorar la
calidad del aire interior.
No haga funcionar el Allergy Pro™ AP200 si tiene
algún filtro roto. En caso de que el filtro presente
algún desgarre u orificio, sustitúyalo.
es
1
30cm
2
30cm
3
4
Page 72
72
es
FUNCIONAMIENTO DEL ALLERGY PRO® AP200
CONTROL DE LA POTENCIA
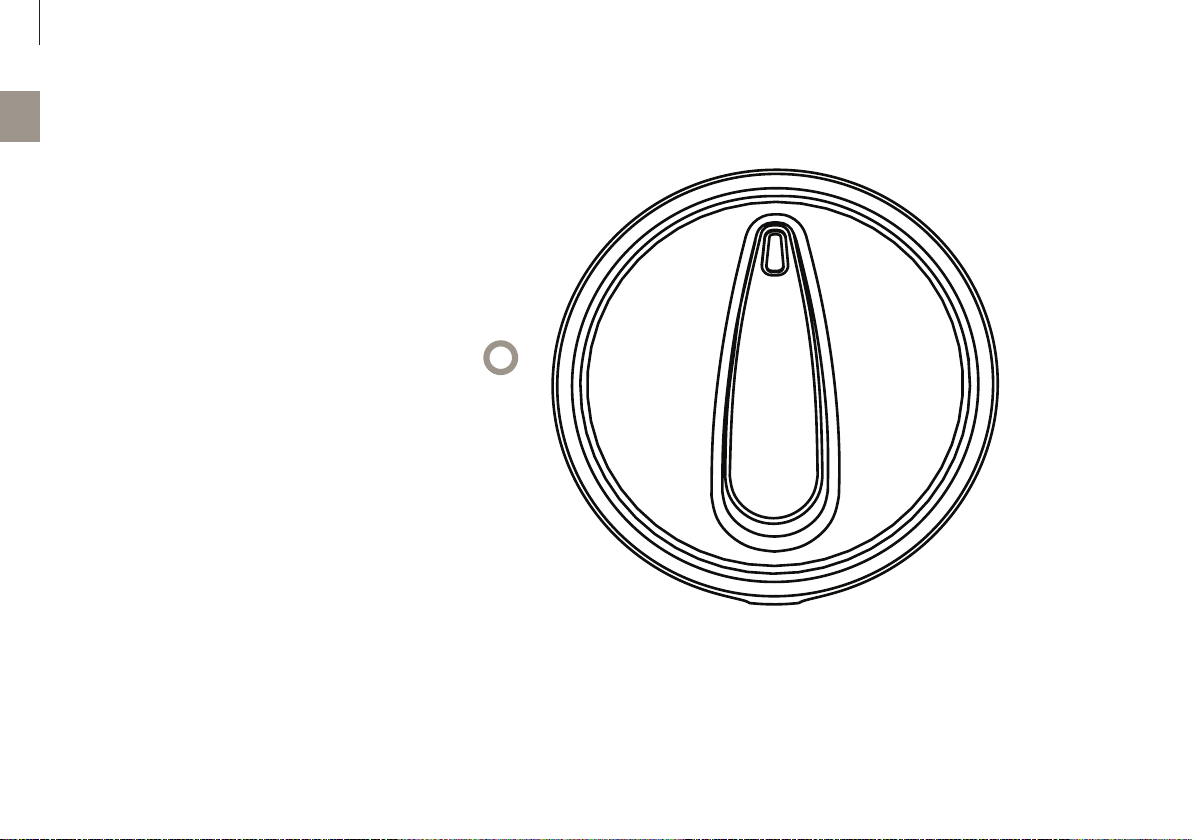
Gire el selector de control en sentido horario para activar
el purificador de aire Allergy Pro™ AP200. Gire el selector
de control en sentido antihorario (hasta la posición OFF)
para desactivar la unidad.
CONTROL DE LA VELOCIDAD DEL VENTILADOR
El Allergy Pro™ AP200 incorpora tres velocidades distintas de limpieza, HI (alta), MED (media) y LOW (baja). Gire
el selector de control en sentido horario para determinar
la velocidad deseada.
HI MED
LOW
Selector de control
Page 73
73
LIMPIEZA Y MANTENIMIENTO
El purificador profesional de aire Allergy Pro™
AP200 apenas requiere mantenimiento. En función del uso y de las condiciones ambientales,
nuestro filtro dura hasta doce meses. Recomendamos sustituirlo cada año.
Antes de reemplazar el filtro del purificador profe-
sional de aire Allergy Pro™ AP200, apague la unidad y desenchúfela de la toma de corriente. Asimismo, lea todas las instrucciones de seguridad y
las advertencias incluidas en el presente manual
del propietario.
1.
2. 3. 4.
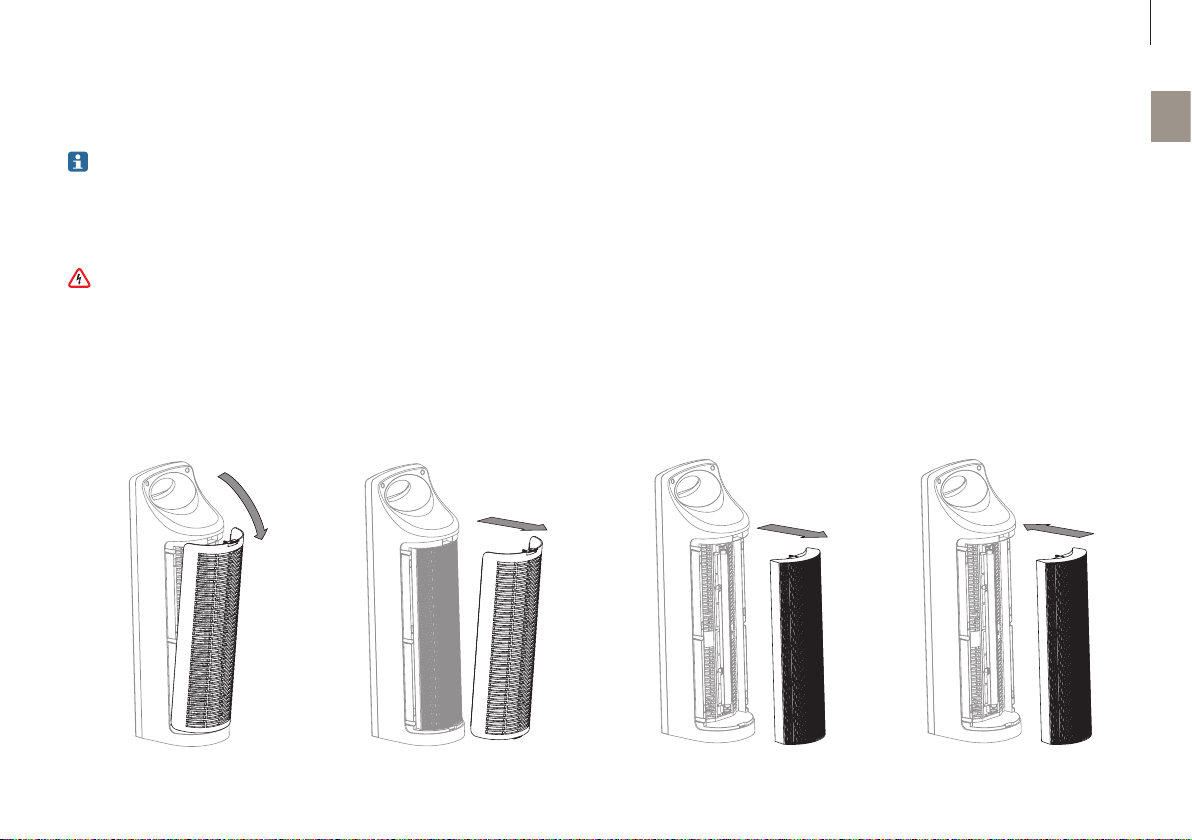
SUSTITUCIÓN DEL FILTRO
1. Asegúrese de que la unidad esté apagad a y desenchufada. Ejerza presión sobre el cierre para soltar
la rejilla de entrada (consulte el diagrama de la
sección “Componentes principales”).
2. Retire la rejilla de entrada de la unidad tal y como
se indica a continuación.
3. Sujete los marcos izquierdo y derecho del filtro por
las muescas de los lados de la carcasa del mismo
y retírelo.
es
4. Introduzca un nuevo filtro y, a continuación, vuelva
a colocar la rejilla de entrada en su lugar.
Page 74

74
es
LIMPIEZA Y MANTENIMIENTO
LIMPIEZA DE LAS SUPERFICIES EXTERIORES
No permita que penetre agua en los componentes
internos, ya que podría ocasionar daños en la unidad y provocarle una descarga eléctrica o heridas.
1. Apague y desenchufe la unidad.
2. Emplee un paño ligeramente humedecido con un
poco de agua y detergente para limpiar las superficies de la carcasa.
3. Deje que la unidad se seque por completo antes de
usarla.
Page 75

75
RESOLUCIÓN DE PROBLEMAS
Problema Motivo Solución
La unidad no funciona El selector de control no se encuentra en la posición ON. Gire el selector de control en sentido horario.
La unidad está desenchufada. Compruebe que la unidad esté enchufada.
Flujo de aire reducido
o filtración deficiente
La rejilla de entrada no está instalada y bloqueada en su
sitio.
Es posible que la rejilla de entrada o de salida esté bloqueada.
Puede que el filtro esté obstruido. En caso necesario, sustitúyalo por uno nuevo.
Compruebe que el filtro y la rejilla de entrada estén correctamente instalados
y bloqueados en su sitio.
Compruebe que nada obstruya la entrada y salida de aire.
es
Page 76

76
es
Page 77

INSTRUÇÕES DE UTILIZAÇÃO
77
pt
Page 78

78
pt
ÍNDICE
Dados técnicos 79
Introdução 80
Vantagens do aparelho 81
Componentes principais 82
Funcionamento do Allergy Pro® AP200 83
Segurança 83
Botão Power 84
Controlo da velocidade do ventilador 84
Limpeza & Manutenção 85
Substituição do filtro 85
Limpeza das superfícies exteriores 86
Resolução de problemas 87
Page 79

79
DADOS TÉCNICOS
Dados técnicos*
Designação do modelo AP200
Consumo de energia 4 5 W
Tensão de rede 220 – 240 V ~ 5 0Hz
Débito de ar limpo (CADR) – poeiras — fumos — pólen 265 m3/h — 233 m3/h — 335 m3/h
Nível de ruído em funcionamento 62 dB(A)
Dimensões 224 x 176 x 647 mm
Peso 4,2 kg
Peças de substituição Filtro – AAP200
* Sujeito a alterações
pt
Page 80
80
pt
INTRODUÇÃO
Obrigado por ter adquirido o purificador de ar Allergy
Pro™ AP200. O purificador de ar Allergy Pro™ AP200
melhorará significativamente a qualidade do ar na sua
casa ou escritório ou em qualquer outro ambiente. É
nosso desejo que fique totalmente satisfeito com o seu
Allergy Pro™ AP200. É por isso que o seu Allergy Pro™
AP200 é fornecido com uma garantia de 1 ano.
Depois de sentir a pureza do ar fornecido pelo Allergy
Pro™ AP200, visite-nos no nosso website para descobrir mais formas de melhorar a qualidade do ar que
respira e a sua vida com os nossos produtos topo de
gama e upgrades.
Leia atentamente as seguintes instruções para assegurar um nível máximo de desempenho e segurança.
envion.com
Page 81
81
VANTAGENS DO APARELHO
• Purificação do ar: O filtro retira partículas do ar,
purificando-o.
• Remove eficazmente fumos, pólen, poeiras, pelos
de animais, ácaros, bolores e bactérias.
• Ventilador com 3 velocidades – permite-lhe escolher o nível de limpeza.
pt
Page 82
82
pt
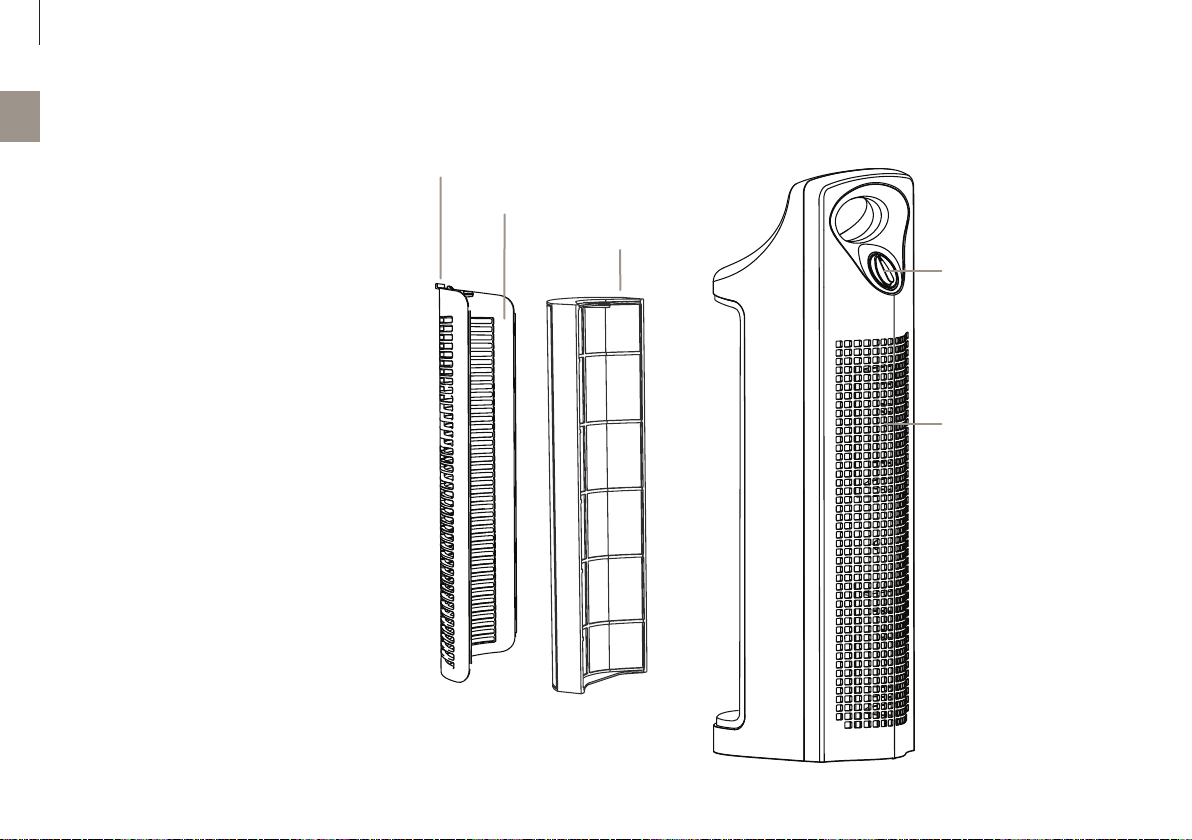
COMPONENTES PRINCIPAIS
1. Trinco
2. Grelha de entrada de ar
3. Filtro
1
2
4. Botão de controlo: Off, HI, MED, LOW
5. Grelha de saída de ar
3
4
5
Page 83
83
FUNCIONAMENTO DO ALLERGY PRO® AP200
SEGURANÇA
Antes de usar o purificador de ar Allergy Pro™
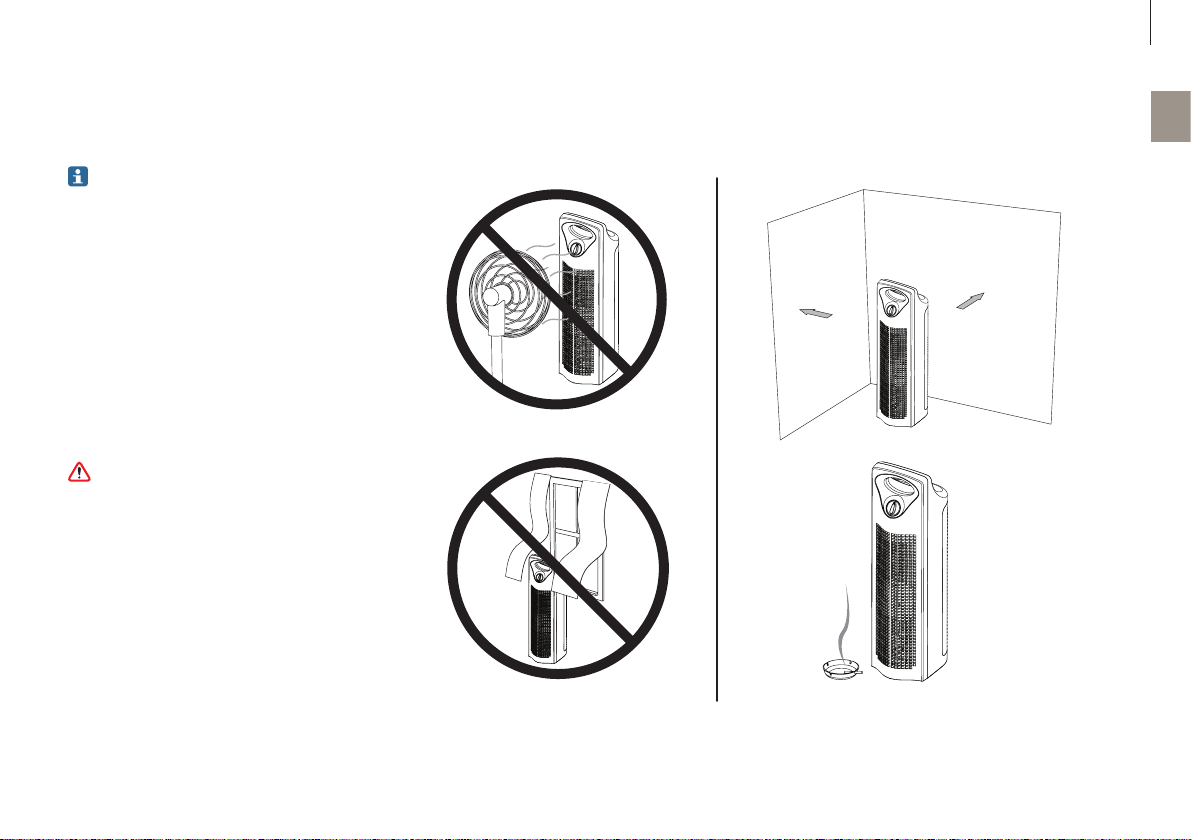
AP200, leia atentamente as seguintes informações.
1. Não coloque o aparelho junto a uma ventoinha.
2. Mantenha ambos os lados do aparelho a uma
distância mínima de 30 centímetros de qualquer
parede.
3. Não coloque o aparelho junto a cortinas.
4. A colocação do aparelho junto a uma fonte de poluição atmosférica é uma forma eficaz de melhorar a qualidade do ar ambiente.
Não utilize o Allergy Pro™ AP200 se o filtro estiver
em más condições. Substitua o filtro se este tiver
um rasgo ou um buraco.
pt
1
30 cm
2
30 cm
3
4
Page 84
84
pt
FUNCIONAMENTO DO ALLERGY PRO® AP200
BOTÃO POWER
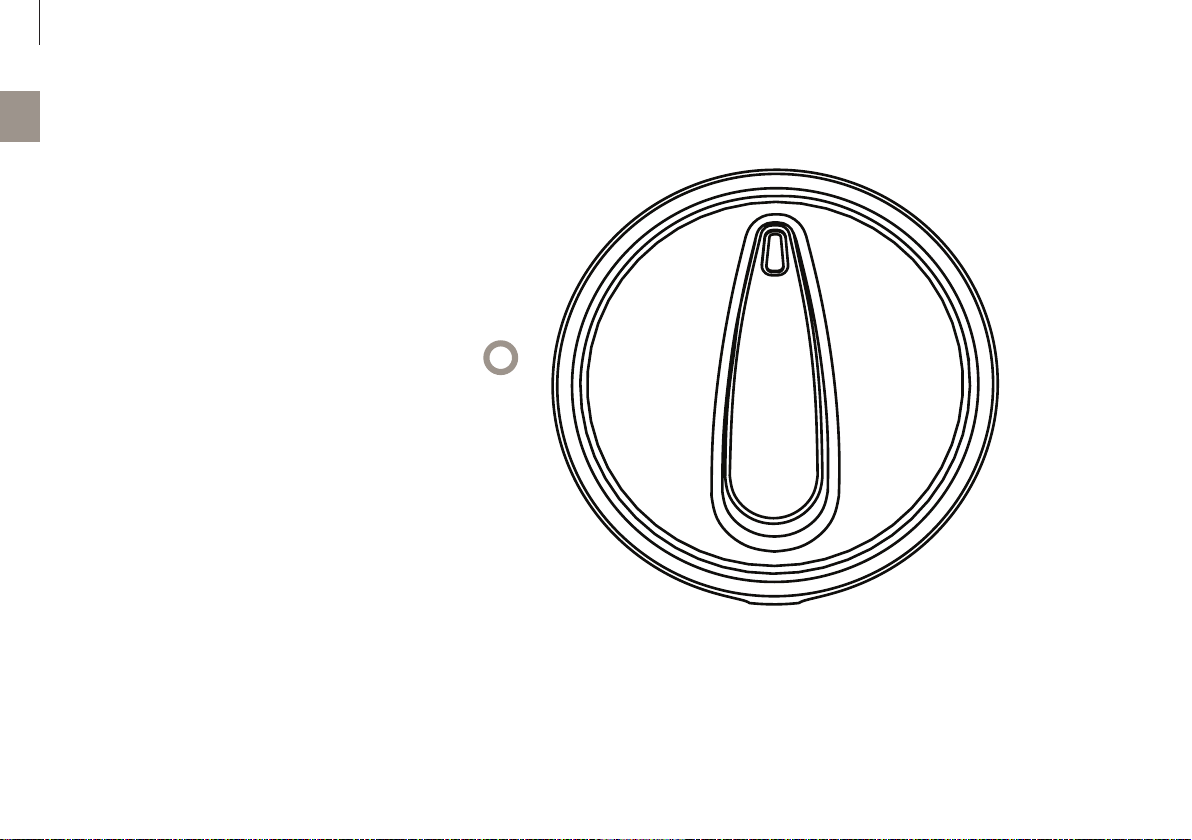
Para utilizar o purificador de ar Allergy Pro™ AP200, rode
o botão no sentido dos ponteiros do relógio para ligá-lo.
Para desligá-lo, rode o botão no sentido contrário ao dos
ponteiros do relógio.
CONTROLO DA VELOCIDADE DO VENTILADOR
O Allergy Pr o™ AP200 possui três velocidades de limpeza:
HI (elevada), MED (média) e LOW (baixa). Rode o botão
no sentido dos ponteiros do relógio até à velocidade desejada.
HI MED
LOW
Botão de controlo
Page 85
85
LIMPEZA & MANUTENÇÃO
O purificador de ar profissional Allergy Pro™
AP200 quase não requer manutenção! O filtro
dura até doze meses, dependendo da utilização
e das condições ambientais. Recomenda-se que
substitua o filtro a cada doze meses.
Antes de substituir o filtro do seu purificador de
ar profissional Allergy Pro™ AP200, desligue o
aparelho, retire a ficha da corrente e leia todas
as instruções de segurança e avisos presentes no
presente manual.
1.
2. 3. 4.
SUBSTITUIÇÃO DO FILTRO
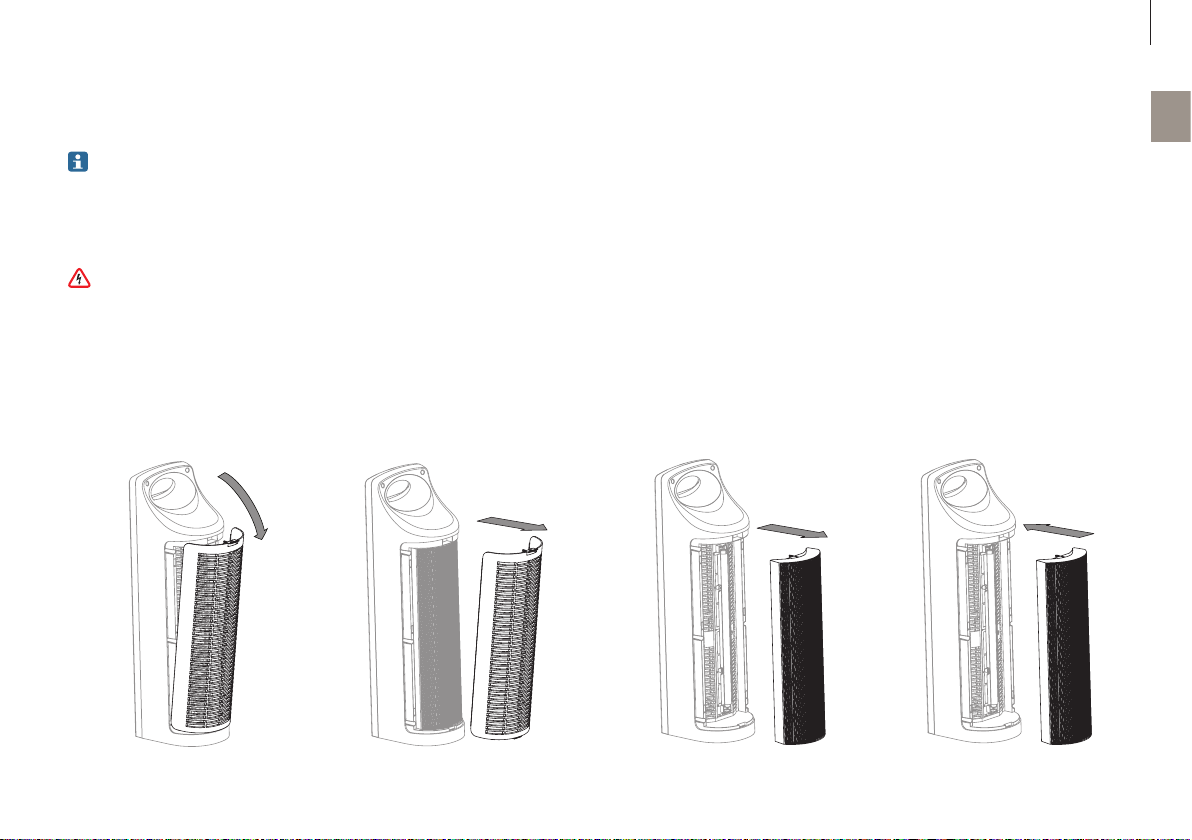
1. Certifique-se de que o aparelho está desligado e
de que a respetiva ficha não es tá ligada à corrente.
Liberte a grelha de entrada de ar, exercendo pressão sobre o trinco (ver diagrama dos “Componentes principais”).
2. Retire a grelha de entrada do aparelho, como representado abaixo.
3. Segure nos lados esquerdo e direito da armação
do filtro através dos entalhes nas laterais do compartimento do filtro e retire o filtro.
pt
4. Introduza um filtro novo e volte a encaixar a grelha
de entrada na sua posição.
Page 86

86
pt
LIMPEZA & MANUTENÇÃO
LIMPEZA DAS SUPERFÍCIES EXTERIORES
Não permita a entrada de água no interior do apa-
relho pois isso poderá danificá-lo e resultar na
eletrocussão e ferimento do utilizador.
1. Desligue o aparelho e retire a ficha da tomada.
2. Use um pano ligeiramente humedecido com água
e detergente da louça para limpar as superfícies
exteriores.
3. Antes de voltar a usá-lo, deixe o aparelho secar
completamente.
Page 87

87
RESOLUÇÃO DE PROBLEMAS
Problema Motivo Solução
O aparelho não funciona O botão de controlo não está na posição ON. Rode o botão no sentido dos ponteiros do relógio.
O aparelho não está ligado à eletricidade. Verifique se o aparelho está ligado à eletricidade.
Fluxo de ar reduzido
ou má filtragem
A grelha de entrada de ar não foi instalada e bloqueada na
posição adequada.
A grelha de entrada ou saída de ar pode estar bloqueada. Verifique se algo está a bloquear a entrada e saída de ar.
O filtro pode estar obstruído. Substitua por um filtro novo, se necessário.
Verifique se o filtro e a grelha de entrada de ar estão bem instalados
e bloqueados.
pt
Page 88

88
pt
Page 89

HASZNÁLATI ÚTMUTATÓ
89
hu
Page 90

90
hu
TARTALOMJEGYZÉK
Műszaki adatok 91
Bevezetés 92
Termékelőnyök 93
Legfontosabb részegységek 94
Az Allergy Pro® AP200 használata 95
Biztonság 95
Teljesítményszabályozás 96
Ventilátorsebesség szabályozása 96
Tisztítás és karbantartás 97
A szűrő cseréje 97
Külső felületek tisztítása 98
Hibaelhárítás 99
Page 91

91
MŰSZAKI ADATOK
Műszaki adatok*
Típus AP200
Teljesítményfelvétel 45 W
Hálózati feszültség 220 – 240 V ~ 50 Hz
Tisztítási teljesítmény (CADR) – por – füst – pollen 265 m3/h — 233 m3/h — 335 m3/h
Működési zajszint 62 dB(A)
Méretek 224 x 176 x 647 mm
Súly 4,2 kg
Cserealkatrészek Szűrő – AAP200
* A változtatások joga fenntar tva.
hu
Page 92
92
hu
BEVEZETÉS
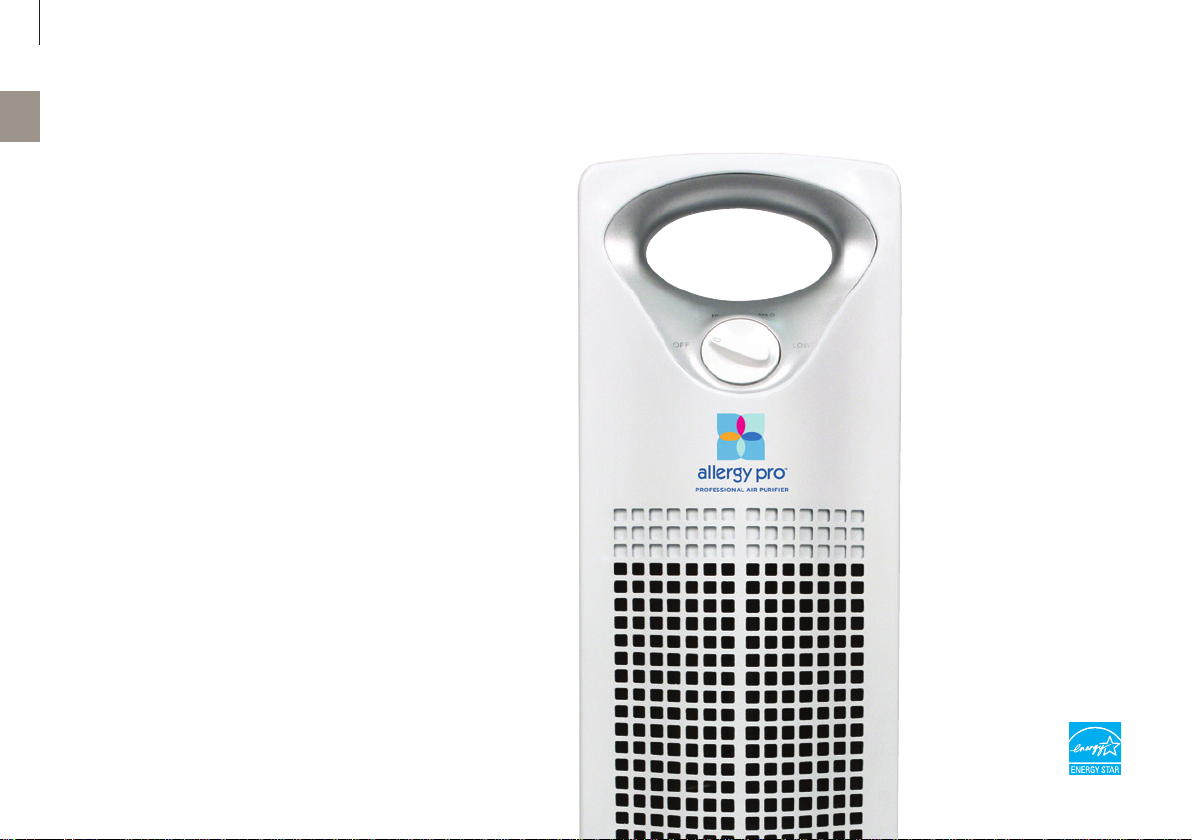
Köszönjük, hogy megvásárolta az Allergy Pro™ AP200
légtisztítót. Az Allergy Pro™ AP200 légtisztító jelentős
mértékben javítani fogja a levegő minőségét otthonában, az irodában vagy más helyiségekben. Reméljük, hogy maximálisan elégedett lesz az Allergy Pro™
AP200 légtisztítóval. Ezért vállalunk az Allergy Pro™
AP200 készülékre egy év korlátozott jótállást.
Ha már megtapasztalta az Allergy Pro™ AP200 levegő
tisztaságát, keresse fel weboldalunkat, ahol megtudhatja milyen módokon javíthatja a levegőjét és életminőségét prémium termékeinkkel és újdonságokkal.
A biztonság és az optimális teljesítmény biztosítása
érdekében figyelmesen olvassa el a következő tudnivalókat.
envion.com
Page 93
93
TERMÉKELŐNYÖK
• Levegőtisztítás: A szűrő kiszűri a levegőben lévő
részecskéket és így megtisztítja azt.
• Hatékonyan eltávolítja a füstöt, pollent, port, elhalt
hámsejteket, poratkákat, penészt és baktériumokat.
• 3 sebességfokozatban állítható ventilátor – kiválaszthatja a kívánt tisztítási szintet.
hu
Page 94
94
hu
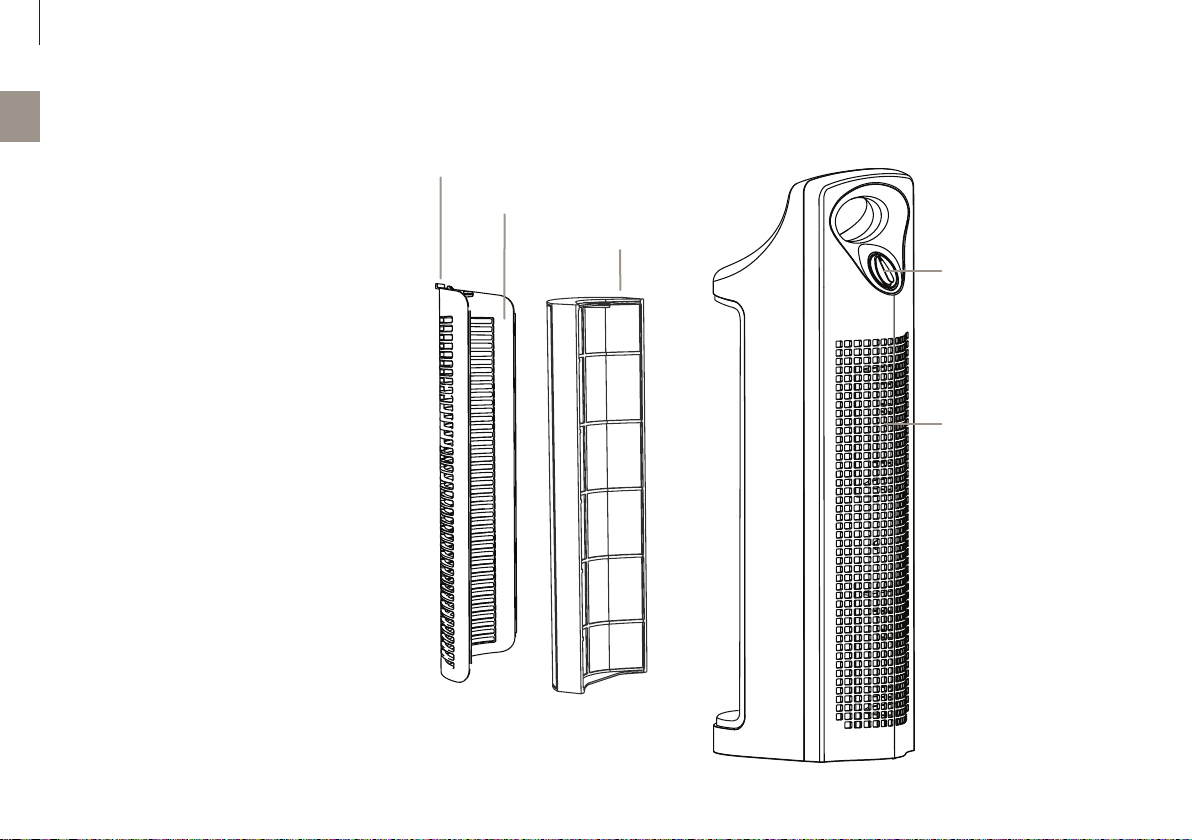
LEGFONTOSABB RÉSZEGYSÉGEK
1. Záróretesz
2. Levegőbemeneti rács
3. Szűrő
4. Beállítógomb: Off, HI, MED, LOW
5. Levegőkimeneti rács
1
2
3
4
5
Page 95
95
AZ ALLERGY PRO® AP200 HASZNÁLATA
BIZTONSÁG
Az Allergy Pro™ AP200 légtisztító használata előtt
feltétlenül olvassa el a következő fontos információkat.
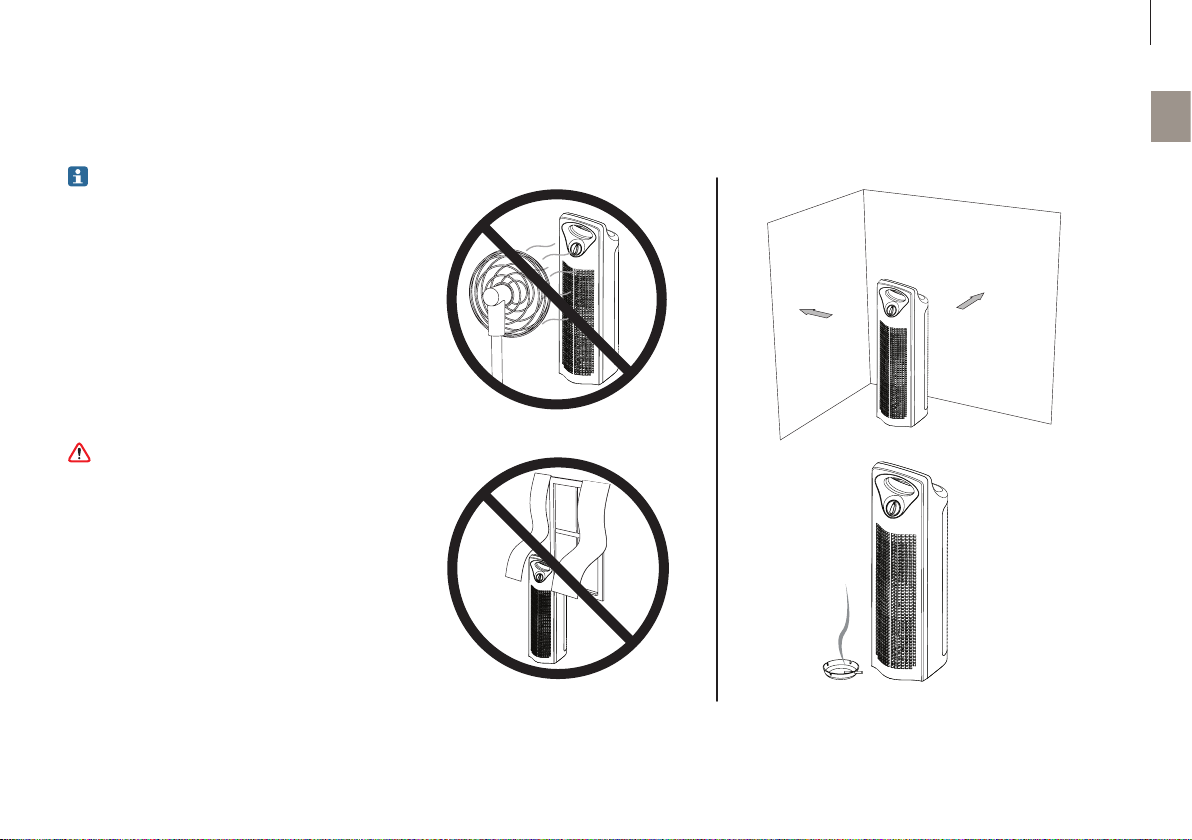
1. Ne helyezze ventilátorok közelébe.
2. Az egység mindkét oldalát tartsa legalább 30 centiméter távolságra a faltól.
3. Ne helyezze az egységet függönyök közelébe.
4. A beltéri levegőminőség javításának hatékony
módja, ha az egységet a légszennyezés forrásának közelében helyezi el.
Ne használja az Allergy Pro™ AP200 készüléket
törött szűrővel. Cserélje ki a szűrőt, ha kiszakadt
vagy kilyukadt.
hu
1
30 cm
2
30 cm
3
4
Page 96
96
hu
AZ ALLERGY PRO® AP200 HASZNÁLATA
TELJESÍTMÉNYSZABÁLYOZÁS
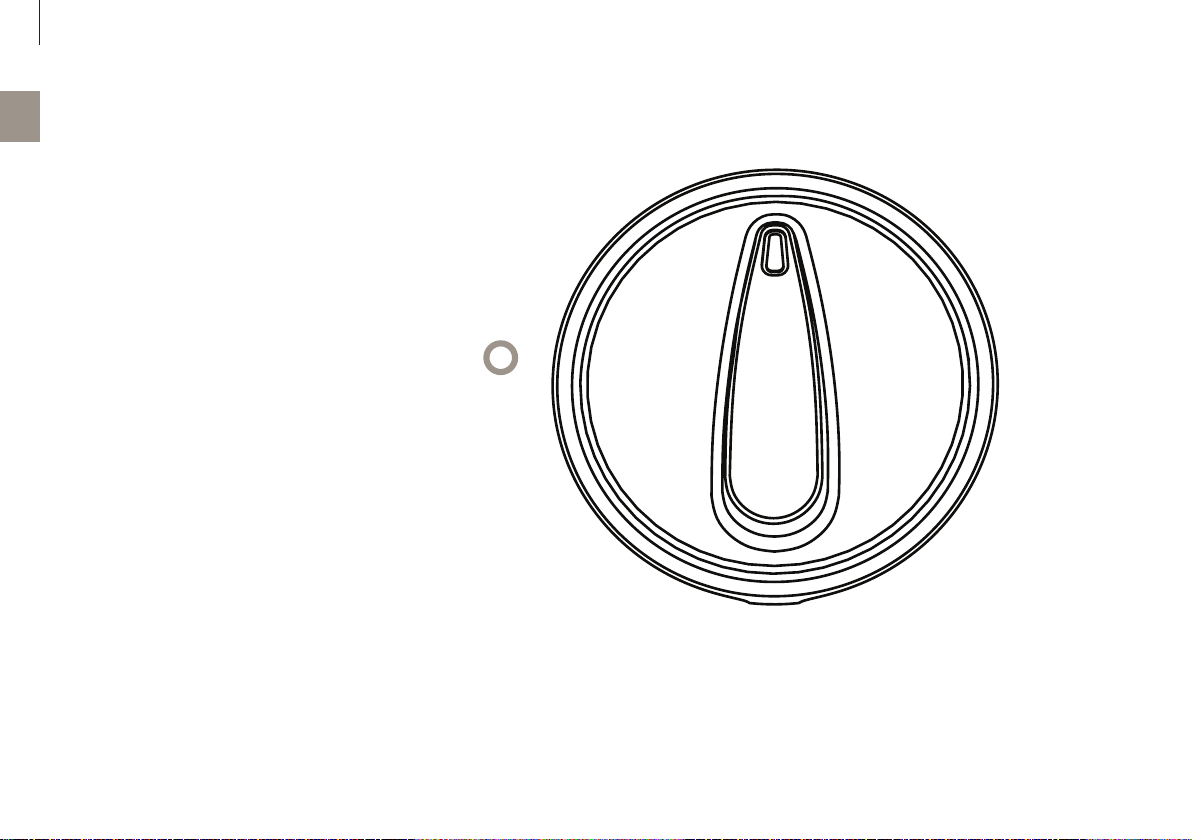
Az Allergy Pro™ AP200 légtisztító használatához kapcsolja be a készüléket a gomb óramutató járásával
azonos irányba történő elfordításával. A készülék kikapcsolásához fordítsa el a gombot az óramutató járásával
ellentétes irányban a KI helyzetbe.
VENTILÁTORSEBESSÉG SZABÁLYOZÁSA
Az Allergy Pro™ AP200 három különböző tisztítási sebességgel működtethető: HI, MED és LOW. Fordítsa a
gombot az óramutató járásával azonos irányban a kívánt
sebességfokozatra.
HI MED
LOW
Beállítógomb
Page 97
97
TISZTÍTÁS ÉS KARBANTARTÁS
Az Allergy Pro™ AP200 professzionális légtisztító
gyakorlatilag nem igényel karbantartást! A szűrőnk élettartama akár tizenkét hónap a használattól és a környezeti feltételektől függően. Tizenkét
havonta ajánlott kicserélni a szűrőt.
Az Allergy Pro™ AP200 professzionális légtisztító
szűrőjének cseréje előtt kapcsolja ki és áramtalanítsa az egységet, illetve olvassa el a kezelési
utasításban található összes biztonsági előírást és
fontos figyelmeztetést.
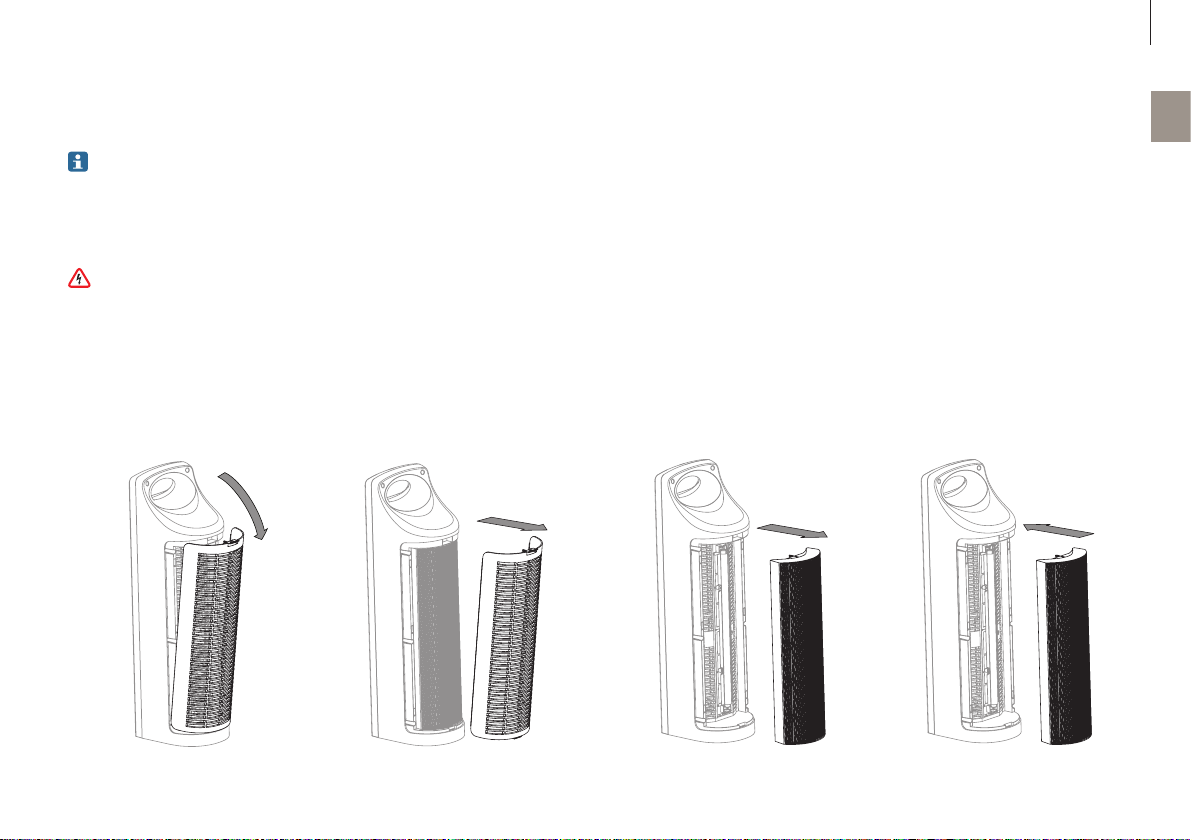
1.
2. 3. 4.
A SZŰRŐ CSERÉJE
1. Győződjön meg arról, hogy az egység kikapcsolt
és áramtalanított állapotban van. A záróretesz
megnyomásával oldja ki a bemeneti rácsot (lásd
a „Legfontosabb részegységek” című ábrát).
2. Távolítsa el a bemeneti rácsot az egységről a lent
látható módon.
3. Fogja meg a szűrő bal és jobb oldali keretét a szűrőburkolat oldalain lévő bemélyedéseknél fogva,
és távolítsa el a szűrőt.
hu
4. Helyezzen be egy új szűrőt, majd pattintsa vissza
a helyére a bemeneti rácsot.
Page 98

98
hu
TISZTÍTÁS ÉS KARBANTARTÁS
KÜLSŐ FELÜLETEK TISZTÍTÁSA
Ne hagyja, hogy víz jusson a belső alkatrészekbe,
mivel az megrongálhatja az egységet, és áramütést, illetve személyi sérülést okozhat.
1. Kapcsolja ki és áramtalanítsa az egységet.
2. A külső burkolat felületeit vízzel és mosogatószerrel enyhén megnedvesített törlőruhával tisztítsa.
3. Használat előtt hagyja teljesen megszáradni az
egységet.
Page 99

99
HIBAELHÁRÍTÁS
Probléma Ok Megoldás
Az egység nem működik A beállítógomb nincs BE helyzetbe fordítva. Fordítsa el a gombot az óramutató járásával azonos irányban.
Az egység nincs csatlakoztatva az elektromos hálózathoz. Győződjön meg arról, hogy az egység csatlakozik az elektromos hálózathoz.
Lecsökkent légáramlás
vagy elégtelen szűrés
A bemeneti rács nincs felszerelve és a helyére rögzítve. Ellenőrizze, hogy a szűrő és a bemeneti rács megfelelően van felszerelve és a
Előfordulhat, hogy a bemeneti vagy a kimeneti rács el van
tömődve.
Előfordulhat, hogy a szűrő eltömődött. Szükség esetén cserélje új szűrőre.
helyére rögzítve.
Győződjön meg arról, hogy semmi sem zárja el a levegőbemenetet vagy -ki-
menetet.
hu
Page 100

hu
100
 Loading...