

Envi HH1012T, HH1012N, HW1012T, HW1012N, HH1022T Owner's Manual
...
wall-mounted room heater
wall-mounted room heater
OWNERS
MANUAL
MODELS COVERED BY THIS MANUAL
475 Watt - 120 Volt Models:
HH1012T (Plug-In with Thermostat)
HH1012N (Plug-In No Thermostat)
HW1012T (Hardwired with Thermostat)
HW1012N (Hardwired No Thermostat)
475 Watt - 220 Volt Models:
HH1022T (Plug-In with Thermostat)
HH1022N (Plug-In No Thermostat)
HW1022T (Hardwired with Thermostat)
HW1022N (Hardwired No Thermostat)
475 Watt - 230 Volt Models:
HH1023T (Plug-In with Thermostat)
HH1023N (Plug-In No Thermostat)
HW1023T (Hardwired with Thermostat)
HW1023N (Hardwired No Thermostat)
TABLE OF CONTENTS
If you need Help p 2
Features and Benefi ts p 2
Important Instructions p 2
What’s in the box p 3
Wall Mounting Instructions p 3
Locking Bar Feature p 4
Hardwiring Instructions p 4
Operating Instructions p 6
How the Envi Works p 6
Unique Safety Features p 6
Grounding p 6
Optimal Operating Conditions p 6
Maintenance p 7
Storage p 7
Troubleshooting p 7
Specifi cations & Certifi cations p 7
Warranty p 8
United States Patent: 8,477,176
DCN-630013-110513
economical. safe. simple

economical. safe. simple.
THANK YOU FOR CHOOSING THE ENVI HEATER
Please take a few moments to thoroughly read the instructions and familiarize yourself with all the operational aspects, installation and care of your new Envi Heater. For your own records, please attach a copy of your sales receipt to this manual. Also,
write the store name/location, date, and serial number in the warranty section on the back of this manual (page 8).
MISSING PARTS? HAVE QUESTIONS OR NEED HELP?
(PLEASE DO NOT RETURN TO RETAIL STORE BEFORE YOU CALL THE ENVI HELP DESK)
We are here to help you with any questions you might have. Before you call for help though, please read this manual as it
contains instructions to help you to install, operate and maintain your heater properly. If you receive a damaged heater - please
immediately contact the dealer that sold you your Envi heater. If you still need help please call the Envi Help desk in the
USA/Canada Toll Free @ (800) 807-0107 or if calling from outside the USA call +1 (281) 516-1577.
FEATURES & BENEFITS
• American Owned & Built with 3 year Warranty (USA )
• ISO 9001 Quality Certification.
• Patented, efficient “Stack Convection” Technology
• Adjustable Temperature control with simple operation.
• Wall-SensTM Technology, safety cut off feature.
• NEW!Internal Safety Locking Feature, locks heater to
wall using provided allen key tool.
• Convenient cordset storage inside the heater.
• Turn down the central heat thermostat and use envi
heaters where needed.
• Environmentally friendly - low power consumption.
• Eliminates hot and cold spots where central heat is
ineffective.
• Ultra Safe - cool to the touch (90oF/32oC) can leave on
unattended 24/7.
• Healthy - won’t blow dust and allergens around or dry
out the air.
• Totally silent fanless teachnology.
• Auto-dimming of power light for dark bedrooms.
• Easy Installation – no drill required for mounting to wall.
• Slim - space saving design, only 2in (5cm) thin.
• Long life - No moving parts, crack resistance surface
• Now available in hardwired & USA 220volt models.
IMPORTANT INSTRUCTIONS
HEATER WILL NOT OPERATE UNLESS MOUNTED
When using electrical appliances, basic precautions should
always be followed to reduce the risk of fire, electric shock, and
injury to persons, including the following:
1. Read all instructions before installing or using this heater.
2. Extreme caution is necessary when any heater is used by or
near children or invalids, or when the heater is left operating and unattended.
3. Do not operate any heater after it malfunctions. Disconnect power at service panel and have heater inspected by
a reputable electrician before reusing.
4. For plug-in heaters, to disconnect, push power button to
turn heater OFF (the power indicator light will turn off),
then remove plug from outlet. Pull firmly on the plug, do
not unplug by pulling on the cord.
5. Connect to properly grounded outlets only.
6. For hardwired heaters, to disconnect, turn controls to off,
and turn off power to heater circuit at main disconnect
panel (or operate internal disconnect switch if provided).
7. Do not insert or allow foreign objects to enter any ventilation or exhaust opening as this may cause an electric shock
or fire, or damage the heater.
8. To prevent a possible fire, do not block air intakes or exhaust in any manner.
9. A heater has hot or arcing parts inside. Do not use in areas
where gasoline, paint, explosive and/or flammable liquids
are used or stored. Keep unit away from heated surfaces
and open flames.
10. Use this heater only as described in this manual. Any other
use not recommended by the manufacturer may cause fire,
electric shock, or injury to persons
11. Use only for the intended household or office uses as described in this manual. Any other use not recommended by
the manufacturer may cause fire, electric shock, or injury to
persons. The use of non-recommended attachments sold
by unauthorized dealers may cause hazards.
12. Do not use outdoors.
13. This heater is intended for use as a WALL MOUNTED heater
only. Failure to properly secure the heater to a flat, level
and vertical wall may result in heater malfunction and/or
property damage.
14. This heater will not operate (power is disconnected) unless
it is attached to a wall using the supplied wall mounting
clips which engage the internal “wall-sens” safety switch.
15. DO NOT attempt to repair or replace any electrical or
mechanical functions on this unit. Doing so will void your
warranty. The inside of the unit contains no user serviceable parts. Qualified personnel should perform all servicing
only.
Page 2
SAVE THESE INSTRUCTIONS
INSTALLATION INSTRUCTIONS
economical. safe. simple.
WHAT IS IN THE BOX
• 475 Watt Envi Wall Mounted Heater
• Owners Manual
• 2 x Mounting Clips
• 3 x #8 Mounting Screws
• 3 x Drywall Anchors / 3 x Masonry Anchors
• Locking Bar Screw and Allen Key tool
• Knockout Hole Grommet (hardwired models only)
• Wall Anchor Marking Template. Template holes are
marked on the outer edge of the packaging insert frame.
WALL MOUNTING
Remove the heater, mounting kit, and packaging insert frame
from the box. Keep the packaging materials for future use.
1. Unwrap and fl atten the sides of the packaging insert
frame (mounting template) and stand the template on
the fl oor. The sides of the template have pre-punched
holes to mark the heater mounting height for either 6” or
or 8” (15 or 20cm) from the bottom of the heater to the
fl oor. Choose either mounting height, and mark three
hole locations on the wall. (see Fig. 1). The top two hole
locations are for the mounting clips and the bottom
location is for a third mounting screw hidden inside the
bottom access door as described in step 5 below.
NOTE:Mostinstallersusetheinternallockingbarscrew
insteadofthebottommountinghole.
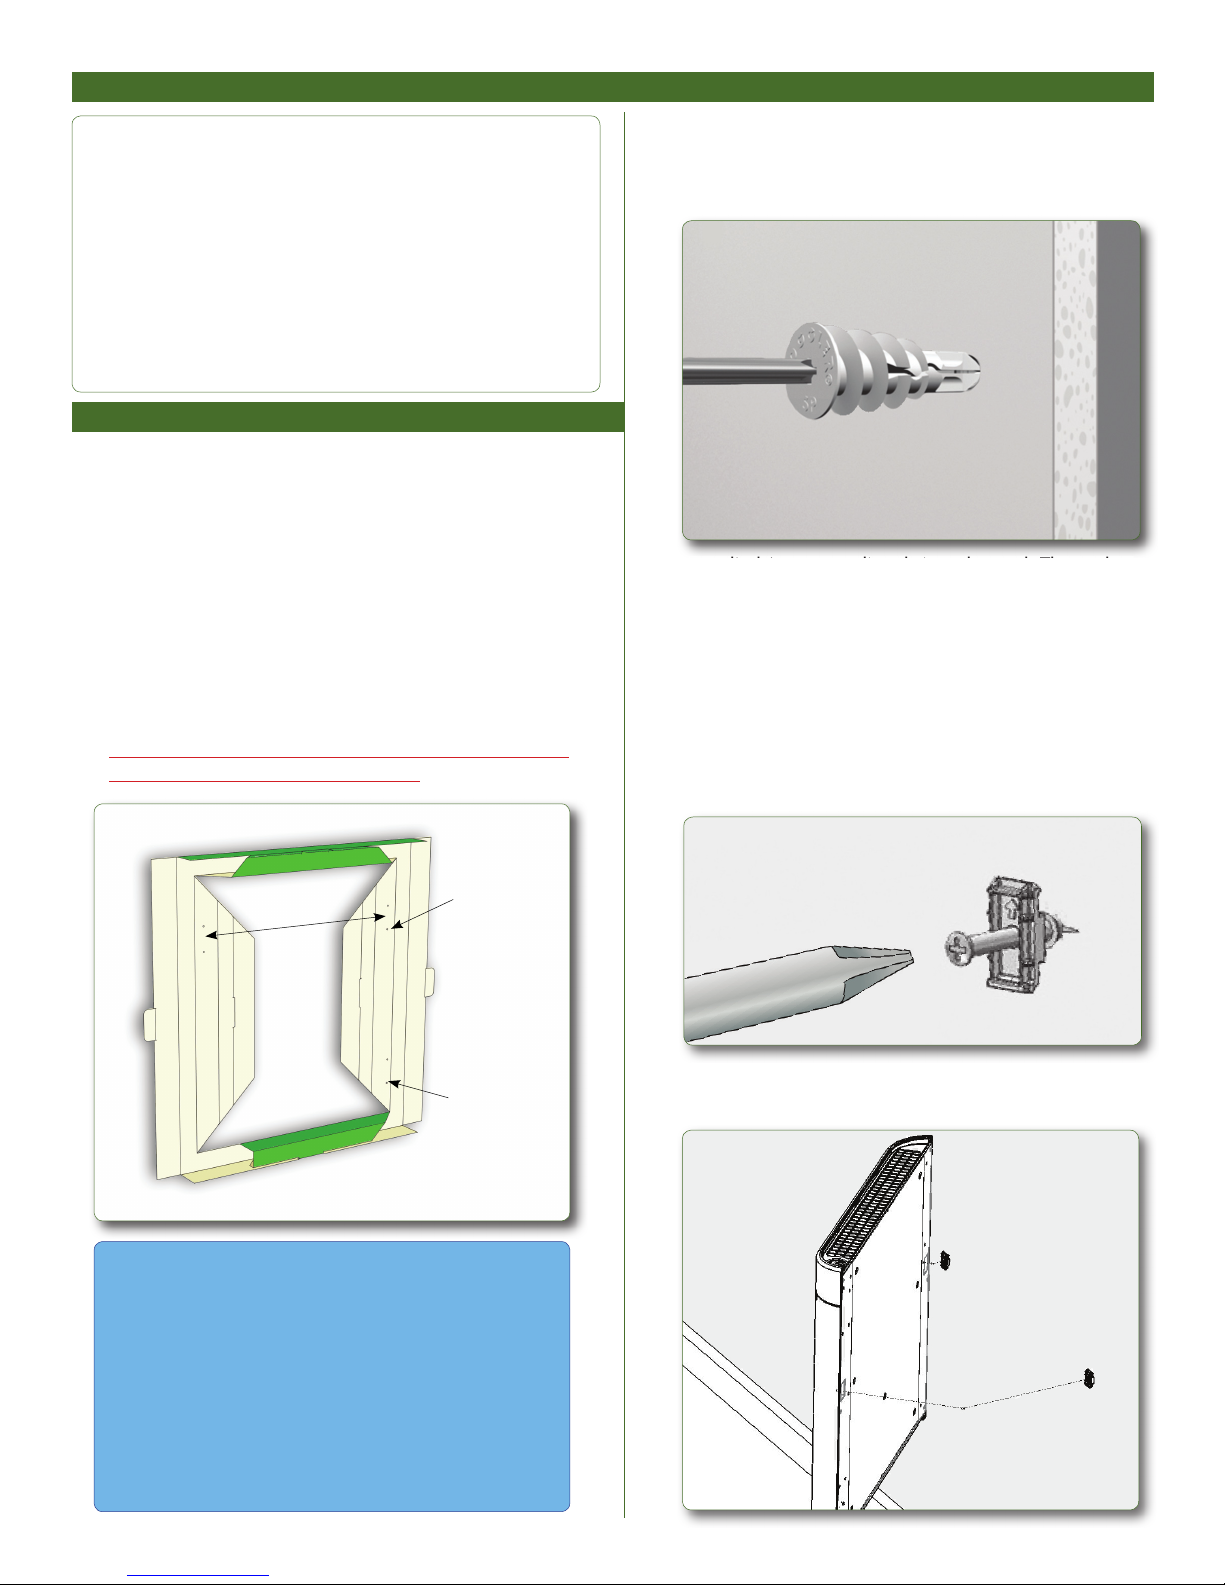
2. Screw the anchors into wall at the marked locations .
(Fig. 2). The distance from the top screws to the fl oor
should be approx. 18” to 20” (45cm to 50cm).
If a stud is in the way, do not use the drywall anchor
Fig. 2
supplied, just screw directly into the stud. The anchor
shown in the illustration is for drywall installation. For
masonry walls, use the masonry wall anchors provided
and drill a 4.5mm (3/16inch) hole using a masonry drill
bit (not supplied).
3. Screw the two mounting clips (with arrow pointing
upward) into the top two anchor locations and secure
fi rmly to the wall anchors using the provided screws.
(see Fig. 3). DO NOT overtighten. There should be a gap
behind the mounting clip to hang the heater on.
Fig. 1
17 3/4”
(451mm)
Mounting Clip
Hole LocationChoose 6” or 8”
Height (15 or 20cm)
OPTIONAL WHEN
INTERNAL LOCKING BAR USED!
Bottom Mounting
Hole Location
Choose 6” or 8”
Height (15 or 20cm)
IMPORTANT MOUNTING TIPS
1) Only use the bottom mounting screw if you do not
intend to use the internal locking bar/screw mechanism.
2) The bottom mounting screw can be marked by hanging the heater fi rst, then using the heater as a template.
3) The right hand side of the heater must be securely and
fi rmly pushed down on the clip to engage the “wall-sens”
power cut-off switch inside the heater. Align this side
of the heater fi rst, to ensure the switch is activated. For
uneven walls, a thin washer can be used to widen the gap
behind this clip to help seat the heater properly.
Fig. 3
4. If you plan on using bottom screw, remove the bottom
access door before you mount the heater.
Fig. 5
Page 3
 Loading...