

Page 1
Pixelator-Mini
KlingNet
Setup Guide
Kling Net Application Guide
This setup guide will step through using Arkaos’ Kling-Net Mapper
software in conjunction with an ENTTEC Pixelator Mini in order to map a
number of shapes.
This guide steps through the process of configuring the following pixel
products:
Pixel Product
Quantity
Product Number
12*12 WS2812b Pixel Tile
7
8PS144-125
60 px/m LED WS2812b strip
1
8PL60
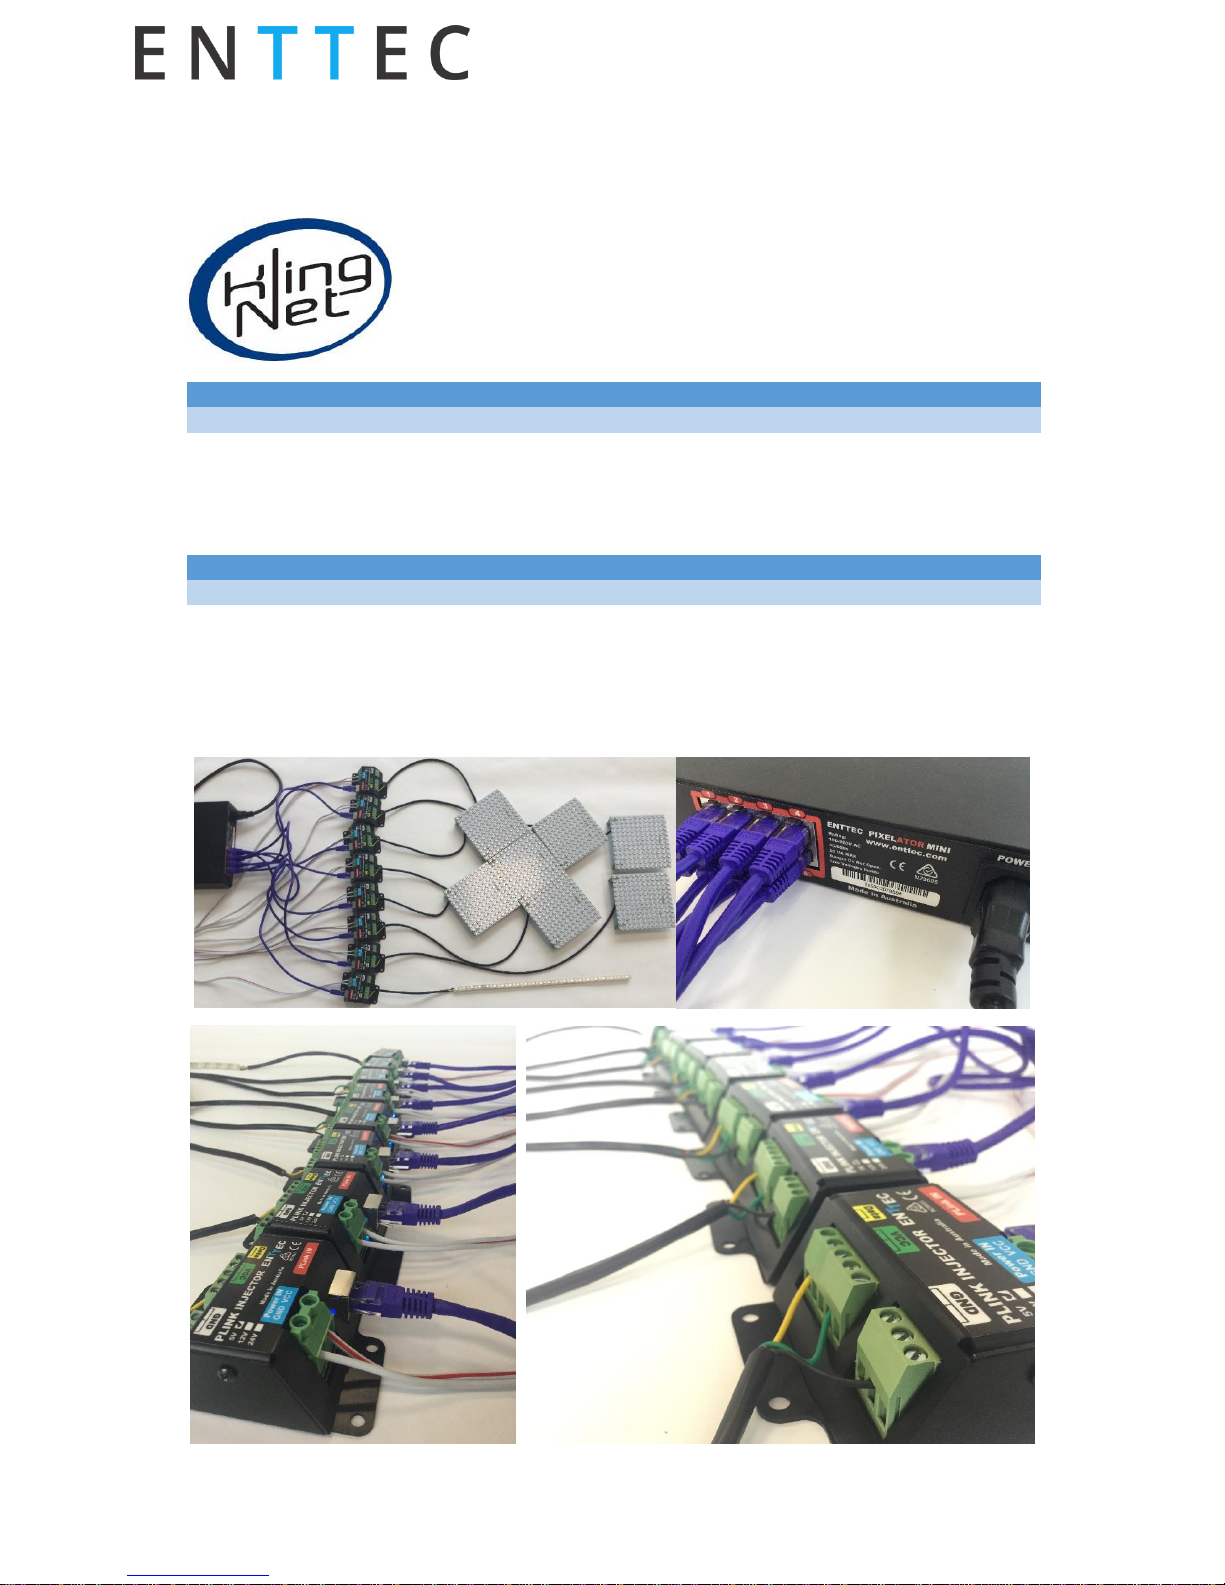
-The pixel products in this guide have been connected to the Pixelator Mini through ENTTEC’s P-
Link System. Using this same system, Phero Battens can also be mapped.
Control Product
Quantity
Product Number
Pixelator Mini
1
70066
5V PLink Injector
8
73546
*DC Power should be provided locally at each Plink Injector.
Page 2
Pixelator-Mini
KlingNet
Setup Guide
Configuration of the Pixelator Mini
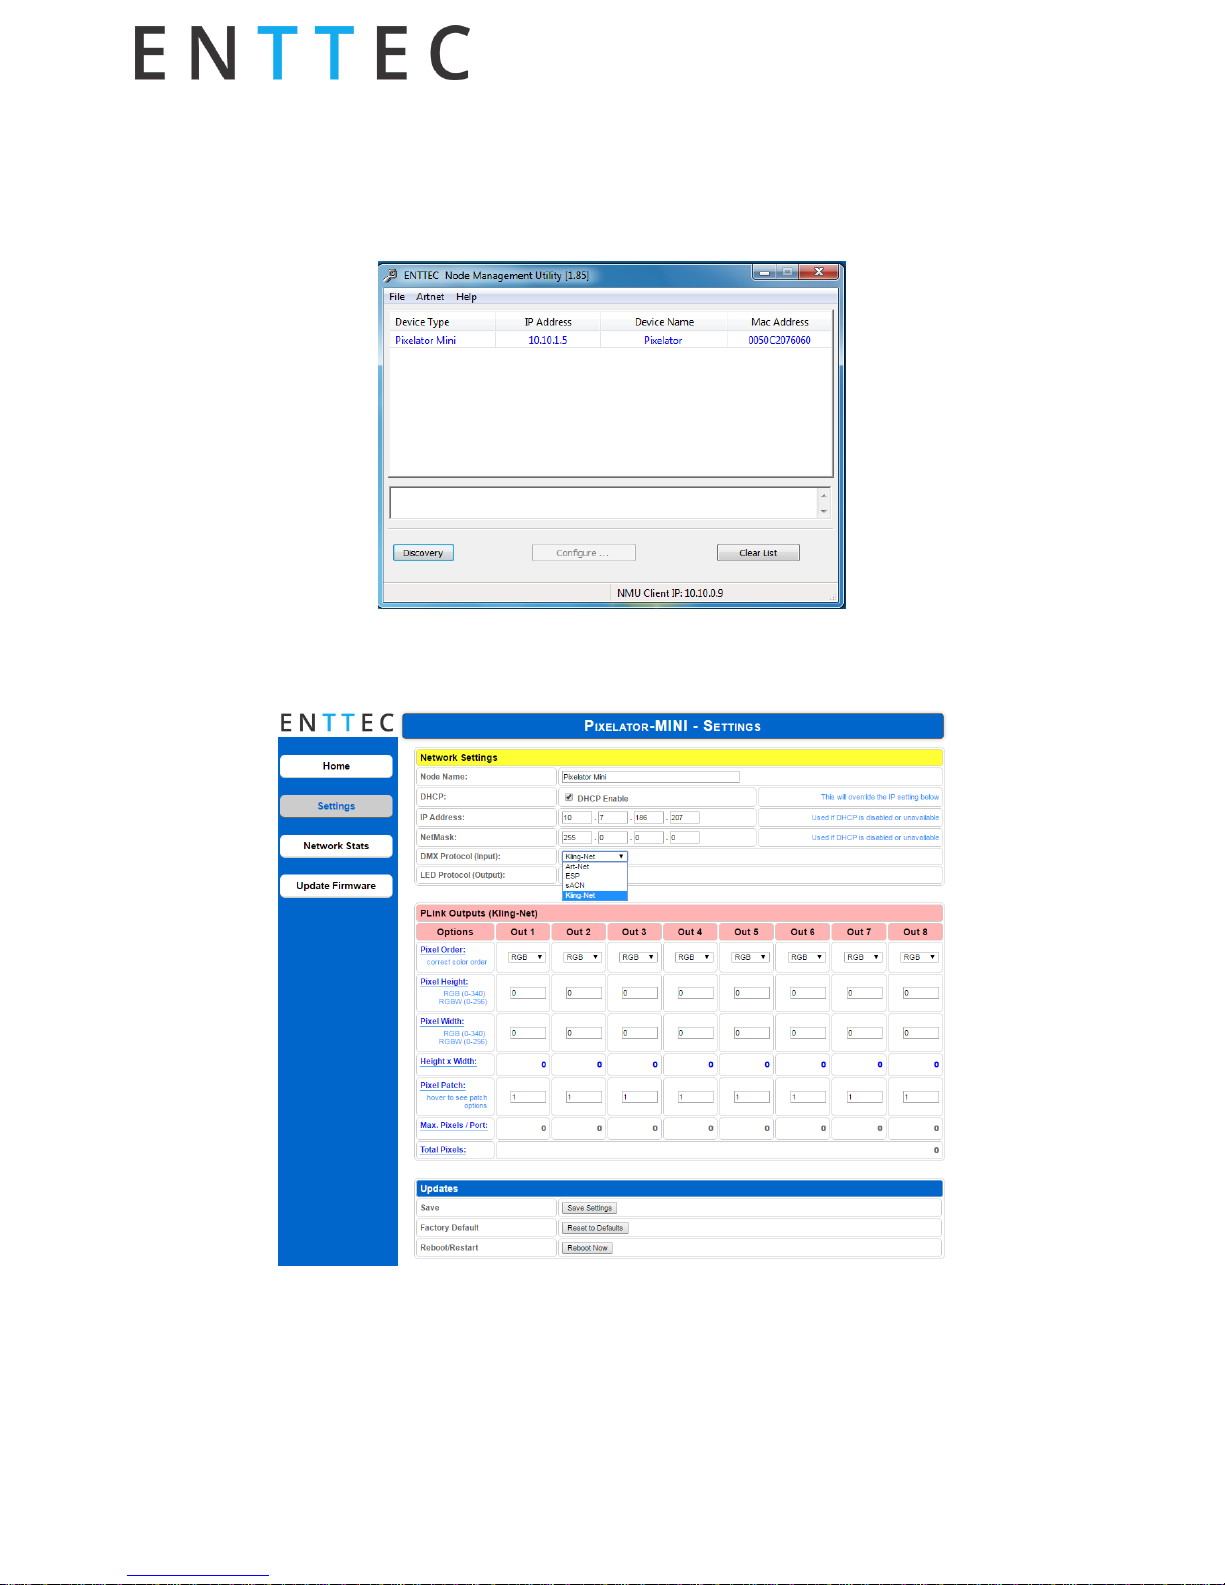
After Plugging in your Pixelator Mini to your network, launch Enttec NMU on your computer to find
the IP address of the unit. From here you can open the web page:
Navigate to the settings tab within the web interface and select ‘Kling-Net’ in the dropdown menu.
Page 3
Pixelator-Mini
KlingNet
Setup Guide
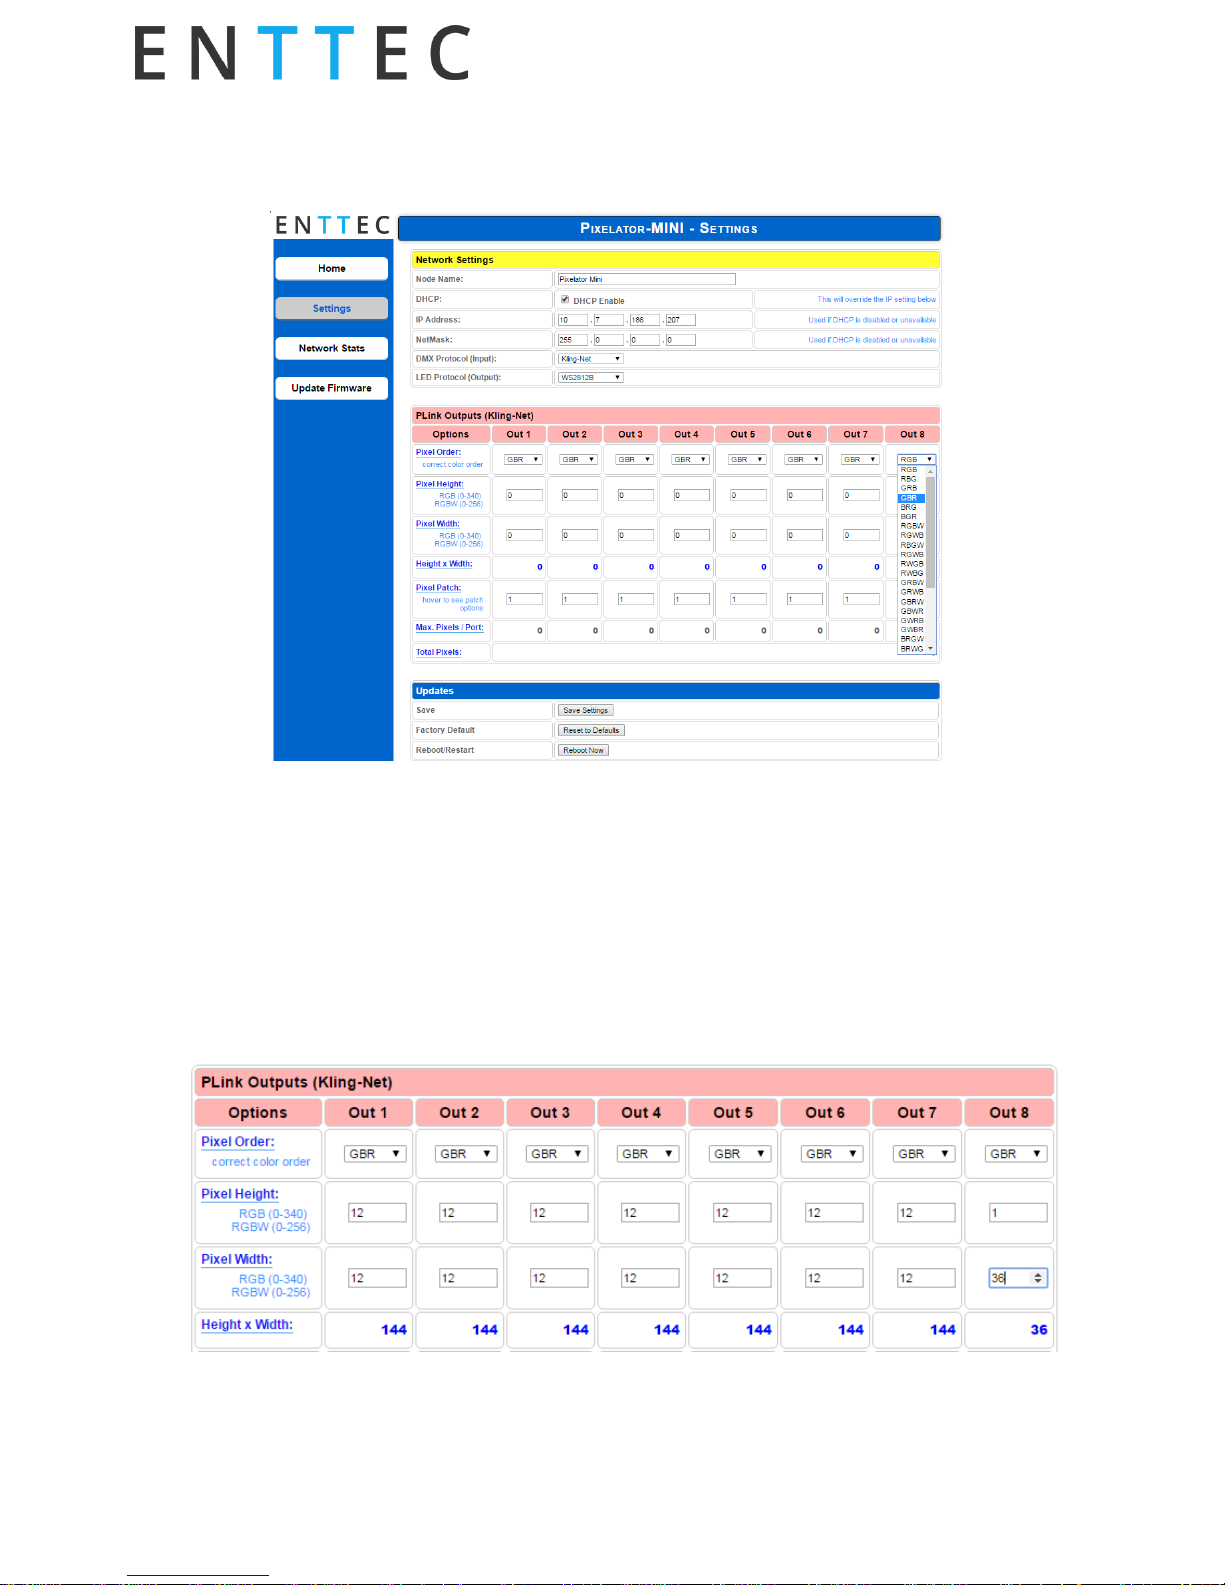
The first row of the outputs will allow you to configure your pixel ordering for each port using the
dropdown menu’s.
-Each port on the rear of the Pixelator Mini Should be thought of as a ‘virtual fixture’ and will appear
as such within the KlingNet Mapper software.
-If you want to disable a port so it does not show up in the KlingNet Mapper software, set it’s
dimensions to 0 Width and 0 Height.
-For the ports you do wish to use, enter the dimensions of each shape you wish to create. Whilst doing
this you must remember that there is a maximum pixel per port limit of: 370 RGB LED’s & 256 RGBW
LED’s.
-The quantity of pixels used per port is shown in the Height * Width row directly below.
Page 4

Pixelator-Mini
KlingNet
Setup Guide
After the number of pixels used per port are assigned, using the PixelPatch row select the way in
which your pixels have been connected to eachother. Hovering your cursor over the ‘Pixel Patch title
will show what layout corresponds to each number.
Once this has been completed click ‘Save Settings’, and wait for the page to refresh.
Your configuration should now appear in KlingNet Mapper.
Page 5

Pixelator-Mini
KlingNet
Setup Guide
Configuration of Arkaos’ KlingNet Mapper
Open ‘Arkaos KlingNet Mapper’ (Ctrl+K from within the main MediaMaster Window) and ensure the
Test Pattern is Enabled on your output.
After all KlingNet devices have been discovered on the network, you will be presented with a list of
fixtures. Each of the Ports on the rear of the Pixelator Mini will show up as individual fixtures (each
with the same dimensions and pixel ordering as defined in the Pixelator Mini Web Interface). Drag
each of these shapes onto the test card and arrange them to suit using the mappers inbuilt tools.
Press ‘Send to Mapper’ when you’re confident everything lines up with your real world design.
Page 6

Pixelator-Mini
KlingNet
Setup Guide
Rotate all ‘virtual fixtures’ to the correct orientation and scaling. By selecting each of them and
moving to the correct size for the canvas port and moving it to suit the correct positioning.
Once satisfied, if necessary use (Ctrl+shift+r) in order to re-size your canvas to be as close to your
mapped objects as possible. Following this, press the ‘Send Mapping to Mediamaster’ button.
Finally, within the Klingnet Mapper Software, set the output to ‘MediaMaster’ instead of the KlingNet
‘Test Pattern’.
Page 7

Pixelator-Mini
KlingNet
Setup Guide
If MediaMaster is configured correctly to output to KlingNet Mapper your LED panels, dots and Pixel
Tape plugged into each Plink Port should function like independant5 KlingNet Fixtures.
 Loading...