

Page 1

CE870 Card Personalization System
Installation and User Guide
November 2011
Part No. 539977-001 Rev. B
Printer Firmware: D3.1.41-0
Embosser Firmware: Rev. A.6
Front Panel Revision: 1.1.2.34
Page 2

Notice
Please do not attempt to operate or repair this equipment without adequate training. Any
use, operation, or repair you perform that is not in accordance with the information
contained in this documentation is at your own risk.
Proprietary Notice
All drawings and information herein are the property of DataCard Corporation. All
unauthorized use and reproduction is prohibited.
Trademark Acknowledgments
Datacard is a registered trademark and service mark of DataCard Corporation in the
United States and other countries.
Windows is a registered trademark of Microsoft Corporation.
All other product names are the property of their respective owners.
Datacard Group
11111 Bren Road West
Minnetonka, MN 55343-9015
Phone: 952-933-1223
Fax: 952-933-7971
www.datacard.com
© 2011 DataCard Corporation. All rights reserved.
Printed in the United States of America.
ii
Page 3

Contents
Chapter 1: Welcome to the Card Personalization System_____________________________ 1
The CE870 Card Personalization System _________________________________________ 1
About the System ______________________________________________________________ 2
System Components ___________________________________________________________ 3
The Printer Component (Top, Front and Right Side) ___________________________ 3
Printer Multi-Card Hopper _______________________________________________ 4
Printer Connections (Left Side)___________________________________________ 5
The Touch Screen Component (Optional) ___________________________________ 6
The Embosser Component (Top, Front and Right Side) ________________________ 7
Inside the Embosser _____________________________________________________ 8
Embosser Connections (Back and Left Side)______________________________ 9
System Labels_________________________________ ________________________________ 10
Printer Configuration Label___ ______________________________________________ 10
Embosser Configuration Label ____ ___ ___ ____ ___ ____ ___ ____ ___ _______ ___ ____ _ 11
How To Topics_________________________________________________________________ 12
Chapter 2: Installation Requirements_______________________________________________ 13
PC Requirements______________________________________________________________ 13
Site Requirements _____________________________________________________________ 14
Electrical Requirements _________________________________ ______________________ 15
Chapter 3: Install the System ____________ __________________________________________ 17
Secure the System _____________________ _______________________________________ 18
Assemble the Printer and Embosser ____________________________________________ 19
Load Supplies_________________________________________________________________ 20
Load Indent Ribbon Cartridge _____________________________________________ 20
Load Topping Foil Cartridge________________________________________________ 21
Load Cleaning Sleeve _______ ____ ___ ___ ____ ___ ____ ___ ____ ___ ___ ____ ___ _____ 22
Load Cards in Hopper _____________________________________________________ 24
Connect Cables ________________________________________ ____ __________________ 25
Connect Data Cables _____________________________________________________ 25
Connect Power Cables____________________________________________________ 26
Power on the System ______________________________________________________ 27
Run Test Card ____________________________________________________________ _____ 28
Chapter 4: Using the System_______________________________________________________ 29
Process Cards ________________________________________________________________ 29
How the Card Travels ______________________________________________________ 30
About Secure Encryption __________________________________________________ 31
Use the Touch Screen _________________________________________________________ 31
Use the Front Panel__________________________________________ ___ _______________ 32
Power Button______________________________________________________________ 32
LCD Panel ________________________________________________________________ 32
User Button and Light ______________________________________________________ 33
Down Arrow, Up Arrow, and Enter Keys _____________________________________ 33
iii
Page 4

Ribbon Light ______________________________________________________________ 34
Card Light ________________________________________________________________ 34
Use the LCD Menus_______________________________ _____________________________ 35
LCD Menus________________________________________________________________ 36
Pause the System__________________________________________________________ 37
Change the LCD Backlight Brightness_______________________________________ 38
View the Printer Serial Number from the LCD Menu __________________________ 40
View Card Counts from the LCD Menu _____________________________________ 42
View the Network IP Address from the LCD Menu____________________________ 45
Set Magnetic Stripe Coercivity from the LCD Menu __________________________ 48
Use the Printer Manager ________________________________________ _______________ 50
Chapter 5: Card Design __________________________________________________________ _ 53
Basic Card Design ___________________________________ _________________________ 53
Magnetic Stripe Design___ _____________________________________________ ________ 53
About Magnetic Stripes____________________________________________________ 53
Magnetic Stripe Formats ___________________________________________________ 54
Three-Track Option_________________ ____ ___ ____ _______ ___ ___ ____ ___ ____ _ 54
Single-Track JIS Option _________________________________________________ 55
Smart Card Design ____________________________________________________________ 56
About Smart Cards ________________________________________________________ 56
Embossing and Indenting Design_______________________________________________ 57
Settings for Card Design in Printer Manager _____________________________________ 57
Chapter 6: System Maintenance___________________________________________________ 59
Clean the Printer ______________________________________________________________ 59
Clean the Embosser______________________________ _____________________________ 59
Run a Cleaning Card__________________________________________________________ 60
Chapter 7: Troubleshooting________________________________________________________ 63
Tools for Troubleshooting ______________________________________________________ 63
Locating the Issue_____________________________________________________________ 64
Installation Troubleshooting____________________________________________________ 65
Card Appearance ____________________________________________________________ 65
Indent Troubleshooting ___ _________________________________________________ 65
Topping Foil Troubleshooting _______________________________________________ 65
Magnetic Stripe_____________________ __________________________________________ 66
Card Jam_____________________________________________________________________ 68
Printer Card Jam __________________________________________________________ 68
Embosser Card Jam ________________ ___ ____ ___ ____ ___ ____ ______ ____ ___ ____ _ 69
Messages and Conditions _____________________________________________________ 70
Messages on the Printer____________________________________________________ 70
Front Panel Conditions During Messages ________________________________ 70
Messages on the Printer Manager __________________________________________ 71
Respond to Messages _________________________________________________________ 72
Printer Component Messages (100-124)_____________________________________ 72
100: Request not supported ____________________________________________ 72
101: Job could not complete____________________________ _______________ 72
iv
Page 5

102: Card not in position________________________________________________ 73
103: Printer problem____________________________________________________ 73
104: Critical problem ___________________________________________________ 73
105: Magstripe data error ______________________________________________ 73
106: Magstripe data not found _________________________________________ 74
107: Magstripe read data error _________________________________________ 74
108: Magstripe read no data ___________________________________________ 74
111: Card not picked __________________________________________________ 75
112: Hopper Empty_____________________________________________________ 75
113: Close cover to continue ___________________________________________ 75
114: Cover opened during job__________________________________________ 75
116: Magstripe not available ___________________________________________ 75
117: Reader not available ______________________________________________ 75
120: User paused the printer ____________________________________________ 76
122: Magnetic stripe format problem____________________________________ 76
123: Insert new card then continue _____________________________________ 76
124: Insert same card then continue ____________________________________ 76
Embosser Component Messages (125-151)__________________________________ 77
125: Emboss critical issue _______________________________________________ 77
126: Emboss format issue _______________________________________________ 77
127: Emboss transport error _____________________________________________ 77
128: Embosser card jam ________________________________________________ 77
129: Embosser topper jam ______________________________________________ 78
130: Embosser card entry jam___________________________________________ 78
131: Embosser card exit jam ____________________________________________ 78
132: Embosser card stack full ___________________________________________ 79
133: Embosser card reject full___________________________________________ 79
135: Indent ribbon supplies out _________________________________________ 79
136: Indent ribbon break _______________________________________________ 80
137: Embosser wheel error ______________________________________________ 80
138: Embosser indent error______________________________________________ 80
139: Lost card, open emboss cover _____________________________________ 81
140: Embosser not available ____________________________________________ 81
141: Close emboss cover _______________________________________________ 81
142: Emboss cover error ________________________________________________ 81
143: Topper ribbon problem ____________________________________________ 82
144: Topper ribbon out _________________________________________________ 82
145: Topper ribbon type problem _______________________________________ 82
146: Topper ribbon support err. _________________________________________ 82
147: Topper ribbon no tag found________________________________________ 82
149: Option not installed________________________________________________ 83
Chapter 8: Supplies and Parts _____________________________________________________ 85
Supplies ______________________________________________________________________ 85
Indent Ribbon_____________________________________________________________ 85
Topping Foil ________________________________________________ _______________ 85
v
Page 6

Supply Storage Guidelines _________________________________________________ 86
Cards ________________________________________________________________________ 86
Card Size _________________________________________________________________ 86
Card Material _____________________________________________________________ 87
Card Surface______________________________________________________________ 87
Card Handling ____________________________________________________________ 87
Card Storage _____________________________________________________________ 87
Replacement Parts____________________________________________________________ 88
Print Ribbon Cartridge _____________________________________________________ 88
Indent Ribbon Cartridge ___________________________________________________ 88
Topping Foil Cartridge _____________________________________________________ 88
Cleaning Supplies _________________________________________________________ 88
Cleaning Roller Spindle ____________________________________________________ 88
Security Lock Option_______________________________________________________ 88
Printer Power Supply ______________________________________________________ 89
Printer Power Cable _______________________________________________________ 89
Embosser Power Supply__________________________________ ___ ___ ____ ___ ____ _ 89
Embosser Power Cable ____________________________________________________ 89
Network Cable____________________________________________________________ 89
Chapter 9: Legal Notices________________________________________ __________________ 91
Regulatory Compliance _______________________________________________ ___ _____ 91
Liability Statement_____________________________ ________________________________ 93
Safety ________________________________________________________________________ 93
Trademarks___________________________________________________________________ 94
Disclaimer ____________________________________________________________________ 94
Proprietary Notice_____________________________________________________________ 94
vi
Page 7

Revision Log
Datacard CE870 Card Personalization System
Installation and User Guide
Revision Date Description of Changes
A September 2011 First release of this document
B November 2011 Update of the document with numerous additions.
vii
Page 8

viii
Page 9
Chapter 1: Welcome to the
Card Personalization System
This chapter introduces the CE870 Card
Personalization System and its components.
This section describes:
• The CE870 Card Personalization System
• About the System
• System Components
• System Labels
• How To Topics
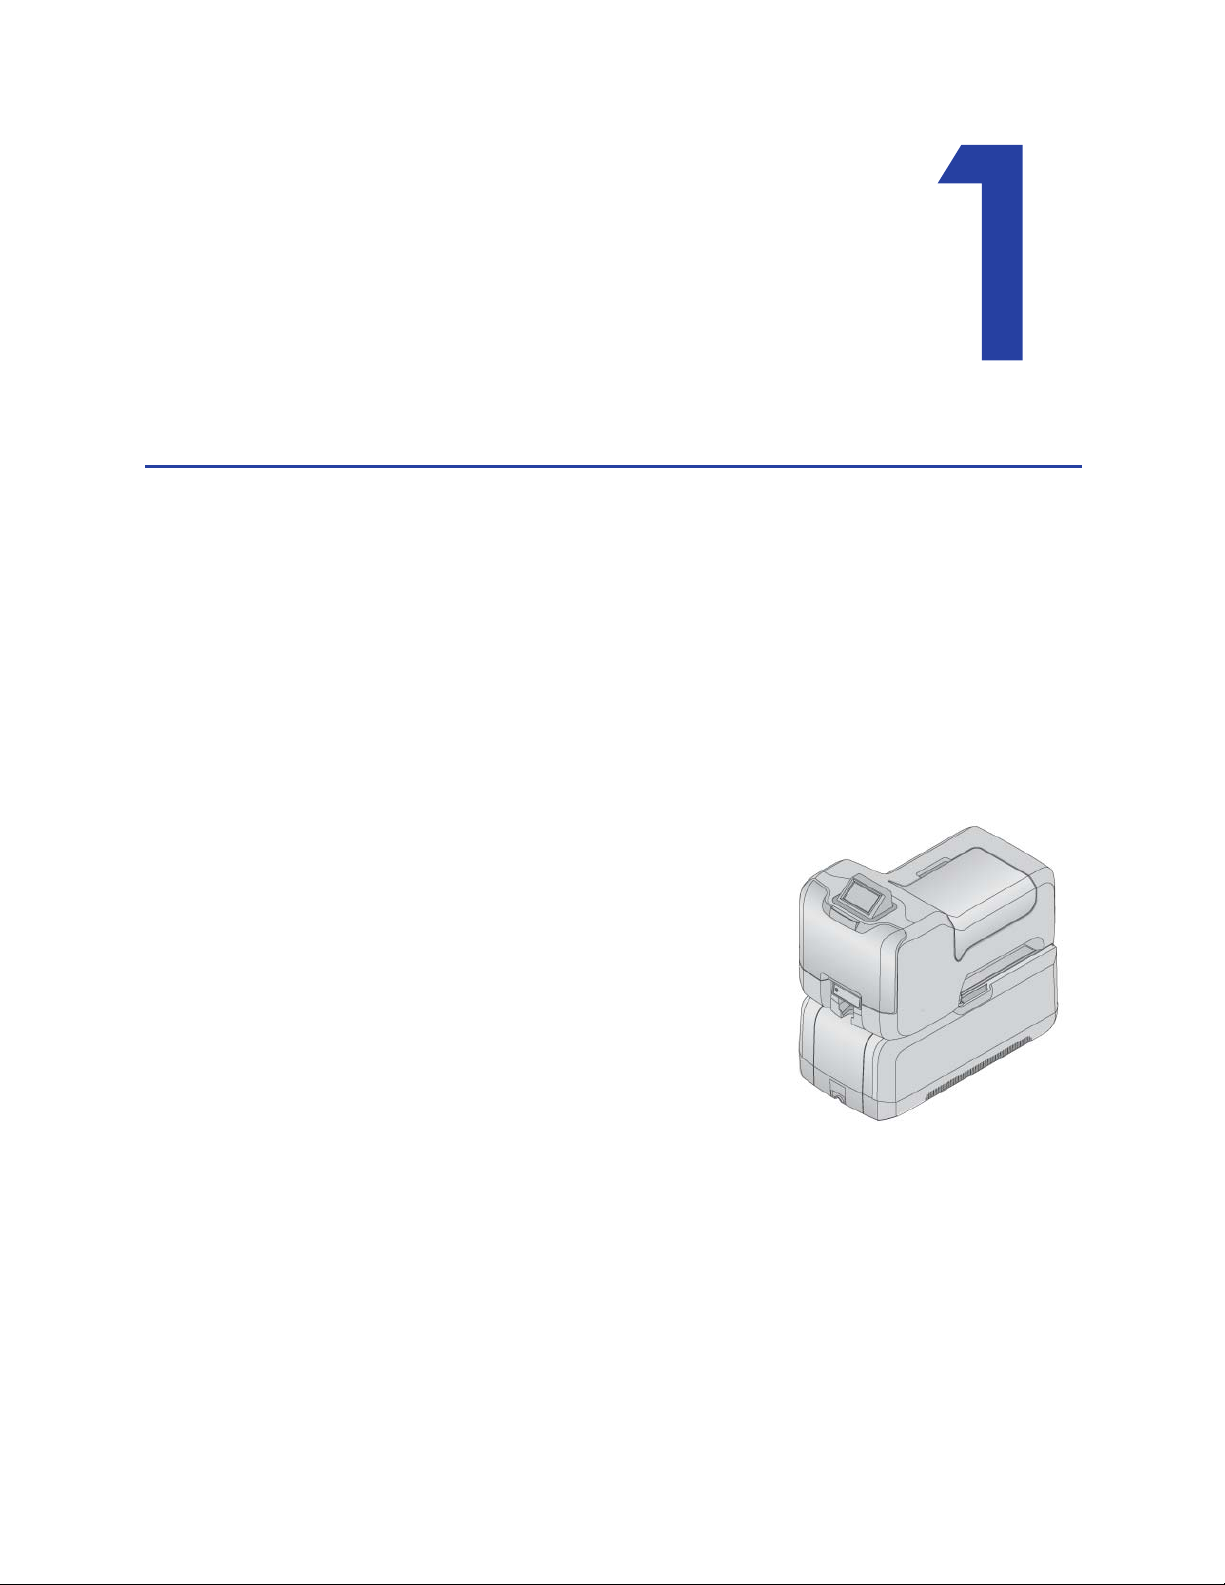
The CE870 Card Personalization System
This manual describes the CE870 Card
Personalization System and how to use it.
Before you use the system, it must be set up and
installed. In most cases, the installation will be
performed by your systems administrator or
service provider.
Please read this manual thoroughly before you
use the system. It will help you learn about the
features of the system and how to process cards
successfully and efficiently.
Each card program has specific features that are important for you to understand.
Talk with your supervisor, system administrator, or other person to learn about
the features of your card program.
This guide provides operator information and describes how to install the system,
use the various components, and perform routine tasks.
An additional Solution Guide is available for use by Administrators or by
professionals designing a new system for card production.
CE870 Card Personalization System Installation and User Guide 1
Page 10
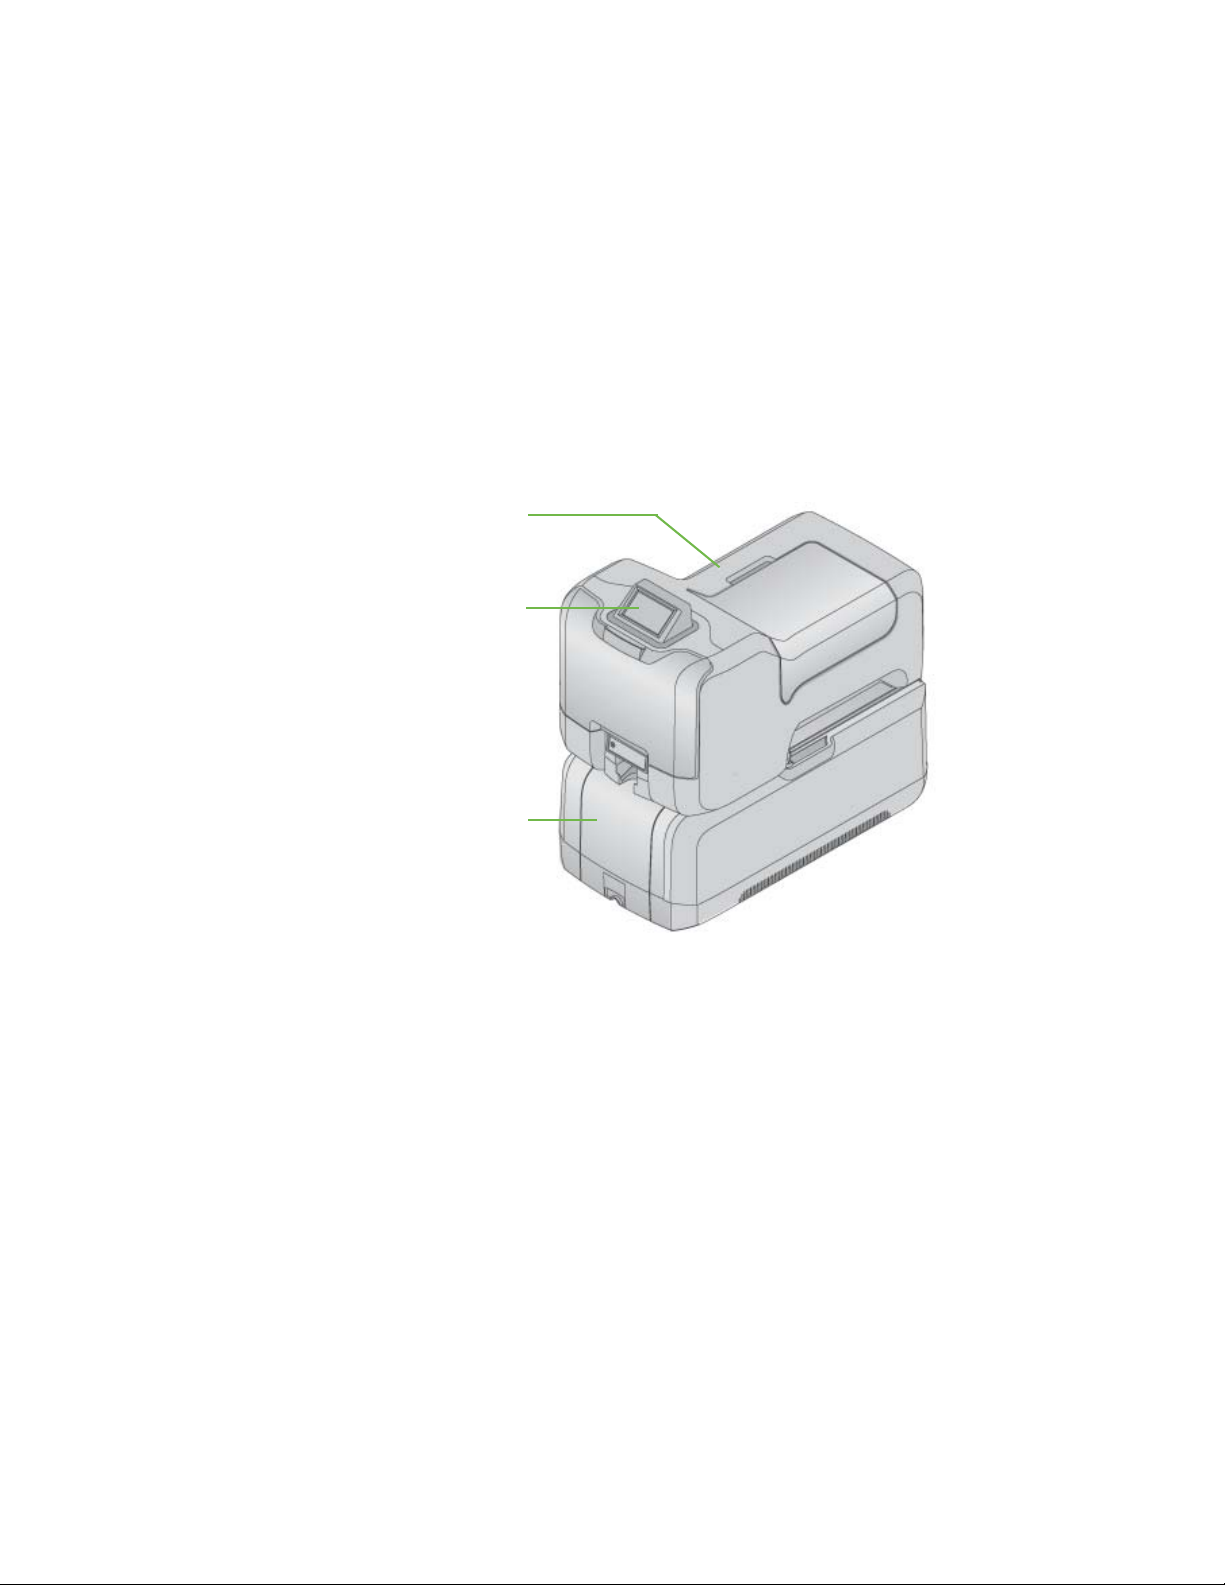
Printer Component
Embosser Component
Touch Screen
Component (Optional)
About the System
The CE870 Card Personalization System is used to produce on-site financial and
debit cards. Personalization includes processing magnetic stripe data, reading or
programming smart cards, embossing, and indenting financial data. The system
is designed to issue cards where the user is (called on-demand or instant
issuance).
The system receives data from a PC or other computer, personalizes the card
using that data, and presents a finished card. The system is a multi-component
system consisting of the following:
2 Welcome to the Card Personalization System
Printer Component
Touch Screen
Component
(Optional)
Embosser Component
Provides print and encoding features. Processes magnetic
stripe data and programs smart card chips using secure
encryption.
Provides the interface for user authentication and card
production.
Produces the raised characters and numbers on the front
of the card; an optional indenter can produce the indented
characters on the back or the front of the card.
Page 11
Printer
Front Panel
Printer Supplies Access Door
System Components
The Printer Component (Top, Front and Right Side)
Printer Processes magnetic stripe data and programs smart cards
using secure encryption.
Printer Supplies Access
Door
Front Panel Includes the User button, status lights, power button, and
Unlock and open the embosser supplies access door to
access printer components.
LCD panel with navigation keys.
CE870 Card Personalization System Installation and User Guide 3
Page 12
H1
H2
H3
H4
H5
H6
H2
Multi-card Hopper Cover
Printer Multi-Card Hopper
H1 and H3 to H6 Card
Hoppers
H2 Exception Card
Hopper
Multi-Card Hopper
Cover
The H1 and H3 to H6 hoppers contain standard card
designs.
The H2 hopper is a manual card hopper that contains a
manual slot and a storage area in which to store a supply
of cards that are different from standard card designs.
Store and feed cards manually into the H2 hopper.
Unlock and open the access cover to load card stock.
4 Welcome to the Card Personalization System
Page 13
Manual Advance Knob
Printer Access
Power Connection
Alarm Terminal
Cover Lock
Network Connection
Embosser Connection
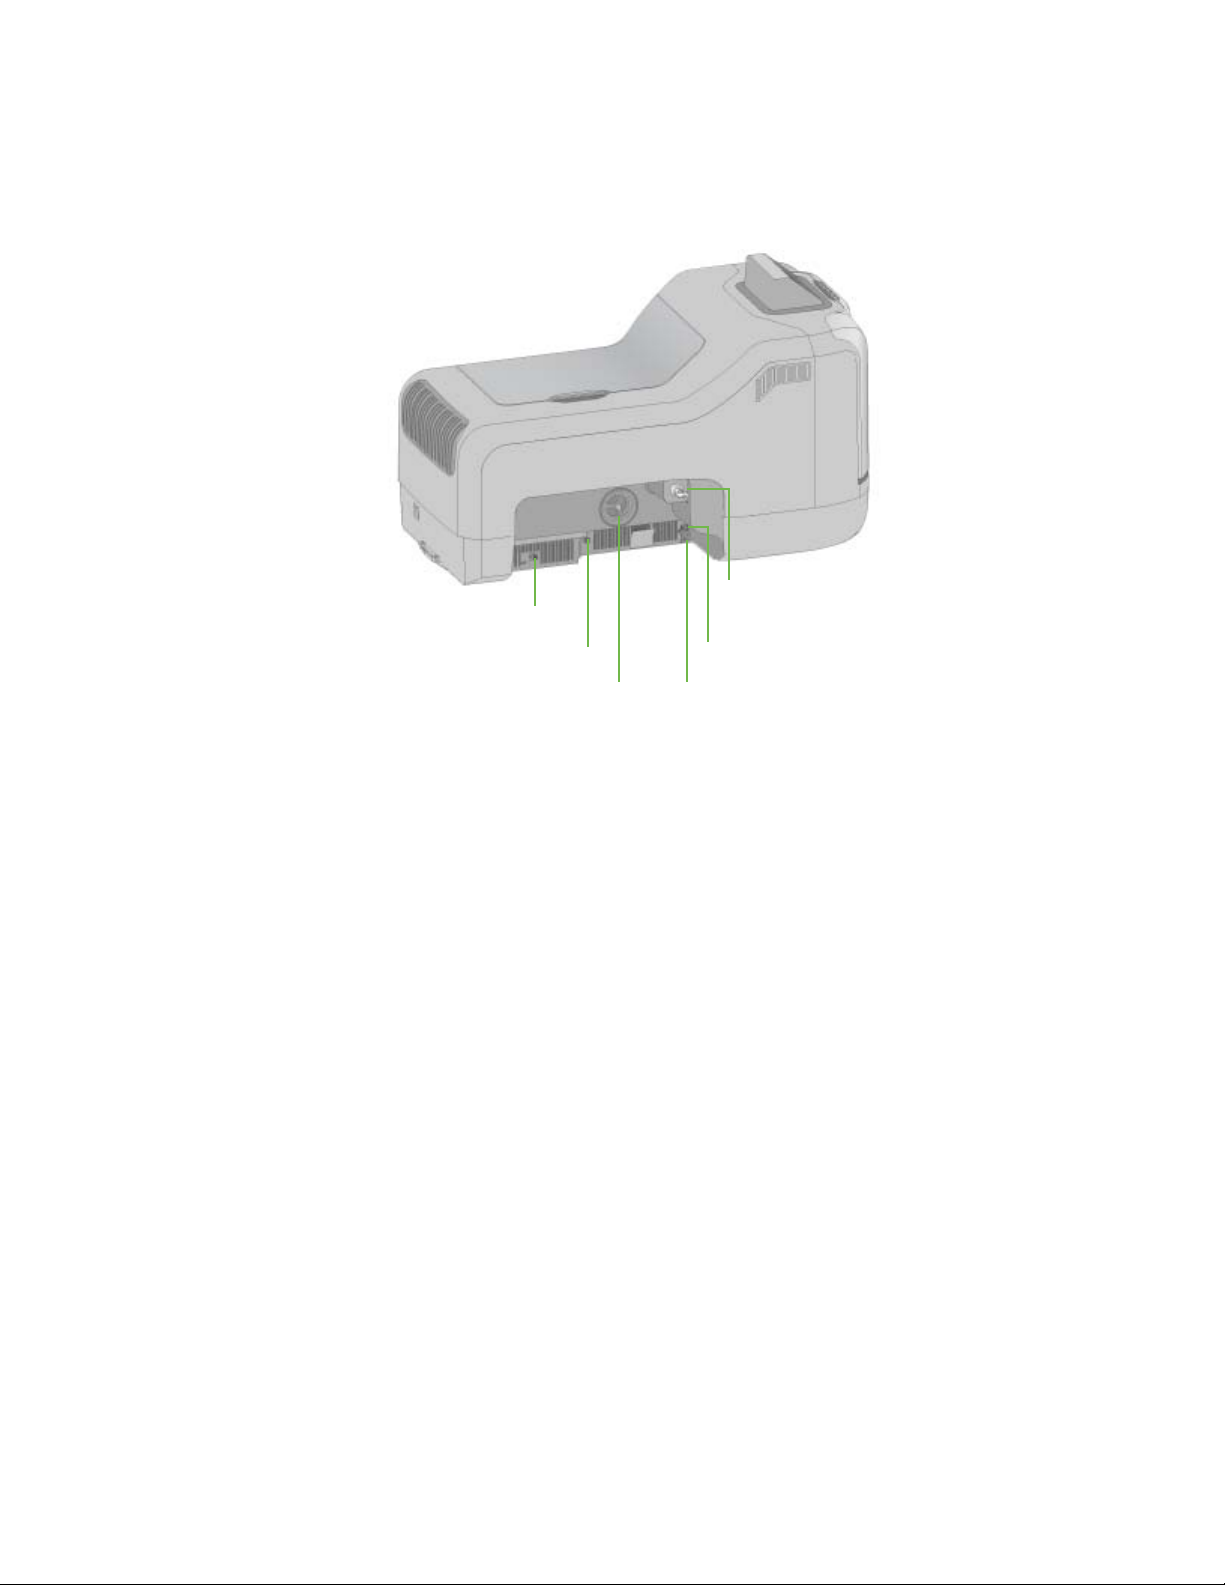
Printer Connections (Left Side)
Alarm Terminal Connect alarm system provided by others.
Power Connection Plug in power supply.
Manual Advance Knob Use the manual advance knob to clear a card jam and
move the card in the card track.
Printer Access Cover
Provides secure access to the printer.
Lock
Network Connection Ethernet connection to network.
Embosser Connection Connect the printer to the embosser using cable from
embosser.
CE870 Card Personalization System Installation and User Guide 5
Page 14
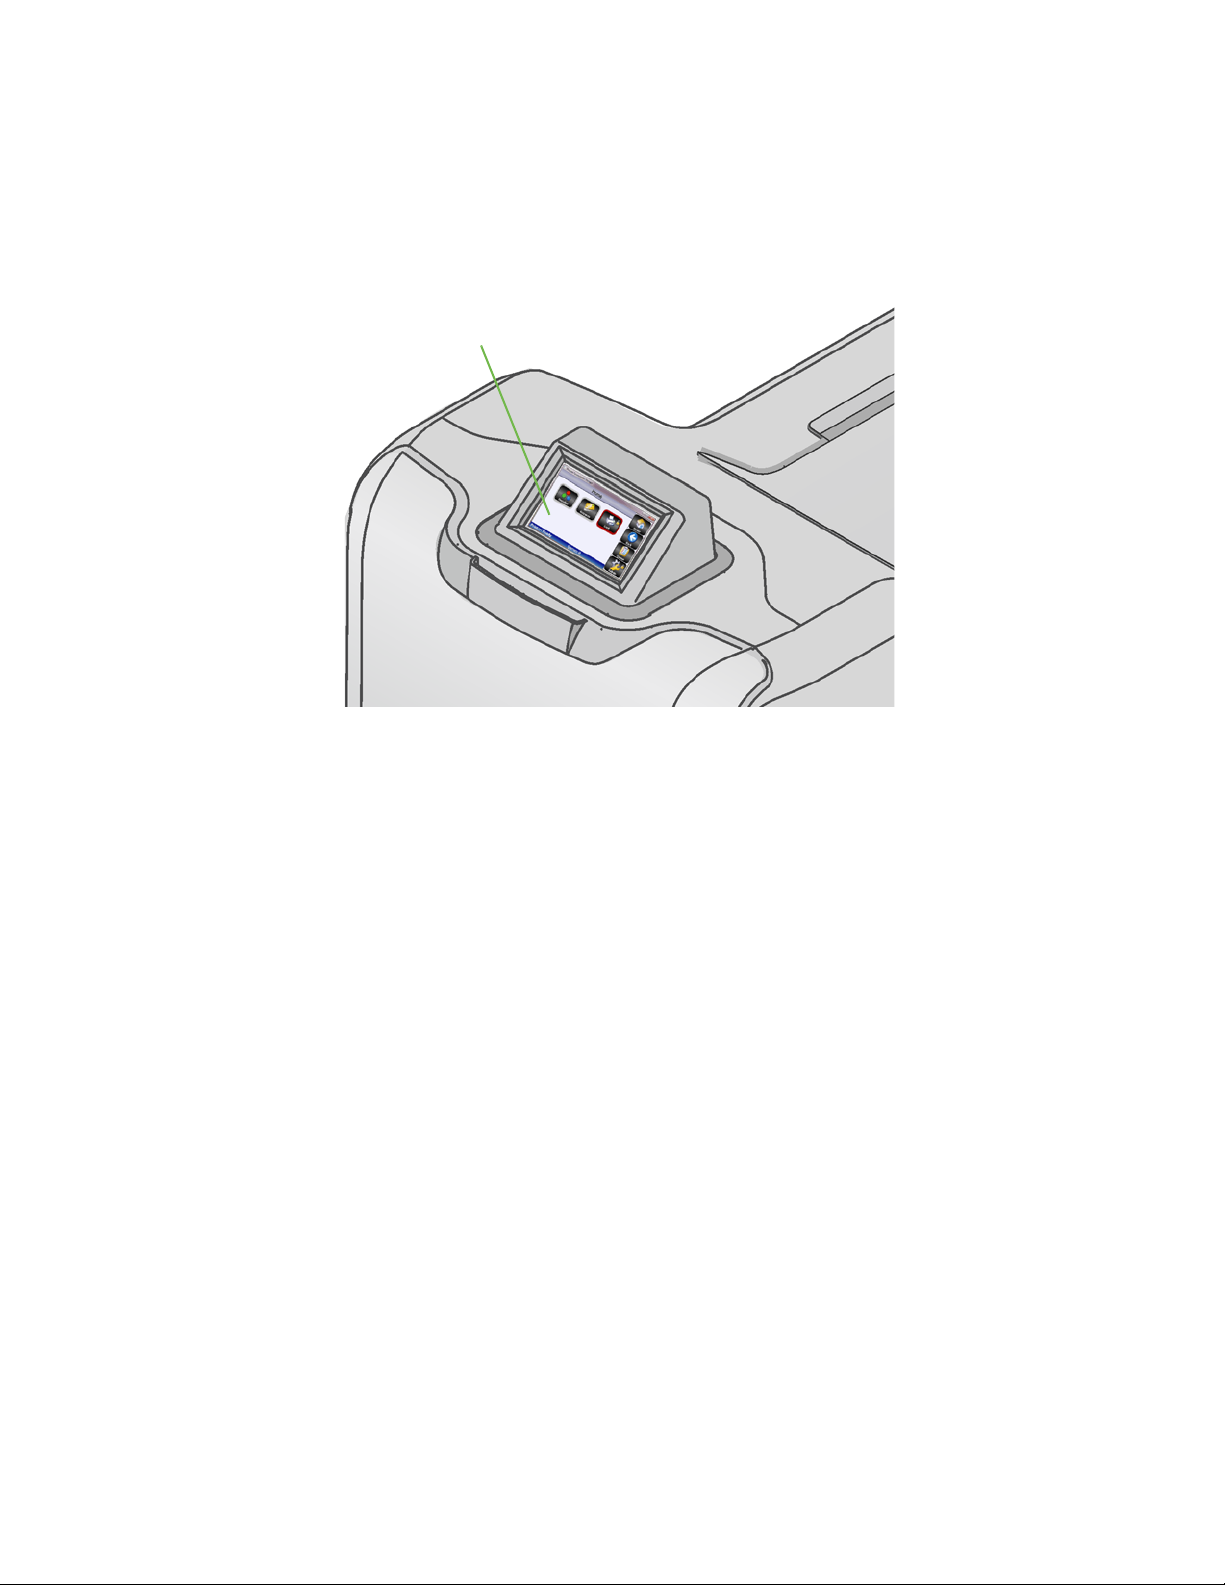
Touch Screen
The Touch Screen Component (Optional)
Touch Screen Standards Buttons with a red background require a PIN to access.
Buttons with a black background are active and can be
selected.
Buttons with a gray background are inactive and cannot
be selected.
Card Hopper Levels View the card type and number of cards remaining in
each of the hoppers inside the multi-card hopper.
Supply Levels View the amount of indent ribbon and topping foil
supplies remaining.
Printer Information View system information including:
• Model
• Serial number
• Firmware version
• IP address
• E-mail alert address
• Flash memory free space
• Printer options
For more information about the Touch Screen, see the Touch Screen User Guide.
6 Welcome to the Card Personalization System
Page 15
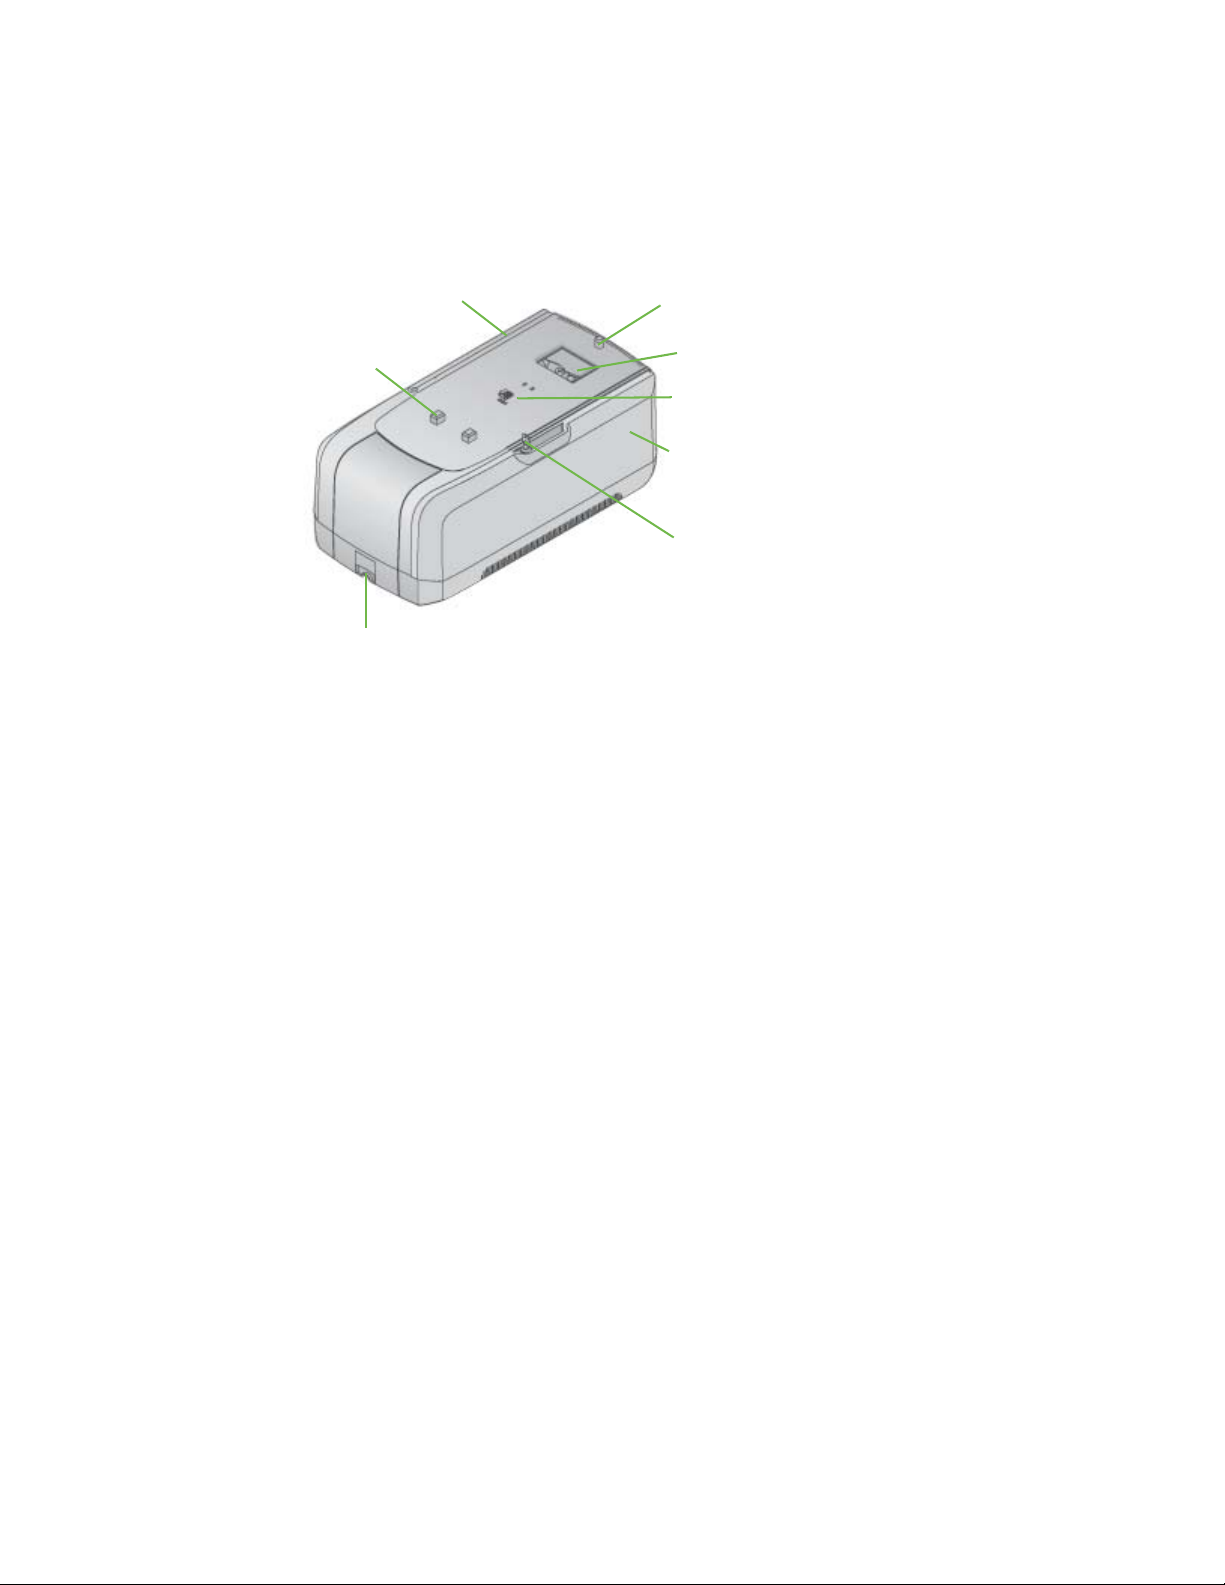
Printer Mounting Pins
Printer Mounting Lock
Embosser Supplies Access Door
Card Transfer Area
Embosser Access Door Lock
Printer
Mounting Pins
Cable Guide
Card Output Hopper
The Embosser Component (Top, Front and Right Side)
Cable Guide The cable guide keeps data cables between the printer and
embosser organized and hidden.
Printer Mounting Pins Aligns the printer to the embosser.
Card Transfer Area Receives the card from the printer component and places
it in position for embossing and indenting.
Printer Mounting Lock Secures the printer to the embosser.
Embosser Supplies
Access Door
Embosser Access Door
Unlock and open the embosser supplies access door to
load indent ribbon and topping foil.
Provides secure access to the embosser supplies.
Lock
Card Output Hopper Concealed output hopper holds up to ten completed
cards.
CE870 Card Personalization System Installation and User Guide 7
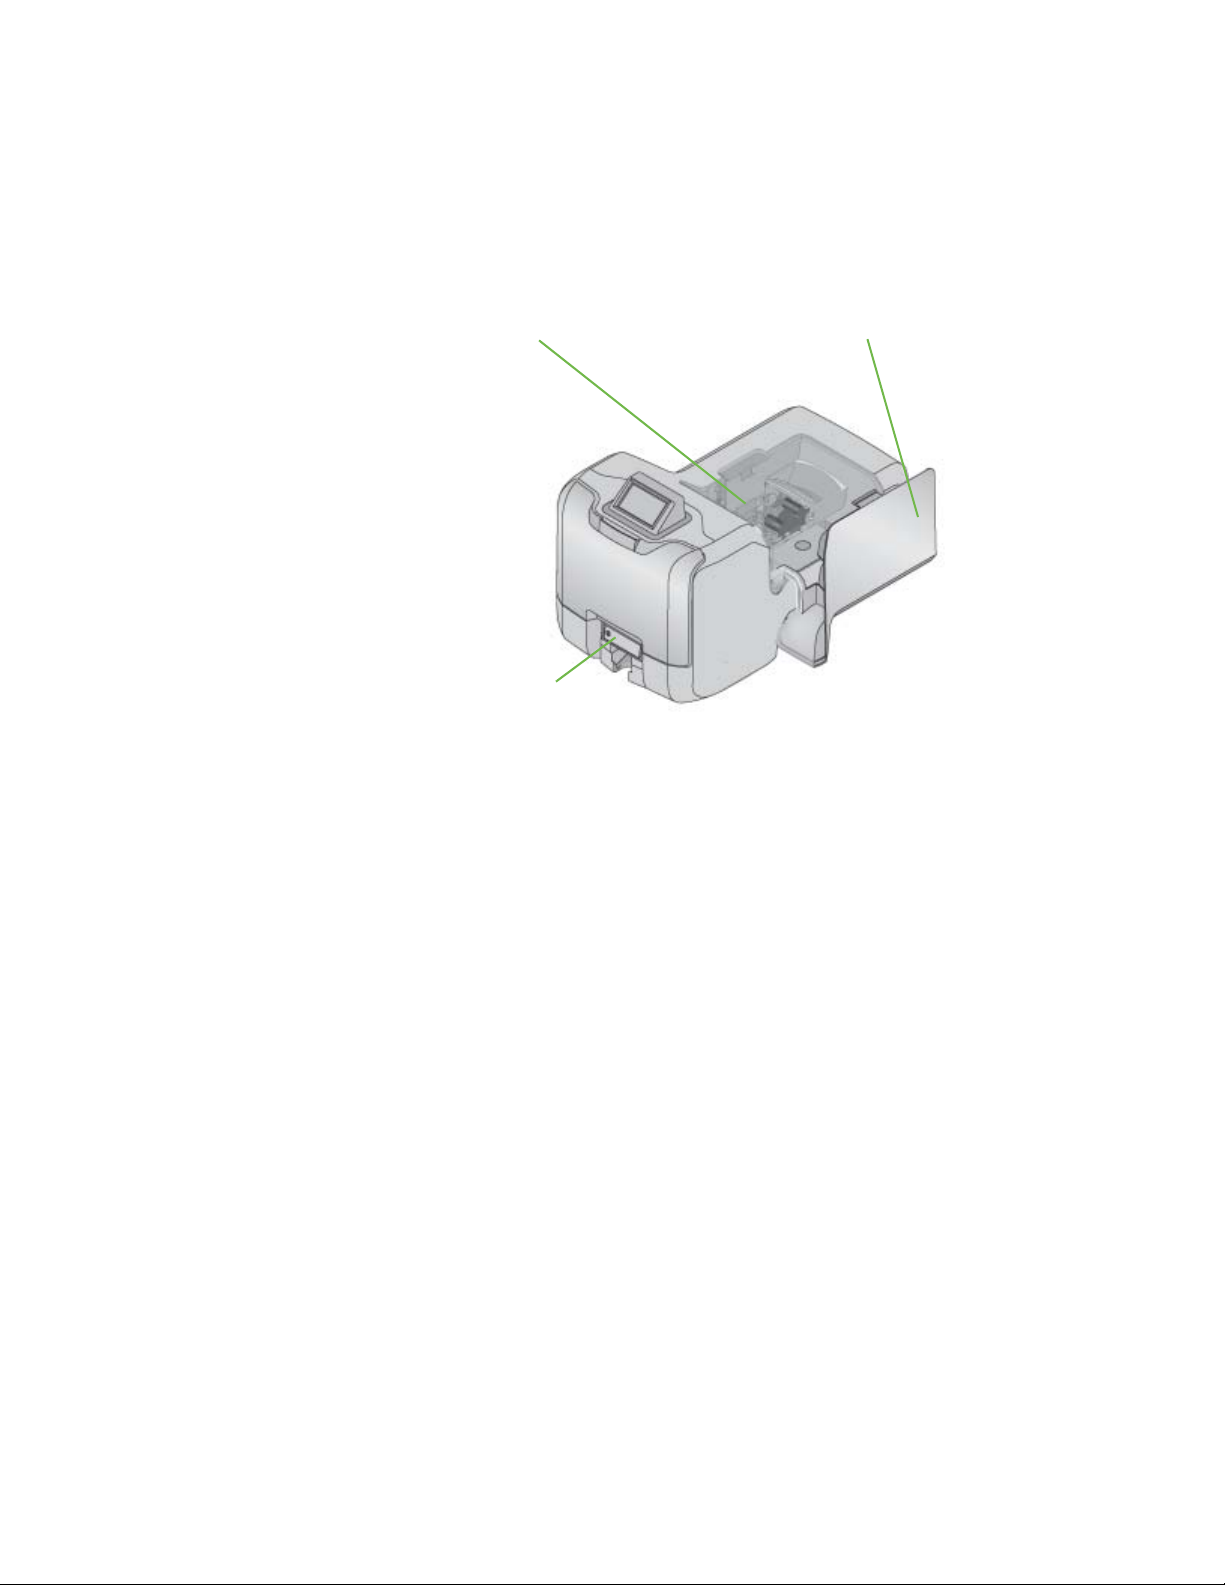
Page 16
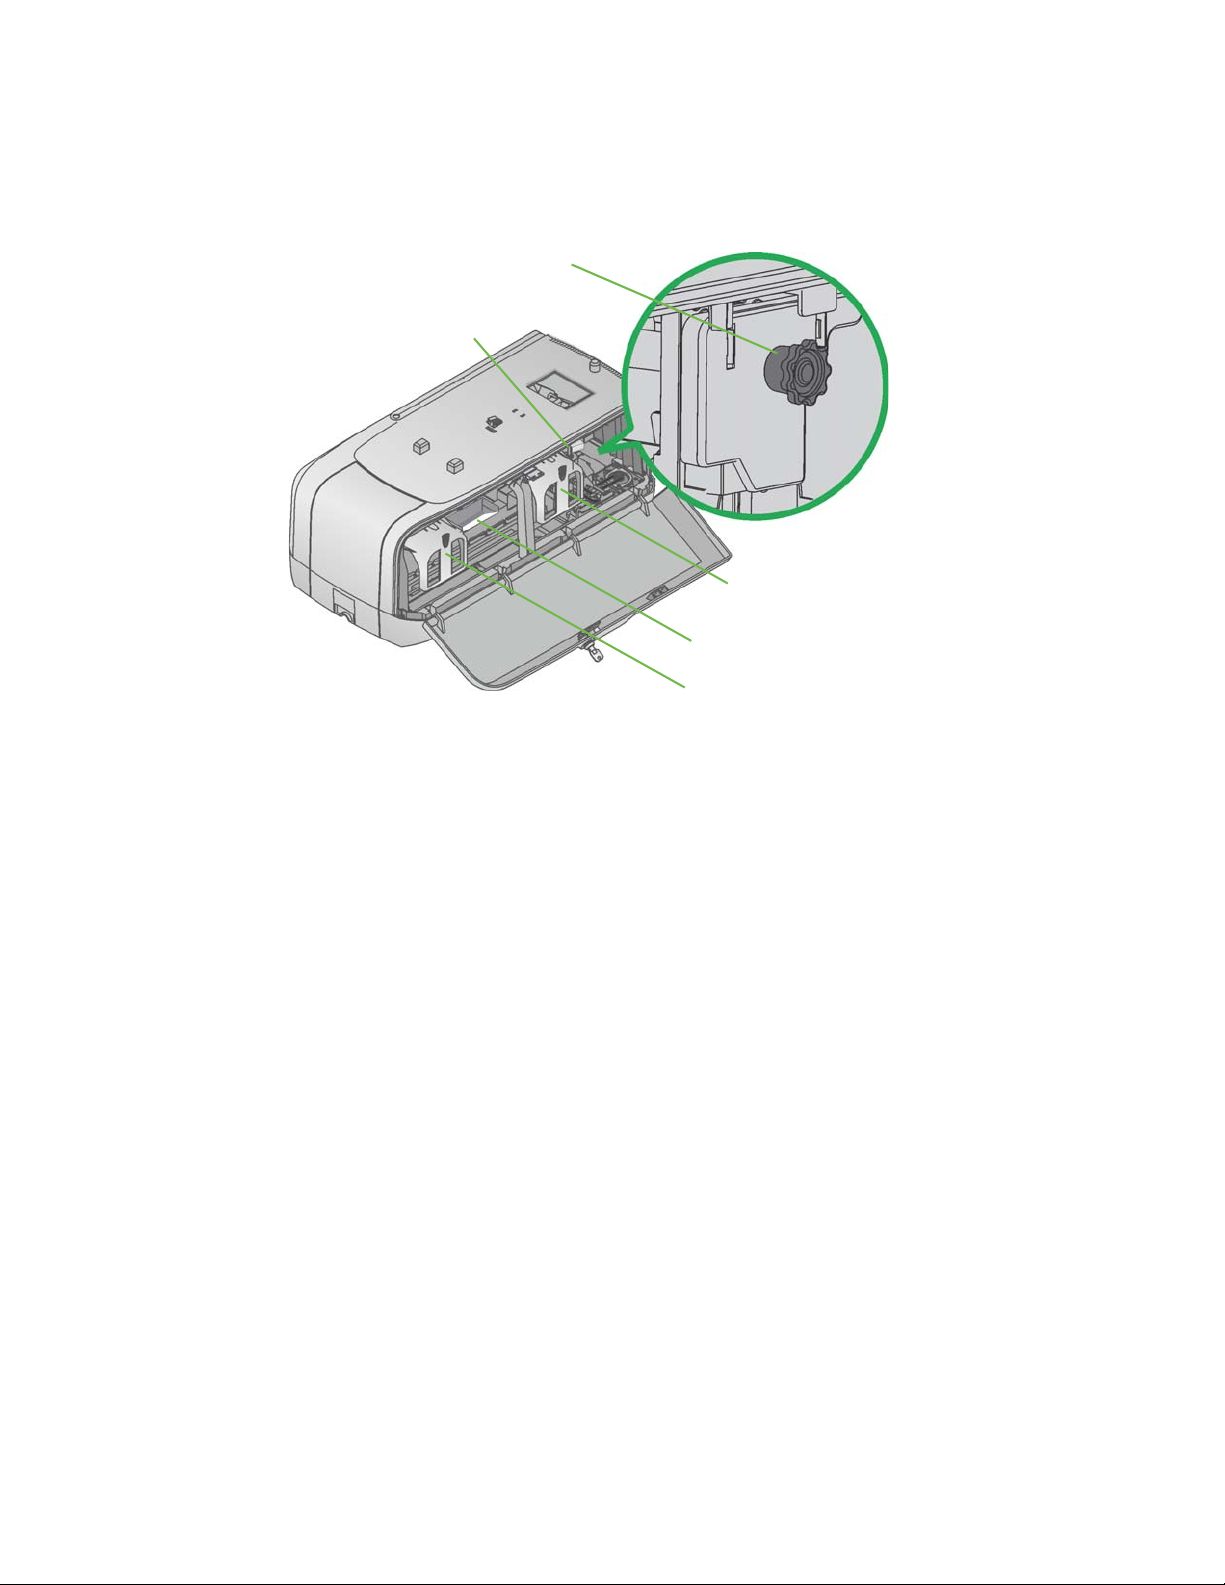
Printer Lock Lever
Indent Ribbon Cartridge
Reject Card Tray
Topping Foil Cartridge
Manual Advance Knob
Inside the Embosser
Printer Lock Lever Push the lever in to lock the printer to the embosser.
Manual Advance Knob Use the manual advance knob to clear a card jam and
move the card in the card track.
Indent Ribbon Cartridge Indent ribbon cartridge holds the indent ribbon supply.
Reject Card Tray Unfinished cards or cards not properly processed exit the
system to the reject card tray.
Topping Foil Cartridge Topping foil cartridge holds the topping foil supply.
8 Welcome to the Card Personalization System
Page 17
Power Connection
Alarm terminal
Security Lock Option
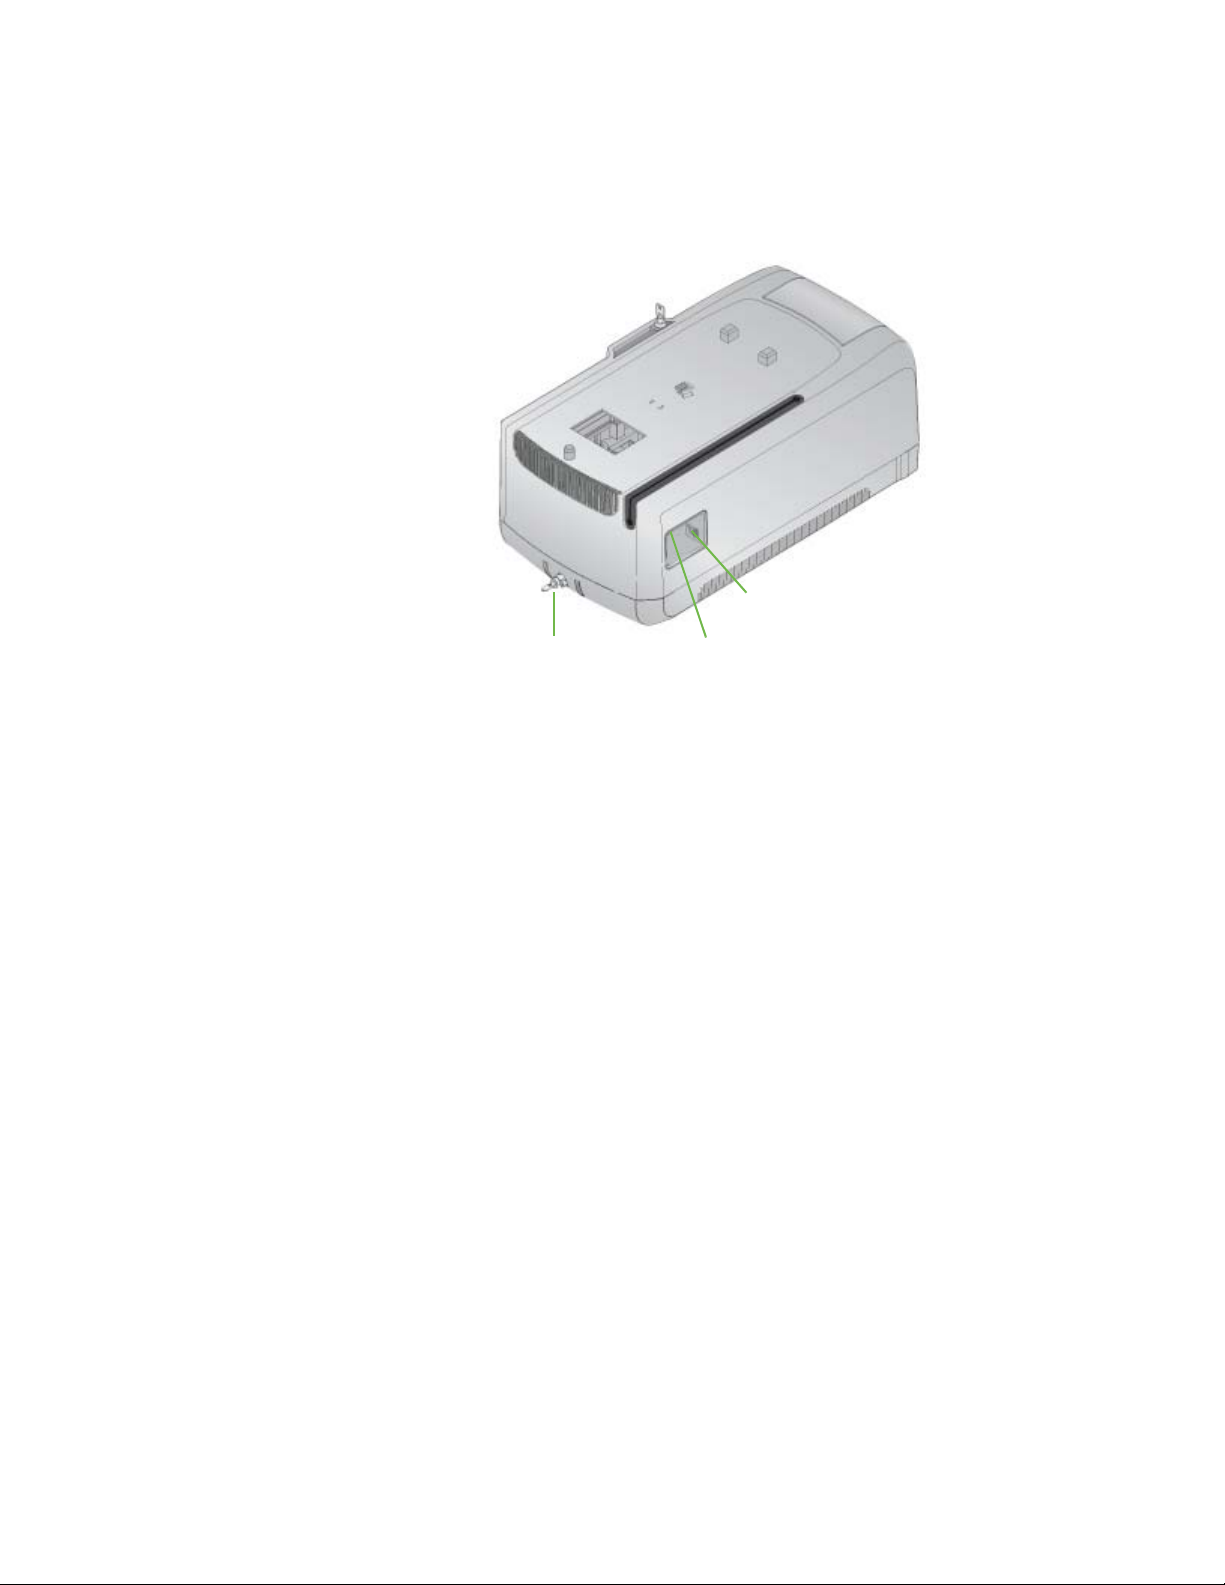
Embosser Connections (Back and Left Side)
Security Lock Option Receptacle for a cable style lock, such as a Kensington
lock.
Alarm Terminal Connect alarm system provided by others.
Power Connection Plug for the embosser power supply.
CE870 Card Personalization System Installation and User Guide 9
Page 18
System Labels
There are two labels on the system, the printer configuration label and the
embosser configuration label. The following section describes the labels, where to
find them, and how to read them.
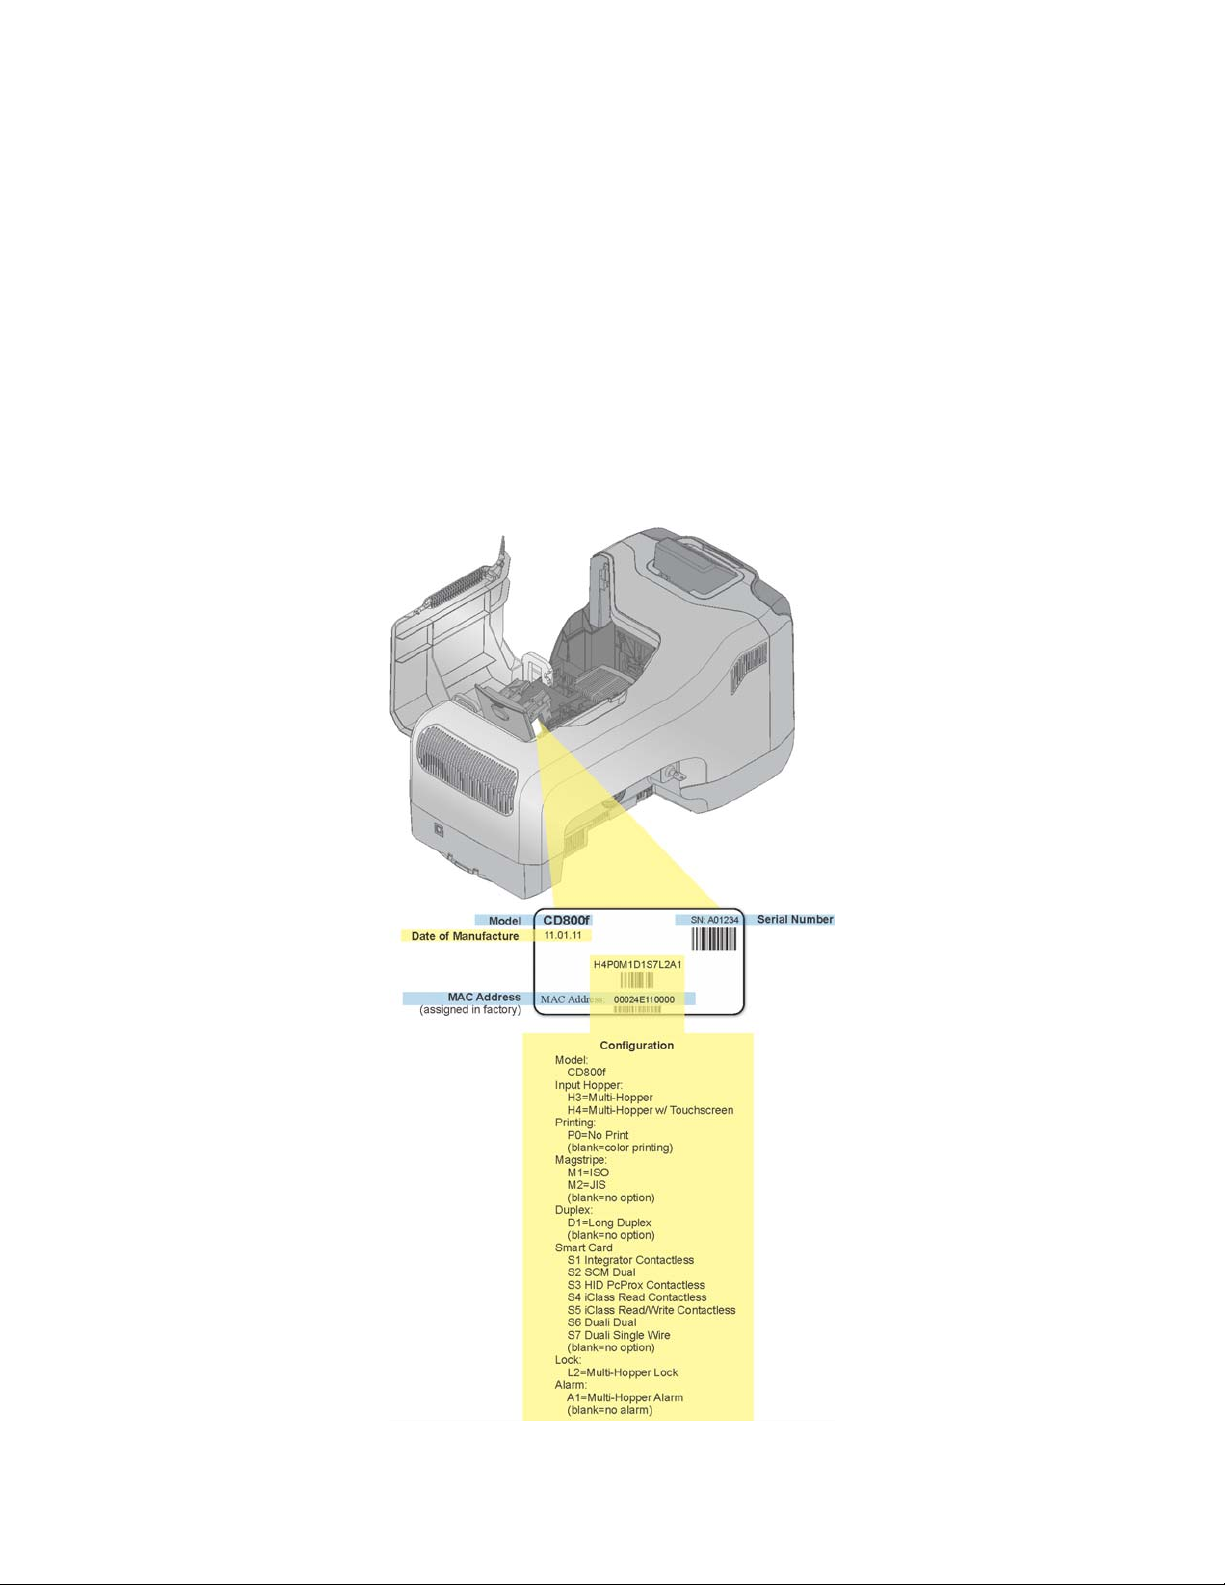
Printer Configuration Label
The printer configuration label is located under the printer supplies access door
on the left-hand side of the printer swingarm. To view the label, unlock and open
the printer supplies access door and press the silver button on top of the printer.
The swingarm is spring-loaded and will open when the button is released.
10 Welcome to the Card Personalization System
Page 19
The printer configuration label shows the printer name, configuration, date and
country of assembly and the MAC address to use when the printer is connected
using an Ethernet network.
The printer configuration label provides information that is useful when
requesting service. It can also help you know which components are installed. If
components are installed by the dealer or sales group, the information for those
items should be on the label.
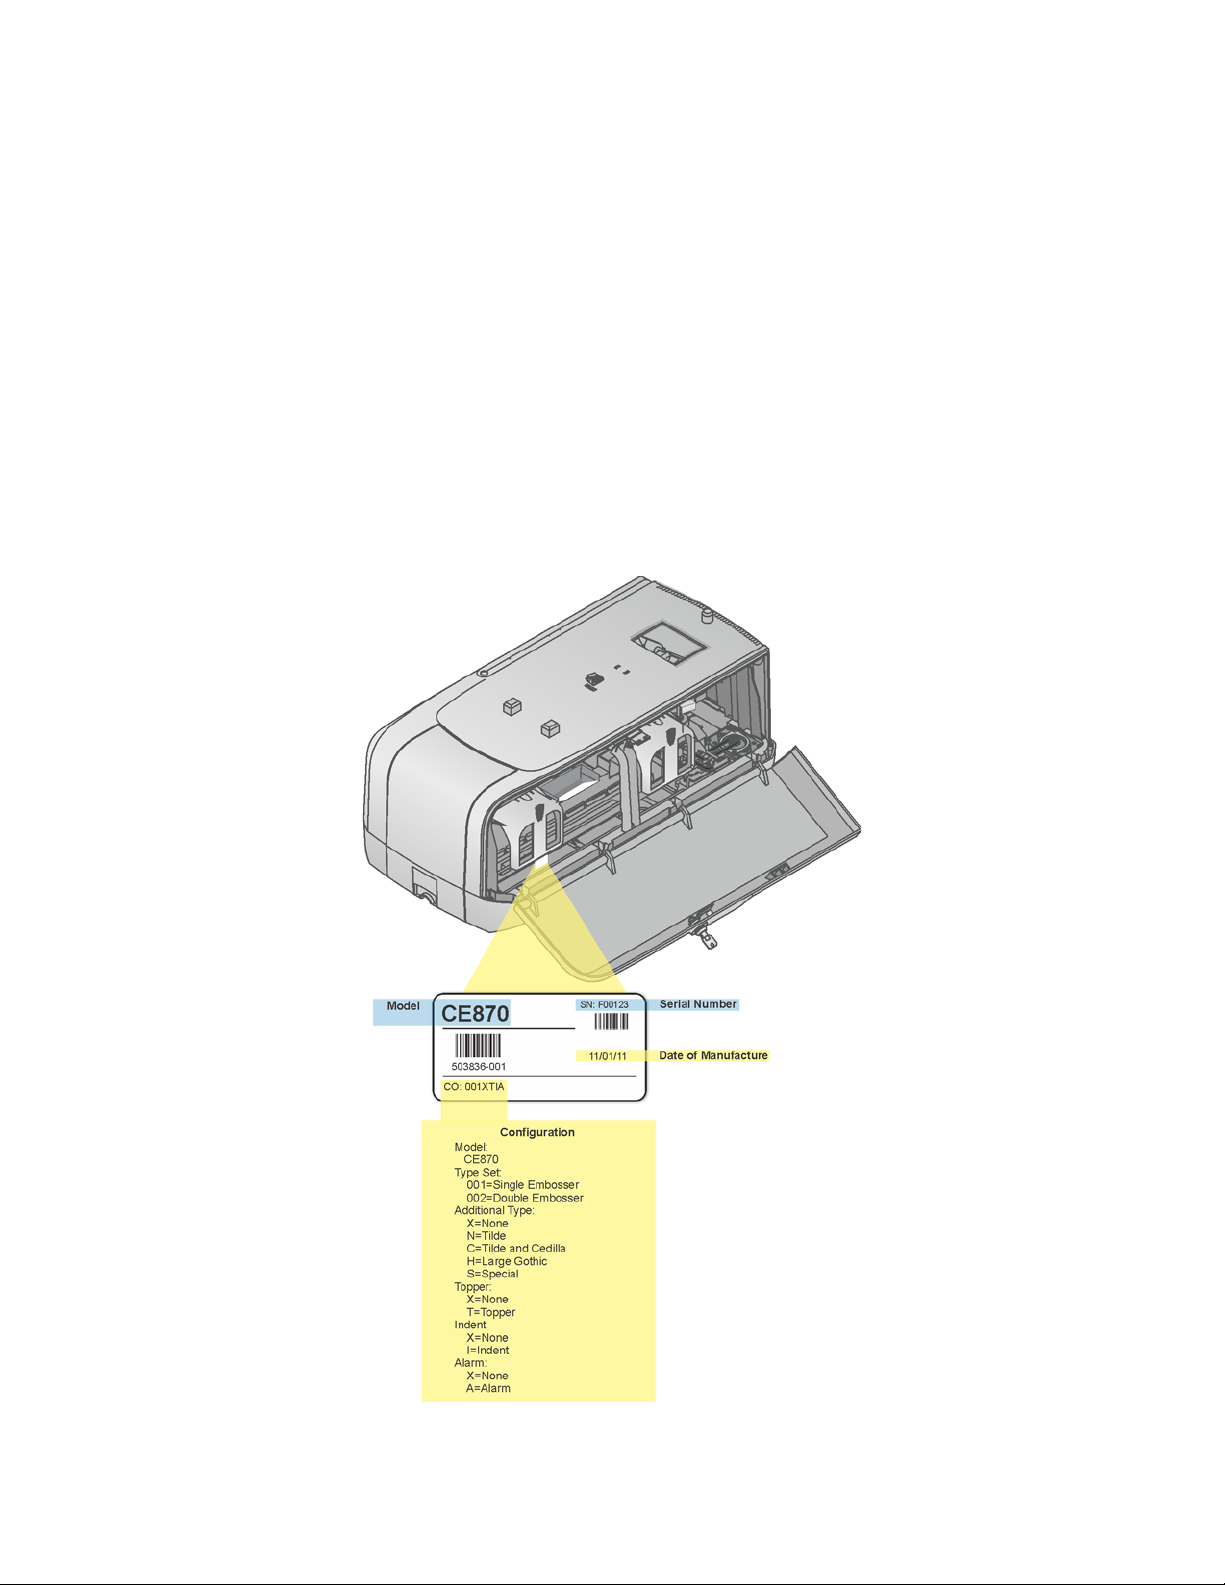
Embosser Configuration Label
The embosser configuration label is located inside the embosser on the lower
enclosure. To view the label, unlock and open the embosser supplies access door
and locate the label inside.
CE870 Card Personalization System Installation and User Guide 11
Page 20

The embosser configuration label shows the embosser name, configuration, date
and country of assembly.
The embosser configuration label provides information that is useful when
requesting service. It can also help you know which components are installed. If
components are installed by the dealer or sales group, the information for those
items should be on the label.
How To Topics
Select a link from the topics below to quickly access common user topics on how
to use the CE870 Card Personalization System.
• Select Use the Touch Screen for information on how to open printer
manager.
• Select LCD Panel for information on how to view and use the printer LCD
menus.
• Select Respond to Messages for information on how to respond to messages
that appear on the printer LCD display.
• Select Run Test Card for information on how to print a test card and verify
system operation.
• Select Run a Cleaning Card for information on how to run a cleaning card as
recommended after every 500 cards are produced.
• Select Load Cards in Hopper for information on how to load cards into the
multi-card hopper.
• Select Load Indent Ribbon Cartridge for information on how to replace
indent ribbon inside the embosser.
• Select Load Topping Foil Cartridge for information on how to replace
topping foil inside the embosser.
12 Welcome to the Card Personalization System
Page 21

Chapter 2: Installation
Requirements
This chapter describes the PC requirements, site requirements, and
electrical requirements for the equipment.
Your company may have additional requirements for a card
production environment. Talk to your system administrator to
determine the optimum location for card production.
This section describes:
• PC Requirements
• Site Requirements
• Electrical Requirements
PC Requirements
The following network components are required:
• An Ethernet network that uses the TCP/IP protocol and can run at 100
megabits per second, also called 100base-T.
• An Ethernet cable to connect the system to the network. No Ethernet cable is
supplied with the system.
• A PC that meets the requirements listed above and is connected to and
communicating with the network.
CE870 Card Personalization System Installation and User Guide 13
Page 22
Site Requirements
Set up and use the system in an environment that meets the following
requirements.
• It is recommended that the system be placed on a table that is no taller than 32
inches (81 cm) in height to allow easy user access and viewing of components.
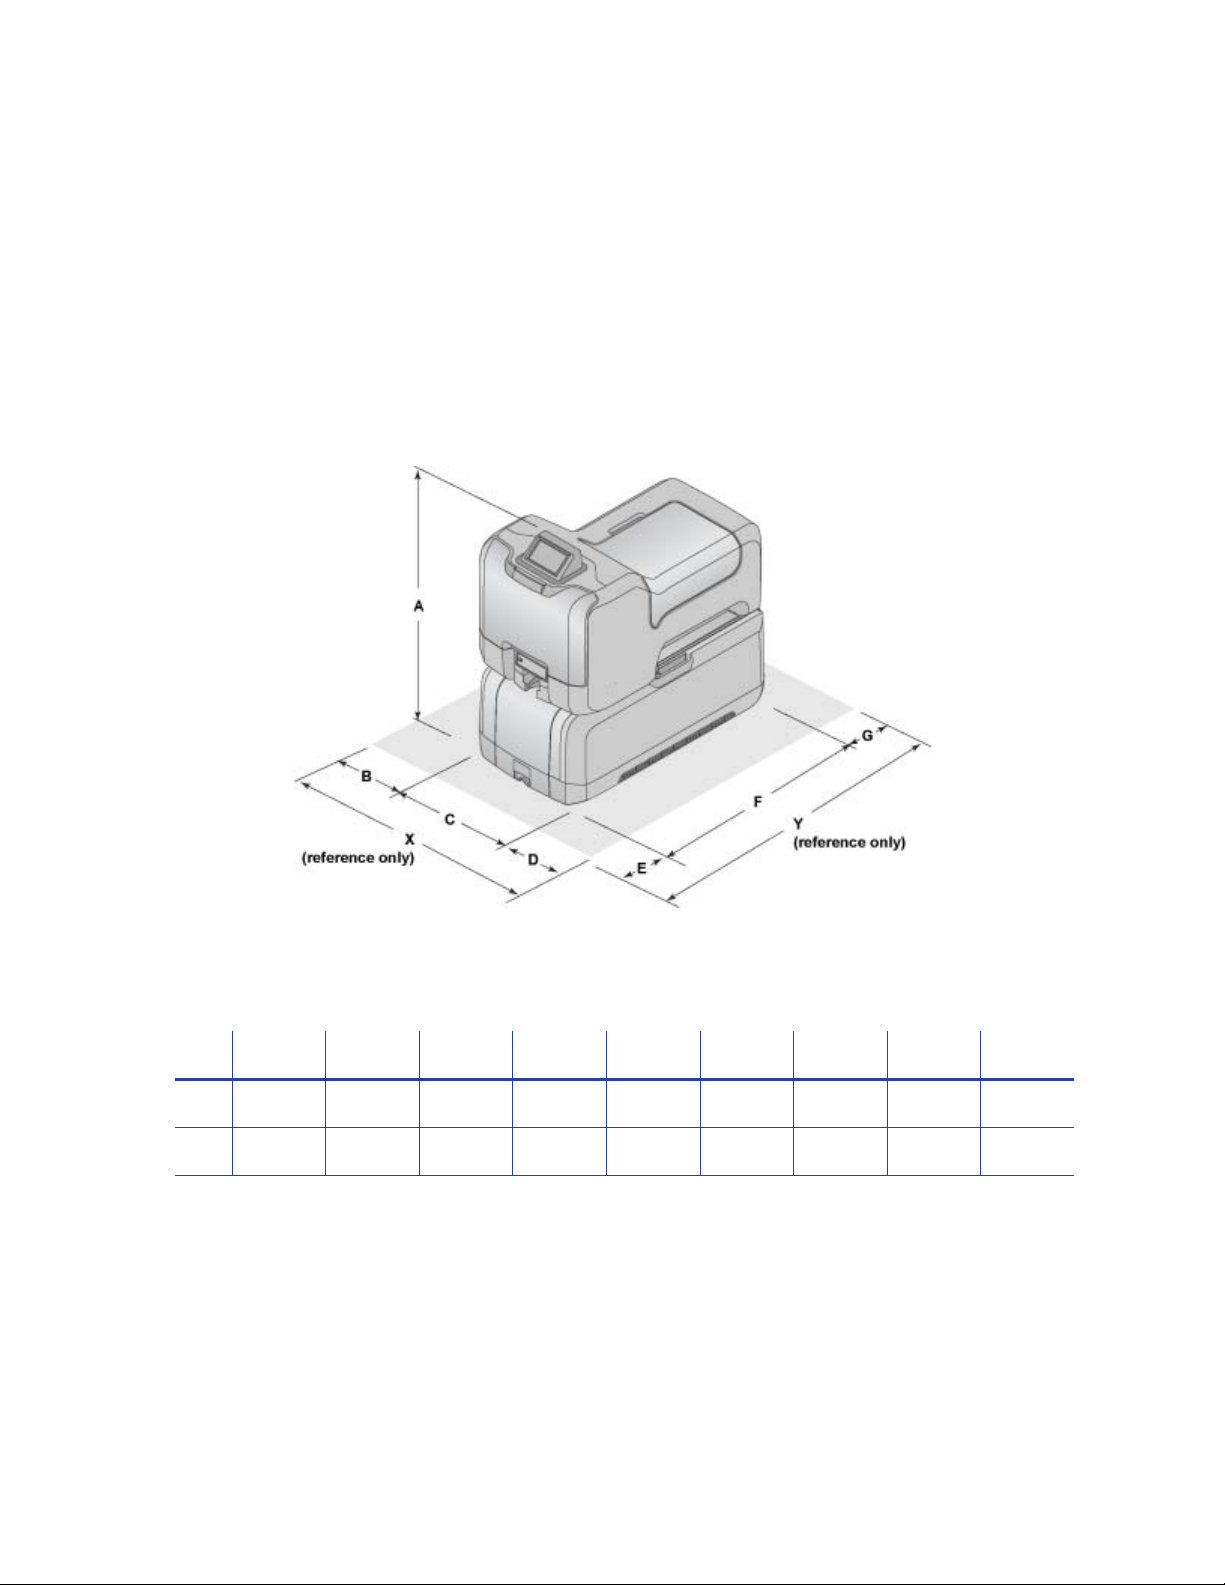
• Provide space for the system and for clearance around the system. The system
dimensions and recommended clearance area are shown in the table below.
Dimensions (in/cm)
ABCDEFGXY
in 27.6 2 16.3 8.5 10 28.1 2 26.8 40.1
cm 70.1 5.1 41.4 21.6 25.4 71.4 5.1 68.1 101.9
• Choose a location in an environment with temperatures ranging from
60° to 95° F (15° to 35° C).
• Use single phase, 3-wire, grounded receptacles.
• Keep all dust, dirt, food, and liquids away from the system.
• Place the system and its supplies in a clean office environment, keeping paper
and foreign materials off the equipment.
14 Installation Requirements
Page 23

• Place the system on a sturdy, level surface.
• Place the system and its supplies away from direct sunlight.
• Do not place the system near heating ducts, fans, or other air vents.
• Do not use the system for purposes other than the intended use.
Electrical Requirements
The power supply is rated as follows:
System Component Electrical Requirements
Printer 110-240V ~ 1.5 Amp, 50-60Hz
Embosser 110-240V ~ 3.5 Amp, 50-60Hz
The power supply detects the input voltage, and works within the range stated.
CE870 Card Personalization System Installation and User Guide 15
Page 24

16 Installation Requirements
Page 25
Chapter 3: Install the System
This section provides information about installing
the CE870 Card Personalization System. Installation
includes system setup, connecting cables, and
installing supplies.
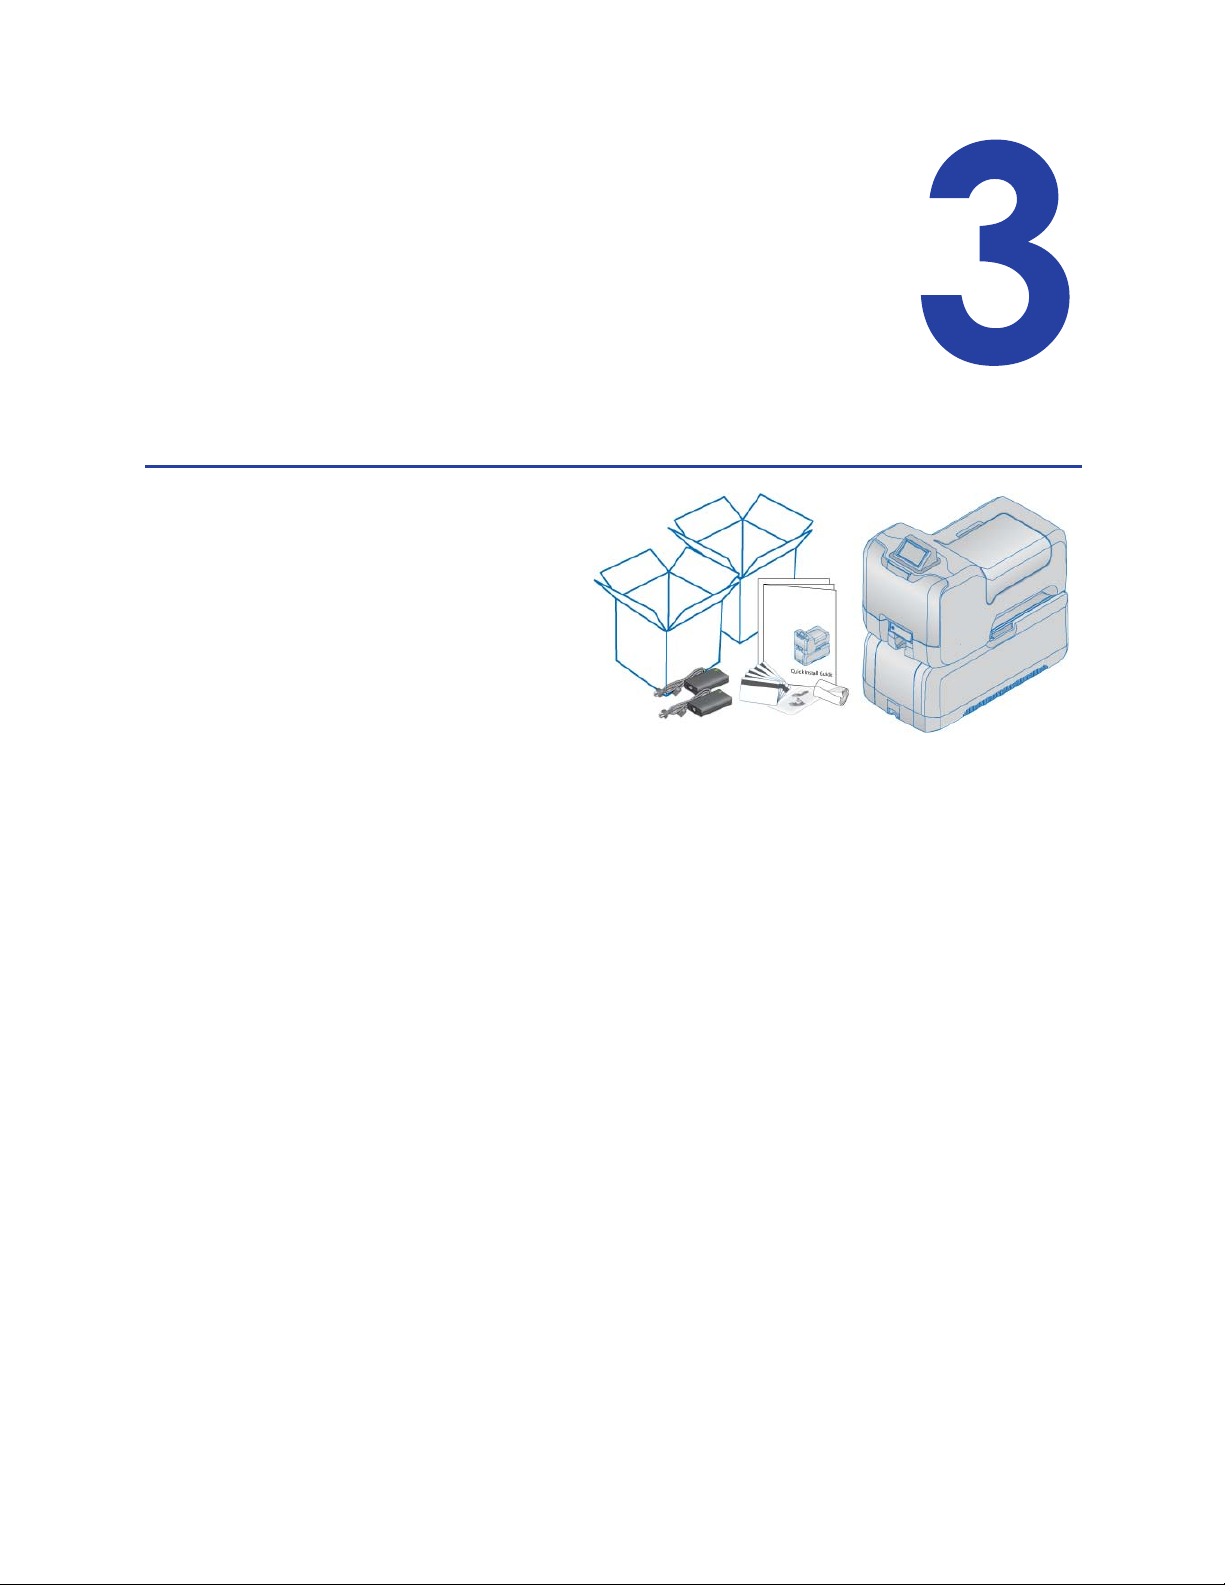
The setup procedure is
described in this section. The
components are shipped in
several containers. Make
sure that you have all
components, including those
not supplied, before you
start the installation. Items
not supplied in the shipping
cartons include Ethernet
cable(s) and bolt-down supplies.
The system is often installed by a systems administrator or service provider.
This section describes how to:
• Secure the System
• Assemble the Printer and Embosser
• Load Supplies
• Connect Cables
• Run Test Card
CE870 Card Personalization System Installation and User Guide 17
Page 26
Indent Ribbon
Cartridge
Topping Foil
Cartridge
Embosser Supplies
Access Door
Secure the System
The embosser includes bolt-down openings for securing the system to its
mounting surface. Choose a location in which to install the system following the
requirements shown in Site Requirements.
1. Unlock and open the embosser
supplies access door.
2. Remove the topping foil and
optional indent ribbon cartridges
and set aside.
3. Bolt the embosser to the work
surface.
You need the following supplies:
• Embosser Bolt-Down
Specification Sheet (Part No.
539999-001).
• Two 1/4 inch Bolts.
The length of the bolts depends on the thickness of the mounting surface.
Bolt length minimum of surface thickness + ¾ inch. Bolt length maximum
of surface thickness +1¼ inch.
• Two 5/8 inch outer diameter Washers.
• Two 1/4 inch Nuts.
Plastic locking nuts are recommended.
A. Drill mounting holes in the mounting surface following the dimensions
and requirements shown on the Embosser Bolt-Down Specification Sheet.
B. Insert the bolts.
i. Place a flat washer on each of the bolts.
ii. Insert the bolts into the mounting holes inside the embosser.
iii. Align the bolts with the holes in the embosser.
C. Secure the embosser using washers and nuts on the inside of the
embosser.
4. Replace the topping foil and indent ribbon cartridges.
5. Close and lock the embosser supplies access door.
18 Install the System
Page 27
Printer
Locking
Lever
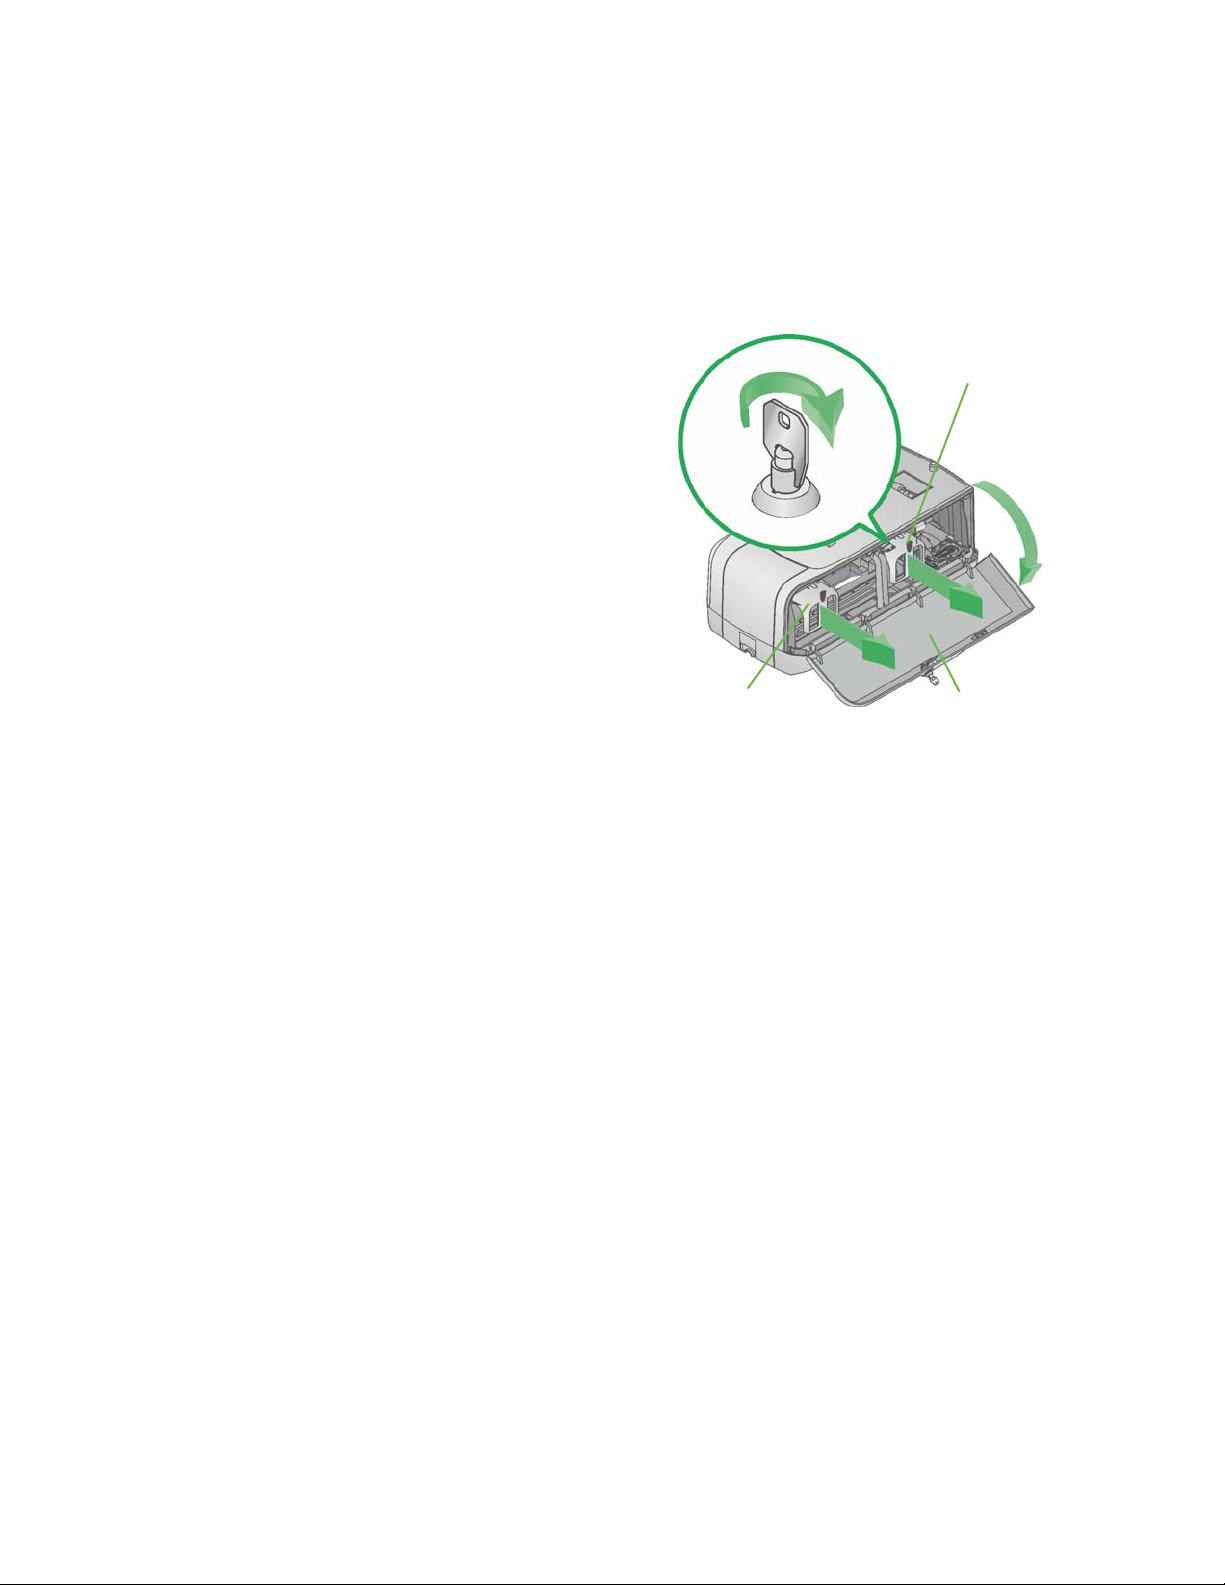
Assemble the Printer and Embosser
1. Unlock and open the embosser
supplies access door.
2. Slide the printer locking lever to
the left to position the mounting
lock in the unlocked state.
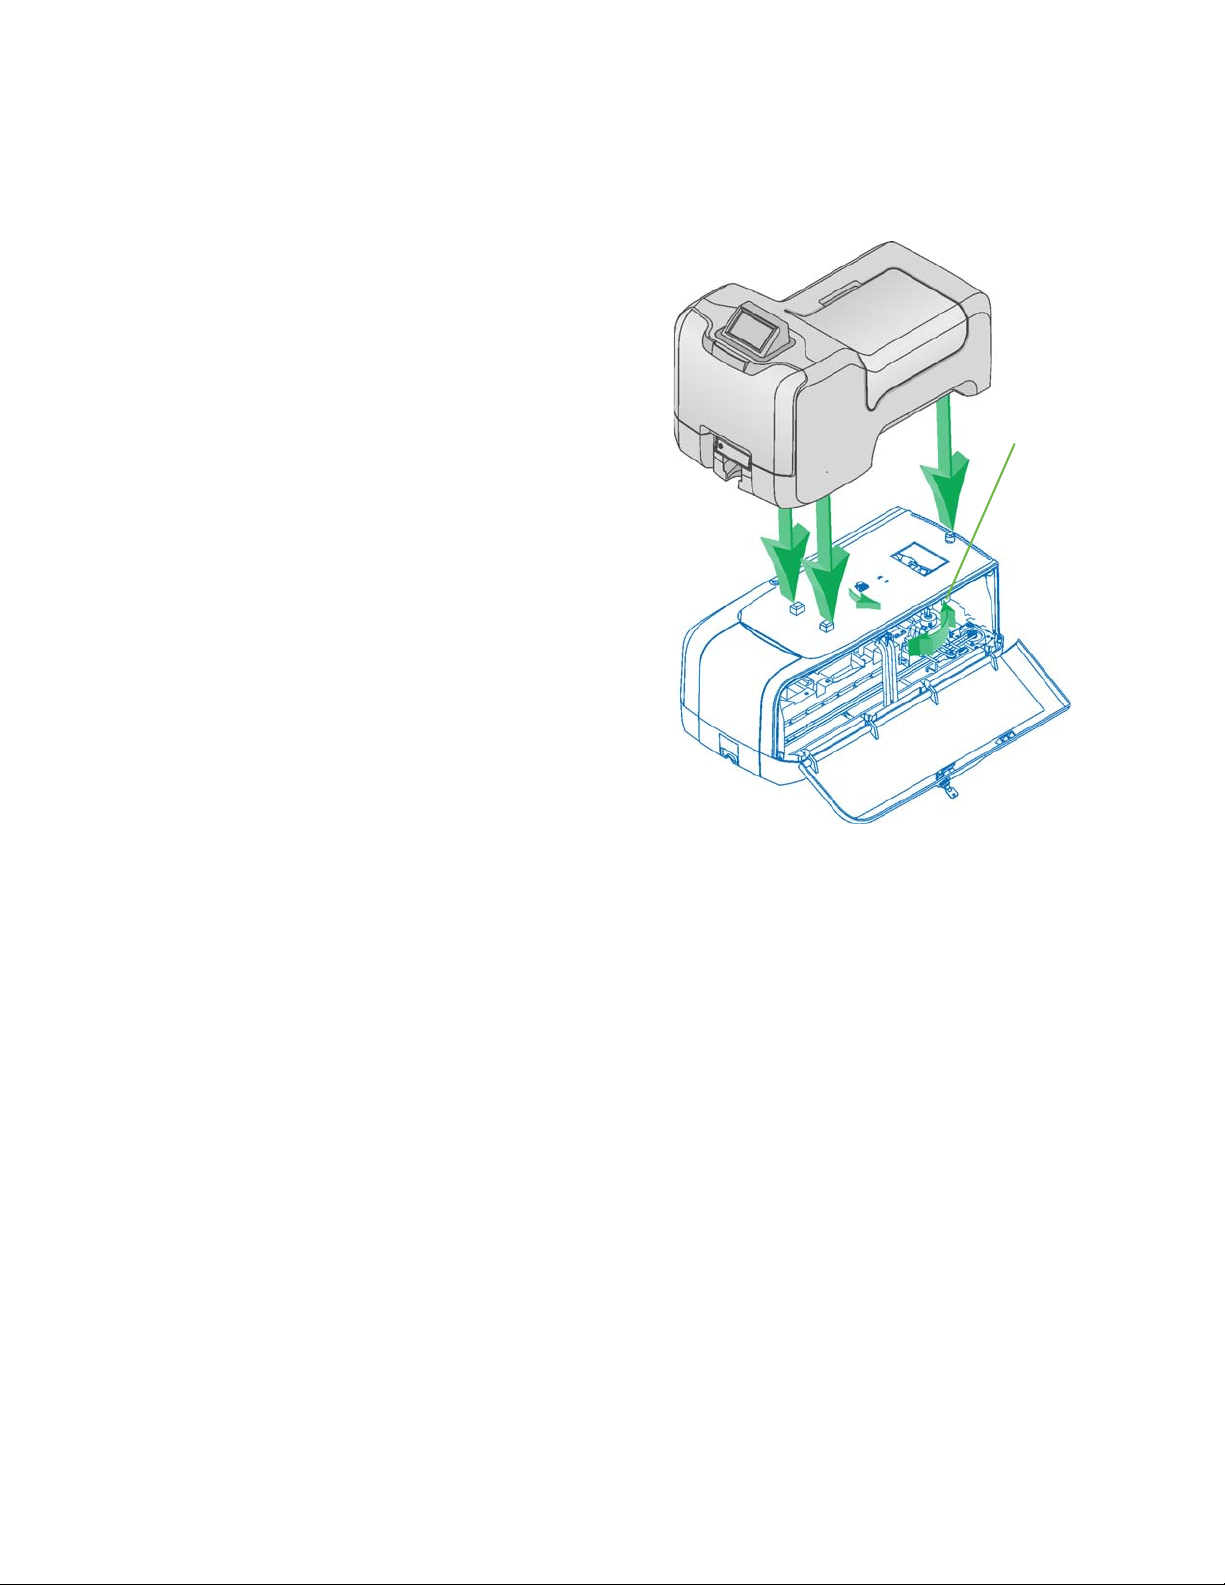
3. Lift the printer over the embosser
and align the pins on the
embosser with the holes on the
underside of the printer.
4. Press down gently, but firmly on
the printer component and push
the printer locking lever to the
right to lock the printer to the
embosser.
5. Check that the printer is securely
locked to the embosser.
6. Close and lock the embosser
supplies access door.
CE870 Card Personalization System Installation and User Guide 19
Page 28
Load Supplies
Embossing supplies include topping foil and indent ribbon. The topping foil is
applied to the embossed characters and can be applied to up to five lines of
characters. The indent ribbon is used to apply black (or white) color to a single
line of indented characters. The printer supplies include a cleaning sleeve.
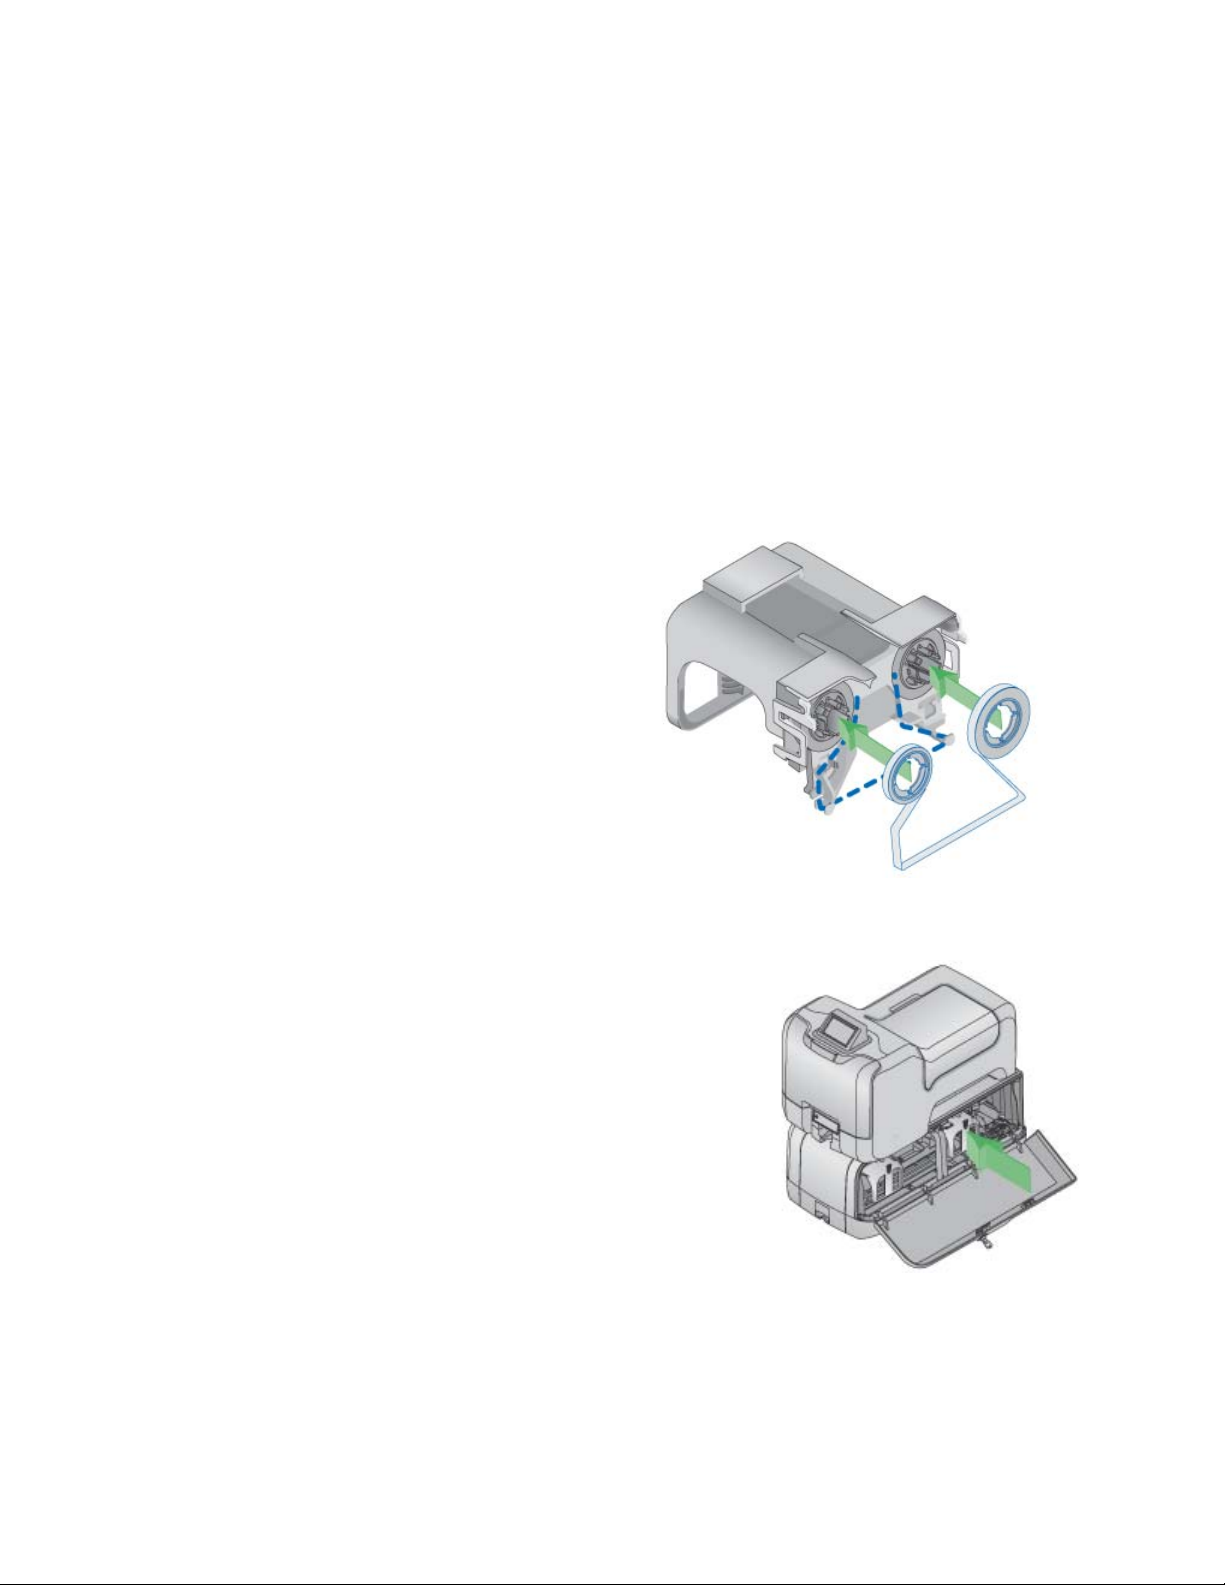
Load Indent Ribbon Cartridge
1. Unlock and open the embosser supplies access door and remove the cartridge
from the embosser. The indent ribbon cartridge is on the right. See Inside the
Embosser for more information.
2. Push the full roll of indent
ribbon onto the spindle on
the right until it snaps
securely into place.
3. Route the ribbon around the
ribbon guides as shown.
4. Push the empty take-up
spool onto the spindle on the
left until it snaps securely
into place.
5. Turn the take-up spool one
full turn counterclockwise to
take up ribbon slack.
6. Replace the indent ribbon cartridge.
The emboss and indent ribbon cartridges
are not interchangeable; they fit only into
the designated cartridge area.
A. Hold the cartridge by its handle.
B. Align the cartridge with the guides
inside the embosser.
C. Slide the cartridge in until it stops.
7. Close and lock the embosser supplies
access door.
20 Install the System
Page 29
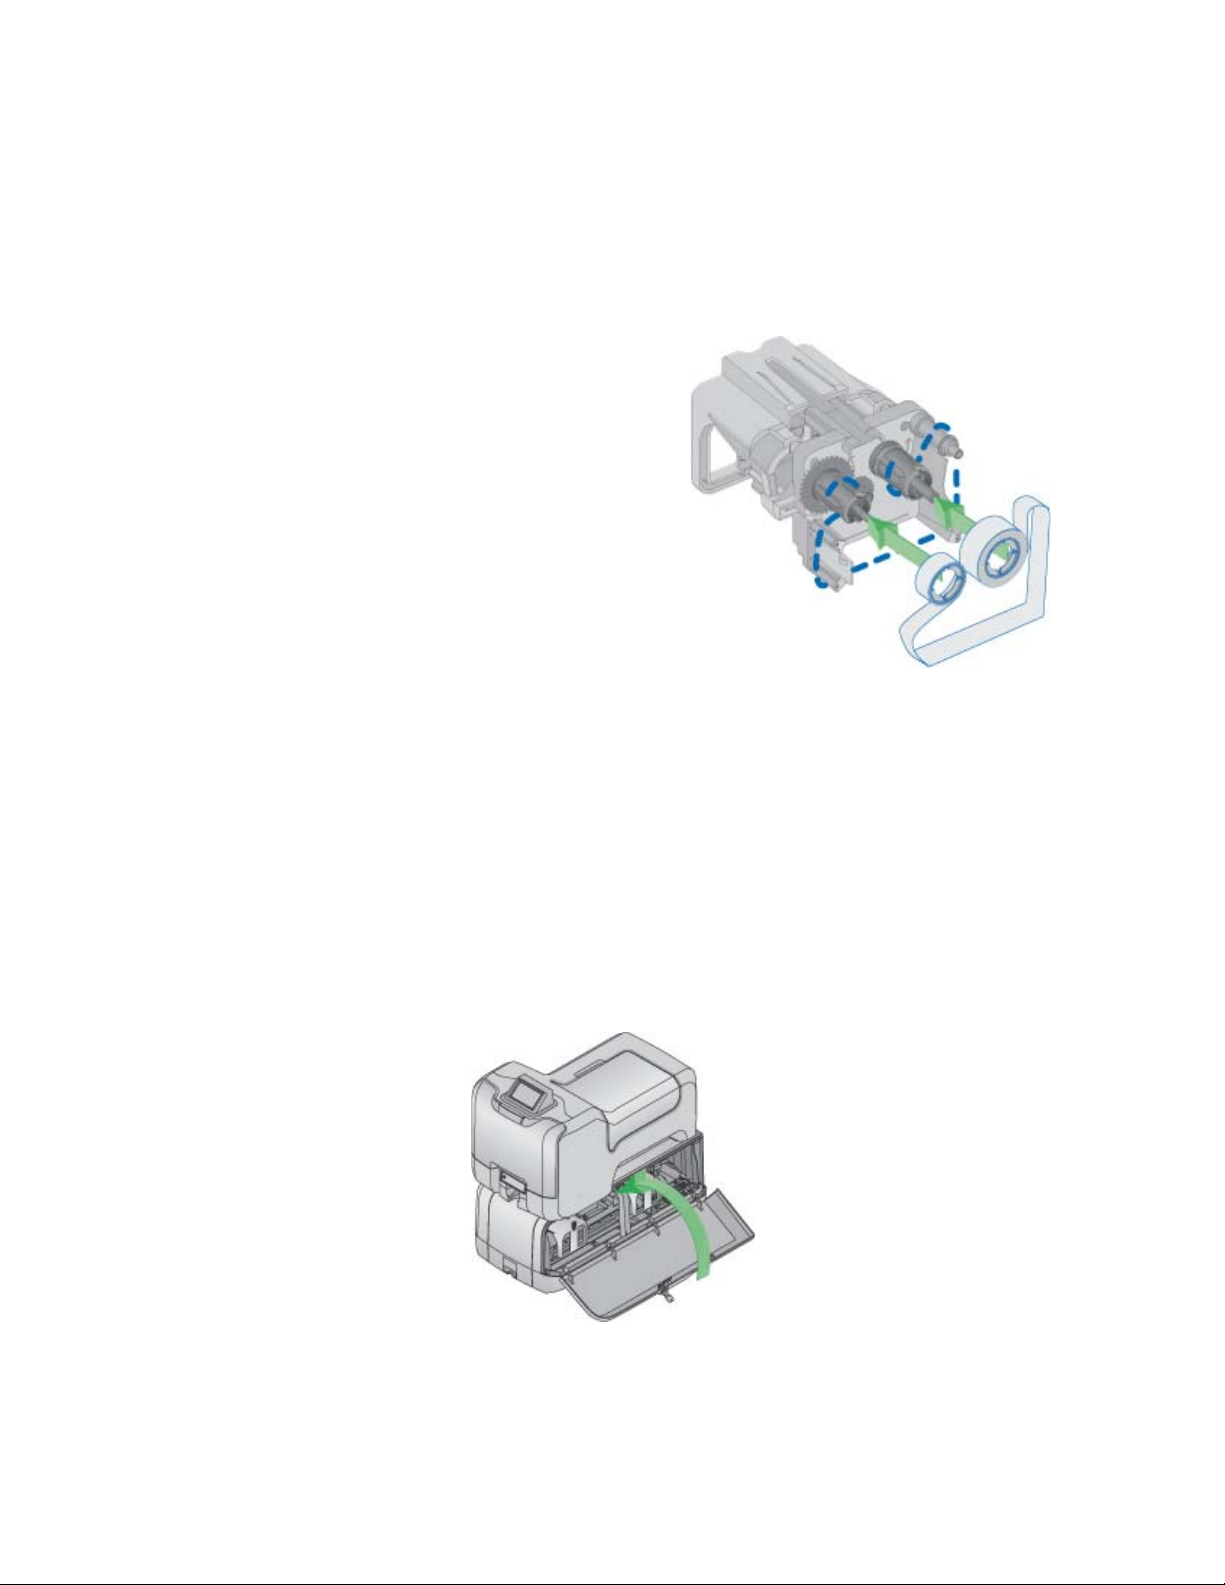
Load Topping Foil Cartridge
1. Unlock and open the embosser supplies access door and remove the topping
foil cartridge. The topping foil cartridge is on the left. See Inside the
Embosser for more information.
2. Push the full roll of ribbon onto the
spindle on the right until it snaps
securely into place.
3. Route the ribbon around the
ribbon guides as shown.
4. Push the empty take-up spool onto
the spindle on the left (spindle
with the black gear) until it snaps
securely into place.
5. Turn the take-up spool one full
turn counterclockwise to take up
ribbon slack.
6. Replace the topping foil cartridge.
The emboss and indent ribbon cartridges are not interchangeable; they fit
only into the designated cartridge area.
A. Hold the cartridge by its handle.
B. Align the top of the cartridge with the guides inside the embosser.
C. Slide the cartridge in until it stops.
7. Close and lock the embosser supplies access door.
CE870 Card Personalization System Installation and User Guide 21
Page 30
Printer
Supplies
Access Door
Unlock
Silver
Button
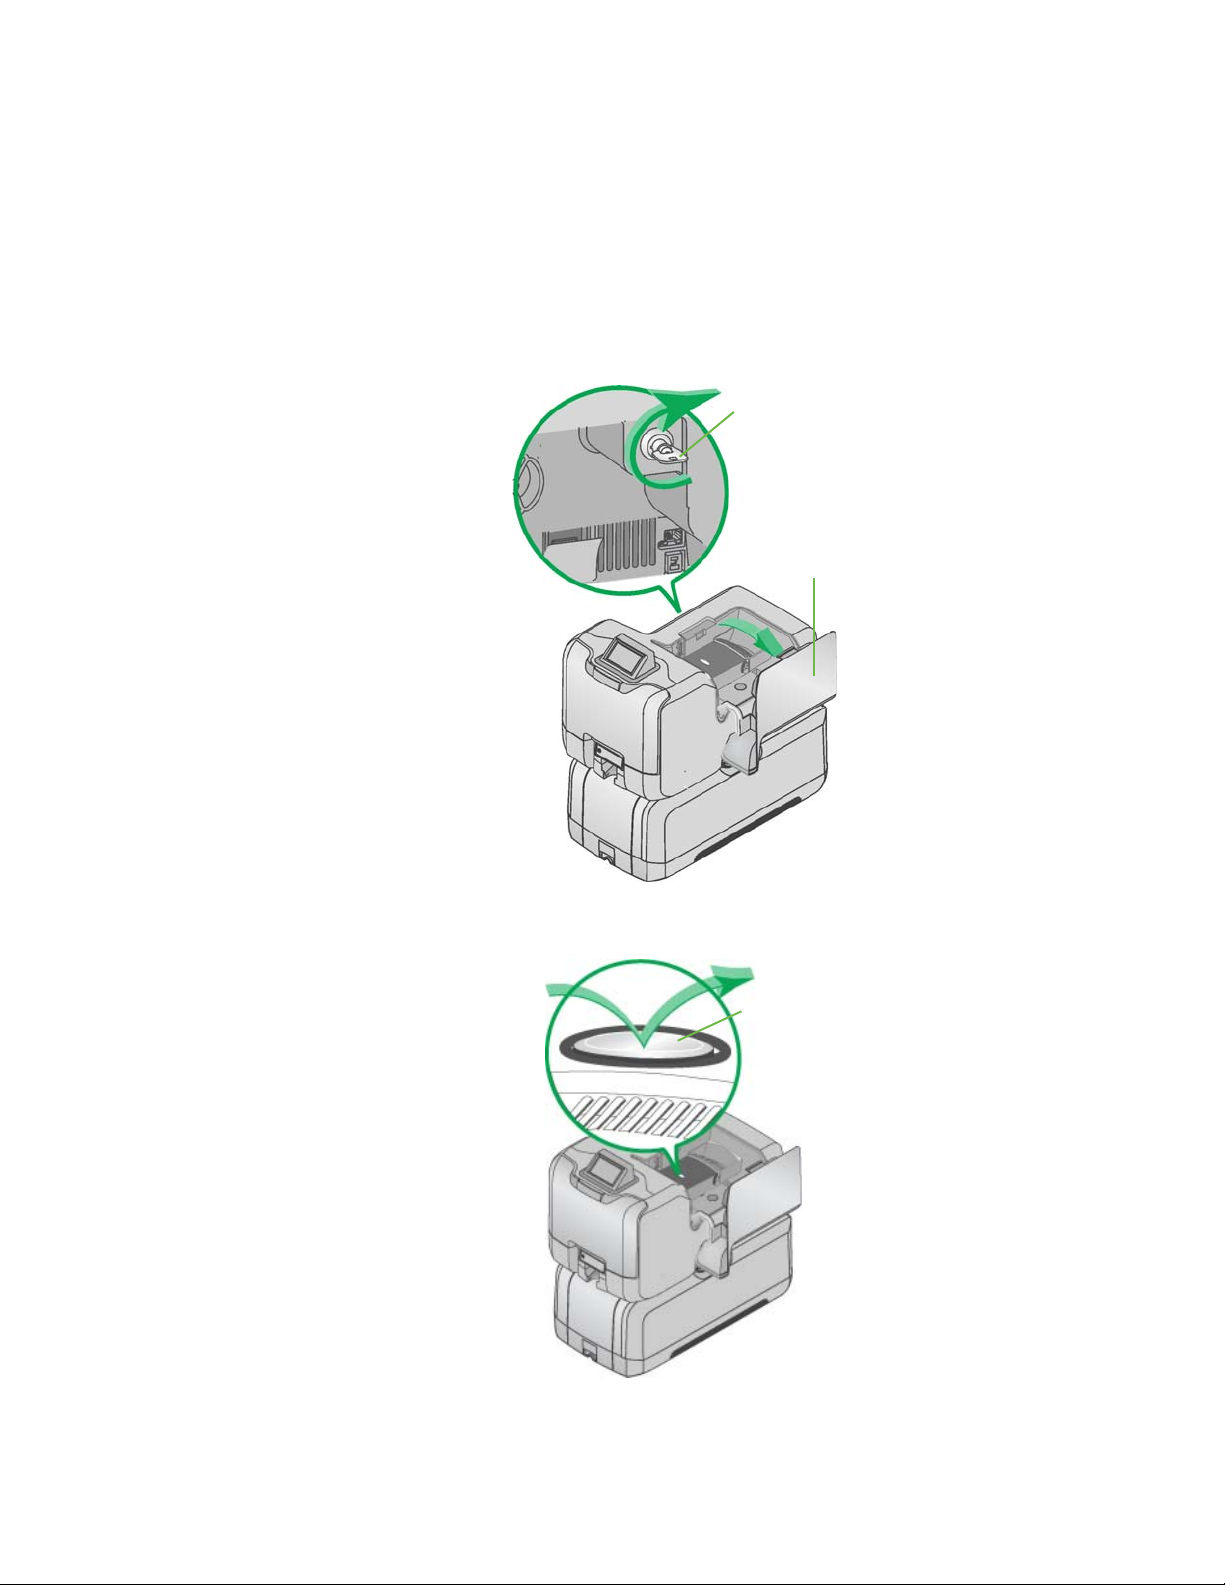
Load Cleaning Sleeve
The printer component uses a replaceable cleaning sleeve to clean dust or lint
from the surface of the card stock before processing data. Each cleaning sleeve is
effective for approximately 500 cards.
1. Unlock the printer and open the printer supplies access door.
2. Press the silver button and open the printer swingarm.
22 Install the System
Page 31
Print
Ribbon
Cartridge
Protective
Ribbon
Cleaning
Roller
Spindle
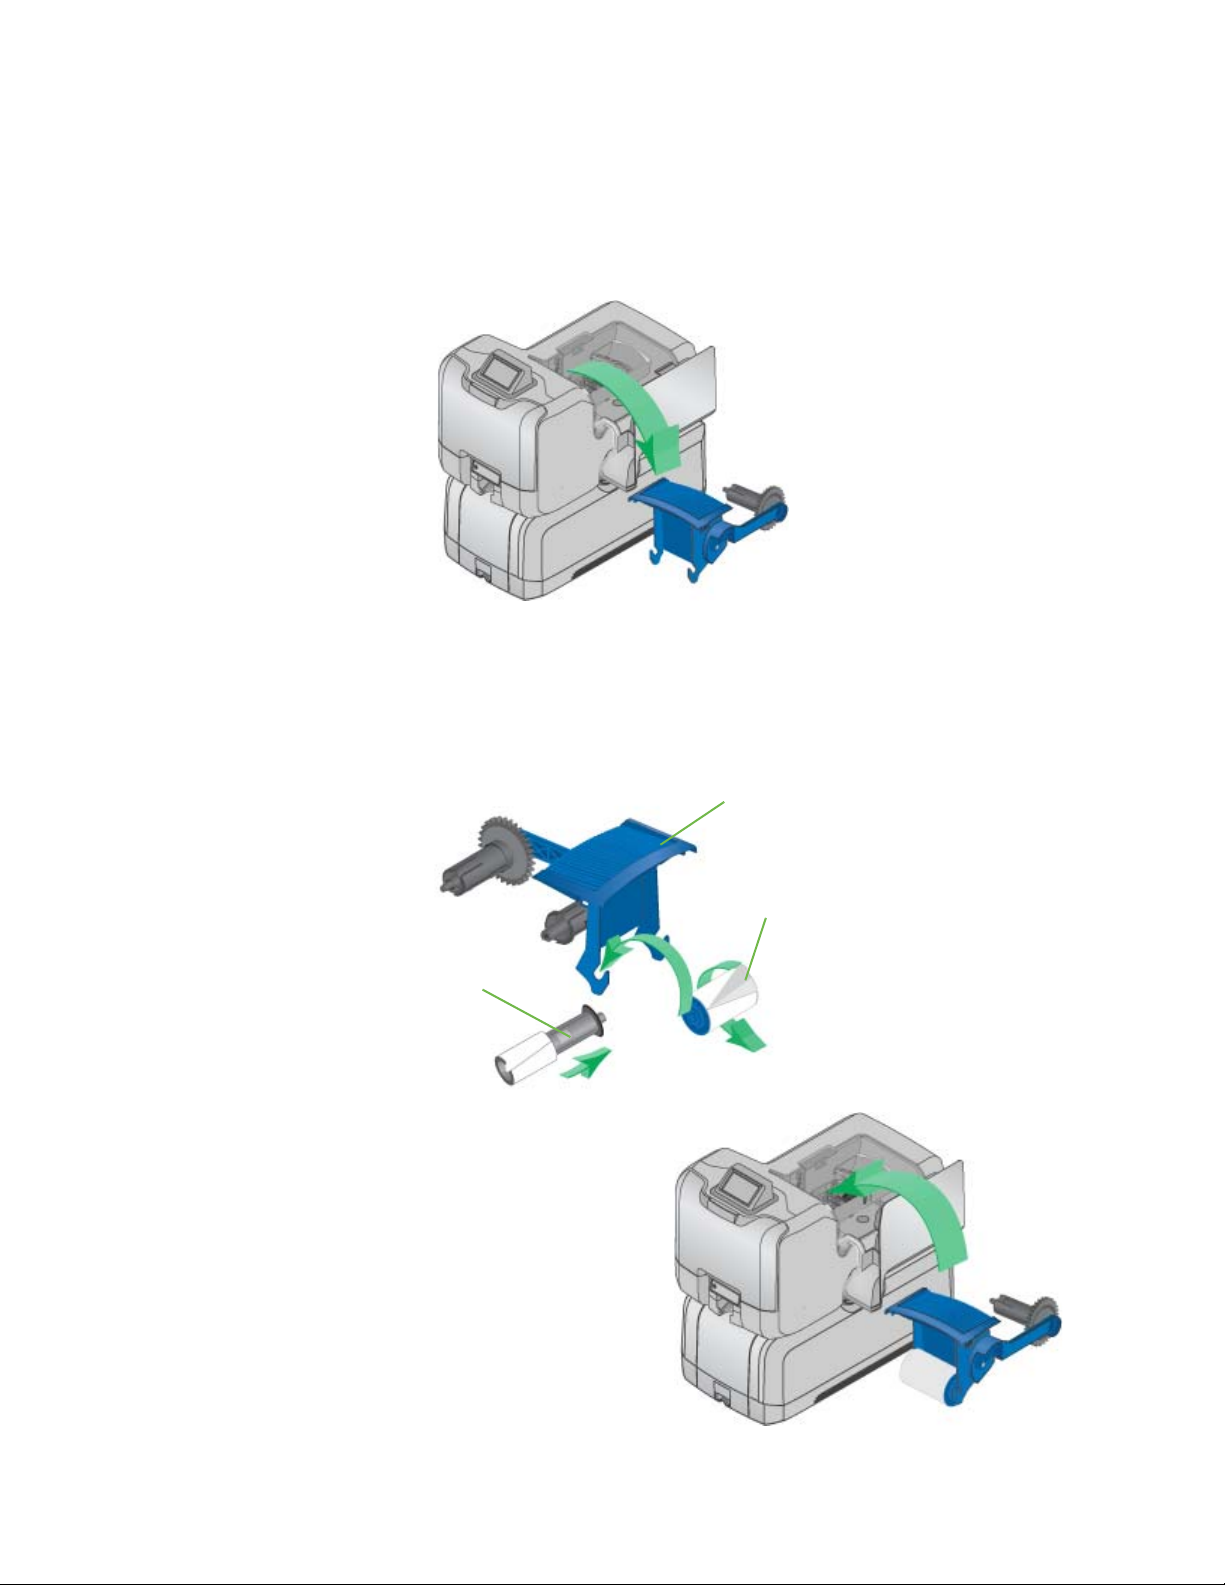
3. Prepare the print ribbon cartridge.
A. Remove the print ribbon cartridge. The printer ships with the cleaning
roller spindle installed on the print ribbon cartridge.
B. Remove the cleaning roller spindle from the cartridge and slide the
continuous cleaning sleeve onto the spindle. Place the spindle with
cleaning sleeve back onto the ribbon cartridge.
C. Remove the protective wrapper from the cleaning sleeve.
4. Reinstall the ribbon cartridge and
close the printer swing arm.
5. Leave the printer access door
open and unlocked to load cards
into the multi-card hopper. The
printer lock secures both the
printer access and multi-card
hopper doors.
CE870 Card Personalization System Installation and User Guide 23
Page 32
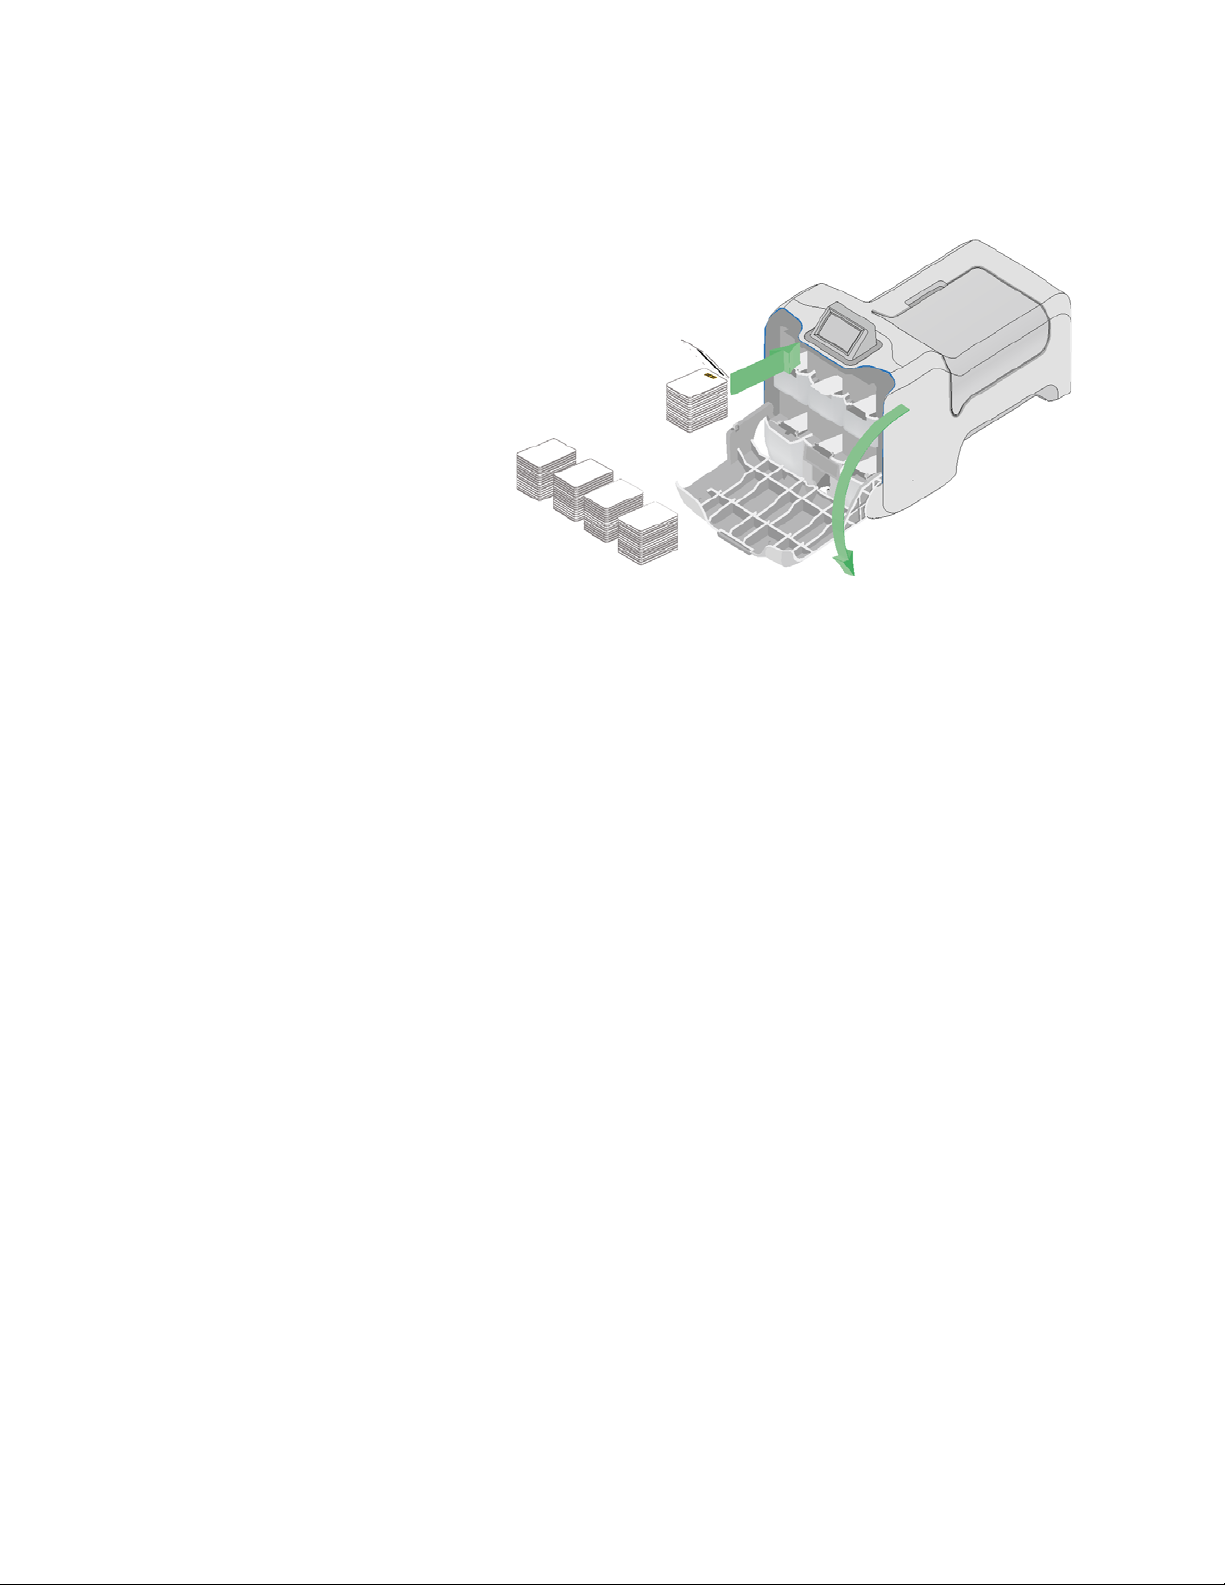
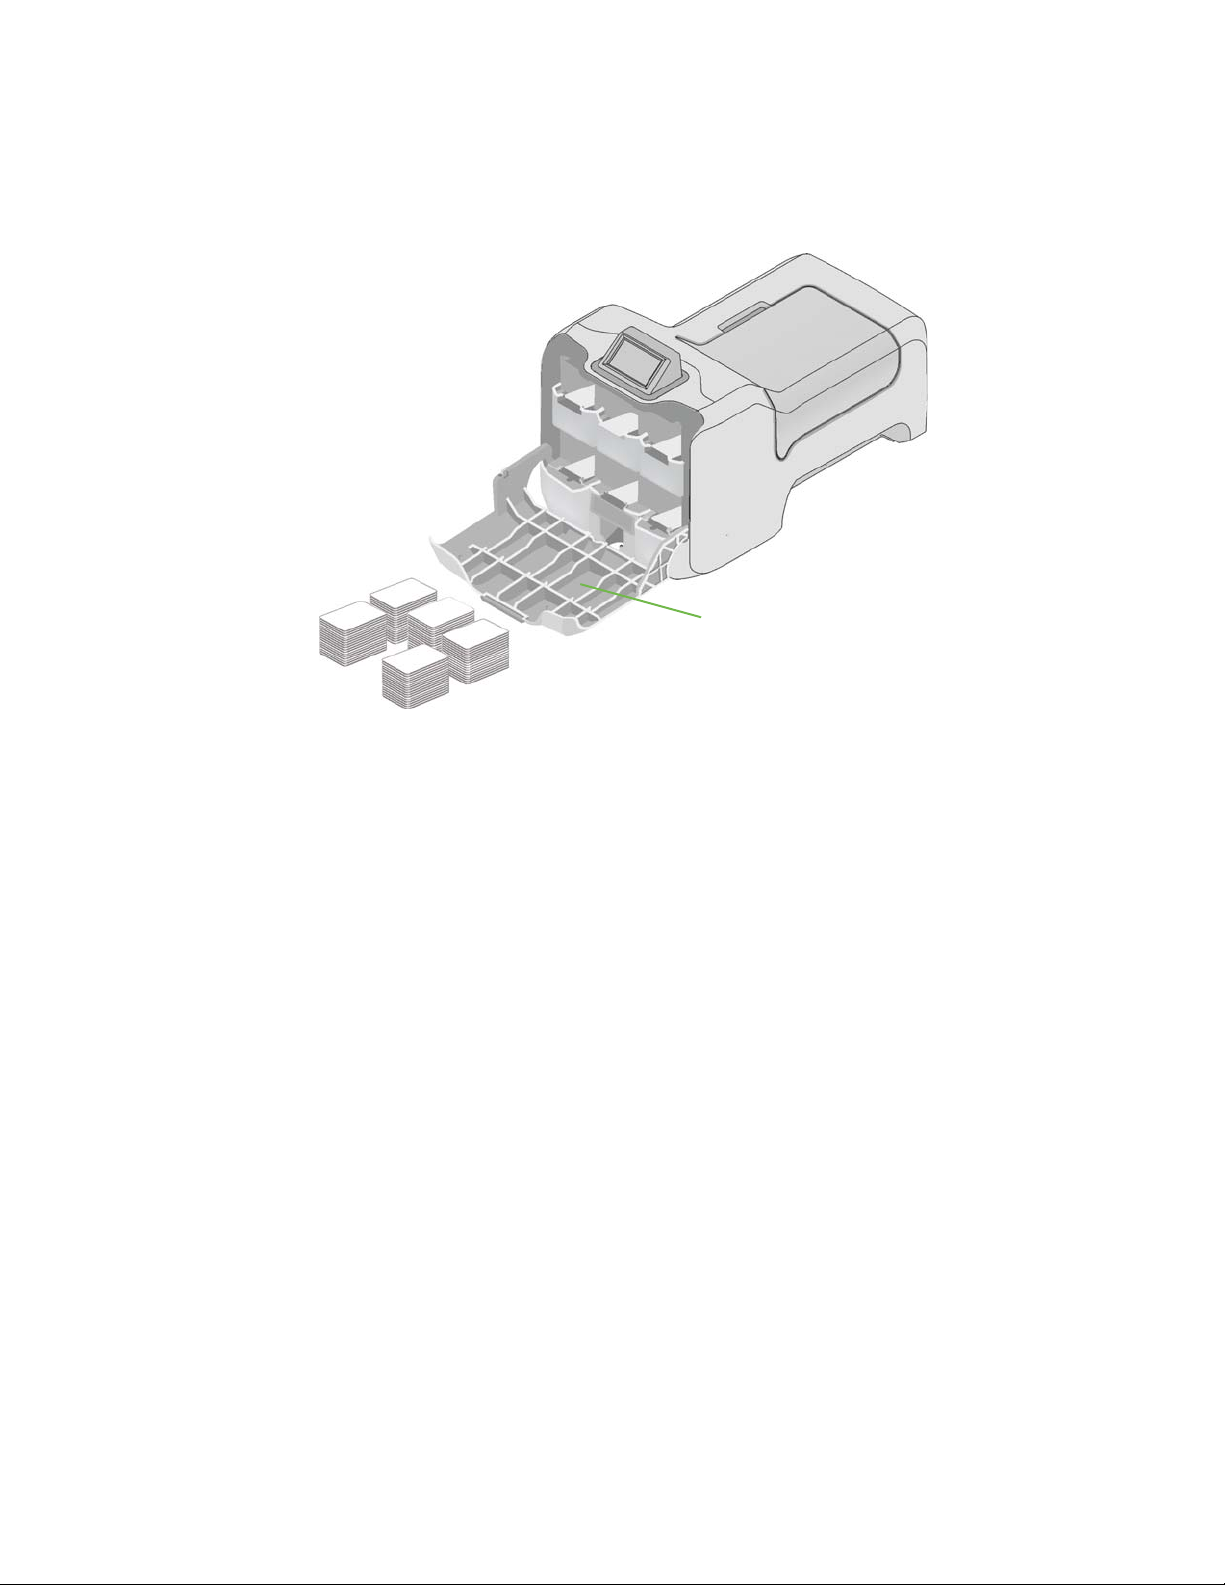
Load Cards in Hopper
1. Open the multi-
card hopper.
2. Fan cards before
placing them into
the input hopper.
• Insert
magnetic
stripe cards
with the
stripe down
and toward
the right side
of the input
hopper.
• Insert smart cards (contacted or contactless) with the smart card chip on
top toward the back of the hopper.
3. The input hoppers are labeled H1 through H6. Load up to 100 cards (0.030-in
/ 0.762mm thickness) into hoppers H1, H3, H4, H5, and H6.
4. The hopper labeled H2 is the manual hopper and manual slot. Load special
card stock on the optional shelf located in the hopper for manual printing.
5. Close the multi-card hopper when finished loading cards.
24 Install the System
Page 33

Printer
Supplies
Access Door
Printer
Swingarm
Lock
Data
Cable
Ethernet
Cable
6. Close and lock the printer swingarm and supplies access door.
Connect Cables
Connect Data Cables
This section provides information about connecting the printer to the embosser
and connecting the system to the network. Connect the cables in the order below.
1. Connect the data cable from the
embosser to the bottom data
port on the printer.
2. Connect the system to a network
connection using an Ethernet
cable. This cable is not supplied
with the system.
3. Plug one end of the Ethernet
cable into the top port on the
printer, and the other end into
your network port.
CE870 Card Personalization System Installation and User Guide 25
Page 34
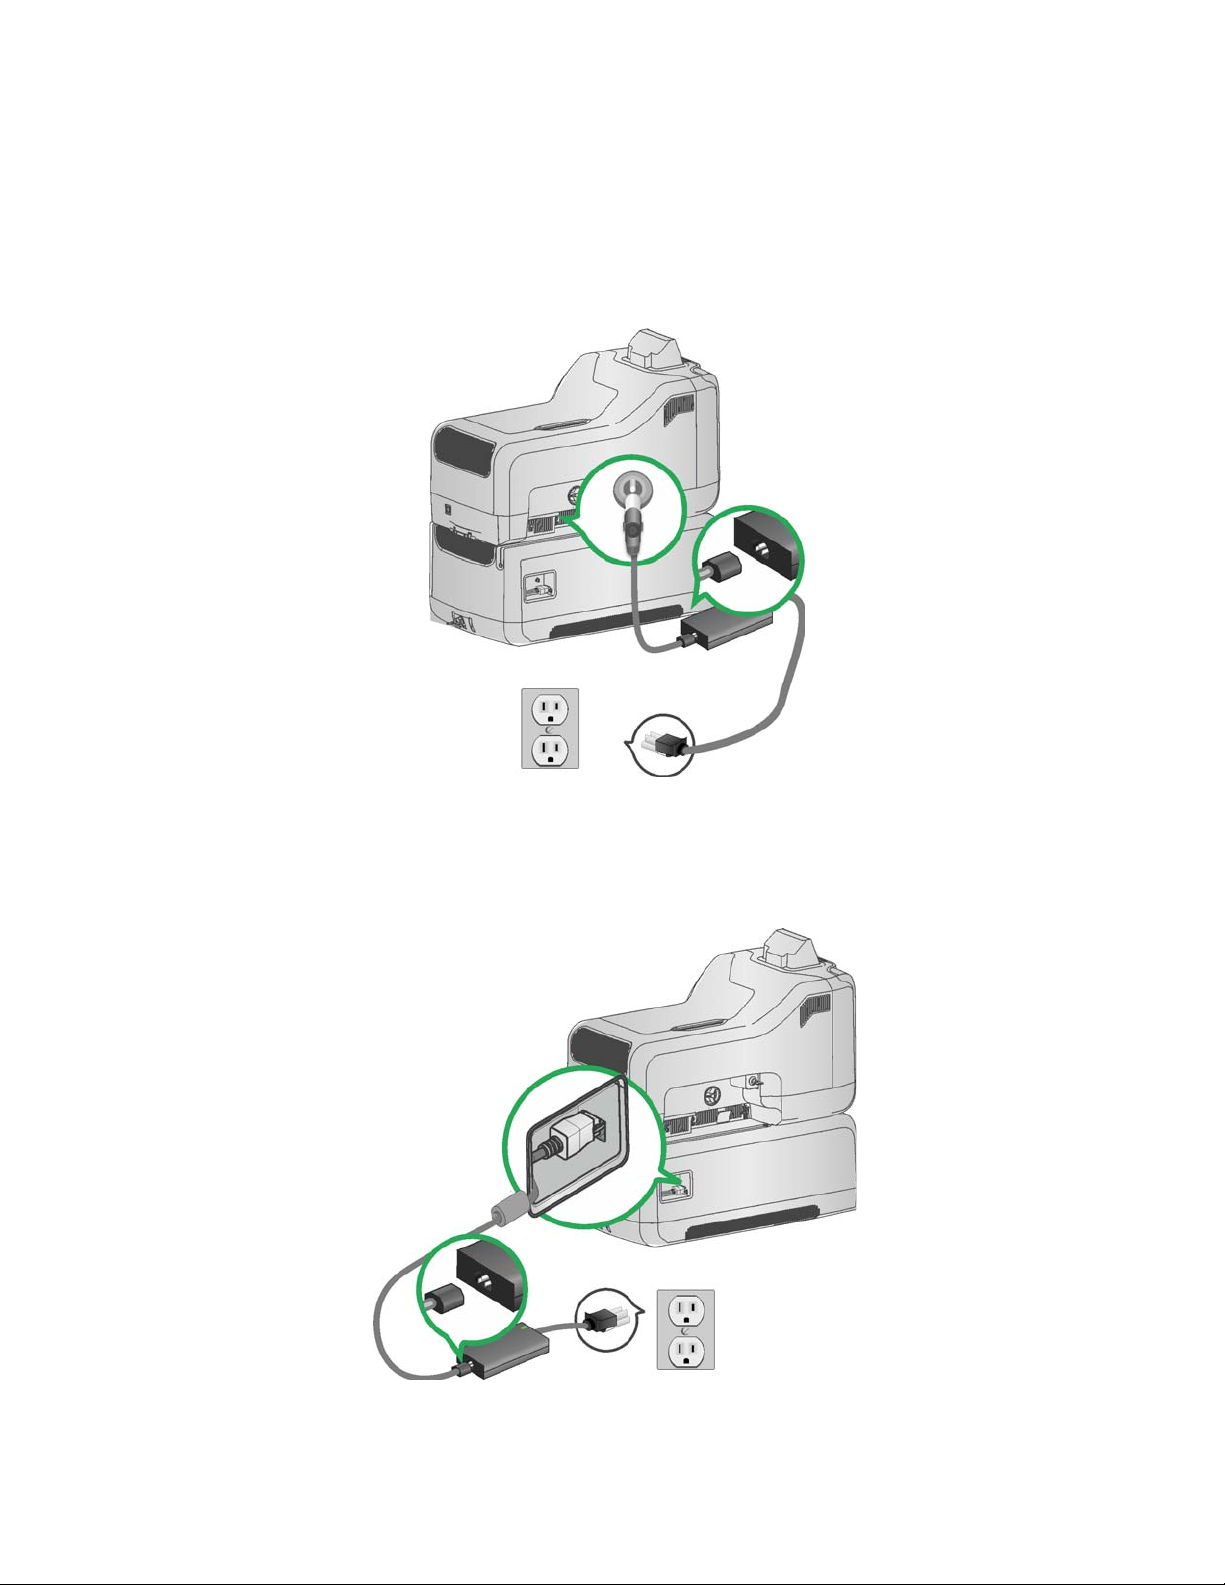
Connect Power Cables
1. Connect the printer power cable into the printer and into the power supply.
2. Connect the power supply cord into the power outlet.
3. Connect the embosser power cable into the embosser and into the power
supply.
4. Connect the power supply cord into the power outlet.
26 Install the System
Page 35

Power on the System
1. Power on the system by
pressing the power button on
the Front Panel.
2. Wait until the system has
powered on and Ready
displays on the LCD screen.
3. See Power Button for more
information.
CE870 Card Personalization System Installation and User Guide 27
Page 36

Run Test Card
Process a test card to verify that the
system has been set up correctly and is
working.
Run a test card using the Printer
Manager. For more information about
the Printer Manager, see the Solutions
Guide (Part No. 539998).
28 Install the System
Page 37

Chapter 4: Using the System
This section details information about how the card travels
through the system, how the data is received and processed, and
how to use the features of the system such as the optional Touch
Screen and the printer’s Front Panel.
This section describes how to:
• Process Cards
• Use the Touch Screen
• Use the Front Panel
• Use the LCD Menus
• Use the Printer Manager
Process Cards
The software used to enter card data is called a server-based print director. In
most cases, this is a custom application developed specifically for your
organization. The software is designed to send card data to the card
personalization system.
The data is received and the card can be accessed and produced from the system’s
optional Touch Screen. The Touch Screen uses the Datacard Personalization
Manager (DPM) to produce the card. With DPM, you can select which hopper to
pick from, and preview your print job before producing a card.
To access the features of the DPM and to produce a card, you will need to sign in
to the Touch Screen using your unique ID and authentication number.
CE870 Card Personalization System Installation and User Guide 29
Page 38

The Touch Screen requires a
The Multi-Card Hopper moves the
The card is transferred
Indent data is processed first.
to the characters.
The finished card
The card flipper turns the card over so that
The Printer
encodes magnetic stripe
data and processes smart
card information.
card from the selected hopper and
transfers it into the printer component.
username and authentication code
to access the print queue, status,
check supplies, and select the
hopper from which to print.
into the embosser
component through a
series of flippers.
characters can be embossed on the front
of the card.
1. Letters and numbers are embossed.
2. Topping foil is applied to the characters.
exits the system
through the card
output hopper.
1. Characters are indented.
2. Indent ribbon is applied
3. Optionally, the front may also be indented.
How the Card Travels
Card processing is a two-step process. The first step is sending the card to print
from the PC. The second step processes the card through the Touch Screen. After
the card has been verified and sent to print, the multi-card hopper pick
mechanism moves to the selected hopper, picks a card, and moves the card into
the printer component for processing.
The card moves to the magnetic stripe encode area or to the smart card park
station depending on the type of card selected. The encrypted data is decrypted
and written to the card. When magnetic stripe and smart card functions are
complete, the card is transferred to the embosser component.
If the card design includes indent data and the embossing wheel includes
optional indent characters, the system processes the indent data first. Upon
entering the embosser, the card is flipped to indent characters and apply ribbon
to the characters on the back of the card. If the card design includes indent
characters on the front of the card, the card is automatically turned and moved
back to the indent module to indent and apply ribbon to the characters on the
front of the card.
30 Using the System
Page 39

The system then processes the emboss data. The emboss function is a two-step
process. First the characters are embossed and then topping foil is applied to
those characters.
About Secure Encryption
Secure encryption on the CE870 Card Personalization System means that the
magnetic stripe or smart card data entered is converted into a secure form of code
before it is sent to the system. The system receives the encrypted data through the
Touch Screen. Datacard Personalization Manager (DPM) passes the encrypted
data to the printer component. The printer decrypts the code and sends the data
to the magnetic stripe or smart card chip on the card.
The printer contains both SSL (Secure Sockets Layer) and AES-128 (Advanced
Encryption Standard) encryption methods. The default setting is SSL. To change
the default encryption method, see your systems administrator or contact your
service provider.
The printer does not accept magnetic stripe or smart card data that is not
encrypted. If non-encrypted data is sent to the printer, a message displays on the
printer’s LCD panel and the card is rejected.
Use the Touch Screen
The optional Touch Screen allows users to interact with the card production
system. From the Touch Screen you can view or enter the print queue, view
supplies and card stock, or make any changes to the system or user authentication
codes.
The Home screen is the base for all Touch
Screen activity. From here you can view the
printer queue and status, check supplies and
designate the hopper from which to print. You
can also unlock the system from the Touch
Screen.
For more information about the Touch Screen
and how to use it, see the Touch Screen User
Guide (Part No. 527228-001).
CE870 Card Personalization System Installation and User Guide 31
Page 40

Use the Front Panel
The front panel of the printer provides the controls you need to operate the
system. It includes the following:
Power Button
Use this button to power the system off
and on. All lights show steady amber
while the system powers on.
To power on the system, press the
button for 1 to 2 seconds until the
system powers on.
To power off the system, press the
button for 1 to 2 seconds until the
system powers off.
If the system is processing cards, you can press the button for 2 or more seconds
to power the system off immediately. You hear the power-down tone. Cards in
process are not completed and are sent to the reject card tray.
LCD Panel
• The LCD panel indicates the system status.
• The panel includes a menu system. See Use the LCD Menus for details.
• The panel displays printer and embosser messages. See Respond to
Messages for details.
32 Using the System
Page 41

User Button and Light
The printer has a USER button with a boarder of light that indicates the system
status.
• Press the U
• Press the U
SER button to suspend the printer when it displays Ready.
SER button to clear a message.
• Press the USER button for 2 seconds or more to clear all messages.
• The U
Off System is off.
Green System is ready or suspended.
Flashing green System is busy. The light flashes slowly
Amber The system is not ready.
Flashing Amber The system has a problem. The light
SER light indicates whether the system is ready, busy, or not ready.
(every 2 seconds).
or
The system has a hardware error
concerning the embosser. The light
flashes quickly (every 1/2 second).
The P
OWER button was pressed to turn
the printer off.
flashes at a medium rate (every second).
or
The system has a hardware error
concerning the printer. The light flashes
quickly (every 1/2 second).
Down Arrow, Up Arrow, and Enter Keys
Use the arrow keys to move through the LCD menu system and the ENTER key to
make a selection. See Use the LCD Menus for details.
CE870 Card Personalization System Installation and User Guide 33
Page 42

Ribbon Light
The ribbon flashes green when the indent ribbon or topping foil levels are low,
out or there is an problem concerning supplies.
• There is no message displayed on the LCD panel when the card light is
• A message is displayed on the LCD panel with details of the problem when
flashing slowly (every 2 seconds). This condition indicates that supplies are
low.
the card light is flashing quickly (every 1/2 second).
Off Ribbon is okay.
Flashing Green The ribbon is low. The light flashes
Card Light
The card light flashes green when the system has a card problem in the embosser
component and flashes amber when the system has a card problem in the printer
component.
• There will be a message displayed on the LCD panel with details of the
Off Cards are okay.
Flashing Green There is a problem with the cards
Flashing Amber There is a problem with the cards
slowly (every 2 seconds).
or
The ribbon is out or there is a
problem with supplies. The light
flashes quickly (every 1/2 second).
problem when the card light is flashing quickly (every 1/2 second).
related to the embosser component.
The light flashes quickly (every 1/2
second).
related to the printer component.
The light flashes quickly (every 1/2
second).
34 Using the System
Page 43

Use the LCD Menus
The front panel of the printer component includes an LCD display with
navigation keys. When the system is not actively processing cards, the LCD menu
system is available. See Use the Front Panel for more information about other
features of the front panel.
Use the LCD menu for tasks including:
• Pause the system when cards are in the print queue. See Pause the System.
• Changing the backlight of the LCD panel. See Change the LCD Backlight
Brightness.
• Viewing the serial number of the printer. See View the Printer Serial
Number from the LCD Menu.
• Retrieving card counts. See View Card Counts from the LCD Menu.
• Viewing the network IP Address. See View the Network IP Address from
the LCD Menu.
• Setting the Magstripe Coercivity. See Set Magnetic Stripe Coercivity from
the LCD Menu.
CE870 Card Personalization System Installation and User Guide 35
Page 44

LCD Menus
The menu system has four major
branches:
• Use the Maintenance menu
• Use the Status menu to see
• Use the Configuration menu
• Use the Activate menu to
to run a cleaning card.
settings and data about the
printer.
to change settings.
enable and disable secure
features of the printer. This
menu is used only during
installation or removal of the
system.
HINTS & TIPS
• The menu system can be used
when Ready is displayed on
Line 1 of the LCD panel.
• The printer returns to the
Ready status after two
minutes of no activity.
Changes not applied will be
lost.
• To leave a selection without
changing the value, press the
up or down arrow key to
scroll to Exit and then press
the E
NTER key.
36 Using the System
Page 45

Pause the System
The system can be paused to prevent additional cards from being processed. A
paused system will complete an active print job and suspend any additional jobs
from printing until unpaused.
1. Pause the system by pressing and holding the U
SER button while Ready or
Busy is displayed on line 1 of the LCD panel.
Suspended is displayed on line 1 of the LCD panel. An active print job (if any)
will continue until completed. Any additional card production will be
paused.
2. Unpause the system by pressing and holding the USER button.
Ready is displayed on line 1 of the LCD panel. Cards can now continue to be
printed.
CE870 Card Personalization System Installation and User Guide 37
Page 46

Change the LCD Backlight Brightness
Begin with the printer displaying Ready. The USER button shows steady green.
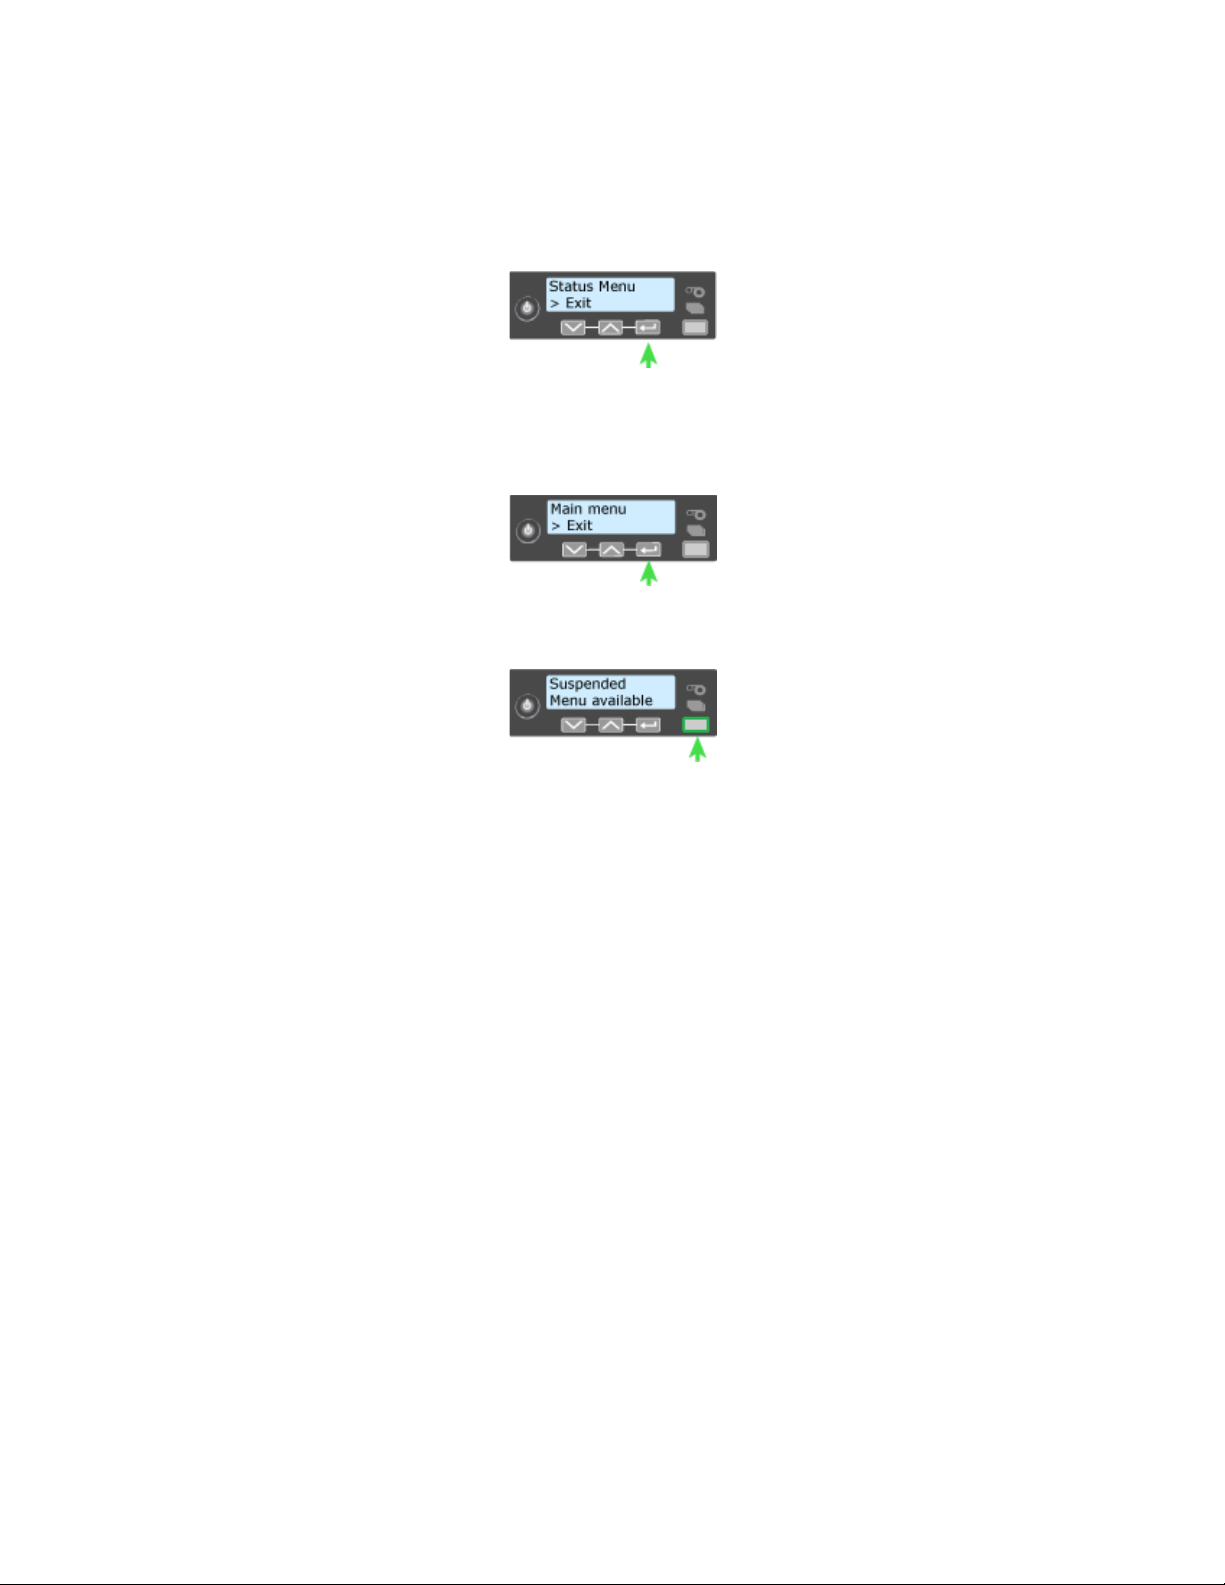
1. Enter the menu system.
A. Press and hold the U
SER button.
Suspended is displayed on line 1 of the LCD panel.
B. Press the E
NTER key to enter the menu system.
2. Access the LCD backlight option.
A. Press the down arrow key until Configuration displays on line 2 of the
LCD panel.
B. Press the E
NTER key to enter the Configuration menu.
LCD backlight displays on line 2 of the LCD panel.
C. Press E
38 Using the System
NTER to select the LCD Backlight.
Page 47
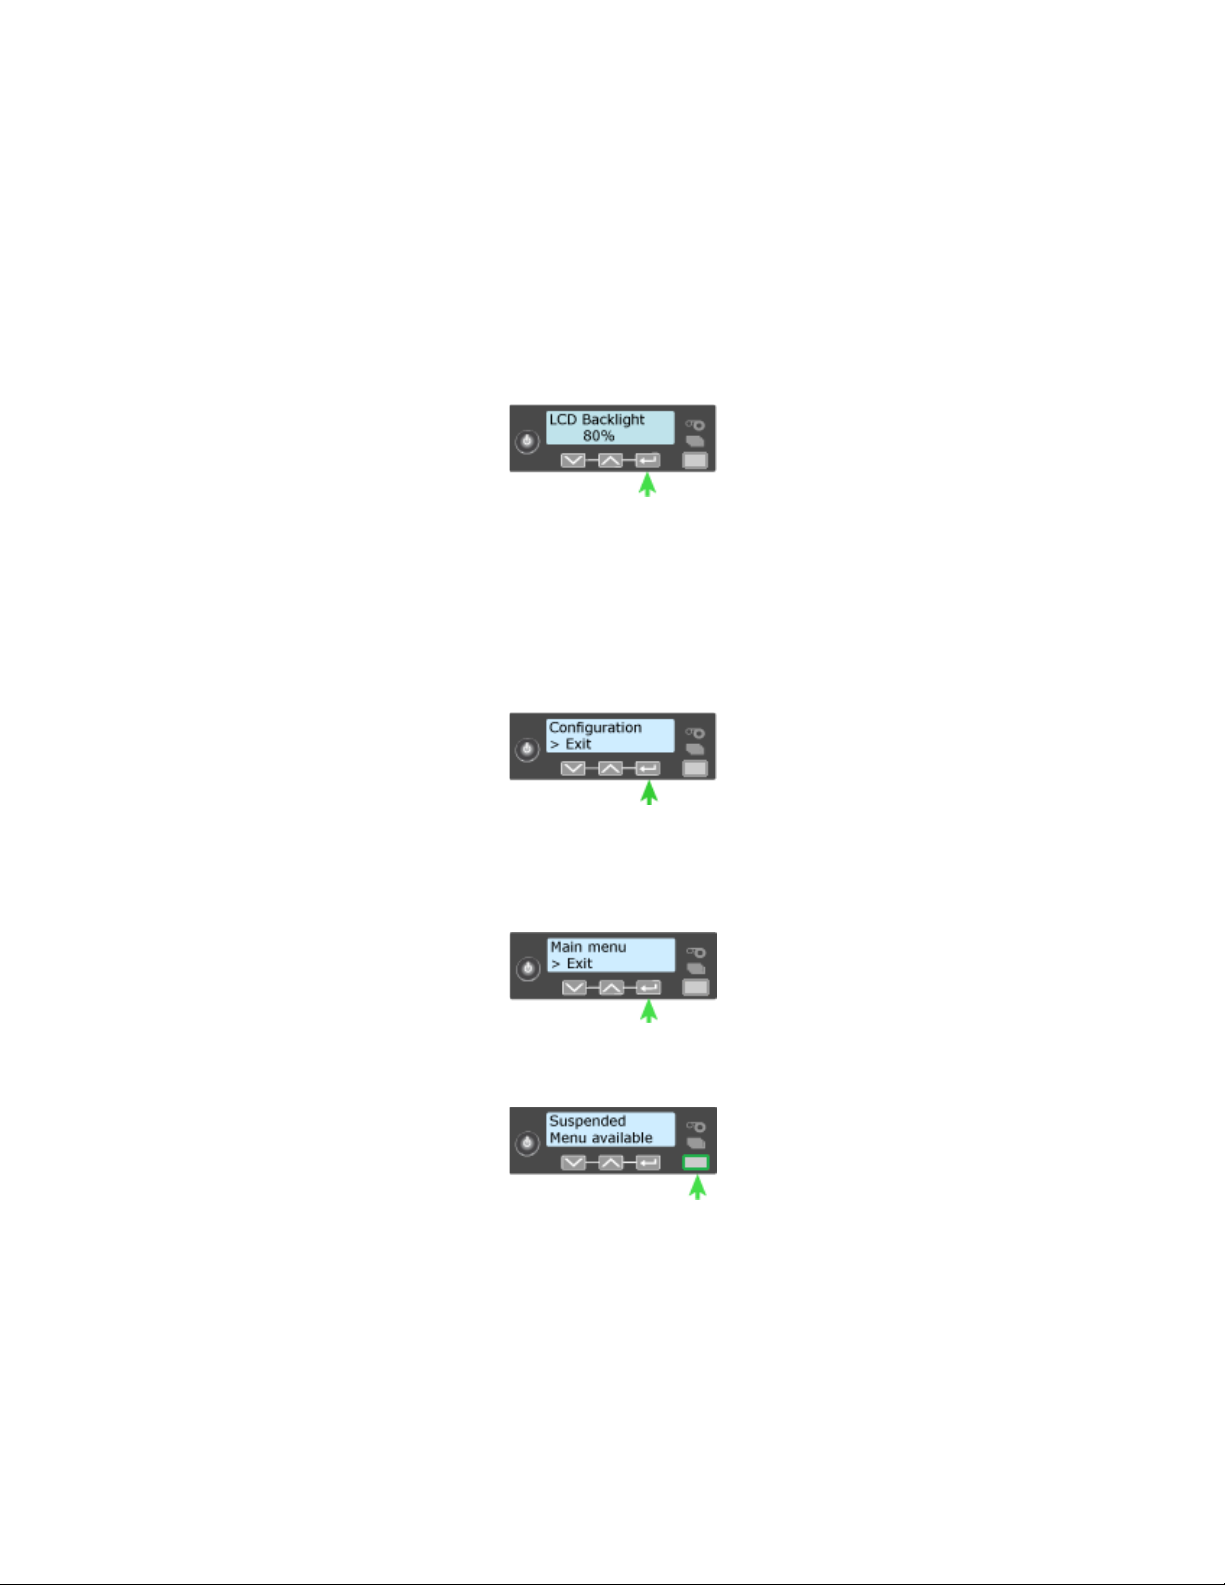
3. Select LCD backlight level.
A. Press the Down arrow key to lower the light level.
Or
Press the Up arrow key to increase the light level.
B. When the light is at the desired level, press the E
NTER key.
The printer saves the settings and returns to the Configuration menu.
4. Exit the menu system.
A. Press an arrow key repeatedly to display Exit on line 2 of the LCD panel.
B. Press the E
NTER key to exit the Configuration menu.
C. Press an arrow key repeatedly until Exit on line 2 of the LCD panel.
D. Press the E
NTER key to exit the Main menu.
5. Press the USER key.
When the Ready is displayed in line 1 of the LCD panel, the printer is
ready.
CE870 Card Personalization System Installation and User Guide 39
Page 48
View the Printer Serial Number from the LCD Menu
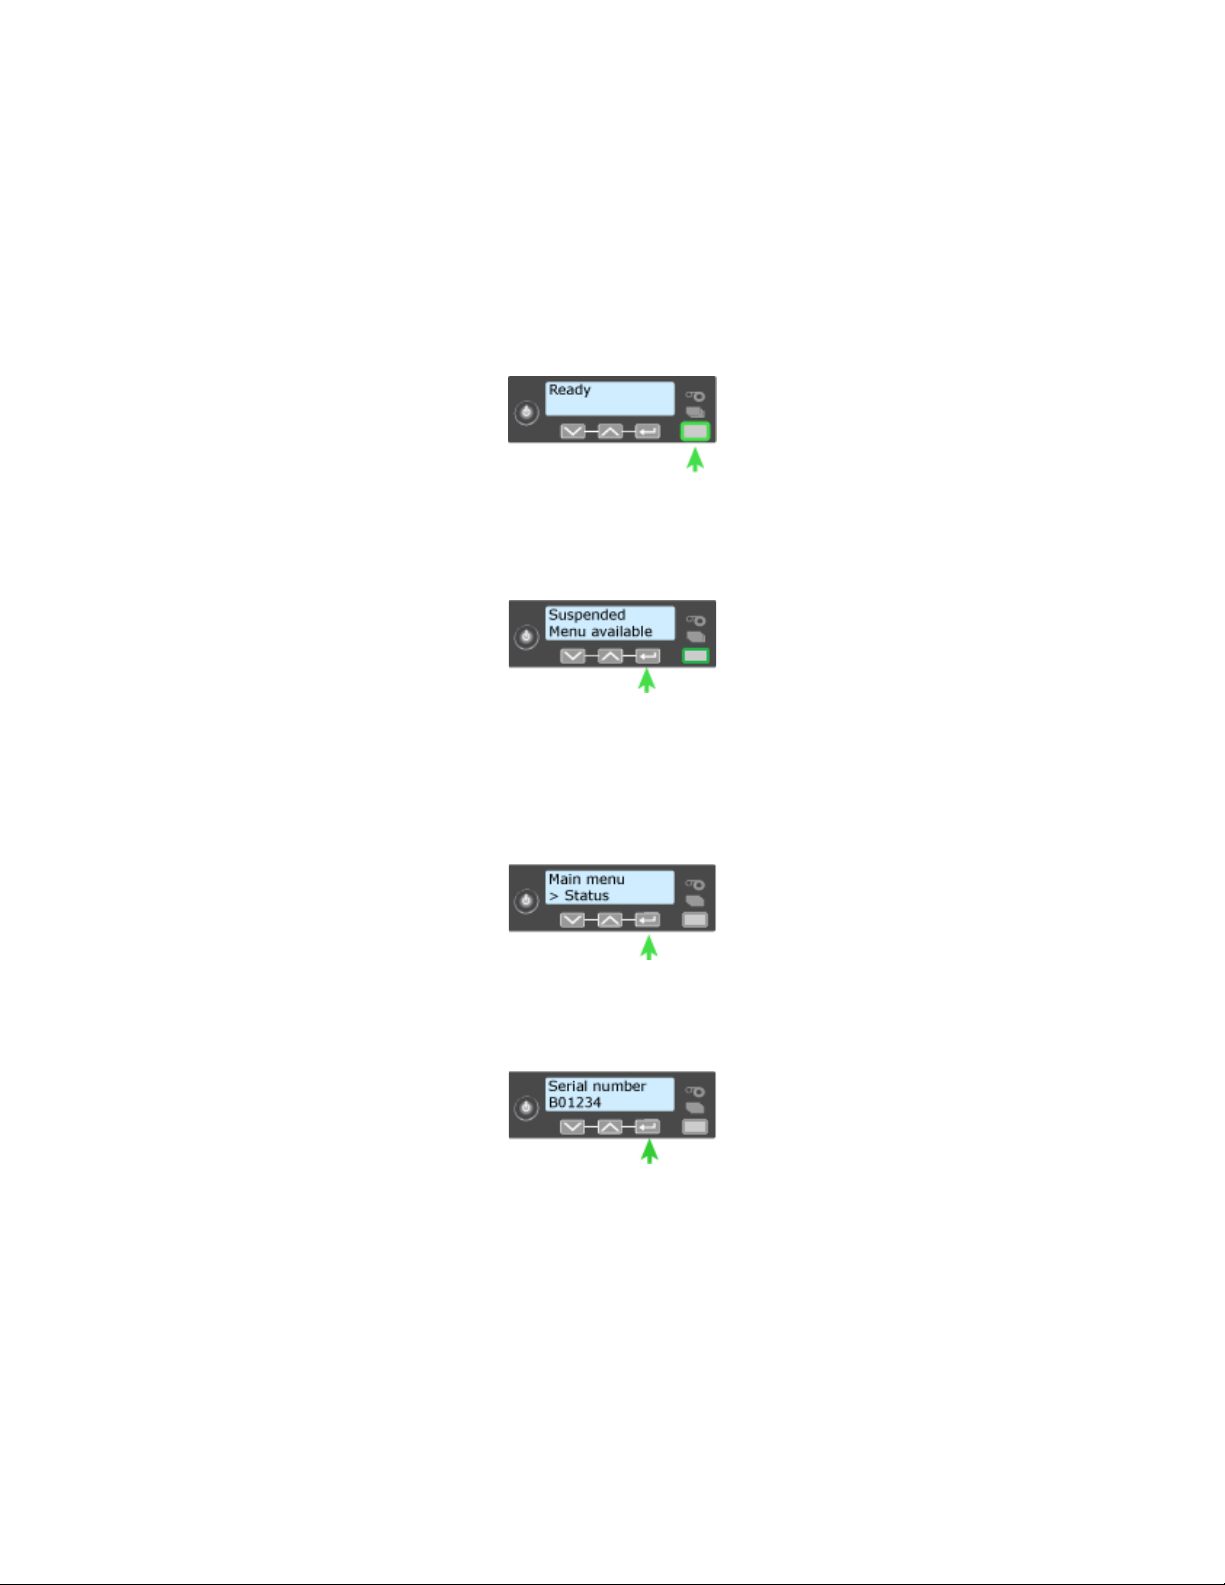
Begin with the printer displaying Ready. The USER button shows steady green.
1. Enter the menu system.
A. Press and hold the U
SER button.
Suspended is displayed on line 1 of the LCD panel.
B. Press the E
NTER key to enter the menu system.
2. View the Serial Number.
A. Press the down arrow key until Status displays.
B. Press the E
NTER key to enter the Status menu.
C. Serial Number is the first choice on the menu. Press ENTER to display the
printer serial number.
40 Using the System
Page 49

3. Exit the menu system.
A. Press an arrow key repeatedly to display Exit on line 2 of the LCD panel.
B. Press the E
NTER key to exit the Configuration menu.
C. Press an arrow key repeatedly until Exit on line 2 of the LCD panel.
D. Press the E
NTER key to exit the Main menu.
4. Press the USER key.
When the Ready is displayed in line 1 of the LCD panel, the printer is
ready.
CE870 Card Personalization System Installation and User Guide 41
Page 50
View Card Counts from the LCD Menu
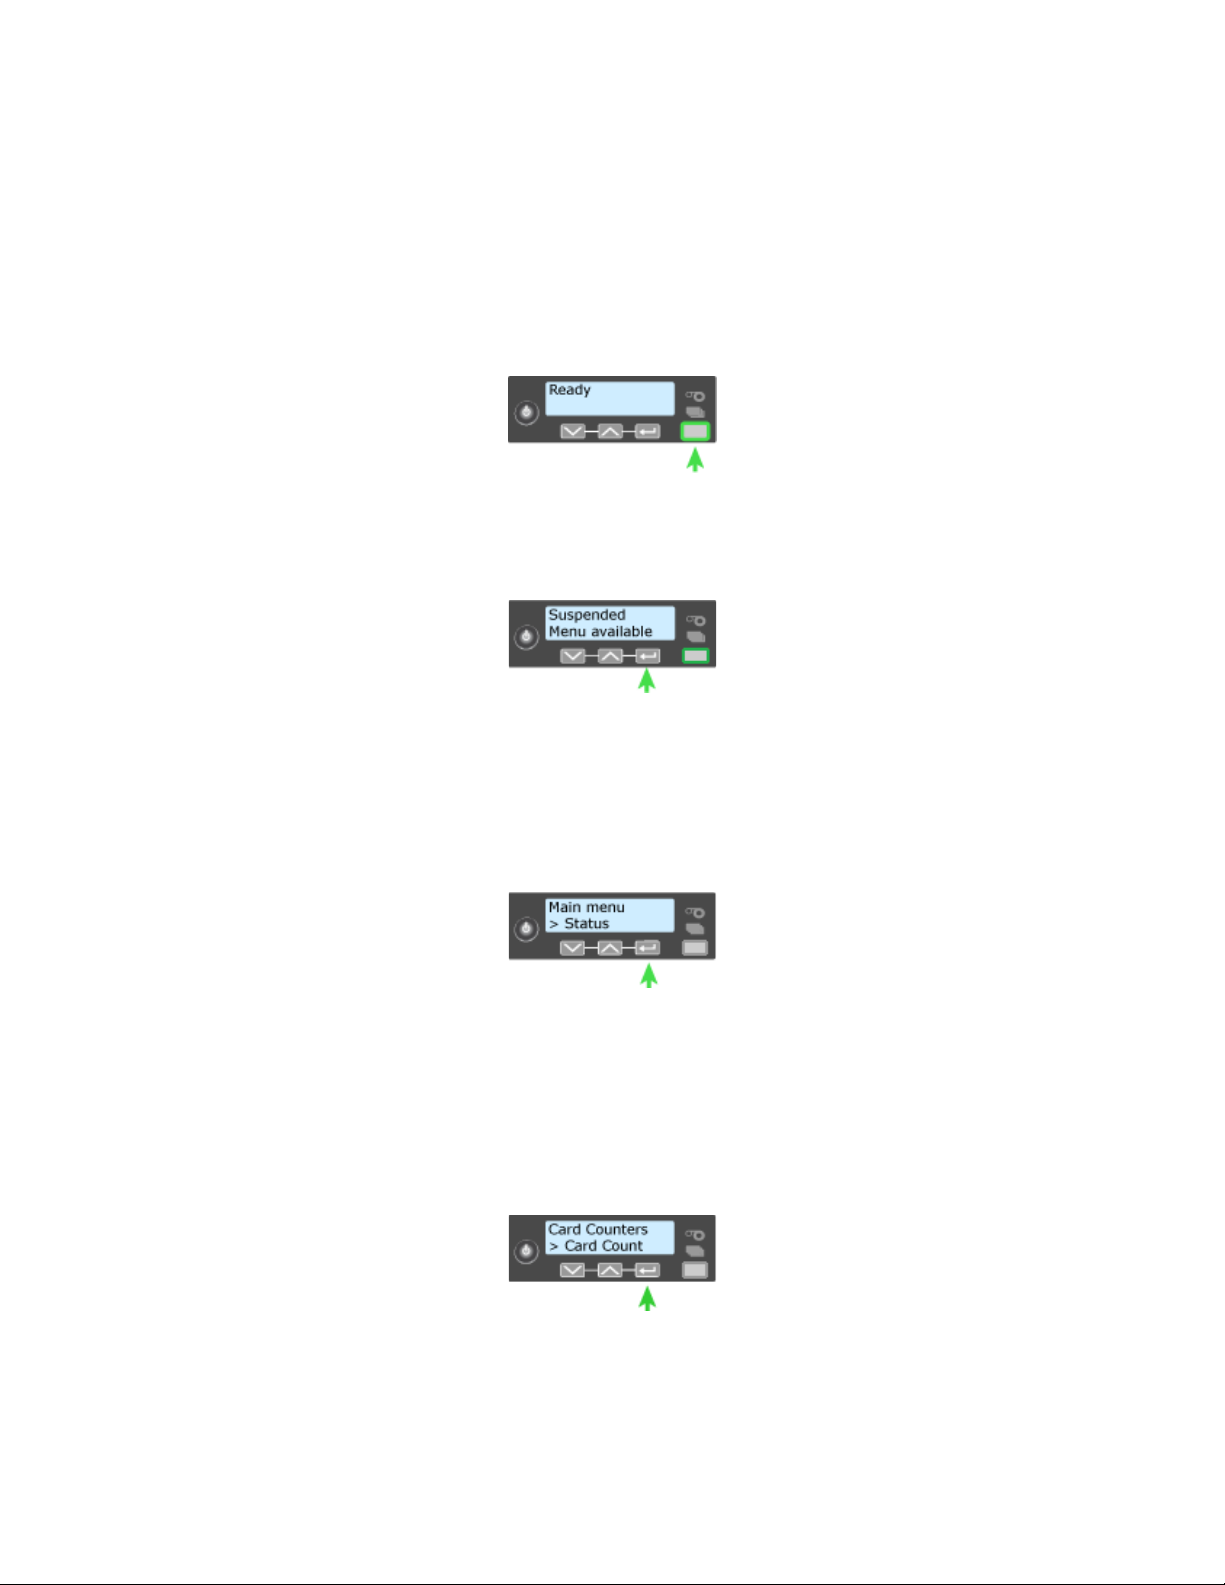
Begin with the printer displaying Ready. The USER button shows steady green.
1. Enter the menu system.
A. Press and hold the U
SER button.
Suspended is displayed on line 1 of the LCD panel.
B. Press the E
NTER key to enter the menu system.
2. Enter the Card Count menu.
A. Press the down arrow key until Status displays on line 2 of the LCD
panel.
B. Press the E
NTER key to enter the Status menu.
C. Press the down arrow until Card Counters is displayed on line 2 of the
LCD panel.
D. Press E
NTER key to enter the Card Counters menu.
E. Press the down arrow until Card Count is displayed on line 2 of the LCD
panel.
F. Press ENTER key to enter the Card Count menu.
42 Using the System
Page 51

3. View the Card Count.
A. Press the E
NTER key to view the total number of cards picked on the
system.
B. View the Completed Card count.
i. Press the E
panel. Press the E
NTER key to display Completed Card on line 2 of the LCD
NTER key again to view the Completed Card count.
ii. Press the ENTER key to display Rejected Cards on line 2 of the LCD
panel. Press the E
iii. Press the E
Press the E
NTER key to display Lost Cards on line 2 of the LCD panel.
NTER key again to view the Lost Cards count.
NTER key again to view the Rejected Cards count.
iv. Press the Enter key to display Exit on line 2 of the LCD panel. Press the
NTER key again to exit to the Card Counters menu.
E
4. Exit the menu system.
A. Press an arrow key repeatedly to display Exit on line 2 of the LCD panel.
B. Press the E
NTER key to exit the Status menu.
C. Press an arrow key repeatedly to display Exit on line 2 of the LCD panel.
D. Press the E
NTER key to exit the Main menu.
CE870 Card Personalization System Installation and User Guide 43
Page 52

5. Press the USER key.
When the Ready is displayed in line 1 of the LCD panel, the printer is
ready.
44 Using the System
Page 53

View the Network IP Address from the LCD Menu
The printer can display the IP address it uses when connected to the network. It
also displays the Subnet Mask and Gateway Address.
Begin with the printer connected to the network and displaying Ready. The U
button shows steady green. printer.
1. Enter the menu system.
A. Press and hold the U
SER button.
Suspended is displayed on line 1 of the LCD panel.
B. Press the E
NTER key to enter the menu system.
2. Enter the Network Status and IP Address menu.
A. Press the down arrow key until Status displays on line 2 of the LCD panel.
SER
B. Press the E
NTER key to enter the Status menu.
C. Press the down arrow key until Network Status displays on line 2 of the
LCD panel.
D. Press E
NTER key to enter the Network Status menu.
CE870 Card Personalization System Installation and User Guide 45
Page 54

3. View network information.
A. View IP Address.
i. Press the down arrow key until IP Address displays on line 2 of the
LCD panel.
ii. Press the E
NTER key to display the printer IP Address.
B. View Subnet Mask.
i. Press E
NTER to return to the Network Status menu. Subnet Mask is
displayed on line 2 of the LCD panel.
ii. Press the E
NTER key to display the printer Subnet Mask.
C. View Gateway Address.
i. Press ENTER to return to the Network Status menu. Gateway Address
is displayed on line 2 of the LCD panel.
ii. Press the E
NTER key to display the printer Gateway Address.
4. Exit the menu system.
A. Press an arrow key repeatedly to display Exit on line 2 of the LCD panel.
B. Press the E
46 Using the System
NTER key to exit the Network Status menu.
Page 55
C. Press an arrow key repeatedly to display Exit on line 2 of the LCD panel.
D. Press the E
NTER key to exit the Status menu.
E. Press an arrow key repeatedly to display Exit on line 2 of the LCD panel.
F. Press the E
NTER key to exit the Main menu.
5. Press the USER key.
When the Ready is displayed in line 1 of the LCD panel, the printer is
ready.
CE870 Card Personalization System Installation and User Guide 47
Page 56

Set Magnetic Stripe Coercivity from the LCD Menu
The setting for coercivity can be changed from the LCD panel, if needed. Usually,
coercivity is a system-wide decision and does not change.
1. Enter the menu system.
A. Press and hold the U
SER button.
Suspended is displayed on line 1 of the LCD panel.
B. Press the E
NTER key to enter the menu system.
C. Press the down arrow key until Configuration displays on line 2 of the
LCD panel.
D. Press E
NTER key to enter the Configuration menu.
2. Set Magnetic Stripe Coercivity.
A. Press the down arrow key until Magstripe displays on line 2 of the LCD
panel.
B. Press E
48 Using the System
NTER key to enter the Magstripe menu.
Page 57

C. Press the down arrow key until Coercivity displays on line 2 of the LCD
panel.
D. Press E
NTER key to enter the Coercivity menu.
i. Press an arrow key to display the intended coercivity.
ii. Press the ENTER key. Apply is displayed on line 2 of the LCD panel.
iii. Press the Enter key to save the value. Exit is displayed on line 2 of the
LCD panel.
Press the ENTER key to exit the Magstripe menu.
3. Exit the menu system.
A. Press an arrow key repeatedly to display Exit on line 2 of the LCD panel.
B. Press the E
CE870 Card Personalization System Installation and User Guide 49
NTER key to exit the Configuration menu.
Page 58
4. Press the USER key.
When the Ready is displayed in line 1 of the LCD panel, the printer is
ready.
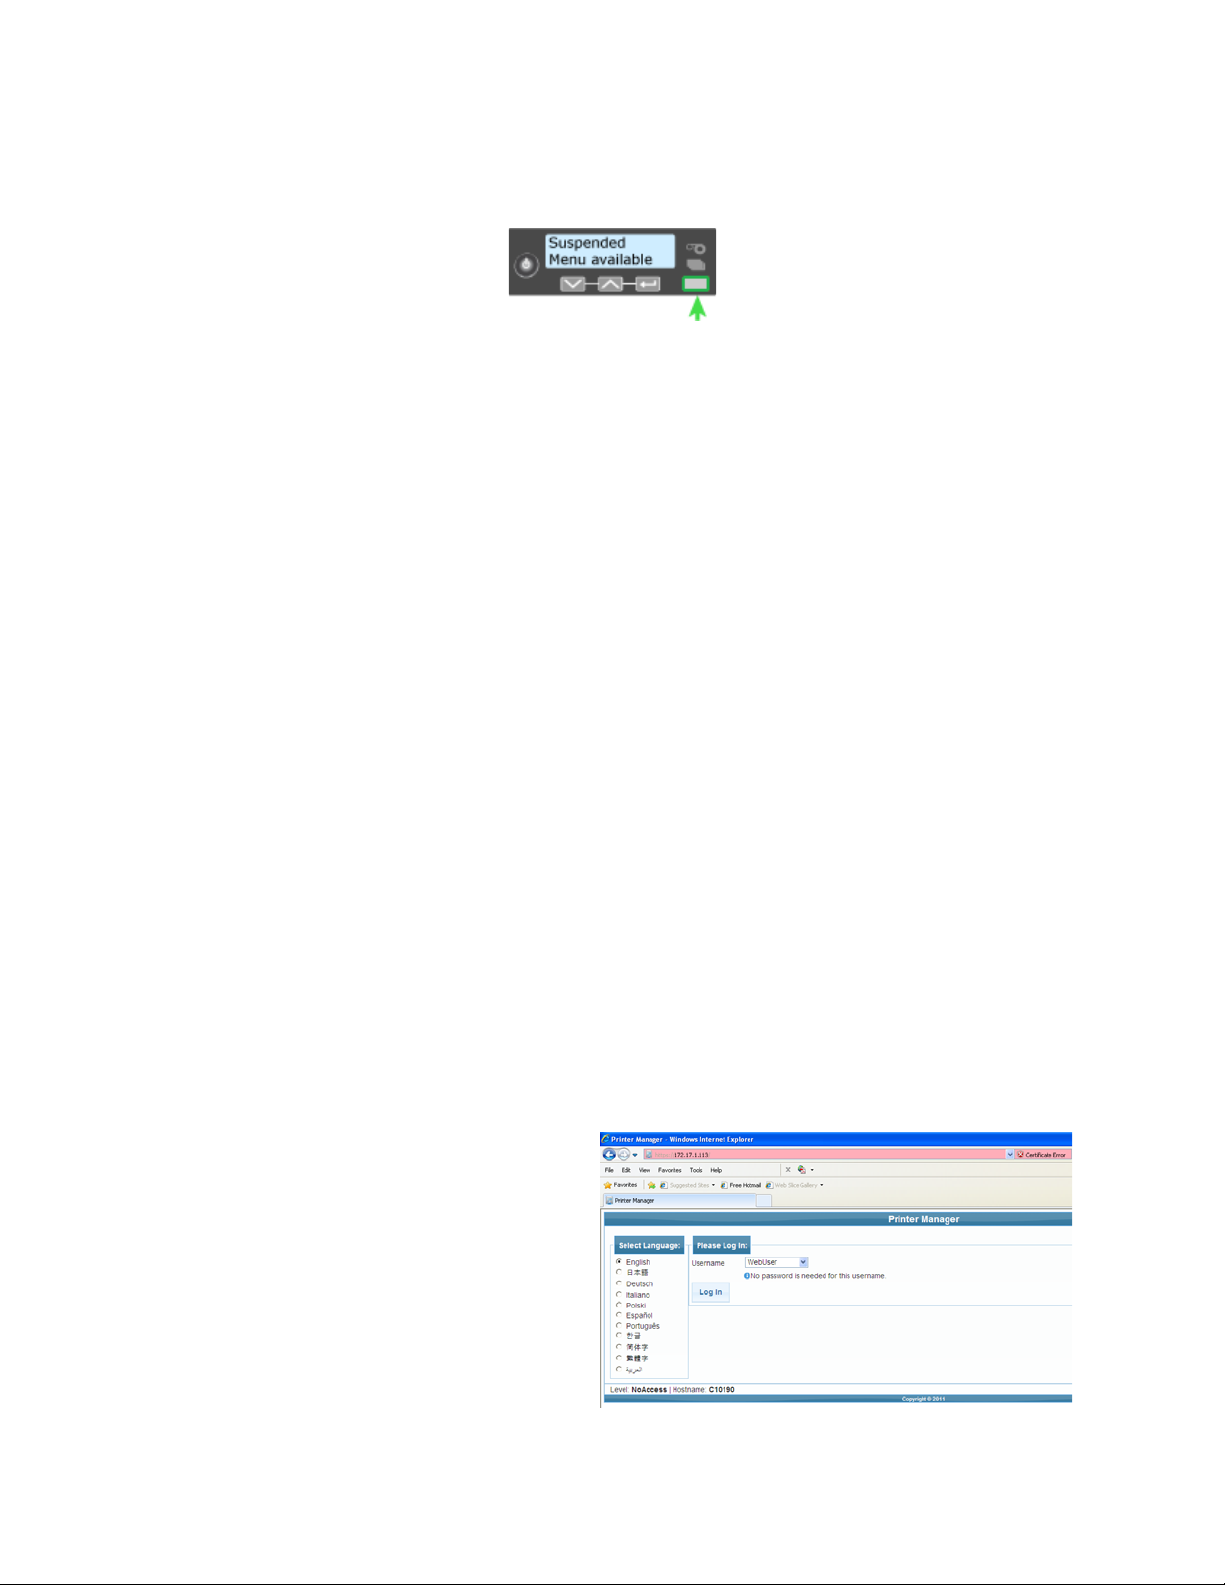
Use the Printer Manager
The system includes the Printer Manager, which displays information about the
system and card production in a Web browser window. Your administrator or
installer uses it to set up the advanced features of the system components and to
work with a service provider when troubleshooting card production issues.
For mor information about specific tasks available to the end user, see the
Solutions Guide (Part No. 539998).
1. Make sure that the LCD Panel displays Ready.
2. Obtain the printer Network IP Address or the USB IP Address and write it
down.
3. Open a Web Browser on the PC.
4. In the Address area of the browser, enter the following:
https://printer IP address
For example: https://123.1.23.123 where 123.1.23.123 is replaced by the
printer IP address.
5. Press the E
NTER key.
6. Select the language in which to display the Printer Manager session from the
left-hand column.
7. In the P
LEASE LOG IN area
select a Username and
enter a password (if
required).
A. Select a Username that
best matches your job
responsibility. Options
are:
• WebUser
50 Using the System
Page 59

• WebAdmin
• WebService
B. Enter a password (if required).
Hints & Tips
8. Click the L
9. Use the L
OG IN button.
OG OUT button in Printer Manager and close the browser after
logging out.
• If the Browser cannot connect to the printer, make sure that:
• The front panel displays Ready on the LCD panel.
• Another user does not have a Printer Manager session running.
• The Printer Manager contains a hover-text feature that shows help
information when the cursor hovers over the setting in the description
column.
For the safety, use the Log Out button in Printer Manager and close the browser
after logging out.
CE870 Card Personalization System Installation and User Guide 51
Page 60

52 Using the System
Page 61

Chapter 5: Card Design
Card design is the name given to the combined features of the
processed cards.
This section describes:
• Basic Card Design
• Magnetic Stripe Design
• Smart Card Design
• Embossing and Indenting Design
• Settings for Card Design in Printer Manager
Basic Card Design
Card design includes:
• The various types of data
such as name and account
number, emboss and indent
characters, and special
features such as magnetic
stripe or smart card chip.
• The layout of the data.
• Processes to enhance card
appearance such as adding
emboss or indent ribbon.
Magnetic Stripe Design
About Magnetic Stripes
The printer component contains a magnetic stripe module to process magnetic
stripe data. There are two options available for the CE870 printer component: ISO
and JIS. See the Printer Configuration Label to determine the type of module
installed.
CE870 Card Personalization System Installation and User Guide 53
Page 62
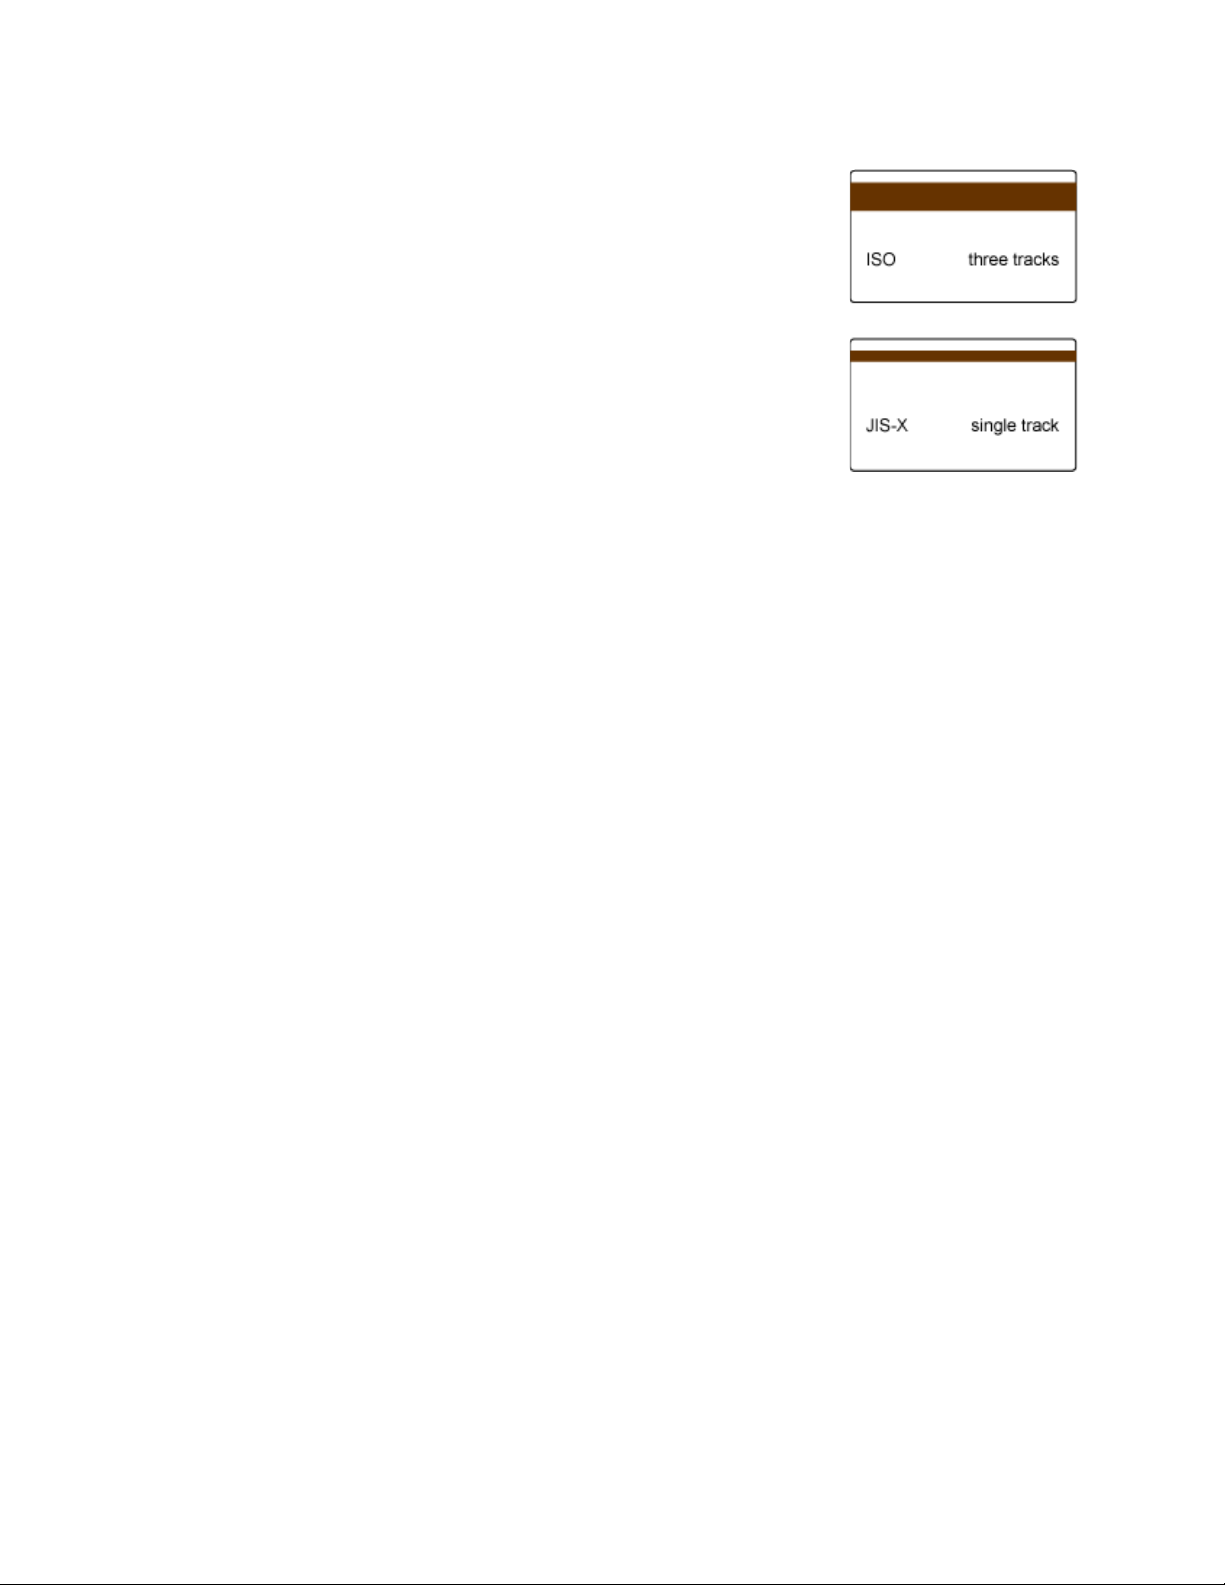
The module format (ISO or JIS) defines the type and
format of the information to encode. The standard ISO
format is a three-track option and the JIS format is a
single-track option. The ISO standard includes default
data settings that determine how many characters can
be encoded on each track. It also determines which
characters can be encoded. Your cards can use the
default format for each track, or can use a different
combination of tracks and data formats.
The JIS module also includes default data settings.
The printer component may require additional settings to match the coercivity of
the card. The system administrator sets these values and they remain the same for
all cards processed using the same design. The defaults are set to standard ISO
format and high-coercivity. There are five high-coercivity cards included with the
system. Use these cards to set up and test the magnetic stripe feature. See Set
Magnetic Stripe Coercivity from the LCD Menu if you need to change the
coercivity.
The type of magnetic stripe cards you use must match the type of module
installed. Purchase magnetic stripe cards to match the type of module installed.
See the card included in the package for details and specifications of the magnetic
stripe.
Magnetic Stripe Formats
Three-Track Option
The default data formats for a three-track magnetic stripe option are:
• Track 1 — IATA
• Track 2 — ABA
• Track 3 — TTS
This combination is often abbreviated IAT. This format is also called ISO format.
IATA (International Air Transport Association)
The maximum number of characters for IATA format date is 76 characters. These
characters can include spaces, upper case alphabetic characters, numeric
characters, and the following special characters:
! # $ % ' ( ) * + , - . / ; : < @ > = ^ ] \ [ " & _
54 Card Design
Page 63

ABA (American Bankers Association)
The maximum number of characters for ABA format is 37 characters. Numeric
characters and the following special characters are allowed:
: ; < = >
TTS (Thrift Third Standard)
The maximum number of characters for TTS format is 104 characters. Numeric
characters and the following special characters are allowed:
: ; < = >
Single-Track JIS Option
The default data encoding format for a single-track magnetic stripe module is the
JIS (Japanese Industrial Standard) Type II format.
The maximum number of characters for the JIS format is 69 characters. These
characters can include spaces, numeric characters, upper case alphabetic
characters, lower case alphabetic characters, and the following special characters:
! " # $ % & ' ( ) * + , - . / : ; < = > ? @ [ ] ^ _ ~ { | } ~
From a PC running a Japanese edition of a supported operating system Japaneselanguage characters are also supported. They include the following special
characters:
45 Katakana characters:
CE870 Card Personalization System Installation and User Guide 55
Page 64

and the following 10 Katakana characters:
Each time you start using Japanese-language characters, or stop using them, a
hidden character is added. Each hidden character reduces the number of
characters you can encode by one character.
Smart Card Design
About Smart Cards
This section presents basic information about personalizing smart cards. Smart
card processing is different from other types of personalization because the
“smart card” step of personalization is controlled by an application that is
different from the rest of card personalization.
Smart card setup is usually provided by a value-added reseller or service
provider. Information about the smart card module installed and the type of
cards to use can be requested from your service provider or value-added reseller.
The following items are required when personalizing smart cards:
• Smart card reader in the printer.
• Smart cards that work with the reader in the printer.
The configuration label includes codes to identify the type and model of smart
card module installed in the printer.
If the S6 value is included in the configuration code, the printer has shipped from
the factory with a Duali dual interface smart card reader. See the Printer
Configuration Label for more information.
56 Card Design
Page 65

Embossing and Indenting Design
The CE870 Embosser is the
component of a card production
system that creates the raised
lettering and numbering that is seen
on the front of most financial or debit
cards. Inside the embosser, you will
find the embossing wheel and
topping- and indent-ribbon
cartridges. The embossing wheel can
be purchased with up to 112 punch
and die pairs. Other features of the
embossing wheel that are determined at time of purchase include multiple font
choices and a variety of special characters.
The embossing wheel can also be purchased with indent characters to produce
characters that are pressed into (indented) the front or back surface of the card.
The most common use of indent characters is to create the Card Security Code
(CSC), sometimes called the Card Verification Value (CVV) on financial credit
and debit cards. Indent ribbon is avaiable in two colors (black or white) and a
special paneld ribbon is also available (paneled black and white).
The CE870 Embosser can emboss up to five lines of text or numbers. Topping foil
is available in five colors and is heat sealed to the embossed characters.
Settings for Card Design in Printer Manager
Administrators and service providers can use the Printer Manager to perform
system setup tasks and troubleshoot the system.
The Printer Manager contains card design settings that managers and service
providers can use to set up card production. The card design settings include
magnetic stripe setup and smart card testing. The Printer Manager also contains
troubleshooting features such as a log file that can track all processes of a card job.
Service providers can use the information in the log file to troubleshoot and relay
information to service providers when troubleshooting card processing issues.
See Use the Printer Manager for more information.
CE870 Card Personalization System Installation and User Guide 57
Page 66

58 Card Design
Page 67

Chapter 6: System
Maintenance
The CE870 Card Personalization System is designed
to be easy to maintain. System operators should be
instructed in routine maintence tasks such as
running a cleaning card. The cleaning card process
removes dirt and particles from inside the system.
This section includes the following:
• Clean the Printer
• Clean the Embosser
• Run a Cleaning Card
Clean the Printer
The following steps should be followed to keep the printer component of the
system clean and in good operation.
• Run a cleaning card and replace the cleaning sleeve in the printer component
after every 500 cards processed by the print system.
• Keep the surface and area around the printer clean and free of environmental
contaminates such as dust and moisture.
• Never clean the surface of the printer with abrasive chemicals or cleansers.
• Keep the area around the printer free of obstructions that may limit
ventilation or access to components.
Clean the Embosser
These steps should be followed to keep the embosser component of the system
clean and in good operation.
• Keep the surface and area around the embosser clean and free of
environmental contaminates such as dust and moisture.
• Never clean the surface of the embosser with abrasive chemicals or cleansers.
• Keep the area around the embosser free of obstructions that may limit
ventilation or access to components.
CE870 Card Personalization System Installation and User Guide 59
Page 68

Run a Cleaning Card
Run a cleaning card to clean debris from the inside of the printer system. The
cleaning card can remove most contaminants from the print system. Run a
cleaning card after every 250 cards processed by the printer system or every 6
months.
Begin with the printer displaying Ready. The U
1. Remove the print ribbon cartridge.
A. Unlock and open the printer
supplies access door.
B. Open the printer cover and remove
the print ribbon cartridge.
C. Close the printer cover, then close
and lock the printer supplies access
door. The front panel should
display Ready and the U
SER button
shows steady green.
2. Enter the menu system.
A. Press and hold the U
SER button.
SER button shows steady green.
Suspended is displayed on line 1 of the LCD panel.
B. Press the E
NTER key to enter the menu system.
3. Enter the Cleaning Card menu.
A. Press the down arrow key until Maintenance displays on line 2 of the LCD
panel.
B. Press the E
60 System Maintenance
NTER key to enter the Maintenance menu.
Page 69

C. Press the down arrow key until Cleaning Card displays on line 2 of the
LCD panel.
D. Press the E
NTER key to enter the Cleaning Card menu.
4. Run the cleaning card.
A. Press the down arrow key until Start displays on line 2 of the LCD panel.
B. Press the ENTER key to display Insert Cleaning Card on the LCD panel.
The U
SER button and the Card light blink.
C. Open the cleaning card package,
remove card and insert the
cleaning card into the manual slot
above the front panel.
The printer moves the cleaning
card through the printer several
times and ejects it in the card
output hopper of the embosser.
D. Remove the used cleaning card.
Wait a few minutes for the rollers
to dry.
CE870 Card Personalization System Installation and User Guide 61
Page 70

5. Relpace cleaning sleve on print ribbon cartridge and return cartridge into the
printer component.
A. Replace the cleaning sleeve on
the print ribbon cartridge with a
new sleeve, and remove the
protective cover.
B. Unlock and open the printer
supplies access door and printer
cover. Return the print ribbon
cartridge into the printer
component.
C. Close the printer cover and
printer supplies access door. The
printer is ready to print cards
again.
Discard the used cleaning card
and cleaning sleeve.
6. Exit the menu system.
A. Press E
NTER repeatedly to exit the menu system.
B. The LCD panel displays Ready and the USER button glows steady green.
62 System Maintenance
Page 71

Chapter 7: Troubleshooting
This chapter details user procedures to recover
from errors that may occur with the system.
This section describes:
• Tools for Troubleshooting
• Locating the Issue
• Installation Troubleshooting
• Card Appearance
• Magnetic Stripe
• Card Jam
• Messages and Conditions
• Respond to Messages
Tools for Troubleshooting
The tools for troubleshooting a problem include the supplies and equipment you
use to print cards:
• Blank cards to print, used at several stages of troubleshooting.
• Indent ribbon and topping foil.
• Cleaning supplies, especially printer cleaning cards and a cleaning pen.
CE870 Card Personalization System Installation and User Guide 63
Page 72

Locating the Issue
The printer, embosser, and software applications work together to produce cards.
If the system is not working as you expect, follow these steps, in the order listed,
to isolate the source of the issue before contacting your service provider.
1. Check that the power cables are connected to both the printer and embosser.
2. Check that all network cables between the printer, embosser, and network are
connected.
3. Power on the printer. Make sure that Ready displays on the front panel
within 1 minute?
• If the printer powers on correctly, continue to step 4.
• If the printer powers on but does not display “Ready,” the printer is not
working properly.
• If the printer does not power on, make sure the printer is connected to a
functioning power source.
A. Remove the printer power cord from the outlet.
B. Connect another device to the same outlet to verify that the power source
functions correctly.
If the power source is functioning correctly, request service for the printer
from you system administrator.
C. Connect the printer to a functioning outlet and repeat, beginning with
step 1.
4. Print a test card. See Run Test Card for the steps to follow.
5. Make sure that the test card prints.
• If the test card prints, the printer is working correctly.
• If the test card does not print, the printer is not working correctly. Request
service for the printer from your system administrator.
64 Troubleshooting
Page 73

Installation Troubleshooting
This section describes issues that could prevent a successful installation and
offers recommended solutions to those issues.
Problem Solution
The system is not
connected to the
network.
Disconnect then reconnect the data cable to the
network port and the printer. Restart the system.
Card Appearance
Card appearance problems can be caused by the indent ribbon and topping foil
application.
Indent Troubleshooting
Problem Probable Cause Solution
The indent characters
are very light.
The indent ribbon is
loaded incorrectly or
not being taken up on
rollers.
Topping Foil Troubleshooting
Problem Probable Cause Solution
Load the indent ribbon correctly. See
Load Indent Ribbon Cartridge for more
information. Contact your system
administrator if the problem continues.
The topping foil is very
light.
CE870 Card Personalization System Installation and User Guide 65
The topping foil is
loaded incorrectly.
The topper
temperature is not hot
enough.
Load the topping foil correctly. See Load
Topping Foil Cartridge for more
information.
Contact your system administrator to
adjust the temperature of the topper
mechanism.
Page 74

Magnetic Stripe
The printer uses the coercivity set using the LCD panel or Printer Manager and
uses the data format set using the Printer Manager.
Problem Solution
Cards are not loaded
correctly.
Cards do not have a
magnetic stripe.
The card has dirt or
damage on the
magnetic stripe.
The magnetic stripe on
the card is low
coercivity material and
the High Coercivity
setting is selected.
Message 106 is
displayed.
The magnetic stripe on
the card is high
coercivity material and
the Low Coercivity
setting is selected.
Load cards with the magnetic stripe down and
toward the right side. See Load Cards in Hopper.
Load magnetic stripe cards in the multi-card hopper.
If the cards have a magnetic stripe, check the
quality of the cards. Change card stock if needed.
Encode and print the card again. If an error message
displays again, run a cleaning card to clean the mag
stripe head.
To use the cards you have, select low coercivity
encoding. See Set Magnetic Stripe Coercivity from
the LCD Menu. To encode with high coercivity,
obtain cards manufactured for high coercivity
encoding.
To use the cards you have, select high coercivity
encoding. See Set Magnetic Stripe Coercivity from
the LCD Menu. To encode with low coercivity,
obtain cards manufactured for low coercivity
encoding.
The data for this job
includes characters not
allowed by the
magnetic stripe format
selected for the track.
66 Troubleshooting
Cancel the current print job. Make sure you know
what data is allowed on the track. Change the data
to be encoded, and resend the card job.
Page 75

Problem Solution
The magnetic stripe
data was sent in an
encoding format not
supported by the track.
The application sent
track data for a track
not supported by the
magnetic stripe
module.
Have your administrator check the encoding format
setting for the tracks by using Printer Manager.
Make sure the application is using the selected
encoding format for the track.
If the application and track are set to the same
format, and the message appears repeatedly,
contact the application provider for assistance.
Check the type of magnetic stripe option in the
printer. See System Labels to understand the options
in your printer.
If the printer label indicates a 3-track ISO module, you
can send data for tracks 1, 2, and 3.
If the printer label indicates a single-track JIS module,
you can send data for track 1.
The magnetic stripe option and cards must be
capable of accepting and encoding each track of
data the ID software sends.
CE870 Card Personalization System Installation and User Guide 67
Page 76

Card Jam
To begin troubleshooting a card jam, first determine where in the system the card
jam has occurred. Card jams can occur in either the printer or embosser
components.
Printer Card Jam
1. Unlock and open the printer supplies access door.
2. Press down the silver button on the top of the printer. The swingarm is spring
loaded and opens when the button is released.
3. Remove the print ribbon cartridge.
4. Rotate the manual advance knob on the side of the printer until the jammed
card is accessible from the rollers.
5. Remove the card.
If no card jam is located in the printer, continue with the Embosser Card Jam
procedure.
6. Close printer swingarm and close and lock the printer supplies access door.
68 Troubleshooting
Page 77
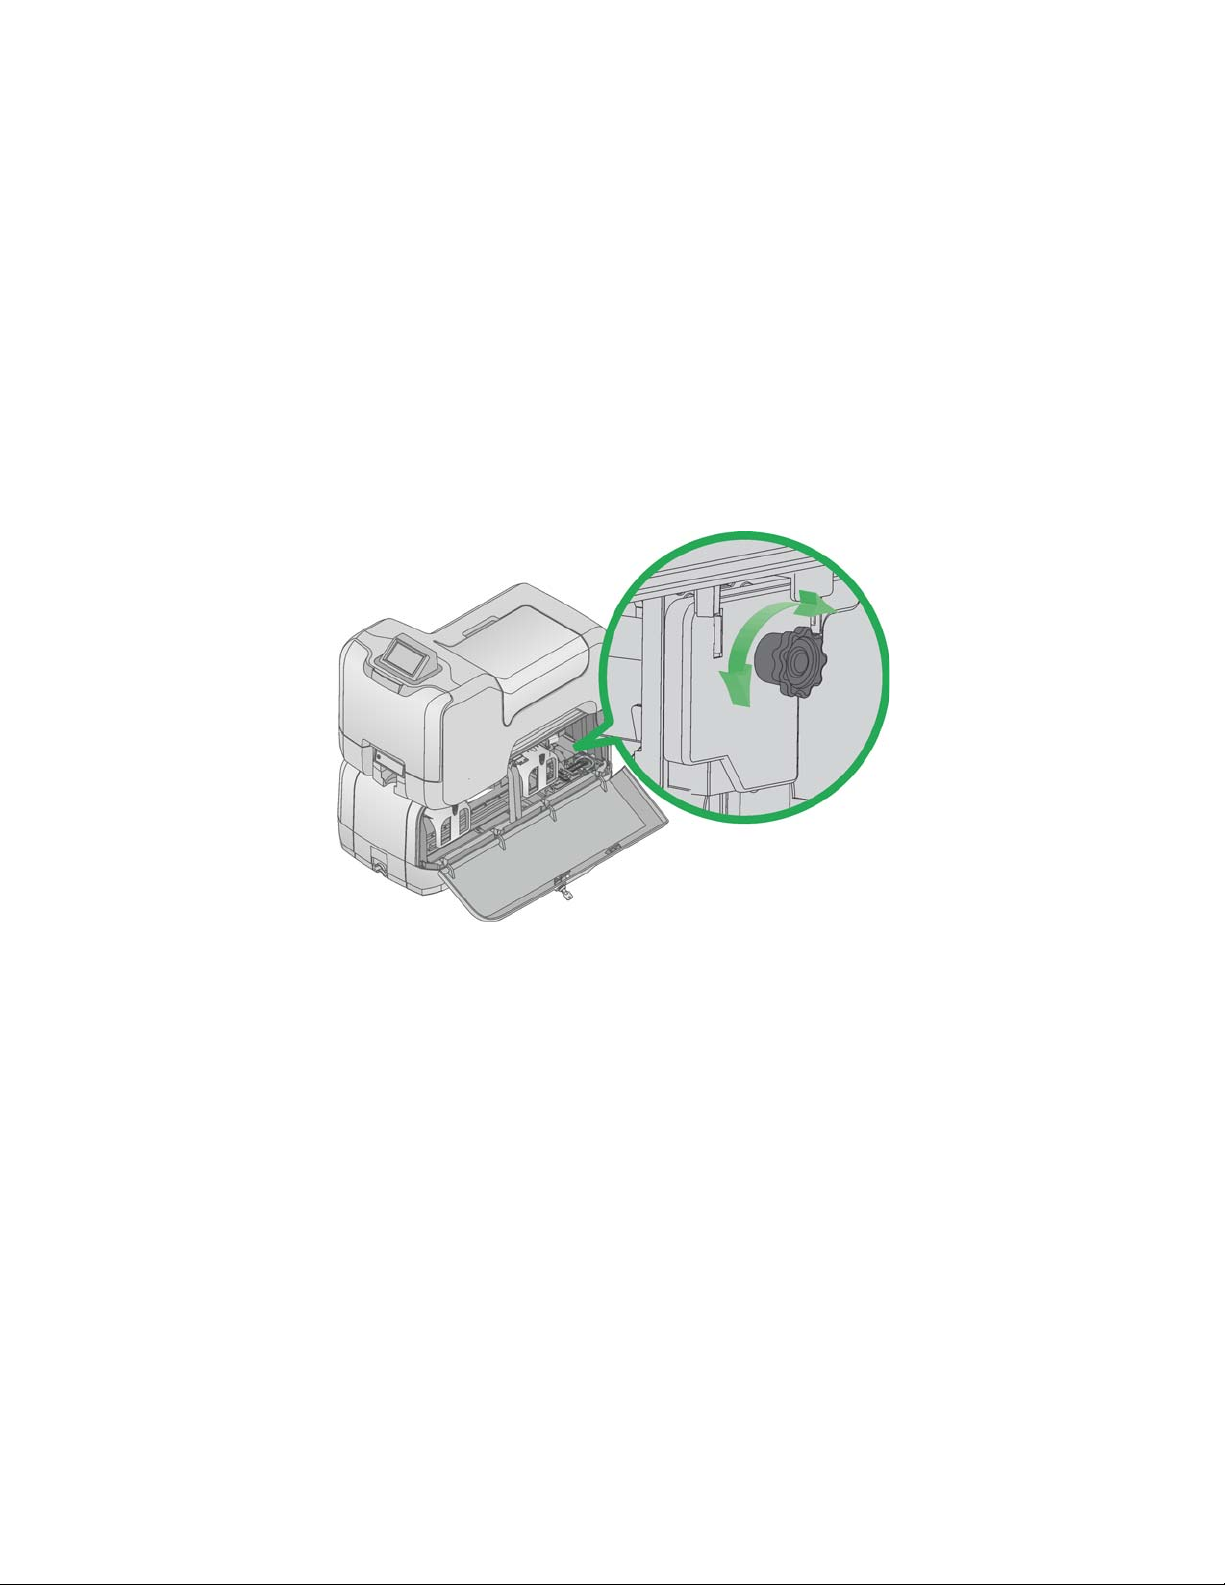
Embosser Card Jam
1. Unlock and open the embosser supplies access door.
2. Remove the indent ribbon and topping foil cartridges.
3. Rotate the manual advance knob inside of the embosser until the jammed
card is accessible from the rollers.
4. Remove the card.
5. Replace the indent ribbon and topping foil cartridges.
6. Close and lock the embosser supplies access door.
CE870 Card Personalization System Installation and User Guide 69
Page 78

Messages and Conditions
When the system cannot process the card sent, it issues a condition. Conditions
are displayed on the LCD panel on the Front Panel.
Messages on the Printer
• The LCD panel displays a short description and a message number for each
message.
• If more than one message was issued, the next message is displayed after the
problem is corrected and the U
Front Panel Conditions During Messages
The following conditions are apparent while messages are displayed on the LCD
panel.
SER button is pressed.
• The U
for a condition of the embosser or amber for a condition of the printer.
• The U
system problems, often accompanied by flashing supply and/or card lights.
• The supply and card lights flash quickly (every 1/2 second); green for
problems concerning the embosser and amber for problems concerning the
printer.
SER light flashes quickly (every 1/2 second) for hardware errors; green
SER light flashes amber at a medium rate (every second) for all other
No. LCD Message User Light Supply Light Card Light Sound
100 Request not supported Amber Flash Off Off Error
101 Job could not complete Amber Flash Off Off Error
102 Card not in position Amber Flash Off Amber Flash Error
103 Printer problem Amber Flash Off Off Error
104 Critical problem Amber Flash Amber Flash Amber Flash Error
105 Magstripe data error Amber Flash Off Off Error
106 Magstripe data not found Amber Flash Off Amber Flash Error
107 Magstripe read data error Amber Flash Off Off Error
108 Magstripe read no data Amber Flash Off Amber Flash Error
111 Card not picked Amber Flash Off Amber Flash Warning
112 Hopper Empty Amber Flash Off Amber Flash Warning
113 Close cover to continue Amber Flash Off Amber Flash Attention
114 Cover opened during job Amber Flash Off Off Error
116 Magstripe not available Amber Flash Off Off Error
70 Troubleshooting
Page 79

No. LCD Message User Light Supply Light Card Light Sound
117 Reader not available Amber Flash Off Off Error
120 User paused the printer Amber Flash Off Off Warning
122 Magnetic stripe format problem Amber Flash Off Off Error
123 Insert new card then continue Amber Flash Off Amber Flash None
124 Insert same card then continue Amber Flash Off Amber Flash None
125 Emboss critical error Green Flash Off Off Error
126 Emboss format error Green Flash Off Off Error
127 Emboss transport error Amber Flash Off Green Flash Error
128 Embosser card jam Amber Flash Off Green Flash Error
129 Embosser topper jam Amber Flash Off Green Flash Error
130 Embosser card entry jam Amber Flash Off Green Flash Error
131 Embosser card exit jam Amber Flash Off Green Flash Error
132 Embosser card stack full Amber Flash Off Green Flash Error
133 Embosser card reject full Amber Flash Off Green Flash Error
135 Indent ribbon supplies out Amber Flash Green Flash Off Warning
136 Indent ribbon break Amber Flash Green Flash Off Error
137 Embosser wheel error Green Flash Off Green Flash Error
138 Embosser indent error Green Flash Off Off Error
139 Lost card, open emboss cover Green Flash Off Off Error
140 Embosser not available Green Flash Off Off Error
141 Close embosser cover Amber Flash Off Off Attention
142 Embosser cover error Amber Flash Off Off Error
143 Topper ribbon problem Amber Flash Green Flash Off Error
144 Topper ribbon out Amber Flash Green Flash Off Error
145 Topper ribbon type problem Amber Flash Green Flash Off Error
146 Topping ribbon support err. Amber Flash Green Flash Off Error
147 Topper ribbon no tag found Amber Flash Green Flash Off Error
149 Option not installed Amber Flash Off Off Error
Messages on the Printer Manager
The Printer Manager can issue messages which are displayed only in the browser
window. Click the Continue button in Printer Manager to continue working with
the printer.
CE870 Card Personalization System Installation and User Guide 71
Page 80

Respond to Messages
Messages can appear on the LCD display of the front panel to identify various
operational conditions and errors of card production on the system.
• Printer Component Messages (100-124)
• Embosser Component Messages (125-151)
Important! Always discard damaged, rejected or partially printed cards
according to your established procedures.
Printer Component Messages (100-124)
Messages 100-124 indicate a condition in the printer.
100: Request not supported
To process the card:
1. Change the data to match the systems features and settings.
2. Press the U
SER button to clear the error and send the new card to print again.
101: Job could not complete
The card took too much time.
To send the card again:
1. Make sure all data for the card is available.
SER button and send the card to print again.
2. Press the U
INTS & TIPS
H
• If you are connected to a network, verify the connection.
• Ask your administrator for assistance if needed.
72 Troubleshooting
Page 81

102: Card not in position
The card did not reach the position for the next action, such as processing the card
or ejecting the card.
1. Unlock and open the printer supplies access door.
2. Press the silver button and open the printer swingarm.
3. Remove the ribbon cartridge.
4. Turn the manual advance knob on the printer component and remove card.
5. Replace the ribbon cartridge and close the printer.
6. Close and lock the printer supplies access door.
7. Press the U
103: Printer problem
The printer component has a problem that prevents it from completing the card.
1. Press the P
2. Press the P
104: Critical problem
1. Press the POWER button to power the printer off.
2. Request service.
INTS & TIPS
H
• The system needs to remain powered off due to an internal problem.
105: Magstripe data error
The printer component could not verify the magnetic stripe data written on the
card. The printer encoded data on the card but could not verify all of the data.
SER button and send the card to print again.
OWER button to power it off.
OWER button to power it on again.
To print the card again:
1. Insert a magnetic stripe card that matches the printer settings.
2. Press the U
INTS & TIPS
H
SER button on the Front Panel.
• The card might have been turned the wrong way.
• The card might not have a magnetic stripe.
CE870 Card Personalization System Installation and User Guide 73
Page 82

106: Magstripe data not found
The printer could not find magnetic stripe written data on the card.
To print the card again:
1. Make sure that the magnetic stripe cards used that match your system
settings.
2. Check that the cards are in the proper position for processing. Position the
card with the magnetic stripe down and to the right side of the input hopper.
3. Press the U
SER button and send the card to print again.
107: Magstripe read data error
The printer could not read the magstripe data on the card. To read the card:
1. Insert a magnetic stripe card with data in the H2 hopper or the external
manual card slot.
2. Check that cards are in the proper position for processing. Position the card
with the magnetic stripe down and to the right side of the input hopper.
3. Press the U
INTS & TIPS
H
SER button and send a new card to the printer.
• The data might use a format different from the current printer setting.
• Ask the administrator to verify that the card, the data, and the printer settings
match.
108: Magstripe read no data
The printer did not find any magnetic stripe data on the card.
To read the card:
1. Insert a magnetic stripe card with data in the H2 hopper or the external
manual card slot.
2. Check that cards are in the proper position for processing. Position the card
with the magnetic stripe down and to the right side of the input hopper.
3. Press the U
INTS & TIPS
H
SER button and send a new card to the printer.
• The card might have been inserted the wrong way.
• The card might not have a magnetic stripe.
74 Troubleshooting
Page 83

111: Card not picked
The system did not pick a card. Make sure that the cards are loaded correctly and
press the U
H
INTS & TIPS
SER button. See Load Cards in Hopper for more information.
• Orient all cards in the same way.
• Do not touch the card surface to be printed. Wear gloves or handle cards by
their edges
112: Hopper Empty
The printer is out of cards. Load cards and press the USER button. See Load Cards
in Hopper for more information.
113: Close cover to continue
All access doors must be closed to process cards.
1. Unlock, open and close and all printer doors to make sure they are closed
completely.
2. Lock the system press the U
114: Cover opened during job
All access doors must be closed to process cards.
1. Unlock, open and close and all printer doors to make sure they are closed
completely.
2. Lock the system and press the U
116: Magstripe not available
1. Look at the printer configuration label inside the printer component. Does the
label show either “M” or “J”?
• If yes, the system has a magnetic stripe option that is not working. Request
service.
• If no, the system does not have a magstripe option.
2. To process the card without magstripe, remove magstripe data from the card
design and send it again.
SER button.
SER button.
117: Reader not available
The printer component does not have a reader option. To print the card without
using a reader option, remove the reader request from the card and send it again.
CE870 Card Personalization System Installation and User Guide 75
Page 84

120: User paused the printer
The USER button on the printer was pressed while a card was in process. Press the
SER button again to continue processing cards.
U
INTS & TIPS
H
• If this message occurs often, ask the system administrator to change the LCD
sensitivity to a lower value.
122: Magnetic stripe format problem
The magnetic stripe data sent does not match the format set in the system.
• Ask your administrator for information about the data to send.
INTS & TIPS
H
The printer component has format settings for the data that can be encoded on
the card. The magstripe data sent does not match those settings.
• Ask your administrator to verify that the card, the data, and the printer
settings match.
123: Insert new card then continue
The card requires you to insert a new card in the manual slot.
1. Make sure there is a card in the H2 hopper or insert a card into the external
manual card slot.
2. Press the U
SER button to resume.
HINTS & TIPS
• Make sure to use the correct type of new card for this job.
• Do not touch the card surface to be printed. Wear gloves or handle cards by
their edges
124: Insert same card then continue
The card must be turned by hand to print the second side. Contact your system
administrator for assistance.
76 Troubleshooting
Page 85

Embosser Component Messages (125-151)
Messages 125-151 indicate a condition in the embosser.
125: Emboss critical issue
The embosser has encountered a critical error.
1. Press the P
2. Request service.
INTS & TIPS
H
• The system needs to remain off due to an internal problem.
• Either pressing the POWER button or press and hold the USER button to power
off the system.
OWER button on the front panel to power the system off.
126: Emboss format issue
The data sent cannot be processed by the embosser.
1. Check that the data sent contains the correct number of characters.
• The embosser cannot accept plain data; all data must be encrypted.
2. Check with your systems administrator for assistance.
127: Emboss transport error
The embosser transport assembly is not in position to process cards or
transporting a card has failed.
1. Resend the card.
2. Unlock and open the embosser while the card is being processed.
3. Inspect the embosser transport for interference.
128: Embosser card jam
The card in process cannot proceed due to mechanical obstruction.
1. Unlock and open the embosser.
2. Remove the topping foil and indent ribbon cartridges.
3. Inspect for and remove card jam inside the embosser.
4. Replace the topping foil and indent ribbon cartridges.
5. Close and lock the embosser.
6. Send the card to print again.
CE870 Card Personalization System Installation and User Guide 77
Page 86

129: Embosser topper jam
The topping foil cartridge is not functioning properly.
1. Unlock and open the embosser.
2. Remove the topping foil cartridge.
3. Repair or the topping foil and replace cartridge.
4. Close and lock the embosser.
5. Send the card to print again.
130: Embosser card entry jam
The card did not transfer from the printer to the embosser correctly.
1. Unlock and open the embosser.
2. Remove the topping foil and indent ribbon cartridges.
3. Turn the manual advance knob to move the card so that it can be removed
from the embosser. See Embosser Card Jam for more information.
• The card may be stuck in the interstage area, or in the transport area of the
embosser.
4. Replace the topping foil and indent ribbon cartridges.
5. Close and lock the embosser.
6. Send the card to print again.
131: Embosser card exit jam
The card is caught in the card exit area or did not exit the embosser correctly.
1. Unlock and open the embosser.
2. Remove the topping foil cartridge.
3. Check the card exit area and output hopper for stuck or out of place cards.
4. Turn the manual advance knob to move the card so that it can be removed
from the embosser. See Embosser Card Jam for more information.
5. Replace the topping foil and indent ribbon cartridges.
6. Close and lock the embosser.
7. Send the card to print again.
78 Troubleshooting
Page 87

132: Embosser card stack full
The sensor in the card exit area is blocked.
1. Remove all completed cards from the card output hopper.
2. Unlock and open the embosser.
3. Remove the topping foil cartridge.
4. Check the card exit area for stuck or out-of-place cards.
5. Replace the topping foil and indent ribbon cartridges.
6. Close and lock the embosser.
7. Send the card to print again.
133: Embosser card reject full
The reject card bin located inside the embosser has more than 10 cards.
1. Unlock and open the embosser.
2. Empty the reject card bin. See Inside the Embosser for more information.
3. Close and lock the embosser.
4. Send the card to print again.
135: Indent ribbon supplies out
The indent ribbon has reached the end of the roll. Replace the indent ribbon. See
Load Indent Ribbon Cartridge for more information.
CE870 Card Personalization System Installation and User Guide 79
Page 88

136: Indent ribbon break
The indent ribbon has broken or become jammed.
1. Unlock and open the embosser.
2. Remove the indent ribbon cartridge.
3. Trim the broken ends of the indent ribbon evenly and tape the ends together.
4. Check ribbon for correct routing indicated on cartridge. See Load Indent
Ribbon Cartridge for correct installation procedures.
5. Turn the take-up spool clockwise until the repaired section is wound onto the
take-up spool.
6. Replace the indent ribbon cartridge into the embosser.
7. Close and lock the embosser.
8. Send the card to print again.
137: Embosser wheel error
There is a card jam near the embossing wheel or the embossing mechanism failed
to reset itself after completing the last card job.
1. Unlock and open the embosser.
2. Check the reject tray and remove any cards. See Inside the Embosser for
more information.
3. Close and lock the embosser.
4. Send the card to print again.
138: Embosser indent error
The indent ribbon cartridge cannot advance the ribbon. This could be caused by
mechanical failure.
1. Unlock and open the embosser.
2. Remove the indent ribbon cartridge.
3. Inspect the indent ribbon cartridge.
4. Turn the take-up spool one full turn clockwise. See Inside the Embosser for
more information.
5. Replace the indent ribbon cartridge.
6. Close and lock the embosser.
7. Send the card to print again.
80 Troubleshooting
Page 89

139: Lost card, open emboss cover
The system lost the location the card inside of the embosser.
1. Unlock and open the embosser.
2. Remove the topping foil and indent ribbon cartridges.
3. Inspect for and remove the card lost in the embosser.
4. Replace the topping foil and indent ribbon cartridges.
5. Close and lock the embosser.
6. Send the card to print again.
140: Embosser not available
The printer could not communicate with the embosser.
1. Check the data cable from the embosser to the printer. See Connect Data
Cables for more information.
2. Make sure that the data cable is plugged into the printer securely.
3. Press the P
on.
141: Close emboss cover
The card cannot process if the embosser, printer, or multi-card hopper doors are
open.
Check that all access doors are closed securely and locked.
142: Emboss cover error
The embosser cover was opened while a card was processing. The card is being
rejected.
Open and close the embosser access door to make sure it is closed completely and
send the card to print again.
OWER button on the Front Panel twice to power the printer off and
CE870 Card Personalization System Installation and User Guide 81
Page 90

143: Topper ribbon problem
The topping foil sensor has issued an error.
1. Unlock and open the embosser.
2. Remove the topping foil cartridge.
3. Inspect the topping foil cartridge. Manually turn the take-up spool one full
turn clockwise. See Inside the Embosser for more information.
4. Replace the topping foil cartridge.
5. Close and lock the embosser.
6. Send the card to print again.
144: Topper ribbon out
The topping foil has reached the end of the RFID roll length.
Replace the topping foil. See Load Topping Foil Cartridge for more
information.
145: Topper ribbon type problem
The embosser supplies use an RFID tag to identify the type of ribbon installed in
the embosser. There is an issue reading this tag.
1. Replace the topping foil with Datacard Certified Supplies.
2. For more information, see Load Topping Foil Cartridge.
146: Topper ribbon support err.
The embosser supplies use RFID technology to identify the type of ribbon
installed in the embosser.
1. Replace the topping foil with Datacard Certified Supplies.
2. For more information, see Load Topping Foil Cartridge.
147: Topper ribbon no tag found
The embosser supplies use RFID technology to identify the type of ribbon
installed in the embosser. The tag is missing or non-tagged supplies are being
used
1. Replace the topping foil with Datacard Certified Supplies.
2. For more information, see Load Topping Foil Cartridge.
82 Troubleshooting
Page 91

149: Option not installed
The data sent to process includes data for hardware that is not included in the
system.
1. Check the data connection between the printer and the embosser and that
there is power to the embosser.
2. Remove the data from the card design before sending the card to print.
CE870 Card Personalization System Installation and User Guide 83
Page 92

84 Troubleshooting
Page 93

Chapter 8: Supplies and Parts
The chapter contains information for the
replacement products available for the CE870 Card
Personalization System.
This section describes:
• Supplies
• Cards
• Replacement Parts
Supplies
Indent ribbon, topping foil and system cleaning supplies are available from your
dealer. For best results, run a cleaning card and replace the cleaning sleeve after
every 500 cards processed by the system.
Indent Ribbon
The following indent ribbons are available:
• Ribbon, black, minimum 250 images per roll (Part No. 504461-001).
• Ribbon, white, minimum 250 images per roll (Part No. 504461-002).
• Ribbon, paneled back and white, minimum 250 images per roll (Part No.
50446-110).
Topping Foil
The following topping foils are available:
• Foil, dark blue, minimum 250 cards per roll (Part No. 504139-001).
• Foil, black, minimum 250 cards per roll (Part No. 504139-002).
• Foil, gold, minimum 250 cards per roll (Part No. 504139-003).
• Foil, white, minimum 250 cards per roll (Part No. 504139-004).
• Foil, silver, minimum 250 cards per roll (Part No. 504139-013).
CE870 Card Personalization System Installation and User Guide 85
Page 94

Supply Storage Guidelines
• Store supplies in the original package until you load them the embosser.
• Keep the original packaging closed.
• The indent ribbon and topping foil maintain their quality for about one year.
For optimum card quality, purchase and store quantities that can be used
within one year.
• The indent ribbon, topping foil, and card stock might require secure storage
and tracking. Follow your policy for storing and tracking the supplies used to
make cards.
• Choose a location away from direct sunlight, with a temperature between 32°
and 77° F (0° and 25° C). A humidity range from 40% to 60% non-condensing
is recommended.
• Supply rolls should be at room temperature when installed in the embosser. If
supplies are stored in an environment that is cooler than the system
environment, allow supplies to reach room temperature before using.
Cards
Card Size
• Supply rolls should be installed into the system within 24 hours of being
unpacked.
• If the system will not be used for an extended period, remove supplies from
the embosser and store them with new supplies.
• Supplies for the system may be an audited item. Check with your system
administrator to follow company policies regarding financial instant issuance.
This section describes the cards to use with the system. For best results, use highquality cards that meet the specifications and recommendations described in this
section.
Use ISO ID-1 size cards, also called CR80 cards. ISO ID-1 cards have the following
dimensions:
• 3.37 long by 2.125 inches wide (85.60 long x 53.98 mm wide).
• 0.030 inch (0.762mm) thick
Actual card thickness can vary by up to ten percent from the sizes listed.
Typically, card bow must be less than the thickness of the card.
86 Supplies and Parts
Page 95

Card Material
Use cards with a glossy PVC surface, either 100% PVC cards or composite cards
with a PVC surface. Cards can have a magnetic stripe on one side of the card.
Card Surface
Cards must meet the following card quality guidelines for the system to process
them successfully.
• The card must be free of irregularities such as particles embedded in the
surface.
• The surface must be glossy.
Card Handling
These guidelines apply to unprinted cards.
• Any debris or particles on blank card stock can reduce card quality and
damage the system.
• Grease or oils, such as oils from your fingers, also reduce card quality. Keep
cards completely clean. Do not touch the print surface of a card with your
fingers or hands. Handle blank card stock by the edges only.
• Do not use a rubber band to bind blank cards together.
• If you drop a card on the floor, clean it using a lint-free cloth before using it in
the system.
Card Storage
These guidelines apply to both blank card stock and processed cards.
• Cards should be at room temperature when they are used. If cards are stored
in a cooler environment than the printer, allow them to reach room
temperature before using.
• Cards must be stacked so that they will not shift and rub against each other.
• Make sure that the magnetic stripe on one card does not come in contact with
the magnetic stripe on another card.
• Make sure that cards with magnetic stripes are stored away from magnets
and other magnetic objects.
• Store cards in a cool, dry, and dark place. Excessive light can cause yellowing
of cards on exposed edges.
• Keep cards in their original packaging.
CE870 Card Personalization System Installation and User Guide 87
Page 96

Replacement Parts
The following replacement parts are available for use with the system.
Print Ribbon Cartridge
The ribbon cartridge holds the replaceable cleaning sleeve
in the printer.
Indent Ribbon Cartridge
The indent ribbon cartridge holds the
indent ribbon.
Topping Foil Cartridge
The topping foil cartridge holds the
topping foil used on the embossed
characters.
Cleaning Supplies
For best results, keep additional cleaning supplies on hand.
The following additional cleaning supplies are available:
• A cleaning kit, including 10 printer cleaning cards, 10 printer cleaning sleeves
and a cleaning pen (Part No. 570113-001).
• Package of 10 printer cleaning cards (Part No. 552141-002).
• Package of 5 replaceable cleaning sleeves (Part No. 569946-001).
• A cleaning pen (Part No. 557492-001). Use the cleaning pen to clean the
internal parts of the printer. A cleaning pen can be used eight times.
Cleaning Roller Spindle
The cleaning roller spindle holds the replaceable cleaning sleeve.
Security Lock Option
The system can be used with a cable lock installed on the embosser.
88 Supplies and Parts
Page 97

Printer Power Supply
The power supply is rated at 24 Vdc, 10.42 Amp, 250 Watts
MAX. It is self-adjusting within the rated input voltage.
Printer Power Cable
The power cable connects the facility power and the printer power supply.
Embosser Power Supply
The power supply is rated at 24 Vdc, 3.0 Amp. It is self-adjusting within the rated
input voltage.
Embosser Power Cable
The embosser power cable connects the facility power and the embosser power
supply.
Network Cable
A Ethernet network cable, sometimes called a Category 5 or Cat 5 cable, connects
the system to a network port.
CE870 Card Personalization System Installation and User Guide 89
Page 98

90 Supplies and Parts
Page 99

Chapter 9: Legal Notices
Please note and heed the WARNING and CAUTION
labels that have been placed on the equipment for
your safety. Please do not attempt to operate or repair
this equipment without adequate training.
Regulatory Compliance
Notice for USA (FCC notice)
This equipment has been tested and found to be within the limits for Class A
computing devices, pursuant to Subpart J of Part 15 of FCC rules, designed to
provide reasonable protection against radio interference in a commercial
environment. This equipment generates, uses, and can radiate radio frequency
energy. If it is not installed and used in accordance with this instruction manual,
it may interfere with radio communications. Operation of this equipment in a
residential area is likely to cause harmful interference in which case the user will
be required to correct the interference at their own expense.
Changes or modifications not expressly approved by the party responsible for
compliance could void the user's authority to operate the equipment.
Notice for Canada
Section 7.1.3 of RSS-GEN
This Device complies with Industry Canada License-exempt RSS standard(s).
Operation is subject to the following two conditions: 1) this device may not cause
interference, and 2) this device must accept any interference, including
interference that may cause undesired operation of the device.
Cet appareil est conforme avec Industrie Canada RSS standard exemptes de
licence(s). Son fonctionnement est soumis aux deux conditions suivantes: 1) ce
dispositif ne peut causer des interférences, et 2) cet appareil doit accepter toute
interférence, y compris les interférences qui peuvent causer un mauvais
fonctionnement du dispositif.
CE870 Card Personalization System Installation and User Guide 91
Page 100

This digital apparatus does not exceed the Class A limits for radio noise for
digital apparatus set out in the Radio Interference Regulations of the Canadian
Department of Communications.
Le présent appareil numérique n'émet pas de bruits radioélectriques dépassant
les limites applicables aux classe A prescrites dans le Règlement sur le brouillage
radioélectrique édicté par le ministère des Communications du Canada.
The term “IC:” before the radio certification number only signifies that Industry
Canada Technical specifications were met.
Notice for Europe
We hereby certify that this printer complies with EMC Directive 89/336/EEC,
R&TTE Directive 1999/5/EC, and the EU RoHS Directive EU Directive 2002/95/
EG. This printer conforms to Class A of EN 55022 and to EN 301 489-5. Operation
of this equipment in a residential environment may possibly cause interference.
In the event of interference, the users, at their
take whatever measures are necessary to correct the problem.
own expense, will be required to
Notice for Taiwan
Notice for Japan
This equipment is in the Class A category of information technology equipment
based on the rules of the Voluntary Control Council for Interference by
Information Technology Equipment (VCCI). When used in a residential area,
radio interference may be caused. In this case, the user may be required to take
appropriate corrective actions.
Notice to All Users
The printer emits radio-frequency waves and must be used as installed and
recommended by the printer manufacturer. You may not modify the printer or
how it is used without written permission. You may not operate the printer after
modifying it or its method of operation.
92 Legal Notices
 Loading...