

Page 1
XPS Card Printer
Installation and User Guide
February 2011
Page 2

REVISION LOG
Revision Description Date
A Combined XPS Card Printer Guide and the Installation Guide into
one document
1/20/2011
XPS Card Printer Installation and User Guide 2
Page 3

HOW-DO I… QUICK LINKS TO FREQUENTLY ASKED QUESTIONS
LOAD SUPPLIES
Load Cards
Load Print Ribbon
Load Cleaning Roller
Install Ribbon Cartridge
INSTALL OPTIONAL EQUIPMENT
Install a Large Output Hopper
Install a 200-Card Input Hopper
Install the Lock Option
PRINT CARDS
Print a Driver Sample Card
Print a Printer Test Card
Print on Both Sides of the Card
Print More Than One Copy of a Card
Set the Print Resolution
Rotate the Card
Change a Card Design
Adjust the Colors Printed
Brightness
Contrast
Color Balance
Print Blocking
Use Print Blocking Escapes
About Printing Areas
Topcoat Add Statement
Topcoat Remove
Full Card Topcoat Options
CLEAN THE PRINTER
Run a Cleaning Card
Clean the Printhead
USE THE LCD PANEL
Change the LCD Backlight
View the Serial Number
View Card Counts
Get the Printer Network IP Address
Get the Printer USB IP Address
Set the IP Address Type
USE PRINTING PREFERENCES
Open Printing Preferences
From My XPS Card Printer
From Windows 7 or Vista Start menu
From the Start Menu in Windows XP
USE PRINTER PROPERTIES
Open Printer Properties
From My XPS Card Printer
From Windows 7 or Vista Start Menu
From the Start Menu in Windows XP
Printer Permissions
View the Driver Version
View Card Counts
View Network Information
View Printer Status
Printer Status
Port Type
Printer Information
Option information
Supplies
Test
How to Set the Driver Network Port Value
USE MAGNETIC STRIPE
Set Magnetic Stripe Coercivity
Use Magnetic Stripe Escapes
Magnetic Stripe Escapes
Supported Escape Codes
Use Magnetic Stripe Fonts
Encode Magnetic Stripe without Printing
Print Blocking
Use Print Blocking Escapes
About Printing Areas
Set the Print Area
Topcoat Add Statement
Topcoat Remove
Full Card Topcoat Options
OPEN THE PRINTER MANAGER
How to Open the Printer Manager
XPS Card Printer Installation and User Guide 3
Page 4

Page 5

Contents
Revision Log ............................................................................................................................ 2
How-Do I… Quick links to Frequently Asked Questions ............................................................ 3
Contents .................................................................................................................................. 5
Welcome to Card Printer Information .................................................................................... 11
About the Printer ................................................................................................................... 12
Printer Components ................................................................................................................ 13
Printer with Single-Feed Slot ................................................................................................... 13
Printer with Input Hopper ....................................................................................................... 13
Inside a single-feed or hopper-equipped printer .................................................................... 14
Printer with Duplex Option ..................................................................................................... 14
Inside a printer with a duplex option ...................................................................................... 15
Printer Configuration Label ..................................................................................................... 16
Printer System ......................................................................................................................... 17
Tasks and Users ....................................................................................................................... 17
Installation Requirements...................................................................................................... 19
PC Requirements ..................................................................................................................... 19
Site Requirements ................................................................................................................... 20
Electrical Requirements .......................................................................................................... 21
Install the Printer ................................................................................................................... 22
Choosing Your Installation Method ......................................................................................... 23
Connecting More Than One Printer ........................................................................................ 23
Prepare the Printer .................................................................................................................. 25
Load Cards ............................................................................................................................... 25
Load Print Ribbon .................................................................................................................... 25
Load Cleaning Roller ................................................................................................................ 26
Install Ribbon Cartridge ........................................................................................................... 27
Install the Printer Driver .......................................................................................................... 28
USB Installation using the Installation CD ............................................................................... 28
USB Installation using a downloaded driver ........................................................................... 31
Network Installation using the Installation CD ........................................................................ 35
Network Installation using a downloaded driver .................................................................... 39
Ret
rieve the Printer IP Address ............................................................................................... 44
Printing Cards ........................................................................................................................ 46
Printing Cards: Printer with Input Hopper .............................................................................. 47
Printing from ID Software........................................................................................................ 47
Printing from Other Software .................................................................................................. 47
Printing Cards: Printer with Single Feed Slot ........................................................................... 48
Printing from ID Software........................................................................................................ 48
Printing from Other Software .................................................................................................. 48
Using the Printer.................................................................................................................... 49
XPS Card Printer Installation and User Guide 5
Page 6

Use the Front Panel ................................................................................................................. 50
Use the LCD Menus ................................................................................................................. 52
LCD Menus ............................................................................................................................... 52
Messages and Conditions ........................................................................................................ 53
Messages on the Printer .......................................................................................................... 53
Messages on the XPS Card Printer Driver ............................................................................... 53
Messages on the Printer Manager .......................................................................................... 53
Other Messages ....................................................................................................................... 53
Responding to Messages ......................................................................................................... 54
Printer Driver Messages .......................................................................................................... 63
Clean the Printer ..................................................................................................................... 66
Run a cleaning card ................................................................................................................. 66
Clean the printhead ................................................................................................................. 67
Card Design and Setup ........................................................................................................... 69
Card Components .................................................................................................................... 70
Color Printing ........................................................................................................................... 71
Print Ribbon ............................................................................................................................. 71
Managing Color ....................................................................................................................... 71
Printing Text ............................................................................................................................ 71
Printing Graphics ..................................................................................................................... 72
Monochrome Printing ............................................................................................................. 73
Monochrome Panels in Full-Color Ribbon ............................................................................... 73
Monochrome Ribbon .............................................................................................................. 73
Printing Bar Codes ................................................................................................................... 73
Printing Text ............................................................................................................................ 74
Printing Graphics ..................................................................................................................... 74
Topcoat Printing ...................................................................................................................... 75
Card Design: Magnetic Stripe .................................................................................................. 76
About Magnetic Stripe ............................................................................................................ 76
Magnetic Stripe Formats ......................................................................................................... 76
Card Design: Smart Card .......................................................................................................... 78
ut Smart Card .................................................................................................................... 78
Abo
Requirements .......................................................................................................................... 78
Smart Card Codes on the Printer Label ................................................................................... 78
Printing and Non-Printing Areas .............................................................................................. 79
Standard Magnetic Stripe Area ............................................................................................... 79
Smart Card Non-printing Area ................................................................................................. 79
Other Areas ............................................................................................................................. 79
Card Layout.............................................................................................................................. 81
Backgrounds ............................................................................................................................ 81
Image Placement ..................................................................................................................... 81
Badges ..................................................................................................................................... 81
XPS Card Printer Installation and User Guide 6
Page 7

Settings .................................................................................................................................... 82
Windows Properties and Preferences ..................................................................................... 82
Printer Manager ...................................................................................................................... 82
Printer Driver ......................................................................................................................... 83
Communication with the Printer ............................................................................................. 84
Using the driver ....................................................................................................................... 85
Updates, Upgrades, and More ............................................................................................... 86
Updates ................................................................................................................................... 86
Updating the Driver ................................................................................................................. 86
Upgrades and Printer Options ................................................................................................. 87
Deviations ................................................................................................................................ 87
Removing a Printer from a Windows PC ................................................................................. 88
Troubleshooting .................................................................................................................... 91
Tools for Troubleshooting ....................................................................................................... 91
Locate the problem ................................................................................................................. 91
Fixing the Printer System ......................................................................................................... 92
The XPS Card Printer Driver ..................................................................................................... 93
ID Software .............................................................................................................................. 93
Using the Printer Plug-in ......................................................................................................... 93
Other Components of the System ........................................................................................... 93
Installation Troubleshooting ................................................................................................... 94
USB Installation Troubleshooting ............................................................................................ 94
Network Installation Troubleshooting .................................................................................... 95
Driver Problems ....................................................................................................................... 97
The driver does not detect the network-connected printer ................................................... 97
The driver does not detect the USB-connected printer .......................................................... 97
Unexpected messages appear ................................................................................................. 98
The driver status or Windows print queue does not provide expected data ......................... 98
Card Appearance ................................................................................................................... 100
Something did not print ........................................................................................................ 100
Printing includes unexpected data ........................................................................................ 100
The co
lor printing has flaws .................................................................................................. 101
The printing is too light ......................................................................................................... 102
The printing in too dark ......................................................................................................... 103
The monochrome printing has flaws ..................................................................................... 103
Magnetic Stripe ..................................................................................................................... 104
For Managers Only ................................................................................................................ 106
Supplies and Parts ............................................................................................................... 107
Print Ribbon ........................................................................................................................... 108
Color Print Ribbon ................................................................................................................. 108
Monochrome Print Ribbon .................................................................................................... 108
Print Ribbon Storage Guidelines ........................................................................................... 109
Cards ...................................................................................................................................... 110
XPS Card Printer Installation and User Guide 7
Page 8

Card Size ................................................................................................................................ 110
Card Material ......................................................................................................................... 110
Pre-Punched Cards ................................................................................................................ 110
New Cards for Color Printing ................................................................................................. 110
Adhesive Backed Cards .......................................................................................................... 110
Card Quality Guidelines ......................................................................................................... 111
Card Surface .......................................................................................................................... 111
Card Handling ........................................................................................................................ 111
Card Storage .......................................................................................................................... 111
Replacement Parts ................................................................................................................ 112
Printhead Cartridge ............................................................................................................... 112
Print Ribbon Cartridge ........................................................................................................... 112
Cleaning Supplies ................................................................................................................... 112
Cleaning Roller Spindle .......................................................................................................... 112
Large Output Hopper Option ................................................................................................ 112
Lock Option............................................................................................................................ 112
Power Supply ......................................................................................................................... 112
200-Card Input Hopper ......................................................................................................... 112
Cables used with the Printer ................................................................................................. 113
Data Cable ............................................................................................................................. 113
USB Cable .............................................................................................................................. 113
Network Cable ....................................................................................................................... 113
Smart Card Cable ................................................................................................................... 113
Power Cable ........................................................................................................................... 113
How-To Topics ..................................................................................................................... 114
How to Install a Large Output Hopper .................................................................................. 116
How to Install the 200-Card Input Hopper Option ................................................................ 118
Install the Lock Option ........................................................................................................... 119
How to Adjust the Colors Printed .......................................................................................... 120
Brightness .............................................................................................................................. 120
Contrast ................................................................................................................................. 121
r Balance ......................................................................................................................... 121
Colo
How to View Card Counts using the Driver ........................................................................... 123
How to View Card Counts from the Printer LCD Menu ......................................................... 124
How to Change a Card Design ............................................................................................... 126
How to Run a Cleaning Card .................................................................................................. 127
How to Clean the Printhead .................................................................................................. 128
How to Set the Driver Network Port Value ........................................................................... 129
How to Encode Magnetic Stripe without Printing ................................................................. 130
How to Change the LCD Backlight ......................................................................................... 131
How to Get the Printer Network IP Address ......................................................................... 132
How to Get the Printer USB IP Address ................................................................................. 133
XPS Card Printer Installation and User Guide 8
Page 9

How to Load Cards ................................................................................................................ 134
How to Load Ribbon .............................................................................................................. 135
Load Cleaning Roller .............................................................................................................. 136
Install Ribbon Cartridge ......................................................................................................... 136
How to Open Printing Preferences ........................................................................................ 137
Open Preferences from My XPS Card Printer ........................................................................ 137
Open Preferences from the Start Menu in Windows 7 or Vista ........................................... 137
Open Preferences from the Start Menu in Windows XP ....................................................... 138
How to Open the Printer Manager ........................................................................................ 139
How to Open the Printer Properties ..................................................................................... 141
Open Printer Properties from My XPS Card Printer .............................................................. 141
Open Printer Properties from the Start Menu in Windows 7 or Vista .................................. 142
Open Printer Properties from the Start Menu in Windows XP ............................................. 142
Printer Permissions ............................................................................................................... 143
How to Print Driver Sample Cards ......................................................................................... 144
How to Print a Printer Test Card ........................................................................................... 145
How to Print on Both Sides of the Card ................................................................................ 146
How to Print More Than One Copy of a Card ........................................................................ 148
How to Rotate the Card ......................................................................................................... 149
How to View Printer Status ................................................................................................... 150
Printer Status ......................................................................................................................... 150
Port Type ............................................................................................................................... 151
Printer Information ............................................................................................................... 151
Option information................................................................................................................ 151
Supplies ................................................................................................................................. 151
Test ........................................................................................................................................ 151
How to Find the Printer Serial Number ................................................................................. 152
Viewing the Serial Number from the Front Panel ................................................................. 152
How to Set Magnetic Stripe Coercivity .................................................................................. 153
How to Set the Print Area ...................................................................................................... 154
How to Set the Print Resolution ............................................................................................ 155
How to Set Static IP Address Type ......................................................................................... 156
How to Use Print Blocking Escapes ....................................................................................... 158
ut Printing Areas ............................................................................................................. 158
Abo
Print Blocking ......................................................................................................................... 159
Topcoat Add Statement ........................................................................................................ 159
Topcoat Remove .................................................................................................................... 159
Full Card Topcoat Options ..................................................................................................... 159
How to Use Magnetic Stripe Escapes .................................................................................... 161
Using Magnetic Stripe Escapes .............................................................................................. 161
Supported Escape Codes ....................................................................................................... 162
How to Use Magnetic Stripe Fonts ........................................................................................ 163
XPS Card Printer Installation and User Guide 9
Page 10

How to View the Driver Version ............................................................................................ 165
How to View Network Information ....................................................................................... 166
Legal Notices ....................................................................................................................... 167
XPS Card Printer Installation and User Guide 10
Page 11

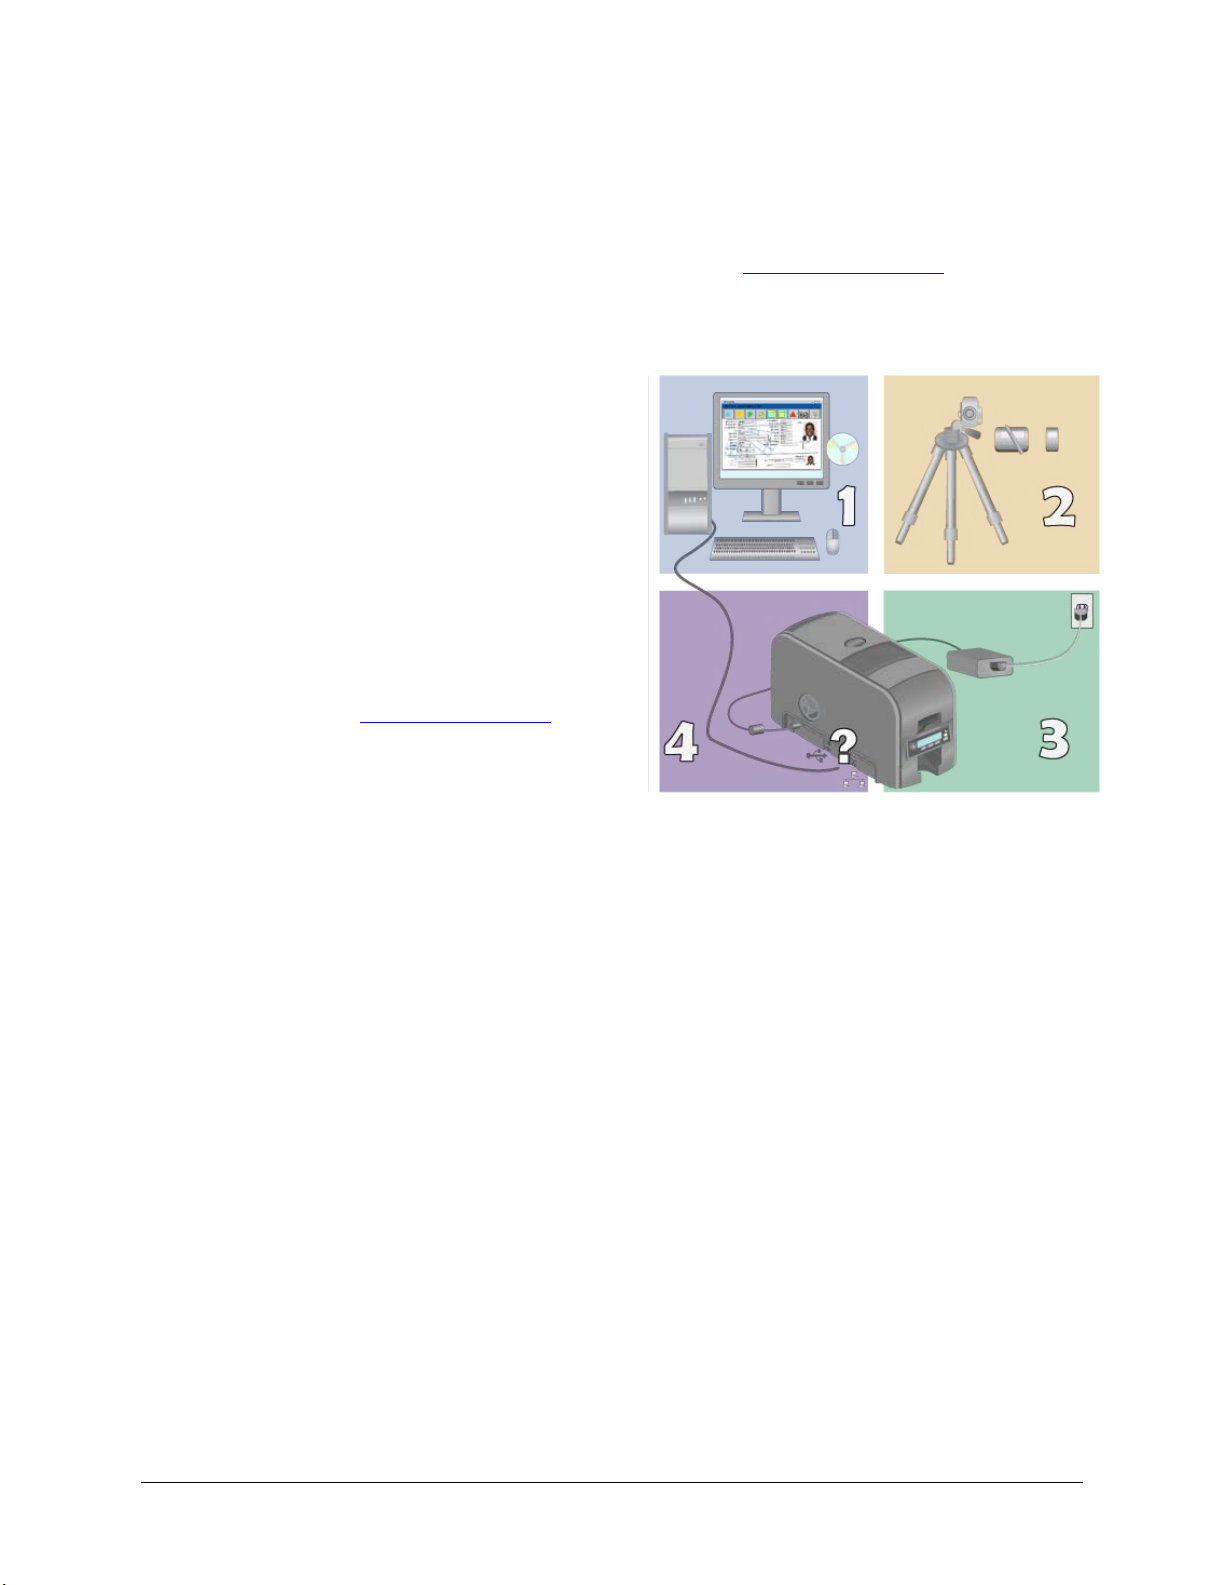
WELCOME TO CARD PRINTER INFORMATION
This manual describes the XPS Card Printer and how to use it.
Before you use the printer, install and set up the printer. In most cases, install the Windows
driver for the printer as part of setup. See
Please read this Printer Guide thoroughly before you use the printer.
Each card program has specific features, and it is important for you to understand the features
of your card program. Talk with your supervisor, system administrator, or other person to
understand the features of your card program. It will help you to successfully print cards using
the printer.
Install the Printer for the steps to follow.
XPS Card Printer Installation and User Guide 11
Page 12

ABOUT THE PRINTER
Card printers are compact printers that apply
images and text to plastic cards. The card
printer can print full-color and monochrome
images, depending on the type of print ribbon
installed.
There are several options available for the card
printer including magnetic stripe, smart card,
automatic duplex, and reject hopper. The
configuration label on the printer can help you
determine the options installed. See the
Configuration Label for more information about
the factory-installed options.
The card printer is available with an input hopper or with a single feed slot, and with or without
automatic duplex. Click one of the following to view the different options:
•
View a simplex printer with an input hopper
•
View a simplex printer with a single feed slot
View a duplex printer.
•
Printer
HINTS & TIPS
• The printer is designed to issue cards either one at a time or in batches — up to 100 cards at
a time. An optional 200-card input hopper is available for some printers.
• A busy issuance site might issue up to 10,000 cards a month.
• Often, a site will have busy times and slow times. During busy times, the site might use more
than one printer to keep up with demand.
XPS Card Printer Installation and User Guide 12
Page 13
Printer Components
Printer with Single-Feed Slot
Printer with Input Hopper
XPS Card Printer Installation and User Guide 13
Page 14

Inside a single-feed or hopper-equipped printer
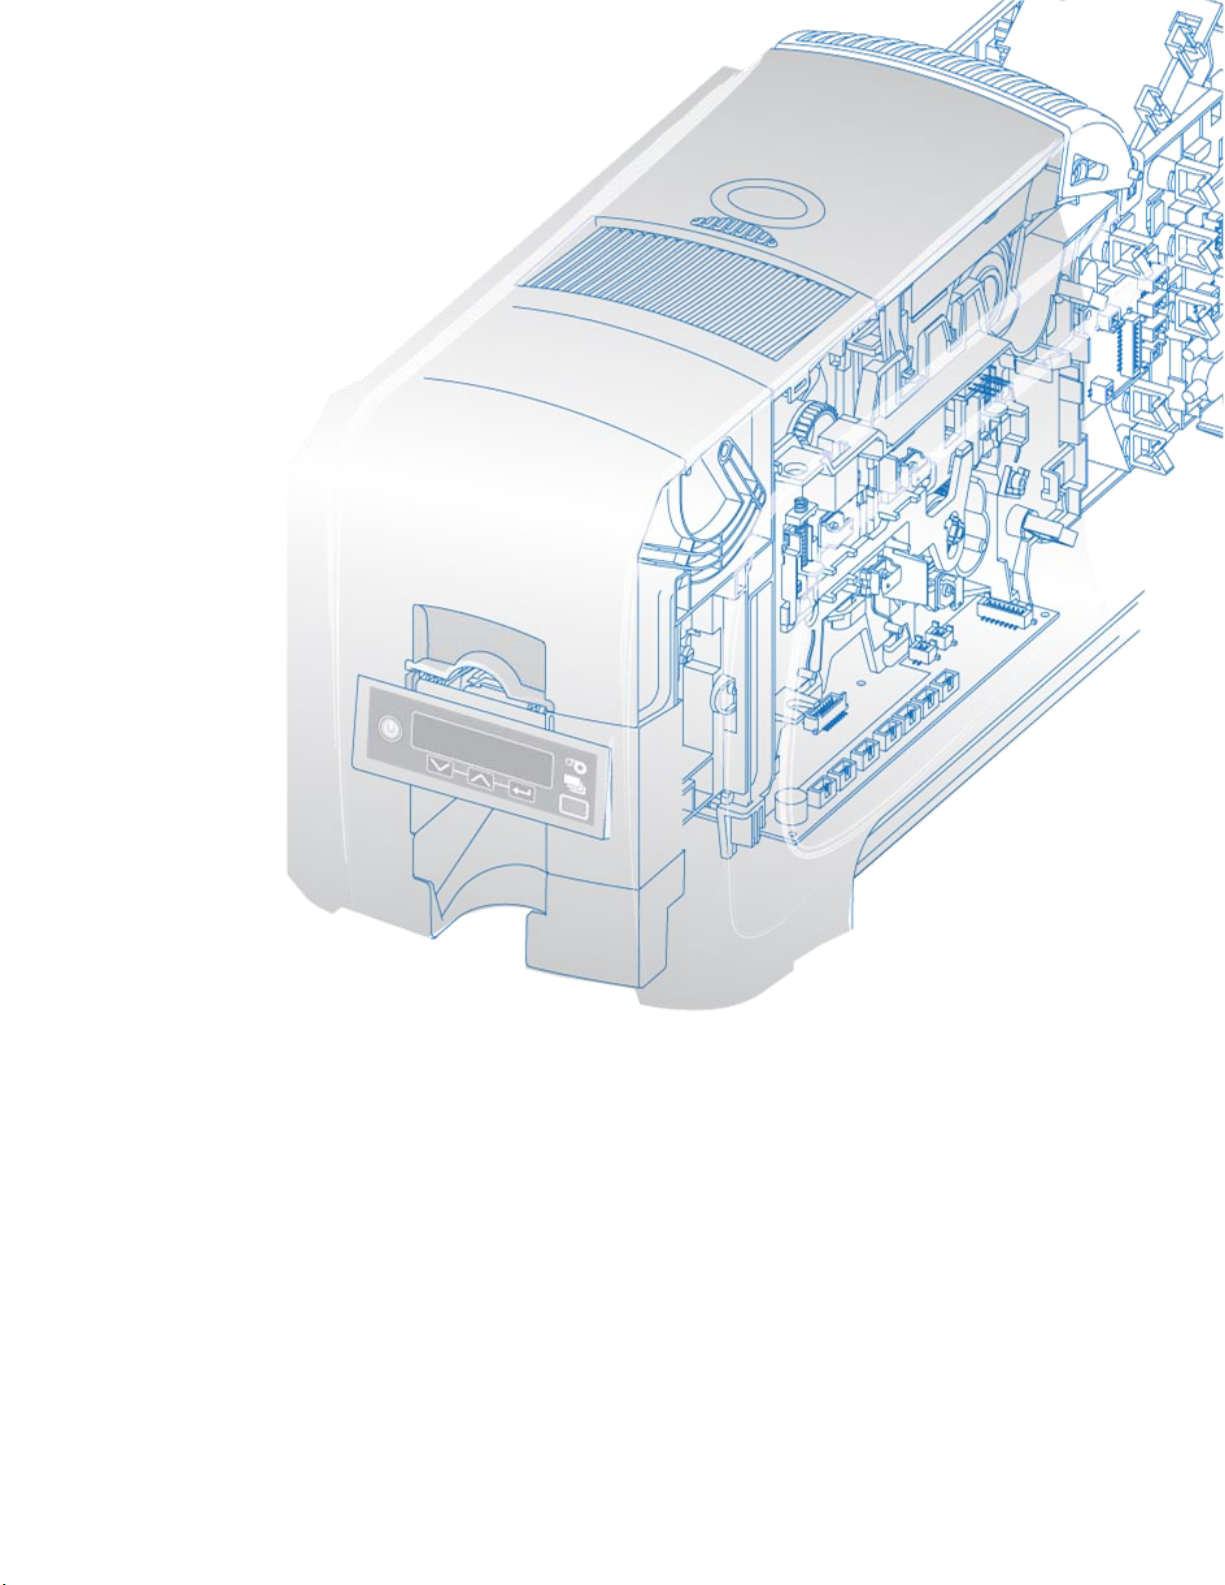
Printer with Duplex Option
XPS Card Printer Installation and User Guide 14
Page 15
Inside a printer with a duplex option
XPS Card Printer Installation and User Guide 15
Page 16
Printer Configuration Label
The printer has a label on the side of the cover arm that shows the components installed. Find
the label on the side of the cover arm:
The label shows:
• Printer name, which also appears on the model label
• Configuration, which includes options in the printer:
o Date and country of assembly
o The MAC address to use when the printer is
connected using an Ethernet network
The printer label provides information that is useful when
requesting service. It can also help you know the
components installed. Some components might be installed
by the dealer or sales group. The information for those
items should be hand-written on the label.
XPS Card Printer Installation and User Guide 16
Page 17
Printer System
The card printer is used with other equipment and software to create a card production system.
The system produces cards for a specific purpose and the cards must meet requirements. Ask
about the requirements for cards that you produce, or see
requirements.
The system can include:
• A PC, with software to support the
printer, such as:
o The XPS Card Printer Driver
for Windows.
o ID software designed
specifically to capture,
format, and save the data for
cards.
o A retail application such as
Microsoft® Word or Adobe®
Photoshop®.
o
See PC Requirements.
Card Design and Setup for typical
• "Capture" devices, such as:
o A digital camera to take
photos for ID badges and other cards, connected to the PC.
o A signature capture pad or fingerprint reader.
• The printer with supplies and a facility power source.
• A data connection between the printer and PC, which can be a USB connection or a
network connection (Do NOT use both connections with one printer.)
Tasks and Users
In most work places, more than one person uses the printer. Each person might use it
differently.
• The Operator makes cards using the printer, loads supplies, and handles minor
problems such as a card jam.
• The Manager sets up the card making system, sets up card designs, and might identify
new ways to use the card printer in the organization.
Information for Users
This guide provides operator information and describes how to install, use the printer, and
perform routine tasks.
An additional Solutions Guide is available for use by Administrators or by professionals designing
a new system for printing cards.
When the XPS Card Printer Driver is installed, the information is also installed. The installation
XPS Card Printer Installation and User Guide 17
Page 18

creates a Windows desktop icon called My XPS Card Printer. Use My XPS Card Printer to choose
the user level. This sets the type of information you view.
Using My XPS Card Printer, you can also:
• Open the Printers Window to view
the status of the printer and to view
settings.
• Print a guide on a paper printer.
• Link to the web site.
For non-Windows Users
The information for the card printer can be
viewed and printed from other operating
systems, such as Linux.
Insert the Driver CD into the PC, open a file
and folder browser, and open the
Documentation folder. Select a document to view.
My XPS Card Printer is a Windows application. It does not run on non-Windows operating
systems.
XPS Card Printer Installation and User Guide 18
Page 19

INSTALLATION REQUIREMENTS
Your installation method depends on how many users will print to the card printer, the
operating system you will use to send card data and other decisions in your environment. This
section describes:
•
PC Requirements
Site Requirements
•
•
Electrical Requirements
Choosing your installation method
•
PC Requirements
Use a PC that meets or exceeds the following:
• A 32- or 64-bit processor, running at 1 GHz or faster
• Memory (RAM):
o 2 GB or more
o At least 1GB free space on the hard drive
• One of the following operating systems:
o Windows 7, 32- or 64-bit
o Windows Vista, 32- or 64-bit
o Windows XP, 32-bit
Windows MSXML 6.0 and the Windows XPS Essentials pack are required
to install the printer driver. The driver installer checks the operating
system for these files and installs them if needed.
o Windows 2003 Server, 32- or 64-bit
o Windows 2008 Server, 32- or 64-bit
• Apple® Bonjour® for Windows is required to install the printer driver. The driver installer
checks the operating system for this application and installs it if needed.
• USB 2.0 port or Ethernet network connection
• ID software to capture and organize the data to appear on each card.
Requirements for a Network Connection
To install a printer on a network, the following components are required:
• An Ethernet network that uses the TCP/IP protocol and can run at 100 megabits per
second, also called 100base-T. Printers also support 10base-T.
• An Ethernet cable to connect the printer to the network. An Ethernet cable is not
supplied with the printer.
• A PC that meets the requirements listed above, that is connected to and communicating
with the network.
XPS Card Printer Installation and User Guide 19
Page 20
• You can connect many network printers to one PC. The maximum number of printers
depends on the capacity of the network to deliver data to the printer.
Requirements for a USB Connection
To install a printer using a USB connection, the following components are required:
• A high speed USB port. USB 2.0 is recommended..
• A USB cable to connect the printer to the PC. A USB cable is supplied with the printer.
• A PC that meets the requirements listed above.
• If you need to connect two card printers to a PC with one USB port, use a single,
independently-powered USB hub to which both printers can be connected.
• Up to four card printers can be connected to a PC using USB cables.
Site Requirements
Set up and use the printer in an environment that meets the following requirements.
• Provide space for the printer and for clearance around the printer. The printer
dimensions and clearance area is shown in the table below.
Printer
Model
SD260 10.00
SD260 w/
Smart Card
SD360 10.00
CD800
Simplex
CD800
Duplex Plus
*Options such as a large output stacker and 200-card input hopper add height to the
printer. Additional clearance is required when using these options.
XPS Card Printer Installation and User Guide 20
A B C D E F G
8.80
254
10.00
254
254
10.00
254
10.00
254
224
8.80
224
8.80
224
8.80
224
8.80
224
Dimensions (inches/mm)
4.00
102
4.00
102
4.00
102
4.00
102
4.00
102
6.85
174
6.85
174
6.85
174
8.79
223
8.79
223
4.00
102
4.00
102
4.00
102
4.00
102
4.00
102
15.37
XXX
21.21
539
21.21
539
17.37
441
21.21
539
4.00
102
4.00
102
4.00
102
4.00
102
4.00
102
Page 21
• Place the printer in an environment with temperatures ranging from 60° F to 95°
SD260
110-240V/50-60 Hz/3.0 Amp
F (15° C to 35° C).
• Use a single phase, 3-wire, grounded receptacle.
• Keep all dust, dirt, food, and liquids away from the printer.
• Keep paper and foreign materials off the printer.
• Place the printer on a sturdy, level surface.
• Place the printer away from direct sunlight.
• Do not place printer near heating ducts, fans, or other air vents.
• Do not use the printer for purposes other than the intended use.
• Prevent debris from entering the printer.
• Place the printer in a clean office environment.
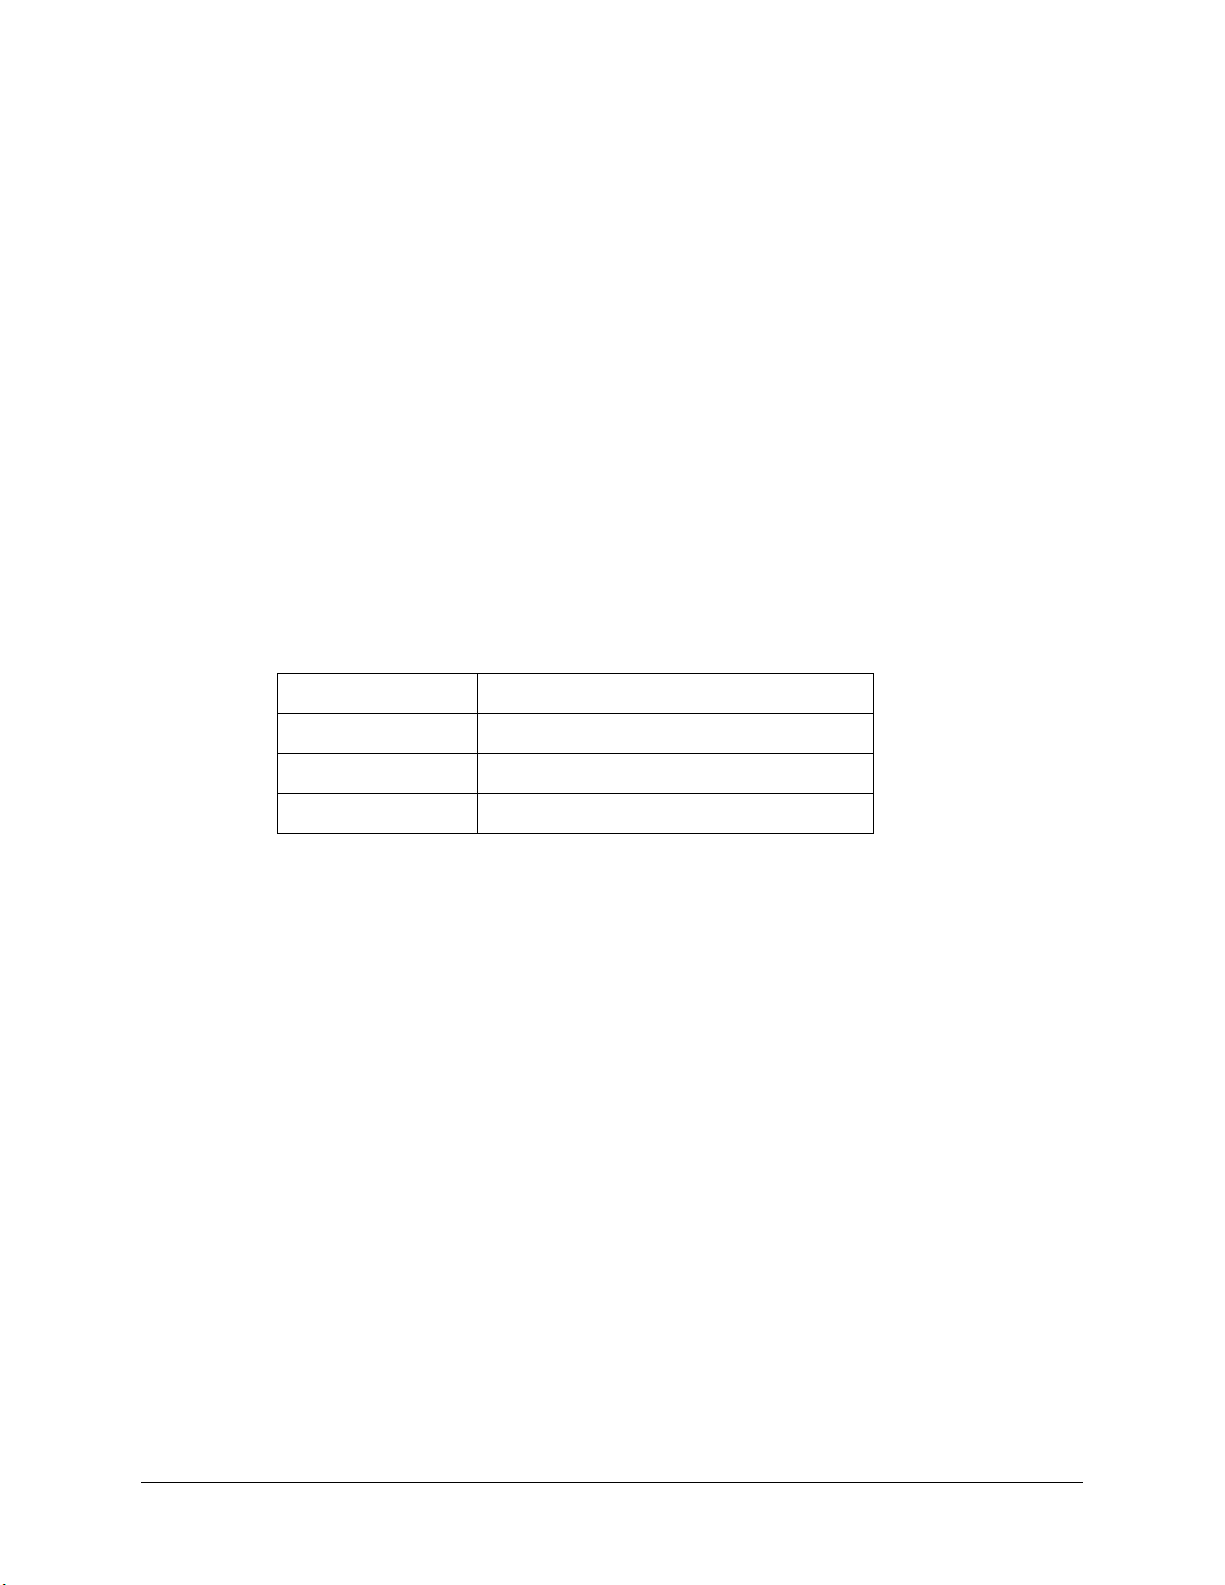
Electrical Requirements
The power supply has earned the ENERGY STAR® and is rated as follows:
Printer Model Electrical Requirements
SD360 110-240V/50-60 Hz/3.0 Amp
CD800 110-240V/50-60 Hz/3.0 Amp
The power supply detects the input voltage, and works within the range stated. The printer is
ENERGY STAR qualified only when used with the included power supply.
XPS Card Printer Installation and User Guide 21
Page 22

INSTALL THE PRINTER
This section provides information about installing the printer and driver on a PC running a
supported Windows operating system. Printer installation includes preparing the printer and
then installing the driver.
Most often, the driver is installed using the installation CD shipped with the printer. The driver
installation procedure prompts you to power on the printer and when to connect cables.
Installation includes the following steps:
1.
Choosing Your Installation Method
2.
Prepare the printer
•
Load cards
Load print ribbon
•
•
Load cleaning roller
3.
Install the driver
XPS Card Printer Installation and User Guide 22
Page 23

Choosing Your Installation Method
Your installation method depends on how many users will print to the card printer, the
operating system you will use to send card data and other decisions in your environment.
The printer can be installed using one of the following installation methods:
Driver CD The printer ships with a CD in the printer carton. In most cases, install the driver
from the CD using one of the following cable types:
• Install the Driver using a USB cable
• Install the Driver using a Network cable
Download If you do not have access to the installation CD, install the driver from a
downloaded driver file:
• Install the printer using a USB connection and a downloaded driver file
• Install the printer using a Network connection and a downloaded driver file
Connecting More Than One Printer
There are several choices for connecting more than one printer to a PC or for having more than
one PC connected to a printer. You can connect to several printers installed on a network, or
connect multiple printers to a PC using USB cables.
Use the following guidelines to install more than one printer using USB cables:
• Connect and install one printer at a time. The PC cannot run more than one installation
program at a time.
• USB protocol allows devices to be connected to the PC through another USB device. USB
protocol also uses hubs to which multiple USB devices can be connected.
o If you need to connect two card printers to a PC with one USB port, use an
independently-powered USB hub to which both printers can be connected.
• Up to four card printers can be connected to a PC using USB cables.
• Use one powered high-speed (USB 2.0) hub. Do not daisy-chain multiple hubs.
• The printer(s) must be powered on for the PC to detect it. It must remain powered on
during installation.
To Install Additional Printers
For each USB printer installed after the initial USB installation, follow these instructions:
1. Load supplies and then power on the printer. See
follow.
2. Log on to the PC as a user with Administrator access.
3. Connect the printer to the PC using a USB cable.
4. The operating system detects the new device. It might display a popup during
installation.
Prepare the Printer for the steps to
5. If the operating system does not display a popup within a few minutes, check the
XPS Card Printer Installation and User Guide 23
Page 24

Printers window to see if the icon for the new printer is displayed. At times, the
software installs without displaying the popup.
6. The operating system usually uses the existing driver files to install the driver for this
printer. Insert the driver CD only if you are prompted for it.
Using more than one printer on a PC
When using more than one printer on a PC, keep the following in mind:
• Select the printer to use in the ID software or other application. Card jobs will be sent to
the selected printer even if more than one card printer is attached to the PC.
• When messages are displayed, the title bar of the message box displays the name of the
printer causing the message. Keep track of which printer has which name.
• Each printer has its own icon in the Printers window, and each printer has separate
Properties and Printing Preferences dialog boxes. Settings are not shared among
printers.
XPS Card Printer Installation and User Guide 24
Page 25
Prepare the Printer
Prepare the printer to print cards by installing supplies including blank card stock, print ribbon,
cleaning roller, and optional equipment. For more information on optional equipment, see
Install Printer Options.
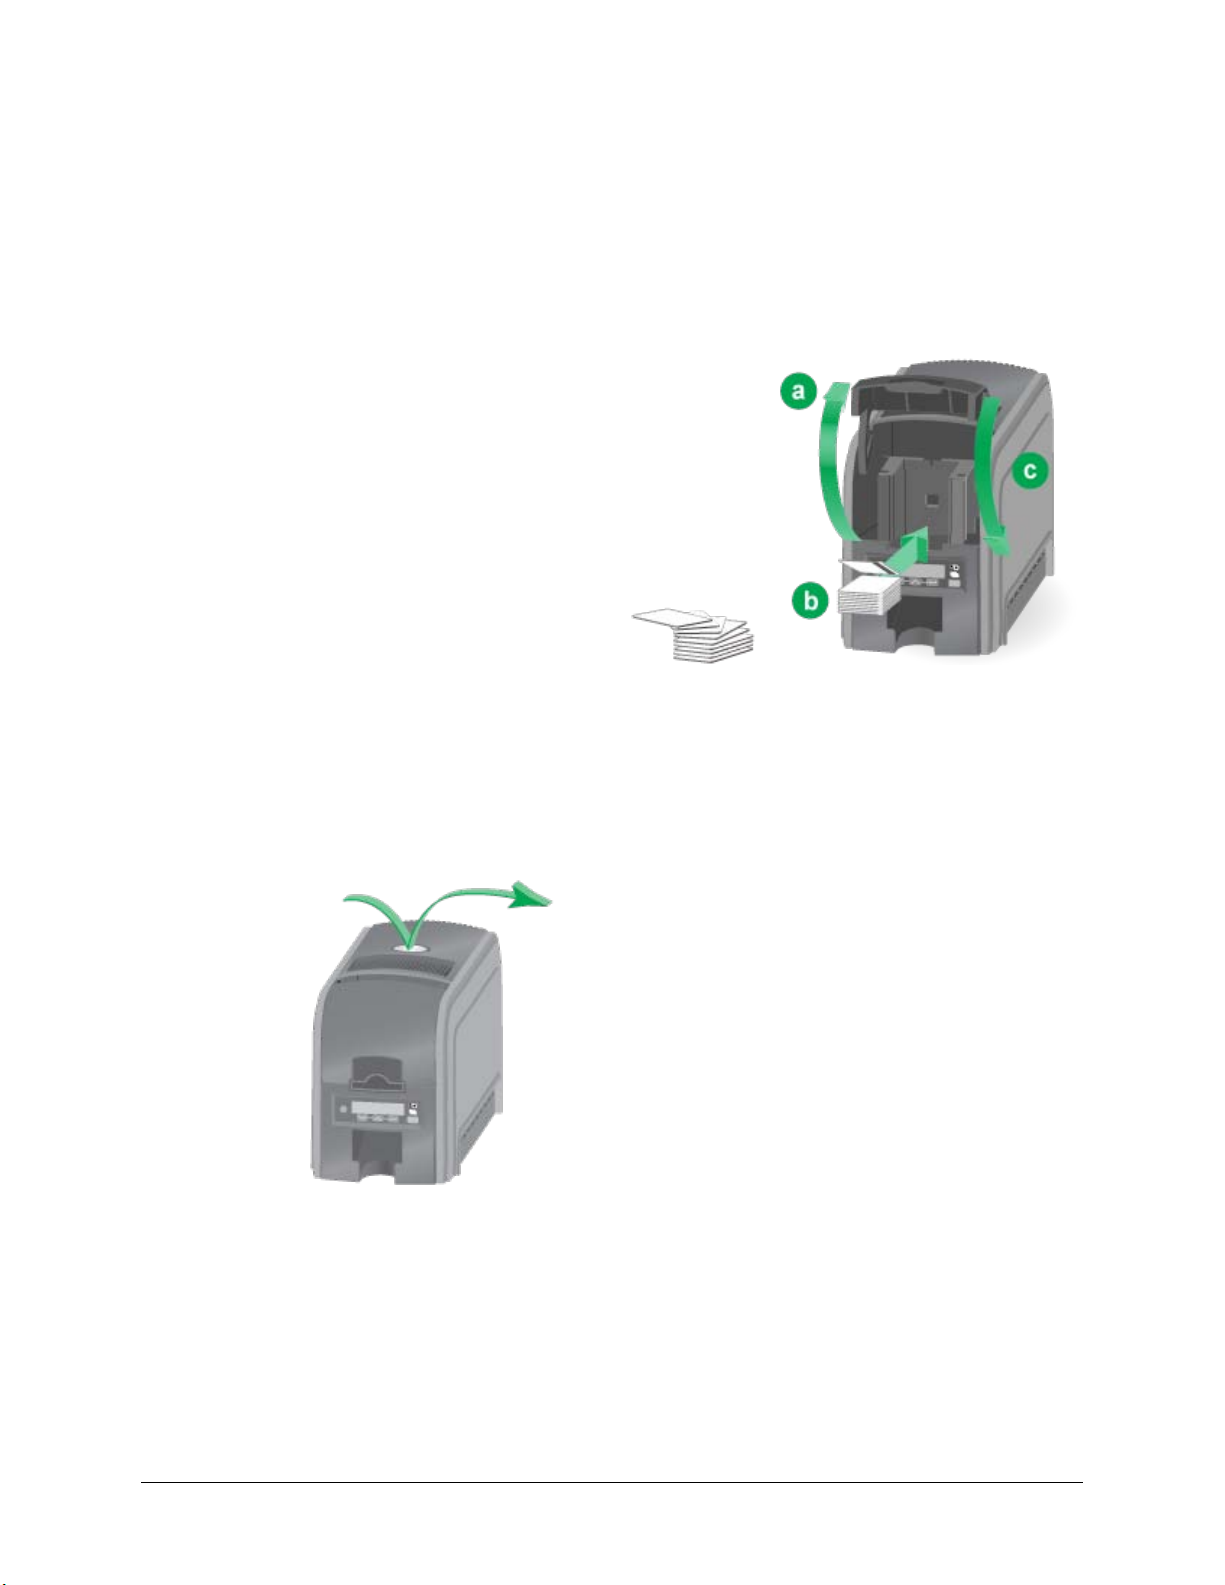
Load Cards
If you are using a manual feed printer,
skip this step and keep a supply of blank
cards close to the printer. For printers
with an input hopper, continue with these
steps:
1. Open the input hopper (a).
2. Fan cards before placing them into
input hopper (b).
Insert magnetic stripe cards with the
stripe down and toward the righthand side of the input hopper.
3. Close input hopper (c).
Load Print Ribbon
Load the ribbon when you install the printer and when the ribbon runs out.
1. Open the printer's top cover.
XPS Card Printer Installation and User Guide 25
Page 26
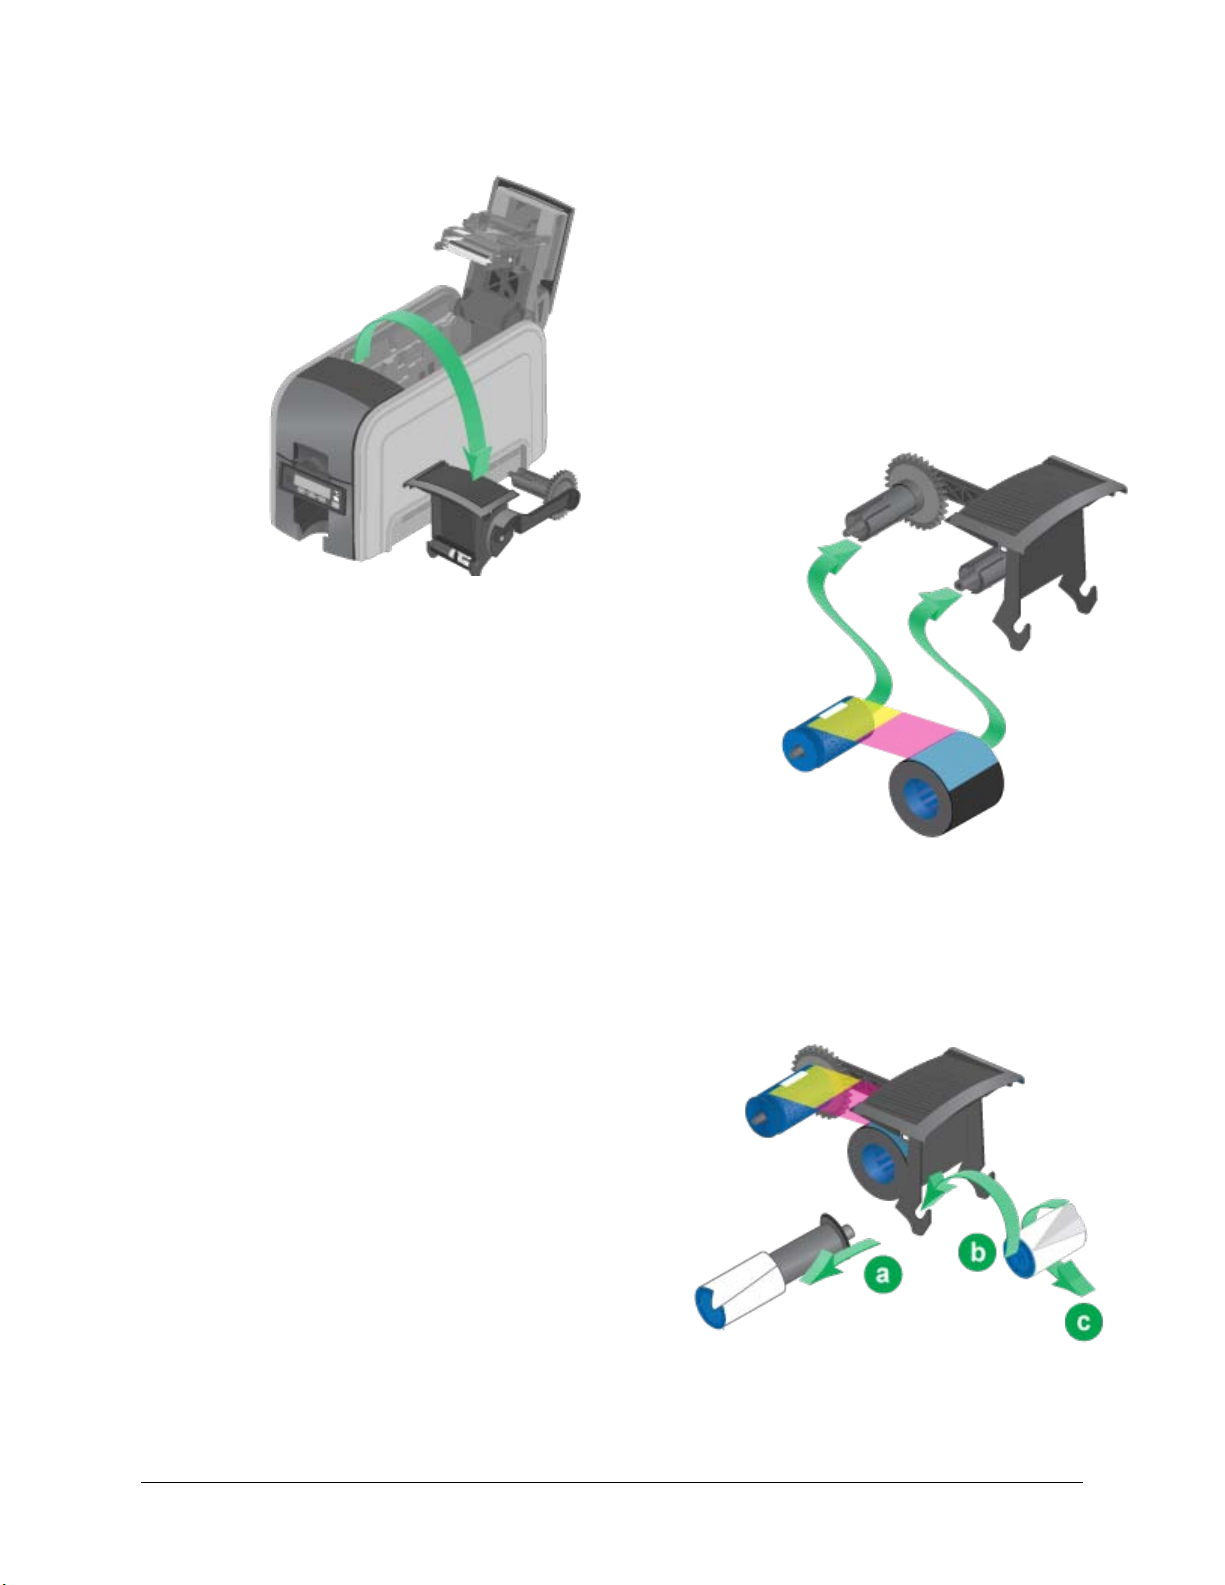
2. Remove the print ribbon cartridge.
3. Load a full roll of print ribbon onto the spindle closest
to the cartridge handle.
4. Place the empty spool on the spindle with the black
gear.
5. Wind the empty spool counter-clockwise one full turn.
Load Cleaning Roller
Load a new cleaning roller with each new
roll of print ribbon.
The printer ships with the cleaning roller
spindle installed on the print ribbon
cartridge.
1. Remove the cleaning roller spindle
from the ribbon cartridge and slide
the continuous cleaning sleeve onto
the spindle (a).
2. Snap the spindle with sleeve installed
back onto the ribbon cartridge (b).
3. Remove the protective wrapper from
the cleaning sleeve (c).
XPS Card Printer Installation and User Guide 26
Page 27

Install Ribbon Cartridge
Install the assembled print ribbon cartridge into the
printer.
1. Hold the print ribbon cartridge by the handle and
lower into the printer with the handle toward the
front of the printer.
2. Check to see that the ribbon cartridge is correctly
positioned in the guides.
3. Close the printer cover.
XPS Card Printer Installation and User Guide 27
Page 28
Install the Printer Driver
This section provides information about installing the printer driver on a PC running a supported
Windows operating system. See
Most often, the driver is installed using the installation CD shipped with the printer. The driver
installation procedure prompts you to power on the printer and when to connect cables.
Use one of the following links to view instructions about how to install the printer driver:
•
USB Installation using the Installation CD
USB Installation using a downloaded driver
•
•
Network Installation using the Installation CD
•
Network Installation using a downloaded driver
PC Requirements for a list of supported operating systems.
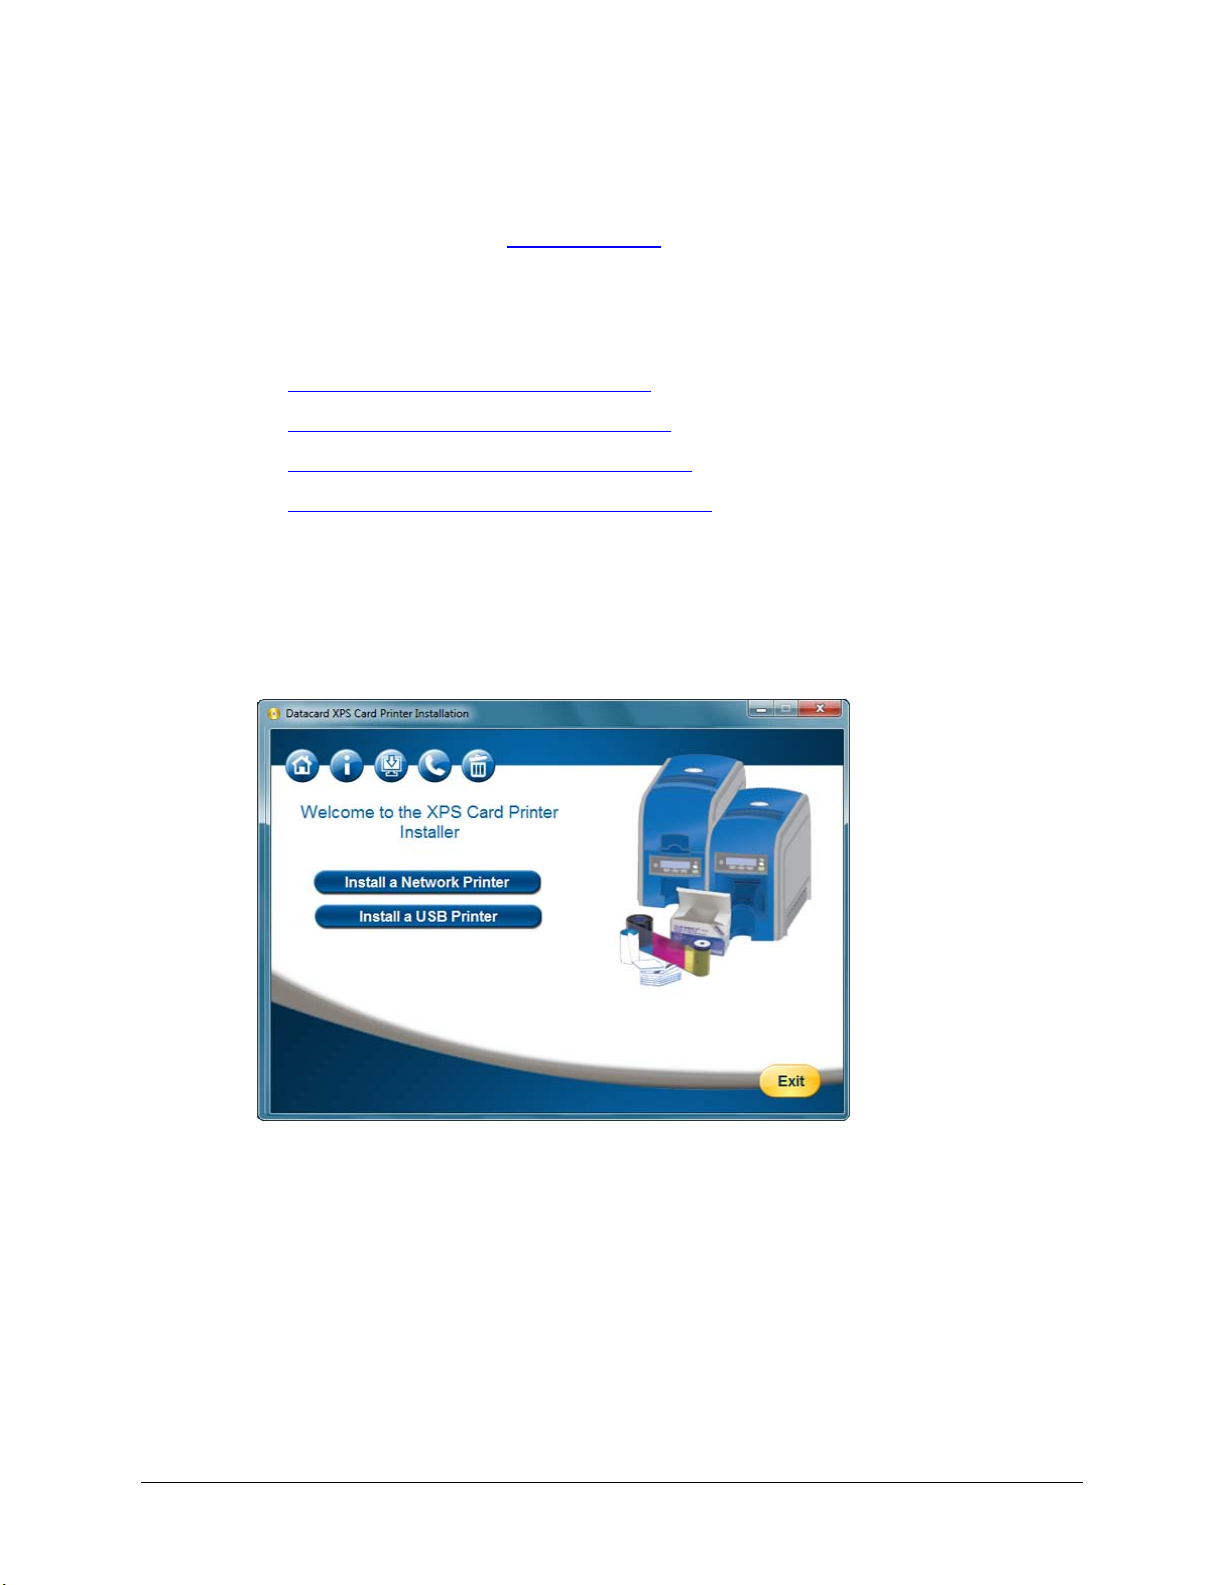
USB Installation using the Installation CD
1. Log on to the PC as a user with Administrator access.
2. Insert the driver CD in the PC's drive. The driver install window opens.
3. Click the "Install a USB Printer" button.
4. The driver might require additional software, and present a license agreement for that
software. Read the license agreement(s) presented, click the "Accept" box, and then
click the blue arrow pointing to the right.
XPS Card Printer Installation and User Guide 28
Page 29

5. Follow the steps to
Use the green media controls to view step-by-step
instructions about how to Prepare the Printer.
Prepare the Printer.
6. Click the blue arrow pointing to the right.
7. Plug in and power on the printer.
XPS Card Printer Installation and User Guide 29
Page 30
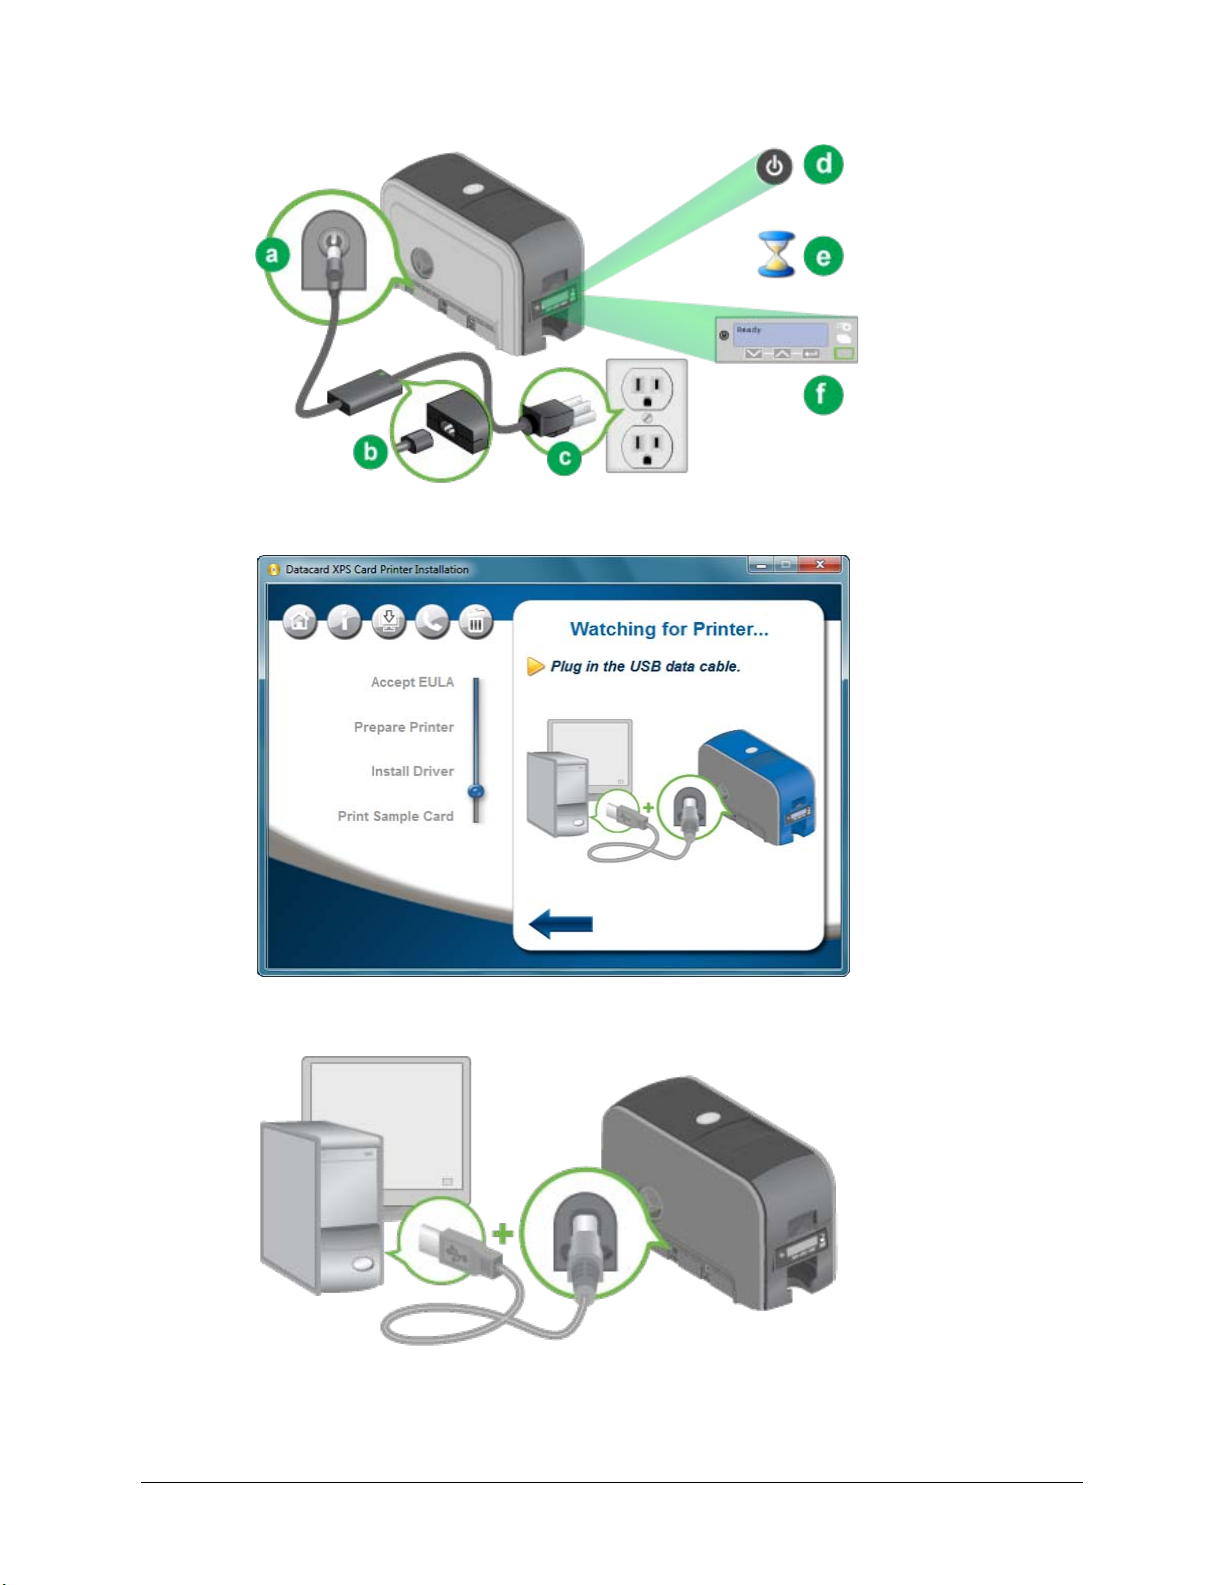
8. The installer will prompt you to connect the printer to the PC using a USB cable.
9. Connect the printer to the PC using a USB cable.
10. When installation is complete, the Print a Sample Card page appears. Check that Ready is
displayed on the LCD panel and click the Print Sample Card button. Installation is complete
XPS Card Printer Installation and User Guide 30
Page 31
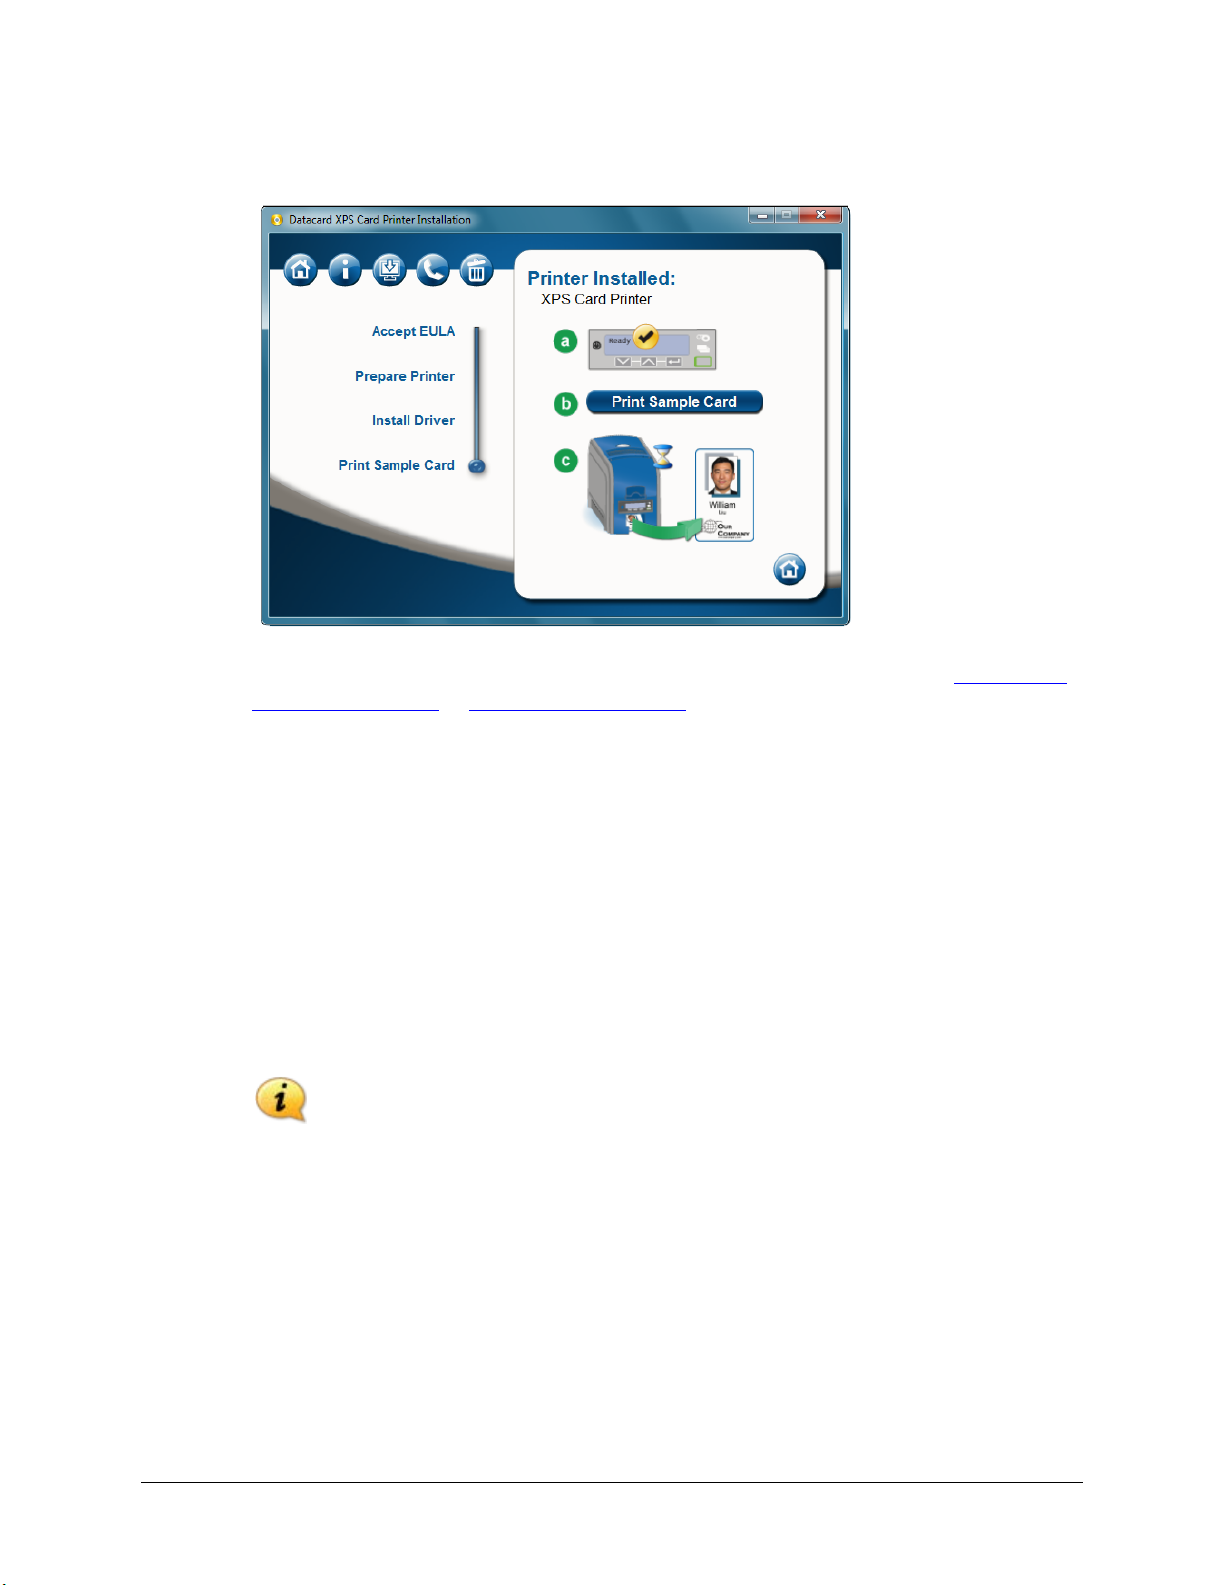
when the sample card prints successfully.
For more information on how to print a sample card or a printer test card, see
a Driver Sample Card or How to Print a Test Card.
How to Print
USB Installation using a downloaded driver
The printer ships with an Installation CD in the printer carton. In most cases, install the driver
from the Installation CD. If you do not have access to the Installation CD, follow these steps:
1. Log on to the PC as a user with Administrator access.
2. Obtain the download file, using a method such as the following:
3. Browse to the Downloads area of the Web site (or the Products page for the printer) and
choose the driver for your printer and operating system
4. Click the link.
5. When the File Download dialog appears, click Save.
Your network might prevent the download or installation of this file. Ask your
network support personnel for help when downloading this file and when installing
the driver
a. Choose a location on your PC, such as C:\Temp and click Save.
b. Receive the file on a portable storage medium, such as CD or USB drive, and
copy it to your hard drive.
c. Receive the file by email and save it to your hard drive.
6. Browse to the location of the file saved in Step 5 on your PC.
7. Double click the downloaded file. The file will have a name similar to
XPSCardPrinterDriver.exe. The card printer installer window opens
XPS Card Printer Installation and User Guide 31
Page 32

8. Click the "Install a USB Printer" button.
9. The driver might require additional software, and present a license agreement for that
software. Read the license agreement(s) presented, click the "Accept" box and then click the
blue arrow.
10. Follow the steps to
XPS Card Printer Installation and User Guide 32
Prepare the Printer.
Page 33

Use the green media controls to view step-by-step
instructions about how to Prepare the Printer.
11. Click the blue arrow pointing to the right.
12. Plug in and power on the printer.
13. The installer will prompt you to connect the printer to the PC using a USB cable.
XPS Card Printer Installation and User Guide 33
Page 34

14. Connect the printer to the PC using a USB cable.
15. When installation is complete, the Print a Sample Card page appears. Check that Ready is
displayed on the LCD panel and click the Print Sample Card button. Installation is complete
when the sample card prints successfully.
XPS Card Printer Installation and User Guide 34
Page 35

For more information on how to print a sample card or a printer test card, see
a Driver Sample Card or How to Print a Test Card.
Network Installation using the Installation CD
1. Log on to the PC as a user with Administrator access.
2. Insert the driver CD in the PC's drive. The driver installer window opens.
3. Click the "Install a Network Printer" button.
How to Print
4. The driver might require additional software, and present a license agreement for that
software. Read the license agreement(s) presented, click the "Accept" box and then
click the blue arrow.
XPS Card Printer Installation and User Guide 35
Page 36

5. Follow the steps to
Use the green media controls to view step-by-step
instructions about how to Prepare the Printer.
Prepare the Printer.
6. Click the blue arrow pointing to the right.
7. Connect the printer to the network using an Ethernet cable.
XPS Card Printer Installation and User Guide 36
Page 37

8. Plug in and power on the printer.
9. Use the LCD panel to retrieve the printer's IP Address. For step-by-step instructions, see
Retrieve the IP Address.
XPS Card Printer Installation and User Guide 37
Page 38

10. Return to the Main menu on the LCD display. Check that Ready is displayed and the User
In some cases, Windows may change the Port Number when the
printer's IP address is entered. The printer always uses Port 9100
button glows green.
11. The Card Printer installer opens the Printer Properties window automatically. When this
window opens, click the Configure Port button and enter the IP Address retrieved in Step 11
in the Printer Name or IP Address area.
IMPORTANT!
12. When installation is complete, the Print a Sample Card page appears.
XPS Card Printer Installation and User Guide 38
Page 39

13. Check that Ready is displayed on the LCD panel and click the Print Sample Card button to
verify that the installation is complete. Installation is complete when the sample card prints
successfully.
For more information on how to print a sample card or a printer test card, see
a Driver Sample Card or How to Print a Test Card.
How to Print
Network Installation using a downloaded driver
The printer ships with an Installation CD in the printer carton. In most cases, install the driver
from the Installation CD. If you do not have access to the Installation CD, follow these steps:
1. Log on to the PC as a user with Administrator access.
2. Obtain the download file, using a method such as the following:
3. Browse to the Downloads area of the Web site (or the Products page for the printer) and
choose the driver for your printer and operating system.
4. Click the link.
5. When the File Download dialog appears, click Save.
Your network might prevent the download or installation of this file. Ask your
network support personnel for help when downloading this file or when installing
the driver.
a. Choose a location on your PC, such as C:\Temp and click Save.
b. Receive the file on a portable storage medium, such as CD or USB drive, and
copy it to your hard drive.
c. Receive the file by email and save it to your hard drive.
6. Browse to the location of the file saved in Step 5 on your PC.
XPS Card Printer Installation and User Guide 39
Page 40

7. Double click the downloaded file. The file will have a name similar to
XPSCardPrinterDriver.exe. The driver installer window opens.
8. Click the "Install a Network Printer" button.
9. The driver might require additional software, and present a license agreement for that
software. Read the license agreement(s) presented, click the "Accept" box and then
click the blue arrow.
10. Follow the steps to
XPS Card Printer Installation and User Guide 40
Prepare the Printer.
Page 41

Use the green media controls to view step-by-step
instructions about how to Prepare the Printer.
11. Click the blue arrow pointing to the right.
12. Connect the printer to the network using an Ethernet cable.
13. Plug in and power on the printer.
XPS Card Printer Installation and User Guide 41
Page 42

14. Use the LCD panel to retrieve the printer's IP Address. For step-by-step instructions, see
Retrieve the IP Address.
15. Return to the Main menu on the LCD display. Check that Ready is displayed and the User
button glows green.
16. The Card Printer installer opens the Printer Properties window automatically. When this
window opens, click the Configure Port button and enter the IP Address retrieved in Step 14
in the Printer Name or IP Address area.
XPS Card Printer Installation and User Guide 42
Page 43

IMPORTANT!
In some cases, Windows may change the Port Number when the
printer's IP address is entered. The printer always uses Port 9100.
XPS Card Printer Installation and User Guide 43
Page 44

17. When installation is complete, the Print a Sample Card page appears.
18. Check that Ready is displayed on the LCD panel and click the Print Sample Card button to
verify that the installation is complete. Installation is complete when the sample card prints
successfully.
For more information on how to print a sample card or a printer test card, see
a Driver Sample Card or How to Print a Test Card.
How to Print
Retrieve the Printer IP Address
The Address Mode determines how the network address of the printer is assigned. The choices
are DHCP and Static IP. DHCP stands for "Dynamic Host Configuration Protocol" and means that
the network assigns the IP Address to the printer. Static IP means that you set the IP Address
assigned by your network support personnel. Network support personnel can tell you whether
the network uses DHCP or static IP addressing.
1. Begin when the LCD panel shows "Ready" on Line 1 of
the display.
2. Press the User button (a).
"Suspended" appears on Line 1, "Menu available"
appears on Line 2, and the user button glows amber.
3. Press the Enter key (b).
"Main Menu" is displayed on Line 1 and "Maintenance"
appears on Line 2.
4. Press the down arrow key (c).
"Main Menu" displays on Line 1 and "Status" is
displayed on Line 2.
XPS Card Printer Installation and User Guide 44
Page 45
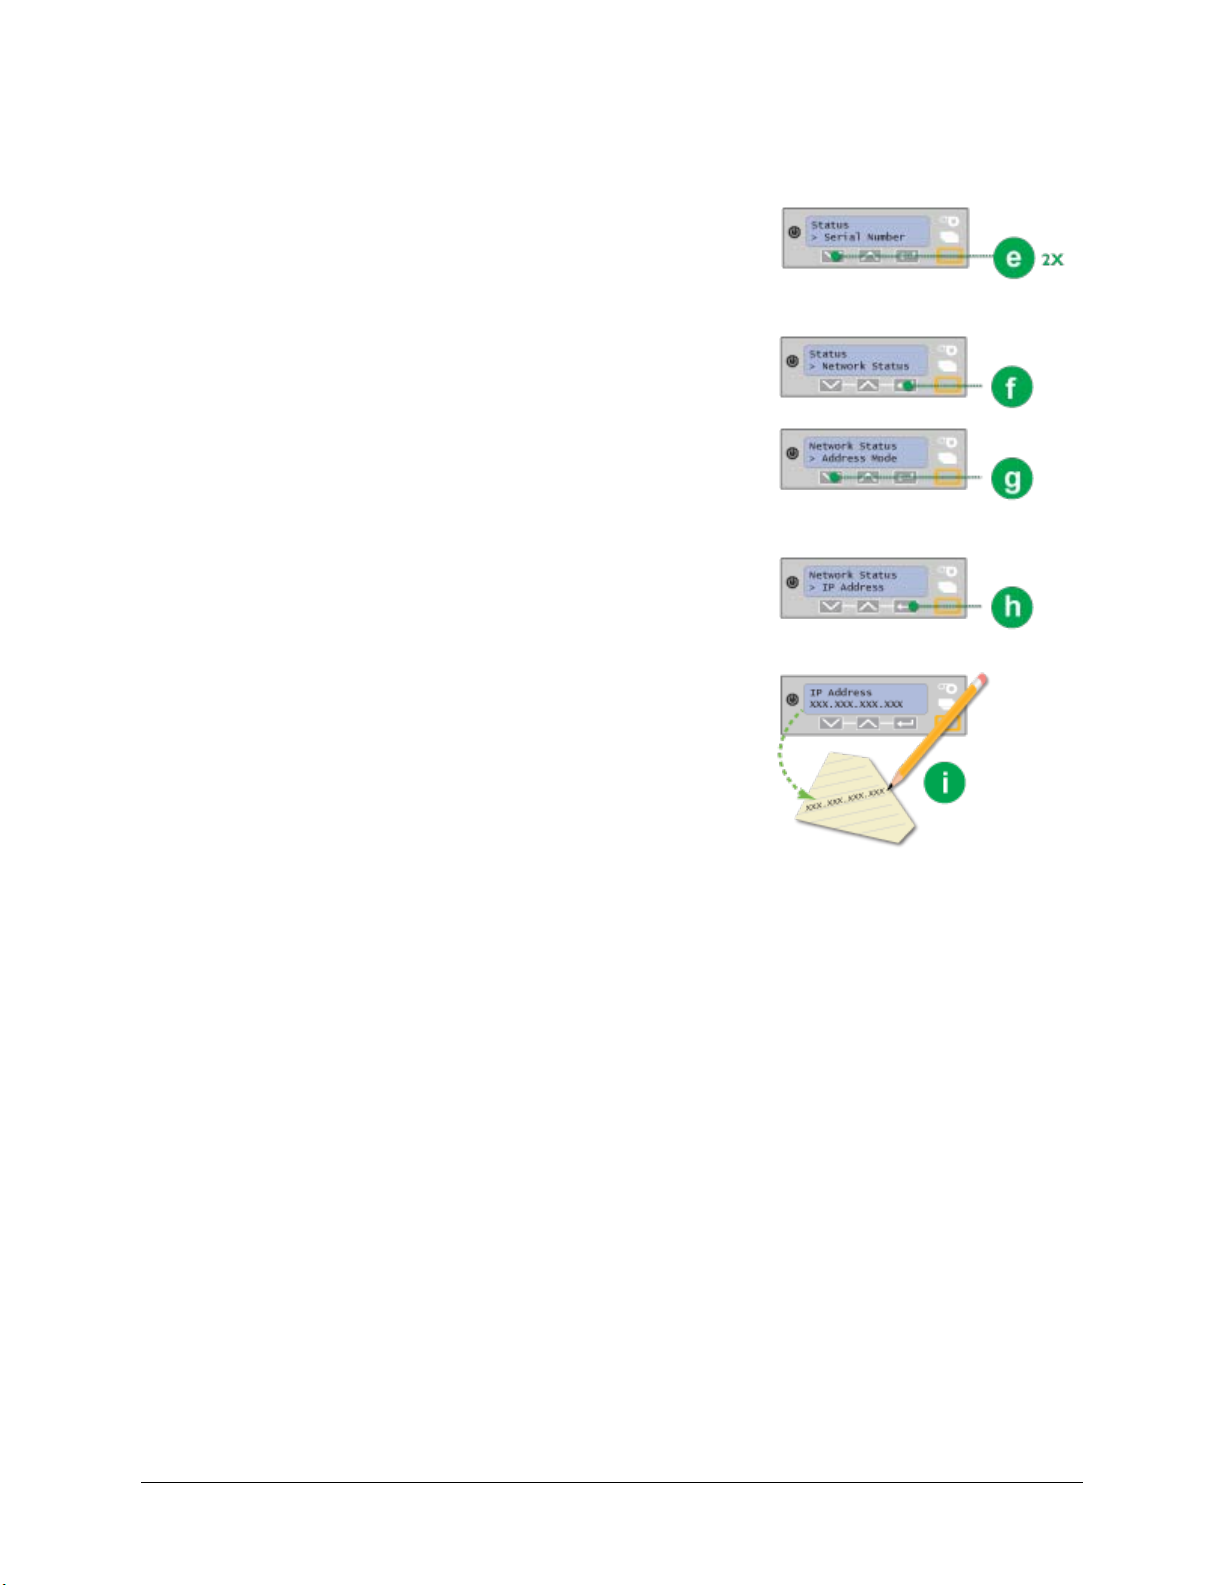
5. Press the Enter key (d)
"Status" appears on Line 1 and "Serial Number" displays
on Line 2.
6. Press the down arrow key two times (e).
"Status " will be displayed on Line 1 and "Network
Status" will be shown on Line 2.
7. Press the Enter key (f).
"Network Status" will be displayed on Line 1 and
"Address Mode" will show on Line 2.
8. Press the down arrow key (g).
"Network Status" appears on Line 1 and "IP Address" is
shown on Line 2.
9. Press the enter key (h).
"IP Address" appears on Line 1 and the printer's IP
Address will be displayed on Line 2.
10. Record the printer's IP Address (i).
11. Exit the menu system.
a. Press the User button repeatedly until "Ready"
is displayed on Line 1 and the User button
changes from amber to green.
XPS Card Printer Installation and User Guide 45
Page 46

PRINTING CARDS
This section explains how to:
•
Print a card to a printer with an input hopper
•
Print a card to a printer with a single feed slot
Print on both sides of a card
•
•
Print a sample card
Make sure:
• The printer system is set up. See
• The card design is set up. See
• Ribbon is loaded in the printer. See
HINTS & TIPS
Make sure magnetic stripe cards are inserted correctly. The printer shows the correct position.
You can also print a test card from the printer. See How to print a test card
Printer System for details.
Card Design if you need to set up the design.
Load Ribbon for the steps to follow.
XPS Card Printer Installation and User Guide 46
Page 47

Printing Cards: Printer with Input Hopper
Make sure:
Cards are loaded in the input hopper. See
Printing from ID Software
1. From the ID software, use the template or
design for this card.
2. Choose the printer if you use more than one
printer.
3. Enter the data for this card. Follow the
instructions for your software.
4. Capture the photo for this card, if used.
5. Click the Print button to send the card to the
printer.
Printing from Other Software
1. Open the software application.
2. Select the XPS Card Printer as the current
printer.
3. Use "Page Setup" to choose the "ID1" page size.
4. Set the margins to 0 (zero or zed).
Load Cards for the steps to follow.
5. Create the card design:
a. Add graphics such as a company logo or
photos
b. Add text information such as name, address, or employee number.
c. For information about additional card features, see
6. Make sure that the input hopper contains blank cards.
7. Click Print to send the card to the printer.
HINTS & TIPS
The printer can get cards from more than one PC. It takes cards in the order received.
Card Design and Setup.
XPS Card Printer Installation and User Guide 47
Page 48

Printing Cards: Printer with Single Feed Slot
Make sure that cards are available to insert.
Printing from ID Software
1. From the ID software, use the template or design for this
card.
2. Choose the printer if you use more than one printer.
3. Enter the data for this card. Follow the instructions for your
software.
4. Capture the photo for this card, if used.
5. Click the Print button to send the card to the printer.
6. At the printer, insert a card in the single feed slot.
Printing from Other Software
1. Open the software application and select the card
printer as the current printer.
2. Use "Page Setup" to choose the "ID1" page size.
3. Set the margins to 0 (zero or zed).
4. Create the card design:
a. Add graphics such as a company logo or
photos
b. Add text information such as name, address,
or employee number.
c. For information about additional card
features, see
5. Click Print to send the card to the printer.
6. At the printer, insert a card in the single feed slot.
HINTS & TIPS
• Push the card in until the printer moves it.
• Orient all cards the same way.
• Do not touch the card surface to be printed:
• Handle cards by their edges Wear gloves
Card Design and Setup
.
XPS Card Printer Installation and User Guide 48
Page 49

USING THE PRINTER
This section includes information on using the printer and driver. It details information on using
the Front Panel and LCD Menus, responding to error conditions, and printer maintenance such
as cleaning the printer.
•
Use the Font Panel
Use the LCD Menu
•
•
Messages and Conditions
Cleaning the Printer
•
XPS Card Printer Installation and User Guide 49
Page 50

Use the Front Panel
The front panel of the printer provides the controls you need to operate the printer. It includes
the following:
Power switch
Use this button to power the printer off and on. All
lights show steady amber while the printer powers on.
To power off the printer, press the switch for 1 to 2
seconds until the printer powers off.
If the printer is processing cards, you can press for 2 or
more seconds to power the printer off immediately.
You hear the power-down tone. Cards in the printer are
not completed.
LCD panel
• The LCD display describes what the printer is doing.
• Includes the printer menu. See
• Shows printer messages. See
• See
Cleaning the Printer to run a cleaning card.
LCD Menus for details.
Respond to Messages for details.
User button and light
The printer has a User button with a ring of light:
• Press the User button to suspend the printer when it displays Ready.
• Press to clear a message.
• Press for 2 seconds or more to clear all messages.
• Press again for 2 seconds or more to clear all cards currently printing.
• Make sure this action is allowed in your card system.
• The light shows whether the printer is ready, busy printing, or not available.
Printer is off
Off
Green
Blinking
green
Printer is ready
Printer is busy
Amber The printer is not ready.
Amber
Blinking
Amber
The Power button was
pressed to turn the printer off.
The printer has an error.
XPS Card Printer Installation and User Guide 50
Page 51

Amber
Ribbon is out or broken.
Down Arrow, Up Arrow, and Enter keys
Use the arrow keys to move through the printer menu system and the enter key to make a
selection. See
LCD Menus for details.
Ribbon Light
The ribbon light glows green when the print ribbon is low and glows amber when there is a
problem with the ribbon, such as out of ribbon.
Off
Green
Blinking
Amber
Ribbon is okay
Ribbon is low - less than 10%
remains
The printer problem applies
to ribbon.
Card Light
The card light blinks amber when the printer has a card problem, such as out of cards. For
printers with a single-feed slot, the card light blinks green when a card needs to be inserted.
Off
Green
Blinking
green
Cards are okay
Ribbon is low - less that
10% remains
Insert cleaning card.
Rapid
Blinking
green
Insert card.
XPS Card Printer Installation and User Guide 51
Blinking
Amber
Green
Blinking
Amber
No cards and printer has
card present sensor.
The printer problem
applies to cards
Page 52

Use the LCD Menus
The front panel of the printer includes an LCD display with keys. When the printer is not actively
printing cards, the LCD menu is available. See
other features of the front panel.
Use the menu for tasks, including:
Use the Front Panel for more information about
• View the printer network IP Address. See
• View the printer USB IP Address. See
• View the printer serial number. See
• Run a cleaning card. See
• Retrieve card counts. See
• Set the IP address type. See
• Set the Magstripe Coercivity. See
• Print a test card. See
• Change the LCD backlight. See
Run a Cleaning Card
View Card Counts
Set the IP Address Type
Set the Magstripe Coercivity
Print a Printer Test Card
Change the LCD backlight
LCD Menus
The menu system has three major branches:
• Use the Maintenance menu to run a
cleaning card or a test card.
• Use the Status menu to see settings
and data about the printer.
• Use the Configuration menu to change
settings.
Get the Network IP Address.
Get the USB IP Address.
View the Serial Number
HINTS & TIPS
The menu system can be opened when
"Ready" is displayed on Line 1 of the LCD panel.
The printer returns to the “Printer Ready”
status after two minutes of no activity.
Changes not applied will be lost.
To leave a selection without changing the
value, press the Up or Down Arrow key to scroll
to Exit and then press the Enter key.
XPS Card Printer Installation and User Guide 52
Page 53

Messages and Conditions
When the printer cannot process the card sent, it issues a condition. Conditions are displayed on
the LCD display on the Front Panel. In most cases, the driver also displays the condition as a
message. See
Driver Messages for information about the messages the driver displays.
Messages on the Printer
• All messages are associated with a card job.
• The printer displays a short description and a message number for each message.
• If more than one message was issued, the next message is displayed after you correct
the problem and click the User button.
• The printer issues messages that focus on recovering from problems. As a result, there
are just a few messages.
• If you cancel a job at the printer, the message will be removed from the PC. Any
additional messages for the cancelled job, such as for a broken ribbon, will not appear
on the PC.
Messages on the XPS Card Printer Driver
• Messages displayed by the driver are similar to those on the printer.
• Messages appear on the PC sending the card.
• Messages might be in the background, behind the application sending the card. On
some operating systems, the message might appear in the status bar. Click the icon in
the status bar to open the message.
• If more than one message was issued, the next message is displayed after you click the
button to close the current message.
• If you have more than one card printer installed on the PC, messages are displayed one
at a time. The title bar of each message shows the printer name.
• If you have more than one card printer installed on the PC and both have issued errors,
the XPS Card Printer Driver will display the messages received even if you cleared the
error at the printer.
• The driver can issue messages which are not displayed on the printer front panel. See
XPS Card Printer Driver Messages.
Messages on the Printer Manager
The Printer Manager can issue messages which are displayed only in the browser window. Click
the Continue button in Printer Manager to continue working with the printer.
Other Messages
• The application you use can display messages.
• Other printers can cause messages if more than one model of card printer is installed.
• If SP, CP, or similar card printers are installed and use the 7.x Smart Driver, message
DR00914 might be displayed. To correct this, remove the 7.x driver and installed the 4.x
Card Printer Driver.
XPS Card Printer Installation and User Guide 53
Page 54

Responding to Messages
Quick Link to a Message:
100 101 102 103 104 105 106 107 108 109 110 111 112
113 114 115 116 117 118 119 120 121 122 123 124
Message 100: Request not supported
To print the card:
1. Change the data to match printer features and settings.
2. Send the new card to print again.
HINTS & TIPS
• The card, if it started to print, should be discarded.
• Make sure you have chosen the correct printer in the application Ask your Manager for
assistance if needed.
Message 101: Job could not complete
The card took too much time. Press the User button on the printer to clear
the error.
To print the card again:
1. Make sure all data for the card is available.
2. Send the card to print again.
HINTS & TIPS
• The card, if it started to print, should be discarded.
• Make sure that data, such as a photo, is on the PC before printing. If you are connected to a
database, verify the connection.
• Ask your Manager for assistance if needed.
XPS Card Printer Installation and User Guide 54
Page 55

Message 102: Card not in position
The card did not reach the position for the next action, such as printing the
card or ejecting the card.
1. Open the printer and remove the ribbon cartridge.
2. Turn the knob to move the card so the printer can eject it.
3. Replace the ribbon cartridge and close the printer.
HINTS & TIPS
• Check the ribbon to make sure it is not torn. See
• Remove any debris from the print area.
• Ask your Manager for assistance if needed.
Message 110 to fix the ribbon if needed.
Message 103: Printer problem
The printer has a problem that prevents it from completing the card.
1. Press the printer Power button to power it off.
2. Press the printer Power button to power it on again.
HINTS & TIPS
• If the printer works, the problem was temporary.
• If the printer does not work, troubleshoot the problem.
Message 104: Critical problem
1. Press the printer Power button or click OK to power the printer
off.
2. Request service.
HINTS & TIPS
• The printer needs to remain off due to an internal problem.
• Pressing either the Power button or the User button will power off the printer.
XPS Card Printer Installation and User Guide 55
Page 56

Message 105: Magstripe data error
The printer could not verify the magnetic stripe data written on the card.
The printer encoded data on the card but could not verify all of the data.
To print the card again:
1. Insert a magnetic stripe card that matches the printer settings.
2. Press the User button on the printer or click "Retry the card" in the
Message box.
HINTS & TIPS
• The card might have been turned the wrong way.
• The card might not have a magnetic stripe.
• Send the new card to the printer.
Message 106: Magstripe data not found
The printer could not find magstripe written data on card.
To print the card again:
1. Insert a magnetic stripe card that matches the printer settings.
2. Position the card with the magnetic stripe down and to the right side
of the printer.
3. Press the User button on the printer or click "Retry the card" in the
Message box.
HINTS & TIPS
• The card might not match printer settings or the data sent.
• Ask the Manager to verify that the card, the data, and the printer settings match.
Message 107: Magstripe read data error
The printer could not read the magstripe data on the card. To read the card:
1. Insert a magnetic stripe card with data.
2. Insert the card with the magnetic stripe down and to the right side of the
printer.
HINTS & TIPS
• The data might use a different format than the current printer setting.
• Ask the Manager to verify that the card, the data, and the printer settings match.
XPS Card Printer Installation and User Guide 56
Page 57

Message 108: Magstripe read no data
The printer did not find any magstripe data on the card.
To read the card:
1. Insert a magnetic stripe card with data.
2. Position the card with the magnetic stripe down and to the right side
of the printer.
3. Send the new card to the printer.
HINTS & TIPS
• The card might have been turned the wrong way.
• The card might not have a magnetic stripe.
Message 109: Print ribbon problem
The print ribbon is not moving properly. To fix the ribbon:
1. Open the printer and remove the ribbon cartridge.
2. Fix the ribbon and move the repaired area one full turn.
3. Replace the ribbon cartridge and close the printer.
HINTS & TIPS
• Remove any debris from the print area.
• If the card is in the printer, turn the knob to move the card so the printer can eject it.
Message 110: Print ribbon out or missing
The printer does not have usable ribbon. Load the ribbon or replace the
ribbon.
1. Open the printer and remove the ribbon cartridge.
2. Remove the existing ribbon and cleaning roller, if present.
3. Install the ribbon. Replace the cleaning roller.
4. Replace the ribbon cartridge and close the printer.
HINTS & TIPS
a. Used ribbon can have "negative" images of printed data. To keep the data confidential,
follow your policy to discard used ribbon.
XPS Card Printer Installation and User Guide 57
Page 58

Message 111: Card not picked
The printer did not pick a card. To load cards:
1. Open the input hopper.
2. Insert cards in the input hopper. Cards can stick together: Slide or fan
cards to separate the edges before loading the input hopper.
3. Close the input hopper and resume printing.
4. For printers with single card feed, push the card in until the printer
moves it.
HINTS & TIPS
• Orient all cards the same way.
• Do not touch the card surface to be printed:
• Handle cards by their edges
• Wear gloves
Message 112: Card hopper empty
The printer does not detect cards in the input hopper.
1. Open the input hopper.
2. Insert cards in the input hopper. Cards can stick together: Slide or fan
cards to separate the edges before loading the input hopper.
3. Close the input hopper and resume printing.
HINTS & TIPS
• Orient all cards the same way.
• Do not touch the card surface to be printed:
• Handle cards by their edges
• Wear gloves
XPS Card Printer Installation and User Guide 58
Page 59

Message 113: Close cover to continue
The printer cover must be closed to print.
1. Close the cover.
2. Push down on the cover to latch it.
HINTS & TIPS
• Make sure the ribbon cartridge is installed.
• Make sure the cartridge handle is even with the edges of the printer.
Message 114: Cover opened during job
The printer cover must be closed to print.
1. Close the cover.
2. Push down on the corners of the cover to latch it.
HINTS & TIPS
• Make sure the ribbon cartridge is installed and the handle is even with the edges of the
printer.
• The card, if it started to print, should be discarded.
Message 115: Wait for print temperature
The printer is not at the correct temperature to print the card.
1. Printing the card will resume on its own.
HINTS & TIPS
• The card, if it started to print, should be discarded.
• Make sure you have chosen the correct printer in the application. Ask the Manager for
assistance if needed.
XPS Card Printer Installation and User Guide 59
Page 60

Message 116: Magstripe not available
Look at the "config" area of the label inside of the printer cover. Does
the label show “M” or “J”?
1. If yes, the printer has a magstripe option that is not working.
Request service.
2. If no, the printer does not have a magstripe option.
3. To print the card without magstripe, remove magstripe data from
the card and send it again.
HINTS & TIPS
To remove magstripe data, you might need to:
• Uncheck a box in the application.
• Change the font from "Mag Track X XPS Card Printer" to a printable font such as Arial,
Verdana, or Calibri.
Message 117: Reader not available
The printer does not have a reader option.
1. To print the card without using a reader option, remove the reader
request from the card and send it again.
HINTS & TIPS
• To remove the reader request, you might need to uncheck a box in the application.
Message 118: Print ribbon type problem
The printer cannot use the ribbon installed.
1. Use ribbon designed for this printer brand and model.
2. Check the Web site for newer firmware, which might support new
ribbon types.
HINTS & TIPS
• When the printer recognizes that a supported ribbon is installed, all enhanced
• Product features are enabled and successful card printing can begin.
XPS Card Printer Installation and User Guide 60
Page 61

Message 119: Print ribbon not supported
The printer cannot use the ribbon installed.
1. Purchase ribbon from your dealer or authorized reseller.
2. Use ribbon designed for this printer brand and model.
HINTS & TIPS
• When the printer recognizes that a supported ribbon is installed, all enhanced product
features are enabled and successful card printing can begin.
Message 120: User paused the printer
A person pressed the User button on the printer and a card was in
process.
1. The card can continue processing without damage.
HINTS & TIPS
• If the user pressed the button for several seconds, the card has been cancelled.
• If this message occurs often, ask the manager to change the LCD sensitivity to a lower value.
Message 121: Print ribbon ID problem
The ribbon data is damaged.
1. The ribbon cannot be used. Ask your dealer or authorized reseller for
a replacement.
2. Use ribbon designed for this printer brand and model.
HINTS & TIPS
• When the printer recognizes that a supported ribbon is installed, all enhanced product
features are enabled and successful card printing can begin.
XPS Card Printer Installation and User Guide 61
Page 62

Message 122: Magnetic stripe format problem
The magstripe data sent does not match the format set in the printer.
1. Ask your Manager for information about the data to send.
HINTS & TIPS
The printer has format settings for the data that can be encoded on the card. The magstripe
data sent does not match those settings.
• Ask the Manager to verify that the card, the data, and the printer settings match.
• See Magnetic Stripe for information about data allowed for specific formats.
• Make sure fonts or escapes are used correctly.
Message 123: Insert new card then continue
The card requires you to insert a new card in the exception slot.
1. Insert the card in the printer.
2. Resume.
HINTS & TIPS
• Make sure to use the correct type of new card for this job.
• Do not touch the card surface to be printed:
• Handle cards by their edges
• Wear gloves
Message 124: Insert same card then continue
The card must be turned by hand to print the second side.
1. Turn the card over.
2. Insert the card in the printer.
3. Resume.
XPS Card Printer Installation and User Guide 62
Page 63

Printer Driver Messages
The driver can create and display the following messages.
500 501 502 503 505 506
Message 500: The printer is not available. The card cannot
print.
The driver cannot communicate with the printer. Make sure the
printer is powered on and connected to the PC.
1. Connect the power cord. Use the power switch to power on
the printer.
2. Connect the cables from the PC to printer.
3. Use a USB cable(a) OR a network cable (b), NOT both.
4. Make sure all connections are complete.
5. Ask network support for help, if needed.
HINTS & TIPS
• Make sure you have chosen the correct printer in the application.
• Ask the Manager for assistance if needed.
Message 501: The printer connection was lost. Printing
the card is canceled.
The printer connection was lost. Printing the card is canceled.
To print the card, make sure the printer is powered
on and connected to the PC.
1. Connect the power cord. Use the power
switch to power on the printer.
2. Connect the cables from the PC to printer.
3. Use a USB cable (a) OR a network cable (b),
NOT both.
4. Make sure all connections are complete.
5. Ask network support for help, if needed.
If this message is followed by message 101, clear message 101 at the printer.
XPS Card Printer Installation and User Guide 63
Page 64

Message 502: The card data is missing or is not usable. The
card cannot print.
The driver could not use the prepared data.
• The PC did not process the data successfully.
• Make sure the data is present. Send the card to print again.
• If the card does not print the second time, troubleshoot the
problem.
• A mistake in using magnetic stripe escapes or blocking escapes
can cause this message.
Message 503: The magnetic stripe data is missing. The card cannot
print.
The driver is set to encode magnetic stripe data only.
• The card did not contain any magnetic stripe data.
• Make sure the magnetic stripe data is present.
• Identify the magnetic stripe data using
• To print on the card:
• Change the setting in Printing Preferences to disable
Message 505: Bonjour is not installed. Cannot connect to
escapes or fonts.
Encode Only.
the printer.
• The driver uses Bonjour® for Windows to connect to a printer
using a USB cable.
• If you previously installed a network-connected printer and
then installed a USB-connected printer, Bonjour might not be
installed.
• Bonjour might have been removed from the PC by another
program or by a user.
o To solve the problem:
Remove the driver, using the Remove icon
on the driver CD installer. Install the USB
printer following the steps in the Quick Install Guide.
• Find a Bonjour for Windows download and install it.
XPS Card Printer Installation and User Guide 64
Page 65

Message 506: A card is currently processing.
The driver is currently processing an interactive job.
• Wait until the current card is complete and then send the card
again.
XPS Card Printer Installation and User Guide 65
Page 66

Clean the Printer
The printer performs best when it is cleaned on a regular basis. The printer should be cleaned
when:
• The number of cards printed since last cleaning reaches the number for your site
• The printer displays a message for which cleaning is a solution
• You notice debris, such as lint, on completed cards
• You install a new roll of print ribbon
• Follow the cleaning guidelines for your site to keep the printer in good working
condition.
You can perform the following cleaning tasks:
•
Run a cleaning card
Clean the printhead
•
Run a cleaning card
Run a printer cleaning card to clean debris from the inside of the printer. The cleaning card can
remove most contaminants from the printer.
1. Begin with the printer powered on.
2. Open the printer cover and remove the print ribbon
cartridge.
3. Close the cover. The Ribbon Light will blink rapidly.
4. Open the input hopper and remove unprinted cards. The
Card light will blink rapidly if the printer has the Card
Present option.
5. Begin with the printer Ready. The User button shows steady
green.
6. Press the User button to display "Suspended" on Line 1 of
the LCD panel.
7. Press the Enter key to enter the menu system.
8. Press the Enter key to enter the Maintenance menu.
9. Press the Enter key to choose Cleaning Card.
XPS Card Printer Installation and User Guide 66
Page 67

10. With Cleaning Card displayed on Line 2, press the Enter key to display Start on Line 2.
11. Press the Enter key to display "Insert Cleaning Card" in the LCD panel. The User button
and the Card light blink.
12. Open the cleaning card package. Place the cleaning card in the input area and press the
User button to start the cleaning cycle. The printer moves the card through the printer
several times and ejects it in the output stacker.
13. Remove the used cleaning card. Wait a few minutes for the rollers to dry.
14. Replace the cards in the input hopper.
15. Replace the cleaning sleeve with a new sleeve, and remove the protective cover.
16. Replace the ribbon cartridge and close the printer. The printer is ready to print cards
again.
17. Discard the used cleaning card and cleaning sleeve.
HINTS & TIPS
• Use the cleaning card and cleaning sleeve one time only.
• Change the cleaning sleeve each time you clean the printer or change the print ribbon.
• You can also clean the printhead. See
follow.
How to Clean the Printhead for the steps to
Clean the printhead
Clean the printhead when:
• The printhead can have contamination stuck to it. You might notice it as unprinted lines
on a card.
• The printhead can have oils from hands, which can occur when replacing the printhead,
or if it is accidentally touched.
1. Begin with the printer powered off.
2. Open the printer cover and remove the print ribbon cartridge.
XPS Card Printer Installation and User Guide 67
Page 68

3. Open the cleaning pen.
4. Using gentle pressure, move the cleaning pen back and
forth along the full length of the printhead edge until it is
completely clean.
5. Replace the print ribbon cartridge and close the printer
cover. Avoid bumping printhead when installing the print ribbon cartridge.
6. Power on the printer.
7. Print a sample card to verify the quality of printing.
HINTS & TIPS
• Avoid touching the printhead edge with your fingers.
• Avoid touching the printing edge of the printhead cartridge with any sharp objects
which can permanently damage the printhead.
• Only use the cleaning pen to clean the printhead. Other materials can stick to the
printhead and cause damage.
• Use the cleaning pen up to 8 times, and then replace it.
XPS Card Printer Installation and User Guide 68
Page 69

CARD DESIGN AND SETUP
Card design is the name given to the combined features of the printed cards. Cards are useful
only when all cards contain the required information.
Card design includes:
• The different types of data such as
name and ID number, images
including company logo or
employee or other photos, and
special features such as bar code
or magnetic stripe.
• The layout of the data.
• Processes to improve card life such
as topcoat.
• Corporate style guidelines. For example, a corporate style guide can specify a particular
shade of red for the logo.
This section describes the card design components available and provides detailed information
about them.
•
Color printing
Monochrome printing
•
•
Topcoat
•
Magnetic stripe
Smart card
•
•
Printing and non-printing areas
HINTS & TIPS
• An organization might have more than one card design. For example, a health club can
use member cards and employee ID cards.
• Print several samples of your card design and use them to evaluate the quality of the
design.
• Use high quality (300dpi) photos and graphics.
XPS Card Printer Installation and User Guide 69
Page 70

Card Components
The printer can personalize cards with the following components:
•
Color printing
Monochrome printing
•
•
Topcoat
Magnetic stripe
•
•
Smart card
Printing and non-printing areas
•
The arrangement or layout of components helps to determine how well your card design works
for users.
The settings you choose define how the software manages the card components. The software
you use to produce cards affects the settings available and how you might use them.
XPS Card Printer Installation and User Guide 70
Page 71
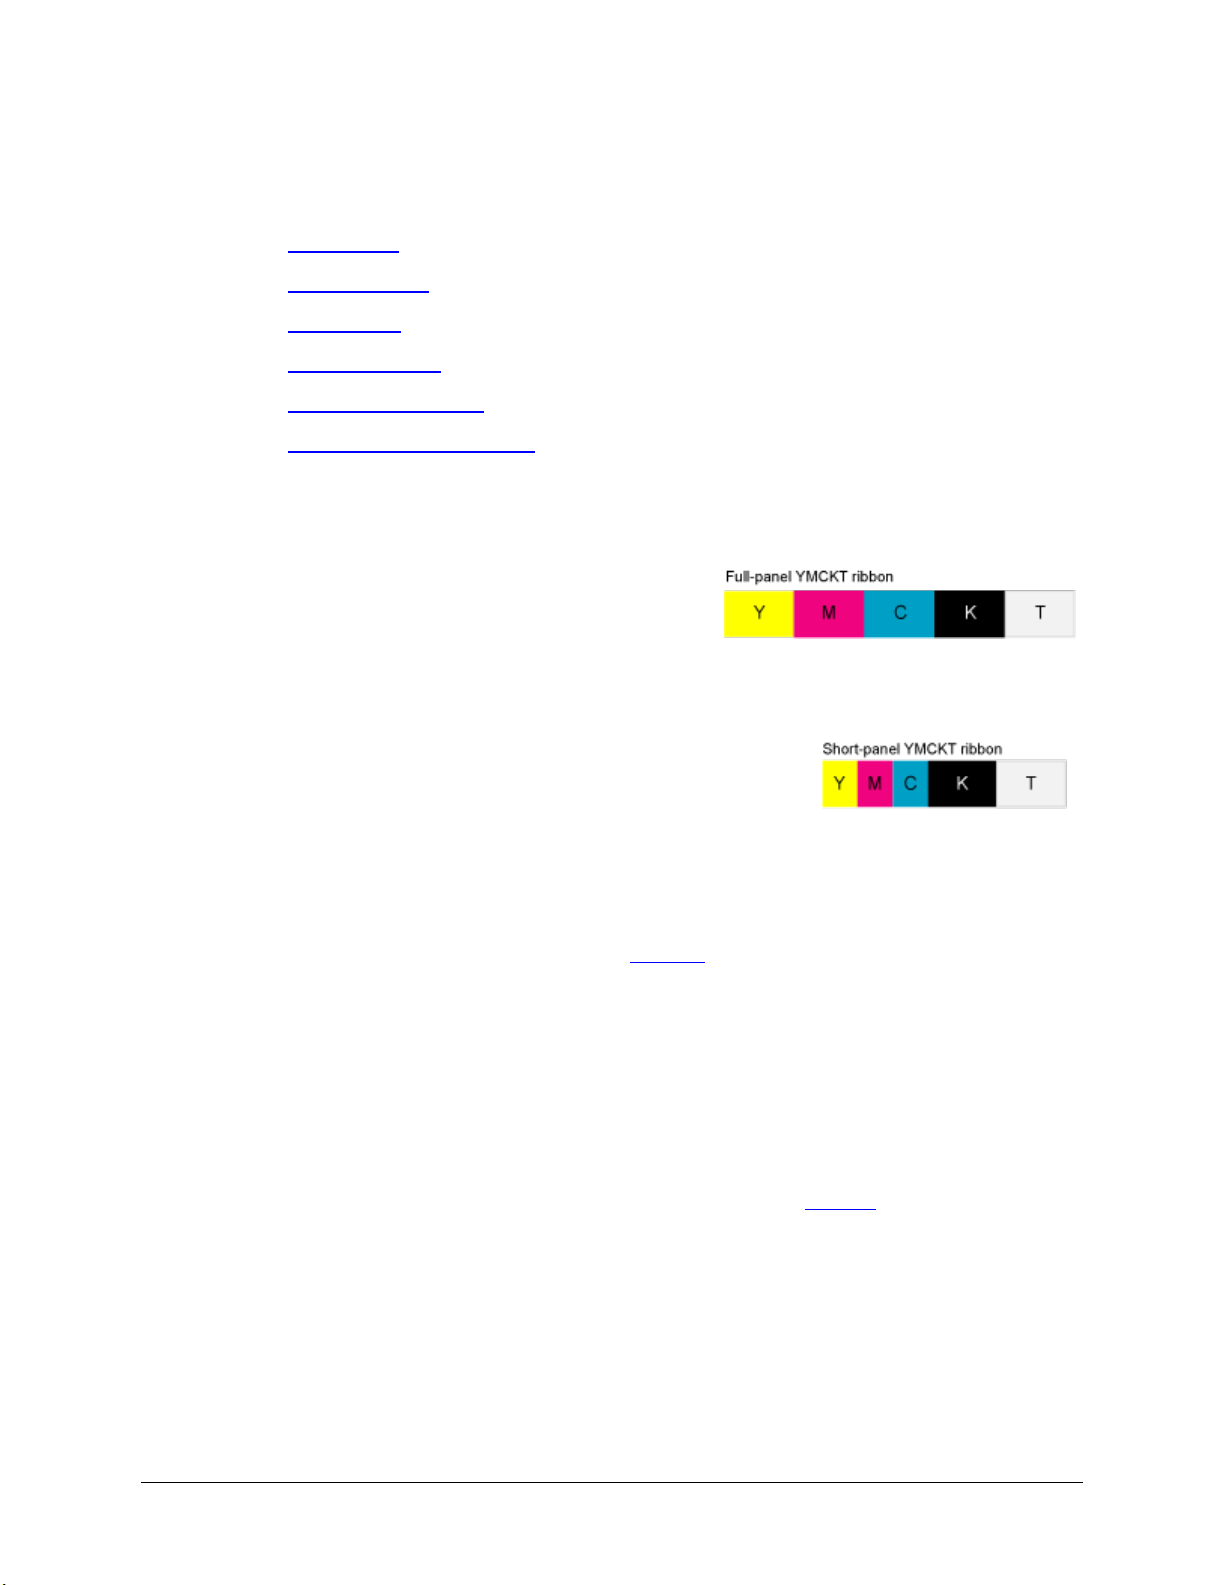
Color Printing
This section includes:
•
Print Ribbon
•
Managing Color
Printing Text
•
•
Printing Graphics
Types of Color Images
•
•
High Resolution Print Mode
Print Ribbon
Color printing uses a print ribbon with three color
panels Y (yellow), M (magenta), and C (cyan). The
ribbon also includes a black (K) panel and a topcoat (T)
panel. The printer applies the color images to the card
first, prints black components using the panel, and then applies the topcoat (T) which helps
protect the color image from damage.
Color print ribbon is available in full panel or short panel. The
color area for short panel ribbon is 1.57 inches (40mm). The YMC
panels of short panel ribbon are approximately half the length of
a full card.
When printing with short panel print ribbon, the location of the color area is defined in the card
design. Color printing begins when the driver detects a color pixel and continues for the length
of the ymc panels.
For more information on print ribbon, see the
Supplies section of this guide.
Managing Color
Many people think that a color on the monitor and the printed color "should be the same."
Color management is the technical process of making color in two different places (such as on
the PC monitor and printed on the card) as similar as possible. A widely used color standard is
sRGB color, and the card printer also uses sRGB color. (sRGB is the name for the standard Red,
Green, and Blue color space.)
Other color characteristics include brightness and contrast. The Windows driver includes
settings to fine-tune the brightness and contrast for the card. See
In a non-Windows environment, color management or graphics software can be used to manage
images.
Settings for more information.
Printing Text
The printer can print text in any color. Small characters are likely to be more readable if they are
formatted as black and printed with the black (K) panel. The printer supports 6 point or larger
text. with a sans-serif font such as Arial.
XPS Card Printer Installation and User Guide 71
Page 72

Printing Graphics
The printer produces full-color images from most types of graphics.
It can use BMP, JPEG, TIFF, and PNG file formats for photos and
logos.
Vector graphics, such as WMF and SVG files, have components such
as shapes with lines and fills. The XPS Card Printer Driver separates
each component. Components defined as black in the file are likely
to print with the K panel.
For the best appearance of graphics, use a color that appears black
but is not, so all parts of a graphic print with YMC panels. In the RGB
color space, 0, 0, 0 is black (and prints with the K panel), but 0, 0, 5 is not black (and prints with
the YMC panels).
Backgrounds that are black might print over colored images or text. Use a color that appears
black for the background to prevent overprinting, or use white text over the black background.
The printer uses the YMC panels of full-color ribbon to print grayscale graphics.
Types of Color Images
Cards can include both color photos and a color logo or text. The logo is usually the same on
each card, and the photo is unique. Follow these guidelines to obtain the best results for
printing both logo and photos:
• First, check the color quality of the photos.
o Change the image capture system to get the best quality photos; work with
distance, lighting, and camera settings to obtain consistent, high quality photos.
o Evaluate the quality of printed photos after the image capture system is
optimized.
o Use the Color Settings tab in Printing Preferences to adjust the printed output, if
necessary.
• Next, evaluate the other color areas of the card, such as text or logo.
o The application might have settings that can help improve the printed color of
text.
o Image editing applications, such as Photoshop©, can be used to change the
color of a logo file for optimal printing.
o If the cards do not have the colors you want, ask your administrator or service
provider for assistance.
HINTS & TIPS
• See
Layout for information about different components, such as a logo or photo, and
how to manage colors.
• See "Printing Text" in the
driver separates color and monochrome components for printing.
XPS Card Printer Installation and User Guide 72
Monochrome Printing topic for information about how the
Page 73

Monochrome Printing
This section describes:
•
Monochrome panels in full-color ribbon
Monochrome ribbon
•
•
Printing bar codes
Printing text
•
•
Printing graphics
High Resolution Print Mode
•
The printer driver or application on the PC prepares the data for the printer to use. The type of
data and the type of ribbon installed determine how the XPS Card Printer Driver renders it.
Monochrome Panels in Full-Color Ribbon
Full-color print ribbon includes a black panel. The black
panel transfers to the card differently than the YMC
panels, Text and bar codes are often printed with the
black panel. It also prints any monochrome or one-bitper-pixel graphics using the K panel.
Monochrome Ribbon
Monochrome ribbon produces single color cards. Monochrome ribbon can
be:
• Alternating black and topcoat panels (KT or KTT ribbon)
The printer applies Black and two topcoat panels on the
same side of the card.
• Continuous black (K ribbon)
• A continuous color, such as green or silver (also K ribbon)
Continuous monochrome printing with certified ribbon uses the
Ribbon Saver feature. The printer begins using ribbon at a location
that corresponds to the leading edge of the card. The printer
continues to spool ribbon for the length of the image but no farther.
(The printer leaves a small margin between each card to avoid image
overlap.)
Printing Bar Codes
Most bar code readers require that bar codes are printed with the K panel of
a ribbon. Bar codes must be tested in your bar code reader to make sure
they are readable.
Bar codes are usually more readable when they are printed with less power.
Bar codes are also more readable when the bars are parallel to the long
edges of the card.
XPS Card Printer Installation and User Guide 73
Page 74

Printing Text
Printing text using a K panel can make text look crisp, because only one panel is used for
printing. Fine text is often more readable when printed with more power.
The font you choose also affects how easy it is to read printed text. The printer reliably prints 6
pt Arial font. Bold, sans-serif fonts are more readable after
printing than serif fonts, or fonts with thin strokes, as shown at
right. Fonts that print well are shown toward the top of the card.
When printing one-color cards, make sure text is formatted as
black. Text formatted with a color (such as blue) in the ID
software is dithered by the driver and might have a broken appearance.
Printing Graphics
When printing one-color cards, the XPS Card Printer Driver dithers color
and grayscale graphics. Dithering converts areas other than black and
white to dots so the single-color ribbon can approximate the lightness
and darkness of the original graphic.
HINTS & TIPS
Monochrome means one-color. When printing cards, the opposite of monochrome is full-color
or YMC printing.
XPS Card Printer Installation and User Guide 74
Page 75

Topcoat Printing
When a ribbon with a topcoat or "T" panel is installed, the
printer can apply topcoat to the card using the printhead.
Full color (YMCKT), KT, and KTT ribbons include topcoat
panels.
Topcoat protects the printed image on the card. Full-color
printing will fade if it lacks topcoat protection. Make sure
that the printing is covered with topcoat (except for areas such as magnetic stripe, smart card,
or signature panel).
Topcoat must be requested by the application or driver sending the card to the printer. When
you use the XPS Card Printer Driver, it automatically requests topcoat for YMCKT, KT, and KTT
ribbons. Most ID software also requests topcoat automatically.
Topcoat should not be applied over the magnetic stripe, smart card chip, or signature panel of a
card. To prevent topcoat application, see
HINTS & TIPS
Topcoat is applied as an even, consistent film.
Print and Non-printing Areas for more information.
XPS Card Printer Installation and User Guide 75
Page 76

Card Design: Magnetic Stripe
This section describes:
•
About Magnetic Stripe
•
Magnetic Stripe Formats
Magnetic Stripe Escapes
•
•
Magnetic Stripe Fonts
About Magnetic Stripe
Magnetic stripe is an option available in the printer. See the Printer
Status page of Printer Properties for the printer to see if your
printer has a magnetic stripe option. The cards you use must also
have a magnetic stripe. The magnetic stripe is a brown or black
stripe close to one long edge of the card.
See the package containing new cards for details about the
magnetic stripe.
The magnetic stripe option is set up to define the coercivity,
number of tracks, and data format. The coercivity and data format
are set in the printer. The installer sets these values and they
remain the same for all cards printed using the same design. See
How to Set the Magnetic Stripe Coercivity if you need to change
the coercivity.
The data format determines how many characters can be encoded on a track. It also determines
which characters can be encoded. Click
three-track format.
Click
here to see the characters available with the JIS single-track format.
Your cards can use the default format for each track, or can use a different combination of
tracks and data formats.
here to see the characters available with the default ISO
Magnetic Stripe Formats
Three-Track Option
The default data formats for a three-track magnetic stripe option are:
• Track 1 — IATA
• Track 2 — ABA
• Track 3 — TTS
This combination is often abbreviated IAT. This format is called ISO format.
IATA (International Air Transport Association)
The maximum number of characters for IATA format is 76 characters. These characters can
include spaces, upper case alphabetic characters, numeric characters, and the following special
characters:
! # $ % ' ( ) * + , - . / ; : < @ > = ^ ] \ [ " & _
XPS Card Printer Installation and User Guide 76
Page 77
ABA (American Bankers Association)
The maximum number of characters for ABA format is 37 characters. Numeric characters and
the following special characters are allowed:
: ; < = >
TTS (Thrift Third Standard)
The maximum number of characters for TTS format is 104 characters. Numeric characters and
the following special characters are allowed:
: ; < = >
Single-Track Option
The default data encoding format for a single-track magnetic stripe module is the JIS Type II
format.
JIS (Japanese Industrial Standard)
The maximum number of characters for the JIS format is 69 characters. These characters can
include spaces, numeric characters, upper case alphabetic characters, lower case alphabetic
characters, and the following special characters:
! " # $ % & ' ( ) * + , - . / : ; < = > ? @ [ ] ^ _ ~ { | } ~
From a PC running a Japanese edition of a supported Windows operating system Japaneselanguage characters are also supported. They include the following special characters:
45 Katakana characters:
and the following 10 Katakana characters:
Each time you start using Japanese-language characters, or stop using them, a hidden character
is added. Each hidden character reduces the number of characters you can encode by one
character.
XPS Card Printer Installation and User Guide 77
Page 78

Card Design: Smart Card
• About Smart Card
Smart Card Requirements
•
•
Smart Card Codes on the Printer Label
About Smart Card
This section presents basic information about personalizing smart cards. Smart card processing
is different from other types of personalization, because the "smart card" step of
personalization is controlled by an application that is different from the rest of card
personalization.
Normally, smart card setup is provided by a value-added reseller or service provider.
Information about the smart card module installed and the type of cards to use can be
requested from your service provider or value-added reseller.
Requirements
The following items are required when personalizing smart cards:
• A direct local connection
between the printer and the PC.
• Smart card reader in the printer.
• A smart card cable for the smart
card port used. The illustration
shows the location of the smart
card connection on the printer.
• Card application that is
customized to work with the
printer and the smart card application (using the driver SDK or ID software application
with a smart card application manager)
• Smart cards that work with the reader in the printer
Smart Card Codes on the Printer Label
The configuration label includes codes to identify the type and model of smart card module
installed in the printer. The following table lists the codes used on the configuration label.
Code on Label Type of Smart Card Module
S1 Integrator
S2 SCM Dual Interface Reader
The S1 value on the configuration label indicates that the printer was ordered from the factory
with the basic smart card components installed. An integrator must install a contactless reader
supplied by others.
If the S2 value is included in the configuration code, the printer has shipped from the factory
with the basic components of an S1, plus the SCM Dual (Contact/Contactless) Interface installed.
XPS Card Printer Installation and User Guide 78
Page 79

Printing and Non-Printing Areas
The card design can have areas where printing is not allowed. Such areas can include a magnetic
stripe, signature panel, or smart card chip. ID software often manages such non-printing areas
automatically.
If you use other applications to print cards, such as Microsoft© Word, define non-printing areas
using the XPS Card Printer Driver or escape codes. The XPS Card Printer Driver includes standard
non-printing areas, such as three-track magnetic stripe and smart card chip. Both printing and
topcoat are blocked in these areas.
• See
• See
How to Set Print Areas to define standard non-printing areas.
How to Define Print Areas using Escape Codes for other areas.
Standard Magnetic Stripe Area
Use the following dimensions to prevent printing in the magnetic stripe area.
The 3-track magnetic stripe is usually on the back of the card, while the single-track magnetic
stripe is usually on the front of the card. The green arrow shows the direction the card travels
through the printer.
A B C
3-track 3.37 in
85.6mm
1.46 in
37.1mm
0.66 in
16.8mm
2-track 3.37 in
Single-track (JIS) 3.37 in
85.6mm
85.6mm
1.57 in
39.9mm
1.60-in
40.6mm
0.55 in
14 mm
0.52 in
13.2mm
Smart Card Non-printing Area
Use the following dimensions to prevent printing in the smart
card area. The smart card area is usually on the front of the
card. The green arrow shows the direction the card travels
through the printer.
A B C D
0.88 in
22.4mm
1.17 in
29.8mm
0.88 in
22.4mm
1.47 in
37.3mm
Other Areas
If you want to specify more than one area on the same side of the card or want an area other
than the standard ones, see
XPS Card Printer Installation and User Guide 79
How to Use Blocking Escapes.
Page 80

HINTS & TIPS
• Blocking typically extends 0.1 inch beyond the edges of a feature. The dimensions listed
include the extended blocking region.
• Print several cards using your card design and application to verify that printing and
topcoat are applied as you intend.
• If you do not use the driver or ID software, you can use the dimensions provided for
smart card and magnetic stripe to customize your print and topcoat areas.
• Use ID software, a custom application, or escapes to define custom nonprinting areas
for one or more of the following:
o Blocking printing but not topcoat
o Non-standard areas, such as a preprinted logo or a signature panel
o More than one area on the same side of the card
XPS Card Printer Installation and User Guide 80
Page 81

Card Layout
The arrangement or layout of components helps to determine how well your card design works
for users. Follow these guidelines to position card design components for best results.
Backgrounds
• Consider using a white background for the card to achieve consistent professional
results.
• Consider using smaller blocks of color, patterned areas, or gradients to highlight printed
card features such as a name, photo, or logo.
• Avoid using a solid color background or half tone over a large area of the card. It can
show flaws on the card (such as uneven surface) or the location of card features (such as
a smart card chip).
Image Placement
• Important images can include the photo, logo, and bar code.
• Do not place an important image on the front of the card in the same area as a magnetic
stripe or other machine-readable feature. Frequent use of a card in a reader can wear
away the image on the opposite side of the card.
• Do not place an important image directly on the other side of a signature panel. Residue
from the panel can cause printing problems on an adjacent card. Place the image above,
below or to the side of the panel.
• Avoid uneven areas which can result in inconsistent print quality.
• Do not place an important image directly on the other side of a smart card chip. The
card might not be as flat in that area and printing voids can occur.
Badges
If cards are used as badges, you might want
to punch a hole or slot after printing so
cards can be attached to clips. The
illustration shows the maximum size for a
slot. A smaller slot will be stronger and
contribute to durability in the slotted area.
XPS Card Printer Installation and User Guide 81
Page 82

Settings
Settings are available through the XPS Card Printer Driver for Operators and Managers.
Managers also can use the Printer Manager to perform setup tasks.
Windows Properties and Preferences
The XPS Card Printer Driver includes the following interfaces:
• Printing Preferences, which provides card design settings, such as Orientation and one
sided or two-sided printing. See
• Printer Properties, which provides status information about the printer. It also has port
setup, permissions, and update tools. See
How to Open Printing Preferences.
How to Open Printer Properties.
Printer Manager
• The printer includes the Printer Manager, which displays information about the printer.
The manager or installer uses it to set up the magnetic stripe option and to work with
your service provider when troubleshooting problems. See
Manager.
• Operators can use the printer front panel and the Properties page of the driver to view
card counts and status information. Operators should use the Printer Manager only at
the direction of their manager.
How to Open the Printer
XPS Card Printer Installation and User Guide 82
Page 83

PRINTER DRIVER
The XPS Card Printer uses Microsoft XPS print technology to support printing from currently
available applications. It also supports applications being developed using the newer
architecture of Windows Vista and Windows 7 operating systems.
The XPS Card Printer Driver:
1. Receives card data from an application
2. Processes it for personalizing a card
3. Sends the prepared data to the printer
4. Checks the printer for card completion
5. Displays any conditions (messages) associated with the card
See
Using the Driver for tasks you can perform using the driver interfaces.
HINTS & TIPS
See the Quick Install Guide for the steps to follow to install the printer and driver correctly.
The installation assigns a default printer name. If you want to use a different name, you can
change the name from the Printer (and Devices) window. If you have changed settings in
Preferences, the settings return to default values. For best results, change the printer name, if
needed, after installation and before changing settings.
XPS Card Printer Installation and User Guide 83
Page 84

Communication with the Printer
How the XPS Card Printer Driver and printer communicate
• The printer can be connected to a PC using a USB cable or an Ethernet cable. For both
connection types, the printer treats communication as if the PC (driver) is connected
over a network.
• The driver requires the current printer IP address when it is connected to the printer
over a network. See
• When both the printer and PC use the organization's network, the network affects the
speed of data transmission, and can affect who can use the printer.
• When the printer and PC are connected using a USB cable, the printer and PC
automatically set up a local network. The printer has an IP address, which can be used
view the Printer Manager. Each time another card printer is connected to the PC, the
to
local network is updated to include the new printer. For best results, do not connect
another printer while using Printer Manager.
• Applications can also be customized to communicate with the printer through the
driver. If the application you use is customized, follow instructions in the application.
HINTS & TIPS
• The printer can have many PCs connected to it.
How to View the Network Port in the Driver for more information.
• Each PC can have up to 4 printers connected using USB cables.
• Each PC can be connected to many printers over the network.
• Each printer has a separate instance of the driver.
• Each printer needs to have a different name. The driver takes care of this requirement.
XPS Card Printer Installation and User Guide 84
Page 85

Using the driver
The XPS Card Printer Driver provides the Windows dialogs for Printing Preferences for setting
the page or card design, and Printer Properties to manage the printer in the Windows
environment.
Using settings in Printing Preferences, you can:
•
Adjust the colors printed
•
Change card design settings
Send cards with only mag stripe data for encoding
•
•
Print on both sides of the card
Rotate the card
•
•
Set the print area
Set the number of copies of the same card design
•
Printer Properties also provides status information and sample cards. Using Printer Properties,
you can:
•
View or set the printer network port address
Print driver sample cards
•
•
View printer and supplies status
View card counts
•
•
View the driver version
Set Windows Permissions
•
HINTS & TIPS
• The Printer Properties dialog includes a Sharing tab. The printer driver does not support
sharing.
• The Ports tab of the Printer Properties dialog includes an "Enable Bidirectional Support"
checkbox. The driver always uses bi-directional communication with the printer.
Changing the checkbox prevents all printing from the driver.
• The Ports tab of the Printer Properties dialog includes an "Enable Printer Pooling"
checkbox. The printer driver does not support pooling.
XPS Card Printer Installation and User Guide 85
Page 86

UPDATES, UPGRADES, AND MORE
This section describes:
•
Updates
•
Upgrades
Deviations
•
Updates
An update replaces part of the product you have–usually software–with a newer release. Driver
updates and firmware updates are the most common types of update.
• Driver Update
Driver updates are available from the website or from your service provider.
• Firmware Update
In most cases, you should update firmware when your service provider recommends it.
Be careful to choose a firmware file that exactly matches your printer type.
Updating the Driver
If a newer printer driver is released, it can be downloaded from the Web site listed in the bar at
the bottom of the page.
Important!
Do not use any of the following methods to remove or replace the existing driver:
• The Printer Properties > Advanced tab >New Driver button
• Delete the printer from the Printers or Hardware window.
After downloading the driver, follow the steps to
remove this driver and install the new one. Removing and installing the driver requires a user
with Windows Administrator-level or Creator/Owner rights or permissions.
When you update the driver, the driver also updates:
• My XPS Card Printer
• The documentation folder
In most cases, software used by the driver, including an mDNS responder such as Bonjour®,
and Microsoft components such as the XPS framework, are not updated.
Remove the Printer from a Windows PC to
XPS Card Printer Installation and User Guide 86
Page 87

Upgrades and Printer Options
Printer upgrades and options add functionality to your printer. Upgrades come with installation
instructions and are designed to be installed by trained service providers. Printer options are
usually installed by operators.
Depending on the printer, the following upgrades and printer options are available:
• Magnetic Stripe Field Upgrade
• Smart Card Field Upgrade
•
High-Capacity Output Hopper Option
•
200-Card Input Hopper Option
•
Lock Option
Deviations
Deviations are specially adapted products, created as a special-order. Most often, the driver or
the firmware is deviated; sometimes the hardware (printer) is also changed. If you have a
deviated driver, firmware or printer, be very careful about updating the driver or firmware. A
deviated driver or firmware will have a version number with “d” near the end, similar to the
following:
Firmware Version: 1.3.d1
Driver Version: 1.0.d2
Always check with your service provider to determine whether to install the update. Do not
update until you are sure that the update supports the special features of your product.
Deviations might be called by a different name in your organization. Other names might include
RPQ, custom, or special. RPQ stands for Request for Price Quotation, which is one of the first
steps in developing an agreement to create the deviated product.
XPS Card Printer Installation and User Guide 87
Page 88

REMOVING A PRINTER FROM A WINDOWS PC
This section includes instructions to remove the XPS Card Printer Driver from a Windows PC. If
the PC is going to be used for another purpose or reason, you may want to remove the printer
and all driver files. When the XPS Card Printer driver is removed, all files associated with the
driver such as printer documentation and magnetic stripe fonts, are also removed.
Follow these instructions to remove the XPS Card Printer Driver from a Windows PC:
1. Log on to the PC as a user with Administrator access.
2. Open the Windows Printers window:
• Windows 7, choose Start > Devices and Printers
• Windows Vista and Windows Server 2008, choose Start > Control Panel > Hardware
and Sound > Printers.
• Windows XP and Windows Server 2003, choose Start > Settings > Printers and Faxes
3. Make sure all cards sent to the printer have printed. You cannot delete a printer that has
jobs in the print queue. Double-click the printer icon to open the Print Manager and view
the print jobs. If any jobs appear, do the following:
1. If the job is paused and you want it to print, click the job and then choose Document
> Resume. Wait for the jobs to complete.
2. If you want to delete a job in the queue, click the job and then choose Document >
Cancel. Click “Yes” to confirm.
3. If the printer is paused or offline, the title bar for the window will include that
status. Choose Printer and clear the appropriate choice to enable printing.
4. To cancel all jobs, choose Printer > Cancel All Documents. Click “Yes” to confirm.
4. Power off the printer.
5. Insert the driver CD into the PCs drive.
6. Click the Remove Printer Driver icon on the main installer screen.
XPS Card Printer Installation and User Guide 88
Page 89

7. Click the Remove the Driver button.
8. Wait until the driver is removed. The installer will show you the progress of the uninstall.
XPS Card Printer Installation and User Guide 89
Page 90

9. You may be prompted to restart the PC. If a restart is required, remove the USB cable and
then click the Restart Now button.
XPS Card Printer Installation and User Guide 90
Page 91

TROUBLESHOOTING
This section describes:
•
Troubleshooting Tools
•
How to Locate the Problem
Installation Problems
•
•
Card Appearance Problems
Magnetic Stripe Problems
•
•
Driver Communication Problems
For Managers Only
•
Tools for Troubleshooting
The tools for troubleshooting a problem are similar to the supplies and equipment you use to
print cards:
• Cards to print, used at several stages of troubleshooting
• Print ribbon
• Cleaning supplies, especially printer cleaning cards and a cleaning pen
• The XPS Card Printer Driver, if you use it when printing cards
• The Printer Manager, for use by managers with the guidance of your service provider
• Procedures to identify where a problem is occurring
Locate the problem
When you think the printer is not working correctly, use the following procedure to locate the
source of the problem.
The printer, printer driver, and ID software work together to produce cards. If the system is not
working as you expect, follow these steps, in the order listed, to isolate the source of the
problem before contacting your service provider.
1. Check that the power cable is connected and the printer is powered on.
2. Does the printer power on and display "Ready" on the front panel within 1 minute?
If yes, the printer powers on. Continue to step 3.
If the printer powers on but does not display "Ready" the printer is not working
properly; If the printer does not power on, make sure the printer is connected to a
functioning power source.
Remove the printer power cord from the outlet.
Connect another device, such as a light, to the same outlet to verify that the power
XPS Card Printer Installation and User Guide 91
Page 92

source functions correctly.
Connect the printer to a functioning outlet and repeat, beginning with step 1.
3. Make a printer test card. See
Does the test card print? Does it look like one of the cards shown in the topic?
If yes, the printer is working correctly. Continue to step 4.
If no, the printer is not working correctly. Request service for the printer.
4. Connect the printer data cable, if needed. Make sure you use the same type of cable –
USB or network – used when the printer was installed.
5. If you use the XPS Card Printer driver, print the driver sample card. See
Driver Sample Cards for the steps to follow.
Does the sample card print?
If yes, the printer and driver are working correctly. Continue to step 6.
If no, the printer and driver have a communication problem. Troubleshoot
communication problems.
If you are not using the driver, ask your service provider or software provider for
assistance.
6. Using your ID software, print a card. Click the type of printer – with an input hopper or
with a single-feed slot – and follow the instructions to print a card.
Does the card print?
How to Run a Printer Test Card for the steps to follow.
How to Print
If yes, the driver is successfully working with the ID software. Troubleshoot the card
design.
If no, check the following:
In the application, is the correct printer chosen in the Print Setup or Print dialog?
If the printer produced a blank card, you might have the wrong page size or driver
settings.
If the card causes an error, the card might have a type of data the printer does not
support.
HINTS & TIPS
This process will not help with card appearance problems. See
problems and solutions.
See
Troubleshooting Magstripe Problems if the card includes magstripe data and it causes a
magstripe message.
Card Appearance for possible
Fixing the Printer System
See Printer System for typical components of the system. If any one component does not work
properly, printing cards can be affected.
• The XPS Card Printer Driver
XPS Card Printer Installation and User Guide 92
Page 93

• ID Software
• Using the printer plug-in
• Other components of the system
The XPS Card Printer Driver
The XPS Card Printer Driver is provided in the CD Folder, included in the shipping carton. If the
CD is not available, you can download the driver from the Web site link at the bottom of this
page. Choose Support & Drivers > Drivers & Download from the menu. Enter your printer model
in the Enter Product Name or Number area, and click Go.
ID Software
ID software formats the types of data used to print cards. Contact the dealer or distributor from
whom you purchased your printer to obtain ID software.
ID software does not know the capabilities of the printer and you are responsible for selecting
card features that work with the printer you have.
If you do not use ID software, make sure the software you use supports the requirements for
creating cards. If you use magnetic stripe data, you must use an application that saves text as
text and not as a graphic. For example, MS Paint only saves graphic data, while Photoshop saves
both graphic and text data. Fonts and escapes require text be sent from the application as text.
Using the Printer Plug-in
ID software might include a printer plug-in, which takes the data in the ID software and makes it
available in the form the driver can use.
Other Components of the System
An ID or badge system usually includes a camera to take photos, and can include other capture
devices such as those for biometric data. Using and maintaining these components is important
to the quality of cards you produce.
XPS Card Printer Installation and User Guide 93
Page 94

Installation Troubleshooting
This section describes issues that could prevent a successful installation and the recommended
solutions to those issues. Choose from the following topics:
•
USB Installation Troubleshooting
Network Installation Troubleshooting
•
USB Installation Troubleshooting
Problem
The cable is loose.
The data cable is damaged or
frayed.
The system has a temporary
communication problem.
The card printer does not
install when the USB cable is
connected
Solution
Reconnect the USB cable to the ports on the PC and the
printer. Power the printer OFF, and then back ON. If the PC
and printer still do not communicate, restart the PC.
Power off the printer. Replace the cable if you have a spare.
Contact your service provider to order a new data cable.
USB extension cables can cause communication problems. The
recommended USB cable is 6-ft (2 meters) long. Be sure to use
a cable rated for USB 2.0 data transmission.
If the printer is not recognized by the PC, or if installation was
interrupted, the Device Manager might have an entry for the
printer that needs to be removed before the printer can be
installed.
Disconnect the printer from the PC.
If the printer was installed, make sure it is deleted. See
Removing a Printer from a Windows PC for the steps to
follow.
Open the Windows Device Manager.
1. Locate the device to delete. The device might be called
"Unknown device" or it might be located under the
Printers or Network Adapters folder. The device might be
marked with a yellow question mark or exclamation mark.
2. Click on the device name to select it, and then right-click
to display a pop-up menu.
3. Choose Remove from the pop-up menu.
4. Click Yes or OK to confirm removal of the device.
5. Close the Device Manager. Close any other windows.
6. Re-install the printer. See Install the Printer Using a USB
Cable.
I get an error message saying The USB installer timed out and a printer was not detected.
XPS Card Printer Installation and User Guide 94
Page 95

USB not detected. Remove the printer driver before re-installing the printer.
For more information on how to remove the driver, see
Removing a Printer from a Windows PC.
The USB cable is connected
before the driver is installed.
The Print Sample Card button
is gray.
The PC USB port does not
communicate reliably with the
printer USB port
The first printer installed on a PC using a USB connection must
be installed from the driver CD or downloaded driver.
Remove the driver before re-installing the printer.
For more information on how to remove the driver, see
Removing a Printer from a Windows PC.
The Print Sample Card button in the Printer Properties is
enabled when the printer and driver communicate normally. If
the Print Sample Card is gray, check that the User button on
the front of the printer is steady green and that Ready is
displayed on the LCD panel.
Power management on the PC has shut down USB
communication.
Open the Device Manager and the list of USB devices. Disable
shutdown for each hub in the list. You might need to restart
the PC to make the changes take effect.
Hibernation on a laptop PC requires several moments to
enable USB communication. Unplug the USB printer port and
then connect it again.
Replace the PC port or the PC. Contact your PC or port vendor
if you need assistance.
The printer does not install or
print on the PC when the PC is
connected to a network using
VPN Client software.
VPN Client software can prevent the installation and use of
other devices. Choose one of the following solutions:
Connect the printer using an Ethernet cable and follow the
instructions in Install the Printer and Driver Using a Network
Cable.
Disconnect the VPN Client software from the network, and
then install the USB printer and driver or resume printing.
Network Installation Troubleshooting
Problem Solution
The cable is loose. Reconnect the data cable to the network port and the
printer. Restart the printer.
The Status page of Printer
Properties shows the printer is not
Follow your network troubleshooting procedures to
isolate and test each component of the computer-to-
XPS Card Printer Installation and User Guide 95
Page 96

available, but the printer shows
"Ready" on the LCD panel.
printer communication link.
Suggestions:
• The computer-to-network connection can be
checked by accessing a network resource,
such as a network drive.
• The network administrator can check
communication between a server and the
printer.
• Make sure the user is logged in to the
network.
The printer is not configured with
the correct network address.
Make sure that the server name or IP address has
been entered in the Port Settings or Configure Port
dialog box on the computer. See Retrieve IP Address
for the steps to follow.
Check that Ready is displayed on the printer's LCD
panel.
XPS Card Printer Installation and User Guide 96
Page 97

Driver Problems
The driver and printer can have the following communication problems:
•
The driver does not detect the network-connected printer
The driver does not detect the USB-connected printer
•
•
Unexpected messages appear
The driver status or Windows print queue does not provide expected data
•
The driver does not detect the network-connected printer
Problem Solution
The Printer Properties > Status
tab shows the printer is not
available.
Message 500 appears after you
send a card to print
The network is not operating
properly.
The printer is not connected to
the network, or the PC is not
connected to the network.
Make sure you are using the same type of data cables –
USB or network – that were used when installing the
printer. You cannot switch the type of data cables after
installing.
Check the current Printer IP Address.
Update the IP Address on the Printer Properties > Ports
tab.
If this happens often, consider switching from DHCP
network addressing to Static IP addressing. See View
the Network Port of the Driver for more information.
Check the network using another device and fix or
report network problems.
To check the network, print to a different (paper)
printer or check the availability of network drives.
Make sure both ends of the data cables are connected.
See Data Cables.
Replace defective cables if needed.
The driver does not detect the USB-connected printer
Problem Solution
The Printer Properties > Status
tab shows the printer is available,
but Message 500 appears after
you send a card to print.
Message 505 appears after you
send a card to print.
XPS Card Printer Installation and User Guide 97
Make sure you are using the same type of data cables –
USB or network – that were used when installing the
printer. You cannot switch the type of data cables after
installing.
Make sure both ends of the data cable are connected.
See Data Cables.
Replace a defective USB cable if needed.
The Bonjour software is disabled or not installed.
Check the Windows Add/Remove Programs list to see if
Page 98

Bonjour is installed. If Bonjour is not installed and the
printer is connected using a USB cable, the driver must
In the print queue (Windows Print
The print queue shows jobs that Windows is still tracking.
The Ribbon Low light on the printer
The percent remaining that causes the printer Ribbon Low
In the print queue (Windows Print
The print queue shows jobs that Windows is still tracking.
The Driver Sample Card or mag
The "Print directly to printer" choice in Printer Properties is
A print job disappears from the
The printer USB cable was disconnected after the
be removed and the printer must be installed again.
A user with administrator (Windows XP) or
Owner/Creator (Windows Vista and 7) permissions is
required to remove and install the printer. See the Quick
Install Guide, available through My XPS Card Printer, for
the required sequence.
The SD260 device was removed
from the Safely Remove
Hardware list.
Power off the printer. Wait a minute. Power on the
printer. The device should be detected again.
The device always
appears in the
Safely Remove
Hardware list.
Unexpected messages appear
When using the XPS Card Printer driver on a PC with some older card printers installed, the older
printer driver can display message DR00914 "The printer driver was not started successfully."
naming the XPS Card Printer as a printer that did not get installed correctly.
Clear the message. The printer works as designed.
The driver status or Windows print queue does not provide expected data
Problem Solution
Manager), print jobs are shown as
done and are removed, when they
have not started in the printer.
The Driver Sample Card or mag
stripe test cards do not print.
and the driver status do not match
Manager), print jobs show an error
and are removed without printing.
XPS Card Printer Installation and User Guide 98
stripe test card do not print.
Those jobs can be in the queue at the printer, waiting for
other jobs to complete.
The "Enable bidirectional support" choice in Printer
Properties is unchecked. This must be checked to allow
printing from the driver.
light can be set using the Printer Manager. The driver
display cannot be changed. As a result, the two indicators
can show different data.
Those jobs can be in the queue at the printer, waiting for
other jobs to complete.
checked. Uncheck the value to allow printing of the driver
sample cards.
Page 99

print queue, but does not print.
application sent the job.
The Eject SD260 device appears
The print job prints, but remains in
The printer might be shared with another PC. The printer
in the Safely Remove Hardware
list.
The USB adapter in the printer appears in the list. This
cannot be changed.
the print queue.
driver does not support sharing. Close the print queue and
open it again to clear it.
XPS Card Printer Installation and User Guide 99
Page 100

Card Appearance
Card appearance problems can be caused by many different factors. Click the link below that
best describes the card appearance issue seen on the printed card.
•
Something did not print
Printing includes unexpected data
•
•
The color printing has flaws
The printing is too light
•
•
The printing in too dark
The monochrome printing has flaws
•
Something did not print
Problem Solution
Nothing is printed on the card The magnetic stripe Encode Only option is set to On.
Open Preferences and change Encode Only to Off.
Nothing is printed on the card The Print Ribbon is loaded incorrectly. Remove the print
ribbon and install it correctly.
Nothing is printed on the card The page size was not set to ISO-ID1. In the application,
use Print set up to choose the card printer. The correct
page size will be available after choosing the printer. See
Printing Cards for details.
Color printing on top of a black
background does not appear on
the card.
The printer uses the print ribbon panels in sequence;
the Y panel prints first, then M, and so on. The black
panel of the print ribbon is used last and will print over
the color panels. For best results, change the 100% black
background to a color near black, so that it prints using
the YMC (color) panels of the print ribbon.
Printing includes unexpected data
Problem Probable Cause Solution
Text intended for the
magnetic stripe printed on the
card.
The magnetic stripe font
was not applied to the
text.
The escape code was typed
incorrectly.
The text to encode was
longer than one line.
See How to Use Magnetic
Stripe Fonts.
See
How to Use Magnetic
Stripe Escape Codes.
Reduce the font size to
keep all text on one line.
XPS Card Printer Installation and User Guide 100
 Loading...