

Page 1
SHORT TERM CONFIDENTIAL
Page 2
SHORT TERM CONFIDENTIAL
Page 3

SHORT TERM CONFIDENTIAL
Page 4
XPS Card Printer Guide
SHORT TERM CONFIDENTIAL
Printer Guide
About the Printer
Using the Printer
Card Design and Setup
Printer Driver
Printing Cards
Troubleshooting
Supplies and Parts
Legal Notices
Installation Guide
Welcome to Card Printer Information
This online manual describes the XPS Card Printer and how to use it.
Before you use the printer, install and set up the printer. In most cases, install the Windows
driver for the printer as part of setup. See the Installation Guide for the steps to follow.
Please read this Printer Guide thoroughly before you use the printer.
Each card program has specific features, and it is important for you to understand the features
of your card program. Talk with your supervisor, system administrator, or other person to
understand the features of your card program. It will help you to successfully print cards using
the printer.
Using this information
The easiest way to print a page of information is to click your browser's Print button. Be sure
you print to a paper printer--these pages are not formatted for a card printer. If you want to print
a chapter or the entire Printer Guide, you can open and view the PDF file which contains the
same content. Click "Home" at the top of this browser window, and then "Print Manuals".
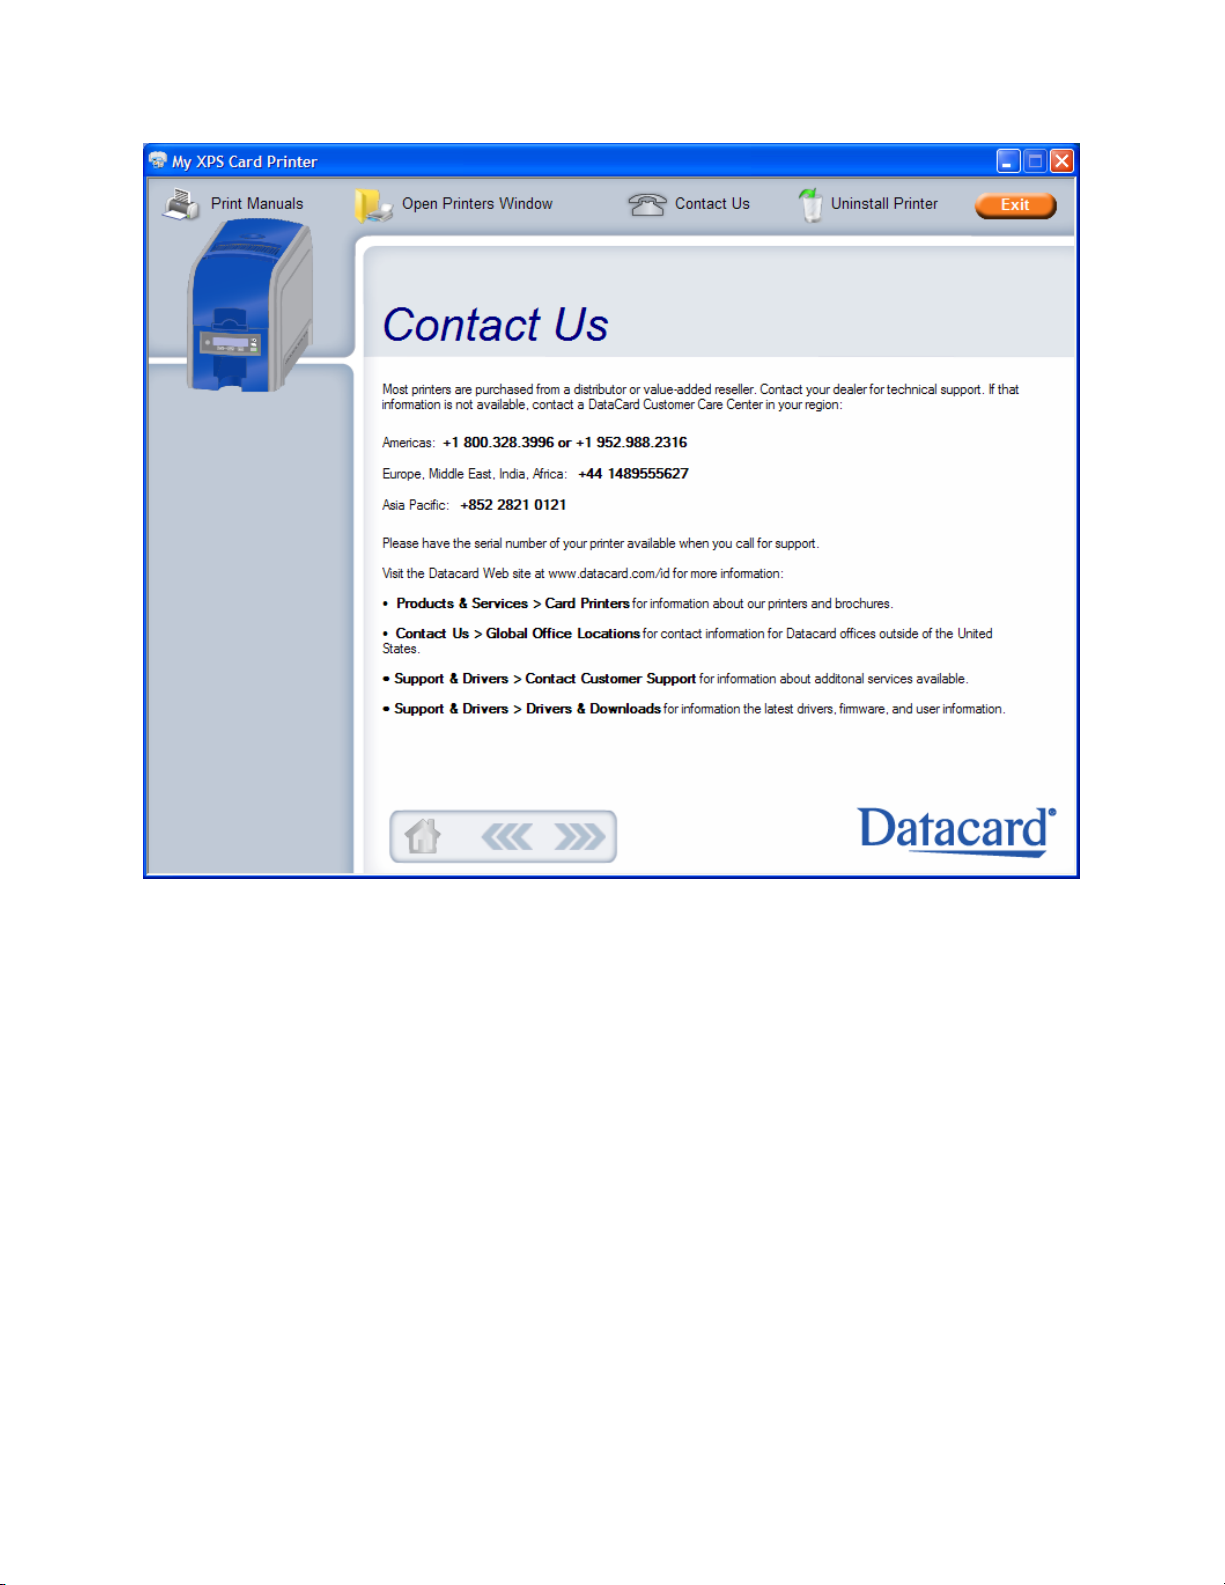
Need more help? Click Home and then "Contact us" for assistance.
Visit Datacard.com/id for downloads and support.
The design and information contained in these materials in protected by U. S. and international copyright law and/or treaties. See Legal Notices for details.
Page 5
XPS Card Printer Guide
XPS Card Printer Guide
DRAFT
2/22
Datacard Confidential
Page 2
SHORT TERM CONFIDENTIAL
Printer Guide
About the Printer
Printer
Components
Printer System
Printer
Configuration
Label
Site
Requirements
Tasks and Users
Using the Printer
Card Design and Setup
Printer Driver
Printing Cards
Troubleshooting
Supplies and Parts
Installation Guide
About the Printer
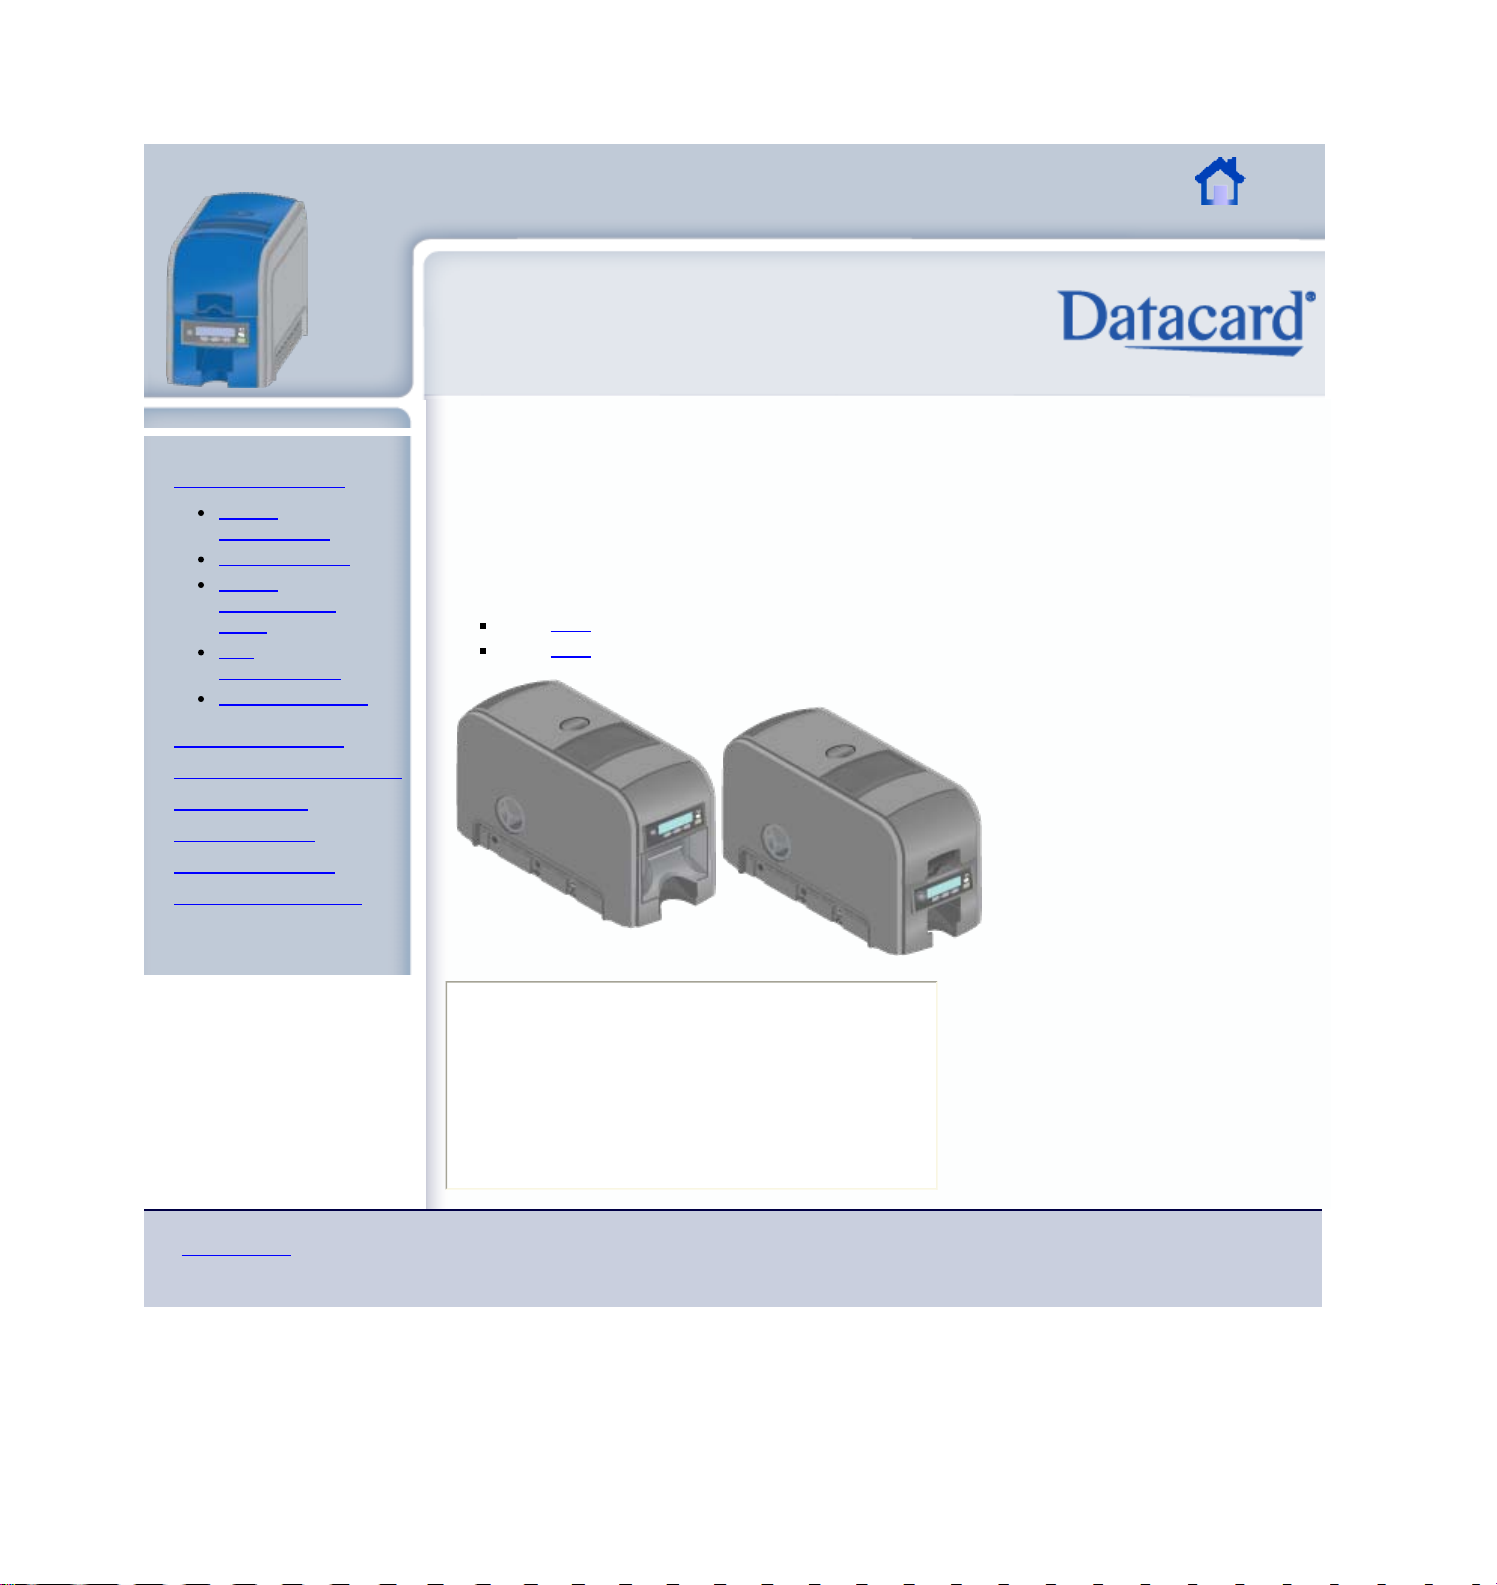
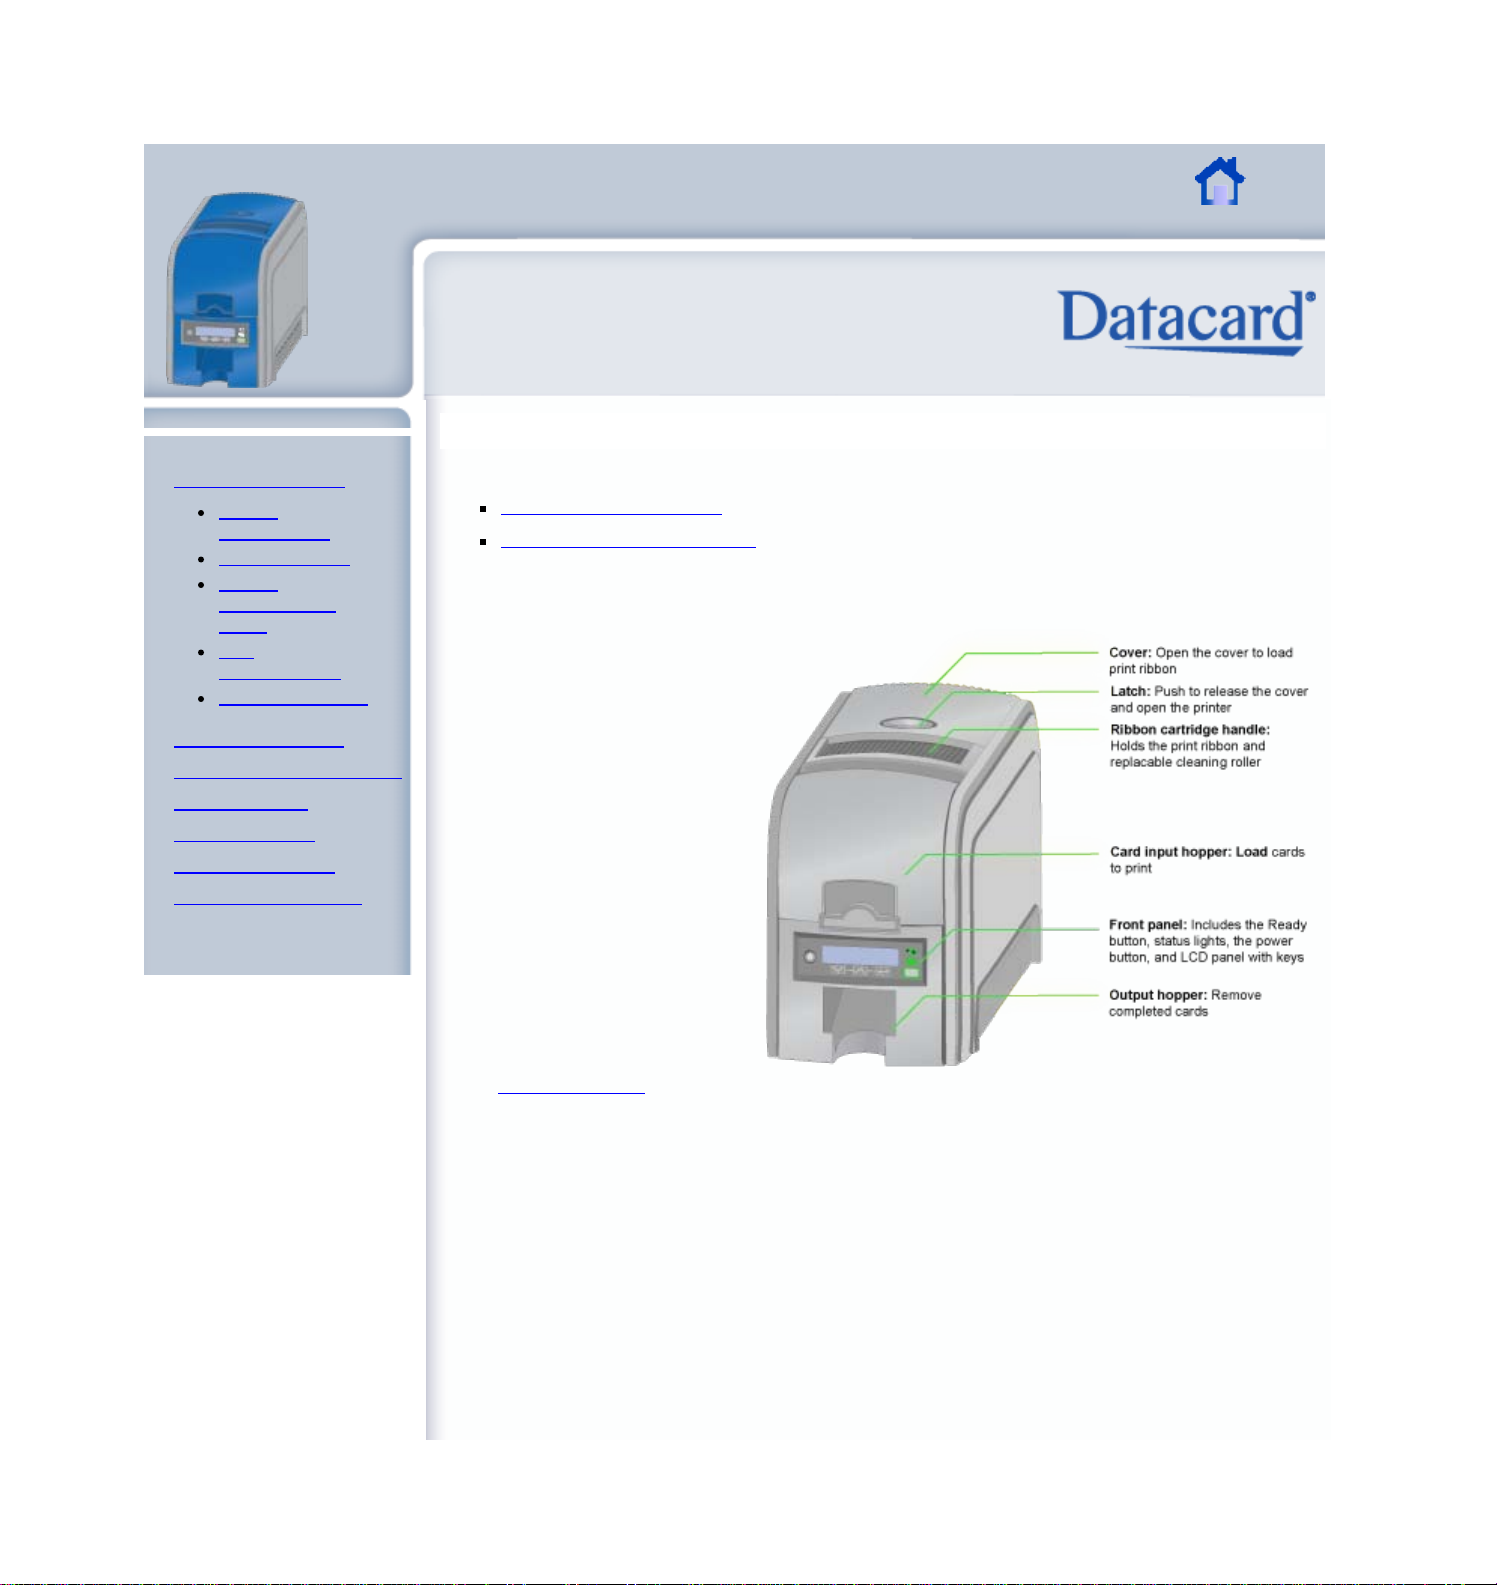
The card printer is a compact printer that applies images and text to plastic cards. The card
printer can print full-color images. It can have an optional magnetic stripe enocder to write data
to the magnetic stripe on a card.
The card printer is available with an input hopper or with a single feed slot.
Click here for a printer with an input hopper
Click here for a printer with a single feed slot.
Fast Fact
The printer is designed to issue cards
where the user is, called on-demand
or instant issuance.
Visit Datacard.com/id for downloads and support.
The design and information contained in these materials in protected by U. S. and international copyright law and/or treaties.
Page 6
XPS Card Printer Guide
XPS Card Printer Guide
DRAFT
2/22
Datacard Confidential
Page 3
SHORT TERM CONFIDENTIAL
Printer Guide
About the Printer
Printer
Components
Printer System
Printer
Configuration
Label
Site
Requirements
Tasks and Users
Using the Printer
Card Design and Setup
Printer Driver
Printing Cards
Troubleshooting
Supplies and Parts
Installation Guide
Printer Components
Choose the type of printer you are using:
Printer with Input Hopper
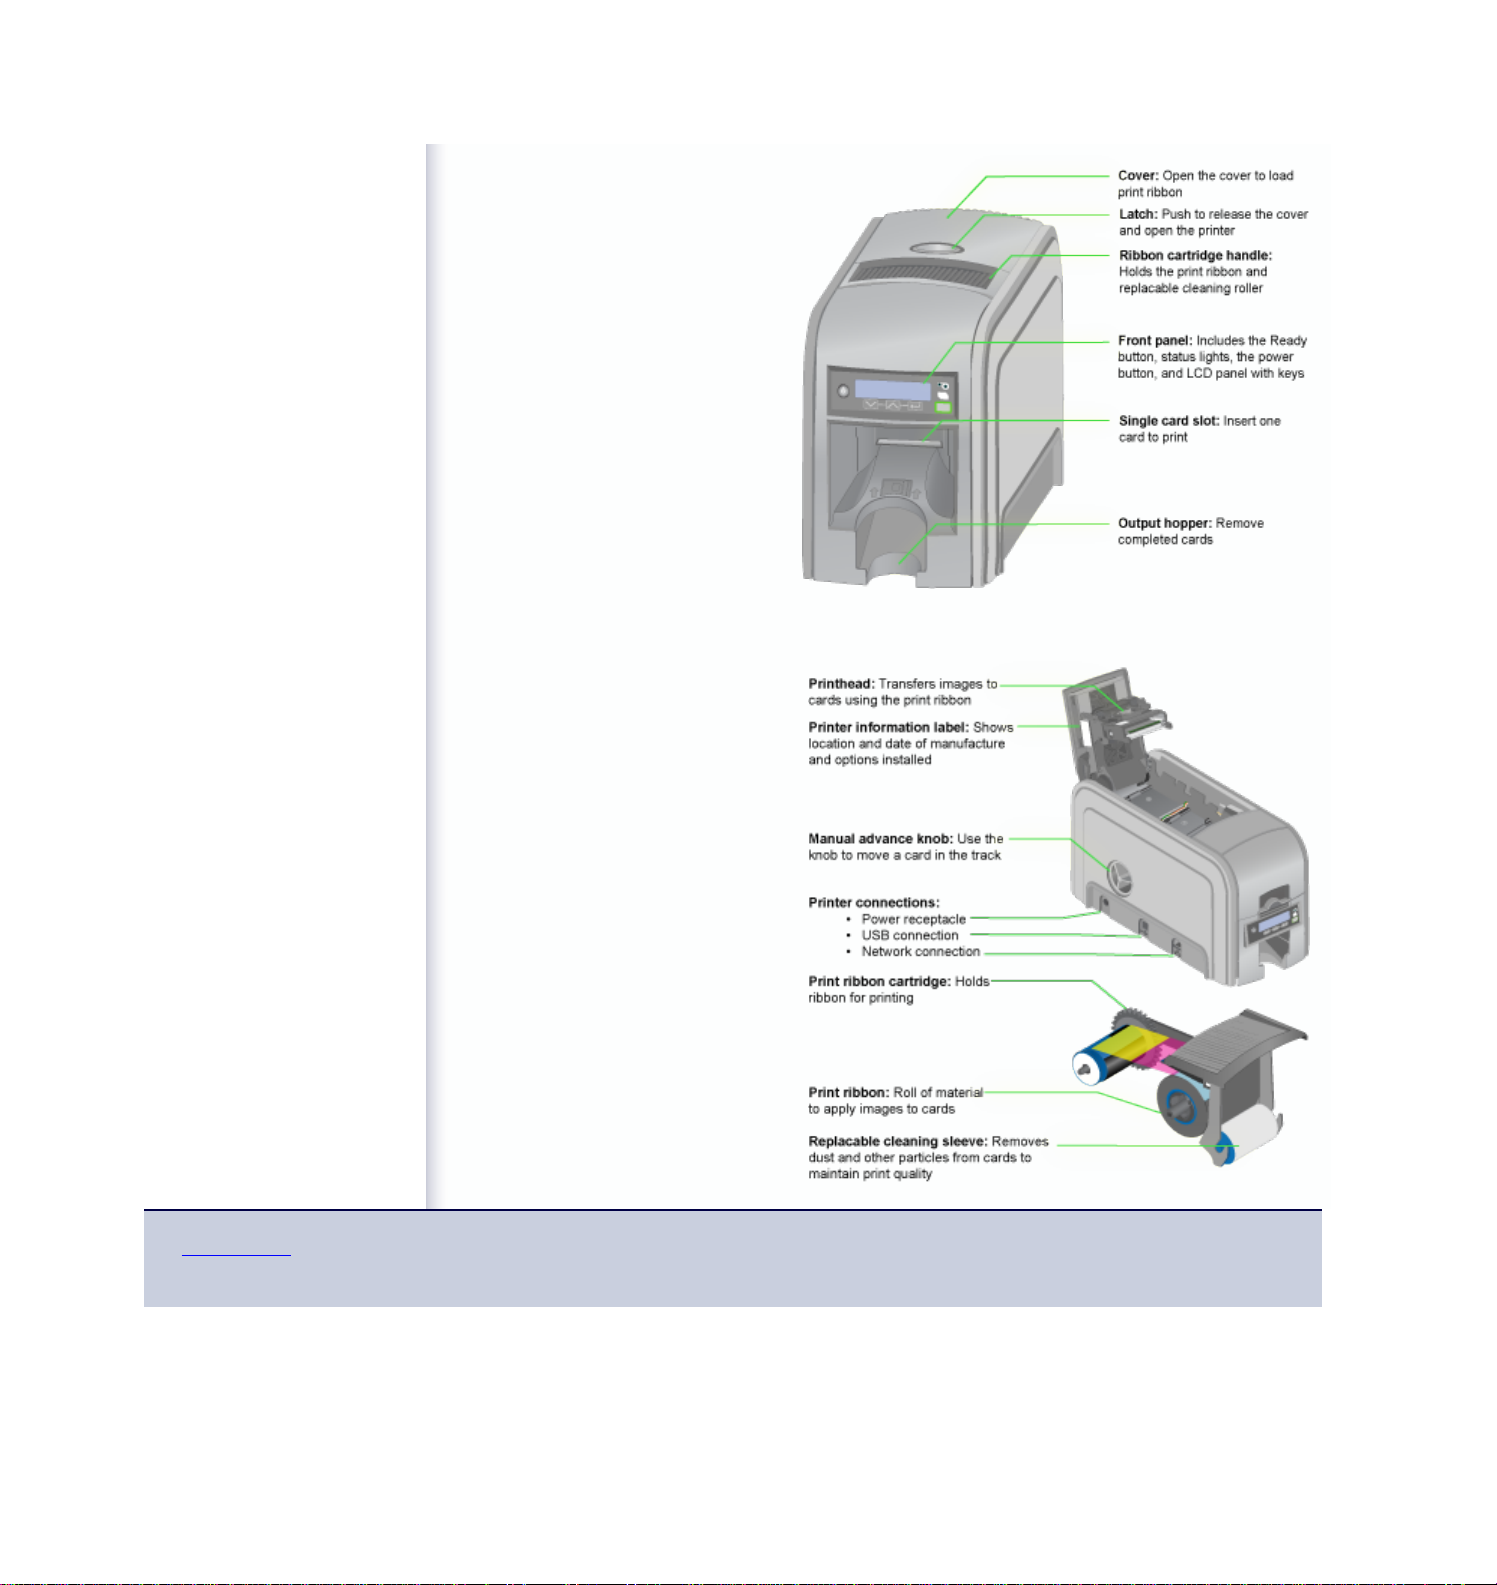
Printer with Single-Feed Slot
Outside the printer
Printer with Input Hopper
See
inside the printer.
Printer with
Single-Feed Slot
Page 7
XPS Card Printer Guide
DRAFT
2/22
Datacard Confidential
Page 4
SHORT TERM CONFIDENTIAL
Inside the printer
Visit Datacard.com/id for downloads and support.
The design and information contained in these materials in protected by U. S. and international copyright law and/or treaties.
Page 8

XPS Card Printer Guide
XPS Card Printer Guide
DRAFT
2/22
Datacard Confidential
Page 5
SHORT TERM CONFIDENTIAL
Printer Guide
About the Printer
Printer
Components
Printer System
Printer
Configuration
Label
Site
Requirements
Tasks and Users
Using the Printer
Card Design and Setup
Printer Driver
Printing Cards
Troubleshooting
Supplies and Parts
Installation Guide
Printer System
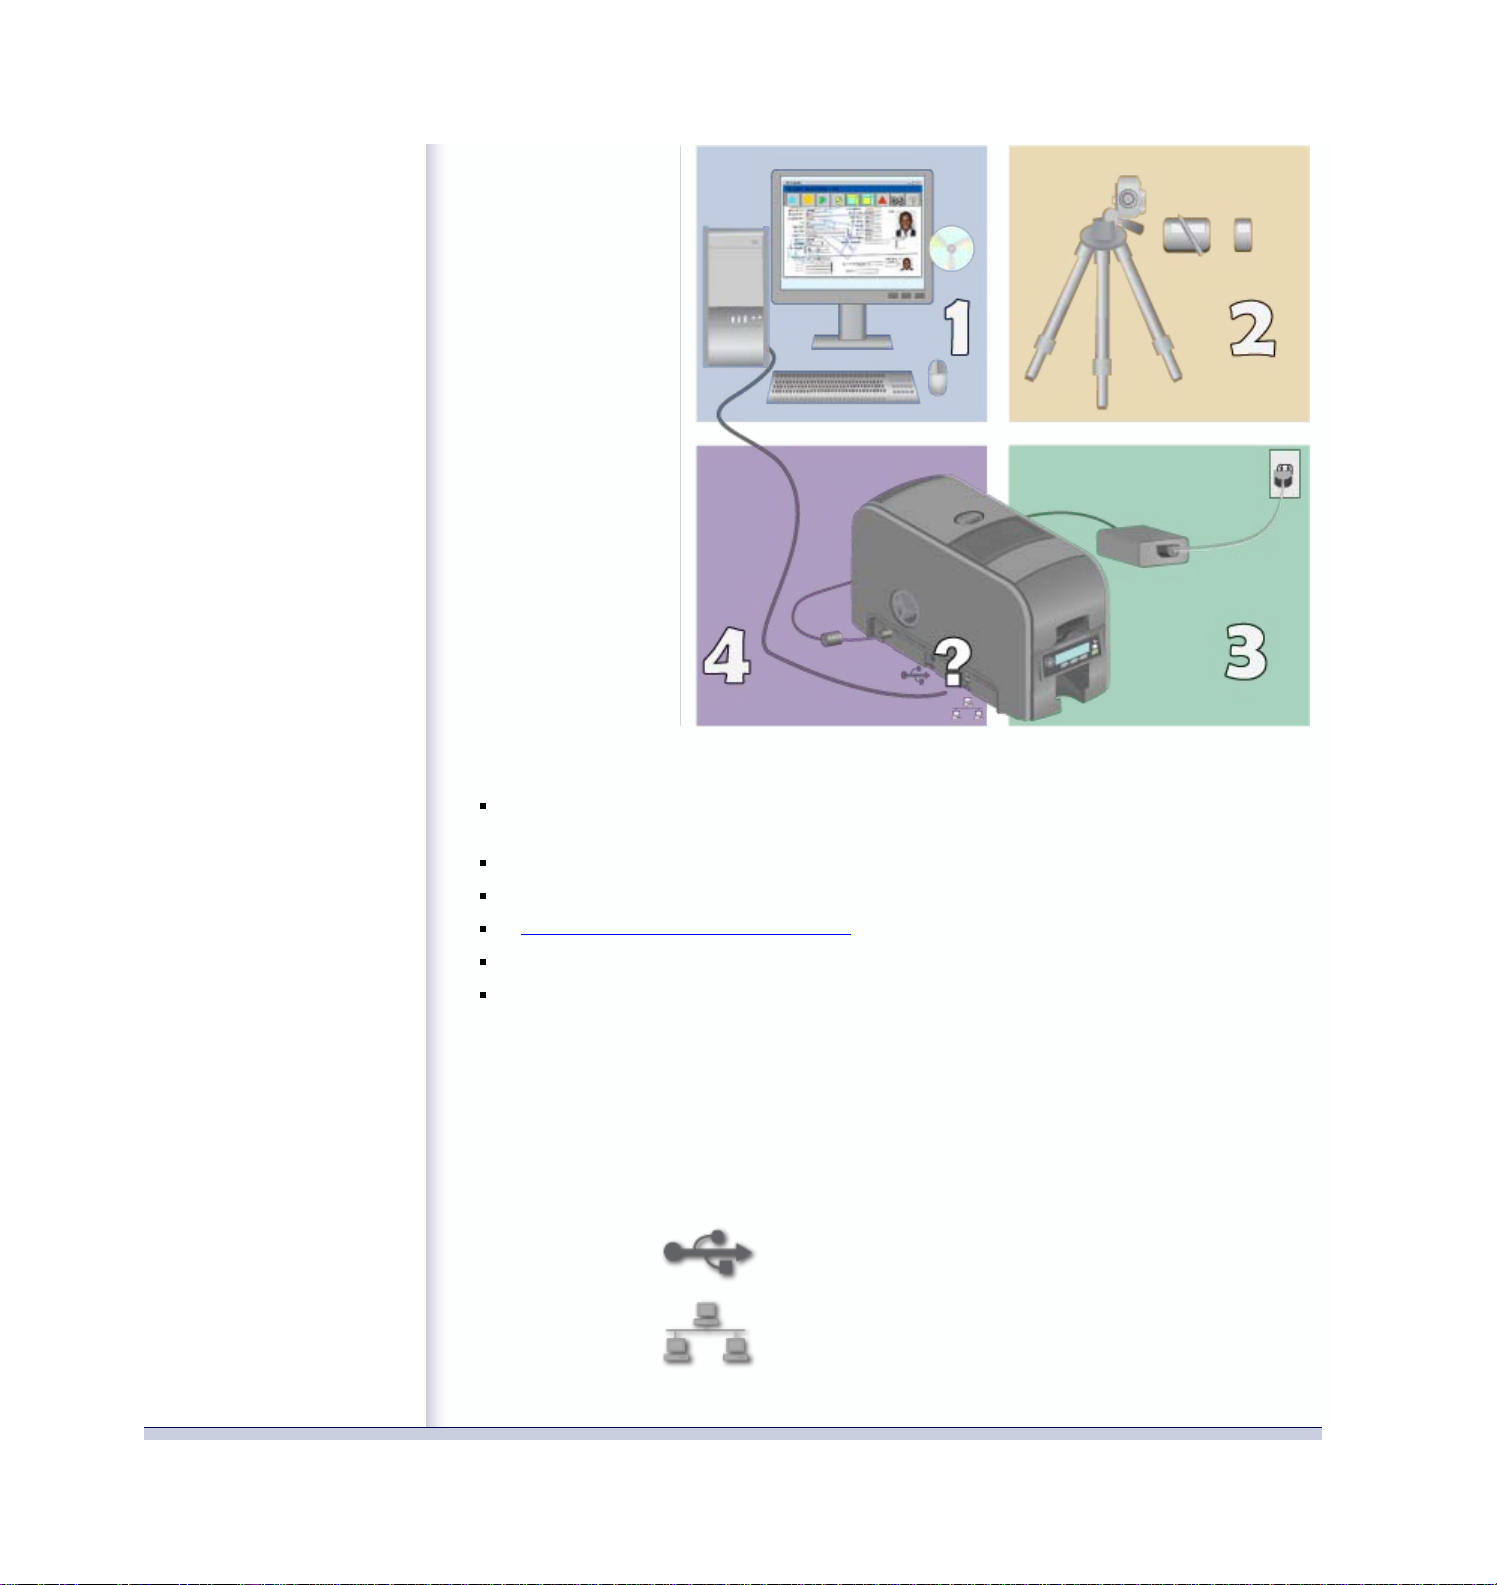
The card printer is used with other equipment and software. The system can include:
1. A PC, with software to support the printer, such as:
The XPS Card Printer Driver for Windows.
ID software designed specifically to capture, format, and save the data for
cards.
A retail application such as Microsoft® Word or Adobe® Photoshop®.
See PC Requirements.
2. "Capture" devices, such as:
A digital camera to take photos for ID badges and other cards, connected
to the PC.
A signature capture pad or fingerprint reader.
3. The printer with supplies and a facility power source.
4. A data connection between the printer and PC, which can be a USB connection or a
network connection (Do NOT use both connections with one printer.) See
Connection.
The system produces
cards for a specific
purpose and the cards
must meet
requirements. Ask what
the requirements for
cards are that you
produce, or see
Design and Setup for
typical requirements.
Card
Printer
Page 9
XPS Card Printer Guide
DRAFT
2/22
Datacard Confidential
Page 6
SHORT TERM CONFIDENTIAL
PC
Requirements
Windows processor, 1 GHz or faster is recommended. Both the 32-bit and 64-bit
architectures are supported by the XPS Card Printer Driver
1 GB of memory (RAM), or more
40 GB hard drive capacity with 15 GB free space
A supported Windows operating system to install the driver
Software to capture and organize the data to appear on each card
USB port or Ethernet network connection
The printer can be used with a host computer that runs another operating system, such as a
Linux® distribution, and that includes a printer driver or an application written to communicate
with the printer.
Printer Connection
The printer can use a USB connection to the PC (host computer), or a network connection. This
information uses the following symbols to show information that applies to the connection type.
USB
Network
Page 10

Visit Datacard.com/id for downloads and support.
XPS Card Printer Guide
DRAFT
2/22
Datacard Confidential
Page 7
SHORT TERM CONFIDENTIAL
The design and information contained in these materials in protected by U. S. and international copyright law and/or treaties.
Page 11
XPS Card Printer Guide
XPS Card Printer Guide
DRAFT
2/22
Datacard Confidential
Page 8
SHORT TERM CONFIDENTIAL
Printer Guide
About the Printer
Printer
Components
Printer System
Printer
Configuration
Label
Site
Requirements
Tasks and Users
Using the Printer
Card Design and Setup
Printer Driver
Printing Cards
Troubleshooting
Supplies and Parts
Installation Guide
Printer Label
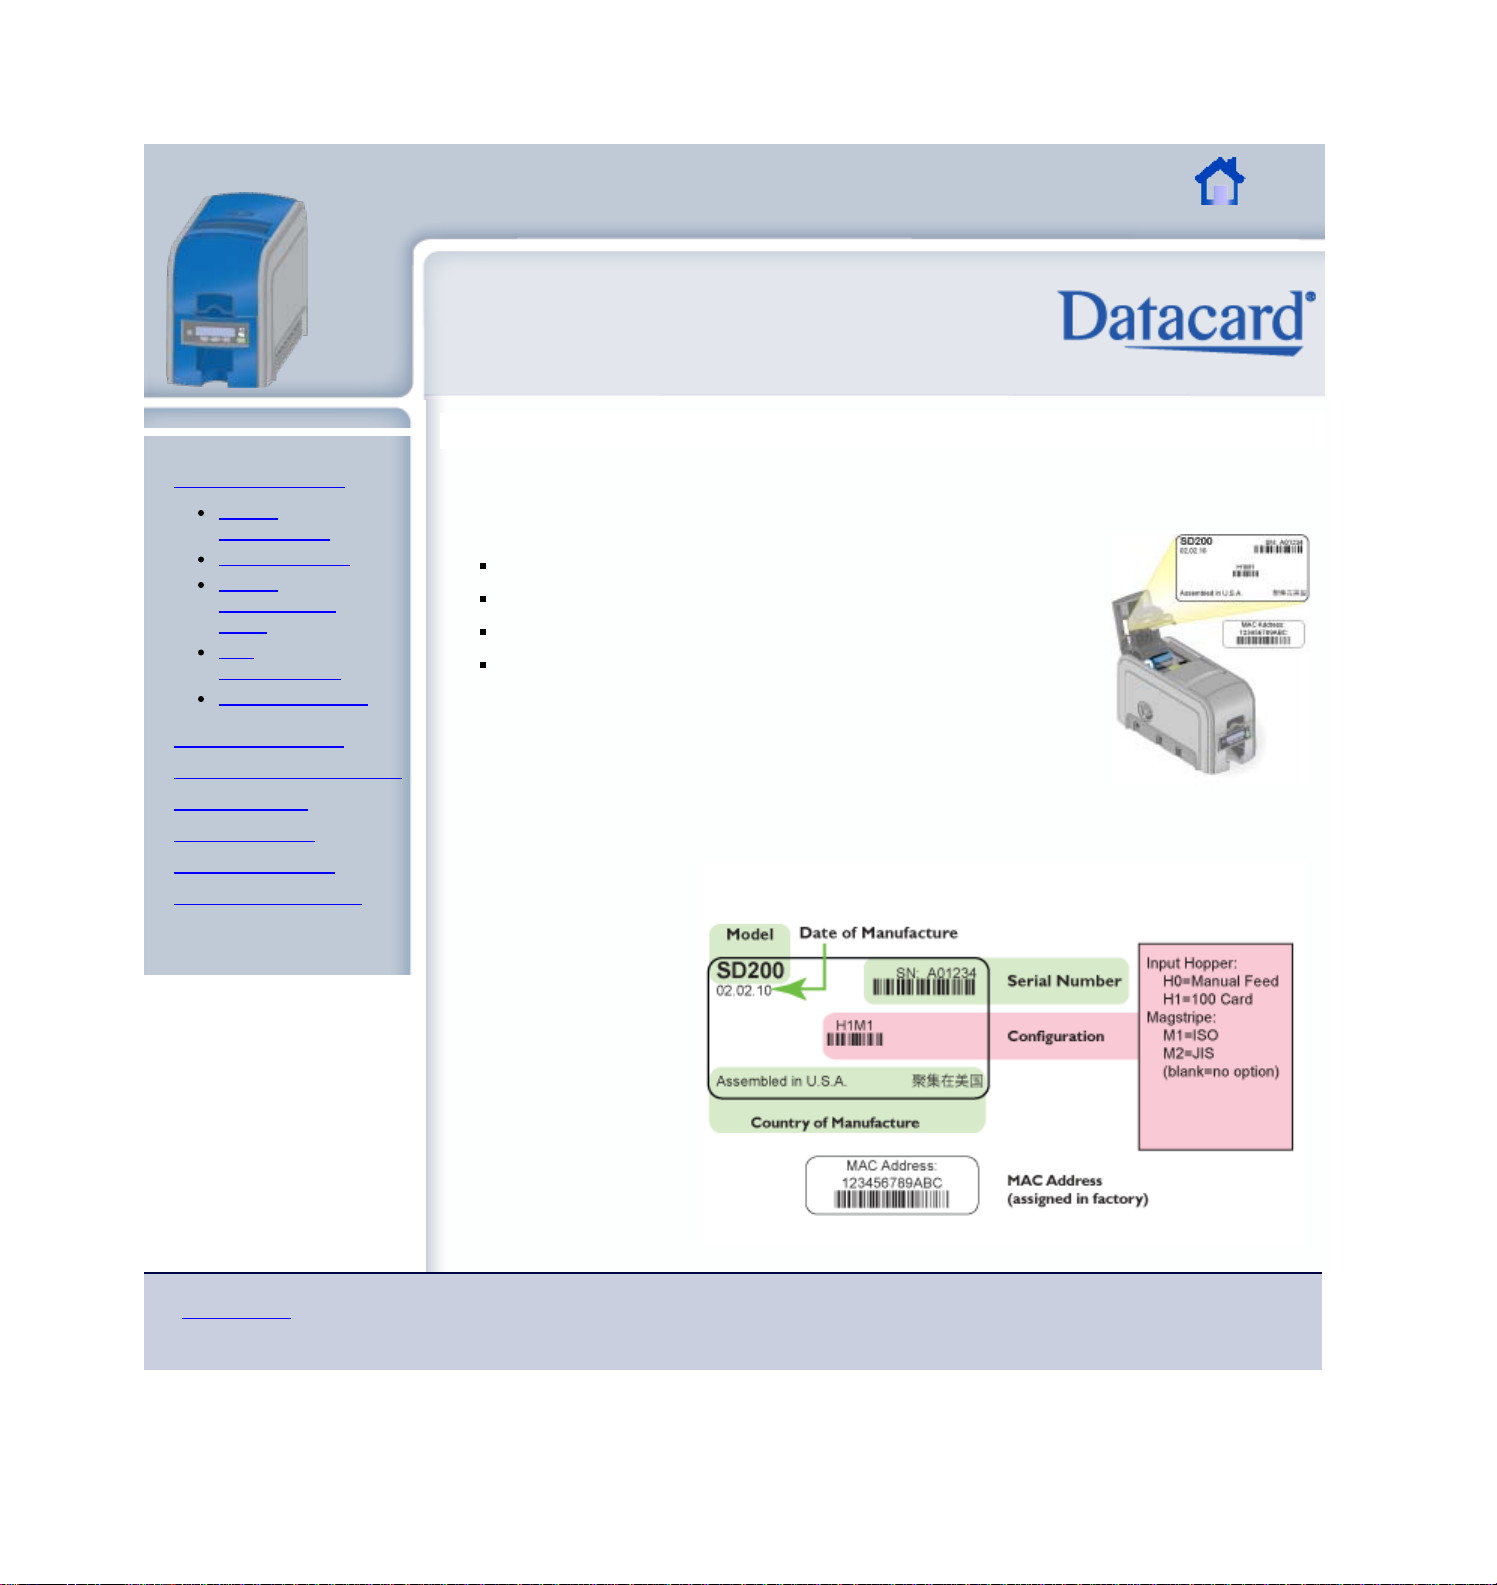
The printer has a label on the side of the cover arm that shows the components installed. Find
the label on the side of the cover arm:
The label shows:
Printer name, which also appears on the model label
Configuration, which includes options in the printer:
Date and counttry of manufacture
The MAC address to use when the printer is connected using an
Ethernet network
The printer label provides information that is useful when requesting
service. It can also help you know the components installed. Some
components might be installed by the dealer or sales group. The
configuration information for those items should be hand-written on the
label.
Visit Datacard.com/id for downloads and support.
The design and information contained in these materials in protected by U. S. and international copyright law and/or treaties.
Page 12
XPS Card Printer Guide
XPS Card Printer Guide
DRAFT
2/22
Datacard Confidential
Page 9
SHORT TERM CONFIDENTIAL
Printer Guide
About the Printer
Printer
Components
Printer System
Printer
Configuration
Label
Site
Requirements
Tasks and Users
Using the Printer
Card Design and Setup
Printer Driver
Printing Cards
Troubleshooting
Supplies and Parts
Installation Guide
Site Requirements
Set up and use the printer in an environment that meets the following requirements.
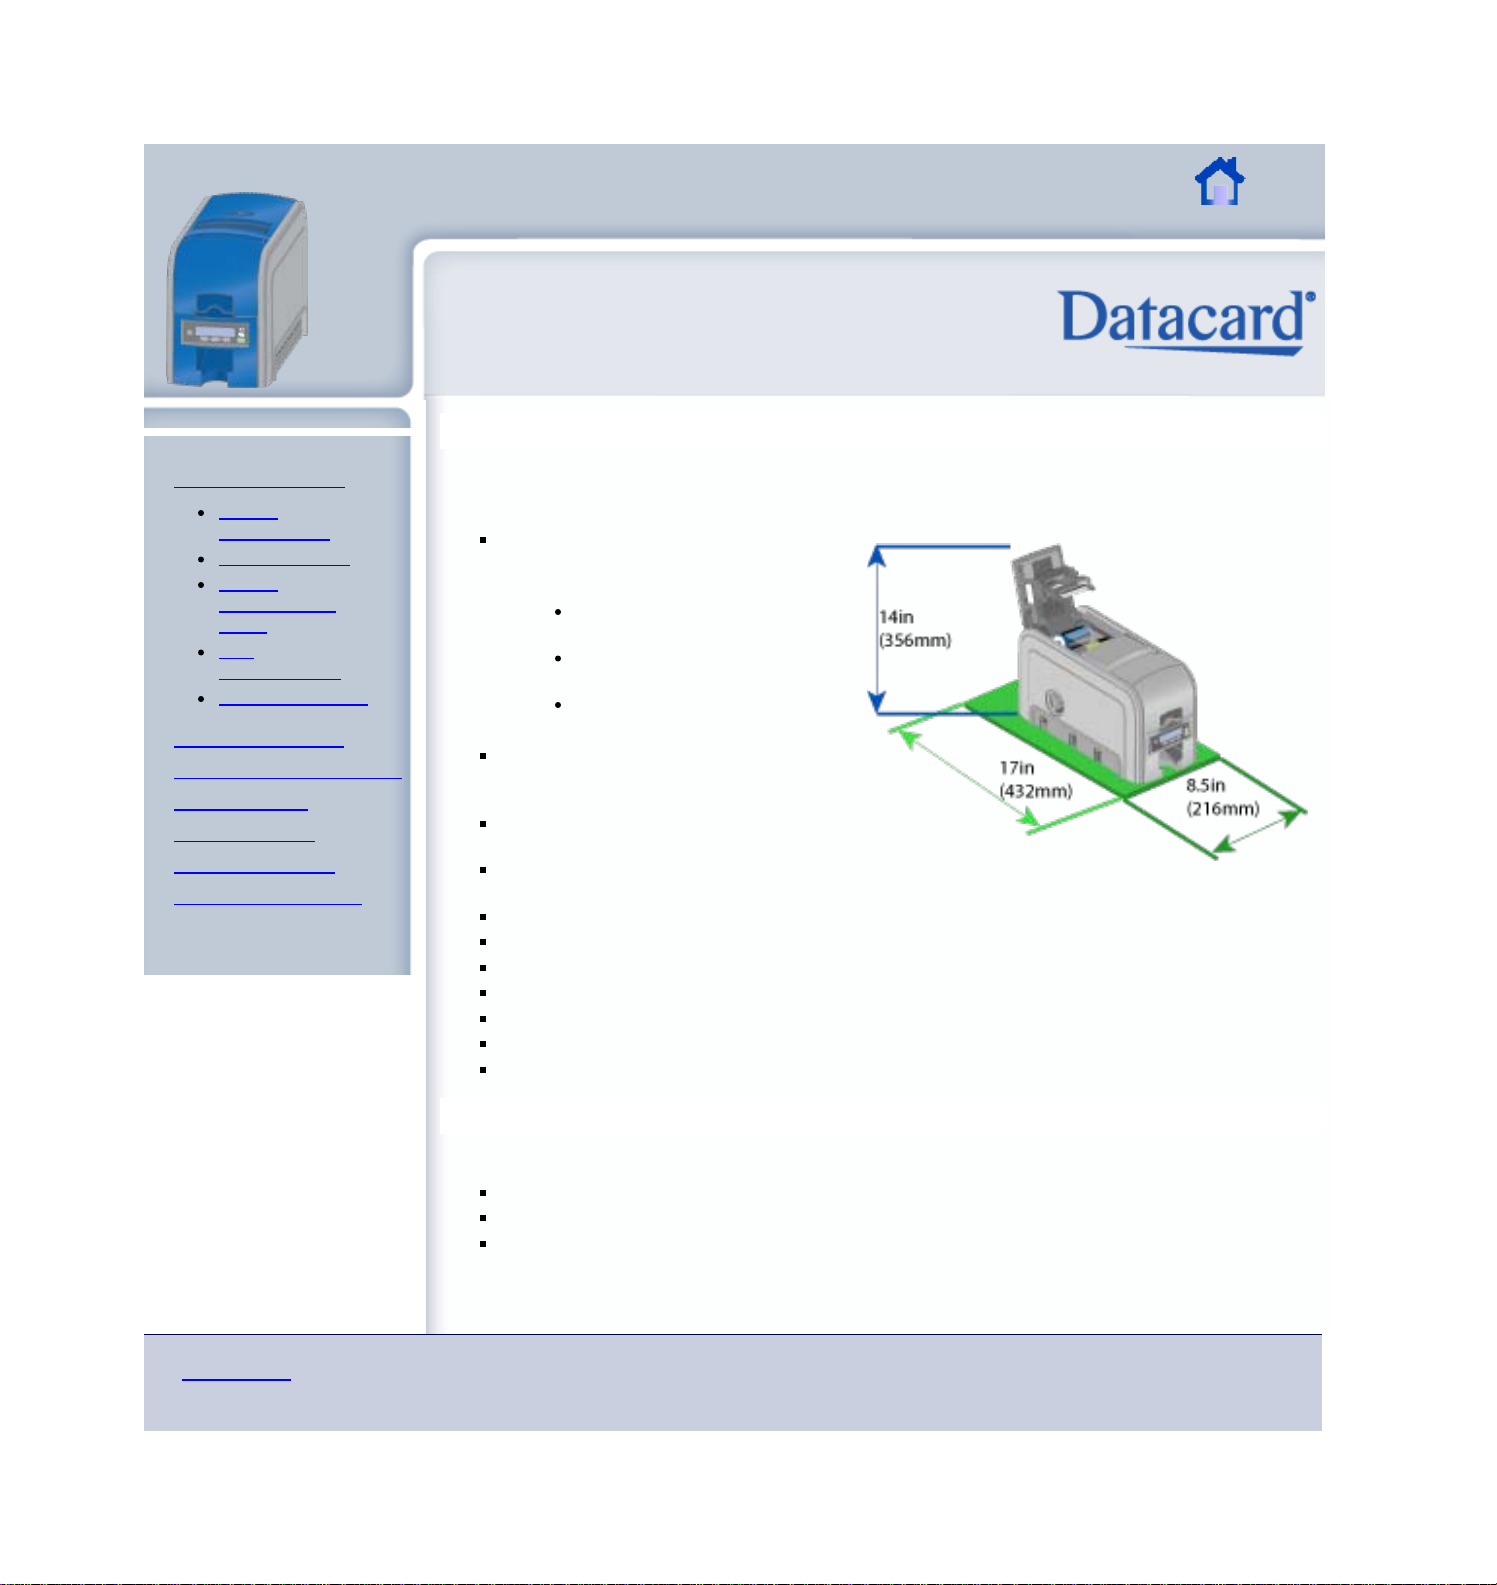
Provide space for the printer and for
clearance around the printer. The
minimum required space is:
8.5 inches (216mm) from side
to side
17 inches (432mm) from back
to front
14 inches (356mm) from the
desk or other surface
Place the printer in an environment with
temperatures ranging from 60° F to 95°
F (15° C to 35° C).
Use a single phase, 3-wire, grounded
receptacle.
Keep all dust, dirt, food, and liquids
away from the printer.
Keep paper and foreign materials off the printer.
Place the printer on a sturdy, level surface.
Place the printer away from direct sunlight.
Do not place printer near heating ducts, fans, or other air vents.
Do not use the printer for purposes other than the intended use.
Prevent debris from entering the printer.
Place the printer in a clean office environment, protected from any type of construction.
Electrical Requirements
The power supply is rated as follows:
100-240 Volts, AC
50-60 Hz
3.0 Amps
The power supply is autodetecting and works within the range stated.
Visit Datacard.com/id for downloads and support.
The design and information contained in these materials in protected by U. S. and international copyright law and/or treaties.
Page 13
XPS Card Printer Guide
XPS Card Printer Guide
DRAFT
2/22
Datacard Confidential
Page 10
SHORT TERM CONFIDENTIAL
Printer Guide
About the Printer
Printer
Components
Printer System
Printer
Configuration
Label
Site
Requirements
Tasks and Users
Using the Printer
Card Design and Setup
Printer Driver
Printing Cards
Troubleshooting
Supplies and Parts
Installation Guide
Tasks and Users
In most work places, more than one person uses the printer. Each person might use it
differently.
The Operator makes cards using the printer, loads supplies, and handles minor problems
such as a card jam,.
The Administrator sets up the card making system, sets up card designs, and might
identify new ways to use the card printer in the organization.
Information for Users
This Printer Guide provides information for the Operator. It describes how to use the
printer and perform routine tasks.
This installed information also includes an Installation Guide and a Solution Guide. The
additional Guides are intended for use by the Administrator, or by professionals designing
a new system for printing cards.
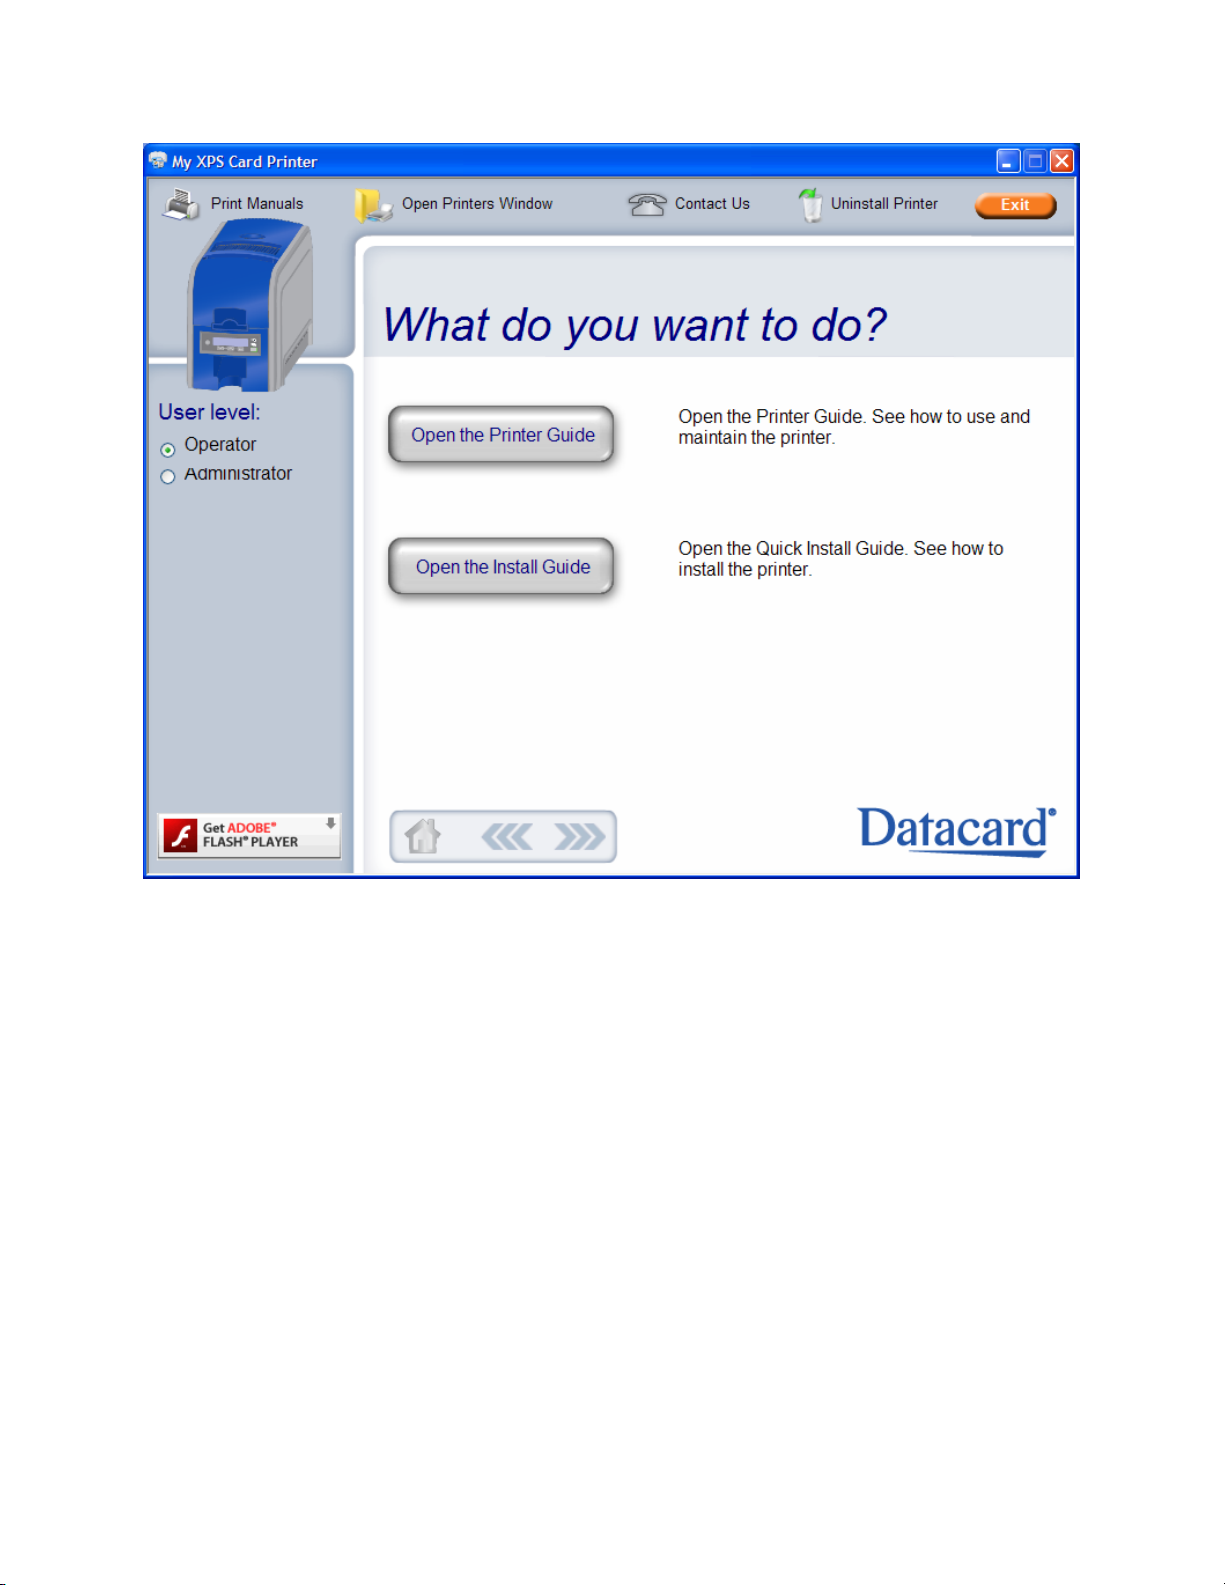
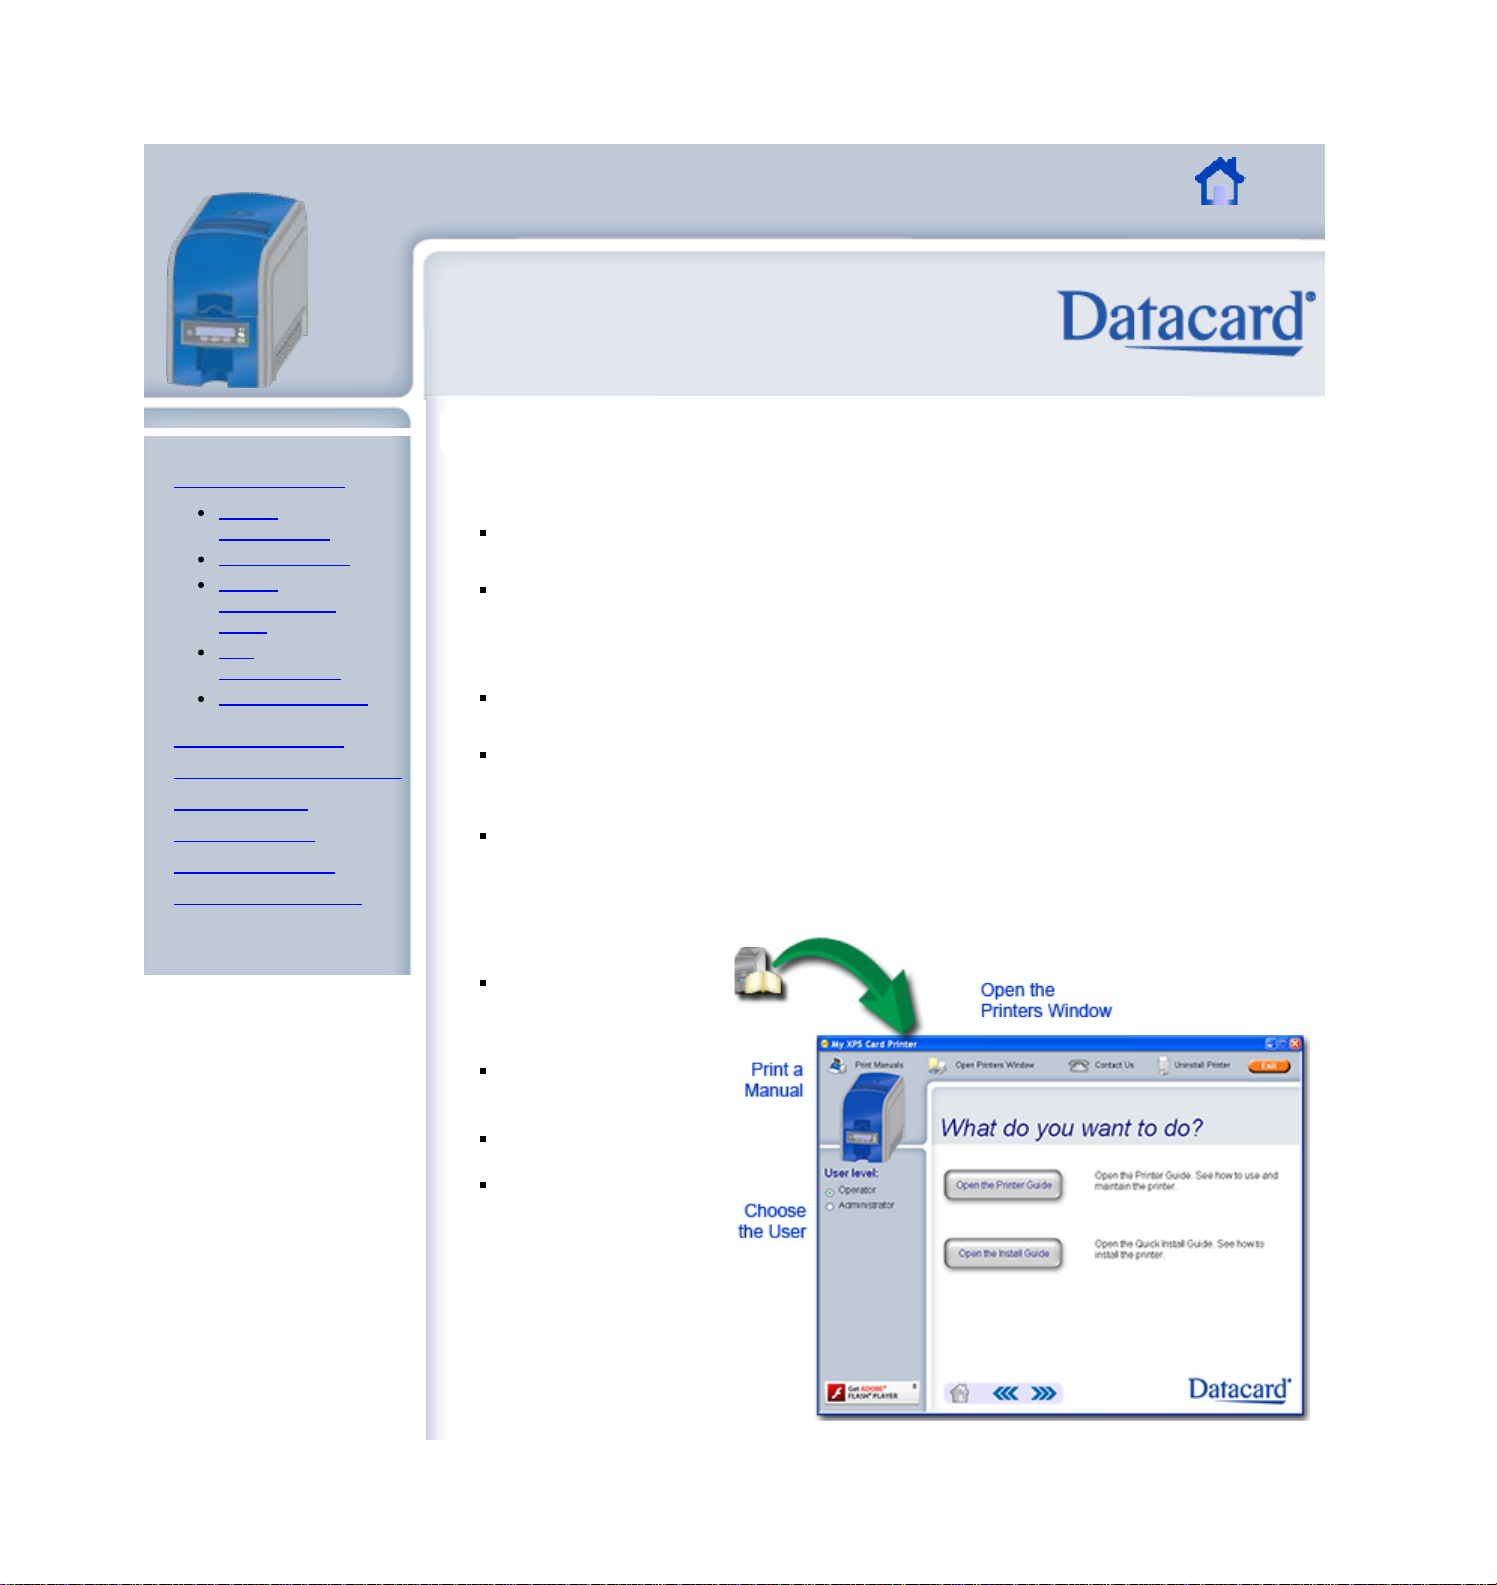
When the XPS Card Printer Driver is installed, the information is also installed. The
installation creates a Windows desktop icon called My XPS Card Printer. Use My XPS
Card Printer to choose the user level. This sets the type of information you view.
Using My XPS Card Printer,
you can also:
Open the Printers
Window to view the
status of the printer
and to view setitngs.
Print one or more of
the Guides (to a paper
printer).
Remove the printer
from the PC.
Link to the web site.
Page 14

For non-Windows Users
XPS Card Printer Guide
DRAFT
2/22
Datacard Confidential
Page 11
SHORT TERM CONFIDENTIAL
The information for the card printer
can be viewed and printed from other
operting sustems, such as Linux.
Insert the Product CD in the drive,
open a file and folder browser, and
open the Documentation folder. Open
the folder for the information you
want to view.
My XPS Card Printer is a Windows
application. It does not run on nonWindows operating systems.
Visit Datacard.com/id for downloads and support.
The design and information contained in these materials in protected by U. S. and international copyright law and/or treaties.
Page 15
XPS Card Printer Guide
XPS Card Printer Guide
DRAFT
2/22
Datacard Confidential
Page 12
SHORT TERM CONFIDENTIAL
About the Printer
Using the Printer
Load Supplies
Connect the
Power Cord
Power on the
Printer
Connect the
Data Cable
Use the Front
Panel
Respond to
Conditions
LCD Menus
Cleaning Card
Card Design and Setup
Printer Driver
Printing Cards
Troubleshooting
Supplies and Parts
Installation Guide
Using the Printer
This section describes how to use the printer, including how to:
Load Supplies
Connect the Power Cord
Power on the Printer
Connect the Data Cable
Use the Front Panel
Respond to Conditions
LCD Menus
Cleaning Card
Hints & Tips
Cards, cards, and more cards
cards
Visit Datacard.com/id for downloads and support.
The design and information contained in these materials in protected by U. S. and international copyright law and/or treaties.
Page 16
XPS Card Printer Guide
XPS Card Printer Guide
DRAFT
2/22
Datacard Confidential
Page 13
SHORT TERM CONFIDENTIAL
About the Printer
Using the Printer
Load Supplies
Connect the
Power Cord
Power on the
Printer
Connect the
Data Cable
Use the Front
Panel
Respond to
Conditions
LCD Menus
Cleaning Card
Card Design and Setup
Printer Driver
Printing Cards
Troubleshooting
Supplies and Parts
Installation Guide
Load Supplies
The printer uses cards and ribbon to print cards. It also uses a cleaning roller to maintain card
quality.
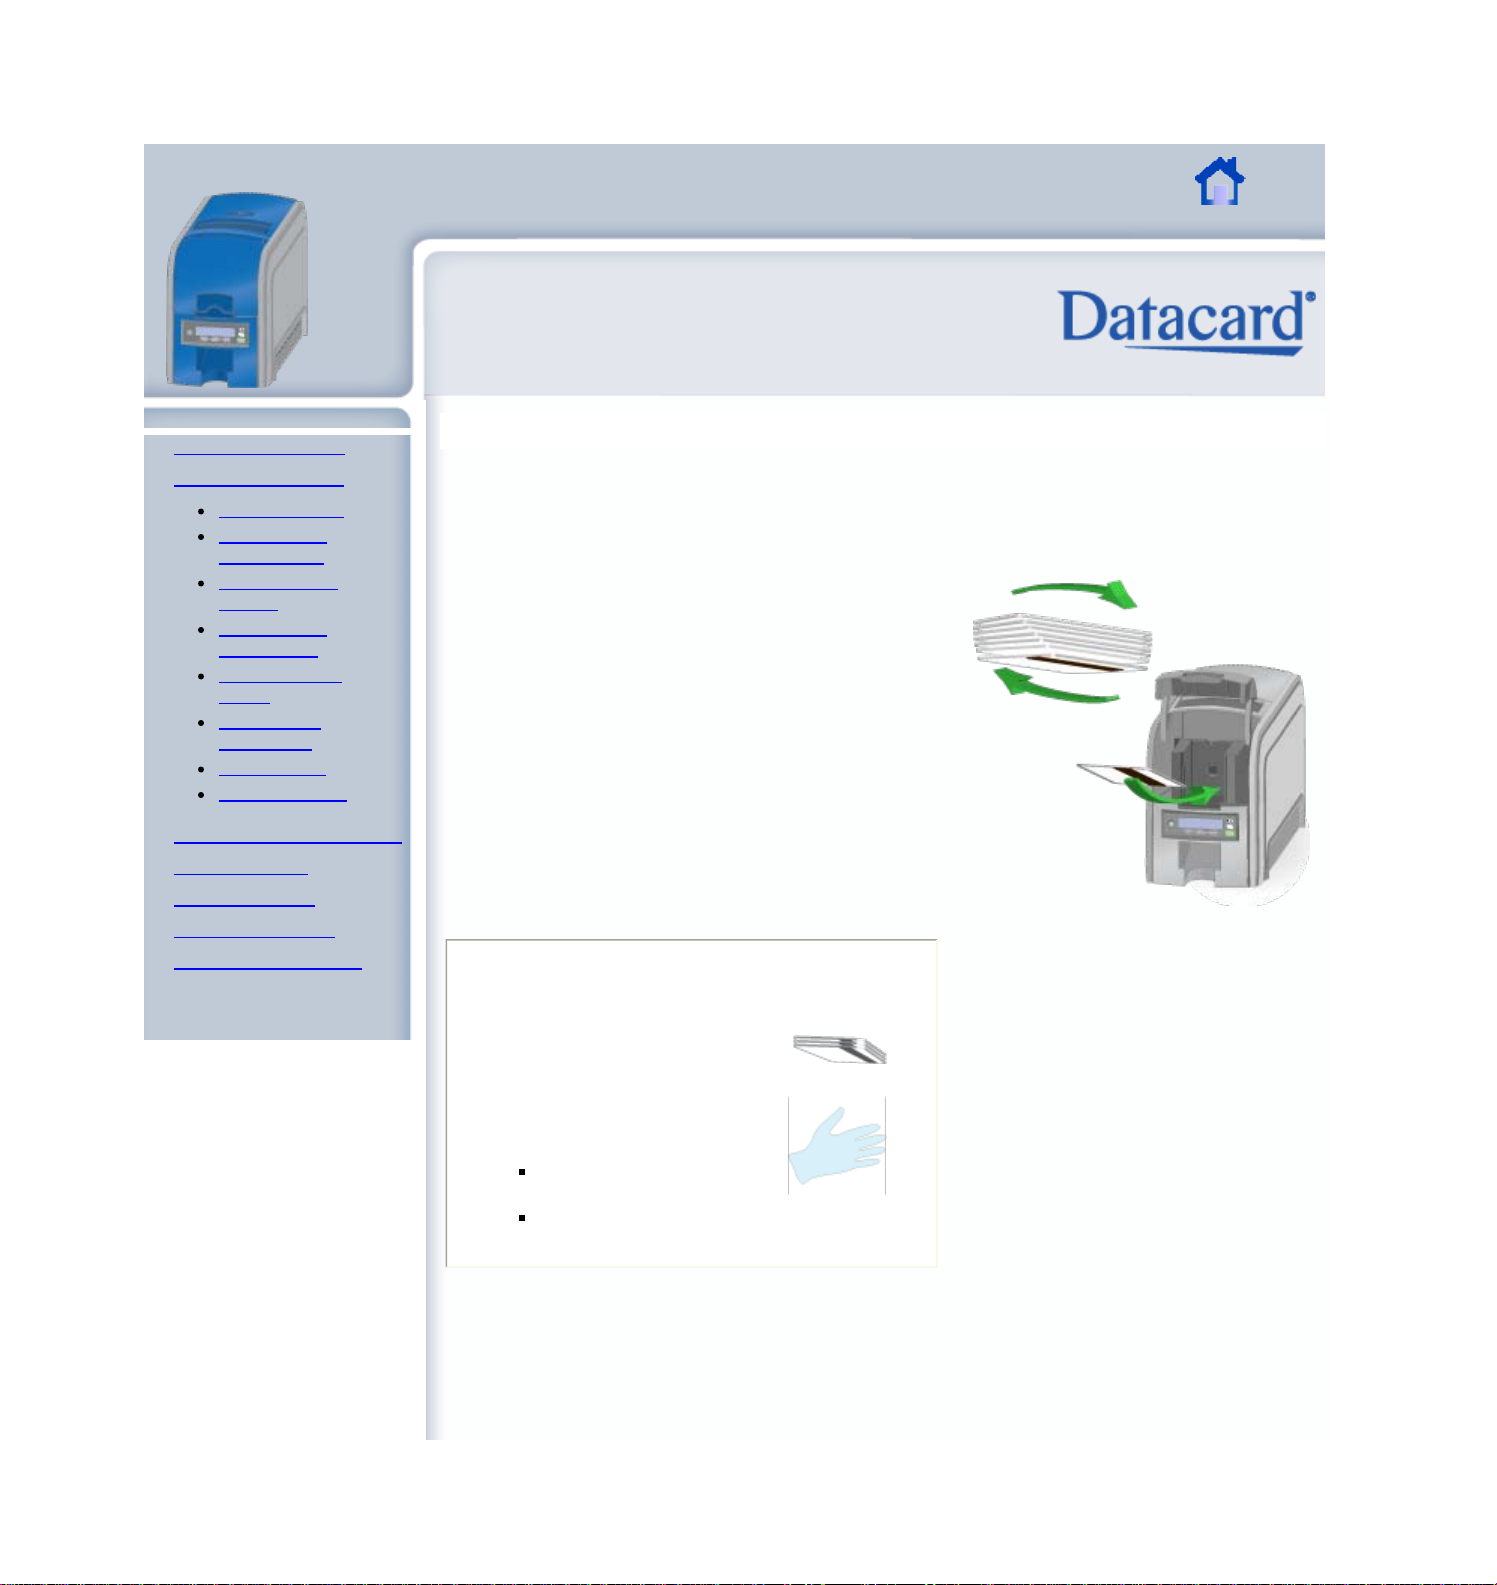
Load Cards
For printers with an input hopper, load cards:
1. Open the Input Hopper.
2. Separate or fan the cards.
3. Load cards in the Input Hopper.
4. Close the Input Hopper.
Hints & Tips
Orient all cards the same
way.
Do not touch the card
surface to be printed:
Handle cards by their
edges
Wear gloves
Load Ribbon
Load the ribbon when you install the printer and when the ribbon runs out.
1. 1. Press the Latch button to open the printer.
Page 17
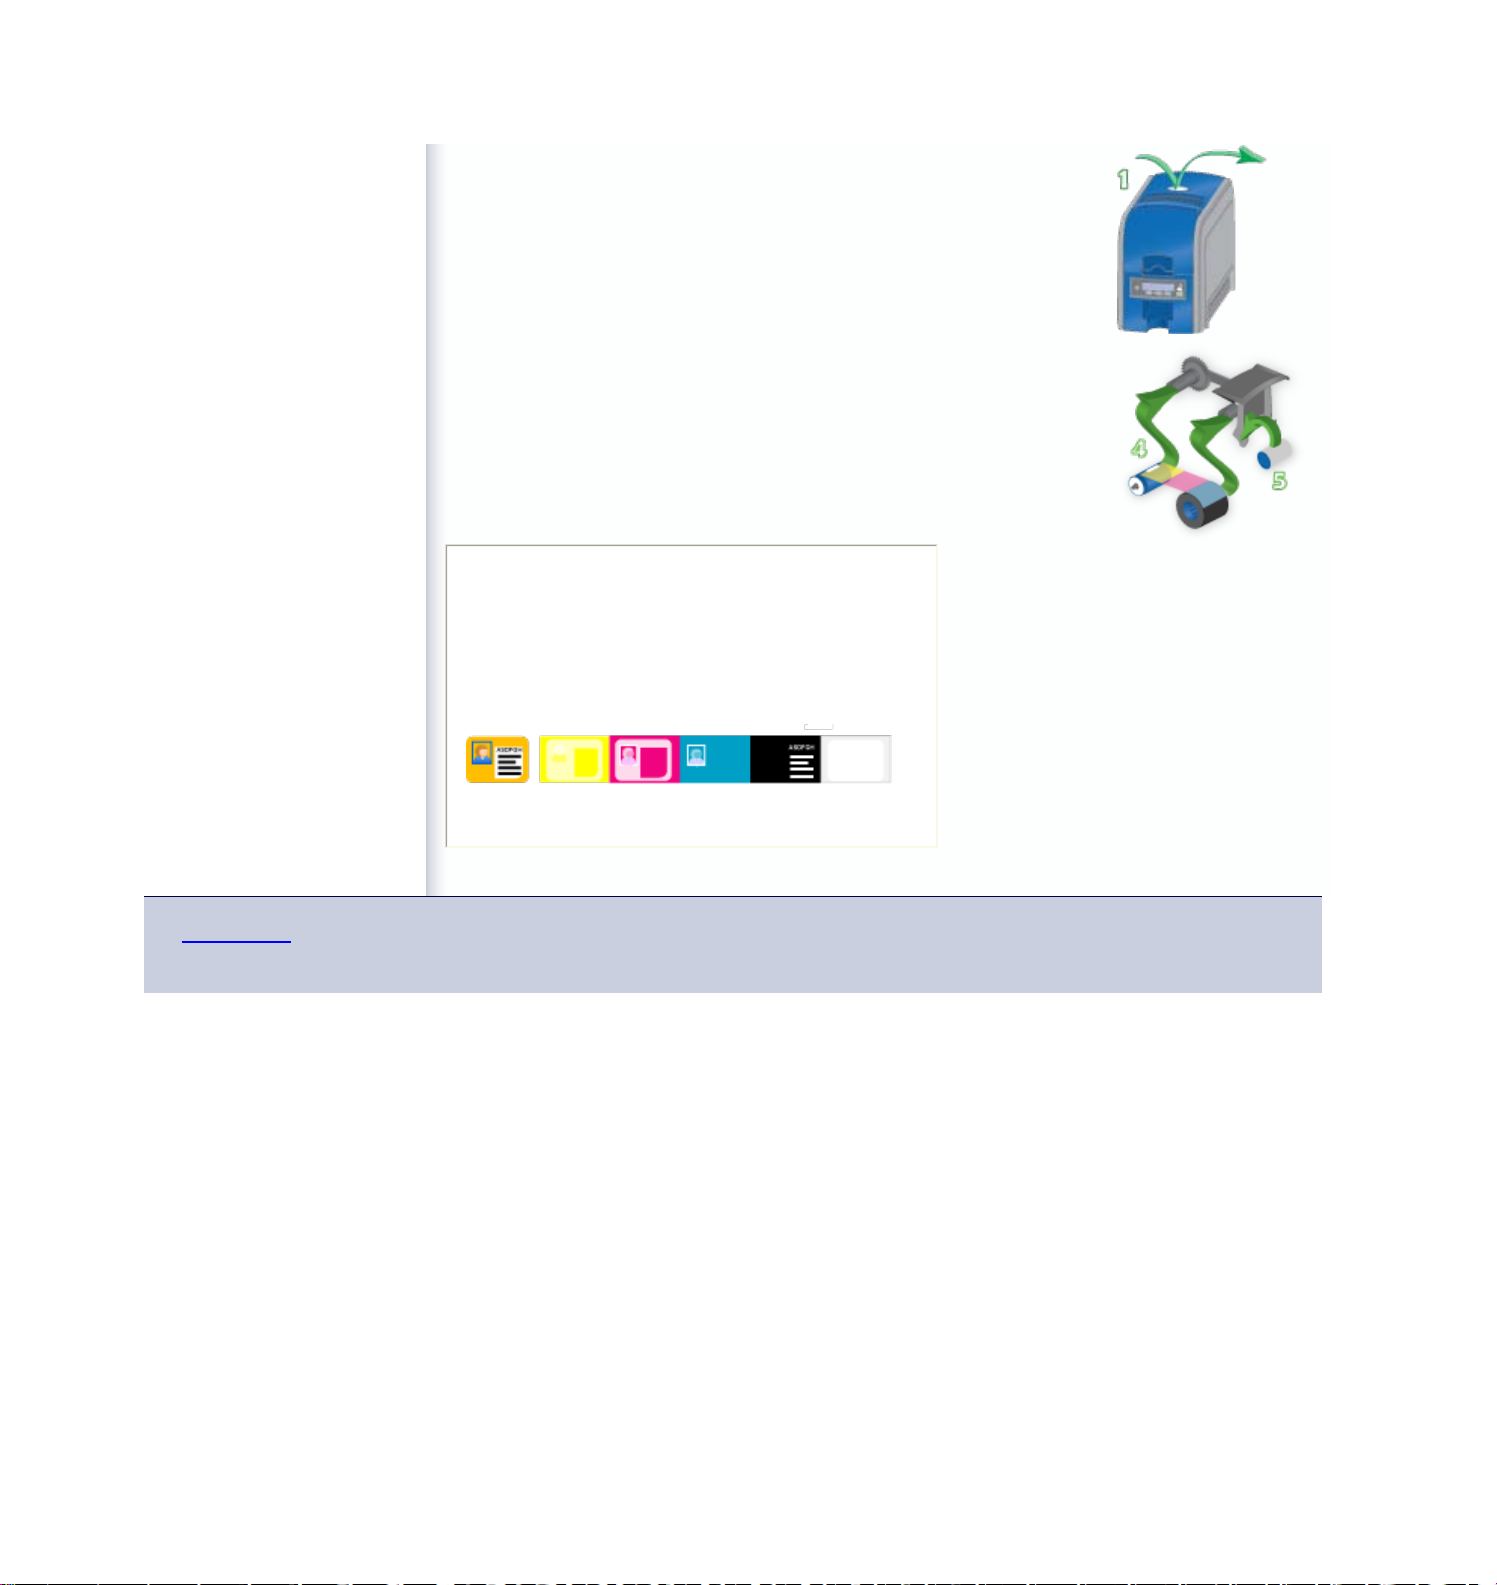
2. Remove the ribbon cartridge.
XPS Card Printer Guide
DRAFT
2/22
Datacard Confidential
Page 14
SHORT TERM CONFIDENTIAL
3. Remove the existing ribbon and cleaning roller, if present.
4. Install the ribbon.
5. Replace the cleaning roller.
6. Replace the ribbon cartridge.
7. Close the printer.
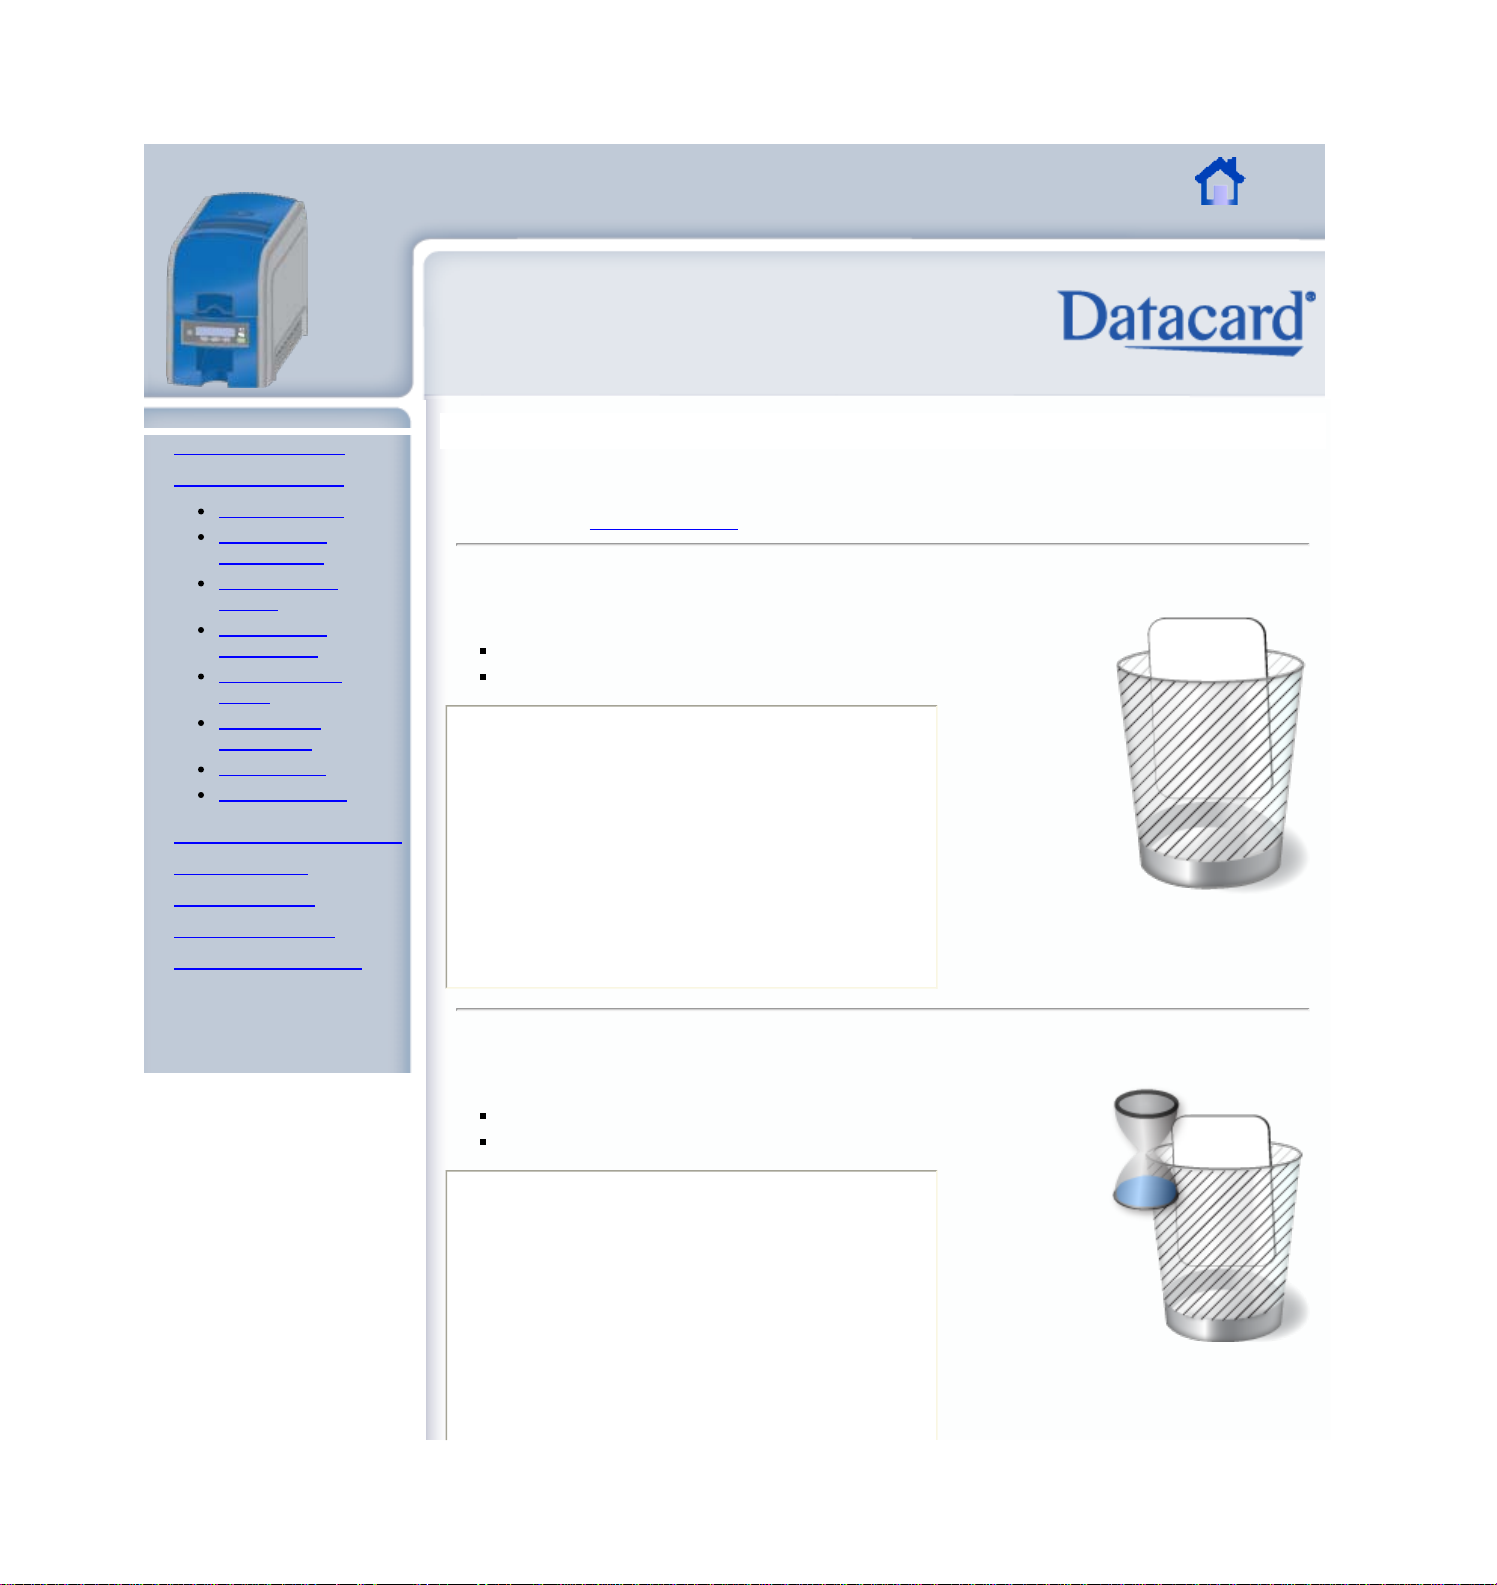
Hints & Tips
Used ribbon can have "negative"
images of printed data. To keep the
data confidential, follow your policy to
discard used ribbon.
Visit Datacard.com/id for downloads and support.
The design and information contained in these materials in protected by U. S. and international copyright law and/or treaties.
Page 18
XPS Card Printer Guide
XPS Card Printer Guide
DRAFT
2/22
Datacard Confidential
Page 15
SHORT TERM CONFIDENTIAL
About the Printer
Using the Printer
Load Supplies
Connect the
Power Cord
Power on the
Printer
Connect the
Data Cable
Use the Front
Panel
Respond to
Conditions
LCD Menus
Cleaning Card
Card Design and Setup
Printer Driver
Printing Cards
Troubleshooting
Supplies and Parts
Installation Guide
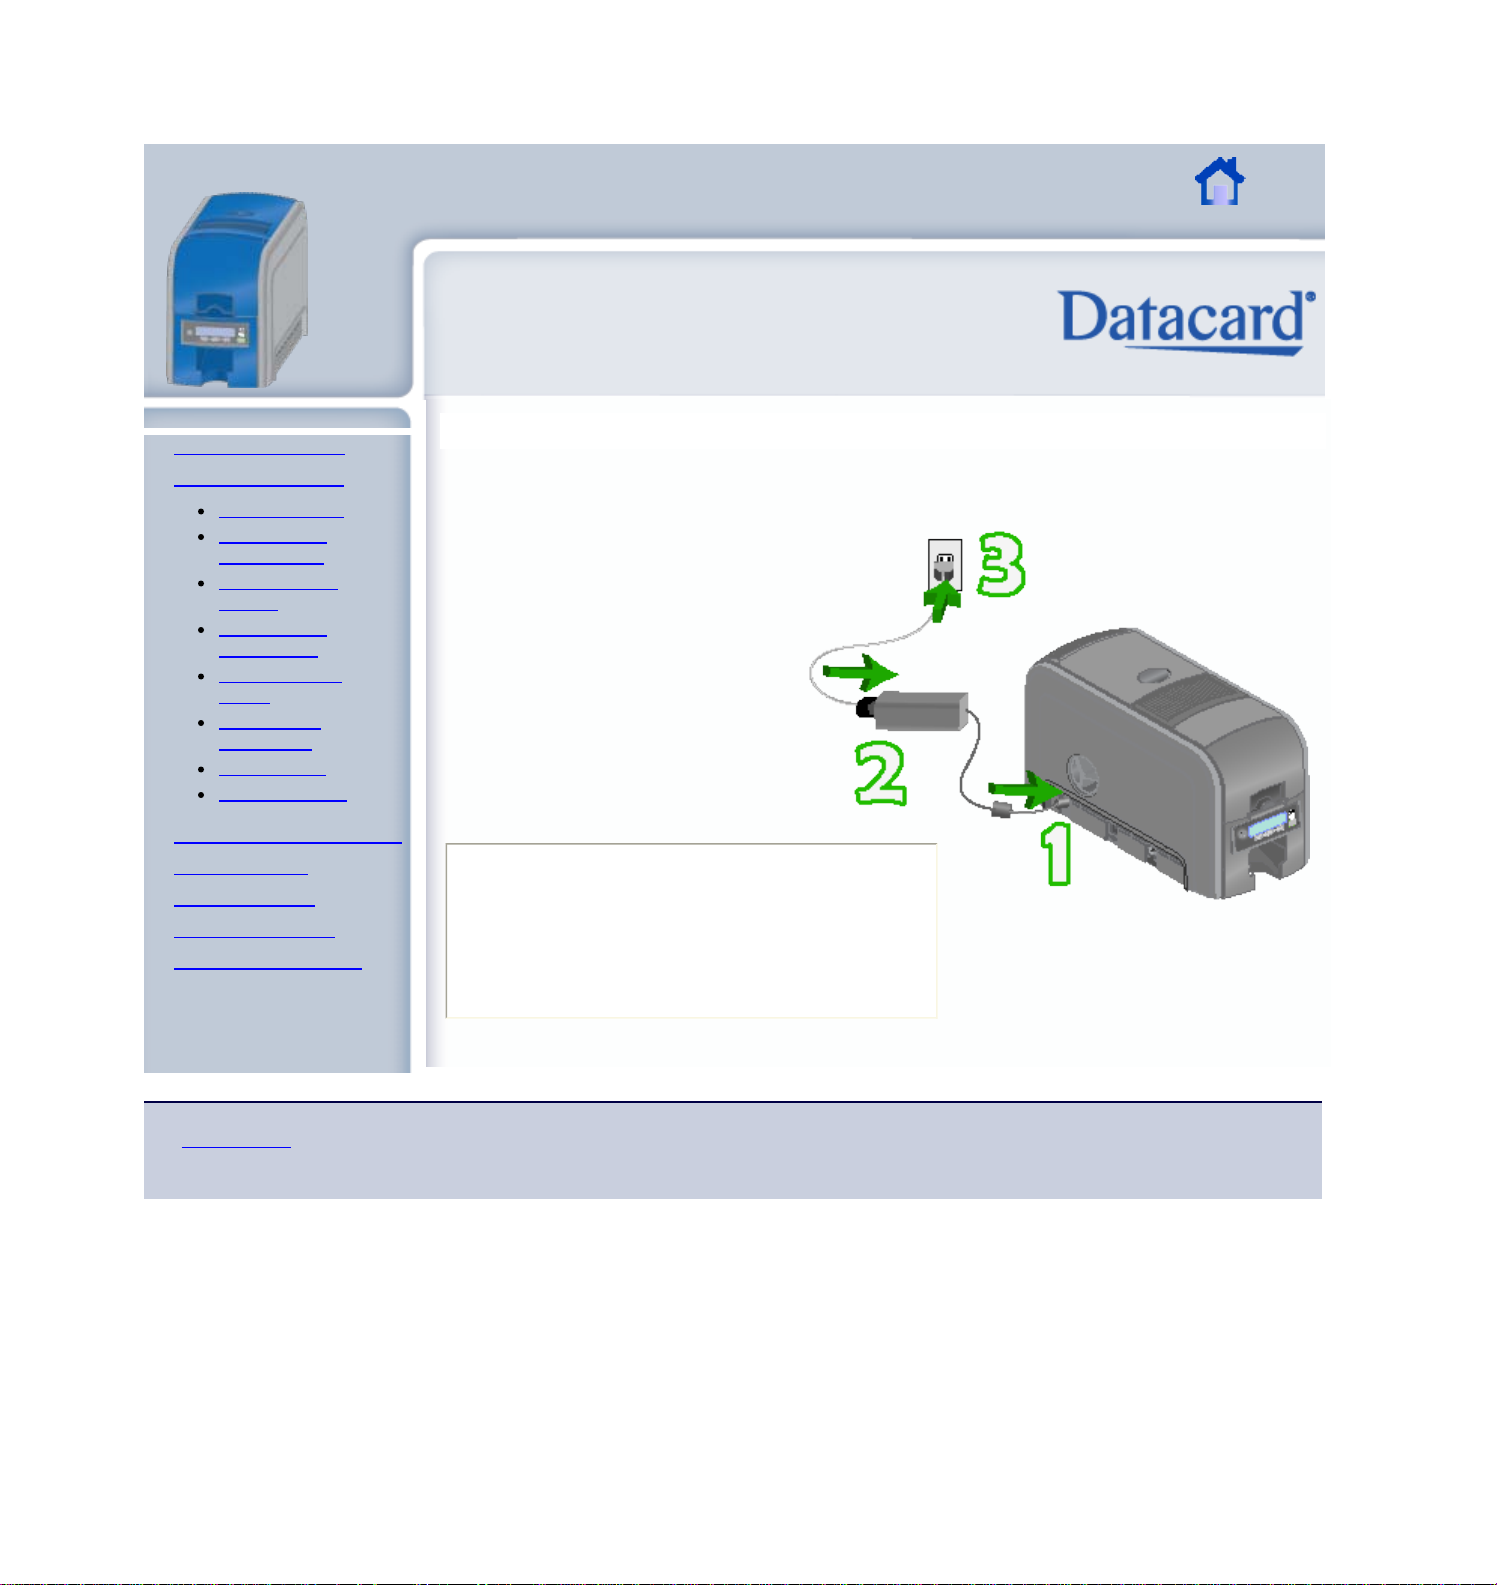
Connecting the Power Cord
The printer uses an external power supply and power cord.
1. 1. Connect the power supply to the
printer.
2. Connect the power supply to the
power cord.
3. Connect the power cord to the
facility power.
Hints & Tips
The printer power button is
on the front panel. Use it to power
the printer on or off.
Visit Datacard.com/id for downloads and support.
The design and information contained in these materials in protected by U. S. and international copyright law and/or treaties.
Page 19
XPS Card Printer Guide
XPS Card Printer Guide
DRAFT
2/22
Datacard Confidential
Page 16
SHORT TERM CONFIDENTIAL
About the Printer
Using the Printer
Load Supplies
Connect the
Power Cord
Power on the
Printer
Connect the
Data Cable
Use the Front
Panel
Respond to
Conditions
LCD Menus
Cleaning Card
Card Design and Setup
Printer Driver
Printing Cards
Troubleshooting
Supplies and Parts
Installation Guide
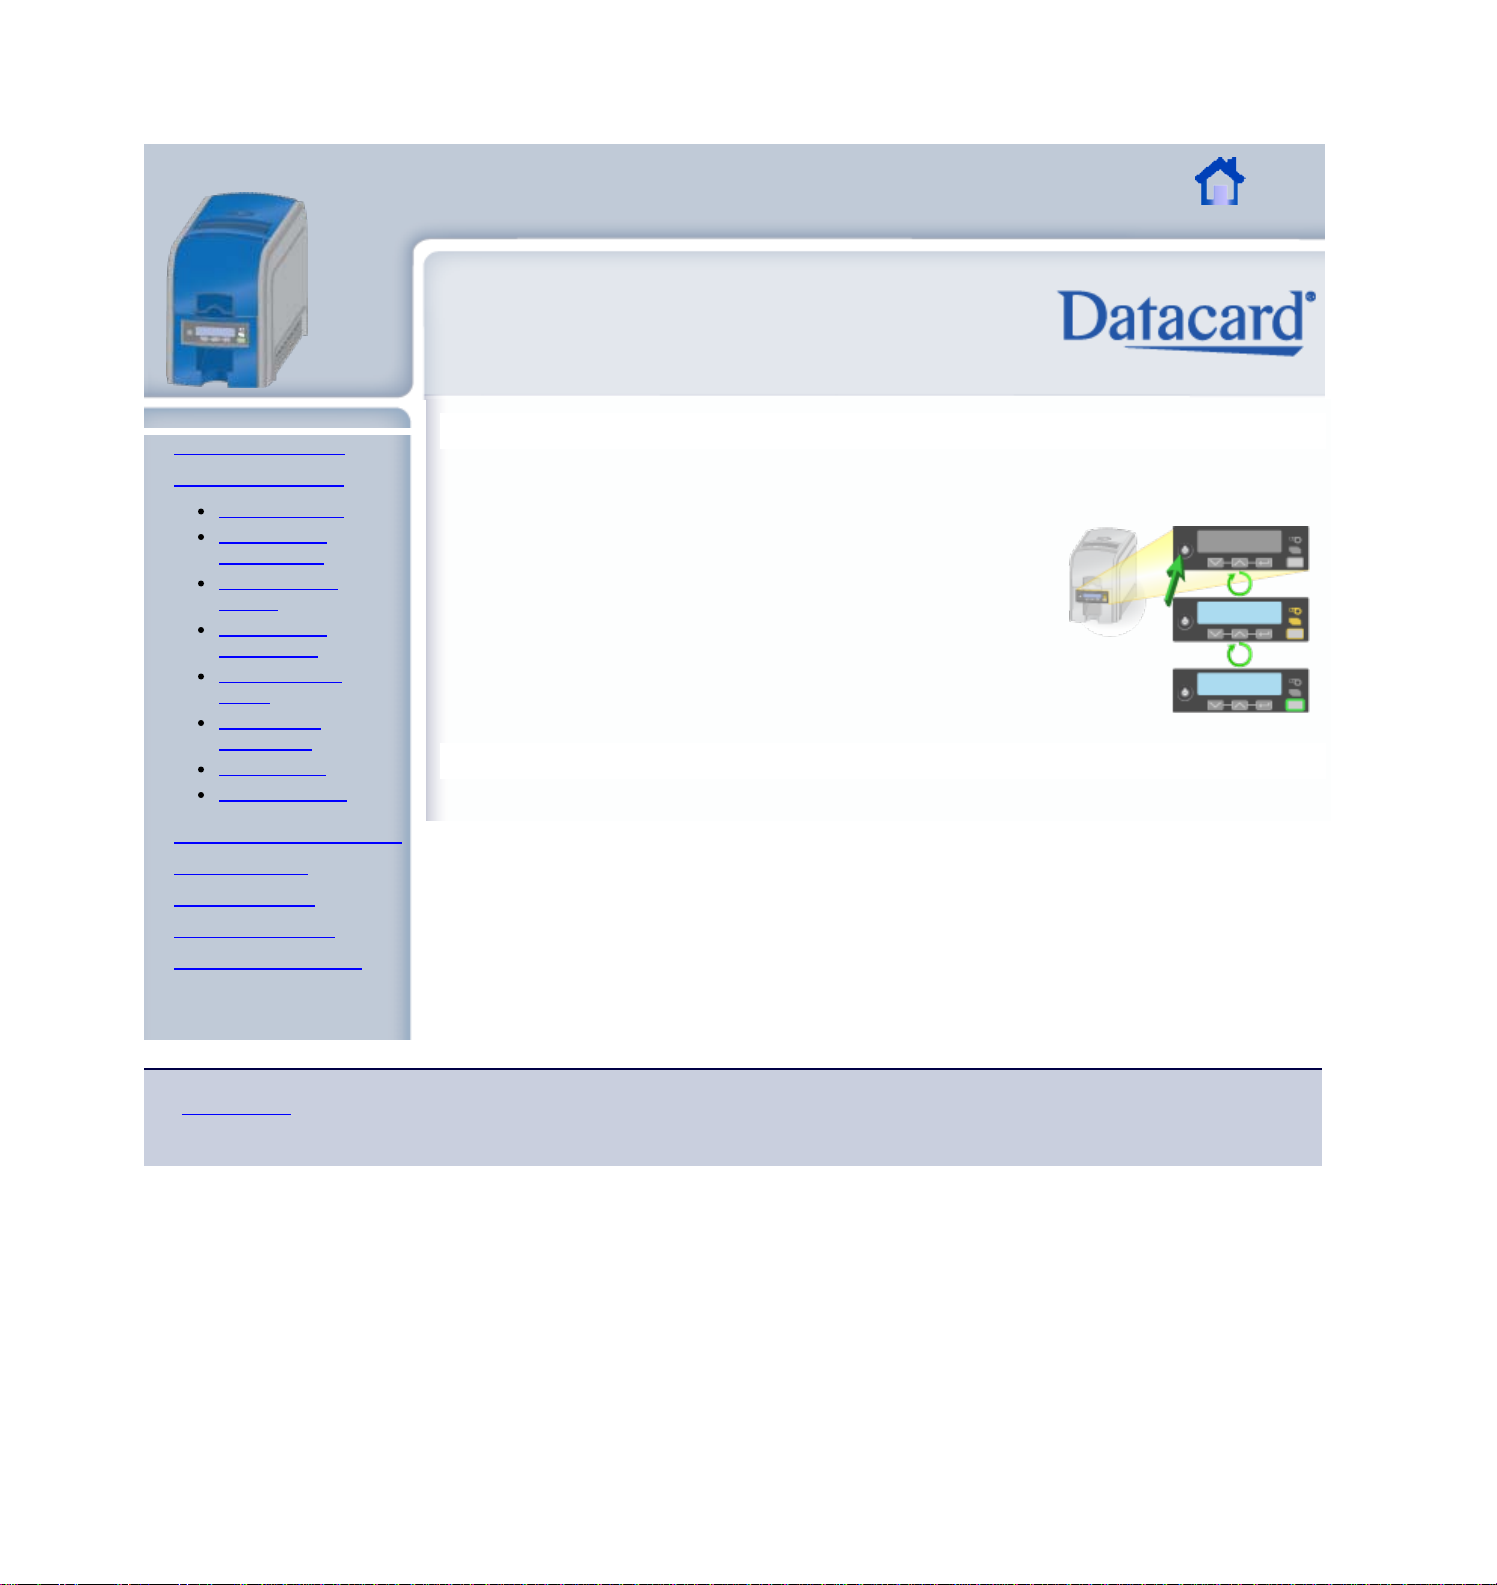
Power On the Printer
The printer must be connected to electrical power.
1. 1. Begin with the printer power connected.
2. Press the Power button to power on the printer.
3. Wait while the printer starts. When the User light shows steady
green, the printer is ready.
Visit Datacard.com/id for downloads and support.
The design and information contained in these materials in protected by U. S. and international copyright law and/or treaties.
Page 20
XPS Card Printer Guide
XPS Card Printer Guide
DRAFT
2/22
Datacard Confidential
Page 17
SHORT TERM CONFIDENTIAL
About the Printer
Using the Printer
Load Supplies
Connect the
Power Cord
Power on the
Printer
Connect the
Data Cable
Use the Front
Panel
Respond to
Conditions
LCD Menus
Cleaning Card
Card Design and Setup
Printer Driver
Printing Cards
Troubleshooting
Supplies and Parts
Installation Guide
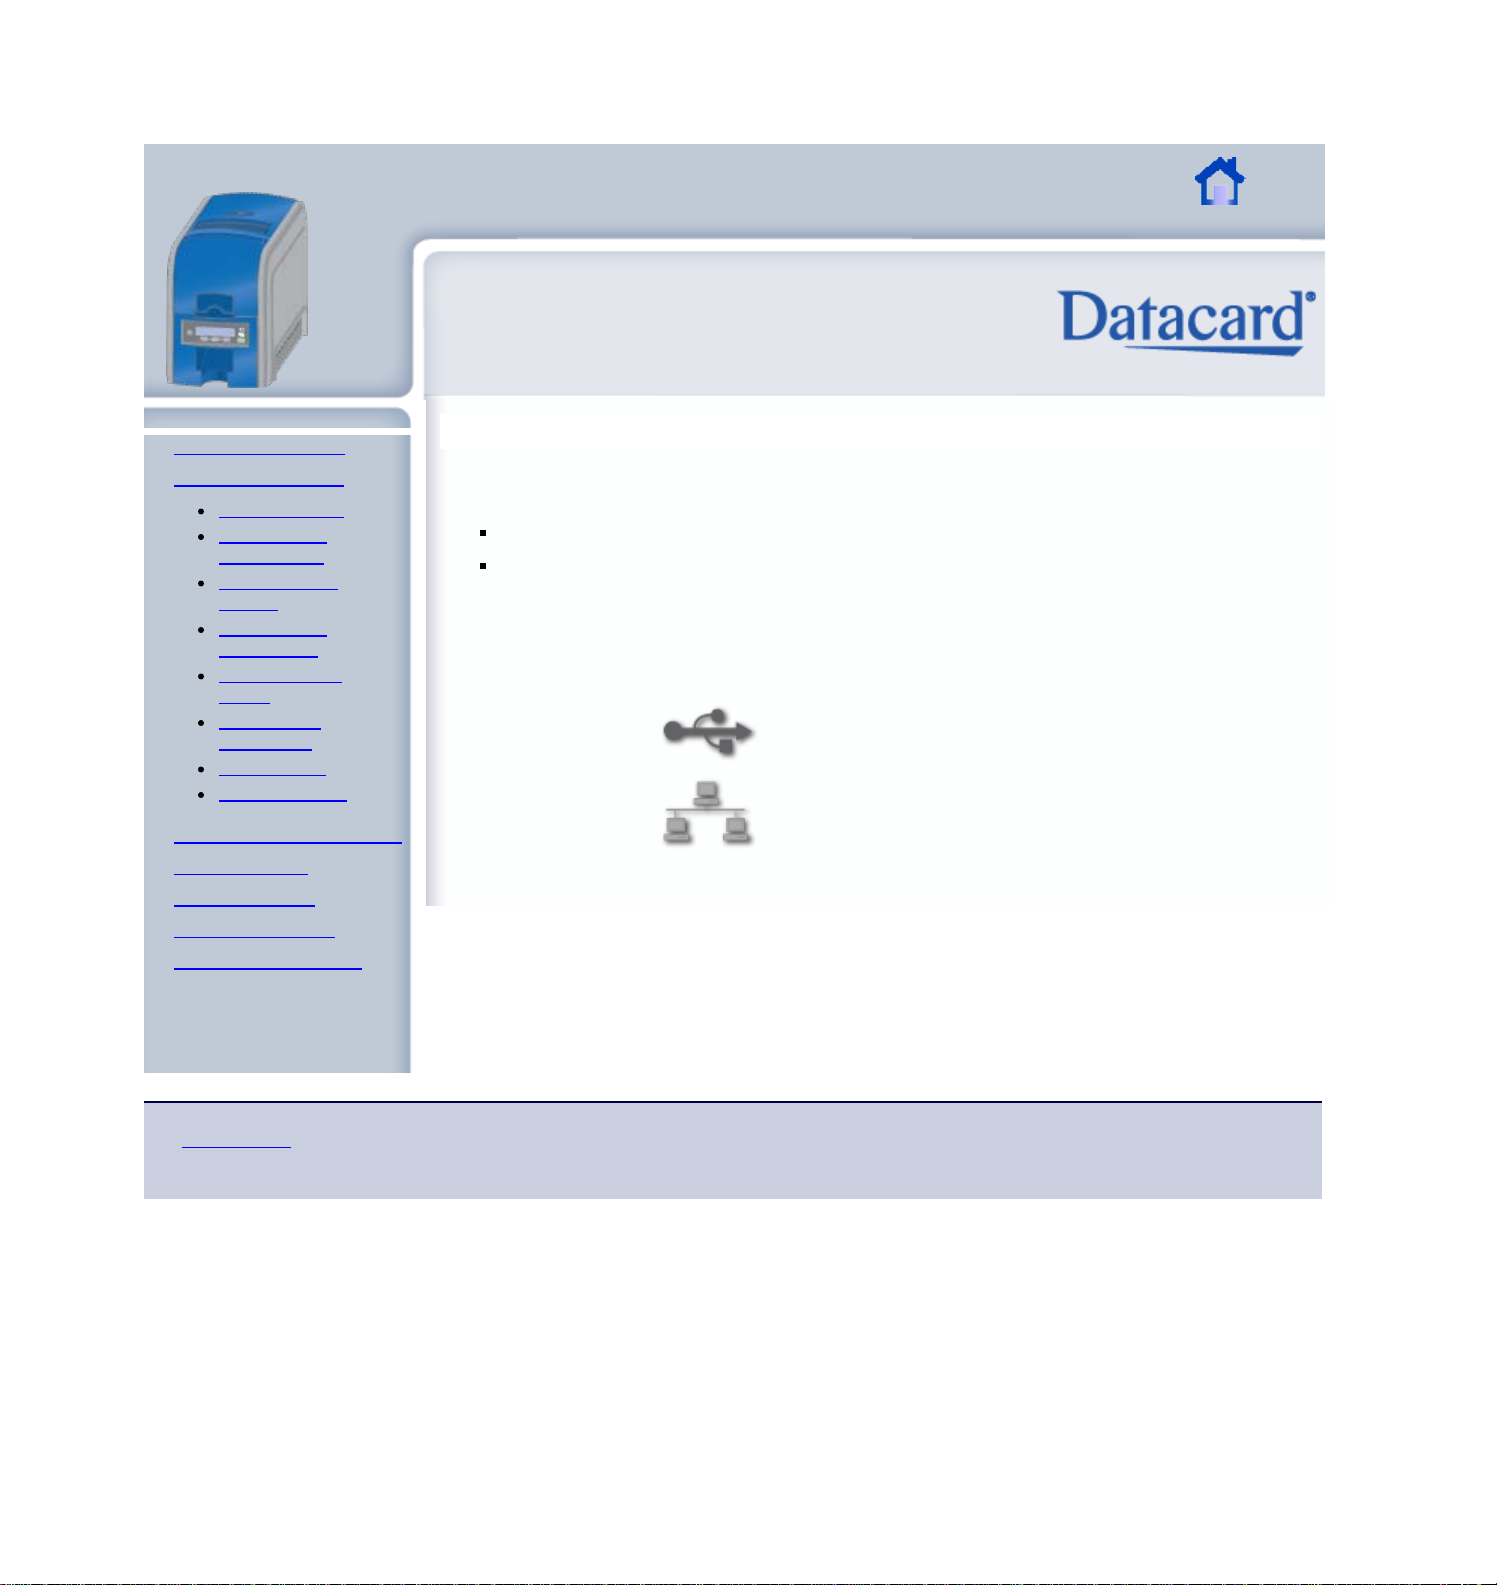
Connect the Data Cable
The printer received the data to print cards from a PC. The printer can be connected to the PC
in one of the following ways:
Using a USB cable, also called a "local connection"
Using a network connection
USB Connection
The printer can use a USB connection to the PC (host computer), or a network connection. This
information uses the following symbols to show information that applies to the connection type.
USB
Network
Visit Datacard.com/id for downloads and support.
The design and information contained in these materials in protected by U. S. and international copyright law and/or treaties.
Page 21
XPS Card Printer Guide
XPS Card Printer Guide
DRAFT
2/22
Datacard Confidential
Page 18
SHORT TERM CONFIDENTIAL
About the Printer
Using the Printer
Load Supplies
Connect the
Power Cord
Power on the
Printer
Connect the
Data Cable
Use the Front
Panel
Respond to
Conditions
LCD Menus
Cleaning Card
Card Design and Setup
Printer Driver
Printing Cards
Troubleshooting
Supplies and Parts
Installation Guide
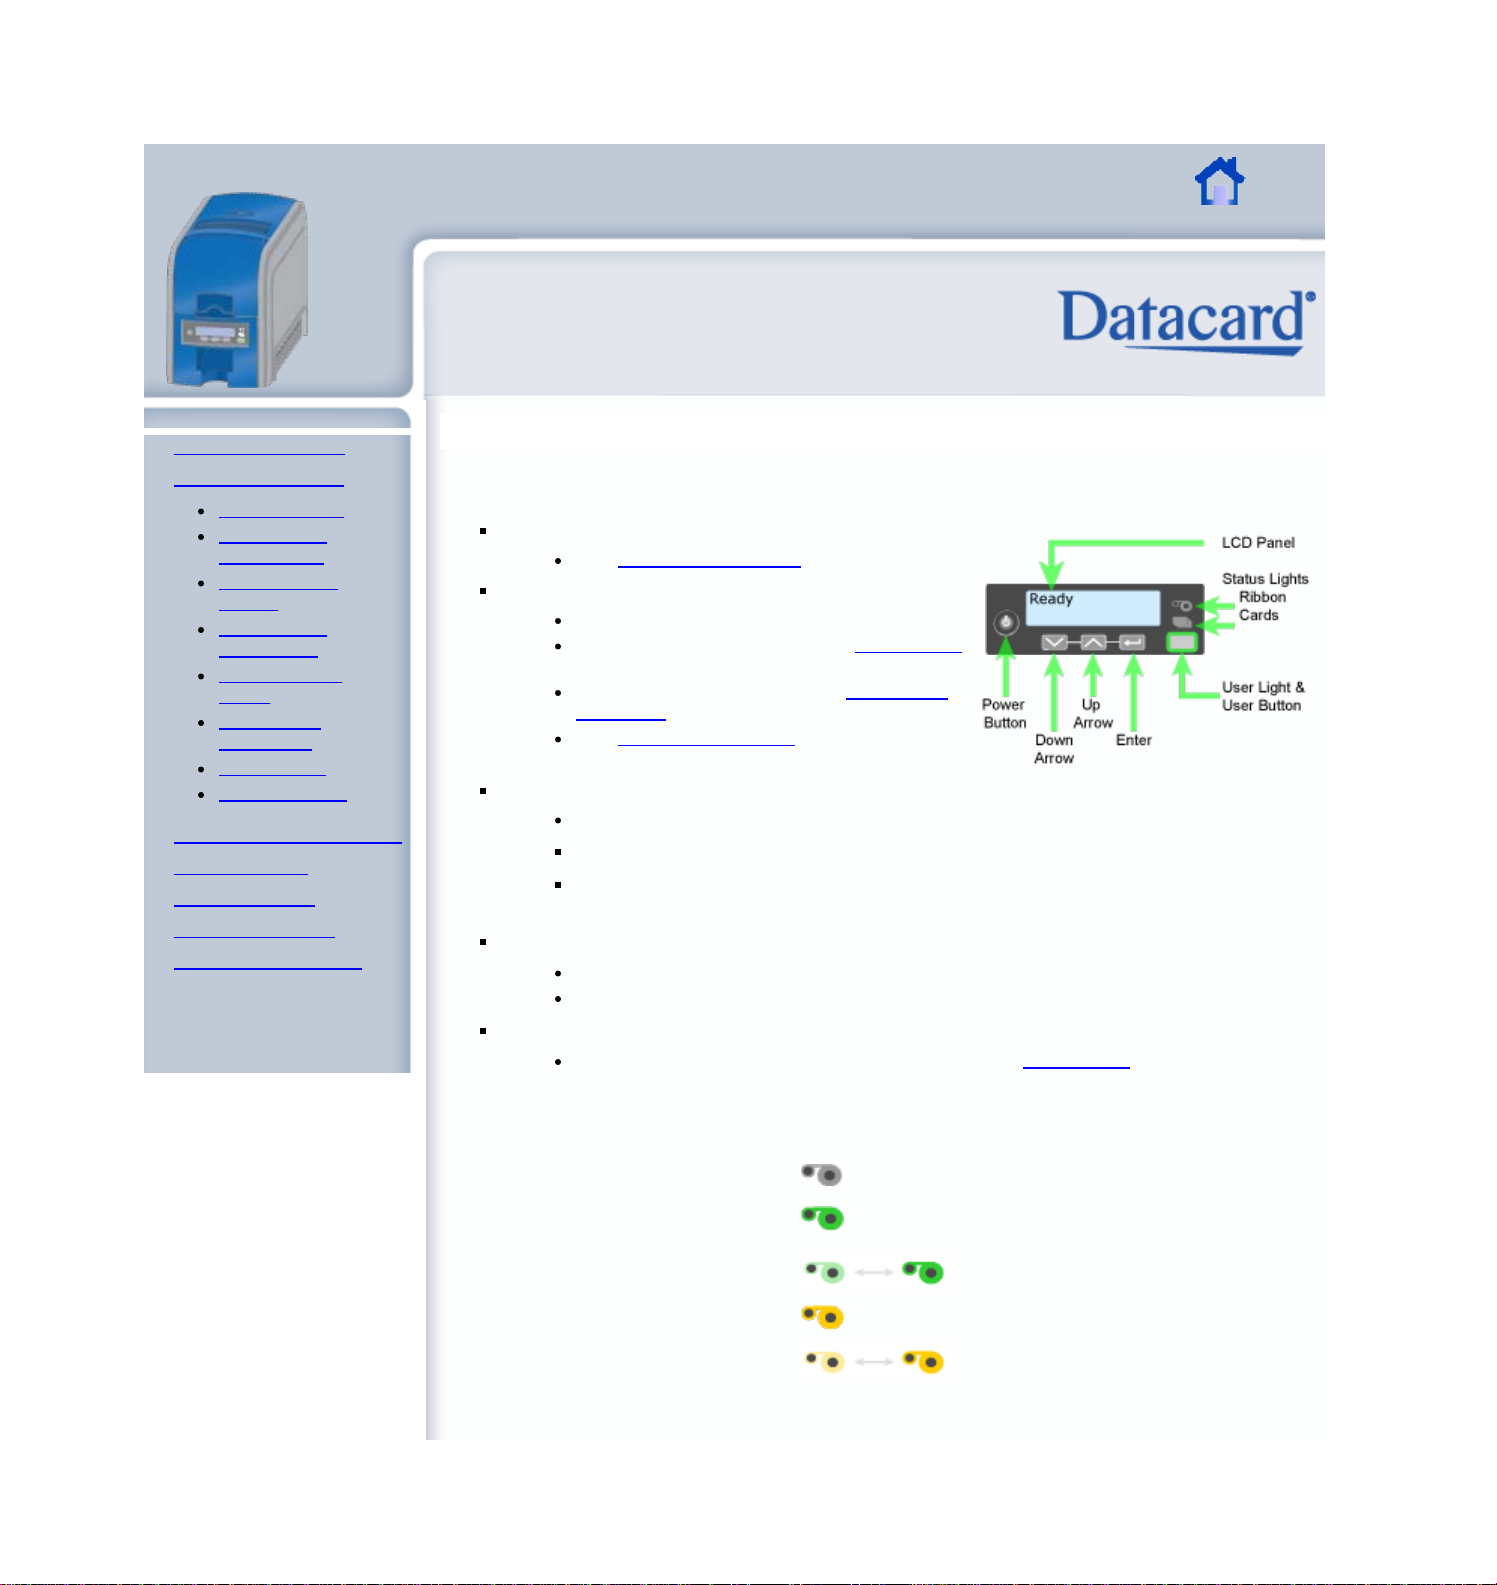
Use the Front Panel
The front panel of the printer provides the controls you need to operate the printer. It includes
the following:
Power button – powers the printer off and on
See Power on the Printer for details.
LCD panel
Describes what the printer is doing.
Includes the printer menu. See LCD Menus
for details.
Shows printer messages. See Respond to
Messages for details.
See Cleaning the Printer to run a cleaning
card.
Status lights
Ribbon light – shows a problem with print ribbon
Cards light – shows a problem with a card or cards
User light – shows whether the printer is ready, busy printing, or not
available
User button
Suspends the printer to use menus
Clears messages
Down Arrow, Up Arrow, and Enter keys
Use with the printer menu on the LCD panel. See LCD Menus for details.
Ribbon Light
Off Ribbon is okay
Green
Blinking
green
Amber Ribbon is out--replace
Blinking
Amber
Ribbon is low - less that
10% remains
Page 22

Off – Ribbon is okay
XPS Card Printer Guide
DRAFT
2/22
Datacard Confidential
Page 19
SHORT TERM CONFIDENTIAL
Cards light
User Light
Hints & Tips
text
Texst
Visit Datacard.com/id for downloads and support.
The design and information contained in these materials in protected by U. S. and international copyright law and/or treaties.
Page 23
XPS Card Printer Guide
XPS Card Printer Guide
DRAFT
2/22
Datacard Confidential
Page 20
SHORT TERM CONFIDENTIAL
About the Printer
Using the Printer
Load Supplies
Connect the
Power Cord
Power on the
Printer
Connect the
Data Cable
Use the Front
Panel
Respond to
Conditions
LCD Menus
Cleaning Card
Card Design and Setup
Printer Driver
Printing Cards
Troubleshooting
Supplies and Parts
Installation Guide
Respond to Conditions or Messages
When the printer cannot process the card sent, it issues a condition. Conditions are displayed on
the LCD of the Front Panel. In most cases, the Windows driver also displays the condition as a
message. See
Message 100: Request not supported
To print the card:
Change the data to match printer features and settings.
Send the new card to print again.
Hints & Tips
The card, if it started to print, should
be discarded.
Make sure you have chosen the
correct printer in the application.
Ask the Administrator for assistance if
needed.
Message 101: Job could not complete
The card took too much time. To print the card again:
Make sure all data for the card is available.
Send the card to print again.
Driver Messages for information about the messages the driver displays.
Hints & Tips
The card, if it started to print, should
be discarded.
Make sure that data, such as a photo,
is on the PC before printing. If you
are connected to a database, verify
the connection.
Ask the Administrator for assistance if
Page 24

needed.
XPS Card Printer Guide
DRAFT
2/22
Datacard Confidential
Page 21
SHORT TERM CONFIDENTIAL
Message 102: Card not in position
The card did not reach the position for the next action,
such as printing the card or ejecting the card.
1. 1. Open the printer and remove the ribbon cartridge.
2. Turn the knob to move the card so the printer can
eject it.
3. Replace the ribbon cartridge and close the printer.
Hints & Tips
Check the ribbon to make sure it is
not torn. See
ribbon if needed.
Remove any debris from the print
area.
Ask the Administrator for assistance if
needed.
Message 110 to fix the
Message 103: Printer problem
The printer has a problem that prevents it from completing the card.
2. 1. Press the printer Power button to power it off.
2. Press the printer Power button to power it on
again..
Hints & Tips
If the printer works, the problem was
temporary.
If the printer does not work, request
service.
Message 104: Critical problem
Press the printer Power button or click OK to power the
printer off.
Request service.
Page 25

XPS Card Printer Guide
DRAFT
2/22
Datacard Confidential
Page 22
SHORT TERM CONFIDENTIAL
Hints & Tips
The printer needs to remain off due to
an internal problem.
Pressing either the Power button or
the User button will power off the
printer.
Message 105: Magstripe data error
The printer could not verify the magnetic stripe data
written on the card. The printer encoded data on the card
but could not verify all of the data.
To print the card again:
3. 1. Insert a magnetic stripe card that matches the
printer settings.
2. Press the User button on the printer or click "Retry
the card" in the Message box.
Hints & Tips
The card might not match printer
settings or the data sent.
Ask the Administrator to verify that
the card, the data, and the printer
settings match.
Message 106: Magstripe data not found
The printer could not find magstripe written data on card.
To print the card again:
4. 1. Insert a magnetic stripe card that matches the
printer settings.
2. Position the card with the magnetic stripe down and
to the right side of the printer.
3. Press the User button on the printer or click "Retry
the card" in the Message box.
Page 26

Hints & Tips
XPS Card Printer Guide
DRAFT
2/22
Datacard Confidential
Page 23
SHORT TERM CONFIDENTIAL
The card might have been turned the
wrong way.
The card might not have a magnetic
stripe.
Message 107: Magstripe read data error
The pritner could not read the magstripe data on the
card. To read the card:
5. 1. Insert a magnetic stripe card with data.
2. Insert the card with the magnetic stripe down and to
the right side of the printer.
3. Send the new card to the printer.
Hints & Tips
The data might use a different format
than the current printer setting.
Ask the Administrator to verify that
the card, the data, and the printer
settings match.
Message 108: Magstripe read no data
The printer did not find any magstripe data on the card.
To read the card:
6. 1. Insert a magnetic stripe card with data.
2. Positon the card with the magnetic stripe down and
to the right side of the printer.
3. Send the new card to the printer.
Page 27

Hints & Tips
XPS Card Printer Guide
DRAFT
2/22
Datacard Confidential
Page 24
SHORT TERM CONFIDENTIAL
The card might have been turned the
wrong way.
The card might not have a magnetic
stripe.
Message 109: Print ribbon problem
The print ribbon is not moving properly. To fix the ribbon:
7. 1. Open the printer and remove the ribbon cartridge.
2. Fix the ribbon and move the repaired area one full
turn.
3. Replace the ribbon cartridge and close the printer.
Hints & Tips
Remove any debris from the print
area.
If the card is in the printer, turn the
knob to move the card so the printer
can eject it.
Message 110: Print ribbon out or missing
The printer does not have usable ribbon. Load the ribbon
or replace the ribbon.
8. 1. Open the printer and remove the ribbon cartridge.
2. Remove the existing ribbon and cleaning roller, if
present.
3. Install the ribbon. Replace the cleaning roller.
4. Replace the ribbon cartridge and close the printer.
Hints & Tips
Used ribbon can have "negative"
Page 28

images of printed data. To keep the
XPS Card Printer Guide
DRAFT
2/22
Datacard Confidential
Page 25
SHORT TERM CONFIDENTIAL
data confidential, follow your policy to
discard used ribbon.
Message 111: Card not picked
The printer did not pick a card. To load cards:
9. 1. Open the input hopper.
Cards can stick together: Slide or fan cards to
separate the edges before loading the input
hopper.
2. Insert cards in the input hopper.
3. Close the input hopper and resume.
For printers with single card feed, push the card in until
the printer moves it.
Hints & Tips
Orient all cards the same way.
Do not touch the card surface to be
printed:
Handle cards by their edges
Wear gloves
Message 112:
Card hopper
empty
The printer does not detect cards in the input hopper.
10. 1. Open the input hopper.
Cards can stick together: Slide or fan cards to
separate the edges before loading the input
Page 29

hopper.
Load cards in the input hopper
Close the cover
XPS Card Printer Guide
DRAFT
2/22
Datacard Confidential
Page 26
SHORT TERM CONFIDENTIAL
2. Insert cards in the input hopper.
3. Close the hopper and resume.
Hints & Tips
Orient all cards the same way.
Do not touch the card surface to be
printed:
Handle cards by their edges
Wear gloves
Message 113:
Close cover to
continue
The printer cover must be closed to print.
11. 1. Close the cover.
2. Push down on the corners of the cover to latch it.
Hints & Tips
Make sure the ribbon cartridge is
installed and the handle is even with
the edges of the printer.
Message 114: Cover opened during job
The printer cover must be closed to print.
12. 1. Close the cover.
2. Push down on the corners of the cover to latch it.
Page 30

Close the cover
Hints & Tips
Wait for print temperature
Printer does not have magstripe
XPS Card Printer Guide
DRAFT
2/22
Datacard Confidential
Page 27
SHORT TERM CONFIDENTIAL
Make sure the ribbon cartridge is
installed and the handle is even with
the edges of the printer.
The card, if it started to print, should
be discarded.
Message 115: Wait for print temperature
The printer is not at the correct temperature to print the
card.
Printing the card will resume on its own.
Hints & Tips
The balloon message informs you that
the card requires a few more seconds
to complete.
If this message appears often, move
the printer to a cooler location.
Message 116: Magstripe not available
Look at the "config" area of the label inside of the printer
cover. Does the label show “M” or “J”?
If yes, the printer has a magstripe option that is not
working. Request service.
If no, the printer does not have a magstripe option.
To print the card without magstripe, remove
magstripe data from the card and send it again.
Hints & Tips
To remove magstripe data, you might
need to:
Uncheck a box in the
application.
Change the font from "XPS Card
Page 31

Printer - Track x" to a printable
Printer does not have magstripe
Printer cannot use this ribbon
XPS Card Printer Guide
DRAFT
2/22
Datacard Confidential
Page 28
SHORT TERM CONFIDENTIAL
font such as Arial, Verdana, or
Calibri.
Message 117: Reader not available
The printer does not have a reader option.
To print the card without using a reader option,
remove the reader request from the card and send
it again.
Hints & Tips
To remove the reader request, you
might need to uncheck a box in the
application.
Message 118: Print ribbon type problem
The printer cannot use the ribbon installed.
Use ribbon designed for this printer brand and
model.
Check the Web site for newer firmware, which might
support new ribbon types.
Hints & Tips
When the printer recognizes that a
supported ribbon is installed, all
enhanced product features are
enabled and successful card printing
can begin.
Message 119: Print ribbon not supported
The printer cannot use the ribbon installed.
Purchase ribbon from your dealer or authorized
reseller.
Use ribbon designed for this printer brand and
model.
Hints & Tips
Page 32

Printer cannot use this ribbon
When the printer recognizes that a
Printer paused
Print ribbon data not readable
XPS Card Printer Guide
DRAFT
2/22
Datacard Confidential
Page 29
SHORT TERM CONFIDENTIAL
supported ribbon is installed, all
enhanced product features are
enabled and successful card printing
can begin.
Message 120: User paused the printer
A person pressed the User button on the printer and a
card was in
Hints & Tips
If the user pressed the button for
several seconds, the card has been
cancelled.
process.
The card can continue processing without damage.
Message 121: Print ribbon ID problem
The ribbon data is damaged. The ribbon cannot be used.
Ask your dealer or authorized reseller for a
replacement.
Use ribbon designed for this printer brand and
model.
Hints & Tips
When the printer recognizes that a
supported ribbon is installed, all
enhanced product features are
enabled and successful card printing
can begin.
Page 33

Message 122: Magstripe format problem
Magstripe format not the same
XPS Card Printer Guide
DRAFT
2/22
Datacard Confidential
Page 30
SHORT TERM CONFIDENTIAL
The magstripe data sent does not match the format set
in the printer.
Ask your administrator for information about the
data to send.
Hints & Tips
The printer has format settings for the
data that can be encoded on the card.
The magstripe data sent does not
match those settings.
Ask the Administrator to verify that
the card, the data, and the printer
settings match.
Card Design> Magnetic Stripe for
See
information about data allowed for
specific formats.
Message 123: Insert new card then continue
The card requires you to insert a new card in the
exception slot.
13. 1. Insert the card in the printer.
2. Resume.
Hints & Tips
Make sure to use the correct type of
new card for this job.
Do not touch the card
surface to be printed:
Handle cards by their
edges
Wear gloves
Message 124: Insert same card then continue
The card must be turned by hand to print the second side.
Page 34

14. 1. Turn the card over.
XPS Card Printer Guide
DRAFT
2/22
Datacard Confidential
Page 31
SHORT TERM CONFIDENTIAL
2. Insert the card in the printer.
3. Resume.
Hints & Tips
Do not touch the card surface to be
printed:
Handle cards by their
edges
Wear gloves
Turn the card
end -over end,
not side to side.
See XPS Card
Printer Driver
Message 500 and Message 501.
Visit Datacard.com/id for downloads and support.
The design and information contained in these materials in protected by U. S. and international copyright law and/or treaties.
Page 35

XPS Card Printer Guide
About the Printer
XPS Card Printer Guide
DRAFT
2/22
Datacard Confidential
Page 32
SHORT TERM CONFIDENTIAL
Using the Printer
Load Supplies
Connect the
Power Cord
Power on the
Printer
Connect the
Data Cable
Use the Front
Panel
Respond to
Conditions
LCD Menus
Cleaning Card
Card Design and Setup
Printer Driver
Printing Cards
Troubleshooting
Supplies and Parts
Installation Guide
LCD Menus
The front panel of the printer includes an LCD display with keys. When the printer is not actively
printing cards, the LCD menu is available. See
other features of the front panel.
Use the menu for tasks, including:
Viewing the printer IP Address
Starting a cleaning card
Retreiving card counts
Paragraph
For Best Results
Text
Text
Use the Front Panel for more information about
Visit Datacard.com/id for downloads and support.
The design and information contained in these materials in protected by U. S. and international copyright law and/or treaties.
Page 36

XPS Card Printer Guide
About the Printer
XPS Card Printer Guide
DRAFT
2/22
Datacard Confidential
Page 33
SHORT TERM CONFIDENTIAL
Using the Printer
Load Supplies
Connect the
Power Cord
Power on the
Printer
Connect the
Data Cable
Use the Front
Panel
Respond to
Conditions
LCD Menus
Cleaning Card
Cleaning the Printer
The printer performs best when it is cleaned on a regular basis. The printer should be cleaned
when:
The number of cards printed, such as 300 cards, reaches the number for your site
The printer displays a message for which cleaning is a solution
You notice debris, such as lint, on completed cards
Follow the cleaning guidelines for your site to keep the printer in good working condition.
Cleaning the printer
Card Design and Setup
Printer Driver
Printing Cards
Troubleshooting
Supplies and Parts
Installation Guide
Visit Datacard.com/id for downloads and support.
The design and information contained in these materials in protected by U. S. and international copyright law and/or treaties.
1. Cleaning Card
a. Change the Cleaning Sleeve
b. Cleaning Count
2. For best results . . .
Paragraph
For Best Results
Cards, cards, and more cards
cards
Page 37

XPS Card Printer Guide
Printer Guide
XPS Card Printer Guide
DRAFT
2/22
Datacard Confidential
Page 34
SHORT TERM CONFIDENTIAL
About the Printer
Using the Printer
Card Design and Setup
Card
Components
Color Printing
Monochrome
Printing
Topcoat Printing
Magnetic Stripe
Printing & Non-
printing Areas
Layout
Settings
Printer Driver
Printing Cards
Troubleshooting
Supplies and Parts
Installation Guide
Card Design and Setup
Card design is the name given to the combined features of the printed cards. Cards are useful
only when all cards contain the required information.
Card design includes:
The different types of data such as name and ID number, images including company logo
or employee or other photos, and special features such as bar code or magnetic stripe.
The layout of the data.
Processes to improve card life such as topcoat.
Corporate style guidelines. For example, a corporate style guide can specify a particular
shade of red for the logo.
This section describes the card design components available and provides detailed information
about them.
Hints & Tips
An organization might have more than
one card design. For example, a
health club can use member cards and
employee ID cards.
Print several samples of your card
design and use them to evaluate the
quality of the design.
Use high quality (300dpi) photos and
graphics.
Visit Datacard.com/id for downloads and support.
The design and information contained in these materials in protected by U. S. and international copyright law and/or treaties.
Page 38

XPS Card Printer Guide
Printer Guide
XPS Card Printer Guide
DRAFT
2/22
Datacard Confidential
Page 35
SHORT TERM CONFIDENTIAL
About the Printer
Using the Printer
Card Design and Setup
Card
Components
Color Printing
Monochrome
Printing
Topcoat Printing
Magnetic Stripe
Printing & Non-
printing Areas
Layout
Settings
Printer Driver
Printing Cards
Troubleshooting
Supplies and Parts
Installation Guide
Card Components
The printer can personalize cards with the following components:
Color printing
Monochrome printing
Topcoat
Magnetic stripe
Printing and non-printing areas
The arrangement or
for users.
The
settings you choose define how the software manages the card components. The software
you use to produce cards affects the settings available and how you might use them.
layout of components helps to determine how well your card design works
Visit Datacard.com/id for downloads and support.
The design and information contained in these materials in protected by U. S. and international copyright law and/or treaties.
Page 39

XPS Card Printer Guide
Printer Guide
XPS Card Printer Guide
DRAFT
2/22
Datacard Confidential
Page 36
SHORT TERM CONFIDENTIAL
About the Printer
Using the Printer
Card Design and Setup
Card
Components
Color Printing
Monochrome
Printing
Topcoat Printing
Magnetic Stripe
Printing & Non-
printing Areas
Layout
Settings
Printer Driver
Printing Cards
Troubleshooting
Supplies and Parts
Installation Guide
Color Printing
This section includes:
Print Ribbon
Managing Color
Printing Text
Printing Graphics
Types of Color Images
Print Ribbon
Color printing uses a print ribbon with three color panels Y (yellow), M (magenta), and C (cyan).
The ribbon also includes a black (K) panel and a topcoat (T) panel.
The printer applies the color images to the card first,
prints black components using the K panel, and then
applies the topcoat (T) which helps protect the color
image from damage.
Color print ribbon is available in full panel or short panel. The color
area for short panel ribbon is 1.57 inches (40mm) from the left
edge of a landscape orientation card and 1.57 inches (40mm) from
the top edge of a portrait orientation card. The color printing is
always on the leading edge of the card as it passes through the
printer.
For more information on print ribbon, see the
this guide.
Supplies section of
Managing Color
Many people think that a color on the monitor and the printed color "should be the same." Color
management is the technical process of making color in two different places (such as on the PC
monitor and printed on the card) as similar as possible. A widely used color standard is sRGB
color, and the card printer also uses sRGB color. (sRGB is the name for the standard Red,
Green, and Blue color space.)
Other color characteristics include brightness and contrast. The Windows driver includes settings
to fine-tune the brightness and contrast for the card. See
non-Windows environment, color management or graphics software can be used to manage
images.
Settings for more information. In a
Page 40

Printing Text
XPS Card Printer Guide
DRAFT
2/22
Datacard Confidential
Page 37
SHORT TERM CONFIDENTIAL
The printer can print text in any color. Small characters are likely to be more readable if they are
formatted as black and printed with the black (K) panel.
Printing Graphics
The printer produces full-color images from most types of graphics. It can use BMP, JPEG,
TIFF, and PNG file formats for photos and logos.
Vector graphics, such as WMF and SVG files, have components such as shapes with lines and
fills. The XPS Card Printer Driver separates each component. Components defined as black in
the file are likely to print with the K panel. For the best appearance of graphics, use a color
close to black, so all parts of a graphic print with YMC panels.
The printer uses the YMC panels of full-color ribbon to print grayscale graphics.
Types of Color Images
Cards can include both color photos and a color logo or text. The logo is usually the same on
each card, and the photo is unique. Follow these guidelines to obtain the best results for printing
both logo and photos:
First, check the color quality of the photos.
Change the image capture system to get the best quality photos; work with
distance, lighting, and camera settings to obtain consistent, high quality photos.
Evaluate the quality of printed photos after the image capture system is optimized.
Use the Color Settings tab in Printer Preferences to adjust the printed output, if
necessary.
Next, evaluate the other color areas of the card, such as text or logo.
The application might have settings that can help improve the printed color of
text. Image editing applications, such as Photoshop©, can be used to change the
color of a logo file for optimal printing.
If the cards do not have the colors you want, ask your administrator or service provider
for assistance.
Hints & Tips
Cyan is a specific shade of blue.
Full-panel color ribbon can apply color
images anywhere on the card.
See
Layout for information about
different components, such as a logo
or photo, and how to manage colors.
See "Printing Text" in the
Printing topic for information about
how the driver separates color and
monochrome components for printing.
Monochrome
Page 41

`
XPS Card Printer Guide
DRAFT
2/22
Datacard Confidential
Page 38
SHORT TERM CONFIDENTIAL
Visit Datacard.com/id for downloads and support.
The design and information contained in these materials in protected by U. S. and international copyright law and/or treaties.
Page 42

XPS Card Printer Guide
Printer Guide
XPS Card Printer Guide
DRAFT
2/22
Datacard Confidential
Page 39
SHORT TERM CONFIDENTIAL
About the Printer
Using the Printer
Card Design and Setup
Card
Components
Color Printing
Monochrome
Printing
Topcoat Printing
Magnetic Stripe
Printing & Non-
printing Areas
Layout
Settings
Printer Driver
Printing Cards
Troubleshooting
Supplies and Parts
Installation Guide
Monochrome Printing
This section describes:
Monochrome panels in full-color ribbon
Monochrome ribbons
Printing bar codes
Printing text
Printing graphics
The printer driver or application on the PC prepares the data for the printer to use. The type of
data and the type of ribbon installed determine how the XPS Card Printer Driver renders it.
Monochrome Panels in Full-Color Ribbon
Full-color print ribbon includes a black panel. The black
panel transfers to the card differently than the YMC
panels, Text and bar codes are often printed with the
black panel.
It also prints any monochrome or one-bit-per-pixel
graphics using the K panel.
Monochrome Ribbon
Monochrome ribbon produces single color cards. Monochrome ribbon
can be:
Alternating black and topcoat panels (KT ribbon)
Continuous black (K ribbon)
A continuous color, such as green or silver (also K ribbon)
Continuous monochrome printing with Authorized
ribbon uses the Ribbon Saver feature. The printer
begins using ribbon at a location that corresponds
to the leading edge of the card. The printer
continues to spool ribbon for the length of the
Page 43

image but no farther. (The printer leaves a small
XPS Card Printer Guide
DRAFT
2/22
Datacard Confidential
Page 40
SHORT TERM CONFIDENTIAL
margin between each card to avoid image
overlap.)
Printing Bar Codes
Most bar code readers require that bar codes are printed with the K panel of a
ribbon.Bar codes must be tested in your bar code reader to make sure they
are readable.
Bar codes are usually more readable when they are printed with less power.
Bar codes are also more readable when the bars are parallel to the long
edges of the card.
Printing Text
Printing text using a K panel can make text look crisp, because only
one panel is used for printing. Fine text is often more readable when
printed with more power.
The font you choose also affects how easy it is to read printed text.
The printer reliably prints 6 pt Arial font. Bold, sans-serif fonts are
more readable after printer than serif fonts, or fonts with thin strokes,
as shown at right. Fonts that print well are shown toward the top of
the card.
When printing one-color cards, make sure text is formatted as black. Text formatted with a color
(such as blue) in the ID software is dithered by the driver and might have a broken appearance.
Printing Graphics
When printing one-color cards, the XPS Card Printer Driver dithers color
and grayscale graphics. Dithering converts areas other than black and
white to dots so the single-color ribbon can approximate the lightness and
darkness of the original graphic.
Hints & Tips
Monochrome means one-color. When
printing cards, the opposite of
monochrome is full- color or YMC
printing.
Page 44

XPS Card Printer Guide
DRAFT
2/22
Datacard Confidential
Page 41
SHORT TERM CONFIDENTIAL
Visit Datacard.com/id for downloads and support.
The design and information contained in these materials in protected by U. S. and international copyright law and/or treaties.
Page 45

XPS Card Printer Guide
Printer Guide
XPS Card Printer Guide
DRAFT
2/22
Datacard Confidential
Page 42
SHORT TERM CONFIDENTIAL
About the Printer
Using the Printer
Card Design and Setup
Card
Components
Color Printing
Monochrome
Printing
Topcoat Printing
Magnetic Stripe
Printing & Non-
printing Areas
Layout
Settings
Printer Driver
Printing Cards
Troubleshooting
Supplies and Parts
Installation Guide
Topcoat Printing
When a ribbon with a topcoat or "T" panel is installed, the printer can apply topcoat to the card
using the printhead.
Topcoat protects the printed image on the card. Full-color printing fades if it lacks topcoat
protection. Make sure that most printing is covered with topcoat.
Topcoat must be requested by the application or driver sending the card to the printer. When
you use the XPS Card Printer Driver, it automatically requests topcoat for YMCKT and KT
ribbons. Most ID software also requests topcoat automatically..
Topcoat should not be applied over the magnetic stripe, smart card chip, or signature panel of a
card. To prevent topcoat application, see Print and Non-printing Areas for more information..
Hints & Tips
Topcoat is applied as an even,
consistent film. If it appears, ask your
administrator or service provider for
assistance.
Full color ribbon (YMCKT) and KT ribbon include topcoat panels.
Visit Datacard.com/id for downloads and support.
The design and information contained in these materials in protected by U. S. and international copyright law and/or treaties.
Page 46

XPS Card Printer Guide
Printer Guide
XPS Card Printer Guide
DRAFT
2/22
Datacard Confidential
Page 43
SHORT TERM CONFIDENTIAL
About the Printer
Using the Printer
Card Design and Setup
Card
Components
Color Printing
Monochrome
Printing
Topcoat Printing
Magnetic Stripe
Printing & Non-
printing Areas
Layout
Settings
Printer Driver
Printing Cards
Troubleshooting
Supplies and Parts
Installation Guide
Magnetic Stripe
This section describes:
About Magnetic Stripe
Magnetic Stripe Escapes
Using Magnetic Stripe Escapes
About Magnetic Stripe
Magnetic stripe is an option available in the printer. See the Printer Status page of Properties for
the printer to see if your printer has a magnetic stripe option.
The cards you use must also have a magnetic stripe. The magnetic
stripe is a brown or black stripe close to one long edge of the card.
See the package containing new cards for details about the
magnetic stripe.
The magnetic stripe option is set up to define the coercivity, number
of tracks, and data format. The coercivity and data format are set in
the printer. The installer sets these values and they remain the same
for all cards printed using the same design.
The data format determines how many characters can be encoded
on a track. It also determines which characters can be encoded.
here to see the characters available with the default ISO three-
Click
track format.
Click
here to see the characters available with the JIS single-track
format.
Your cards can use the default format for each track, or can use a different combination of tracks
and data formats.
Magnetic Stripe Escape Codes
The data to encode on a magnetic stripe is entered as text and can look like data to print. The
XPS Card Printer Driver uses special characters called Escape Codes to identify data to encode.
Data within escape codes is not printed. The driver supports several Escape Code systems to
allow easy compatibility with other card printers.
The Escape Code defines the track for the data. The printer is set to use the format for each
track and you must enter the type of data the format requires. The table below shows the default
ISO format data, and how the data looks when formatted. The syntax column shows the general
statement for how the data must be provided. For each track there is an example of how the
data looks.
Page 47

Syntax Track Example Manufacturer
XPS Card Printer Guide
DRAFT
2/22
Datacard Confidential
Page 44
SHORT TERM CONFIDENTIAL
~<track#><data>
~<track#>=<data>
~<track#><Start
Sentinel> <data><End
Sentinel
1 (IATA)
2 (ABA)
3 (TTS)
1 (IATA)
2 (ABA)
3 (TTS)
1 (IATA)
2 (ABA)
3 (TTS)
~1ENCODING
WITH ESCAPES
~21234567890
~31234567890
~1=ENCODING
WITH ESCAPES
~2=1234567890
~3=1234567890
~1%ENCODING
WITH ESCAPES?
~2;1234567890?
~3;1234567890
Using Magnetic Stripe Escapes
Use ID software or other application to create a card design.
Eltron/Zebra
Atlantek
Datacard HiFX,
RP90x, and SRxxx;
JVC; and Fargo
The only Start
Sentinel permitted for
tracks 2 and 3 is ;
(semocolon)
1. 1. Format the text and graphics to print on the card.
2. Choose a location on the card where typing the data to encode will not affect other card
design components.
3. Type the encode data (text) for one track. The example shown below uses the
~<track#><Start Sentinel><Data><End Sentinel> syntax.
The text for track 1 looks like this: ~1%Zachary Hamilton 12345 Finance?
Page 48

4. Press Enter to end a line.
XPS Card Printer Guide
DRAFT
2/22
Datacard Confidential
Page 45
SHORT TERM CONFIDENTIAL
5. Repeat Steps 3 and 4 for each track of magnetic stripe data.
End each line with an Enter keystroke.
Do not not put data for two tracks on the same line.
Do not allow text to encode to wrap to another line.
You can use two or more lines of text for one track. Each line must start
and end with escape codes. The driver will add (append) lines for the
same track together.
Data to encode can be on side 1 (front) or side 2 (back) of the card.
6. With magnetic stripe cards in the printer, send the card to print.
7. Verify the encoding success by passing the card through a card reader.
Hints & Tips
The driver recognizes all supported
escape codes.
Use a small font size to shorten lines
of text to encode.
Keep text to print on a different line
from text to encode.
When the driver adds lines of text for
the same track, the sequence is
determined by the application. Test
your application with the driver to
make sure the data is in the correct
order.
Magnetic stripe data sent by the driver
is always encoded on side 2 of the
card.
Page 49

Magnetic stripe data will be converted
XPS Card Printer Guide
DRAFT
2/22
Datacard Confidential
Page 46
SHORT TERM CONFIDENTIAL
to uppercase (capital) letters if
needed.
If not - allowed characters are sent
within the magnetic stripe data, the
printer displays a message.
Visit Datacard.com/id for downloads and support.
The design and information contained in these materials in protected by U. S. and international copyright law and/or treaties.
Page 50

XPS Card Printer Guide
Printer Guide
XPS Card Printer Guide
DRAFT
2/22
Datacard Confidential
Page 47
SHORT TERM CONFIDENTIAL
About the Printer
Using the Printer
Card Design and Setup
Card
Components
Color Printing
Monochrome
Printing
Topcoat Printing
Magnetic Stripe
Printing & Non-
printing Areas
Layout
Settings
Printer Driver
Printing Cards
Troubleshooting
Supplies and Parts
Installation Guide
Magnetic Stripe Formats
Three-Track Option
The default formats for a three-track magnetic stripe option are:
Track 1 — IATA
Track 2 — ABA
Track 3 — TTS
This combination is often abbreviated IAT. This format is called ISO format.
IATA (International Air Transport Association)
The maximum number of characters for IATA format is 76 characters. These characters can
include spaces, upper case alphabetic characters, numeric characters, and the following special
characters:
! # $ % ' ( ) * + , - . / ; : < @ > = ^ ] \ [ " & _
ABA (American Bankers Association)
The maximum number of characters for ABA format is 37 characters. Numeric characters and
the following special characters are allowed:
: ; < = >
TTS (Thrift Third Standard)
The maximum number of characters for TTS format is 104 characters. Numeric characters and
the following special characters are allowed:
: ; < = >
Single-Track Option
The default encoding format for a single-track magnetic stripe module is the JIS X format.
JIS (Japanese Industrial Standard)
The maximum number of characters for the JIS format is 69 characters. These characters can
Page 51

include spaces, numeric characters, upper case alphabetic characters, lower case alphabetic
characters, and the following special characters:
XPS Card Printer Guide
DRAFT
2/22
Datacard Confidential
Page 48
SHORT TERM CONFIDENTIAL
! " # $ % & ' ( ) * + , - . / : ; < = > ? @ [ ] ^ _ ~ { | } ~
From a PC running a Japanese edition of a supported Windows operating system Japaneselanguage characters are also supported. They include the following special characters:
45 Katakana characters:
and the following 10 Katakana characters:
Each time you start using Japanese-language characters, or stop using them, a hidden
character is added. Each hidden character reduces the number of characters you can encode by
one character.
Hints & Tips
Ask your administrator which format
you use for each track.
Visit Datacard.com/id for downloads and support.
The design and information contained in these materials in protected by U. S. and international copyright law and/or treaties.
Page 52

XPS Card Printer Guide
Printer Guide
XPS Card Printer Guide
DRAFT
2/22
Datacard Confidential
Page 49
SHORT TERM CONFIDENTIAL
About the Printer
Using the Printer
Card Design and Setup
Card
Components
Color Printing
Monochrome
Printing
Topcoat Printing
Magnetic Stripe
Printing & Non-
printing Areas
Layout
Settings
Printing and Non-printing Areas
The card design can have areas where printing is not allowed. Such areas can include a
magnetic stripe, signature panel, or smart card chip. ID software often manages such nonprinting areas automatically. If you use other applications to print cards, such as Microsoft©
Word, define non-printing areas in the XPS Card Printer Driver.
The XPS Card
stripe and smart card chip. Both printing and topcoat are blocked in these areas.
Custom Non-Printing Areas
Use custom non-printing areas for one or more of the following:
Blocking printing but not topcoat
Non-standard areas, such as a preprinted logo or a signature panel
More than one area on the same side of the card
Printer Driver includes standard non-printing areas, such as three-track magnetic
Printer Driver
Printing Cards
Troubleshooting
Supplies and Parts
Installation Guide
Standard Magnetic Stripe Area
Use the following dimensions to prevent printing in the magnetic stripe area.
(The green arrow shows the direction the card travels through the printer.)
A B C
3-track
2-track
Single-track
(JIS)
in
3.37
85.6
mm
3.37 in
85.6
mm
3.37 in
85.6
mm
1.46 in
37.1
mm
1.57 in
39.9
mm
1.60 in
40.6
mm
0.66 in
16.8 mm
0.55 in
14 mm
0.52 in
13.2 mm
Smart Card Non-printing Area
Page 53

Use the following dimensions to prevent printing in the smart card area.
XPS Card Printer Guide
DRAFT
2/22
Datacard Confidential
Page 50
SHORT TERM CONFIDENTIAL
(The green arrow shows the direction the card travels through the printer.)
A B C D
0.88 in 0.29 in 0.88 in 1.47 in
22.4 mm 7.4 mm 22.4 mm 37.3 mm
Hints & Tips
Blocking typically extends 0.1 inch
beyond the edges of a feature. The
dimensions listed include the extended
blocking region.
Print several cards using your card
design and application to verify that
printing and topcoat are applied as
you intend.
If you do not use the driver or ID
software, you can use the dimensions
provided for smart card and mag
stripe to customize your print and
topcoat areas.
Visit Datacard.com/id for downloads and support.
The design and information contained in these materials in protected by U. S. and international copyright law and/or treaties.
Page 54
XPS Card Printer Guide
Printer Guide
XPS Card Printer Guide
DRAFT
2/22
Datacard Confidential
Page 51
SHORT TERM CONFIDENTIAL
About the Printer
Using the Printer
Card Design and Setup
Card
Components
Color Printing
Monochrome
Printing
Topcoat Printing
Magnetic Stripe
Printing & Non-
printing Areas
Layout
Settings
Printer Driver
Printing Cards
Troubleshooting
Supplies and Parts
Installation Guide
Card Layout
The arrangement or layout of components helps to determine how well your card design works
for users. Follow these guidelines to position card design components for best results.
Backgrounds
Consider using a white background for the card to achieve consistent professional results.
Consider using smaller blocks of color, patterned areas, or gradients to highlight printed
card features such as a name, photo, or logo.
Avoid using a solid color background or half tone over a large area of the card. It can
show flaws on the card (such as uneven surface) or the location of card features (such as
a smart card chip).
Image Placement
Important images can include the photo, logo, and bar code.
Do not place an important image on the front of the card in the same area as a magnetic
stripe or other machine-readable feature. Frequent use of a card in a reader can wear
away the image on the opposite side of the card.
Do not place an important image directly on the other side of a signature panel. Residue
from the panel can cause printing problems on an adjacent card. Place the image above,
below or to the side of the panel.
Avoid uneven areas which can result in inconsistent print quality.
Do not place an important image directly on the other side of a smart card chip. The card
might not be as flat in that area and printing voids can occur.
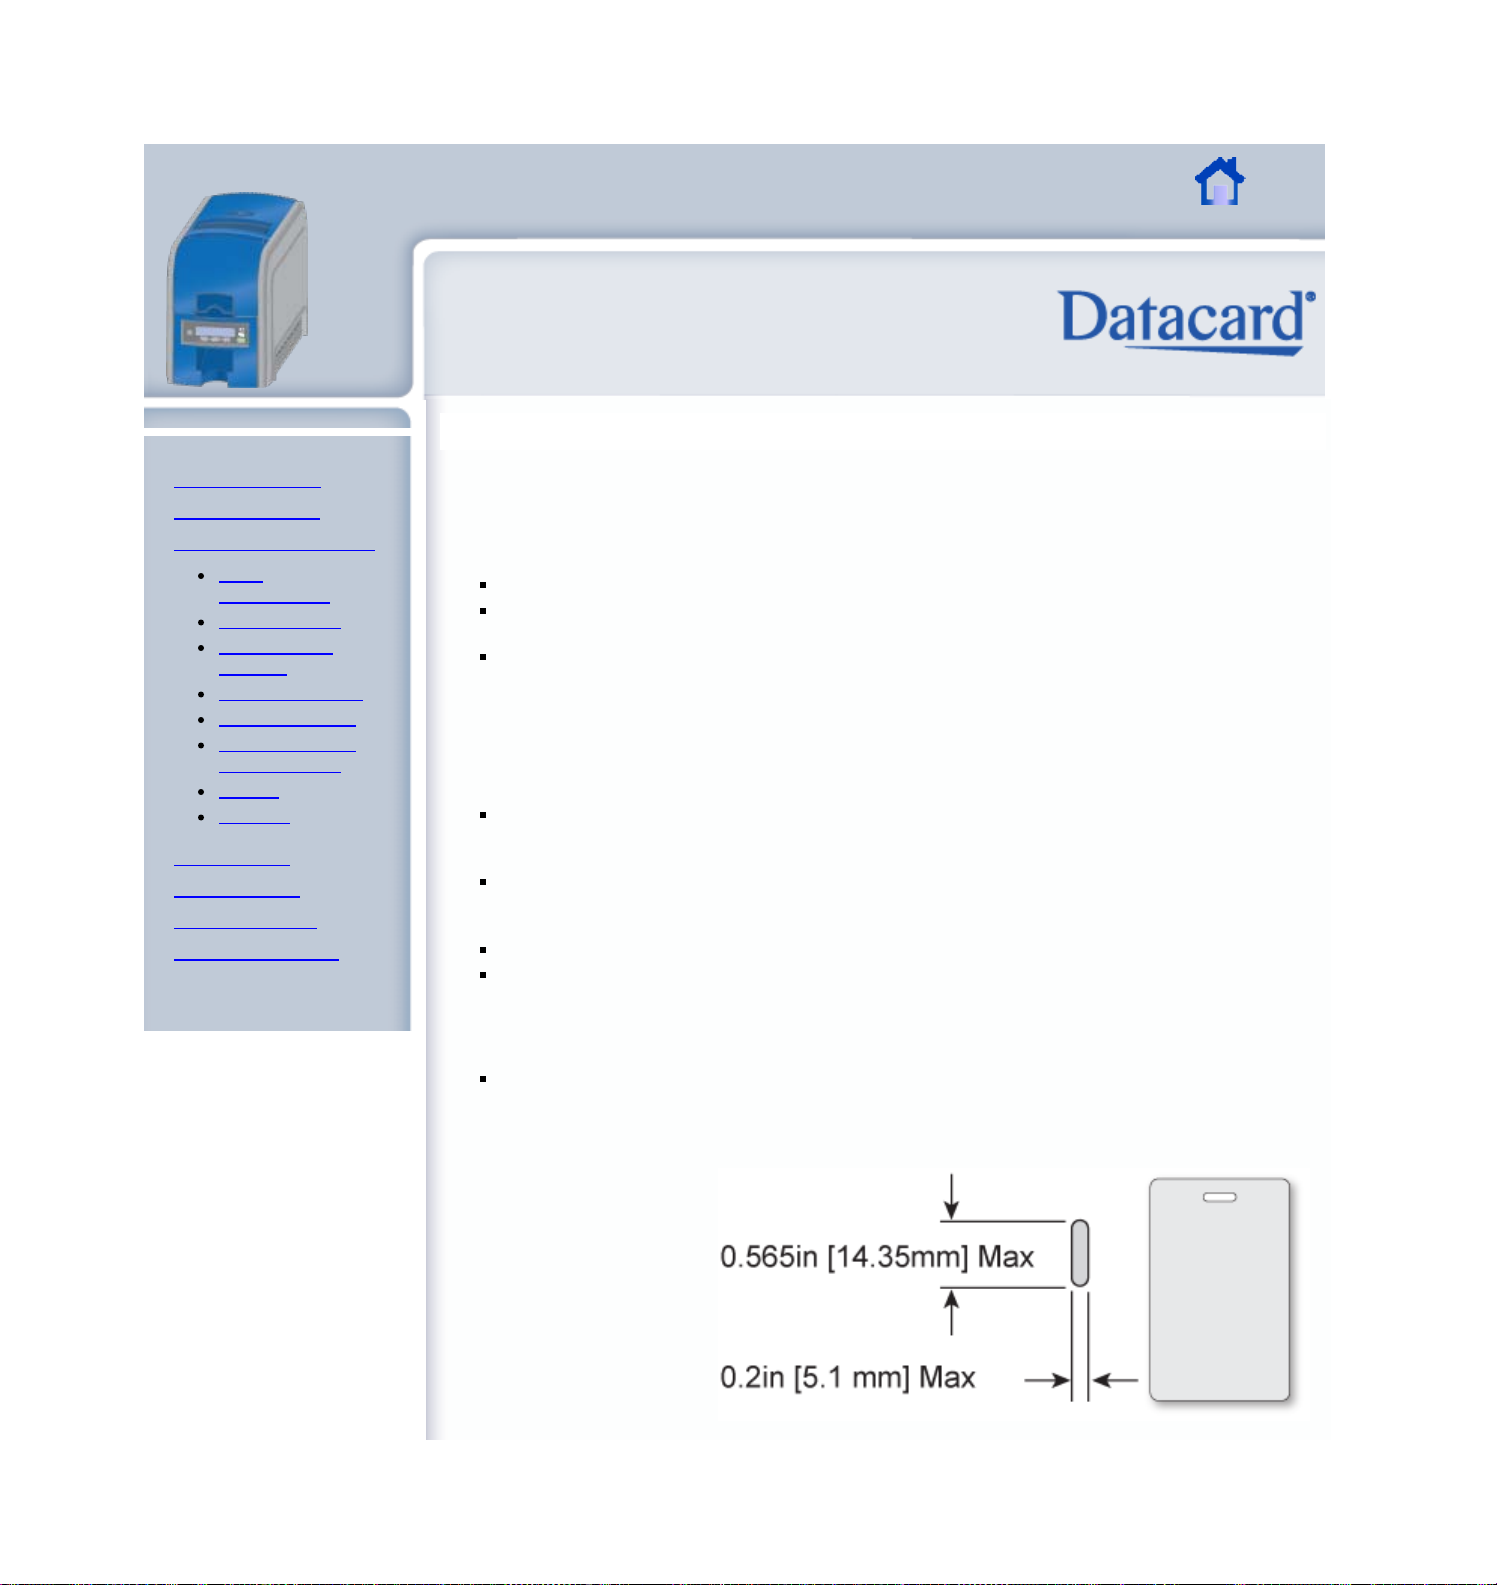
Badges
If cards are used as badges, you might want to punch a hole or slot after printing so
cards can be attached to clips. The illustration shows the maximum size for a slot. A
smaller slot will be stronger and contribute to durability in the slotted area.
Page 55

XPS Card Printer Guide
DRAFT
2/22
Datacard Confidential
Page 52
SHORT TERM CONFIDENTIAL
Visit Datacard.com/id for downloads and support.
The design and information contained in these materials in protected by U. S. and international copyright law and/or treaties.
Page 56

XPS Card Printer Guide
Printer Guide
XPS Card Printer Guide
DRAFT
2/22
Datacard Confidential
Page 53
SHORT TERM CONFIDENTIAL
About the Printer
Using the Printer
Card Design and Setup
Card
Components
Color Printing
Monochrome
Printing
Topcoat Printing
Magnetic Stripe
Printing & Non-
printing Areas
Layout
Settings
Printer Driver
Printing Cards
Troubleshooting
Supplies and Parts
Installation Guide
Settings
Settings are available through the XPS Card Printer Driver for Operators and Administrators.
Administrators also can use the printer's web server to perform setup tasks.
Windows Properties and Preferences
The XPs Card Printer Driver includes the following interfaces:
Printing Preferences, which provides card design settings, such as Orientation and onesided or two-sided printing
Properties, which provides status information about the printer, and port setup,
permissions, and update tools. See
Web Server
The printer includes a Web Server, which displays information about the printer. The
administrator or installer uses it to set up the magnetic stripe option and to work with your
service provider when troubleshooting problems.
1. 1. Get the printer IP Address.
steps to follow.
2. Open the Web Browser on the PC.
Click for
Printer Driver for information about Properties.
You can open a new tab in the
Browser if it is already open.
3. Type the printer IP address in the
Address area of the browser and
press Enter.
4. Choose Basic User and choose
Enter.
5. The Printer Manager menu appears.
You can choose one of the following tasks:
Page 57

Set up Magnetic Stripe
XPS Card Printer Guide
DRAFT
2/22
Datacard Confidential
Page 54
SHORT TERM CONFIDENTIAL
View printer information
View supplies information
Gather troubleshooting data
Hints & Tips
Use the web server only for the tasks
described in this manual.
Visit Datacard.com/id for downloads and support.
The design and information contained in these materials in protected by U. S. and international copyright law and/or treaties.
Page 58

XPS Card Printer Guide
About the Printer
XPS Card Printer Guide
DRAFT
2/22
Datacard Confidential
Page 55
SHORT TERM CONFIDENTIAL
Using the Printer
Card Design and Setup
Printer Driver
Communciation
with the Printer
Driver Messages
USB Connection
Network
Connection
Using the Driver
Permissions
Printing Cards
Troubleshooting
Supplies and Parts
Installation Guide
Printer Driver
The card printer includes the XPS Card Printer Driver, for use on Windows operating systems.
The supported operating systems are:
Windows 7, 32-bit
Windows 7, 64-bit
Windows Vista, 32-bit
Windows Vista, 64-bit
Windows XP, 32-bit
Windows XP, 64-bit
Windows 2003 Server (32 and 64??)
Windows 2008 Server (32 and 64??)
About the Driver
The XPS Card Printer uses Microsoft XPS print technology to support printing from currently
available applications. It also supports applictions being developed using the newer architecture
of Windows Vista and Windows 7 operating systems.
The XPX Card Printer Driver:
1. 2. Receives card data from an application
3. 4. Processes it for personalizing a card
5. 6. Sends the prepared data to the printer
7. 8. Checks the printer for card completion
9. 10. Displays any conditions associates with the card
The XPS Card Printer Driver also provides card design settings, status information, and sample
cards.
1. For Best Results
See the Installation Guide for
information about installing the driver.
Page 59

XPS Card Printer Guide
DRAFT
2/22
Datacard Confidential
Page 56
SHORT TERM CONFIDENTIAL
Visit Datacard.com/id for downloads and support.
The design and information contained in these materials in protected by U. S. and international copyright law and/or treaties.
Page 60

XPS Card Printer Guide
About the Printer
XPS Card Printer Guide
DRAFT
2/22
Datacard Confidential
Page 57
SHORT TERM CONFIDENTIAL
Using the Printer
Card Design and Setup
Printer Driver
Communciation
with the Printer
Driver Messages
USB Connection
Network
Connection
Using the Driver
Permissions
Communication with the Printer
This section includes:
How the driver and printer communicate
Do's and Don'ts
The printer can be connected to a PC using a USB cable or an Ethernet cable. For both
connection ttypes, the printer treats connunication as if the PC (driver) is connected over a
network.
Applications can also be customized to communicate with the printer through the driver. If the
application you use is customized, follow instructions in the application.
Printing Cards
Troubleshooting
Supplies and Parts
Installation Guide
Visit Datacard.com/id for downloads and support.
The design and information contained in these materials in protected by U. S. and international copyright law and/or treaties.
Fast Facts
The printer can have many PCs
connected to it.
Each PC needs to have a different
name. The driver takes care of this
requirement.
The
Page 61

XPS Card Printer Guide
About the Printer
NOT both.
XPS Card Printer Guide
DRAFT
2/22
Datacard Confidential
Page 58
SHORT TERM CONFIDENTIAL
Using the Printer
Card Design and Setup
Printer Driver
Communciation
with the Printer
Driver Messages
USB Connection
Network
Connection
Using the Driver
Permissions
Printing Cards
Troubleshooting
Supplies and Parts
Installation Guide
Messages
The driver can display the following messages.
Message 500: The printer is not available. The card cannot print.
The driver cannot communicate with the printer. Make
sure the printer is powered on and connected to the PC.
1. Connect the power cord. Use the power switch to
power on the printer.
2. Connect the cables from the PC to printer.
Use a USB cable(a) OR a network cable (b),
NOT both.
Make sure all connections are complete.
3. Ask network support for help, if needed.
Hints & Tips
Make sure you have chosen the
correct printer in the application.
Ask the Administrator for assistance if
needed.
Message 501: The printer connection was
lost. Printing the card is canceled.
The printer connection was lost. Printing the card is
canceled.
To print the card, make sure the printer is powered on
and connected to the PC.
1. Connect the power cord. Use the power switch to
power on the printer.
2. Connect the cables from the PC to printer.
Use a USB cable(a) OR a network cable (b),
Page 62

Make sure all connections are complete.
XPS Card Printer Guide
DRAFT
2/22
Datacard Confidential
Page 59
SHORT TERM CONFIDENTIAL
3. Ask network support for help, if needed.
Hints & Tips
The card, if it started to print, should
be discarded.
Ask the Administrator for assistance if
needed.
For messages coming from the printer, see
Respond to Conditions or Messages.
Visit Datacard.com/id for downloads and support.
The design and information contained in these materials in protected by U. S. and international copyright law and/or treaties.
Page 63

XPS Card Printer Guide
About the Printer
XPS Card Printer Guide
DRAFT
2/22
Datacard Confidential
Page 60
SHORT TERM CONFIDENTIAL
Using the Printer
Card Design and Setup
Printer Driver
Communciation
with the Printer
Driver Messages
USB Connection
Network
Connection
Using the Driver
Permissions
Printing Cards
Troubleshooting
Supplies and Parts
Installation Guide
Visit Datacard.com/id for downloads and support.
The design and information contained in these materials in protected by U. S. and international copyright law and/or treaties.
USB Connection
Paragraph
H2 level heading
Paragraph
1. text
2. text
3. text
Paragraph
For Best Results
Cards, cards, and more cards
cards
cards
Page 64

XPS Card Printer Guide
About the Printer
XPS Card Printer Guide
DRAFT
2/22
Datacard Confidential
Page 61
SHORT TERM CONFIDENTIAL
Using the Printer
Card Design and Setup
Printer Driver
Communciation
with the Printer
Driver Messages
USB Connection
Network
Connection
Using the Driver
Permissions
Printing Cards
Troubleshooting
Supplies and Parts
Installation Guide
Printer Driver: Network Connection
When the printer and driver use a network connection, the driver must have the IP Address of
the printer. The IP Address must be entered in the Properties > Ports > Configure Port dialog
box.
Question: can it use a Network Name instead?
H2 level heading
Paragraph
1. text
2. text
3. text
Paragraph
For Best Results
Cards, cards, and more cards
cards
cards
Visit Datacard.com/id for downloads and support.
The design and information contained in these materials in protected by U. S. and international copyright law and/or treaties.
Page 65

XPS Card Printer Guide
About the Printer
XPS Card Printer Guide
DRAFT
2/22
Datacard Confidential
Page 62
SHORT TERM CONFIDENTIAL
Using the Printer
Card Design and Setup
Printer Driver
Communciation
with the Printer
Driver Messages
USB Connection
Network
Connection
Using the Driver
Permissions
Using the Driver Interface
This section includes:
Using driver preferences
Using Properties and status information
About installing or updating the driver
The driver can ....... follow instructions in the application.
For Best Results
cards
Printing Cards
Troubleshooting
Supplies and Parts
Installation Guide
Visit Datacard.com/id for downloads and support.
The design and information contained in these materials in protected by U. S. and international copyright law and/or treaties.
Page 66
XPS Card Printer Guide
About the Printer
For a user who should not print to the card printer,
XPS Card Printer Guide
DRAFT
2/22
Datacard Confidential
Page 63
SHORT TERM CONFIDENTIAL
Using the Printer
Card Design and Setup
Printer Driver
Communciation
with the Printer
Driver Messages
USB Connection
Network
Connection
Using the Driver
Permissions
Printing Cards
Troubleshooting
Supplies and Parts
Installation Guide
Printer Permissions
The Windows operating systems include security settings. An administrator uses them to give or
limit access for users to the printer.
Setting Printer Permissions
If the PC to which the printer is attached has more than one user, set permissions that:
Give users access to all features of the printer and driver, including messages. Messages
inform users when they need to change the ribbon, load cards, and fix problems.
Prevent any access to the printer by unauthorized users.
update with new driver and Win7 info
1. 1. Login to the PC as the Creator/Owner (Vista) or with Administrator permissions (XP).
2. Open the Printers window:
Windows 7
From the Windows ...
Choose ....
Windows Vista
From the Windows Start menu, select Control Panel.
Choose Printer from the Hardware and Sound section. The printers window
opens.
Windows XP
From the Windows Start menu, select Settings, and then Printers or
Printers (and Faxes). The Printers (and Faxes) window appears.
3. Right click on the printer and select Properties. The Properties window appears.
4. Choose the Security tab.
5. Review the Names list. If the names for which you want to specify permissions do not
appear in the list, add the names.
6. Choose the Add button to open the Users and Groups dialog box.
7. Click on the name and click Add. Repeat for each name to add.
8. When done adding names, click OK. The Users and Groups dialog box closes.
9. In the Names list, select the name for which you want to specify permissions.
10. From the Permissions list, select the access:
For a local user of a local printer and for a user of a directly networked
printer:
To enable printing, select Allow for Print, Manage
Printers, and Manage Documents.
Page 67

select Deny for all permissions.
For a user of a shared printer:
XPS Card Printer Guide
DRAFT
2/22
Datacard Confidential
Page 64
SHORT TERM CONFIDENTIAL
For a local user on the PC connected to the printer,
select Allow for Print, Manage Printers, and Manage
Documents. The user will be able to see all messages. The
Select Apply to save the change. Save changes for each name.
11. Repeat steps 5 through 11 to add other users or groups.
12. Select OK to close the Properties dialog box.
user will also be able to perform other actions, such as
deleting the printer driver.
For a user who should not print on the printer, select
Deny for all permissions.
For a user connected through a network using Printer
Sharing, select Allow only for the Print permission. Select
Deny for Manage Printers and Manage Documents.
For Best Results
Cards, cards, and more cards
Visit Datacard.com/id for downloads and support.
The design and information contained in these materials in protected by U. S. and international copyright law and/or treaties.
Page 68

XPS Card Printer Guide
About the Printer
XPS Card Printer Guide
DRAFT
2/22
Datacard Confidential
Page 65
SHORT TERM CONFIDENTIAL
Using the Printer
Card Design and Setup
Printer Driver
Printing Cards
Printing with a
Hopper
Printing with
Single Feed
Printing Both
Sides
Printing a
Sample Card
Troubleshooting
Supplies and Parts
Installation Guide
Printing Cards
Paragraph
« Print a card—hopper
« Print a card—single feed
« Print a card—manual duplex
« Mag stripe?
« Print a sample card
H2 level heading
Paragraph
1. text
2. text
3. text
Paragraph
For Best Results
Cards, cards, and more cards
cards
cards
Visit Datacard.com/id for downloads and support.
The design and information contained in these materials in protected by U. S. and international copyright law and/or treaties.
Page 69

XPS Card Printer Guide
About the Printer
XPS Card Printer Guide
DRAFT
2/22
Datacard Confidential
Page 66
SHORT TERM CONFIDENTIAL
Using the Printer
Card Design and Setup
Printer Driver
Printing Cards
Printing with a Hopper
Printing with
Single Feed
Printing Both
Sides
Printing a
Sample Card
Troubleshooting
Supplies and Parts
Installation Guide
Printing with a Hopper
Paragraph
« Print a card—hopper
« Print a card—single feed
« Print a card—manual duplex
« Mag stripe?
« Print a sample card
H2 level heading
Paragraph
1. text
2. text
3. text
Paragraph
For Best Results
Cards, cards, and more cards
cards
cards
Visit Datacard.com/id for downloads and support.
The design and information contained in these materials in protected by U. S. and international copyright law and/or treaties.
Page 70

XPS Card Printer Guide
About the Printer
XPS Card Printer Guide
DRAFT
2/22
Datacard Confidential
Page 67
SHORT TERM CONFIDENTIAL
Using the Printer
Card Design and Setup
Printer Driver
Printing Cards
Printing with a
Hopper
Printing with Single Feed
Printing Both
Sides
Printing a
Sample Card
Troubleshooting
Supplies and Parts
Installation Guide
Printing with Single Feed
Paragraph
« Print a card—hopper
« Print a card—single feed
« Print a card—manual duplex
« Mag stripe?
« Print a sample card
H2 level heading
Paragraph
1. text
2. text
3. text
Paragraph
For Best Results
Cards, cards, and more cards
cards
cards
Visit Datacard.com/id for downloads and support.
The design and information contained in these materials in protected by U. S. and international copyright law and/or treaties.
Page 71

XPS Card Printer Guide
About the Printer
XPS Card Printer Guide
DRAFT
2/22
Datacard Confidential
Page 68
SHORT TERM CONFIDENTIAL
Using the Printer
Card Design and Setup
Printer Driver
Printing Cards
Printing with a
Hopper
Printing with
Single Feed
Printing Both Sides
Printing a
Sample Card
Troubleshooting
Supplies and Parts
Installation Guide
Printing Both Sides
Paragraph
« Print a card—hopper
« Print a card—single feed
« Print a card—manual duplex
« Mag stripe?
« Print a sample card
H2 level heading
Paragraph
1. text
2. text
3. text
Paragraph
For Best Results
Cards, cards, and more cards
cards
cards
Visit Datacard.com/id for downloads and support.
The design and information contained in these materials in protected by U. S. and international copyright law and/or treaties.
Page 72

XPS Card Printer Guide
About the Printer
XPS Card Printer Guide
DRAFT
2/22
Datacard Confidential
Page 69
SHORT TERM CONFIDENTIAL
Using the Printer
Card Design and Setup
Printer Driver
Printing Cards
Printing with a
Hopper
Printing with
Single Feed
Printing Both
Sides
Printing a Sample Card
Troubleshooting
Supplies and Parts
Installation Guide
Printing a Sample Card
Paragraph
« Print a card—hopper
« Print a card—single feed
« Print a card—manual duplex
« Mag stripe?
« Print a sample card
H2 level heading
Paragraph
1. text
2. text
3. text
Paragraph
For Best Results
Cards, cards, and more cards
cards
cards
Visit Datacard.com/id for downloads and support.
The design and information contained in these materials in protected by U. S. and international copyright law and/or treaties.
Page 73

XPS Card Printer Guide
About the Printer
XPS Card Printer Guide
DRAFT
2/22
Datacard Confidential
Page 70
SHORT TERM CONFIDENTIAL
Using the Printer
Card Design and Setup
Printer Driver
Printing Cards
Troubleshooting
Printer System
Printer and
Driver
Card
Appearance
Magnetic Stripe
For
Administrators
Only
Supplies and Parts
Installation Guide
Troubleshooting
Paragraph
« Troubleshooting Tools
« Printer Conditions
« Locate the problem
« Appearance
« Communications
« Installation
H2 level heading
Paragraph
1. text
2. text
3. text
Paragraph
For Best Results
Cards, cards, and more cards
cards
cards
Visit Datacard.com/id for downloads and support.
The design and information contained in these materials in protected by U. S. and international copyright law and/or treaties.
Page 74

XPS Card Printer Guide
About the Printer
XPS Card Printer Guide
DRAFT
2/22
Datacard Confidential
Page 71
SHORT TERM CONFIDENTIAL
Using the Printer
Card Design and Setup
Printer Driver
Printing Cards
Troubleshooting
Supplies and Parts
Print Ribbon
Cards
Cleaning
Supplies
Replacement
Parts
Cables
Supplies and Parts
Paragraph
H2 level heading
Print ribbon
Cards « Cleaning supplies « Parts Ribbon cartridge Printhead cartridge Power supply and cable
Data cables Paragraph
1. text
2. text
3. text
Paragraph
Installation Guide
Visit Datacard.com/id for downloads and support.
The design and information contained in these materials in protected by U. S. and international copyright law and/or treaties.
For Best Results
Cards, cards, and more cards
cards
cards
Page 75

Home
XPS Card Printer Guide
DRAFT
2/22
Datacard Confidential
Page 72
SHORT TERM CONFIDENTIAL
Printers
Window
Manuals
XPS Card Printer Guide
Print
ExitContact
Us
Printer Guide
About the Printer
Using the Printer
Card Design and Setup
Printer Driver
Printing Cards
Troubleshooting
Supplies and Parts
Legal Notices
Installation Guide
Legal Notices
Safety and Compliance
Please note and heed the WARNING and CAUTION labels that have been placed
on the equipment for your safety. Please do not attempt to operate or repair
this equipment without adequate training.
Regulatory Compliance
Notice for USA (FCC notice)
This equipment generates, uses, and can radiate radio frequency energy. If it is not installed and
used in accordance with this instruction manual, it may interfere with radio communications. This
equipment has been tested and found to be within the limits for Class A computing devices,
pursuant to Subpart J of Part 15 of FCC rules, designed to provide reasonable protection against
radio interference in a commercial environment. Operation of this equipment in a residential
environment may possibly cause interference. In the event of interference, the user, at their own
expense, will be required to take whatever measures are necessary to correct the problem.
Notice for Canada
This digital apparatus does not exceed the Class A limits for radio noise for digital apparatus set
out in the Radio Interference Regulations of the Canadian Department of Communications.
Le présent appareil numérique n'émet pas de bruits radioélectriques dépassant les limites
applicables aux classe A prescrites dans le Règlement sur le brouillage radioélectrique édicté
par le ministère des Communications du Canada.
The term "IC:" before the radio certification number only signifies that Industry Canada Technical
specifications were met.
Notice for Europe
We hereby certify that this printer complies with EMC Directive 89/336/EEC, R&TTE Directive
1999/5/EC, and the EU RoHS Directive EU Directive 2002/95/EG. This printer conforms to Class
A of EN 55022 and to EN 301 489-5. Operation of this equipment in a residential environment
may possibly cause interference. In the event of interference, the user, at their own expense, will
be required to take whatever measures are necessary to correct the problem.
Notice for Taiwan
Page 76

Taiwan Statement
XPS Card Printer Guide
DRAFT
2/22
Datacard Confidential
Page 73
SHORT TERM CONFIDENTIAL
Notice for Japan
This equipment is in the Class A category of information technology equipment based on the
rules of the Voluntary Control Council for Interference by Information Technology Equipment
(VCCI). When used in a residential area, radio interference may be caused. In this case, the
user may be required to take appropriate corrective actions.
Japanese Statement
Notice to All Users
The printer emits radio-frequency waves and must be used as installed and recommended by
the printer manufacturer. You may not modify the printer or how it is used without written
permission. You may not operate the printer after modifying it or its method of operation.
Liability Statement
This product has been built to the high standards of DataCard Corporation. Please note and
heed the WARNING and CAUTION labels that have been placed on the equipment for your
safety. Please do not attempt to operate or repair this equipment without adequate training. Any
use, operation or repair in contravention of this document is at your own risk. By acceptance of
this system you hereby assume all liability consequent to your use or misuse of this equipment.
DataCard Corporation assumes no liability for incidental, special, or consequential damage of
any kind. Equipment specifications, applications and options are subject to change at the sole
discretion of DataCard Corporation without notice.
Safety
All Datacard® brand products are built to strict safety and reliability specifications in accordance
with UL60950 and Canadian requirements, and the Low Voltage Directive 73/23/EEC. Therefore,
safety issues pertaining to operation and repair of Datacard® brand equipment are primarily
environmental and human interface.
The following basic safety tips are given to ensure safe installation, operation and maintenance
of Datacard® brand equipment and are not to be considered as comprehensive on all matters of
safety.
Safe environment
Connect equipment to a grounded power source. Do not defeat or bypass the ground
lead.
Place the equipment on a stable surface (table) and ensure floors in the work area are
dry and non-slip.
Know the location of equipment branch circuit interrupters or circuit breakers and how to
turn them on and off in case of emergency.
Know the location of fire extinguishers and how to use them. ABC type extinguishers may
be used on electrical fires.
Page 77

Know local procedures for first aid and emergency assistance at the customer facility.
Use adequate lighting at the equipment location.
XPS Card Printer Guide
DRAFT
2/22
Datacard Confidential
Page 74
SHORT TERM CONFIDENTIAL
Maintain the recommended temperature and humidity range in the equipment area.
Safe human interface
Use proper lifting techniques when moving or installing the equipment.
Use standard electrostatic discharge (ESD) precautions when working on or near
electrical circuits.
Do not defeat or disconnect safety interlocks on covers. Operate the printer with the cover
closed.
Acknowledgments
Datacard is a registered trademark of DataCard Corporation in the United States and/or other
countries. PartnerPage is a service mark of DataCard Corporation in the United States and/or
other countries. The Color Blue with Platinum Flecks mark is a registered trademark of DataCard
Corporation in the European Union and other countries.
Microsoft, Windows, and windows Vista are trademarks or registered trademarks of Microsoft
Corporation.
Photoshop is a registered trademark of Adobe Systems Incorporated.
TrueType is a registered trademark of Apple Computer, Inc.
Gemplus is a registered trademark and GemPC is a trademark of Gemplus S.C.A. Corporation.
iCLASS and HID are registered trademarks of HID Corporation.
All other trademarks are the property of their respective owners.
Fonts
Portions of the software are copyrighted by Red Hat. To access magnetic stripe fonts, download
the Windows fonts (liberation-fonts.zip) from www.redhat.com/promo/fonts.
The Katakana font used in magnetic stripe fonts is copyright 1990-2003 Wada Laboratory, the
University of Tokyo. All rights reserved.
Copyright (c) 2003-2004 Electronic Font Open Laboratory (/efont/). All rights reserved.
This font is provided by WADA Laboratory, the University of Tokyo and contributors "AS IS" and
any express or implied warranties, including, but not limited to, the implied warranties of
merchantability and fitness for a particular purpose are disclaimed. In no event shall the
laboratory or contributors be liable for any direct, indirect, incidental, special, exemplary, or
consequential damages (including, but not limited to, procurement of substitute goods or
services; loss of use, data, or profits; or business interruption) however caused and on any
theory of liability, whether in contract, strict liability, or tort (including negligence or otherwise)
arising in any way out of the use of this software, even if advised of the possibility of such
damage.
Disclaimer
Names and logos on sample cards are fictitious. Any similarity to actual names, trademarks, or
trade names is coincidental.
Proprietary Notice
All drawings and information herein are the property of DataCard Corporation.
Page 78

XPS Card Printer Guide
DRAFT
2/22
Datacard Confidential
Page 75
SHORT TERM CONFIDENTIAL
Visit Datacard.com/id for downloads and support.
The design and information contained in these materials in protected by U. S. and international copyright law and/or treaties.
 Loading...