

Page 1

FCC ID: GDI-Q10055
SP Series Info Central
Welcome to Info Central for Datacard SP35 and SP55 card printers.
What do you want to do?
• Answer questions you have about using the printer
• Learn how to use this online information
• Learn more about tasks, such as installation, setup, or maintenance
• Solve problems with printing
• Access an online version of the Printer Guide
• Open help for the Printer Toolbox and Messages
• Open help for Properties or Printing Preferences
• Safety and compliance (FCC)
1
SP Series Info Central
Page 2

2
Answer questions you have about using the printer
What is “SmartDriver”?
The SmartDriver™ is the printer driver for several Datacard desktop printers, including SP35, SP55,
Select™ and Magna™ Platinum™ Series, Select and Magna Class printers with Advanced Imaging
Technology, and the ImageCard IV printer. Older printers, such as the Express Class, use a similar driver
that supports only that type of printer.
The SmartDriver provides bi-directional communication. Bi-directional means that the driver both sends
and receives data. The driver sends card data, queries, and comman ds to the printer. The driver receives
data such as status and error notices from th e printer.
As part of bi-directional communication, the driver identifies the type of printer attached (when the printer is
powered on and ready). The driver changes the settings displayed or the settings available to match the
features of the printer.
How do I obtain Technical Support?
Most customers purchase their Datacard printer from a distributor or value-added reseller. Your dealer or
value-added reseller should tell you who to contact for technical su pport. If that information is not available,
contact Datacard.
Contact the Datacard Customer Care Center at 1.800.328.3996 for service in the United States and
Canada. For worldwide service, call the Datacard Customer Care Center directly at 952.988.2316. Make
sure you have the serial number, located on the inside of the printer, when you call.
The Datacard Web site, at www.datacard.com, also provides several resources:
• The Support and Service area of the Web site pro vides a FAQs (Frequently Asked Questions) area
where you can search for information about a pr ob le m you exp e rie nc e. You also can submit
suggestions for topics to address.
• The Support and Service area provides contact information for service providers outside of the United
States.
• The Support and Service area provides Phone Support Information. This area provides the telephone
numbers above and additional information.
• The Support area provides information about services that are available, including training.
• The Downloads area provides access to the latest printer drivers, printer firmware, and user
information. It also provides online brochures, white papers, and other resources to enhance your
understanding.
SP Series Info Central
Page 3

Learn how to use this online information
The following descriptions can help you use the HTML Help Viewer window to find and read the
information you want.
About Info Central
SP Series Info Central is an library on the PC that provides access to all user information for SP35 and
SP55 printers. Info Central is made up of several compiled Microsoft HTML Help files which are linked
together. It includes:
• Toolbox and Message Help for the SP Series Printer is one of the files linked to Info Central.
• Help for Properties or Printing Preferences, a traditional help file, can be opened from Info Central.
• The e-Guide for SP Series Printers is linked to Info Central and provides detailed information about
using the printer and driver.
• The Printer Guides, provided in printed form with the printer, are also available online through Info
Central and through links.
SP Series printers are designed to be simple and easy to use. However, they are also flexible printers. For
that reason, there is information that a few users need but that does not apply to others. Info Central
provides all of this information--not all of it will apply to you.
Info Central uses the Microsoft HTML Help Viewer, which is part of the operating system for Windows Me,
Windows 98 Second Edition (and Windows 98), Windows 20 00, and Windows XP. The HTML Help Viewer
uses Microsoft Internet Explorer. The SmartDriver checks for Internet Explorer when it installs and warns
the installer if it is not present. The Smar tDriver also makes sure that special files to enable HTML Help are
present.
3
Accessing Info Central and Help
Info Central is available from the desktop icon. The “Central” in the name is used because it provides
access to online versions of other user information, specifically the printer guide and help.
Help is available from Messages by clicking the Help button.
Help is available from the pages the Printer Toolbox by clicking the Help button.
Help is available in the Properties dialog box by clicking the Help (?) icon and then clicking a setting. On
Windows 2000 and XP, help is available in the Printing Preferences Advanced Op tions dialo g by clicking
the Help (?) icon and then clicking in the Printer Features list.
Navigating in Info Central
Topics in Info Central include several features for providing complete information in a compact manner.
Related Topics Lists: This list of topics appears at the end of message help topics. The topics are
relevant to the page you are viewing and cross-reference related information. Click a topic from the popup
and it opens in the right-hand pane.
Help viewer window size: You can change the size of the viewer window like any other window:
• Minimize the window so it displays only in the task bar.
• Maximize the window so it occupies the whole desktop.
• Restore the default size.
SP Series Info Central
Page 4

4
• Position the cursor over the edge of the window and drag the edge to a new location.
Left-hand pane: You can hide (close) or show (open) the left-hand side of the HTML help viewer. The left-
hand side of the window provides navigation choices--ways for you to find topics of interest to you. The
left-hand pane provides:
• Contents: The Contents tab displays an expanding list of the information available through Info
Central. Each line includes a symbol and text. If the symbol is a closed book, you can click the plus (+)
sign, the book, or the text to display additional topics. If the symbol is a page with question mark, you
can click the symbol or the text to view the topic in the right-hand pane.
• Index: The Index tab displays a list of terms or phrases. Each term is associated with one or more
topics. In the box above the list of terms, you can type a term or part of a term and the list will scroll to
entries that match the characters you typed. To see topics associated with a term, double-click the
term. If more than one topic is associated with the term, a Topics Found box appears listing the topics.
Click a term to view the topic in the right-hand pane. If only one topic is associated with the term, the
topic appears in the right-hand pane.
• Search: The Search tab helps you find words in Info Central. In the box at the top of the tab, type the
word you want to find. Click the “List Topics” button to display a list of all topics that contain the word
you want to find. From the list of topics, click a topic and then click the Display button to display the
topic in the right-hand pane.
Printing
You can print a single topic or several related topics from Info Central. The printing choices are affected by
the version of Internet Explorer and Microsoft HTML Help Viewer installed on your PC.
To print a single topic:
1 Begin with the topic displayed in the right-hand pane.
2 Make sure that all items in the topic that you want to print are displayed. For example, drop-down
hotspots must be expanded if you want them on the printout.
3 Click Print.
4 Select “Print the selected topic” and click OK.
To print all topics in a selected book:
1 Begin with the Contents tab displayed and select the book you want to print.
2 Make sure that all items in the topics in the book that you want to print are displayed. For example, go
to each topic to expand drop-down hotspots if you want them on the printout.
3 Click Print.
4 Select “Print the selected heading and all subtopics” and click OK.
SP Series Info Central
Page 5

Learn more about tasks, such as installation, setup, or maintenance
The middle part of the Contents list is organized by tasks. Make sure the left-hand pane is displayed and
scroll through the list to see the tasks available. If needed, close or open books to help you find the
information you want. You can also use the Index or Search tabs to find information about a task.
5
SP Series Info Central
Page 6

6
Solve problems with printing
Is a message displayed on the PC?
Is the quality of the printed card a problem?
Is the problem with the printer? For example, is it making noise? Is a card stuck in the printer?
Is there a problem with the magnetic stripe?
Is the printer not responding when you send a card from the PC?
SP Series Info Central
Page 7

Access an online version of the Printer Guide
Do one of the following:
• The Printer Guides (one for SP35 and one for SP55) are included in the Contents list of Info Central,
near the end of the list. Make sure the left-hand p ane is di splayed an d scr oll through the list to see the
tasks available. If needed, close or open books to help you find the Printer Guide.
• You can also type “Printer Guide” on the Index tab to locate and display the Printer Guides.
• Click Printer Guide.
Note: The pages displayed online do not look exactly like the printed pages. Howeve r, the page numbers
are the same and the content is the same.
7
SP Series Info Central
Page 8

8
Open help for the Printer Toolbox and Messages
Help for the Printer Toolbox and Messages is included in the Contents list of Info Central, near the bottom
of the list.
Or, click Help for Printer Toolbox and Messages.
SP Series Info Central
Page 9

Open help for Properties or Printing Preferences
Help for the Properties or Printing Preferences uses the Microsoft Windows Help format (not HTML Help),
so it is not included in the Contents list of Info Central.
Open Help
9
SP Series Info Central
Page 10

10
SP Series Info Central
Page 11

11
Safety and compliance (FCC)
This section presents:
• Regulatory compliance information
• Safety information
• Trademark acknowledgments
Regulatory compliance
Notice for USA (FCC notice)
This equipment generates, uses, and can radiate radio frequency energy. If it is not installed and used in
accordance with this instruction manual, it may interfere with radio communications. This equipment has
been tested and found to be within the limits for Class A computing devices, pursuant to Subpart J of Part
15 of FCC rules, designed to provide reasonable protection against radio interference in a commercial
environment. Operation of this equipment in a residential environment may possibly cause interference. In
the event of interference, the user, at their own expense, will be required to take whatever measures are
necessary to correct the problem.
This equipment has been tested and found to comply with the limits for a Class A digital device, pursuant
to part 15 of the FCC Rules. These limits are designed to provide reasonable protection against harmful
interference when the equipment is operated in a commercial environment. This equipment generates,
uses, and can radiate radio frequency energy and, if not installed and used in accordance with the
instruction manual, may cause harmful interference to radio communications. Operation of this equipment
in a residential area is likely to cause harmful interference in which case the user will be required to correct
the interference at his own expense.
Notice for Canada
This digital apparatus does not exceed the Class A limits for radio noise for digit a l apparatus set out in the
Radio Interference Regulations of the Canadian Departmen t of Communications.
Le présent appareil numérique n'éme t p as de bruit s radioé lectriques dép assant les limites applicables aux
appareils numériques de la classe A prescrites dans le Règlement sur le brouillage radioélectrique édicté
par le ministère des Communications du Canada.
The term “IC:” before the radio certification nu m ber only signifies that Industry Canada Technical
specifications were met.
Notice for Europe
We hereby certify that the Datacard® SP35 or SP55 printer complies with EMC Directive 89/336/EEC and
R&TTE Directive 1999/5/EC.This printer conforms to Class A of EN 55022 and to EN 301 489-5. Operation
of this equipment in a residential environment ma y possibly cause interference. In the event of
interference, the user, at their own expense, will be required to take whatever measures are necessary to
correct the problem.
SP Series Info Central
Page 12

12
Notice for Taiwan
Notice for Japan
This equipment is in the Class A category of information technology equipment ba sed on the rules of the
Voluntary Control Council for Interference by Information Technology Equipment (VCCI). When used in a
residential area, radio interference may be caused. In this case, the user may be required to take
appropriate corrective actions.
Notice to Users of SP35 or SP55 Printers
The printer emits radio-frequency waves and must be used as installed and recommended by Datacard,
the printer manufacturer. You may not modify the printer or how it is used without the written permission of
Datacard. You may not operate the printer after modifying it or its method of operation.
Notice to Users of Printers Equipped with Contactless Smart Card Coupler
The contactless smart card coupler emits radio-frequency waves and must be used as installed and
recommended by Datacard, the printer manufacturer. You may not modify the coupler or how it is used
without the written permission of Datacard. You may not operate the printer after modifying the coupler or
its method of operation.
Liability statement
This Datacard® product has been built to the high standards of DataCard Corporation (doing business as
Datacard® Group). Please note and heed the WARNING and CAUTION labels that have been placed on
the equipment for your safety. Please do not attempt to operate or repair this equipment without adequate
training. Any use, operation or repair in contravention of this document is at your own risk. By acceptance
of this system you hereby assume all liability consequent to your use or misuse of this equipment.
DataCard Corporation assumes no liability for incidental, special or consequential damage of any kind.
Equipment specifications, applications and options are subject to change at the sole discretion of
DataCard Corporation without notice.
Safety
All Datacard® products are built to strict safety and reliability specifications in accordance with UL60950
and Canadian requirements, and the L ow V olt age Directive 73/23/EEC. Therefore, sa fety issues pertaining
to operation and repair of Datacard® equi pment are primarily environmental and human interface.
The following basic safety tips are given to ensure safe installation, operation and maintenance of
Datacard® equipment and are not to be considered as comprehensive on all matters of safety.
SP Series Info Central
Page 13

13
Safe environment
• Connect equipment to a grounded facility power source. Do not defeat or bypass the ground lead.
• Place the equipment on a stable surface (t able) and ensu re floors in the work area are dry and non-slip.
Insulated rubber floor mats are preferred.
• Know the location of equipment branch circuit interrupters or circuit breakers and how to turn them on
and off in case of emergency.
• Know the location of fire extinguishers and how to use them. ABC type extinguishers may be used on
electrical fires.
• Know local procedures for first aid and emergency assistance at the customer facility.
• Use adequate lighting at the equipment.
• Maintain the recommended range of temperature and humidity in equipment area.
Safe human interface
• Use proper lifting techniques when moving or installing the equipment.
• Use standard electrostatic discharge (ESD) precautions when working on or near electrical circuits.
• Do not defeat or disconnect safety interlocks on covers. Operate the printer with the cover closed.
Acknowledgments
Microsoft, Windows NT, and Windows are trademarks or registered trademarks of Microsoft Corporation.
Select, Magna, Express, Advanced Imaging Technology, Platinum, SmartDriver, Preface, TruImage, and
StickICards are trademarks of DataCard Corporation. Datacard, ID Works, ImageCard, and UltraGrafix are
registered trademarks of DataCard Corporation.
All other trademarks are the property of their respective owners.
SP Series Info Central
Page 14

14
SP Series Info Central
Page 15

Installation 1
Installation
The printer is easy to install and use. It is also flexible; you can connect and use it in many different
ways. Most often, one printer is connected to one PC. However, two or more PCs can connect to and
use one printer, or more than one printer can be attach e d to a PC.
The information in this section has two purposes:
• If you are not familiar with installing a printer on a PC, this section provides detailed steps and
information to help you.
• If you want to understand the connection choices available to you, or if you want use another
connection method, this section explains what the ch oic es ar e an d how to imple m en t th em.
SP Series Info Central
Page 16

2 Installation
SP Series Info Central
Page 17

Before you install
This chapter presents the following:
• Skills that installers need
• Site requirements and guidelines
• Requirements for the PC used with the Datacard® SP35 or SP55 printer
• The preferred sequence for installing this printer as part of an identification system
• Choices for installing the printer, including using a network
Installation audience
To perform the procedures in the installation section of this guide, you need the following skills:
• Ability to read and understand written and graphical instructions
• Experience and comfort installing hardware (such as a printer, scanner, expansion card, etc.) in a
personal computer (PC)
• Experience with configuring applications and ports
• Experience installing and using Microsoft® Windows® 98, Windows Me, Windows 2000 or Windows
XP (for Windows 2000 and XP, the installer must have administrator access to the PC)
• Ability to perform simple troubleshooting using written and graphical instructions
If you do not feel comfortable with installing the printer, find a network support or other technical
professional to install the printer. Datacard-authorized service personnel also install printers.
3
Site Requirements
The SP35 Printer Guide or SP55 Printer Guide describes the site requirements for each printer.
Common Sense Site Guidelines
When choosing a site for the printer and its supplies, consider these common sense guidelines:
• Keep all dust, dirt, food, liquids, etc. away from the printer at all times.
• Do not use supplies or cards that have been dropped on the floor or have otherwise become
contaminated.
• Keep paper and foreign materials off the printer.
• Place the printer on a stable platform; keep it off the floor.
• Place the printer away from direct sunlight.
• Place the printer away from heating ducts, blowers, or other air vents.
• Do not use the printer for purposes other than its intended use.
• When cleaning around the printer, prevent debris from entering the printer.
• Place the printer in a clean office environment, protected from any type of construction.
• Store all supplies (ribbons, cards, etc.) in the original packaging until you load them in the printer. Keep
the original packaging closed.
SP Series Info Central
Page 18

4
• Store all supplies in a clean, cool, dry location. See Supplies Storage for information about the storage
environment for printer supplies.
PC and software requirements
The printer must be used with a PC that runs the printer driver. The PC also runs a card creation
application that captures and organizes the data to appear on each card.
To support the printing speed that the printer can de liver, the PC must m eet the following r equiremen ts:
• Have a 233 MHz (or faster) Pentium MMX-, Pentium II-, Pentium III-, or Pentium IV-compatible
processor. Datacard recommends a 500 MHz (or faster) processor.
• Have at least 128 MB of memory (RAM). Datacard recommends 256 MB or more of memory.
• Have 60 MB or more of hard disk space available to store the printer driver and provide working space
for preparing card data. (Additional components might require more space.) Datacard recommends at
least 100 MB of hard disk space before installing the printer driver.
The PC, including processor speed, memory, operating system, applications running, an d av aila b le
hard disk space, can have a dramatic effect on card processing speed. The operating system or
applications can require more or faster resources than the printer driver. Meet the most demanding
requirements for the operating system, application, and drivers running on the PC.
• Have a one of the following:
– USB port
• The PC might have more than one USB port, or USB devices already attached to the PC might
provide USB ports to use.
Datacard recommends using the Windows 2000 or XP operating systems if you plan to connect
more than one printer to a PC using USB ports or using a USB por t and another connection method.
– A network connection to support printer sharing or direct networking
• Have a CD-ROM drive to install the printer driver
• Have one of the following supported and recommended operating systems:
– Windows XP with service pack 1
– Windows Millennium Edition (Me)
Or one of the following supported operating systems:
– Windows 2000 with service pack 3 or 4
– Windows 98 Second Edition
The PC must also have a card creation application that formats and prepares the card data. For the PC
requirements of your card creation application, see the application's documentation.
The SmartDriver cannot be used on a PC that also has an Express Class 1.x, Select Class 2.x or 3.x,
Magna Class 2.x, or ImageCard IV 2.x printer driver installed on it. Delete the other printer driver,
following the instructions that came with the driver, before installing the SmartDriver.
ID system installation sequence
You might use this printer as part of an identification system (with a camera) or you might use it with
existing data and applications. When you set up this printer along with other system components, install
SP Series Info Central
Page 19

the printer driver after setting up the PC and before installing the card creation application and capture
software and devices. Verify the success of each installation step before continuing.
Installation choices
Most users install one printer on a PC, using the CD-ROM shipped with the printer for insta llation. If you
will install the printer in this way, see Install the printer and then Install the printer driver to a USB port
on Windows 2000 or XP or Install the printer driver to a USB port on Windows Me or 98.
More choices are available to meet the needs of a variety of users. Choices include:
• Installing two printers to one PC using USB ports
USB allows devices to be connected to the PC th rough anoth er USB device (daisy-chain ed). USB also
uses hubs to which multiple USB devices (including other hu b s) ca n be conne cte d (cas ca de d) . Up to
five hubs can be used between the printer and the PC. ( In a daisy chain, a t least every other hub n eeds
to be powered.) Datacard printers do not have ports to support daisy chaining. If you need to connect
two Datacard printers to a PC with one USB port, obtain a USB hub to which both printers can be
connected.
See Connecting more than one printer or more than one PC for information about installing a printer
using a USB port.
5
• Installing the printer using files downloaded from the Datacard Web site
The printer driver for the Datacard® SP35 or SP55 printer is available from Datacard web site at
www.Datacard.com. When downloading a driver, be sure to choose the most recent SmartDriver and
the correct operating system for the PC on which the driver will run. The driver to download does not
include some of the files that are available on the CD, including:
–This SP Series Info Central (which can be downloaded from the same Datacard Web site)
– Installation files for the SmartDriver™ Printer Diagnostic Utility, and the Cleanup Utility
– Driver installation files for other PC operating systems
• Upgrading the printer driver
See Upgrading the driver for the steps to follow.
• Installing a printer on a client PC when the printer is connected to a host PC and both PCs are
connected to a network (using Windows printer sharing).
See Printer sharing for setup and operating information for both the host PC and the client PC.
• Installing a printer on a network using a print server and then installing the driver on a PC on the
network. This method is called direct networking.
See Direct network printing for information on installing and using a directly networked printer.
• Installing two printers to a PC, when one is directly connected and another is connected through a
network (using Windows printer sharing or direct networking)
See Direct network printing for information on installing and using a networked printer.
• Installing printers using a combination of connection methods. For example, one or more printers can
be directly connected to the PC and others can be connected through a network.
See Direct network printing for information on installing and using a networked printer.
SP Series Info Central
Page 20

6
• Using more than one printer installed to a PC as a printer pool, when the PC is running Windows 2000
or XP. The operating system manages sending jobs to the printers so the next available printer receives
the card.
See Printer pooling for information on setting up and using printer pooling.
SP Series Info Central
Page 21
Install the printer
This section describes how to install the Datacard® SP35 or SP55 printer. It describes:
• Unpacking the printer
• Connecting the power cord
• Connecting the data cable
• Preparing for printer driver installation
Unpacking the printer
The printer is small and easy to unpack.
1 Open the shipping carton.
2 Remove the installation map. The top side shows the accessories shipped with the printer. If the printer
includes optional items, the options are checked on the installation map.
3 The cables, Printer Guide, and other supplies are contained in the accessories tray. For SP35, lift out
the accessories tray.
4 The printer is located between two shipping supports. Lift off the top shipping support and put it aside.
7
5 Lift out the printer and place it on a work surface.
6 After connecting the printer, put the shipping carton, shipping supports, and accessories tray aside in
case you need to ship the printer in the future.
If any items are missing, contact your dealer to inform them.
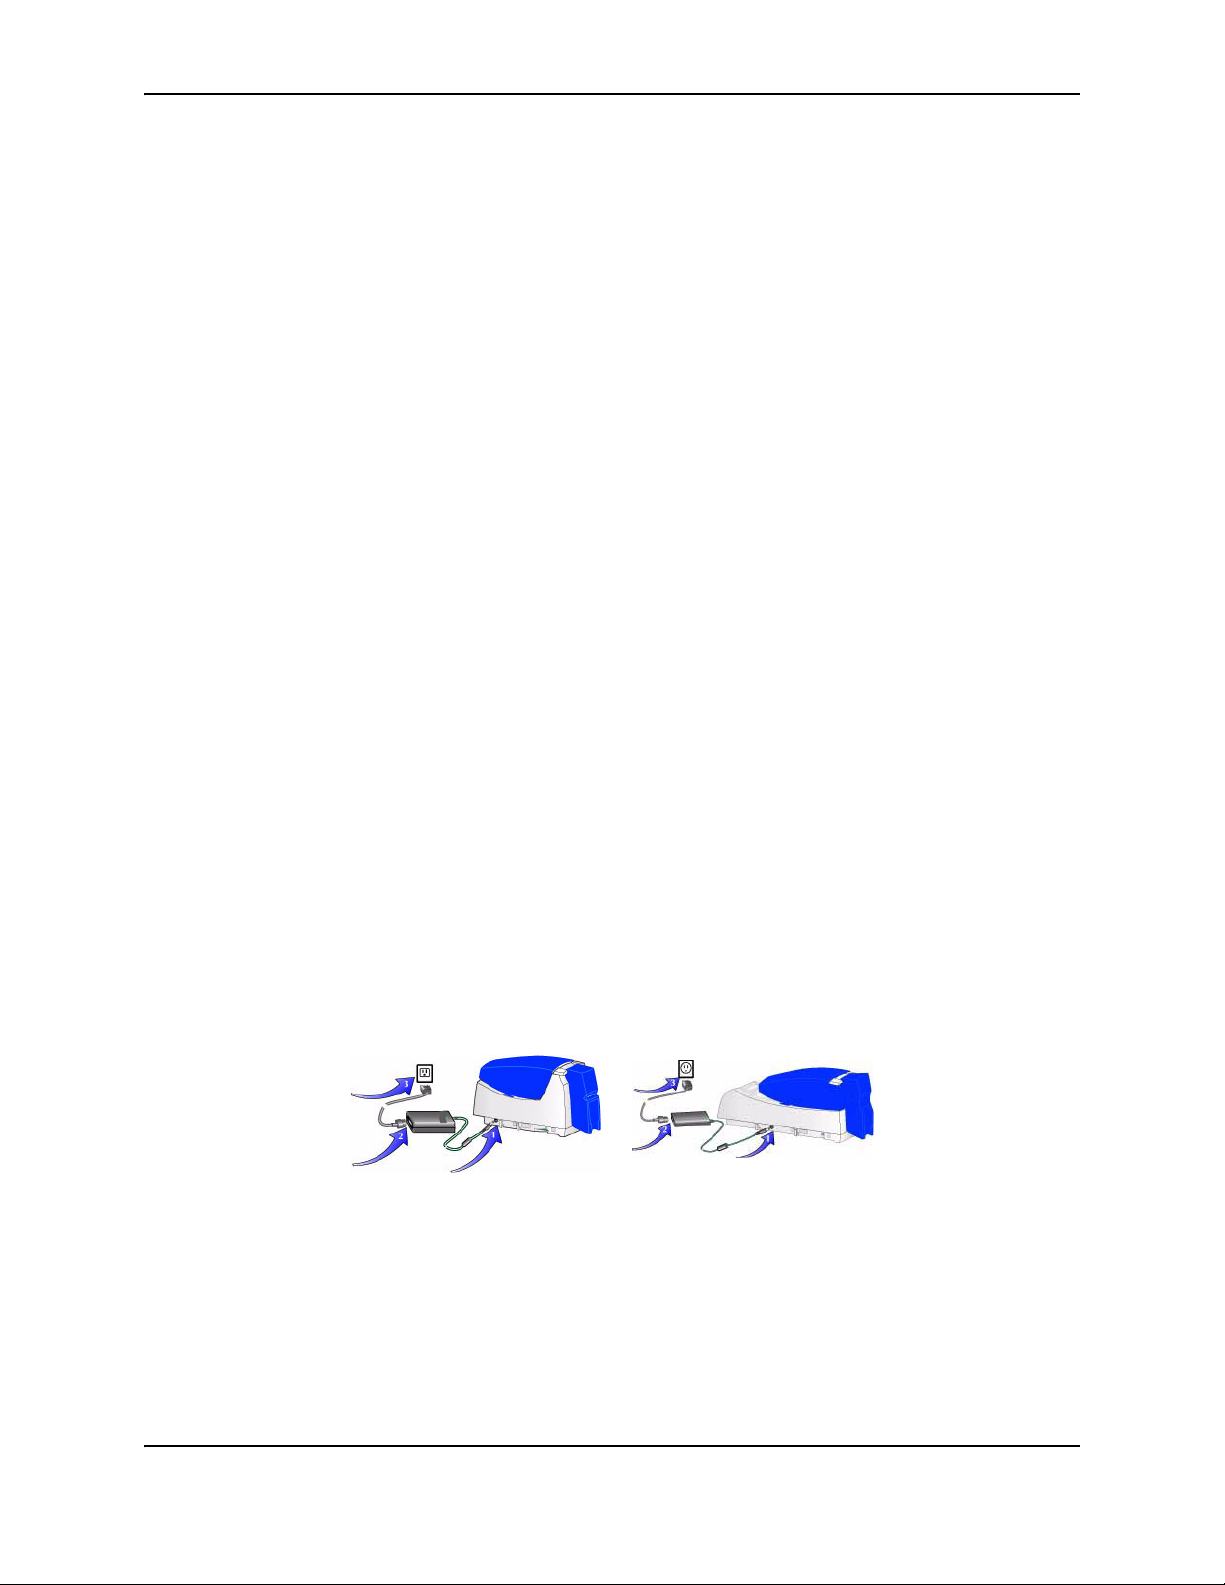
Connecting the power cord
1 Plug the power supply cord into the printer (1). The power receptacle is located on the side of the
printer.
2 Plug the power cord into the power supply (2).
Do not power on the printer until supplies are loaded.
3 Plug the other end of the power cord into a single-phase, 3- wire grounded recept acle with 90-130V AC
or 195-254V AC at 50 or 60 Hz (3).
The printer power supply automatically adjusts to the voltage of the input power.
Connecting the data cable
The printer has a USB data port and requires a data cable. A printer with smar t card module has o ne or
two additional ports. Do not connect smart card ports at this time!
SP Series Info Central
Page 22

8
The USB cable must be a type CM 30V cable, up to a maximum of 6.5 feet or 2 meters long. A longer
cable might result in electrical interference.
If the printer is connected over a network using a print server , see Direct network printing for information
about connecting the printer.
1 Attach the flat end of the USB cable to the USB data port on the PC (or to a device att ached to the PC
through a USB port).
2 If you are installing the printer, Wait to connect the other end of the data cable.
3 If you are connecting a printer that has been ins talled, you ca n plu g in th e da ta cable now.
– After the printer is powered on and ready, attach the other end of the USB cable to the printer. DO
NOT use the smart card USB port if it is installed in the printer.The smart card USB port is closer to
the power receptacle.
USB allows devices to be connected to the PC th rough anoth er USB device (daisy-chain ed). USB also
uses hubs to which multiple USB devices (including other hu b s) ca n be conne cte d (cas ca de d) . Up to
five hubs can be used between the printer and the PC. ( In a daisy chain, a t least every other hub n eeds
to be powered.) Datacard printers do not have ports to support daisy chaining. If you need to connect
two Datacard printers to a PC with one USB port, obtain a USB hub to which both printers can be
connected.
Is the printer ready for driver installation?
Before installing the printer driver, do the following:
• Load cards in the card tray. See the SP35 Printer Guide, SP55 Printer Guide, or the Installation Map.
• Install the p rint ribbon and cont inuous cleaning roller. See the SP35 Printer Guide, SP55 Printer Guide,
or the Installation Map.
• Power on the printer and PC. Plug the power supply into the printer power receptacle. The printer
should display a series of colors on the status light when it p owers on. The printer st atus light becom es
steady green when the printer is ready.
• For a directly networked printer, make sure that the printer is ready before installing the driver on a PC.
See Direct network printing for more information.
• For a shared printer, make sure that the printer is ready before installing the driver on the attached
(host) PC. See Printer sharing for more information. You must install the driver on the host PC before
installing the driver on any other attached PCs.
SP Series Info Central
Page 23

Installing the driver
The printer is shipped with a CD-ROM that contains the printer drivers for the supported Windows
operating systems. The supported operating systems are:
• Windows Millennium Edition (Me) (recommended)
• Windows XP with Service Pack 1 (recommended)
• Windows 2000, with Service Pack 3
• Windows 98 Second Edition (SE)
See PC and software requirements for details on operating system supp ort and limitations.
Installation choices
• If the PC does not have a CD-ROM drive, request diskettes from your service provider. (Service
providers can obtain the driver as diskette images from the partner page.) You also can download the
printer driver from the Datacard Web site, at www.datacard.com.
• If you have installed the printer driver and want to update to the most recent driver, follow the steps in
Upgrading the driver.
• Several other connection methods are available, including printer sharing over a network, installing two
printers on parallel ports on a PC, and installing multiple printers to a PC using the USB port. See
Connecting more than one printer or more than one PC for information on these installation
alternatives.
9
• You can also directly connect the printer to a network using a print server. See Direct network printing
for more information.
• See Printer pooling for information on printer pooling on the Windows 2000 and XP operating systems.
• If the printer includes a smart card module, do not connect it at this time. See Set up Smart Card for
details.
Choose the section that applies to the type of port and operating system on the PC:
• Install the printer driver to a USB port on Windows 2000 or XP
• Install the printer driver to a USB port on Windows Me or 98
Install the printer driver to a USB port on Windows 2000 or XP
For Windows 2000 or XP, make sure you are logg ed in as the Ad ministrator when you install the printer
driver.
1 Close all applications. Do not close Windows.
2 Make sure the printer is powered on.
3 With Windows running, insert the CD-ROM in the PC's drive.
4 The SmartDriver window opens.
5 Click “Install the Printer.” The SmartDriver installation program starts.
SP Series Info Central
Page 24

10
– If the PC has an existing SmartDriver installed, the program displays a message telling you to
upgrade the printer driver. See Upgrading the driver.
6 If you are using files downloaded from the Web, extract the files to the PC’s hard drive. The
SmartDriver installation program will start automatically when the files have been extracted.The first
page provides a choice:
– If the SmartDriver is installed on th e PC, “Upgr ade the existi ng dr ive r” is the defa ult. See Upgrading
the driver for the steps to follow.
– If the installation program does not detect an existing SmartDriver, “Install the Printer” is the default.
Click Next to continue.
7 Connect the printer to the PC using the USB data cable. The ope rating system d etects the printer and
displays the Found New Hardware Wizard.
8 Make sure “Local Printer (LPT or USB)” is chosen and then click Next.
9 A Windows message might appear.
– On Windows 2000, the Digital Signature Not Found message appears. Click Yes to continue with
installation. Security on the PC might be set to prevent installation without a digital signature. See
Windows help for “digital signature” to change the security setting.
– On Windows XP, the Windows Logo Signing message appears. Click Yes to continue with
installation. Security on the PC might be set to prevent installation without a digital signature. See
Windows help for “Logo signing” to change the security setting.
– If installation is cancelled or cannot continue, see Local (USB) installation troubleshooting for steps
to follow.
10 The dialog instructs you to power on the printer, wait until the Ready light is steady green, and then
connect the printer and PC. Follow the instructions and then click Next. The SmartDriver installation
program closes.
11 Install the printer automatically.
– On Windows 2000, the SmartDriver installation program closes.
– On Windows XP, the Found New Hardware Wizard starts.
– Make sure “Install the software automatically (recommended)” is chosen and click Next.
12 A Windows message appears.
– On Windows 2000, the Digital Signature Not Found message appears. Click Yes to continue with
installation. Security on the PC might be set to prevent installation without a digital signature. See
Windows help for “digital signature” to change the security setting.
– On Windows XP, the Windows Logo Signing message appears. Click Yes to continue with
installation. Security on the PC might be set to prevent installation without a digital signature. See
Windows help for “Logo signing” to change the security setting.
– If installation is cancelled or cannot continue, see the Local (USB) installation troubleshooting for
steps to follow.
13 The installation program copies files to the PC and updates entries to enable the printer. The driver
installed.
– If you installed the driver from CD-ROM, the SP Series Info Central files and desktop icon area
installed.
SP Series Info Central
Page 25

11
– If you installed the driver from downloaded files, a message appears indicating that the SP Series
Info Central (or e-Guide) isa not installed. You can locate the download file for SP Series Info
Central and the e-Guide in the downloads area of the Datacard Web site at www.datacard.com.
–Go to Printing sample cards to complete installation.
If you will connect additional Datacard printers, you can install e-Guides for the Magna Platinum Series
printer, th e Select Platinum Series printer, and the ImageCard IV printer. The procedure is slightly
different for these e-Guides. See the User Guide for the printer for details.
Install the printer driver to a USB port on Windows Me or 98
1 Close all applications. Do not close Windows.
2 With Windows running, insert the CD-ROM in the PC's drive.
3 The SmartDriver window opens automatically.
4 Make sure printer is powered on and ready.
5 Connect the printer to the PC using the USB data cable. The ope rating system d etects the printer and
displays the Add New Hardware Wizard.
– If you are using a downloaded file, extract the files to the PC’s hard drive. The SmartDriver
installation program will start automatically when the files have been extracted.
6 Use the Add New Hardware Wizard to start the driver installation process. Close the SmartDriver
Printer Driver Setup dialog if has started automatically.
– For some Windows Me and 98 PCs, Windows finds USBPrint.inf and installs USB printer support. If
this occurs, follow the prompts. The Add New Hardware Wizard appears again; continue.
7 On Windows 98, click Next on the Wizard and do one of the following:
– If you are installing from CD-ROM, make sure that “Search for the best driver for my device
(recommended).” is chosen.
– If you are installing from files on the hard drive, click “Specify the location of the driver.”
– Click Next.
8 On Windows Me, the Wizard searches automatically and might open the SmartDriver installation
program. If it does, go to step 12.
9 Browse to the location of the DSPnp.inf file and click OK and Next as pr ompted.
10 The installation program displays a question asking whether you would like to view the Release Notes.
Do one of the following:
– Click Next to continue.
– Click Y es and then Next to open the Release Notes in WordPad. Close the Release Notes when you
have viewed the information.
11 If you are installing from CD-ROM, choose the information to install:
– Choose the SP Series Info Central and e-Guide. If you will connect additional Datacard printers, you
can
install e-Guides for the Magna Platinum-AIT printer, the Select Platinum-AIT printer, and the
ImageCard IV printer.
– Click to remove the check from any e-Guide that you do not want to install.
12 Click Next to copy driver files and to install the e-Guide(s) you selected.
SP Series Info Central
Page 26

12
13 The installation program copies files to the PC and updates entries to enable the printer.
14 If you chose the Magna, Select, or ImageCard IV e-guides, the installation program detects whether
the Adobe Acrobat Reader program is installed on the PC. If it is not, the installation program asks if
you want to install Acrobat Reader. Follow instructions provided with the printer to install Acrobat
Reader.
15 On Windows Me, click Finish to close the Add New Hardware Wizard. Close the Windows Add New
Hardware Wizard and restart the PC.
On Windows 98, the Windows Add New Hardware Wizard closes on its own. On both Windows Me and
98, the Datacard Group installation program closes when you restart the PC.
16 After the PC restarts, the Printer Toolbox is displayed. Click the Print Sample Card button to verify
printer and driver installation.
Printing sample cards
The printer is shipped with one or more cards that are printed in the factory. You can also print a
sample card, which looks like one of the factory-printed cards, using the Printer Toolbox.
Setup tips
• The printer cover is closed and latched.
• Cards are loaded in the card tray.
• The data cable is connected to the USB port of the printer and the corresponding port of the PC.
• The settings for the USB port (if used) are correct. See PC port settings for more information.
• Supplies are installed in all cartridges and cartridges are loaded correctly. See the Printer Guide for
more information.
• The printer is ready to print. The status light on the printer should be steady green when you send a
sample card. See Open the Printer Toolbox for more information.
• Use the driver sample card, not a card from a card creation application, to verify that the printer and
driver are working together.
1 Begin with the printer powered on and conn ec te d to the PC, supp lies loaded, the printer driver
installed, and Windows running.
2 Make sure the Printer Toolbox is open.
– After the PC restarts, the Printer Toolbox is displayed.
– The icon for the Printer Toolbox is located in the lower right corner of the Windows desktop. Double-
click the icon to open it.
– If the Printer Toolbox and its icon are not displayed, see the Printer Guide for steps to follow.
3 Click the Sample Card button.
– The driver identifies the type of printer and whether it prints color or monochrome images, and then
sends the appropriate sample card to print.
SP Series Info Central
Page 27

13
– If the printer is a color printer and is using a monochrome (K) ribbon, the printed sample card will be
mostly black, not full-color.
4 Compare the cards you printed with the cards shipped with the printer.
5 When you have printed the card, you can close the Printer Toolbox or leave it open.
6 Use the card the evaluate how well the printer is operating:
– If you have just completed installation, use the comparison to complete the Installation Report and
mail or fax the report to Datacard.
– If you are checking the operation of the printer, see Troubleshooting.
Setting printer permissions
If the PC to which the printer is attached has other users and runs the Windows 2000 or XP operating
system, set permissions that:
• Allow users to use all features of the printer and driver , including messages. (Messages inform users
when they need to change the ribbon, load cards, and fix problems.)
• Prevent any access to the printer by unauthorized users.
1 From the Windows taskbar select S t art, then Settings, and the n Printer (and Fa xes). The Printer s (and
Faxes) window appears.
2 Highlight the SmartDriver icon by clicking on it once.
3 From the menu bar, select File and then Properties. The Properties window for the SmartDriver
appears.
4 Select the Security tab.
5 Review the Names list. If the names for which you want to specify permissions do not appear in the
list, add the names.
a Select the Add button to open the Users and Groups dialog box.
b Click on the name and click Add. Repeat for each name to add.
c When done adding names, click OK. The Users and Groups dialog box closes.
6 In the Names list, select the name for which you want to specify permissions.
7 From the Permissions list, select the access:
– For a local user of a local printer and for a user of a directly networked printer:
• To enable printing, select Allow for Print, Manage Printers, and Manage Documents.
• For a user who should not print on the SmartDriver printer, select Deny for all permissions.
• Single permissions, such as the Print permission, are not supported.
– For a user of a shared printer:
• For a local user of the printer on the PC connected to the printer, select Allow for Print, Manage
Printers, and Manage Documents. The user will be able to see all messages. The user will also
be able to perform other actions, such as deleting the printer driver . (Single perm issions, such a s
Print, are not supported for local users of the printer driver.)
• For a user who should not print on the printer, select Deny for all permissions.
SP Series Info Central
Page 28

14
• For a user connected through a network using Printer Sharing, select Allow only for the Print
permission. (Select Deny for Manage Printers and Manage Documents.)
8 Select Apply to save the change. Save changes for each name.
9 Repeat steps 5 through 8 to add other users or groups.
10 Select OK to close the Properties dialog box.
Changing the type of printer connected
The SmartDriver supports SP35 printers, Select printers (Platinum Series or with Advanced Imaging
Technology), Magna printers (Platinum Se ries or with Ad vanced Im aging Technology) , and Image Card
IV printers. Each of these groups is considered a printer type. You can directly connect one type of
printer to a PC, install the SmartDriver, and, at a later time, connect a different type of Datacard printer.
If the printer is connect using a direct network connection, the PC will detect the printer connected and
change driver settings.
• If another printer is connected to a USB port, the operating system detects the new printer and starts
the Add/Detected New Hardware wizard.
• On the Windows XP operating system, the operating system can detect the changed printer and display
the Add/Detect New Hardware wizard. Follow the wizard. If the wizard displays a message indicating
that it cannot find the ds.ppd file, click Cancel on the message box to continue and use the printer.
This feature is designed for use in limited situations, such a connecting a backu p printer when the main
printer is out of service.
Operating tips for changing the type of printer
• When the printer is powered up and connected, the SmartDriver detects the type of printer attached.
The SmartDriver reads settings from the printer and updates values on the PC for the printer.
• The Properties or Printing Preferences dialog box includes a Printer Type setting. In addition, the
Printer Toolbox displays the type of printer connected.
• You must set the Printer Type on the Client PC for a shared printer. The driver on a Client PC cannot
communicate directly with the printer and so cannot determine the type of printer connected.
• If a printer is connected and running, the SmartDriver will detect it and change the Printer Type to
match the machine connected. (Power of f the printer o r disconnect it if you do not wa nt the SmartDriver
to detect that type of printer.)
SP Series Info Central
Page 29

Upgrading the driver
When a newer release of the SmartDriver becomes avialable, you might want to upgrade the printer
driver to take advantage of new features. The Printer Toolbox displays the version of the printer driver,
which can help you to decide whether to update the driver. See the SP35 Printer Guide or SP55 Printer
Guide if you need instructions on opening the Printer Toolbox.
The procedure to use depends on the operating system running on the PC. Choose the prodedure for
your PC:
Upgrading the printer driver on Windows XP and 2000
Upgrading the printer driver on Windows Me and 98 SE
You can download the current printer driver from the Datacard web site, at www.datacard.com. Go to
the downloads area and click Printer Drivers. Be sure to download the correct printer driver for your
operating system.
Upgrading the printer driver for Windows XP and 2000
Tips for success
15
• These steps apply to printers attached through a USB port and to directly networked printers.
• Make sure you are logged in as the Administrator when you install or upgrade the printer driver.
• To upgrade the driver, do not remove the existing printer driver if the operating system is Windows
2000 or Windows XP.
• On a PC running Windows 2000, use the printer driver only with Service Pack 3 or 4 installed.
1 Close all applications. Do not close Windows.
2 Start the Setup Program:
– If the driver is on CD-ROM, insert the CD-ROM in the PC's drive.
– If you are using files downloaded from the Web, extract the files to the PC’s hard drive. The
SmartDriver installation program will start automatically when the files have been extracted.
3 Click “Upgrade the SmartDriver” on the SmartDriver CD-ROM program or click “Upgrade the
SmartDriver” and then Next on the SmartDriver installation program.
4 A Windows message appears.
– On Windows 2000, the Digital Signature Not Found message appears. Click Yes to continue with
installation. Security on the PC might be set to prevent installation without a digital signature. See
Windows help for “digital signature” to change the security setting.
– On Windows XP, the Windows Logo Signing message appears. Click Yes to continue with
installation. Security on the PC might be set to prevent installation without a digital signature. See
Windows help for “Logo signing” to change the security setting.
5 The installation program copies files to the PC and updates entries to enable the printer. The driver
installed.
SP Series Info Central
Page 30

16
– If you installed the driver from CD-ROM and SP Series Info Central was previously installed, the files
are updated.
– If you installed the driver from downloaded files, a message appears to infor m you that that the SP
Series Info Central (or e-Guide) is not available.
6 Y ou must rest art the PC before the driver can work with the printer. Click Finish to close the installation
and restart the PC.
7 Follow instructions to update the printer firmware if prompted. Make sure the printer is connected to
the PC and powered on before running the Firmware update utility.
If you downloaded the driver from the Internet, you can delete the SmartDriver folder from your hard
drive after installing the printer driver. You can also delete the downloaded SD_xxx.exe file (where xxx
represents an abbreviation for the operating system and the release).
Upgrading the printer driver for Windows Me and 98 SE
To upgrade the printer driver for Windows Me or 98 SE, first remove the existing driver. Then, install the
printer, as described in Install the printer driver to a USB port on Wind ows Me or 98. If you are
upgrading the driver on a client PC that shares a printer, see Installing the printer driver on the client
PC.
Tips for success
• Make sure all jobs have been printed or deleted from the Print Manager before removing the existing
printer driver. See Windows help to use the Print Manager.
• The printer name and printer settings are deleted when you delete the printer driver . If needed for an
application or printer sharing, you can record the printer name and settings you use before you delete
the driver.
• If you have more than one printer driver o n th e PC, first de lete the p rinter driver insta lled most recently,
if known.
1 If the printer is connected to the PC using a USB cable, unplug the cable from the printer before
deleting the printer driver. If you do not, the operating system might install the printer again.
2 Close all applications. Do not close Windows.
3 Select Settings and then Printers from the Windows Start menu.
4 In the Printers window, click once on the SmartDriver icon to select it. Press the Delete key.
5 When the confirmation prompt appears, select Yes or OK to delete the printer driver. Follow any
prompts that appear.
6 Close the Printers window and close all applications.
7 When the prompt to restart Windows appears, select Finish, Yes, or OK.
8 Restart Windows. For Windows 2000 or XP, make sure you have permission to restart Windows and
then log in as the Administrator.
SP Series Info Central
Page 31

15
Reinstalling the driver
If you have problems printing from a PC to the printer, you might need to remove the driver and install it
again. Only perform the steps in section if the following is true:
– Message help includes reinstalling the driver as a solution, and you have attempted all other
solutions to the message without success
– Your service provider has asked you to remove and reinstall the driver as a solution to a problem
– You can remove the driver if you will not use the printer from this PC again
You can download the current printer driver from the Datacard web site, at www.datacard.com. Go to
the downloads area and click Printer Drivers. Be sure to download the correct printer driver for your
operating system.
Removing the existing printer driver
Tips for success
• Make sure all jobs have been printed or deleted from the Print Manager before removing the existing
printer driver. See Windows help to use the Print Manager.
• For Windows 2000 and XP only, the Administrator and users with Manage Printers permission can
delete the printer driver.
• The printer name and printer settings are deleted when you delete the printer driver . If needed for an
application or printer sharing, you can record the printer name and settings you use before you delete
the driver.
1 If the printer is connected to the PC using a USB cable, unplug the cable from the printer before
deleting the printer driver. If you do not, the operating system might install the printer again.
2 Close all applications. Do not close Windows.
3 Select Settings and then Printers (and Faxes) from the Windows Start menu.
4 In the Printers window, click once on the SmartDriver icon to select it. Press the Delete key.
5 When the confirmation prompt appears, select Yes or OK to delete the printer driver. Follow any
prompts that appear.
6 Close the Printers window and close all applications.
7 When the prompt to restart Windows appears, select Finish, Yes, or OK.
8 Restart Windows. For Windows 2000 or XP, make sure you have permission to restart Windows and
then log in as the Administrator.
Running the Cleanup utility
Tips for success
• Download the Cleanup Utility from the downloads area of the Datacard Web site at www.datacard.com.
• The cleanup utility is also available on the printer driver CD-ROM.
SP Series Info Central
Page 32

16
• If you have attempted to delete the printer and the icon remains, run the Cleanup utility as though the
driver was deleted.
1 Begin with all SmartDriver printer drivers deleted from the PC. Ma ke sure you have rest arted Windows
after deleting the drivers.
2 Start the Cleanup process:
– If you downloaded the Cleanup Utility, double-click the Cleanup.exe file to extract and start the utility.
– Insert the SmartDriVer CD-ROM in the PC’s drive. Select Driver Support Programs and then click
Cleanup Utility.
3 Click OK and then Unzip to extract files and start the Cleanup Utility.
4 Click OK when files are extracted. The Cleanup Utility starts automatically.
5 Click Yes on the Question box to open the Cleanup.pdf file using Acrobat Reader. This file provides
specific instructions on running the Cleanup utility. Follow the instructions carefully.
6 Exit the SmartDriver window and remove the CD-ROM if used.
7 When you run the Cleanup Utility, it removes the SP Series Info Central and e-Guide from the PC.
When you reinstall the driver, install the SP Series Info Central and e-Guide again from the
SmartDriver CD-ROM or download the most current e-Guide from the Datacard Web site at
www.datacard.com.
Install the printer and driver again
The steps to follow to install the printer and driver depend on the operating system and how you will
connect the printer and PC. See Installation choices for guidance.
SP Series Info Central
Page 33

Troubleshooting Installation Problems
This section describes some problems users have reported when installing the printer and provides
solutions to those problems.
Troubleshooting any installation
The following problems might occur when installing the printer using any type of connection. Address
the possible causes in the order listed.
Problem Cause Possible solution
21
The light on the power supply
does not come on within 30
seconds after plugging in the
power supply.
The light on the front of the
printer does not come on
within 2 minutes after
plugging in the printer.
The power outlet does not
work.
The power strip, surge
protector, or similar device is
not powered on or is
defective.
The power supply or power
cord does not work.
The printer is defective. Contact your service provider for
Connect the power supply to another
power source that you have verified,
for example by connecting a lamp. If
the other device works, assume the
outlet functions correctly.
If you are using a power strip, surge
protector, or similar device, make
sure it is powered on and that other
devices connected through it power
on.
Request a replacement power supply
or power cord from your dealer.
assistance.
Local (USB) installation troubleshooting
This section describes possible problems and their solutions when using a USB connection. Address
the possible causes in the order listed.
Problem Cause Possible solution
Windows XP displays “USB
device not recognized” when
you power on the printer.
The PC does not detect the
printer when it is connected.
SP Series Info Central
The printer status light was
not steady green when the
printer and PC were
connected.
The printer is not powered on. Remove one end of the USB cable.
The USB cable is defective. Use a different USB cable that is up to
This is a short-term condition while all
internal elements of the printer
become functional. The message
disappears by itself when the printer
is ready.
Power on the printer.
When the printer Ready light is steady
green, connect the USB cable.
6.5 feet or 2 meters long.
Page 34

22
Problem Cause Possible solution
The PC does not detect the
printer when you connect it.
On Windows XP, the Detect
New Hardware wizard does
not identify the printer driver
on the CD-ROM.
The printer is connected
through more than 5 hubs (or
devices) or through 2 or more
unpowered hubs (or devices).
The printer is connected
through a USB hub or device
that is defective.
The printer is connected with
a cable that is longer than
specified.
The operating system
identified the printer but you
cancelled the Add/Found
New Hardware wizard.
The operating system
identified the printer but you
cancelled the Found New
Hardware wizard.
Remove hubs until the printer is
connected through 5 or fewer hubs (or
devices) or directly to the PC. Make
sure every other hub is powered.
Replace the USB hub or, if the printer
is connected through another device,
connect both devices through a USB
hub.
Use a USB cable that is up to 6.5 feet
or 2 meters long.
If the printer is connected through a
USB hub or device, use a shorter
cable between the PC and USB hub.
Unplug the USB cable, remove the
printer from the Device Manager and
then try again.
Unplug the USB cable, remove the
printer from the Device Manager and
then try again.
The Add/Found New
Hardware wizard appears
when the printer is connected
or powered on, after the
printer is installed.
Windows is associating the
printer with its existing printer
database.
The printer you just
connected has a different
serial number than the one
previously connected.
The wizard closes. No action is
necessary.
The Wizard installs another copy of
the printer driver. (Find the icon in the
Printers Window.) This occurs
because Windows tracks the serial
number of each USB device
connected.
Troubleshooting a direct network installation
The following problems might occur when installing the printer using a direct network connection.
Address the possible causes in the order listed.
Problem Cause Possible solution
SP Series Info Central
Page 35

23
Test LED does not light up on
power up the print server.
On Windows 2000 or XP, the
DCNETn port does not
appear in the Ports list when
installing the printer.
Port status is:
The port mode has not been
detected.
Port status is:
Network not responding.
Port status is:
Communication with the
printer is suspended.
The power or network
connection for the print server
is not working.
The network address or name
of the printer has not been
defined.
The print server is not
responding to a query by the
printer driver.
The printer has been busy or
the network has not
responded for more than 30
seconds.
Make sure that the print server is
connected to a power source and that
the network connection is good. See
the guide for the print server.
The network port driver installation did
not complete successfully.
In the printer Properties dialog box,
make sure the port is a Datacard
network port (DCNet_) and that the IP
address or device name is configured
for the port.
Check the power to the print server,
and the connections from the printer,
print server and network Also verify
the PC connection to the network.
Resume the Printer Toolbox to see
whether the printer is busy or the
network is not responding.
If the status remains, check the
printer. Make sure it is powered on.
See if another PC is displaying a
message. Address the printer
problem if possible.
Support for Direct Network Connections
If you need assistance with the installation or use of a print server and printer, do the following in the
order listed:
• Closely review this Installation e-Guide to see if it addresses your issue. See the Connecting more than
one printer or more than one PC section for information.
• Read the guide(s) for the print server, which addresses many common situations not specifically
covered in this e-Guide.
• View the Technical Support section of the print server manufacturer’s Web site.
• Request assistance from your Datacard service provider.
Removing a device from the Device Manager
Remove a device from the Device Manager if the Add/Detect New Hardware wizard was cancelled (or
another installation problem occurred), or you want to reinstall the printer driver.
1 Disconnect the printer from the PC.
2 If the printer driver was installed, make sure the printer driver has been deleted and that you have
rebooted the PC after deletion.
SP Series Info Central
Page 36

24
3 Select Start from the Windows task bar.
4 From the Windows Start menu, select Settings and then Control Panel. The Control Panel appears.
5 Double-click the System icon to open it. The System dialog box opens.
6 Open the Device Manager.
– On Windows Me and Windows 98, click the Device Manager tab.
– On Windows 2000 and Windows XP, click the Hardware tab, and then click the Device Manager
button.
7 Make sure “View devices by type” is selected.
– On Windows 2000 and Windows XP, select “View hidden devices” from the View menu.
8 Locate the device to delete. The device might be called “Unknown device” or “SmartDriver.” It is
usually marked with a yellow question mark. If neither of these types of devices is displayed, go to step
10.
– On Windows Me and Windows 98, click on the device name or icon to select it, and then click the
Remove button.
– On Windows 2000 and Windows XP, click on the device name to select it, and then right-click to
display a pop-up menu. Select Remove from the pop-up menu.
9 Click Yes or OK to confirm removal of the device.
10 Click OK to close the Device Manager. Close any other windows.
SP Series Info Central
Page 37

25
PC port settings
This section describes how to configure ports on the PC attached to the prin ter. For a lo cal connectio n,
the PC uses a USB port. If the printer includes a smart card module, that module connects to a USB or
serial port on the PC. (This section does not address any network setup issues.)
Set up a Universal Serial Bus (USB) port on all operating systems
These steps apply to the USB data port and to an optional smart card USB port. If the printer includes
two USB ports, follow these steps for each port. The ports are not connected inside the printer to
preserve the data security of the smart card port.
1 Right-click on the My Computer icon on the desktop and then select Properties from the popup menu.
The System Properties dialog box appears.
2 Select the Device Manager tab to view a list of devices. (On Windows 2000 and Windows XP, select
the Hardware tab and then click the Device Manager button.)
3 Select “View devices by type” if needed.
4 Click the + next to Universal Serial Bus controllers to display the USB port controllers.
5 Click USB Root Hub, and then select the Properties button. (On Windows 2000 and Windows XP,
right-click USB Root Hub and then select Properties from the pop-up menu.) The USB Root Hub
Properties dialog box appears.
6 Make sure that the device is enabled.
– For Windows 2000, Me, and 98 make sure that “Disable in this hardware profile” is not selected.
– On Windows XP, make sure that "Use this device (enable)" is selected from the Device Usage drop-
down menu.
7 Click OK to close the dialog box.
8 Click the other entry, which includes the name of the installed USB device and ends with “Host
Controller,” and then select the Properties button. (On Windows 2000 and Windows XP, right-click
USB Host Controller and then select Properties from the pop-up menu.) The Properties dialog box
appears.
– Make sure that the device is enabled:
• For Windows 2000, Me, and 98 make sure that “Disable this hardware profile” is not selected.
• On Windows XP, make sure that "Use this device (enable)" is selected from the Device Usage
drop-down menu.
– Click the Resources tab. The “Conflicting device list” should show "No conflicts."
SP Series Info Central
Page 38

26
If the Resources tab shows conflicts, select another configuration or change the settings for the port,
following port instructions.
9 Click OK on the Properties dialog box and on the System Properties dialog box to save settings and
close the dialog boxes.
Serial port settings
This section describes how to set serial port values A serial port might be used with a smart card
module.
For some smart card applications, you connect the PC to the serial port on the printer. The PC should
be set to match the printer serial port settings.
If you use a contact station with the printer, see the information about the contact station for port
settings.
Setting the serial port on Windows 2000
1 From the Control Panel, select Ports.
2 From the Ports dialog box, select the port, such as COM1 or COM2.
3 Select the Settings button to display the port settings.
SP Series Info Central
Page 39

If the PC has more than one serial port, make sure you view the settings for the serial po rt to which the
printer is attached.
4 Select the following settings:
Setting Value
Baud rate 9600
Data bits 8
Parity None
Stop bits 1
27
Flow control None
5 When the settings are correct, click OK to save settings and close the dialog box.
Setting the serial port on Windows XP
1 From the Start menu, select Settings and then Control Panel.
2 From the Control Panel, select the System icon.
3 Select the Hardware tab, and then select the Device Manager button.
4 Press the "+" next to Ports and double click the Communications Port to open the Communications
Port Properties dialog box.
SP Series Info Central
Page 40

28
5 Select the Port Settings tab.
If the PC has more than one serial port, make sure you view the settings for the serial po rt to which the
printer is attached.
6 Select the following settings:
Setting Value
Baud rate 9600
Data bits 8
Parity None
Stop bits 1
Flow control None
7 When the settings are correct, click OK to save settings and close the dialog box.
Setting a serial port for Windows Me & 98
1 From the Start menu, select Settings and then Control Panel.
2 From the control panel, select System.
3 On the system Properties dialog box, select the Device Manager tab.
SP Series Info Central
Page 41

4 Click the Plus sign + next to Ports (COM & LPT) to display a list of ports.
29
5 From the Ports list, select the port, such as COM1 or COM2.
6 Select the Properties button to display the port settings.
If the PC has more than one serial port, make sure you view the settings for the serial po rt to which the
printer is attached.
7 Select the Port Settings tab.
SP Series Info Central
Page 42

30
8 Select the following settings:
Setting Value
Bits per second 9600
Data bits 8
Parity None
Stop bits 1
Flow control None
9 When the settings are correct, click OK to save settings and close the dialog box.
SP Series Info Central
Page 43

31
Connecting more than one printer or more than one PC
You have several choices for having more than one printer connecte d to a user or for having mo re than
one user connected to a printer. Choices include:
• Installing two printers to one PC using USB ports See Install more than one printer using a USB
connection for details.
• Installing a printer on a client PC when the printer is connected to a host PC and both PCs are
connected to a network (using Windows printer sharing). See Printer sharing for details.
• Installing a printer on a network using a print server and then installing the driver on a PC on the
network. This method is called direct networking. Direct network printing for details.
• Installing multiple printers to a PC using a combination of connection methods. For example, one or
more printers can be directly connected to the PC and others can be connected through a network
(using Windows printer sharing or direct networking).
• Using more than one printer installed to a PC as a printer pool, when the PC is running Windows 2000
or XP. The operating system manages sending jobs to the printers so the next available printer receives
the card. See Printer pooling for details.
Install more than one printer using a USB connection
Tips for success
• More than one USB-connected printer on a PC running Windows 98 (including SE) is not fully
supported. Datacard recommends using Windows Me, 2000, or XP when using more than one printer
on a PC.
• Connect and install one printer at a time. The PC cannot run two or more installation programs at the
same time.
• The USB protocol allows devices to be connected to the PC through another USB device (daisychained). USB also uses hubs to which multiple USB devices (including other hubs) can be connected
(cascaded). Up to five hubs can be used between the printer and the PC. Datacard printers do not have
ports to support daisy chaining. If you need to connect two Dat ac ar d pr int er s to a PC with on e USB
port, obtain a USB hub to which both printers can be connected.
• The printer must be powered on for the PC to detect it. It must remain powered on so the operating
system can keep track of the printer if the printer is moved fr om one USB p or t or conn ection to another.
1 Begin with the PC powered on and running. Existing Data card prin ters can be powere d on or powe red
off.
2 Exit the Printer Toolbox for existing printers. Right-click on the printer icon (in the lower right corner of
the desktop) to display a pop-up menu. Select Exit from the pop-up menu.
3 Attach the flat end of the USB cable to the USB port on the PC or on a device connected to the PC.
4 Power on the printer and wait until it is ready (the printer light is steady green).
5 Attach the square end of the USB cable to the printer.
6 The operating system should detect the new device and display the Add/Detect New Hardware wizard.
Follow the prompts.
SP Series Info Central
Page 44

32
If the operating system does not detect the pr int e r and display the Add/Detect New Hardware wizard
within a few minutes, check the Printers window to see if the icon for the new printer is displayed. At
times, the Wizard runs quickly and you might not notice it. If the Wizard doe s not appear and the icon is
not present, see Troubleshooting Installation Problems for more information.
For Windows 98 and Me, the Add New Hardware wizard might appear twice; to install USB printer
support and then to install the printer driver.
7 In most cases, the operating system will use the existing driver files to install the driver for this printer:
– On Windows Me, the Copying Files dialog box might appear. If it does, browse to the location on the
hard disk for the Windows\System folder to continue.
– On Windows 98 and 98 SE, Windows might prompt you to insert the printer driver CD-ROM to
complete installation.
Using more than one printer on a PC
When using more than one printer on a PC, keep the following in mind:
• Select the printer to use in the application. Card jobs will be sent to the selected printer even if more
than one Datacard printer is attached to the PC.
• When messages are displayed, the title bar of the message box displays the name of the printer
causing the message. Keep track of which printer has which name.
• Each printer has it’s own icon in the Printers window, and each printer has a separate Properties or
Printer Preferences dialog box. Settings are not shared among printers.
• A Printer Toolbox dialog box for each printer is displayed on the desktop (unless you minimize it).
Printer pooling
Printer pooling is a feature of the WIndows 2000 and Windows XP operating systems. A printer pool
treats a group of printers as one printer and distributes print jobs among the available printers.
Requirements for a printer pool
To create a printer pool for Datacard printers, you must:
• Install the printers (connect the printers and install the SmartDriver) to the same PC. Your can use one
or more of the following methods to install the printers:
– Install the printer locally using a USB port
– Install the printer using a direct network connection
• A printer pool that is installed without having an actual Datacard printer and its driver installed will not
print cards.
• Use the Windows 2000 or Windows XP operating system on the PC. (Windows NT in cludes support for
printer pooling; however the Datacard SmartDriver does not support printer pooling on Windows NT
and the SP Series printer is not designed for use on Windows NT.)
• All printers must have the same features to be part of the pool. Printers can be installed before or after
the printer pool is set up and will be included in the pool. By default, all directly connected Datacard
printers are included in the pool, so all printers must support and use the same card features.
For example, if the cards will have magnetic stripe data encoded, all printers must have the same type
of magnetic stripe module.
SP Series Info Central
Page 45

33
• Use the Datacard method for setting up printe r pooling, not the Enable Printer Pooling check box on the
Properties dialog box for the printer. Windows permits checking this box but does not permit displaying
a message if the printer does not support it.
• Special features that require interactive mode, including reading magnetic stripe and programming
smart cards, do not work with printer pooling. (The PC must communicate directly with the printer about
a specific job, and this information is not available to the PC.)
• Shared printers cannot be part of a printer pool.
Set up printer pooling
To set up a printer pool on a PC:
1 Install each printer and its driver on the PC. See Install the printer and Installing the driver for steps to
follow.
2 Set up each printer with the same settings, especially print ribbon type, print on both sides, magnetic
stripe settings, and topcoat or overlay “apply material.” See Printer Setup if needed.
3 Verify the operation of each printer on its own.
4 Install the SmartDriver printer pool (described in the following procedure).
5 Set up the pool with the same values that each printer uses. See Printer Setup if needed.
6 Verify the operation of the printer pool.
Install the SmartDriver printer pool
1 Begin with Windows running and all printers installed.
2 Start the installation program by doing one of the following:
– Insert the SmartDriver CD-ROM. When the dialog box appears, click “Install the Printer”.
– Double-click the SD-2K-XP-n_n.exe file to extract downloaded driver files and start the installation
program (the n_n represents the version of the driver, such as 6_0).
3 On the dialog box, click “Install the Printer.”
4 Choose “SmartDriver Printer Pool” from the list and click Next.
5 Respond to the Microsoft dialog box to complete installation:
– For Windows 2000, click Yes on the Digital Signature Not Found message.
– For Windows XP, click Continue Anyway on the Software Installation message.
6 The installation program runs to install the printer pool.
Use a printer pool
Begin with the PC powered on and the driver and port installed.
Tips for success
• To use the printer pool effectively, each different card must be sent from the application as a separate
job. Some applications, such as Datacard’s ID Works, send each card in a batch as a separate job,
while others send the batch as one job. (Multiple copies of the same card are sent as one job.) Test the
application you use to determine the best way to send multiple cards to the printer pool.
SP Series Info Central
Page 46

34
• If you do not want one or more printers to print cards as part of the pool, power off that printer. The
printer pool will identify a printer as available even when the printer status is Suspended or Not
Responding if the printer is powered on. If you need to use a printer separately from the printer pool,
install it on another PC or contact your service provider for assistance.
• Some applications track card completion status, and this data is available for cards sent to the printer
pool. The application can query the printer pool and obtain status for all cards processed through the
pool. Card completion status does not indicate which printer actually printed the job.
• In the Printing Preferences dialog box for the printer pool, select SP35 or SP55 as the printer type.
• For magnetic stripe encoding, use the same coercivity and magnetic stripe format values for all printe rs
and the printer pool. (If you select “Use printer settings,” make sure the settings in the printers are the
same; use the SmartDriver Diagnostics Utility to view magnetic stripe values if needed.)
To use a printer pool:
1 In the application used to print cards, select the name assigned to the printer pool when it was
installed.
2 Make sure that all printers you want to receive card data and print cards have the same type of
supplies loaded and the same settings.
For example, to print color and encode magnetic strip e, load YMCKT ri bbon in the p rinte r and use h ighcoercivity magnetic stripe cards. Each printer identifies the ribbon type as YMCKT, but the pool cannot
identify the Print Ribbon Type so you must set the Print Ribbon Type.
3 Make sure the printers are powered on and ready.
4 Select Print in the application. The application sends the cards to the printer pool, which randomly
distributes the card jobs among the available Dat a card pr inter s. When all prin te rs are b usy, the printer
pool keeps the card jobs in a queue until the next printer is not busy . It will send the next card job as
soon as any printer in the pool is available.
– A printer is available if:
• The number of jobs active in the printer is less than the number of jobs suppor ted for tha t pr inter
type
• No jobs are pending in the spooler for that printer
• The printer is not paused
• The printer is not set to “work offline”
• The printer status is not “User Intervention Required”
• The Printer Toolbox is not in Advanced Setup mode
5 After a card is sent by the printer pool to a specific printer, it cannot be removed from that printer and
assigned to another printer.
6 When a printer issues a message, the message appears on the PC with the name of the printer in the
title bar of the message box. The printer will be unavailable to print cards until the situation causing the
message is corrected. Other printers in the pool will continue to receive card jobs and print cards.
SP Series Info Central
Page 47

35
Direct network printing
A directly networked printer is connected to a print server which is then connected to the network. A PC
can connect to several directly networked printers at a time. All users receive status and message
information from the printer.
Several types of directly networked connection are possible:
• The printer and print server can be wired into an existing network using an HP jetdirect 175x printer
server
• The printer can be connected to a wireless print server, which communicates with a PC using a wireless
connection on the PC (ad hoc or peer-to-peer mode), creating a local wireless network.
• The printer can be connected to a wireless print server, which communicates to a wireless access point
(WAP) on an existing network( infrastructure mode). The printer location is limited by the range and
availability of WAPs.
To connect an SP35 or SP55 printer directly to a network, you need the following:
• Print Server
SP Series Info Central
Page 48

36
Print servers that have been tested are:
The HP jetdirect 175x printer server uses a USB cable to connect to the printer and an RJ45 cable to
connect to an available network port. It can be used with the SP35 or SP55 printer.
The HP jetdirect 380x print server uses a USB cable to connect to the printer and the 802.11b wireless
(WiFi) protocol to connect to a wireless access point (WAP) on the network. It can be used with the
SP35 or SP55 printer.
• Print Server Software
The print servers are shipped with the appropriate CD-ROM that includes the pr int server so ftware you
will need to set up and administer an HP jetdirect 175x or 380x print server.
• Power supply and power cord for the print server
The power supply and cord are shipped with the print server.
• USB cable to connect the printer and print server
The USB cable is shipped with the print server.
• For a wired connection, a network cable to connect the print server to the network
You must provide the cable to connect to your network.
• For a wireless connection, a wireless network adapter for the PC
The wireless network adapter must use the same wireless protocol as the print server (802.11.b.) One
adapter is needed to configure the print server for both ad-hoc and infrastructure modes. If you plan to
use ad-hoc mode, you also need a wireless network adapter for each PC that will use the printer.
•PC
– The PC must be an X86 MMX-compatible PC, running Windows Me or Windows XP (preferred) or
Windows 98SE or Windows 2000. (See PC and software requirements for service pack
requirements.) For a wired or wireless infrastructure connection, the PC must be connected to and
working on an Ethernet network.
– The printer driver will be installed on a PC to enable the user to print to the Datacard printer. (If a
previous version of the SmartDriver is currently installed on the PC, upgra de the driver following the
steps in Upgrading the driver before following these steps. )
– More than one PC on the network can print to the printer. Datacard recommends that one PC be
used for administrative tasks, such as running the setup utility and, if needed, Diagnostics.
– For Windows XP and 2000, users must have the same permissions as for a locally att ached prin ter.
(Power users cannot perform all the tasks required.) See Setting printer permissions for information
about permissions.
• For a wired or infrastructure wireless connection, an Ethernet network
The Ethernet network can be either a 10baseT or a 100baseT Ethernet network. The print server is
configured using the TCP/IP protocol. The print server is attached to an available network port for a
wired connection or uses a Wireless Access Point (WAP) for a wireless infrastructure connection. See
the documentation for the print server for details abo ut network requirements.
• SP35 or SP55 Printer
– An SP35 or SP 55 printer works with the SmartDriver, version 6.0 or higher, which support s a direct
network connection.
– Future releases of the printer driver will be tested for direct network support.
SP Series Info Central
Page 49

37
Choose one of the following procedures, depending on whether you will use a wired or wireless
connection.
Installing a wired network connection
1 Connect the HP jetdirect 175x print server to the printer, using the USB cable shipped with the print
server.
2 Connect the print server to the network. See the setup information provided with the print server.
3 Connect the print server to a power source.
4 Plug in the printer power cord to power on the printer.
5 Insert the print server CD-ROM in the drive of the administrative PC. The CD-ROM automatically
starts. Click on Install to run the utility that sets up the print server and network printer. Follow the
prompts to complete print server setup.
– Be sure to record the server name or IP address, which you will use when you install the
SmartDriver on the PCs that send print jobs.
6 On each PC that will send jobs to the printer, beginning with the Admin PC, install the SmartDriver. See
Installing the driver and follow these guidelines:
– Choose to install a directly networked printer.
– Make sure than each printer has a unique name on the PC. One PC can connect to multiple
Datacard printers on the network.
7 Configure the port to define the connection between the printer and PC.
a After installing the driver, open the printer Properties dialog box.
b In the Properties dialog:
• On Windows 2000 and XP, make sure you are logged in as the Administrator. (Users and Power
Users cannot complete this task successfully .) Select the Ports tab. Click the Configure Port
button.
• On Windows Me and 98, select the Details tab. Click the Port Settings button.
c Enter the server name or IP address of the print server (from step 5). If your network uses DHCP,
use the server name (not the IP address, whic h th e ne two rk cha nges).
d Click OK to save the setting. Open the Enter Network Address dialog box again.
e Click the T est button to verify that the PC can communicate with the print server . If the PC does not
communicate with the printer, see Troubleshooting a direct network installation.
8 With the Properties dialog box open, select the General t ab . Click the Pr int Test Page button to send a
Windows test page to the printer. If the test page prints, the printer has been successfully installed.
Installing a wireless network connection
On Windows 2000 and XP, make sure you are logged in as the Administrator . If netwo rking is set up o n
the PC, log into the network.
1 Install the wireless network adapter, including the driver files, to the PC. Follow the instructions
provided with the adapter to install it.
SP Series Info Central
Page 50

38
2 Change setting in the utility for the wireless network adapter (if needed) to match the default settings
for the HP jetdirect 380x print server. The settings are located in the information provided with the print
server.
3 Power on the HP jet direct 380x wireless print server. Do not connect the print server to the printer at
this time (this sequence might be different from the one the print ser ver recommends). The power light
on the print server will be on.
4 Insert the CD-ROM provided with the HP jet direct 380x print server on the PC with the wireless
network adapter. Set up the print server to work with the network you plan to use.
• If needed, work with your network administrator to understand the settings to use.
• Record the values you use so you can repeat the setup for other d evices and to finish config uring
the connection to the printer.
5 Install the SmartDriver on each PC that will use the printer. See Installing the driver and follow these
guidelines:
– Choose to install a directly networked printer.
– Make sure than each printer has a unique name on the PC. One PC can connect to multiple
Datacard printers on the network.
6 Configure the port to define the connection between the printer and PC.
a After installing the driver, open the printer Properties dialog box.
b In the Properties dialog:
• On Windows 2000 and XP, make sure you are logged in as the Administrator. (Users and Power
Users cannot complete this task successfully .) Select the Ports tab. Click the Configure Port
button.
• On Windows Me and 98, select the Details tab. Click the Port Settings button.
c Enter the server name or IP address of the print server (from step 4). If your network uses DHCP,
use the server name (not the IP address, whic h th e ne two rk cha nges).
d Click OK to save the setting. Open the Enter Network Address dialog box again.
e Click the Test button to verify that the PC can communicate with the print server.
7 Using the SmartDriver Toolbox, click the Sample Card button. If the sample page prints, the printer has
been successfully installed.
Printer setup
• The Printer Type, Print Ribbon Type, and Print on both sides (or Duplex method) settings depend on
the printer attached. Use the settings supplied by the printer.
• From the Admin PC, make sure the following settings in the Properties (Windows Me and 98) or
Printing Preferences (Windows 2000 or XP) dialog box are correct for the printer:
– Mag stripe coercivity
– Mag stripe encoding format
• Consider a policy that only the Admin PC is used to make changes in the following, which make
changes in the printer:
– Firmware Update utility
– SmartDriver Printer Diagnostics
SP Series Info Central
Page 51

39
– The Printhead tab in the Advanced Setup area of the Printer Toolbox. Any user can use the Color
Settings tab, which affects processing on the PC.
Printing
• To send print jobs from a PC on the network to the printer, make sure the printer is set up, the driver is
installed on the PC, and the Windows test p age has printed successfully.
• Open the Properties (Windows Me or 98) or Printing Preferences (Windows 2000 or XP) dialog box.
Select card design settings, such as rotation and topcoat pattern.
• Select the printer in the application, and print. The print server will handle jobs from more than one PC
at a time. See Status for details.
Status
The Printer Toolbox is displayed by default when the PC starts. The icon for the printer appears in the
system tray, usually in the lower right corner of the Windows desktop. ( Double-click the icon to open the
Toolbox, if needed.) The Printer Toolbox displays the port mod e and printer stat us. The port mode for a
printer connected using a network print server is "The port type is directly networked." The possible
printer statuses are:
• Printer responding normally.
– The printer is powered on, connected to and communicating with the network. The printer is not
currently printing cards.
• Printer is busy.
– The printer is printing, is communicating with another PC, has an error, or is powered off.
– Users can submit print jobs. When the printer is available, the PC will send the jobs to the printer.
• Network not responding.
– The print server is not responding to a query by the printer driver.
• Communication with the printer is suspende d.
– The printer has been busy or the network has not responded for more than 30 seconds.
– The status might change to "Printer is busy" or "Network is not responding" after communication
resumes.
Messages
• The printer driver displays messages whe n the dr iver has a problem sen ding a card or when th e printe r
has a problem completing a card. Any PC with the driver installed and conne cted to the printer over the
network using a print server can display messages from the printer.
• Messages not associated with a job, such as startup and out of ribbon messages, can appear on all
PCs that send jobs to the printer.
Administration
• Several tasks should be performed only from the Admin PC. In addition, Datacard recommends that
other PCs connected to the printer not use the printer while administration tasks are performed on the
Admin PC. (The PCs can be powered off or users can exit from the Printer T oolbox and avoid printing.
If the Printer Toolbox is active, it can display messages that result from the administrative tasks.)
SP Series Info Central
Page 52

40
• Actions you take while performing administrative functions ca n cause messages to be issued. At times,
the messages will not be displayed on the Admin PC but can be displayed on other PCs if the Printer
Toolbox is active.
Printer sharing
This section describes how you can print to a printer over a network using Microsoft File and Printer
Sharing. A shared printer is connected to a PC with the printer driver installed (host PC). Users at other
PCs on the network (clients) can print to the shared printer over the network. Up to 10 client PCs can
share the printer at one time. Users at client PCs do not have the same level of access to the printer
driver as a user at the host PC.
The following operating system configurations are supported:
• Both the client and host PCs run Windows 2000.
• Both the client and host PCs run Windows XP.
• Both the client and host PCs run Windows Me or Windows 98 (Second Edition).
Requirements for local printer sharing
Before sharing a printer over the network, meet the following requirements:
• A network card is installed in and working on each PC to use the printer.
• The same Windows operating system is installed on and operating on each PC.
• If you are installing both a network card and a service pack or Windows upgrade, install the network
card first and then install the service pack or upg ra de. If you installed a service pack or upgrade before
installing a network card, you must install the service pack or upgrade again.
• The printer must be enabled for sharing. See Windows help for information on enabling printer sharing.
• The PC with the printer attached must remain on, and the Windows operating system must be running.
For Windows 2000 and XP, a user with Print, Manage Printers, and Manage Documents permissions to
the printer must be logged on at the host PC so that other users can print.
• If more than one printer is connected to a PC and one is a shared printer, the printers must have
different names.
• For Windows 2000 and Windows XP, you must set up permission for users at the client PC and
permission for users at the host PC. See Setting printer permissions for more information.
Printer and PC setup
This section describes the components you need to use the SP Series printer with local printer sharing.
Network: A network must be set up and working before you begin. This guide does not address
network setup or requirements.
SP Series Info Central
Page 53

41
Host PC: The host PC has the printer attached to it. The host PC must be connected to the network.
For Windows 2000 and Windows XP, you need to set up users and access.
Port connection: The printer is connected to a USB port on the host PC, in the same way as though
you were using it just from the host PC.
Client PC: The client PC is connected to the host PC over the network.
Setting up printing sharing
To set up printer sharing, do the following:
1 Install the printer driver on the host PC. See the Installing the driver for more information.
2 With the printer power on, change settings to reflect your card design, including printer features such
as ribbon type and magnetic stripe settings. Record the settings so you can also make those settings
on the client PC.
3 Enable printer sharing. See Windows help for more information.
4 For Windows 2000 and Windows XP, set up an account for each user.
– At the host PC set up accounts for users who log onto the host PC and for users who log onto the
client PC(s).
– At the client PC set up an account for the user who logs onto the client PC.
5 For Windows 2000 and Windows XP, grant users' permission to the printer from the host PC, including:
– Client PC users who have Print permission to the printer.
– Host PC users who also have Print, Manager Printers, and Manage Documents permissions to the
printer.
– Host PC users (if any) who are denied permission to the printer.
6 Make sure client PC users can access the host PC from the network.
7 Install the printer driver on the client PC. See the following procedure.
8 At the client PC, set the printer type in the Properties or Printing Preferences dialog box.
9 Change driver settings on the client PC to match settings on the host PC.
Installing the printer driver on the client PC
Tips for success
• If an Express Class v1.x, Select Class v2.x or v3.x, Magna Class v2.x, or ImageCard IV printer driver is
installed on the client PC, delete the printer driver and reboot the PC before continuing.
• For Windows 2000 and Windows XP, log on to the client PC as a user wi th access rights to the host PC.
You also need Print permission to the shared printer to open the Prin ting Preferences d ialog box and to
print test cards.
• A PC can have a locally connected (USB) Datacard printer attached, a directly networked Datacard
printer attached, and be connected to a shared printer as a client PC. All printers connected to the PC
must be supported by and use the current version of the SmartDriver.
SP Series Info Central
Page 54

42
• If you use more than one connection method on a PC, install the locally and/or directly-network
connected printer(s), and then follow the steps in this section to install the shared printer last. The
shared printer must have a different name from the other printers.
• If you upgrade the SmartDriver on the host PC, you need to remove the driver from the client PC. See
“Upgrading the printer driver on Windows Me and 98 SE” on page 5-15 to remove the existing driver.
Follow the steps in this section and then restart Windows before printing from the PC.
• Do not rename the printer on the client PC.
1 Make sure that the printer and driver on the host PC are working properly before beginning this task.
2 Start Windows at the client PC and log onto the network.
3 Use Windows Explorer, Network Neighborhood, or My Computer to locate the host PC.
4 When you locate the host PC, click the icon for the host PC to display the Enter Network Password
dialog box. Type your password and click OK to log on to the host PC. Keep the window open during
printer driver installation.
5 In the Printers window, double-click the Add Printers icon.
6 In the Add Printers wizard, select the following choices:
a Choose the "Network printer" button, not the "My Computer" or “Local printer” button.
b Choose to browse for the printer. An expandable list of printers and/or PCs appears.
c If needed, double-click a server or PC name to see the names of printers attached.
d Choose the printer to which the user will print. The printer name appears in the Printer box.
e Change the name of the printer if needed so it is different fro m the name of other Dat acard printers
attached to the PC.
f Continue to follow the prompts on the Add Printers Wizard.
g If you have not logged into the PC with the printer attached, you will receive a message. Return to
step 3 and repeat the procedure.
h If you are prompted, choose "Replace ex istin g dr iver," not "Keep existing driver (recommen d ed). "
i If you are prompted to print a test page, click No. You must set values in the Properties or Printing
Preferences dialog box before printing.
7 When the printer has been installed on the client PC, change settings on the client PC to reflect the
printer and your card design. Open Properties (Windows Me and 98) or Printing Preferences
(Windows XP or 2000) to change settings.
– Set the printer type and click OK or Apply.
– Set the ribbon type to match the ribbon in the printer and the setting on the host PC.
– Change settings that apply to the printer, such as magnetic stripe, so they do not conflict with the
host PC and printer features.
– Change settings to reflect your card design, such as portrait or landscape orientation. These
settings can be different from the settings on the host PC.
8 From the Properties or Printing Preferences dialog box for the shared printer, print a Windows test
page from the client PC.
SP Series Info Central
Page 55

43
Perform management tasks at the host PC
The user at the host PC has more control over the printer and more information about the printer. This
section describes some tasks performed at the host PC.
For Windows 2000 and XP, the user must be logged in as a user with Full Control permission.
• Manage all jobs in the print queue. You can use Print Manager to view all jobs in the print queue and
to pause or delete any jobs in the print queue, no matter who submitted the job. The job remains in the
print queue until it has been sent to the printer . See Windows help for information on using Print
Manager.
• See and respond to messages. If the printer is not able to process and print a card, the printer driver
displays a message on the host PC, not the client PC. You can see the message and view help, which
guides you in resolving the situation. Printing for all users is suspended until the situation is resolved.
• On Windows 2000 and XP, set printer values, such as ribbon type, for all users. The values you
set in the Properties or Printing Preferences dialog box apply to all users. Several values can be
changed at client PCs, but those values apply only to the print jobs being sent. V alues yo u set are used
at client PCs after the client PC queries the host PC. Open the Properties or Printing Prefer ences dialog
box at each client PC after setting values at the host PC to query the host PC. (You can close the dialog
box at the client PC after viewing it.) If you do not open the Properties dialog box, the client PC does not
query the host PC, the first card printed will not use the new settings, and you will need to send the card
to print again.
• On Windows Me and 98, set or view values that control card processing for all users. Reco rd th e
ribbon type so you can set it correctly at the client PC. The values you set for Ma g Stripe encoding can
affect all users.
• View printer st atus. The host PC ru ns the Printer Toolbox and all status functions. The Printer Toolbox
is open by default or you can double click the printer icon in the system tray to open it. See Open the
Printer Toolbox in the Printer Guide for details.
• Use all features of the SmartDrive r Toolbox. The Printer T oolbo x on the host PC provides access to
settings, including edge to edge settings and use color controls.
• Run the firmware update utility. The host PC displays a prompt when you need to run the firmware
update utility. The utility works only from a PC with the printer directly connected to it.
Using the printer from the client PC
For Windows 2000 and Windows XP, users at the client PC must be logged into the host PC and must
have Print permission to the printer. Users at the client PC can perform several actions, including:
• Print a card using an application at the client PC. At the client PC, you can use an application to
print cards by selecting the printer in the application. See Making Cards for details.
• Print a card using an application and magnetic stripe fonts from the client PC. When you print
from an application such as Microsoft Word, you can type text an d format it using font s pr ovided by the
printer driver.
• For Windows Me and 98, set card design values. Select the same Ribb on Type as the Host PC. For
other settings, such as Magnetic Stripe Encoding Format, the printer must support the setting you
select but the setting can be different from the Host PC setting.
• For Windows 2000 and XP, change card design settings, including settings such as landscape or
portrait orientation. Many settings are read from the host PC and cannot be selected.
SP Series Info Central
Page 56

44
• Do not use the Restore Defaults featur e on any operating system. The Restore Defaults function
attempts to query the printer to verify its features and cannot access the printer over the network.
• Pause or delete print jobs you submitted from Print Manager at the client PC. The card job
remains in the print queue until it is sent to the printer. See Wind ows help for infor mation on using Print
Manager.
• View status of the client PC. The Printer Toolbox dialog box is also available on the client PC. It
displays the client status and a reminder that the host PC provides messages and additional status
information.
• Use the Color Settings page of the Toolbox. The Printer Toolbox box on the client PC provides
access to the Color Settings page. The color settings can be used to fine-tune th e appearance o f cards
sent from the client PC.
• On Windows 2000 and XP, view the Print Manager to see printer messages from the host PC.
The card job remains in the print queue until it is sent to the printer. You can expand the Status column
in the Print Manager dialog box to see the messages .
SP Series Info Central
Page 57

On the CD-ROM
The printer is shipped with a CD-ROM that contains the printer driver (SmartDriver), user information,
and other utilities and files that you might want.
The following table lists the contents of the CD-ROM, the path, and the purpose of the program, file, or
utility:
Path Purpose
43
Datacard SmartDriver
D:\SETUP.EXE
#
CD-ROM
Printer driver for
D:\DsPnp.inf
#
Windows 2000 and XP
Printer driver for
D:\Me-98\SETUP.EXE
Windows Me and 98
Printer driver for
D:\NT\ SETUP.EXE
Windows NT (supports
other printers)
e-Guide installation D:\e-Guide\SP35_e-
Guide_v.exe
#†
e-Guide installation D:\e-Guide\IC4_e-
Guide_v.exe
#†
e-Guide installation D:\e-Guide\Mag_e-
Guide_v.exe
††
User-friendly access to
all of the applications on
the CD-ROM
Installation for Windows
2000 and XP that meets
Microsoft Plug-and-Play
requirements
#
Custom installation for
Windows Me and
Windows 98
#
Custom installation for
Windows NT 4.0
Installation program for
SP Series Info Central.
Installation program for
ImageCard IV e-Guide.
Installation program for
Magna e-Guide.
e-Guide installation D:\e-Guide\Sel_e-
e-Guides (use the eGuide(s) that match the
printer(s) installed on the
PC)
SP Series Info Central
Guide_v.exe
#†
D:\e-Guide\SP Series\
SP_Info_Central.chm
#
and
other files with names in the
SP_xxx.chm format
D:\e-Guide\ Magna Class
with AIT\
DM-e-Guide.pdf
#
and other
files with names in the
M_xxx.pdf format
Installation program for
Select e-Guide.
SP Series Info Central
and e-Guide files, which
contain detailed
information about the
SP35 and SP55 printers
Magna e-Guide files,
which contains error
recovery procedures
linked to help.
Page 58

44
Path Purpose
Adobe Acrobat Reader
installation
SmartDriver Diagnostics
Utility
D:\e-Guide\ Select Class
with AIT\
DS-e-Guide.pdf
#
and other
files with names in the
S_xxx.pdf format
D:\e-Guide\ ImageCard IV\
D4-e-Guide.pdf
#
and other
files with names in the
4_xxx.pdf format
D:\Adobe\
AcroReader51_CHS.EXE,
\AcroReader51_CHT.EXE
\AcroReader51_DEU.EXE,
\AcroReader51_ENU.EXE,
\AcroReader51_ESP.EXE,
\AcroReader51_FRA.EXE,
\AcroReader51_ITA.EXE,
\AcroReader51_JPN.EXE
D:\Support\Diagnostics\
SD_Diagnosticsvvv.EXE
#†
Select e-Guide files,
which contains error
recovery procedures
linked to help.
ImageCard IV e-Guide,
which contains error
recovery procedures
linked to help.
Installation program for
Adobe Acrobat Reader,
Version 5.1. The Reader
(version 3 or higher) is
required to view the eGuides for Select,
Magna and ImageCard
IV printers, part of the
#†
help system.
Installation program for
the SmartDriver
Diagnostics Utility, used
to identify or fix printer
problems
Cleanup Utility D:\Support\Diagnostics\
SD_CLEANUPvvv.EXE
#†
Installation program for
the Cleanup Utility,
which is used after
removing a version 1.x
or 2.x driver.
Support files D:\Support\color.prn
D:\Support\mono.prn
#
Files used at the
direction of service for
troubleshooting.
SmartDriver SDK D:\Support\SDK\
SmartDriver SDK.exe
#
Self-extracting file for the
SmartDriver SDK which
is used to write
applications that work
with the printer.
#. Where D is the drive letter of the CD-ROM drive
†. Where v is the version, such as C or 6.0
The printer drivers are updated from time to time to provide optimal functionality. You can obtain
themost recent printer driver for the PC operating system you use from the Datacard Web site at
www.datacard.com. You also can request the newest release of the printer driver on CD-ROM. The
SP Series Info Central
Page 59

45
part number changes with each release. The e-Guides are also updated from time to time and can be
downloaded from the Datacard Web site at www.datacard.com.
SP Series Info Central
Page 60

Setting up for your card design 1
Setting up for your card design
The driver provides settings that you can use to make sure that your cards print as you intend. These
settings provide users of the printer with great flexibility in printing, encoding a magnetic stripe, or
personalizing a smart card. This flexibility makes it very difficult to provide you with a step-by-step process
for getting your cards to print as you intend. Instead, Datacard recommends that you do on e of the
following:
• Work with your value-added reseller or dealer to design cards and set up the printer to produce them
• Understand the features of your card design, read information in this section to match features to
printer settings, and change the settings to produce the cards.
How do I create a card design?
• Datacard’s ID Works and Preface applications are designed to capture, format, and manage
the data the often appears on cards. (Other applications can use the SmartDriver API or other
driver features to handle card-specific data.)
• A PC application that can be used for many purposes, such as Word, Excel, or PaintShopPro,
can be used to create a card design and format the data for the cards.
• This section focuses on the settings, not the application you use. When the application has an
affect on the driver settings, this section will include that information.
What is a card design?
• Card design is the name given to the combined features of the cards you produce. Cards are
useful only when all cards contain the same information: Name, photo, and so on.
• The card design includes the different types of data (name, ID number, and so on), images
(logo, photo, and so on), and special features such as barcode, magnetic stripe, or smart card
on the card.
• Card design also includes the way those components are arrang ed.
• Finally, card design frequently includes quality guidelines. For example, an organization might
print their logo in red, however another organization might require a specific shade of red for
the logo.
• An organization might have more than one card design. For example, a health club is likely to
produce member cards and employee cards.
• Card design checklist
When should I perform setup tasks?
• Initial setup: When you obtain the printer and have the card design complete, perform setup
tasks to get the printer to produce the cards you want.
• Production changes: If you make substantial changes to the way you produce cards, review
setup tasks to make sure cards continue to have the quality you require. For example, if you
purchase a new brand of (unprinted) cards, you might notice changes in the color of some
images.
• New card design: If you change the design of your cards, or if you start producing an
additional card design, review setup tasks to make sure each design prints as re quired. You
might identify changes to your process to support printing of two different designs.
SP Series Info Central
Page 61

2 Setting up for your card design
What do I use to set up the printer?
• Properties dialog box:
On Windows 98 and Me, the Properties dialog box includes typical printer settings, such as
landscape or portrait orientation, and settings for card printers, such magnetic stripe setting s. It
also includes port and communication settings.
On Window 2000 and XP, the Properties dialog box includes port and communication settings
and permissions.
• Printing Preferences:
The Printing Preferences dialog box is displayed on Windows 2000 and XP to provide typical
printer settings, such as landscape or portrait orientation.
• Printer Toolbox:
The Printer Toolbox provides information about printer-driver communication, buttons for
performing tasks such as running a cleaning card, and access to color settings and advanced
setup.
• Advanced Setup:
Advanced Setup is a special mode that allows you to view or change some settings in the
printer. For SP Series printers, you can change where printing occurs on a card and the
intensity for topcoat or monochrome (single-color) printing.
• Printer Diagnostics:
Printer Diagnostics is a separate application that you can install to perform tests on the printer
with the guidance of your service provider. It also includes settings that might need to be
changed for special-purpose cards.
Why are there several interfaces to set up the printer?
• Microsoft Windows provides a set of tools that other products (such a s SP Series printer s) ca n
use for viewing and changing device settings (Properties or Printing Preferences dialog box).
The functions available meet some but not all needs for setting up ca rd printe rs. In add ition the
organization and functions available are different for Windows 98 /ME and Windows 2000/XP.
Because the printers can be used on several operating systems and include functions that
cannot be managed through standard Windows tools, more than one interface is needed.
• As Datacard’s printers have changed over time, the features needed in the driver have
changed. In addition, some tasks are mutually exclusive. For example, you cannot change
printhead settings at the same time as you are print i ng car ds . The cur re n t inte rf ace s ar e th e
result of Datacard’s efforts to meet the needs of customers and dealers who use the printer.
(The driver for SP Series printers can be used with other Datacard printers.)
• Some tasks are advanced, requiring a highe r level of kn owledge about the printer. These tasks
are usually performed infrequently, and only by service providers or with the guidance of
service providers, and so should not be easily available.
SP Series Info Central
Page 62

Card design checklist
Use this checklist to guide your selection of set up tasks to perform.
Before you print the design:
• Does the card include a smartcard o r magnetic stripe on the printed side of the card? If yes, set topcoat
blocking to prevent application of topcoat over that feature.
• Does the card include a magnetic stripe? If yes, see Magnetic Stripe Setup for more information.
• Does the card include a smart card? If yes, see Smart card setup for more information.
• Do you want to power off the printer when fixing problems, or is saving ribbon very important to you?
The “Ribbon Initialization” setting determines whether the printer moves ribbon to the start of a panel
set when it powers up. If saving ribbon is very important, leave this setting unchecked and fix any
problems in the printer with the power on. If powering off the printer to fix problems is more important
than saving ribbon, check this setting so cards printed after printer power-on will print correctly.
Make several cards using y o ur card design and evaluate the quality of the card.
• Are you printing barcodes? If yes, check the cards in your barcode reader to make sure they are easy
to read. If needed, change the printing intensity for K to improve bar code readability.
• Are you printing both photos and a logo in color? Use the following sequence to obtain the best color
quality:
– Check the color quality of the photos first.
– Change the image capture system (If used) to get the best quality photos. For example, work with
distance, lighting, and camera settings to obtain consistent, high quality photos.
– After you optimize the image capture system, evaluate the quality of printed photos. If needed,
change the Color Settings for optimal printing of phot os. Color settings af fect all colored areas of the
card, but you can change other components to return them to optimal color.
– Next, evaluate the other colored areas of the card, such as text or logos.
– You might want to use settings in the application to improve the printed color of text.
– You might also want to use an image editing application (such as PhotoShop or PaintShopPro) to
change the color of a logo file (bitmap) for optimal printing.
• If you print without a margin (the setting is edge-to-edge), observe whether the both long edges of the
card appear evenly printed. If not, change the position of printing on the card. See Fine-tune edge-to-
edge printing for steps to follow.
3
If you print with only one color (monochrome or K ribbon), decide whether to perform the
following setup tasks:
• If you print photos:
– Select a dithering method (for Windows 98 or Me) to manage how color photos are printed using
one color.
– Use the Brightness, Contrast, and Sharpness controls on the Color Settings page to obtain the best
quality printed photos.
• Adapt your card design to use the ribbon saver feature. See Using Ribbon Saver for details.
SP Series Info Central
Page 63

4
• Change the print intensify to o ptimize printing of featu res such as barcode s or small text. See Changing
the print intensity for details.
SP Series Info Central
Page 64

Working with Properties and Printing Preferences
Printer driver settings and data are organized in a set of dialog boxes or pages where settings for the
printer are displayed and can be changed. The dialog boxes are orga nized dif ferently for Windo ws Me and
98, Windows 2000, Windows XP, and Windows NT. Use the section that applies to the operating system
you use.
The default printer name when the driver is installed is SmartDriver. References in this guide to the printer
driver refer to the SmartDriver. The driver detects the type of printer attached and displays a status icon
that matches the printer type.
Tips for Properties and Printing Preferences
• When it is installed, the SmartDriver printer driver uses default settings for the printer. Make
sure that driver settings match printer features and supplies used.
• For settings that affect the printer, such as magnetic stripe settings, make sure that the printer
and PC are connected so the value you select is sent to the printer and saved. (For settings
that affect only the card format, such as landscape or portrait orientation, the printer does not
need to be connected and powered on.)
• The Print Ribbon Type setting depends on the printer and cannot be changed.
• The card creation application might include settings that override driver settings. Also, yo u can
access printer settings through the application’s print feature. (Depending on the application
and operating system, settings might apply only to the current document or session.)
5
• When the printer is installed, the default spool setting is “Spool printing so program finishes
printing faster.” Use this setting, not “Print directly to printer.”
• When the printer is installed, “Enable bi-directional support” is selected . This setting is r equired
to display messages, print test cards, and perf or m othe r func tio ns .
Properties for Windows Me & 98
The Properties dialog box includes the following settings or data:
• Card design settings, such as landscape or portrait orientation and print blocking pattern
• Print ribbon type
• Magnetic stripe encoding for mats and coercivity
• Data about the printer, including the print er type
• Port to which the printer is attached
• Port settings for a directly networked printer
Use the Properties dialog box
Make sure the printer power is on and the printer is connected to the PC.
1 Select Start from the Windows task bar.
2 From the Windows Start menu, select Settings and then Printers. The Printers window appears.
3 Click once on the SmartDriver icon.
4 Select File from the Printers menu bar, and then select Properties. The SmartDriver Properties dialog
box appears.
SP Series Info Central
Page 65

6
– If you have the Printer Toolbox open, you can click the Properties button on the S t atus p age to o pen
the Properties dialog box. The General, Details, Color Management, and Sharing tabs are not
displayed when you open Properties from the Printer Toolbox.
5 Select the tab with the information to view or change.
– General: Shows the printer name and contains the Print Test Page button (sends a Windows test
page)
– Details: Shows the port to which the printer is connected, and includes the Port Settings button for
setting up a directly networked printer
– Color Management: Allows you to load a color profile (the printer does not include a color profile)
– Sharing: Allows you set up the printer for sharing over a network
– Card: Allows you to set the orientation, rotation, print blocking, print margin, and number of copies
– Graphics: Shows the print ribbon type and allows you to set ribbon initialization (For K ribbons, you
can choose the type of dithering to use. See Set up for monochrome (K) printing for details.)
– Printer Info: Shows the printer type and the resettable card count. Includes the Open Printer
Toolbox button and the About Driver button.
– Mag Stripe: Shows whether a magnetic stripe option is included in the printer. If the printer includes
a magnetic stripe module, you can set the Coercivity and Encoding Format. You can also enable
Magnetic Stripe Escape Compatibility. (See Magnetic Stripe Setup for details.)
– Smart Card: Shows whether a smart card option is included in the printer. There are no settings.
(See Smart card setup for details.)
– To view help for settings, click on the What's This help button and then click the setting.
6 If you make changes, click Apply to save the settings. When you are done, click OK to close the dialog
box. If you do not want to make changes, click Cancel to close the Properties dialog box.
Properties & Printing Preferences for Windows 2000 & XP
The Properties dialog box includes the following:
SP Series Info Central
Page 66

• Printer type
• Port to which the printer is attached
• Permissions for other users of the PC
The Printing Preferences dialog box includes the following settings or data:
• Card design settings, such as landscape or portrait orientation and print blocking pattern
• Print ribbon type
• Magnetic stripe encoding for mats and coercivity
• Data about the printer, including the print er type
Use the Properties dialog box
Make sure the printer power is on and the printer is connected to the PC.
1 Select Start from the Windows 2000 or XP task bar.
2 From the Windows Start menu, select Settings and then Printers (2000) or Printers and Faxes (XP).
The Printers (and Faxes) window appears.
3 Click once on the SmartDriver icon.
4 Select File from the Printers menu bar, and then select Properties. The SmartDriver Properties dialog
box appears.
7
– To view help for the Properties dialog box, click on the help icon and then click the setting. Microsoft
provides help for Properties dialog box.
5 Select the tab that contains the information you want to view or change.
– General: Shows the printer name and contains the Print Test Page button (sends a Windows test
page).
– Sharing: Allows you set up the printer for sharing over a network.
SP Series Info Central
Page 67

8
– Ports: Shows the port to which the printer is connected, and includes the Port Settings button for
setting up a directly networked printer.
– Advanced: Contains the “Update Driver” button. Use the Datacard installation, not this button, to
install a more recent printer driver
– Color Management: Allows you to load a color profile (the printer does not include a color profile).
– Security: Contains setting you use to grant or deny permissions to the printer for users of the PC.
6 If you make changes, click OK to save the settings and close the dialog box. If you do not want to
make changes, click Cancel to close the Properties dialog box.
7 If you change the port or change the printer name, reboot the PC before printing.
Use the Printing Preferences dialog box
Make sure the printer power is on and the printer is connected to the PC.
1 Select Start from the Windows 2000 or XP task bar.
2 From the Windows Start menu, select Settings and then Printers (2000) or Printers and Faxes (XP).
The Printers (and Faxes) window appears.
3 Click once on the SmartDriver icon.
4 Select File from the Printers menu bar, and then select Printing Preferences. The SmartDriver Prin ting
Preferences dialog box appears.
– If you have the Printer Toolbox open, you can click the Printing Preferences button on the Status
page to open the Printing Preferences dialog box.
5 View or change settings.
– If the setting you want to change appears, select the setting.
– If the setting you want to change does not appear, click the Advanced button to display the
Advanced Options dialog box.
– Click the plus sign (+) to see all selections available.
SP Series Info Central
Page 68

– When you click a selection, a list of choices appears ne xt to the selection. Click the arro w on the box
to see the selections available.
– If the selections you want to use are not ava ila ble (ar e gr ay ed out ), m ake sur e th e fea tu r e is
available in the printer . Also make sure that the printer is powe red on and con nected to the PC, an d
then resume communication using the Printer Toolbox.
– To view help for settings, click on the What's This help button and then click any setting in the Printer
Features list. A list of settings is displayed. Select the setting for which you want help.
6 If you make changes, click OK on each dialog box to save the settings and close the dialog box. If you
do not want to make changes, click Cancel to close the Advanced and Printing Preferences dialog
boxes.
9
SP Series Info Central
Page 69

10
Changing the type of print ribbon
You can easily use a different type of print ribbon in the printer. (For example, you can change a color
printer from YMCKT to monochrome (K) ribbon.) To use a different type of ribbon, do the following:
1 Make sure all cards from PCs attached to the printer have finished printing.
2 With the printer power on and the printer communicating with the PC, open the printer co ver.
3 Remove the ribbon cartridge and remove the existing ribbon from the cartridge.
4 Load the new type of ribbon on the cartridge. Make sure the ribbon is Datacard-approved for use in the
SP Series card printer you are using.
5 Replace the ribbon cartridge in the printer and close the cover. When you close the cover, the printer
reads the type of ribbon installed and changes settings to match the current type of ribbon.
6 At each PC connected to the printer, make sure the printer and PC are communicating, and then open
the Properties or Printing Preferences dialog box. View the Ribbon Type setting. The driver
communicates with the printer to obtain the new ribbon type and will display the Ribbon Type. Close
the dialog box when you confirm that the PC shows the new Ribbon Type setting. (At the client PC for
a shared printer, you must change the setting.)
7 The PC is ready to send cards to the printer. Cards will be formatted to print with the new type of
ribbon.
SP Series Info Central
Page 70

11
Set up for monochrome (K) printing
If you print with only one color, decide whether to perform the following setup tasks:
• Adapt your card design to use the ribbo n saver feature
• Change the print intensity to optimize printing of features such as barcodes or small text.
Using Ribbon Saver
If you use a Datacard Black (K) monochrome ribbon, or a Datacard monochrome ribbon of another color,
such as red, you can use the Ribbon Save feature. Without Ribbon Saver, the printer uses a length of
ribbon that is about the same length as the card. With Ribbon Saver, the printer can use less ribbon if the
card design does not occupy the complete length of the card.
The printer begins using ribbon at a location that corresponds to the le ading edge of the card. WIth Ribbon
Saver, the pr inter continu es to spool ribbo n for the length of th e image but no farther. (The printer leaves a
small margin between each card to avoid image overlap.)
Without Ribbon Saver, the printer spools ribbon for the length of the card.
You can adapt your card design to take advantage of the Ribb on Saver feature. Fo r example, the following
card does not make best use of the ribbon saver feature while the card shown above saves more ribbon.
Changing the print intensity
When you use Datacard monochrome ribbons, the printer identifies the ribbon and changes internal values
for optimal printing of a range of card features. (For example, the printer uses slightly different values to
print with black ribbon than with red ribbon.) However, your card requirements might be different. For
SP Series Info Central
Page 71

12
example, your card might include a barcode and you might want to change print intensity to produce the
most readable barcodes.
Consider changing the print intensity in the following situations:
• You use infrared barcode readers. Barcodes often are most readable when printed with lower intensity.
• You print using a small font size. Small characters often print better when printed with higher intensity.
• The settings were changed previously and you want to return settings to the default.
See Changing settings in the printer for steps to follow.
SP Series Info Central
Page 72

13
Color settings
Use the Color Settings page to fine-tune the printed appearance of your cards. Color settings affect how
the printer driver prepares card data to send to the printer, so the changes to color settings affect only the
cards sent from the PC on which you make the changes.
Changing the color settings
Settings that you can change include brightness, contrast, sharpness, and the balance of red, green and
blue. When you change color settings, all the colored features (such as photos, logos, and text) on the
card change.
For some settings and operating systems, the brightness, contrast, and sharpness will affect dithered
images. The following table indicates the operating systems and settings for which dithering can be
affected:
Operating system Dithering setting Dithering affected?
Windows 98 or Me Course No
Windows 98 or Me Error diffusion Yes
Windows 2000 or XP (not available) Yes
You must change color settings at the PC sending the card. If a PC is connected to the printer through
a network, changing color settings at the administrative or host PC will not change color settings at any
client or user PCs.
Open the Color Settings page
1 Double-click on the printer Printer Toolbox icon. The Printer Toolbox appears.
2 Click the Color Settings tab to display the Color Settings page.
SP Series Info Central
Page 73

14
The page displays the current settings. For all settings, a value of 0 (zero) is equal to no change. The
Color image preview pop-up also appears.
What should I do before changing color settings?
1 Set up your card design, using your card creation application. Make sure that you use all the data you
plan to print in the design, such as a logo, a photo, text, and a barcode. You can use one sample card
or a set (batch) of sample cards.
2 If you use photos, choose one or more photos that are similar to all the photos you plan to use.
3 Determine the priority and requirement s for chan ging color settings. Color settings affect the complete
card and cannot be used to change just one part of the card.
4 Consider the use of a graphics application to change one part of a card if needed. For example, if the
color of the logo is not acceptable when the appearanc e of photos is best, consider chan ging the color
of the logo using a graphics application.
5 Load the cards you plan to use in the card cartridge. Card stock can have a big impact on the
appearance of printed cards.
6 Make one or more sample cards with the current settings. The card provides a way to record current
settings and to evaluate the effect of changed settings. Do one of the following:
– In the card creation application, send the sample card(s) to print.
– Click the Print Sample Card button.
7 Use a permanent marker to mark the back of the card(s) with a 1 and the date. If you printed the
sample card from the Color Settings tab, the curr ent settings are prin ted on th e card. If you pr inted the
sample card from the card creation application, record all settings on the Color Settings page.
SP Series Info Central
Page 74

How do I choose the correct order for changing color settings?
1 First, decide whether you want to use the printer’s color profile. The printer’s color profile assumes
colors on the cards are adjusted from the input device to the Windows default profile, and adjusts from
the Windows profile to the printer’s color profile.
To use the printer’s color profile, check Match Monitor. (Most monitors do not use a color profile.)
2 Change the Brightness setting, if needed.
3 Change the Contrast setting, if needed.
4 Change the Sharpness setting, if needed.
5 Change the Color Balance settings, if needed.
How do I make photos brighter?
1 After making a sample card, click on the pointer in the Brightness box.
2 Drag the slider to the new position.
3 Wait a moment while the Color Image Preview changes to show the effect of the new setting.
4 If preview shows the change you want, click the Apply Changes button. If not, return to step 2.
5 Print a sample card, using the same method as you used in What should I do before changing color
settings?
15
– In the card creation application, print one or more sample cards.
– Click the Print Sample Card button to print a card.
6 Use a permanent marker to mark the back of the card with a 2 (or the next number if repeating these
steps).
– If you printed the sample card from the Color Settings tab, the current settings are printed on the
card.
– If you printed the sample card from the card creation application, record the new Brightness setting
on the card.
7 Evaluate the appearance of the sample card(s).
– If the brightness is decreased all the way, the white color in a card might become slightly darker.
8 Repeat these steps until the sample cards meet your requirements.
How do I change the contrast?
1 After making a sample card, click on the pointer in the Contrast box.
2 Drag the pointer to the new position. Move to the right to increase the contrast.
3 Wait a moment while the Color Image Preview changes to show the effect of the new setting.
4 If preview shows the change you want, click the Apply Changes button. If not, return to step 2.
5 Print a sample card. (Use the same method as you used in What should I do before changing color
settings?.)
– In the card creation application, print one or more sample cards.
– Click the Print Sample Card button to print a card.
SP Series Info Central
Page 75

16
6 Use a permanent marker to mark the back of the card with a 2 (or the next number if repeating these
steps).
– If you printed the sample card from the Color Settings tab, the current settings are printed on the
card.
– If you printed the sample card from the card creation application, record the new Contrast setting on
the card.
7 Evaluate the appearance of the sample card(s).
8 Repeat these steps until the sample cards meet your requirements.
How do I make the dark colors darker and the light colors lighter?
1 After making a sample card, click on the pointer in the Contrast box.
2 Drag the slider to the new position. Move it to the right to increase the difference between light and
dark colors.
3 Wait a moment while the Color Image Preview changes to show the effect of the new setting.
4 If preview shows the change you want, click the Apply Changes button. If not, return to step 2.
5 Print a sample card, using the same method as you used previously.
– In the card creation application, print one or more sample cards.
– Click the Print Sample Card button to print a card.
6 Use a permanent marker to mark the back of the card with a 2 (or the next number if repeating these
steps).
– If you printed the sample card from the Color Settings tab, the current settings are printed on the
card.
– If you printed the sample card from the card creation application, record the new Contrast setting on
the card.
7 Evaluate the appearance of the sample card(s).
8 Repeat these steps until the sample cards meet your requirements.
How do I make the printed cards less fuzzy?
1 After making a sample card, click on the pointer in the Sharpness box.
2 Drag the slider to the new position. Drag the slider to the right to increase sharpness.
3 Wait a moment while the Color Image Preview changes to show the effect of the new setting.
4 If preview shows the change you want, click the Apply Changes button. If not, return to step 2.
5 Print a sample card, using the same method as you used previously.
– In the card creation application, print one or more sample cards.
– Click the Print Sample Card button to print a card.
6 Use a permanent marker to mark the back of the card with a 2 (or the next number if repeating these
steps).
– If you printed the sample card from the Color Settings tab, the current settings are printed on the
card.
SP Series Info Central: Setup Guide
Page 76

17
– If you printed the sample card from the card creation application, record the new Sharpness setting
on the card.
7 Evaluate the appearance of the sample card(s).
8 Repeat these steps until the sample cards meet your requirements.
How do I improve the color of my logo?
1 Evaluate the problem, such as “The logo has a yellow cast” or “The logo is reddish.”
If most of the card prints with the correct colors, consider using a graphics application to change the
logo or other part of the card that needs color improvement.
2 After making a sample card, click on the pointer for the color that is a problem.
3 Drag the pointer to the new position.
4 If changing the color that appears to be a p roblem do es not fix th e situation, try chan ging the othe r two
colors. For example, if the logo is too red, try changing green and blue to bring red into balance.
5 Wait a moment while the Color Image Preview changes to show the effect of the new setting.
6 If preview shows the change you want, click the Apply Changes button. If not, return to step 2.
7 Print a sample card, using the same method as you used previously.
– In the card creation application, print one or more sample cards.
– Click the Print Sample Card button to print a card.
8 Use a permanent marker to mark the back of the card with a 2 (or the next number if repeating these
steps).
– If you printed the sample card from the Color Settings tab, the current settings are printed on the
card.
– If you printed the sample card from the card creation application, record the new Color Balance
settings on the card.
9 Evaluate the appearance of the sample card(s).
– If the color balance is increased all the way, the white color in a card might become slightly darker.
10 Repeat these steps until the sample cards meet your requirements.
How do I make my photo colors more lifelike?
1 After making a sample card, click on the pointer in the Contrast box.
2 Drag the slider to the new position.
3 Wait a moment while the Color Image Preview changes to show the effect of the new setting.
4 If preview shows the change you want, click the Apply Changes button. If not, return to step 2.
5 Print a sample card, using the same method as you used previously.
– In the card creation application, print one or more sample cards.
– Click the Print Sample Card button to print a card.
6 Use a permanent marker to mark the back of the card with a 2 (or the next number if repeating these
steps).
SP Series Info Central: Setup Guide
Page 77

18
– If you printed the sample card from the Color Settings tab, the current settings are printed on the
card.
– If you printed the sample card from the card creation application, record the new Sharpness setting
on the card.
7 Evaluate the appearance of the sample card(s).
8 Repeat these steps until the sample cards meet your requirements.
How do I undo color changes?
1 If you want to remove all color changes and set all controls to 0, click the Restore Defaults button.
2 Click the Apply changes button.
3 You will use the default color settings.
How do I use a different color profile?
You must have another color profile to use.
1 Make a sample card. The card provides a way to record current settings and to evaluate the effect of
changed settings. Do one of the following:
– In the card creation application, send the sample card(s) to print.
– Click the Print Sample Card button.
2 Open the Printer Toolbox.
3 Click the Color Settings tab and make sure the Match Monitor setting is clear.
4 Click the Apply Changes button.
5 Print a sample card. (Use the same method as you used in step 1.)
– In the card creation application, print one or more sample cards.
– Click the Print Sample Card button to print a card.
6 Use a permanent marker to mark the back of the card with a 2 (or the next number if repeating these
steps) and “Uncheck Match Monitor.”
7 Use the Color Management Tab of the Printer Properties dialog box to load a color profile. See
Windows Help for more information.
8 Continue with changing any other color settings.
SP Series Info Central: Setup Guide
Page 78

19
Changing settings in the printer
This section describes the settings in the printer that you might want to change. These settings can be
used to customize the performance of the printer to meet the demands of your card design.
Tips for success
• You must use a PC to which the printer is directly connected to change operational settings
(locally attached or directly networked). You cannot change operational settings from a client
PC using shared printing.
• Your service provider can guide you in making settings that will meet your specific needs.
• Printer settings should be changed only by someone familiar with the operation of the printer
and with Windows. Allow enough time to perform all steps of the procedures to achieve the
card quality desired.
• If this information does not result in the print quality that you want, contact your service provider
for assistance.
You can work with the following settings:
• Printing intensity: You can fine-tune the appearance and function of cards you print by changing the
intensity used to print black (K) and topcoat (T) panels. Intensity affects the thickness of letters and
barcodes–higher intensity prints thicker letter or bar codes. Use the Pr inthead tab of the Printer Toolbox
to change the printing intensity.
• Fine-tune edge-to-edge printing : You can change where the printing is positioned on the card. When
you select “Edge to edge” as the Print Margin value, you should set the Leading Edge for best
appearance and smooth operation. (Print Margin is set in the Prope rties, Document Default Properties ,
or Printing Preferences dialog box.) You can also change the position of printing to address card quality
concerns. Use the Edge to edge tab of the Printer Toolbox to fine-tune where printing occurs on the
card.
Process for changing settings
This section contains several procedures which help you make specific changes to settings. All of the
procedures use the following basic steps. This overview can help you prepare for the specific processes
that follow.
Materials to use
• Blank cards, for making “test cards” before and after changing settings. If you will be making
printer test cards and the printer includes a magnetic stripe module, make sure the magnetic
stripe test cards and the printer have the same coercivity.
• Permanent marker (for recording data on cards) or a pen (if you record data on paper).
• Paper and tape, if you want to create log pages. A log page has “test cards” taped to it with
corresponding data (such as setting values) writte n on the page. Only one side of the ca rd is
visible when it is taped to the log page, but you can write more information on a log page than
on a test card or sample card.
Suggested process
1 Make sure the printer is powered on and is directly connected to the PC.
2 Identify the setting to change and the result you want. (Stating the desired result in a measurable way
can help you identify when you have met your goal.)
SP Series Info Central: Setup Guide
Page 79

20
3 Make a test card (or sample card) and record the current values for the setting to change. Also recor d
the date and sequence number (beginning with 1). Use the same test or sample card at each step.
4 Change the setting and apply the change.
5 Make another test or sample card. Record the new setting and sequence number.
6 Evaluate the result on the card.
– If the result meets the goal, you have completed the process.
– If the result does not meet the goal, return to step 4. Repeat steps 4, 5, and 6 until you meet the
stated goal.
– If you have repeated the steps several times but are not making progress toward the stated goal,
consider whether the goal is possible and whether changing this setting will lead to the goal. Return
to the settings recorded in step 1.
Change printing intensity
1 Make sure the Printer Toolbox is open. Double-click on the icon in the system tray if needed.
2 Select the Advanced Setup button on the Printer Toolbox.
– The printer driver changes from printing mode to Advanced Setup mode, and additiona l tabs appear
on the Printer Toolbox.
3 Click the Printhead tab to display the Printhead page.
– The driver obtains the values from the printer when the window opens. If the values were not
available and the “Printer not responding” message appears, click the Retry button. The printhead
values must be available to continue.
4 Click the Printer Test Card button to print a test card that serves as a baseline for the changes you
make.
5 Mark the back of the test card with “1” and the intensity setting that you plan to change. For example,
mark it “1-K 0” if you plan to change the intensity for black (K) and the current value is 0.
6 To change the printhead intensity:
a Select the panel type: K for monochrome ribbon or panels; T for the topcoat panel.
The slider moves to the location that matches the current value and the current value appears.
b Move the slider:
• You can use the mouse or the arrow keys (← →) to move the slider.
• Move to the right to increase the intensity . Printing on the card will appear darker. If you selected
the topcoat panel type, the degree of coverage increases. If intensity is too high, the print ribbo n
will wrinkle or break (or both), especially at the end of a panel.
• Move to the left to decrease the intensity . Colors on the card will appear lighter and ribbon is less
likely to break.
• Decrease the intensity for the topcoat only if the ribbon is melting when appl ying th e to pc oa t.
Decreasing the intensity reduces the degree of coverage of the topcoat. Topcoat can affect the
durability of the image, and the degree of coverage can be difficult to detect.
c Select the Apply Changes button to make the values take effect in the printer, OR select the
Cancel Changes button to return to the values displayed before you used the slider.
SP Series Info Central: Setup Guide
Page 80

21
• The “Changes saved to printer” message appears when the values have been saved to the
printer.
7 Select the Printer Test Card button.
8 Mark the card on the back with a 2 (or the next number if repeating these steps) and the new settings
(such as K -20 for K intensity).
9 Evaluate the result as shown on the printed card.
– If the new setting has solved the problem, you can select another value to chan ge or quit Advance d
Setup.
– If the new setting has not solved the problem, return to step 5 and repeat the process.
– If the new setting has made the problem worse, return to step 6 and move the slider to the intensity
value for the selected panel type written on card 1.
10 When you are done running Advanced Setup, select the S t atus t ab and then the Qu it Advanced Setup
button to enable printing.
If you have entered Advanced Setup and selected the Close button in any tab of the Status dialog box,
the driver quits Advanced Setup for you.
Fine-tune edge-to-edge printing
Tips for success
• Make small changes in settings to avoid breaking the print ribbon.
• You can use the mouse or the arrow keys (< >) to move the slider.
• If you have selected “Edge to edge” as the Print Margin value and you are changing the
Leading Edge or Trailing Edge setting, watch for print ribbon break messages. If you change
these settings too much, the print ribbon might break as a result. If so, return to a setting that
does not break the ribbon.
• If you have changed both Leading Edge and Trailing Edge settings and the ribbon breaks, you
can determine the setting that is probably causing the break by looking at where the ribbon is
broken. Change the Leading edge setting if the break is at the beginning of a ribbon panel.
Change the Trailing Edge setting if the break is near the end of a ribbon panel.
• If you install a new printhead, you can change the Long Edges setting to center printing on the
card.
1 Make sure the Printer Toolbox is open. Double-click on the icon in the system tray if needed.
2 Select the Edge To Edge tab on the Printer Toolbox.
3 Click the Print Sample Card button to print a card that serves as a baseline for the changes you make.
4 Mark the back of the card with “1.” Also mark the position change you plan to make. Finally, mark the
current values, such as 13/50/-1 for the Leading Edge, Trailing Edge, and Long Edges values.
5 Select and move the slider for the setting you want to change.
SP Series Info Central: Setup Guide
Page 81

22
6 Select the Apply Changes button to make the values take effect in the printer, OR select the Cancel
Changes button to return to the values displayed before you used the slider.
– The “Changes saved to printer” message appears when the values have been saved to the printer.
7 Select the Print Sample Card button.
8 Mark the card on the back with a 2 (or the next number if repeating these steps) and the new settings
(such as 18/50/-1).
9 Evaluate the result as shown on the printed card.
– If the new setting has solved the problem, you can select another value to change or be done.
– If the new setting has not solved the problem, return to step 5 and repeat the process.
– If the new setting has made the problem worse, return to step 5 and move the slider to the value for
the print position written on card 1.
SP Series Info Central: Setup Guide
Page 82

25
Magnetic Stripe Setup
Do the following to set up the printer and driver to encode magnetic stripes on cards:
• Use cards with magnetic stripes when making a printer test card.
• Identify the encoding format and how it will be formatted (by the application, using magnetic stripe
fonts, or using escape codes).
• Determine whether to send coercivity and encoding format data with each card or whether to set values
in the printer. Choose the "Use printer settings" in the Properties or Printing Preferences dialog box if
you set values in the printer (using Diagnostics).
• Determine the coercivity to use. Usually, the coercivity is a system-wide decision: The magnetic stripe
readers which will read the cards encoded by the printer are likely to require a specific coercivity value.
Card stock is purchased to match that coercivity value. Set the coercivity in the Properties or Printing
Preferences dialog box.
• Select the encoding format. If a custom format, such as Triple-IATA, is used, choose “Use Printer
Coercivity” in the printer driver.
• Determine the order for encoding the magnetic stripe and printing. Typically, the magnetic stripe is
encoded first and then the card is printed. In some cases, a card design works most efficiently when the
magnetic stripe data is encoded, and then the reverse side of the card is printed (a duplex module is
required to use this feature). The “Print and Encode Sequence” choices allow you to choose which way
to process cards. If you choose to encode first, be sure to load cards with the magnetic stripe up and
toward the right side of the printer.
• If you will encode cards only, choose the Mag Stripe Encode Only selection in Properties or Printing
Preferences. Also make sure that you have not chosen duplex printing (print on both sides) and do not
apply topcoat (using settings in Properties or Printing Preferences).
• The following table lists formatting choices available and provides information about setup:
Format
IAT Three track (IAT) ID Works ID Works/Driver N o effect No
NTT Single-track (NTT) ID Works ID Works /Driver No effect Coercivity
Triple IATA Three-Track (IAT)
Printer
Module
Single Track (NTT)
Data formatted by Data verified by
Magnetic Stripe Fonts
(includes Preface)
Escape Codes Printer IAT No
Magnetic Stripe Fonts
(includes Preface)
ID Works ID Works/Driver No effect Yes
Magnetic Stripe Fonts
(includes Preface)
Some Escape Code
Formats
Printer IAT No
Printer NTT Coercivity
Printer Use printer
Printer Use printer
Driver format
setting
settings
settings
Use
Diagnostics?
Yes
Yes
SP Series Info Central: Setup Guide
Page 83

26
Format
Proprietary Three-Track (IAT) ID Works Printer Use printer
Custom Three-Track (IAT)
Binary Three-Track (IAT) ID Works ID Works Binary No
Printer
Module
Single Track (NTT)
Data formatted by Data verified by
Magnetic Stripe Fonts Driver Use printer
Custom Application Application Use printer
Custom Application Application Binary or
Magnetic Stripe Fonts
(includes Preface)
Custom Application Application Binary No
-- Binary or
Driver format
setting
settings
settings
settings
Use printer
settings
Use printer
settings
Use
Diagnostics?
Yes
Yes
Yes
Optional
Optional
Tips for success
• If you plan to use a custom magnetic stripe format, you r se rvic e pr ov ide r or valu e- ad de d
reseller (VAR) must make changes to printer settings to set up a custom magnetic stripe
format. Follow the guidance of your service provider or VAR when using a custom magnetic
stripe format.
• Proprietary formats, used for applications such as driver’s licenses or hotels, can be used with
the SP Series printers. Obtain the guidance of your service provider or (VAR) when using
proprietary formats.
• On Windows 98 and Me, data formatted with magnetic stupe fonts or escape codes cannot be
located in rotated fields.
Magnetic stripe escapes
Customers have the ability to use magnetic stripe escape codes with the SmartDriver, version 5.0 and
higher, and the SP Series printer. Magnetic stripe escape codes are used by card printers from several
other manufacturers. To support existing custom applications, Datacard has implemented magnetic stripe
escapes. T o use magnetic stripe escapes with the SmartDriver, a custom application must send data to the
driver, not directly to the printer. Magnetic stripe escapes can also be used when an application cannot
format magnetic stripe data and when the application does not allow you to select the SmartDriver’s
magnetic stripe fonts for formatting magnetic stripe data.
Magnetic stripe escapes are most commonly used for the IAT format, which encodes IATA (International
Air Transport Association) data on Track 1, ABA (American Banker’s Association) data on Track 2, and
TTS (Thrift Third Shift) data on Track 3. Other card printer manufacturers sometimes refer to this format as
ISO format. Using information in this section, you can also use magnetic stripe escapes to encode
variations to the IA T format.
SP Series Info Central: Setup Guide
Page 84

27
Enabling magnetic stripe escapes
The SmartDriver includes a setting to enable magnetic stripe escapes. Enable mag netic stripe escapes on
each PC that will use magnetic stripe escapes to send data to a printer. Also, enable magnetic stripe
escapes for each printer attached to a PC if you will send magnetic stripe data to the printer.
To enable magnetic stripe escapes, do the following:
1 Make sure the printer power is on and the printer is connected to the PC. Also make sure the driver is
installed on the PC and communicates with the printer.
2 Select Start from the Windows task bar.
3 From the Windows Start menu, select Settings and then Printers. The Printers window appears.
4 Click once on the SmartDriver icon.
5 Select File from the Printers menu bar, and then:
– For Windows 9x, select Properties. The SmartDriver Properties dialog box appears.
– For Windows 2000 and XP, select Printing Preferences. On the Printing Preferences dialog box,
click Advanced to display Advanced settings.
– If you have the Printer Toolbox open, you can click the Properties (9x), Printing Preferences (2000
and XP) button on the Status page to open the Properties or Advanced dialog box.
6 Locate the Mag Stripe Escape Compatibility setting.
– On Windows 9x, choose the Mag Stripe tab.
– On Windows 2000 and XP, scroll through the settings list to locate the Mag Stripe Escape
Compatibility setting.
7 Choose Enabled for the setting.
8 Locate the Mag Stripe Encoding Format setting.
– If you will encode IAT (ISO) format, choose IAT for the format.
– If you will encode a variation to IAT (ISO) format, choose "Use printer settings" for the format.
9 Click Apply or OK to save the settings and close the dialog box.
You do not need to specify which syntax or manufacturer’s escape sequence you will use. When you
enable Mag Stripe Escape Compatibility, the SmartDriver will recognize any of the escape character
sequences listed in this section.
Using magnetic stripe escapes
To use magnetic stripe escapes, do the following:
• Use an application in which you can enter and save text, and then edit it after saving.
• Before the magnetic stripe data, provide the escape seq uence, such as ~1 or ~1% . The rest of th e line
of text will be encoded, up to an End Sentinel (if the syntax uses one).
• Use a Return or Enter keystroke to end a line.
• Do not allow text to wrap to two lines. The text on the following line will print on the card.
• You might be able to send two lines of text to one track. Each line of text must begin with the escape
sequence. Test cards made with this method to see whe the r the lines ar e en co de d in the or de r in
SP Series Info Central: Setup Guide
Page 85

28
which the lines appear on the page. Some applications do not support this method or produce
unpredictable results.
• Text to print can be on the same line as data to encode, but must be located before the escape
sequence.
• Only one track can be encoded per line of text.
• Magnetic stripe data will be converted to uppercase (capital) letters if necessary.
• If you include not-allowed characters within the magnetic stripe data, the printer will beep and a
message will be displayed on the PC.
• The driver does not check the data you send. (The printer che cks the data.) This is the same behavior
as magnetic stripe fonts.
On Windows 98, 98 SE, and Me, data formatted with escape codes cannot be located in rotated fields.
Printer
Manufacturer
Eltron IAT (ISO) ~<track#><data> ~1ENCODING WITH ESCAPES
Atlantek IAT (ISO) ~<track#>=<data> ~1=ENCODING WITH ESCAPES
Fargo IAT (ISO) ~<track#>(Start Sentinel><Data>
Datacard HiFX IAT (ISO) ~<track#>(Start Sentinel><Data>
Victor Data
Systems
Encoding
Format
IAT (ISO) ~<track#>(Start Sentinel><Data>
Syntax Example
<End Sentinel>
<End Sentinel>
<End Sentinel>
~21234567890
~31234567890
~2=1234567890
~3=1234567890
~1%ENCODING WITH ESCAPES?
~2;1234567890?
~3;1234567890?
~1%ENCODING WITH ESCAPES?
~2;1234567890?
~3;1234567890?
~1%ENCODING WITH ESCAPES?
~2;1234567890?
~3;1234567890?
#
#
#
#
#. Only the default start sentinel, a semicolon (;), is pe rmitted.
For information about the characters allowed for each track format, see the following section. For more
information about requirements for using escapes, se e the documentation for the original printer.
IATA, ABA, and TTS character sets
The IAT encoding format selection for the SP55 printer encodes IATA data on track 1, ABA data on track 2,
and TTS data on track 3. This meets the requirements of the ISO standard.
IATA (International Air Transport Association)
The maximum field length for IATA format is 76 characters. IATA allows spaces, upper case alphabetic
characters, numeric characters, and the following special characters:
! # $ % ' ( ) * + , - . / ; : < @ > = ^ ] \ [ " & _
SP Series Info Central: Setup Guide
Page 86

29
ABA (American Bankers Association)
The maximum field length for ABA format is 37 characters. ABA allows numeric characters and the
following special characters:
: ; < = >
TTS (Thrift Third Standard)
The maximum field length for TTS format is 104 characters. TTS allows numeric characters and the
following special characters:
: ; < = >
NTT character set
The maximum field length for NTT (Nippon Telephone & Telegraph) format is 69 characters. NTT allows
spaces, numeric characters, upper case alphabetic characters, lower case alphabetic characters, and
special characters. From a PC running a Japanese edition of a supported Windows operating system, NTT
also supports 55 Katakana characters.
The special characters include:
! " # $ % & ' ( ) * + , - . / : ; < = > ? @ [ ] ^ _ ` { | } ~
and the following Japanese-language special characters: (a Japanese edition of a supported Windows
operating system is required.)
The 55 Katakana characters include the following 45 Katakana characters:
and the following 10 Katakana characters:
Each time you start using Japanese-language characters, or stop using them, the driver adds a hidden
character. Each hidden character reduces by one the number of characters you ca n en co de .
SP Series Info Central: Setup Guide
Page 87

30
Magnetic Stripe settings used by the printer
The following table presents technical details that apply to encoding magnetic stripe data.
IATA ABA TTS NTT Binary
Character Differential 32 48 48 0 0
Start Sentinel (SS)
(ASCII character)
% (37) ; (59) ; (59) 127 None
End Sentinel (ES)
(ASCII character)
Lowest ASCII Character space (32) 0 (48) 0 (48) (1) 0
Highest ASCII Character _ (95) ? (63) ? (63) (126) 255
Character-level parity (VRC) Odd Odd Odd Even None
Cumulative parity (LRC) Even Even Even Even None
Density in bits per inch 210 75 210 210 210
Data bits per character6 4478
Maximum number of
encodable characters (not
including start and end
sentinel or LRC)
Encoding direction SS first SS first SS first SS last SS first
? (63) ? (63) ? (63) 127 None
76 37 104 69 33
SP Series Info Central: Setup Guide
Page 88

31
Smart card setup
This section presents information about h ow to set up a system if you are personalizing smart cards. Smart
card processing is different from other types of personalization, because the “smart card” step of
personalization is controlled by an application (or application module) that is diff er en t from th e rest of card
personalization.
The data for smart card personalization is sent from the smart card ap plication using a separa te smart card
cable.
Requirements
To personalize a smart card, you need to obtain or create the following:
• A direct local connection between the printer and the PC
• Smart card module in the printer OR a contact station in the printer plus an external coupler
• A smart card cable for each smart card port used
• Card application that is customized to work with the SP Series printer and the smart card application
(using the SmartDriver SDK or an application such ID Works with the Smart Card Application Manager)
• Smart card application (which uses the SDK for the smart card and coupler type)
• Smart cards that work with the coupler in the printer
Smart card codes on the printer label
The printer label includes codes to identify the type and model of smart card module inst alled in the printer.
The model(s) of coupler available might change and additional models might become available. (SP55
printers might have identifiers that describe the coupler, such as SC430.)
SP Series Info Central: Setup Guide
Page 89

32
If the printer contains a smart card module, the printer label will include “SC” and three numbers. Each digit
in the number represents a dif ferent part of the code. The following table list s the codes u sed on the prin ter
label.
Code First digit Second digit Third digit
SC1n0 1=contact coupler 1=GemPC 430
2=GemPC USB
3=GemPC Serial
SC20n 2=contactless (RF)
coupler
SC3nn 3=combo coupler 1=GemPC 430
SC400 4=contact station 0=no contact 0=no contactless
If the codes on your printer label do not match any codes presented in this section and you do not know
the type of smart card module installed in the printer, contact your service provider who can obtain the
most recent codes from the Partner Page.
0=no contact 1=GemPlus 680
2=GemPC USB
3=GemPC Serial
0=no contactless
2=HID
3=Casi
4=Indala
1=GemPlus 680
2=HID
3=Casi
4=Indala
Obtaining smart card support files
Tips for success
• Typically, the developer of the smart card application will download smart card support files and
provide them as part of smart card installation and setup.
Obtain files to support the module:
• If the coupler name includes "GemPC," go to the Gemplus Web site at www.gemplus.com to obtain
files. Choose the Support area of the Gemplus Web site, and then downloads for PC-Link readers.
Choose the reader installed in your printer and the operating system used by the PC, and download the
files. Also download or print the readme.txt file that applies to your reader and operating system. See
Hardware set up for installation.
• If the coupler is a 680, files to support a contactless reader are available from the Products area of the
Gemplus Web site at www.gemplus.com
Development Downloads to obtain files. The zip file you download will include instructions. See
Hardware set up for installation.
. Select the GemEasyLink680 product, and then go to
• You can also download the Gemplus SmartDiag utility.
SP Series Info Central: Setup Guide
Page 90

33
• If the coupler type is HID, Casi, or Indala, the files to support the reader are installed by Windows. For
Windows 2000, Me, and 98SE, use the Windows installation CD-ROM to inst all the files. (Windows XP
includes the files on the PC.) Use the RF IDeas CD-ROM provided with the smart card module which
contains the configuration utility to complete setup.
• If a contact station is installed, obtain driver files from the supplier or manufacturer.
• If the printer has a combo smart card module, obtain files for each type of coupler included.
Hardware set up
Make sure the printer driver has been installed and that the printer produces a sample card before setting
up the smart card module.
A printer with a smart card module has one or two additional ports.
• If the printer has a USB smart card port, follow these guidelines:
– The USB cable must be a type CM 30V cable, up to a maximum of 6.5 feet or 2 meters long. A
longer cable might result in electrical interference.
– Datacard recommends that you connect a smart card port directly to the PC port (without using
other USB devices, which might permit access to the sm ar t car d da ta).
– The Windows XP operating system includes support for contact smart card modules and for HID,
Casi, and Indala contactless modules. The files will be installed automatically when you connect the
USB smart card port to the PC. More recent files for GemPC couplers are available from Gemplus.
Install the files from Gemplus after Windows installs the device.
– If you plug in the smart card USB port instead of the printer data port when installing the printer, the
Add/Detected New Hardware wizard appears, naming the coupler as the hardware it found. For
Windows XP only, allow the wizard to complete and then connect the USB data cable to the USB
port closest to the input hopper to install the printer on the PC.
– For Windows Me and 98SE and HID, Casi, and Indala readers, use the Windows installation CD-
ROM to install contactless couplers that use a USB port.
– For Windows Me, 2000, and 98SE and contact coupl ers, use the downloaded files from Gemplu s to
install the drivers, not the Add/Detected New Hardware Wizard. Restart Windows before you use
the coupler.
– If the printer includes two smart card modules that use a USB port, the port will be connected to an
internal hub. Make sure you have the files (described above) for both devices before you connect
the smart card USB port and the PC. When you connect the smart card USB port and PC, the PC
will identify two new devices and might display two Found New Hardware Wizards. Use only one
wizard at a time and follow the guidelines above to install each type of coupler.
• If the printer has only a serial smart card port, you can connect the hardware before installing files to
support the smart card.
SP Series Info Central: Setup Guide
Page 91

34
– The smart card serial cable must be a shielded DB9 serial cable, up to a maximum of 9.8 feet or 3
meters long.
– For a 680 coupler , double-click the downloaded file to view the files available. Follow the instructions
in the downloaded file to install a reader on the PC. You do not need to install the complete API.
• If the printer includes both a smart card USB po rt and a smart card serial port, the printer includes both
a contact coupler and a 680 reader. Install files for both devices and use two smart card cables.
Verify Windows installation of a smart card module
Verify that the driver files for the smart card coupler(s) are installed correctly on the PC and that Windows
can communicate with the coupler.
• Check the Windows Device Manager to verify that the device is installed:
– A contact smart card module will appear as an entry under “Smart Card Reader.”
– If the contact reader appears as an entry under “Other devices” the device is not installed correctly.
For Windows Me and 98 SE, restart Windows to enable device installation.
– A contactless smart card module is likely to appear as a Keyboard or a Human Interface Device.
– A 680 contactless module does not appear in the Device Manager list.
• To verify the installation of Gemplus smart card driver files, use the Gemplus SmartDiag utility, which is
available from the GemPlus web site.
• SmartDriver Diagnostics, which you can install using the SmartDriver CD-ROM, include the ability to
test some types of smart card couplers.
• To verify the installation of HID, Casi, or Indala readers, install and use the configuration utility on the
RF IDeas CD-ROM.
Tips for success
• Cards-per-hour ratings do not apply. The smart card personalization process requires dwell
time that is controlled by the personalizing application, not the printer and driver.
• The Retry button on message boxes is not available. The personalizing application can contr ol
messages, and so some printer messages might not be displayed.
SP Series Info Central: Setup Guide
Page 92

Card production and system maintenance 1
Card production and system maintenance
After the printer, driver, card creation application, and captur e system are set up, you are ready to produce
cards. To assure that you produce cards that meet requirements, be familiar with how to make cards. In
addition, invest small amount of time to care for the equipment you use to print cards.
SP Series Info Central: Production e-Guide
Page 93

2 Card production and system maintenance
SP Series Info Central: Production e-Guide
Page 94

Card Production
To use a card creation application, such as Datacard’s ID Works™ or Preface™:
1 Follow instructions for the card creation applica tion to captu r e, fo rm a t, an d sa ve th e ca rd data.
2 In the card creation application, send cards to the printer (usually, use the Print button).
The printer driver receives and processes card data, places cards in a queue, and sends the next card
to the printer.
To use a PC application such as Microsoft Word:
1 In the application, select the SmartDriver as the current printer. (Your printer might have a different
name.)
2 Select the printer settings that correspond to the cards. See Setting up for the card design for details.
3 In the application's page setup feature, set the paper size to CR80 Card 2.13" x 3.38" and set the
margins to match the driver.
4 Format the text to print using TrueT ype font s. Text formatted as Black will print using the K (solid black)
ribbon panel. All other colors are printed using the color panels (if you use a color print ribbon).
3
5 To encode magnetic stripe data,
a Type the magnetic stripe dat a on the front of the card and format the text using one of the following
fonts:
• Track 1—Magnetic Stripe
• Track 2—Magnetic Stripe
• Track 3—Magnetic Stripe
• Track NTT—Magnetic Stripe (PC must run a Japanese language Windows operating system)
b If your application does not allow you to select font s, use mag netic str ipe escap es to identify da ta.
See Magnetic stripe setup for details.
6 When the card data is ready, select Print to send the card to print. The printer driver receives and
processes card data, places cards in a queue, and sends the next card to the printer.
do one of the following:
Tips for success
• Developers can write applications using the SmartDriver™ Software Developer’s Kit. This kit can be
downloaded from www.datacard.com
• If you use magnetic stripe fonts or escapes, keep d ata for one tra ck in one line of text, and only
have magnetic stripe data on the line. (Use a small font size if needed.)
• Do not use character formatting (such as kerning) or formatting characters (such as tabs) with
data intended for magnetic stripe encoding.
•
Whenever you encode magnetic stripe data or program smart cards, the card can include confidential
data that you cannot see. In addition, used print ribbon contains negative images of data printed on cards.
Handle used print ribbon and incomplete cards according to your policy for handling the confidential data
that might be on the card.
• For the most current information about messages, see the online help for each message.
.
SP Series Info Central: Production e-Guide
Page 95

4
SP Series Info Central: Production e-Guide
Page 96

Responding to messages
The printer and driver generate a message on the PC when a card cannot be processed. Usually, the
message is displayed on the PC.
1 When a message is displayed on the PC, follow the suggested action. Click the Help button to see
likely causes and possible solutions.
2 When the printer status light blinks amber, it is safe to open the printer to fix any problems.
3 Fix the problem, then close the printer cover and press to latch it.
4 The message box might disappear on its own or you might need to click a button.
Buttons on the message box can be:
Retry: Clears the card. The driver sends the card or cards to the printer again. If the problem is fixed,
normal operation resumes.
Cancel: Clears the card. The driver does not send the card again. If the problem is fixed, normal
operation resumes.
OK: Used for a message that occurs when no card was being printed, a status message, or an
equipment failure message. If the problem is corrected, normal operation resumes. (Power the printer
off and on if operation does not resume.)
5
5 The printer might eject any cards in the printer.
Message Tips
• If the message box disappears automatic ally, you might need to return to the card creation
application to send the card to print again.
• If the printer beeps and the status light blinks amber but no message appears on the PC, try:
• If you printed a test card and the printer beeps but no message appears on the PC, use a card
with a magnetic stripe and make sure the stripe is oriented correctly.
• Restart Windows to fix the problem.
• If a message appears repeatedly and you cannot reliably fix it, the printer might need service.
Record the message and message number, the printer serial number, and the driver and
firmware versions (see the Printer Toolbox). Call your service provider.
SP Series Info Central: Production e-Guide
Page 97

6
SP Series Info Central: Production e-Guide
Page 98

Cleaning the Printer
See “Common-sense site requirement s” in Before you install for guidelines for a good pr inter environment,
which can reduce the amount of cleaning required to produce high-quality cards.
Cleaning tips
• Run a cleaning card as the first step when cleaning the printer. The cleaning card can remove
most contaminants from the printer. See Cleaning the printer for steps to follow.
• If you use StickICards™, clean the card tracks after every 100 cards. Run a cleaning card to
clean the card track.
• Some card features can require more frequent cleaning of the pri nter , especially if the cards are
not high quality . Signature panels and ma gnetic stripes can deposit particles on rollers. You can
run a cleaning card, replace the cleaning roller, or clean the printer rollers to remove particles.
Cleaning the printer rollers
The printer rollers move the card during printing or cleaning operations. Clean the rollers when problems
occur such as:
• Repeated card jams
• Cards are not being picked, repeatedly
• Colors are not aligned on the printed card
Use the cleaning pen to clean printer rollers.
7
Make sure that printing of cards is complete before cleaning the rollers.
1 Open the Printer Toolbox if needed by double-clicking the printer icon.
2 Clean the pick roller:
a Open the input hopper.
b Remove all cards from the input hopper.
c Remove the cap from the cleaning pen. Hold the end of the cleaning pen against the pick roller.
SP Series Info Central: Production e-Guide
Page 99

8
d Click the Clean Printer button in the Printer Toolbox. Click OK on the prompt that appears. Do not
insert a cleaning card! The driver sends a command to th e printer to run the printer cleaning card.
The printer moves rollers when it attempts to pick the card.
e Slowly move the pen on the pick roller.
f Lightly wipe any dirt from the end of the cleaning pen onto a clean cloth or paper. Move the
cleaning pen to another area of the roller. (Click Cancel on the “Card not picked” message if it
appears.)
g Repeat steps d through f until no more dirt appe ars on the pen.
3 Clean the permanent cleaning rollers if needed:
a Open the printer cover and remove the print ribbon cartridge. Make sure cards are removed from
the input hopper.
b Remove the cleaning roller.
c Observe the permanent cleaning rollers, especially the lower roller (location 1 in the following
illustration). If you observe ribbon or other debris on the rollers, clean the rollers using the cleaning
pen. (If not, continue with step 4.)
d Do one of the following to turn the rollers in the printer.
• Click the Clean Printer button in the Printer Toolbox. Click OK on the prompt that appears. Do not
insert a cleaning card! The driver sends a command to the printer to run the printer cleaning
card. The printer moves rollers when it attempts to pick the card.
• Turn the card advance knob to move rollers by hand.
e Move the pen on the roller.
f Lightly wipe any dirt from the end of the cleaning pen onto a clean cloth or paper. Move the
cleaning pen to another area of the roller. (Click Cancel on the “Card not picked” message if it
appears.)
g Repeat steps d through f for the rollers at location 1 until no more dirt appears on the pen or cloth.
4 Clean the transport area rollers:
SP Series Info Central: Production e-Guide
Page 100

a Make sure the print ribbon cartridge and cleaning rollers have been removed. Make sure cards are
removed from the input hopper.
b Place the cleaning pen on top of the first transport roller (location 2 in the illustration). Do not place
the pen next to the black transport base. The pen can get pinched between the roller and the
transport base.
9
c Do one of the following to turn the rollers in the printer.
• Click the Clean Printer button in the Printer Toolbox. Click OK on the prompt that appears. Do not
insert a cleaning card! The driver sends a command to the printer to run the printer cleaning
card. The printer moves rollers when it attempts to pick the card.
• Turn the card advance knob to move rollers by hand.
d Move the pen on the roller.
e Lightly wipe any dirt from the end of the cleaning pen onto a clean cloth or paper. Move the
cleaning pen to another area of the roller. (Click Cancel on the “Card not picked” message if it
appears.)
f Repeat steps c through e for the roller at location 1 until no more dirt appears on the pen or cloth.
g Move the cleaning pen to location 3. Repeat steps c through f.
h Move the cleaning pen to location 4. Repeat steps c through f.
• If the printer has a magnetic stripe module, the roller is just visible below the black cover of the
magnetic stripe module, on the left side of the printer.
• If the printer does not have a magnetic stripe module, clean the uppe r roller and the p artly hidden
lower roller.
5 For SP55 printers, clean the additional transport rollers:
a Make sure the print ribbon cartridge and cleaning rollers have been removed. Make sure cards are
removed from the input hopper.
b Place the cleaning pen on top of the last transport roller (location 5 in the illustration).
c Do one of the following to turn the rollers in the printer.
SP Series Info Central: Production e-Guide
 Loading...