

Page 1
www.entrematic.com
Ditec E2H
Installation manual for control panel for 2-motor 24V
automations with built-in radio
IP1967EN
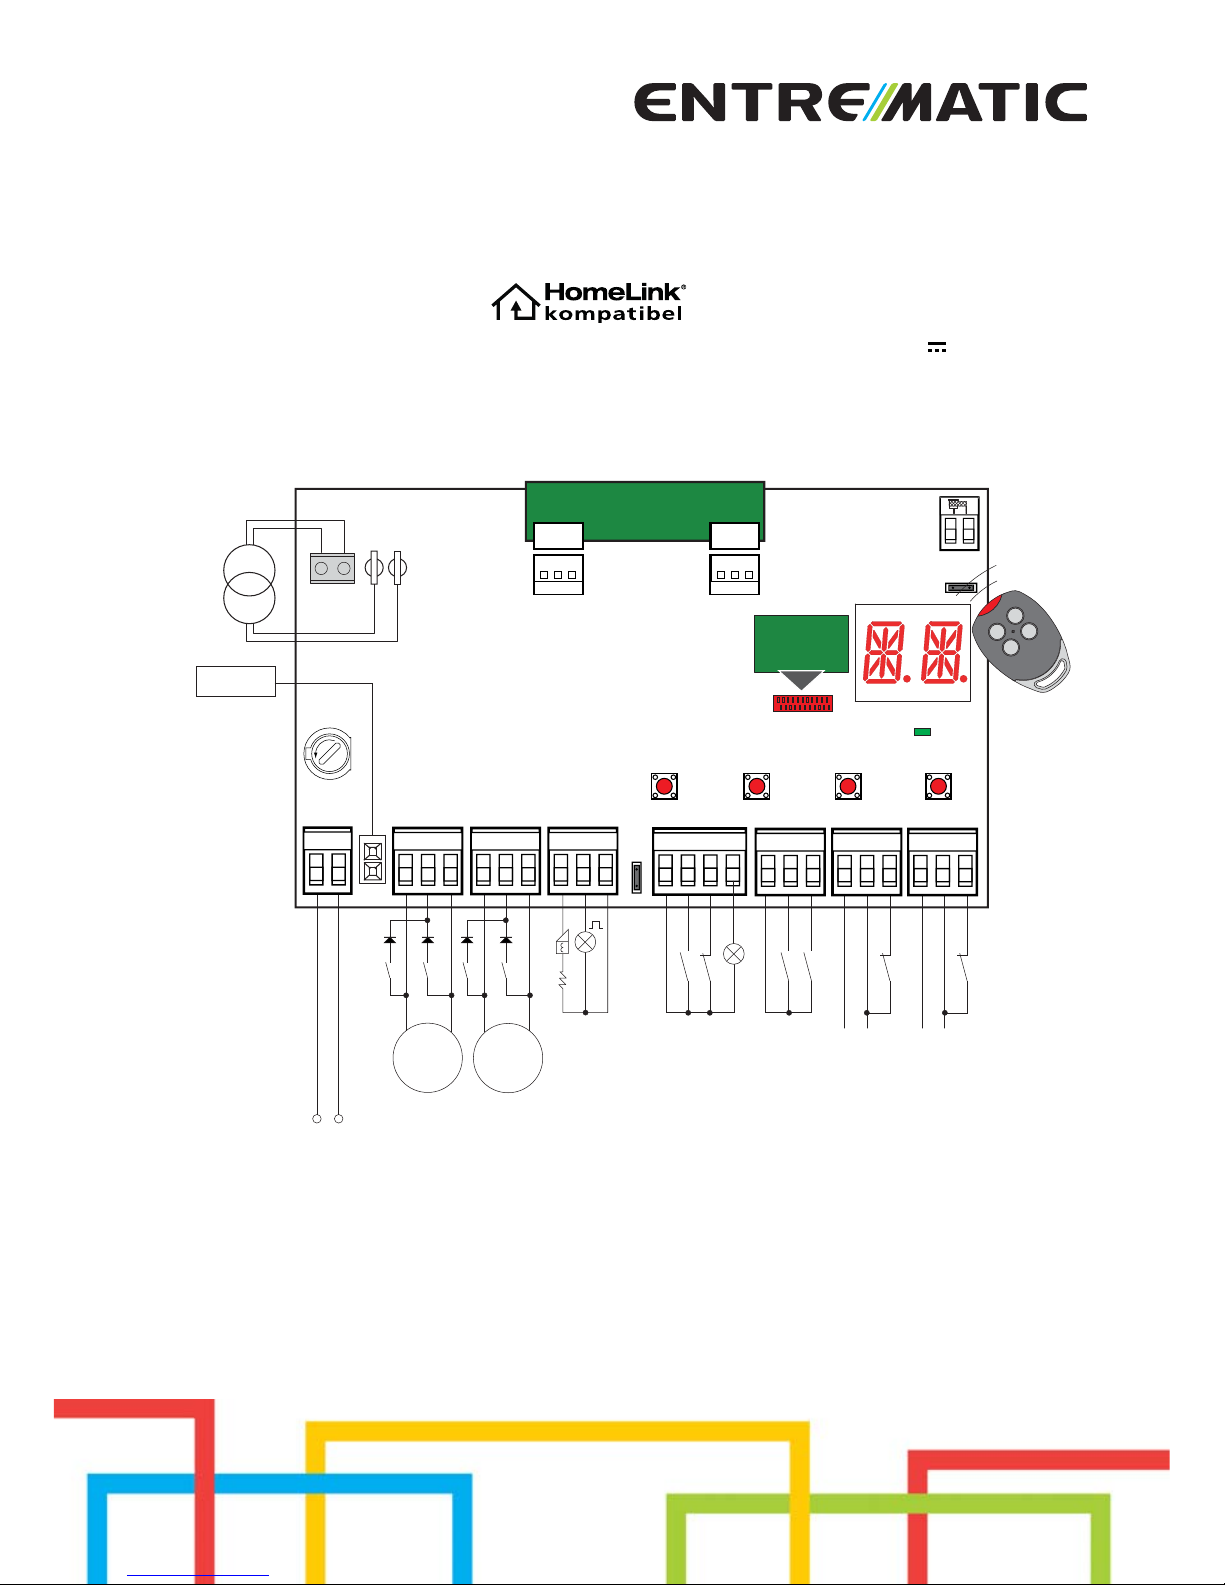
F1
BATK1
UP
JR5
COM
DOWN
ENTERESC
24V
LN
POWER
TRF
-
+
-
+
AUX
JR1
BAT
ANT
GOL
4
24V= 24V=
F
U
S
E
LN
36 35 34 33 32 31
15 139
15 14 0
1520 016 018
Power supply
Motor 1Motor 2
Power unit
Memory
card
Flashing light
Electric lock
Stop safety contact
Lamp
Step by step
Step by step
Partial opening
Stop
Output 24 V=
Output 24 V=
eversal saf
ety contact
Page 2

40
IP1967EN - 2016-08-01
Subject Page
1. General safety precautions 41
2. EC declaration of conformity 42
3. Technical data 42
3.1 Applications 42
4. Connection of power supply 43
5. Commands 44
5.1 SOFA1-SOFA2 or GOPAVRS self-controlled safety edge 45
6. Outputs and accessories 46
7. Selection 47
8. Signals 47
9. Adjustments 48
9.1 Switching on and off 48
9.2 Key combination 48
9.3 Main menù 49
9.4 Second level menù - AT (Automatic Configurations) 50
9.5 Second level menù - BC (Basic Configurations) 51
9.6 Second level menù - BA (Basic Adjustment) 53
9.7 Second level menù - RO (Radio Operations) 57
9.8 Second level menù - SF (Special Functions) 59
9.9 Second level menù - CC (Cycles Counter) 61
9.10 Second level menù - AP (Advanced Parameters) 62
10. Display viewing mode 65
10.1 Automation status display 65
10.2 Commands and safety devices display 65
10.3 Alarms and anomalies display 67
11. Start-up 69
12. Troubleshooting 70
13. Example application of automation with two swinging door wings 72
14. Example application of automation with one swinging door wings 73
This symbol indicates instructions or notes regarding safety issues which require particular attention.
This symbol indicates instructions or notes intended for technical and expert personnel.
This symbol indicates options and parameters which are only available with the indicated
item.
This symbol indicates options and parameters which are not available with the indicated
item.
This symbol indicates operations not to be effected for not compromise the correct operation of the automation.
This symbol indicates informations which are useful for correct product function.
i
STOP
Caption
Index
All the rights concerning this material are the exclusive property of Entrematic Group AB. Although the contents of this publication have been drawn up with the greatest care, Entrematic Group AB cannot be held
responsible in any way for any damage caused by mistakes or omissions in this publication.
We reserve the right to make changes without prior notice. Copying, scanning and changing in any way are
expressly forbidden unless authorised in writing by Entrematic Group AB.
Page 3
41
IP1967EN - 2016-08-01
This installation manual is intended for qualified personnel only.
Installation, electrical connections and adjustments must be performed in accordance
with Good Working Methods and in compliance with the present standards.
Read the instructions carefully before installing the product. Bad installation could
be dangerous.
The packaging materials (plastic, polystyrene, etc.) should not be discarded in
the environment or left within reach of children, as these are a potential source
of danger.
Before installing the product, make sure it is in perfect condition.
Do not install the product in explosive areas and atmospheres: the presence of inflammable gas or fumes represents a serious safety hazard.
The safety devices (photocells, safety edges, emergency stops, etc.) must be installed
taking into account: applicable laws and directives, Good Working Methods, installation premises, system operating logic and the forces developed by the automation.
Before connecting the power supply, make sure the plate data correspond to that
of the mains power supply. An omnipolar disconnection switch with minimum
contact gaps of 3 mm must be included in the mains supply.
Check that there is an adequate residual current circuit breaker and a suitable overcurrent cut-out upstream of the electrical installation in accordance with Good Working
Methods and with the laws in force.
When requested, connect the automation to an effective earthing system that complies
with current safety standards.
During installation, maintenance and repair operations, cut off the power supply before
opening the cover to access the electrical parts.
The electronic parts must be handled using earthed antistatic conductive arms.
The manufacturer of the motorisation declines all responsibility in the event
of component parts being fitted that are not compatible with the safe and correct
operation.
Use original spare parts only for repairing or replacing products.
1. General safety precautions
“Important instructions for installation safety.
Incorrect installation can cause serious injury”
1.1 Safety functions
The E2H control panel has the following safety functions:
- obstacle recognition with force limiting;
The maximum response time of the safety functions is 0.5 s. The reaction time to a faulty safety
function is 0.5 s.
The safety functions comply with the standards and performance level indicated below:
EN ISO 13849-1:2008 Category 2 PL=c
EN ISO 13849-2:2012
The safety function cannot be bypassed either temporarily or automatically. Fault exclusion
has not been applied.
Page 4
42
IP1967EN - 2016-08-01
ARCBH
OBBI3BH
LUXO3BH
LUXO4BH
FACIL3H
FACIL3EH
Memory module
3M1OB
3M1AR
3M1LX
3M1FC
Power supply 230 V~ 50/60 Hz
F1 fuse F1,6A F1,6A
Motor output 24 V
2x4,5 A max 24 V 2x6 A max
Accessories power supply 24 V 0,5 A 24 V 0,5 A
Temperature min -20 °C max 55 °C min -20 °C max 55 °C
Degree of protection IP55 IP54
Memorizable
radio codes
100
200 [BIXMR2]
100
200 [BIXMR2]
Radio frequency 433,92 MHz 433,92 MHz
i
3. Technical data
2. EC declaration of conformity
3.1 Applications
NOTE: the given operating and performance features can only be guaranteed with the use
of DITEC accessories and safety devices.
The manufacturer Entrematic Group AB, with headquarters in Lodjursgatan 10, SE-261 44 Landskrona, Sweden, declares that the Ditec E2H type control panel complies with the conditions
of the following EC directives:
EMC Directive 2004/108/EC
Low Voltage Directive 2006/95/EC
R&TTE Directive 1999/5/EC.
L a n d s k r o n a , 0 8 - 0 9 - 2 0 1 4 M a r c o Z i n i
(President & CEO)
arrooZiniii
Pre
Pre
Pre
Pre
Pre
Pre
sid
sid
sidsss&&CEO
CEO
CEO
)))
)
)
)
)
Page 5

43
IP1967EN - 2016-08-01
4. Connection of power supply
Before connecting the power supply, make sure the plate data correspond to that of the mains
power supply.
An omnipolar disconnection switch with minimum contact gaps of 3 mm must be included in
the mains supply.
Check that upstream of the electrical installation there is an adequate residual current circuit
breaker and a suitable overcurrent cutout.
Use a H05RN-F 3G1,5 or H05RR-F 3G1,5 type electric cable and connect to the terminals L
(brown), N (blue),
(yellow/green) in the automation.
Secure the cable using the special cable clamp and remove the outer sheath near the terminal
only.
Connection to the mains power supply, in the section outside the automation, is made with
independent channels and separated from the connections to the control and safety devices.
The channels must penetrate a few centimetres inside the automation thorough a hole maximum Ø16 mm.
Make sure there are no sharp edges that may damage the power supply cable.
Make sure that the mains power supply (230 V) conductors and the accessory power supply
(24 V) conductors are separate.
Page 6

44
IP1967EN - 2016-08-01
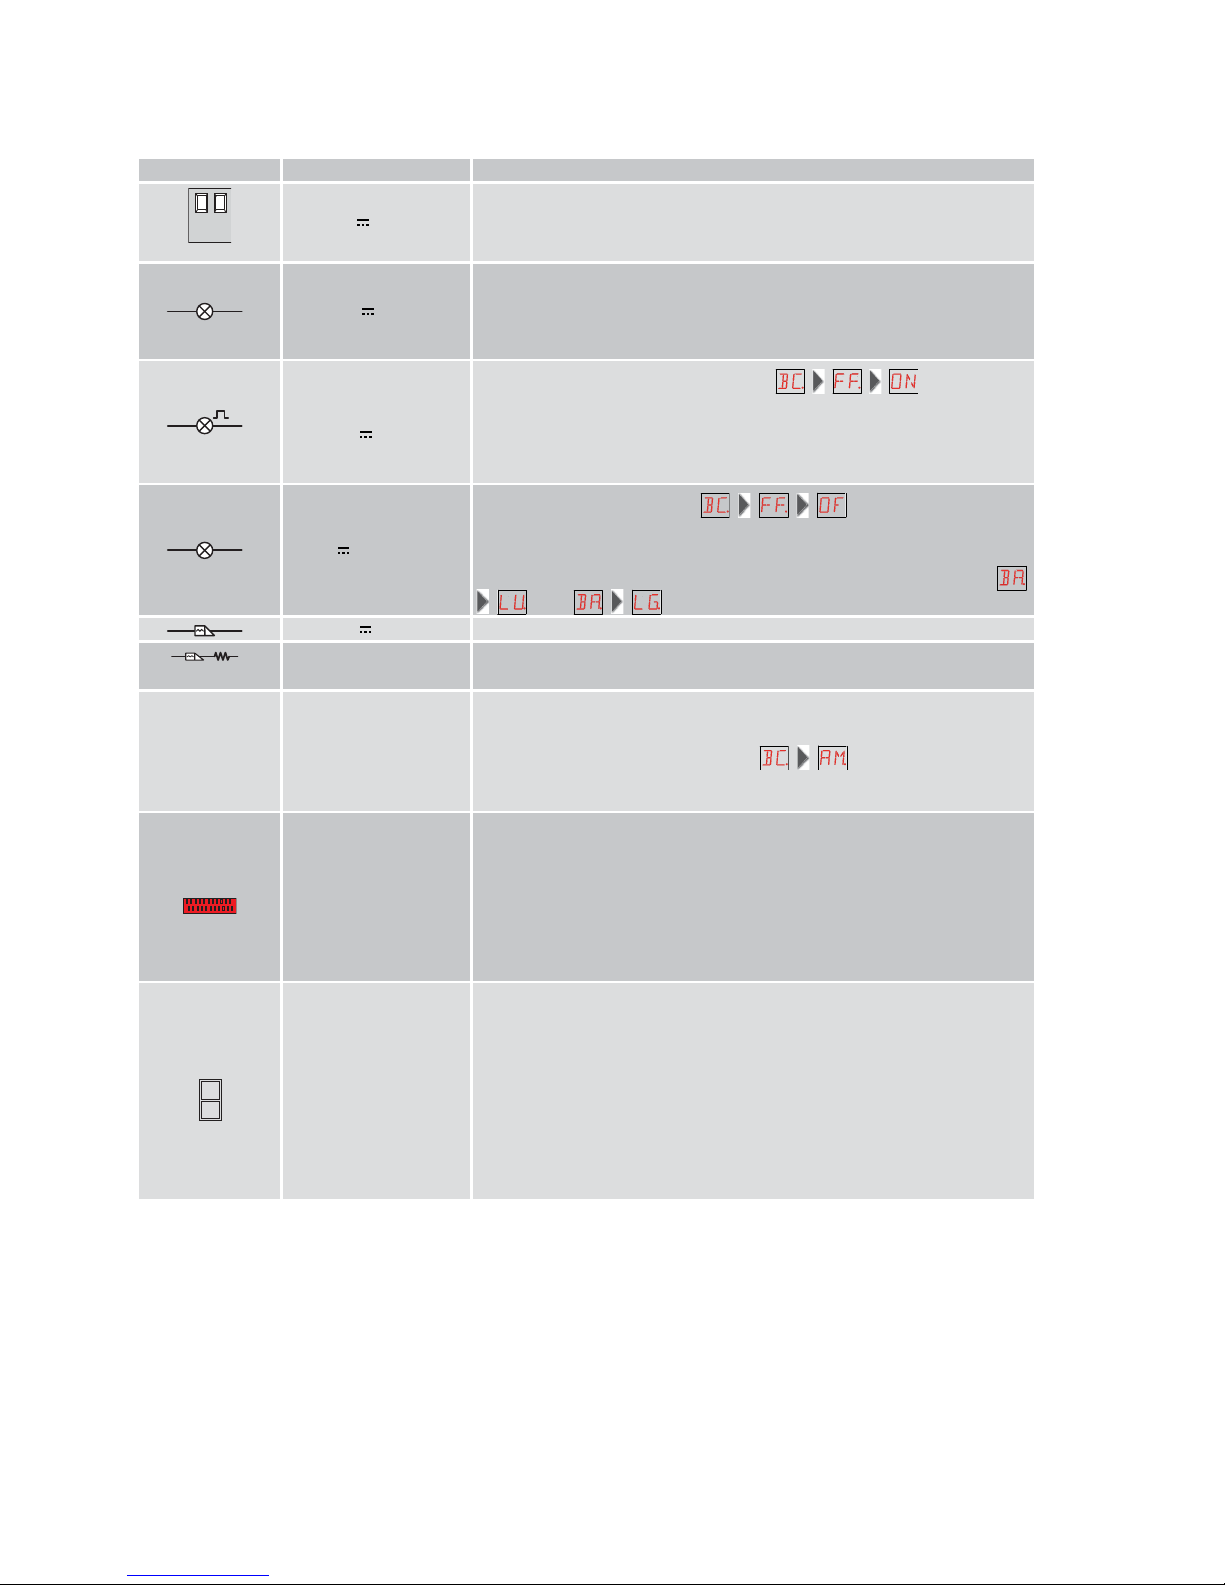
Command Function Description
1
5 N.O. STEP BY STEP
Selecting , the closure of the contact
activates a closing or opening operation in the sequence: open-stop-close-open.
Warning: if automatic closing is enabled, the duration of
the stop is selected via the selection
.
OPENING
Selecting
, the closure of the contact
activates an opening operation.
1
6 N.C. SAFETY STOP
Selecting
, the opening of the safety
contact stops and prevents any movement.
Note: to set the different contact safety functions, see the
parameter settings.
1 6 N.O. CLOSING
Selecting
, the closure of the contact
activates a closing operation.
1
8 N.C. REVERSAL SAFETY
CONTACT
The opening of the safety contact triggers a reversal of
motion (re-opening) during a closing operation.
Selecting
, with the automation idle,
the opening of the contact prevents any operation.
Selecting , with the automation idle,
the opening of the contact prevents the closing operation only.
1
9 N.C. STOP Opening the safety contact stops the current operation.
Note: the flashing light flashes.
1
9 N.O. HOLD TO RUN FUNCTION
Selecting
and , the
permanent opening of the safety contact enables the
hold to run function.
In this state, the opening (1-5) and closing (1-6) controls
function only if held in the pressed position, and the automation stops when the controls are released.
Any safety devices, plus the automatic closing, are disabled.
1
20 N.O. PARTIAL OPENING
Selecting
, the closure of the contact
activates a partial opening operation of the door wing
commanded by motor 1, and the duration is fixed by
adjustment
.
Warning: if automatic closing is enabled, the duration
of the stop is selected via the adjustment
.
1
20 N.C. AUTOMATIC CLOSING
Selecting
, the permanent closure of
the contact enables automatic closing.
5. Commands
WARNING: Make a jumper on all NC contacts if not in use. The terminals with the same
number are equal
Page 7
45
IP1967EN - 2016-08-01
Command Function Description
SOFA1-SOFA2
GOPAVRS
0411
SAFETY TEST Insert the electronic card SOFA1-SOFA2 or GOPAVRS in the
housing AUX on the control panel.
Selecting
, the terminal 41 activates a safety
ed ge te s t bef ore each ope r ation. I f the test fails, an alar m message is visualised on the display.
1
6 N.C. OPENING SAFETY
DEVICE
Selecting
, connect the output contact of device
SOFA1-SOFA2 to terminals 1-6 on the control panel (in series with
the photocell output contact, if installed).
1 8 N.C. REVERSAL
SAFETY
CONTACT
Selecting
, connect the output contact of device
SOFA1-SOFA2 to terminals 1-8 on the control panel (in series
with the photocell output contact, if installed).
5.1 SOFA1-SOFA2 or GOPAVRS self-controlled safety edge
Page 8
46
IP1967EN - 2016-08-01
6. Output and accessories
Output Value - Accessories
Description
01
+-
24 V / 0,5 A
Power supply output for external accessories, including automation status lamp. Electronically protected output.
1
13
24 V
/ 3 W
Automation status lamp (proportional).
The light switches off when the automation is closed; the light switches
on when the automation is open; the light flashes with a variable
frequency while the automation is operating.
0
14
LAMPH
24 V / 25 W
Flashing light (LAMPH). Selecting
, the flashing
light activates simultaneously with the opening and closing operation.
NOTE: with automatic closing enabled, there is a pre-flashing of 3
s that cannot be regulated.
0
14
24 V
/ 25 W max.
Courtesy light. Selecting
, it is possible to connect a cour tesy light that activates each time a total or partial
opening command or closing command is received.
The duration of the light can be regulated via the adjustment
and .
0
15 24 V / 1,2 A Electric block 24V.
0
15
12V~ / 15 W
Electric lock 12 V. Connect the supplied 8.2 Ω / 5W resistance in
series.
AUX
The control panel is fitted with a housing for a plug-in card, such
as radio receivers, magnetic spirals, etc. The action of the card
can be selected via the selection .
WARNING: the plug-in cards must be inserted and removed with the
power supply disconnected.
COM
Storage
module
The storage module allows remote controls to be stored and the type
of control panel application to be defined (see TECHNICAL DETAILS
on page 4).
If the control panel is replaced, the storage module being used can
be inserted in the new control panel.
WARNING: the storage module must be inserted and removed with
the power supply disconnected.
BAT
BATK1
2 x 12 V / 2 Ah
Battery operating. The batteries are kept charged when the power
supply is on. If the power supply is off, the control panel is powered
by the batteries until power is re-established or until the battery
voltage drops below the safety threshold. If this occurs, the control
panel turns off.
WARNING: the batteries must always be connected to the control
panel for charging. Periodically check the efficiency of the batteries.
NOTE: the operating temperature of the rechargeable batteries is
approximately +5°C/+40°C.
Page 9

47
IP1967EN - 2016-08-01
7. Selection
8. Signals
Description OFF ON
JR1 Display mode setting. Visualization mode. It is
only possible to visualize
the values and parameters
present.
Maintenance mode. It is
possible to visualize and
modify the values and parameters present. The entry in maintenance mode is
indicated by the permanent
switching on of the righthand point.
JR5 Built-in radio receiver. Disabled Enabled
LED ON Flashing
POWER
24 V= power supply. Indicates the transfer of data during
DMCS programming.
Page 10
48
IP1967EN - 2016-08-01
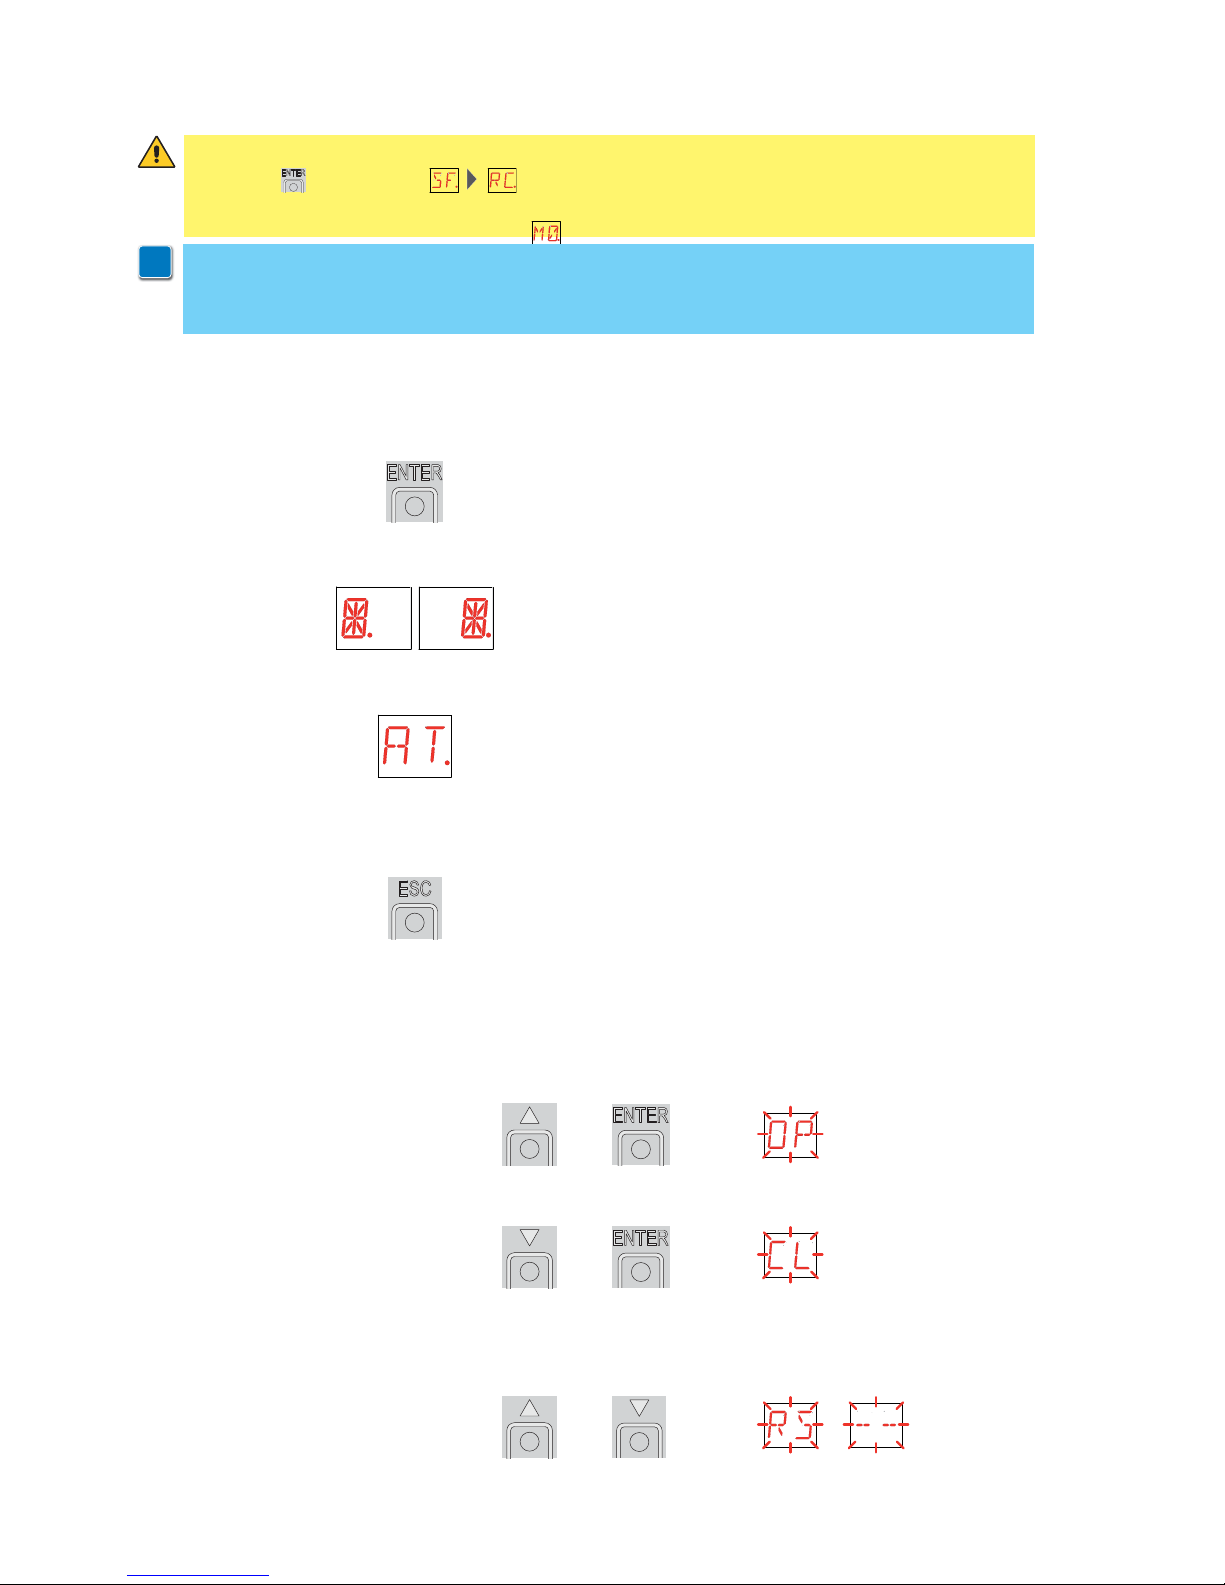
The procedure to switch on the display is as follows:
- press the ENTER key
- start of display functioning check
- visualisation of first level menu
The procedure to switch off the display is as follows:
- press the ESC key and keep it pressed
NOTE: the display switches off automatically after 60 s of inactivity.
The simultaneous pressing of the keys S and ENTER performs an opening command.
+ =
The simultaneous pressing of the keys T and ENTER performs a closing command.
+ =
The simultaneous pressing of the keys S and T performs a POWER RESET command.
(Interruption of the power supply and restart of the automation).
+ =
9. Adjustment
9.1 Switching on and off
9.2 Key combinations
NOTE: before making all the automation adjustments, insert the dedicated memory module
and press , or load the configuration applying to the automation installed (see
options). When the power is connected or in the case of motor non-selection, the display
will block all operations and give an error message.
WARNING: the pressure on the keys can be quick (less than 2 s) or prolonged (longer than 2
s). Unless specified otherwise, quick pressure is intended.
To confirm the setting of a parameter, prolonged pressure is necessary.
i
Page 11
49
IP1967EN - 2016-08-01
- use the keys S and T to select the required function
- press the ENTER key to confirm
Display Description
AT - Automatic Configurations.
The menu allows you to manage the automatic configurations of the control panel.
BC - Basic Configurations.
The menu allows to visualise and modify the main settings of the control panel.
BA - Basic Adjustments.
The menu allows to visualise and modify the main adjustments of the control panel.
RO - Radio Operations.
The menu allows you to manage the radio operations of the control panel.
SF - Special Functions.
The menu allows to set the password and manage the special functions in the control
panel.
CC - Cycles Counter.
The menu allows to visualise the number of operations carried out by the automation, and
manage the maintenance interventions.
AP - Advanced Parameters.
The menu allows to visualise and modify the advanced settings and adjustments of the
control panel.
After confirming the selection, you access the second level menu.
9.3 Main menu
WARNING: it is possible that, owing to the type of automation and control panel, certain
menus are not available.
i
Page 12

50
IP1967EN - 2016-08-01
Display Description
H0 - Predefined setting for residential use 0.
2 s
H1 - Predefined setting for residential use 1.
2 s
C0 - Predefined setting for condominial use 0.
2 s
RD - Resetting the basic settings (SETTINGS RESET).
2 s
- use the keys S and T to select the required function
- press the ENTER key to confirm
9.4 Second level menu - AT (Automatic Configurations)
This selection loads predefined values for cer tain standard parameters:
AC - enabling of automatic closing : disabled
C5 - step-by-step/opening command operation : step-by-step
RM - remote control operation : step-by-step
AM - AUX coupling board operation : step-by-step
SS - selection automation status at start up : open
This selection loads predefined values for cer tain standard parameters:
AC - enabling of automatic closing : enabled
TC - setting of automatic closing time : 1 minute
C5 - step-by-step/opening command operation : step-by-step
RM - remote control operation : step-by-step
AM - AUX coupling board operation : step-by-step
SS - selection automation status at start up : closed
This selection loads predefined values for cer tain standard parameters:
AC - enabling of automatic closing : enabled
TC - setting of automatic closing time : 1 minute
C5 - step-by-step/opening command operation : opening
RM - remote control operation : opening
AM - AUX coupling board operation : opening
SS - selection automation status at start up : open
WARNING: it is possible that, owing to the type of automation and control panel, certain
menus are not available.
i
The procedures to activate the functions are described in the table.
Page 13

51
IP1967EN - 2016-08-01
- use the keys S and T to select the required function
- press the ENTER key to confirm
Display Description
VS - Selecting mechanical stops verification.
When enabled (ON), with every power supply connection
the automation automatically checks the mechanical
opening and closing end stops and/or the stop limit
switches during opening and closing operation at the
speed set with the adjustment .
During the learning operation, the display visualizes the
message .
OFF ON
NW - Selecting number of door wings.
1 2
AC - Enabling of automatic closing.
OFF ON
C5 - Step-by-step/opening command operation.
STEP-BY-STEP OPENING
RM - Radio receiver functionality.
STEP-BY-STEP OPENING
AM - AUX coupling board operation.
STEP-BY-STEP OPENING
SS - Selection of automation status at activation.
Indicates how the control panel considers the automation
at the time of switch-on, or after a POWER RESET command.
OPEN CLOSED
EL - Enablement of electric lock release stroke.
When an electric lock is present, the enablement of the
release stroke is recommended.
OFF ON
9.5 Second level menu - BC (Basic Configurations)
Page 14

52
IP1967EN - 2016-08-01
Display Description
SO - Enabling reversal safety contact functionality.
When enabled (ON) with the automation idle, if the contact
1-8 is open, all operations are prevented.
When disabled (OFF) with the automation idle, if the contact 1-8 is open, it is possible to activate the opening operation.
OFF ON
NI - Activation of NIO electronic anti-freeze system.
When enabled (ON), it maintains the efficiency of the motors even in low temperatures.
Note: for correct operation, the control panel must be exposed to the same ambient temperature as the motors.
OFF ON
64 - Functioning of safety stop/closing command.
STOP CLOSING
P2 - Functioning of partial opening command contact 1-20.
P3 - Partial opening command.
1-2 - Enablement of automatic closing
PARTIAL
OPENING
AUTOMATIC
CLOSING
EO - Functioning of electric lock/electric brake.
SC - Functioning of electric lock (functioning time set
via adjustment )
SF - Functioning of electric magnet powered with automation closed
ELECTRIC
LOCK
ELECTRIC
MAGNET
FF - Setting function of 0-14 exit.
OF - Courtesy light
ON - Flashing light
COURTESY
LIGHT
FLASHING
LIGHT
WARNING: it is possible that, owing to the type of automation and control panel, certain
menus are not available.
i
Page 15

53
IP1967EN - 2016-08-01
Display Description
MT - Selection of automation type.
NO - None
O3 - OBBI-ARC
F3 - FACIL
L3 - LUXO
NONE
FACIL
OBBI-ARC
LUXO
R1 - Adjustment of motor 1 thrust on obstacles. [%]
The control panel is fitted with a safety device which, when
it detects an obstacle:
- in opening, stops the movement with a disengagement
operation;
- in closing, before the deceleration, inverts the move-
ment;
- in closing, during the deceleration, stops or inver ts the
movement according to the type of limit switch installed.
0% 99%
R2 - Adjustment of motor 2 thrust on obstacles. [%]
The control panel is fitted with a safety device which, when
it detects an obstacle:
- in opening, stops the movement with a disengagement
operation;
- in closing, before the deceleration, inverts the move-
ment;
- in closing, during the deceleration, stops or inver ts the
movement according to the type of limit switch installed.
0% 99%
RP - Adjustment of the partial opening measurement. [%]
Adjusts the percentage of operation in relation to the total
opening of the automation.
10% 99%
9.6 Second level menu - BA (Basic Adjustments)
- use the keys S and T to select the required function
- press the ENTER key to confirm
i
WARNING: the gap between the adjustment values of the parameters may vary according
to the type of automation.
WARNING: it is essential to set the type of automation
before making the adjustments.
Page 16

54
IP1967EN - 2016-08-01
Display Description
FA - Selection of opening limit switch mode.
NO - None
RA - Deceleration limit switch
(after the activation, the door wing slows down its
movement)
SX - Stop limit switch
(after the activation, the door wing stops its movement)
PX - Proximity limit switch
(after the activation, the door wing continues as far as
the end stop)
NONE
STOP
DECELERATION
PROXIMITY
FC - Selection of closing limit switch mode.
NO - None
RA - Deceleration limit switch
(after the activation, the door wing slows down its
movement)
SX - Stop limit switch
(after the activation, the door wing stops its movement)
PX - Proximity limit switc
(after the activation, the door wing continues as far as
the end stop)
NONE
STOP
DECELERATION
PROXIMITY
VA - Setting opening speed. [V]
MIN MAX
VC - Setting closing speed. [V]
MIN MAX
VR - Setting acquisition manoeuvre speed. [V]
MIN MAX
TC - Setting automatic closing time. [s]
Adjustment occurs with intervals of varying sensitivity.
- from 0 to 59 sec with 1 sec intervals;
- from 1 to 2 min with 10 sec intervals.
0 SECONDS
1 MINUTE
59 SECONDS
2 MINUTE
M1 - Setting motor 1 manoeuvre time. [s]
Adjustment, in seconds, of the total manoeuvre time for
motor 1.
Example: = 7 seconds
= 7,5 seconds
MIN MAX
i
WARNING: adjustment occurs with a sensitivity interval of 0.5 sec, indicated by the switching on of the
right-hand point.
i
WARNING: the acquisition manoeuvre speed can
only be adjusted with the setting .
Page 17

55
IP1967EN - 2016-08-01
Display Description
M2 - Setting motor 2 manoeuvre time. [s]
Adjustment, in seconds, of the total manoeuvre time for
motor 2.
Example:
= 7 seconds
= 7,5 seconds
MIN MAX
TR - Setting motor 1 closing delay time. [s]
Adjustment, in seconds, of the delay time for starting the
manoeuvre of motor 1, in relation to motor 2.
MIN MAX
TO - Impostazione tempo di ritardo motore 2 in apertura. [s]
Regolazione in secondi del tempo di ritardo della partenza
di manovra del motore 2 rispetto al motore 1.
MIN MAX
LU - Setting switch-on time for courtesy light. [s]
Adjustment occurs with intervals of varying sensitivity.
- from 0 to 59 sec with 1 sec intervals;
- from 1 to 2 min with 10 sec intervals;
- from 2 to 3 min with 1 min intervals;
NO - Disabled
ON - Permanent switch-on, switch-off using radio
command
i
WARNING: the courtesy light switches on at the start
of each operation.
DISABLED
1 SECOND
1 MINUTE
3 MINUTES
59 SECONDS
2 MINUTES
ON
LG - Setting switch-on time for independent light. [s]
Adjustment occurs with intervals of varying sensitivity.
- from 0 to 59 sec with 1 sec intervals;
- from 1 to 2 min with 10 sec intervals;
- from 2 to 3 min with 1 min intervals;
NO - Disabled
ON - Switch-on and switch-off using radio command
i
WARNING: the switching on of the light does not depend on the start of an operation, but it is possible to
control it separately using the relevant transmitter
key.
DISABLED
1 SECOND
1 MINUTE
3 MINUTES
59 SECONDS
2 MINUTES
ON
i
WARNING: adjustment occurs with a sensitivity interval of 0.5 sec, indicated by the switching on of the
right-hand point.
Page 18

56
IP1967EN - 2016-08-01
Display Description
LR - Setting electric lock release time. [s]
ON - Active throughout the entire operation
MIN
ON
MAX
TS - Setting renewal of automatic closing time after safety
release. [%]
MIN MAX
WO - Setting opening pre-flashing time. [s]
Adjustment, in seconds, of the lead time for the switch-on
of the flashing light, in relation to the start of the manoeuvre from a voluntary command.
MIN MAX
WC - Setting closing pre-flashing time. [s]
Adjustment, in seconds, of the lead time for the switch-on
of the flashing light, in relation to the start of the manoeuvre from a voluntary command.
MIN MAX
WARNING: it is possible that, owing to the type of automation and control panel, certain
menus are not available.
i
Page 19

57
IP1967EN - 2016-08-01
Display Description
SR - Transmitter memory storage.
...x2, x3...
ER - Deleting a single transmitter.
2 s
EA - Total memory deleting.
2 s 2 s
EC - Deleting a single code. (FUTURE USE)
RE - Setting memory opening from remote control.
When enabled (ON) remote programming is activated. To
memorise new transmitters without using the control panel,
press and hold down the PRG key of an already-memorised
GOL4 transmitter for 5 seconds until the LED switches on
(within the capacity of the receiver) and press any CH key of
the new transmitter.
NOTE: make sure that undesired transmitters are not accidently memorized.
OFF ON
MU - Setting the maximum number of transmitters that
can be memorized on a memor y module.
It is possible to memorise up to 100 or 200 rolling code
transmitters.
200 100
- use the keys S and T to select the required function
- press the ENTER key to confirm
9.7 Second level menu - RO (Radio Operations)
It is possible to directly access the Transmitter memory storage menu with the display switched off, but only with Display visualization mode set at 00 or 03:
- by transmitting a remote control not present in the memory,
- by transmitting an unstored channel of a remote control already present in the memory.
The procedures to activate the functions are described in the table.
NOTE: it is necessary to set to allow the
system configuration to be saved on the memory module
Page 20

58
IP1967EN - 2016-08-01
Display Description
C1 - Setting key 1 function of memorized transmitter.
C2 - Setting key 2 function of memorized transmitter.
C3 - Setting key 3 function of memorized transmitter.
C4 - Setting key 4 function of memorized transmitter.
NO - None
1-3 - Opening command
1-4 - Closing command
1-5 - Step-by-step command
P3 - Partial opening command
LG - Courtesy light status change command
1-9 - STOP command
i
WARNING: 1-3 (opening) and 1-5 (step-by-step) are
binary options and are dependent by the
selection.
NONE
CLOSING
PARTIAL
STOP
OPENING
STEP-BY-STEP
COURTESY
LIGHT
RK - Navigation via transmitter keyboard.
With the display switched off, quickly type the sequence of
keys 3 3 2 4 1 using the desired memorized transmitter.
Note: it is recommended to use a dedicated transmitter.
To test the new configuration, switch off the display and give
an open command using key 3.
12
34
Navigation via transmitter keyboard is automatically disabled after 4 minutes of inactivity or by setting .
OFF ON
WARNING: during navigation via transmitter keyboard, NONE of the memorized transmitters are active.
i
Warning: it is possible that, owing to the type of automation and control panel, certain menus
are not available.
Page 21

59
IP1967EN - 2016-08-01
Display Description
SP - Setting the password
IP - Inserting the password.
RD - Resetting the basic settings (SETTINGS RESET).
EU - Deleting of the user configurations and the last configuration set present in the
memory module.
SV - Saving user configuration.
Selecting it is possible to save up to 2 personalised configurations
in the memory positions and only with the storage module present on the
control panel.
(
EXAMPLE
)
2 s
2 s
(
EXAMPLE
)
2 s
2 s
2 s
(
EXAMPLE
)
9.8 Second level menu - SF (Special Functions)
- use the keys S and T to select the required function
- press the ENTER key to confirm
The procedures to activate the functions are described in the table.
It is possible to annul the set password by selecting the sequence JR1=ON,
JR1=OFF, JR1=ON.
i
i
Note: this is only possible when the password is not set.
The setting of the password prevents unauthorised personnel from accessing
selections and adjustments.
Note: this is only possible when the password is set.
When the password is not inserted, it is possible to access the visualisation
mode regardless of the selection made with JR1.
When the password is inserted, it is possible to access the maintenance mode.
Page 22

60
IP1967EN - 2016-08-01
Display Description
RC - Loading configuration.
It is possible to load the configurations previously saved, or load the predefined settings available in the memory positions , , and . The predefined settings are as follows:
: OBBI
: FACIL
: LUXO
: ARC
Loading a predefined setting, standard average values are automatically set for certain
parameters (type of automation, operation speed, operation times and deceleration
times).
RL - Loading the last configuration set
CU - Viewing the electronic panel’s firmware version.
= Release 0.3.4 (example)
2 s
2 s
NOTE: the control panel automatically saves the last configuration set, and
keeps it memorised in the storage module. In the event of a fault or the replacement of the control panel, it is possible to restore the last configuration of
the automation by inserting the storage module and loading the last configura-
tion set.
i
i
Note: view only.
WARNING: it is possible that, owing to the type of automation and control panel, certain
menus are not available.
Page 23

61
IP1967EN - 2016-08-01
Display Description
CV - View total manoeuvres counter.
= 241.625 manoeuvres (example)
CA - Setting the maintenance alarm interval. (max 500.000 partial manoeuvres)
= 08 08 50 00 = 85.000 manoeuvres (ex)
= 50
= 00
It is possible to set the required number of operations for the signalling of the maintenance alarm.
OA - Selecting maintenance alarm viewing mode.
00 - Display
(display alarm message )
01 - Flashing light
(when automation is closed it flashes 4 times every 60
minutes)
02 - Open gate indicator light
(when automation is closed it flashes 4 times every 60
minutes)
DISPLAY
INDICATOR
FLASHING
CP - View partial manoeuvres counter.
= 71.625manoeuvres (example)
ZP - Resetting partial manoeuvres counter.
To ensure correct operation, it is recommended to reset the partial manoeuvres counter:
- after each maintenance intervention,
- after each setting of the maintenance alarm interval.
2 s
(
EXAMPLE
)
(
EXAMPLE
)
2 s
9.9 Second level menu - CC (Cycles Counter)
- use the keys S and T to select the required function
- press the ENTER key to confirm
The procedures to activate the functions are described in the table.
i
Note: view only.
i
i
Note: view only.
Warning: it is possible that, owing to the type of automation and control panel, certain
menus are not available.
Page 24

62
IP1967EN - 2016-08-01
- use the keys S and T to select the required function
- press the ENTER key to confirm
Display Description
AA - Activating advanced parameters menu.
OFF ON
ET - Enabling of safety test (SOFA1-A2 card).
OFF ON
DO - Setting of disengagement on obstacle during opening. [s]
MIN MAX
DC - Setting of disengagement on obstacle during closing. [s]
MIN MAX
PP - Step-by-step sequence with commands 1-5.
OFF - Opening-Stop-Closing-Opening
ON - Opening-Stop-Closing-Stop-Opening
OFF ON
S5 - Duration of STOP in step-by-step sequence with commands 1-5.
TEMPORARY PERMANENT
R9 - Enablement of automatic closing after command 1-9
(STOP).
When enabled (ON), after a command 1-9 the automation
carries out the automatic closing (if enabled), after the set
time.
OFF ON
TA - Adjustment acceleration phase. [%]
FAST SLOW
9.10 Second level menu - AP (Advanced Parameters)
i
WARNING: the gap between the adjustment values of the parameters may vary according
to the type of automation.
Given the complexity of the parameters, use of the Advanced Parameters menu is recommended only for qualified technical personnel.
i
NOTE: activation necessary before being able to scroll
through the AP menu.
Page 25

63
IP1967EN - 2016-08-01
Display Description
TP - Setting of automatic closing time after partial opening. [s]
Adjustment occurs with intervals of varying sensitivity.
- from 0 to 59 sec with 1 sec intervals;
- from 1 to 2 min with 10 sec intervals.
0 SECONDS
1 MINUTE
59 SECONDS
2 MINUTES
PO - Approaching/deceleration speed during opening. [V]
MIN MAX
PC - Approaching/deceleration speed during closing. [V]
MIN MAX
OB - Deceleration/braking time during opening. [s]
MIN MAX
CB - Deceleration/braking time during closing. [s]
MIN MAX
DS - Setting of display viewing mode.
00 - No display
01 - Commands and safety devices with radio test (see
paragraph 10.2)
02 - Automation status (see paragraph 10.1)
03 - Commands and safety devices (see paragraph 10.2)
NONE
STATUS
RADIO TEST
COMMANDS
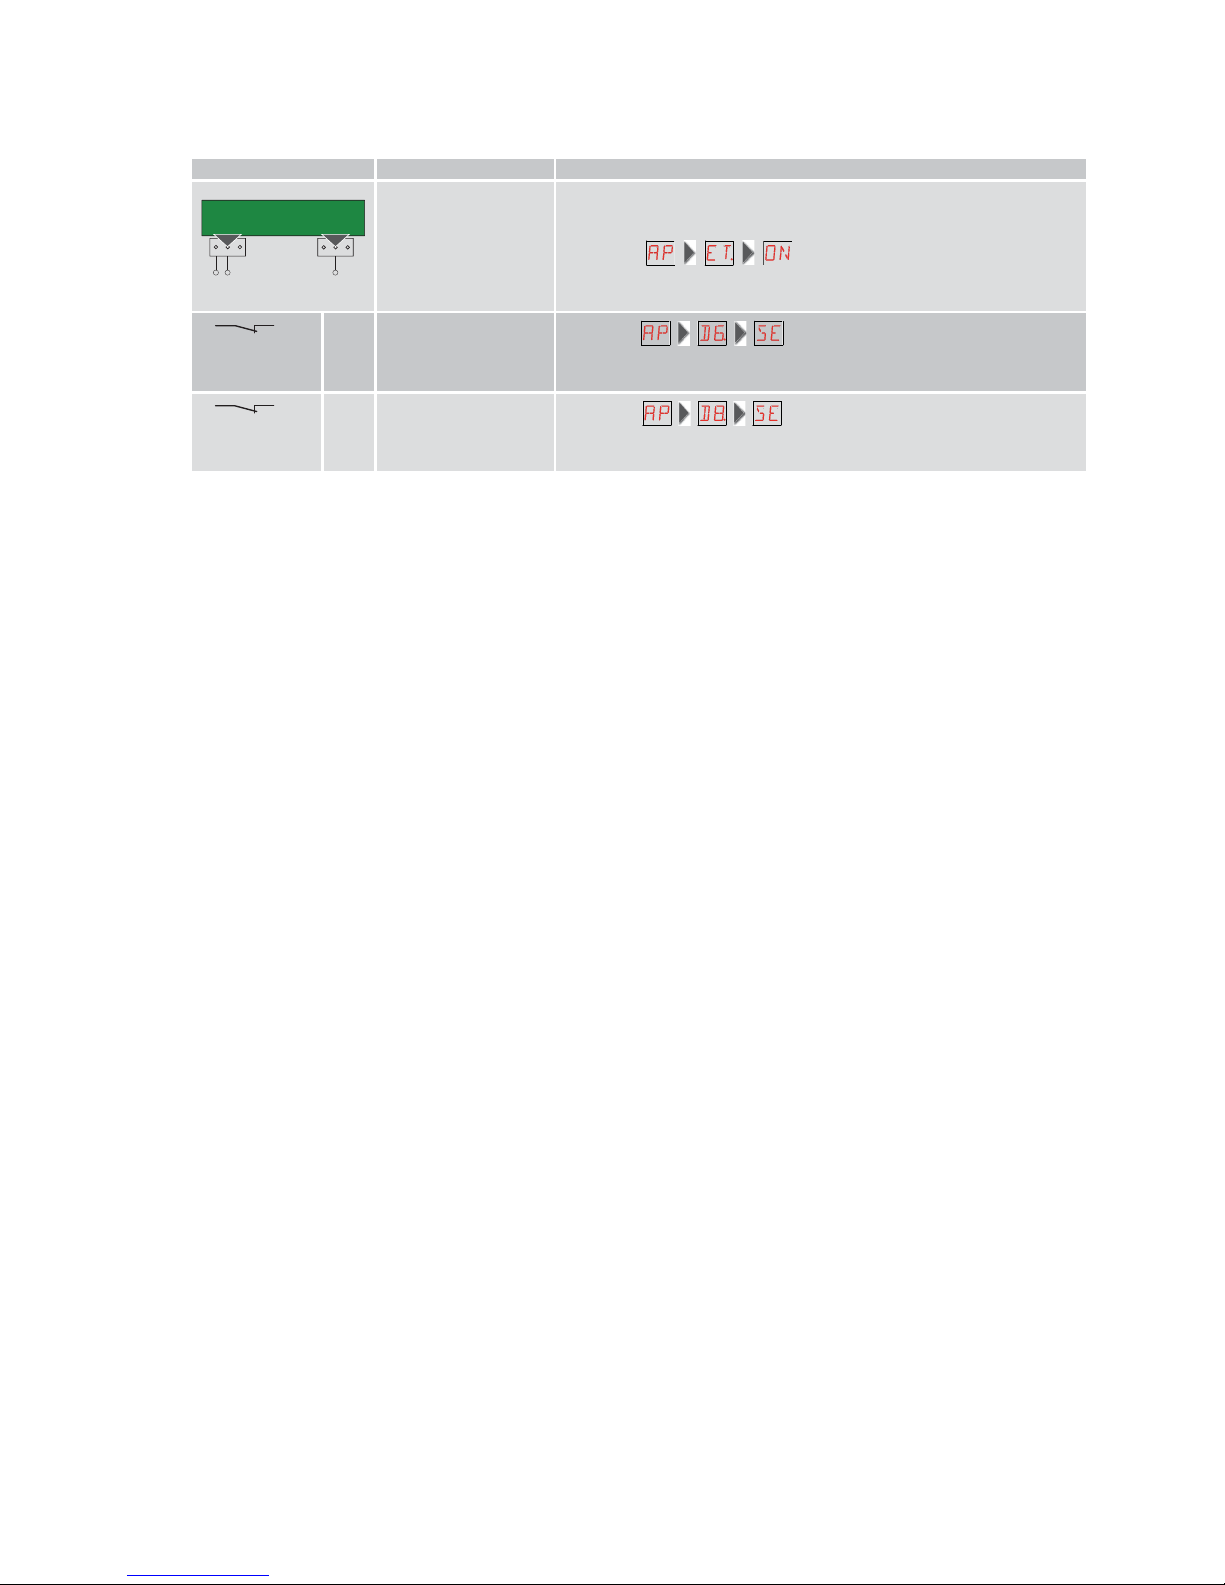
D6 - Selecting device connected to terminals 1-6.
NO - None
SE - Safety edge
PH - Photocells
NONE
PHOTOCELLS
EDGE
D8 - Selecting device connected to terminals 1-8.
NO - None
SE - Safety edge
PH - Photocells
NONE
PHOTOCELLS
EDGE
NOTE: setting 01 allows to view the reception of a radio
transmission for checking its range.
Page 26

64
IP1967EN - 2016-08-01
Display Description
SM - Selection of the operating mode of photocell terminals
1-6. (only with ).
00 - During manoeuvre, the opening of the safety contact
stops movement with disengagement.
01 - During manoeuvre, the opening of the safety contact
stops movement with disengagement. When the contact
is reclosed the interrupted manoeuvre resumes.
02 - During manoeuvre, the opening of the safety contact
stops movement with disengagement. When the contact
is reclosed an opening manoeuvre starts.
03 - During a closing manoeuvre, the opening of the safety
contact reverses the movement.
STOP +
DISENGAGE
STOP +
OPENING
STOP +
RESUME
REVERSE
CLOSING
TN - Setting intervention temperature for NIO anti-freeze
system. [°C]
Adjustment of the working temperature of the control
panel.
DOES NOT refer to outside temperature.
-6 ºC +6 ºC
TB - View control panel temperature.
DO NOT USE
OFF ON
OL - Selecting open gate indicator light mode.
When set ON, the light is switched off when automation is
closed; it is switched on when automation is open and during
the opening and closing phases.
When set OFF the light is switched off when automation is
closed; it is switched on when automation is open , it flashes
during the opening and closing phases.
FLASHING ON
i
WARNING: it is possible that, owing to the type of automation and control panel, certain
menus are not available.
Page 27

65
IP1967EN - 2016-08-01
Display Description
Automation closed.
Automation open.
Automation stopped in intermediate position.
Automation closing.
Automation opening.
Automation closing from partial opening.
Automation in partial opening.
Automation partially open.
10. Display viewing mode
10.1 Automation status display
10.2 Commands and safety devices display
i
i
i
WARNING: it is possible that, owing to the type of automation and control panel, certain
menus are not available.
WARNING: the automation status display mode is visible only with the Display viewing mode
set on 02.
WARNING: the commands and safety device display mode is only visible with the Display
viewing mode set on 01 or 03.
Display Description
1-2 - Automatic closing activation command.
1-3 - Opening command.
1-4 - Closing command.
Page 28

66
IP1967EN - 2016-08-01
1-5 - Step-by-step command.
1-6 - Safety with opening and closing stop.
1-8 - Safety with closing reversal.
1-9 - STOP command.
P3 - Partial opening command.
3P - Hold-to-run opening command.
4P - Hold-to-run closing command.
RX - Radio reception (of any memorised transmitter key present in the memory module).
NX - Radio reception (of any key not memorised).
CX - AUX coupling board command reception.
F1 - Generic limit switch relating to motor 1.
F2 - Generic limit switch relating to motor 2.
O1 - Detection of an obstacle by motor 1 or arrival of motor 1 at mechanical stop.
O2 - Detection of an obstacle by motor 2 or arrival of motor 2 at mechanical stop.
RV - Enablement/disablement of built-in radio receiver via JR5.
MQ - Acquisition of mechanical stops in progress.
HT - Heating of the motors (NIO function) in progress.
J1 - Variation of the JR1 jumper status.
1C - Closing manoeuvre 1 wing at a time.
Page 29

67
IP1967EN - 2016-08-01
Type of
alarm
Display Description Remedy
Mechanical alarm
M0 - Automation type not selected. If the dedicated memory module is present
press
.
Select a type of automation.
MB - Absence of motor 1 during an operation.
Check the connection of motor 1.
MC - Absence of motor 2 during an operation (if 2-motor functioning has been set).
Check the connection of motor 2.
MD - Irregular functioning of motor 1
opening limit switch.
Check the connection of the motor 1 opening limit switch.
ME - Irregular functioning of motor 1 closing limit switch.
Check the connection of the motor 1 closing limit switch.
MF - Irregular functioning of motor 2
opening limit switch.
Check the connection of the motor 2 opening limit switch.
MG - Irregular functioning of motor 2 closing limit switch.
Check the connection of the motor 2 closing limit switch.
MH - Incorrect wings overlap. Verify that the motor which opens first (M1)
is connected as shown in fig. 1.
MI - Detection of third consecutive obstacle.
Check for the presence of permanent obstacles along the automation path.
Radio operations
alarm
R0 - Insertion of a memory module containing more than 100 memorized transmitters.
Warning: the setting is
automatic.
To save the set configurations in the memory module, cancel a few memorized
transmitters to bring the total lower than
100.
Set .
R3 - Memory module not detected. Insert a memory module.
R4 - Memory module not compatible with
control panel.
Insert a compatible memory module.
10.3 Alarms and anomalies display
i
WARNING: alarms and anomalies are displayed when any display selection is made. The
signaling of alarm messages takes priority over all other displays.
Page 30

68
IP1967EN - 2016-08-01
Type of
alarm
Display Description Remedy
Accessories alarm
A0 - Failure of test of safety sensor on
contact 6.
Check the device SOFA1-A2 is working
correctly.
If the supplementar y SOF card is not in-
serted, check the safety test is disabled.
A3 - Failure of test of safety sensor on
contact 8.
Check the device SOFA1-A2 is working
correctly.
If the supplementar y SOF card is not in-
serted, check the safety test is disabled.
A7 - Incorrect connection of contact 9 to
terminal 41.
Connect the 1-9 contact
Service
V0 - Request for maintenance intervention.
Proceed with the scheduled maintenance
intervention.
Page 31

69
IP1967EN - 2016-08-01
11.1 Make a jumper for safety contacts 1-6, 1-8, 1-9. Set JR1=ON, JR5=ON.
11.2 If limit switches are used, adjust them by manually moving the wings as described here:
- deceleration limit switch: activation of the limit switch must occur before the mechanical
doorstop,
- stop limit switch: activation of the stop limit switch must occur in the open/close position of
the wings,
- proximity limit switch: activation of the proximity limit switch must occur near the mechanical
doorstop.
11.3 Switch on power.
Warning: the following operations are performed with no safety devices.
11.4 If the dedicated memory module is present, press , if it is not present, load the
configuration related to the type of automation installed.
11.5 If the automation has 1 door wing, set .
11.6 Verify the setting.
11.7 With the automation idle in the intermediate position, give a closing command + , and
check the door wings move in the correct direction. In the event of an incorrect connection,
invert the polarity of the motor.
Note: the first closing operation after a power supply interruption is carried out with one
door wing at a time, at reduced speed.
11.8 Give an opening command + and verify that the automation carries out the operation
at reduced speed stopping at the mechanical doorstops during the opening phase.
11.9 Load the predefined setting most suitable for system available in the menu.
11.10 If limit switches are used, define their use by means of settings and .
11.11 In order to save the configurations in the memory module it is necessary to set
.
11.12 To modify the operation and deceleration speed settings, the automatic closing times, and
the thrust on obstacles, consult the menus.
11.13 Connect the safety devices (removing all relevant jumpers) and verify their correct operation.
Note: ensure that the forces exerted by the door wings are compliant with EN12453-EN12445
regulations.
11.14 If desired, memorize the radio commands with command (refer to chapter 12).
11.15 Connect any other accessories and check operation.
11.16 Once the start up and check procedures are completed, close the container.
11. Starting
WARNING: the system must have mechanical doorstops of appropriate strength or limit
switches must be installed.
WARNING: if this control panel is being used to replace a faulty one, it is possible to reset the
last automation configuration by inserting the storage module of the old control panel in the
housing on the new one, then loading the last configuration set with the
command.
Page 32

70
IP1967EN - 2016-08-01
12. Troubleshooting
Problem Possible cause Alarm
signalling
Operation
The automation does not
open or close.
No power. Check power supply cable.
Short circuited accessories. Disconnect all accessories
from terminals 0-1 (a voltage
of 24V= must be present) and
reconnect them one at a time.
Contact Technical Service
Blown line fuse. Replace fuse.
Safety contacts are open.
Check that the safety contacts
are closed correctly (NC).
Safety contacts not correctly
connected or self-controlled
safety edge not functioning
correctly.
Check connections to terminals
6-8 on control panel and connections to the self-controlled
safety edge.
Photocells activated.
Check that the photocells are
clean and operating correctly.
The automatic closing does
not work.
Issue any command. If the
problem persists, contact
Technical Service
Faulty motor
Check motor connection, if
the problem persists, contact
Technical Service.
The external safety devices
are not activated.
Incorrect connections between the photocells and the
control panel.
Check that
/ is displayed
Connect NC safety contacts
together in series and remove
any jumpers on the control
panel terminal board.
Check the
→ and
→ setting
The automation opens/closes briefly and then stops.
There is a presence of friction.
Manually check that the automation moves freely and check
the
/ adjustment
Contact Technical Service
The remote control has limited range and does not work
with the automation moving.
The radio transmission is impeded by metal structures and
reinforced concrete walls.
Install the antenna outside.
Replace the transmitter batteries.
Page 33

71
IP1967EN - 2016-08-01
The remote control does not
work
No storage module or incorrect storage module.
Switch the automation off and
plug in the correct storage
module.
Check the correct memorisation of the transmitters on the
built-in radio. If there is a fault
with the radio receiver that is
built into the control panel, the
remote control codes can be
read by removing the storage
module.
Page 34

72
IP1967EN - 2016-08-01
When the E2H control panel is
used in applications for double
wings automations with overlapping it is possible to make
the following connections.
(Fig. 13.1) Installation with mechanical doorstops in opening and closing phases, without
the use of electric limit switches.
(Fig. 13.2) Installation with mechanical doorstop in closing phases, with the use of electric
limit switches.
36 35 34 33 32 31
24V=24V=
Motor 1Motor 2
12
36 35 34 33 32 31
24V=24V=
Motor 1Motor 2
12
Fig. 13.1
Fig.13.2
13. Example application of automation with two
swinging door wings
Page 35

73
IP1967EN - 2016-08-01
When the E2H control panel is
used in applications for single
wing automations it is possible
to make the following connections.
(Fig. 14.1) Installation with mechanical doorstops in opening and closing phases, without
the use of electric limit switches.
(Fig. 14.2) Installation with mechanical doorstop in closing phases, with the use of electric
limit switches.
33 32 31
24V=
1
Motor 1
33 32 31
1
24V=
Motor 1
Fig. 14.1
Fig. 14.2
14. Example applications for automation with
one swinging door wing
Page 36

IP1967EN - 2016-08-01
Entrematic Group AB
Lodjursgatan 10
SE-261 44, Landskrona
Sweden
www.entrematic.com
 Loading...