

Page 1
BIXLR12-BIXLR22 / GOL4-4C
IP2016 • 2015-09-24
Manuale di installazione e uso per scheda radio BIXLR12-22 con trasmettitori serie GOL.
Installation and use manual for BIXLR12-22 radio board with GOL series transmitters.
[*] Utilizzare batterie tipo CR2032 o equivalenti / Use CR2032 type batteries or equivalent
Frequenza serie L
L series frequency
Tipo
Type
Alimentazione
Power supply
Canali
Channels
Portata
Range
N. codici memorizzabili
Memorizable codes nr.
Uscita
Output
GOL4 433,92 MHz rolling code 3 V= / 220 mAh [*] 4 50÷100 m / /
GOL4C 433,92 MHz fixed code 3 V= / 220 mAh [*] 4 50÷100 m / /
BIXLR12 433,92 MHz /
12 V= 20 mA
24 V=/~ 20 mA
1 / 200
1 relay
1 A / 30 V
BIXLR22 433,92 MHz /
12 V= 20 mA
24 V=/~ 20 mA
2 / 200
2 relays
1 A / 30 V
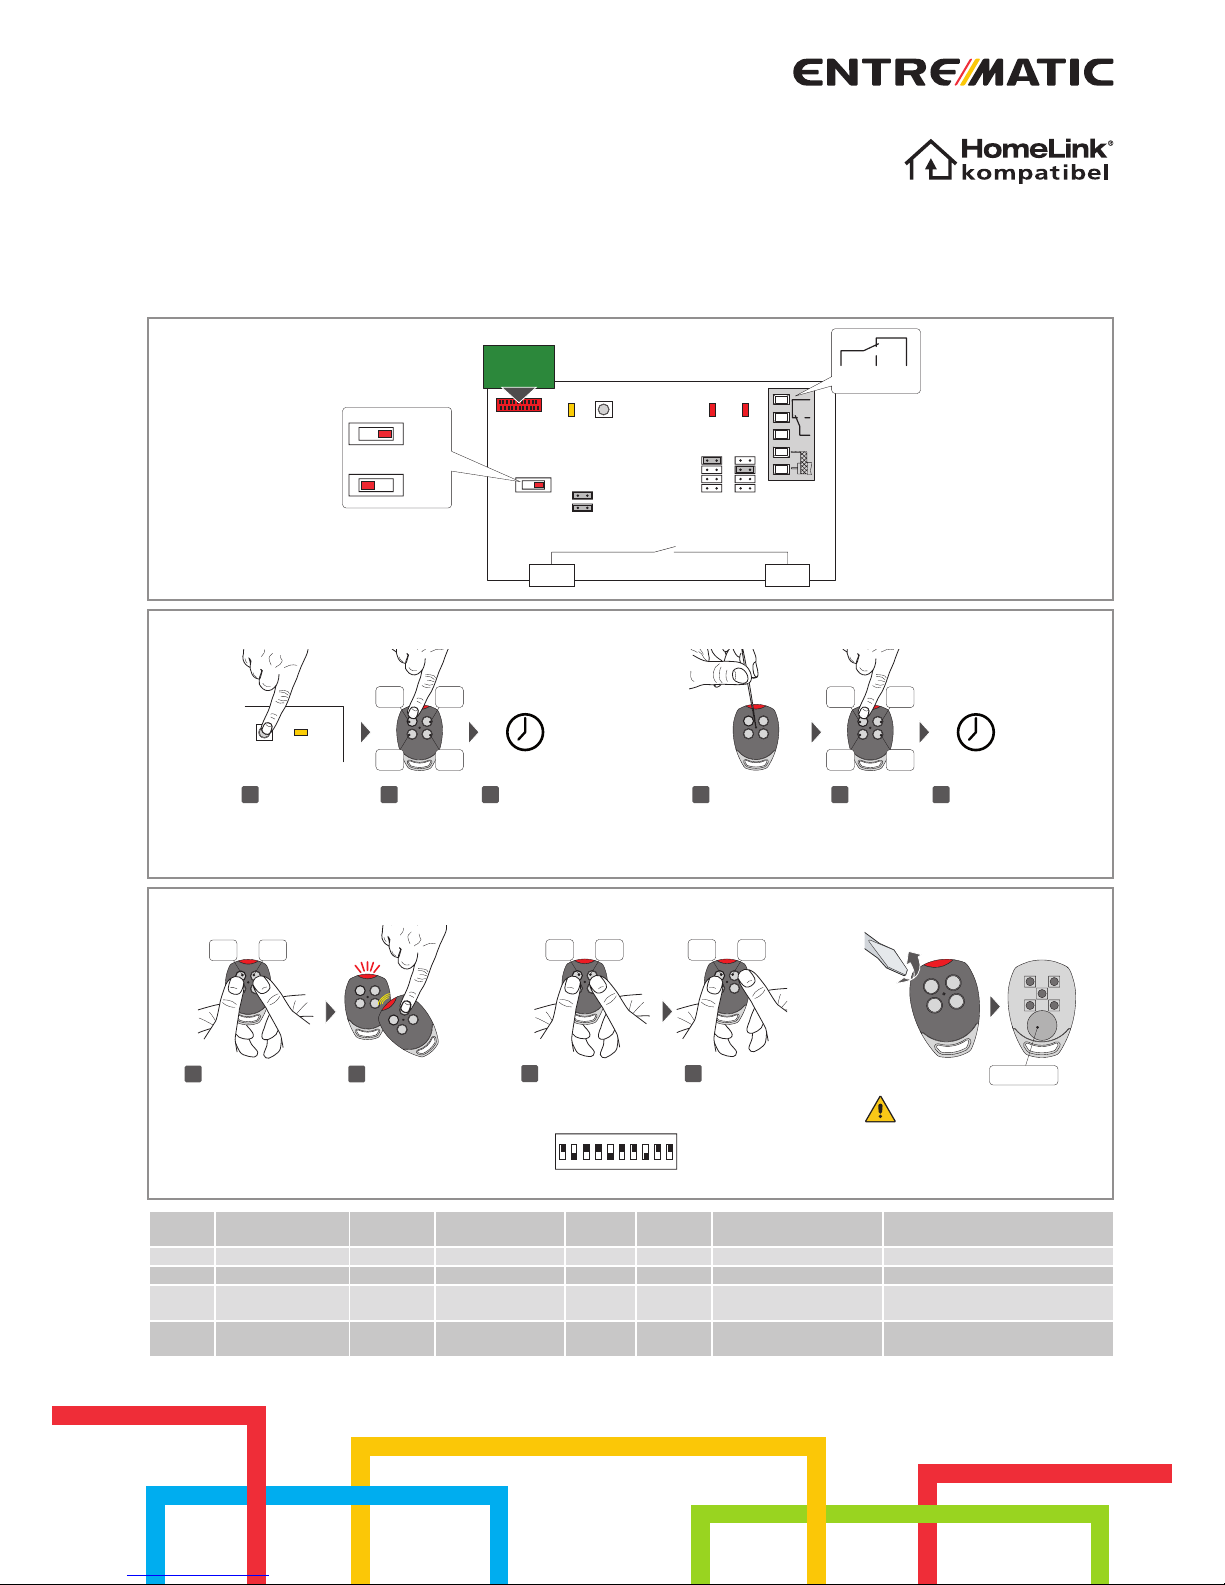
Fig. 1
BIXLR12
BIXLR22
COM
BIXMR2
PRG
SIG
LD1
JR1 JR2
LD2
ON
ANT
JR5
1
2
3
4
JR4
S1
OUT1
OUT2
CNONC
24 V
12 V
Fig. 3
Fig. 2
BIXLR22
BIXLR12
Premere PRG
Push PRG
1
Premere CH
Push CH
2
Attendere 10
s
Wait 10 s
3
A
A
CH1 CH2
: nuovo GOL4-GOL4C / new GOL4-GOL4C
CH3 CH4
PRG
SIG
Memorizzazione GOL4-GOL4C
GOL4-GOL4C storage
Premere PRG per 5 s
Push PRG for 5 s
1
Premere CH
Push CH
2
Attendere 10
s
Wait 10 s
3
A
BA
CH1 CH2
: nuovo GOL4 / new GOL4
B
: GOL4 memorizzato / stored GOL4
Memorizzazione a distanza GOL4
GOL4 remote storage
CH3 CH4
Fig. 4
Fig. 5
Fig. 6
Premere CH1+CH2 per 5 s
Push CH1+CH2 for 5 s
1
Premere CH
Push CH
2
CH1
Clonazione GOL4C
A
A
A
B
GOL4C cl
oning
CH2
: nuovo GOL4C / new GOL4C
B
: GOL4C memorizzato / stored GOL4C
Premere CH1+CH2 per 5 s
Push CH1+CH2 for 5 s
1
Inserire il codic
e
Enter code
2
CH1
Clonazione con codice GOL4C
A
A
GOL4C cl
oning using code
CH2 CH1
CH1=0 (DIP=OFF)
CH2=1 (DIP=ON)
A
CH2
: nuovo GOL4C / new GOL4C
Esempio / Example:
ON
OFF
123 4 5 678 9 10
Sostituzione batteria
Battery substitution
Fare attenzione alla polarità
Pay attention to polarity
CR2032 3V
Page 2

2
IP2016 - 2015-09-24
Dichiarazione CE di conformità
Il fabbricante Entrematic Group AB con sede in Lodjursgatan 10, SE-261 44 L andskrona,
Sweden, dichiara che i radiocomandi serie GOL4, GOL4V, GOL4C, GOL4CV, BIXLR12, BIXLR22
sono conformi alla Direttiva 1999/5/CE R&TTE.
Landskrona 2015-05-05 Marco Zini
(President & CEO)
1. Trasmettitore
I radiocomandi serie GOL servono per attivare da remoto porte e cancelli motorizzati. I
radiocomandi serie GOL sono compatibili con tutti i ricevitori radio BIX e con tutti i quadri elettronici
con ricevitore radio a bordo.
2. Ricevitore (fig. 1)
I ricevitori radio BIXLR12-BIXLR22 possono essere inseriti direttamente sui quadri elettronici o
nella base porta schede CONT1. Il modulo memoria BIXMR2 del ricevitore radio può contenere
max 200 trasmettitori.
Verificare che il modulo memoria BIXMR2 sia inserito sul connettore COM del ricevitore radio.
ATTENZIONE: l’inserimento e l’estrazione del modulo memoria BIXMR2 devono essere effettuate
in assenza di alimentazione.
I ricevitori radio sono dotati di antenna (filo rigido di lunghezza 173 mm). In alternativa è possibile
collegare l’antenna accordata BIXAL. Per collegare l’antenna al ricevitore radio utilizzare un cavo
coassiale tipo RG58 (max 10 m). L’antenna deve essere installata in posizione più elevata possibile
e lontano da strutture metalliche. E’ possibile utilizzare i lampeggianti provvisti di antenna a filo.
3. Selezione canali-uscite (fig.1)
1 o 2 dei 4 canali dei radiocomandi possono essere abbinati alle uscite del ricevitore radio
BIXLR12-BIXLR22 mediante i jumper:
JR1 uscita OUT1, attivazione led LD1
JR2 uscita OUT2, attivazione led LD2 (solo BIXLR22)
4. Memorizzazione GOL4-GOL4C (fig. 2)
- Premere e rilasciare il pulsante PRG presente sul ricevitore radio o sul quadro elettronico, il
led segnalazione SIG si accende.
- Effettuare una trasmissione premendo i tasti CH che si desidera memorizzare del radiocomando
(entro la portata del ricevitore radio). Il radiocomando viene così memorizzato. Durante
questa fase il led segnalazione SIG lampeggia. Quando il led segnalazione SIG torna acceso è
possibile abilitare un nuovo radiocomando. Abilitare tutti i nuovi radiocomandi effettuando una
trasmissione come indicato.
NOTA: se JR4=ON vengono memorizzati tutti i canali del radiocomando, se JR4=OFF viene
memorizzato solo il tasto canale premuto.
- L’uscita dalla procedura avviene in modo automatico dopo 10 s dall’ultima trasmissione oppure
premendo nuovamente il tasto PRG (il led segnalazione SIG si spegne).
5. Memorizzazione a distanza GOL4 (fig. 3)
Per memorizzare nuovi radiocomandi senza agire sul ricevitore radio o sul quadro elettronico,
premere per 5 s il tasto PRG di un radiocomando GOL4 già memorizzato fino all’accensione del led
(entro la portata del ricevitore radio) e premere uno qualsiasi dei tasti CH del nuovo radiocomando;
verranno memorizzati gli stessi tasti CH del radiocomando GOL4 già presente in memoria.
Per disabilitare la memorizzazione a distanza impostare JR5=OFF.
NOTA: fare attenzione a non memorizzare involontariamente radiocomandi non desiderati.
6. Clonazione GOL4C (fig. 4)
- Premere contemporaneamente i tasti CH1 e CH2 di un nuovo radiocomando per 5 s, il led rosso
si accende.
- Avvicinare a contatto il radiocomando GOL4C già memorizzato ed eseguire una trasmissione
premendo uno qualsiasi dei tasti CH.
- Dopo tre lampeggi di conferma si esce automaticamente dalla procedura di clonazione.
NOTA: è possibile effettuare la clonazione anche dei trasmettitori BIXLS2.
7. Clonazione GOL4C con inserimento codice (fig. 5)
- Premere contemporaneamente i tasti CH1 e CH2 di un nuovo radiocomando per 5 s, il led rosso
si accende.
- Inserire un codice di 10 cifre premendo CH1=0 (OFF) o CH2=1 (ON). Tra una pressione e l’altra
si dispone di 5 s.
- L’uscita dalla procedura avviene in modo automatico dopo l’inserimento della decima cifra. (Il
radiocomando effettua 3 lampeggi)
NOTA: questa procedura rende il radiocomando GOL4C equivalente ad un radiocomando BIXLS2.
8. Cancellazione radiocomandi da memoria ricevitore
- Tenere premuto per 3 s il pulsante PRG presente sul ricevitore radio o sul quadro elettronico,
il led segnalazione SIG comincia a lampeggiare.
- Per cancellare tutti i trasmettitori dalla memoria premere nuovamente per 3 s il pulsante PRG.
- Per cancellare un singolo radiocomando, premere uno dei tasti CH precedentemente
memorizzati del radiocomando che si desidera cancellare.
- La cancellazione viene confermata dal lampeggio veloce del led SIG.
9. Sostituzione batteria (fig. 6)
Usare la massima cautela nel sostituire la batteria. Fare attenzione alle polarità.
Non maneggiare la batteria con l’ausilio di pinze o altri utensili, per evitare rischi di scarica o
esplosione.
Per garantire prestazioni ottimali, si consiglia di sostituire la batteria una volta l’anno o quando
si riscontri un consistente calo di portata.
EC declaration of conformity
The manufacturer Entrematic Group AB, with headquarters in Lodjursgatan 10, SE-261 44
Landskrona, Sweden, declares that GOL4, GOL4V, GOL4C, GOL4CV, BIXLR12, BIXLR22 remote
controls meet the essential requisites fixed by the Directive 1999/5/EC R&TTE.
Landskrona, 2015-05-05 Marco Zini
(President & CEO)
1. Transmitter
The GOL series transmitters are used to activate motorized doors and gates from a distance,
GOL series transmitters are compatible with all BIX radio receivers and with all control panels
with an incorporated radio receiver.
2. Receiver (fig. 1)
The BIXLR12-BIXLR22 radio receivers can be inserted directly on the control panels or in the
CONT1 holding-board base. The BIXMR2 memory module of the radio receiver can contain up
to 200 transmitters.
Check that the BIXMR2 memory module is inserted on the COM connector of the radio receiver.
WARNING: the insertion and the extraction of the memory module must be carried out in the
absence of power supply.
The radio receivers are equipped with an antenna (rigid wire of 173 mm). Alternatively, it is possible
to connect the tuned BIXAL antenna. To connect the antenna to the radio receiver, use a RG58
type coaxial cable (max 10 m). The antenna must be positioned as high as possible, far from any
metal structures. You can use the flashing lights supplied with a wired antenna.
3. Channels-outputs selection (fig.1)
1 or 2 of the 4 transmitter channels must be matched with the four outputs of the BIXLR12-BIXLR22
radio receiver by means of the jumpers:
JR1 OUT1 output, activation of LD1 LED
JR2 OUT2 output, activation of LD2 LED (BIXLR22 only)
4. GOL4-GOL4C storage (fig. 2)
- Press and release the PRG button on the radio receiver or on the control panel; the SIG LED
lights up.
- Make a transmission by pressing one of the desired CH buttons of the transmitter (within the
range of the radio receiver). The transmitter is now stored. During this phase, the SIG LED
flashes. When the SIG LED is again lit up, it is possible to validate another transmitter. Validate
all the new transmitters by making a transmission as indicated.
NOTE: with JR4=ON all the channels are stored, with JR4=OFF only the channel key that is
pressed is stored.
- You automatically exit the procedure 10 seconds after the last transmission, or you can press
the PRG button again (the SIG LED goes off).
5. GOL4 remote storage (fig. 3)
To store new transmitters without using the receiver or the control panel, press for 5 s the PRG
button of an already stored GOL4 transmitter, until the LED comes on (within the range of the
radio receiver) and press any one of the CH keys of the new transmitter.
Set JR5=OFF to disable the remote storage.
NOTE: be careful not to accidentally store unwanted transmitters.
6. GOL4C cloning (fig. 4)
- Press simultaneously for 5 s CH1 and CH2 keys of a new transmitter; the red LED comes on.
- Bring the already memorized GOL4C transmitter close, and make a transmission by pressing
any one of the CH keys.
- After three confirmation flashes, you automatically exit the procedure.
NOTE: it is also possible to carry out the cloning of the BIXLS2 transmitters.
7. GOL4C cloning using code (fig. 5)
- Press simultaneously for 5 s CH1 and CH2 keys of a new transmitter; the red LED comes on.
- Insert a 10-digit code, pressing CH1=0 (OFF) or CH2=1 (ON). You have 5 s between one pressing
and the next one.
- You exit the procedure automatically after inserting the tenth digit. (The transmitter flashes 3
times)
NOTE: this procedure makes the GOL4C transmitter equivalent to a BIXLS2 transmitter.
8. Transmitters erasing from receiver memory
- Keep pressed for 3 s the PRG button on the radio receiver or on the control panel, the SIG LED
begins to flash.
- To erase all the transmitters from the memory of the radio receiver keep pressed for 3 s again
the PRG button.
- To erase a single transmitter, press one of the previously stored CH keys of the transmitter to
be erased.
- The cancellation is confirmed by the quick flashing of the SIG LED.
9. Battery substitution (fig. 6)
Be extremely careful when replacing the battery. Pay attention to the polarities.
Do not handle the battery with pliers or other tools, to avoid the risk of discharge or explosion.
To ensure an optimum performance, you are advised to replace the battery once a year, or when
noticed a substantial loss of range.
ITALIANO
ENGLISH
Tutti i diritti relativi a questo materiale sono di proprietà esclusiva di Entrematic
Group AB. Sebbene i contenuti di questa pubblicazione siano stati redatti con la
massima cura, Entrematic Group AB non può assumersi alcuna responsabilità
per danni causati da eventuali errori o omissioni in questa pubblicazione.
Ci riserviamo il diritto di apportare eventuali modifiche senza preavviso. Copie,
scansioni, ritocchi o modifiche sono espressamente vietate senza un preventivo
consenso scritto di Entrematic Group AB.
All the rights concerning this material are the exclusive property of Entrematic
Group AB. Although the contents of this publication have been drawn up with the
greatest care, Entrematic Group AB cannot be held responsible in any way for
any damage caused by mistakes or omissions in this publication.
We reserve the right to make changes without prior notice. Copying, scanning
and changing in any way are expressly forbidden unless authorised in writing by
Entrematic Group AB.
Page 3

3
IP2016 - 2015-09-24
Declaration CE de conformite
Le constructeur Entrematic Group AB sis à Lodjursgatan 10, SE-261 44 L andskrona, Swe den
déclare ci-après que les radiocommandes GOL4, GOL4V, GOL4C, GOL4CV, BIXLR12, BIXLR22
sont conforme aux dispositions établies par la Directive 1999/5/CE R&TTE.
Landskrona, 2015-05-05 Marco Zini
(Pres ident & CEO)
1. Transmetteur
Les radiocommandes de la série GOL servent à activer à distance des portes et des portails
motorisés. Les radiocommandes de la série GOL sont compatibles avec tous les récepteurs radio
BIX et avec tous les tableaux électroniques avec récepteur radio à bord.
2. Recepteur (fig. 1)
Les récepteurs radio BIXLR12-BIXLR22 peuvent être insérés directement dans les tableaux
électroniques ou dans la base porte carte CONT1. La mémoire BIXMR2 du récepteur peut contenir
au max 200 transmetteurs.
Contrôler si le module mémoire BIXMR2 est bien insérée sur le connecteur COM du récepteur radio.
ATTENTION: l’insertion et l’extraction de le module mémoire doit se faire avec la tension coupée.
Les récepteurs radio sont équipés d’une antenne (fil rigide de 173 mm de long). En alternative il est
possible de connecter l’antenne accordée BIXAL. Pour connecter l’antenne au récepteur utiliser un
câble coaxial de type RG58 (max 10 m). L’antenne doit être positionnée le plus haut possible et loin
de structures métalliques. On peut utiliser les flashs clignotants équipés d’une antenne avec fil.
3. Selection canaux-sorties (fig.1)
1 ou 2 des quatre canaux des transmetteurs doivent être couplés aux quatre sorties du récepteur
radio BIXLR12-BIXLR22 moyennant les jumpers:
JR1 sortie OUT1, activation led LD1
JR2 sortie OUT2, activation led LD2 (seulement BIXLR22)
4. Memorisation GOL4-GOL4C (fig. 2)
- Appuyer et relâcher sur le bouton PGR qui se trouve sur le récepteur radio ou sur le tableau
électronique, la led de signalisation SIG s’allume.
- Effectuer une transmission en appuyant sur les boutons CH désirant du transmetteur (dans
la porte du récepteur radio). Cela permettra au transmetteur d’être mémorisé. Pendant cette
phase la led de signalisation SIG clignote. Lorsque la led s’allume à nouveau il est possible
d’activer un nouveau transmetteur. Activer tous les nouveaux transmetteurs en effectuant une
transmission de la manière indiquée plus haut.
REMARQUE: si JR4=ON tous les canaux du transmetteur sont mémorisés, si JR4=OFF on ne
mémorise que le canal sur lequel on appuie.
- La sortie de la procédure se fait automatiquement 10 s après la dernière transmission ou bien
en appuyant à nouveau sur la touche PRG (la led SIG s’éteint).
5. Memorisation a distance GOL4 (fig. 3)
Pour mémoriser des nouveaux transmetteurs sans intervenir sur le récepteur radio ou sur le
tableau électronique, appuyer sur le PRG d’un transmetteur GOL4 déjà mémorisé pendant 5 s
jusqu’à l’allumage de la led (dans la porte du récepteur radio) et appuyer sur n’importe laquelle
des touches CH du nouveau transmetteur.
Afficher JR5=OFF on désactive la programmation à distance.
REMARQUE: prêter attention à ne pas mémoriser involontairement des radiocommandes non
souhaitées.
6. Clonage GOL4C (fig. 4)
- Appuyer en même temps sur les touches CH1 et CH2 d’un nouveau transmetteur pendant 5 s,
la led rouge s’allume.
- Approcher le transmetteur GOL4C déjà mémorisé et effectuer une transmission en appuyant
sur n’importe lequel des boutons CH.
- Après trois clignotements de confirmation on sort automatiquement de la procédure.
REMARQUE: il est également possible d’effectuer le clonage des transmetteurs BIXLS2.
7. Clonage GOL4C par introduction d’un code (fig. 5)
- Appuyer en même temps sur les touches CH1 et CH2 d’un nouveau transmetteur pendant 5 s,
la led rouge s’allume.
- Entrer un code formé de 10 chiffres en appuyant sur CH1=0 (OFF) ou CH2=1 (ON). On a 5 s à
disposition entre une pression et l’autre.
- La sortie de la procédure se fait automatiquement après avoir entré le dixième chiffre. (Le
transmetteur clignote 3 fois).
REMARQUE: cette procédure rend le transmetteur GOL4C l’équivalent d’un transmetteur BIXLS2.
8. Effacement transmetteurs de la memoire du recepteur
- Appuyer sur le bouton PRG qui se trouve sur le récepteur radio ou sur le tableau électronique
en maintenant la pression pendant 3 s, jusqu’à ce que la led SIG commence à clignoter.
- Pour effacer tous les transmetteurs de la mémoire du récepteur radio appuyer à nouveau
pendant 3 s sur le bouton PRG.
- Si l’on veut effacer un seul transmetteur, appuyer sur les boutons CH précédemment enregistré
du transmetteur à effacer.
- L’effacement est confirmé par le clignotement rapide de la led SIG.
9. Remplacement batterie (fig. 6)
Faire très attention lorsque l’on remplace la batterie. Contrôler les polarités. Ne pas manier
la batterie avec des pinces ou d’autres instruments, elle risque de se décharger voire même
d’exploser. Pour avoir des performances de premier niveau, il est recommandé de remplacer
la batterie au moins une fois par an ou de toute manière lorsque l’on se rend compte d’une
baisse de portée.
EG-konformitätserklärung
Der Hersteller Entrematic Group AB mit Sitz in Lodjursgatan 10, S E-261 44 L andskrona,
Schweden erklärt hiermit, daß die Fernsteuerungen GOL4, GOL4V, GOL4C, GOL4CV, BIXLR12,
BIXLR22 mit den einschlägigen Bestimmungen folgender EG-Richtlinie 1999/5/CE R&TTE
übereinstimmen.
Landskrona, 2015-05-05 Marco Zini
(P resident & CEO)
1. Sender
Die Funkhandsender der Serie GOL dienen, der Betätigung kraftbetätigter Tor und Türantrieben.
Die GOL Funkhandsender sind kompatibel mit DITEC Funkempfängern der Serie BIXLR und
bereits auf der Motorsteuerung integrierten Funkempfängern (433 MHz).
2. Empfänger (Abb. 1)
Die Empfänger BIXLR12-BIXLR22 können direkt in DITEC Steuerungen eingesteckt werden, oder
mit dem Gehäuse CONT1 als externer Empfänger betrieben werden.
Auf die Speicherplatine BIXMR2 können maximal 200 Sender gespeichert werden.
Der BIXMR2 Speicher muss auf dem COM-Steckplatz eingesteckt sein, und darf nur im
spannungslosen Zustand eingesteckt oder entfernt werden.
Die Empfänger sind mit Antennen (Kupferdraht Länge 173 mm) versehen. Alternativ kann die
externe BIXAL-Antenne angeschlossen werden. Für den Anschluss der Antenne an den Empfänger
ein Koaxialkabel Typ RG58 (max. 10 m) verwenden. Die Antenne sollte fern von Metallstrukturen
installiert werden. Es können die Blinker, die ein Drahtkabel haben, verwendet werden.
3. Kanalauswahl (Abb.1)
1 oder 2 der 4 Kanäle der Sender müssen mit 4 Ausgängen des Empfängers BIXLR12-BIXLR22
durch folgende Drahtbrücken ausgewählt werden:
JR1 Ausgang OUT1, Aktivierung LED LD1
JR2 Ausgang OUT2, Aktivierung LED LD2 (nur BIXLR22)
4. Speicherung GOL4-GOL4C (Abb. 2)
- Die Taste PRG am Empfänger oder an der Steuerung kurz drücken, die LED SIG leuchtet.
- Eine Speicherung durch Drücken der gewünschteTasten CH des Senders für 2 s innerhalb
der Reichweite des Empfängers vornehmen. Der Sender wird so gespeichert. Während dieser
Phase blinkt die Melde-LED SIG. Wenn die LED wieder leuchtet, kann ein neuer Sender aktiviert
werden. Alle neuen Sender durch eine Übertragung wie angegeben aktivieren.
ANMERKUNG: Wenn JR4=ON werden alle Kanäle gespeichert, wenn JR4=OFF wird nur die
gedrückte Kanaltaste gespeichert.
- Das Verlassen des Verfahrens erfolgt automatisch nach 10 s ab der letzten Übertragung oder
durch erneutes Drücken der Taste PRG (die LED SIG schaltet sich aus).
5. Fernspeicherung GOL4 (Abb. 3)
Im Empfangsbereich des Funkempfängers muss die verdeckte PRG-Taste eines bereits
eingelernten Handsenders GOL4 für 5 s betätigt werden, danach ist die Taste des einzulernenden
Handsenders für 1 s zu betätigen. Beachten sie das beim Kopiervorgang nicht weitere Empfänger
aktiviert werden.
Mit JR5=OFF ist es nicht möglich einzelne neue Handsender einzuspeichern.
ANMERKUNG: Achten Sie darauf, nicht unbeabsichtigterweise nicht gewünschte Fernbedienungen
zu speichern.
6. Kopieren GOL4C (Abb. 4)
- Gleichzeitig CH1 und CH2 eines neuen Senders drücken, bis die rote LED dauerhaft leuchtet.
- Den bereits gespeicherten Sender GOL4C, direkt über den dauerhaft leuchtenden Handsender
legen und eine beliebige Taste, des bereits gespeicherten Handsenders betätigen.
- Der Kopiervorgang wird durch ein dreifaches Blinksignal bestätigt.
7. Kopieren GOL4C durch eingabe des codes (Abb. 5)
- Gleichzeitig CH1 und CH2 eines neuen Senders drücken, bis die rote LED dauerhaft leuchtet.
- Einen Code von 10 Ziffern durch Drücken von CH1=0 (OFF) oder CH2=1 (ON) eingeben. Zwischen
dem zweimaligen Drücken hat man 5 s lang Zeit.
- Das Verlassen des Verfahrens erfolgt automatisch nach der Eingabe der zehnten Ziffer. (Der
Sender blinkt dreimal).
ANMERKUNG: Dieses Verfahren macht den Sender GOL4C gleichbedeutend mit dem Sender
BIXLS2.
8. Löschen der sender aus dem empfängerspeicher
- Die Taste PRG an dem Empfänger oder an der Steuerung 3 s lang gedrückt halten, bis die LED
SIG zu blinken beginnt.
- Zum Löschen aller Sender aus dem Empfängerspeicher, erneut 3 s lang die Taste PRG gedrückt
halten.
- Um einen einzelnen Sender zu löschen, irgendeine der Tasten CH des zu löschenden Senders
drücken.
- Das Löschen wird durch das schnelle Blinken der LED SIG bestätigt.
9. Batteriewechsel (Abb. 6)
Beim Batteriewechsel sehr vorsichtig umgehen. Die Einsetzrichtung beachten.
Keine Zangen oder andere Geräte dafür verwenden, um die Gefahr einer Entladung oder Explosion
zu vermeiden. Um eine optimale Leistung zu garantieren, wird empfohlen, die Batterie einmal im
Jahr oder dann zu ersetzen, wenn eine erhebliche Verringerung der Reichweite festgestellt wird.
FRANÇAIS
DEUTSCH
Alle Rechte an diesem Material sind ausschließliches Eigentum von Entrematic
Group AB. Obwohl der Inhalt dieser Publikation mit größter Sorgfalt erstellt wurde,
kann Entrematic Group AB keinerlei Haftung für Schäden übernehmen, die durch
mögliche Fehler oder Auslassungen in dieser Publikation verursacht wurden. Wir
behalten uns das Recht vor, bei Bedarf Änderungen ohne jegliche Vorankündigung
vorzunehmen. Kopien, Scannen, Überarbeitungen oder Änderungen sind ohne
vorherige schriftliche Zustimmung von Entrematic Group AB nicht erlaubt.
Tous les droits relatifs à ce matériel sont la propriété exclusive d’Entrematic
Group AB. Bien que les contenus de cette publication aient été rédigés avec le
plus grand soin, Entrematic Group AB ne saurait être tenue responsable en cas
de dommages dérivant d’erreurs ou d’omissions éventuelles.
Nous nous réservons le droit d’apporter des modifications éventuelles sans
préavis. Toute copie, reproduction, retouche ou modification est expressément
interdite sans l’accord écrit préalable d’Entrematic Group AB.
Page 4

4
IP2016 - 2015-09-24
Declaración CE de conformidad
El fabricante Entrematic Group AB con sede en Lodjursgatan 10, SE-261 44 L andskrona,
Sweden
declara que los radiomandos GOL4, GOL4V, GOL4C, GOL4CV, BIXLR12, BIXLR22 son conformes
con las condiciones de la directiva 1999/5/CE R&TTE.
Landskrona, 2015-05-05 Marco Zini
(Pres ident & CEO)
1. Transmisor
Los telemandos de la serie GOL sirven para accionar a distancia puertas y cancelas motorizadas.
Los telemandos de la serie GOL son compatibles con todos los receptores radio BIX y con todos
los cuadros electrónicos con receptor radio incorporado.
2. Receptor (fig. 1)
Los receptores radio BIXLR12-BIXLR22 pueden instalarse directamente en los cuadros
electrónicos o en la base portatarjeta CONT1. El módulo memoria BIXMR2 del receptor radio
puede almacenar hasta un máximo de 200 emisores.
Compruebe que el módulo memoria BIXMR2 se ha introducido en el conector COM del receptor.
ATENCIÓN: para introducir y extraer el módulo memoria desconecte la alimentación.
Los receptores radio están equipados con una antena (hilo rígido de 173 mm de longitud). Como
alternativa, es posible conectar la antena BIXAL. Para conectar la antena al receptor radio,
utilice un cable coaxial de tipo RG58 (máx 10 m). La antena debe colocarse lo más alto posible,
lejos de estructuras metálicas. Es posible utilizar los destellantes dotados de antena con hilo.
3. Selección canales-salidas (fig.1)
1 o 2 de los 4 canales de los telemandos, deben combinarse con las 4 salidas del receptor radio
BIXLR12-BIXLR22 mediante los jumper:
JR1 salida OUT1, activación led LD1
JR2 salida OUT2, activación led LD2 (sólo BIXLR22)
4. Memorización GOL4-GOL4C (fig. 2)
- Pulse y expedir la tecla PRG del receptor radio o del cuadro electrónico, el led de indicación
SIG se encenderá.
- Realice una transmisión pulsando las teclas CH deseada del telemando (dentro del alcance del
receptor radio). De este modo el telemando quedará memorizado. Durante esta fase el led de
indicación SIG parpadea. Cuando dicho led permanezca encendido, será posible registrar otro
telemando. Memorice todos los telemandos nuevos realizando una transmisión, tal y como se
ha descrito.
NOTA : si JR4=ON se memorizarán todos los canales, si JR4=OFF sólo se memorizará la tecla
canal pulsada.
- Para salir automáticamente del modo de memorización, deje pasar 10 s después de la última
transmisión, o vuelva a pulsar la tecla PRG (el led SIG se apagará).
5. Memorización a distancia GOL4 (fig. 3)
Para memorizar nuevos telemandos sin utilizar el receptor radio o el cuadro electrónico, mantenga
pulsada durante 5 s la tecla PRG de un telemando GOL4 ya memorizado, hasta que se encienda el
led (dentro del radio de alcance del receptor radio) y pulse cualquier tecla CH del nuevo telemando.
Programar JR5=OFF para deshabilitar la programación a distancia.
NOTA: preste atención en no memorizar involuntariamente telemandos que no se desean.
6. Clonación GOL4C (fig. 4)
- Mantenga pulsados durante 5 s las teclas CH1 y CH2 de un telemando nuevo. El led rojo se
encenderá.
- Acerque el telemando GOL4C ya memorizado y realice una transmisión pulsando cualquier
tecla CH.
- Después de tres parpadeos de confirmación, se sale automáticamente del proceso.
NOTA : también es posible clonar los telemandos BIXLS2.
7. Clonación GOL4C mediante inserción código (fig. 5)
- Mantenga pulsados durante 5 s las teclas CH1 y CH2 de un telemando nuevo. El led rojo se
encenderá.
- Introduzca un código de 10 cifras pulsando CH1=0 (OFF) o CH2=1 (ON). Dispone de 5 s entre
una presión y otra.
- De este proceso se sale automáticamente al introducir la décima cifra. (El emisor parpadea 3
veces).
NOTA : mediante este procedimiento, el telemando GOL4C se vuelve equivalente a un telemando
BIXLS2.
8. Borrado de emisores de la memoria del receptor
- Mantenga pulsada durante 3 s la tecla PRG del receptor radio o del cuadro electrónico, hasta
que el led SIG empiece a parpadear.
- Para borrar un solo transmisor, apriete una de las teclas CH precedentemente memorizadas
del telemando que se desea borrar.
- Para borrar un solo telemando, pulse cualquier tecla CH del telemando que se desee eliminar.
- Para confirmar que se ha borrado el telemando, el led SIG parpadeará rápidamente.
9. Cambio de batería (fig. 6)
Cambie la batería con la máxima precaución. Respete los polos.
Para manipular la batería no utilice pinzas ni otros utensilios, ya que podrían causar descargas
o explosiones.
Para garantizar las óptimas prestaciones, le aconsejamos que cambie la batería una vez al año
o cuando detecte un descenso considerable del alcance.
Declaração CE de conformidade
O fabricante Entrematic Group AB com sede em Lodjursgatan 10, SE-261 44 L andskrona,
Sweden
declara que rádio controlos GOL4, GOL4V, GOL4C, GOL4CV, BIXLR12, BIXLR22 seja conforme
pela directriz 1999/5/CE R&TTE.
Landskrona, 2015-05-05 Marco Zini
(Pres ident & CEO)
1. Transmissor
Os transmissores da série GOL servem para activar em modo remoto portas e portões
motorizados. Os transmissores da série GOL são compatíveis com todos os receptores rádio BIX
e com todos os quadros electrónicos com receptor rádio a bordo.
2. Receptor (fig. 1)
Os receptores rádio BIXLR12-BIXLR22 podem ser inseridos direitamente nos quadros electrónicos
ou na base porta-placa CONT1. O modulo memória BIXMR2 do receptor rádio pode conter ao
máximo 200 transmissores.
Verificar que o modulo memória BIXMR2 esteja inserida no conector COM do receptor radio.
ATENÇÃO: a inserção e a extracção do modulo memória devem ser efectuadas em ausência
de alimentação.
Os receptores rádio são dotados de antena (fio rígido comprimento 173 mm). Alternativamente,
é possível ligar a antena sintonizada BIXAL. Para ligar a antena ao receptor rádio usar um cabo
coaxial do tipo RG58 (max 10 m). A antena deve ser posicionada no ponto mais alto possível, longe
de estruturas metálicas. É possível usar os lampejantes providos de antena de fio.
3. Selecção canais-saídas (fig.1)
1 ou 2 dos 4 canais dos transmissores devem ser combinados com as 4 saídas do receptor rádio
BIXLR42 mediante os jumpers:
JR1 saída OUT1, activação led LD1
JR2 saída OUT2, activação led LD2 (somente BIXLR22)
4. Memorização GOL4-GOL4C (fig. 2)
- Pressionar e soltar no botão PRG do receptor rádio ou do quadro electrónico, o led de sinalização
SIG liga-se.
- Efectuar uma transmissão pressionando nos botões CH desejados do transmissor (dentro
da porta do receptor rádio). O transmissor é assim memorizado. Durante esta fase, o led de
sinalização SIG pisca. Quando o led volta a ser aceso é possível activar um novo transmissor.
Activar todos os novos transmissores efectuando uma transmissão conforme indicado.
NOTA: se JR4=ON são memorizados todos os canais, se JR4=OFF, é memorizada apenas a tecla
do canal pressionada.
- A saída do processo é efectuada de modo automático depois de 10 s da última transmissão ou
premindo novamente a tecla PRG (o led SIG desliga-se).
5. Memorização a distância GOL4 (fig. 3)
Para memorizar novos transmissores sem efectuar alterações no receptor rádio ou no quadro
electrónico, pressionar no botão PRG de um transmissor GOL4 já memorizado por 5 s até a
ignição do led (dentro da porta do receptor rádio) e pressionar qualquer uma das teclas CH do
novo transmissor.
JR5=OFF desactiva-se a programação a distância.
NOTA: estar atento para não memorizar involuntariamente transmissores não desejados.
6. Clonagem GOL4C (fig. 4)
- Premer contemporaneamente os botões CH1 e CH2 de um novo transmissor por 5 s, o led
vermelho liga-se.
- Aproximar o transmissor GOL4C já memorizado e executar uma transmissão premindo um
qualquer dos botões CH.
- Depois de três relampejos de confirmação sai-se automaticamente do processo.
NOTA: é possível efectuar a clonagem também dos transmissores BIXLS2.
7. Clonagem GOL4C mediante inserção código (fig. 5)
- Premer contemporaneamente os botões CH1 e CH2 de um novo transmissor por 5 s, o led
vermelho liga-se.
- Inserir um código de 10 cifras premindo CH1=0 (OFF) ou CH2=1 (ON). Entre uma pressão e
outra dispõe-se de 5 s.
- A saída do processo é efectuada depois da inserção da décima cifra. (O transmissor efectua 3
relampejos).
NOTA: este processo torna o transmissor GOL4C equivalente a um transmissor BIXLS2.
8. Cancelar transmissores dà memória do receptor
- Manter pressionado o botão PRG do receptor rádio ou do quadro electrónico por 3 s, até o led
SIG começa a piscar.
- Para cancelar todos os transmissores da memória do receptor rádio, manter pressionado
novamente o botão PRG por 3 s.
- Para cancelar um único transmissor, pressionar um dos botões CH anteriormente memorizado
do transmissor a cancelar.
- O cancelamento é confirmado pelo piscar rápido do led SIG.
9. Substituição bateria (fig. 6)
Tomar o máximo cuidado durante a substituição da bateria. Fazer atenção às polaridades.
Não manusear a bateria com o auxílio de pinças ou outros objectos, para evitar riscos de
descarga ou explosão.
Para garantir prestações óptimas, aconselha-se de substituir a bateria uma vez por ano ou quando
evidencia-se uma consistente perda de capacidade.
ESPAÑOL
PORTUGUÊS
Todos los derechos relativos a este material son propiedad exclusiva de Entrematic Group AB. Aunque los contenidos de esta publicación se hayan redactado con
la máxima atención, Entrematic Group AB no puede asumir ninguna responsabilidad por daños causados por eventuales errores u omisiones en esta publicación.
Nos reservamos el derecho de aportar eventuales modificaciones sin previo aviso.
Las copias, los escaneos, los retoques o las modificaciones están expresamente
prohibidos sin el consentimiento previo por escrito de Entrematic Group AB.
Todos os direitos relativos a este material são de propriedade exclusiva da Entrematic Group AB. Embora os conteúdos dessa publicação foram compilados
com o maior cuidado, Entrematic Group AB não pode assumir qualquer responsabilidade por danos causados por eventuais erros ou omissões nessa publicação. Reservamo-nos o direito de fazer alterações sem aviso prévio. Cópias,
digitalizações, alterações ou modificações são expressamente proibidas sem o
consentimento prévio por escrito da Entrematic Group AB.
 Loading...