

ENTOMED SA40, LYDIA User Manual

User Manual Sound Level Dose Meter Lydia U, Lydia X, SA 40 and SoundReport, EPP116 rev.3.
User manual
Sound Level Dose Meter
SA40 & LYDIA
English edition August 2010
Sound Level Dose Meter SA40 and LYDIA are marketed in cooperation with
Sound Level Dose Meters SA40 and LYDIA are made in Sweden by
Entomed MedTech AB
Storgatan 7
SE-233 31 Svedala, Sweden
+46 40 48 11 40
info@entomedmedtech.se
www.entomedmedtech.se

User Manual Sound Level Dose Meter Lydia U, Lydia X, SA 40 and SoundReport, EPP116 rev.3.
Table of contents
Page
INTRODUCTION ..................................................................................................................................................... 2
The sound level dose meter is shipped with pre-settings, ready to be used ................................................... 2
Positioning the sound level dose meter on a wall ........................................................................................... 2
Setting of the alarm levels and the indicator light intensity .............................................................................. 2
The sound level dose meter has a rotary switch at the bottom - providing for manual settings ...................... 2
Sound level, manual setting of alarm levels for yellow and red indicators ...................................................... 2
Manual setting of the indicator light intensity .................................................................................................. 2
SoundReport - Program for PC ............................................................................................................................ 2
Installation ...................................................................................................................................................... 2
General information ........................................................................................................................................ 2
Connecting the Sound Level Dose Meter ....................................................................................................... 2
SoundReport - Real time presentation (Live mode) ........................................................................................... 2
Live – real time presentation of the sound pressure level ............................................................................... 2
Zooming in – zooming out resp. repositioning of the diagram ........................................................................ 2
SoundReport – Settings for the Sound Level Dose Meter ................................................................................. 2
Device – Settings for the Sound Level Dose Meter ........................................................................................ 2
SoundReport - Uploading measurement data files from the Lydia X/SA40 Sound Level Dose Meters ......... 2
Measurement – Uploading the measurements from Lydia X/SA40 ................................................................ 2
Presetting of measurement file identity presets .............................................................................................. 2
Correction of measurement start and stop time – Date och Time ................................................................... 2
Correlation to other references - Notes .......................................................................................................... 2
SoundReport – Administration of measurement data files................................................................................ 2
Creating a new folder ..................................................................................................................................... 2
Deleting a folder or a measurement data file .................................................................................................. 2
Measurement data files – backing up, export, import, ..........
.......................................................................... 2
SoundReport – Preset information alternatives ................................................................................................. 2
Settings – customizing the SoundReport preset information .......................................................................... 2
Measurement file identity presets ................................................................................................................... 2
Setting the time interval/point of times for the calculation of LEX ..................................................................... 2
Limit values in the diagram’s .......................................................................................................................... 2
Communication port settings of the PC .......................................................................................................... 2
Hard copy print-out settings ............................................................................................................................ 2
Reporting – Overall sound/noise-exposure ........................................................................................................ 2
Day View – Daily sound exposure level LEX. ................................................................................................. 2
Zooming in – zooming out resp. repositioning of the diagram ........................................................................ 2
Documentation – hard copy print-outs/export of measurement data .............................................................. 2
Reporting – Detailed sound level variation over time ........................................................................................ 2
Time View - Equivalent L
pAeq
and maximal sound pressure level
LpAFmax
........................................................ 2
Comparing several graphs to each other ........................................................................................................ 2
Zooming in – zooming out resp. repositioning of the diagram ........................................................................ 2
Documentation – hard copy print-outs/export of measurement data .............................................................. 2
Reporting – Sound pulse peak levels accumulated ........................................................................................... 2
Total view – Sound pulse peak levels L
pCmax
accumulated over period. ......................................................... 2
Documentation – hard copy print-outs/export of measurement data .............................................................. 2
Documentation – hard copy print-outs of reports .............................................................................................. 2
Reporting sound pressure level measurements in hard copy print-outs ......................................................... 2
Generating the hard copy print-outs ............................................................................................................... 2
Export of measurement data .......................................................................................................................... 2
Measurement uncertainty – automatically reported calculation ...................................................................... 2
Quick reference guide – Lydia U, Lydia X and SA40 - SoundReport ................................................................ 2
Settings – to present, alter or to delete measured values ............................................................................... 2
Real time sound level monitoring - (Live mode) .............................................................................................. 2
Quick reference guide – Lydia X and SA40 - SoundReport ............................................................................... 2
Uploading measured values from the Lydia X and the SA 40 ........................................................................ 2
Documentation – hard copy print outs/export of measurement data .............................................................. 2
Measurement data memory check ................................................................................................................. 2
User Manual Sound Level Dose Meter Lydia U, Lydia X, SA 40 and SoundReport, EPP116 rev.3.
INTRODUCTION
Entomed MedTech AB is, in cooperation with HLF in Norway, marketing a sound level dose meter designed to allow for an easy and efficient noise level screening and monitoring, as a complement to
traditional methods for sound level dose calculations and measurements.
It is designed for continuous use, thus adding the time perspective to the measurements, but yet most easy to use. Put it on
the wall at a suitable location; connect the enclosed mains
adaptor to the nearest mains outlet – Ready to use!
All sound level dose meters are shipped with the alarm level
factory pre-settings as follows:
Red indicates sound levels of 70 dBA or more.
Yellow indicates sound levels of 67 dBA or more.
Green indicates its currently monitoring the sound level.
These settings and the indicator lamps intensity might easily be
altered using the rotary switch at the bottom.
The following sound level dose meter models are available:
Lydia U sound level indicator (not available on all mar-
kets)
Lydia X sound level dose meter
SA40 sound level dose meter
The SoundReport reporting program, enclosed in the shipment, adds additional monitoring and reporting features to the level dose meter, such as parameter settings and real time monitoring and visualization of the sound level.
For Lydia X and SA40, with their unique design in automatically storing the sound level measurements
in their measurement data memories, the SoundReport program provides a complete and easy to operate system for the screening and monitoring of sound levels and sound level doses, to be analysed,
printed and documented into reports – fully in accordance to the occupational health and safety legislation and its noise level regulations.
LYDIA U although basically being a sound level indicator, but yet designed to allow for being upgraded
with additional software and a measurement data memory – in order to provide exactly the same functionality as the Lydia X type sound level dose meter.
The sound level dose meter is shipped with pre-settings,
ready to be used
Put it on the wall at a suitable location and connect the enclosed mains adaptor to the nearest mains
outlet. The green light indicates that it has started monitoring the sound level and according to the factory pre-settings, the yellow light indicates a sound level of 67 dBA or more and the red light indicates
70 dBA or more.
Positioning the sound level dose meter on a wall
It is important that the sound level dose meter is positioned in such a way that the measured sound
levels are relevant to the sound levels of the room. When positioned on a wall, the recommended horizontal distance to the closest corner is 30-45% of the length of the wall. I.e. if the wall is 3.0 m, the
recommended distance is 0.9 to 1.35 m from the corner.
Regarding the vertical position, it’s recommended to be related to the level of the heads of the people
occupying the room, adults or children, standing upright, sitting down on chairs or directly on the floor.
User Manual Sound Level Dose Meter Lydia U, Lydia X, SA 40 and SoundReport, EPP116 rev.3.
Setting of the alarm levels and the indicator light intensity
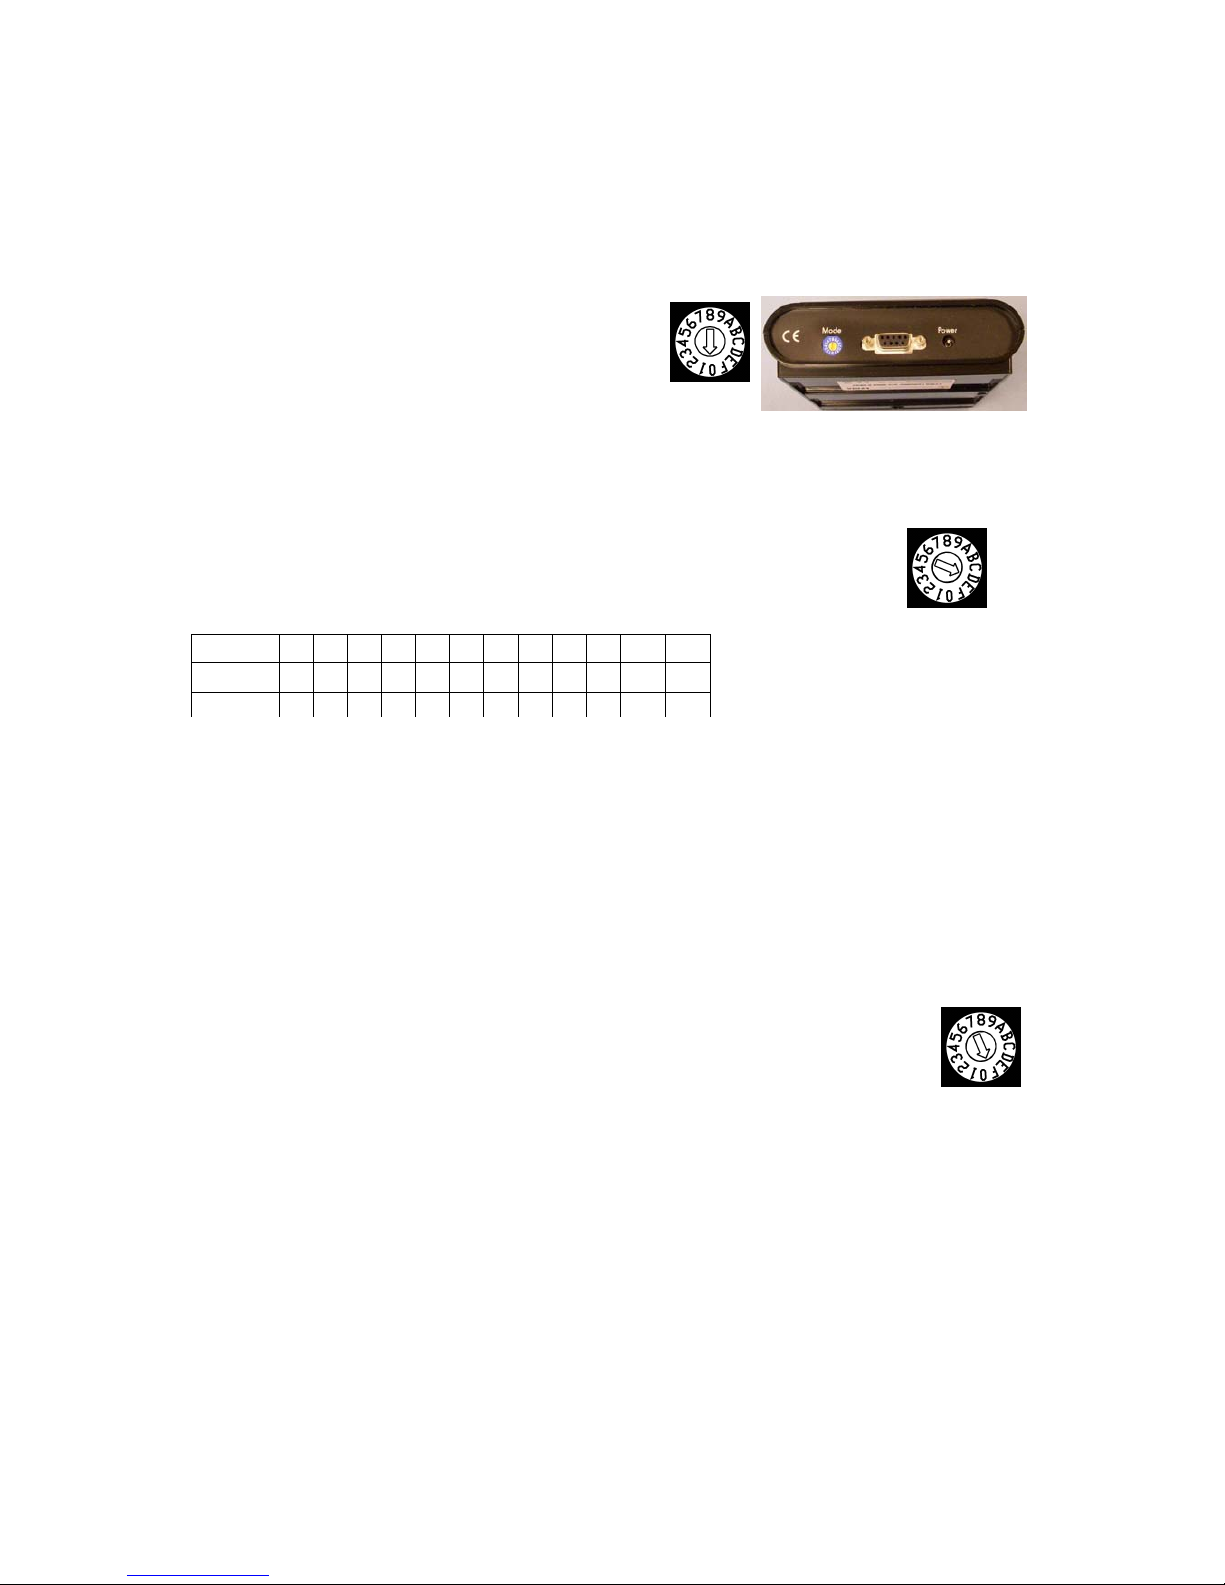
The sound level dose meter has a rotary switch at the bottom - providing
for manual settings
The pre-set values for the alarm levels and for the indicator light intensity might easily become altered by the
use of the rotary switch at the bottom.
(Please Note. The switch should always be set back into position
”0” when operating the sound level dose meter).
Sound level, manual setting of alarm levels for yellow and red indicators
Manual setting of the alarm levels for the yellow and the red indicator lights.
Disconnect it from the mains, then turn the rotary switch into position ”D”. Reconnect it to the mains and all three indicators are switched on.
Turn the rotary switch into the position of the desired alarm level (in dB)
in accordance to the table to the left.
When the desired setting has been selected, all indicators provide one flash, then wait until the green
indicator has provided one flash. Disconnect it from the mains; turn the rotary switch back into position
“0” and the selected alarm levels have been set.
The sound level dose meter, with the new alarm level settings, is ready for use and to be connected to
the mains.
Manual setting of the indicator light intensity
The indicator light intensity could be altered from maximum down to minimum or even switched off.
The factory pre-setting, when shipped, is the second to maximum setting, corresponding to the rotary
switch position ”E”.
To alter this setting, disconnect it from the mains, turn the rotary switch into position ”F”.
Reconnect it to the mains and all three indicators are switched on at maximum intensity.
For maximum intensity, disconnect it from the mains; turn the rotary switch back into position “0”.
For less intensity, turn the rotary switch step by step counter clockwise until the desired intensity has
been achieved. Position ”F” represents the maximum and position ”1” the minimum intensity.
Disconnect it from the mains; turn the rotary switch back into position “0” and the selected indicator
light level has been set.
The sound level dose meter, with the desired light intensity, is ready for use and to be connected to
the mains.
Please Note! In position ”0” all indicators are switched off – an important feature for the Lydia X and
Entomed SA40 models thus allowing for the monitoring of the sound levels “unaffected” of individual
behaviour.
Position 2 3 4 5 6 7 8 9 A B C D
Red 40 50 60 70 75 80 85 87 90 95 100 103
Yellow 37 47 57 67 72 76 79 81 84 89 94 97

User Manual Sound Level Dose Meter Lydia U, Lydia X, SA 40 and SoundReport, EPP116 rev.3.
SoundReport - Program for PC
The SoundReport program-CD is enclosed free of charge, as a free-ware, with all shipments of all
models (Lydia U, Lydia X with memory and SA40 with memory) of the sound level dose meter.
Installation
Insert the SoundReport CD into the CD-ROM drive. The installation guide will start automatically –
select ”Install SoundReport” and follow the instructions.
(In case the CD-ROM doesn’t start automatically, try the “Start”-menu, select ”Run” use “Browse” to
find the "Install SoundReport.exe”-file on the SoundReport CD and follow the instructions).
General information
When opening the program, the following starting menu is being presented. All other menus and alternatives are accessed both via the menu bar at the top, as well as shortcuts directly via the tab bar.
The alternatives provided are as follows:
Total view the sound pulse levels
accumulated over the
measured periods
Day view the daily sound exposure
level LEX
Time view the sound pressure level
LpAeq and maximum time weighted sound pressure
level LpAFmax.
Measuring uploading, administration
of measurement data files
Settings for program-and calculation
settings
Live real time sound level
presentation - live mode
Device for Sound Level Dose Meter
identification and parameter
settings
Help/About for the user manuals and
program information
Connecting the Sound Level Dose Meter
The Sound Level Dose Meter is connected via the enclosed RS 232-cable to a serial port of the PC, or
to an USB-port, by using the USB-adaptor (This adaptor is optional for the Lydia U, but included in the
shipment for the Lydia X and SA40).
Please Note! When using the USB-adaptor, the enclosed mini-CD with the USBdriver program needs to be installed as well. Follow its separate instructions.
Make sure the sound level dose meter rotary switch is set to position”0” and connect
it to the mains. Start the SoundReport program and then connect the sound level
dose meter to the PC.
When the connection to the PC is established, the SoundReport connection icon
changes to the proper status and that the indicator lights of the sound level dose meter
will all be switched off.
Further information regarding communication port settings, automatic/manual, please
refer to page 10.
 Loading...