

Page 1

Aurorean™ Virtual Network
Aurorean™ Virtual Network
Aurorean™ Virtual NetworkAurorean™ Virtual Network
RiverMaster
RiverMaster
RiverMaster RiverMaster
Administrator
Administrator’s Guide
AdministratorAdministrator
Version 3.1
Version 3.1
Version 3.1Version 3.1
s Guide
s Guides Guide
Page 2

©2001 Enterasys Networks. Allrights reserved. This publication contains information that is the property of
Enterasys Networks. No part of this publication may be copied, photocopied, repr oduced, translated, or reduced to
any electronic medium or machine readable form without prior written consent of Enterasys Networks. Information in
this publication is subject to change without notice. Enterasys Networks assumes no responsibility for errors or
omissions in this publication or for the use of this mat erial.
Part Number: AVN-RMAG-R31
Released: March 2001
Printed in the USA.
For more information on Enterasys Networks products, refer to the following table:
U.S. Office
Address 35 I ndustrial Way
Rochester, NH 03866
Phone 1-877-641-7400
Fax (603) 3 37-2211
Internet http://www.enterasys.com
Sales 1-877-641-7400
www.enterasys.com
Support Call the Enterasys GTAC at
1-800-872-8440 or email us at
support@enterasys.com
The Enterasys Networks logo, Aurorean, Prescriptive Diagnostic Engine, RiverM aster, Intelligent Client Routing and
TollSaver, and TurboTunnel are trademarks of Enterasys Networks.
Microsoft, MS, and MS-DOS are registered trademarks and Windows, Windows 95, Windows 98, Windows NT,
Windows 2000 Professional, and Windows Millennium are trademarks of Microsoft Corporation in the USA and other
countries.
Virtual Network Computing is a trademark of AT&T Laboratories C ambridge.
Other trademar ks and trade names used in this publication belong to their respective owners.
Aurorean Virtual Network software includes the following third-party components:
Gate Daemon software. © 1995 The Regents of the University of Michigan. All rights reserved.
Gate Daemon was originated and developed through release 3.0 by Cornell University and its collaborators.
A DES implementation written by Eric Young. © 1995-1997 Eric Young (eay@cryptsoft.com). All rights reserved.
MD4 and MD5 implementation derived from the RSA Data Security, Inc. MD4 Message-Digest Algorithm and
MD5 Message-Digest Algorithm. © 1991-2, RSA Data Security, Inc. Created 1991. All rights reserved.
ccp.c - PPP Compression Control Protocol. © 1994 The Australian National University. All rights reserved.
chap.c - Cryptographic Handshake Authentication Protocol.© 1991 GregoryM. Christy. All rights reserved.
chap_ms.c - Microsoft MS-CHAP compatible implementation. © 1995 Eric Rosenquist, Strata Software Limited
(www.strataware.com). All rights reserved.
fsm.c - {Link, IP} ControlProtocol Finite State Machine. © 1989 Carnegie MellonUniversity.All rights reserved.
Routinesto compressand uncompress TCP packets(fortransmission over low speed seriallines).
© 1989 Regents of the University of California. All rights reserved.
Portions of Aurorean Client Software are copyrighted to ICE Engineering, Inc. and licensed through a GNU public license. For
more information, including access to the source code, visit their Web site at www.ice.com.
ii
RiverMaster Administrator’s Guide
Page 3

Table of Contents
Table of Contents
Table of ContentsTable of Contents
About Thi s Guide
Contents of the Guide ...........................................................................................................ix
Conventions Used in this Guide..........................................................................................xi
Related Documents................................................................................................................ xi
Chapter 1 – Installing RiverMaster Software
System Requirements..............................................................................................................1
Hardware Requirements..................................................................................................1
Software Requirements....................................................................................................2
Installing the Application.......................................................................................................2
Upgrading a Previous Release........................................................................................2
Installation Steps...............................................................................................................2
Starting the Application for the First Time...................................................................4
Removing RiverMaster Files..................................................................................................9
Chapter 2 – Getting Started with RiverMaster
RiverMaster Overview..........................................................................................................11
Logging into RiverMaster.....................................................................................................13
Checking Server Status .........................................................................................................15
Problem Summary & Users Logged In........................................................................15
Aurorean Network Gateway Statistics........................................................................16
Aurorean Policy Server Statistics.................................................................................17
Setting Up a Aurorean Virtual Network the First Time...................................................21
RiverMaster Administrator’s Guide
iii
Page 4

Table of Contents
Chapter 3 – Configuring an ANG-3000/7000
Before You Begin ................................................................................................................... 26
Allocating IP/IPX Addresses to Remote Clients.......................................................27
Virtual Subnets for Site-to-Site and Remote Access Tunnel Servers.............. 30
Intelligent Client Routing .............................................................................................31
NAT Server......................................................................................................................33
Site-to-Site Tunnels ........................................................................................................34
AutoLink Recovery........................................................................................................ 35
General Aurorean Network Gateway Settings.................................................................37
Viewing Aurorean Alternate Address Information.........................................................42
Tunnel Protocols.................................................. ...... ............................................................ 43
Virtual Subnetting ................................................................................................................. 50
IP Subnetting .................................................................................................................. 50
iv
IPX Virtual Networks .................................................................................................... 52
Routing ................................................................................................................................... 54
Setting Routing Protocol Parameters.......................................................................... 55
Setting RIP Properties ........................................................................................... 55
Setting OSPF Properties........................................................................................ 57
Routing Interfaces.......................................................................................................... 59
Adding or Removing a Routing Protocol for an Interface............................... 60
Configuring RIP for the Interface........................................................................ 62
Configuring OSPF on an Interface...................................................................... 64
Creating Static Routes........................................................................................... 65
Adding a Remote Server...................................................................................................... 68
Changing Server and Tunnel Properties..................................................................... 71
RiverMaster Administrator’s Guide
Page 5

Chapter 4 – Setting Up Aurorean Services
Before You Begin....................................................................................................................75
Authorization Plug-in Options.....................................................................................76
RADIUS Authentication Servers.......................................................................... 76
Plug-in Planning..................................................................................................... 77
Threads..................................................................................................................... 77
Private/Public Keys for IPSec Authentication...........................................................78
Problem Notification......................................................................................................78
Trace Levels......................................................................................................................79
Adding an Authorization Plug-In.......................................................................................80
Enterasys Authentication ..............................................................................................81
RADIUS Authorization..................................................................................................83
SecurID Authorization...................................................................................................87
Table of Contents
Generating Private/Public Keys..........................................................................................91
Using the Notification Service to Send E-Mail..................................................................93
Creating a Mailing List...................................................................................................93
Adding an Address to a Mailing List ..........................................................................95
Setting Trace Levels ...............................................................................................................97
Backing Up the Database............................ ...... ..... ................................................... ............98
Chapter 5 – Controlling Remote U s er Dialing & Access
Before You Begin..................................................................................................................101
TollSaver Database........................................................................................................102
Corporate Dial-Up Access...........................................................................................103
Problem Notification....................................................................................................104
Creating POP Packages.......................................................................................................105
Adding Corporate ISPs.......................................................................................................108
RiverMaster Administrator’s Guide
v
Page 6

Table of Contents
Adding POPs for Corporate ISPs........................................................ ...... ..... ...... ..............114
Chapter 6 – Managing Users & Groups
Before You Begin ................................................................................................................. 120
Group Policies .............................................................................................................. 121
Aurorean Client Installation Kits............................................................................... 122
Client Synchronization................................................................................................124
Group Notices...............................................................................................................127
Creating a New Group.......................................................................................................127
Adding Users to a Group............................................................................................ 134
Modifying User & Group Information.....................................................................137
Removing Users & Groups.........................................................................................138
Creating an Aurorean Client Installation Kit..................................................................139
Controlling Client Synchronization.................................................................................. 145
Viewing Group Policies...............................................................................................146
Building Core Data Files.............................................................................................147
Uploading Software Synchronization Files..............................................................149
Setting Up Group Notices..................................................................................................152
Chapter 7 – Viewing Server Activity & Statistics
Monitoring System Activity .............................................................................................. 157
Current Message Activity...........................................................................................157
Advanced Message Viewer ........................................................................................164
RiverMaster Options ................................................................................................... 170
Viewing Tu nnel Activity .................................................................................................... 173
Using SNMP to Gather Statistics ......................................................................................176
vi
RiverMaster Administrator’s Guide
Page 7

Chapter 8 – Generating Reports
Report Contents....................................................................................................................177
Server Anomaly Report ...............................................................................................177
Network Gateway Report............................................................................................179
Client Anomaly Report................................................................................................182
Client Report..................................................................................................................183
Accounting Report........................................................................................................187
Downloading, Viewing and Exporting Reports..............................................................190
Printing Reports............................................................................................................193
Exporting Reports.........................................................................................................194
Exporting Reports to a Disk File ........................................................................ 194
Exporting Reports to a Microsoft Exchange Folder......................................... 203
Exporting Reports Using MAPI ......................................................................... 207
Table of Contents
Appendix A – Glossary
Appendix B – ANG-3000/7000 Preconfigu ration Stored on a
Floppy Disk
Adding Remote Gateways..................................................................................................218
Configuring ANG IP Addresses........................................................................................220
Configuring Tunnel Protocols............................................................................................221
Configuring Virtual Subnets..............................................................................................228
Configuring Routing Protocols..........................................................................................230
OSPF Properties.................................... ...... ..... ................................................... ..........232
RiverMaster Administrator’s Guide
vii
Page 8

Table of Contents
Configuring Routing Interfaces ........................................................................................234
Configuring RIP for the Interface.............................................................................. 236
Configuring OSPF on an Interface ............................................................................ 238
Creating Static Routes................................................................................................. 239
Creating Remote Connections...........................................................................................242
Loading the Floppy Disk.................................................................................................... 247
Chapter 9 – License Agreement & Support
Enterasys Networks License Agreement......................................................................... 249
License Grant................................................................................................................ 249
Warranty........................................................................................................................250
Infringement Indemnification....................................................................................251
Limitation of Liability..................................................................................................251
Index
viii
Termination................................................................................................................... 252
International Provisions.............................................................................................. 252
Applicable Law ............................................................................................................ 252
U. S. Government - Commercial Computer Software............................................253
Technical Support................................................................................................................ 254
Support from Authorized Resellers..........................................................................254
Support from Enterasys Networks............................................................................254
On-line Services ................................................................................................... 254
Phone Support...................................................................................................... 254
RiverMaster Administrator’s Guide
Page 9

This guide describes how to use Version 3.1 of the RiverMaster management
application to set up and monitor Aurorean Virtual Network systems. While
written primarily to describe how to configure a Aurorean Virtual Network
solution for the first time, this guide also addresses how to track usage and
troubleshoot end-to-end VPN connectivity problems.
The guide is designed for network administrators who are responsible for
installing and mana ging local and wide area networking equipment. Th e
guide assumes you have experience working with LAN devices such as
firewalls, routers, hubs, and file servers.
Contents of the Guide
Information in this guide is arranged as follows:
H Chapter 1, Installing RiverMaster Software provides step-by-step
instructions for installing the R iverMaster application on your
computer and starting the application for the first time.
H Chapter 2, The Guided Tour contains an overview of RiverMaster
operation, describes how to log into RiverMaster and check the status
of your Aurorean Virtual Network servers, and walks you through
the process of setting up an Aurorean Virtual Network for the first
time.
About This Guide
About This Guide
About This GuideAbout This Guide
H Chapter 3, Configuring a Aurorean Network Gatewaydescribes how to
configure network settings, such as IP addresses, name resolution
servers, t unnel p rotoc ols, an d rou ting pr otoco ls, usi ng Riv erMaster or
Aurorean Policy Manager. The chapter describes how to back up the
database on the Aurorean Policy Server and details how to set up
site-to-site tunnels from one Aurorean Network Gateway to another.
It also details how to view and change alternate ANG address data.
H Chapter 4, Setting Up Aurorean VN Services discusses how to: use the
Authorization service to authenticate remote users, prepare the
Notification service to send E-mail in response to Aurorean Virtual
Network alarm, alert, or notification messages, and set trace levels for
system messages.
RiverMaster Administrator’s Guide
ix
Page 10

About This Guide
H Chapter 5, Controlling Remote User Dialing & Access describes how to
define Aurorean Network Gateway destinations, select ISPs from the
TollSaver database, configure POP packages and add corporate dialup phone numbers.
H Chapter 6, Manag ing Users & Groups addresses how to create a user
database on a Aurorean Policy Server, assign policies that govern
user access to the network, and prepare a customized Aurorean
Client Software installation kit.
H Chapter 7, Viewing Server Activity & Statistics shows you how to
examine and interpret message traffic between Aurorean Virtual
Network devices and monitor the performance of active tunnel
connections. Standard SNMP MIB-II and two private MIBs are now
available to monitor your Aurorean systems.
H Chapter 8, Generating Reports describes how to download and view
customize d reports th at re veal Aurorean Virtual Network server
performance and remote user activity.
H Appendix A, Glossary contains definitions for terms used throughout
this guide.
H Appendix B, Configuring the ANG with a Floppy Disk, describes a
procedure similar to the steps you would take to configure the ANG
by using the RiverMaster application. But this method allo ws an
administrator to centrally set up one or more gateways and distribute
that information on floppy disks to remote sites.
H Appendix C, License Agreement & Support describes the agreement that
governs the use and distribution of RiverMaster software and
provides information for contacting Enterasys Networks for technical
support.
x
RiverMaster Administrator’s Guide
Page 11
Conventions Used in this Guide
The following conventions are used in this guide:
About This Guide
NOTE Notes supply additional helpful information,
CAUTION Cautions contain directions that can prevent you
WARNING Warnings provide directions that you must
Bold Text in boldface indicates values you type using
Italics T ext in italics indicates a variable, important new
SMALL CAPS Text in small caps specifies keys to press on the
Courier font Text in this font denotes a file name or directory.
Related Documents
The following publications are also supplied with Aurorean VN systems:
point you to where you can find more
information, or emphasize critical issues you
should consider w hen performing an action.
from damaging the product or losing data.
follow to avoid harming yourself.
the keyboard (for example, a:\setup). Default
settings may also appear in bold.
term, or the title of a manual.
keyboard; a plus sign (+) between keys indicates
that you must press the keys simultaneously (for
example,
CTRL+ALT+DEL).
H RiverMaster Quick Reference Card that contains shortcuts and tips f or
installing and using the RiverMaster application.
H Quick Setup cards that highlight the basic steps required to install
either a Aurorean Policy Server or Aurorean Network Gateway.
H Aurorean Installation & Service Guide describes how to mount, connect,
power-up, and maintain an Aurorean Policy Server and Aurorean
Network Gateway.
H ANG-1000 User’s Guide details how to install and configure the small
office/home office Network Gateway.
Portable Document File (PDF) versions of these manuals are available on the
Aurorean System Software CD ROM. Using Adobe Acrobat Reader 3.0 (or
RiverMaster Administrator’s Guide
xi
Page 12

About This Guide
later), you can view these manuals on-line or print additional copies. Acrobat
Reader can be downloaded from the Adobe web site (www.adobe.com).
xii
RiverMaster Administrator’s Guide
Page 13

This chapter provides the system requirements and step-by-step instructions
for installing RiverMaster software on your computer. If you have not already
done so, Enterasys Networks recommends that you mount and connect your
Aurorean Polic y Server and Au rorean Network Gatewa y before per forming
these steps. Refer to the Aurorean Installation & Service Guide supplied with
each server for detailed installation instructions.
System Requirements
To run the RiverMaster application, your computer must meet the following
requirements.
Hardware Requirements
1
Installing RiverMaster
Installing RiverMaster
Installing RiverMasterInstalling RiverMaster
Software
Software
SoftwareSoftware
RiverMaster runs on a desktop or laptop computer equipped with:
H A 233 MHz processor or faster
H 64 MB RAM minimum, 128 MB recommended
H 80 MB free space on the computer’s hard drive
H CD ROM drive
H Ethernet network interface
To best view the RiverMaster user interface, set your monitor to display
65536 colors or better at 1024 x 76 8 resolution.
RiverMaster Administrator’s Guide
NOTE
1
Page 14

Installing the Application
Software Requirements
The following operating syst ems, applications, and protocols should be
installed and configured before you install RiverMaster:
H Windows NT 4.0 Workstation upgraded with Service Pack 4 (SP4) or
later version or Windows 2000 Professional
H TCP/IP protocol
H To use Aurorean Policy Manager: Internet Explorer 5 or Netscape 4
Installing the Application
Before installing RiverMast er, close any applications you have runn ing. Once
the installation is complete, you must restart the computer before you can use
RiverMaster to manage your Aurorean Virtual Network.
NOTE
You must log into your Windows NT Workstation/2000 computer using
an account with administrator privileges before installing RiverMaster.
Without administrator privileges, some files may not install properly and
you may be prevented from using some RiverMaster features.
Chapter 1
Installing RiverMaster Software
Upgrading a Previous Release
The following instructions assume you are installing RiverMaster on your
computer for the first time. Do not re-install RiverMaster over a previous
version. Remove the older version of RiverMaster as described in “Removing
RiverMaster Files” on page 9 and then install the new version as described in
the following section.
Installation Steps
To install RiverMaster on your computer, perform the following steps:
1
Insert the Aurorean 3.0 System Software CD into the CD ROM drive.
2
Open Windows Explorer, go to the RiverMaster directory on this CD
and run the
2 RiverMaster Administrator’s Guide
SETUP.EXE
program.
Page 15

Chapter 1
Installing RiverMaster Software
3
If a warning message appears stating that Microsoft ODBC is not
present on your computer, click OK to install Microsoft ODBC. If this
message does not appear, continue with the next step.
The Microsoft ODBC text driver must be installed on your computer
in order for RiverMaster to generate reports. RiverMaster Setup
automatically launches the Microsoft ODBC install program; follow
the instructions provided on the screen. When asked, choose the
Typical ODBC installation. After ODBC is installed, RiverMaster
Setup automatically resumes.
4
When the Welcome window appears, click Next to continue.
To halt the installation and exit the Setu p program, click Ca ncel; this
option is also availa ble on all Setup windows that follow.
5
When the Software License Agreement window appears, carefully
read the agreement and click Yes to accept the terms.
To install RiverMaster, you must accept the agreement. If you click
No to decline the agreement, the Setup program will close.
6
On the Choose Destination Location window, select where you want
RiverMaster files stored on the computer’s hard disk and click Next.
As a default, RiverMaster files are stored in C:\Program Files\
Indus River Networks\RiverMaster. To change the
destination folder, click Browse to select an existing folder or create a
new folder. To return to the previous window to change your
selections, click Back; this option is also available on all Setup
windows that follow.
Installing the Application
7
When the Select Program Folder window appears, assign a name to
the RiverMaster program folder and click Next.
As a default, the Setup program creates an Indus River Networks
folder that appears in the Programs menu. This folder contains
shortcut icons for the RiverMaster application and a README file.
8
When the Start Copying Files window appears, click Next to continue
the installation or click Back to change your selections.
9
An Information window appears stating that to read the RiverMaster
documentation, you must install the Adobe Acrobat Reader program.
Click OK.
Acrobat Reader can be found in the 3rd Party Support Software
directory on this CD or at the Adobe Website (www.adobe.com).
RiverMaster Administrator’s Guide 3
Page 16

Installing the Application
10
11
When the reboot completes, RiverMaster is installed and ready to manage
your Aurorean Virtual Network.
If RiverMaster is running while you upgrade your Aurorean Policy
Server software, RiverMaster may become confused. To avoid this
situation, exit RiverMaster at the beginnin g the APS installation or exit
and restart RiverMaster after the process has completed.
Starting the Application for the First Time
Chapter 1
Installing RiverMaster Software
When the Setup Complete window appears, do one of the following:
– To view the README file immediately, leave the check box
checked and click Finish.
– To wait until later to view the README file, remove the check
from the check box and click Finish.
At the second Setup Complete window, choose Yes to restart your computer and click Finish.
NOTE
When you start the RiverMaster application for the first time, you are asked
for the following information:
H The IP address(es) you assigned to the Aurorean Policy Server(s)
during its installation.
H The Aurorean VPN you assigned to your servers when they were
installed.
H A user name and password to log into RiverMaster (the defaults are
user netadmin and password netadmin).
NOTE
RiverMaster lets you invoke two RiverMaster sessions from one
Windows NT/2000 computer to a prima ry and secondary Aurorean
system. This feature is especially useful when running AutoLink
Recovery™ (ALR), which employs automatic fail over to a backup
Aurorean Virtual Network system. If you wish to invoke two
RiverMaster sessions, you will be required to enter two IP addresses.
4 RiverMaster Administrator’s Guide
Page 17
Chapter 1
Installing RiverMaster Software
To start RiverMaster, perform the following steps:
1
On the main Windows NT/2000 desktop, double-click the RiverMaster icon.
Alternatively, you can click the Start button, point to Programs, point
to Indus River Networks, and then click RiverMaster. In the
RiverMaster program group, click RiverMaster to launch the
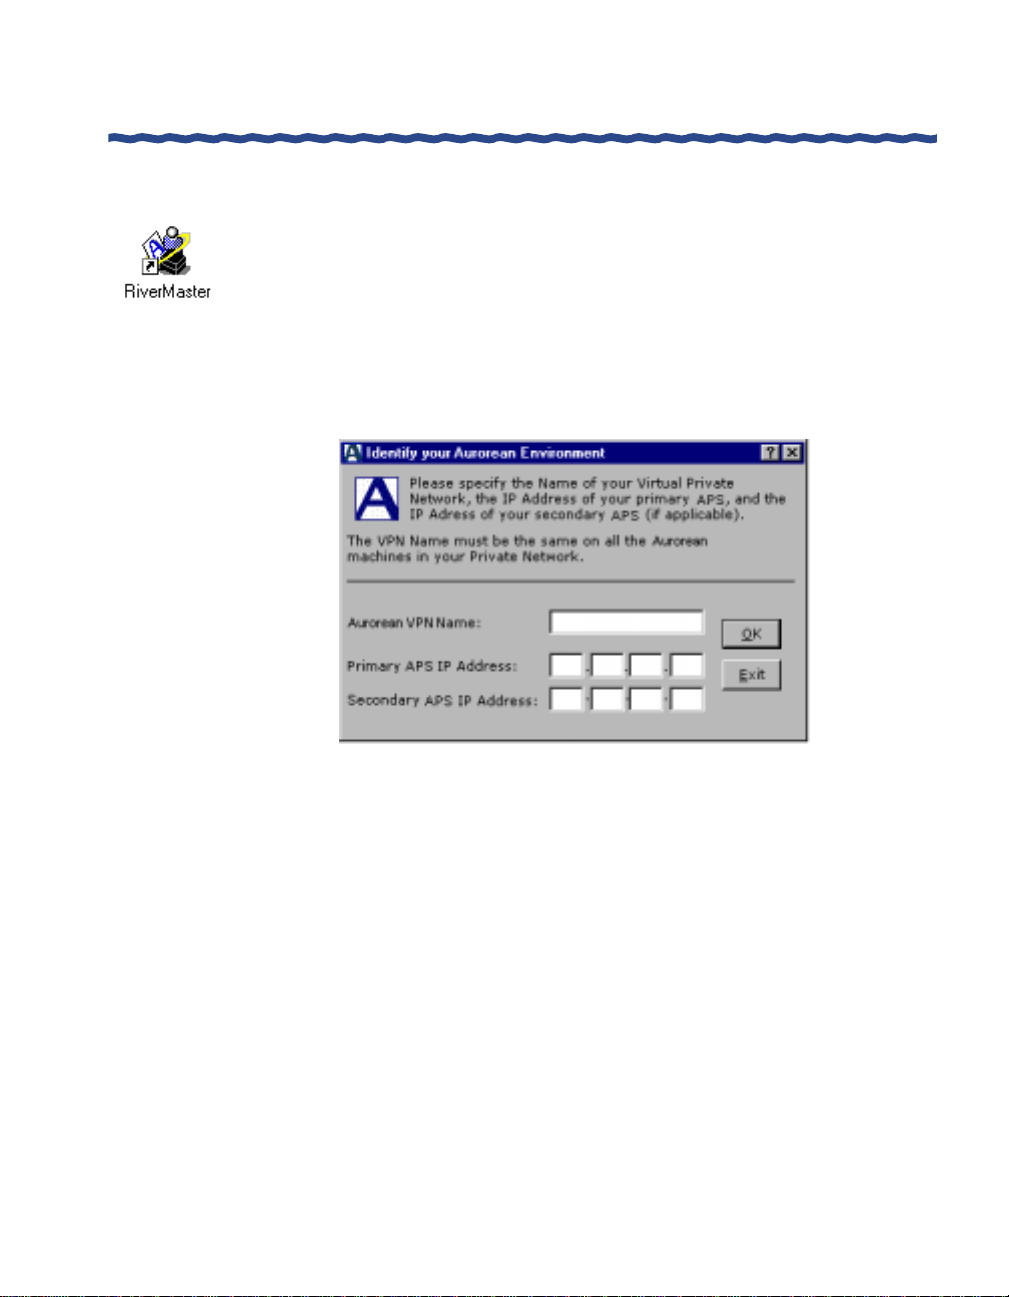
application. After a few seconds, the Identify Your Aurorean
Environment window appears as shown in Figure 1.
Installing the Application
Figure 1 First-Time Setup Information
In the Aurorean VPN Name field, type a collective name that will be
2
shared by all Aurorean devices on your corporate network.
This name is set using the APS Quick Configuration wizard program;
refer to the Aurorean Installation & Service Guide fo r more information.
RiverMaster Administrator’s Guide 5
Page 18
Installing the Application
3
4
Chapter 1
Installing RiverMaster Software
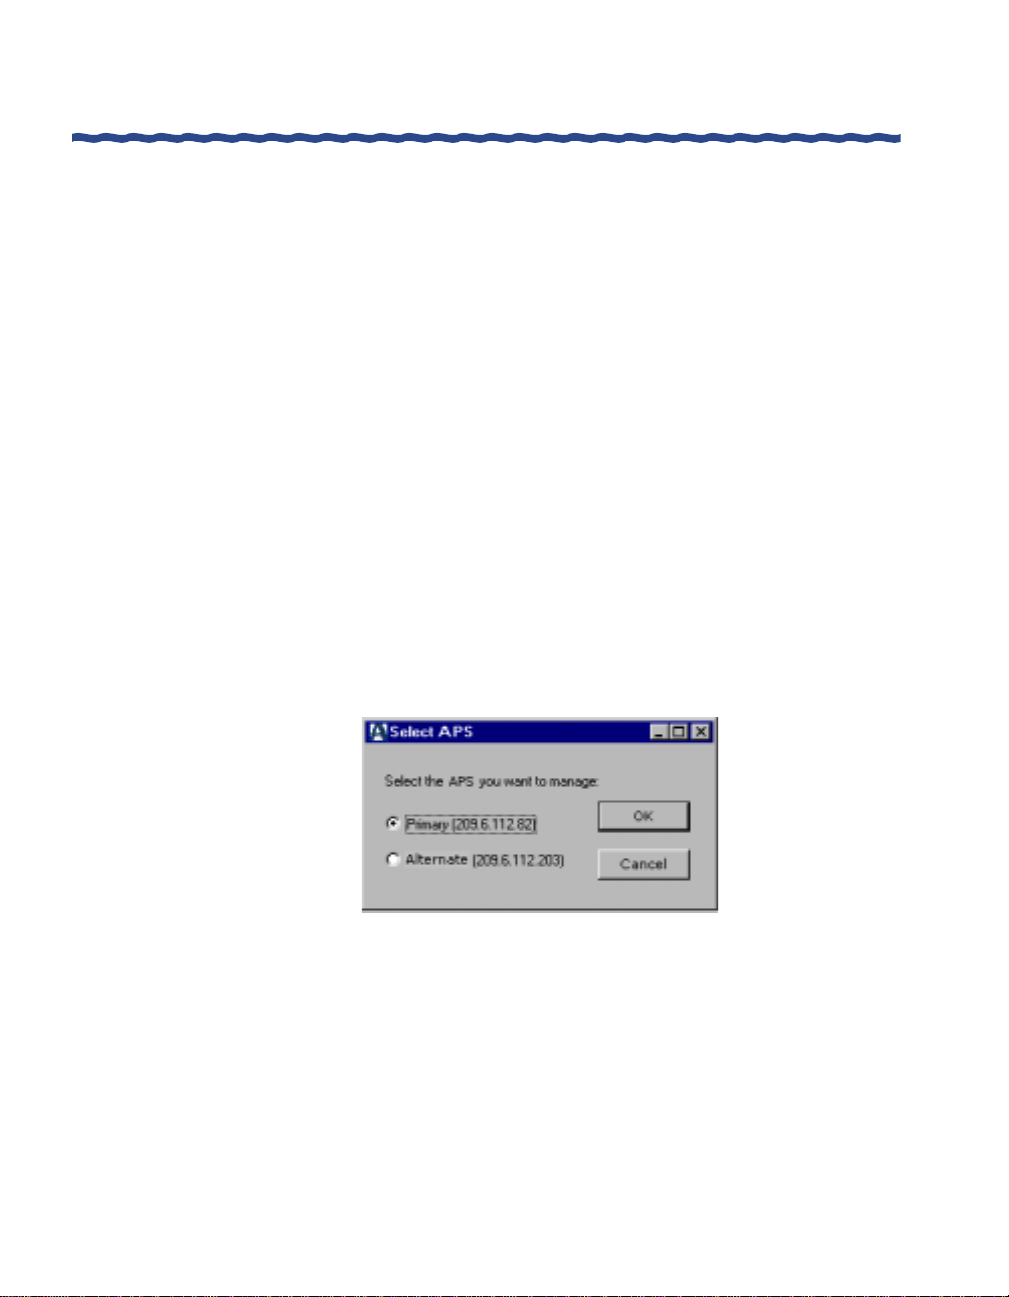
Do one of the following:
– If you are configuring only one Aurorean Policy Server, enter the
IP address assigned to it in the Primary fields and click OK . The
RiverMaster Login window will appear as shown in Figure 3
with the Aurorean VN Name, APS name and IP address
displayed as you specified earlier. Skip to Step 5.
– If, in addition to configuring a Primary APS, you have installed a
backup APS to use with the Auto Link Recovery feature, supply
this IP address in the Alter nate fiel ds after enteri ng an IP addr ess
of the Primary APS in the fields provided. Click OK. The Select
APS window will appear as shown in Figure 2.
This IP address is set using the Aurorean configuration wiz ard
program; refer to the instructions supplied with this program for
more information. RiverMaster needs this IP address to locate and
synchronize with the Aurorean Policy Server.
If you entered both APS IP addresses, select the APS you want to log into and click OK.
The RiverMaster Login window appear s as shown in Figure 3 with
the Aurorean VPN name displayed as typed in the Identify your
Aurorean Environment window.
Figure 2 Select APS Window
6 RiverMaster Administrator’s Guide
Page 19
Chapter 1
Installing RiverMaster Software
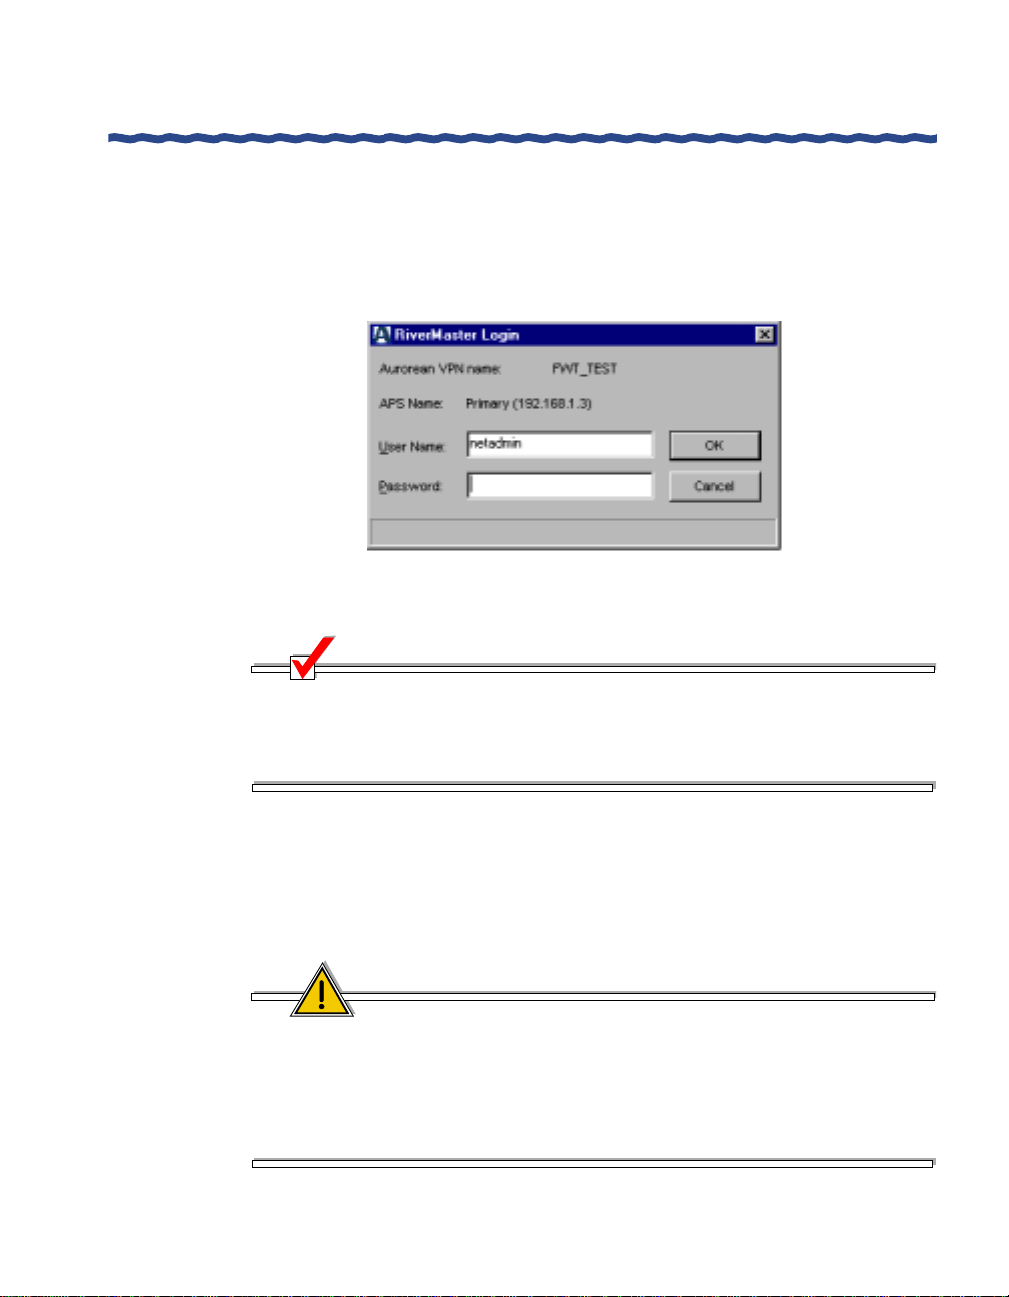
5
Type the default user name (
and click OK.
For example, the primary APS name and its IP address is displayed in
the RiverMaster Login window in Figure 3. When the RiverMaster
application starts, the main in terfa c e appears as shown in Figure 4.
NOTE
netadmin
) and password (
Figure 3 RiverMaster Login Window
Installing the Application
netadmin
)
To prevent unauthorized RiverMaster access, Enterasys Networks
recommends that you i mmediatel y cr eate a new admin istra tor account i n
the Admin group and delete the default login account. Refer to Chapter 6
for instructions on adding and deleting user accounts.
When you start RiverMaster, the application immediately attempts to detect
and communicate with the Aurorean Policy Server and Aurorean Network
Gateway located within the same corporate network. Dependin g upon the
amount of remote client activity occurring on the VPN, RiverMaster may
need up to a minute to detect and synchronize with both servers.
CAUTION
If you want to configure a connection to a second APS after having
already configured a connection to only one server, you must first delete
the config.irx file in the C:\Program Files\Indus River
Networks\RiverMaster directory on the RiverMaster PC. Then, when
you click on the RiverMaster desktop icon, the Identify your
Aurorean VN Environment window will appear as described on page 5.
RiverMaster Administrator’s Guide 7
Page 20
Installing the Application
Using the Delivery service running on all Aurorean components, RiverMaster
establishes a Delivery session with each server. The Aurorean Policy Server
reports service status, memory/hard disk usage, and a summary of alarms,
alerts, and problem notification messages. The Aurorean Network Gateway
reports an aggregated total of bytes sent and received over all tunnels, as well
as memory/hard disk usage.
When memory and disk usage
appears, RiverMaster has
detected and synchronized with
the Aurorean Network Gateway
Chapter 1
Installing RiverMaster Software
Click here to close
the application
Configuration pullout
Manage Users & Groups
pullout
View System Activity
pullout
When service status appears,
RiverMaster has detected
and synchronized with the
Aurorean Policy Server
Figure 4 RiverMaster Main Interface
To learn more about the server status data displayed on the RiverMaster
interface, refer to Chapter 2. To exit the RiverMaster application at any time,
click the close (
X) button in the upper-right corner of the main interface.
NOTE
If you have used RiverMaster extensively to generate reports and view
messages during a period of peak activity, the application may require a
few moments to close.
8 RiverMaster Administrator’s Guide
Page 21

Chapter 1
Installing RiverMaster Software
Removing RiverMaster Files
RiverMaster can be uninstalled from your computer using the standard
Add/Remove Programs tool provided with Windows. After RiverMaster files
are removed from your computer, you should restart the computer to clean
up any files that were in use during the uninstall.
To remove RiverMaster files from your computer, perform the following
steps:
1
On your desktop computer, click the Start button, point to Settings, then click Control Panel.
2
Double-click on Add/Remove Programs to launch the utility.
3
On the Install/Uninstall tab page, select RiverMaster from the list of
programs and click Add/Remove.
4
When the Confirm File Deletion window appears, click Yes to confirm
that you want to remove RiverMaster.
Clicking Yes launches the UnInstallShield program, which manages
the process of deleting RiverMaster files.
Removing RiverMaster Files
5
When Remove Shared File? windows appear for shared .DLL and
.OCX files, click Y es To All and click Yes again to confirm your
decision.
6
When the Remove Programs From Your Computer window appears with all items checked, click OK.
7
When a window appears indicating that RiverMaster has been
removed, click OK to acknowledge the message but do not restart
your computer.
Although the Add/Remove Programs utility removes most Aurorean
VN files, you must manually delete the contents of the RiverMaster
folder within the Indus River Networks folder on your hard drive.
You should do this before restarting your computer.
8
Close the Add/Remove Programs control panel.
9
Open Windows Explorer by clicking the Start button, pointing to
Programs, and then clicking Windows Explorer.
RiverMaster Administrator’s Guide 9
Page 22

Removing RiverMaster Files
10
Locate the RiverMaster program folder.
The default location for this folder is C:\Program Files\
Indus River Networks.
11
Delete the RiverMaster folder.
12
Restart your computer.
Chapter 1
Installing RiverMaster Software
10 RiverMaster Administrator’s Guide
Page 23

This chapter introduces the essential functions of RiverMaster, describes
Aurorean Virtual Network system status information displayed on the main
interface, and summarizes the steps required to use RiverMaster to configure
your Aurorean Virtual Network for the first time.
RiverMaster Overview
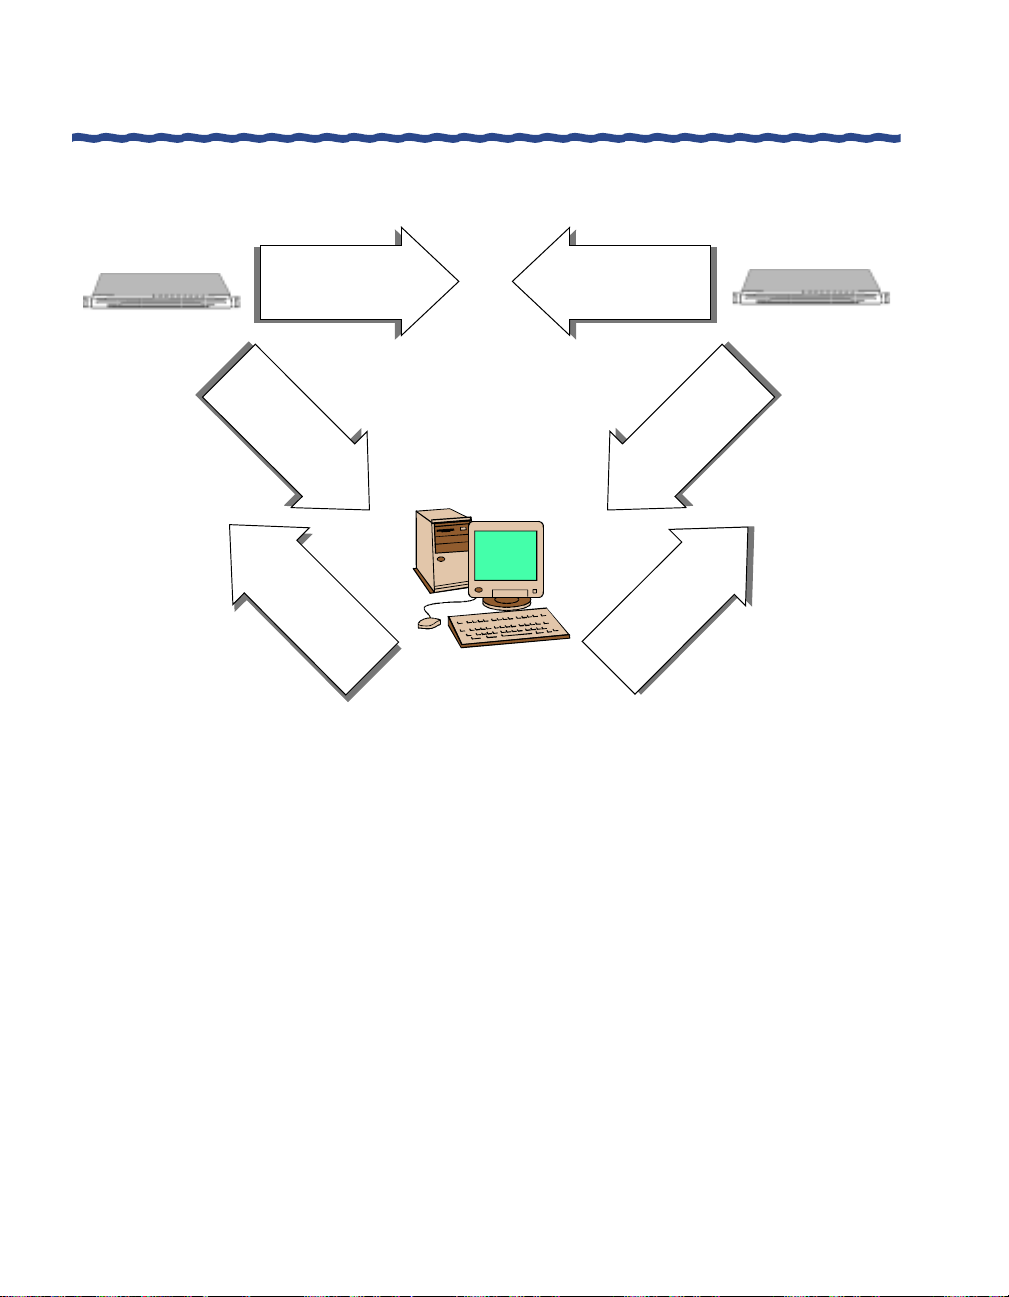
When RiverMaster is installed on your PC, the computer becomes a
“management station” for the Aurorean Virtual Network, receiving dynamic
updates from Aurorean Virtual Network systems and making immediate
configuration changes. All data displa yed by RiverMaster is retrieved from
databases residing on the Aurorean Policy Server or from incoming messages
from either the Aurorean Policy Server or Aurorean Network Gateway; no
data is stored locally on your PC’s hard disk.
2
Getting Started with
Getting Started with
Getting Started withGetting Started with
RiverMaster
RiverMaster
RiverMasterRiverMaster
Figure 5 illustrates the interaction between the Aurorean Policy Server,
Aurorean Network Gateway, and RiverMaster PC.
RiverMaster Administrator’s Guide 11
Page 24
RiverMaster Overview
Chapter 2
Getting Started with RiverMaster
Aurorean
Policy
Server
• Updated configurations
• Requests for logs
• Curre
• Status of services
n
• Reports
•
ki
Cus
t
t
c
onf
•
Us
•
R
e
q
u
t
om A
b
u
i
ld
c
• Backup configuration
files
• Log files
i
g
u
ra
t
e
r
e
s
u
o
mma
t
s
rore
ions
&
g
ro
u
p
f
c
o
h
r
a
re
n
p
g
o
es
rt
a
s
n
Client
n
d
s
RiverMaster PC
N
•
ati
c
fi
i
ot
f
n
o
c
• Tunnel statist
of
n
o
ti
a
igur
Figure 5 Aurorean Virtual Network Communication Flow
Aurorean
Network
Gateway
cs
i
s
e
g
n
a
h
c
n
o
Using the RiverMaster management application you can:
H Quickly check a server’s operational status by determining if all
services are running, reviewing alarm and alert messages that have
accumulated, and displaying current tunnel activity (the number of
users logged in and the amount of data passing over all tunnels).
H Define “virtual subnets” to provide IP addresses to remote Aurorean
Client Software users and allow the Aurorean Network Gateway to
properly route remote user packets through the corporate network.
H Select which Internet Service Providers (ISPs) your remote Aurorean
Client Software users can use from the extensive TollSaver database
stored on the Aurorean Policy Server.
H Define user accounts on the Aurorean Policy Server to locally
authenticate remote users or install a “plug-in” to authenticate users
against an external RADIUS or SecureID server.
12 RiverMaster Administrator’s Guide
Page 25
Chapter 2
Getting Started with RiverMaster
H Organize users with groups and assign each group policies that
govern the features available in Aurorean Client Software.
H Create customized Aurorean Client Software installation kits to
distribute to your remote users that contains the Aurorean Client
Software application, POP packages, group policies, and destination
IP addresses.
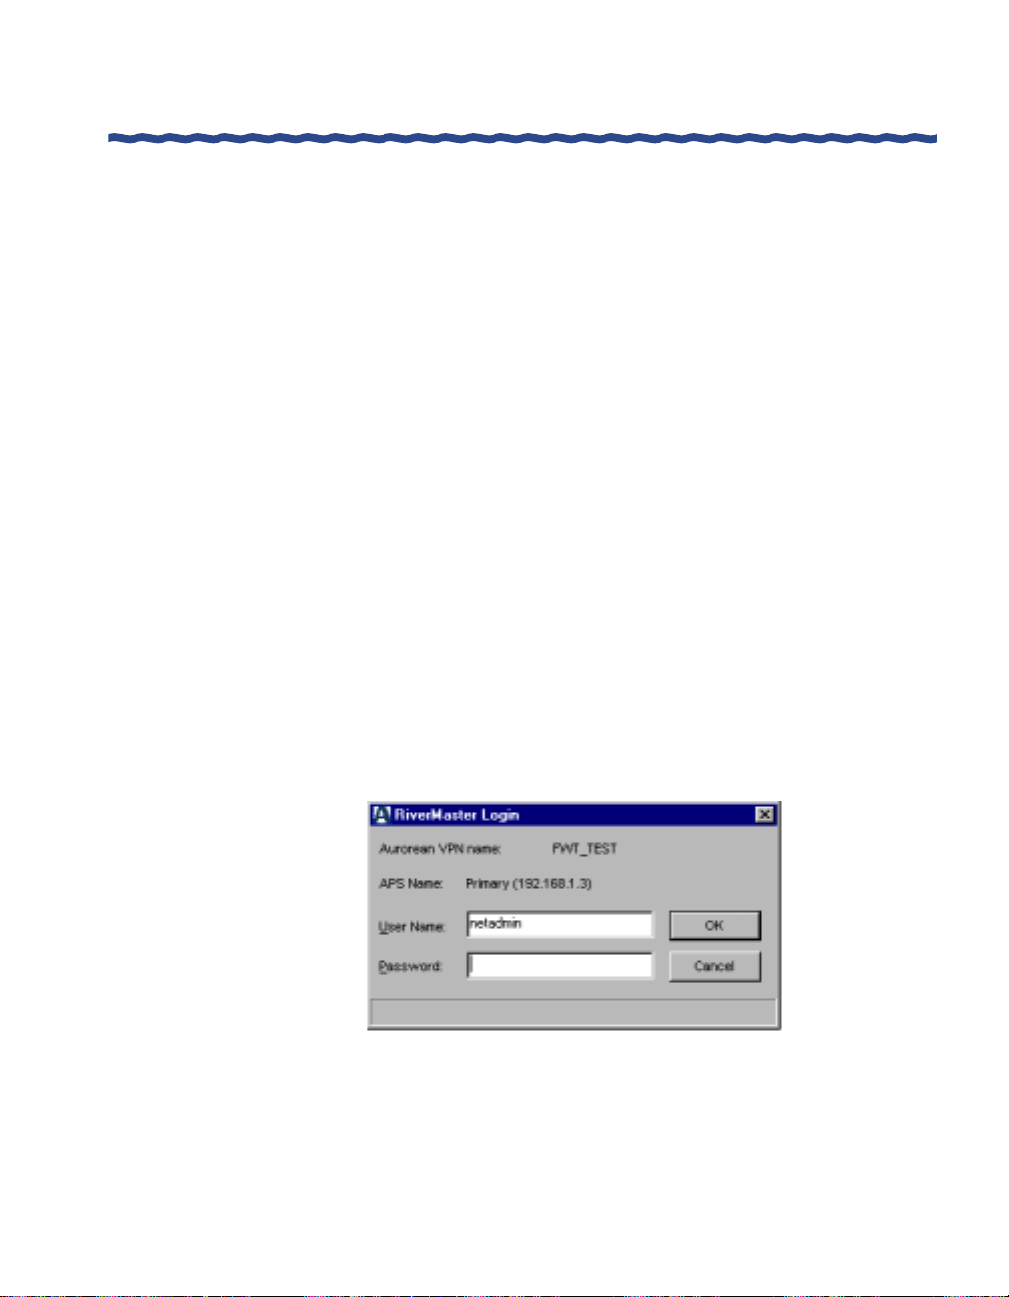
Logging into RiverMaster
When you start the RiverMaster application, the RiverMaster Login window
appears as shown in Figure 6 if yo u have configured a connection to one
Aurorean Policy Server. If you have configured a connection to a second
Aurorean Policy Server, the Select APS window will appear as shown in
Figure 7.
Version 3.0 of RiverMaster lets you start two RiverMas ter sessions from one
Windows NT/2000 computer to separate Aurorean Virtual Network systems.
This feature is especially useful when running AutoLink Recovery, which
employs automatic fail over to a backup Aurorean Virtual Network system.
Logging into RiverMaster
To access RiverMaster, you must enter a user name and password that the
Aurorean Policy Server can authorize from its internal database. The default
login account is netadmin with the password netadmin.
Figure 6 RiverMaster Login Window
Log into RiverMaster by typing a user name and password in the fields
provided, and choosing the Aurorean VPN name associated with the Primary
Aurorean Policy Server. Click OK.
RiverMaster Administrator’s Guide 13
Page 26
Logging into RiverMaster
To prevent unauthorized RiverMaster access, Enterasys Networks
recommends that you immediately create a new administra tor login
account in the IRAdmin group and delete the default login account.
Refer to Chapter 6 for more on adding and deleting user accounts.
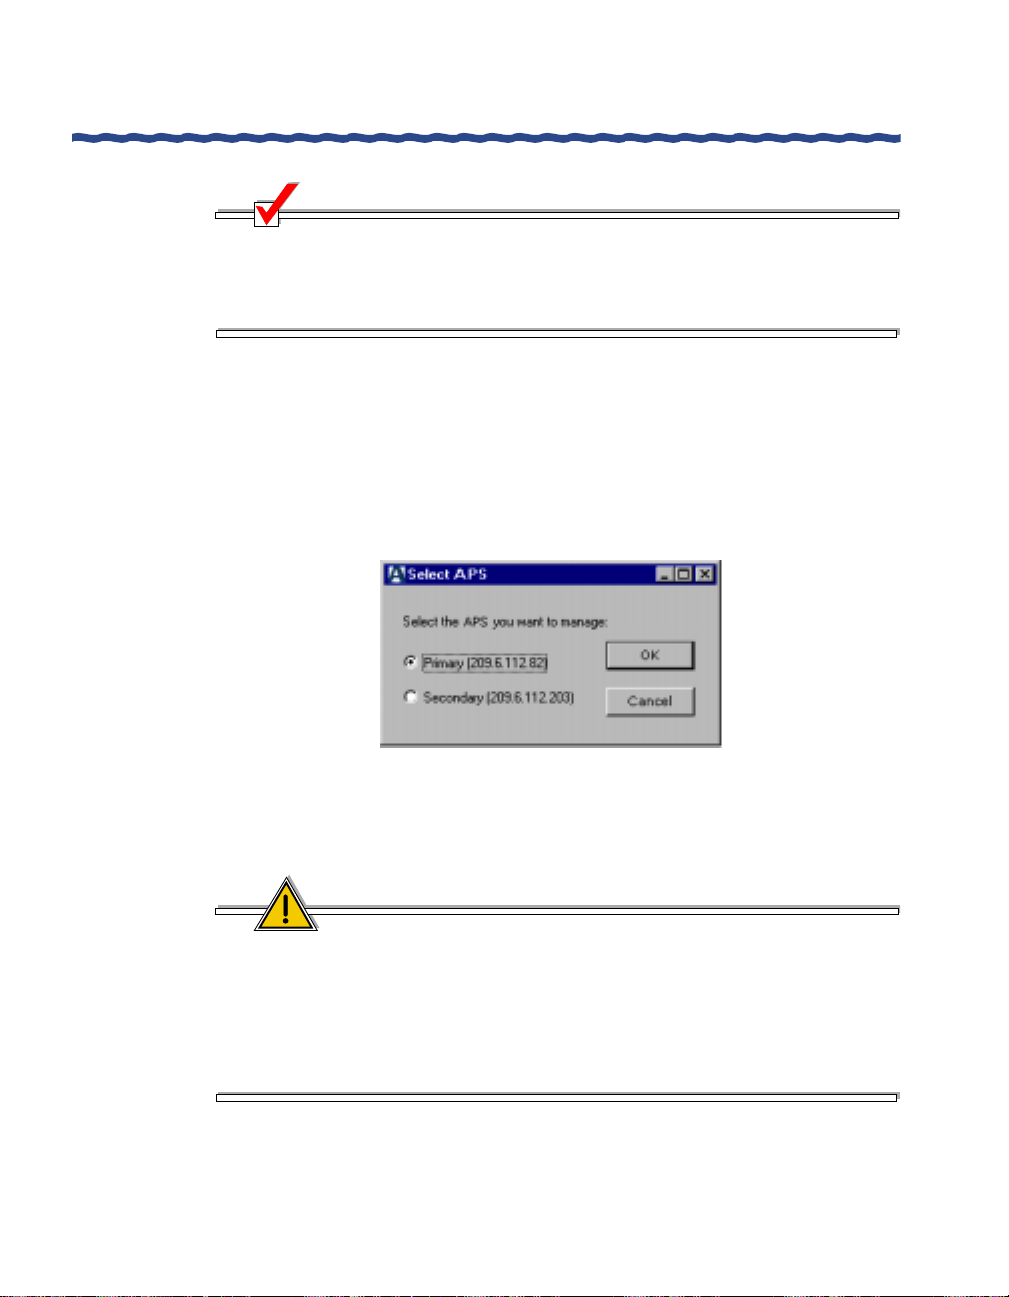
If you have configured a connection to a second Aurorean Policy Server, the
Select APS window appears as shown in Figure 7. Select the Aurorean Policy
Server you want to manage and click OK. The RiverMaster Login window
then appears as shown in Figure 6 allowing you to log into the selected
Aurorean Policy Server.
Chapter 2
Getting Started with RiverMaster
NOTE
Figure 7 Select APS Window
CAUTION
If you want to configure a connection to a second Aurorean Policy Server
after having already configured a connection to only one server, you must
first delete the config.irx file in the C:\Program Files\Indus
River Networks\RiverMaster directory on the RiverMaster
computer. Then, when you click on the RiverMaster desktop icon, the
Identify your Aurorean Environment window will appear as described in
Chapter 1.
14 RiverMaster Administrator’s Guide
Page 27

Chapter 2
Getting Started with RiverMaster
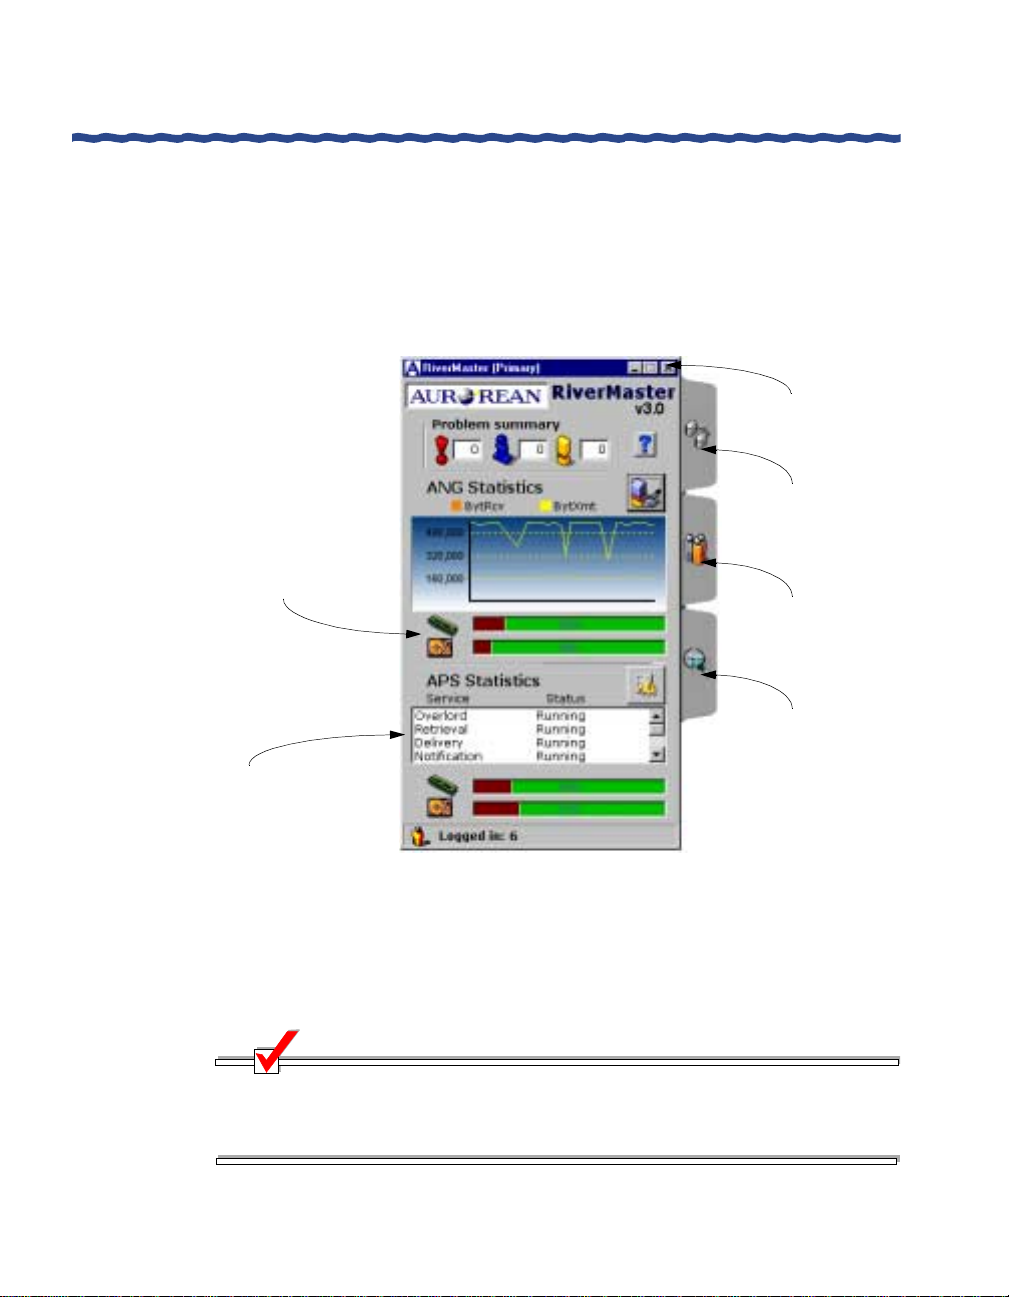
Checking Server Status
RiverMaster’s main interface is des igned to quickly show the Aurorean
Virtual Network’s “health” when you start the application. The health
conditions are organized into three categories:
H Problem summary and users logged in
H Aurorean Network Gateway statistics
H Aurorean Policy Server statistics
Problem Summary & Users Logged In
As shown in Figure 8, counters at the top and bottom of the interface track
both error conditions and successful tunnel login attem p ts. The Problem
Summary counters are updated whenever RiverMaster receives one of three
types of mess ag e s:
H Alarms notify you when a significant error occurs with a service
running on a Aurorean Virtual Network system or a general server
problem that is preventing the server from operating normally.
Checking Server Status
H Alerts occur when an error count threshold has been crossed and an
alarm condition is imminent.
H Problem Notification messages typically indicate an error at the
Aurorean Network Gateway or a remote client connection problem
which Aurorean Client Software’s Prescriber feature diagnosed and
reported. Prescriber is a Aurorean Virtual Network feature which
diagnoses why a tunnel connection failed and attempts to correct the
problem.
RiverMaster Administrator’s Guide 15
Page 28
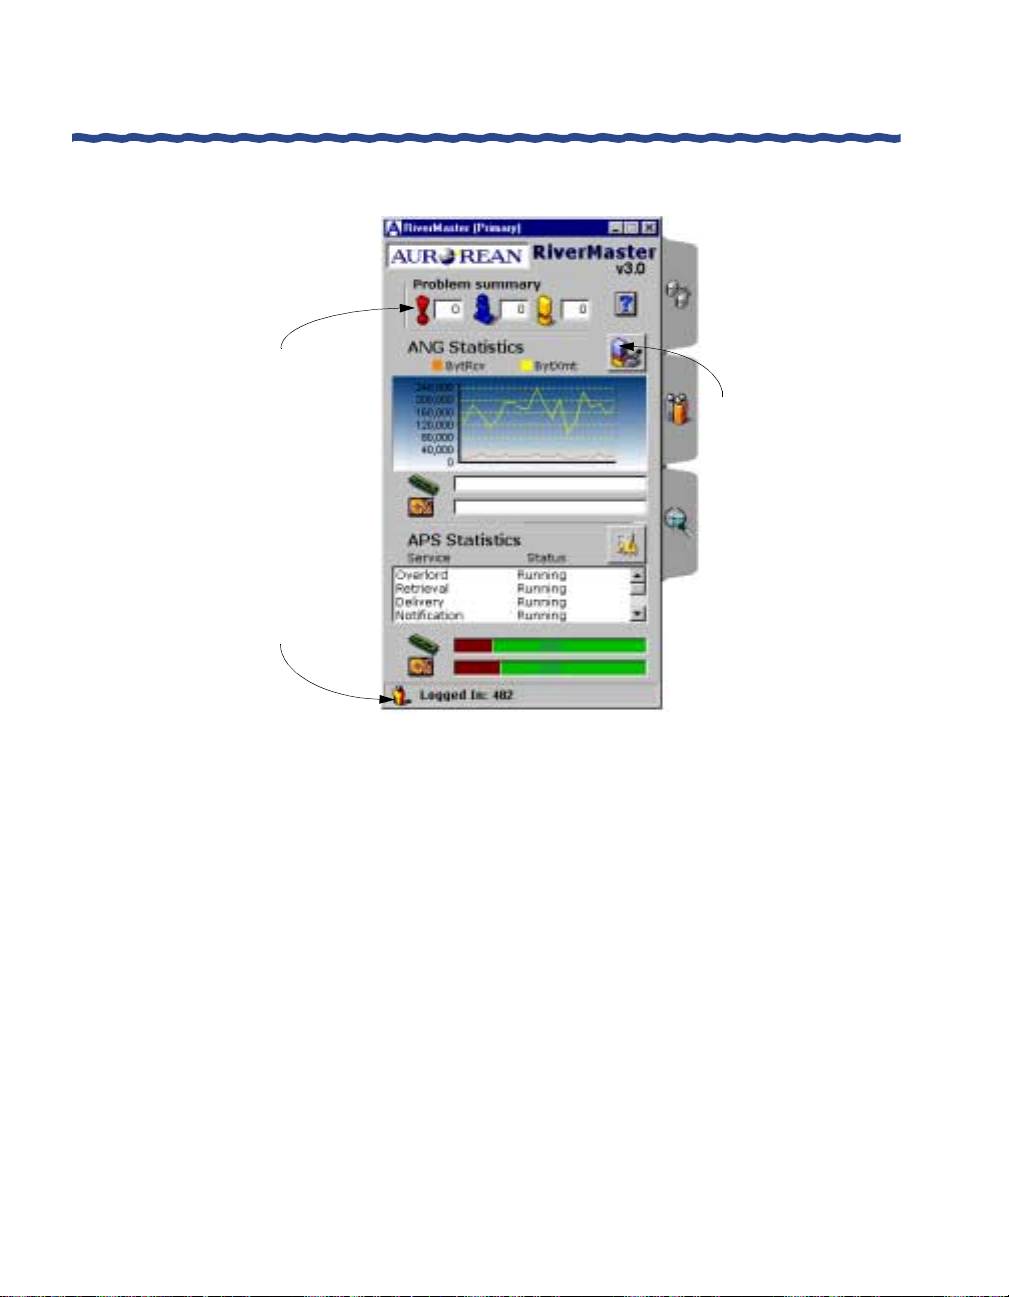
Checking Server Status
Indicates current alarms,
alerts, and informational
messages that appear in
the System Activity window
(refer to Chapter 7 for more
information)
Total number of remote
users authenticated and
connected to the corporate
network via the Aurorean
Network Gateway
Chapter 2
Getting Started with RiverMaster
Click here to view
more details about
logged in users
Figure 8 Aurorean Network Gateway Status Information
Aurorean Network Gateway Statistics
Figure 9 shows the statistics information RiverMaster displays for the
Aurorean Network Gateway. The graph indicates total amount of bytes sent
and received over all tunnels processed by the Aurorean Network Gateway;
to view the traffic passing over a single tunnel, click the button at the top right
corner of the graph.
16 RiverMaster Administrator’s Guide
Page 29
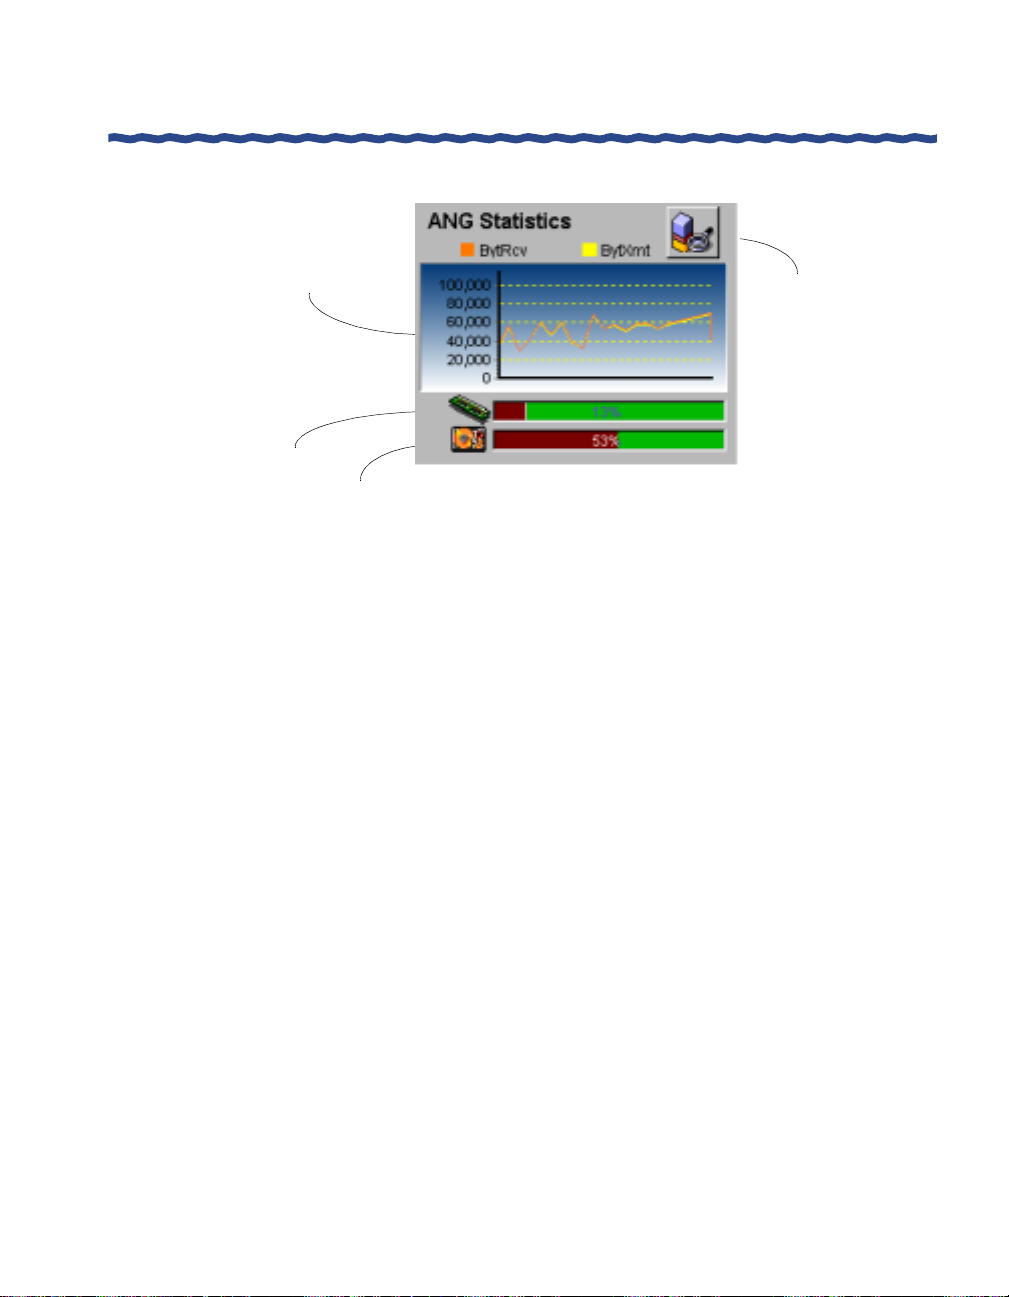
Chapter 2
Getting Started with RiverMaster
Aggregated number of bytes
received and sent over all
tunnels processed by the
Aurorean Network Gateway
Memory usage
Hard disk usage
The memory and hard disk usage meters show how much system resources
are being consumed supporting tunnel connections. You can use these values
for capacity p l an ni ng t o determine when th e nu m ber of concurren t t u n ne l s is
approaching the server’s li mit .
Checking Server Status
Click here to view
detailed statistics
for individual tunnels
(refer to Chapter 7
for details)
Figure 9 Aurorean Network Gateway Statistics
Aurorean Policy Server Statistics
As shown in Figure 10, RiverMaster displays the current status of services
running on the Aurorean Policy Server. Normally, all services should appear
as “Running.” If one or more services appears as “Stopped,” then the
Aurorean Policy Server may not function correctly. Table 1 briefly defines
each service and describes what occurs when the service is stopped.
RiverMaster Administrator’s Guide 17
Page 30
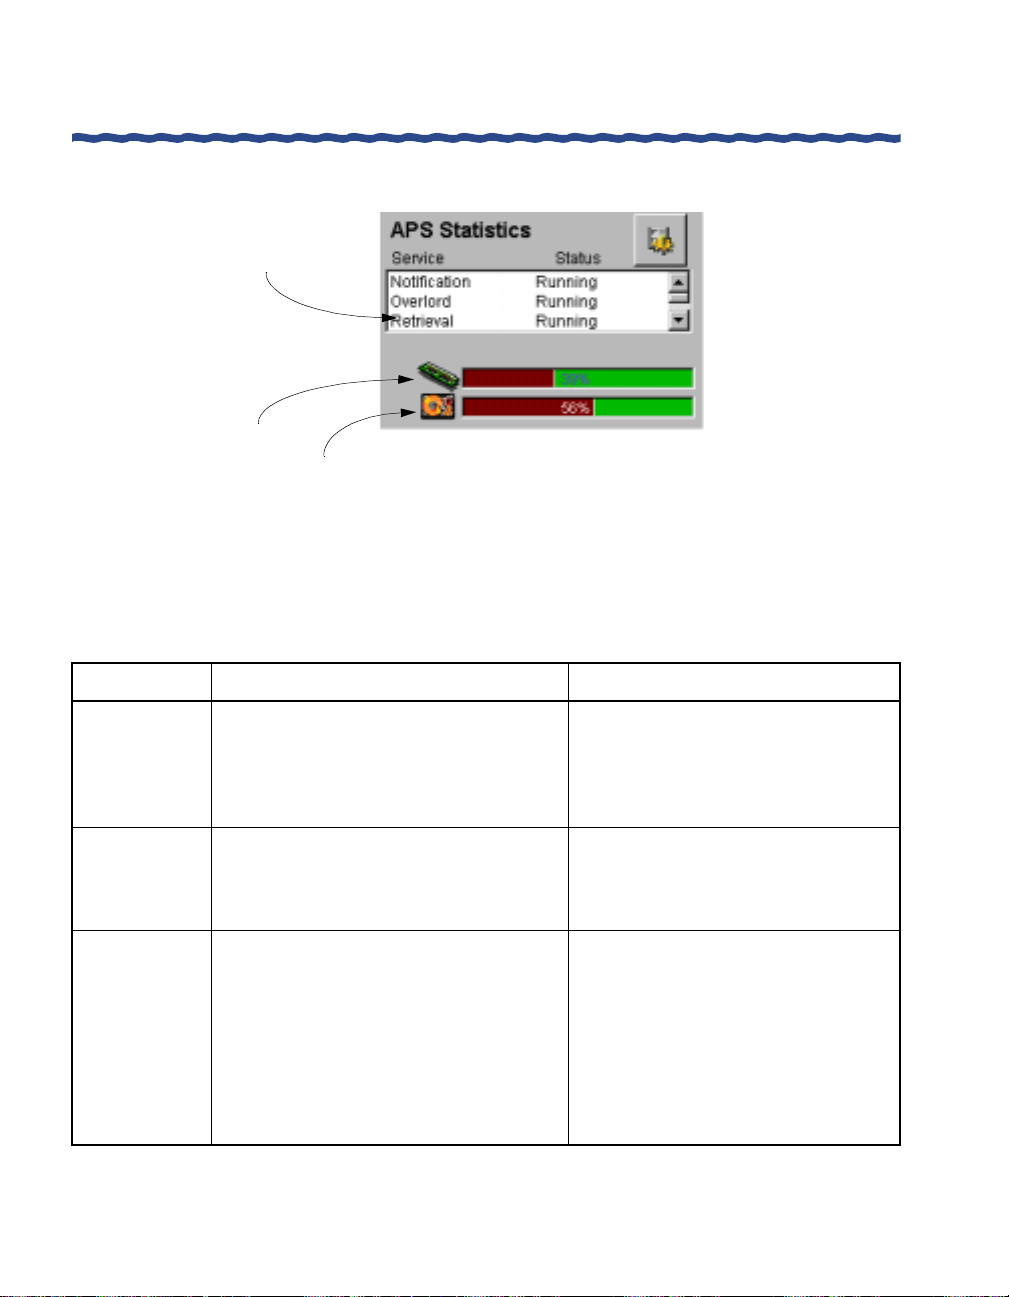
Checking Server Status
Status of services running
or stopped on the
Aurorean Policy
Server
Memory usage
Chapter 2
Getting Started with RiverMaster
Hard disk usage
Figure 10 Aurorean Network Gateway Statistics
Table 1 Aurorean Policy Server Services
Service Function If Stopped...
Overlord Monitors the condition of all other
Auroreanservices and restarts a serviceif
it fails to initialize properly or ceases to
operate at any point. Overlord may also
force a total server reboot if necessary.
Retrieval Retrieves statistics and messages from
both the Aurorean Network Gateway and
Policy Server to generate activity and
anomaly reports.
Delivery Carries messages between all Aurorean
Virtual Network components, including
servers, Aurorean Client Software clients,
and the RiverMaster management
application. Delivery is a critical service
that must be operational for Aurorean
Virtual Network components to initialize
properly and synchronizewith one
another.
18 RiverMaster Administrator’s Guide
The Aurorean Policy Server
automatically reboots itself
approximately 20 seconds after the
Overlord service stops.
You cannot downloadand view reports
using RiverMaster.
The Aurorean Policy Server cannot
communicate with the RiverMaster
application and remote users are
unable to authenticate and establish a
tunnel connection with the Aurorean
Network Gateway. The Aurorean
Policy Server automatically reboots
itself approximately 3 minutes after the
Delivery service stops.
Page 31

Chapter 2
Getting Started with RiverMaster
Table 1 Aurorean Policy Server Services
Service Function If Stopped...
Checking Server Status
Notification Reports alarm, alert, and problem
notification messages using E-mail.
FTP Provides the mechanismfor transferring
files between Aurorean Virtual Network
servers and RiverMaster. FTP also allows
Aurorean Client Software computers to
synchronize group policy settings,
TollSaver POP phone numbers,
Prescriber remedies, and Aurorean Client
Software application executables.
Access Supports the exchange of database
informationstoredontheAuroreanPolicy
Server to other Aurorean Virtual Network
components,such as TollSaver data,
logs, and server configuration files.
The Aurorean Policy Server and
Network Gateway can operate
normally but E-mail messages are no
longer sent when
alarms/alerts/problems occur.
Aurorean Client Software users can
connect but cannot perform client
synchronization. RiverMaster cannot
download reports from the Aurorean
Policy Server. RiverMaster cannot
complete database transactions and
queries.
The Aurorean Policy Server cannot
acceptany configurationchangesfrom
the RiverMaster application and
remote users are unable to
authenticate and establish a tunnel
connection with the Aurorean Network
Gateway. The Aurorean Policy Server
automatically reboots approximately 3
minutes after this service stops.
RiverMaster Administrator’s Guide 19
Page 32

Checking Server Status
Getting Started with RiverMaster
Table 1 Aurorean Policy Server Services
Service Function If Stopped...
Chapter 2
Log Maintains a running record of system
events and messages received by each
Aurorean Virtual Network component.
The RiverMaster application displays
these logs and extracts information from
them to produce daily reports.
Authentication Provides the mechanism for
authenticating remote users against user
databases located on either the Aurorean
Policy Server or an external
authentication server (such as a RADIUS
device). Authentication also serves
another security role, by enforcing a strict
ring level hierarchy for Deliverymessages
to prevent unauthorized access to
sensitive information.
The memory and hard disk usage meters in the Aurorean Policy Server
statistics area show how much server resources are being consumed to
manage the Aurorean Virtual Network. High memory usage normally reflects
a large number of authorization messages for both remote user authentication
and server-to-server traffic; generating reports and Aurorean Client Software
installation kits can also consume Aurorean Policy Server memory . High disk
space usage is normally a result of many large log and report files
accumulating on the hard disk.
The Aurorean Policy Server will accept
configuration changes and the
Aurorean Network Gateway will accept
tunnel connection attempts. However,
the messages generated by these
actions are not stored in a log file on
the Aurorean Policy Server and cannot
be viewed as they occur from the
RiverMaster. Reports will also be
inaccurate.
Configuration changes sent by the
RiverMaster to the Aurorean Policy
Server are rejected because the
Aurorean Policy Server cannot
authenticate them. Also, the Aurorean
Network Gateway will not accept new
tunnel connection attempts because
the remote user cannot be
authenticated. The Aurorean Policy
Server reboots approximately 3
minutes after this service stops.
NOTE
When 85% of the Aurorean Policy Server drive capacity is full, the server
automatically begins deleting lo gs and reports older than 90 days. Log
and report deleti ons are not configu rable at this time.
20 RiverMaster Administrator’s Guide
Page 33

Chapter 2
Getting Started with RiverMaster
Setting Up a Aurorean Virtual Network the First Time
Setting Up a Aurorean Virtual Network the First Time
When you start RiverMaster for the first time, you need to perform several
basic configuration steps to put your Aurorean Virtual Network into
operation. These basic steps are outlined below, with references to the
detailed instructions provided throughout this manual.
1
Enter the Aurorean VPN name for your Aurorean Virtual Network
equipment and enter the IP address(es) of the Aurorean Policy
Server(s).
You are prompted to enter these values the first time you start the
RiverMaster application.
2
After you login with the default user name and password, set the
authentication, encryption, and compression options used during
tunnel connections.
These options are set separately for each tunnel protocol (PPTP or
IPSec) as described in Chapter 3.
3
Allocate IP addresses for remote users to use when they tunnel into the corporate network.
You can assign a specific address to each remote user or allow users
to dynamically draw addresses from a pool. Address pools are
created by defining virtual subnets as described in Chapter 3.
4
Configure the Aurorean Network Gateway to route packets from
remote users through the corporate network.
The Aurorean Network Gateway supports RIP, OSPF, and static
routes to forward packets to their destination; to configure these
routing protocols, refer to the instructions in Chapter 3.
5
Determine how remote Aurorean Client Software users will be authenticated.
– To authenticate against a database residing on the Aurorean
Policy Server, you must use the Authorization service as
described in Chapter 4.
– To authenticate against an external RADIUS server, you must
configure an authorization plug-in as described in Chapter 4.
– To authenticate against an external SecurID server, you must
configure an authorization plug-in as described in Chapter 4.
RiverMaster Administrator’s Guide 21
Page 34

Setting Up a Aurorean Virtual Network the First Time
6
Create mailing lists so that the Aurorean Policy Server sends you
E-mail when alarm, alert, or notification messages are generated
(optional).
E-mail messages are generated by the Notification service as
described in Chapter 4.
7
Reboot the Aurorean Network Gateway to put the networking changes into effect.
8
Create POP packages of selected Internet Service Providers (ISPs)
from the list of those available in the master TollSaver database as
described in Chapter 5.
By limiting the ISPs available for use by remote users and grouping
them in POP packages, you can minimize the size of the database of
Point of Presence (POP) phone numbers distributed to your Aurorean
Client Software users. In addition to POP phone numbers, you can
add corporate direct dial phone numbers to this database.
9
Define groups for remote Aurorean Client Software users as described in Chapter 6.
For each group you can assign a range of IP addresses to allocate to
Aurorean Client Software users when they connect (using the virtual
subnets you defined in Step 3). You can also grant policies to each
group that determine the Aurorean Client Software features and
functions that can be used by members of that group.
Chapter 2
Getting Started with RiverMaster
10
Add user accounts to each group as described in Chapter 6.
If you plan to authenticate all remote users against an external
RADIUS or SecurID server, you can skip this step. For each user
account, you must enter a specific IP address or indicate that the
Aurorean Network Gateway must allocate the user an address from
the group’s virtual subnet.
11
Generate a customized Aurorean Client Software installation kit for
distribution to members of each group as described in Chapter 6.
This installation kit contains the Aurorean Client Software
application, group policy settings, destinations, and a TollSaver
database with POP phone numbers for the ISPs assigned to the
group.
22 RiverMaster Administrator’s Guide
Page 35

Chapter 2
Getting Started with RiverMaster
Once remote users begin tunneling into the corporate network using
Aurorean Client Software software, you can view this activity using the
Tunnel Statistics wind ow described in Chapter 7 . You can also produce
detailed daily usage reports as described in Chapter 8.
Authentication requests and other user activity messages are also displayed
in the System Activity window described in Chapter 7. This window also
displays alarm and alert messages that warn you when server errors occur.
Setting Up a Aurorean Virtual Network the First Time
RiverMaster Administrator’s Guide 23
Page 36

Page 37

3
Configuring an ANG-3000/7000
Configuring an ANG-3000/7000
Configuring an ANG-3000/7000Configuring an ANG-3000/7000
This chapter describes how to configure network settings for your local
Aurorean Network Gateway (ANG-3000/7000). Local ANGs have an
accompanying Aurorean Policy Server and are configured using RiverMaster.
Remote ANGs are stand-alone systems configured by using the Web-based
Aurorean Policy Manager utility. The ANG-1000 is configured using its Webbased configuration utility only. Network settings for the ANG fall into these
categories:
H General settings such as the DNS, WINS and NAT servers that
remote clients require for name resolution or authentication.
H Tunnel protocol (PPTP or IPSec) parameters for authentication,
encryption, and compression.
H Virtual subnets containing pools of IP addresses or IPX network
numbers that are allocated to remote users when they tunnel into the
corporate network.
H Routing protocol (static, RIP, and OSPF) settings for each ANG
Ethernet interface.
H Site-to-site tunnel parameters between two Aurorean Network
Gateways.
NOTE
The ANG-3000/7000 can also be configured using a floppy disk.
Appendix B describes a procedure similar to configuring the ANG using
the RiverMaster application. Using the floppy disk method allows an
administrator to centrally con figure one or more gateways and
conveniently distribute that configuration data on floppy disks to remote
sites.
RiverMaster Administrator’s Guide 25
Page 38

Before You Begin
Select the
Network
Gateway from
the list of
servers
Click here to
access the
Network
Gateway
configuration
windows
Chapter 3
Configuring an ANG-3000/7000
These functions are grouped on the Configuration pullout as shown in
Figure 11.
Click here to
open the
Configuration
pullout
Figure 11 Configuration Pullout
Before You Begin
Before performing the steps in this chapter, you should familiarize yourself
with the following Aurorean Virtual Network concepts:
H Methods available for allocating IP add resses and IPX network
numbers to remote clients when they connect.
H Aurorean Virtual Network’s Intelligent Client Routing feature.
H Aurorean Virtual Network’s support for Network Address
Translation (NAT).
H Methodology of Site-to-Site tunnels.
H Aurorean Virtual Netw ork’s AutoLink Recovery featur e.
26 RiverMaster Administrator’s Guide
Page 39

Chapter 3
Configuring an ANG-3000/7000
Allocating IP/IPX Addresses to Remote Clients
When remote clients tunnel into the corporate network, they must be able to
access devices on the network just as if they were locally connected. To serve
this need, the ANG acts as a router, forwarding packets between devices on
the corporate network and remote clients. When remote clients tunnel into
the ANG, they must be allocated IP addresses accessible to or on the local
network.
NOTE
T o access Novell NetWare servers using IPX protocol, remote clients must
receive an IPX network number. RiverMaster allows you to specify a
single IPX network number that is shared by all remote clients when they
connect. IPX usage is also controlled by a gr oup policy; refer to Chapter 6
for more information on group policies.
You can allocate IP addresses to Aurorean users in one of three ways:
H Assign a specific IP address to each remote client. This address is
saved as part of the client’s user name and password account
information stored on the Aurorean Policy Server. Once the client
authenticates, the address is allocated to the client for the duration of
the connection. To receive an IP address in this manner, the remote
client must authenticate against the Enterasys authorization plug-in
as described in Chap ter 4.
Before You Begin
H Authenticate remote clients against an external authentication server
(such as a RADIUS server) and have that server allocate IP addresses.
To receive an IP address in this manner, the remote client must
authenticate against a RADIUS plug-in as described in Chapter 4.
H Define one or more virtual subnets that act as address pools. Virtual
subnets are linked to groups; when a member of a group connects, an
address from within the virtual subnet is allocated to that user for the
duration of the connection.
To support virtual subnets, the ANG must learn the topology of the corporate
network and advertise to other devices that remote clients on the virtual
subnet are reachable. To do this, the ANG supports Routing Information
Protocol (RIP) and Open Shortest Path First (OSPF) routing proto cols. The
ANG supports both RIP Version 1 and Version 2.
RiverMaster Administrator’s Guide 27
Page 40

Before You Begin
Chapter 3
Configuring an ANG-3000/7000
Virtual subnets can use both legitimate IP addresses (unique addresses
purchased and registered by your company) and non-routable address ranges
reserved for private network use only. These reserved address ranges include:
H 10.0.0.0 to 10.255.255.254 on a Class A network
H 172.16.0.0 to 172.30.2 55.254 on a Class B net work. Alth ough 172.3 1.0.0
to 172.31.255.254 is also a reserved range, you cannot define virtual
subnets within this range because addresses in that range may be
taken by the ANG for internal use.
H 192.168.0.0 to 192.16 8.255.254 on a Class C network
These addresses are not routable outside your corporate network. By using
these addresses for remote clients, you can preserve the routable IP addresses
for LAN devices.
NOTE
If you allocate addresses from one of these non-routable ranges and you
want remote clients to be able to browse the Internet while connected,
you must enable the Intelligent Client Routi ng de scribed on page 31 or
use network address translation.
There are several advantages to using virtual subnets over other IP address
allocation techniques:
H The ANG can advertise the virtual subnets before remote clients
connect. Using the other techniques, the ANG would only create a
host route when the client connected. Because routing protocols may
take as long as 30 seconds per router to propagate a host route, the
client may remain unreachable for a period of time.
H Creating individual host routes for each r emote client as they connect
may overload the network’s routers. Because ANG-5000s support
5000 tunnels (ANG-3000s support 500 tunnels), each router may
become burdened with 5000 routes in its route table.Virtual subnets
can be quickly and easily scaled up to accommodate large number of
remote clients. You can modify the subnet mask for an existing
virtual subnet to provide additional addresses or create entire new
virtual subnets.
28 RiverMaster Administrator’s Guide
Page 41

Chapter 3
Configuring an ANG-3000/7000
Figure 12 shows a sample corporat e n e twork that employs two virtual
subnets. Each virtual subnet provides up to 255 client IP addresses depending
upon the subnet mask used. By assigning different virtual subnets to each
group, you can control what devices members of the group can access once
they are connected.
Before You Begin
Aurorean Remote Clients
INTERNET
Virtual Subnet #1
192.168.1.0
Firewall
200.100.200.0
Server #1
Aurorean
Network
Gateway
Virtual Subnet #2
192.168.2.0
Router
200.100.201.0
Server #2
Figure 12 Remote Client Virtual Subnet Usage
For example, because Server #1 resides on the same network segment as the
ANG, all remote clients can access this server regardless of the v irtual subnet
that provided their address. If you enable RIP or OSPF on the ANG Trusted
interface, the router in this diagram will learn about both virtua l subnets.
However, if you enable only static routing on the ANG Trusted interface, you
can limit access to the 200.100.201.0 subnet to users that receive address from
Virtual Subnet #1. To accomplish this , you m ust create two static routes:
RiverMaster Administrator’s Guide 29
Page 42

Before You Begin
Chapter 3
Configuring an ANG-3000/7000
H Using RiverMaster, adding a static route for all addresses in the
Virtual Subnet #1 range with the router’s IP address as the default
gateway.
H On the router, create a static route to forward all packets addressed
with IP addresses in the Virtual Subnet #1 range to the IP address of
the ANG Trusted interface.
With this arrangement, remote clients that receive addresses from Virtual
Subnet #1 will be able to access Server #2. Without a static route, remote
clients that receive addresses from Virtual Subnet #2 will be unable to access
Server #2 or any other device on the 200.100.201.0 segment
Virtual S ubnets for Site-to-Site and Remote Access Tunnel Servers
When you set up a site-to-site tunnel in conjunction with remote access
service, we recommend creating separate groups and assigning separate
virtual subnets for all your site-to-site and remote access users. This is
necessary because RIP does not forward knowledge of a route over the
interface from which it learned of that route. So if a remote client and a site-tosite tunnel obtain their virtual IP addresses from the same virtual subnet on
the terminating ANG, then that remote access client will n ot be a b le to learn
the routes that are known to the initiator of the si te-t o-site tunnel. This
condition does not apply to a terminating ANG, though.
As shown in Figure 13, if ANG1 initiates a tunnel connection to ANG2, RIP
will broadcast knowledge of ANG1’s associated networks A, B and C to
ANG2 just as it will propagat e knowledge of ANG2’s associated network s X,
Y and Z to ANG1. Then, if the virtual subnet 10.10.10.0 is created on ANG2
for use by ANG1 site-to-site clients and is shared with remote Aurorean
clients, the Aurorean users cannot access networks A,B, and C on ANG1
because they have no knowledge of those networks.
To remedy this situation, create virtual subnet 187.14.57.0 on ANG2 for
Aurorean users. RIP will broadcast knowledge of this route to ANG2
enabling Aurorean users to dial into ANG1 as well as ANG2.
30 RiverMaster Administrator’s Guide
Page 43

Chapter 3
Configuring an ANG-3000/7000
Before You Begin
Network A
Network B
Network C
ANG1
10.10.10.2
Learned
Routes:
X, Y, Z
Aurorean
10.10.10.3
Site-to-Site Tunnel
Learned
Routes:
X, Y, Z
INTERNET
ANG2
Learned
Routes:
A, B, C
Virtual Subnet
10.10.10.0
Network X
Network Y
Network Z
Figure 13 Virtual Subnets for Site-to-Site and Remote Access Tunnels
For instructions on creating virtual subnets for IP add ress a nd IPX network
number allocation, refer to “Virtual Subnetting” on page 50.
Intelligent Client Routing
Enterasys Networks’ Intelligent Client Rout ing feature provides you with a
measure of contr ol over a Au ro r ean Client user’s access to the Internet. When
enabled (this feature is enabled by default), Intel ligent Client Routing allows
remote clients to browse the Internet directly, outside of the tunnel. For
example, if a remote client tries to browse the Internet while tunneled into the
corporate network, packets bound for any destination within the Internet are
sent down the tunnel into the ANG and then back out the network’s Internet
gateway.
When Intelligent Client Routing is enable d, th e ANG exports routes over the
tunnel to the client. Based on this information, the client determines if the
destination address can only be reached over the tunnel or can be reached
directly on the Internet. Figure 14 contrasts how packets that are destined for
an Internet server are routed with the Intelligent Client Routing feature
enabled or disabled.
If you allocate a non-routable IP address to a remote client from a virtual
subnet, you may need to enable Intelligent Client Routing to allow the remote
client to browse the Internet.
RiverMaster Administrator’s Guide 31
Page 44

Before You Begin
Chapter 3
Configuring an ANG-3000/7000
Packets that are addressed with non-routable addresses are typically blocked
by firewalls and Internet gateways and will be dropped by any Internet
router. The only exceptions to this rule are devices such as “proxy” servers
that perform a network address translation (NAT) to dynamically re-address
packets as they leave the corporate network. If you do not have a NAT device,
you can enable Intelligent Client Routing so that packets sent from the
Aurorean Client computer to an Internet destination are addressed with the
computer’s own IP address (not the non-routable address allocated from the
virtual subnet).
Intelligent Client Routing DISABLED
INTERNET
Aurorean Client
Aurorean Client
Packets addressed to
server on Internet
POP
The Tunnel
Router Firewall
Internet
Server
Intelligent Client Routing ENABLED
INTERNET
The Tunnel
Router
Internet
Server
Figure 14 Aurorean Virtual Network’s Intelligent Client Routing Feature
Firewall
Aurorean
Network
Gateway
Aurorean
Network
Gateway
32 RiverMaster Administrator’s Guide
Page 45

Chapter 3
Configuring an ANG-3000/7000
NAT Ser ver
RiverMaster’s NAT server feature provides support for security conscious
administrators who want to conceal the physical IP address of their system
(ANG or another Gateway) without affecting Aurorean service. By
configuring a NAT Server with an alias IP address for the ANG (refer to
page 41 for instructions), the real IP address of the ANG will remain hidden
and any IP address received by the NAT Server will be translated to the real
IP address of the destination for all incoming clients. This ensures that clients
access the correct IP address and build a tunnel connection to the ANG
without revealing physical addresses. The process is reversed for clients on
the corporate LAN seeking to dial up remote destinations.
In Figure 15 below, the IP addresses rece ived at the NAT Server for Serv ers #1,
#2 and the ANG are translated into the real IP addresses of the destination
servers.
Before You Begin
Aurorean Client
INTERNET
NAT
Server
Server #1 Server #2
200.57.115.15 200.57.115.23 200.57.115.18
Aurorean
Policy
Server
Figure 15 Aurorean Virtual Network’s NAT Server Feature
RiverMaster Administrator’s Guide 33
NAT Server Received IP Addresses
Server #1: 165.32.46.34
Server #2: 165.32.46.115
ANG: 165.32.46.98
Aurorean
Network
Gateway
PC
PC
Page 46

Before You Begin
Site-to-Site Tunnels
Chapter 3
Configuring an ANG-3000/7000
NOTE
Aurorean’s NAT Server implementation cannot be employed as a client
NA T where, for example, it operates within a cable modem/ISP topology.
Aurorean’s NAT Server implementation is server-centric.
Aurorean site-to-site tunnels optimize service between remote offices and
their remotely linked corporate LANs. This configuration is similar to a
remote access Aurorean connection in the sense that both configurations
originate tunnels from an ANG and terminate the tunnel a t a remote site. The
site-to-site tunnel configuration differs from the typical ANG model in the
sense that the remote server and tunnel must be configured with several
network values which identify the remote server to the local ANG. Figure 16
displays two site-to-site configurations of Regional Offices A and B connected
to a local ANG and both remote offices connected together, as well as a
remote access connection into Corporate Headquarters.
Aurorean Client
Aurorean Client
Corporate
Headquarters
Firewall
Server #1 Server #2
Remote access tunnel
INTERNET
Aurorean
Network
Gateway
Aurorean
Policy
Server
Aurorean
Network
Gateway
Aurorean
Network
Gateway
Regional Office A
PC
Regional Office B
PC
Site-to-Site tunnel
PC
PC
Figure 16 Site-to-Site Configuration
34 RiverMaster Administrator’s Guide
Page 47

Chapter 3
Configuring an ANG-3000/7000
When corporate networks are linked via one or more tunnels, users can
utilize applications over these LANs simply by choosing a networksupported program or by using Windows Explorer to find a destination
server. Using Aurorean Client to dial up a remote connection is not required.
Remote Aurorean site-to-site connections are set up by first adding a remote
ANG to an existing ANG configuration, then adding the tunnel itself. This is
done by configuring a user on that server with the following values: an IP
address or Fully Qualified Domain Name (FQDN) for the server, a user name
and password, and a tunnel protocol (either IPSec or PPTP). These are all the
values required to make the connection. We recommend that you enable
Intelligent Client Routing on both A urorean Virtual Network Network
Gateways so clients accessing the tunnel remotely or locally can access clients
on the far end of the network.
NOTE
Enable at least on e routing protoc o l (RI P v 1, RI P v 2 or OSPF) on the ANG.
Refer to Chapter 3 for instructions.
Before You Begin
Refer to “Adding a Remote Server” on page 68 to configure a site-to-site
tunnel.
AutoLink Recovery
Auto LinkRecovery (ALR) extends the fault isolation an d recovery
capabilities of the Aurorean Client to include automatic fail-over to a backup
Aurorean Virtual Network system in the event of a service outage or VPN
hardware failure.
To support ALR, a second Aur orean Virtua l Network sy s t em APS, ANG, and
RiverMaster management application) is required. The secondary Aurorean
Virtual Network system operates in parallel but independently of the primary
Aurorean Virtual Network system. Each system must be located on the same
corporate network, but can be physically situated at different sites, to support
disaster recovery, as shown in Figure 17. For more detailed information, refer
to “Viewing Aurorean Alternate Address Information” on page 42.
RiverMaster Administrator’s Guide 35
Page 48

Before You Begin
Chapter 3
Configuring an ANG-3000/7000
Primary
Aurorean
System
Aurorean
Policy
Server
Aurorean Client
Aurorean
Network Gateway
Primary & Secondary
RiverMaster
INTERNET
Trust ed network
External
Authorization
Server
Primary RM session
Secondary RM session
Aurorean
Network Gateway
Aurorean
Policy
Server
Figure 17 Auto Link Recovery Architecture
If the primary Aurorean Virtual Network system fails or is unreachable due to
Internet congestion, corporate ISP outage, or router malfunction, the
secondary Aurorean Virtual Network system provides continued VPN
service to remote users and branch offices.
Secondary
Aurorean
System
From the standpoint of network topology, both Aurorean Virtual Network
systems share the same Management domain name although they are
physically discrete. Also, a RiverMaster management application serving
each Aurorean Virtual Network system is accessible at and operates from a
single Windows NT/2000 computer. The Aurorean Virtual Network system
pairs can handle authentication through a shared database if an external
service such as RADIUS or SecurID is used. ALR also supports Enterasys
authentication via the APS database although this requires that user
information be manually replicated in each Aurorean Virtual Network
system. For more detailed information, refer to the AutoLink Recovery
Application Note.
36 RiverMaster Administrator’s Guide
Page 49

Chapter 3
Configuring an ANG-3000/7000
General Aurorean Network Gateway Settings
General Aurorean Network Gateway Settings
General network settings for the ANG include:
H The current and possible future IP addresses for the server.
H Enabling Aurorean Virtual Network’s Intelligent Client Routing
feature which provides you with a measure of control over a
Aurorean Client’s access to the Internet.
H Addresses for the Domain Name System (DNS), Windows Internet
Name Service (WINS), and Network Address Translation (NAT)
servers used by remote clients for name resolution.
To set general network settings for the ANG, perfo rm the following steps:
1
Open the Configuration pullout.
2
In the list of Aurorean devices, expand the tree list under Servers
(click the + symbol).
3
Expand the tree list under the name of your ANG.
4
Click on General to display the general network settings tab pages.
A sample General settings window appears as shown in Figure 18.
The IP Address field is r ead-o nly and displays a n addr es s assign ed to
the ANG during installation. If the ANG is equipped with a single
Ethernet interface, this field shows the address of the Trusted port. If
the ANG is equipped with dual Ethernet interfaces, this field shows
the address of the External port.
RiverMaster Administrator’s Guide 37
Page 50

General Aurorean Network Gateway Settings
Chapter 3
Configuring an ANG-3000/7000
The Aurorean Network Gateway IP address is set when
the servers are installed and displayed here as read-only
Click here to allow
remote users to
directly browse the
Internet while they
are tunneled into the
corporate network
Figure 18 General Aurorean Network Gateway Settings
If you plan to change the Aurorean Network Gateway’s IP address in
5
the future, enter the new address in the Future IP Address field;
otherwise, leave this field blank and continue with the next step.
When you build a custom Aurorean Client installation kit for your
remote users (as described in Chapter 6), the ANG’s IP address is
saved as part of the kit. Aurorean Client needs this address to locate
the ANG across the Internet and create a tunnel. If you enter an IP
address in the Future IP Address field, the kit will contain both IP
addresses that appear on this pullout. If Aurorean Client cannot
locate a ANG by first using the standard IP address, it will
automatically use the future IP address. If connecting to this address
is unsuccessful, a user can enter an IP address in the Alternate Tunnel
Server IP address field in Aurorean Client. Refer to the Aurorean
Client User’s Guide for more information.
38 RiverMaster Administrator’s Guide
Page 51

Chapter 3
Configuring an ANG-3000/7000
6
To allow remote users to browse the Internet directly while they are
tunneled into the corporate network, place a check next to Enable
Intelligent Client Routing on the General page.
For more in formati on on Aurorean Virtual Network’s Intelligent
Client Routing feature, refer to “Intelligent Client Routing” on
page 31.
NOTE
The Reset button returns any altered values to their earlier setting.
7
Click the DNS tab.
The DNS server addresses tab page appears as shown in Figure 19.
General Aurorean Network Gateway Settings
Click here to
open the
Configuration
pullout
Figure 19 DNS Server Addresses
RiverMaster Administrator’s Guide 39
Page 52

General Aurorean Network Gateway Settings
8
In the Primary DNS and Secondary DNS fields, enter the IP
addresses of DNS servers on your network.
You must identify a primary DNS server; the secondary DNS server
is optional. The primary and secondary labels indicate the search
order (primary first and then secondary). Select DNS servers that can
resolve the names of network devices that remote clients must access.
CAUTION
Not specifying a value for both primary and secondary DNS and WINS
servers may cause connection problems on networks with Windows NT
clients. To avoid this possibility, enter the IP address used on your
primary DNS server in all DNS/WINS fields even if you do not have a
secondary DNS or primary or secondary WINS server installed on your
network.
9
Click the WINS tab.
The tab page for Windows Internet Name Service (WINS) server
addresses appears as shown in Figure 19.
Chapter 3
Configuring an ANG-3000/7000
Click here to
open the
Configuration
pullout
Figure 20 WINS Server Addresses
40 RiverMaster Administrator’s Guide
Page 53

Chapter 3
Configuring an ANG-3000/7000
10
In the Primary WINS and Secondary WINS fields, enter the IP
addresses of WINS servers on your network.
If your re mote clients use st a n d a rd Microsoft Dial-Up Networking
(DUN) on the corporate network, you must complete these fields to
enable browsing and communication with other devices in the
Network Neighborhood.
11
Click the NAT tab.
The tab page for the Network Address Translation (NAT) server
address appears as shown in Figure 21.
General Aurorean Network Gateway Settings
Click here to
open the
Configuration
pullout
Figure 21 NAT Server Address
12
In the NAT field, enter the IP Address of the NAT server on your network.
The IP address you enter here is the address that Aurorean users will
receive in the installation kit as their destination address - the alias
external IP address of the ANG.
RiverMaster Administrator’s Guide 41
Page 54

Viewing Aurorean Alternate Address Information
Configuring an ANG-3000/7000
NOTE
You must configure an IP address on your NAT Server that correlates
with the alias IP address you set here.
13
Click Apply to save your changes.
To return the parameters to their original settings without saving
your changes, click Reset.
14
Do one of the following:
– If you are se t ti ng up your Aurorean Vi rtual Network for th e f ir s t
time, continue with the next subsection to configure additional
ANG network settings.
– If you are finished with the ANG network configuration and you
want to put the new network settings into effect, no additional
work is required.
Viewing Aurorean Alternate Address Information
Chapter 3
The Aurorean Alternate Address Info window displays IP addresses of the
alternate APS and ANG systems, as well as those of the primary system.
To invoke the display, perform the following steps:
1
Open the Configuration pullout.
2
Click the arrow on the Configure toolbar item at the top left edge of the pullout.
3
Choose Alt IP Addresses as shown in Figure 22.
The Aurorean Alternate Address Info window appears as shown in
Figure 22.
4
View the ANG and APS Primary and Secondary (if previously configured) IP addresses.
NOTE
Primary addresses cannot be modified in this window.
42 RiverMaster Administrator’s Guide
Page 55

Chapter 3
Configuring an ANG-3000/7000
Tunnel Protocols
Click here to
open the Alt
Addresses
window
Click here to select the Alt Address option
Figure 22 Aurorean Alternate Address Info Window
If you want to change either the ANG or APS Alternate IP address,
5
click Modify, enter a value and click Update.
Click here to
open the
Configuration
pullout
Tunnel Protocols
The ANG supports two tunnel protocols:
H Point-to-Point Tunneling Protocol (PPTP) developed by Microsoft,
3Com and others that uses Point-to-Point (PPP) protocol and Generic
Routing Encapsulation (GRE) to route packets through the Internet.
H IP Security (IPSec) protocol developed by the Internet Engineering
Task Force (IETF) that adds security extensions for encryption and
message authentication to IP protocol.
For each tunnel protocol, you can configure authentication, encryption, and
compression parameters. To set tunnel protocol parameters, perform the
following steps:
RiverMaster Administrator’s Guide 43
Page 56

Tunnel Protocols
Click here to
access the
Gateway
configuration
windows
Configuring an ANG-3000/7000
1
Open the Configuration pullout.
2
In the list of Aurorean devices, expand the tree list under Servers
(click the + symbol).
3
Expand the tree list under the name of your ANG.
4
Click on Tunnel Protocols to display PPTP and IPSec protocol tab pages.
The Tunnel Protocols window appears as shown in Figure23.
Chapter 3
Click here to
open the
Configuration
pullout
Figure 23 Tunnel Protocol General Settings
If you want to prevent remote clients from using one of the tunnel
5
protocols,select the protocol and click Remove.
By default, PPTP and IPSec are both enabled for client use. You
normally control protocol usage on a per group basis by selecting the
protocol when you assign group policies (refer to Chapter 6 for
instructions). If you want to globally dis abl e a protocol, you can
remove it from this list. If you have removed a protocol and want to
reinstall it, click Add once and when the highlighted tunnel protocol
pops up, click Add again. You are not required to click Apply.
44 RiverMaster Administrator’s Guide
Page 57

Chapter 3
Configuring an ANG-3000/7000
6
Click the Authentication tab.
Figure 24 shows the authentication parameters available for each
tunnel protocol.
7
Do one of the following:
– Choose IPSec from the Protocol pull down menu .
– For PPTP, no additional work is required. Unlike IPSec, PPTP
Tunnel Protocols
- Use the information in Table 2 to select the IPSec Signature
Algorithm that determines how IPSec packets exchanged
between the ANG and Aurorean users are signed and
verified.
- Set the Key Lifetimes Time Period and Data Transferred
value. The default values are 60 minutes for T ime Period and
Disabled for Data Transferred. Refer to Ta ble 2 to select the
Tim e Perio d and Data Transferred values wh ich set how long
the key lifetime should last in terms of time elapsed or
kilobytes amassed.
- Click Apply.
does not authenticate individual packets; instead, PPTP relies on
user authentication using MS-CHAP. After the remote user is
authenticated, all PPTP packets are allowed access.
IPSec
PPTP
Figure 24 Tunnel Protocol Authentication Settings
RiverMaster Administrator’s Guide 45
Page 58

Tunnel Protocols
Chapter 3
Configuring an ANG-3000/7000
Table 2 IPSec Authentication Parameters
Parameter Explanation
None Disables the Signature Algorithm for IPSec packets; individual
packets are no longer signed and verified during transmission.
HMAC-SHA Enables hashing messageauthenticationcodes (HMAC) that are
generated using the SHA cryptographichashing function. HMACSHA is generally regarded as stronger, more secure
cryptographic function than HMAC-MD5.
HMAC-MD5 Enables hashing message authentication codes(HMAC) that are
generated using the Rivest MD5 message digest algorithm
hashing function. While not as strong cryptographically as
HMAC-SHA, HMAC-MD5 provides better performance.
Time Period Interval after which a new key is generated.
Data
Transferred
8
Click the Encryption tab.
9
Do one of the following:
Lifetime volume (in kilobytes) of the key after which a new key is
generated.
– To set IPSec encryption parameters, choose IPSec from the
Protocol menu. IPSec encryption parameters are shown in
Figure 25. Select the IPSec Encryption Algorithm that determines
how IPSec packets exchanged between the ANG and Aurorean
Client remote users are encrypted.
– To set PPTP encryption parameters, choose PPTP from the
Protocol menu. PPTP encryption parameters are shown in
Figure 25. Select the Microsoft Point-to-Point Encryption (MPPE)
algorithm that determines how PPTP packets exchanged between
the ANG and Aurorean remote users are encrypted.
46 RiverMaster Administrator’s Guide
Page 59

Chapter 3
Configuring an ANG-3000/7000
Tunnel Protocols
ARCFOUR is a public
domain algorithm
designed to work
with RC4
DES is a government
standard block cipher
that uses a 56-bit key.
Triple-DES uses three
keys to achieve the
equivalent of 112-bit
encryption.
IPSec
Figure 25 Tunnel Protocol Encryption Settings
PPTP
RiverMaster Administrator’s Guide 47
Page 60

Tunnel Protocols
Chapter 3
Configuring an ANG-3000/7000
Table 3 Encryption Parameters
Tunnel
Protocol
IPSec None Disables encryption on the tunnel; because this results
PPTP MPPE (40 bit) Enables 40-bit key Microsoft Point-to-Point Encryption
Parameter Explanation
in a less s ecure connection, this setting is not
recommended.
ARCFOUR 40 bit Enables a 40-bit key public domain algorithm that is
designed to work with Rivest Cipher 4 (RC4), a
stream-based cipher method that supports both 40-bit
and 128-bit keys. Using RC4, data packets can be
encrypted as they are received instead of in blocks.
ARCFOUR 128 bit Enables a 128-bit key version of ARCFOUR (described
above).
DES Enables Data Encryption Standard (DES), a block
cipher method that uses 56-bit keys. Using DES, data is
encrypted in fixed-size blocks and packets are padded
to become a multiple of the block size.
Triple-DES Enables a version of DES (described above) that
employs a DES encryption with one key, a decryption
with a second key, and then another encryption with a
third key. The result is equivalent to DES with a 112-bit
key.
(MPPE) which generates a key based on a hash of the
user’s password and invokes RC4 encryption. This type
of encryption is supported by
Windows 95/98/NT/2000/ME computers without any
additional software.
MPPE (128 bit) Enables 128-bit key MPPE on the tunnel. To support
128-bit keys, the Aurorean computer must receive a
128-bit encryption upgrade available from Microsoft.
This upgrade may not be available to users outside the
U.S.
10
Click the Compression tab.
48 RiverMaster Administrator’s Guide
Page 61

Chapter 3
Configuring an ANG-3000/7000
11
Enable or disable MPPC as required.
For both IPSec and PPTP protocols, Microsoft Point-to-Point
Compression (MPPC) is currently the only compression technique
supported by the ANG. By default MPPC compression is enabled for
both protocols.
NOTE
Compression settings are applied automatically to bot h tunnel protocols.
That is, disabling compression on IPSec also disables compression on
PPTP.
Tunnel Protocols
Figure 26 Tunnel Protocol Compression Settings
Click Apply to save your changes.
12
To return the parameters to their original settings without saving
your changes, click Reset.
RiverMaster Administrator’s Guide 49
Page 62

Virtual Subnetting
13
Do one of the following:
– If you are se t ti ng up your Aurorean Vi rtual Network for th e f ir s t
time, continue with the next subsection to configure additional
ANG network settings.
– If you are finished with the ANG network configuration and you
want to put the new network settings into effect, no additional
work is required.
Virtual Subnetting
Virtual subnets fall into two categories:
H IP subnets that serve as IP address pools for allocation to remote
clients when they connect.
H An IPX network number that is shared by all remote clients wh en
they connect and use IPX protocol to access Novell NetWare servers.
IP Subnetting
To set up virtual subnets of IP addresses to allocate to remote users, perform
the following steps:
Chapter 3
Configuring an ANG-3000/7000
1
Open the Configuration pullout.
2
In the list of Aurorean devices, expand the tree list under Servers
(click the + symbol).
3
Expand the tree list under the name of your ANG.
4
Click on Subnetting to display IP and IPX subnet tab pages.
5
Click the IP Subnets tab if it is not already displayed.
A sample IP subnet window is shown in Figure 27.
50 RiverMaster Administrator’s Guide
Page 63

Chapter 3
Configuring an ANG-3000/7000
Click here to
access the
Gateway
configuration
windows
Virtual Subnetting
Click here to
open the
Configuration
pullout
Figure 27 IP Subnet Configuration for Remote Clients
NOTE
Click Remove to delete any configured virtual subnets.
6
Click Add.
The Add An IP Virtual Subnet window appears as seen in Figure 28.
Figure 28 Adding An IP Virtual Subnet
RiverMaster Administrator’s Guide 51
Page 64

Virtual Subnetting
Configuring an ANG-3000/7000
7
Enter the starting address of the subnet in the Address fields.
You can use actual IP addresses from your network or non-routable
IP address ranges (such as 192.168.x.x for a Class C network).
8
Enter a subnet mask to define the subnet range in the Mask field.
9
Do one of the following:
– Click Add to add the new virtual subnet.
– Click Cancel to close the window without savin g your changes.
10
Repeat Step 6 through Step 9 for each virtual subnet you require.
11
Click Apply to save your changes.
To return the parameters to their original settings without saving
your changes, click Reset.
12
Do one of the following:
– If you are se t ti ng up your Aurorean Vi rtual Network for th e f ir s t
time, continue with the next subsection to configure additional
ANG network settings.
– If you are finished with the ANG network configuration and you
want to put the new network settings into effect, no additional
work is required.
Chapter 3
IPX Virtual Networks
To set up a single IPX network number to allocate to remote users, perform
the following steps:
1
Open the Configuration pullout.
2
In the list of Aurorean devices, expand the tree list under Servers
(click the + symbol).
3
Expand the tree list under the name of your ANG.
4
Click on Subnetting to display IP and IPX subnet tab pages.
5
Click the IP Virtual Networks tab if it is not already displayed.
A sample IPX virtual networks window is shown in Figure 29.
52 RiverMaster Administrator’s Guide
Page 65

Chapter 3
Configuring an ANG-3000/7000
Click here to
access the
Gateway
configuration
windows
Virtual Subnetting
Click here to
open the
Configuration
pullout
Figure 29 IPX Subnet Configuration for Remote Clients
In the IPX Virtual Network Number field, enter an IPX network
6
number to be used by all remote clients. This number must be unique.
The network number must be between 1 and 8 hexadecimal digits (1
to FFFFFFFD). This network number will be attached to all IPX
frames received from remote clients.
NOTE
Zero (0) and FFFFFFFF addresses are invalid due to NetWare restrictions.
FFFFFFFE is reserved for the default route.
7
Click Apply to save your changes.
To return the parameters to their original settings without saving
your changes, click Reset.
RiverMaster Administrator’s Guide 53
Page 66

Routing
Routing
Chapter 3
Configuring an ANG-3000/7000
8
Do one of the following:
– If you are se t ti ng up your Aurorean Vi rtual Network for th e f ir s t
time, continue with the next subsection to configure additional
ANG network settings.
– If no additional ANG network configuration is required and you
want to put the new network settings into effect, reset the ANG.
Configuring the routing behavior of the ANG consists of two general steps:
H Setting parameters for the two routing protocols supported, RIP and
OSPF.
H Selecting routing protocols for each ANG Ethernet interface.
Click here to
open the
Click here to
access the
Gateway
configuration
windows
Configuration
pullout
Figure 30 Aurorean Network Gateway Routing Configuration
54 RiverMaster Administrator’s Guide
Page 67

Chapter 3
Configuring an ANG-3000/7000
Setting Routing Protocol Parameters
To access RIP and OSPF parameters for the ANG, perform the following
steps:
1
Open the Configuration pullout.
2
In the list of Aurorean devices, expand the tree list under Servers
(click the + symbol).
3
Expand the tree list under the name of your ANG.
4
Click on Routing to display the routing parameter tab pages.
5
Click on the Protocols tab to display protocol parameters for RIP and OSPF.
6
Do one of the following:
– To set RIP parameters, c hoose RIP from the Routing Proto c ols
– T o set OSPF parameters, choose OSPF from the Routing Protocols
Routing
menu and click Properties; refer to the next section “Setting RIP
Properties” for additional instructions.
menu and click Properties; refer to “Setting OSPF Properties” on
page 57 for add i t ional instructions.
Setting RIP Properties
To configure RIP properties for the ANG, perform the following steps:
1
Perform the steps in the previous section to access RIP properties.
The RIP Configuration window should appear as shown in Figure 31.
RiverMaster Administrator’s Guide 55
Page 68

Routing
If this list is blank, the
Aurorean Network Gateway
accepts RIP updates from all
routers on the subnet. You
can limit the amount of
updates that the Aurorean
Network Gateway will accept
by specifying individual routers
in this list.
Figure 31 RIP Routing Protocol Configuration
2
To turn on RIP for IPX packets, click Enable under IPX RIP Enable;
otherwise, continue with the next step.
Chapter 3
Configuring an ANG-3000/7000
3
Do one of the following:
– To allow the ANG to accept RIP updates from all routers on the
same subnet, no further work is required. Skip to Step 6.
– To configure “trusted” individual routers to supply RIP updates
to the ANG, click Add and continue with the next step.
The Add A Trusted Gateway wind ow appears as shown in Figure 32.
Figure 32 Adding A Trusted Gateway for RIP
4
In the Address field, type the address for the router that the ANG will
accept updates from and click Add.
You can later modify this address or delete it using the Modify and
Remove button s.
56 RiverMaster Administrator’s Guide
Page 69

Chapter 3
Configuring an ANG-3000/7000
5
Repeat Step 3 and Step 4 for each gateway required.
6
Do one of the following:
– Click Apply to save your changes.
– Click Cancel to close the window without savin g your changes.
– Click Reset to return the RIP parameters to their default settings.
SettingOSPFProperties
Using the RiverMaster, you can define the following OSPF parameters:
H Area ID shared by the routers and the ANG.
H Router ID that identifies the ANG to other devices in the OSPF area.
The default value for this address is the IP address assigned to the
Trusted interface on the ANG.
H Authentication algorithm used to accept or reject routing table
updates from other routers.
To route packets for remote clients using OSPF, the ANG also uses a set of
fixed operating parameters. Table 4 lists these fixed OSPF parameters, which
use common default values and cannot be changed.
Routing
Table 4 Fixed OSPF Parameters
Parameter Meaning Fixed Value
Preference D etermines how OSPF routes compete with
routes from other protocols (such as RIP) in
the ANG’s routing table. The route with the
lowest preference value is selected.
Cost Used when exporting a non-OSPF route from
the ANG’s routing table into OSPF as an
autonomous system (AS).
Type Indicates which type of autonomous systems
that routes exported from the ANG’s routing
table become.
AS Export
Interval
RiverMaster Administrator’s Guide 57
Specifies how often autonomous system link
advertisementsare generated and exported.
150
1
Type 1 AS
Once per second
Page 70

Routing
Chapter 3
Configuring an ANG-3000/7000
Table 4 Fixed OSPF Parameters
Parameter Meaning Fixed Value
AS Export
Limit
Interface
Priority
Specifies howmany autonomous systems are
generated and exported each time.
Determines the ANG’s priority for becoming
the designated router in the area.
100
0(the ANG cannot
be the designated
router)
To configure OSPF properties for the ANG, perform the following steps.
1
Perform the steps in “Setting Routing Protocol Parameters” on
page 55 to access OSPF properties.
The OSPF Configuration window appears as shown in Figure 33.
Figure 33 OSPF Routing Protocol Configuration
Type the area ID shared by the ANG and routers within the subnet in
2
theOSPFAreaIDfields.
3
Type the IP address for the Trusted interface in the OSPF Router ID fields.
58 RiverMaster Administrator’s Guide
Page 71

Chapter 3
Configuring an ANG-3000/7000
4
From the OSPF Authentication Algorithm menu, choose the
authentication algorithm used by routers on your network.
If the routers on your network do not require passwords to accept
OSPF updates, set the algorithm to None and continue with the next
step.
5
Do one of the following:
– Click Apply to save your changes.
– Click Cancel to close the window without savin g your changes.
– Click Reset to the return the OSPF properties to their default
Routing Interfaces
The ANG is equipped with two Ethernet interfaces:
H The Trusted interface should be connected to a protected network
segment (one behind a firewall or router that offers protection against
unauthorized access). Typically, you should enable a routing protocol
(RIP, OSPF, or both) on the Trusted interface so that the ANG can
advertise to other devices that its virtual subnets are reachable to the
corporate network.
Routing
settings.
H The External interface can be connected to a network segment that
resides outside a firewall and offers unfiltered access to the Internet.
You must create a static route between the External interface and the
router that serves as the gateway to the Internet. You cannot enable
RIP or OSPF on this interface.
RiverMaster Administrator’s Guide 59
Page 72

Routing
Chapter 3
Configuring an ANG-3000/7000
Click here to
open the
Configuration
pullout
Click here to
access the
Gateway
configuration
windows
Figure 34 Aurorean Network Gateway Routing Interface Configuration
Adding or Removing a Routing Protocol for an Interface
To add or remove a routing protocol from an interface, perform the following
steps:
1
Open the Configuration pullout.
2
In the list of Aurorean devices, expand the tree list under Servers
(click the + symbol).
3
Expand the tree list under the name of your ANG.
4
Click on Routing to display the routing parameter tab pages.
5
Click on the Interfaces tab to display the configuration for each ANG network interface.
60 RiverMaster Administrator’s Guide
Page 73

Chapter 3
Configuring an ANG-3000/7000
6
Select the interface (Trusted or External) from the list under Network Interfaces.
The protocols already enabled for this interface appear in the Routing
Protocols list.
7
Do one of the following:
– To add a protocol to the trusted interface, click Add and continue
– To remove a protocol, select the protocol from the Routing
8
When the Add an Interface Routing Protocol window appears as
shown in Figure 35, select a routing protocol and click Add.
Routing
with the next step.
Protocols list and click Remove. Skip to Step 10.
Figure 35 Adding a Routing Pr otocol
NOTE
For the External interface, you can only add or remove static routing.
Because the External interface is optimized for tunnel protocols only, you
cannot use RIP or OSPF on this interface.
9
Do one of the following:
– If you are adding RIP to the interface, perform the steps in
“Configuring RIP for the Interface” on page 62.
– If you are adding OSPF to the interface, perform the steps in
“Configuring OSPF on an Interface” on page 64.
– If you are adding a static route to the interface, perform the steps
in “Creating Static Routes” on page 65.
10
Do one of the following:
– Click Apply to save the routing protocol configuration changes.
– Click Reset to the return the interface’s protocol configuration to
its original setting.
RiverMaster Administrator’s Guide 61
Page 74

Routing
Configuring an ANG-3000/7000
Configuring RIP for the Interface
To configure RIP on an interface, perform the following steps:
1
Add RIP as described in the previous section or select RIP from the
Routing Protocols list and click Properties.
The RIP Interface Configuration window appears as shown in
Figure 36.
These values are
used to authenticate
RIP updates from
routers on the network
Chapter 3
Figure 36 Routing Interfaces Configuration - RIP
Choose the version of RIP to use on this interface.
2
RIP Version 1 uses IP broadcast packets for periodic announcements
of reachable subnets. RIP Version 2 is an enhanced version of RIP that
uses IP multicast packets for announcements.
3
In the RIP Authentication fields, choose the algorithm used by routers on your network.
If the routers on your network do not require passwords to accept
RIP updates, set the algorithm to None and skip to Step 7.
62 RiverMaster Administrator’s Guide
Page 75

Chapter 3
Configuring an ANG-3000/7000
NOTE
RIP update authentication is only supported by RIP Version 2. If the
routers on your network only support RIP Version 1, you cannot enter
values in the RIP Authentication fields. Refer to “Configuring RIP for the
Interface” on page 62 for instructions on selecting the version of RIP used
on your network.
4
Type the RIP authentication password used by routers on your network in the Password field.
RIP authentication passwords are used by routers to determine if
they should accept updated routing information sent from another
router. If your routers do not authenticate updates, leave this field
blank and skip to Step 2.
5
Type the same password in the Re-Type Password field exactly as
you entered it in Step 4.
6
Set the RIP Route Importing/Exporting options as follows:
– To allow the ANG interface to learn new routes, place a check
– To cause the ANG to advertise its known routes, place a check
Routing
next to Enable Import. If you enabled the Intelligent Client
Routing feature, you should turn on Enable Import to allow the
ANG to pass known reachable addresses to the remote client.
next to Enable Export. This setting is required to allow the ANG
to advertise the reachability of virtual subnets to other devices on
the network.
7
Do one of the following:
– Click Apply to save the RIP configuration changes.
– Click Cancel to close the window without savin g your changes.
– Click Reset to the return the interface’s protocol configuration to
its original setting.
RiverMaster Administrator’s Guide 63
Page 76

Routing
Configuring an ANG-3000/7000
ConfiguringOSPFonanInterface
To enable OSPF on an interface, perform the following steps:
1
Add OSPF as described in “Adding or Removing a Routing Protocol
for an Interface” on page 60 or select OSPF from the Routing
Protocols list and click Properties.
The OSPF Interface Configuration window appears as shown in
Figure 37.
Chapter 3
Figure 37 Routing Interfaces Configuration - OSPF
2
Type the OSPF password used by routers on your network in the Authentication Password field.
OSPF authentication passwords are used by routers to determine if
they should accept updated routing information sent from another
router. If your routers do not authenticate updates, leave this field
blank.
NOTE
Passwords are limited to 8 characters or less
3 Type the same password in the Re-Type Authentication Password
field exactly as you entered it in Step 2.
64 RiverMaster Administrator’s Guide
Page 77

Chapter 3 Routing
Configuring an ANG-3000/7000
4 Doone of the following:
– Click Apply to save the OSPF parameter changes.
– Click Cancel to close the window without savin g your changes.
– Click Reset to the return the interface’s protocol properties to
their default settings.
Creating Static Routes
To configure a static route between an ANG interface and another device,
perform the following steps:
1 Open the Configuration pullout. 2 In the list of Aurorean devices, expand the tree list under Servers
(click the + symbol).
3 Expand the tree list under the name of your ANG. 4 Click on Routing to display the routing parameter tab pages. 5 Click on the Interface tab to display the routing protocol(s) selected
for each interface.
6 From the Interfaces menu, choose the ANG Ethernet interface to
configure (External or Trusted).
7 In the Routing Protocol Selection list, double click Static Routes and
click Add in the Static Route Configuration window.
The Static parameter tab page is displayed as shown in Figure 38.
RiverMaster Administrator’s Guide
65
Page 78

Routing Chapter 3
Configuring an ANG-3000/7000
Figure 38 Static Routing Configuration
8 In the Gateway address fields, type the IP address of a gateway on
this subnet.
For External interfaces, enter the IP address of the router that
provides access to the Internet.
66
9 Inthe Reachable Subnet fields, type a starting IP address and subnet
mask to define a subnet.
Packets received by the ANG are statically routed to the gateway you
specified. To forward all packets to the gateway when there is no
other reachable “next hop” address for a packet, enter an address of
0.0.0.0 and a subnet mask of 0.0.0.0.
CAUTION
Configuring a default static route (0.0.0.0/0.0.0.0) on the Trusted interface
of the ANG disables Intelligent Client Routing. Refer to “Intelligent
Client Routing” on page 31 for more information.
RiverMaster Administrator’s Guide
Page 79

Chapter 3 Routing
Configuring an ANG-3000/7000
10 Click Add.
The static route you configured appears in the Internal Static Routes
display.
11 Do one of the following:
– Click Apply to create the static route.
– Click Reset to the return the interface’s protocol properties to
their default settings.
– Click Cancel to close the window without savin g your changes.
RiverMaster Administrator’s Guide
67
Page 80

Adding a Remote Server Chapter 3
Configuring an ANG-3000/7000
Adding a Remote Server
An ANG can be added at a remote location in a Site-to-Site configuration.
This secti on descr ibes ho w to set up an initiating Network Gateway to connect
to a Local or terminating ANG/APS pair.
NOTE
Local ANGs use an accompanying APS; remote ANGs are stand-alone.
These instructions cannot be used to configure a stand-alone ANG connection
to another stand-alone ANG (refer to A ppe n di x B for more information).
To add a Remote Network Gateway, perform the following st ep s.
1 Open the Configuration pullout. 2 In the list of Aurorean devices, expand the tree list under gateways
(click the + symbol).
Click here to
expand the
tree list
Click here to
add the Remote
Gateway or Tunnel
Click here to
select the
created server
or tunnel
Click here to
access the
Network Gateway
configuration
68
3 Expand the tree list under Remote Servers.
The Tunnel Protocols window appears as shown in Figure 39.
Click here to display the configured properties of the selected device
Click
Click
C
C
Figure 39 Remote Server Display
RiverMaster Administrator’s Guide
Click here to
open the
Configuration
pullout
Page 81

Chapter 3 Adding a Remote Server
Configuring an ANG-3000/7000
4 Click Add Remote Server.
The Add Remote Server window appears as shown in Figure 40.
Type the name of the Remote Server here
Click here to add
the server
Click either the
IP Address or
FQDN button and
enter a value in the
adjacent field
5 Choose a name for the server in the Remote Server Name window. 6 Click either IP Address or FQDN (Fully Qualified Domain Name). If
you choose IP Address, enter an IP address in the fields provided. If
you choose FQDN, enter a value in the single field.
The FQDN is the name of the Remote Server as well as its domain.
For example: server1.argus.com
7 Type a User Name and User Password and confirm the password in
the fields provided.
This User Name and Password must later be registered in the
authentication database of the Remote (terminating) ANG by adding
the user to a group (Refer to Chapter 6 for more information).
RiverMaster Administrator’s Guide
Figure 40 Add Remote Server Window
69
Page 82

Adding a Remote Server Chapter 3
Configuring an ANG-3000/7000
8 Choose the tunneling protocol: IPSec or PPTP. 9 Click Add.
This action adds the remote ANG to the configuration on yo ur Local
ANG. A message will display stating you have successfully added
the remote server.
10 Click Add Remote Tunnel or select the Remote Server just added and
click Add Tunnel.
The Add Remote Tunnel window appears as shown in Figure 41.
Type the name of the Remote Tunnel here
Click here to add
the tunnel
70
Choose the Remote
Gateway name from
this pull-down list
Figure 41 Add Remote Tunnel Window
11 Choose a name for the Remote Tunnel in the provided field.
RiverMaster Administrator’s Guide
Page 83

Chapter 3 Adding a Remote Server
Configuring an ANG-3000/7000
12 Click the arrow in the Remote Server Name field to bring up a pull-
down list and select the Remote Server you just added.
RiverMaster types the Server user name and password into the open
fields. You may change these settings if necessary.
13 Select Enabled or Disabled in the Enabled State field.
If you select Enabled, the tunnel will be created immediately. Select
Disabled if you want to delay enabling the tunnel until configuration
is complete at the other end of the tunnel.
14 Click Add.
If the Enabled state was selected earlier, the tunnel becomes
operational in a few moments.
NOTE
You can configure additional tunnels to the Remote Server just added by
selecting the particular server in the Remote Tunnels display, clickin g
Properties, and clicking Add Tunnel in the Remote Server Properties
window.
Changing Server and T unnel Properties
The information configured for Site-to-Site servers and tunnels can be
changed by clicking the Properties buttons on either display.
To change properties for the Remote Server, perform the following steps:
1 Select your Remote Server from the tree list under Remote Servers
and click Properties in the display.
2 When the Remote Server Properties window appears, change any
information and do one of the following:
– Click Modify to reconfigure the Remote Server.
– Click Cancel to close the window without savin g your changes.
– Click Delete to remove the Remote Server configuration.
RiverMaster Administrator’s Guide
71
Page 84

Adding a Remote Server Chapter 3
Configuring an ANG-3000/7000
To change properties for the Remote Tunnel, perform the following steps:
1 Select your Remote Tunnel from the tree list under Remote Servers
and click Properties in the display.
The Remote Tunnel Properties window appears as shown in
Figure 42.
Click here to
update the
tunnel
Click here to refresh
the values for the
Current state and
Last try result
attributes shown in
the Tunnel Protocols
window
72
Figure 42 Remote Tunnel Properties Window
2 Change any information. If the Remote Tunnel is enabled, select
Disabled in the Enabled State field and do one of the following:
– Click Update to reconfigure the Remote Tunnel.
– Click Cancel to close the window without savin g your changes.
– Click Delete to remove the Remote Tunnel configuration.
If you clicked Update, a window pops up asking if you want to save
the modified tunnel. Click Yes or No.
RiverMaster Administrator’s Guide
Page 85

Chapter 3 Adding a Remote Server
Configuring an ANG-3000/7000
3 Re-openthe Remote TunnelProperties window and select Enabled in
the Enabled State field if you want to create the tunnel immediately
with the reconfigured properties.
If you clicked Update, a window pops up again asking if you want to
save the modified tunnel. Click Yes or No.
NOTE
Clicking Refresh displays the status for the Current State and Last
Connection Result attributes of the tunnel.
RiverMaster Administrator’s Guide
73
Page 86

Page 87

Setting Up Aurorean Services
Setting Up Aurorean Services
Setting Up Aurorean ServicesSetting Up Aurorean Services
This chapter describes how to perform the following tasks:
H Add an Authorization se rvice plug-in to allow Aurorean Virtual
Network systems to authenticate remote users aga inst a local
database on the Aurorean Policy Server, an external Remote
Authentication Dial In User Service (RADIUS) server, or an RSA
ACE/Server.
H Generate private/public encryption/decryption keys for use with the
IPSec protocol.
H Prepare the Notification server on the APS to send E-mail when
alarm, alert, or notification messages are generated.
H Adjust trace levels for Management and Tunnel server services to
generate a controlled stream of messages.
4
H Backup the Management Database to avoid operational down time.
Before You Begin
Before performing the steps in this chapter, you should familiarize yourself
with the following Aurorean Virtual Network concepts:
H Authorization pl ug-in options
H Private/public keys for IPSec authentication
H Problem notification via E-mail
H Trace levels
RiverMaster Administrator’s Guide
75
Page 88

Before You Begin Chapter 4
Setting Up Aurorean Services
Authorization Plug-in Options
Within a Aurorean Virtual Network, the APS coordinates remote user
authentication. Using an internal software service known as Authenticatio n
and a series o f “plug-ins”, the APS can authenticate remote users in three
ways:
H Using the Enterasys Authentication plug- in, remote users are
authenticated against a database residing on the APS’s hard drive.
H Using the RADIUS plug-in, the APS acts as a RADIUS client,
forwarding authentication requests from Aurorean users to a
RADIUS server.
H Using the RSA Security SecurID plug-in, the APS acts as a native
ACE/Client, forwarding authentication requests from Aurorean
users directly to an ACE/Server. This plug-in supports the fail-over
function of automatically connecting to a slave ACE/Server if the
master fails.
RADIUS Authentication S ervers
76
Aurorean Virtual Network systems support a wide range of RADIUS servers,
including:
H Microsoft RADIUS
H Funk Software’s Steel-Belted RADIUS
H RSA Security ACE/Server that supports RADIUS extensions. This
allows remote users to not only authenticate against a centralized
authentication database, but also to take advantage of the strong
security offered by SecurID passcodes.
H Novell’s BorderManager™ Authentication Services (BMAS) running
on a RADIUS server. BMAS is an interface that links dial-in users to
the network through Novell Directory Services (NDS™). Support for
BorderManager is seamless and it requires no configuration on the
APS. Refer to BorderManager Enterprise Edition documentation for
more information.
RiverMaster Administrator’s Guide
Page 89

Chapter 4 Before You Begin
Setting Up Aurorean Services
NOTE
Enterasys Networks continually tests interoperability with other RADIUS
server vendors. Contact Enterasys Networks Customer Support for an
up-to-date list of app roved RADIUS server s.
Plug-in Planning
You can add multiple plug-ins for RADIUS or SecurID authentication.
Typically, you add one plug-in for each RADIUS or SecurID authentication
server on your network and preserve the Enterasys Authentication plug-in
for RiverMaster logins. One plug-in must be designated as the default
plug-in. When you set up your Aurorean Virtual Network for the first time,
the default plug-in is Enterasys Authentication.
When Aurorean users attempt to tunnel into the corporate network, they
must present a VPN user name and password for authentication. If the
Aurorean Client user presents a simple user name such as BSmith, the user is
authenticated against the default plug-in. Aurorean users have the ability to
override the default and select another plug-in by adding an “@” symbol and
the identifier for the plug-in. For example, if you add a RADIUS plug-in with
the identifier RADIUS1, a Aurorean Client user can select this plug-in by
entering a VPN user name such as BSmith@RADIUS1.
Threads
You can accelerate the authentication of multiple users logging in at the same
time by increasing the number of threads (logins in progress) the
authenticating server will handle. This function is useful if you discover that
users are exceeding the timeout value allowed for authentication and are not
being connected because too many clients are dialing in simulta neously.
For instructions on customizing the Enterasys Authentication plug-in and
adding RADIUS and SecurID pl ug-ins, refer to “Adding an Authorization
Plug-In” on page 80.
RiverMaster Administrator’s Guide
77
Page 90

Before You Begin Chapter 4
Setting Up Aurorean Services
Private/Public K eys for IPSec Authentication
Aurorean users who tunnel into your network using the IPSec protocol also
require an El Gamal public key for authentication. The key is an embedded
piece of data used to encrypt and decrypt packets exchanged between
Aurorean Client and the Aurorean Network Gateway. A pair of keys, one
private and one public, are generated and saved on the APS.
The public key is included in the Aurorean Client installation kit you build
and distribute for your remote users (as described in Chapter 6). The
exchange of keys is handled entirely by the Aurorean Client application; the
user does not need to know or type the public key.
However, if the private key on the APS becomes compromised, you may need
to regenerate the private/public key pair and distribute files with the new
public key to your remote users. Without the current public key, IPSec users
will be unable to tunnel into the network. For instructions on generating a
new private/public key pair, refer to “Generating Private/Public Keys ” on
page 91.
78
Problem Notification
The Notification service that runs on both the Management and Tunnel
servers generate messages when the server experiences operational difficulty.
The events that trigger these messages fall into three categories:
H Alarms notify you when a significant error occurs with a service
running on a Aurorean Virtual Network system or a general system
problem that is preventing the server from operating normally.
H Alerts occur when an error count threshold has been crossed and an
alarm condition is imminent.
H A Problem Notification typically indicates a remote client connection
problem which Aurorean Client’s Prescriber feature diagnosed.
These messages appear in the View System Activity pullout and advanced
message viewer (as described in Chapter 7) and can also be retrieved from
system reports (as described in Chapter 8). For immediate notification when
one of these events occurs, the APS can send E-mail to one or more persons
RiverMaster Administrator’s Guide
Page 91

Chapter 4 Before You Begin
Setting Up Aurorean Services
that you select. You must first define a mailing list and then add E-mail
addresses for each recipient to this list. You can select which types of
messages (alarms, alerts, or problem notifications) will be sen t to each
address.
For instructions on creating mailing lists for problem notification, refer to
“Using the Notification Service to Send E-Mail” on page 93.
Trace Levels
The number of messages the Management and Tunnel servers report to
RiverMaster can be set on a per service ba sis. Because so many messages are
routinely shared via control traffic between the servers and clients, if a limit
were not set on their collection and display they could disrupt Aurorean
Virtual Network service. But, having the option to occasionally read these
messages can help tr oubl esho ot serv ice p r oblems . Refer to C hapte r 7 for more
detailed information on the types of messages displayed.
RiverMaster permits you to set low, medium or high trace levels for the ten
available Enterasys services. These levels correspond to varying numbers of
messages reported to RiverMaster, depending on the service you configure.
RiverMaster Administrator’s Guide
79
Page 92

Adding an Authorization Plug-In Chapter 4
Setting Up Aurorean Services
For example, a low trace level set for the Tunnel Management Service will
produce messages similar to those in Figure 43.
Note Tunnel Trace
messages sent by
the tunnel server
Highlighted message
here is detailed in
description area
below
See message text
here
Click here
for View
System
Activity
pullout
Figure 43 Trace Messages Display
If you read the text for each Tunnel Trace message above, you can follow the
chain of protocol messages which signify the communications that occur on a
packet level when a client successfully makes a connection. Th en, if a client
connection subsequently fails, you could compare messages and troubleshoot
the problem. For instructions on setting trace levels, refer to “Setting T race
Levels” on page 97.
Adding an Authorization Plug-In
The Enterasys Authentication plug-in is factory-installed by Enterasys
Networks and made the default plug-in. This plug-in is used when you log
into the RiverMaster application to ensure that you have administration
privileges. To support SecurID and RADIUS authentication, you must add
one or more SecurID or RADIUS plug-ins.
80
RiverMaster Administrator’s Guide
Page 93

Chapter 4 Adding an Authorization Plug-In
Setting Up Aurorean Services
NOTE
Do not remove the Enterasys Authentication plug-in or convert it into
a RADIUS or SecurID plug-in. Without a plug-in of this type, you will
not be able to log into RiverMaster.
Enterasys Authentication
To modify the Enterasys Authentication plug-in, perform the following steps:
1 Open the Configuration pullout. 2 In the list of Aurorean devices, expand the tree list (by clicking the +
symbol) under the name of your APS, and expand it again under Auth
Service.
Figure 44 shows the Configurat ion pullout.
Click here to view Configure pull-down box options
Click here to add
a new Authorization
Plug-in or
here to expand the
tree list and select
or create a plug-in
Click here to access
the APS
configuration
windows
RiverMaster Administrator’s Guide
Click here to
open the
Configuration
pullout
Click here to configure the plug-in
Figure 44 Configure Authorization Plug-ins Window
81
Page 94

Adding an Authorization Plug-In Chapter 4
Setting Up Aurorean Services
3 From the list of Plug-ins, select Enterasys Authentication. 4 Click Properties.
The Properties for Plug-in - Enterasys Authentication wind ow will
appear as shown in Figure 45.
Click here to
update the
plug-in
82
Figure 45 Enterasys Authentication Plug-in Window
5 In the Identifier field, type a name that remote users will use to select
this plug-in.
Aurorean users can include this identifier as part of their VPN user
names to override the default authorization plug-in. For example, if
you enter Enterasys as the identifier for this plug-in, Aurorean users
can specify a user name such as Bob@Enterasys to ensure that they
authenticate against the APS.
RiverMaster Administrator’s Guide
Page 95

Chapter 4 Adding an Authorization Plug-In
Setting Up Aurorean Services
6 Optionally, specify a value in the Num Threads field.
This function allows the specified number of users to simultaneously
log in without delay. The range of threads that can be set is 1 to 100,
with a default value set to 10.
7 If you want to make this plug-in the default authorization method,
check the Default Plug-In box.
8 Doone of the following:
– Click Update to save your changes.
– Click Cancel to clear the fields without saving the plug-in.
RADIUS Authorization
To configure the APS to forward authentication requests to a RADIUS server,
perform the following steps:
1 Open the Configuration pullout. 2 Choose AuthorizationPlug-ins from the Configure pull-down box in
the top left corner of the pullout. Or, in the list of Aurorean Virtual
Network devices, expand the tree list under the name of your APS (by
clicking the + symbol), expand it again under Auth Service and click
Make New Plug-in...
The Create New Plug-in window will appear as shown in Figure 46,
but without default or configured values.
RiverMaster Administrator’s Guide
83
Page 96

Adding an Authorization Plug-In Chapter 4
Setting Up Aurorean Services
Type plug-in name
and identifier here
Click here to
create the
plug-in
Click here to enter
RADIUS Plug-in
values
84
Figure 46 Sample RADIUS Authorization Plug-In Settings
3 In the Name field, type in a name to describe the plug-in.
This name later appears in the plug-in tree list. For example, if you
are adding a plug-in for a Steel-Belted RADIUS server, you can type
Steel-Belted RADIUS as the name. If you plan to authenticate
against more than one RADIUS server, you can enter a specific server
name in this field.
4 In the Identifier field, type a name that remote users will use to select
this plug-in.
Aurorean users can include this identifier as part of their VPN user
names to override the default authorization plug-in. For example, if
you enter RADIUS as the identifier for this plug-in, Aurorean users
can specify a user name such as Bob@RADIUS to authenticate
against the RADIUS server instead of the default plug-in.
RiverMaster Administrator’s Guide
Page 97

Chapter 4 Adding an Authorization Plug-In
Setting Up Aurorean Services
5 Optionally, specify a value in the Num Threads field.
This function allows the specified number of users to simultaneously
log in without delay. The range of threads that can be set is 1 to 100,
with a default value set to 10.
NOTE
Do not set Num Threads to a 0 (zero) value for a RADIUS plug-in. This
will cause user login problems. You may set the value to zero for the
Enterasys Authentication plug-in.
6 To make this plug-in the default authorization method, place a check
next to Default Plug-In.
7 ClickonRadiusPlug-In. 8 In the Server Address field, enter the IP address or DNS name of the
RADIUS server.
9 Inthe Shared Secret field, type the same shared secret password you
entered on the RADIUS server.
For more informati on on shared secrets, refer to the documentation
supplied with your RADIUS server.
10 Leave the Authentication Port and Accounting Port fields set to their
default values.
These values specify UDP port numbers and match indust ry
standards for RADIUS.
RiverMaster Administrator’s Guide
85
Page 98

Adding an Authorization Plug-In Chapter 4
Setting Up Aurorean Services
11 In the Timeout field, enter the number of seconds the APS should
wait before resending an authentication request.
If the RADIUS server fails to respond to an authentication request
within the time specified, the APS automatically resends the request.
Depending upon the type of RADIUS server you use, set this field as
follows:
Server Type Recommended Value
Steel-Belted RADIUS 10 seconds
MS RADIUS 10 seconds
SecurID over RADIUS 30 seconds
12 In the Retry field, enter the number of times the APS should resend
an authentication request.
For example, when this field is set to 2, the APS resends an
authentication request twice before declaring the RADIUS server
unreachable. Depending upon the type of RADIUS server you use,
set this field as follows:
86
Server Type Recommended Value
Steel-Belted RADIUS 3 retries
MS RADIUS 3 retries
SecurID over RADIUS 1retry
13 If you were unable to create an Enterasys group on your RADIUS
server and need to reuse an existing group attribute, enter the
attribute number in the Group Attrib. field.
Authentication messages passed between the APS and the RADIUS
server must carry a group attribute. If the RADIUS server
management application prevented you from creating an Enterasys
group attribute, you can take over a pre-defined attribute and use it
for VPN authentication. For example, the standard attribute LoginLAT-Group can be us ed by entering its number, 36, in this field. For a
complete list of attribute numbers, refer to the IETF RFC 2138.
RiverMaster Administrator’s Guide
Page 99

Chapter 4 Adding an Authorization Plug-In
Setting Up Aurorean Services
14 If you want the APS to apply an MD4 hash to the key returned by the
RADIUS server, place a check next to the Apply Hash field.
Place a check in this field only if all of the following statements are
true: remote users will authenticate against a Steel-Belted RADIUS 2.1
or earlier server, the tunnel protocol negotiated for all connections by
these users will be PPTP, and 128-bit encryption is enabled on the
Aurorean Network Gateway.
15 Do one of the following:
– Click Commit to save the new plug-in.
– Click Cancel to clear the fields without saving the plug-in.
16 If you click Commit, you are prompted to re-type the Shared Secret. 17 Reboot the APS to enable the authorization changes.
SecurID Authorization
To configure the APS to forward authentication requests to a SecurID server,
perform the following steps:
1 Open the Configuration pullout. 2 Choose AuthorizationPlug-ins from the Configure pull-down box in
the top left corner of the pullout. Or, in the list of Aurorean devices,
expand the tree list under the name of your APS (by clicking the +
symbol), expand it again under Auth Service and click Make New
Plug-in ...
The Create New Plug-in window will appear as shown in Figure 47.
RiverMaster Administrator’s Guide
87
Page 100

Adding an Authorization Plug-In Chapter 4
Setting Up Aurorean Services
Type plug-in name
and identifier here
Click here to
create the
plug-in
Click here to enter
SecurID Plug-in
values
88
Figure 47 SecurID Plug-in Window
3 In the Name field, type in a name to describe the plug-in.
This name later appears in the plug-in tree list. For example, if you
are adding a plug-in for a SecurID server, you can type SecurID as
the name. If you plan to authenticate against more than one SecurID
server, you can enter a specific server name in this field .
RiverMaster Administrator’s Guide
 Loading...