

Page 1
FN10-12
FN10-24
AUI 1
X2X3X4X 5X
14X
13X
15X 16X
X2X3X4X 5X
FAST NETWORK 10
USER GUIDE
Link
6X 7X8X9X
17X 18X
6X 7X8X9X
20X 21X 22X 23X 24X
19X
10X
10X
12XAUI 1
11X
12X
11X
231456 789101112AB
19 2021 2223
13
1415 161718
Link
Link
231456 789101112AB
24
Usr
Segment Status
Usr
Segment Status
TX
RX
Act
Col
TX
Select
RX
Act
Col
Select
Reset Ready
Pwr
NMS Port
Reset Ready
Pwr
NMS Port
Page 2

Page 3

NOTICE
Cabletron Systems reserves the right to make changes in specifications and other information
contained in this document without prior notice. The reader should in all cases consult Cabletron
Systems to determine whether any such changes have been made.
The hardware, firmware, or software described in this manual is subject to change without notice.
IN NO EVENT SHALL CABLETRON SYSTEMS BE LIABLE FOR ANY INCIDENTAL,
INDIRECT, SPECIAL, OR CONSEQUENTIAL DAMAGES WHATSOEVER (INCLUDING BUT
NOT LIMITED TO LOST PROFITS) ARISING OUT OF OR RELATED TO THIS MANUAL OR
THE INFORMATION CONTAINED IN IT, EVEN IF CABLETRON SYSTEMS HAS BEEN
ADVISED OF, KNOWN, OR SHOULD HAVE KNOWN, THE POSSIBILITY OF SUCH
DAMAGES.
Copyright March 1996 by Cabletron Systems, Inc., P.O. Box 5005, Rochester, NH 03866-5005
All Rights Reserved
Printed in the United States of America
Order Number: 9031805-01 May 1996
All other product names mentioned in this manual may be trademarks or registered trademarks of
their respective companies.
Printed on Recycled Paper
Fast Network 10 User Guide i
Page 4

FCC NOTICE
This device complies with Part 15 of the FCC rules. Operation is subject to the following two
conditions: (1) this device may not cause harmful interference, and (2) this device must accept any
interference received, including interference that may cause undesired operation.
NOTE:
This equipment has been tested and found to comply with the limits for a Class A digital
device, pursuant to Part 15 of the FCC rules. These limits are designed to provide reasonable
protection against harmful interference when the equipment is operated in a commercial environment.
This equipment uses, generates, and can radiate radio frequency energy and if not installed in
accordance with the operator’s manual, may cause harmful interference to radio communications.
Operation of this equipment in a residential area is likely to cause interference in which case the user
will be required to correct the interference at his own expense.
WARNING:
party responsible for compliance could void the user’s authority to operate the equipment.
Changes or modifications made to this device which are not e xpressly appro v ed by the
DOC NOTICE
This digital apparatus does not exceed the Class A limits for radio noise emissions from digital
apparatus set out in the Radio Interference Regulations of the Canadian Department of
Communications.
Le présent appareil numérique n’émet pas de bruits radioélectriques dépassant les limites applicables
aux appareils numériques de la class A prescrites dans le Règlement sur le brouillage radioélectrique
édicté par le ministère des Communications du Canada.
VCCI NOTICE
This equipment is in the 1st Class Category (information equipment to be used in commercial and/or
industrial areas) and conforms to the standards set by the Voluntary Control Council for Interference
by Information T echnology Equipment (VCCI) aimed at preventing radio interference in commercial
and/or industrial areas.
Consequently, when used in a residential area or in an adjacent area thereto, radio interference may be
caused to radios and TV receivers, etc.
Read the instructions for correct handling.
ii Fast Network 10 User Guide
Page 5

CABLETRON SYSTEMS, INC. PROGRAM LICENSE AGREEMENT
IMPORTANT:
This document is an agreement between you, the end user, and Cabletron Systems, Inc. (“Cabletron”)
that sets forth your rights and obligations with respect to the Cabletron software program (the
“Program”) contained in this package. The Program may be contained in firmware, chips or other
media. BY UTILIZING THE ENCLOSED PRODUCT, YOU ARE AGREEING TO BECOME
BOUND BY THE TERMS OF THIS AGREEMENT, WHICH INCLUDES THE LICENSE AND
THE LIMITATION OF WARRANTY AND DISCLAIMER OF LIABILITY. IF YOU DO NOT
AGREE TO THE TERMS OF THIS AGREEMENT, PROMPTLY RETURN THE UNUSED
PRODUCT TO THE PLACE OF PURCHASE FOR A FULL REFUND.
Before utilizing this product, carefully read this License Agreement.
CABLETRON SOFTWARE PROGRAM LICENSE
1. LICENSE
package subject to the terms and conditions of this License Agreement.
You may not copy, reproduce or transmit any part of the Program except as permitted by the
Copyright Act of the United States or as authorized in writing by Cabletron.
2. OTHER RESTRICTIONS. You may not reverse engineer, decompile, or disassemble the
Program.
3. APPLICABLE LA W. This License Agreement shall be interpreted and governed under the laws
and in the state and federal courts of New Hampshire. You accept the personal jurisdiction and
venue of the New Hampshire courts.
. You have the right to use only the one (1) copy of the Program provided in this
EXCLUSION OF WARRANTY AND DISCLAIMER OF LIABILITY
1. EXCLUSION OF
writing, Cabletron makes no warranty, expressed or implied, concerning the Program (including
its documentation and media).
CABLETRON DISCLAIMS ALL WARRANTIES, OTHER THAN THOSE SUPPLIED TO
YOU BY CABLETRON IN WRITING, EITHER EXPRESSED OR IMPLIED, INCLUDING
BUT NOT LIMITED TO IMPLIED WARRANTIES OF MERCHANTABILITY AND
FITNESS FOR A PARTICULAR PURPOSE, WITH RESPECT TO THE PROGRAM, THE
ACCOMP ANYING WRITTEN MA TERIALS, AND ANY A CCOMP ANYING HARDWARE.
WARRANTY. Except as may be specifically provided by Cabletron in
2. NO LIABILITY FOR CONSEQUENTIAL DAMAGES. IN NO EVENT SHALL
CABLETRON OR ITS SUPPLIERS BE LIABLE FOR ANY DAMAGES WHATSOEVER
(INCLUDING, WITHOUT LIMITATION, DAMAGES FOR LOSS OF BUSINESS,
PROFITS, BUSINESS INTERRUPTION, LOSS OF BUSINESS INFORMATION, SPECIAL,
INCIDENTAL, CONSEQUENTIAL, OR RELIANCE DAMAGES, OR OTHER LOSS)
ARISING OUT OF THE USE OR INABILITY TO USE THIS CABLETRON PRODUCT,
EVEN IF CABLETRON HAS BEEN ADVISED OF THE POSSIBILITY OF SUCH
DAMAGES. BECAUSE SOME STATES DO NOT ALLOW THE EXCLUSION OR
LIMITATION OF LIABILITY FOR CONSEQUENTIAL OR INCIDENTAL DAMAGES, OR
ON THE DURATION OR LIMITATION OF IMPLIED WARRANTIES, IN SOME
INSTANCES THE ABOVE LIMITATIONS AND EXCLUSIONS MAY NOT APPLY TO
YOU.
Fast Network 10 User Guide iii
Page 6

UNITED STATES GOVERNMENT RESTRICTED RIGHTS
The enclosed product (a) was developed solely at private expense; (b) contains “restricted computer
software” submitted with restricted rights in accordance with Section 52227-19 (a) through (d) of the
Commercial Computer Software - Restricted Rights Clause and its successors, and (c) in all respects
is proprietary data belonging to Cabletron and/or its suppliers.
For Department of Defense units, the product is licensed with “Restricted Rights” as defined in the
DoD Supplement to the Federal Acquisition Regulations, Section 52.227-7013 (c) (1) (ii) and its
successors, and use, duplication, disclosure by the Government is subject to restrictions as set forth in
subparagraph (c) (1) (ii) of the Rights in Technical Data and Computer Software clause at
252.227-7013. Cabletron Systems, Inc., 35 Industrial Way, Rochester, New Hampshire 03867-0505.
iv Fast Network 10 User Guide
Page 7

CONTENTS
CHAPTER 1 INTRODUCTION
1.1 About This Manual.......................................................................1-1
1.2 Getting Help.................................................................................1-2
1.3 Document Conventions...............................................................1-3
1.4 Related Documentation...............................................................1-4
1.5 Overview......................................................................................1-4
1.5.1 FN10 Architecture...........................................................1-6
1.5.1.1 Store and Forward Switching.........................1-7
1.5.1.2 Discarding Local Traffic..................................1-8
1.5.1.3 Spanning Tree Algorithm................................1-8
1.5.2 FN10 Bridge Address Table ...........................................1-9
1.5.3 FN10 Filtering ...............................................................1-10
1.5.4 FN10 Sample Applications ...........................................1-11
1.5.4.1 FN10 Trunking..............................................1-11
1.5.4.2 FN10’s Fast Ethernet Option........................1-12
1.5.4.3 Virtual Workgroups.......................................1-14
1.6 Local Console Manager.............................................................1-15
1.6.1 Command Syntax Conventions ....................................1-16
1.6.2 Basic LCM Commands................................................. 1-17
1.6.2.1 Help..............................................................1-18
1.6.2.2 Erase............................................................1-18
1.6.2.3 Exit ............................................................... 1-19
1.6.2.4 Logout .......................................................... 1-19
1.6.2.5 Traplog.........................................................1-19
CHAPTER 2 UNPACKING AND INSTALLING YOUR FN10
2.1 FN10 Panels................................................................................2-1
2.2 Installing the FN10.......................................................................2-4
2.2.1 Checking the Power-up Diagnostics Sequence.............. 2-6
2.3 Connecting the Local Console Manager ..................................... 2-7
2.4 Connecting the FN10 to the Network .......................................... 2-8
2.4.1 Connecting the AUI Interface.......................................... 2-9
2.5 Adding or Replacing the Optional Fast Ethernet Module ............ 2-9
FastNET 10 User Guide v
Page 8

Contents
CHAPTER 3 CONFIGURING YOUR FN10
3.1 Assigning IP Addresses...............................................................3-3
3.1.1 Displaying IP Addresses .................................................3-4
3.1.2 Deleting an IP Address....................................................3-4
3.1.3 Changing a Subnet Mask................................................3-4
3.2 Enabling Bridging.........................................................................3-5
3.3 Disabling Bridging........................................................................3-6
3.4 Displaying Bridging Functions......................................................3-6
3.5 Enabling Trunking........................................................................3-7
3.6 Disabling Trunking .......................................................................3-9
3.7 Displaying Trunking Status ........................................................3-10
3.8 Defining and Deleting Workgroups ............................................3-12
3.9 Assigning a Community Name...................................................3-15
3.10 Configuring Multicast Storm Protection......................................3-16
3.11 Modifying MIB Variables ............................................................3-17
3.11.1 System Contact.............................................................3-17
3.11.2 System Name................................................................3-17
3.11.3 System Location............................................................3-17
3.11.4 Authentication Password...............................................3-18
3.11.5 Aging Parameter ...........................................................3-18
CHAPTER 4 MONITORING AND MANAGING YOUR FN10
4.1 FN10 Management Tools ............................................................4-1
4.2 FN10 Statistics.............................................................................4-2
4.2.1 Pseudo Filters .................................................................4-3
4.2.2 Gathering Statistics.........................................................4-3
4.2.3 System Statistics.............................................................4-3
4.2.4 Ethernet Port Statistics....................................................4-4
4.2.5 MAC Statistics.................................................................4-6
4.2.6 Traffic Analysis Statistics.................................................4-7
4.2.7 SNMP Statistics...............................................................4-7
4.3 Using LCM to Check FN10 Status...............................................4-9
4.3.1 Displaying Status.............................................................4-9
4.3.2 Displaying MAC Addresses...........................................4-11
4.3.3 Displaying Manufacturing Information...........................4-14
4.4 Managing the FN10 ...................................................................4-14
vi FastNET 10 User Guide
Page 9

Contents
4.5 Using LCM to Manage the FN10...............................................4-15
4.5.1 Disabling a Port ............................................................4-15
4.5.2 Enabling a Port .............................................................4-16
4.5.2.1 noRIP Option................................................4-16
4.5.3 Changing a Subnet Mask .............................................4-17
4.5.4 Changing a Community Name...................................... 4-18
4.5.5 Setting the Baud Rate................................................... 4-18
4.5.6 Setting a Reboot Time..................................................4-19
CHAPTER 5 FN10 FILTERS
5.1 Bridge Address Table Filters.......................................................5-1
5.1.1 Source Address Filter .....................................................5-3
5.1.2 Source Address Multicast Filter...................................... 5-3
5.1.3 Destination Address Filter............................................... 5-4
5.2 Port Filters...................................................................................5-4
5.2.1 Configurable Fields.........................................................5-5
5.2.1.1 Pseudo Filtering ............................................. 5-6
5.2.1.2 Filter Links......................................................5-6
5.3 Using Filters for Security Purposes...........................................5-10
5.4 Using Filters to Enhance Network Performance........................5-16
5.5 Configuring a Port Filter.............................................................5-19
5.5.1 Modifying a Port Filter...................................................5-22
5.5.2 Deleting a Port Filter..................................................... 5-23
5.6 Filtering and Performance Considerations................................5-23
CHAPTER 6 FN10 DIAGNOSTICS AND TROUBLESHOOTING
6.1 Power-up Diagnostics..................................................................6-1
6.1.1 Power-up LED Sequence ...............................................6-2
6.1.2 Specific Power-up Tests................................................. 6-2
6.1.3 Software Checksum Comparison ...................................6-3
6.1.4 Power-up Diagnostics Results........................................6-3
6.2 Responses to Failures at Power-up ............................................ 6-3
6.3 Diagnostic Loopback Tests ......................................................... 6-3
6.3.1 Loopback Tests ..............................................................6-4
6.4 Status and Activity Indicators ...................................................... 6-4
6.5 Troubleshooting...........................................................................6-7
6.5.1 FN10 Does Not Power Up ..............................................6-7
6.5.2 Connectivity Problems.................................................... 6-7
6.5.3 FN10 Has Rebooted.......................................................6-8
6.5.4 FN10 Does Not Respond to NMS................................... 6-8
FastNET 10 User Guide vii
Page 10

Contents
APPENDIX A TECHNICAL SPECIFICATIONS
A.1 FN10 Specifications.................................................................... A-1
A.2 Serial Cable Pin Assignments..................................................... A-3
A.3 10BASE-T Pin Assignments....................................................... A-3
A.4 Straight-through Wiring............................................................... A-4
A.5 Crossover Wiring ........................................................................A-5
A.6 5 - 4 - 3 Rule ............................................................................... A-5
APPENDIX B GLOSSARY
INDEX
viii FastNET 10 User Guide
Page 11

CHAPTER 1
INTRODUCTION
1.1 ABOUT THIS MANUAL
This manual is for system administrators responsible for configuring,
monitoring, and maintaining the Fast Network 10 (FN10). You should
have a familiarity with networking concepts and principles. In addition, a
basic understanding of SNMP is helpful.
Some FN10 configurations can only be done using an SNMP-based
Network Management System (NMS). Therefore, how you configure and
manage the FN10 is dependent on the NMS you use. Where applicable,
this manual provides instructions for using the Local Console Manager
(LCM) to perform basic configuration. Where it is not possible to use
LCM, general instructions and guidelines applicable to most NMSs are
provided.
The contents of each chapter are described below.
• Chapter 1,
provides an overvie w of the FN10’ s switching functions and the Local
Console Manager (LCM).
• Chapter 2,
FN10 front and rear panels, how to install the FN10, how to connect
the Local Console Manager (LCM), and how to connect the FN10 to
the network.
• Chapter 3,
configuring the FN10 using the Local Console Manager (LCM). It also
provides some common Management Information Base (MIB)
variables you may want to change.
• Chapter 4,
monitor FN10 status and statistics. It also describes how to manage the
FN10 Ethernet ports using the Local Console Manager (LCM).
Fast Network 10 User Guide Page 1-1
Introduction
Unpacking and Installing Your FN10
Configuring Your FN10
Monitoring and Managing Your FN10
, outlines the contents of this manual and
, describes the
, provides instructions for
, describes how to
Page 12

Chapter 1:
Introduction
• Chapter 5,
FN10 Filters
, describes FN10 filtering and provides
specific examples of how filters can be used. It also provides
instructions for adding, modifying, and deleting Port filters using the
Local Console Manager (LCM).
• Chapter 6,
FN10 Diagnostics and Troubleshooting
, describes the
FN10 diagnostics and provides information on troubleshooting
common problems.
• Appendix A,
Technical Specifications
, provides the FN10
specifications and basic 10BASE-T cabling pin assignments.
• Appendix B,
Glossary
, provides a glossary of terms both specific to
the FN10 and common to the networking field.
1.2 GETTING HELP
If you need additional support related to the FN10, or if you have any
questions, comments, or suggestions concerning this manual, contact
Cabletron Systems Technical Support:
By phone (603) 332-9400
A.M
Monday-Friday; 8
By CompuServe GO CTRON from any ! prompt
By Internet mail support@ctron.com
By FTP ctron.com (134.141.197.25)
Login
Password
anonymous
your email address
. – 8 P.M. Eastern Time
Page 1-2 Fast Network 10 User Guide
Page 13

Document Conventions
1.3 DOCUMENT CONVENTIONS
The following conventions are used throughout this document:
LCM commands, prompts, and information displayed by the computer
appear in Courier typeface, for example:
Current Number of Learned Addresses: 133
Number of Defined Filters: 4
Information that you enter appears in Courier bold typeface, for example:
FN10 >
status
Information that you need to enter with a command is enclosed in angle
brackets < >. For example, you must enter a port number and an IP
address to execute the
FN10 >
ipaddr 6 192.138.217.40
ipaddr <port #> <IP address>
Field value options appear in bold typeface. For example, a FN10 filter
Entry
or
Exit
type can be either
Note
NOTE
symbol. Calls the reader’s attention to any item of
information that may be of special importance.
.
command:
Tip
symbol. Conveys helpful hints concerning procedures or
TIP
CAUTION
Fast Network 10 User Guide Page 1-3
actions.
Caution
damage to the equipment.
!
Warning
equipment damage, personal injury or death.
symbol. Contains information essential to avoid
symbol. Warns against an action that could result in
Page 14

Chapter 1:
Introduction
1.4 RELATED DOCUMENTATION
The following documentation may assist the user in using this product:
•
Fast Network 10 MIB Reference Guide
– contains enterprise MIB
information.
•
Interconnections, Bridges and Routers,
Radia Perlman, Addison
Wesley © 1992.
•
Internetworking with TCP/IP: Principles, Protocols, and Ar chitectur e
(2nd edition), Volumes I and II, Douglas Comer , Prentice Hall © 1991.
•
The Simple Book, An Introduction to Management of TCP/IP-based
internets
, Marshall T. Rose, Prentice Hall © Second Edition, 1994.
1.5 OVERVIEW
The FN10 is an intelligent Ethernet-to-Ethernet switch that is available in
the following configuration options:
•
12 port
Ethernet Attachment Unit Interface (AUI) connection.
- 12 IEEE 802.3 10BASE-T Ethernet ports, including one
•
12 port with FE up-link option
- 2 Fast Ethernet ports (100 Mbps)
and 12 IEEE 802.3 10BASE-T Ethernet ports (10 Mbps), including
one Ethernet Attachment Unit Interface (AUI) connection.
•
24 port
- 24 IEEE 802.3 10BASE-T Ethernet ports, including one
Ethernet Attachment Unit Interface (AUI) connection.
•
24 port with FE up-link option
- 2 Fast Ethernet ports (100 Mbps),
and 24 IEEE 802.3 10BASE-T Ethernet ports (10 Mbps), including
one Ethernet Attachment Unit Interface (AUI) connection.
In addition, each FN10 configuration includes an RS232C port for
out-of-band management.
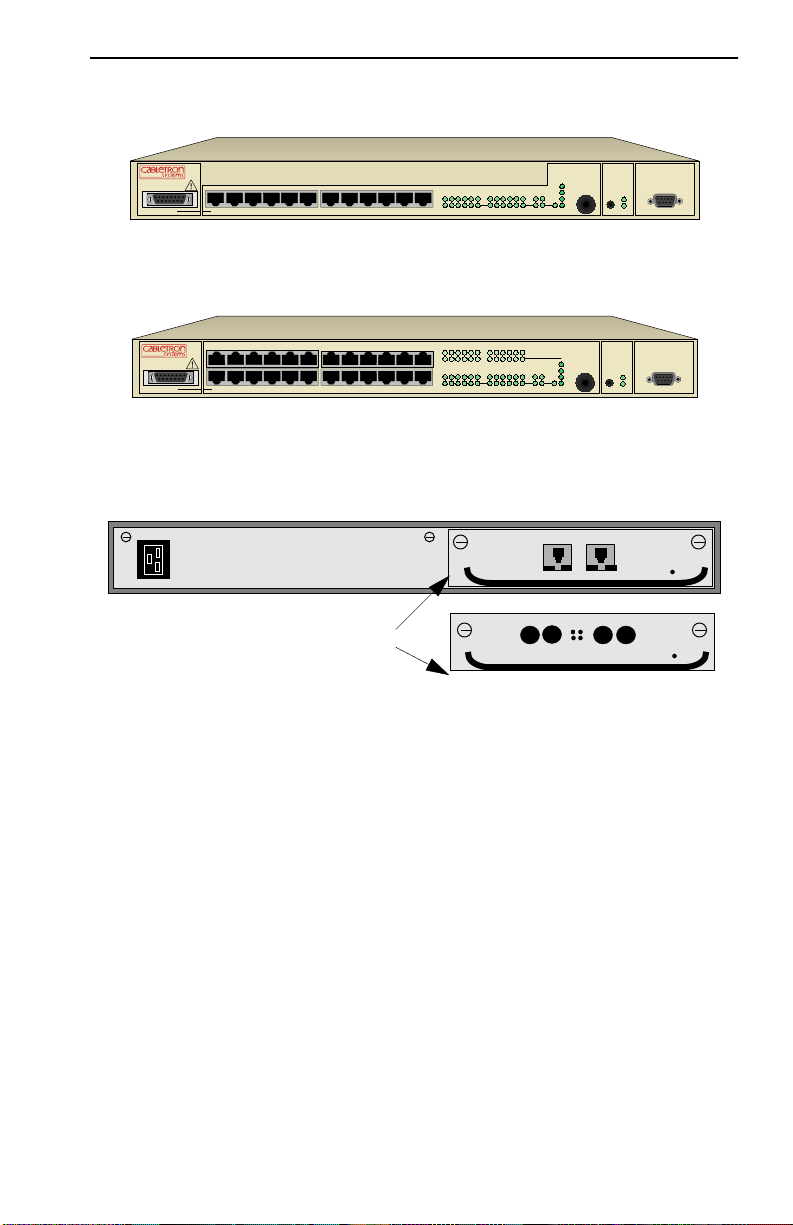
The following figures show the different front panels for the 12 and 24
port FN10 configurations, and the rear panel for the optional 2 Fast
Ethernet ports.
Page 1-4 Fast Network 10 User Guide
Page 15
.
Front Panel with 12 10BASE-T (10 Mbps) Ports
FN10-12
X2X3X4X 5X
6X 7X8X9X
Front Panel with 24 10BASE-T (10 Mbps) Ports
FN10-24
AUI 1
13X
15X 16X
X2X3X4X 5X
17X 18X
20X 21X 22X 23X 24X
19X
6X 7X8X9X
14X
Figure 1-1 FN10 Front Panels
Rear Panel with 2 Fast Ethernet (100 Mbps) Ports
Connection type options
Overview
Segment Status
TX
Select
Reset Ready
Link
12XAUI 1
11X
12X
11X
231456 789101112AB
19 2021 2223
13
1415 161718
Link
Link
231456 789101112AB
10X
10X
RJ45
ST fiber-optic
RX
Act
Col
Usr
24
Segment Status
TX
Select
Reset Ready
RX
Act
Col
Usr
Port B
Port A
Status
Link
RX TX
Port B Port A
Status
Link
BA
Link
Status
RX TX
Pwr
NMS Port
Pwr
NMS Port
Ready
Ready
Figure 1-2 FN10 Rear Panel with the Optional Fast Ethernet Ports
The FN10:
• Provides dedicated bandwidth for each network connected to its ports.
• Provides full store and forward bridging functionality.
• Provides complete error checking functionality.
• Provides port trunking to increase bandwidth.
• Allows you to define virtual workgroups to optimize network traffic.
• Filters and forwards received Ethernet packets based on Network
Management System (NMS) configurable parameters.
• Supports 48-bit IEEE 802 MAC addressing.
Fast Network 10 User Guide Page 1-5
Page 16

Chapter 1:
Introduction
• Implements the Spanning Tree protocol (802.1d).
• Configured with factory-set defaults for immediate plug-and-play
capability.
In addition, the FN10 offers features that can help you manage and
maintain your network, such as:
• Configuration and management using the Simple Network
Management Protocol (SNMP) with either an in-band or out-of-band
connection.
• Protection against multicast storms.
• Data flow control based on user-defined data packet filters.
• Ability to define virtual workgroups for more efficient bandwidth
usage.
• Compilation of statistics for traffic generated by each user device
connected to a FN10 segment.
• Real time “what-if” analysis of the traffic flo w throughout the network.
1.5.1 FN10 Architecture
The FN10 enables you to link two or more Local Area Networks (LANs)
together. To accomplish this, the FN10 regulates network traffic on the
basis of the source and destination addresses that are in each data packet it
receives.
The FN10 is protocol-transparent, meaning it can handle different types
of network traffic regardless of the network protocol, such as IP and IPX.
As the FN10 reads addresses from the packets it processes, it builds a
dynamic database of addresses called the
Bridge Address Table
way , the FN10 continuously learns the addresses of all connected de vices.
Consequently, you can add new devices to the network, change device
addresses, and remove devices from the network without having to
reconfigure the FN10.
The Open System Interconnection (OSI) Reference Model, developed by
the International Standards Organization (ISO), identifies the levels of
functionality inherent in each of its seven layers. The FN10 operates at the
Page 1-6 Fast Network 10 User Guide
. In this
Page 17

Overview
Media Access Control (MAC) sub-layer of the Data Link layer.
Figure 1-3 shows the OSI Reference Model.
7
Application
Presentation
6
5
Session
Transport
4
3
Network
2
1
Data Link
Physical
Figure 1-3 OSI Reference Model
FN10 operates at Layer 2
Because the FN10 does not process any Network Layer information, it
provides a high level of performance in terms of packet throughput. In
addition, the FN10 does not need to learn network topology , requiring less
programming and configuration time.
1.5.1.1 Store and Forward Switching
As an intelligent Ethernet switch, the FN10 uses full store and forward
switching. Store and forward switching allows the FN10 to temporarily
store packets until network resources, typically an unused link, are
available for forwarding. This allows for complete error checking, and
limits the amount of time between when a device requests access to the
network and when it is granted permission to transmit. In addition, full
store and forward switching ensures data integrity, thus preventing
network error conditions from being generated throughout the network.
1.5.1.2 Discarding Local Traffic
The FN10 checks all incoming packets for their destination address
against the Bridge Address Table. If a packet’s destination address is not
on the same network segment as the originating packet, the FN10
Fast Network 10 User Guide Page 1-7
Page 18

Chapter 1:
Introduction
forwards the packet to the network segment associated with that
destination address. However, if the packet’s source and destination
address are on the same network segment, known as
local traffic
, the
packet is automatically discarded (i.e., ignored by the FN10).
For example, a file transmitted from Workstation A to Workstation C in
Figure 1-4 does not need to leave LAN 1. The FN10 connected to LANs 1
and 2 sees all traffic from LAN 1, including LAN 1 local traffic.
FN10
FastNet 10
LAN 1
ABC
Figure 1-4 Typical Switching Application
LAN 2
By forwarding only packets addressed to devices on other network
segments, the FN10 reduces unnecessary traffic and thereby enhances the
overall performance of the network.
1.5.1.3 Spanning T ree Algorithm
The FN10 supports the IEEE 802.1d Spanning Tree algorithm. The
Spanning Tree algorithm converts multiple LANs into a “spanning tree”
of networks. It is used to prevent bridging loops. This standard defines a
logical (not physical) network configuration consisting of one extended
LAN without active duplicate paths between spanning tree bridges.
The FN10, along with other IEEE 802.1d Spanning Tree compliant
bridges in the network, dynamically configure the network topology into
a single Spanning Tree by exchanging Bridge Protocol Data Units
(BPDUs). Typically, each LAN segment is sent one BPDU every two
seconds.
When there are multiple FN10s connecting LANs in a loop, the Spanning
Tree algorithm determines which FN10 should forward packets to the
LAN. If there is a cable break or a port failure, the network topology is
Page 1-8 Fast Network 10 User Guide
Page 19

Overview
automatically reconfigured by the Spanning Tree protocol to create an
alternate path to the LAN.
1.5.2 FN10 Bridge Address Table
The FN10 creates and maintains a dynamic database of addresses called
the Bridge Address Table. The FN10 examines every packet to determine
its source address and LAN segment origin. It then compares the source
address and segment information it finds to the entries in the Bridge
Address Table.
If a packet’ s address is not already stored in the Bridge Address Table, the
FN10 adds the learned address, associated segment number, and a timer
value that indicates the age of the observation. Consequently, the FN10
knows the address and associated segment number the next time it sees
that address. By using the information stored in the Bridge Address Table,
the FN10 is able to quickly forward each packet to the correct LAN
segment.
The FN10 learns addresses from all packets, including data transmissions
and “keep alive” packets (packets sent by an idle station to let other
stations know it is present and functional). When devices are added to the
network, removed from it, or relocated, you do not hav e to reconfigure the
FN10. The FN10 automatically learns new device addresses, recognizes
when a previously used address is missing, or when a device has been
moved to a new LAN segment.
An address stored in the Bridge Address Table is discarded if there is no
subsequent activity from that address after a configured length of time
(five minutes by default). This aging process ensures that the Bridge
Address Table is continually updated.
Typically, addresses are continually added to and deleted from the Bridge
Address Table, reflecting the dynamic nature of internetwork traffic.
Howev er, you can change an address from dynamic to static if you do not
want the entry in the Bridge Address Table to get discarded.
Each dynamic entry includes:
• An Ethernet MAC address
Fast Network 10 User Guide Page 1-9
Page 20

Chapter 1:
Introduction
• A single port number of the LAN on which the address resides
• The age of the entry
• Various statistics counters
• Any filtering restrictions added by a Network Management Station
(NMS)
Each static entry contains the same information as a dynamic entry,
except the static entry is not aged, and can contain a range of port
numbers, rather than a single port number.
The FN10 stores 8,192 dynamic (learned) entries in its Bridge Address
Table. In addition, it stores up to 200 static or user-defined addresses.
1.5.3 FN10 Filtering
One of the most significant features of the FN10 is its user-configurable
filtering capabilities. A filter is an instruction to the FN10 to screen data
packets based on the criteria you define. Filtering is useful for gathering
statistics, implementing security measures, and improving network
performance.
The FN10 allows you to implement two types of filters that are useful for
managing and administering networks:
• Bridge Address Table filters, which use the FN10 Bridge Address
Table to screen local traffic
• Port filters, which apply filters to or from a specific port segment
See Chapter 5, FN10
Filters for instructions on setting up FN10 filters.
1.5.4 FN10 Sample Applications
Just as a six lane highway allows you to travel much faster than a single
lane highway, a network backbone creates high-speed connections for
your network. In general, a network backbone allows you to distribute
access to important network resources such as file or print servers.
Page 1-10 Fast Network 10 User Guide
Page 21
Overview
Additional FN10 features, such as trunking, Fast Ethernet, and virtual
workgroups allow you to optimize bandwidth and design a more efficient
flow for your network traffic.
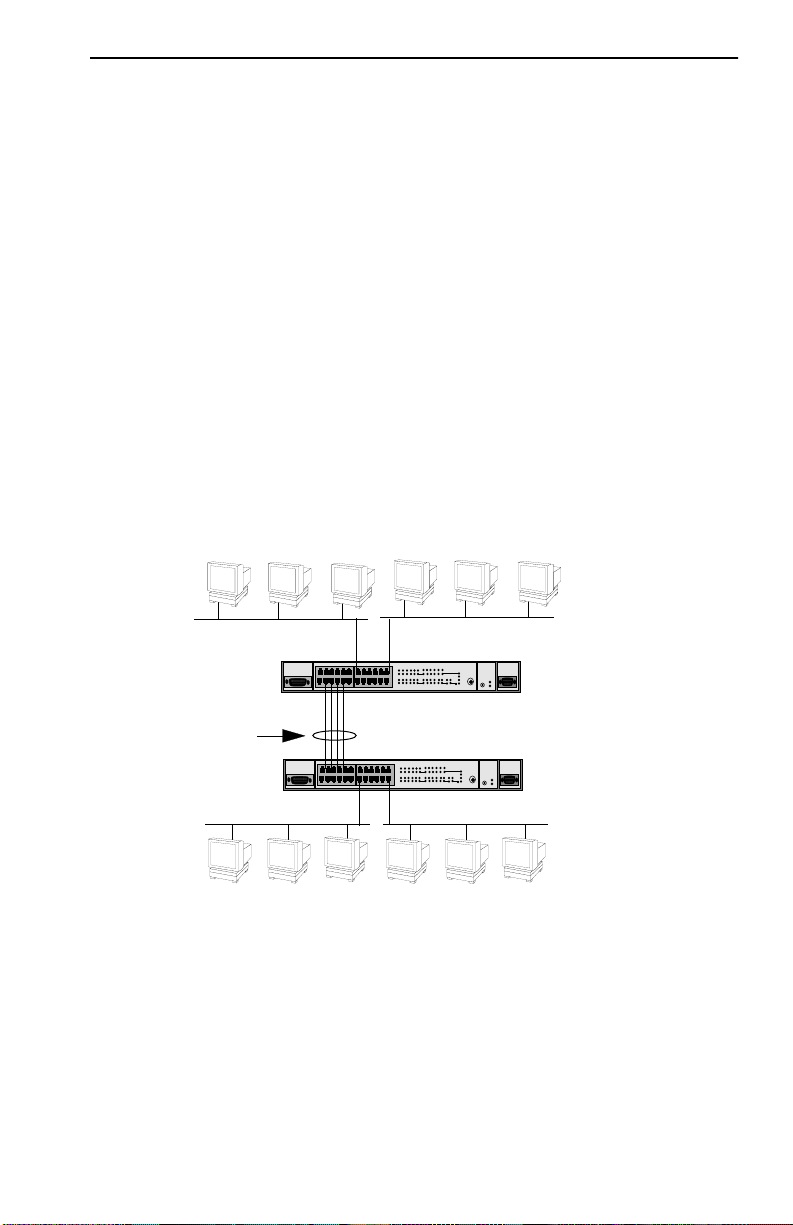
1.5.4.1 FN10 T runking
The FN10 allows multiple trunk groups with up to eight ports each to be
connected between the FN10 and other network devices. This capability
provides a scalable dedicated bandwidth of up to 80 Mbps.
For example, local traffic, such as the Manufacturing Department’s
internal traffic, can be easily handled by a single, 10 Mbps connection.
However, when the Manufacturing Department needs access to the
corporate database, the traffic could travel over a trunk line, thereby
increasing the speed of transmission. Figure 1-5 illustrates the trunking of
multiple FN10 ports to increase the bandwidth.
LAN segments
FN10
FN10
LAN segments
Up to 80 Mbps
Bandwidth
10 Mbps
10 Mbps
Figure 1-5 FN10 Application #1
10 Mbps
Trunk Lines
10 Mbps
Figure 1-6 illustrates how the FN10 can be used in a backbone network
configuration.
Fast Network 10 User Guide Page 1-11
Page 22
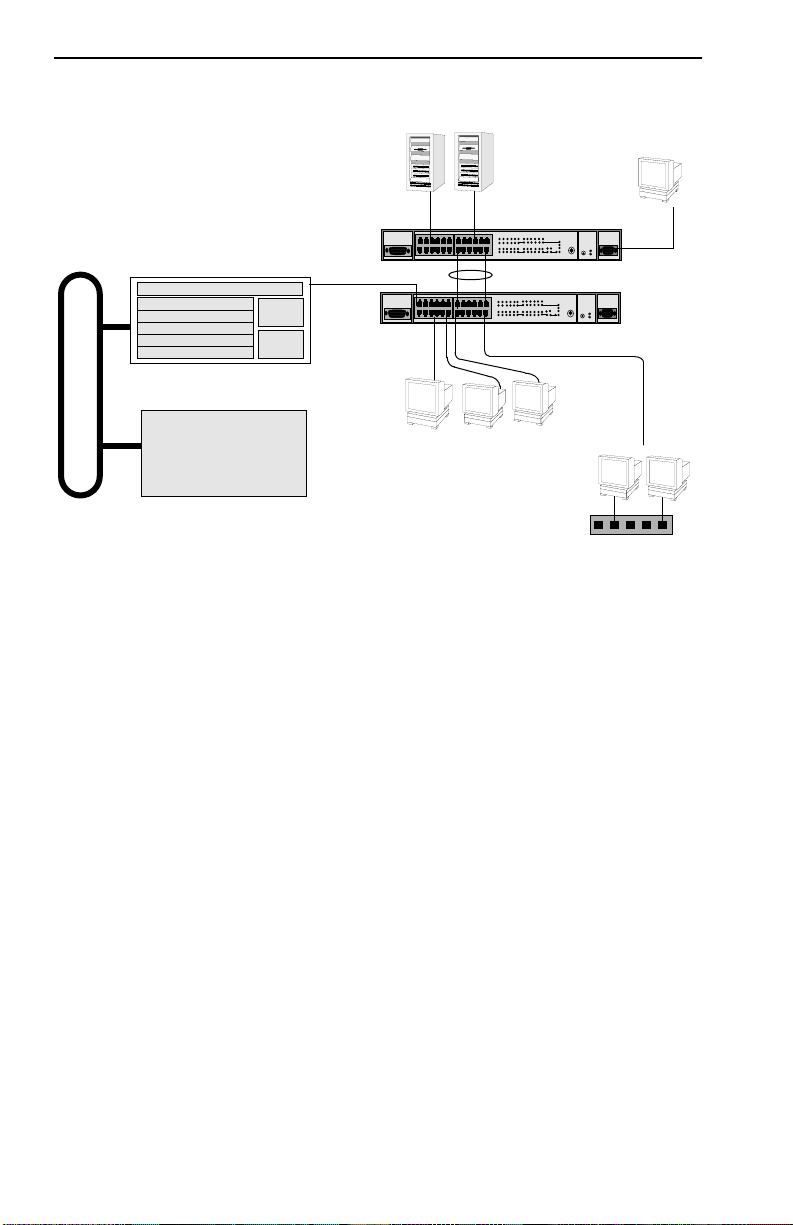
Chapter 1: Introduction
Network
Management
Station
Workgroup
Hub
Network Switch
WAN Router
10BASE-T Cables
10BASE-T Cables
Servers
FN10
Trunk Lines
FN10
Figure 1-6 FN10 Application #2
1.5.4.2 FN10’s Fast Ethernet Option
The FN10, configured with the Fast Ethernet option, has two additional
ports that provide a fast Ethernet connection of 100 Mbps. Applying this
increased bandwidth to the previous example, the Manufacturing
Department’s traffic to the corporate database could be transmitted to the
corporate database at the 100 Mbps rate.
Figure 1-7 illustrates connecting two FN10 Fast Ethernet ports to increase
the bandwidth to 100 Mbps.
Page 1-12 Fast Network 10 User Guide
Page 23
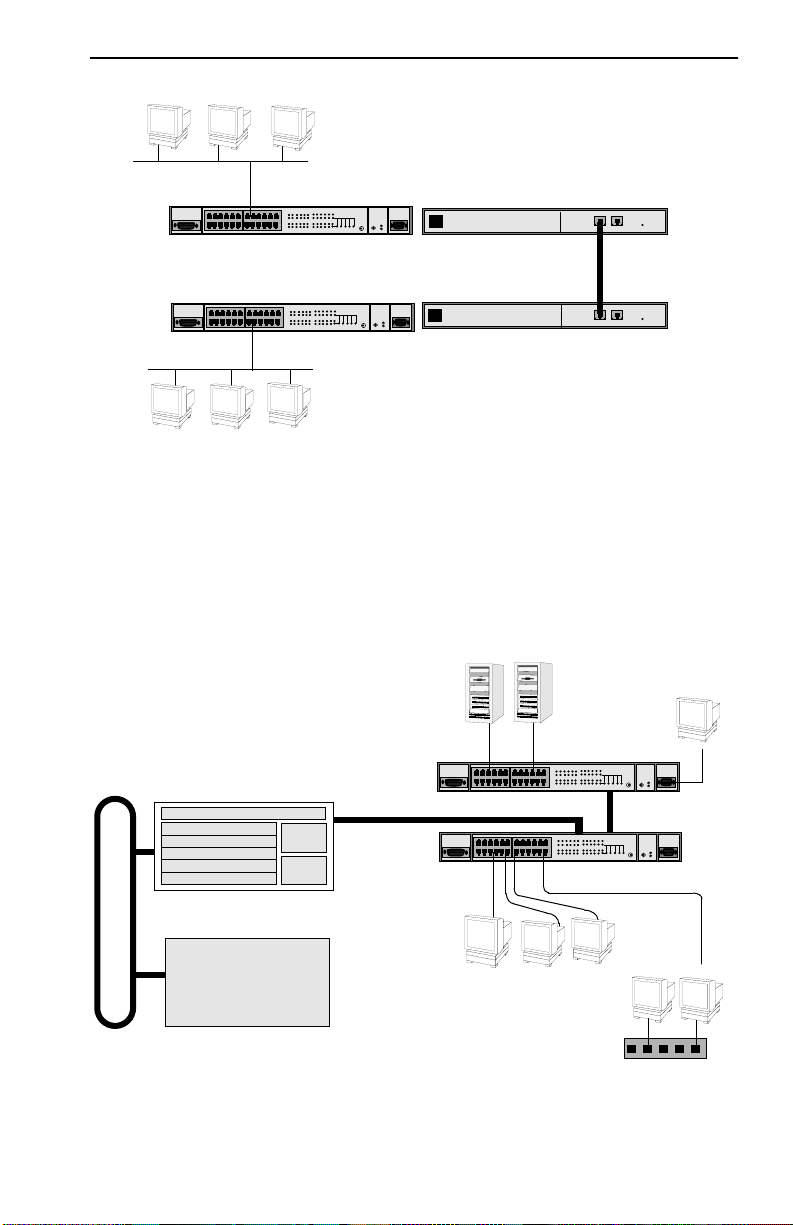
LAN segment
FN10 / FE
Overview
Front Panel
Front Panel
FN10 / FE
LAN segment
100 Mbps bandwidth
(Fast Ethernet)
Rear Panel
Rear Panel
Figure 1-7 FN10 Application #3
Figure 1-8 illustrates how the FN10 can be used in a backbone network
configuration using increased bandwidth of the optional Fast Ethernet
configuration.
Fast Ethernet Switching
10BASE-T Cables
100 Mbps
(Fast Ethernet)
Servers
Network
Management
Station
FN10
FN10
10BASE-T Cables
WAN Router
Workgroup
Hub
Figure 1-8 FN10 Application #4
Fast Network 10 User Guide Page 1-13
Page 24
Chapter 1: Introduction
1.5.4.3 Virtual Workgr oups
The FN10 allows you to define ports for logical groups of associated hosts
(virtual workgroups) to provide a more efficient flo w of traf fic across your
Ethernet network.
Virtual workgroups offer you the ability to limit broadcasts to logical
domains within the network. Workgroup destinations are recognized by
the FN10 and broadcast packets are routed directly to hosts within the
workgroup, eliminating the need to perform a general broadcast across
each segment of the network to find specific host addresses.
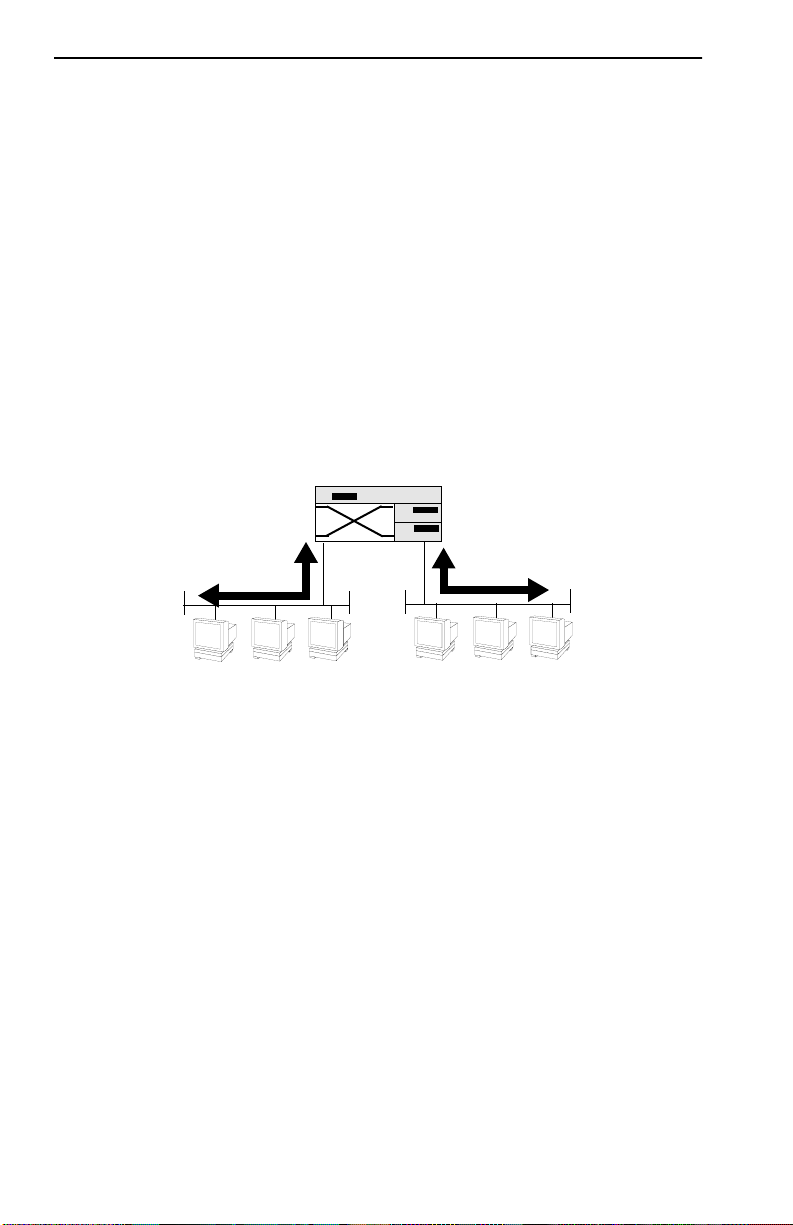
Figure 1-9 shows two Ethernet segments, A and B, that do not include a
FN10.
Router
Traffic
Figure 1-9 Multiple Ethernet Segments Sharing 10 Mbps Bandwidth
A
B
Traffic
Each host on segments A and B is limited to sharing a network bandwidth
of 10 Mbps.
Figure 1-10 shows two Ethernet segments that take advantage of the
virtual workgroup feature of the FN10 and the increased bandwidth
applied to each A and B host.
Page 1-14 Fast Network 10 User Guide
Page 25
Router
Local Console Manager
AB
A
Workgroup A
Figure 1-10 Using the FN10 to Create Virtual Workgroups
A
A
to Help Optimize Bandwidth
B
FN10
B
Workgroup B
B
A host from workgroup A can limit a broadcast to all hosts within
workgroup A or B and prevent the broadcast from going across the
network and adding to the amount of contention for the limited 10 Mbps
bandwidth.
As illustrated in the previous diagram, virtual workgroups allow you to
associate multiple hosts and define a workgroup. In reality, you are
assigning workgroup IDs to FN10 ports.
1.6 LOCAL CONSOLE MANAGER
The Local Console Manager (LCM) is a command-line interface built
into the FN10 that enables you to monitor, manage, and configure the
FN10 through the out-of-band RS232C connection attached to any
non-intelligent terminal.
You can also use a Cabletron Systems Network Management System, or a
standard SNMP-based Network Management System, to manage the
FN10. For a list of available FN10 network management tools, see
Section 4-1, FN10 Management Tools.
Fast Network 10 User Guide Page 1-15
Page 26

Chapter 1: Introduction
The following sections describe LCM command syntax and the basic
LCM commands for logging in, logging out, and getting help.
• LCM commands used for configuring the FN10 are described in
Chapter 3, Configuring Your FN10.
• LCM commands used for monitoring and managing the FN10 are
described in Chapter 4, Monitoring and Managing Your FN10.
• LCM commands used for adding and deleting Port filters are described
in Chapter 5, FN10 Filters.
NOTE
The FN10
Reference Card
each command’s options.
Local Console Manager (LCM) Commands
lists the available LCM commands, including
1.6.1 Command Syntax Conventions
The following conventions apply as you use LCM commands:
• Press the Enter key to execute a command after you type it in.
•A port range is either a single port number, or a list of port numbers
separated by commas or hyphens. For example,
3 and 7; 3-5 are ports 3,4, and 5; and 3-5,7 are ports 3,4,5,
ports
and 7.
• To quit any command, press the Control-C keys (^C or Ctrl-C).
• You can abbreviate any command where there is no ambiguity; if there
is ambiguity, LCM responds with an error message.
• Commands are not case sensitive.
• Any invalid commands or misspellings will receive an error message.
• A previous command can be repeated by typing !!.
3 is port 3; 3,7 are
• MAC addresses are displayed in little-endian Ethernet bit order, with
each octet separated by a colon. For example:
FN10 >address 00:40:27:04:1a:0f
Page 1-16 Fast Network 10 User Guide
Page 27

Local Console Manager
• Information that you need to enter with an LCM command is enclosed
in square brackets [ ]. For example, you must enter a port number and
an IP address to execute the
ipaddr [PORT-NUMBER] [IP ADDRESS]
command:
FN10 >ipaddr 6 192.138.217.40
• Parameters that appear in all capital letters, for example bridge
[PORT-RANGE]
, indicate that you must enter a value for that parameter.
If a string of parameters is displayed between braces, for example
[{off|on|noBPDU}], you must select one of the displayed options. For
example, if you wanted to enable bridging on a port, or a range of
ports, you would enter:
FN10 >bridge 2-4 on
• The default v alues for filtering command field options appear in square
brackets [ ], for example:
Type:[Entry] (Entry/Exit)>
1.6.2 Basic LCM Commands
If you are going to manage the FN10 using LCM, you first must connect
the FN10 to an ASCII terminal or terminal emulator. See Section 2.3,
Connecting the Local Console Manager, for instructions.
When you want to use LCM, begin by pressing the Enter key several
times to get the LCM prompt (
Fast Network 10 User Guide Page 1-17
FN10 >).
Page 28

Chapter 1: Introduction
1.6.2.1 Help
Displays the menu of available commands. Help can also be displayed by
typing a question mark (?). The output from the
displayed below.
help command is
FN10 > help
help or ?
status [PORT-RANGE]
baud [BAUD-RATE]
exit or logout
erase
ident
ipaddr [PORT# IPADDR [MASK]]
addresses display [any] [ADDR [MASK]]
bridge [PORT-RANGE [OPTIONS]]
trunk [PORT-RANGE [{on | off}]]
enable [PORT-RANGE [noRIP]]
disable [PORT-RANGE]
filters {display|modify|add|delete}
community
sttimer [TIME-VALUE]
workgroup [NAME [delete|PORT-RANGE [INFO]]]
speed [PORT-RANGE [{10|100}]]
reboot {SECONDS | off}
arp [display]
route display [IPADDR]
traplog
FN10 Local Console Manager
this menu
to display unit or port status
to change the console baud rate
to logout
to erase configuration information
to display unit identification
to set or display IP addresses
to display learned addresses
to set bridging methods
to set or display trunking status
to enable a set of ports
to disable a set of ports
to manage port filters
to change the password/community name
to set or display st age time
to set or display workgroups
to set or display Fast Ethernet speed
to reboot the unit after seconds
to display arp table information
to display routing table information
to display the most recent SNMP traps
FN10 >
1.6.2.2 Erase
Entering erase to erase the current FN10 configuration sets up the IP
address on Port 1 to 192.0.2.1 (default) when the FN10 is rebooted.
Page 1-18 Fast Network 10 User Guide
Page 29

Local Console Manager
1.6.2.3 Exit
Logs you out of LCM. (The exit command is functionally equivalent to
logout command.)
the
1.6.2.4 Logout
The logout command logs you out of LCM. (The logout command is
functionally equivalent to the
exit command.)
1.6.2.5 Traplog
Displays the traps messages captured by the FN10. The following is an
example of a traplog display:
FN10 > traplog
Trap 16 0:00:00
The unit has booted.
Trap 25 0:00:00
The unit’s spanning tree maximum age has changed.
Trap 26 0:00:00
The unit’s spanning tree hello time has changed.
Trap 27 0:00:00
The unit’s spanning tree forward delay times has changed.
Trap 3 0:00:02 port 1
The current functional state of the port has changed.
...
FN10 >
Fast Network 10 User Guide Page 1-19
Page 30

Chapter 1: Introduction
Page 1-20 Fast Network 10 User Guide
Page 31

CHAPTER 2
UNPACKING AND INSTALLING
YOUR FN10
Carefully unpack the FN10 from the shipping carton and inspect it for
possible damage. If any damage is evident, contact your supplier. The
shipping carton contains the following:
• The FN10 unit
• One AC power cord
• Console Cable kit
• Two rack-mounting brackets with fasteners (for rack-mount
installation)
• Four stick-on feet (for desktop installation)
• Documentation – In addition to this manual, the Fast Network 10
Quick Setup card, the Fast Network 10 Local Console Manager
(LCM) Commands Reference Card, the Fast Network 10 MIB
Reference Guide, and Release Notes are also included.
2.1 FN10 PANELS
The FN10 provides 12 or 24 10BASE-T Ethernet ports, including one
Ethernet Attachment Unit Interface (AUI) connection. Each FN10 also
includes an RS232C port for out-of-band management, and can be
configured with two additional Fast Ethernet (100 Mbps) ports.
Figure 2-1 shows the FN10’s front and rear panels. The LEDs and buttons
are described in Tables 2-1 and 2-2.
Fast Network 10 User Guide Page 2-1
Page 32

Chapter 2: Unpacking and Installing Your FN10
FN10-12
X2X3X4X 5X
6X 7X8X9X
Link
12XAUI 1
11X
231456 789101112AB
10X
Usr
Segment Status
TX
RX
Act
Col
Select
Reset Ready
Pwr
NMS Port
Ethernet Attachment
Unit Interface (AUI) Port
FN10-24
RJ45 Ethernet 10BASE-T
14X
13X
X2X3X4X 5X
AUI 1
Crossover Ports
17X 18X
15X 16X
19X
6X 7X8X9X
20X 21X 22X 23X 24X
10X
11X
Figure 2-1 FN10 12- and 24-Port Front Panels
Rear Panel with 2 Fast Ethernet (100 Mbps) Ports
Connection type options
Status LEDs and Buttons
19 2021 2223
13
1415 161718
Link
Link
231456 789101112AB
12X
24
RJ45
RX TX
Port B Port A
ST fiber-optic
Segment Status
Usr
Port B
Status
Link
TX
Select
RX
Act
Col
Status
Link
BA
Reset Ready
Port A
Status
Link
RX TX
Pwr
NMS Port
Ready
Ready
Figure 2-2 FN10 Fast Ethernet (FE) Rear Panel
Page 2-2 Fast Network 10 User Guide
Page 33

Table 2-1 Meaning of FN10 LEDs
LED Meaning
FN10 Panels
Link (upper level of
port LEDs)
Status (lower level
of port LEDs)
Segment Status
TX
RX
Act
Col
Usr
Ready On – Indicates the FN10 is operational.
Pwr
On – Indicates the link is good.
Off – Indicates there is no link.
On/Blinking – Indicates you are monitoring the port for
a selected segment status condition.
Off – Indicates you are not monitoring the port.
On – Indicates you are monitoring Transmit (TX)
activity on all ports.
On – Indicates you are monitoring Receive (RX)
activity on all ports.
On – Indicates you are monitoring Transmit (TX) and
Receive (RX) activity on all ports.
On – Indicates you are monitoring packet collision on
all ports.
On – Indicates you are monitoring transmission and
receive errors on all ports.
Blinking – Indicates the FN10 is running power-up
diagnostics.
Off – Indicates the FN10 is non-operational.
On – Indicates the FN10 is receiving power and the
voltage is within the acceptable range.
Off – Indicates the FN10 is not receiving power.
If the Ready LED continues to blink after power-up diagnostics
are complete, it could mean the FN10 is overheating.
!
CAUTION
Fast Network 10 User Guide Page 2-3
Page 34

Chapter 2: Unpacking and Installing Your FN10
Table 2-2 describes the FN10 buttons.
Table 2-2 Description of FN10 Buttons
Button Function
Cycles through the Segment Status options (TX, RX, Act,
Select
Reset Restarts the FN10.
Col, and Usr) for all ports. The lower port status LEDs of the
ports you are monitoring are activated based on what
function you chose with the Select button.
2.2 INSTALLING THE FN10
Table-mounting an FN10
If the FN10 is to be table-mounted, make sure you install the four stick-on
feet on the bottom of the unit, as shown in Figure 2-3. In addition, make
sure the unit is within reach of the network cables to which it will be
connected.
Figure 2-3 Installing the Stick-on Feet
Page 2-4 Fast Network 10 User Guide
Page 35

Installing the FN10
Rack-mounting an FN10
The table below describes some general considerations you should be
aware of before mounting a FN10 in a rack assembly.
Table 2-3 General Considerations for Mounting a FN10
Consideration Discussion
Since the temperature within a rack assembly may
be higher than the ambient room temperature,
Temperature
Air Flow
make sure the rack-environment temperature is
within the Operating Temperature range specified
in Appendix A.
Make sure there is at least 2 inches (or more) on
both sides of the FN10 to allow for adequate air
flow.
Mechanical Loading
Circuit Overloading
Grounding (Earthing)
Do not place equipment on top of a rack-mounted
FN10.
Make sure the power supply circuit to the rack
assembly is not overloaded.
Rack-mounted equipment should be grounded. In
addition to the direct connections to the main power
supplies, make sure all the other supply
connections are also grounded.
The FN10 can be rack-mounted in a standard 19-inch equipment cabinet.
To mount the FN10 in a rack assembly, apply the following steps:
1. Attach the rack-mount brackets to either side of the FN10 chassis.
Fast Network 10 User Guide Page 2-5
Page 36

Chapter 2: Unpacking and Installing Your FN10
2. Place the FN10 chassis in the cabinet.
3. Secure the FN10 with the rack-mount fasteners by inserting and
securing a fastener through each of the four slots in the rack-mount
brackets, as shown in Figure 2-4.
Fasteners
Rack
Figure 2-4 Rack-mounting the FN10
Fasteners
4. Once the FN10 is installed, plug the AC power cord into the AC power
connector on the rear of the FN10 chassis. Plug the other end of the
power cord into a three-prong grounded outlet.
2.2.1 Checking the Power-up Diagnostics Sequence
Before connecting any devices to the FN10, power on the unit and
observe the power-up diagnostics sequence to check for proper operation.
To observe the power -up diagnostics sequence completely, you may want
to repeat it. To restart the power-up sequence, turn the power switch
ON again, or press the reset button on the front panel.
then
When you power up the FN10, the following occurs:
OFF,
1. All LEDs, except for the Port Link LEDs, turn on for one second.
2. The Power (Pwr) LED remains on.
3. The Ready LED starts flashing.
4. After several seconds, the Port Link LEDs turn on briefly.
Page 2-6 Fast Network 10 User Guide
Page 37

Connecting the Local Console Manager
5. After several more seconds, the Ready LED will stay on, indicating
that the power-up diagnostics sequence is complete.
In addition, the Port Link LEDs will turn on for those ports with good
links and the Segment Status LEDs will turn on (or flash) when the
selected status condition is present.
NOTE
If a critical component fails diagnostics, the Ready LED will turn
off and the FN10 will attempt to reboot. If the Ready LED does
not stay on, contact Cabletron Systems Technical Support.
Refer to Section 1.2
2.3 CONNECTING THE LOCAL CONSOLE MANAGER
The Local Console Manager (LCM) is a command-line interface for
configuring, monitoring, and managing the FN10 through the out-of-band
RS232C connection on the front panel.
To connect LCM:
1. Connect your ASCII terminal or terminal emulator to the out-of-band
management RS232C port on the front panel of the FN10 using the
standard 9-pin serial cable shipped with the unit. (Only three of the
nine wires are necessary: Receive Data, Transmit Data, and Ground.)
NOTE
2. Set the terminal to 9600 baud, 8 data bits, 1 stop bit, and no parity.
For your convenience, a male DB-9 to DB-25 converter has
been included in the FN10 shipping carton. This con verter may
come in handy when connecting your ASCII terminal, or
terminal emulator.
3. Press the Enter key several times. If the FN10 is operational, LCM
responds with the
FN10 > prompt.
LCM is now ready to use.
Refer to Section 1.6, Local Console Manager for a general overview of
LCM and the command syntax. LCM commands for configuring,
monitoring, and managing the FN10 are provided in the chapters dealing
with those topics.
Fast Network 10 User Guide Page 2-7
Page 38

Chapter 2: Unpacking and Installing Your FN10
NOTE
See the
Reference Card
command’s options.
FN10 Local Console Manager (LCM) Commands
for a list of all LCM commands, including each
2.4 CONNECTING THE FN10 TO THE NETWORK
Installations vary depending on existing wiring, application objectives,
and other considerations. Be sure to have your current network topology
map available or contact your network administrator.
The FN10 can be connected via 10BASE-T (or optional Fast Ethernet
100BASE-TX) cable to a punch-down block or patch panel located in a
wiring closet. Individual devices are then connected to the FN10 at either
the punch-down block or patch panel, usually via unshielded twisted-pair
cabling.
For each device you connect to the FN10 through a punch-down block or
patch panel, do the following:
1. Connect one end of the 10BASE-T (or optional 100BASE-TX) cable
to the device’s network interface card.
2. Connect the other end of the 10BASE-T cable to a connector on the
punch-down block or patch panel.
3. Connect one end of a second 10BASE-T cable to the connector on the
punch-down block or patch panel.
4. Connect the other end of the second 10BASE-T cable to a numbered
port on the FN10.
For each device you directly connect to the FN10, do the following:
1. Connect one end of the 10BASE-T (or optional 100 BASE-TX) cable
to the device’s network interface card.
2. Connect the other end of the 10BASE-T cable to a numbered port on
the FN10.
Page 2-8 Fast Network 10 User Guide
Page 39

Adding or Replacing the Optional Fast Ethernet Module
2.4.1 Connecting the AUI Interface
The FN10 includes one Ethernet Attachment Unit Interface (AUI)
connector (Port 1). To connect the A UI to a thick coax netw ork, you must
use an AUI drop cable and a tap-type transceiver:
1. Attach a tap-type transceiver to the thick coax cable. Refer to the
transceiver manufacturer’s documentation for installation
instructions.
2. Connect one end of the AUI drop cable to the FN10’s AUI port and the
other end to the tap-type transceiver.
T o connect the AUI to an alternate media, such as thin coax, you must use
a transceiver connected to the AUI port. Be sure that the transceiver
matches the type of Ethernet cable you are using.
NOTE
The Ethernet Attachment Unit Interface (AUI) Port and Port 1
on the FN10’s front panel cannot be used simultaneously. If
you connect an RJ45 cable to Port 1 and an AUI cable to the
AUI P ort, the FN10 automatically uses the RJ45 connection, as
long as there is a good link. If there is no link on Port 1, or the
link goes down, the FN10 automatically switches to the AUI
Port until there is a good link on Port 1.
2.5 ADDING OR REPLACING THE OPTIONAL FAST
ETHERNET MODULE
The FN10 is available with an optional Fast Ethernet module to add two
additional ports that can be configured for either 10 or 100 Mbps. If you
have purchased a FN10/FE, the Fast Ethernet (FE) module is already
installed in your FN10.
If you have purchased the FE module separately , or you need to replace an
existing FE module, follow the steps below:
1. Disconnect the FN10 from the network and remove the power cord
from the rear.
2. Loosen the 2 spring-loaded fastening screws securing the blank
backplate and remove the backplate from the FN10. Refer to
Figure 2-5.
Fast Network 10 User Guide Page 2-9
Page 40

Chapter 2: Unpacking and Installing Your FN10
Figure 2-5 Removing the FN10 Backplate
NOTE
If you are replacing an FE module assembly, slowly pull the
module handle away from the FN10 to disconnect the internal
connector and slide the assembly out of the FN10.
3. Insert the FE module assembly, making sure the edges of the board fit
into the guides that allow the assembly to smoothly glide into place.
Refer to Figure 2-6.
Figure 2-6 Inserting the FE Module Assembly
4. When the FE assembly makes contact with the internal connector,
gently press the assembly into the FN10 to allow the connector to snap
firmly into place.
5. Tighten the spring-loaded fastening screws to secure the FE module.
The physical installation of the FE module assembly is complete.
Page 2-10 Fast Network 10 User Guide
Page 41

Adding or Replacing the Optional Fast Ethernet Module
Figure 2-7 Completed FE Module Installation
6. Reconnect the FN10 to the network, plug in the power cord, and power
on the unit.
7. Configure the FE module using the LCM command line interface.
Refer to Chapter 3, Configuring Your FN10.
Fast Network 10 User Guide Page 2-11
Page 42

Chapter 2: Unpacking and Installing Your FN10
Page 2-12 Fast Network 10 User Guide
Page 43

CHAPTER 3
CONFIGURING Y OUR FN10
The FN10 does not require any additional configuration to operate as a
standard, transparent switch. However, if you want to use any of the
FN10’s advanced functions, such as filtering, you must first assign an IP
(Internet Protocol) address to any of the ports on the FN10 that you use to
communicate with a Simple Network Management Protocol (SNMP)
manager.
To initially assign an IP address, you can use the Local Console Manager
(LCM). LCM is a command-line interface built into the FN10. It allows
you to configure and manage the FN10 through the out-of-band RS232C
connection attached to any non-intelligent terminal. (See Section 3.1,
Assigning IP Addresses.)
Once you have assigned an IP address, you can use any of the following
network management tools to configure and manage the FN10:
• Any SNMP-based NMS.
Configuration parameters are stored in an SNMP standard Management
Information Base (MIB). All FN10 MIB v ariables are listed and described
in the Fast Network 10 MIB Reference Guide.
NOTE
There are some configuration options that cannot be
configured using LCM commands. You may need to modify
your configuration using an NMS. See Section 3.11, Modifying
MIB Variables.
The following sections describe how to configure the FN10 using LCM
commands, including:
• Assigning IP addresses
• Enabling and disabling bridging
• Displaying bridging functions
• Enabling and disabling trunking
Fast Network 10 User Guide Page 3-1
Page 44

Chapter 3: Configuring Your FN10
• Displaying trunking status
• Defining and deleting virtual workgroups
• Assigning a community name
NOTE
You can use the LCM erase command to erase all
configuration information on the next system reset.
If you are using a network management tool other than LCM,
refer to its accompanying documentation.
Page 3-2 Fast Network 10 User Guide
Page 45

Assigning IP Addresses
3.1 ASSIGNING IP ADDRESSES
IP addresses for each port must be unique. IP addresses are divided into
classes based on what portion of the address is network or port
information. The address classes are A, B, and C.
• Class A addresses are used in very large networks that support many
ports. The first byte identifies the network and the other three bytes
identify the node. The first byte of a class A address must be in the
range 1-126. The address 100.125.110.10 would identify node
125.110.10 on network 100.
• Class B addresses are used for medium sized networks. The first two
bytes identify the network and the last two identify the node. The first
byte of a class B address must be in the range 128-191. The address
128.150.50.10 identifies node 50.10 on network 128.150.
• Class C addresses are used for small networks. The first three bytes
identify the network and the last byte identifies the port. The first byte
of a class C address must be in the range 192-223. The address
192.138.217.10 identifies node 10 on network 192.138.217.
To assign an IP address to a port, at the LCM prompt:
1. Type
ipaddr <PORT-NUMBER> <IP ADDRESS>
For example, ipaddr 6 192.138.217.40 would set the IP address of
Port 6 to 192.138.217.40. LCM responds by displaying the IP address
table, as shown under the ipaddr command.
NOTE
Fast Network 10 User Guide Page 3-3
Entering erase to erase the current FN10 configuration sets the
IP address on Port 1 to 192.0.2.1 (default) when the FN10 is
rebooted.
Page 46

Chapter 3: Configuring Your FN10
3.1.1 Displaying IP Addresses
T o display IP addresses, subnet masks, and MA C addresses of all ports on
the FN10 you are configuring, at the LCM prompt:
1. Type ipaddr
LCM displays the current IP address table, for example:
Port
IP Address Address Mask MAC Address
192.138.217.1
1
0.0.0.0
2
192.138.217.10
3
0.0.0.0
4
0.0.0.0
5
192.138.217.20
6
192.138.217.50
7
192.138.217.30
8
255.255.255.0
255.0.0.0
255.255.255.0
255.0.0.0
255.0.0.0
255.255.255.0
255.255.255.0
255.255.255.0
00:40:27:00:06:1f
00:40:27:00:06:c3
00:40:27:00:06:3e
00:40:27:00:03:7a
00:40:27:00:05:c7
00:40:27:00:04:4a
00:40:27:00:06:9e
00:40:27:00:04:b4
3.1.2 Deleting an IP Address
To delete an IP address, at the LCM prompt:
1. Type
ipaddr <PORT-NUMBER> 0.0.0.0
LCM responds by redisplaying the current IP address table.
3.1.3 Changing a Subnet Mask
You can optionally set the subnet mask for a port. A subnet mask is a
32-bit address mask used in IP to specify a particular subnet. If the subnet
mask is 0.0.0.0, the FN10 will automatically convert the displayed mask
to the standard default, based on the port’s IP address class. (Class A
address masks are 255.0.0.0, Class B address masks are 255.255.0.0,
Class C address masks are 255.255.255.0.)
To change the subnet mask, at the LCM prompt:
1. Type
ipaddr <PORT-NUMBER> <IP ADDRESS> <SUBNET MASK>
For example, ipaddr 6 192.138.217.40 255.255.240.0 would set the
subnet mask for port 6 to 255.255.240.0. LCM responds by
redisplaying the current address table.
Page 3-4 Fast Network 10 User Guide
Page 47

Enabling Bridging
NOTE
When you change the subnet mask for a port, you must also
enter the IP address for that port. Make sure you enter the IP
address for the port correctly; whate ver you enter becomes the
IP address.
3.2 ENABLING BRIDGING
The LCM bridge command allows you to set bridging options for a single
port or a range of ports. The options include:
•off
• on (the default with
•no
BPDU
BPDU (Bridge Protocol Data Unit) is a data unit transmitted as part of the
IEEE 802.1d Spanning Tree protocol. The exchange of BPDUs allows
bridges within a network to logically configure the network as a single
spanning tree.
NOTE
Selecting the noBPDU option could make your network
inoperable because the FN10 would be unable to detect loops.
BPDU enabled)
Using LCM to enable bridging for a port or port range, at the LCM
prompt:
1. Type
bridge [PORT-RANGE [{off|on|noBPDU}]]
For example, bridge 2 on would enable bridging on port 2.
LCM responds:
Port 2 bridging: Transparent Bridging
Fast Network 10 User Guide Page 3-5
Page 48

Chapter 3: Configuring Your FN10
3.3 DISABLING BRIDGING
To turn off the bridging function for a port or port range, at the LCM
prompt:
1. Type bridge [PORT-RANGE] off
For example, bridge 2 off would disable bridging on port 2.
LCM responds:
Port 2 bridging: off
3.4 DISPLAYING BRIDGING FUNCTIONS
To display the bridging functions that are enabled for all ports, at the
LCM prompt:
1. Type bridge
LCM responds with a list of all ports and the bridging function that is
enabled. For example, typing
for all ports.
bridge would display the bridging status
Usage: bridge [PORT-RANGE [{off|on|noBPDU{]]
Port 1 bridging: Transparent Bridging
Port 2 bridging: Transparent Bridging
Port 3 bridging: Transparent Bridging
Port 4 bridging: Transparent Bridging
.
.
.
Port 24 bridging: off
You could also type
of ports. For example
bridge [PORT-RANGE] to look at a specific range
bridge 2-4 would display bridging functions for
ports 2, 3, and 4.
Page 3-6 Fast Network 10 User Guide
Page 49

Enabling T runking
3.5 ENABLING T RUNKING
If your network configuration requires you to connect two or more FN10s
together, but the applications you are running over the network require
more than 10 Mbps of bandwidth per connection, you can use the built-in
trunking feature to increase bandwidth up to 80 Mbps, without installing
additional hardware on your network.
Trunking is a Cabletron Systems proprietary extension to the 802.1D
Spanning Tree algorithm. It enables you to use multiple 10BASE-T
Ethernet segments to connect FN10s together, while maintaining first-in,
first-out ordering of Ethernet packets. In addition, if any of the Ethernet
segments configured for trunking become inoperable, those Ethernet
segments are automatically bypassed.
Figure 3-1 shows two FN10s connected by four 10BASE-T crossover
cables. You can connect up to eight ports for sharing the traffic load. Any
additional connected ports will become standby ports. The connections
must be point-to-point. That is, there cannot be any other devices on the
Ethernet segments.
FastNET 10
10BASE-T Crossover Cables
(providing 40 Mbps of bandwidth)
Figure 3-1 Trunk Connections
Fast Network 10 User Guide Page 3-7
FastNET 10
Page 50

Chapter 3: Configuring Your FN10
NOTE
via an Ethernet concentrator. However, you must make sure
that there are no other devices connected to the Ethernet
concentrator.
Trunk Groups
Each set of connections between two FN10s is called a T runk Group. You
can create several Trunk Groups to interconnect your FN10s. Each FN10
can have up to four Trunk Groups.
For example, if you have three FN10s (A, B, and C), as shown in
Figure 3-2, you could connect them using a single Ethernet segment.
However, that would limit the interconnection to 10 Mbps. To solve this
problem, you could connect A to B with one Trunk Group, and connect
B to C with a second Trunk Group.
FastNET 10 A
Trunk Group #1
FastNET 10 B
In some wiring closets, it may be easier to connect two FN10s
Trunk Group #2
FastNET 10 C
Figure 3-2 Trunk Groups
Page 3-8 Fast Network 10 User Guide
Page 51

Disabling T runking
To enable trunking for the example shown, you would:
1. Connect the desired ports of the FN10s together using 10BASE-T
crossover cables.
If FN10 A is handling only a small number of users, the A to B Trunk
Group could have just two ports per FN10. If FN10 B and C are
expected to interconnect many users, you could use up to eight ports
in the B to C Trunk Group.
2. Using LCM, turn on trunking for the connected ports on each FN10.
For FN10 A, at the LCM prompt:
a. Type
trunk 2,3 on
For FN10 B, at the LCM prompt:
b. Type
trunk 3-10,14-15 on
For FN10 C, at the LCM prompt:
c. Type
trunk 3-10 on
Each FN10 automatically determines which ports are part of which
Trunk Group. After Trunk Group configuration, the FN10s complete
the standard 802.1D Spanning Tree state changes, treating each Trunk
Group as a single 802.1D Spanning Tree port.
802.1D Spanning Tree takes about thirty seconds to resolve which
FN10 ports are to become forwarding ports. As ports within a Trunk
Group become forwarding ports, traffic within the Trunk Group is
momentarily halted to guarantee the first-in, first-out ordering of the
Ethernet packets.
NOTE
The FN10-to-FN10 connections must be point-to-point. There
cannot be any other devices on those Ethernets. The ports
used for trunking can be in any order. However, both ends of
the FN10-to-FN10 connections must have trunking turned on
for the ports that are being used for the connections.
3.6 DISABLING T RUNKING
To turn off trunking, at the LCM prompt:
Fast Network 10 User Guide Page 3-9
Page 52

Chapter 3: Configuring Your FN10
1. Type trunk <PORT-RANGE> off
For example, trunk 2-4 off
3.7 DISPLAYING T RUNKING STATUS
To check the status of your current trunking configuration, at the LCM
prompt:
1. Type trunk <PORT-RANGE>
The display could look like the following:
FN10 > trunk 2-4
Port 2 trunking joined to Bridge MAC Addr 00:40:27:00:06:1f IP Addr 192.138.217.1
Port 3 trunking joined to Bridge MAC Addr 00:40:27:00:06:c3 IP Addr 192.138.200.2
Port 4 trunking joined to Bridge MAC Addr 00:50:36:00:07:4a IP Addr 192.140.250.7
The following conditions can be displayed:
• Closed (or Oneway) — Trunking is enabled, and the Trunking
Protocol is attempting to establish a trunk connection.
• Heldown — Trunking is enabled, but the trunk connection was
rejected. After a short time-out period, another attempt is
automatically initiated to establish a good trunk connection.
• Joined — Trunking is enabled, and the Trunking Protocol has
established a good trunk connection.
• Off — Trunking is not enabled.
• Perturbed — Trunking is enabled, and a good trunk connection has
been established. However, the forwarding of data packets is
temporarily suspended to allow for a change in the membership of the
Trunk Group.
Page 3-10 Fast Network 10 User Guide
Page 53

Displaying T runking Status
To check the status for ports configured for trunking, at the LCM prompt:
1. Type
status <PORT-RANGE>
The display could look like the following:
FN10 > status 1
Port 1 Status
Bridging:
Enabled/Disabled:
Spanning Tree:
Trunking State: Off
Pkts Transmitted:
Pkts Received:
Carrier Losses:
Total Collisions:
Excess Collisions:
RX Missed Pkts:
RX Runt Pkts:
RX FCS/Align Errs:
Internal TX Errs:
Type <CR> to display port 2 status...>
Transparent Bridging
Enabled, Rip listening
Forwarding
1693
0
1693
0
0
0
0
0
0
The following conditions can be displayed:
• Broken — Trunking is enabled, but the port in non-operational.
• Closed (or Oneway) — Trunking is enabled, and the Trunking
Protocol is attempting to establish a trunk connection.
• Heldown — Trunking is enabled, but the trunk connection was
rejected. After a short time-out period, another attempt is
automatically initiated to establish a good trunk connection.
• Joined — Trunking is enabled, and the Trunking Protocol has
established a good trunk connection.
• Off — Trunking is not enabled.
• Perturbed — Trunking is enabled, and a good trunk connection has
been established. However, the forwarding of data packets is
temporarily suspended to allow for a change in the membership of the
Trunk Group.
Fast Network 10 User Guide Page 3-11
Page 54

Chapter 3: Configuring Your FN10
3.8 DEFINING AND DELETING WORKGROUPS
The FN10 allows you to define logical groups of associated hosts (virtual
workgroups) to provide a more efficient flow of traffic across your
Ethernet network.
Virtual workgroups offer you the ability to limit broadcasts to logical
domains within the network. Workgroup destinations are recognized by
the FN10 and packets are routed directly to hosts within the workgroup,
eliminating the need to perform a general broadcast across each segment
of the network to find specific host addresses.
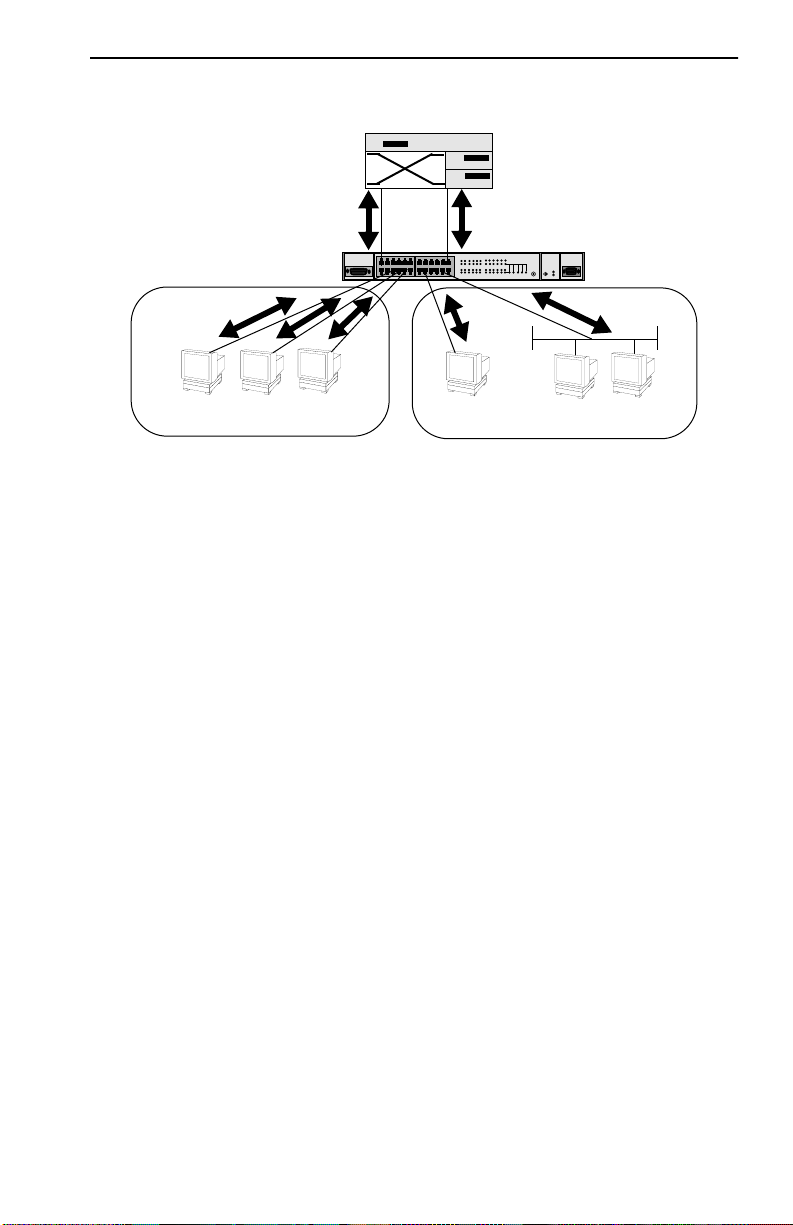
Figure 3-3 shows a FN10 that has been programmed to identify
workgroups A and B. Workgroup A uses ports 3 through 5, and
workgroup B uses ports 7 and 11. Port 16 connects a segment that
contains both workgroup A and workgroup B hosts.
Router
A
A
Workgroup A
Figure 3-3 Defining Virtual Workgroups
AB
A
A
A
B
FN10
B
Workgroup B
B
B
B
Page 3-12 Fast Network 10 User Guide
Page 55

Defining and Deleting Workgroups
The LCM commands used to create the previous configuration are as
follows:
1. To create workgroup A on ports 3, 4, 5, 13, and 16:
FN10 > workgroup A 3-5,13,16
LCM responds with the following display:
Name: a
Ports: 3, 4, 5, 13, 16
Info: all
2. To create workgroup B on ports 7, 11, 16, and 24:
FN10 > workgroup B 7,11,16,24
LCM responds with the following display:
Name: b
Ports: 7, 11, 16, 24
Info: all
Port 16 has been assigned to a segment that includes hosts that belong to
workgroup A and workgroup B. Port 13 connects workgroup A to the
router and port 24 connects workgroup B to the router.
In the above steps, both command lines did not specify a specific
classification of workgroup and have defaulted to the all category that
allows broadcasts of any protocol. To specify a specific IP network you
would need to add the IP network ID.
The following LCM commands re-define the previous example as
workgroups with an IP network classification:
1. To create workgroup A:
FN10 > workgroup A 3-5,13,16 ip 198.113.120.0
LCM responds with the following display:
Name: a
Ports: 3, 4, 5, 13, 16
Info: IP 198.113.120.0 255.255.255.0
Fast Network 10 User Guide Page 3-13
Page 56

Chapter 3: Configuring Your FN10
2. To create workgroup B:
FN10 > workgroup B 7,11,16,24 ip 198.113.121.0
LCM responds with the following display:
Name: b
Ports: 7, 11, 16, 24
Info: IP 198.113.121.0 255.255.255.0
In both cases, a specific NETMASK value was omitted and LCM
assumed the standard IP address class mask.
As illustrated in the previous example, virtual workgroups allow you to
associate multiple hosts, define a workgroup, or delete a workgroup. In
reality, you are assigning workgroup IDs to FN10 ports.
Use the LCM command, workgroup, to create, modify, and delete virtual
workgroups. The full syntax of the command is as follows:
workgroup [NAME [{delete | PORT-RANGE [INFO]}]]
The options for INFO include:
• ip IP-ADDRESS [NETMASK] - indicates an IP network and if
NETMASK is omitted, the standard IP class mask is assumed.
• ipx [IPX-NETWORK] - indicates an IPX network and if
IPX-NETWORK is omitted all IPX numbers will be assumed (this is
referred to as the default workgroup).
• all - allows any network protocol and is the default setting for the
workgroup command.
To display all of the workgroups defined by the FN10, at the LCM
prompt:
1. Type workgroup
To display information about a specific workgroup, at the LCM prompt:
1. Type
workgroup NAME
To create or modify a workgroup, at the LCM prompt:
1. Type
Page 3-14 Fast Network 10 User Guide
workgroup NAME PORT-RANGE INFO
Page 57

Assigning a Community Name
To delete a workgroup, at the LCM prompt:
1. Type
workgroup NAME delete
To create or modify the port list for a specific workgroup, at the LCM
prompt:
1. Type workgroup NAME PORT-RANGE
T o modify the netw ork classification of a specific workgroup, at the LCM
prompt:
1. Type workgroup NAME INFO
3.9 ASSIGNING A COMMUNITY NAME
A community name is similar to a password. You use the same steps to
assign a new community name or to change an existing community name.
This sets the MIB variable
community name to perform any
empty string that allows you to enter your community name.
To assign a community name, at the LCM prompt:
1. Type
community
2. Enter the old community name.
If one has not been assigned, you do not need to enter anything. LCM
prompts you for the new community name.
sxadminAnyPass. You can then enter a
SNMP sets. The default password is an
3. Enter the new community name.
LCM prompts you to verify the new community name by retyping it.
4. Retype the new community name.
Fast Network 10 User Guide Page 3-15
Page 58

Chapter 3: Configuring Your FN10
3.10 CONFIGURING MULTICAST STORM PROTECTION
The FN10 provides automatic protection against multicast storms.
Multicast storms are excessive broadcasts to all ports, typically caused by
a malfunctioning device. They can result in severe network performance
problems, including causing the network to crash.
T o protect against multicast storms, you must define an acceptable rate for
multicast traffic across a port. In many ways, this feature is similar to
filtering, however, multicast storm protection does not involve the use of
filters.
Each FN10 port can be individually configured for automatic multicast
storm protection. You define what level of multicasts the FN10 will
recognize as a multicast storm by specifying the number of multicast
packets that can be transmitted within a given time period.
NOTE
LCM does not allow you configure for multicast storm
protection. You must use RCM or an SNMP-based NMS. See
the
RCM Reference Guide
with your NMS for configuration instructions.
or the documentation that came
For example, if you configure FN10 to transmit onto Port 3 no more than
five multicasts per 60 seconds, any multicasts destined for Port 3 are
discarded after the first five multicasts. After 60 seconds have elapsed,
another five multicasts to Port 3 will be allowed. This maintains an
effective maximum rate of five multicast packets per minute.
The two Management Information Base (MIB) variables for configuring
multicast storm protection are:
sxifTxStormCnt – specifies the maximum number of multicasts that
•
can be broadcast within the given time.
• sxiTxStormTime – specifies the period of time that the maximum
number of multicasts can be broadcasted.
Refer to the Fast Network 10 MIB Reference Guide for a complete listing
and description of MIB variables.
Page 3-16 Fast Network 10 User Guide
Page 59

Modifying MIB Variables
3.11 MODIFYING MIB VARIABLES
Specific instructions for controlling FN10 operations, modifying
parameters, and so on, depend on the NMS you are using. This manual
provides instructions for using LCM commands. However, LCM
commands do not exist for all configuration options. You may need to
modify your configuration using an NMS.
This section provides several common MIB variables you may want to
change. Refer to the Fast Network 10 MIB Reference Guide for a
complete listing and description of MIB variables.
Each variable is first described in words, and is then identified in MIB
form, for example,
sxadminGetPass - {sxadmin 3}. The Display String
line shows the range of values that can be used for the gi v en parameter. In
each case, the DisplayString is a string of ASCII characters.
3.11.1 System Contact
The system contact parameter identifies the contact person who is
responsible for operating the FastNET 10. Typically, this parameter
includes the person’s name, company or division name, and telephone
number.
sysContact - {system 4}
DisplayString (SIZE (0..255))
3.11.2 System Name
The system name is a name assigned to the FN10 by the network
administrator. By convention, the system name is the fully qualified
domain name. (This name then becomes the LCM prompt.)
sysName - {system 5}
DisplayString (SIZE (0..255))
3.11.3 System Location
The system location identifies the physical location of the FN10.
sysLocation - {system 6}
DisplayString (SIZE (0..255))
Fast Network 10 User Guide Page 3-17
Page 60

Chapter 3: Configuring Your FN10
3.11.4 Authentication Password
The set password and get password variables (from the SMC proprietary
MIB), must be initialized with the correct authentication passwords.
All requests from any SNMP manager contain a community name field.
For set requests, the community name must match the set password;
otherwise, the request will be rejected by the FN10. For get requests, the
community name must match either the set password or the get password.
Set Password
The set password variable (sxadminAnyPass) must be set to the value of
the community name used by the SNMP manager for performing either
set or get operations. A zero length password means that any community
name is acceptable.
sxadminAnyPass - {sxadmin 2}
DisplayString (SIZE (0..24))
Get Password
The get password variable (sxadminGetPass) must be set to the value of
the community name used by the SNMP manager for performing get
operations. A zero length password means that any community name is
acceptable.
sxadminGetPass - {sxadmin 3}
DisplayString (SIZE (0..24))
3.11.5 Aging Parameter
Dynamic (learned) addresses are automatically deleted from the FN10
Bridge Address Table after a certain length of time. The aging time
default is five minutes, as set by the IEEE 802.1d standard. However , you
can change the aging parameter using the MIB variable
dot1dTpAgingTime.
The FN10 continually compares the actual age of each dynamic address
against the age specified by the dot1dTpAgingTime parameter, and deletes
any addresses that are older than the age specified (or older than five
minutes if you are using the default). Typically, there is no need to set the
aging time to a very small number because the FN10 Bridge Address
Table supports 8,192 addresses.
Static addresses (those added by the user) are not aged.
Page 3-18 Fast Network 10 User Guide
Page 61

CHAPTER 4
MONITORING AND MANAGING
YOUR FN10
Monitoring the FN10 consists of collecting and analyzing statistics and
system status information. Additional statistics gathered by the FN10 are
the result of user-configurable filters. See Chapter 5, FN10 Filters, for
information on setting up FN10 filters.
You can use the Select button on the front panel of the FN10 to monitor
segment status on any of the Ethernet ports. Refer to Section 2.1 for a
description of the segment status options.
Basic management of the FN10 consists of disabling or enabling Ethernet
ports, changing subnet masks, setting the community name for the FN10,
and changing the baud rate for your Local Console Manager (LCM)
connection.
4.1 FN10 MANAGEMENT TOOLS
LCM is a command-line interface built into the FN10 that enables you to
monitor and manage the FN10 through the out-of-band RS232C
connection attached to any non-intelligent terminal. You can also use one
of the following Cabletron Systems Network Management Stations
(NMSs), or a standard SNMP-based NMS to manage the FN10:
• Any SNMP-based NMS.
4.2 FN10 STATISTICS
The FN10 gathers statistics that can help you build a comprehensive
profile of the network traffic flow between each Local Area Network
(LAN) you are connecting, as well as the network traffic flow to and from
each Ethernet port on the FN10.
FN10 statistics are divided into five groups:
• System statistics
• Ethernet port statistics
Fast Network 10 User Guide Page 4-1
Page 62

Chapter 4: Monitoring and Managing Your FN10
• MAC statistics
• Traffic analysis statistics
• SNMP statistics
You can use this information to analyze your overall network
performance and to make configuration changes as necessary. For
example, Ethernet port statistics can help you identify network devices
that require high bandwidth, and therefore should be connected through a
dedicated, rather than a shared, network connection. In addition, Ethernet
port statistics can help you identify a network device that is the source of
numerous multicast packets due to a possible malfunction.
Page 4-2 Fast Network 10 User Guide
Page 63

FN10 Statistics
4.2.1 Pseudo Filters
You can configure pseudo-filters to optimize your network design.
Pseudo-filters generate statistics as if a filter had actually been applied
without actually invoking the filter or impacting the netw ork. See Chapter
5, Fast Network 10 Filters for information on setting up FN10 filters.
4.2.2 Gathering Statistics
For purposes of network management, managed objects, such as the
FN10, must be identified. Creation of a managed object is achieved by
placing its identifier, and a set of management information appropriate to
its class, in the Management Information Database (MIB).
Using the MIB variables, you can obtain a detailed analysis of your
network by combining statistics for each source network, destination
network, and source and destination port. The Fast Network 10 MIB
Reference Guide contains the SNMP MIB variables you need to monitor
and manage the FN10.
4.2.3 System Statistics
For each FN10, the following system statistics are available:
• The number of seconds since the FN10 was last reset.
• The number of spanning tree topology changes that have occurred
since the FN10 was last reset.
• The time since a topology change was last initiated.
• The physical location of the FN10.
• The name and address of the contact person for the FN10.
• The name of the FN10.
• The number of times an address was not added to the FN10 Bridging
Address Table because the table was full.
• The current number of dynamic (learned) addresses.
• The current number of static addresses.
Fast Network 10 User Guide Page 4-3
Page 64

Chapter 4: Monitoring and Managing Your FN10
• The number of times each filter was successfully invoked, and the
source address of the packet for the last successful inv ocation of each
of the combination filters.
NOTE
To check FN10 system status using LCM, see Section 4.3.
4.2.4 Ethernet Port Statistics
For each Ethernet port connection on the FN10, the following statistics
are available. They can help you analyze both network activity and
utilization, and in some cases, indicate faulty equipment or cabling.
NOTE
• The number of packets received from the port.
All statistics counters are cleared when the FN10 is reset or
when Ethernet ports are re-enabled.
The packets are broken down into the following categories by type of
destination address:
- Known individual destination address
- Unknown individual destination address
- Multicast address (other than broadcast)
- Broadcast address
- Individual node management packets
- Multicast node management packets (other than broadcast)
- Broadcast node management packets
Page 4-4 Fast Network 10 User Guide
Page 65

FN10 Statistics
For each of the above categories, statistics on whether a packet was
forwarded or filtered are available. In addition, if a packet was filtered,
the following conditions are recorded:
- If the packet is local traffic
- If the port is not in the Spanning Tree Forwarding state
- If there is a source address or entry port restriction
- If there is a destination address or exit port restriction
• The number of bytes in the received packets.
• The number of bytes in the packets that were filtered.
• The number of bytes in the packets that were forwarded.
• The total number of packets transmitted to the LAN.
The packets are broken down into the following categories by type of
destination address:
- Known individual destination address
- Unknown individual destination address
- Multicast address (other than broadcast)
- Broadcast address
- Individual node management packets
- Multicast node management packets (other than broadcast)
- Broadcast node management packets
• The number of bytes in the transmitted packets.
• The number of packets not transmitted to the LAN.
The packets are broken down into the following categories:
- Not sent due to congestion
- Not sent due to multicast storm protection
• The number of receiv ed Frame Check Sequence (FCS) errors detected.
• The number of missed packets due to receive queue overflows.
Fast Network 10 User Guide Page 4-5
Page 66

Chapter 4: Monitoring and Managing Your FN10
• The number of received packets with frame alignment errors.
• The number of packet transmissions that were initially deferred due to
the media being busy.
• The number of packets not transmitted due to excessive collisions.
• The number of packets transmitted with one collision.
• The number of packets transmitted with multiple collisions.
• The number of RX and TX collisions.
4.2.5 MAC Statistics
Media Access Control (MAC) statistics are available for each MAC
address stored in the FN10 Bridging Address Table. They can help you
determine how many packets are being sent and received by a specific
device on the network.
• The number of seconds since receiving a pack et from the device with
a specific address.
• The number of seconds since transmitting a packet to the de vice with
a specific address.
• The number of packets received from the device with a specific
address.
• The number of packets transmitted to the device with a specific
address.
• The number of bytes receiv ed from the device with a specific address.
• The number of bytes transmitted to the device with a specific address.
• The number of multicast packets received from the device with a
specific address.
• Number of packets forwarded from the de vice with a specific address.
NOTE
Page 4-6 Fast Network 10 User Guide
The receive statistics for the entries in the FN10 Bridging
Address Table are only updated when packets are received on
Ethernet ports that are in Spanning Tree Forwarding or
Learning state, and if Learning has been enabled on the
Ethernet port.
Page 67

FN10 Statistics
4.2.6 Traffic Analysis Statistics
You can configure the FN10 to collect statistics on traffic between active
Ethernet ports, for example:
• Number of packets sent from Station A to Station B.
Configure pseudo source-port filter with Station A’s address as source
address match and Station B’s address as destination address match.
• Number of IP packets sent from Station A to Station B.
Configure pseudo source-filter with Station A’s address as source
address match and Stations B’s address as destination address match
and Frame Type set to IP.
• Number of packets sent from Station A to Segment B.
Configure pseudo destination filter on port B with Station A’s address
as source address match.
• Number of packets sent from Segment A to Station B.
Configure pseudo source filter on port A with Station B’s address as
destination address match.
Refer to Chapter 5, FN10 Filters, for instructions on setting up FN10
pseudo filters.
4.2.7 SNMP Statistics
The following statistics relate specifically to SNMP. The Management
Information Base (MIB) variable that collects the statistics is provided in
square brackets.
• The number of SNMP PDUs received by the FN10. [
• The number of SNMP PDUs created by the FN10. [
• The number of SNMP PDUs received by the FN10 which had an
unsupported SNMP version. [snmpInBadVersions]
• The number of SNMP PDUs received by the FN10 which had an
unrecognized SNMP community name. [snmpInBadCommunityNames]
• The number of SNMP PDUs received by the FN10 which had an
authentication failure. [snmpInBadCommunityUses]
Fast Network 10 User Guide Page 4-7
snmpInPkts]
snmpOutPkts]
Page 68

Chapter 4: Monitoring and Managing Your FN10
• The number of SNMP PDUs received by the FN10 which had an
ASN.1 parsing error while being decoded by the FN10.
snmpInASNParseErrs]
[
• The total number of MIB objects which have been successfully
retrieved by the FN10 as a result of SNMP GetRequest or GetNext
PDUs. [
snmpInTotalReqVars]
• The total number of MIB objects which hav e been successfully altered
by the FN10 as a result of SNMP SetRequest PDUs.
snmpInTotalSetVars]
[
• The total number of SNMP GetRequest PDUs received by the FN10,
which have been processed with no errors. [snmpInGetRequests]
• The total number of SNMP GetNext PDUs received by the FN10,
which have been processed with no errors. [snmpInGetNexts]
• The total number of SNMP SetRequest PDUs received by the FN10,
which have been processed with no errors. [snmpInSetRequests]
• The total number of SNMP PDUs created by the FN10, with a value
of tooBig in the PDU’s ErrorStatus . [snmpOutTooBigs]
• The total number of SNMP PDUs created by the FN10, with a value
of noSuchName in the PDU’s ErrorStatus . [snmpOutNoSuchNames]
• The total number of SNMP PDUs created by the FN10, with a value
of badValue in the PDU’s ErrorStatus . [snmpOutBadValues]
• The total number of SNMP PDUs created by the FN10, with a value
of genErr in the PDU’s ErrorStatus . [snmpOutGenErrs]
• The total number of SNMP GetResponse PDUs created by the FN10.
[snmpOutGetResponses]
• The total number of SNMP Trap PDUs created by the FN10.
[snmpOutTraps]
4.3 USING LCM TO CHECK FN10 STATUS
The LCM commands that enable you to quickly check on the status of the
FN10 include:
• Status
Page 4-8 Fast Network 10 User Guide
Page 69

Using LCM to Check FN10 Status
• Address display
• Ipaddr
• Ident
These LCM commands are described in the sections that follow.
4.3.1 Displaying Status
The status command displays the status of the FN10 and automatically
pages through the status of all of the Ethernet ports, pausing at each
screen of information.
NOTE
You can also use the status command to display status for
individual Ethernet ports by typing status and specifying a port
number.
At the LCM prompt:
1. Type
status
LCM displays the following type of information.
Fast Network 10 User Guide Page 4-9
Page 70

Chapter 4: Monitoring and Managing Your FN10
Software Currently Running: TigerSwitch software, Tue 08/23/94 15:03:09
Next Bootstrap (1st bank): TigerSwitch software Tue 08/23/94 15:03:09
Power-up test failures: none
Current unit temperature is normal.
System Up Time: 2:25:57
Current Number of Learned Addresses: 133
Number of Defined Filters: 0
CPU utilization is light.
Port RX Packets TX Packets Collisions Erred Packets
1
2
3
4
.
.
.
24 0 0 0
Type <CR> to display port 1 status...>
6978
0
0
0
.
.
.
1676
0
8
0
0
.
.
.
0
0
0
.
.
.
1676
0
0
0
.
.
.
0
If you do not want to view the status of each Ethernet port, use the
Ctrl-C keys to return to the LCM prompt.
Port 1 Status
Bridging:
Enabled/Disabled:
Spanning Tree:
Transparent Bridging
Enabled, Rip listening
Forwarding
Trunking State: Off
Pkts Transmitted:
Pkts Received:
Carrier Losses:
Total Collisions:
Excess Collisions:
RX Missed Pkts:
RX Runt Pkts:
RX FCS/Align Errs:
Internal TX Errs:
1693
0
1693
0
0
0
0
0
0
Type <CR> to display port 2 status...>
If you do not want to view the status of port 2, use the Ctrl-C keys to
return to the LCM prompt.
You can view the status for multiple of ports by typing
indicating the range of port numbers, for example
Page 4-10 Fast Network 10 User Guide
status and
status 2-6.
Page 71

Using LCM to Check FN10 Status
4.3.2 Displaying MAC Addresses
The addresses display command displays all MAC addresses in the
FN10 Bridge Address Table. The display includes:
• The MAC address
• Type of address, including:
- Dynamic (learned)
- Ethernet port (for the MAC address of an Ethernet port)
- Static (for an address that was added by an NMS)
- BPDU (the MAC address to which all BPDUs are directed)
- Reserved (the address reserved by 802.1d, but not yet assigned)
- All LANs (the addresses reserved by 802.1d for network
management)
• Port number
• Age (in seconds since a packet was last received from that address)
• Number of packets received from that address
• Number of packets forwarded to that address
The display automatically pauses with each screen of information.
Addresses are displayed in random order; for example, address
02:00:00:00:00:00 may appear after address 04:00:00:00:00:00.
The age will be the most recent of the following:
• Time since a packet was last received from that address
• Time since that address was created (e.g., a static address created by
an NMS)
Fast Network 10 User Guide Page 4-11
Page 72

Chapter 4: Monitoring and Managing Your FN10
To display all MAC addresses, at the LCM prompt:
1. Type
addresses display any
LCM responds with a list of all MAC addresses, their associated ports,
the type, age, and number of frames from and to that address.
Address Type Port
08:00:20:02:3a:44
00:40:27:03:b7:21
Enter <CR> to continue, Ctrl-C to exit:
If you do not specify
Learned
Static
any , only the learned static and other addresses are
Age(secs)
3
**
Frames-From Frames-To
26
5
1
17110
195
displayed.
To display a specific address, at the LCM prompt:
1. Type
addresses display <MAC-ADDRESS>
For example, if you typed, addresses display 02:04:06:03:2a:43,
LCM would display the following information:
Address Type Port
02:04:06:03:2a:43 Learned 5
Age(secs)
Frames-From Frames-To
21 1181
73
You can display a range of addresses by using a net mask. This is helpful
when determining the status associated with stations containing the same
make of Ethernet network interface cards. At the LCM prompt:
0
1. Type addresses display <MAC-ADDRESS> <NET-MASK>
For example, to see all addresses that begin with 02:04:06, you would
enter:
addresses display 02:04:06:00:00:00 ff:ff:ff:00:00:00
Page 4-12 Fast Network 10 User Guide
Page 73

LCM would display:
Using LCM to Check FN10 Status
Address Type Port
02:04:06:03:2a:43
02:04:06:00:2a:67
02:04:06:a3:70:2b
Enter <CR> to continue, Ctrl-C to exit:
Learned
Learned
Learned
Age(secs)
5
4
6
Frames-From Frames-To
21
1
0
1181
3421
15339
LCM allows you to display MAC addresses in two formats:
• Little-endian (default)
Little-endian is a method of storing or transmitting data in which the
least significant bit of each byte is presented first. This is used in
Ethernet networks.
• Big-endian
Big-endian is a method of storing or transmitting data in which the
most significant bit of each byte is presented first. Use the
big option
to display MAC addresses in big-endian format.
Big-endian format separates the bytes with spaces rather than colons.
You can also enter MAC addresses in big-endian format by using
spaces rather than colons. This option is helpful if your network
includes Token Ring or FDDI along with Ethernet.
ipaddr command displays the IP addresses, subnet masks, and MAC
The
addresses of all FN10 ports. At the LCM prompt:
73
0
235
1. Type
ipaddr
LCM displays the current IP address table, for example.
Port
1
2
3
4
5
6
7
8
IP Address
192.138.217.1
0.0.0.0
192.138.217.10
0.0.0.0
0.0.0.0
192.138.217.20
192.138.217.50
192.138.217.30
Address Mask
255.255.255.0
255.0.0.0
255.255.255.0
255.0.0.0
255.0.0.0
255.255.255.0
255.255.255.0
255.255.255.0
Fast Network 10 User Guide Page 4-13
MAC Address
00:40:27:00:06:1f
00:40:27:00:06:c3
00:40:27:00:06:3e
00:40:27:00:03:7a
00:40:27:00:05:c7
00:40:27:00:04:4a
00:40:27:00:06:9e
00:40:27:00:04:b4
Page 74

Chapter 4: Monitoring and Managing Your FN10
4.3.3 Displaying Manufacturing Information
The ident command identifies FN10 manufacturing information,
including the part number and any power-up test codes and diagnostic
data. To display the manufacturing information, at the LCM prompt:
1. Type
ident
LCM displays the following type of information:
Part Number:
Up-Link Module Part Number: 123-4567-891 X1234567-1234567
Power-up test codes:
Diagnostic data:
501-3000-002
00000000 00000000 00000000 00000000
00000000 00000000 fffffffc fffffffc
00000000 ff006000
X70002e4-0006891
4.4 MANAGING THE FN10
Managing the FN10 consists of:
• Disabling and enabling Ethernet ports
• Changing a subnet mask
• Changing a community name
• Setting the baud rate of your terminal connection
• Setting a reboot time
You can use the Local Console Manager (LCM), any of the Cabletron
Systems NMSs, or a standard SNMP-based NMS to manage the FN10.
Refer to Section 4.1.
Page 4-14 Fast Network 10 User Guide
Page 75

Using LCM to Manage the FN10
4.5 USING LCM TO MANAGE THE FN10
The LCM commands that enable you to manage the FN10 include:
• Disable
• Enable
• Ipaddr
• Community
• Baud
• Reboot
These LCM commands are described in the sections that follow.
4.5.1 Disabling a Port
There can be times when you need to disable a specific Ethernet port, for
example, after you have determined that there is faulty equipment.
Disabling a port effectively stops all bridging functions for that port.
Disabled ports do not accept SNMP packets, and therefore cannot
communicate with an NMS.
To disable a port, or port range, at the LCM prompt:
1. Type
disable <PORT-RANGE>
For example, disable 7-9 would disable ports 7, 8, and 9.
LCM responds:
Port 7: Disabled
Port 8: Disabled
Port 9: Disabled
Once an Ethernet port is disabled, it will be disabled until you enable it
again. Resetting the FN10 will not enable a port that has been disabled.
Fast Network 10 User Guide Page 4-15
Page 76

Chapter 4: Monitoring and Managing Your FN10
If you disable the port through which someone is remotely
managing the FN10, that person will not be able to
!
CAUTION
communicate with the FN10. Use the LCM command
addresses display to find the port number you are using to
manage the FN10.
4.5.2 Enabling a Port
When you enable an Ethernet port that has been disabled, whatever
bridging functions you had previously configured for that port are
re-enabled.
To enable a port, or a range of ports, at the LCM prompt:
1. Type enable <PORT-RANGE>
For example, enable 7-9 would enable ports 7, 8, and 9.
LCM responds:
Port 7: Enabled, Rip listening
Port 8: Enabled, Rip listening
Port 9: Enabled, Rip listening
Entering enable <port number> for an already enabled FN10
port resets that port’s statistics counters.
!
CAUTION
NOTE
Rip listening means that the FN10 is in listening mode
only. No RIP packets are created.
4.5.2.1 noRIP Option
The Routing Information Protocol (RIP) is one of the protocols that
allows the FN10 to build an accurate, current routing table. This table
includes the networks it knows about, the next hop, and the number of
hops to get there. RIP enables you to use an NMS to remotely manage the
FN10 through a router.
Page 4-16 Fast Network 10 User Guide
Page 77

Using LCM to Manage the FN10
The noRIP option allows you to turn off the routing information that
builds the routing table. You would use this option when you are
connecting network devices that do not support RIP.
4.5.3 Changing a Subnet Mask
You can optionally set the subnet mask for a port. A subnet mask is a
32-bit address mask used in IP to specify a particular subnet. If the subnet
mask is 0.0.0.0, the FN10 automatically converts the displayed mask to
the standard default, based on the port’ s IP address class. (Class A address
masks are 255.0.0.0, Class B address masks are 255.255.0.0, Class C
address masks are 255.255.255.0.)
T o display IP addresses, subnet masks, and MA C addresses of all ports on
the FN10 you are managing, at the LCM prompt:
1. Type
ipaddr
LCM displays the current IP address table, for example:
Port IP Address Address Mask MAC Address
1
192.138.217.1
2
0.0.0.0
3
192.138.217.10
4
0.0.0.0
5
0.0.0.0
6
192.138.217.20
7
192.138.217.50
255.255.255.0
255.0.0.0
255.255.255.0
255.0.0.0
255.0.0.0
255.255.255.0
255.255.255.0
00:40:27:00:06:1f
00:40:27:00:06:c3
00:40:27:00:06:3e
00:40:27:00:03:7a
00:40:27:00:05:c7
00:40:27:00:04:4a
00:40:27:00:06:9e
To change the subnet mask, at the LCM prompt:
1. Type
ipaddr <PORT-NUMBER> <IP ADDRESS> <SUBNET MASK>
For example, ipaddr 6 192.138.217.40 255.255.240.0 would set the
subnet mask for port 6 to 255.255.240.0. LCM responds by
redisplaying the address table.
NOTE
When you change the subnet mask for a port, you must also
enter the IP address for that port. Make sure you enter the IP
address for the port correctly; whate ver you enter becomes the
IP address.
To assign a new IP address, refer to Section 3.1.
Fast Network 10 User Guide Page 4-17
Page 78

Chapter 4: Monitoring and Managing Your FN10
4.5.4 Changing a Community Name
A community name is similar to a password. You use the same steps to
assign a new community name or to change an existing community name.
This sets the MIB variable
community name to perform any
To assign a community name, at the LCM prompt:
sxadminAnyPass. You can then enter a
SNMP sets.
1. Type
community
2. Enter the old community name.
If one has not been assigned, you do not need to enter anything. LCM
prompts you for the new community name.
3. Enter the new community name.
LCM prompts you to verify the new community name by retyping it.
4. Retype the new community name.
4.5.5 Setting the Baud Rate
You can set the baud rate for your LCM console connection. The options
for baud rate include:
• 1200
• 2400
• 4800
• 9600
• 19200
The default rate is 9600.
NOTE
Page 4-18 Fast Network 10 User Guide
Make sure that the baud rate you set matches the baud rate
setting for the terminal you are using.
Page 79

Using LCM to Manage the FN10
To display the current baud rate setting, at the LCM prompt:
1. Type
baud
LCM responds:
Usage: baud [1200|2400|4800|9600|19200]
Baud rate is 4800.
To change the baud rate setting, at the LCM prompt:
1. Type baud <baud rate>
For example, baud 9600 would set the baud rate to 9600.
LCM responds:
Baud rate is 9600.
4.5.6 Setting a Reboot Time
You can enter the number of seconds the FN10 waits before rebooting. At
the LCM prompt:
1. Type reboot <time interval>
For example, reboot 60
LCM responds:
System will be reset in 60 seconds.
Fast Network 10 User Guide Page 4-19
Page 80

Chapter 4: Monitoring and Managing Your FN10
Page 4-20 Fast Network 10 User Guide
Page 81

CHAPTER 5
FN10 FILTERS
One of the most significant features of the FN10 is its powerful
user-configurable filtering capabilities. A filter is an instruction to the
to screen data packets based on the criteria you define. Filtering is
FN10
useful for gathering statistics, implementing security measures, and
improving network performance.
The FN10 also supports pseudo filtering. Pseudo filtering provides a
unique traffic monitoring capability, including:
• Determining the effect a filter would have, without actually invoking
it.
• Monitoring traffic patterns to help determine optimum network
design.
• Monitoring potential security threats.
• Evaluating security policies.
You can configure the FN10
following types of filters:
• Bridge Address T able filters
• Port filters
Although proper use of filters can have a positive effect on the network
performance, excessive use of filters may degrade network performance.
(Refer to Section 5.6.)
to selectively filter network traffic using the
5.1 BRIDGE ADDRESS TABLE FILTERS
Bridge Address Table filters use the FN10 Bridge Address Table to
determine if there are any filtering flags assigned to a packet’s source or
destination address. By assigning FN10 Bridge Address Table filter flags,
you can selectively filter:
• T raffic to and/or from any station (Media Access Control (MA C) layer
address).
Fast Network 10 User Guide Page 5-1
Page 82

Chapter 5: FN10 Filters
• Multicast traffic from any station (MAC layer address). Multicast
packets are those destined for more than one address.
Each source address can be assigned one of the following restrictions:
• Filter all packets from this source address.
• Filter all multicast packets from this source address.
NOTE
The capacity of the FN10
Local Console Manager (LCM).
Bridge Address Table is 8,192 entries. The
majority of entries are dynamically learned addresses. However, 200
entries can be static (manually entered).
You cannot configure Bridge Address Table filters using the
Table 5-1 shows what a dynamically learned entry in the FN10
Bridge
Address Table might look like.
Table 5-1 Representation of an Internal Bridge Address Table Entry
MAC address
00:01:02:03:04:05 3 26 OFF OFF
Port
(segment)
Age Source filter
Multicast
source
filter
Where:
MAC address
Port (segment)
with the MAC address. The segment port number is automatically learned for
dynamic addresses, but can be manually entered as a static address.
Age
– Indicates when a frame from the device was last received by the
FN10.
Source filter – Indicates the flags used solely for filtering. They instruct the
FN10 to filter (ON) or not filter (OFF) packets generated by specified MAC
address.
Multicast source filter
instruct the FN10 to filter (ON) or not filter (OFF) multicast packets generated
by specified MAC address.
– Indicates the Ethernet address.
– Indicates the physical Ethernet segment port associated
– Indicates the flags used solely for filtering. They
Page 5-2 Fast Network 10 User Guide
Page 83

Bridge Address Table Filters
With the Bridge Address Table entry sho wn in Table 5-1, you can use any
of the following types of Bridge Address Table filtering:
• Source address
• Source address multicast
• Destination address
5.1.1 Source Address Filter
The source address filtering capability uses the source filter flag, which is
a component of each entry in the FN10
Bridge Address Table. When the
flag is set to ON, all packets originating from the designated MAC
address are filtered. This enables the FN10
to recognize — and ignore —
local traffic. Local traffic refers to data packets that only need to travel
within one network segment.
5.1.2 Source Address Multicast Filter
The source address multicast filtering capability uses the multicast source
filter flag in the FN10
Bridge Address Table.
When this flag is set to ON, all multicast packets originating from the
designated MAC address are filtered. This is useful for preventing
broadcast traffic from a particular station from being propagated to other
network segments.
Fast Network 10 User Guide Page 5-3
Page 84

Chapter 5: FN10 Filters
5.1.3 Destination Address Filter
A destination address filter can be used to discard all traffic destined to a
specific MAC address. This type of filter is configured by setting a static
address entry for the MAC address and specifying
assignment. The port assigned by the static entry will take precedence
over the port learned by the FN10’s learning algorithm.
Destination address filters can be used to create virtual LANs. For
example, if you want users on Ports 1 and 2 to communicate with each
other, and users on Ports 3, 4, and 5 to communicate with each other, but
not allow cross traffic between the two groups, you could configure a
destination address filter for the broadcast address (i.e., ff:ff:ff:ff:ff:ff), as
follows:
• Source Port 1, then forward to Port 2
• Source Port 2, then forward to Port 1
• Source Port 3, then forward to Ports 4 and 5
• Source Port 4, then forward to Ports 3 and 5
• Source Port 5, then forward to Ports 3 and 4
{null} as the port
5.2 PORT FILTERS
In contrast to Bridge Address Table filters, which apply to traffic to or
from a particular MAC address, Port filters apply to traffic to or from a
specific port on the FN10.
Using any of the FN10
one of the following restrictions:
• Filter all packets entering the port, except those from addresses defined
as static entries in the FN10 Bridge Address Table.
• Treat all packets with identical source and destination addresses as
broadcasts.
• Filter all packets that match all of the fields in the Port filter.
Page 5-4 Fast Network 10 User Guide
management tools, you can assign an Entry port
Page 85

Port Filters
Likewise, you can assign an Exit port one of the following restrictions:
• Only allow a certain number of multicast packets every “n” seconds
and then stop transmitting.
• Filter a packet destined for this port that matches all of the fields in the
Port filter.
Port filters can include multiple filtering conditions. This makes it
possible to configure very specific filters. For example, a Port filter could
be configured to filter all AppleTalk packets from Port 2 whose
destination address is XYZ.
In this example, three filtering conditions are specified. The Port filter
could be logically represented as:
Filter packets if:
• They are from Port 2.
• They are AppleTalk packets.
• The destination address is XYZ.
The FN10 allows you to implement up to 100 Port filters (total, for all
connected ports). The various types of filtering conditions that can be
specified are referred to as fields.
5.2.1 Configurable Fields
Port filters can be configured to selectively filter network traffic based on
specific Entry and Exit ports. Entry port filters include filtering
conditions on a port that is to receive a packet. Exit port filters include
filtering conditions on a port to which the packet is destined.
Each Port filter can contain entries for the configurable fields, with the
exception of the Port/Group Match and Port/Group# fields that are only
used with Exit port filters. If you do not specify a value for a particular
field, that field will not be used.
The Type field (Entry or Exit) must always be specified, since it
identifies which traffic flow the FN10 is to observe for filtering. The
default is Entry.
Fast Network 10 User Guide Page 5-5
Page 86

Chapter 5: FN10 Filters
For the fields defined as True, False, or Not Applicable (NA) in the
following sections:
• True – Means all traffic that matches the field will be filtered.
• False – Means all traffic that does not match the field selection will be
filtered (inverse filter).
• Not applicable (NA) – Means that when the filter is in voked, the FN10
will not check this field.
In addition to the configurable fields, there are two additional options you
can use when you configure Port filters:
• Pseudo filtering
• Filter links
5.2.1.1 Pseudo Filtering
Any Port filter can be set to pseudo mode. In pseudo mode, the filter
generates statistics, counting how many packets meet the filtering criteria.
The FN10 does not actually block any traffic.
The pseudo filter option provides unique traffic monitoring capability,
including:
• Determining the effect a particular filter w ould ha ve, without actually
invoking it.
• Monitoring traffic patterns as an aid in determining optimum netw ork
design, usage policies, and so on.
• Monitoring potential security threats.
5.2.1.2 Filter Links
Port filters can be logically linked using the Boolean And/Or operators.
Because Port filters are maintained as a table, each Port filter you
configure is assigned a Port Filter Table index number. This number is
incremented each time a Port filter is added to the Port Filter Table index.
Port filter processing is a one pass, sequential operation. All And/Or
operators apply to the next Port filter in the Port Filter Table index that is
assigned the same port number and Entry/Exit value.
Page 5-6 Fast Network 10 User Guide
Page 87

Port Filters
For example, if you had the configuration shown below, the And operator
assigned to Port 2 would apply to the next instance of Port 2, not
necessarily the next sequential filter number in the Port Filter Table index.
Filter
Inde
1
2
3
4
5
x
Filter
Port
1
2
1
2
2
Filter
Operator
Or
And
Or
Or
Or
The Port filter configuration fields are described in Table 5-2.
Table 5-2 Port Filter Configuration Fields
Field Description Default
If the filter is for port 1, you do not need to enter
Port
Type
Port/
Group
Match
anything. If the filter is for another port, enter that
number.
Either Entry – apply the filter to all packets received
on the port, or Exit
transmitting the packet from the port.
Either NA (not applicable), True – filter the packet if
the receiving port or group number matches, or False
– apply the filter before
– filter the pack et if the receiving port or group number
does not match. This is valid only if the filter type is
Exit.
1
Entry
NA
Decimal value for the number of the port or group
Port/
Group #
Source
Range
through which the packet entered the FN10 XE. This is
valid only if the filter type is Exit. Port group numbers
start at 25.
Either NA (not applicable), True – filter the packet if
the source MAC address is within the range, or False
– filter the packet if the source MAC address is
outside of the range.
NA
NA
Fast Network 10 User Guide Page 5-7
Page 88

Chapter 5: FN10 Filters
Table 5-2 Port Filter Configuration Fields (Continued)
Field Description Default
Source
Range
Start
Source
Range
End
Source
Range
Mask
Destinati
on
Range
Destinati
on
Range
Start
Destinati
on
Range
End
Destinati
on
Range
Mask
The starting MAC address for the source range of
MAC addresses. If you are filtering on a single source
address, enter that address here.
Ending MAC address for the source range of MAC
addresses. If you are filtering on a single address,
enter that address here.
MAC address mask to apply to the range of source
MAC addresses.
Either NA (not applicable), True – filter the packet if
the destination MAC address is within the range, or
False
– filter the packet if the destination MAC
address is outside of the range.
Starting MAC address for the destination range of
MAC addresses. If you are filtering on a single source
address, enter that address here.
Ending MAC address, for the destination range of
MAC addresses.
MAC address mask to apply to the range of
destination MAC addresses.
ff:ff:ff: ff:
ff:ff
NA
ff:ff:ff: ff:
ff:ff
Protocol
Match
Protocol
Type
Field
Match
Either NA (not applicable), True – filter the packet if
the protocol type matches, or False
if the protocol type does not match.
For all Ethernet-2, 802.3, or specific Ethernet frames.
All of the Ethernet hex values are listed in RFC 1060.
Some common Ethernet protocol hex values include:
0800 – IP, 0806 – ARP, 6003 – DECnet Phase IV, and
809B – AppleTalk
Either NA (not applicable), True – filter the packet if
the masked value matches, or F alse
if the masked value does not match. This option allows
you to examine a portion of a packet to set up
customized filters to match conditions you specify.
– filter the packet
– filter the packet
NA
NA
Page 5-8 Fast Network 10 User Guide
Page 89

Port Filters
Table 5-2 Port Filter Configuration Fields (Continued)
Field Description Default
Field
Origin
Field
Offset
Field
Value
Either TYPE, IP, MAC, or SR (see Field Offset
description). The origin is the field from which the
offset count starts.
The decimal offset of the portion of the packet to be
examined. If the origin is TYPE, the field offset value is
relative to the end of the Ethernet frame type,
regardless of whether or not the frame type is SNAP
encapsulated. For example, for IP packets, a field
origin of TYPE with a field offset of zero indicates the
start of the IP header.
If the origin is IP, then the offset is relative to the end of
the IP Header (an offset of zero indicates the portion
immediately following the end of the IP Header).
If the origin is MAC, then the offset is relative to the
beginning of the MAC addresses (an offset of zero
indicates the start of the destination MAC address).
If the origin is SR, then the offset is relative to the end
of the MAC header , including the Source Routing (SR)
header, if present.
The two digit hexadecimal value of each of the eight
octets beginning at the origin and offset by the value
specified above. The octets must be separated by
spaces. This is the value that the filter is using when it
does a comparison for a match, for example a MAC
address.
TYPE
An eight octet mask applied to the packet’s eight
Field
Mask
Filter
Index
octets before comparing them to the Field Value
specified above. The mask octets must be separated
by spaces. This is a mask of the specified Field Value.
Filter number for this filter . For example, a value of one
indicates that this is the first filter in the Filter Table. If
you use the default index of 1, any other filters you
have previously defined will be renumbered starting
with 2. Although filters are assigned to a port, filter
indexes are not; they are assigned sequentially to all
filters for all ports.
One
Fast Network 10 User Guide Page 5-9
Page 90

Chapter 5: FN10 Filters
When adding or modifying a filter, you must enter both a Source Range
Start value and a Source Range End value. For example:
Source Range: [NA] (InRange/OutRange/NA)>inrange
Source Range Start: [00:00:00:00:00:00] >08:00:20:00:00:00
Source Range End: [00:00:00:00:00:00] >00:40:60:0a:10:3e
Source Range Mask: [ff:ff:ff:ff:ff:ff] >ff:ff:ff:00:00:00
To filter on a single address, be sure to enter the same address in both the
Source Range Start: and Source Range End: fields.
5.3 USING FILTERS FOR SECURITY PURPOSES
The various types of security restrictions that can be implemented using
filters include:
• Restricting access to a network segment – you can configure a filter to
prevent any traffic from being forwarded to a specific network
segment.
• Restricting access to specific stations – you can use filters to restrict
access to specific stations on the network.
• Prev enting access by unauthorized users – you can use filters to restrict
individual workstations from accessing other network devices.
For each example shown below, the situation is described first, and the
objective to be accomplished is explained. Then, how the objective could
be accomplished using the FN10 is explained in general terms. In these
examples, single letters are used to represent MAC-layer addresses.
Actual MAC addresses consist of a string of numbers, (22:14:15:4:5:6).
Example 1: Restricting Access to a Network Segment
The objective in this example is to restrict access for security reasons.
Workstations on one network segment (subnet) are to be restricted
entirely from access to devices on an adjoining subnet.
In this example, there are three subnets connected by a centrally located
FN10 (see Figure 5-1). The subnets are referred to as Manufacturing,
Engineering, and Accounting.
Page 5-10 Fast Network 10 User Guide
Page 91

Using Filters for Security Purposes
Manufacturing Subnet
Concentrator
Engineering Subnet
LAN 2
LAN 1
FN10
Concentrator
Accounting Subnet
LAN 3
Figure 5-1 Using Filters to Restrict Access to an
Adjoining Network Segment
Fast Network 10 User Guide Page 5-11
Page 92

Chapter 5: FN10 Filters
The company wants to allow Engineering and Accounting workstations to
access resources on the Manufacturing subnet (LAN 1), but wants to
prevent users on the Engineering subnet (LAN 2) from accessing
resources on the Accounting subnet (LAN 3). Therefore, the objective is
to set up a filter that will block all traffic between LANs 2 and 3, while
allowing users on both LANs 2 and 3 to access LAN 1.
For this example, assume that LAN 2 and LAN 3 are connected to ports 2
and 3 on the FN10, respectively. LAN 1 is connected to the ports 1 and 4
on the FN10.
Two Port filters are used to discard any packets from the Engineering
subnet destined for the Accounting subnet (LAN 2 to LAN 3), and any
packets from the Accounting subnet destined for the Engineering subnet
(LAN 3 to LAN 2). Each filter includes:
• The source LAN or port number
• The destination port
• Match flags
The filters are constructed as follows:
• Filter 1: Identifier is port 3 as a destination (i.e., exit)
Fields are source LAN = 2, Match
• Filter 2: Identifier is port 2 as a destination (i.e., exit)
Fields are source LAN = 3, Match
Any packet whose source is LAN 3 and destination is port 2 will be
filtered. Likewise, any packet whose source is LAN 2 and destination is
port 3 will be filtered. However, the filters will not affect user access to
the Manufacturing subnet (LAN 1). Therefore, the objective has been
accomplished: Users on LANs 2 and 3 (Engineering and Accounting)
cannot communicate, but users on either LAN can access LAN 1
(Manufacturing).
This is an example of logical segmenting. In this case, LANs 2 and 3 are
distinct physical segments. Howe ver , before the filters were implemented,
they were able to freely communicate. The filters were used to logically
segment the network in such a way that LANs 2 and 3 cannot
communicate.
Page 5-12 Fast Network 10 User Guide
Page 93

Using Filters for Security Purposes
Example 2: Blocking Access to Specific Stations
In this example, a company uses a FN10 to connect two LANs (see
Figure 5-2). Three workstations on LAN 2 (the Accounting Subnet)
contain sensitive data (workstations F, G, and H). The company wants to
prevent users on LAN 1 (the Manufacturing Subnet) from accessing data
on these three workstations. Therefore, the objectiv e is to prev ent users on
LAN 1 from accessing workstations F, G, and H on LAN 2.
Manufacturing Subnet
LAN 1
C D
B
A
FN10
Accounting Subnet
LAN 2
Concentrator
Figure 5-2 Using Filters to Restrict Access to Specific Stations
Concentrator
FE G H
Computers that cannot
be accessed by LAN 1
users
In this example, a Port filter is configured that instructs the FN10 to
discard data packets whose destination address is F, G, or H (the
addresses of the workstations containing sensitive data). Therefore, the
FN10 will not pass any packets from LAN 1 to LAN 2 if the packet’s
destination address is F, G, or H.
This filtering example specifies three separate components:
• Traffic from LAN 1
• Traffic destined for addresses F, G, and H on LAN 2
• Match flags for both components
Fast Network 10 User Guide Page 5-13
Page 94

Chapter 5: FN10 Filters
This information is used to configure the filter as follows:
• Filter identifier – port number of the port attached to LAN 2 as a
destination.
• Filter fields – destination address F-H (range, match) source LAN = 1
(match).
Note that a match flag is specified for both fields; this instructs the
FN10 to filter any packets that match both fields (traffic from LAN 1 and
to addresses F-H on LAN 2).
Several methods are available to accomplish this goal. For example, the
Port filter could have been specified as follows:
• Filter identifier – port number of the port attached to LAN 1 as a source
• Filter fields – destination address F-H (range, match)
This example is useful for illustrating three basic concepts concerning
filters:
• Even though a FN10 is used to join network segments, it can also be
used to block selected traffic — or all traffic if desired — between
joined segments. The blocking mechanism is the filters you set up.
• Filters can be based upon various criteria: source address, destination
address, packet type, and so on. In the example, the filter criteria were
source port and destination MAC address.
• A filter can only block (discard) packets which must cross the FN10.
The FN10 in the example can only filter traffic that travels from LAN
1 to LAN 2 (or from LAN 2 to LAN 1).
While a filter can prevent LAN 1 stations from accessing the
sensitive-data workstations on LAN 2, it cannot prevent workstation E
on LAN 2 from accessing these workstations. The reason is that
workstation E is on the same LAN as the sensitive-data computers, and
therefore does not need to use the FN10 to access them.
Page 5-14 Fast Network 10 User Guide
Page 95

Using Filters for Security Purposes
Example 3: Restricting Access to Authorized Users
The example shown in Figure 5-3 is very similar to the previous e xample.
The difference is that access to workstations F, G, and H will not be
denied to all LAN 1 users. Instead, only authorized users on LAN 1 will
be able to access the sensitive data workstations F, G, and H on LAN 2.
FN10
LAN 1
BAC D
Figure 5-3 Using Filters to Restrict Access to Authorized Users
E F G H
Restricted WorkstationsAuthorized Users
LAN 2
A Port filter is configured that allows data packets to be sent to the
restricted workstations on LAN 2 only if the packet’s source address is
the address of an authorized user on either workstation B, C, or D of LAN
1. The Port filter’s components are:
• Source addresses (of authorized users)
• Destination addresses (which identify packets directed to any of the
restricted workstations)
• No match flags for both of the above components
The filter is configured as follows:
• Source address field: B, C, or D (LAN 1), no match
• Destination address field: F, G, and H (LAN 2), no match
The No match flag is used in both fields to instruct the FN10 to filter all
traffic that does not match both fields.
All packets destined for the restricted workstations on LAN 2 (F, G, or H)
are filtered, unless the source address is the address of an authorized user
on LAN 1 (B, C, or D).
Fast Network 10 User Guide Page 5-15
Page 96

Chapter 5: FN10 Filters
Note that the FN10 is not storing information designed to identify
restricted devices or authorized or unauthorized users. Instead, it is using
address information (which it does store) to act on filters that have been
configured to meet the desired objective: Restrict access to certain
workstations to authorized users.
5.4 USING FILTERS TO ENHANCE NETWORK
PERFORMANCE
In many applications, filters can be used to enhance network performance
by preventing certain types of traffic which may degrade performance. A
filter that defines logical barriers to protect a network segment or
segments from conditions that may degrade network performance is
referred to as a firewall filter.
Examples of poor network performance that can be controlled by firewall
filters include:
• Unnecessary traffic
• Broadcast storms
• Conflicting applications that occur within a particular network
segment
Firewall filters can also be used to help implement fault isolation, error
recovery, and security measures.
A firewall filter can be a Bridge Address Table filter or a Port filter.
Firewall filters can be configured to:
• Allow only serv er traffic to be forw arded from LAN A to LANs B and
C. (Other traffic would not be forwarded.)
• Prevent a specific type of traffic from being forwarded to a specific
network segment. For example, it might be desirable to block DECnet
broadcast traffic from a LAN that includes no devices that use DECnet
data packets.
• Prev ent multicast packets from being forw arded to a specific netw ork
segment (localized broadcast storm prevention).
Page 5-16 Fast Network 10 User Guide
Page 97

Using Filters to Enhance Network Performance
NOTE
as a firewall feature, in that it performs a protective blocking
function. However, it is not a filter. Multicast storm protection is
described in Section 3.10, Configuring Multicast Storm
Protection.
Example 4: Using a Firewall Filter to Control Multicasts
To optimize network performance, you can configure filters to reduce
multicasts (packets broadcast to multiple destinations). In addition, you
can prevent multicasts packets of a particular protocol type.
In this example, four LANs are interconnected by a FN10 (see
Figure 5-4). The objective is to prevent LAN 1 from sending AppleTalk I
multicasts to LANs 2 and 3, yet allow AppleTalk I multicasts to be sent
from LAN 1 to LAN 4.
The filter described is a firewall filter; it acts as a barrier to protect the
network from a condition that may degrade network performance.
The FN10 multicast storm protection feature may be thought of
LAN 1
LAN 2
Concentrator
Concentrator
Figure 5-4 Using Firewall Filters to Reduce Multicasts
Concentrator
FN10
Concentrator
LAN 4LAN 3
Fast Network 10 User Guide Page 5-17
Page 98

Chapter 5: FN10 Filters
This filter is configured as follows:
• Filter identifier – port number of the port attached to LAN 2 as a
destination (i.e., exit)
• Filter identifier – port number of the port attached to LAN 3 as a
destination (i.e., exit)
• Filter fields – protocol type = AppleTalk I, match source LAN = LAN
1, match destination address, match
This filter blocks AppleTalk I multicasts (or all AppleTalk I traffic if the
destination address field is omitted) from LAN 1 to LANs 2 and 3, yet
AppleTalk I traffic to LAN 4 is permitted because LAN 4 is not specified
for filtering.
Page 5-18 Fast Network 10 User Guide
Page 99

Configuring a Port Filter
5.5 CONFIGURING A PORT FILTER
To configure a Port filter, use the Local Console Manager (LCM). The
LCM prompts you through the fields for each Port filter you want to
configure. If you are adding a Port filter to be used in conjunction with
another Port filter, and the filters must be ordered sequentially, use the
filters display command to find the filter index number of the
LCM
existing Port filter.
After you have configured a Port filter, the LCM display would look
something like the example shown below . Your actual display depends on
how you have configured your Port filter.
Port Number? >1
Index:
Type:
Pseudo:
SourceRange:
SourceRangeStart
SourceRangeEnd:
SourceRangeMask
DestRange:
DestRangeStart:
DestRangeEnd:
DestRangeMask:
ProtocolMatch:
ProtocolType:
FieldMatch:
FieldOrigin:
FieldOffset:
FieldValue:
FieldMask:
Operator:
PktCnts:
Octets:
LasrSRC:
Type <cr> to display the next filter ...>
1
Entry
True
True
00:00:00:00:00:00
00:00:00:00:00:00
ff:ff:ff:ff:ff:ff
True
00:00:00:00:00:00
00:00:00:00:00:00
ff:ff:ff:ff:ff:ff
True
LLC
True
IP
0
00:00:00:00:00:00:00:00
ff:ff:ff:ff:ff:ff:ff:ff
And
0
0
00:00:00:00:00:00
See Table 5-2 for information on the configurable fields.
Fast Network 10 User Guide Page 5-19
Page 100

Chapter 5: FN10 Filters
Complete the following steps to configure a Port filter . To accept a default
value, press the Enter key.
At the LCM prompt:
1. Type
filters add
2. Enter the port number.
1 is the default. If the filter is for port 1, you do not need to enter
anything; if the filter is for another port, enter that number.
3. Select the filter type.
Entry is the default. If the filter will be an entry filter, you do not need
to enter anything; if the filter will be an exit filter, type
exit.
4. Select whether the filter should be a real filter or a pseudo filter.
True is the default; meaning the filter will be a pseudo filter. You do
not need to enter anything if the filter is to be pseudo. If you want the
filter to be a real filter, type
False.
5. Select whether the filter will use a range of source MAC addresses.
NA is the default; meaning the filter will not use a source range. You
do not need to enter anything unless you are using a source range. (If
you are not using a source range, go to Step 8.)
If you are using a source range, type either:
True – Filter the packet if the source MAC address is within the range.
False – Filter the packet if the source MAC address is outside the
range.
6. Enter the first MAC address in the source range.
7. Enter the last MAC address in the source range.
8. Enter the source range MAC address mask.
ff:ff:ff:ff:ff:ff is the default address mask. If ff:ff:ff:ff:ff:ff is the mask
you want to use, you do not need to enter anything. If you want to use
a different mask, enter that value.
Page 5-20 Fast Network 10 User Guide
 Loading...