

Page 1
6H308-24 and 6H308-48 Fast Ethernet
Installation Guide
FAST ENET
6H308-24
1X
G
R
O
U
P
1
12X
13X
G
R
O
U
P
2
FAST ENET
6H308-48
RESET
C
O
M
CPU
GROUP
SELECT
GROUP
1X
G
R
O
U
P
1
12X
13X
G
R
O
U
P
2
RESET
C
O
M
CPU
GROUP
25X
SELECT
GROUP
4
G
R
O
U
P
3
36X
37X
G
R
O
U
P
4
9033549
48X
24X
24X
Page 2

Page 3

ELECTRICAL HAZARD: Only qualified personnel should perform installation
procedures.
NOTICE
Enterasys Networks and its lic ensors reserv e t he right to ma ke cha nges in specifications and other informa tion co ntaine d
in this document without prior notice. The reader should in all cases consult Enterasys Networks to determine whether
any such changes have been made.
The hardware, firmware, or software described in this manual is subject to change without notice.
IN NO EVENT SHALL ENTERASYS NETWORKS AND ITS LICENSORS BE LIABLE FOR ANY INCIDENTAL, INDIRECT,
SPECIAL, OR CONSEQUENTIAL DAMAGES WHATSOEVER (INCLUDING BUT NOT LIMITED TO LOST PROFITS)
ARISING OUT OF OR RELATED TO THIS MANUAL OR THE INFORMATION CONTAINED IN IT, EVEN IF ENTERASYS
NETWORKS AND ITS LICENSORS HAVE BEEN ADVISED OF, KNOWN, OR SHOULD HAVE KNOWN, THE POSSIBILITY
OF SUCH DAMAGES.
Enterasys Networks, Inc.
35 Industrial Way
Rochester, NH 03866-5005
Enterasys Networks, Inc. is a subsidiary of Cabletron Systems, Inc.
2000 by Enterasys Networks , Inc.
All Rights Reserved
Printed in the United States of America
Order Number: 9033549 December 2000
LANVIEW is a registered trademark of Enterasys Networks or its licensors; SmartSwitch and Enterasys Networks are
trademarks of Enterasys Networks or its l icensors. SPECTRUM is a registered trademark of Aprisma Ma nagement
Technologies or its licensors.
All other product names mentioned in this manual may be trademarks or registered trademarks of their respective
companies.
Page 4

FCC NOTICE
This device complies with P art 15 of th e FCC rul es. Ope rat ion is sub ject to th e following two conditions: (1) this d evice
may not cause harmful interference, and (2) this device must accept any interference received, including interference that
may cause unde s i re d operation.
NOTE: This equipment has been tested and found to comply with the limits for a Class A digital device, pursuant to
Part 15 of the FCC rules. These limits are designed to provide reasonable protection against harmful interference whe n
the equipment is operated in a commercial environment. This equipment uses, generates, and can radiate radio frequency
energy and if not instal led in accordance with the operator’s manual, may cause harmful interference to radio
communications. Operation of this equipment in a residential area is likely to cause interference in which case the user
will be required to correct the interference at his own expense.
WARNING: Changes or modifications made to this device which are not expressly approved by the party responsible
for compliance could void the user’s authority to operate the equ ip ment.
INDUSTRY CANADA NOTICE
This digital apparatus does not exceed the Class A limits for radio noise emissions from digital apparatus set out in the
Radio Interference Regulations of the Canadian Department of Communications.
Le présent appareil numérique n’émet pas de bruits radioélectriques dépassant les limites applicables aux appareils
numériques de la class A prescrites dans le Règlement sur le brouillage radioélectrique édicté par le ministère des
Communications du Canada.
VCCI NOTICE
This is a Class A product based on the standard of the Voluntary Control Council for Interference by Information
Technology Equipment (VCCI). If this equipment is used in a domestic environment, radio disturbance may arise. When
such trouble occurs, the user may be required to take co rrective actions.
Page 5

ENTERASYS NETWORKS, INC.
PROGRAM LICENSE AGREEMENT
BEFORE OPENING OR UTILIZING THE ENCLOSED PRODUCT,
CAREFULLY READ THIS LICENSE AGREEMENT.
This document is an agreement (“Agreement”) between You, the end user, and Enterasys Networks, Inc. (“Enterasys”)
that sets forth your rights and obligations with respect to the Enterasys software program (“Program”) in the package.
The Program may be contained in firmware, chips or other media. UTILIZING THE ENCLOSED PRODUCT, YOU
ARE AGREEING TO BECOME BOUND BY THE TERMS OF THIS AGREEMENT, WHICH INCLUDES THE
LICENSE AND THE LIMITATION OF WARRANTY AND DISCLAIMER OF LIABILITY. IF YOU DO NOT
AGREE TO THE TERMS OF THIS AGREEMENT, RETURN THE UNOPENED PRODUCT TO ENTERASYS OR
YOUR DEALER, IF ANY, WITHIN TEN (10) DAYS FOLLOWING THE DATE OF RECEIPT FOR A FULL
REFUND.
IF YOU HAVE ANY QUESTIONS ABOUT THIS AGREEMENT, CONTACT ENTERASYS NETWORKS
(603) 332-9400. Att n: Legal Department.
1. LICENSE. You have the right to use only the one (1) copy of the Program provided in this package subject to the
terms and conditions of this License Agreement.
You may not copy, reproduce or transmit any part of the Program except as permitted by the Copyright Act of the
United States or as authorized in writing by Enterasys.
2. OTHER RESTRICTIONS. You may not reverse engineer, decompile, or disassemble the Program.
3. APPLICABLE LAW. This License Agreement shall be interpreted and governed under the laws and in the state
and federal courts of New Hampshire. You accept the personal jurisdiction and venue of the New Hampshire courts.
4. EXPORT REQUIREMENTS. You understand that Enterasys and its Affiliates are subject to regulation by
agencies of the U.S. Government, includ ing the U.S. Department of Commerce, which prohibit export or dive rsion of
certain technical pro ducts to certain countrie s, unless a license to expo rt the product is obta ined from the U.S. Gove rnment
or an exception fro m obtaining such license may be relied upon by the exporting party.
If the Program is exported from the United States pursuant to the License Exception CIV under the U.S. Export
Administration Regulations, You agree that You are a civil end user of the Program and agree that You will use the
Program for civil end uses only and not for milita ry pu rpo se s.
If the Program is exported from the United States pursuant to the License Exception TSR under the U.S. Export
Administration Regulations, in addition to the restriction on transfer set forth in Sections 1 or 2 of this Agreement, You
agree not to (i) reexport or release the Program, the source code for the Program or technology to a national of a country
in Country Groups D:1 or E:2 (Albania, Armenia, Azerbaijan, Belarus, Bulgaria, Cambodia, Cuba, Estonia, Georgia,
Iraq, Kazakhstan, Kyrgyzstan, Laos, Latvia, Libya, Lithuania, Moldova, North Korea, the People’s Republic of China,
Romania, Russia, Rwanda, Tajikistan, Turkmenistan, Ukraine, Uzbekistan, Vietnam, or such other countries as may be
designated by the United States Government), (ii) export to Country Groups D:1 o r E:2 (as defined herein) the di rect
product of the Program or th e te chn olo g y, if such foreign produced direct produc t is su bje ct to na tio n al securi ty c o ntro ls
as identified on th e U.S. Commerc e Contro l List, or (iii) if the d irect pro duct o f the te chnolog y is a c omplete plant o r an y
major component of a pl ant, export to Country Groups D:1 or E:2 the dir ect product of the plant or a major component
thereof, if such foreign produced di re ct product is subject to national security controls as identified on the U.S.
Commerce Control List or is subject to State Department controls under the U.S. Munitions List.
Page 6

5. UNITED STATES GOVERNMENT RESTRICTED RIGHTS. The enclosed Product (i) was developed solely
at private expense; (ii) contains “re stricted computer software” submitte d with restricted rights in accordance with section
52.227-19 (a) through (d) of the Commercial Computer Software-Restricted Rights Clause and its successors, and (iii) in
all respects is proprietary data b e lon ging to En terasys an d/ or i ts sup pli ers. Fo r Departm ent o f De fe nse un its, the Pr od uc t
is considered commercial computer software in accordance with DFARS section 227.7202-3 and its successors, and use,
duplication, or disclosure by the Government is subject to restrictions set forth herein.
6. EXCLUSION OF WARRANTY. Except as may be specifically provided by Enterasys in writing, Enterasys
makes no warranty, expressed or implied, concerning the Program (including its do cumentation and media).
ENTERASYS DISCLAIMS ALL WARRANTIES, OTHER THAN THOSE SUPPLIED TO YOU BY
ENTERASYS IN WRITING, EITHER EXPRESS OR IMPLIED, INCLUDING BUT NOT LIMITED TO IMPLIED
WARRANTIES OF MERCHANTABILITY AND FITNESS FOR A PARTICULAR PURPOSE, WITH RESPECT TO
THE PROGRAM, THE ACCOMPANYING WRITTEN MATERIALS, AND ANY ACCOMPANYING HARDWARE.
7. NO LIABILITY FOR CONSEQUENTIAL DAMAGES. IN NO EVENT SHALL ENTERASYS OR ITS
SUPPLIERS BE LIABLE FOR ANY DAMAGES WHATSOEVER (INCLUDING, WITHOUT LIMITATION,
DAMAGES FOR LOSS OF BUSINESS, PROFITS, BUSINESS INTERRUPTION, LOSS OF BUSINESS
INFORMATION, SPECIAL, INCIDENTAL, CONSEQUENTIAL, OR RELIANCE DAMAGES, OR OTHER LOSS)
ARISING OUT OF THE USE OR INABILITY TO USE THIS E NTERASYS PRODUCT, EVEN IF ENTERASYS HAS
BEEN ADVISED OF THE POSSIBILITY OF SUCH DAMAGES. BECAUSE SOME STATES DO NOT ALLOW THE
EXCLUSION OR LIMITATION OF LIABILITY FOR CONSEQUENTIAL OR INCIDENTAL DAMAGES, OR IN
THE DURATION OR LIMITATION OF IMPLIED WARRANTIES IN SOME INSTANCES, THE ABOVE
LIMITATION AND EXCLUSIONS MAY NOT APPLY TO YOU.
Page 7

DECLARATION OF CONFORMITY
Application of Counc il D ire ctive(s): 89/336/EEC
73/23/EEC
Manufacturer’s Name: Enterasys Networks, Inc.
Manufacturer’s Address: 35 Industrial Way
PO Box 5005
Rochester, NH 03867
European Representative Name: Mr. Jim Sims
European Representative Address: Enterasys Networks Ltd.
Nexus House, Newbury Business Park
London Road, Newbury
Berkshire RG14 2PZ, England
Conformance to Directive(s)/Product Standards: EC Directive 89/336/EEC
EC Directive 73/23/EEC
EN 55022
EN 55024
EN 60950
EN 60825
Equipment Type/Environment: Networki ng Equipment, for use in a Commercial
or Light Industrial Environment.
We the undersigned, hereby declare, under our sole responsibility, that the equipment packaged with this
notice conforms to the above directives.
Manufacturer Legal Representative in Europe
Mr. Tom Whissel Mr. Jim Sims
___________________ ________________ __________________ _________________
Full Name Full Name
Compliance Engineering Manager President - E.M.E.A.
___________________________________ ___________________________________
Title Title
Rochester, NH, USA Newbury, Berkshire, England
___________________________________ ___________________________________
Location Location
Page 8

Page 9

Contents
Figures ............................................................................................................................................ix
Tables.............................................................................................................................................. x
ABOUT THIS GUIDE
Using This Guide....................... ............................................. ...... ................................... xi
Structure of This Guide ..................................................................................................xii
Related Documents........................................................................................................xii
Document Conventions.................................................................................................xiii
Getting Help..................................................................................................................xiv
1
2
INTRODUCTION
1.1 Connectivity.....................................................................................................1-3
1.2 Runtime IP Address Discovery .......................................................................1-3
1.3 Half-Duplex/Full-Duplex Auto-Negotiation ......................................................1-3
1.4 SmartT runk......................................................................................................1-4
1.5 Remote Monitoring (RMON) ..... ...... ....... ...... ....... ...... ...... ................................1-4
1.6 Broadcast Suppression...................................................................................1-4
1.7 Port/VLAN Redirect Functions........................................................................1-5
1.8 Traffic Rate Limiting ........................................................................................1-5
1.9 Flow Control....................................................................................................1-6
1.10 GARP Switch Operation..................................................................................1-6
1.11 802.1 Port Priority ...........................................................................................1-6
1.12 Distributed Chassis Management...................................................................1-7
1.13 Management ...................................................................................................1-7
1.14 Switching Options ...........................................................................................1-8
1.15 Standards Compatibility ...................................................................... ...... ......1-8
1.16 LANVIEW Diagnostic LEDs ............................................................................1-8
NETWORK REQUIREMENTS
2.1 SmartTrunk Feature ........................ ....... ............................................. ...... ......2-1
2.2 100BASE-FX Fiber Optic Network..................................................................2-1
Contents vii
Page 10

3
INSTALLATION
3.1 Unpacking the Module ....................................................................................3-2
3.2 Installing Optional FLASH Upgrade................................................................3-2
3.3 Installing the Module into the MATRIX E7 Chassis.........................................3-3
3.4 Installing the Module into the 6C105 Chassis.................................................3-5
3.5 Connecting to the Network..............................................................................3-7
3.6 Completing the Installation..............................................................................3-9
4
A
B
INDEX
TROUBLESHOOTING
4.1 Using LANVIEW..............................................................................................4-1
4.2 Troubleshooting Checklist...............................................................................4-5
4.3 Using the RESET Button.................................................................................4-7
SPECIFICATIONS
A.1 Module Specifications .....................................................................................A-1
A.2 Fiber Budget.......... ...... ....... ...... ....... ...... ....... ...... ....... ...... ...... ..........................A-2
A.3 COM Port Pinout Assignments .......................................................................A-3
A.4 Regulatory Compliance...... ...... ....... ...... ....... ...... .............................................A-3
MODE SWITCH BANK SETTINGS AND OPTIONS
B.1 Required Tools................................................................................................B-1
B.2 Setting the Mode Switches..............................................................................B-2
B.3 FLASH Upgrade..............................................................................................B-4
B.3.1 Locating the FLASH Module...........................................................B-4
B.3.2 Installing the FLASH Module ..........................................................B-5
viii Contents
Page 11

Figures
Figure Page
1-1 The 6H308-24 and 6H308-48 Modules...........................................................................1-2
3-1 Installing the Module into the MATRIX E7 Chassis.........................................................3-4
3-2 Installing the Module into the 6C105 Chassis .................................................................3-6
3-3 Connecting a Fiber Optic Segment to the Module ..........................................................3-8
4-1 LANVIEW LEDs ..............................................................................................................4-1
4-2 RESE T Button................. ...... ....... ...... ....... ...... ....... ............................................. ...... ..... .4-7
B-1 Mode Switch Location.....................................................................................................B-2
B-2 FLASH Module Location .................................................................................................B-4
B-3 Installing the FLASH.................................. ...... ....... ...... ....... ...... ...... ....... ...... ...................B-5
Figures ix
Page 12

Tables
Table Page
3-1 Contents of Module Carton ...........................................................................................3-2
4-1 LANVIEW LEDs............................................................................................................4-2
4-2 Troubleshooting Checklist.............................................................................................4-5
A-1 Module Specifications ..................................................................................................A-1
A-2 Transmitter Power (1300 nm) ......................................................................................A-2
A-3 COM Port Pin Assignments.........................................................................................A-3
A-4 Compliance Standards..................... ...... ....... ...... ....... ...... ............................................A-3
x Tables
Page 13

About This Guide
Welcome to the 6H308-24 and 6H308-48 Fast Ethernet User’s Guide. This guide describes the
6H308-24 and 6H308-48 modules and provides information concerning network requirements,
installation, and troubleshooting. For information about how to use Local Management to
configure and manage the 6H308-24 and 6H308-48 module, refer to the Enterasys Networks
MATRIX E7 Series and SmartSwitch 6000 Series Modules Local Management User’s Guide
available on the web. To access the user’s guide on the web, refer to “Related Documents” in this
preface.
Important Notice
Depending on the firmware version used in the 6H308-24 or 6H308-48 module, some features
described in this document may not be supported. Refer to the Release Notes shipped with the
module to determine which features are supported.
USING THIS GUIDE
Read through this guide to completely understand the product capabilities and how to install the
modules.
A general working knowledge of Ethernet and IEEE 802.3 type data communications networks
and their physical layer components is helpful when using this module.
NOTE: In this document, the 6H308-24 and 6H308-48 may also be referred to as
“module”. Any module references that are specific to a particular module, the module will
be referred to by name.
About This Guide xi
Page 14

Structure of This Guide
STRUCTURE OF THIS GUIDE
This guide is organized as follows:
This chapter provides preliminary information to aid in using this manual, lists technology and
user guides that may help the user set up and manage the module, and gives instructions on ho w to
get help from Enterasys Networks.
Chapter 1, Introduction, provides an overview of the module and its features.
Chapter 2, Network Requirements, outlines the network requirements th at must be met be fore
installing the module.
Chapter 3, Installation, provides instructions on how to install the module, and connect segments
to the module.
Chapter 4, Troubleshooting, describes the function of the LANVIEW LEDs, which can help to
quickly diagnose network/operational problems.
Appendix A, Specifications, contains information on functionality and operating specifications,
connector pinouts, environmental requirements, and physical properties.
Appendix B, Mode Switch Bank Settings and Options, describes how to set the Mode Switch
and install options.
RELATED DOCUMENTS
The following Enterasys Networks documents may help to set up and manage the modules:
• MATRIX E7 Series and SmartSwitch 6000 Series Modules Local Management User’s Guide
• MATRIX E7 Overview and Setup Guide
• 6C105 SmartSwitch 6000 Overview and Setup Guide
• Ethernet Technology Guide
• Cabling Guide
The manuals listed above can be obtained from the World Wide Web in Adobe Acrobat Portable
Document Forma t (PDF) at the fo llowing site:
http://www.enterasys.com/
NOTE: All documentation for the Enterasys Networks SecureFast VLAN Manager
software is contained on the VLAN Manager CD-ROM.
xii About This Guide
Page 15

DOCUMENT CONVENTIONS
The guide uses the following conventions:
NOTE: Calls the reader’s attention to any item of information that may be of special
importance.
TIP: Conveys helpful hints concerning procedures or actions.
CAUTION: Contains information essential to avoid damage to the equipment.
ELECTRICAL HAZARD: Warns against an action that could result in personal injury or
death due to an electrical hazard.
WARNING: Warns against an action that could result in personal injury or death.
Document Conventions
About This Guide xiii
Page 16

Getting Help
GETTING HELP
For additional support related to the module or any documents, contact Enterasys Networks using
one of the fo llowing methods:
World Wide Web http://www.enterasys/
Phone (603) 332-9400
Internet mail support@enterasys
FTP ftp://ftp.enterasys
Login anonymous
Password your email address
To send comments or suggestions concerning this document, contact the Te chnical Writing
Department via the following email address: TechWriting@enterasys.com
Make sure to include the document Part Number in the email message.
Before contacting Enterasys Networks, have the following information ready:
• Your Enterasys Networks service contract number
• A description of the failure
• A description of any action(s) already taken to resolve the problem (e.g., changing mode
switches, rebooting the unit, etc.)
• The serial and revision numbers of all involved Enterasys Networks products in the network
• A description of your network environment (layout, cable type, etc.)
• Network load and frame size at the time of trouble (if known)
• The device history (i.e., have you returned the device before, is this a recurring problem, etc.)
• Any previous Return Material Authorization (RMA) numbers
xiv About This Guide
Page 17

1
Introduction
This chapter introduces the 6H308-24 and 6H308-48 Fast Ethernet switching modules.
Important Notice
Depending on the firmware version used in the module, some features described in this document
may not be supported. Refer to the Release Notes shipped with the module to determine which
features are supported.
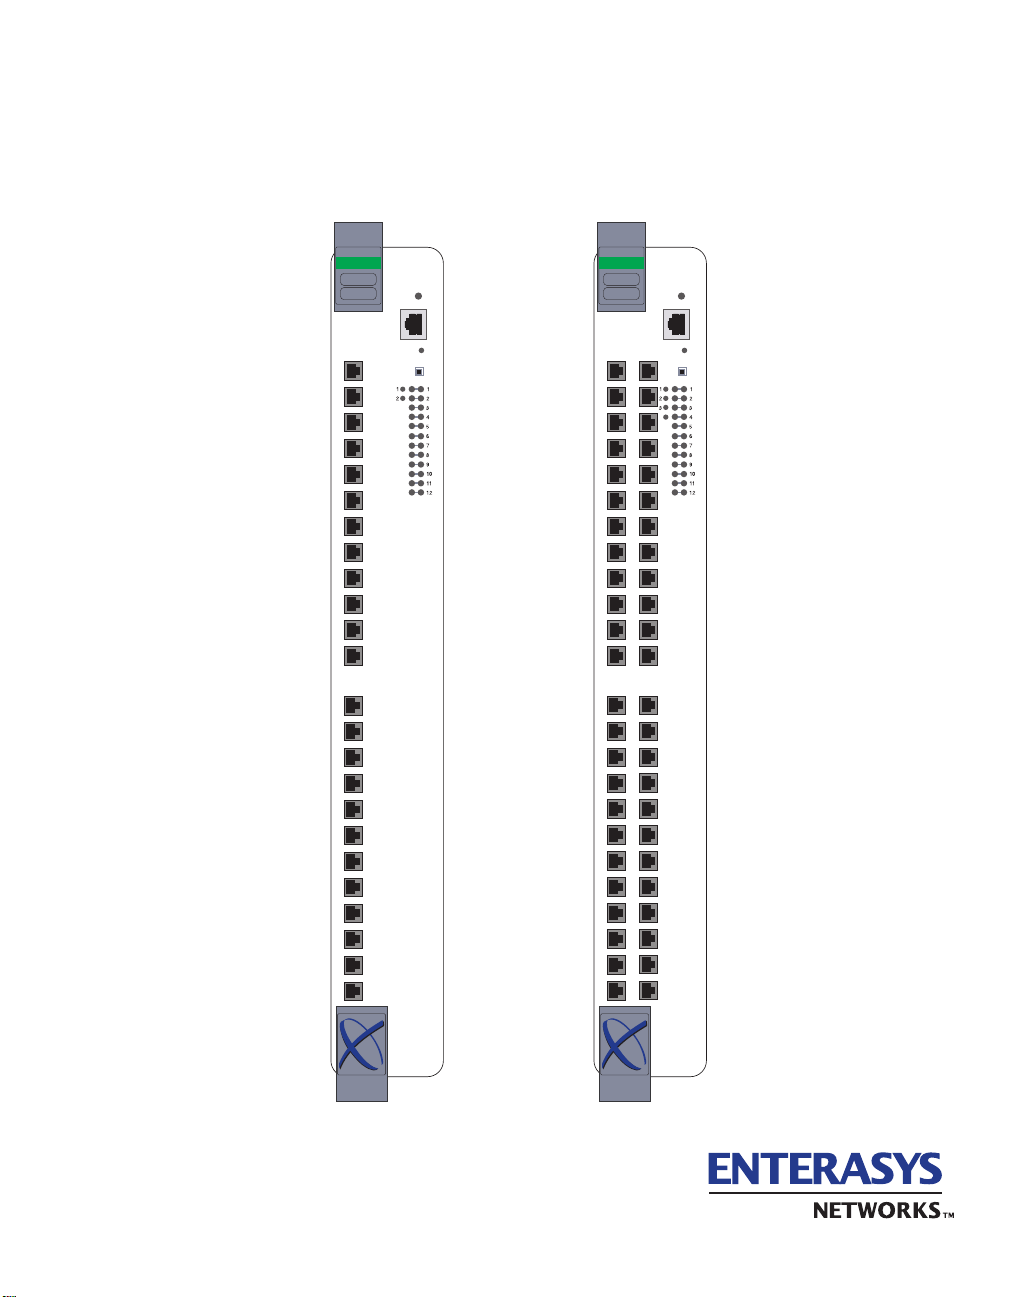
The 6H308-24 module (Figure 1-1) features 24 100BASE-FX switched ports connected via 24
MT-RJ fiber connectors. The 6H308-48 module (Figure 1-1) features 48 100BASE-FX switched
ports connected via 48 MT-RJ fiber connectors.
Each of the fixed front panel ports can operate in either half-duplex or full-duplex mode of
operation, as determined by auto-negotiation. Full-duplex can also be manually configured.
Each module is a high-speed network switch that supports IEEE 802.1D switching (bridging).
Distributed Chassis Management (DCM) and SecureFast Switching (SFS) functionality is not
supported when the modu le is installed in the MATRIX E7. Both DCM and SFS are supported fo r
this module when it is installed in the 6C105 SmartSwitch 6000 chassis.
The module ports can be configured to control tr affic in several ways, incl udi ng prioritizing traffic
flow according to protocol type. The module can also be configured to establish 802.1Q Virtual
Local Area Networks (VLANs) and control the flow of frames associated with each VLAN
according to priority and Ether type. Detailed information about VLANs is provided in the
Enterasys Networks MATRIX E7 Series and S martSwitc h 6000 Series Modul es Local Manage ment
User’s Guide.
The module receives power and backplane connectivity when it is inserted into an Enterasys
Networks MATRIX E7 or 6C105 chassis.
Introduction 1-1
Page 18

Figure 1-1 The 6H308-24 and 6H308-48 Modules
24 100BASE-FX
Fiber Optics Ports
(100 Mbps)
FAST ENET
6H308-24
1X
G
R
O
U
P
1
12X
13X
GROUP
FAST ENET
6H308-48
GROUP
4
RESET
C
O
M
CPU
GROUP
SELECT
COM Port
System LED
Group
Select
Switch
Port
Status
LEDs
Group
Select
LEDs
RESET
C
O
M
CPU
GROUP
SELECT
COM Port
System LED
Group
25X
1X
Select
Switch
Port
Status
LEDs
G
Group
Select
LEDs
48 100BASE-FX
G
R
R
O
O
U
U
P
P
3
1
36X
12X
Fiber Optics Ports
(100 Mbps)
37X
13X
1-2 Introduction
G
G
R
O
U
P
2
24X
G
R
R
O
O
U
U
P
P
4
2
48X
24X
35491_01
Page 19

Connectivity
1.1 CONNECTIVITY
The module connects t o Ethernet net works or w orkstatio ns through the fr ont panel conne ctors. The
ports are IEEE 802.3 100BASE-FX compliant, using MT-RJ fiber connectors for multimode fiber.
1.2 RUNTIME IP ADDRESS DISCOVERY
This feature enables the module to automatically accept an IP address from a Boot Strap Protocol
(BootP) server on the network without requiring a user to enter an IP address through Local
Management.
When the module is connected to the network and powered up, Runtime IP Address Discovery
(RAD) checks the module for an IP address. If one has not yet been assigned (module IP address
set to 0.0.0.0), RAD checks to see if any of the module interfaces have a link. If a link is
discovered, RAD sends out Reverse Address Resolution Protocol (RARP) and BootP requests to
obtain an IP address from a BootP server on the network.
The RAD requests start at an interval of one per second. The interval then doubles after every
transmission until an interval of 300 seconds is reached. At this point, the interval remains at 300
seconds. The RAD requests contin ue u ntil an IP a ddress is re cei ved from a RARP or BootP serv er,
or an IP address is entered using Local Management.
NOTE: The module will reboot after RAD is successful.
1.3 HALF-DUPLEX/FULL-DUPLEX AUTO-NEGOTIATION
The fixed front panel ports on the module have the ability to auto-negotiate the ports’ mode of
operation (half-duplex or full-duplex) between two devices according to the 802.3x standard.
During Auto-Negotiation, two devices automatically exchange information “telling” each other
their current operating mode. The Auto-Negotiation feature targets the maximum capability that
can be reached between the two devices. For example, the module can adjust to full-duplex
operation when the device on the other end of the connection can also adjust from half-duplex to
full-duplex. I f t he device on the other en d of th e connection can only operate in half-duplex mode,
then the module simply adjusts to operate in half-duplex mode.
Introduction 1-3
Page 20

SmartTrunk
1.4 SmartTrunk
Traditional 802.1D Spanning Tree Bridges only allow one active data path between any two
switches; all other parallel data paths are in Standby or Blocking mode. If one interface or path
should fail, t hen the other interface automatically comes out o f Bloc king mode and forwards all of
the traffic. This is fine for redundancy purposes. However, it is not the most efficient use of
resources.
SmartTrunk, also referred to as SmartTrunking, is Enterasys Networks’ terminology for load
balancing or load sharing. SmartTrunk provides the ability to take full advantage of the network’s
redundant bandwidth. SmartTrunk divides network traffic across multiple ports in parallel to
provide additional throughput. The SmartTrunk application can be used with any of Enterasys
Networks’ switch modules (except ATM modules).
For more information about SmartTrunk and how to configure the SmartSwitch module, refer to
the MATRIX E7 Series and SmartSwitch 6000 Series Modules Local Management User’s Guide.
1.5 REMOTE MONITORING (RMON)
The module supports all nine Ethernet RMON groups. The Statistics, Alarms, Events and History
groups are enabled on all ports by default.
Enterasys Networks RMON Actions is a vendor-specific extension of RMON and provides the
ability to set an “Action” on any SNMP MIB variable. The Action can be tr igg ere d by any RMON
Event and/or Alarm. An example of an Action would be to turn off a MIB-2 interface if a
broadcast threshold is crossed.
1.6 BROADCAST SUPPRESSION
Broadcast Suppressi on enables a user to s et a desire d limit of re cei ve br oadcas t frames per port/per
second to be forwarded out the other ports on the module. Any broadcast frames above this
specified limit ar e dropped. In the event tha t bro adc ast fr ames ar e bei ng su ppressed, multicast and
unicast frames continue to be switched.
1-4 Introduction
Page 21

Port/VLAN Redirect Functions
1.7 PORT/VLAN REDIRECT FUNCTIONS
The port redirect function, also referred to as “Port Mirroring,” is a troubleshooting tool used to
map traffic from a single source port to a single destination port within the module. This feature
allows frames, including those with errors, to be copied and sent to an analyzer or RMON probe.
The analyzer or RMON p robe will see the data as if it were dir ectly conn ected to the LAN se gment
of the source port.
The VLAN redirect func ti on i s similar to the port red ir ect f unction except that t he fr ames r eceived
by the module are r edire cted t o a des ignat ed dest inati on port accor ding t o the VLAN c lassi f icat ion
of the frames received. Multiple VLANs can be directed to the same destination port. The VLAN
redirect function is only supported when the module is operating as an 802.1Q switch.
1.8 TRAFFIC RATE LIMITING
The Traffic Rate Limiting feature enables the SmartSwitch device to control traffic rates on a
per-port, per-priority basis . The n etw ork adminis trator can conf i gure a rat e limit (from 100 kbps to
1 Gbps) for a given port with an associated list of IEEE 802.1p priorities (which can include one,
some, or all of the eight priority levels defined in 802.1p). Each rate limit is specified as an
inbound or an outbound limit. The combined rate of all traffic on the port that matches the listed
priorities cannot exceed the programmed limit. If the rate exceeds the defined limit, frames are
dropped until the rate falls below the limit.
Administrators can configure up to four rate limit rules per port; however, each rule must not
include conflicting 802.1p priority values. In order to control inbound and outbound traffic on the
same port, two rate limiting rules must be configured (one for inbound and one for outbound).
Since the rate limiting operation occurs after the processing of the multi-layer classification rules,
the two features can be combined to provide application-aware rate limiting.
NOTE: This Traffic Rate Limiting function is not supported on ports connected to
SmartTrunk segments.
For more information about the application of the Traffic Rate Limiting function, refer to the
Enterasys Networks MATRIX E7 Series and S martSwitc h 6000 Series Modul es Local Manage ment
User’s Guide.
Introduction 1-5
Page 22

Flow Control
1.9 FLOW CONTROL
Flow control is a method of managing the flow of frames between two devices. It ensures that a
transmitting device does not overwhelm a receiving device with data. This is accomplished by the
transmitting device pausing its transmission while the receiving device processes the frames
already received.
The module supports frame based 802.3x flow control. Frame based 802.3x flow control is
supported on all Ethernet ports operating in the full-duplex mode. Flow control can be enabled or
disabled on a port-by-port basis.
1.10 GARP SWITCH OPERATION
Some or all ports on the switch may be activated to operate under the Generic Attribute
Registration Protocol (GARP) applications, GARP VLAN Registration Protocol (GVRP) and/or
GARP Multicast Registration Protocol (GMRP).
GARP is a protocol, or set of rul es, tha t outl ines a mec hanism fo r propa gati ng the por t stat e and/ or
user information throughout a bridged LAN to keep track of users and VLANs on the network
fabric. MAC bridges and end users alike can take part in the registration and de-registration of
GARP attributes suc h as VLAN and mu ltic ast gro up membershi p. F or more det ails on ho w GVRP
and GMRP handle frames under GARP, and how to conf igure t he switch po rts to ta ke adv anta ge of
this operation, refer to the Enterasys Ne tworks MATRIX E7 Series and SmartSwitch 6000 Series
Modules Local Management User’s Guide.
1.11 802.1 PORT PRIORITY
The 802.1 por t priority is u sed to assign a default priority to the frames received without priority
information in their tag header, map prioritized frames to the appropriate transmit queues, and
prioritize frames according to protocol type. The 802.1 port priority is part of the IEEE 802.1D
standard.
1-6 Introduction
Page 23

Distributed Chassis Management
1.12 DISTRIBUTED CHASSIS MANAGEMENT
Installation in the 6C107 MATRIX E7 Chassis
From a management perspective, 6x3xx modules in the MATRIX E7 chassis can be managed
separately by individual IP addresses. Any modules in the MATRIX E7 can be selected and
managed, however, no overall system wide settings are available.
NOTE: The MATRIX E7 chassis does not allow Distributed Chassis Management
functionality as in the 6C105 chassis. Refer to the Enterasys Networks MATRIX E7
Overview and Setup Guide
for more information.
Installation in the 6C105 SmartSwitch 6000 Chassis
The 6C105 SmartSwitch 6000 chassis ca n be viewed as a single entity with a singl e IP addre ss. Its
systems management functions are distributed to all modules, including the module. The chassis
can be managed using a single IP addr ess, or the modul es can be managed sep arately by indi vidu al
IP addresses. When the IP address of the chassis is used, system wide settings can be done from
the chassis menu in Local Management, while module settings are done by selecting the specific
module to be modified and changing the settings for that module.
1.13 MANAGEMENT
Management of the module can be either in-band or out-of-band. In-band remote management is
possible through any SNMP compliant Network Management Software, such as Enterasys
Networks’ Webview. Out-of-band Local Management is provided through the RJ45 COM port on
the front panel using a VT100 terminal or a VT100 terminal emulator.
Local Management, described in a separate Enterasys Networks document, provides the ability to
manage the module. Refer to the MATRIX E7 Series and SmartSwitch 6000 Series Modules Local
Management User’s Guide for more information.
Introduction 1-7
Page 24

Switching Options
1.14 SWITCHING OPTIONS
The module provides 802.1Q switching between all of the front panel interfaces. In the 802.1Q
mode (the default mod e of operation), the module functi ons a s an 802.1D switch until VLANs are
configured .
IEEE 802.1Q switching allows migration to Virtual Network technologies without requiring the
replacement of existing equipment.
1.15 STANDARDS COMPATIBILITY
The module is fully compliant with the IEEE 802.3, 802.3u, 802.3x, 802.1D, and 802.1Q
standards. The module prov ides IEEE 802.1D Spanni ng T ree Algori thm (STA) support to enhance
the overa ll reliability of the network and protect against “loop” conditions. The modu le s upports a
wide variety of industry standard MIBs including RFC 1213 (MIB II), RFC 1757 (RMON),
RFC 1493 (Bridge MIB), RFC 1354 (FIB MIB), and RFC 1190 (Path MTU Discovery). A full
suite of Enterasys Networks Enterprise MIBs provides a wide array of statistical information to
enhance troubleshoot ing. For information on how to extract and c ompil e i ndividual MIBs, contact
Enterasys Networ ks.
1.16 LANVIEW DIAGNOSTIC LEDs
LANVIEW diagnostic LEDs serve as an important troubleshooting aid by providing an easy way
to observe the status of individual ports and overall network operations.
1-8 Introduction
Page 25

2
Network Requirements
Before installin g the mod ule, review the req uirem ents an d specifications referre d to i n this cha pter
concerning the following:
• SmartTrunk (Section 2.1)
• 100BASE-FX Fiber Optic Network (Section 2.2)
The network installation must meet the requirements to ensure satisfactory performance of this
equipment. Failure to do so will produce poor network performance.
NOTE: The Enterasys Networks
Modules Local Management User’s Guide
sections can be found on the Enterasys Networks World Wide Web site:
http://www.enterasys.com/
MATRIX E7 Series and SmartS witc h 6000 Series
and
Cabling Guide
referre d to in th e f oll o win g
2.1 SmartTrunk FEATURE
Before connecting the module to a network so it can take advantage of the SmartTrunk feature,
there are certain rules concerning port connections and configurations that must be followed for
proper operation. Refer to the MATRIX E7 Series and SmartSwitch 6000 Series Modules Local
Management User’s Guide for addi ti ona l information.
2.2 100BASE-FX FIBER OPTIC NETWORK
The front panel ports of the module provide connections that support 100BASE-FX fiber optic
cabling. The device at the other end of the fiber optic segment must meet 100BASE-FX Fast
Ethernet network r equirement s for th e de vices t o operate at 100 Mbps. IEEE 802.3u 100BASE-FX
characteristics for Multimode Fiber is a segment length of 412 meters (switched port) in half
duplex, 2 kilometers (switched p ort) in f ull duple x. This distance will be co nsiderabl y shorter f rom
a repeater port. Make sure to check your network diameter specifications. Refer to the Cabling
Guide for details.
Network Requirements 2-1
Page 26

Page 27

3
Installation
ELECTRICAL HAZARD: Only qualified personnel should install the 6H308-24 or
6H308-48.
NOTE: Read the Release Notes shipped with the module to check for any exceptions to
the supported features and operation documented in this guide.
This chapter prov ides t he inst ruct ion s to ins tall th e 6H308 -24 or 6 H308-48. A Phi lli ps scr e wdriver
is required to install options into the module. Follow the order of the sections listed below to
correctly install the module.
• Unpacking the module (Section 3.1)
• Installing Optional FLASH Upgrade (Section 3.2)
• Installing the module int o the MATRIX E7 Chas sis (Section 3.3)
• Installing the module into the 6C105 Chassis (Section 3.4)
• Connecting to the Network (Section 3.5)
• Completing the Installation (Section 3.6)
Installation 3-1
Page 28

Unpacking the Module
3.1 UNPACKING THE MODULE
Unpack the module as follows:
1. Open the box and remove the packing material protecting the module.
2. Verify the contents of the carton as listed in Table 3-1.
Table 3-1 Contents of Module Carton
Item Quantity
The 6H308-24 or 6H308-48 Module 1
Antistatic Wrist Strap 1
Manual Accessory Kit 1
3. Remove the tape seal on the non-conductive bag to remove the module.
4. Perform a visual inspection of the module f or any signs of physical damage . Con tac t Enterasys
Networks if there are any signs of damage. Refer to “Getting Help” in About This Guide for
details.
3.2 INSTALLING OPTIONAL FLASH UPGRADE
NOTE: Install any optional equipment before proceeding to Section 3.3.
If the module is to be installed with an optional FLASH upgrade, refer to Appendix B for
installation instructions.
3-2 Installation
Page 29

Installing the Module into the MATRIX E7 Chassis
3.3 INSTALLING THE MODULE INTO THE MATRIX E7 CHASSIS
CAUTION: Failure to observe static safety precautions could cause damage to the
module. Follow static safety handling rules and wear the antistatic wrist strap provided
with the 6C107 chassis.
Do not cut the non-conductive bag to remove the module. Sharp objects contacting the
board or components can cause damage.
The module can be installed in any of the slots that are available.
NOTE: First and second generation boards (6x1xx and 6x2xx series) installed in slots
one through five in the MATRIX E7 chassis cannot communicate with slots six and
seven unless a third generation board (6x3xx) is installed in one of the first five slots,
providing backplane connectivity.
The 6H308-24 or 6H308-48 (third generation modules) can provide backplane
connectivity for the 6x1xx and 6x2xx series (first and second generation modules) in the
MATRIX E7 chassis from slots 1 through 5 to slots 6 and 7.
To install a module, refer to Figure 3-1 and proceed as follows:
1. Remove the blank panel covering the slot in which the module will be installed. All other slots
must remain covered to ensure proper airflow and cooling. ( Save the blank plate in the event you
need to remove the module.)
2. Carefully remove the module from the shipping box. (Save the box and packing mate rials in the
event the module must be reshipped.)
3. Locate the antista tic wrist strap shipped with th e module. Attach t he antistatic wr ist strap to your
wrist and plug the cable fro m the anti stati c wrist strap into the ESD groundi ng rece ptacl e at the
upper right corner of the 6C107.
4. Remove the module from the plastic bag. (Save the bag in the event the module must be
reshipped.) Observe all precautions to prevent damage from Electrostatic Discharge (ESD).
NOTE: Distributed Chassis Management and SecureFast Switching functionality of the
6C105 SmartSwitch 6000 chassis is not supported for any generation of interface
modules installed in a MATRIX E7 chassis. Refer to the module release notes for
specific information on supported functionality.
Installation 3-3
Page 30

Installing the Module into the MATRIX E7 Chassis
Figure 3-1 Installing the Module into the MA TRIX E7 Chassis
Backplane
Connectors
Slot Number
Plastic Locking Tab
123
AC ON
ACON
1
POWER OK/
REDUNDANCY
FAN
STATUS
0
6C207-1
45
12X
12X
POWER OK/
FAN
REDUNDANCY
STATUS
6C207-1
FAST ENET
6H308-24
1X
G
R
O
U
P
1
1X
G
R
O
U
P
2
6C407
6C107
7
RESET
C
O
M
CPU
GROUP
SELECT
GROUP
AC ON
ACON
1
0
Plastic
Locking Tab
6
3-4 Installation
Metal Back-Panel
35491_02
Circuit Card
Card Guides
Page 31

Installing the Module into the 6C105 Chassis
5. Examine the module for damage. If any damage exists, DO NOT install the module.
Immediately contact Enterasys Networks. Refer to “Getti ng Help” in About This Guide.
CAUTION: To prevent damaging the backplane connectors in the following step, take
care that the module slides in straight and properly engages the backplane connectors.
Ensure that the top plastic locking tab lines up with the desired slot number
located on the front panel of the chassis. Refer to Figure 3-1.
6. Locate the slot guides that line up with the number of the slot in which the module will be
installed. Insta ll the module in the chas sis by aligning the modul e circuit card bet ween the upper
and lower metal rail guides of the desired slot, sliding it into the chassis, and locking down the
top and bottom plasti c locki ng tab s, as sh own in Fi gure 3-1. Take care that the module slides i n
straight and properly engages the backplane connectors.
7. If the chassis in which the module is installed was powere d down for the installa tion, turn it back
on. Check to see that the CPU LED settles at solid green after a few minutes. If the LED does
not turn solid green, see Chapter 4 for details.
3.4 INSTALLING THE MODULE INTO THE 6C105 CHASSIS
CAUTION: Failure to observe static safety precautions could cause damage to the
module. Follow static safety handling rules and wear the antistatic wrist strap provided
with the 6C105 chassis.
Do not cut the non-conductive bag to remove the module. Sharp objects contacting the
board or components can cause damage.
Certain restrictions may apply when installing the module into the 6C105 chassis. Refer to the
Release Notes for any updated information concerning installing the modules into the 6C105
chassis. Otherw ise, the instal lation p rocedure from Sect ion 3.3 can be followed , with the exception
that the 6C105 chassis has only 5 slots as compared t o th e 7 s lo ts in t he M ATRIX E7. The module
can be installed in any of the slots that are available. To install a module, refer to Figure 3-2 and
proceed as in Section 3.3.
NOTE: The Distributed Chassis Management and SecureFast Switching functions are
only supported when the modules are installed in a 6C105 SmartSwitch 6000 chassis.
Refer to the module release notes for specific information on supported functions.
Installation 3-5
Page 32

Installing the Module into the 6C105 Chassis
Figure 3-2 Installing the Module into the 6C105 Chassis
Slot Number
Backplane
Plastic Locking Tab
Connector
1
2
3
45
FAST ENET
FAST ENET
6H308-24
6H308-24
FAST ENET
6H308-24
RESET
RESET
C
C
O
O
M
M
CPU
CPU
GROUP
GROUP
1X
1X
SELECT
SELECT
GROUP
GROUP
1X
G
G
R
R
G
O
O
R
U
U
O
P
P
U
P
1
1
1
12X
12X
12X
1X
1X
1X
G
G
R
R
G
O
O
R
U
U
O
P
P
U
P
2
2
2
12X
12X
12X
PS1
FAST ENET
6H308-24
RESET
RESET
C
O
M
C
O
CPU
GROUP
SELECT
GROUP
12X
12X
M
CPU
GROUP
1X
SELECT
GROUP
G
R
O
U
P
1
1X
G
R
O
U
P
2
PS2
Metal Back-Panel
3-6 Installation
Circuit Card
Card Guides
Plastic
Locking Tab
3549_03
Page 33

Connecting to the Network
3.5 CONNECTING TO THE NETWORK
This section provides the procedures for connecting fiber optic cable from the network or other
devices to the mod ule. F or deta ils on how to get manuals , refer to the “Relat ed Document s” section
in About This Guide.
NOTE: If the module is being installed in a network using SmartTrunking, there are
rules concerning the network cable and port configurations that must be followed for
SmartTrunking to operate properly. Before connecting the cables, refer to the
E7 Series and SmartSwitch 6000 Series Modules Local Management User’s Guide
the configuration information.
The front panel ports of the module are 100BASE-FX, MT-RJ ports.
NOTE: An odd number of crossovers (preferably one) must be maintained between
devices so that the transmit port of the other device and vice versa.
Connect a fiber optic cable segment to the module as follows:
1. Remove any protective covers from the fiber optic ports on the applicable port on the module
and from the ends of the connectors on the cable segment.
MATRIX
for
CAUTION: Do not touch the ends of the fiber optic strands, and do not let the ends
come in contact with dust, dirt, or other contaminants. Contamination of the ends
causes problems in data transmissions. If the ends become contaminated, blow the
surfaces clean with a canned duster. A fiber port cleaning swab saturated with
optical-grade isopropyl alcohol may also be used to clean the ends.
2. Insert one end of the cable with an MT-RJ connector into the appropriate port on the module.
The MT-RJ connector is keyed with a self-locking tab. See Figure 3-3.
NOTE: To remove an MT-RJ connector, you press on its locking tab to release it and
pull it out of the front-panel connector.
3. At the other end of the fiber optic cable, attach the MT-RJ connector to the other device.
Installation 3-7
Page 34

Connecting to the Network
Figure 3-3 Connecting a Fiber Optic Segment to the Module
Fiber Optic Cable
MT-RJ Port
Release Tab
FAST ENET
6H308-24
RX TX
1X
RX TX
RX TX
RX TX
RX TX
RX TX
G
R
RX TX
O
U
P
RX TX
1
RX TX
RX TX
RX TX
RX TX
RX TX
12X
6H308-24
GROUP
CPU
RESET
C
O
M
GROUP
SELECT
Receive (RX)
Transmit (TX)
Group Select
Button
Group Indicators
FAST ENET
6H308-48
RX TX
1X
1X
RX TX
RX TX
RX TX
RX TX
RX TX
G
G
R
R
RX TX
O
O
U
U
P
P
RX TX
1
3
RX TX
RX TX
RX TX
RX TX
RX TX
12X
12X
6H308-48
RX TX
RX TX
RX TX
RX TX
RX TX
RX TX
RX TX
RX TX
RX TX
RX TX
RX TX
RX TX
CPU
GROUP
4
RX TX
RESET
C
O
M
GROUP
SELECT
3549_04
4. Verify that a link exists by checking that the port RX (Receive) LED is ON (flashing amber,
blinking green, or solid green). If the RX LED is OFF and the TX (Transmit) LED is not
blinking amber, perform the following steps until it is on:
a. To view the receive and transmit activity on a group of segments, press the GROUP
SELECT button (see Figure 3-3) to step to the appropriate group. Each time the GROUP
SELECT button is pressed, the GROUP LED lights up in se quence, indicatin g which Group
is selected. On the 6H308-24 you can ste p to 1 or 2 for Group 1 or 2. On the 6H308-48, you
can step to 1, 2, 3, or 4 for Groups 1 through 4. The receive and transmit activity for that
group of segments is then indicated by the RX and TX LEDs for each segment.
b. If there are separate fiber optic conn ecti ons on t he othe r d evice, check t he cross over of the
cables. Swap the cable connections if necessary.
3-8 Installation
Page 35

Completing the Installation
c. Verify that the fiber connection meets the dB loss and cable specifications for multimode
cabling, as outlined in the Cabling Guide.
If a link is not established, see Chapter 4 before contacting Enterasys Networks. Refer to “Getting
Help” in About Th i s Gu ide for details.
3.6 COMPLETING THE INSTALLATION
After installing the module and making the connections to the network, proceed as follows:
1. If the chassis is installed in a rack that has strain-relief brackets, secure the cables by running the
cables along the strain-relief bracket and tying them to the bracket, using cable ties.
2. The module is now re ady to be confi gured through Lo cal Management. Refer to the MA TRIX E7
Series and SmartSwitch 6000 Series Modules Loca l Manag ement User’s Guide for information
on how to access and use Local Management. For details on how to get manuals, refer to
“Related Documents” in About This Guide.
Installation 3-9
Page 36

Page 37

Troubleshooting
This chapter provides information concerning the following:
•Using LANVIEW (Section 4.1)
• Troubleshooting Checklist (Section 4.2)
• Using the RESET Button (Section 4.3)
4.1 USING LANVIEW
The 6H308-24 and 6H308-48 modules use Enterasys Networks’ built-in visual diagnostic and
status monitoring system called LANVIEW. The LANVIEW LEDs (Figure 4-1) allow quick
observation of the network status to aid in diagnosing network problems.
Figure 4-1 LANVIEW LEDs
FAST ENET
6H308-48
4
RESET
C
O
M
RX TX
1X
RX TX
RX TX
RX TX
RX TX
RX TX
G
R
RX TX
O
U
P
1
CPU
RX TX
1X
G
R
O
U
P
3
GROUP
RX TX
RX TX
4
RX TX
RX TX
RX TX
RX TX
GROUP
SELECT
GROUP
RX TX
GROUP
SELECT
Port 1, Group 1
LEDs
3549_05
Troubleshooting 4-1
Page 38

Using LANVIEW
Table 4-1 describes the LED indications and provides recommended actions as appropriate.
NOTE: The terms flashing, blinking, and solid used in Table 4-1 indicate the following:
Flashing indicates an LED is flashing randomly.
Blinking indicates an LED is flashing at a steady rate (approximately 50% on, 50% off).
Solid indicates a steady LED light. No pulsing.
Table 4-1 LANVIEW LEDs
LED Color State Recommended Action
CPU Off Power off. Ensure chassis has adequate power.
Red Blinking. Hardware
failure has occurred.
Solid. Resetting, normal
power up reset.
Contact Enterasys Networks for technical
support.
If the LED remains red for several minutes,
contact Enterasys Netw or ks for technical
support.
Amber Blinking. Crippled. Contact Enterasys Networks for technical
support.
Solid. Testing. If the LED remains amber for more than
several minutes, contact Enterasys
Networks for technical support.
Green Solid. Functional. None.
Amber
and
Booting. Blinks amber
and green while booting.
None.
Green
4-2 Troubleshooting
Page 39

Table 4-1 LANVIEW LEDs (Continued)
LED Color State Recommended Action
Using LANVIEW
RX
(Receive)
Off No link.
None.
No activity or port in
standby. Port enabled or
disabled.
Green Solid. Link, port enabled,
None.
no activity.
Blinking. Link, port
None.
disabled.
Amber Flashing. Link, port
None.
enabled, activity.
Red Solid. Diagnostic failure. Contact Enterasys Networks for assistance.
Troubleshooting 4-3
Page 40

Using LANVIEW
Table 4-1 LANVIEW LEDs (Continued)
LED Color State Recommended Action
TX
(Transmit)
Off Port enabled, and no
activity. If STA is
enabled an d there is a
valid link, this led should
flash green every two
seconds indicating that
BPDUs are being sent.
Green Flashing. Indicates
activity. Rate indicates
data rate.
Amber Blinking. Port in
standby. The port may be
disabled due to Span ning
Tree.
Red Flashing. Indicates
collision rate.
Solid. Diagnostic failure. Contact Enterasys Networks for technical
Ensure that the STA is enabled and that
there is a valid link.
Contact Enterasys Networks for technical
support.
None.
Ensure that the port is not disabled.
Contact Enterasys Networks for technical
support.
None, unless there is a high amount of
activity. In this case, check for networ k
configuration problems or a defective
device.
support.
4-4 Troubleshooting
Page 41

Troubleshooting Checklist
4.2 TROUBLESHOOTING CHECKLIST
If the module is not working properly, refer to Table 4-2 for a checklist of problems, possible
causes, and recommended actions to resolve the problem.
Table 4-2 Troubleshooting Checklist
Problem Possible Cause Recommended Action
All LEDs are
OFF.
No Local
Management
Password screen.
Cannot navigate
beyond Pas sword
screen.
Loss of power. Ensure that the module was installed
properly according to the installation
instructions in Chapter 3, and that the host
chassis is powered properly.
Autobaud is enabled, but
the baud ra te has not yet
Press ENTER (RETURN) (may take up to
four times).
been detected.
Incorrect terminal setup. Refer to the MATRIX E7 Series and
SmartSwitch 6000 Series Modules Local
Management User’s Guide for proper setup
procedures.
Improper console cable
pinouts.
Corrupt firmware image,
or hardware fault.
Refer to Appendix A for proper COM port
pinouts.
If possible, attemp t to download the im age to
the module again. Refer to Section B.2 for
instructions to clear NVRAM.
Improper Community
Names Table.
Refer to the MATRIX E7 Series and
SmartSwitch 6000 Series Modules Local
Management User’s Guide for the
Community Names Table setup.
If the Community Names have been
forgotten, refer to Section B.2 for
instructions on ho w to set the mode switch to
reset the Community Names to their default
values.
Troubleshooting 4-5
Page 42

Troubleshooting Checklist
Table 4-2 Troubleshooting Checklist (Continued)
Problem Possible Cause Recommended Action
Cannot contact
the module
through in-band
management.
Port(s) goes into
standby for no
apparent reason.
IP address not assigned. Refer to the MATRIX E7 Series and
SmartSwitch 6000 Series Modules Local
Management User’ s Gu ide for the I P addres s
assignment procedure.
Port is disabled. Enable port. Refer to the MATRIX E7 Series
and SmartSwitch 6000 Ser ies Modules Local
Management User’s Guide for instructions
to enable/disable ports.
No link to device. Verify that all network connections between
the network management station and the
module are valid and operating.
If the problem continues, contact Enterasys
Networks for technical support.
Loop condition detected. Verify that Spanning Tree is enabled. Refer
to MATRIX E7 Seri es and SmartS witc h 6000
Series Modules Local Management User’s
Guide for the instructions to set the type of
STA.
Review the network design and delete
unnecessary loops.
User parameters
(IP address,
Device and
Module name,
etc.) were lost
when the module
power was cycled
or the front panel
RESET button
was pressed.
Position of Mode switch
(7), NVRAM Reset, was
changed so metime before
either cycling power or
pressing the RESET
button, causing the
user-entered parameters to
reset to factory default
settings.
Clear NVRAM was set
through Local
Management.
4-6 Troubleshooting
If the problem continues, contact Enterasys
Networks for technical support.
Reenter the lost parameters as necessary.
Refer to MATRIX E7 Series and SmartSwitch
6000 Series Modules Local Management
User’s Guide for the i nstructions to
configure the device through Local
Management.
If the problem continues, contact Enterasys
Networks for technical support.
Page 43

Using the RESET Button
4.3 USING THE RESET BUTTON
The RESET button shown in Figure 4-2 resets and re-initializes the module.
CAUTION: Pressing the RESET button resets the device, and all current switching
being performed by the module is halted. A network downtime of up to two minutes will
result from this action for any devices connected to the module.
Figure 4-2 RESET Button
FAST ENET
6H308-48
RESET Button
RESET
C
O
M
RX TX
1X
RX TX
CPU
RX TX
1X
GROUP
RX TX
GROUP
SELECT
RX TX
RX TX
4
RX TX
RX TX
RX TX
RX TX
RX TX
RX TX
RX TX
G
R
RX TX
O
U
P
3
3549_06
G
R
O
U
P
1
To reset the module processor, press and release the RESET button. The module goes through a
reset process for approximately 60 seconds. Additional downtime may result as the module
reenters the network.
NOTE: Pressing the RESET button while the module is already in reset mode is not
recommended. If the RESET button is pressed while the module is in reset mode, the
module will enter an extended diagnostic procedure, which is unnecessary for normal
operation. This extended diagnostic procedure takes longer than one minute to
complete.
Troubleshooting 4-7
Page 44

Page 45

A
Specifications
This appendix provides operating specifications for the Enterasys Networks 6H308-24 and
6H308-48 modules. Enter asys Net w orks re serv e s the ri ght to ch ange the spec if ic ations at a ny t ime
without notice. The specifications apply to both modules unless otherwise indicated.
A.1 MODULE SPECIFICATIONS
Table A-1 provides the I/O ports, processors and memory, physical, and environmental module
specifications for the 6H308-24 and 6H308-48.
Table A-1 Module Specifications
Item Specification
I/O Ports
6H308-24, Ports 1 through 24 Fast Ethernet 100 Mbps (100BASE-FX compliant) with
24 MT-RJ connectors.
6H308-48, Ports 1 through 48: Fast Ethernet 100 Mbps (100BASE-FX compliant) with
48 MT-RJ connectors.
Processors/Memory
Processors XPCPRX740_300LE processor
Power PC
Dynamic Random Access Memory
(DRAM)
FLASH Memory 8 MB expandable to 16 MB
Shared Memory 4 MB
20 MB
Specifications A-1
Page 46

Fiber Budget
Table A-1 Module Specifications (Continued)
Item Specification
Physical
Dimensions 7.11H x 43.18W x 46.99D (cm)
2.8H x 17W x 18.5D (in)
Approximate Weight (Unit) 2.04 kg (4.5 lb)
MTBF (Predicted)
6H308-24
6H308-48
220,759 hours
213,814 hours
Environmental
Operating Temperature 5°C to 40°C (41°F to 104°F)
Storage Temperature -30°C to 73°C (-22°F to 164°F)
Operating Relative Humidity 5% to 90% (non-condensing)
A.2 FIBER BUDGET
When using fiber optic cables, it is important to consider the cable type and the associated dB
budgets shown in Table A-2.
Table A-2 Transmitter Power (1300 nm)
Cable Type Worst Case Budget Typical Budget
50/125 m Fiber 6.0 dB 9.0 dB
62.5/125 m Fiber 9.0 dB 12.0 dB
100/140 m Fiber 15.0 dB 18.0 dB
A-2 Specific ati ons
Page 47

COM Port Pinout Assignments
A.3 COM PORT PINOUT ASSIGNMENTS
The COM port is a serial co mmunicati ons port tha t supports Local Manage ment or conn ection to a
UPS. Refer to Table A-3 for the COM port pin assignments.
Table A-3 COM Port Pin Assignments
Pin Signal Name Input/Output
1 Transmit Data (XM T) Output
2 Data Carrier Detect (DCD) Output
3 Data Set Ready (DSR) Input
4 Receive Data (RCV) Input
5 Signal Ground (GND) NA
6 Data Terminal Ready ( DTR) Output
7 Request to Send (RTS) Input
8 Clear to Send (CTS) NA
A.4 REGULATORY COMPLIANCE
This equipment meets the safety and electromagnetic compatibility (EMC) requirements listed in
Table A-4:
Table A-4 Compliance Standards
Compliance Standards
Safety UL 1950, CSA C22.2 No. 950, 73/23/EEC,
EN 60825, EN 60950, and IEC 950
Electromagnetic Compatibility (EMC) FCC Part 15, CSA C108.8, 89/336/EEC, EN 55022,
EN 61000-3-2, EN 61000-3-3, EN 55024,
AS/NZS 3548, and VCCI V-3
Specifications A-3
Page 48

Page 49

Mode Switch Bank Settings and Options
This appendix covers the following items:
• Required tools (Section B.1)
• Locations, functions, and settings for the mode switches (Section B.2)
• Upgrading the FLASH (Section B.3)
B.1 REQUIRED TOOLS
Use the following tools to perform the procedures provided in this appendix:
• Antistatic wrist strap
• Phillips screwdriver
CAUTION: An antistatic wrist strap is required (provided with the module) to perform
the procedures in this appendix. Use the antistatic wrist strap when performing any of
the procedures in this appendix to minimize ESD damage to the devices involved.
B
Mode Switch Bank Settings and Options B-1
Page 50

Setting the Mode Switches
B.2 SETTING THE MODE SWITCHES
CAUTION: Read the appropriate sections to be fully aware of the consequences when
changing switch settings.
Only qualified personnel should change switch settings.
Figure B-1 shows the location of the mode switches and the switch settings for normal operation.
These switches are set at the factory and rarely need to be changed.
Switch definitions and positions are as follows:
• Switches 1 through 4 – For Enterasys Networks use only.
• Switch 5 – COM Port Autobaud. The default (OFF) position enables Autobaud sensing on the
COM port for Local Management sessions. Changing the switch to the ON position disables
Autobaud sensing and sets the COM port to 9600 baud for Local Management sessions.
Figure B-1 Mode Switch Location
MODE SWITCH
8
7
6
5
4
3
2
ON
1
Memory Board
B-2 Mode Switch Bank Settings and Options
3195_34
Page 51

Setting the Mode Switches
• Switch 6 – Forced BootP.
NOTE: After changing the position of Switch 6, DO NOT reapply power to the module
until there is a station on the network acting as a BootP server, which contains the
downloadable firmware image file.
DO NOT attempt a Forced BootP u nless a BootP server has be en configured for the modul e. The
BootP server references the location of a station acting as a Trivial File Transfer Protocol
(TFTP) server containing the module image file.
When the position of Switch 6 is changed and the power is cycled to the module, the device
requests the image file location from the BootP server and uses TFTP to download the image
from the TFTP server. If one of these requirements is not met, the module continues to request
either the BootP server or the TFTP server until the RESET button on the module is pressed.
Once the RESET button is pressed, the module resets after one minute and loads the image
stored in FLASH memory.
• Switch 7 – Clear NVRAM. Changing the position of this switch resets NVRAM on the next
power -up of the device. All user -ente red pa ramete rs, such as the I P addre ss, device names, etc.,
are reset to the factory default settings. Once the module resets, you can either use the factory
default settings or reenter your own parameters.
• Switch 8 – Reset Password/Community Names. Changing the position of this switch clears
user-entered passwords stored in NVRAM, and restores the factory default passwords on the
next power-up of the device. Once the module resets, you can either use the factory default
settings or reenter your own passwords.
NOTE: Do not change the position of Switch 8 unless it is necessary to reset the
super-user configured passwords to their factory default settings.
Mode Switch Bank Settings and Options B-3
Page 52

FLASH Upgrade
B.3 FLASH UPGRADE
FLASH upgrade is available for the SmartSwitch to expand from 8 to 16 MB. This section
explains how to locate and add/replace the FLASH module. For details, refer to “Getting Help” in
About This Guide.
B.3.1 Locating the FLASH Module
Figure B-2 shows the location of the FLASH module.
Figure B-2 FLASH Module Location
Flash Module
Memory Board
B-4 Mode Switch Bank Settings and Options
Page 53

FLASH Upgrade
B.3.2 Installing the FLASH Module
CAUTION: Observe all antistatic precautions when handling sensitive electronic
equipment.
To install a FLASH module, refer to Figure B-3 and proceed as follows:
1. With the FLASH module oriented as shown in Figure B-3, insert the FLASH module down
between the connector.
2. Pivot the FLASH module downward so the connector clips align with the two side notches of
the FLASH module and the connector clips lock the FLASH module into place.
Figure B-3 Installing the FLASH
Connector
Clip
FLASH
2
1
Clip
2504_91
Mode Switch Bank Settings and Options B-5
Page 54

Page 55

Index
Numerics
100BASE-TX
requirements 2-1
802.1p Port Priority
introduction to 1-6
A
Auto-Negotiation 1-3
B
Broadcast Supp ression
introduction to 1-4
C
Cable specifications
100BASE-TX network 2-1
COM port
pin assignments A-3
Connecting to the network 3-7
Connectivity
introduction to 1-3
D
Distributed Chassi s Management 1-7
support 3-3, 3-5
Document conventions xiii
F
FLASH
installation B-5
Flow Control 1-6
Front panel 1-2
G
GARP Switch Operation 1-6
Getting help xiv
GROUP SELECT button
use of the 4-1
I
Installation
connecting to the Network 3-7
L
LANVIEW LEDs 4-1
Local Management
introduction to 1-7
M
Management
use of 1-7
Mode Switch
setting B-2
Module Installation 3-3
P
Part number i
Port redirect function
introduction to 1-5
Index-1
Page 56

R
T
Receive LEDs
viewing of 4-1
Redirect functions
port and VLAN
introduction to 1-5
Regulatory Compliance A-3
Related manual s xii
Remote Monitoring (RMON)
introduction to 1-4
RESET button 4-7
Runtime IP address discovery
introduction to 1-3
S
SecureFast Switching support 3-3, 3-5
SmartTrunk
introduction to 1-4
Specifications A-1
Standards compatibility 1-8
Switching options
introduction to 1-8
Traffic Rate Limiting 1-5
Transmit LEDs
viewing of 4-1
Troubleshooting 4-1
checklist 4-5
U
Unpacking the module 3-2
V
Viewing Receive and Transmit Activity
instructions for 4-1
VLAN redirect function
introduction to 1-5
Index-2
 Loading...