


Getting Started Guide
Revision Date: 11.27.2002
8000/8600
9032552-16

NOTICE
Enterasys Networks reserves the right to make changes in specific ations and other information contained in
this document and its web site without prior notice. The reader should in all cases consult Enterasys Networks
to determine whether any such changes have been made.
The hardware, firmware, or software described in this document is subject to change without notice.
IN NO EVENT SHALL ENTERASYS NETWORKS BE LIABLE FOR ANY INCIDENTAL, INDIRECT,
SPECIAL, OR CONSEQUENTIAL DAMAGES WHATSOEVER (INCLUDING BUT NOT LIMITED TO
LOST PROFITS) ARISING OUT OF OR RELATED TO THIS DOCUMENT, WEB SITE, OR THE
INFORMATION CONTAINED IN THEM, EVEN IF ENTERASYS NETWORKS HAS BEEN ADVISED
OF, KNEW OF, OR SHOULD HAVE KNOWN OF, THE POSSIBILITY OF SUCH DAMAGES.
Enterasys Networks, Inc.
35 Industrial Way
Rochester, NH 03866-5005
2002 Enterasys Networks, Inc. All Rights Reserved
Printed in the United States of America
Order Number: 9032552-16 November 2002
LANVIEW is a registered trademark and ENTERASYS NETWORKS, NETSIGHT, MATRIX, WEBVIEW,
and any logos associated therewith, are trademarks of Enterasys Networks, Inc. in the United States and other
countries.
All other product names mentioned in this document may be trademarks or registered trademarks of their
respective companies.
ELECTRICAL HAZARD: Only qualified personnel should perform installation procedures.

Enterasys X-Pedition 8000/8600 Getting Started Guide i
FCC NOTICE
This device complies with Part 15 of the FCC rules. Operation is subjec t to the following two conditions: (1) this device may
not cause harmful interference, and (2) this device must accept any interference received, including interference that may
cause undesired operation.
NOTE: This equipment has been tested and found to comply with the limits for a Class A digital device, pursuant to Part 15
of the FCC rules. These limits are designed to provide reasonable protectio n against harmful interference when the equipment
is operated in a commercial environment. This equipment uses, generates, and can radiate radio frequency energy and if not
installed in accordance with the operator’s manual, may cause harmful interference to radio communications. Operation of
this equipment in a residential area is likely to cause interference in which case the user will be required to correct the
interference at his own expense.
WARNING: Changes or modifications made to this device which are not expressly approved by the party responsible for
compliance could void the user’s authority to operate the equipment.
INDUSTRY CANADA NOTICE
This digital apparatus does not exceed the Class A limits fo r radio noise emissio ns from digital ap paratus set out in the Radio
Interference Regulations of the Canadian Department of Communications.
Le présent appareil numérique n’émet pas de bruits radioélectriques dépassant les limites applicables aux appareils
numériques de la class A prescrites dans le Règlement sur le brouillage radioélectrique édicté par le ministère des
Communications du Canada.
VCCI NOTICE
This is a Class A product based on the standard of the Voluntary Control Council for Interference by Information Technology
Equipment (VCCI). If this equipment is used in a domestic environment, radio disturbance may arise. When such trouble
occurs, the user may be required to take corrective actions.
CLASS A ITE NOTICE
WARNING: This is a class A product. In a domestic environment this product may cause radio interference in which case
the user may be required to take adequate measures.

ii Enterasys X-Pedition 8000/8600 Getting Started Guide
CLASS 1 LASER TRANSCEIVERS
THE SINGLE MODE INTERFACE MODULES USE CLASS 1 LASER
TRANSCEIVERS. READ THE FOLLOWING SAFETY INFORMATION BEFORE
INSTALLING OR OPERATING THESE MODULES.
The Class 1 laser transceivers use an optical feedback loop to maintain Class 1 operation limits. This control loop eliminates
the need for maintenance checks or adjustments. The output is factory set, and does not allow any user adjustment. Class 1
Laser transceivers comply with the following safety standards:
• 21 CFR 1040.10 and 1040.11 U.S. Department of Health and Human Services (FDA).
• IEC Publication 825 (International Electrotechnical Commission).
• CENELEC EN 60825 (European Committee for Electrotechnical Standardization).
When operating within their performance limitations, laser transceiver output meets the Class 1 accessible emission limit of
all three standards. Class 1 levels of laser radiation are not considered hazardous.
When the connector is in place, all laser radiation remains within the fiber . The maximum amount of radiant po wer e xiting the
fiber (under normal conditions) is -12.6 dBm or 55 x 10-6 watts.
Removing the optical connector from the transceiver allows laser radiation to emit directly from the optical port. The
maximum radiance from the optical port (under worst case conditions) is 0.8 W cm-2 or 8 x 10³ W m2 sr-1.
Do not use optical instruments to view the laser output. The use of optical instruments to view laser output increases eye
hazard. When viewing the output optical port, power must be removed from the network adapter.

Enterasys X-Pedition 8000/8600 Getting Started Guide iii
ENTERASYS NETWORKS, INC.
PROGRAM LICENSE AGREEMENT
BEFORE OPENING OR UTILIZING THE ENCLOSED PRODUCT,
CAREFULLY READ THIS LICENSE AGREEMENT.
This document is an agreement (“Agreement”) between You, the end user, and Enterasys Networks, Inc. (“Enterasys”) that
sets forth your rights and obligations with respect to the Enterasys software program (“Program”) in the package. The
Program may be contained in firmware, chips or other media. UTILIZING THE ENCLOSED PRODUCT, YOU ARE
AGREEING TO BECOME BOUND BY THE TERMS OF THIS AGREEMENT, WHICH INCLUDES THE LICENSE
AND THE LIMITATION OF WARRANTY AND DISCLAIMER OF LIABILITY. IF YOU DO NOT AGREE TO THE
TERMS OF THIS AGREEMENT, RETURN THE UNOPENED PRODUCT TO ENTERASYS OR YOUR DEALER, IF
ANY, WITHIN TEN (10) DAYS FOLLOWING THE DATE OF RECEIPT FOR A FULL REFUND.
IF YOU HAVE ANY QUESTIONS ABOUT THIS AGREEMENT, CONTACT ENTERASYS NETWORKS
(603) 332-9400. Attn: Legal Department.
1. LICENSE. You have the right to use only the one (1) copy of the Program provided in this pack age subject to the terms
and conditions of this License Agreement.
You may not copy, reproduce or transmit any part of the Program except as permitted b y the Copyri ght Act of the United
States or as authorized in writing by Enterasys.
2. OTHER RESTRICTIONS. You may not reverse engineer, decompile, or disassemble the Program.
3. APPLICABLE LAW. This License Agreement shall be interpreted and governed under the laws and in the state and
federal courts of New Hampshire. You accept the personal jurisdiction and venue of the New Hampshire courts.
4. EXPORT REQUIREMENTS. You understand that Enterasys and its Affiliates are subject to regulation by agencies of
the U.S. Government, including the U.S. Department of Commerce, which prohibit export or diversion of certain technical
products to certain countries, unless a license to export the product is obtained from the U.S. Government or an exception from
obtaining such license may be relied upon by the exporting party.
If the Program is exported from the United States pursuant to the License Exception CIV under the U.S. Export
Administration Regulations, You agree that You are a civil end user of the Program and agree that You will use the Program
for civil end uses only and not for military purposes.
If the Program is exported from the United States pursuant to the License Exception TSR under the U.S. Export
Administration Regulations, in addition to the restriction on transfer set forth in Sections 1 or 2 of this Agreement, You agree
not to (i) reexport or release the Program, the source code for the Program or technology to a national of a country in Country
Groups D:1 or E:2 (Albania, Armenia, Azerbaijan, Belarus, Bulgaria, Cambodia, Cuba, Estonia, Georgia, Iraq, Kazakhstan,
Kyrgyzstan, Laos, Latvia, Libya, Lithuania, Moldova, North Korea, the People’s Republic of China, Romania, Russia,
Rwanda, T ajikistan, T urkmenistan , Ukraine, Uzbekistan, V ietnam, or such other countries as may be designated b y the United
States Government), (ii) export to Country Groups D:1 or E:2 (as defined herein) the direct product of the Program or the
technology, if such foreign produced direct product is subject to national security controls as identif ied on the U.S. Commerce
Control List, or (iii) if the direct product of the technology is a complete plant or any major component of a plant, export to
Country Groups D:1 or E:2 the direct product of the plant or a major component thereof, if such foreign produced direct
product is subject to national security controls as identified on the U.S. Commerce Control List or is subject to State
Department controls under the U.S. Munitions List.
5. UNITED STATES GOVERNMENT RESTRICTED RIGHTS. The enclosed Product (i) was developed solely at
private expense; (ii) contains “restricted computer software” submitted with restricted rights in accordance with section
52.227-19 (a) through (d) of the Commercial Computer Software-Restricted Rights Clause and its successors, and (iii) in all
respects is proprietary data belonging to Enterasys and/or its suppliers. For Department of Defense units, the Product is
considered commercial computer software in accordance with DFARS section 227.7202-3 and its successors, and use,
duplication, or disclosure by the Government is subject to restrictions set forth herein.

iv Enterasys X-Pedition 8000/8600 Getting Started Guide
6. EXCLUSION OF WARRANTY. Except as may be specifically provided by Enterasys in writing, Enterasys makes no
warranty, expressed or implied, concerning the Program (including its documentation and media).
ENTERASYS DISCLAIMS ALL WARRANTIES, OTHER THAN THOSE SUPPLIED TO Y OU BY ENTERASYS
IN WRITING, EITHER EXPRESS OR IMPLIED, INCLUDING BUT NOT LIMITED TO IMPLIED WARRANTIES OF
MERCHANTABILITY AND FITNESS FOR A PARTICULAR PURPOSE, WITH RESPECT TO THE PROGRAM, THE
ACCOMPANYING WRITTEN MATERIALS, AND ANY ACCOMPANYING HARDWARE.
7. NO LIABILITY FOR CONSEQUENTIAL DAMAGES. IN NO EVENT SHALL ENTERASYS OR ITS
SUPPLIERS BE LIABLE FOR ANY DAMAGES WHATSOEVER (INCLUDING, WITHOUT LIMITATION, DAMAGES
FOR LOSS OF BUSINESS, PROFITS, BUSINESS INTERRUPTION, LOSS OF BUSINESS INFORMATION, SPECIAL,
INCIDENTAL, CONSEQUENTIAL, OR RELIANCE DAMAGES, OR OTHER LOSS) ARISING OUT OF THE USE OR
INABILITY TO USE THIS ENTERASYS PRODUCT, EVEN IF ENTERASYS HAS BEEN ADVISED OF THE
POSSIBILITY OF SUCH DAMAGES. BECAUSE SOME STATES DO NOT ALLOW THE EXCLUSION OR
LIMITATION OF LIABILITY FOR CONSEQUENTIAL OR INCIDENTAL DAMAGES, OR IN THE DURATION OR
LIMITATION OF IMPLIED WARRANTIES IN SOME INSTANCES, THE ABOVE LIMITATION AND EXCLUSIONS
MAY NOT APPLY TO YOU.

Enterasys X-Pedition 8000/8600 Getting Started Guide v
DECLARATION OF CONFORMITY
Application of Council Directive(s): 89/336/EEC
73/23/EEC
Manufacturer’s Name: Enterasys Networks, Inc.
Manufacturer’s Address: 35 Industrial Way
PO Box 5005
Rochester, NH 03866-5005
European Representative Address: Enterasys Networks Ltd.
Nexus House, Newbury Business Park
London Road, Newbury
Berkshire RG14 2PZ, England
Conformance to Directive(s)/Product Standards: EC Directive 89/336/EEC
EC Directive 73/23/EEC
EN 55022
EN 55024
EN 60950
EN 60825
Equipment Type/Environment: Networking Equipment, for use in a Commercial
or Light Industrial Environment.
Enterasys Networks, Inc. declares that the equipment packaged with this notice conforms to the above directives.

vi Enterasys X-Pedition 8000/8600 Getting Started Guide

Enterasys X-Pedition 8000/8600 Getting Started Guide 9
Contents
Notice ..................................................................................................................... ii
About this Guide.................................................................................................. xi
What’s New................................................................................................................................xi
Who should Read this Guide?........................................................................................ ............xi
How to Use this Guide............................................................... .............................................. xii
Related Documentation................................................................... ..................................... .... xii
Chapter 1: Features Overview..............................................................................1
Specifications..............................................................................................................................1
Features.......................................................................................................................................5
Hardware Overview..................................................................................................................10
Chapter 2: Hardware Installation......................................................................51
Safety Considerations ...............................................................................................................51
Hardware Specifications...........................................................................................................53
Installing the Hardware.............................................................................................................55
Chapter 3: Software Installation and Setup......................................................83
Installing a PCMCIA Flash Card..............................................................................................84
Powering On and Booting the Software ...................................................................................86
Starting the Command Line Interface.......................................................................................87
Setting Basic System Information.............................................................................................89
Setting Up SNMP Community Strings.....................................................................................91
Setting Up Passwords................................................................................................................92
Setting the DNS Domain Name and Address...........................................................................94
Setting SYSLOG Parameters....................................................................................................95
Loading System Image Software..............................................................................................96
Loading Boot Firmware............................................................................................................97
Activating Configuration Changes and Saving the Configuration File ....................................98
Appendix A: Troubleshooting ..........................................................................101

Contents
10 Enterasys X-Pedition 8000/8600 Getting Started Guide
Appendix B: Hardware Components...............................................................105
SSR-ATM29-02..................................................................................................................... 106
SSR-CM2B-64, SSR-CM3-128, and SSR-CM4-256 ............................................................ 107
SSR-FDDI-02......................................................................................................................... 109
SSR-GLX39-02...................................................................................................................... 110
SSR-GLX39-04 and SSR-GSX31-04 ................................. .................................... ............... 111
SSR-GLX70-01-AA and SSR-GLH39-02......................................................... .................... 112
SSR-GSX21-02-AA and SSR-GLX29-02-AA...................................................................... 113
SSR-GSX31-02...................................................................................................................... 114
SSR-GTX32-04 and SSR-GTX32-02................................................................................. ... 115
SSR-HFX21-08-AA and SSR-HFX29-08-AA ...................................................................... 116
SSR-HSSI-02-CK................................................................................................................... 117
SSR-HTX22-08-AA and SSR-HTX12-08-AA............................................ .......................... 119
SSR-HTX32-16...................................................................................................................... 121
SSR-POS29-04 and SSR-POS21-04...................................................................................... 122
SSR-POS39-02 and SSR-POS31-02...................................................................................... 122
SSR-SERCE-04-AA and SSR-SERC-04-AA........................................................................ 123
Appendix C: Technical Support.......................................................................125
Getting Help........................................................................................................................... 125
Index....................................................................................................................127

Enterasys X-Pedition 8000/8600 Getting Started Guide xi
About this Guide
This guide provides a general overview of the 8-slot and 16-slot Enterasys Networks
X-Pedition 8000 and X-Pedition 8600 hardware and software features. It provides procedures for
installing the X-Pedition 8000 and X-Pedition 8600. For product information not available in this
guide, see the manuals listed in Related Documentation on page xii.
What’s New
Changes to this manual include the addition of new and extended capabilities for the following:
Line Cards on page 20
Control Mo dules on page 14
External Controls on page 15
Installing the Hardware on page 55
Software Installation and Setup on page 83
Installing a PCMCIA Flash Card on page 84
Troubleshooting on page 101
Who should Read this Guide?
Read this guide if you are a network administrator responsible for installing and settin g up the
X-Pedition 8000 or X-Pedition 8600.
ELECTRICAL HAZARD: Only qualified personnel should perform the installation
procedures in this guide.

Preface
xii Enterasys X-Pedition 8000/8600 Getting Started Guide
How to Use this Guide
Related Documentation
The Enterasys Networks X-Pedition 8000/ 8600 documentation set includes the following items.
Refer to these other documents to learn more about your product.
If you want to... See...
Get an overview of the X-Pedition 8000 and
X-Pedition 8600 software and hardware features
Chapter 1, Features Overview
Install the X-Pedition 8000 or X-Pedition 8600
hardware
Chapter 2, Hardware Installation
Install the X-Pedition 8000 or X-Pedition 8600
software, boot the software, and set up the unit
Chapter 3, Software Installation
and Setup
Troubleshoot installation problems Appendix A, Troubleshooting
Cabling and LED information Appendix B, Hardware Components
Contact Enterasys Networks Technical Support Appendix C, Technical Support
For Information About... See the...
How to use Command Line Interface (CLI)
commands to configure and manage the
X-Pedition 8000 or X-Pedition 8600
Enterasys X-Pedition User Reference
The complete syntax for all CLI commands Enterasys X-Pedition Command Line
Interface Reference Manual
System messages Enterasys X-Pedition Error Reference
Manual

Enterasys X-Pedition 8000/8600 Getting Started Guide 1
Chapter 1
Features Overview
The 8-slot and 16-slot Enterasys Networks X-Pedition 8000 and X-Pedition 8600 provide nonblocking, wire-speed Layer-2 (switching), Layer -3 (routing) and Layer-4 (application) switching.
This chapter provides a basic overview of the X-Pedition 8000 and X-Pedition 8600 software and
hardware feature set.
• If you want to skip this information and install the X-Pedition now, see Chapter 2, Hardware
Installation.
• If you want to boot the X-Pedition software and perform basic configuration tasks now, see
Chapter 3, Software Installation and Setup.
Specifications
The X-Pedition provides wire-speed switching and full non-blocking throughput. The hardware
provides wire-speed performance regardless of the performance monitoring, filtering, and Quality
of Service (QoS) features enabled by the software. You do not need to accept performance
compromises to run QoS or access control lists (ACLs).

Specifications
2 Enterasys X-Pedition 8000/8600 Getting Started Guide
The following table lists the basic hardware and software specifications for the X-Pedition.
Feature Specification
Throughput • 16-Gbps non-blocking switching fabric (X-Pedition 8000)
• 32-Gbps non-blocking switching fabric (X-Pedition 8600)
• Up to 30 million packets-per-second routing throughput (X-Pedition 8600)
• Up to 15 million packets-per-second routing throughput (X-Pedition 8000)
Capacity • Up to 250,000 routes
• Up to 2,000,000 Layer-4 application flows (X-Pedition 8000)
• Up to 4,000,000 Layer-4 application flows (X-Pedition 8600)
• 400,000 Layer-2 MAC addresses (X-Pedition 8000)
• 800,000 Layer-2 MAC addresses (X-Pedition 8600)
• 4,096 Virtual LANs (VLANs)
• 20,000 Layer-2 security and access-control filters
• Up to 16 MB input/output buffering per Gigabit port
• 1 MB input/output buffering per 10/100 port
• 20 MB shared input/output buffering across WAN ports on a WAN module
• 32 MB input/output buffering per Packet Over SONET/SDH OC-3c port
• 64 MB input/output buffering per Packet Over SONET/SDH OC-12c port
Routing protocols • IP: RIP v1/v2, OSPF, BGP 2, 3, 4
• IPX: RIP, SAP
• Multicast: IGMP, DVMRP, PIM-SM
• AppleTalk
Bridging and VLAN
protocols
• 802.1d Spanning Tree
• 802.1Q (VLAN trunking)
Media interface
protocols
• 802.3 (100BASE-T)
• 802.3u (100BASE-TX, 100BASE-FX)
• 802.3x (1000BASE-SX, 1000BASE-LX)
• 802.3z (1000BASE-SX, 1000BASE-LX)
• 802.3ab (1000BASE-T)
Quality of Service
(QoS)
• Layer-2 prioritization (802.1p)
• Layer-3 source-destination flows
• Layer-4 source-destination flows
• Layer-4 application flows
RMON • RMON v1/v2 for each port
Management • SNMP (v1, v2C, v3)
• Emacs-like Command Line Interface (CLI)

Enterasys X-Pedition 8000/8600 Getting Started Guide 3
Specifications
This guide and other X-Pedition documentation refers to the X-Pedition’s Layer-2 (L2), Layer-3
(L3), and Layer-4 (L4) switching and routing. These layers are based on the International Standards
Organization (ISO) 7-layer reference model. Here is an example of that model. The X-Pedition
operates within the layers that are not shaded. Notice that Layer 2 is divided into an LLC layer and
a MAC layer. The X-Pedition operates at the MAC layer but not the LLC layer.
Port mirroring • Traffic to the control module
• Traffic from specific ports
• Traffic to specific chassis slots (line cards)
Hot swapping • Line cards
• Control module (when redundant control module is installed and online)
• Switching Fabric Modules (X-Pedition 8600 only—when redundant switch
fabric is installed and online)
• Power Supply (when redundant supply is installed and online)
Load balancing/
sharing
• Enterasys SmartTRUNK support
• Load Sharing Network Address Translation (LSNAT)
Redundancy • Redundant and hot-swappable power supplies
• Redundant and hot-swappable control modules
• Redundant and hot-swappable Switching Fabric Modules (X-Pedition 8600
only)
• Virtual Router Redundancy Protocol (VRRP)
Layer 7 Application
Layer 6 Presentation
Layer 5 Session
Layer 4 TCP/UDP - application
Layer 3 IP/IPX - routing
Layer 2 LLC
Layer 2 MAC - bridging
Layer 1 Physical Interfaces
Feature Specification

Specifications
4 Enterasys X-Pedition 8000/8600 Getting Started Guide
TCP/UDP Services
The following table lists some well-known TCP/UDP services provided by the X-Pedition.
TCP Port UDP Port Description
23 Telnet
161 SNMP
67 BOOTP/DHCP Relay Agent
520 Routed

Enterasys X-Pedition 8000/8600 Getting Started Guide 5
Features
Features
This section describes the following X-Pedition features:
• Address-based and flow- b ased bri d ging
• Port-based VLANs and protocol-based VLANs
• IP and IPX routing
• Layer-4 (application) switching
• Security
• Quality of Service (QoS)
• Statistics
• Management
Bridging
The X-Pedition provides the following types of wire-speed bridging:
• Address-based bridging – The X-Pedition performs this type of bridging by looking up the
destination address in an L2 lookup table on the line card that receives the bridge packet from
the network. The L2 lookup table indicates the exit port(s) for the bridged packet. If the packet
is addressed to the X-Pedition’s own MAC address, the packet is routed rather than bridged.
• Flow-based bridging – The X-Pedition performs this type of bridging by looking up an entry in
the L2 lookup table containing both the source and destination addresses of the bridge packet.
Your choice of bridgin g meth od does not affect X-Pedition performance. However, address-based
bridging is more efficient because it requires fe wer table entries while flow-based bridging provides
tighter management and control over bridged traffic.
The X-Pedition ports perform address-based bridging by default but can be configured to perform
flow-based bridging, instead of address-based bridging, on a per-port basis. A port cannot be
configured to perform both types of bridging at the same time.

Features
6 Enterasys X-Pedition 8000/8600 Getting Started Guide
Port and Protocol VLANs
The X-Pedition supports the following types of Virtual LANs (VLANs):
• Port-based VLANs – A port-based VLAN is a set of ports that comprises a Layer-2 broadcast
domain. The X-Pedition confines MAC-layer broadcasts to the ports in the VLAN on which the
broadcast originates. X-Pedition ports outside the VLAN do not receive the broadcast.
• Protocol-based VLANs – A protocol-based VLAN is a named set of ports that compris es an IP
or IPX broadcast domain. The X-Pedition confines IP or IPX broadcasts to the ports within the
IP or IPX based VLAN. Protocol-based VLANs sometimes are called subnet VLANs or Layer3 VLANs.
You can include the same port in more than one VLAN, even in both port-based and protocol-based
VLANs. Moreover, you can define VLANs that span across multiple X-Peditions. To simplify
VLAN administration, the X-Pedition supports 802.1Q trunk ports, which allow you to use a single
port to “trunk” traffic from multiple VLANs to another X-Pedition or switch which supports
802.1Q.
Routing
The X-Pedition provides wire-speed routing for the following protocols:
• Internet Protocol (IP) – protocol that switching and routing devices use for moving traffic
within the Internet and within many corporate intranets
• Internet Packet Exchange (IPX) – protocol by Novell used in NetWare products
• Appletalk – protocol used to allow users of dissimilar computer systems to share information
over a network without regard for special formats and internal differences.
Note: All other protocols that require routing must be tunneled using IP.
By default, the X-Pedition uses one MAC address for all interfaces. The X-Pedition can be
configured to have a separate MAC address for each IP interface and a separate MAC address for
each IPX interface. When the X-Pedition receives a packet whose destination MAC address is one
of the X-Pedition’s IP or IPX interface MAC addresses, the line card that received the packet from
the network uses information in the line card’s Layer-3 lookup tables (or information supplied by
the control module) to route the packet to its IP destination(s). (See Control Modules on page 14 for
information about the control module.)
You can create only one IP and IPX interface on a single port or VLAN. You can add secondary IP
addresses to the same IP interface. When you add an interface to a set of ports, you are adding a
VLAN to those ports. Ports that contain IP and IPX interfaces can also still perform Layer-2
bridging.
In addition to hardware based, wire-speed routing, the Advanced Routing Engine (ARE) feature
extends X-Pedition’s capabilities to support software based routing. This capability is perfect for
less demanding protocols like AppleTalk.

Enterasys X-Pedition 8000/8600 Getting Started Guide 7
Features
IP Routing
The X-Pedition supports the following IP unicast routing protocols:
• RIP v1 and RIP v2
• OSPF v2
• BGP 2,3,4
IP interfaces do not use a specific routing protocol by default. When you configure an interface for
routing, you also specify the routing protocol the interface will use.
IP Multicast Routing
The X-Pedition supports the following IP multicast routing protocols:
•IGMP
•DVMRP
• PIM-SM
The X-Pedition does not use a specific IP Multicast routing protocol by default. When you
configure an interface for IP Multicast, you also specify the routing protocol you want the interface
to use.
IPX Routing
The X-Pedition supports the following IPX routing protocols:
• IPX RIP – a version of the Routing Information Protocol (RIP) tailored for IPX
• IPX SAP – the Service Advertisement Protocol, which allows hosts attached to an IPX network
to reach printers, file servers, and other services
By default, IPX routing is enabled on the X-Pedition when an IPX interface is created.
Layer-4 Switching
In addition to Layer-2 bridging and Layer-3 routing, the X-Pedition performs Layer-4 switching.
Layer-4 switching is based on applications and flows.
• Layer-4 applications – The X-Pedition understands the application for which an IP or IPX
packet contains data and therefore enables you to manage and control traffic on an application
basis. For IP traffic, the X-Pedition looks at the packet’ s TCP or UDP port number to determine
the application. For IPX packets, the X-Pedition looks at the destination socket to determine the
application.

Features
8 Enterasys X-Pedition 8000/8600 Getting Started Guide
• Layer-4 flows – The X-Pedition can store Layer-4 flows on each line card. A Layer-4 flow
consists of the source and destination addresses in the IP or IPX packet combined with the TCP
or UDP source and destination port number (for IP) or the source and destination socket (for
IPX). You can therefore manage and control individual flows between hosts on an individual
application basis.
A single host can have many individual Layer-4 entries in the X-Pedition. For example, an IP host
might have separate Layer-4 application entries for E-mail, FTP, HTTP, and so on, or separate
Layer-4 flow entries for specific E-mail destinations and for specific FTP and Web connections.
Security
The bridging, routing, and application (Layer-2, Layer-3, and Layer-4) support described in
previous sections enables you to implement security filters that meet specific needs. You can
implement the following types of filters to secure traffic on the X-Pedition.
• Layer-2 source filters (block bridge traffic based on source MAC address)
• Layer-2 destination filters (block bridge traffic based on destination MAC address)
• Layer-2 flow filters (block bridge traffic based on specific source-destination pairs)
• Layer-3 source filters (block IP or IPX traffic based on source IP or IPX address)
• Layer-3 destination filters (block IP or IPX traffic based on destination IP or IPX address)
• Layer-3 flow filters (block IP or IPX traffic based on specific source-destination pairs)
• Layer-4 flow filters (block traffic based on application flows)
• Layer-4 application filters (block traff i c based on UDP or TCP source and destination ports for
IP or source and destination sockets for IPX)
Quality of Service
Although the X-Pedition supplies non-blocking wire-speed throughput, you can configure the
X-Pedition to apply Quality of Service (QoS) policies during peak periods to guarantee service to
specific hosts, applications, and flows (source-destination pairs). This is especially useful in
networks where the traffic level can exceed the network medium’s capacity.
The X-Pedition QoS is based on four queues: control, high, medium, and low. Control traffic has
the highest priority, high the second highest, and so on. The default priority for all traffic is low.

Enterasys X-Pedition 8000/8600 Getting Started Guide 9
Features
You can configure QoS policies for the following types of traffic:
• Layer-2 prioritization (802.1p)
• Layer-3 source-destination flows
• Layer-4 source-destination flows
• Layer-4 application flows
Statistics
The X-Pedition can provide extensiv e statistical data on demand. You can access the following
types of statistics:
• Layer-2 RMON and MIB II Statistics – Port statistics for normal packets and for errors (packets
in, packets out, CRC errors, and so on)
• Layer-3 RMON v2 Statistics – Statistics for ICMP, IP, IP-interface, IP routing, IP multicast,
VLAN
• Layer-4 RMON v2 Statistics – Statistics for TCP and UDP
• NetFlow – The export of flow accounting statistics
Management Platforms
You can manage the X-Pedi tion using the following management platforms:
• Command Line Interface (CLI) – An Emacs editor-like interface that accepts typed
commands and responds when applicable with messages or tables. You will use the CLI to
perform the basic setup procedures described in Chapter 3 of this guide.
• SNMP MIBs and traps – The X-Pedition supports SNMP v1, SNMP v2C, SNMP v3, and
many standard networking MIBs. You can access the X-Pedition’s SNMP agent using
integration software for Enterasys Netsight Atlas, Netsight Element Manager 3.0, or HP
OpenVie w 5.x on W indows NT, Solaris 2.x, or Aprisma SPECTRUM on Solaris 2.x. Chapter 3
in this guide explains how to set up SNMP on the X-Pedition.
Hardware Overview
10 Enterasys X-Pedition 8000/8600 Getting Started Guide
Hardware Overview
This section describes the X-Pedition hardware modules with which you will be working.
Chapter 2 in this guide describes how to install the hardware. This section describes the following
hardware:
• Chassis
• Backplane
• Fan module
• Control Module
• Power Supply
• Switching Fabric Module (X-Pedition 8600 only)
• Line cards
Chassis
Figure 1 shows the front view of a fully loaded X-Pedition 8000 chassis. The X-Pedition 8000
chassis contains eight slots, numbered from 0 to 7. Slot 0 is in the lower left corner of the chassis
and slot 7 is in the upper right corner.
Figure 1. Front view of a fully loaded X-Pedition 8000 chassis
21 21
87654321 87654321
87654321 87654321
87
6
5
4
3
21
Fan module Power supply Control module Power supply
Gigabit-LX module
Gigabit-SX module 10/100 BASE-TX
module
100 BASE-FX
module
SSR-CM3-128 CONTROL MODULE
10/100BASE-TXSSR-HTX12-08-AA
10/100BASE-TXSSR-HTX12-08-AA
10/100BASE-TXSSR-HTX12-08-AA
10/100BASE-TXSSR-HTX12-08-AA
1000BASE-LXSSR-GLX29-02-AA
SSR-8
1000BASE-SXSSR-GSX21-02-AA
100BASE-FXSSR-HFX21-08-AA
SSR-PS-8
100-125~5A
200-240~3A
50-60 Hz
PWR
SSR-PS-8
100-125~5A
200-240~3A
50-60 Hz
PWR
6
4
2
7
5
3
CM/1
PS2PS1
CM
SSR-8

Enterasys X-Pedition 8000/8600 Getting Started Guide 11
Hardwar e Overview
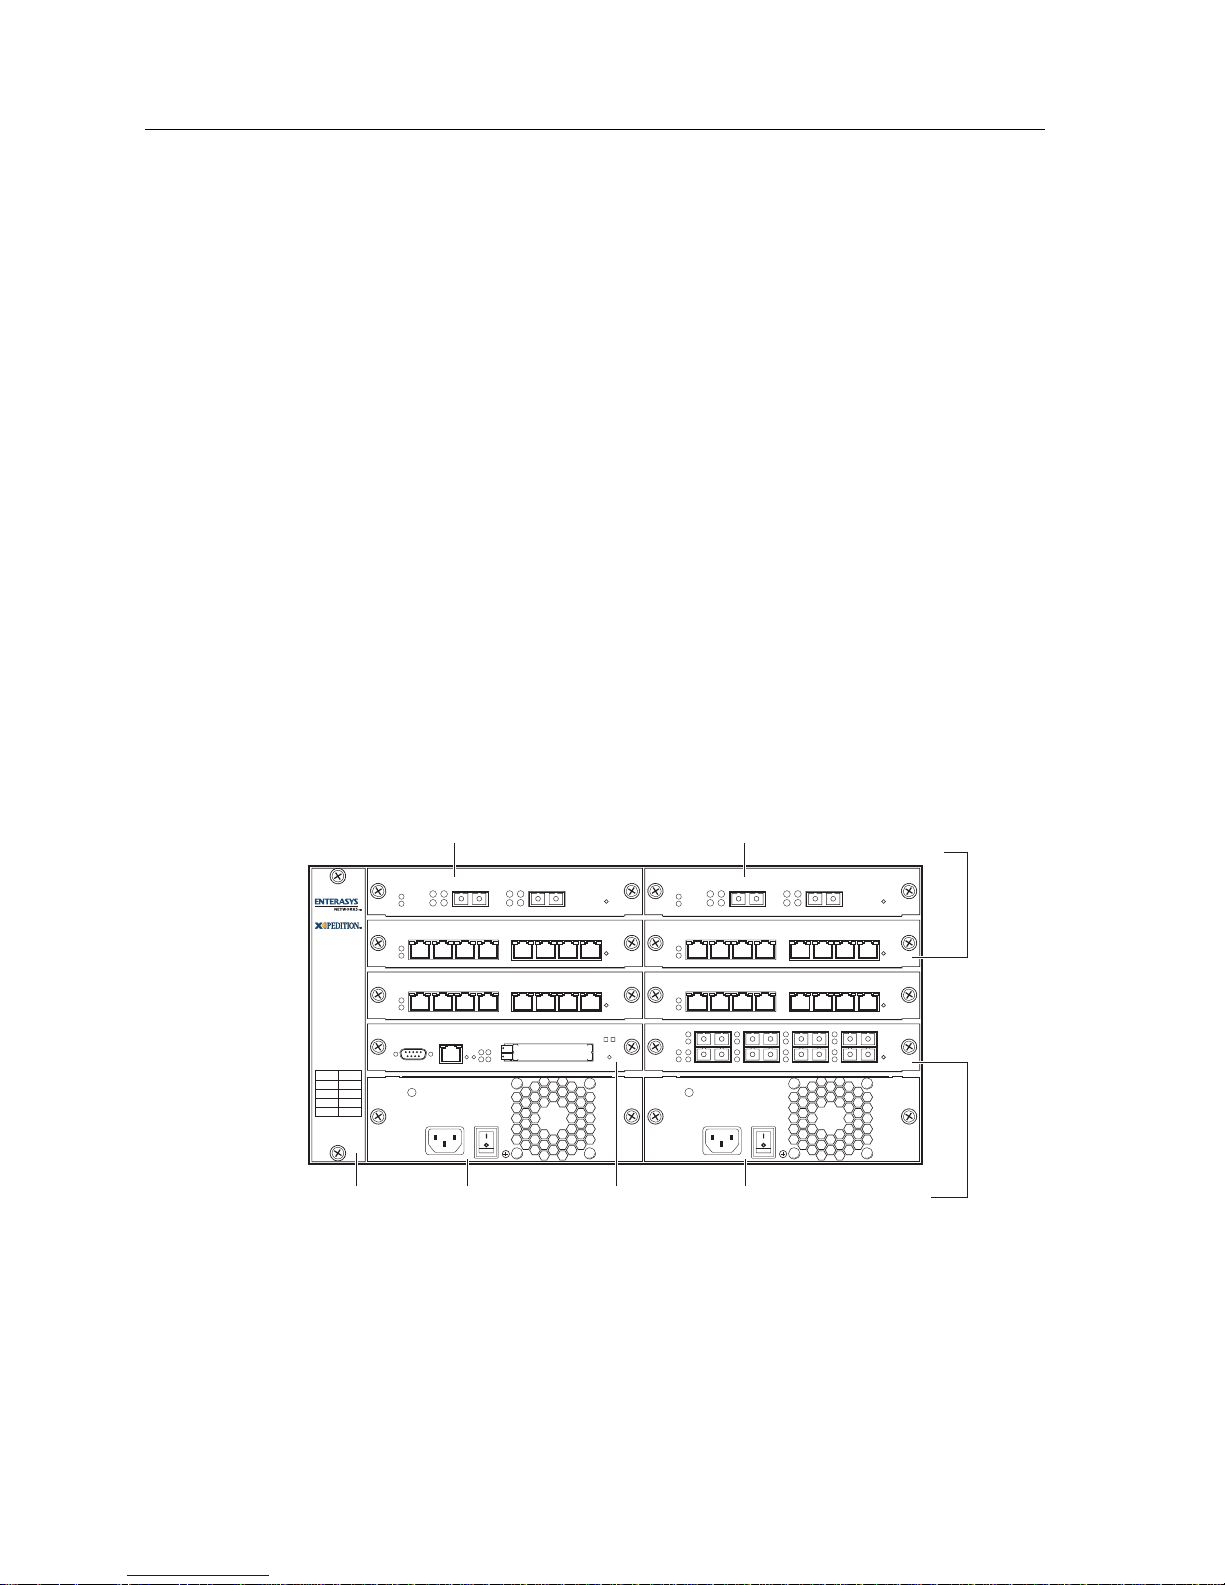
Figure 2 shows the front view of a fully loaded X-Pedition 8600 chassis. The X-Pedition 8600
chassis is similar to the X-Pedition 8000 chassis, except for the following:
• The chassis can contain up to 16 line cards.
• The switching fabric is stored on a separate module.
• There is a slot for a redundant switching fabric module.
• The power supply is larger.
Figure 2. Front view of a fully loaded X-Pedition 8600 chassis
The X-Pedition 8600 chassis contains sixteen slots, numbered from 0 to 15. Slot 0 is in the lower
left corner of the chassis and slot 15 is in the upper right corner. The X-Pedition 8600 also has slots
for primary and redundant switching fabric modules.
6
4
2
7
5
3
CM/1
PS2PS1
CM
21 21
87654321 87654321
87654321 87654321
87
6
5
4
3
21
10/100BASE-TXSSR-HTX22-08-AA
10/100BASE-TXSSR-HTX22-08-AA
10/100BASE-TXSSR-HTX22-08-AA
10/100BASE-TXSSR-HTX22-08-AA
1000BASE-LXSSR-GLX29-02-AA 1000BASE-SXSSR-GLX29-02-AA
100BASE-FXSSR-HFX21-08-AA
21 21
87654321 87654321
87654321 87654321
SSR-CM3-128 CONTROL MODULE
10/100BASE-TXSSR-HTX22-08-AA
10/100BASE-TXSSR-HTX22-08-AA
10/100BASE-TXSSR-HTX22-08-AA
10/100BASE-TXSSR-HTX22-08-AA
1000BASE-LXSSR-GLX29-02 1000BASE-SXSSR-GLX29-02
87
6
5
4
3
21
100BASE-FXSSR-HFX21-08-AA
12
10
8
13
11
9
14 15
Fabric 1
Fabric 2
SSR-CM3-128 CONTROL MODULE
Switching Fabric
Switching Fabric
Switching Fabric
module
Power supply
PWR
SSR-PS-16
SN
100-125V~ 10A
200-240V~ 6A
50/60 Hz
TO REMOVE POWER TO
UNIT DISCONNECT ALL
POWER SUPPLY CORDS
PWR
SSR-PS-16
SN
100-125V~ 10A
200-240V~ 6A
50/60 Hz
TO REMOVE POWER TO
UNIT DISCONNECT ALL
POWER SUPPLY CORDS
SSR-SF-16
SSR-SF-16
SSR-16

Hardware Overview
12 Enterasys X-Pedition 8000/8600 Getting Started Guide
On both the X-Pedition 8000 and X-Pedition 8600, slot 0 is labeled “CM” and contains the primary
control module. The CM slot cannot be used for line cards. The primary control module must be
installed in this slot. The CM/1 slot can contain a redundant control module (if you install one) or
can contain a line card. Slots 2 to 7 on the X-Pedition 8000 or slots 2 to 15 on the X-Pedition 8600
can contain any line cards unless otherwise noted in Installing Line Cards on page 71. For
information about these items, see Control Modules on page 14 and Line Cards on page 20 .
You can install line cards in any order in the slots. For example, you could install line cards in slots
2 and 5 and leave the other line card slots empty . The X-Pedition provides non-blocking throughput
regardless of the software features you are using. Therefore, you do not need to “load balance” line
cards by placing them in certain relationships to balance the load on the backplane. Regardless of
where you install the line cards, the backplane can provide full, non-blocking throughput.
Backplane
The backplane occupies the rear of the chassis and connects the power supplies, control modules,
and line cards together. The power supplies use the backplane to provide power to the rest of the
system. The line cards and control modules use the backplane to exchange control information and
packets. The backplane is installed at the factory. Contact Enterasys Networks if you wish to
replace the backplane.
Fan Module
The X-Pedition contains a fan module to provide a cooling air flow across the control module(s)
and line cards. The fan module is located on the left side of the control modules and line cards. The
X-Pedition 8000 fan module contains two fans; the X-Pedition 8600 fan module contains six fans.
The fan module is installed at the factory, but you can replace the module yourself, if necessary.
Note: To ensure that the fan module can provide adequate cooling, always provide a minimum of
3 inches of clearance on each side of the chassis.
Hot Swapping a Fan Tray
Note: Before you hot swap a fan tray on the X-Pedition, have the replacement fan nearby and
ready to install—delays in completing the swap may cause the router to overheat.
1. Loosen the captive screws.
2. Remove the fan tray (the fans will wind down and stop). Although the system will continue to
operate normally with the fans removed, if the fans are removed long enough the system will
overheat, power off, and reboot. When the fan tray is removed, the following message will
appear on the console:
%SYS-W-FANFAILED, system fan(s) have failed or fan tray is not installed

Enterasys X-Pedition 8000/8600 Getting Started Guide 13
Hardwar e Overview
3. Slide the new fan tray completely into the slot. Fans will start up and the LED on the front of
the fan tray will light if the fan is installed properly. Once the fan tray is installed, the following
message is displayed on the console:
4. Tighten the captive screws.
%SYS-I-FANSOKAY, system fans are operational.

Hardware Overview
14 Enterasys X-Pedition 8000/8600 Getting Started Guide
Control Modules
The control module is the X-Pedition’s central processing unit. It contains system-wide bridging
and routing tables. Traffic that does not yet have an entry in the L2 and L3/L4 lookup tables on
individual line cards is sent to the control module. After processing traffic, the control module
updates the L2 and L3/L4 tables on the line cards that received the traffic. The line cards thus
“learn” about how to forward traffic. Figure 3 shows the front panel of a control module.
Figure 3. Front panel of a control module
Note: Only PCMCIA slot 0 (the upper slot) is active. The control module cannot use two
PCMCIA flash cards at the same time.
Boot Flash
The control module has a boot flash containing the X-Pedition’s boot software and configuration
files. The system software image file resides on a PCMCIA flash card or a TFTP server.
Memory Module
The control module uses memory to hold the routing tables and other tables. The minimum factory
configuration for the control module includes 64MB of memory in an SSR-CM2B-64, 128MB of
memory in an SSR-CM3-128, and 256MB of memory in an SSR-CM4-256. You can obtain
X-Pedition memory upgrade kits from Enterasys Networks to increase memory to 128MB (in a
10/100 Mgmt
Console
RST
SYS
OK
ERR DIAG
HBT
Hot
Swap
Online Offline
PCMCIA slot 1
SSR-CM4-256 CONTROL!MODULE
PCMCIA slot 0
Insert
This side up
PART NO. 8910478
Software Rev:
MODEL NO. XP-PCMCIA-32AT

Enterasys X-Pedition 8000/8600 Getting Started Guide 15
Hardwar e Overview
128MB DIMM), or 256MB (in two 128MB DIMMs). See Installing a Memory Upgrade on
page 66 for the upgrade procedure.
External Controls
The control module has the following external controls. Where appropriate, this guide describes
how to use the controls.
• Male DB-9 Data Communications Equipment (DCE) port for serial connection from a
management terminal. Use this port to establish a direct CLI connection to the X-Pedition. The
default baud rate is 9600.
• 10/100BASE-TX out-of-band Ethernet management port for network management. The port is
configured as a Media Data Interface (MDI). Use this port to establish a management
connection to the X-Pedition over a local or bridged Ethernet segment.
• Reset switch (RST). Use this switch to reboot the X-Pedition’s CPU.
• PCMCIA flash memory slots. These slots let you install system image software upgrades as well
as older system image software versions.
Note: You can install a PCMCIA flash in slot 0 only. You cannot use two PCMCIA cards at the
same time.
LEDs
Table 1. Control Module LED Indicators
LED Condition Status
OK On Ready for operation or configuration.
HBT Flashing Booting or waiting for configuration.
On Remains on for 5 seconds at power-up.
ERR On Remains on for 5 seconds at power-up.
On Error occurred.
DIAG On Remains on for 5 seconds at power-up.
On The diagnostics are running.
GREEN On Link on ethernet port.
YELLOW Flashing Activity on port.
Hot Swap On CM4 is active.
Off CM4 is redundant or offline.

Hardware Overview
16 Enterasys X-Pedition 8000/8600 Getting Started Guide
AC Power Supply
The power supply delivers 3.3, 5, and 12 volts DC to the X-Pedition’s control module(s), fan
modules, and other components. A single power supply provides enough current to operate a fully
configured chassis—with the exception of certain line cards. For information about these cards,
refer to Installing Line Cards on page 71. The power supply has its own internal cooling fan. The
vent on the front of the power supply is the inlet vent for the cooling fan. Figure 4 shows the front
view of an X-Pedition 8000 AC power supply.
Figure 4. Front view of an X-Pedition 8000 AC power supply
The X-Pedition 8600 power supply is nearly twice as large as the X-Pedition 8000 power supply.
Figure 5 shows the front view of an X-Pedition 8600 AC power supply.
Figure 5. Front view of an X-Pedition 8600 AC power supply
SSR-PS-8
100-125~5A
200-240~3A
50-60 Hz
PWR
PWR
SSR-PS-16
SN
100-125V~ 10A
200-240V~ 6A
50/60 Hz
TO REMOVE POWER TO
UNIT DISCONNECT ALL
POWER SUPPLY CORDS

Enterasys X-Pedition 8000/8600 Getting Started Guide 17
Hardwar e Overview
AC Power Supply Specifications
The following table lists the specifications for the X-Pedition’s AC power supplies.
To ensure against equipment failure, you can install a redundant power supply. When two power
supplies are active in the X-Pedition, they load share, each supply delivering approximately 50
percent of the current needed. Moreover, if one of the power supplies fails, the other power supply
immediately assumes the entire load, thus preventing any system outage.
The AC power supply has a green status LED. When the LED is lit, the power supply is connected
to an appropriate power source and is active. The status LED is lit when you switch the power
supply on, not when you plug the power supply into a power source.
X-Pedition 8000 X-Pedition 8600
Dimensions 8.27 in. H x 17.25 W x 12.25 D
22.23 cm H x 43.82 W x 31.12 D
8.27 in. H x 17.23 W x 19.25 D
22.23 cm H x 43.82 W x 48.9 D
Weight Pounds: 24Lbs
Kilograms: 10.8 Kg
Pounds: 47 Lbs
Kilograms: 21.2 Kg
AC Power 100-125 VAC, 5A maximum
200-240 VAC, 3A maximum
50/60 Hz
100-125 VAC, 10A maximum
200-240 VAC, 6A maximum
50/60 Hz
Output Wattage
At 3.4 V
At 5.1 V
At 12 Volts
390 Watts
70 Amps
25 Amps
2 Amps
780 W a tts
140 Amps
50 Amps
4 Amps
Operating
Temperature
Fahrenheit: 41
o
F to 104oF
Centigrade: 5oC to 40oC
Fahrenheit: 41oF to 104oF
Centigrade: 5oC to 40oC

Hardware Overview
18 Enterasys X-Pedition 8000/8600 Getting Started Guide
DC Power Supply
The X-Pedition DC power supply delivers 3.3, 5, and 12 volts DC to the X-Pedition’s control
module(s), fan modules, and other components. A single DC power supply provides enough current
to operate a fully configured chassis—with the exception of certain line cards. For information
about these cards, refer to Installing Line Cards on page 71.
Figure 6 shows the front view of an X-Pedition 8000 DC power supply.
Figure 6. Front view of an X-Pedition 8000 DC power supply
The X-Pedition 8 000 DC power supply has a three-termin al wiring block on the front panel,
consisting of a positive (+) terminal, negative (-) terminal and a safety ground. The DC supply is
designed to be powered by a 48-Volt DC source. Figure 7 shows the front view of an
X-Pedition 8600 DC Power Supply.
Figure 7. Front view of an X-Pedition 8600 DC power supply
The X-Pedition 8600 DC power supply has a five-terminal wiring block on the front panel,
consisting of two positive (+) terminals, two negative (-) terminals and a safety ground. The DC
supply is designed to be powered by a 48-Volt DC source.
SSR-PS-8-DC
PWR
SN
!
To!be!installed!in!a!restricted
access!area!in!accordance
with!the!NEC!or!authority
having!jurisdiction.
See!manual!for!installation
instructions.
48/60V
14A!MAX
PWR
SSR-PS-16-DC
SN
48/60V
27A MAX
!
To be installed in a restricted
access area in accordance
with the NEC or authority
having jurisdiction.
See manual for installation
instructions.

Enterasys X-Pedition 8000/8600 Getting Started Guide 19
Hardwar e Overview
DC Power Supply Specifications
The following table lists the physical specifications for the X-Pedition’s DC power supplies.
The following table lists the environmental specifications for the X-Pedition’s DC power supplies.
Switching Fabric Module (X-Pedition 8600 only)
On the X-Pedition 8600, the switching fabric is contained on a separate plug-in module. The
X-Pedition 8600 has slots for two of these modules. When two switching fabric modules are
installed, the module in the slot labelled “Fabric 1” serves as the primary switching fabric module,
and the module in the slot labelled “Fabric 2” serves as a redundant switching fabric module.
Figure 8 shows the front panel of the X-Pedition 8600 Switchi ng Fabric module.
Figure 8. Front panel of X-Pedition 8600 Switching Fabric module
X-Pedition 8000 X-Pedition 8600
Input Voltage 48 to 60 VDC
(14 Amperes Max.)
48 to 60 VDC
(27 Amperes Max.)
Output Wattage
At 3.4 V
At 5.1 V
At 12 Volts
390 W atts
70 Amps
25 Amps
2 Amps
780 Watts
140 Amps
50 Amps
4 Amps
Dimensions 11.00 in. L x 7.70 W x 2.55 H
27.94 cm L x 19.55 W x 6.47 H
12.15 in. L x 7.70 W x 5.05 H
30.86 cm L x 19.55 W x 12.82 H
Weight 6.5 lb (2.95 kg) 12.0 lb (5.45 kg)
Operating Temperature +5 to +40 °C (41 to 104 °F)
Non-operating Temperature -30 to +73 °C (-22 to 164 °F)
Operating Humidity 15 to 90% (non-condensing)
SSR-SF-16
Switching Fabric
Active
Online
Swap
Hot
Offline
Active
Online
Swap
Hot
Offline
Hardware Overview
20 Enterasys X-Pedition 8000/8600 Getting Started Guide
LEDs
Line Cards
This section addresses the following line cards:
SSR-ARE on page 21
SSR-ATM29-02 on page 21
SSR-CM2B-64, SSR-CM3-128, and SSR-CM4-256 on page 25
SSR-FDDI-02 on page 26
SSR-GLX39-02 on page 28
SSR-GLX39-04 and SSR-GSX31-04 on page 30
SSR-GLX70-01-AA and SSR-GLH39-02 on page 33
SSR-GSX21-02-AA and SSR-GLX29-02-AA on page 35
SSR-GSX31-02 on page 37
SSR-GTX32-04 and SSR-GTX32-02 on page 39
SSR-HFX21-08-AA and SSR-HFX29-08-AA on page 41
SSR-HSSI-02-CK on page 42
SSR-HTX22-08-AA and SSR-HTX12-08-AA on page 44
SSR-HTX32-16 on page 45
SSR-POS29-04 and SSR-POS21-04 on page 46
SSR-POS39-02 and SSR-POS31-02 on page 48
SSR-SERCE-04-AA and SSR-SERC-04-AA on page 50
Note: When using line cards introduced prior to the “AA” series, SNA/DLC/NetBIOS traffic
may not bridge properly. The issue in bridging DLC packets occurs where the length field
within an IEEE 802.3 frame indicates less than 46 bytes of data.
The X-Pedition removes the length field information of incoming IEEE 802.3, 802.2, and
Ethernet SNAP packets, then recalculates the f ield prior to re-transmission. Consequently,
the calculation is based on the length of the entire data field. A packet entering the
X-Pedition whose length field indicates a data field of less than 46 bytes will exit with the
length field recalculated incorrectly. This can be a problem with LLC2 and legacy IPX
applications. Typically, such packets exist only in SNA and NetBIOS/NetBEUI
environments.
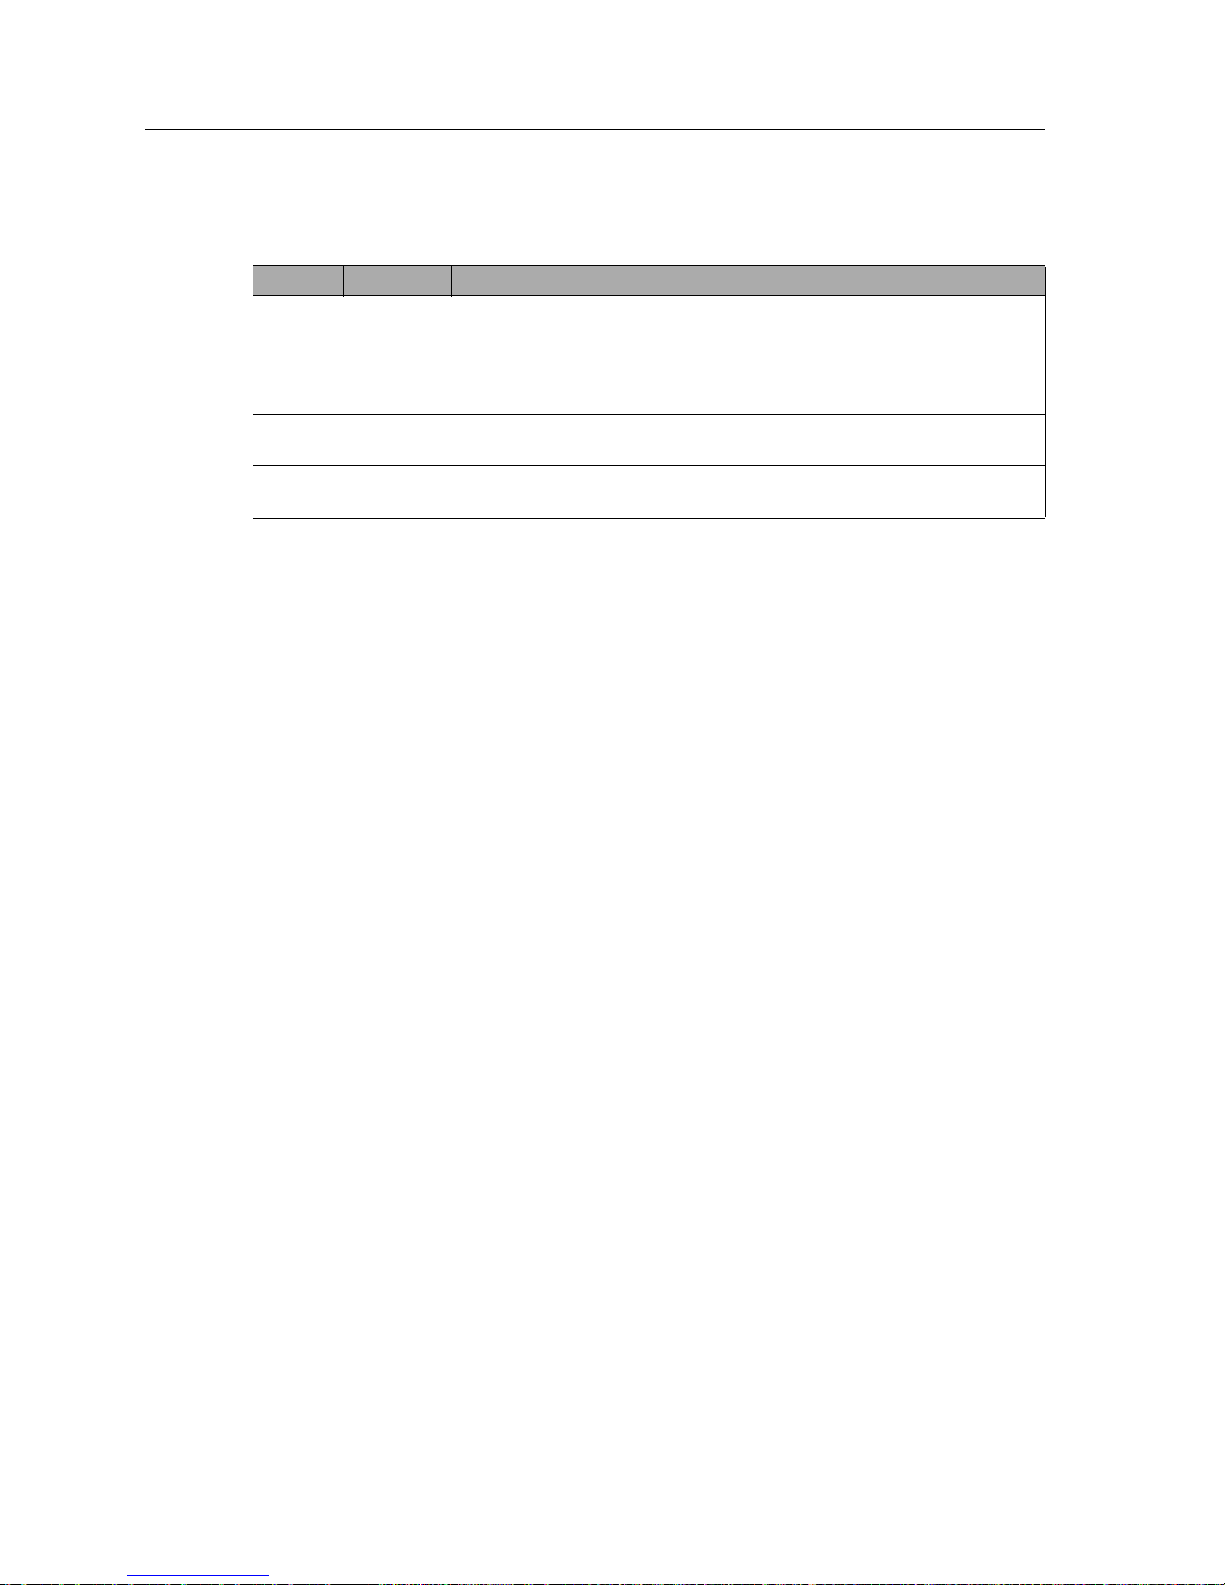
Table 2. X-Pedition 8600 Switching Fabric module LEDs
LED Condition Description
Offline Amber The module is offline (powered off) and is ready for hot swap.
The Offline LED also lights briefly during a reboot or reset of the X-Pedition and
goes out as soon as the control module discovers and properly initializes the
switching fabric module.
Online Green T he module is online and is ready to receive, process, and send packets if
configured to do so.
Active On The switching fabric module is actively receiving, processing, and sending
packets.

Enterasys X-Pedition 8000/8600 Getting Started Guide 21
Hardwar e Overview
SSR-ARE
The Advanced Routing Engine (ARE) provides the X-Pedition 8000/8600 an avenue for routing
protocols other than IP and IPX—currently, the ARE supports only the Appletalk protocol. The
ARE is powered by a RISC processor that operates at 380Mhz, providing lightning-fast routing of
your personal appletalk traffic. If you use a VLAN to create an AppleTalk interface, you must use
an AppleTalk procotol-based VLAN.
Note: The ARE module cannot be installed into slots 0 or 1 on an X-Pedition 8000, or 0, 1, or 15
on an X-Pedition 8600. Attempting to hot swap this module into any of those slots may
cause the router to core dump.
SSR-ATM29-02
The fully integrated design of the X-Pedition family increases the value of the product line by
providing a seamless solution to support the industry’s most complete range of technology and
media options. This scalable framework ensures full cross-platform compatibility and allows for
the smoothest possible migration as customers’ technology and interface requirements evolve.
The combination of the X-Pedition and the SSR-ATM29-02 OC-3c module provide a complete
solution for both the service provider and enterprise markets. Interconnecting IP networks over an
ATM backbone is done by many service provider and enterprise customers. The OC-3c module
provides the vital link between the network’s switch-router solutions and the ATM-based solution
in the WAN. Each PVC on the module can be configured as a routed IP interface, and the ATM
backbone can provide connectivity from one routed backbone to another.
The SSR-ATM29-02 is a modular, high-performance OC-3c ATM interface for the
X-Pedition 8000 and X-Pedition 8600. The module is optimized to provide an ATM uplink to an
ATM backbon e, and supp orts two modular slots, each of which accepts T1 /E1, T3/E3 and OC-3 c
(single mode and multimode fiber, as well as unshielded twisted pair) interface.
The SSR-ATM29 -02 line card actu ally houses various Physical Layer (PHY) interface cards in its
two available slots. ATM PHY cards provide the media-specific portion of an ATM interface to
support ATM connect ivity across multiple platforms using different media types. The host system
provides the power, initialization, and control for the PHY card. The PHY card is used with an
ATM segmentation and reassembly (SAR) or cell-switching function.
See Installing the ATM PHY Cards on page 80 for installation instructions for the ATM PHY cards
into the SSR-ATM29-02 line card. Figure 9 shows the front panel of the SSR-AT M29-02 line card.
Figure 9. Front panel of SSR-ATM29-02 line card
Online
Offline
SSR-ATM29-02 ATM MODULE
Hot
Swap
P1
P2

Hardware Overview
22 Enterasys X-Pedition 8000/8600 Getting Started Guide
Options Available
This module operates with the following APHYs (you may purchase them separately from the
module) connected to the outside world. For information about these APHYs, consult the Enterasys
Networks web site.
Caution: The X-Pedition-APHY-21 and X-Pedition-APHY-29IR use Class 1 Lasers. Do not use
optical instruments to view laser output. The use of optical instruments to view laser output
increases eye hazard.
Note: Before you can remove an APHY, Hot Swap the host ATM module.
The ATM line card has two available slots. Each slot accepts the following PHY interface modules:
Port type Specification
APHY-67 • 1 DS-3/T-3 interface (BNC Coax); see APHY-67 and APHY-77
on page 81 for attaching cables
• 75 coaxial (RG-59B or equivalent) terminated with 75-ohm BNC
connectors
• Maximum of 450 ft (137 m) of cable
APHY-77 • 1 E-3 interface (BNC); see APHY-67 and APHY-77 on page 81
for attaching cables
• 75 coaxial (RG-59B or equivalent) terminated with 75-ohm BNC
connectors
• Maximum of 450 ft (137 m) of cable
APHY-82V • 1 T-1 interface (UTP); see APHY-82V on page 81 for attaching
cables
Note: The APHY-82V is not a T1 interface. It merely allows you
to connect to a T1 CSU—the T1 CSU will allow you to
connect to a T1 circuit.
• ITU-T G.703 for a symmetrical pair
• 100 ohm symmetrical pair
• Maximum of 655 ft (200 m) of cable
• 0 through 6 dB loss at 200 m
APHY-67
PHY
APHY-77
PHY
APHY-82V
PHY

Enterasys X-Pedition 8000/8600 Getting Started Guide 23
Hardwar e Overview
Ports
Depending on the APHY used, 1 or 2.
APHY-92V • 1 E-1 interface (UTP); see APHY-82V on page 81 for attaching
cables
Note: The APHY-92V is not an E1 interf ace. It merely allo ws you
to connect to an E1 CSU—the E1 CSU will allow you to
connect to an E1 circuit.
• ITU-T G.703 for a symmetrical pair
• 120 ohm symmetrical pair
• Maximum of 655 ft (200 m) of cable
• 0 through 6 dB loss at 200 m
APHY-21 • 1 OC-3c MMF interface (SC-style); see APHY-21 and APHY-
29IR on page 81 for attaching cables
• EIA/TIA 492-AAAA
• 62.5/125 µm
• Maximum cable length cannot exceed 2 kilometers (maximum
will allow up to three cables—two splices). Additional
cables/splices will reduce the maximum cable length.
• 0 to 9 dB loss at 1300 nm
APHY-29IR • 1 OC-3c SMF-IR interface (SC-style); see APHY-21 and APHY-
29IR on page 81 for attaching cables
• EIA/TIA 492-CAAA
• 9/125 µm
• Maximum cable length cannot exceed 15 kilometers (maximum
will allow up to three cables—two splices). Additional
cables/splices will reduce the maximum cable length.
• 0 to 15 dB loss at 1300 nm
APHY-22 • 1 OC-3c interface (UTP); see APHY-22 on page 82 for attaching
cables
• EIA/TIA 568B
• 295 ft (90 m) of Category 5 building cable
• 33 ft (10 m) of Categor y 5 patch cords
• 1 punchdown block (Category 5)
APHY-92V
PHY
APHY-21
PHY
APHY-29IR
PHY
APHY-22
PHY

Hardware Overview
24 Enterasys X-Pedition 8000/8600 Getting Started Guide
Interface
X-Pedition 8000/8600 2-port base module
Physical Dimensions
Size: 27.94 cm H x 19.68 W x 3.94 D (11.00 in. H x 7.75 W x 1.55 D)
Weight: 1.4 kg (3.0 lb)
Temperature
Operating: 41° to 104°F (5° to 40°C)
Storage: -22° to 164°F (-30° to 73°C)
Humidity
5% to 90% (non-condensing)
LEDs
Table 3. SSR-ATM29-02 LED Indicators
LED Condition Status
Hot Swap (2) Yellow (Top) Unit is not functioning, cannot hot swap.
Green (Bottom) Unit is operational.
Port 1 Traffic (2) Tx Green (Top) Indicates when the transceiver receives packets.
Rx Green (Bottom) Indicates when the transceiver receives flow-control
packets.
Port 2 Traffic (2) Tx Green (Top) Indicates when the transceive r transmits packets.
Rx Green (Bottom) Indicates when the transceiver transmits flow-control
packets.
PHY (Top) Green The PHY is operating properly and a link is
established.
Yellow The PHY is inactive due to media errors.
Blinking Green The PHY was disabled by management.
Off No connection.
Lightning
(Bottom)
Yellow The diagnostics have detected a fault.
Blinking Green The PHY port has been redirected elsewhere.
Off Unit is operating properly.

Enterasys X-Pedition 8000/8600 Getting Started Guide 25
Hardwar e Overview
SSR-CM2B-64, SSR-CM3-128, and SSR-CM4-256
The SSR-CM2B-64, SSR-CM3-128, and SSR-CM4-256 are Control Modules for the
X-Pedition 8000 and X-Pedition 8600 product family. The CM4, targeted for applications that
require higher processing power, uses a 380Mhz RISC processor and detection circuitry to
maximize the internal clock speed for the given chassis.
Port
1 10/100 BaseT
MAC Addresses
64 Internal MAC Addresses
Temperature
Operating: 41° to 104°F (5° to 40°C)
Storage: -22° to 164°F (-30° to 73°C)
Humidity
5% to 90% (non-condensing)
Options Available
Control modules will operate only in slots 0 and 1 of the X-Pedition chassis.

Hardware Overview
26 Enterasys X-Pedition 8000/8600 Getting Started Guide
SSR-FDDI-02
The SSR-FDDI-02 module supports high-performance translation from Ethernet, Fast Ethernet,
Gigabit Ethernet, and ATM to FDDI, as well as connectivity between FDDI modules. IP
Fragmentation support allows the module to fragment FDDI frames into multiple, smaller Ethernet
frames. MTU path discovery support allows the module to transport the maximum size of packet to
its end destination. FDDI full-duplex support is available for point to point connections with only
two stations on a FDDI ring that support full duplex. The SSR-FDDI-02 module also supports the
ring and DEC ring purger protocols, an extension to the FDDI specification.
Ports
2 Port FDDI Base Module (SSR-FDDI-02)
ASIC Type
T-Series
Network Interfaces
FPHY-01 MMF DAS
FPHY-02 UTP SAS
FPHY-09 SMF DAS
Number of Flows/Routes
Layer-2 Entries = 128,000 (memory size = 8 MB)
Layer-3/4 Entries = 256,000 (memory size = 16 MB)
Queue Buffer
8 MB per port
Physical Dimensions
Size: 27.94 cm H x 3.94 W x 19.68 D (11 in. H x 1.55 W x 7.75 D)
Weight: 1.4 kg (3.0 lb)
Temperature
Operating: 41° to 104° F (5° to 40° C)
Storage: -22° to 164° F (-30° to 73° C)
Humidity
15% to 90% (non-condensing)

Enterasys X-Pedition 8000/8600 Getting Started Guide 27
Hardwar e Overview
LEDs
Table 4. SSR-FDDI-02 LED Indicators
LED Condition Status
Rx Off No activity
Flashing Yellow Activity
Red Diagnostic failure
Tx Off No activity
Flashing Green Activity
Blinking Yellow Port on standby
Red Diagnostic failure
Primary/Secondary
Port LEDs
(A, B, P, S)
ABP S
Yellow Yellow Off Off Port enabled, not active
Off Off Of f Off Ports disabled
Green Green Off Off Ports enabled
Green Green Green Off THRU A
Green Green Off Green THRU B
Green Off Green Yellow WRAP A
Off Green Green Yellow WRAP B
Green Green Green Yellow WRAP AB
Green Off Green Off WRAP S (in S mode)
Green Green Of f Off BYPASS Board
Green Green Red Red TWISTED A-A, B-B
Red Red Red Red Diagnostic failure

Hardware Overview
28 Enterasys X-Pedition 8000/8600 Getting Started Guide
SSR-GLX39-02
The SSR-GLX39-02 (T-Series) line card provides the same features as the SSR-GSX31-02 line
card, but supports single mode fiber (SMF) as well as multimode fiber (MMF). Figure 10 shows the
front panel of the SSR-GLX39-02 (T-Series) line card.
Figure 10. Front panel of SSR-GLX39-02 (T-Series) line card
LEDs
21
Link
Offline
Online
Tx
Rx
1000BASE-LXSSR-GLX39-02
Hot
Swap
LinkTx
RxAN AN
Gigabit Port
Gigabit Port
Table 5. SSR-GLX39-02 line card LED Indicators
LED Condition Status
Offline Amber The line card is offline (powered off) but is ready for hot
swap.
The Offline LED also lights briefly during a reboot or
reset of the X-Pedition but goes out as soon as the control
module discovers the line card.
Online Green The line card is online and is ready to receive, process,
and send packets if configured to do so.
Per-port Link Green The port hardware detects a cable plugged into the port
and a good link is established.
Red (intermittent) The port received an error during operation.
Red (solid) The port hardware detects a cable plugged into the port,
however, a bad link is established.
Off Indicates that no link from the port exists.
Per-port Rx Green The port’s transceiver received a packet.
Amber The port’s transceiver received a flow control packet.
Per-port Tx Green The port’s transceiver transmitted a packet.
Amber The port’s transceiver transmitted a flow-control packet.

Enterasys X-Pedition 8000/8600 Getting Started Guide 29
Hardwar e Overview
Per-port AN Green The line card has auto negotiated the operating mode of
the link between full-duplex and half-duplex.
Amber (intermittent) Auto-Negotiation is in process.
Amber (solid) Indicates a problem with Auto-Negotiation
configuration.
Red Indicates an Auto-Negotiation failure. This fault may
occur if the link partner does not support full duplex.
Off Auto-Negotiation was disabled or the link is down.
Table 5. SSR-GLX39-02 line card LED Indicators (Continued)
LED Condition Status

Hardware Overview
30 Enterasys X-Pedition 8000/8600 Getting Started Guide
SSR-GLX39-04 and SSR-GSX31-04
The SSR-GLX39-04 and SSR-GSX31-04 are 4-port, T-Series Gigabit Line Cards for the
X-Pedition 8000 and X-Pedition 8600 switch routers. The SSR-GLX39-04 connects to 1000BASELX fiber and the SSR-GSX31-04 connects to 1000BASE-SX fiber.
Note: If your system uses a redundant power configuration or only one power supply, you will
not be able to support more than 4 SSR-GLX39-04 and SSR-GSX31-04 cards in the
X-Pedition 8000 and 10 in the X-Pedition 8600.
Ports
4 1000BASE-SX or 1000BASE-LX SC connectors
Network Interfaces
SC connector—850 nm Short-Wavelength Transceiver
SC connector—1300 nm Long-Wav elength Transceiver
50/125 mm Multimode Fiber-Optic Cables
62.5/125 mm Multimode Fiber-Optic Cables
10/125 mm Single Mode Fiber-Optic Cables
Offline
Online
T
R
L
A
Hot!Swap
T
R
L
A
T
R
L
A
T
R
L
A
SSR-GLX39-04!
Offline
Online
T
R
L
A

Enterasys X-Pedition 8000/8600 Getting Started Guide 31
Hardwar e Overview
Number of Flows/Routes
Layer-2 Entries = 512,000 (memory size = 32 MB)
Layer-3 Entries = 256,000 (memory size= 16 MB)
Switch Method
Address-based and Flow-based.
Queue Buffer
Input packet memory size: 8 MB
Output packet memory size: 8 MB
Physical Dimensions
Size: 3.94 cm H x 19.68 W x 27.94 D (1.55 in. H x 7.75 W x 11 D)
Weight: 1.4 kg (3.0 lb)
Temperature
Operating: 41° to 104° F (5° to 40° C)
Storage: -22° to 164° F (-30° to 73° C)
Humidity
15% to 90% (non-condensing)

Hardware Overview
32 Enterasys X-Pedition 8000/8600 Getting Started Guide
LEDs
Table 6. SSR-GLX39-04 and SSR-GSX31-04 LED Indicators
LED Condition Status
Offline On The line card is offline (powered off) and ready to hot swap.
This LED also lights briefly whey you reboot or reset the
X-Pedition but turns off as soon as the control module discovers
the SSR-GLX39-04 or SSR-GSX31-04.
Online On The SSR-GLX39-04 or SSR-GSX31-04 is ready to receive,
process, and send packets (if configured).
Per-Port Link Green Indicates that the port hardware detected the cable plugged into
the port and a good link is established.
Red
(intermittent)
The port received an error during operation.
Red The port hardware detected a cable plugged into the port, but a
bad link was established.
Off No link from the port exists.
Per-port Rx Green The port’s transceiver is receiving packets.
Amber The port’s transceiver is receiving flow-control packets.
Per-port Tx Green The port’s transceiver is transmitting packets.
Amber The port’s transceiver is transmitting flow-control packets.
Per-port AN Green The line card auto-negotiated the operating mode of the link
between full-duplex and half-duplex.
Amber
(intermittent)
Auto-Negotiation is in progress.
Amber Indicates a problem with Auto-Negotiation configuration.
Red An Auto-Negotiation failure occurred.This fault may occur if the
link partner does not support full-duplex operation.
Off Auto-Negotiation is disabled or the link is down.

Enterasys X-Pedition 8000/8600 Getting Started Guide 33
Hardwar e Overview
SSR-GLX70-01-AA and SSR-GLH39-02
The SSR-GLX70-01-AA and SSR-GLH39-02 line cards are similar to the SSR-GLX39-02 line
card, but extend the transmission distance over single mode fiber (SMF) to 70 kilometers for
Gigabit Ethernet. Figure 11 shows the front panel of the 1000BASE-LLX line card.
Figure 11. Front panel of 1000BASE-LLX line card
Figure 12 shows the front panel of the 1000BASE-LLX (T-Series) line card.
Figure 12. Front panel of 1000BASE-LLX (T-Series) line card
LEDs
Hot
Swap
1
Online
Offline
Rx
Tx Link
AN
Gigabit!port
1000BASE-LLXSSR-GLX70-01-AA
21
Link
Offline
Online
Tx
Rx
1000BASE-LLXSSR-GLH39-02
Hot
Swap
LinkTx
RxAN AN
Gigabit Port
Gigabit Port
Table 7. SSR-GLX70-01-AA and SSR-GLH39-02 line card LEDs
LED Condition Description
Offline Amber The line card is offline (powered off) but is ready for hot
swap.
The Offline LED also is lit briefly during a reboot or reset of
the X-Pedition but goes out as soon as the control module
discovers the line card.
Online Green The line card is online and is ready to receive, process, and
send packets if configured to do so.

Hardware Overview
34 Enterasys X-Pedition 8000/8600 Getting Started Guide
Per-port Link Green The port hardware detects a cable plugged into the port and a
good link is established.
Red
(intermittent)
Indicates that the port received an error during operation.
Red (solid) The port hardware detected a cable plugged into the port,
however, a bad link is established.
Off Indicates that no link from the port exists.
Per-port Rx Green The port’s transceiver received a packet.
Amber The port’s transceiver received a flow-control packet.
Per-port Tx Green The port’s transceiver transmitted a packet.
Amber The port’s transceiver transmitted a flow-control packet.
Per-port AN Green Green – indicates that the line card has auto negotiated the
operating mode of the link between full-duplex and halfduplex.
Amber
(intermittent)
Amber (intermittent) – indicates that Auto-Negotiation is in
process.
Amber (solid) Indicates a problem with Auto-Negotiation configuration.
Red Indicates an Auto-Negotiation failure. This fault may occur if
the link partner does not support full duplex.
Off Auto-Negotiation was been disabled or the link is down.
Table 7. SSR-GLX70-01-AA and SSR-GLH39-02 line card LEDs (Continued)
LED Condition Description

Enterasys X-Pedition 8000/8600 Getting Started Guide 35
Hardwar e Overview
SSR-GSX21-02-AA and SSR-GLX29-02-AA
The SSR-GSX21-02-AA and SSR-GLX29-02-AA line cards contain two independent Gigabit
(1000 Mbps) Ethernet ports. The ports connect to multimode fiber (MMF) cables. Figure 10 shows
the front panel of the SSR-GSX21-02-AA line card.
Figure 13. Front panel of SSR-GSX21-02-AA line card
LEDs
21
Link
Offline
Online
Tx
Rx
1000BASE-LXSSR-GSX21-02-AA!
Hot
Swap
LinkTx
RxAN AN
Gigabit Port
Gigabit Port
Table 8. SSR-GSX21-02-AA and SSR-GLX29-02-AA line card LEDs
LED Condition Description
Offline Amber The line card is offline (powered off) but is ready for hot swap.
The Offline LED also lights briefly during a reboot or reset of
the X-Pedition but goes out as soon as the control module
discovers the line card.
Online Green The line card is online and is ready to receive, process, and send
packets if configured to do so.
Per-port Link Green The port hardware detects a cable plugged into the port and a
good link is established.
Red
(intermittent)
The port received an error during operation.
Red (solid) The port hardware detects a cable plugged into the port,
however, a bad link is established.
Off Indicates that no link from the port exists.
Per-port Rx Green The port’s transceiver received a packet.
Amber The port’s transceiver received a flow control packet.
Per-port Tx Green The port’s transceiver transmitted a packet.
Amber The port’s transceiver transmitted a flow-control packet.

Hardware Overview
36 Enterasys X-Pedition 8000/8600 Getting Started Guide
Per-port AN Green The line card has auto negotiated the operating mode of the link
between full-duplex and half-duplex.
Amber
(intermittent)
Auto-Negotiation is in process.
Amber (solid) Indicates a problem with Auto-Negotiation configuration.
Red Indicates an Auto-Negotiation failure. This fault may occur if
the link partner does not support full duplex.
Off Auto-Negotiation was disabled or the link is down.
Table 8. SSR-GSX21-02-AA and SSR-GLX29-02-AA line card LEDs
LED Condition Description

Enterasys X-Pedition 8000/8600 Getting Started Guide 37
Hardwar e Overview
SSR-GSX31-02
The SSR-GSX31-02 line card contains two independent Gigabit (1000 Mbps) Ethernet ports. The
ports connect to multimode fiber (MMF) cables. Figure 14 shows the front panel of the SSRGSX31-02 (T-Series) line card.
Figure 14. Front panel of SSR-GSX31-02 (T-Series) line card
LEDs.
21
Link
Offline
Online
Tx
Rx
1000BASE-SXSSR-GSX31-02
Hot
Swap
LinkTx
RxAN AN
Gigabit PortGigabit Port
Table 9. SSR-GSX31-02 line card LEDs
LED Condition Description
Offline Amber The line card is offline (powered off) but is ready for hot
swap.
The Offline LED also is lit briefly during a reboot or reset of
the X-Pedition but goes out as soon as the control module
discovers the line card.
Online Green The line card is online and is ready to receive, process, and
send packets if configured to do so.
Per-port Link Green The port hardware detects a cable plugged into the port and a
good link is established.
Red
(intermittent)
The port received an error during operation.
Red (solid) The port hardware detects a cable plugged into the port,
however, a bad link is established.
Off No link from the port exists.
Per-port Rx Green The port’s transceiver received a packet.
Amber The port’s transceiver received a flow-control packet.
Per-port Tx Green The port’s transceiver transmitted a packet.
Amber The port’s transceiver transmitted a flow-control packet.

Hardware Overview
38 Enterasys X-Pedition 8000/8600 Getting Started Guide
Per-port AN Green The line card has auto negotiated the operating mode of the
link between full-duplex and half-duplex.
Amber
(intermittent)
Auto-Negotiation is in process.
Amber (solid) Indicates a problem with Auto-Negotiation configuration.
Red Red – indicates an Auto-Negotiation failure. This fault may
occur if the link partner does not support full duplex.
Off Off – indicates that Auto-Negotiation has been disabled or the
link is down.
Table 9. SSR-GSX31-02 line card LEDs (Continued)
LED Condition Description

Enterasys X-Pedition 8000/8600 Getting Started Guide 39
Hardwar e Overview
SSR-GTX32-04 and SSR-GTX32-02
The SSR-GTX32-04 is a 4-port and the SSR-GTX32-02 a 2-port copper-based 1000BASE-T
Gigabit Ethernet module for the X-Pedition platform. Figure 15 displays the front panel of an SSRGTX32-04.
Figure 15. Front panel of SSR-GTX32-04 line card
Note: If your system uses a redundant power configuration or only one power supply, you will
not be able to support more than 5 SSR-GTX32-04 and SSR-GTX32-02 cards in the
X-Pedition 8000 and 10 in the X-Pedition 8600.
Ports
4 1000BASE-T Ports
or
2 1000BASE-T Ports
Network Interface
RJ-45 100 m Cat. 5 UTP Cabling per ANSI/TIA/EIA-568-A.
Offline
Online
T
R
L
Q
SSR-GTX32-04
Offline
Online
T
R
L
Q
T
R
L
Q
T
R
L
Q
T
R
L
Q
Hot Swap

Hardware Overview
40 Enterasys X-Pedition 8000/8600 Getting Started Guide
Number of Flows/Routes
Layer-2 Entries =512,000 (memory size = 32 MB)
Layer-3 Entries = 256,000 (memory size = 16 MB)
Physical Dimensions
Size: 27.94 cm H x 3.94 W x 19.68 D (11.00 in. H x 1.55 W x 7.75 D)
Weight: 1.4 kg (3.0 lbs)
Temperature
Operating: 41° to 104° F (5° to 40° C)
Storage: -22° to 164° F (-30° to 73° C)
Humidity
15% to 90% (non-condensing)
LEDs
Table 10. SSR-GTX32-04 and SSR-GTX32-02 LED Indicators
LED Condition Status
Online On (Green) The module is online and ready to receive, process, and send
packets (if configured to do so).
Offline On (Amber) The module is offline (powered down) and ready to hot swap.
Per-Port
Transmit
Green The port transmitted a packet.
Amber The port transmitted a flow-control packet.
Per-Port
Receive
Green The port received a packet.
Amber The port received a flow-control packet.
Per-Port
Link
Green The port hardware detected a cable plugged into the port and
established a good link.
Off No link exists from the port.
Per-Port
Quality
Green Auto-Negotiation completed successfully and the phy is attempting
to establish a link. This LED remains green while the link operates
with good signal-to-noise ratio.
Fast blink Low signal-to-noise ratio, close to data errors.
Slow blink Receive bit errors detected.
Off Auto-Negotiation is still in progress or the phy cannot receive
packet data.

Enterasys X-Pedition 8000/8600 Getting Started Guide 41
Hardwar e Overview
SSR-HFX21-08-AA and SSR-HFX29-08-AA
The SSR-HFX21-08-AA and SSR-HFX29-08-AA line cards provide the same features as the SSRHTX22-08-AA line card but use a multimode fiber-optic cable (MMF) to connect to the network.
The MMF line cards are available in 4 MB and 16 MB versions. Figure 16 shows the front panel of
the 4 MB SSR-HFX21-08-AA line card.
Figure 16. Front p anel of 4 M B SSR-HFX21-08-AA line card (MMF)
LEDs
Hot
Swap
Online
Offline
87
6
5
4
3
21
Act
Lnk
Lnk
Act
Lnk
Lnk
Act
Lnk
Lnk
Act
Lnk
Lnk
100 BASE-FX ports
100BASE-FX
SSR-HFX21-08-AA
Table 11. SSR-HFX21-08-AA and SSR-HFX 29-08-AA line card LEDs
LED Condition Description
Offline Amber When lit, this amber LED on the left side of the line card indicates that
the line card is offline (powered off) but is ready for hot swap.
The Offline LED also is lit briefly during a reboot or reset of the
X-Pedition but goes out as soon as the control module discovers the
line card.
Online Green When lit, this green LED indicates that the line card is online and is
ready to receive, process, and send packets if configured to do so.
Lnk Green Each port has two LEDs located to the left of the connector. The green
Lnk LED indicates the link status. When this LED is lit, the port
hardware is detecting that a cable is plugged into the port and the port
has established communication with the device at the other end.
Act Amber The amber Act LED flashes each time the port’s transceiver sends or
receives packets.

Hardware Overview
42 Enterasys X-Pedition 8000/8600 Getting Started Guide
SSR-HSSI-02-CK
The HSSI interface extends the benefits of the X-Pedition router to the WAN, providing
application-level control and wire-speed across high-speed WAN connections. The HSSI interface
supports PPP and Frame Relay at speeds up to 52 Mbps. Typical applications include T3/E3
circuits or inverse multiplexed T1 connections. Flow Rate Limiting, Weighted Random Early
Discard and Weighted Fair Queuing work together to manage and prevent congestion. The SSRHSSI-02-CK also provides external clocking—you do not need an external CSU/DSU.
The HSSI module for the X-Pedition supports true Layer 2, 3 and 4 switching, allowing for
consistent policy management for security and quality of service. Detailed accounting information
can be gathered using per-PVC RMON, enabling easy confirmation that service-level agreements
are being met. Prioritization policies can be extended across the entire network to allocate
appropriate resources to groups of users, or specific applications.
Figure 17. Front panel of the SSR-HSSI-02-CK line card
Ports
2 STS-1 or 52 MBps Serial ports
Network Interfaces
50-Pin Connector supporting 1 HSSI interface. WAN INTERFACES V.35, EIA-530, EIA-449, &
X.21.
Physical Dimensions
Size: 52.9 cm H x 2.9 W x 40.1 D (20.83 in. H x 1.14 W x 15.79 D)
Weight: 2.72 kg (6.0 lbs)
Temperature
Operating: 32° to 104° F (0° to 40° C)
Storage: -22° to 194° F (-30° to 90° C)
Humidity
5% to 95% (non-condensing)
Offline
Online
Hot
Swap
SSR-HSSI-02-CK
Link
Rx
Tx
Link
Rx
Tx
Dual!HSSI

Enterasys X-Pedition 8000/8600 Getting Started Guide 43
Hardwar e Overview
LEDs
Table 12. SSR-HSSI-02-CK LED Indicators
LED Condition Status
Online (2) Green The unit is operational and functioning properly.
Offline (2) Amber The unit is not operational. You may remove the unit from
the chassis.
Tx (4) Amber A frame was transmitted.
Rx (4) Amber A frame was received.
Link (4) Green A valid link is established on the port.

Hardware Overview
44 Enterasys X-Pedition 8000/8600 Getting Started Guide
SSR-HTX22-08-AA and SSR-HTX12-08-AA
The SSR-HTX22-08-AA and SSR-HTX12-08 line cards contain eight independent Ethernet ports.
Each port senses whether it is connected to a 10-Mbps segment or a 100-Mbps segment and
automatically configures itself as a 10BASE-T or 100BASE-TX port. Figure 18 shows the front
panel of the SSR-HTX22-08-AA line card.
Figure 18. Front panel of SSR-HTX22-08-AA line card
LEDs
Hot
Swap
Online
Offline
87654321
10 BASE-T/100 BASE-TX ports 10 BASE-T/100 BASE-TX ports
10/100BASE-TXSSR-HTX22-08-AA
Table 13. SSR-HTX22-08-AA line card LEDs
LED Condition Description
Offline Amber The line card is offline (powered off) and is ready for hot swap.
The Offline LED also is lit briefly during a reboot or reset of the
X-Pedition and goes out as soon as the control module
discovers and properly initializes the line card.
Online Green When lit, this green LED indicates that the line card is online
and is ready to receive, process, and send packets if configured
to do so.
Link Green Each port has two LEDs on its connector. The green LED on the
left side of the connector indicates the link status. When this
LED is lit, the port hardware is detecting that a cable is plugged
into the port and the port has established communication with
the device at the other end.
Activity Flashing amber The port’s transceiver sent or received packets.

Enterasys X-Pedition 8000/8600 Getting Started Guide 45
Hardwar e Overview
SSR-HTX32-16
The SSR-HTX32-16 16-port line card contains 16 independent Ethernet ports. Each port senses
whether it is connected to a 10-Mbps segment or a 100-Mbps segment and automatically configures
itself as a 10BASE-T or 100BASE-TX port. Figure 19 shows the front panel of the SSR-HTX32-16
line card.
Figure 19. Front panel of SSR-HTX32-16 (T-Series) line card
LEDs
Hot
Swap
Online
Offline
10/100BASE-TXSSR-HTX32-16
161412108642
15131197531
Table 14. SSR-HTX32-16 line card LEDs
LED Condition Description
Offline Amber The line card is offline (powered off) and is ready for hot swap.
The Offline LED also lights briefly during a reboot or reset of the
X-Pedition and goes out as soon as the control module discovers and
properly initializes the line card.
Online Green The line card is online and is ready to receive, process, and send
packets if configured to do so.
Link Green Each port has two LEDs on its connector. The green LED on the left
side of the connector indicates the link status. When this LED is lit,
the port hardware is detecting that a cable is plugged into the port
and the port has established communication with the device at the
other end.
Activity Amber The amber LED on the right side of each port connector flashes each
time the port’s transceiver sends or receives packets.

Hardware Overview
46 Enterasys X-Pedition 8000/8600 Getting Started Guide
SSR-POS29-04 and SSR-POS21-04
The SSR-POS29-04 and SSR-POS21-04 modules provide high-speed connectivity to SONET
networks. These modules support ACL-based filtering, Layer-4 application-aware switching, QOS
features, and Server Load Balancing. The SSR-POS29-04 and SSR-POS21-04 are available as
4-port OC-3 SMF or MMF models and are compatible with the X-Pedition 8000/8600 hardware
platforms. The POS OC-3c line cards use MT-RJ connectors to attach to multimode fiber (MMF)
and single mode MT-RJ cables. To attach the segment cables to a POS OC-3c line card, obtain an
MT-RJ cable and plug one end into the port connector. Plug the other end into the port of the other
device. Since MT-RJ cables consist of only one line, there are no concerns about matching the
receive port with the transmit port. Figure 20 shows an SSR-POS29-04 line card.
Figure 20. SSR-POS29-04 line card
Note: If your system uses a redundant power configuration or only one power supply, you will
not be able to support more than 5 SSR-POS29-04 and SSR-POS21-04 cards in the
X-Pedition 8000 and 10 in the X-Pedition 8600.
Ports
4 OC-3 MT-RJ MMF Ports
4 OC-3 MT-RJ SMF Ports
Physical Dimensions
Size: 27.94 cm H x 3.94 W x 19.68 D (11.00 in. H x 1.55 W x 7.75 D)
Weight: 1.4 kg (3.0 lbs)
SSR-POS29-04 POS-OC3 SMF
Offline
Hot
ap
Link
Tx
R
x
1
L
in
k
Tx
2
L
in
k
Tx
R
x
1
Link
Tx
2

Enterasys X-Pedition 8000/8600 Getting Started Guide 47
Hardwar e Overview
Temperature
Operating: 41° to 104° F (5° to 40° C)
Storage: -22° to 164° F (-30° to 73° C)
Humidity
15% to 90% (non-condensing)
LEDs
Table 15. SSR-POS29-04 and SSR-POS21-04 LED Indicators
LED Condition Status
Online Green The module is online and ready to receive, process, and send
packets (if configured to do so).
Offline Amber The module is offline (powered down) and ready to hot swap.
Transmit Green The port transmitted a packet.
Red The port transmitted a flow-control packet.
Receive Green The port received a packet.
Red The port received a flow-control packet.
Link Green The port hardware detected a cable plugged into th e port and
established a good link.
Red Signal is degraded or a signal fail event occurred.
Off No link exists from the port.

Hardware Overview
48 Enterasys X-Pedition 8000/8600 Getting Started Guide
SSR-POS39-02 and SSR-POS31-02
The SSR-POS39-02 and SSR-POS31-02 modules provide high-speed connectivity to SONET
networks. These modules support ACL-based filtering, Layer-4 application-aware switching, QOS
features, and Server Load Balancing. The SSR-POS39-02 and SSR-POS31-02 are available as
2-port OC-12 SMF or MMF models and are compatible with the X-Pedition 8000/8600 hardware
platforms. The POS OC-12c line cards use SC-style Media Interface Connectors (MICs) to attach
to multimode fiber (MMF) and single mode (SMF) cables. Figure 21 shows an SSR-POS39-02 line
card.
Figure 21. SSR-POS39-02 line card
Note: If your system uses a redundant power configuration or only one power supply, you will
not be able to support more than 5 SSR-POS39-02 and SSR-POS31-02 cards in the
X-Pedition 8000 and 10 in the X-Pedition 8000/8600.
Ports
2 OC-12 SC MMF Ports
2 OC-12 SC SMF Ports
Physical Dimensions
Size: 27.94 cm H x 3.94 W x 19.68 D (11.00 in. H x 1.55 W x 7.75 D)
Weight: 1.4 kg (3.0 lbs)
Temperature
Operating: 41° to 104° F (5° to 40° C)
Storage: -22° to 164° F (-30° to 73° C)
SSR-POS39-02 POS-O
C1
2
SMF
Offline
Link
Tx
R
x
R
x
Tx
Link
Hot
S
wap
1
2

Enterasys X-Pedition 8000/8600 Getting Started Guide 49
Hardwar e Overview
Humidity
15% to 90% (non-condensing)
LEDs
Table 16. SSR-POS39-02 and SSR-POS31-02 LED Indicators
LED Condition Status
Online On (Green) The module is online and ready to receive, process, and send
packets (if configured to do so).
Offline On (Amber) The module is offline (powered down) and ready to hot swap.
Transmit Green The port transmitted a packet.
Red The port transmitted a flow-control packet.
Receive Green The port received a packet.
Red The port received a flow-control packet.
Link Green The port hardware detected a cable plugged into the port and
established a good link.
Red Signal is degraded or a signal fail event occurred.
Off No link exists from the port.

Hardware Overview
50 Enterasys X-Pedition 8000/8600 Getting Started Guide
SSR-SERCE-04-AA and SSR-SERC-04-AA
The SSR-SERCE-04-AA and SSR-SERC-04-AA line cards each contain two dual-serial WAN
ports (two serial ports located on one high density connector). In addition, the Quad Serial – C line
card includes compression, and the Quad Serial – CE line card includes compression and
encryption, for each WAN port. Figure 22 shows the front panel of the Quad Serial – CE WAN line
card.
Figure 22. Front panel of the SSR-SERCE-04-AA line card
LEDs
1,2
Tx
Rx
Link
Quad!Serial!-!C
SSR-SERCE-04-AA
12
3,4
Tx
Rx
Link
34
Online
Offline
Hot
Swap
Table 17. SSR-SERCE-04-AA and SSR-SERC-04-AA line card LEDs
LED Condition Description
Offline Amber The line card is offline (powered off) but is ready for hot swap.
The Offline LED also is lit briefly during a reboot or reset of the
X-Pedition but goes out as soon as the control module discovers
the line card.
Online Green The line card is online and is ready to receive, process, and send
packets if configured to do so.
Per-port Link On The line card detected a cable plugged into the port and a good
link is established.
Per-port Rx On The port’s transceiver received data.
Per-port Tx On The port’s transceiver transmitted data.

Enterasys X-Pedition 8000/8600 Getting Started Guide 51
Chapter 2
Hardware Installation
This chapter provides hardware installation information and procedures in the following sections:
• Safety considerations
• Installing the hardware
If the hardware is already installed and you are ready to install the software and perform basic
system configuration, see Chapter 3, Sof tware Installation and Setup.
Safety Considerations
Read the following safety warnings and product cautions to avoid personal injury or product
damage.
Preventing Injury
Cautions: Observe the following safety warnings to prevent accidental injury when working with
the Enterasys X-Pedition (X-Pedition) hardware.
• To avoid back strain, be careful when lifting the chassis out of the shipping box.
• Never attempt to rack mount the X-Pedition chassis unaided. Ask an assistant to help you hold
the chassis.
• Never operate the X-Pedition with exposed power-supply bays or module slots. You can leave
the slots exposed but make sure you do not place any tools or body parts in the slot.
ELECTRICAL HAZARD: Only qualified personnel should perform installation procedures.

Safety Considerations
52 Enterasys X-Pedition 8000/8600 Getting Started Guide
• Never operate the X-Pedition if the chassis becomes wet or the area where the chassis is
installed is wet.
Preventing Equipment Damage
Observe the precautions listed in this section to pre vent accidental damage to the X-Pedition
components.
Cautions: To prevent accidental product damage, observe the following precautions:
• Always use proper electrostatic discharge (ESD) gear when handling the control module,
backplane, line cards or other internal parts of the chassis.
• Make sure you allow adequate room for air flow around the chassis.
• If you plan to install the chassis in an equipment rack, it is recommended that you install a
support tray under the chassis, especially for chassis that are completely filled (no empty control
module, power supply, or line card slots).
Before Removing Fiber Optic Protective Caps
Cable assemblies and fiber optic ports are shipped with protective caps to prevent contamination.
To avoid contamination, replace port caps on all fiber optic de vices when not in use. Cable
assemblies and fiber optic ports that become contaminated may experience signal loss or difficulty
inserting and removing cable assemblies from fiber optic ports.
Contamination can be removed from cable assemblies by:
1. Blowing surfaces with canned duster (Chemtronics p/n ES1270 or equivalent).
2. Using a fiber port cleaning swab (Alcoa Fujikura LTD p/n ACT-01 or equivalent) saturated
with optical-grade Isopropyl Alcohol, gently wipe the end face surface of ferrules first; then
wipe down the sides of both ferrules. Blow ferrule surfaces dry with canned duster.
Contamination can be removed from fiber optic ports by:
1. Using the extension tube supplied with canned duster, blow into the optical port, being careful
not to allow the extension tube to touch the bottom of the optical port.
2. Reconnect cable and check for proper mating. If problems remain, gently wipe out optical port
with a DRY fiber port cleaning swab and repeat step 1.

Enterasys X-Pedition 8000/8600 Getting Started Guide 53
Hardware Specifications
Hardware Specifications
The following table lists the physical and en vironmental specifications for the X-Pedition 8000 and
X-Pedition 8600.
The number of line modules you can install in an X-Pedition 8000/8600 chassis is limited only by
the total power consumption of the installed modules. As long as you do not exceed the maximum
power available, you may completely fill the chassis. Modules with high power consumption
(i.e., the SSR-GTX32-04, SSR-GSX31-04, SSR-GLX39-04, SSR-POS21-04-AA, SSR-POS29-04AA, SSR-POS31-02-AA, SSR-POS39-02-AA, and SSR-ATM29-02) can limit the number of
modules you may install—some slots may remain empty. Table 18 lists the power consumption for
each module and the total power limit for each chassis type.
Note: As long as you do not exceed the maximum Amps listed at the bottom of the following
chart, the restrictions above do not apply. For questions related to power consumption,
please contact Enterasys Networks.
X-Pedition 8000 X-Pedition 8600
Dimensions 8.75 in. H x 17.25 W x 12.25 D
22.3 cm H x 43.82 W x 31.12 D
19.25 in. H x 17.25 W x 12.25 D
48.9 cm H x 43.82 W x 12.25 D
Weight Pounds: 40 lbs
Kilograms: 18.2 Kg
Pounds: 61.75 lbs
Kilograms: 28 Kg
AC Power 100-125 VAC, 5A maximum
200-240 VAC, 3A maximum
50/60 Hz
100-125 VAC, 10A maximum
200-240 VAC, 6A maximum
50/60 Hz
DC Power 48-60 Vdc maximum
14A maximum
48-60 Vdc maximum
27A maximum
Output Wattage
At 3.4 V
At 5.1 V
At 12 Volts
390 Watts
70 Amps
25 Amps
2 Amps
780 W a tts
140 Amps
50 Amps
4 Amps
Operating
Temperature
Fahrenheit: 41
o
F to 104oF
Centigrade: 5
o
C to 40oC
Fahrenheit: 41
o
F to 104oF
Centigrade: 5
o
C to 40oC
Table 18. Power Consumption
Line Module Description 3.3v Amps 5v Amps
SSR-SF-16 SSR Switch Fabric Module 3.00 0.00
SSR-CM2B-64 SSR 64 MB Switch Control Processor 3.65 0.33
SSR-CM3-128 SSR 128 MB Switch Control Processor 4.42 0.38
SSR-CM4-256 SSR 128 MB Switch Control Processor 4.42 0.38
SSR-GLX29-02-AA SSR 2-Port Gigabit Ethernet-LX 16 MB line card 5.40 0.50

Hardwar e Specifications
54 Enterasys X-Pedition 8000/8600 Getting Started Guide
SSR-GLX70-01-AA SSR 1-Port 70km GbE LX (SMF) 16MB line card 5.40 0.50
SSR-GLX39-02 SSR Gigabit Jumbo Packet 7.32 0.51
SSR-GLX39-04 SSR Gigabit Jumbo Packet (Blackbird) 13.16 0.98
SSR-GLH39-02 SSR Gigabit Jumbo Packet 7.32 0.51
SSR-GSX21-02-AA SSR 2-Port Gigabit Ethernet-SX 16 MB line card 5.40 0.50
SSR-GSX31-02 SSR Gigabit Jumbo Packet 7.32 0.51
SSR-GSX31-04 SSR Gigabit Jumbo Packet (Blackbird) 13.16 0.98
SSR-GTX32-02 SSR Gigabit 1000BASE-T (Nighthawk) 10.44 0.00
SSR-GTX32-04 SSR Gigabit 1000BASE-T (Spirit) 12.30 0.98
SSR-HFX21-08-AA SSR 8-Port Fast Ethernet-FX (MMF) 16 MB line card 6.10 2.70
SSR-HFX29-08-AA SSR 8-Port Fast Ethernet-FX (SMF) 16 MB line card 6.10 2.70
SSR-HTX12-08-AA SSR 8-Port Fast Ethernet-TX (UTP) 4 MB line card 5.90 1.60
SSR-HTX22-08-AA SSR 8-Port Fast Ethernet-TX (UTP) 16 MB line card 5.90 1.60
SSR-HTX32-16 SSR 16-Port Fast Ethernet-TX, 16MB (Dino/TREX) 7.68 0.00
SSR-HSSI-02-AA SSR 2-Port HSSI Line Card 3.70 0.50
SSR-SERC-04-AA SSR 4-Port Serial LC w/ HW Compression 4.80 0.50
SSR-SERCE-04-AA SSR 4-Port Serial LC w/ HW Compression and HW Encryption 4.80 0.50
SSR-POS21-04-AA SSR Quad OC-3 (POS-MMF) 5.62 0.88
SSR-POS29-04-AA SSR Quad OC-3 (POS-SMF) 5.62 0.88
SSR-POS31-02-AA SSR Dual OC-12 (POS-MMF) 6.00 1.041
SSR-POS39-02-AA SSR Dual OC-12 (POS-SMF) 6.00 1.041
SSR-ATM29-02 SSR OC-3 ATM (Modular PHY) 12.00 0.00
SSR-FDDI-02-Fiber Phy SSR FDDI (Fiber mod-PMD) 6.95 2.60
SSR-FDDI-02-Copper Phy SSR FDDI (Copper Mod-PMD) 6.84 1.50
SSR-ARE SSR AppleTalk Routing Engine 1.41 2.26
8000 Chassis Limit 68.5 Amps 25 Amps
8600 Chassis Limit 140 Amps 50 Amps
Table 18. Power Consumption (Continued)

Enterasys X-Pedition 8000/8600 Getting Started Guide 55
Installing the Hardware
Installing the Hardware
This section describes how to perform the following tasks:
• Check the shipping box to ensure that all the parts arrived
• Install the chassis (on a tabletop or in an equipment rack)
• Install the control module
• Install a memory upgrade
• Install the switching fabric module (X-Pedition 8600 only)
• Install line cards
• Install the power supply (either AC or DC)
• Attach console management cables
• Attach port cables
Verifying Your Shipment
Before you begin installing your X-Pedition, check your shipment to ensure that everything you
ordered arrived securely.
Caution: To avoid back strain, be careful when lifting the chassis out of the shipping box.
Open the shipping box(es) and verify that you received the following equipment:
• An X-Pedition 8000 or X-Pedition 8600 chassis containing a backplane, fan module, and a
console cable. The console cable is used for connecting a terminal to the control module DB-9
port.
• An X-Pedition 8000 or X-Pedition 8600 power supply.
• One country-specific power cable per power supply.
• One control module.
• One Switching Fabric Module (X-Pedition 8600 only).
• An X-Pedition Media Kit containing:
– One PCMCIA flash card containing the X-Pedition system software
– One copy of the Enterasys X-Pedition 8000/8600 Getting Started Guide (the book you are
reading now)
– Release Notes

Installing the Hardware
56 Enterasys X-Pedition 8000/8600 Getting Started Guide
Depending on your order, your shipment may also contain some or all of the following:
• Redundant power supply, if you ordered one.
• Redundant control module, if you ordered one.
• Redundant Switching Fabric Module, if you ordered one (X-Pedition 8600 only).
• The line cards you ordered.
Installing the Chassis
Enterasys recommends that only qualified personnel conduct installation of any X-Pedition chassis.
This section contains procedures for the following types of installation:
• Tabletop Installation
• Rack mount Installation
Tabletop Installation
You can install the X-Pedition on a tabletop.
1. Select a table that is stable (not wobbly) and is not in an area subject to frequent foot traffic.
Remember that you will be attaching numerous cables to the chassis.
2. Place the X-Pedition on the table, allowing at least 3 inches (7.62 centimeters) of room above
and behind the unit for air flow to the cooling fans.

Enterasys X-Pedition 8000/8600 Getting Started Guide 57
Installing the Hardware
Rack Mount Installation
You can install the X- Pedition in a standard 19-inch equipment rack. The X-Pedition chassis is
equipped with front-mounting brackets. Figure 23 shows an example of how to install an
X-Pedition 8600 chassis in an equipment rack.
Figure 23. Installing the X-Pedition 8600 chassis in an equipment rack
Note: Never attempt to rack mount the X-Pedition chassis unaided. Ask an assistant to help you
hold the chassis.
Caution: To make lifting and holding the chassis easier, install the chassis before you install line
cards or redundant control modules and power supplies.
To install the X-Pedition chassis in an equipment rack, use the following procedure. You need a #2
Phillips screwdriver to perform this procedure.
1. If the front-mounting brackets are already installed on the X-Pedition chassis, go to step 2. If
not, do the following:
a. Align one of the mounting brackets over the corresponding holes in the side of the chassis.
The mounting bracket is correctly positioned when the side with two open mounting holes
is flush with the front of the chassis.
b. Use the #2 Phillips screwdriver and two of the supplied Phillips screws to attach the
mounting bracket to the chassis.
c. Attach the other mounting bracket.
SSR-8

Installing the Hardware
58 Enterasys X-Pedition 8000/8600 Getting Started Guide
2. Along with an assistant, lift the chassis into place in the mounting rack.
3. While your assistant holds the chassis in place, use the #2 Phillips screwdriver and four #2
Phillips screws to attach the mounting brackets to the mounting rack.
Note: Make sure there are at least 3 inches (7.62 centimeters) of room above and behind the unit
for air flow to the cooling fans.
Caution: Make sure the screws are tight before your assistant releases the chassis. If you
accidentally leave the screws loose, the chassis can slip and fall, possibly becoming damaged.
Installing an AC Power Supply
The primary AC power supply is shipped separately from the X-Pedition chassis. To install or
replace the primary AC power supply or if you want to install a redundant power supply, use the
following procedure. You will need a #2 Phillips screwdriver to perform this procedure.
Note: Use a single-phase grounded power source located within 6 feet (1.89 meters) of the
installation site.
AC Power Supply Specifications
The following table lists the physical specifications for the X-Pedition’s AC power supplies.
X-Pedition 8000 X-Pedition 8600
Dimensions 2.5 in. H x 7.70 W x 11 D
6.35 cm H x 19.56 W x 27.94 D
5.05 in. H x 7.70 W x 12.28 D
12.83 cm H x 19.56 W x 31.19 D
Weight 6 lbs
2.73 Kg
11 lbs
4.99 Kg
AC Power 100-125 VAC, 5A maximum
200-240 VAC, 3A maximum
50/60 Hz
100-125 VAC, 10A maximum
200-240 VAC, 6A maximum
50/60 Hz
Output Wattage
At 3.4 V
At 5.1 V
At 12 Volts
390 Watts
70 Amps
25 Amps
2 Amps
780 Watts
140 Amps
50 Amps
4 Amps
Operating
Temperature
Fahrenheit: 41
o
F to 104oF
Centigrade: 5
o
C to 40oC
Fahrenheit: 41
o
F to 104oF
Centigrade: 5
o
C to 40oC

Enterasys X-Pedition 8000/8600 Getting Started Guide 59
Installing the Hardware
The following table lists the environmental specifications for the X-Pedition’s AC power supplies.
Figure 24 shows an example of how to install an AC power supply. The procedure following the
figure describes how to do this.
Figure 24. Installing an AC power supply
AC Power Supply Installation Procedure
To install an AC power supply:
1. Ensure that the AC power supply is not powered on.
2. If a coverplate is installed over the power supply slot, use the #2 Phillips screwdriver to remove
it. If you are replacing an AC power supply, unplug the power cable from the supply you are
replacing, loosen the captive screws on the power supply’s front panel, then pull the supply out
of the chassis.
3. Slide the AC power supply all the way into the slot, firmly but gently pressing to ensure that
the pins on the back of the power supply are completely seated in the backplane.
Operating Temperature +5 to +40 °C (41 to 104 °F)
Non-operating Temperature -30 to +73 °C (-22 to 164 °F)
Operating Humidity 15 to 90% (non-condensing)
SSR-8
SSR-PS-8
100-125~5A
200-240~3A
50-60 Hz
PWR

Installing the Hardware
60 Enterasys X-Pedition 8000/8600 Getting Started Guide
4. Use the #2 Phillips screwdriver to tighten the captive screws on each side of the power supply
to secure it to the chassis.
5. Attach the power cable to the AC power supply.
Installing a DC Power Supply
The X-Pedition DC power supply delivers 3.3, 5, and 12 volts DC to the X-Pedition’s control
module(s), fan modules, and other components. A single DC power supply provides enough current
to operate a fully-configured chassis.
DC Power Supply Specifications
The following table lists the physical specifications for the X-Pedition’s DC power supplies.
Caution: To reduce the risk of electric shock or energy hazards:
1. Connect to a reliably grounded SELV source.
2. The branch circuit over current protection must be rated at a maximum of 20A for the
X-Pedition 8000 and 40A for the X-Pedition 8600.
3. Use 14 AWG solid copper wires on the X-Pedition 8000 and 8 A WG solid copper wires on the
X-Pedition 8600 only.
4. A readily accessible disconnect device that is suitably approved and rated shall incorporated in
the field wiring.
5. To be installed in a restricted access area in accordance with the NEC or authority having
jurisdiction.
X-Pedition 8000 X-Pedition 8600
Input Voltage 48 to 60 Volts
(14 Amperes Max.)
48 to 60 Volts
(27 Amperes Max.)
Output Wattage
At 3.4 V
At 5.1 V
At 12 Volts
390 Watts
70 Amps
25 Amps
2 Amps
780 Watts
140 Amps
50 Amps
4 Amps
Dimensions 2.5 in. H x 7.70 W x 11 D
6.35 cm H x 19.56 W x 27.94 D
5.05 in. H x 7.70 W x 12.28 D
12.83 cm H x 19.56 W x 31.19 D
Weight 6 lbs
2.73 Kg
11 lbs
4.99 Kg

Enterasys X-Pedition 8000/8600 Getting Started Guide 61
Installing the Hardware
The following table lists the environmental specifications for the X-Pedition’s DC power supplies.
DC Power Supply Installation Procedure
To install a DC power supply on the X-Pedition 8000 or X-Pedition 8600:
1. Ensure that the DC power supply is not powered on.
2. If a coverplate is installed over the DC power supply slot, use a #2 Phillips screwdriver to
remove it. If you are replacing a power supply, unplug the power cable from the supply you are
replacing, loosen the captive screws on the power supply’s front panel, then pull the supply out
of the chassis.
3. Slide the DC power supply all the way into the slot, firmly but gently pressing to ensure that
the pins on the back of the power supply are completely seated in the backplane.
4. Use a #2 Phillips screwdriver to tighten the captive screws on each side of the DC power
supply to secure it to the chassis.
5. Attach wires to the terminal blocks on the front of the unit. To attach a wire, loosen the
terminal screw, insert the exposed end of the wire, and tighten the terminal screw.
6. Connect the safety ground wire to a reliable earth ground.
7. Connect the DC input wiring to a DC power source. See Figure 28 on page 64 and Figure 29
on page 64 for a diagram of the wirin g conn ections between the X-Pedition and a DC power
source.
Operating Temperature +5 to +40 °C (41 to 104 °F)
Non-operating Temperature -30 to +73 °C (-22 to 164 °F)
Operating Humidity 15 to 90% (non-condensing)

Installing the Hardware
62 Enterasys X-Pedition 8000/8600 Getting Started Guide
X-Pedition 8000 DC Power Supply
Figure 25 shows the front view of an X-Pedition 8000 DC power supply.
Figure 25. Front view of an X-Pedition 8000 DC power supply
The X-Pedition 8 000 DC power supply has a three-termin al wiring block on the front panel,
consisting of a positive (+) terminal, negative (-) terminal and a safety ground. The DC supply is
designed to be powered by a 48-volt DC source.
X-Pedition 8600 DC Power Supply
Figure 26 shows the front view of an X-Pedition 8600 DC power supply.
Figure 26. Front view of an X-Pedition 8600 DC power supply
The X-Pedition 8600 DC power supply has a five-terminal wiring block on the front panel. The
wiring block contains two positive (+) terminals, two negative (-) terminals, and a safety ground.
The DC supply is designed to be powered by a 48-volt DC source.
SSR-PS-8-DC
PWR
SN
!
To!be!installed!in!a!restricted
access!area!in!accordance
with!the!NEC!or!authority
having!jurisdiction.
See!manual!for!installation
instructions.
48/60V
14A!MAX
PWR
SSR-PS-16-DC
SN
48/60V
27A MAX
!
To be installed in a restricted
access area in accordance
with the NEC or authority
having jurisdiction.
See manual for installation
instructions.

Enterasys X-Pedition 8000/8600 Getting Started Guide 63
Installing the Hardware
Internally, the X-Pedition 8600 DC power supply consists of two separate power supplies. Each of
these internal power supplies must be energized to produce sufficient power for the
X-Pedition 8600 to operate. Each internal power supply is connected to source power through a
pair of positive (+) and negative (-) wiring lugs on the wiring block. Figure 27 shows the internal
relationship of the wiring lugs of the X-Pedition 8600 DC power supply.
Figure 27. Relationship of wiring lugs on X-Pedition 8600 DC power supply
Note: For the X-Pedition 8600 to work properly, both positi ve (+) terminals and both ne gati ve (-)
terminals of the X-Pedition 8600 DC power supply MUST be connected to the DC source.
Because of the X-Pedition 8600 DC supply current requirements, each po le of the 48 Volt DC
source should use 6 gauge wire. Each 6 gauge wire can be divided into two 12 gauge wires by using
a conductive splitter-block. This creates two 12 gauge wires carrying positive (+) current and two
12 gauge wires carrying negative current. In turn, both 12 gauge positive (+) wires and both 12
Internal Power Supply One
Internal Power Supply Two
XP-8600 DC Power Supply
These lugs supply power
to Power Supply One
These lugs supply power
to Power Supply Two

Installing the Hardware
64 Enterasys X-Pedition 8000/8600 Getting Started Guide
gauge negative (-) wires are connected to the X-Pedition 8600 DC power supply wiring block. See
Figure 28.
Figure 28. Splitting each source wire to two 12-gauge wires
An alternate method of wiring the X-Pedition 8600 power supply is to use a single set of 8-AWG
wires (+ and -) from the DC source, and then tie the X-Pedition 8600’s wiring lugs together: + to +
and - to -. See Figure 29.
Figure 29. Tying X-Pedition 8600 DC supply lugs together
From!-!48-Volt!
Source
From!
+
!48-Volt
Source
Conductive!
Splitter!Block
Conductive!
Splitter!Block
12-Gauge!Wire!(Black)
6-Gauge!Wire!(Black)
6-Gauge!Wire!(Red)
12-Gauge!Wire!(Red)
+
+
-
-
12-Gauge!Wire!(Black)
12-Gauge!Wire!(Red)
XP-8600!
Wiring!Lugs
From!True!
Ground
8-Gauge!Wire!(Green)
Both positive (+) and both
negative (-) lugs are tied
together with 8-gauge wire
To True
Ground
(Green)
From Power
Source
(Black)
From Power
Source +
(Red)
8-Gauge!Wire

Enterasys X-Pedition 8000/8600 Getting Started Guide 65
Installing the Hardware
Installing the Control Module
The primary control module always resides in the CM slot. If you need to replace the primary
control module in the CM slot, or you want to install a redundant control module in slot CM/1, use
the following procedure (you will need a #2 Phillips screwdriver to perform this procedure). The
primary control module must be installed in slot CM. The redundant control module must be
installed in slot CM/1. (See Chassis on page 10 for information about the chassis slots.)
Figure 30 shows an example of how to install a control module. The procedure following the figure
describes how to do this.
Figure 30. Installing a Control Module
To install the control module:
1. If a coverplate is installed over the control module slot (slot or CM/1 only), use the #2 Phillips
screwdriver to remove it.
2. Slide the control module all the way into the slot, firmly but gently pressing to ensure that the
pins on the back of the control module are completely seated in the backplane.
Note: Make sure the circuit card (and not the metal plate) is between the card guides, as shown
in Figure 30. Check both the upper and lower tracks.
3. Use the #2 Phillips screwdriv er to tighten the capti ve scre ws on each side of the control module
to secure it to the chassis.
4. When you are ready to attach the management cables to the control module, review the cable
specifications under SSR-CM2B-64, SSR-CM3-128, and SSR-CM4-256 on page 107.
10/100 Mgmt
Console
SSR-8
SSR-CM2-64 CONTROL MODULE
Card Guides
Circuit Card
Metal Plate

Installing the Hardware
66 Enterasys X-Pedition 8000/8600 Getting Started Guide
Firmware Image Requirements
Version 8.2.0.0 or later.
Default Module Settings
The CM4 comes with the baud rate on RS232 console port set to 9600.
Preparing the Module
• You must install the PCMCIA card before you install the command module. You cannot add or
remove a PCMCIA card while the unit is powered on.
Installing a Memory Upgrade
1. Determine how much memory is already installed on the Control Module. If you do not
know how much memory is installed on the Control Module, enter the system show hardware
command in Enable mode. The amount of memory is reported as the System Memory size. For
example:
2. Power down the chassis.
Note: If the X-Pedition chassis contains a redundant Control Mod ule, you do not need to power
down the X-Pedition. You must, however, press the Hot Swap button before removing the
Control Module.
CAUTION: Before performing any upgrade or installation, ensure that you are properly
“grounded” to avoid electrostatic discharge. The switch must be powered off before
installing or replacing any module.
xp# system show hardware
Hardware Information:
System type: X-Pedition 8600, Rev. A
CPU Module type: CPU-Elan, Rev. 0
Processor: R5000, Rev 3.0, 249.99 MHz
Icache size: 32 Kbytes, 32 bytes/line
Dcache size: 32 Kbytes, 32 bytes/line
CPU Board Frequency: 83.33 MHz
Switching Fabrics: 2 (Active = Fabric 1)
PCMCIA card: No card present
System Memory size: 64 MBytes
Network Memory size: 8 MBytes
MAC Addresses
System: 00e063:fdd700
10BASE-T CPU Port:00e063:fdd701
Internal Use: 00e063:fdd702 -> 00e063:fdd73f
CPU Mode: Active
Redundant CPU: Not present

Enterasys X-Pedition 8000/8600 Getting Started Guide 67
Installing the Hardware
3. Loosen captive screws. Use a phillips screwdriver to loosen the captive screws on the face of
the module.
4. Remove the Control Module. Pull the Control Module out of the X-Pedition chassis and
place it on an ESD-safe work area.The Control Module memory resides in slots P7 and P8.
Figure 4 shows the location of the DIMM slots—slot P7 is the slot closest to the backplane.
Figure 31. Install the DIMM in an X-Pedition memory slot
5. Insert the SSR-MEM-128 into an empty memory slot. Gently press the memory card in
place and ensure that the card is completely seated in the slot.
Note: Slot P7 must contain the larger of the two DIMMs. If slot P7 already contains a 64MB
DIMM, remove the 64MB DIMM and install the 128MB DIMM in slot P7. You may then
install the 64MB DIMM in slot P8 for a total of 192MB installed on the Control Module.
If a 128MB DIMM already resides in slot P7, you need not remove it. Install the new
128MB DIMM in slot P8.
6. Align the backsheet of the Control Module between the card guides as shown in Figure 32.
Console
10/100 Mgmt
SSR-CM4-256
CONTROL!MODULE
Memory slots
Slot P7
Slot P8

Installing the Hardware
68 Enterasys X-Pedition 8000/8600 Getting Started Guide
Note: Make sure that the circuit card is between the card guides. Check both tracks.
Figure 32. Insert card between card guides
7. Slide the upgraded Control Module back into the chassis. Return the Control Module to the
chassis, firmly but gently pressing the line module fully in place to ensure that the pins on the
back of the line card are completely seated in the backplane.
8. Tighten captive screws. Align the captiv e screws with the holes in the face of the module and
tighten the screws to secure the module to the chassis.
9. Power on the X-Pedition chassis. Move the power switch located on the power supply to the
“On” position. As the X-Pedition boots, messages on the console will appear, reflecting the
memory upgrade on the Control Module.
Card Guides
Circuit Card
Metal Plate
Console
10/100 Mgmt
SSR-CM2-64
CONTROL!MODULE
SSR-8

Enterasys X-Pedition 8000/8600 Getting Started Guide 69
Installing the Hardware
Installing the Switching Fabric Module (X-Pedition 8600 only)
On the X-Pedition 8600, the switching fabric module is shipped separately from the X-Pedition
chassis. To install or replace the primary switching fabric module, or if you want to install a
redundant switching fabric module, use the following procedure. You will need a #2 Phillip s
screwdriver to perform this procedure.
The primary switching fabric module must be installed in slot Fabric 1. The redundant switching
fabric module must be installed in slot Fabric 2. Figure 33 shows an example of how to install a
switching fabric module. The procedure following the figure describes how to do this.
Figure 33. Installing a switching fabric module on the X-Pedition 8600
To Install a Switching Fabric Module
1. If a coverplate is installed over the switching fabric module slot (slot Fabric 1 or Fabric 2), use
the #2 Phillips screwdriver to remove the coverplate.
2. Slide the switching fabric module all the way into the slot, firmly but gently pressing to ensure
that the pins on the back of the module are completely seated in the backplane.
6
4
2
7
5
3
CM/1
PS2PS1
CM
SSR-16
1000BASE-SX
12
10
8
13
11
9
14 15
Fabric 1
Fabric 2
SSR-CM2-64 CONTROL MODULE
21
87654321
87654321
10/100BASE-TXSSR-HTX22-08-AA
10/100BASE-TXSSR-HTX22-08-AA
1000BASE-LXSSR-GLX29-02-AA
87
6
5
4
3
21
100BASE-FXSSR-HFX21-08-AA
21
1000BASE-LXSSR-GLX19-02 SSR-GSX11-02
1000BASE-SXSSR-GLX29-02-AA
21
87654321
10/100BASE-TXSSR-HTX22-08-AA
87654321
10/100BASE-TXSSR-HTX22-08-AA
87
6
5
4
3
21
100BASE-FXSSR-HFX21-08-AA
87654321
10/100BASE-TXSSR-HTX22-08-AA
21
Switching Fabric
87654321
10/100BASE-TXSSR-HTX22-08-AA
SSR-CM2-64 CONTROL MODULE
87654321
10/100BASE-TXSSR-HTX22-08-AA
87654321
10/100BASE-TXSSR-HTX22-08-AA
PWR
SSR-PS-16
SN
100-125V~ 10A
200-240V~ 6A
50/60 Hz
TO REMOVE POWER TO
UNIT DISCONNECT ALL
POWER SUPPLY CORDS
PWR
SSR-PS-16
SN
100-125V~ 10A
200-240V~ 6A
50/60 Hz
TO REMOVE POWER TO
UNIT DISCONNECT ALL
POWER SUPPLY CORDS
Switching Fabric
SSR-SF-16
SSR-SF-16

Installing the Hardware
70 Enterasys X-Pedition 8000/8600 Getting Started Guide
Note: Make sure the circuit card (and not the metal plate) is between the card guides, as shown
in Figure 30 on page 65. Check both the upper and lower tracks.
3. Lock down the left and right metal tabs to secure the switching fabric module to the chassis.
4. Use the #2 Phillips screwdriver to tighten the captive screws on each side of the switching
fabric to secure the switching fabric to the chassis.

Enterasys X-Pedition 8000/8600 Getting Started Guide 71
Installing the Hardware
Installing Line Cards
You can install lin e modules in slots 1 to 7 on the X-Pedition 8 000 (sl ot 0 allows a control module
only) or 1 to 15 on the X-Pedition 8600 (again, slot 0 allows a control module only). If you plan to
install a redundant control module, you may install line cards in slots 2–7 on the X-Pedition 8000
and 2–15 on the X-Pedition 8600. Before you begin, please review Table 19 for system firmware
requirements, restrictions, and special instructions that apply to the line card you are installing.
ELECTRICAL HAZARD: Only qualified personnel should perform installation procedures.
Table 19. Line card installation notes
Minimum
Firmware
Restrictions Special Instructions
SSR-ARE
Note: The SSR-ARE is designed for the
X-Pedition 8000/8600 only—do not try to
install these modules in any other units. Do
not install the SSR-ARE in slot 0 or 1 on the
X-Pedition 8000 or slot 0, 1, or 15 on the
X-Pedition 8600.
SSR-ATM29-02 3.0.0.0
CLI Setup
Enter the following commands at the CLI before
implementing any configurations.
1. Enable —> Configuration —> <Enter>.
2. Once you reach the configuration prompt, you
can create the ATM interface using CLI
commands as described in the ATM section of
the X-Pedition CLI manual. Enter the ?
character to view the options available to you in
configuration mode.
Proper Boot sequence
• The control module on the chassis should indicate
that the SSR-ATM29-02 was detected and is
operating correctly.
Common Errors
• Make sure the chassis is connected to a terminal
through a console port.
Helpful CLI Commands for Debugging
• System show hardware
• System show version
• System show bootlog

Installing the Hardware
72 Enterasys X-Pedition 8000/8600 Getting Started Guide
SSR-CM2B-64
SSR-CM3-128
SSR-CM4-256
E8.2.0.0
WARNI N G: The SSR-CM4-256 is designed for
slots 0 and 1 only, and is easily damaged by
electrostatic discharge.
CAUTION: You cannot hot swap the Primary CM;
however, you may hot swap a Secondary CM by
pressing the hot swap button.
Note: You cannot use a CM4 with CM3 or CM2
command modules. Older modules will not
recognize the CM4.
Default Module Settings
The CM4 comes with the baud rate on RS232
console port set to 9600.
Preparing the Module
• You must install the PCMCIA card before you
install the command module. You cannot add or
remove a PCMCIA card while the unit is powered
on.
Proper Boot Sequence
• The HBT, ERR, and D I AG LEDs light mome nt ari l y.
• The screen displays the boot softwa re ver sion, cache ,
and processor information.
• The CM boots an image if available or stops at a
prompt for configuration.
Common Errors
• The firmware image was loaded but no traffi c is being
passed. This occurs when your network reboots and
cannot find your network settings in the configuration
file.
• Screen connected to console port displays random
text. Change terminal to 9600 baud/8 bits/Xon
Xoff/full duplex.
Helpful CLI Commands for Debugging
• System show hardware
• System show version
• System show bootlog
SSR-FDDI-02
3.2.0.0
Preparing the Module
• Before installing the module, you must install at
least one of the following FPHYs (purchased
separately): FPHY-01, FPHY-02, or FPHY-09.
See Installing FPHYs
on page 7 9.
• Because FDDI full duplex is not an industry
standard, its implementation is based on the
Digital Equipment Corporation (DEC) standard.
FDDI full duplex will interoperate with all DEC
products and most Enterasys Networks FDDI
products.
Proper Boot Sequence
• Firmware loads.
• The LEDs on Port 1 light in the following order: A, B,
P, S, Rx, and Tx. After the Tx LED lights, all LEDs
turn off and the online LED turns green.
• Diagnostic messages display for each line card.
• Status lights on line cards go online.
• Link lights activate for connected lines.
Common Errors
• The X-Pedition is not powered up.
• Ensure that the device attached to the module is
powered up and operating correctly.
• The module is not properly seated in the slot.
• Connectors on both ends of the cable are not properly
engaged. Fiber cable attached to an SC-type port did
not click into place or is not properly seated.
• If you are using fiber optic cable with an ST-type
connector in conjunction with an SC-ST port
converter, try switching the TX and RX connectors.
Helpful CLI Commands for Debugging
• System show hardware
• System show version
• System show bootlog
Table 19. Line card installation notes (Continued)
Minimum
Firmware
Restrictions Special Instructions

Enterasys X-Pedition 8000/8600 Getting Started Guide 73
Installing the Hardware
SSR-GLX39-04
SSR-GSX31-04
8.3.0.0 Note: If your system uses a redundant power
configuration or only one power supply, you
will not be able to support more than 5 SSRGLX39-04 and SSR-GSX31-04 cards in the
X-Pedition 8000 and 10 in the
X-Pedition 8600.
Note: You may install the SSR-GLX39-04 or
SSR-GSX31-04 in any line card slot except
the CM slot which supports a control module
only.
Preparing the Module
• When connecting a 1000Base-SX/LX module to
a device that does not support auto-negotiation,
ensure that auto-negotiation is disabled and that
both devices are set to the same data transmission
speed and duplex mode.
Default Module Settings
The default mode for each port on the X-Pedition8000 and X-Pedition-8600 is:
Full duplex/ 1000 mbs/ autonegotiation on
To view the current mode for a particular port, enter
the following (where x is the chassis slot that
contains the line card and y is a specific port number
on the card):
xp# port show port status gi.x.y
CLI Setup
Enter the following commands at the CLI before
implementing any configurations.
1. Type the following from Enable mode to enter
Configuration mode
Enable -> Configure #
2. You may now begin configuring ports on the
SSR-GLX39-04 or SSR-GSX31-04. Refer to the
Enterasys X-Pedition Command Line Interface
Reference Manual for details.
When connecting a 1000BASE-SX/LX module to a
device that does not support auto-negotiation, ensure that
Auto-Negotiation is disabled and that both devices are set
to the same data transmission speed and duplex mode.
Proper Boot Sequence
• Offline LED turns on and remains on until card is
online.
• Port LEDs turn on momentarily and the CLI indicates
that the system discovered the line card in proper slot .
• CLI indicates all ports are initialized and offline LED
turns off.
• Online LED lights.
• Link LED is active for connected lines.
Common Errors
• The line card is not inserted properly or seated
completely in the chassis
• Connectors for the connected lines are not seated
properly.
• Attached device is not configured to match
configuration mode of module (i.e., auto-negotiation,
speed, duplex).
Helpful CLI Commands for Debugging
• System show hardware
• System show version
• Port show port status gi.x.y (where x is the chassis
slot that contains the line card and y is a specific po rt
number on the card).
• System show bootlog
Table 19. Line card installation notes (Continued)
Minimum
Firmware
Restrictions Special Instructions

Installing the Hardware
74 Enterasys X-Pedition 8000/8600 Getting Started Guide
SSR-GTX32-04
SSR-GTX32-02
9.0.0.0 Note: The SSR-GTX32-02 line card does not
support 10/100 Mbps traffic.
Default Module Settings
The default mode for each port on the
X-Pedition 8000/8600X-Pedition is:
Full duplex/ 1000 mbs/ autonegotiation on
To view the current mode for a particular port, enter
the following (where x is the chassis slot that
contains the line card and y is a specific port number
on the card):
xp# port show port status gi.x.y
CLI Setup
Enter the following commands at the CLI before
implementing any configurations.
1. Enable —> Configure —> <Enter>.
2. Once you reach the configuration prompt, you
can configure the module using CLI commands
as described in the X-Pedition CLI manual.
Enter the ? character to view the options
available to you in configuration mode.
Proper Boot Sequence
• Offline LED lights at power-up.
• Port LEDs flicker briefly during system boot while
ports initialize.
• Online LED turns on once module is active.
Common Errors
• The X-Pedition is not powered up.
• The module is not properly seated in the slot.
• Connectors on both ends of the cable are not properly
engaged. The copper cable did not click into place or
is not properly seated.
Helpful CLI Commands for Debugging
• System show hardware
• System show version
• System show bootlog
SSR-HSSI-02-CK
8.3.0.0
CLI Setup
Enter the following command at the CLI before
implementing any configurations.
1. Type the following from Enable mode to enter
Configuration mode
Enable -> Configure #
2. You may now begin configuring ports on the
SSR-HSSI-02-CK. Refer to the Enterasys
X-Pedition Command Line Interface Reference
Manual for details.
Proper Boot Sequence
• Firmware loads.
• The control module for the chassis should indicate
that the SSR-HSSI-02-CK was detected and is
operating correctly.
• The Online LED will turn on and remain lit (no other
LEDs should illuminate during module power-up).
Common Errors
• The SSR-HSSI-02-CK is not inserted properly or
seated completely in the chassis
• Connectors for the connected lines are not seated
properly.
• The CM does not connect to a terminal through a
console port.
Helpful CLI Commands for Debugging
• System show hardware
• System show version
• Port show port status gi.x.y (where x is the chassis
slot that contains the line card and y is a specific por t
number on the card).
• System show boot log
Table 19. Line card installation notes (Continued)
Minimum
Firmware
Restrictions Special Instructions

Enterasys X-Pedition 8000/8600 Getting Started Guide 75
Installing the Hardware
SSR-POS29-04
SSR-POS21-04
9.0.0.2 Note: If your system uses a redundant power
configuration or only one power supply, you
will not be able to support more than 5 cards
in the X-Pedition 8000 and 10 in the
X-Pedition 8600.
CLI Setup
Enter the following commands at the CLI before
implementing any configurations.
1. Enable —> Configure —> <Enter>.
2. Once you reach the configuration prompt, you
can configure the SSR-POS21-04 or
SSR-POS29-04 using CLI commands as
described in the X-Pedition CLI manual. Enter
the ? character to view the options available to
you in configuration mode.
Proper Boot Sequence
• Offline LED lights at power-up.
• Port LEDs flicker briefly during system boot while
ports initialize.
• Online LED turns on once module is active.
Common Errors
• The X-Pedition is not powered up.
• The module is not properly seated in the slot.
• Connectors on both ends of the cable are not properly
engaged. The copper cable did not click into place or
is not properly seated.
Helpful CLI Commands for Debugging
• System show hardware
• System show version
• System show bootlog
SSR-POS39-02
SSR-POS31-02
9.0.0.2 Note: If your system uses a redundant power
configuration or only one power supply, you
will not be able to support more than 5 cards
in the X-Pedition 8000 and 10 in the
X-Pedition 8600.
CLI Setup
Enter the following commands at the CLI before
implementing any configurations.
1. Enable —> Configure —> <Enter>.
2. Once you reach the configuration prompt, you
can configure the SSR-POS39-02 or
SSR-POS31-02 using CLI commands as
described in the X-Pedition CLI manual. Enter
the ? character to view the options available to
you in configuration mode.
Proper Boot Sequence
• Offline LED lights at power-up.
• Port LEDs flicker briefly during system boot while
ports initialize.
• Online LED turns on once module is active.
Common Errors
• The X-Pedition is not powered up.
• The module is not properly seated in the slot.
• Connectors on both ends of the cable are not properly
engaged. The copper cable did not click into place or
is not properly seated.
Helpful CLI Commands for Debugging
• System show hardware
• System show version
• System show bootlog
Table 19. Line card installation notes (Continued)
Minimum
Firmware
Restrictions Special Instructions

Installing the Hardware
76 Enterasys X-Pedition 8000/8600 Getting Started Guide
SSR-SERC-04-AA E8.3.0.0
CLI Setup
Enter the following command at the CLI before
implementing any configurations.
1. Type the following from Enable mode to enter
Configuration mode
Enable -> Configure #
2. You may now begin configuring ports on the
SSR-SERC-04-AA. Refer to the Enterasys
X-Pedition Command Line Interface Reference
Manual for details.
Proper Boot Sequence
• Firmware loads.
• The control module for the chassis should indicate
that the SSR-SERC-04-AA was detected and is
operating correctly.
• The Online LED will turn on and remain lit (no other
LEDs should illuminate during module power-up).
Common Errors
• The ER16-SERC-04-AA is not inserted properly or
seated completely in the chassis
• Connectors for the connected lines are not seated
properly.
Helpful CLI Commands for Debugging
• System show hardware
• System show version
• Port show port status se.x.y (where x is the chassis
slot that contains the line card and y is a specific por t
number on the card).
• System show bootlog
SSR-SERCE-04-AA
E8.3.0.0
CLI Setup
Enter the following command at the CLI before
implementing any configurations.
1. Type the following from Enable mode to enter
Configuration mode
Enable -> Configure #
2. You may now begin configuring ports on the
SSR-SERCE-04-A. Refer to the Enterasys
X-Pedition Command Line Interface Reference
Manual for details.
Proper Boot Sequence
• Firmware loads.
• The control module for the chassis should indicate
that the SSR-SERCE-04-A was detected and is
operating correctly.
• The Online LED will turn on and remain lit (no other
LEDs should illuminate during module power-up).
Common Errors
• The ER16-SERCE-04-A is not inserted properly or
seated completely in the chassis
• Connectors for the connected lines are not seated
properly.
Helpful CLI Commands for Debugging
• System show hardware
• System show version
• Port show port status se.x.y (where x is the chassis
slot that contains the line card and y is a specific por t
number on the card).
• System show bootlog
Table 19. Line card installation notes (Continued)
Minimum
Firmware
Restrictions Special Instructions

Enterasys X-Pedition 8000/8600 Getting Started Guide 77
Installing the Hardware
Handling the Module
Caution: Line cards are easily damaged by electrostatic discharge.
To prevent electrostatic damage, observe the following guidelines:
• Do not remove the module from its packaging until you are ready to install it.
• Do not touch any of the module’s pins, connectors or components.
• Hold the module only by its edges or front panel.
• Wear an anti-static wristband connected to a suitable earth ground whenever handling the
module.
• Store or transport this module only in appropriate anti-static packaging.
Tools
Typical installations require the following tools:
Hot Swap
You may install most modules into a live system without powering off the device. However, do not
remove an active module from a live system except under the following conditions:
• Press the Hot Swap button on the front panel. The Online LED will turn off and the Offline
LED will turn on.
OR...
• Enter the following from the CLI and click enter: Enable -> System -> Hotswap -> Out -> Slot
-> #. The Online LED will turn off and the Offline LED will turn on.
• Remove the module.
For more information on hot swapping, see Hot Swapping Line Cards and Control Modules in the
Enterasys X-Pedition User Reference Manual.
Warning: Do not insert tools or body parts in the chassis while it is powered on. Doing so may
cause electrical shock or equipment damage.
Anti-static wristband Phillips screwdriver Flathead screwdriver

Installing the Hardware
78 Enterasys X-Pedition 8000/8600 Getting Started Guide
Instructions
Caution: You may install the line card in the chassis with the chassis powered up. However, before
removing an existing line card, Hot Swap the line card as described under Hot Swap on page 77.
1. If a coverplate is installed in the line module slot, remove the coverplate: loosen the captive
screws on each side of the coverplate and pull out the plate.
2. Align the backsheet of the line card between the card guides as shown in Figure 34.
Note: Make sure that the circuit card is between the card guides. Check both tracks.
Figure 34. Installing a line card
3. Slide the line card all the way into the slot, firmly but gently pressing the line card fully in
place to ensure that the pins on the back of the line card are completely seated in the backplane.
4. Tighten captive screws. Align the captiv e screws with the holes in the face of the module and
tighten the screws to secure the card to the chassis.
5. Repeat the above steps for additional cards.
6. Attach the segment cables when you are ready.
87654321
10/100BASE-TXSSR-HTX22-08-AA
Card!Guides
Circuit!Card
Metal!Plate

Enterasys X-Pedition 8000/8600 Getting Started Guide 79
Installing the Hardware
Installing FPHYs
The FDDI (Fiber Distributed Data Interface) line card has modular PHYs supporting multimode
fiber (MMF), single mode fiber (SMF), and unshielded twisted pair (UTP). Installing the FDDI
module is a two-part process: first, install the PHY cards into the line card; then, install the line card
in the SSR.
Preparing the Module
• Before installing the module, you must install at least one of the following FPHYs (purchased
separately): FPHY-0 1, FPHY-02, or FPHY-09.
• Because FDDI full duplex is not an industry standard, its implementation is based on the Digital
Equipment Corporation (DEC) standard. FDDI full duplex will interoperate with all DEC
products and most Enterasys Networks FDDI products.
Installing the FDDI PHY Cards
Each FDDI line card has two slots available for PHY cards. One FDDI PHY card can be installed
into each available slot. The following procedure describes how to do this. To install a PHY card
into an FDDI line card:
1. Remove the blank coverplates on the front of the line card, if present.
2. Remove the two screws from the standoffs on both sides of the PHY connector on the line card.
3. Hold the PHY card by the edges and position it above the line card.
4. Slide the transceivers into the slot openings.
5. Connect the stacking connector at the back of the PHY to the pins on the line card.
6. Push the PHY card down until the connector is firmly seated on the line card.
7. Tighten the two screws on the top rear of the PHY and the tw o scre ws on the faceplate that will
hold the PHY card in place.
8. You are now ready to install the SSR-FDDI-02 line card. Please refer to Installing Line Cards
on page 71.

Installing the Hardware
80 Enterasys X-Pedition 8000/8600 Getting Started Guide
Installing the ATM PHY Cards
Each ATM line card has two slots available for PHY cards. One ATM PHY card can be installed
into each available slot. You will need a #2 Phillips screwdriver to perform this procedure.
Figure 35 shows an example of how to install a PHY card. The procedure following the figure
describes how to do this.
Figure 35. Installing an ATM PHY card
To install a PHY card into an ATM line card:
1. Use a Phillips screwdriver to loosen the two captive screws that hold the option slot cover in
place.
2. Save the option slot cover.
3. Hold the PHY card by the edges and position it so that it is parallel with the slot opening.
4. Insert the PHY card through the opening in the system unit by aligning the sides of the PHY
card with the card guide.
ATM Board
Seat screws into
mounting holes,
then press PHY card
to fully engage connector
Phy Card
Guide Rails

Enterasys X-Pedition 8000/8600 Getting Started Guide 81
Installing the Hardware
5. Push the PHY card into the slot until the 96-pin connector is firmly seated on the motherboard.
6. Fasten the PHY card to the system unit with the two captive screws. Torque to 5 in-lb (0.56
N-m).
Connecting ATM PHY Cards
The following are instructions on how to attach cables to the various PHY interface cards.
APHY-67 and APHY-77
To attach the segment cables to your APHY-67 and APHY-77 card:
1. Align the transmit cable connector with the transmit port and the receive cable connector with
the receive port.
2. Push one connector into the PHY port and rotate clockwise 1/4 turn to lock it in place.
3. Repeat step 2 for the second cable.
APHY-82V
To attach the segment cables to your APHY-82V card:
1. Align the key of the modular jack (MJ) plug with the locking key of the MJ receptacle.
2. Push the MJ plug into the receptacle until the plug mates fully with the locking key. You will
hear a snapping sound when the locking key engages.
Note: The APHY-82V is not a T1 interface. It merely allows you to connect to a T1 CSU—the
T1 CSU will allow you to connect to a T1 circuit.
APHY-92V
To attach the segment cables to your APHY-92V card:
1. Align the key of the modular jack (MJ) plug with the locking key of the MJ receptacle.
2. Push the MJ plug into the receptacle until the plug mates fully with the locking key. You will
hear a snapping sound when the locking key engages.
Note: The APHY-92V is not an E1 interface. It merely allo ws you to connect to an E1 CSU—the
E1 CSU will allow you to connect to an E1 circuit.
APHY-21 and APHY-29IR
To attach the segment cables to your APHY-21 and APHY-29IR card:
1. Remove the dust caps from the PHY port and cable.

Installing the Hardware
82 Enterasys X-Pedition 8000/8600 Getting Started Guide
2. Line up the transmit cable connector with the transmit port and the receive cable connector
with the receive port. Insert the connectors, ensuring that the key is correctly positioned.
APHY-22
To attach the segment cables to your APHY-22 card:
1. Align the key of the modular jack (MJ) plug with the locking key of the MJ receptacle.
2. Push the MJ plug into the receptacle until the plug mates fully with the locking key. You will
hear a snapping sound when the locking key engages.

Enterasys X-Pedition 8000/8600 Getting Started Guide 83
Chapter 3
Software Installation
and Setup
This chapter provides the following software installation and basic setup procedures:
• Installing the PCMCIA flash card (if you are upgrading from the software version on the
X-Pedition’s boot flash)
• Powering on and booting the software
• Starting the Command Line Interface (CLI)
• Setting basic system information
• Setting up SNMP community strings
• Setting up passwords
• Setting the DNS domain name and address
• Setting SYSLOG parameters
• Loading system image software
• Loading the Boot Firmware
• Activating configuration changes and saving the configuration file
Note: The command examples used in the following instructions are for informational purposes
only. Please consult the Enterasys X-Pedition User Reference Manual for more detailed
information.

Installing a PCMCIA Flash Card
84 Enterasys X-Pedition 8000/8600 Getting Started Guide
Installing a PCMCIA Flash Card
The control module PCMCIA flash card contains a version of the system image software that is
installed at the factory. If you have a more recent system image and want to boot the X-Pedition
using the newer software, you must boot either from a PCMCIA card or from a TFTP server.
To install a PCMCIA card:
1. Power off the X-Pedition.
Cautions: Do NOT install or remove a PCMCIA card while the X-Pedition is running.
2. Insert the PCMCIA card into the upper slot on the control module, pressing firmly to ensure
that the card is fully seated.
Figure 36. Install a PCMCIA flash card in a Control Module
Note: Only the upper slot is active. The control module cannot use two PCMCIA flash cards at
the same time.
3. Lock the PCMCIA card into the slot with the locking mechanism.
4. Power on the X-Pedition. (See Powering On and Booting the Software on page 86.)
5. Once the X-Pedition is powered on and starts to boot up, any of the following scenarios may
occur:
Console
10/100 Mgmt
SSR-CM4-256
C
ONT
ROL!MODULE
I
nsert
This sid
e up
PART NO.
89
10
478
S
o
ftwar
e
Re
v:
M
O
DEL
NO.
X
P-
PC
M
CI
A-32
A
T

Enterasys X-Pedition 8000/8600 Getting Started Guide 85
Installing a PCMCIA Flash Card
– The X-Pedition will boot up and the following messages will appear, indicating that the
PCMCIA flash card was installed successfully:
– The X-Pedition will start to boot up but stop after a few seconds, lea ving the router in boot
mode. If the X-Pedition displays the “external flash card absent” message, the PCMCIA
flash card was not found and an image was not loaded. If this occurs, power off the
X-Pedition and verify that the PCMCIA flash card is properly installed (refer to steps 2 and
3). Power on the router—if the problem persists, contact Enterasys T echnical Support (see
Technical Support on page 125).
– The X-Pedition will start to boot up but stop after a few seconds, lea ving the router in boot
mode. If the X-Pedition does not display the “external flash card absent” message, the
router did not find an image to load from the PCMCIA Flash Card. Please contact Enterasys
Technical Support for assistance (see Tec h nical Support on page 125).
Note: If you boot from a TFTP server and the system does not detect a PCMCIA card, the
“external flash card absent” message will appear. As the system firmware boots, the
%SYS-E-NOFLASHCARD message will also appear, indicating that the PCMCIA card is
not present or is not installed correctly. If this occurs, power off the X-Pedition and verify
that the PCMCIA flash card is properly installed (refer to steps 2 and 3). Power on the
router—if the problem persists, contact Enterasys Technical Support (see Technical
Support on page 125).
%SYS-I-FLASHCRD, Mounting 32MB Flash card
%SYS-I-FLASHMNTD, 32MB Flash card mounted

Powering On and Booting the Software
86 Enterasys X-Pedition 8000/8600 Getting Started Guide
Powering On and Booting the Software
To power on the X-Pedition and boot the software:
1. Make sure any exposed expansion slots are free of foreign objects, such as tools or your hands,
and are covered with coverplates.
2. Plug the X-Pedition’s power supplies into a po wer source. Assuming that your po wer source is
currently active, the router will automatically power on and attempt to boot using the software
image in the motherboard’s boot flash.
While the software is booting, the HBT (heartbeat) LED on the chassis flashes. When the
software finishes booting, the HBT LED goes dark and the OK LED lights up, indicating that
the X-Pedition software is online. As the software boots, the management console attached to
the X-Pedition’s DB-9 DCE port displays messages related to the phases of the boot sequence.
When the software is fully booted, the following message appears on the management console:
3. Press Return (or Enter) to activate the CLI on the console.
Press RETURN to activate console...

Enterasys X-Pedition 8000/8600 Getting Started Guide 87
Starting the Command Line Interface
Starting the Command Line Interface
After the software has successfully booted and you press Return (or Enter) to activate the CLI, the
CLI prompts you for a password. You can define separate passwords for login access and Enable
mode. The factory default password for both of these is set to blank (simply press Return).
Access Modes
The CLI has the following access modes:
• User – Allows you to display basic information and use basic utilities such as ping but does not
allow you to display SNMP, filter and access control list information, or make other
configuration changes. Y ou can tell you are in User mode when the command prompt ends with
a “
>” character.
• Enable – Allows you to display SNMP, filter, and access control information as well as all the
information you can display in User mode. To enter Enable mode, enter the enable command,
then supply the password when prompted. When you are in Enable mode, the command prompt
ends with a “
#” character.
• Configure – Allows you to make configuration changes. To enter Configure mode, first enter
Enable mode (enable command), then enter the configure command from the Enable command
prompt. When you are in Configure mode, the command prompt ends with “(config)#.”
• Boot – This mode appears when the system image is not found during bootup. Y ou should enter
the reboot command to reset the router. If the X-Pedition still fails to boot up, please call
Enterasys Technical Support (see Technical Support on page 125).
Note: The command prompt will show the name of the X-Pedition in front of the mode
character(s). The default name is “xp.” The procedure in Setting Basic System
Information on page 89 describes how to change the system name.
When you are in Configure or Enable mode, use the exit command or press Ctrl+Z to exit to the
previous access mode.
Note: When you exit Configure mode, the CLI will ask you whether you want to activate the
configuration commands you have issued. If you enter yes or y, the configuration
commands you issued are placed into effect and the X-Pedition’s conf iguration is changed
accordingly. However, the changes are not written to the Startup configuration file in the
X-Pedition’s boot flash and therefore are not reinstated after a reboot. See Activating
Configuration Changes and Saving the Configuration File on page 98 for information
about saving configuration changes.

Starting the Command Line Interface
88 Enterasys X-Pedition 8000/8600 Getting Started Guide
Basic Line Editing Commands
The CLI supports EMACs-like line editing commands. The following table lists some commonly
used commands. For a complete set of commands, see the Enterasys X-Pedition User Reference
Manual.
Table 20. Some commonly used CLI commands
Key sequence Command
Ctrl+A Move cursor to beginning of line
Ctrl+B Move cursor back one character
Ctrl+D Delete character
Ctrl+E Move cursor to end of line
Ctrl+F Move cursor forward one character
Ctrl+N Scroll to next command in command history (use the cli show history
command to display the history)
Ctrl+P Scroll to previous command in command history
Ctrl+U Erase command line up to cursor
Ctrl+X Move cursor to beginning of the next word in the command line
Ctrl+Z Exit current access mode to previous access mode
 Loading...