

P/N 1030-104 | REV. C 03/19 | INSTRUCTION SHEET
*
P7 Diaphragm/retainer/
Integra® Manually Operated
Diaphragm Valves
1
⁄2" Orifice, 2-way, Multi-turn Designs
REPAIR INSTRUCTIONS
—
For models:
201-38, 201-39, 201-40, 201-41, 201-42, 201-41-SI,
201-41-SO, 201-42-SI, 201-42-SO, 201-38-01,
201-39-01, 201-40-01, 201-41-01, 201-42-01,
201-41-SI-01, 201-41-SO-01, 201-42-SI-01,
201-42-SO-01
REPAIR PROCEDURE – DISASSEMBLY
—
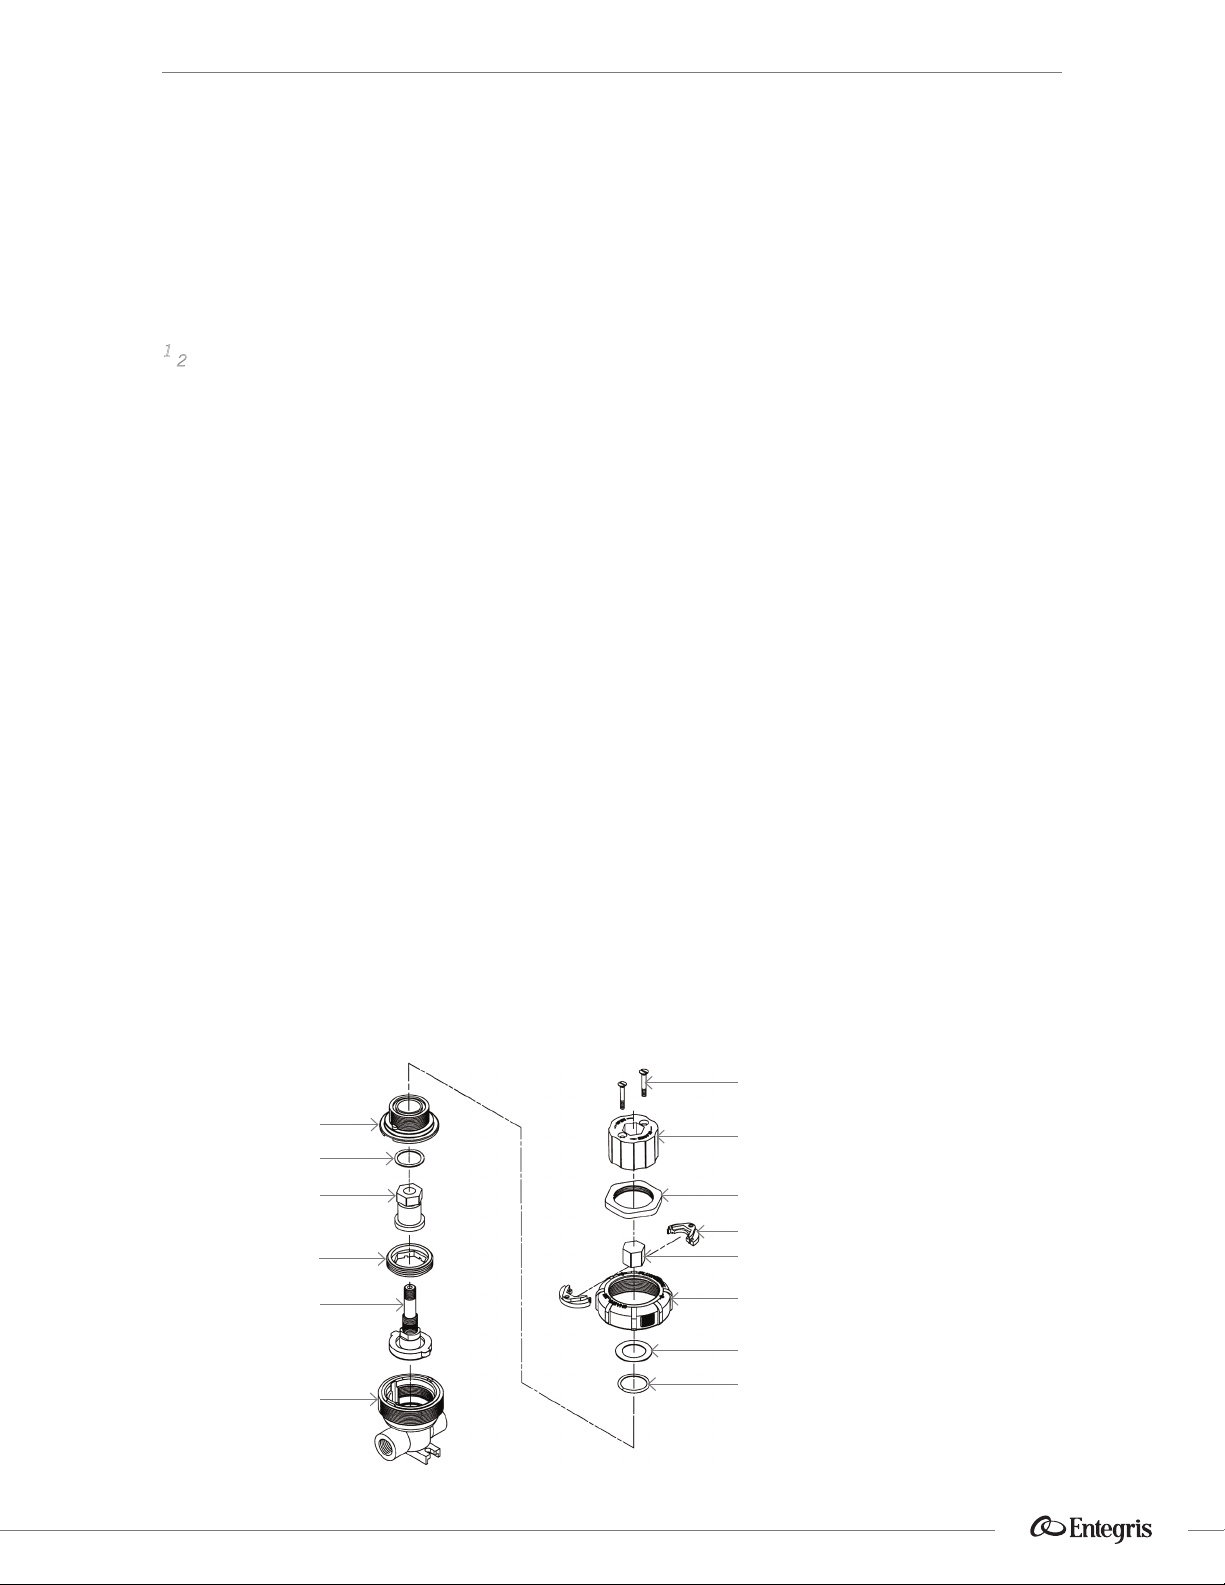
1. Begin disassembly by referring to Figure 1.
2. Remove the two screws (P1) on top of the handle
(P8) with a screwdriver (S1). Discard screws.
3. Remove the handle (P8) by pulling up on it.
4. Remove the stop nut (P2) by rotating it counterclockwise, then discard it.
5. Remove the collar halves (P9) by inserting a
screwdriver (S1) into the slot and separating
them as shown in Figure 2.
6. Remove the panel mount nut (P10).
7. Remove the outer cap (P11) with the outer
cap wrench (T1) by turning it slowly counterclockwise.
8. Remove and discard the thrust washer (P3)
and O-ring (P4).
9. Remove the inner cap (P12).
10. Remove and discard the thrust washer (P5).
11. Remove the actuator nut (P6) by rotating it
clockwise. Discard this part.
12. Use the retainer nut adaptor (T2) and an adjustable wrench (S2) to remove the retainer nut (P13).
See Figure 3.
13. Remove the diaphragm/retainer/stem assembly
(P7) by pulling up on it. Discard this assembly.
P12 Inner cap
P5 Thrust washer*
P6 Actuator nut*
P13 Retainer nut
stem assembly*
Figure 1.
P14 Body
P1 Screws (2)*
P8 Handle
P10 Panel mount nut
P9 Collar halves (2)
P2 Stop nut*
P11 Outer cap
P3 Thrust washer*
P4 O-ring*
*Repair parts kit
INTEGRA MANUALLY OPERATED DIAPHRAGM VALVES
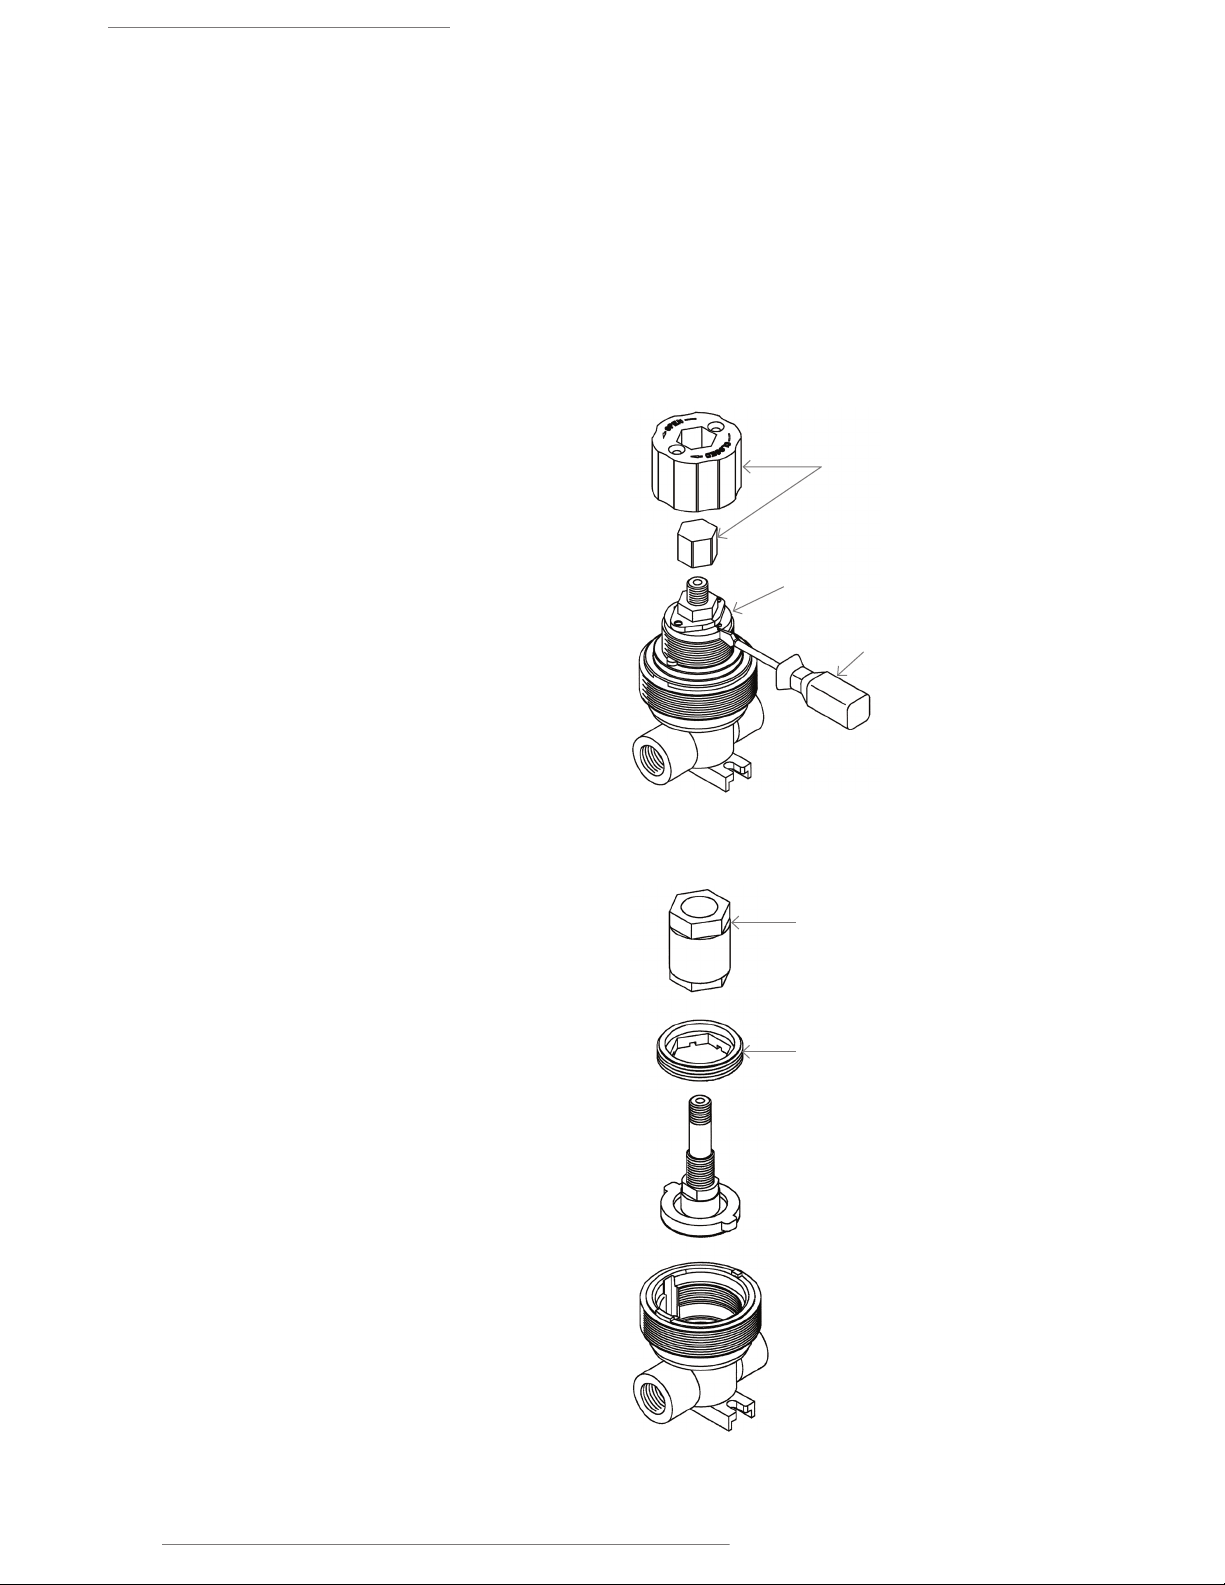
REPAIR PROCEDURE – ASSEMBLY
—
1. Before beginning assembly, clean the internal
body surfaces (P14) and the parts not supplied
in the kit with isopropyl alcohol (S3).
2. Begin assembly by making sure the O-ring
between the diaphragm and retainer is evenly
in place. Snap O-ring pre-set tool (P15) on stem
(see Figure 4). Then position the diaphragm/
retainer/stem assembly (P7) into the body (P14),
lining up the tabs on the retainer with the slots
on the body (P14).
3. Thread the retainer nut (P13) into the body (P14)
until the retainer nut (P13) just contacts the
retainer. See Figure 3.
4. With the retainer nut adaptor (T2) tighten the hex
portion of the adaptor to 5.65 N•m (50 in•lbs)
using the torque wrench (S4) and 1⁄" crow’s foot
(S5). Discard O-ring pre-set tool (P15).
5. Thread the actuator nut (P6) onto the stem until
it bottoms out.
6. Place the thrust washer (P5) onto the actuator
nut.
actuator nut (P6) first lines up with the hex on
the stop nut (P2).
15. Install the handle (P8) so that the holes in the
handle line up with the holes in the collar halves
(P9).
16. Insert two screws (P1).
17. Proceed to test the valve.
P8 Handle and
P2 Stop nut removed
P9 Collar half
S1 Screwdriver
7. Place the inner cap (P12) onto the valve body,
aligning the bosses on the body with the slots in
the cap.
8. Install the outer cap (P11) and slowly torque to
13.5 N•m (120 in•lbs) using the torque wrench
(S4), 1⁄" crow’s foot (S5) and outer cap wrench
(T1).
9. Turn actuator nut (P6) clockwise until it contacts
the inner cap (P12).
10. Place O-ring (P4) and thrust washer (P3) into the
groove on the inner cap (P12).
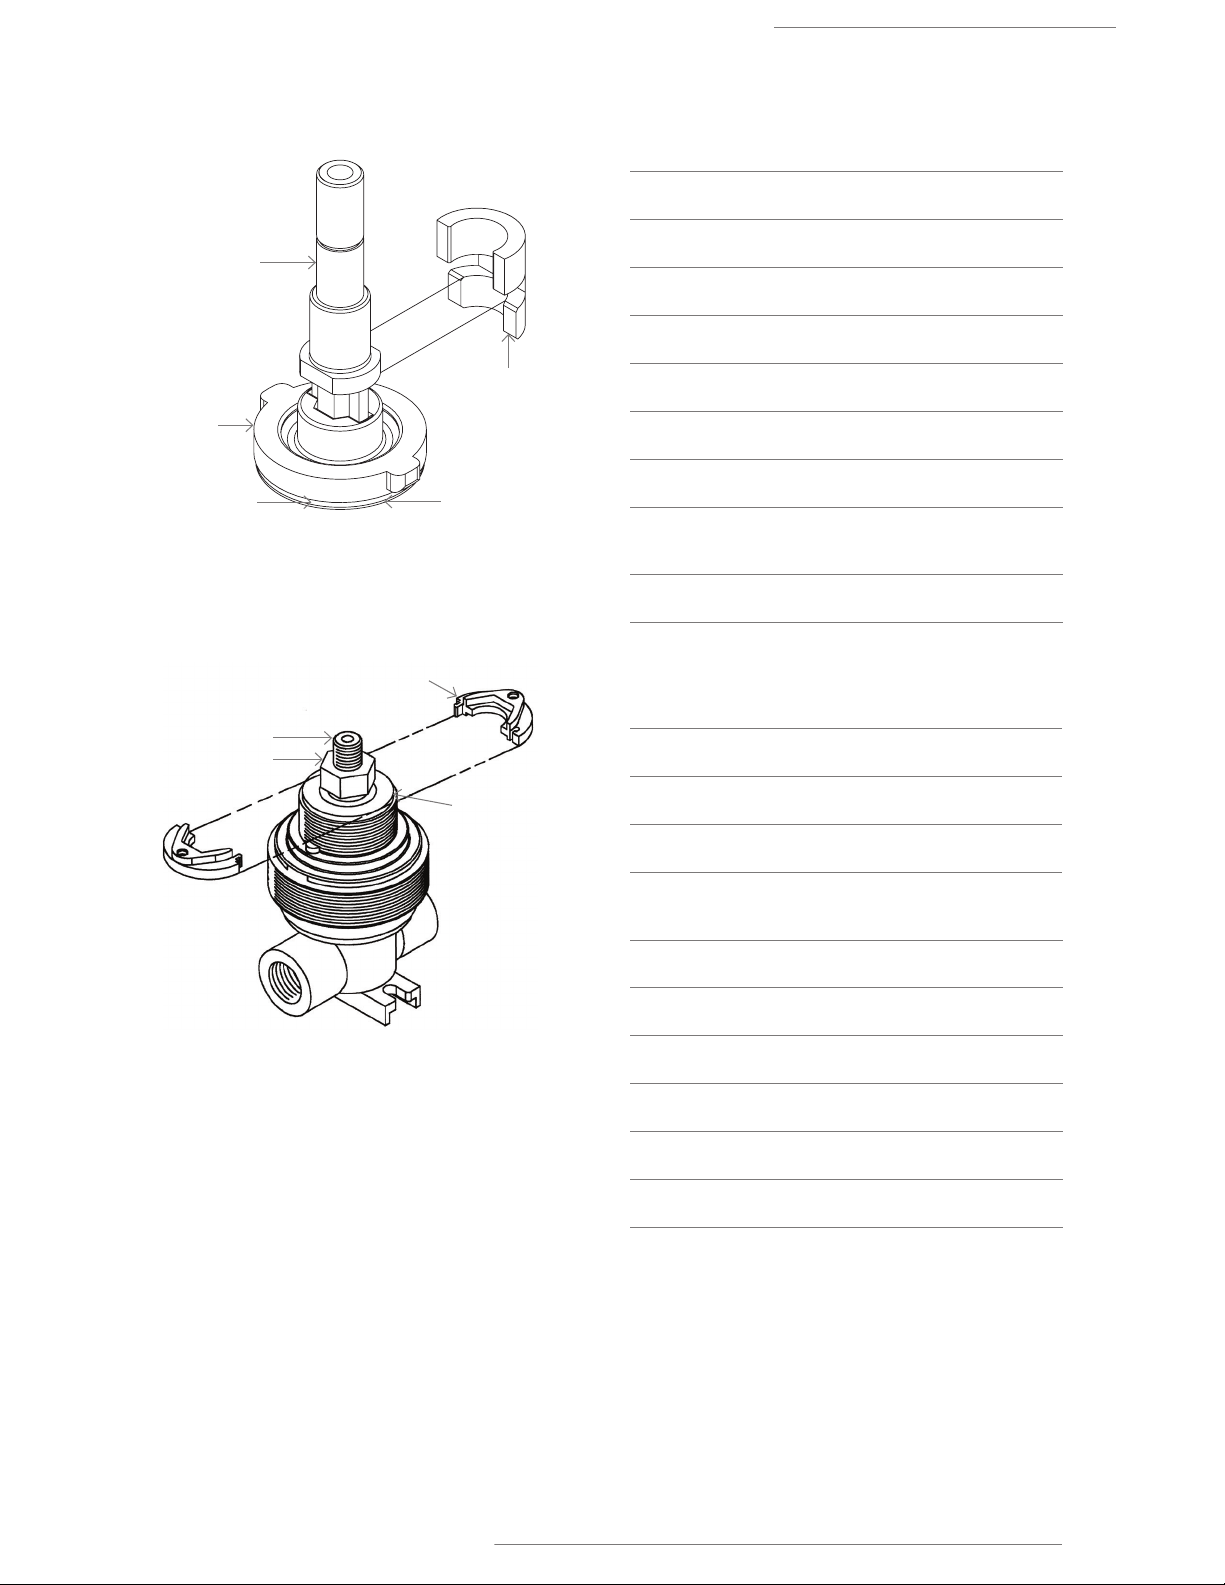
11. Install collar halves (P9) onto the stem as shown
in Figure 5.
12. Thread on the panel mount nut (P10).
13. Set up valve so that 552 kPa (80 psi) can be
applied to the outlet port.
14. Place the handle (P8) onto the actuator nut (P6)
and slowly close the valve until a seal is just
made. Remove the valve handle without disturbing the stem position, and turn the stop nut (P2)
clockwise until it first contacts the actuator nut
(P6). Then turn the stop nut (P2) counterclockwise less than ⁄ of a turn so the hex on the
Figure 2.
T2 Retainer nut adaptor
P13 Retainer nut
Figure 3.
P/N 1030-104 | Rev. C 03/19 | Entegris, Inc.2
INTEGRA MANUALLY OPERATED DIAPHRAGM VALVES
*Repair parts ki
P7 Stem assembl
P7 Diaphragm/Retainer/Stem Assembly
Stem
P15 O-ring
pre-set tool*
Retainer
O-ring
t
Figure 4.
P9 Collar half
Diaphragm
Repair Parts Kit
(See part numbers listed below)
ITEM DESCRIPTION QUANTITY
P1 Screw 2
P2 Stop nut 1
P3 Thrust washer 1
P4 O-ring 1
P5 Thrust washer 1
P6 Actuator nut 1
P7 Diaphragm/retainer/
1
stem assembly
P15 O-ring pre-set tool 1
Repair Tool Kit
(Part number 213-103)
P6 Actuator nut
Figure 5.
y
ITEM DESCRIPTION
P4 O-ring
with P3
Thrust washer
on top
T1 Outer cap wrench
T2 Retainer nut adaptor
Customer Supplied Items
ITEM DESCRIPTION
S1 Screwdriver
S2 Adjustable wrench
S3 Isopropyl alcohol
S4 Torque wrench 22 N•m (200 in•lbs) scale
S5 1⁄" Crow’s foot
Entegris, Inc. | P/N 1030-104 | Rev. C 03/19 3

ORDERING INFORMATION
—
All of the following valves use repair parts kit part number 201-74.
Valve part number
201-38 201-42-01
201-39 201-41-SI
201-40 201-41-SO
201-41 201-42-SI
TESTING
—
The valve must be tested in the following ways:
Outlet to Inlet Leakage
With 552 kPa (80 psi) air pressure applied to the outlet
and the valve fully closed, no leakage at the inlet
should be seen when the inlet port is submerged in
water. If leakage occurs, back o the stop an additional ⁄ turn. If this does not correct the leakage,
disassemble and inspect the valve seat for a defect.
201-42 201-42-SO
201-38-01 201-41-SI-01
External Media Leakage
With the inlet plugged with a taped plug or Flaretek®
fitting cap, apply 552 kPa (80 psi) air pressure to the
201-39-01 201-41-SO-01
outlet. No leakage should be observed from around
the outer cap.
201-40-01 201-42-SI-01
201-41-01 201-42-SO-01
LIMITED WARRANTY
Entegris’ products are subject to the Entegris, Inc. General Limited Warranty. To view and print this
information, visit entegris.com and select the Legal & Trademark Notices link in the footer. Entegris
does not warranty any failure in the case of customers using unapproved foreign components.
FOR MORE INFORMATION
Please call your Regional Customer Service Center today to learn what Entegris can do for you.
Visit entegris.com and select the Contact Us link to find the customer service center nearest you.
TERMS AND CONDITIONS OF SALE
All purchases are subject to Entegris’ Terms and Conditions of Sale. To view and print this information,
visit entegris.com and select the Terms & Conditions link in the footer.
Corporate Headquarters Customer Service
129 Concord Road
Billerica, MA 01821
USA
Entegris®, the Entegris Rings Design®, and other product names are trademarks of Entegris, Inc. as listed
on entegris.com/trademarks. All third-party product names, logos, and company names are trademarks or
registered trademarks of their respective owners. Use of them does not imply any aliation, sponsorship,
or endorsement by the trademark owner.
©1996-2019 Entegris, Inc. | All rights reserved. | Printed in the USA | 3220-10453ENT-0319
P/N 1030-104 | Rev. C 03/19
Tel +1 952 556 4181
Fax +1 952 556 8022
Toll Free 800 394 4083
www.entegris.com
 Loading...