

Page 1

USER MANUAL
!Getting
!to know your
Crossfire tablet!
1st Edition
entegra technologies inc.
Date Issued;
August 2014
Document Number
ECS-D1-102:A0
Page 2
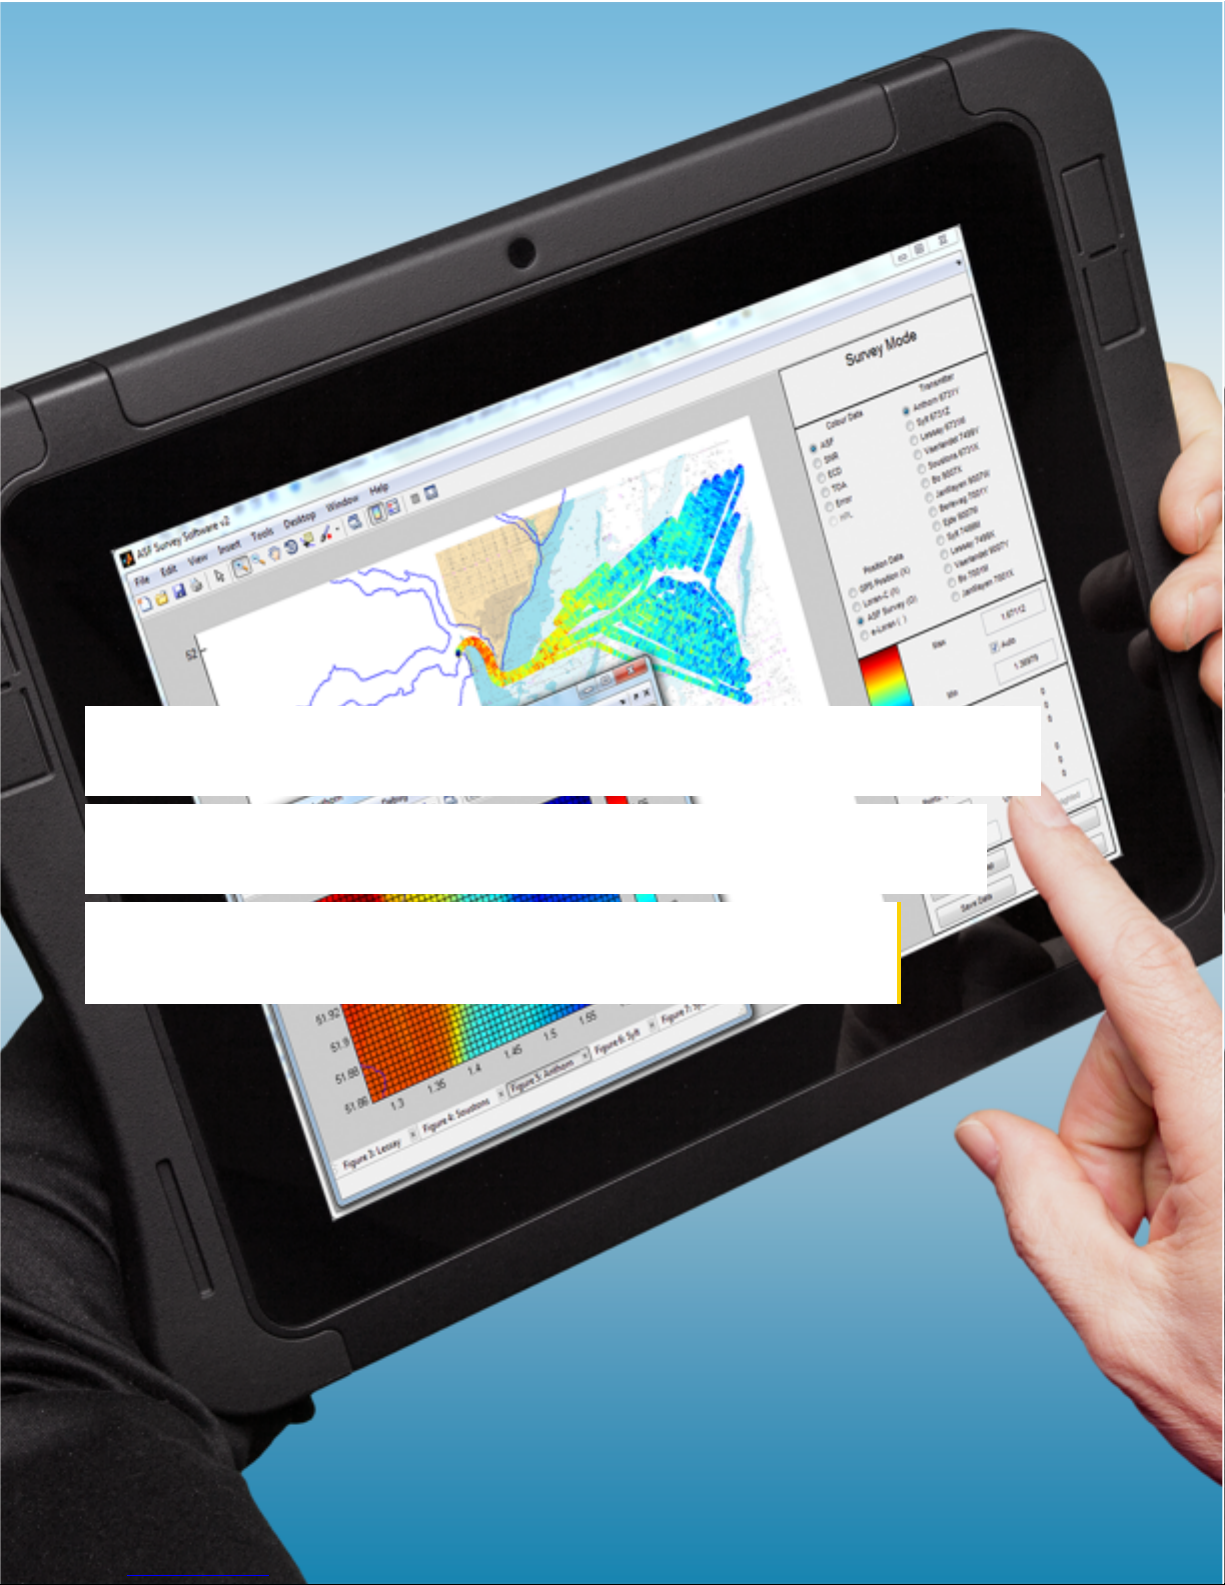
!
Congratulations, you and
!your Crossfire Pro were
!made for each other. !
Page 3

Page 3 | Crossfire Pro User Manual | entegratec.com | [email protected]
TABLE OF CONTENTS
Crossfire User Guide
1st Edition
Publish Date:
August, 2014
Document Number:
ECS-D1-102:A0
..........................................................................................................................................................Glossary 25
..............................................................................................................................................................Notes 29
.......................................................................................................................................Contacting Entegra 5
..............................................................................................................................................Getting Started 7
............................................................................................................................................Using Crossfire 12
................................................................................................................................................Helpful Hints 20
................................................................................................................................................Maintenance 22
..........................................................................................................................................Troubleshooting 23
............................................................................................................................................Agency Notices 27
.....................................................................................................................................General information 4
entegra technologies inc
Address
6500 Pinecrest Drive, # 500
Plano, TX 75024
Phone
800-766-2026
Email
Page 4

MODEL
INPUT
CONTROL METHOD
Crossfire Pro
Finger Touch /
Active Stylus
(ProCAP &
Digitizer)
Your finger and/or stylus
(included with the tablet)
Crossfire Extreme
Finger or Passive
Stylus
(ProACP or
Resistive)
Any suitable pointing
device (passive stylus
included with the tablet)
Page 4 | Crossfire Pro User Manual | entegratec.com | [email protected]
GENERAL INFORMATION
!Welcome to Crossfire.
Crossfire has been designed, tested, and manufactured to meet the environmental and physical real-world
challenges faced by today’s mobile workers. Based on years of experience in rugged mobile applications,
Crossfire is designed to withstand the abuses of everyday wear and tear. Modern technology, modular and
adaptive design are just a few highlights of your Crossfire tablet.
NOTES
This Guide assumes that you have basic
experience using computers and Microsoft
Windows.
In this guide, all information applies to all
models unless otherwise noted.
ABOUT YOUR CROSSFIRE
Crossfire is a high-performance tablet PC
that runs on Microsoft® Windows®
operating systems.
PACKAGE CONTENTS
Check to make sure your package includes
the following items:
• Crossfire Tablet Computer
• Battery Pack
• AC Adapter
• AC Adapter Cord
• Stylus
• Quick Start Guide
• Product Information Kit (Warranty &
Safety)
All Crossfire tablets have been engineered and
tested to meet Military Standards for
Environmental Extremes (MIL STD 810G). Your
tablet includes the following features that make it
exceptionally rugged and durable:
• Durable, long-lasting, magnesium enclosure
• Interior and exterior multi-layer magnesium frames and cavities
• Over-molded side bumper system
• Solid State Storage Media
• Removable Solid State Storage Media
• Integrated, protected wireless LAN and WAN antennas
• Locked in place memory, cables, and connectors
• Proprietary thermal management system
Page 5

web site:
entegratec.com for Live Chat help or Video
Tutorials
email:
Toll Free:
(800) 766-2026
Page 5 | Crossfire Pro User Manual | entegratec.com | [email protected]
CONTACTING ENTEGRA
!We‘re here to help.!
Visit our web site - entegratec.com for Live Chat help, see video tutorials, or read our FAQ’s, email us at
[email protected] or call toll free (800) 766-2026:
To troubleshoot problems (including wireless and
GPS problems), before you call, read the FAQ page
on the entegra web site. Go to http://
entegratec.com; then select Support; then FAQ:
If you purchased your tablet from an authorized entegra dealer, contact the
dealer for service and support.
NOTE
The serial number is on the back of the
tablet.
If you purchased your tablet directly from entegra, use any of the following
methods to contact us for service and support:.
Before you contact support, have the following information ready so that the
customer support representative can quickly provide a solution:
Product Name: Crossfire
Product Serial Number:
Purchase Date:
Conditions under which the problem occurred
Any error messages that were displayed
Type of device connected, if any
Page 6
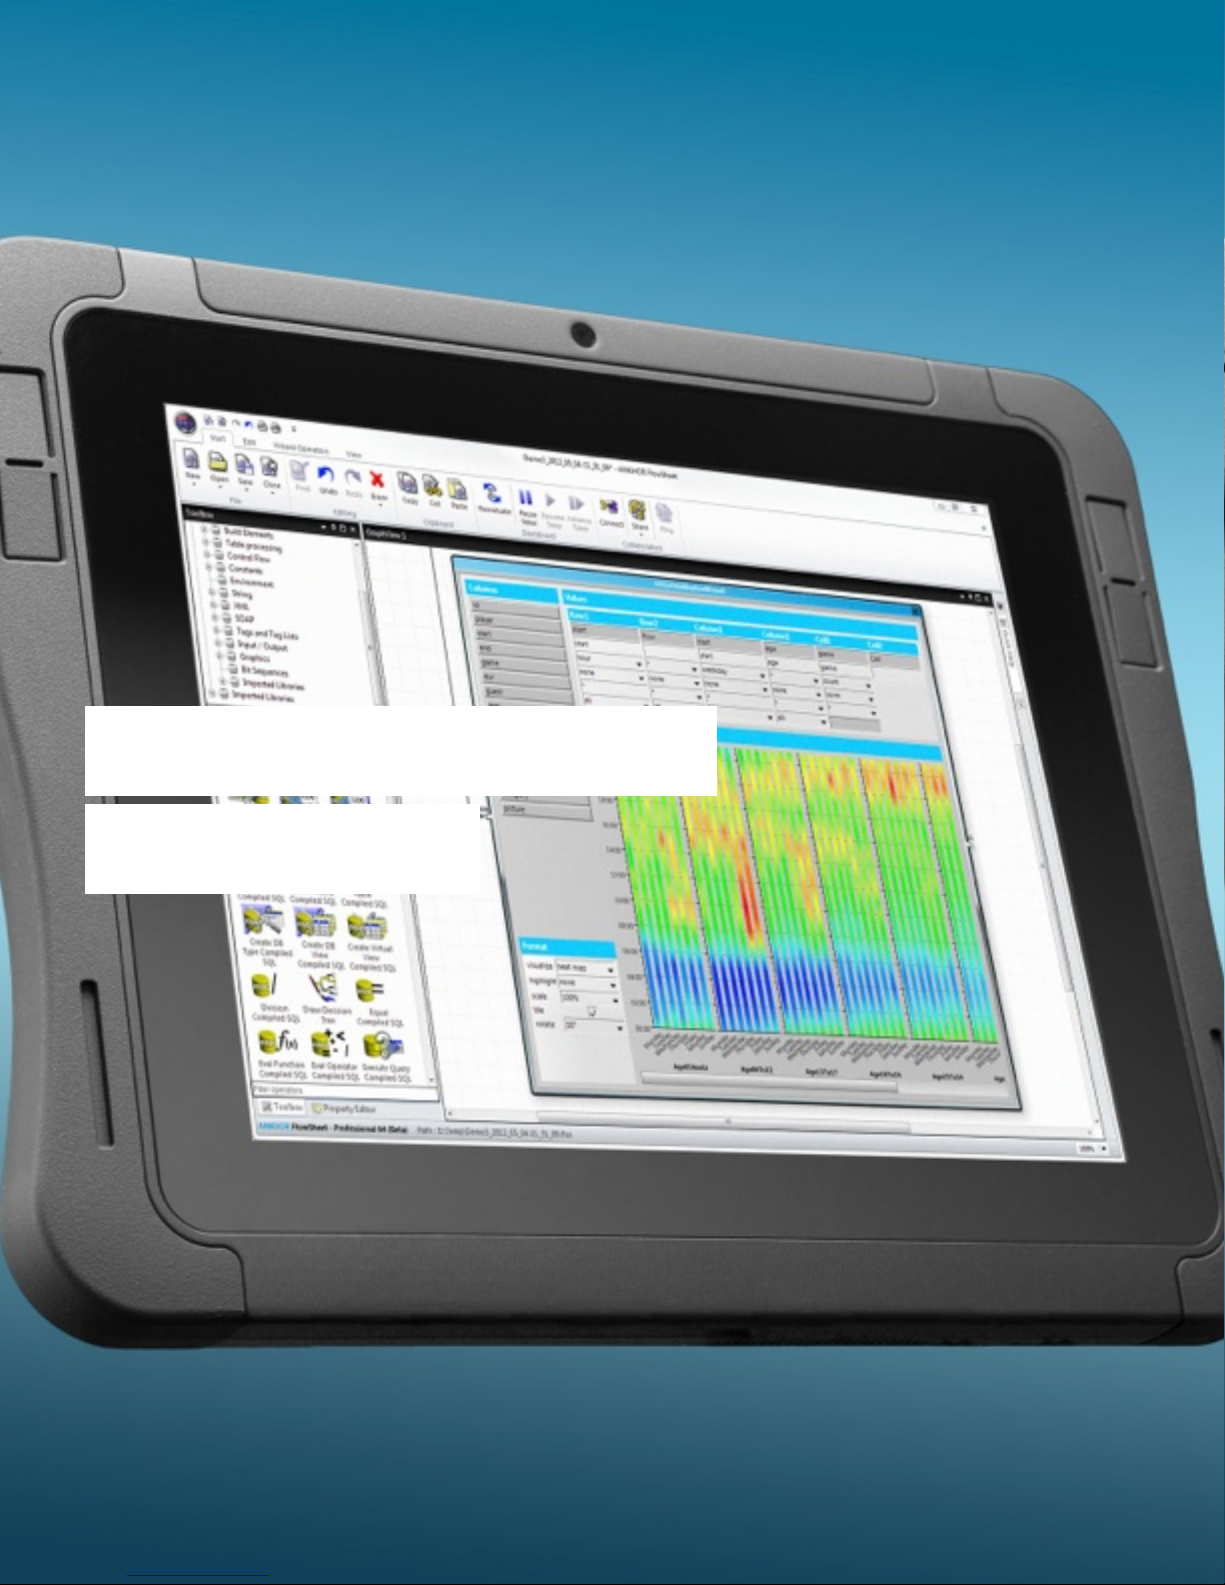
!Getting to know
!Crossfire.
Page 7
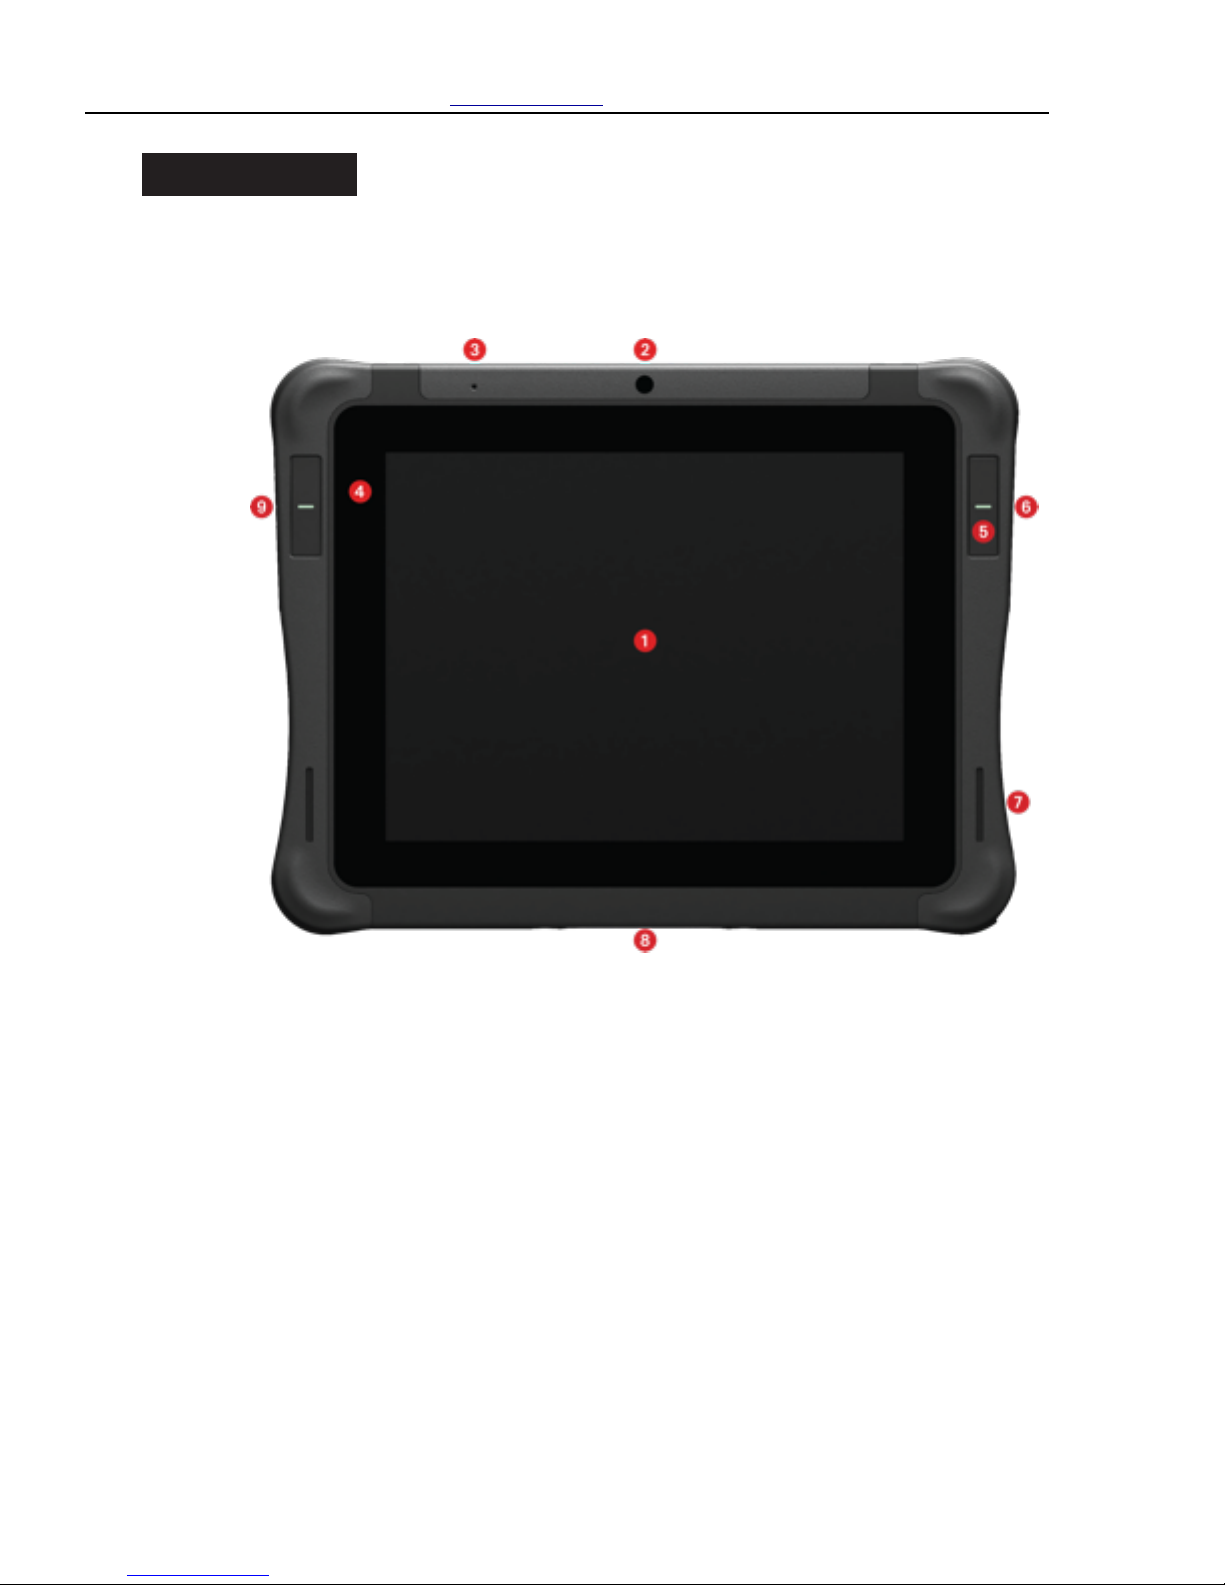
FRONT VIEW
1
9.7-inch XGA LCD with integrated Touch Screen and Digitizer
2
Front-facing Camera - allows you to use for applications like video conferencing
3
Microphone - enables you to input audio with noise cancellation
4
Light Sensor - detects ambient light conditions and helps optimize the display for best viewing in those conditions
5
2x Programmable Function Keys (L/R sides) - allows you to manually control the Crossfire functions or applications
6
Battery LED - indicates the status of the battery such as charging or fully charged
7
Speakers - enables you to listen to audio files
8
35-pin Docking Connector - for signal & power to docking stations
9
System LED - Indicates the status of the computer (on, off, etc)
Page 7 | Crossfire Pro User Manual | entegratec.com | [email protected]
GETTING STARTED
This chapter gives you an overview of your tablet and includes a quick-start guide to key tablet items.
Page 8
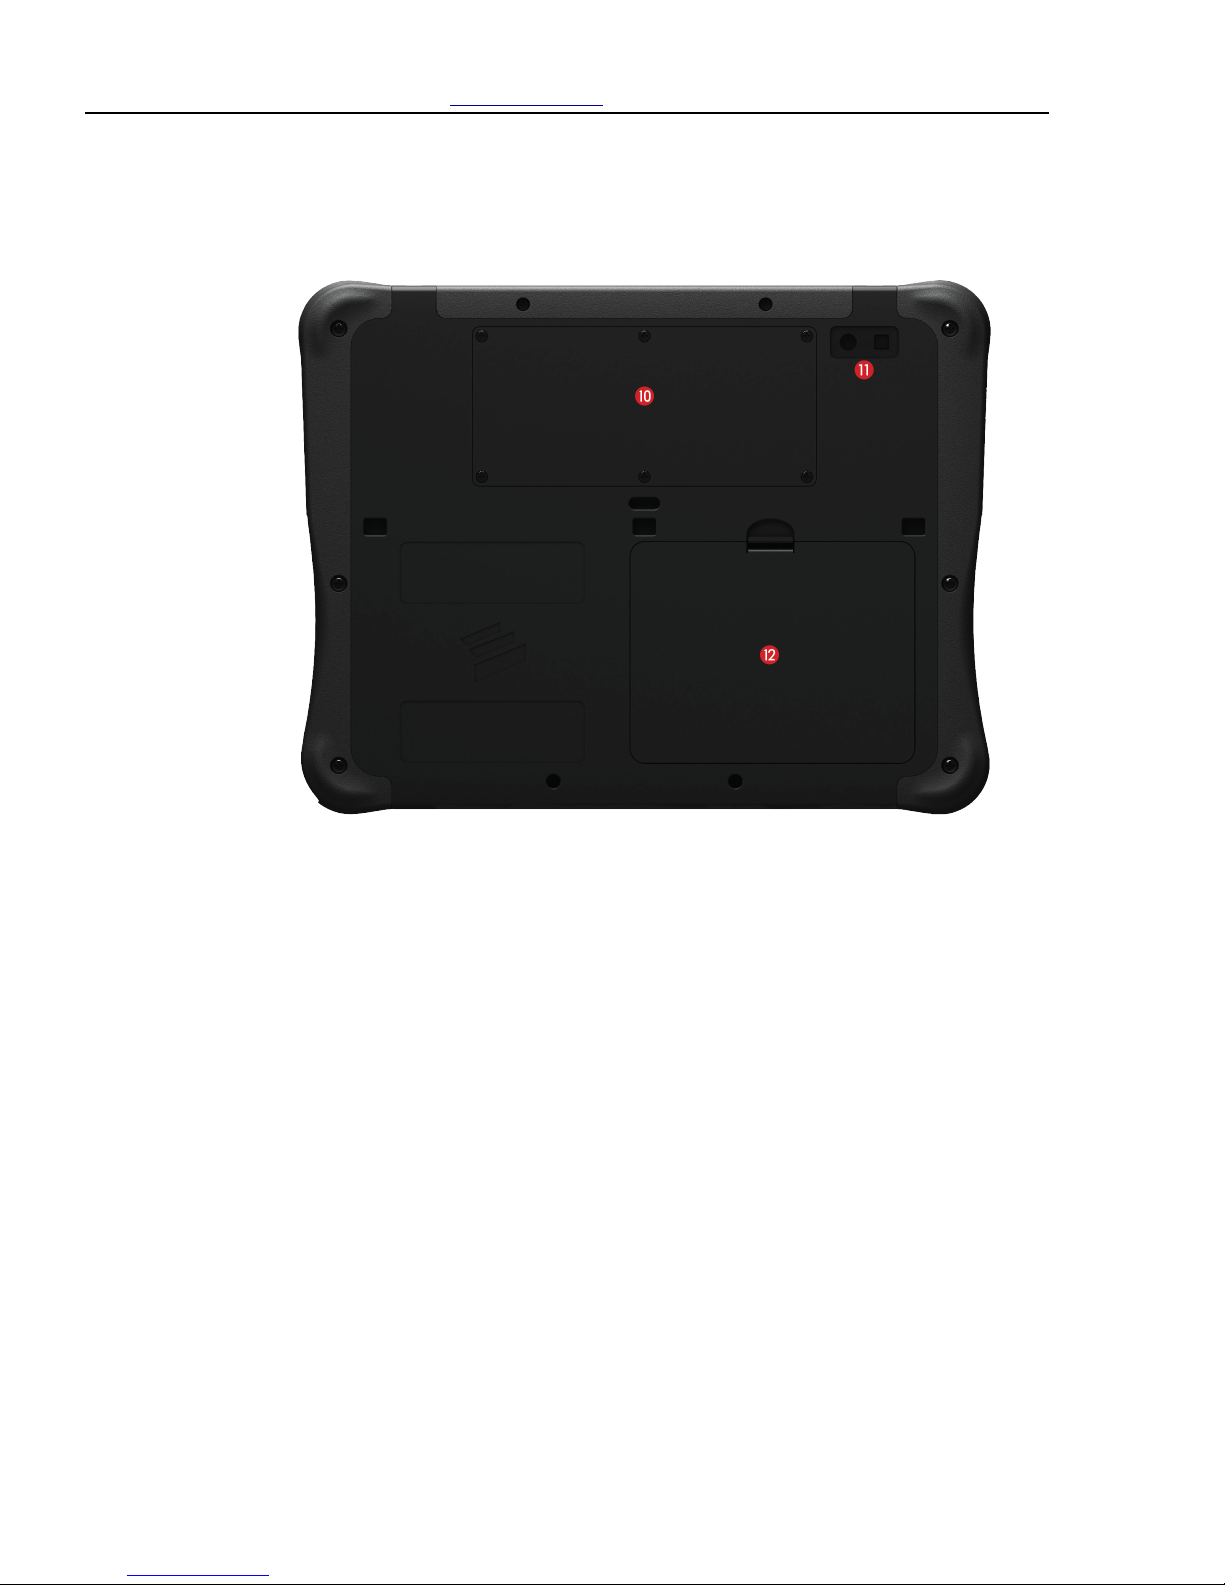
BACK VIEW
10
Expansion Bay - lets you add expansion modules to your system for additional features (such as a Point of Sale
Module)
11
Rear-facing Camera & Flash - allows you to take pictures or videos
12
Removable Battery Pack - enables you to replace a depleted battery with a freshly charge battery - NOTE: batteries
can be hot swapped on the fly without interference to system operations
Page 8 | Crossfire Pro User Manual | entegratec.com | [email protected]
Page 9
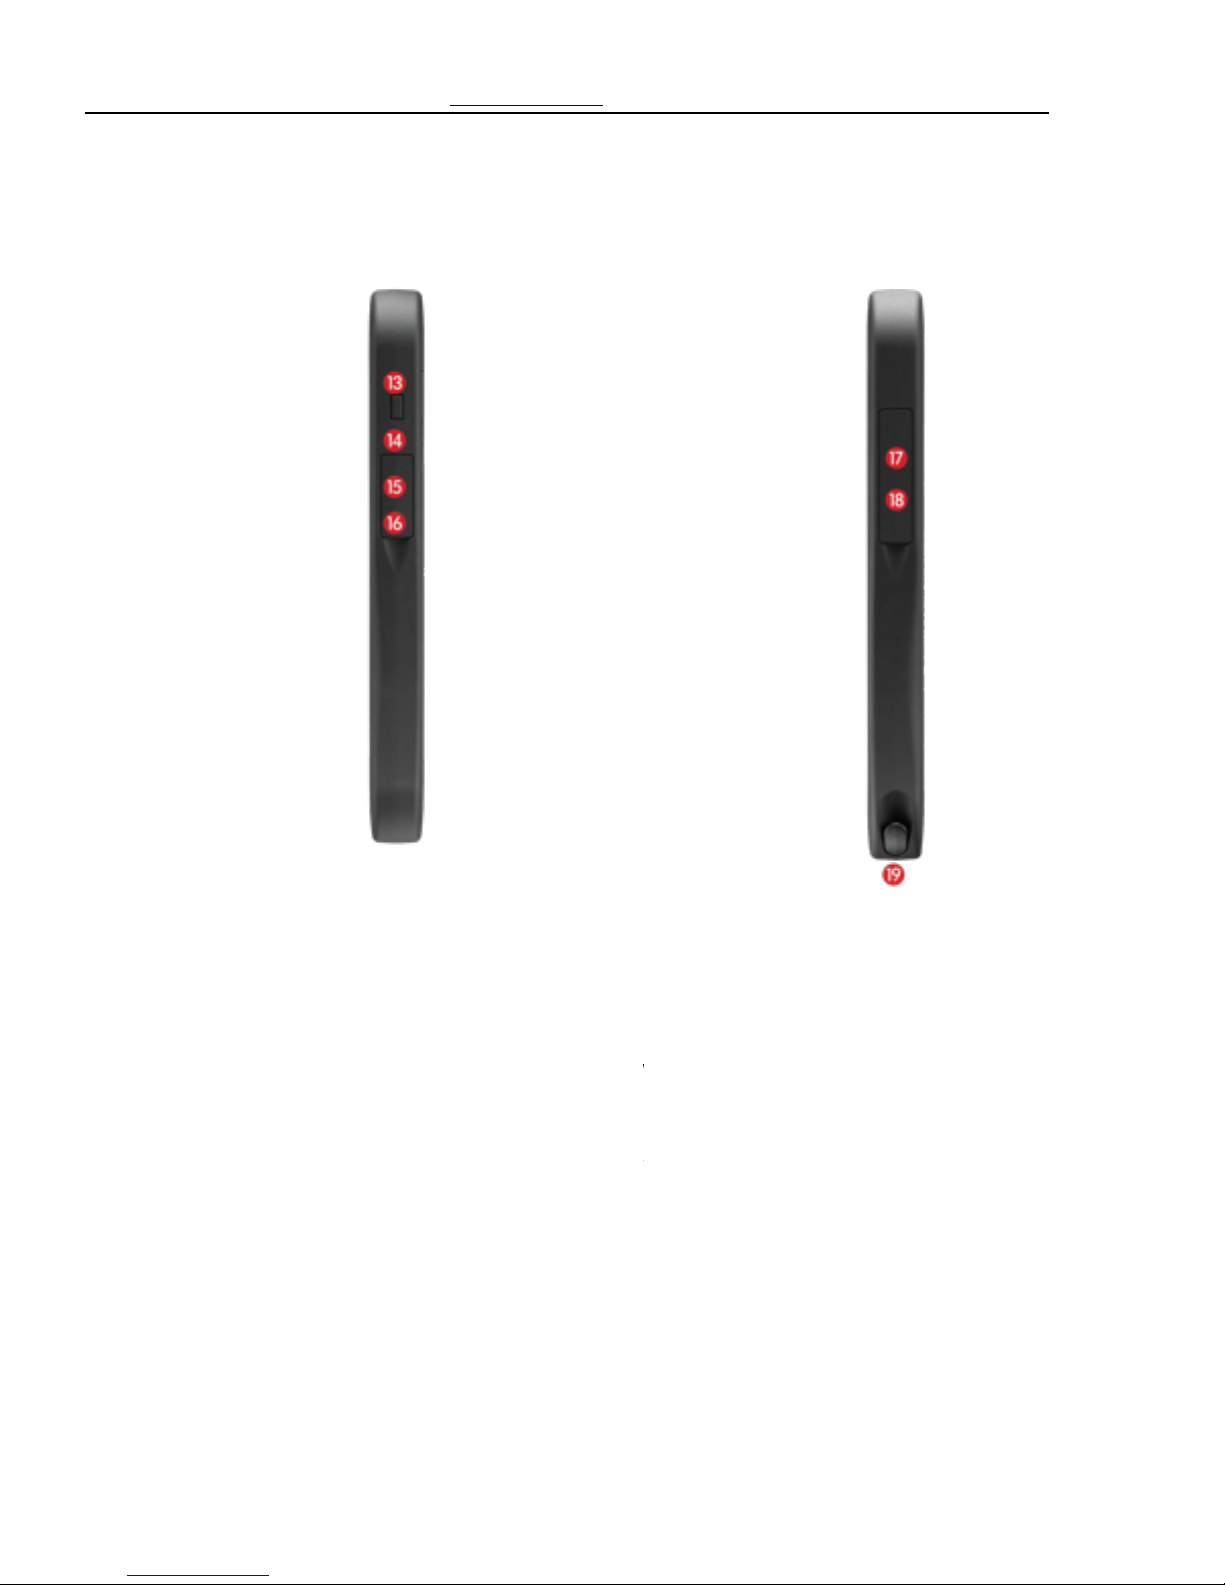
SIDE VIEWS
Left Side
Right Side
13
Power Button - to turn the system On/Off or put into sleep or hibernate modes
14
Reset Button - for resetting the system when other controls are not working
15
Headset Port - for plugging in 3.5 mm audio jack devices (such as headphones or speakers)
16
Power Port - provides access to connect the AC or DC power adapter to charge the system
17
Mini-HDMI Port - allows you to connect to HDMI monitors/screens for second display capabilities
18
USB Port - allows you to connect a wide variety of peripherals to your device (such as keyboards or mice)
19
Stylus - stylus is stowed with the computer - remove it to use when it is preferred over using your finger
Page 9 | Crossfire Pro User Manual | entegratec.com | [email protected]
Page 10
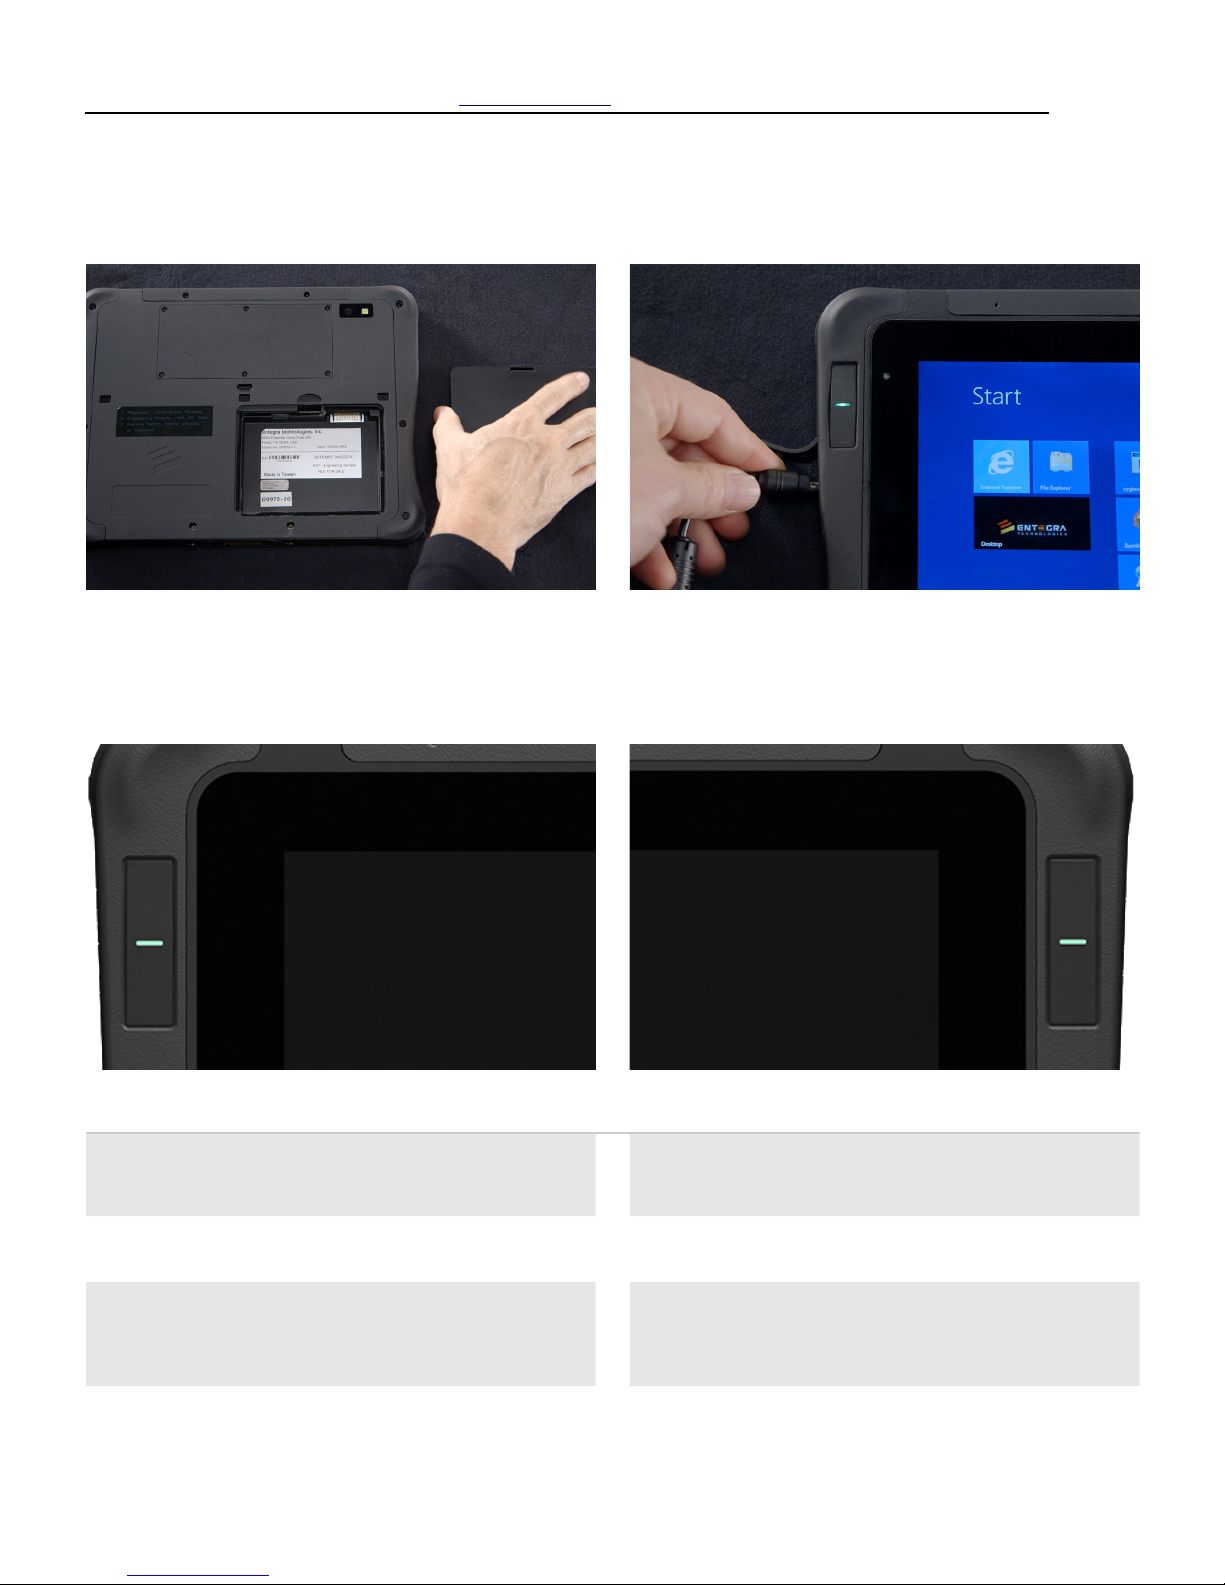
Installing the Battery & Plugging in Power
Install the Battery by angling the bottom of the pack into
the battery bay and tilting forward until it clicks in place
Power Port provides access to sources to charge the
battery such as the AC Adapter
Power Port provides access to sources to charge the
battery such as the AC Adapter
LED INDICATORS (Items 6 & 9 from Front View)
LED INDICATORS (Items 6 & 9 from Front View)
LED INDICATORS (Items 6 & 9 from Front View)
LEFT SIDE - SYSTEM STATUS
LEFT SIDE - SYSTEM STATUS
RIGHT SIDE - BATTERY STATUS
RIGHT SIDE - BATTERY STATUS
MODE/
STATE
LED STATE
MEANING
MODE/
STATE
LED
STATE
MEANING
OFF
OFF
The tablet is powered down and in the
OFF state
CHARGING
SOLID
AMBER
Your tablet is charging the battery
from an external power source such
as AC Adapter or docking station
ON
SOLID
GREEN
The tablet is powered ON and in the ON
state
CHARGED
SOLID
GREEN
Your tablet’s battery is fully charged
SLEEP
MODE
BLINKING
GREEN
The tablet is powered on and in the
low-power SLEEP state
LOW
BATTERY
BLINKING
RED
Your tablet’s battery is nearing empty
- time to change batteries or plug into
an external power source (such as AC
Adapter or docking station.)
Page 10 | Crossfire Pro User Manual | entegratec.com | [email protected]
Page 11
Page 11 | Crossfire Pro User Manual | entegratec.com | [email protected]
!Getting to know
!Crossfire.
•
Page 12
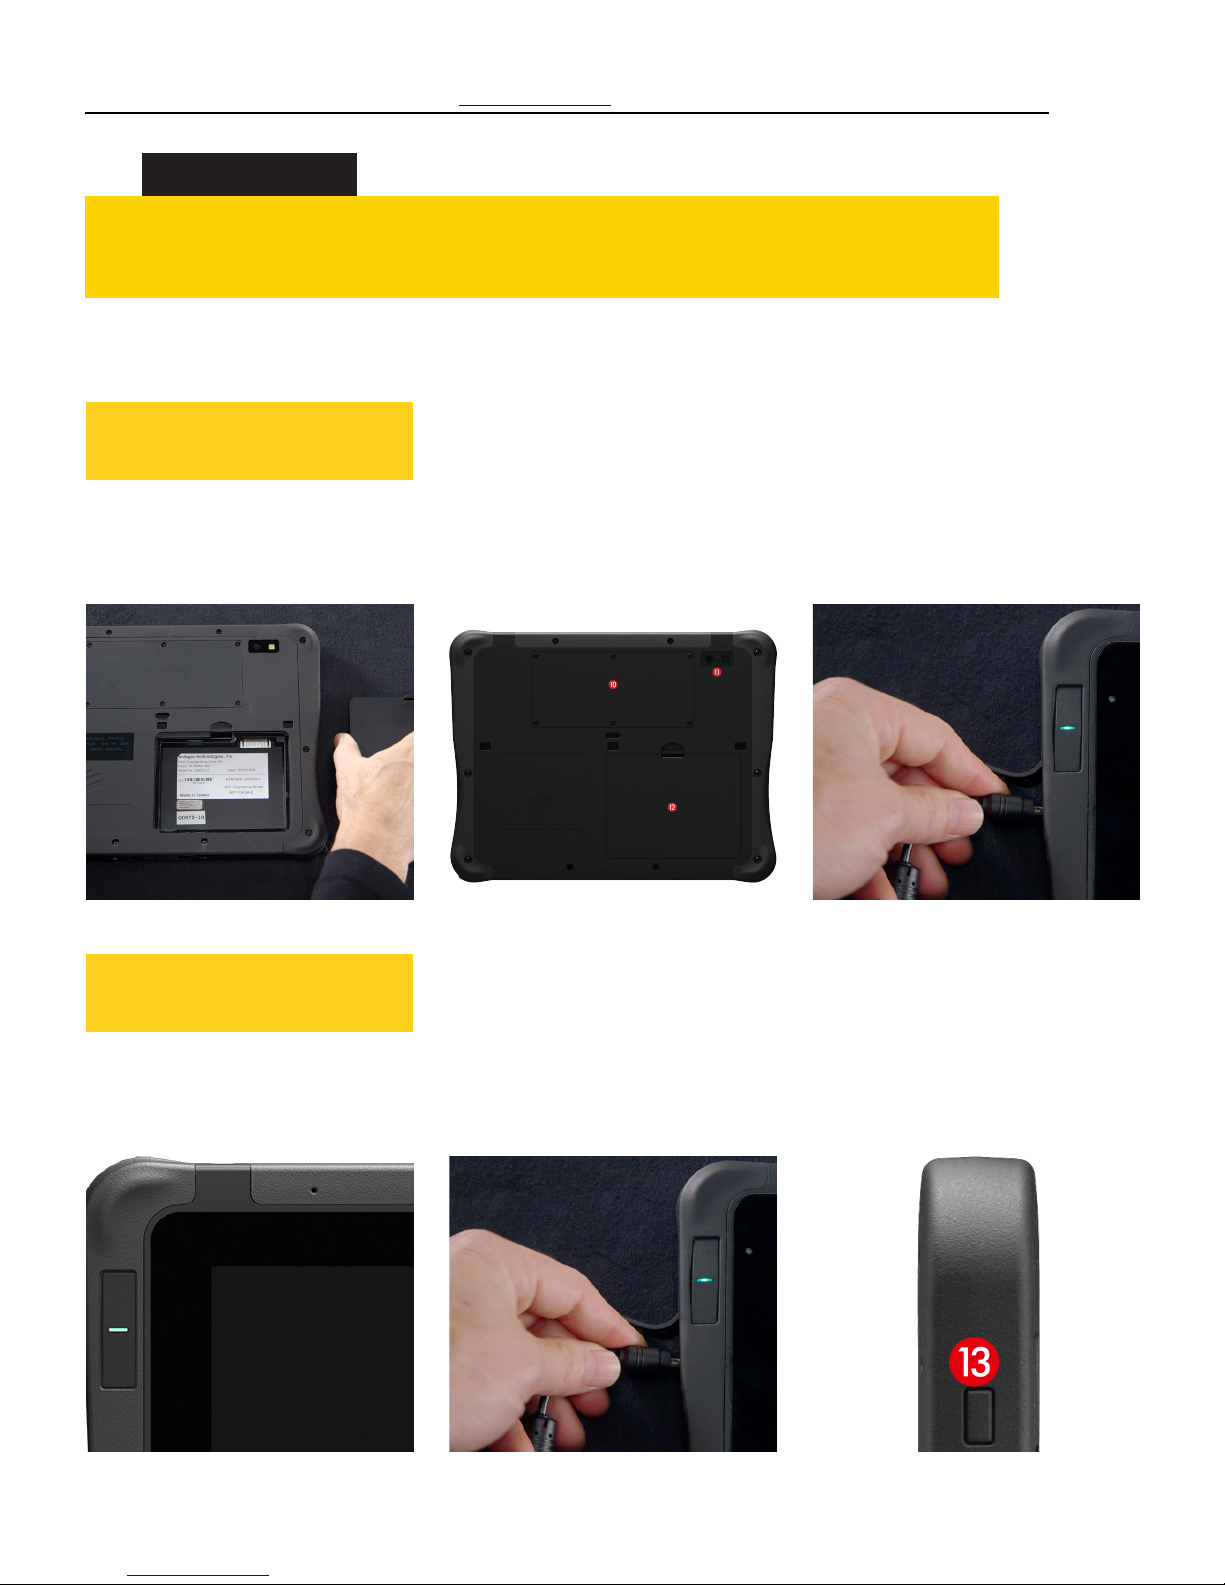
To Install the Battery
START HERE
➔
➔
1. With your tablet display facing
down towards the table locate the
battery pack and battery bay.
2. Simply place the bottom of the
battery pack into the battery bay.
Then tilt the battery forward until
it clicks into place. (Item #12)
3. You can now plug in the AC
Adapter to charge the battery.
To Turn on the Tablet
START HERE
➔
➔
1. With your tablet OFF the left side
LED status light will be black.
2. Make sure the battery is charged
or that the computer is plugged in
to an external power source as
shown in the previous section.
3. Press the Power On/Off/Suspend/
Resume button and hold for 2 sec.
Page 12 | Crossfire Pro User Manual | entegratec.com | [email protected]
USING CROSSFIRE
!Setup and get going.
This chapter contains detailed instructions for using Crossfire.
Page 13
START HERE
➔
When the tablet is
in Sleep mode, the
Status LED is
Blinking Green.
1. If the tablet is in Sleep
mode, Press the Power
Button for 2 seconds to
resume operation.
2. Save your work and close
any programs that may be
running.
3. Some Windows configurations have a power button on the Start
screen. If your tablet has a power button, tap or click it, and then
tap or click Shut down.
4. If you don't see the power button on the Start screen, here's
how to shut down:
- Swipe in from the right edge of the screen, and then tap
Settings.
- Tap or click Power, and then tap or click Shut down.
-
This is what the Power Button looks like
You can also select from one of the two other states - Sleep or Hibernate. A description of both are noted below.
Sleep - This state uses very little power, your tablet starts up faster, and you’re instantly back to where you left off. You don’t have to
worry that you will lose your work because of your battery draining as Windows automatically saves all of your work and turns off the
tablet if the battery is too low. Use sleep when you’re going to be away from your tablet for just a little while – like when you’re taking
a coffee break.
To make your tablet Sleep:
1. Open Power Options by swiping in from the right edge of the screen, tapping Search entering Power Options in the search box,
and tapping or clicking Power options.
2. Tap or click Choose what the power button does and under Power button settings, select Sleep and tap or click Save changes..
3. When you’re ready to make your PC sleep, just press the power button on your tablet.
To make your tablet Wake Up:
1. Press and hold the Power button for 2 seconds The tablet will resume normal operation.
2. NOTE: Press the power button only one time.
Hibernate - Hibernate uses less power than sleep and when you start up the tablet again, you’re back to where you left off (though not
as fast as sleep). Use hibernation when you know that you won't use your tablet for an extended period and won't have an opportunity
to charge the battery during that time. First check to see if this option is available on your tablet and if it is, turn it on.
1. Open Power Options by swiping in from the right edge of the screen, tapping Search, entering Power options in the search box, and
tapping or clicking Power options.
2. Tap or click Choose what the power button does and under Shutdown settings, select Hibernate (if it's available).
Now you'll see hibernate in these two places:
In the Power menu in the Settings charm.
In the Shut down menu.
Page 13 | Crossfire Pro User Manual | entegratec.com | [email protected]
Turning off the tablet:
There are three ways to shut down your Tablet—you can it turn off completely, you can make it sleep, or you can hibernate.
If you don't plan to use your PC for a while, you might want to turn it off completely. Before turning off your PC, close all open desktop
apps—this will prompt you to save your work.
Page 14
START HERE
➔
Use the Reset
switch only if you
cannot turn off the
tablet by any other
means because you
may lose unsaved
data.
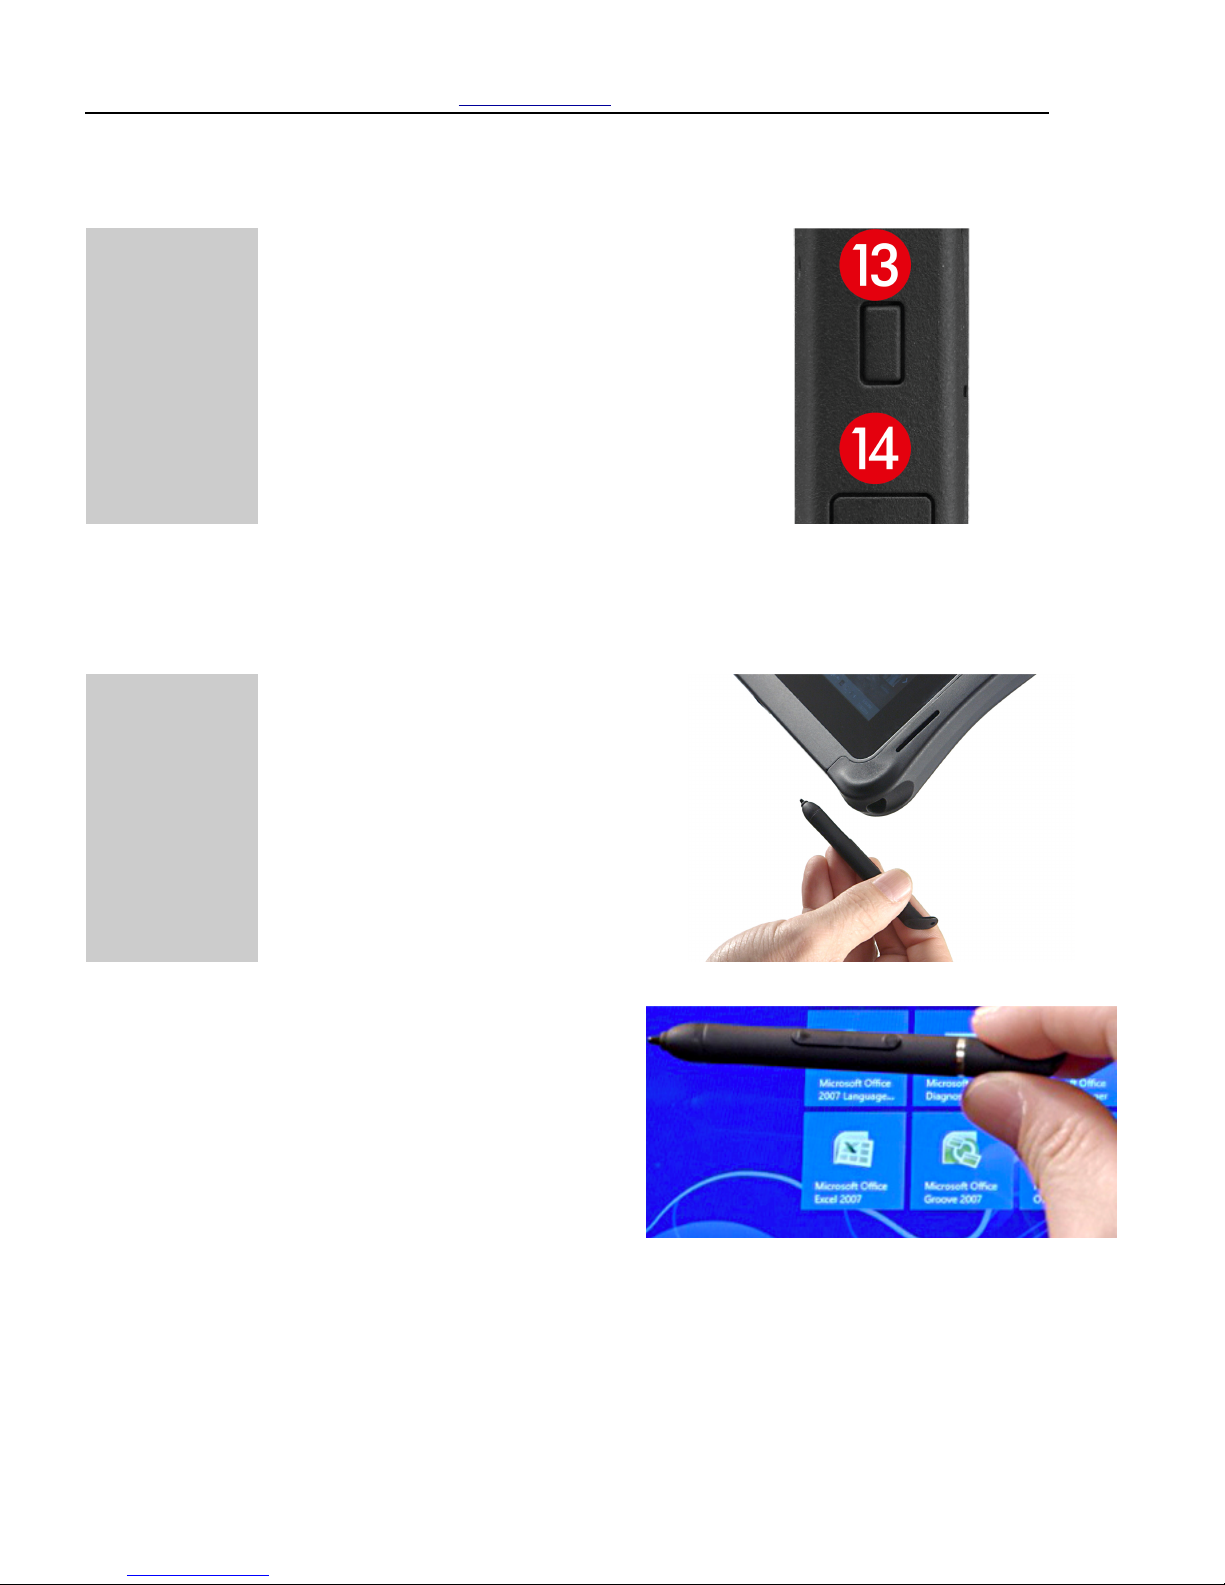
1. If the tablet does not appear
to be accepting input and you
cannot turn it off by using
methods described above,
press the Reset switch.
- the Reset switch is located
just below the power on/off
button on the side of the
tablet. #14
START HERE
➔
Your tablet uses
both touch and
stylus control.
Finger-touch is
quick and
convenient, while
stylus control
provides pinpoint
accuracy when
needed.
With the tablet display facing you,
the stylus is stored at the lowerright side of the tablet.
Using your finger, locate the catch
on the stylus and pull it out
slightly. Then pull the stylus out
fully with your finger and thumb.
Note that the stylus has left and
right mouse button controls on the
barrel. Feel free to use these
controls if you are more
comfortable with traditional
mouse actions rather than tap-andhold gestures. More information
below.
Page 14 | Crossfire Pro User Manual | entegratec.com | [email protected]
Using the Reset Switch:
Using Your Finger and Stylus:
Page 15
START HERE
➔
➔
1. The default input mode uses
both finger-touch and stylus
inputs
2. A special stylus-only mode is
available to disable finger-touch
input when needed
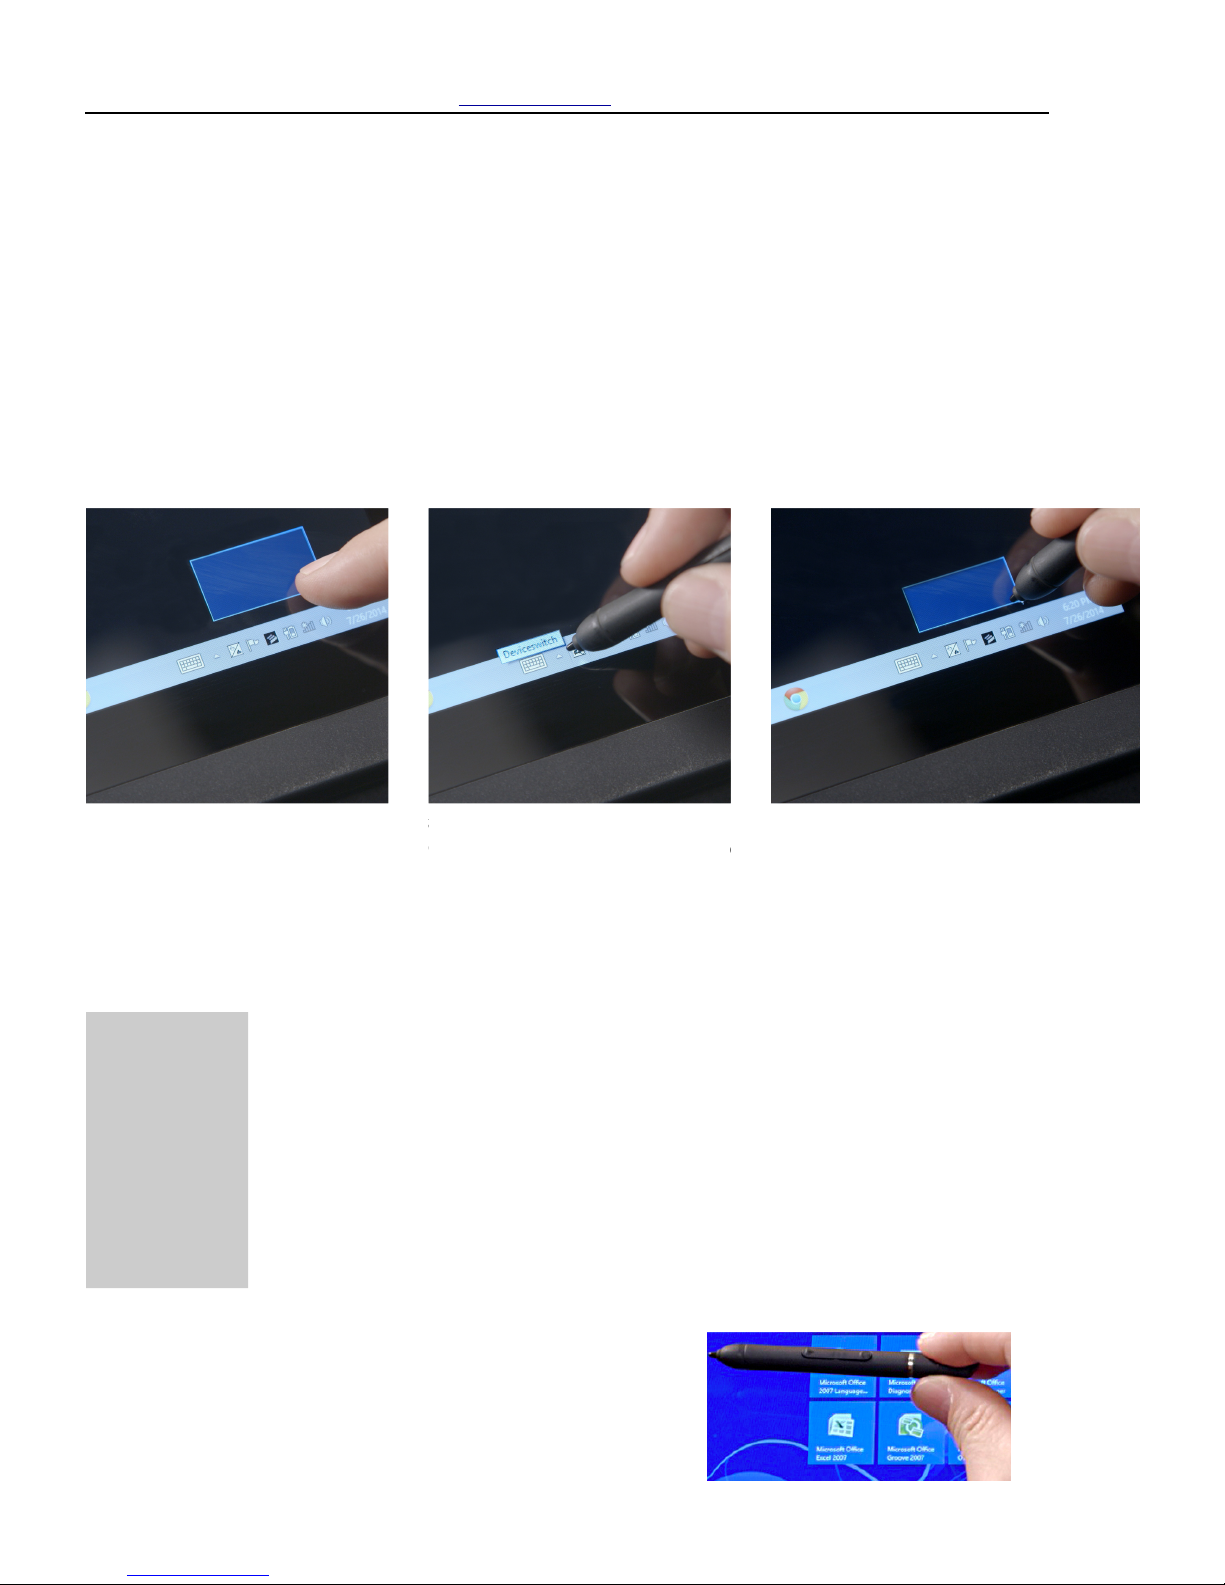
3. To switch input modes, use the
stylus or your finger to tap the
input selector icon in the
system tray (at the bottom of
the screen)
4. Once this mode is activated, all finger
touches to the display will be ignored.
- To restore dual-input mode use, simply
tap the icon with the stylus.
- Finger-touch input is quick and easy for most tasks.
- The stylus is ideal for marking CAD drawings, maps or other detailed documents.
To Perform this function:
➔
Quick Functions
- Select an object (left mouse
click)
Tap the stylus once on the object (like an icon)
Quick Functions
- Perform a double click
Quickly tap the stylus twice on the object
Quick Functions
- Move or drag an object
Place the stylus tip on the object, then continue to hold the stylus
tip on the screen as you move the stylus.
Quick Functions
- Perform a right click
Hold the stylus directly on the object for 1 second. The right click
menu appears OR Hold the stylus above the icon and click the
button on the stylus (closest to the tip as shown below)
Note that the stylus has left and right
mouse button controls on the barrel. Feel
free to use these controls if you are more
comfortable with traditional mouse
actions rather than tap-and-hold gestures.
Page 15 | Crossfire Pro User Manual | entegratec.com | [email protected]
Toggle Mode for Finger/Stylus Switching:
Using the Stylus to Perform Mouse Functions:
Page 16
To Manually Adjust Speaker
Volume:
➔
Your Crossfire is
equipped with
stereo speakers. You
can manually
control audio
volume levels with
both onscreen
(software) controls
or onboard buttons.
The speaker volume can also be
manually controlled with system
software. But for convenient
manual control, Crossfire features
onboard buttons.
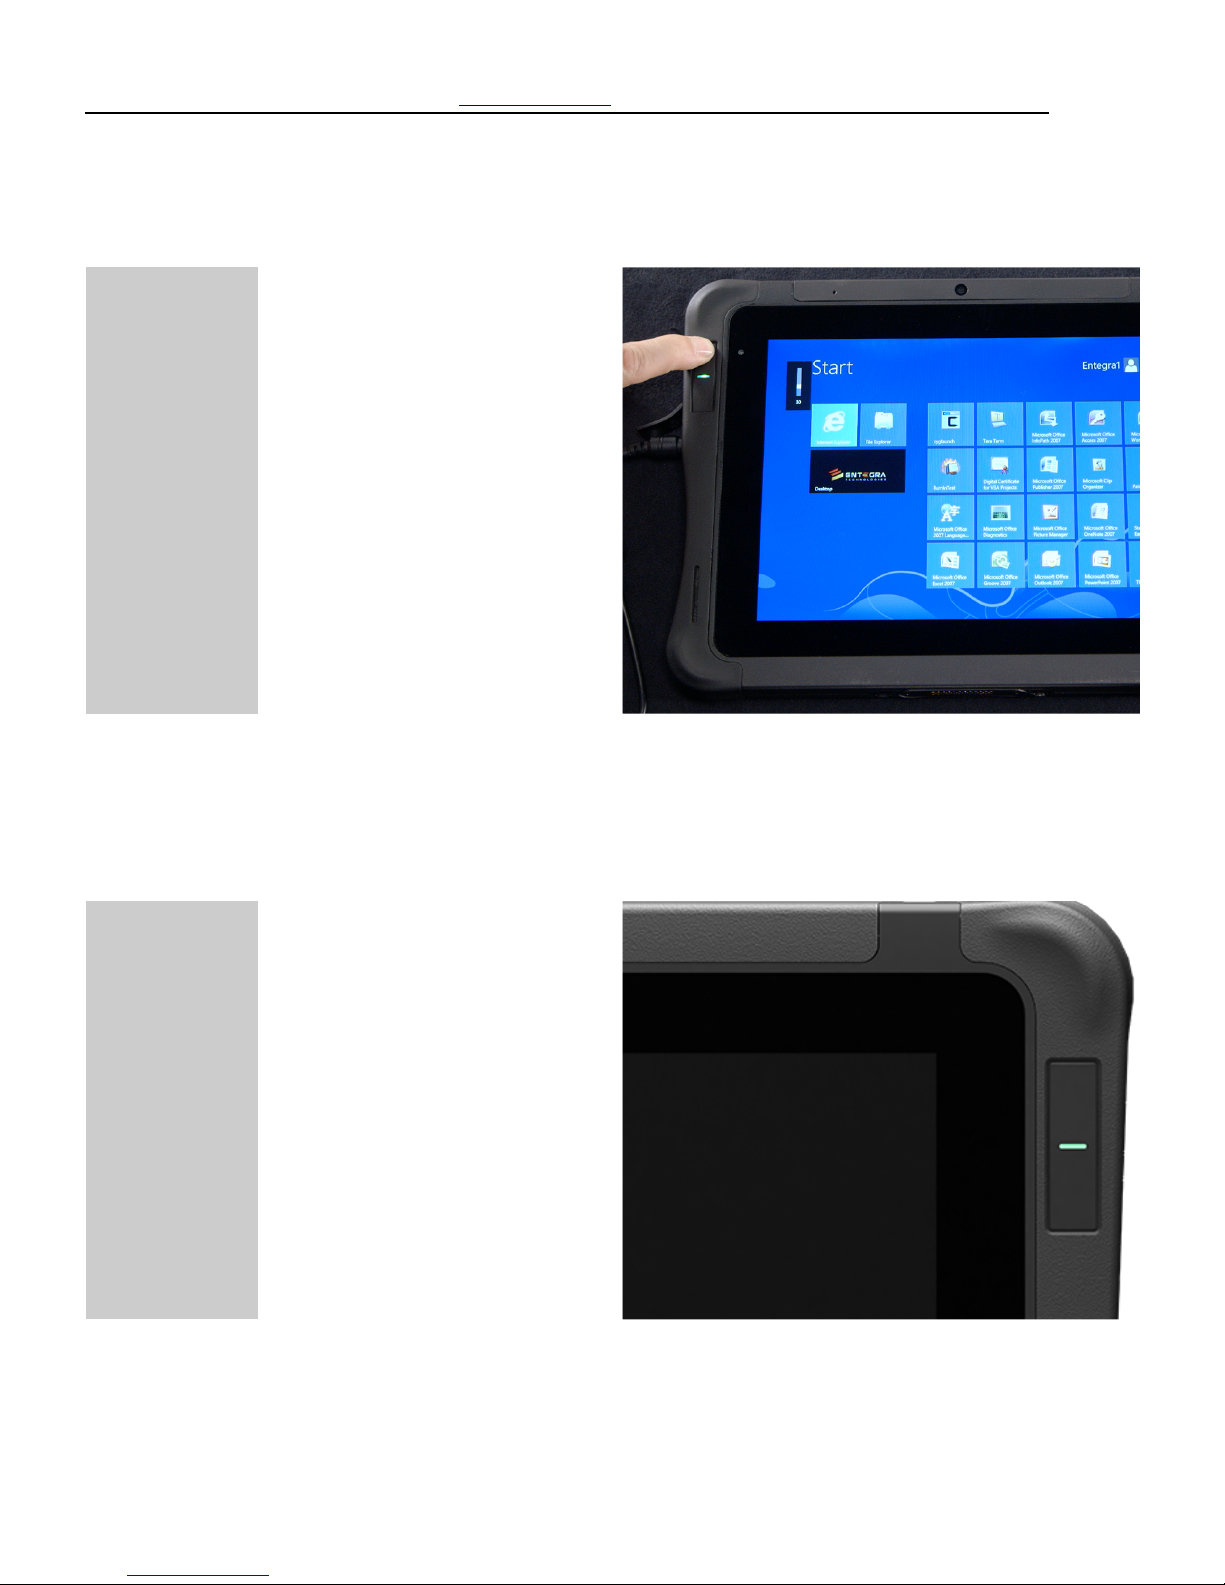
- With the tablet display facing
you, the Volume buttons are
located on the upper-left side
of the comfort grip.
- To increase the speaker
volume, press the Up button.
To lower the volume, press the
Down button.
To Manually Control Brightness:
➔
Your Crossfire
features a light
sensor that
dynamically adjusts
screen brightness
according to
ambient light
levels.
The screen’s brightness can also be
manually controlled with system
software. But for convenient
manual control, Crossfire features
onboard buttons.
With the tablet display facing you,
the Brightness buttons are located
on the upper-right side of the
comfort grip.
To increase the screen’s
brightness, press the Up button. To
lower the brightness, press the
Down button.
Page 16 | Crossfire Pro User Manual | entegratec.com | [email protected]
Adjusting the Speaker Volume:
Adjusting the Screen Brightness:
Page 17
START HERE
➔
➔
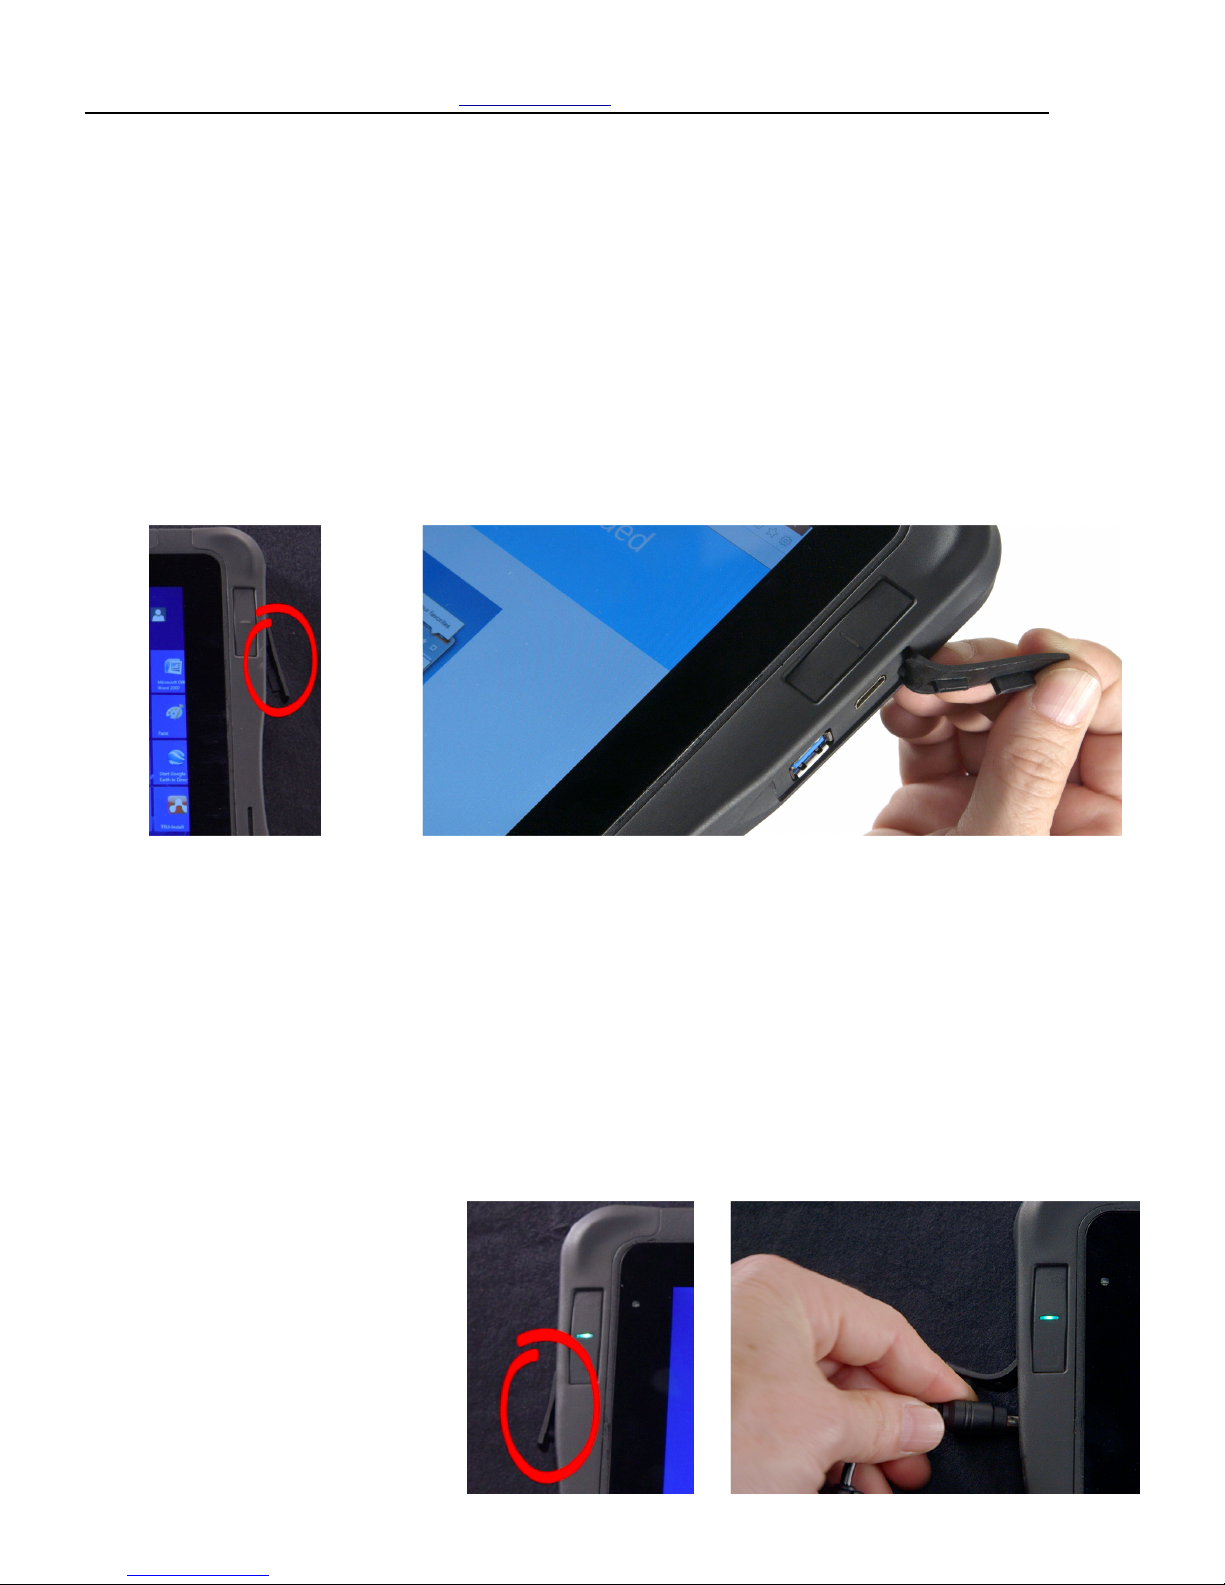
1. With the tablet display facing
you, locate the Mini HDMI and
USB ports on the right side of
the tablet.
2. Then simply lift the hinged
door and insert the Mini HDMI
plug from your external video
display.
3. To connect a peripheral device, insert
the USB plug from your external device.
- Your tablet’s Mini-HDMI and USB port layout allows for simultaneous connection to external monitors and devices.
START HERE
➔
1. With the tablet display facing
you, locate the 3.5mm audio
port on the left side of the
tablet.
2. Then simply lift the hinged door
and insert the audio plug from
your speakers or headphones.
Page 17 | Crossfire Pro User Manual | entegratec.com | [email protected]
Connecting Devices:
To use external monitors, keyboards or external hard drives with your Crossfire, simply connect devices via your tablet’s mini-HDMI port
or the USB 2.0/3.0 port.
NOTE: There is a protective cover over the ports. To connect devices you will need to lift the door. There is a finger scoop to provide easy
access about mid-way down on the side of the grip area.
To use external speakers or headphones with your Crossfire, simply connect devices via your tablet’s 3.5mm audio port.
NOTE: There is a protective cover over the ports. To connect devices you will need to lift the door. There is a finger scoop to provide easy
access about mid-way down on the side of the grip area.
Page 18
To Swap a depleted battery for a
charged battery:
➔
Your Crossfire
features hot-swap
battery technology.
That means you can
change batteries on
the fly, without
having to power
down the tablet.
-
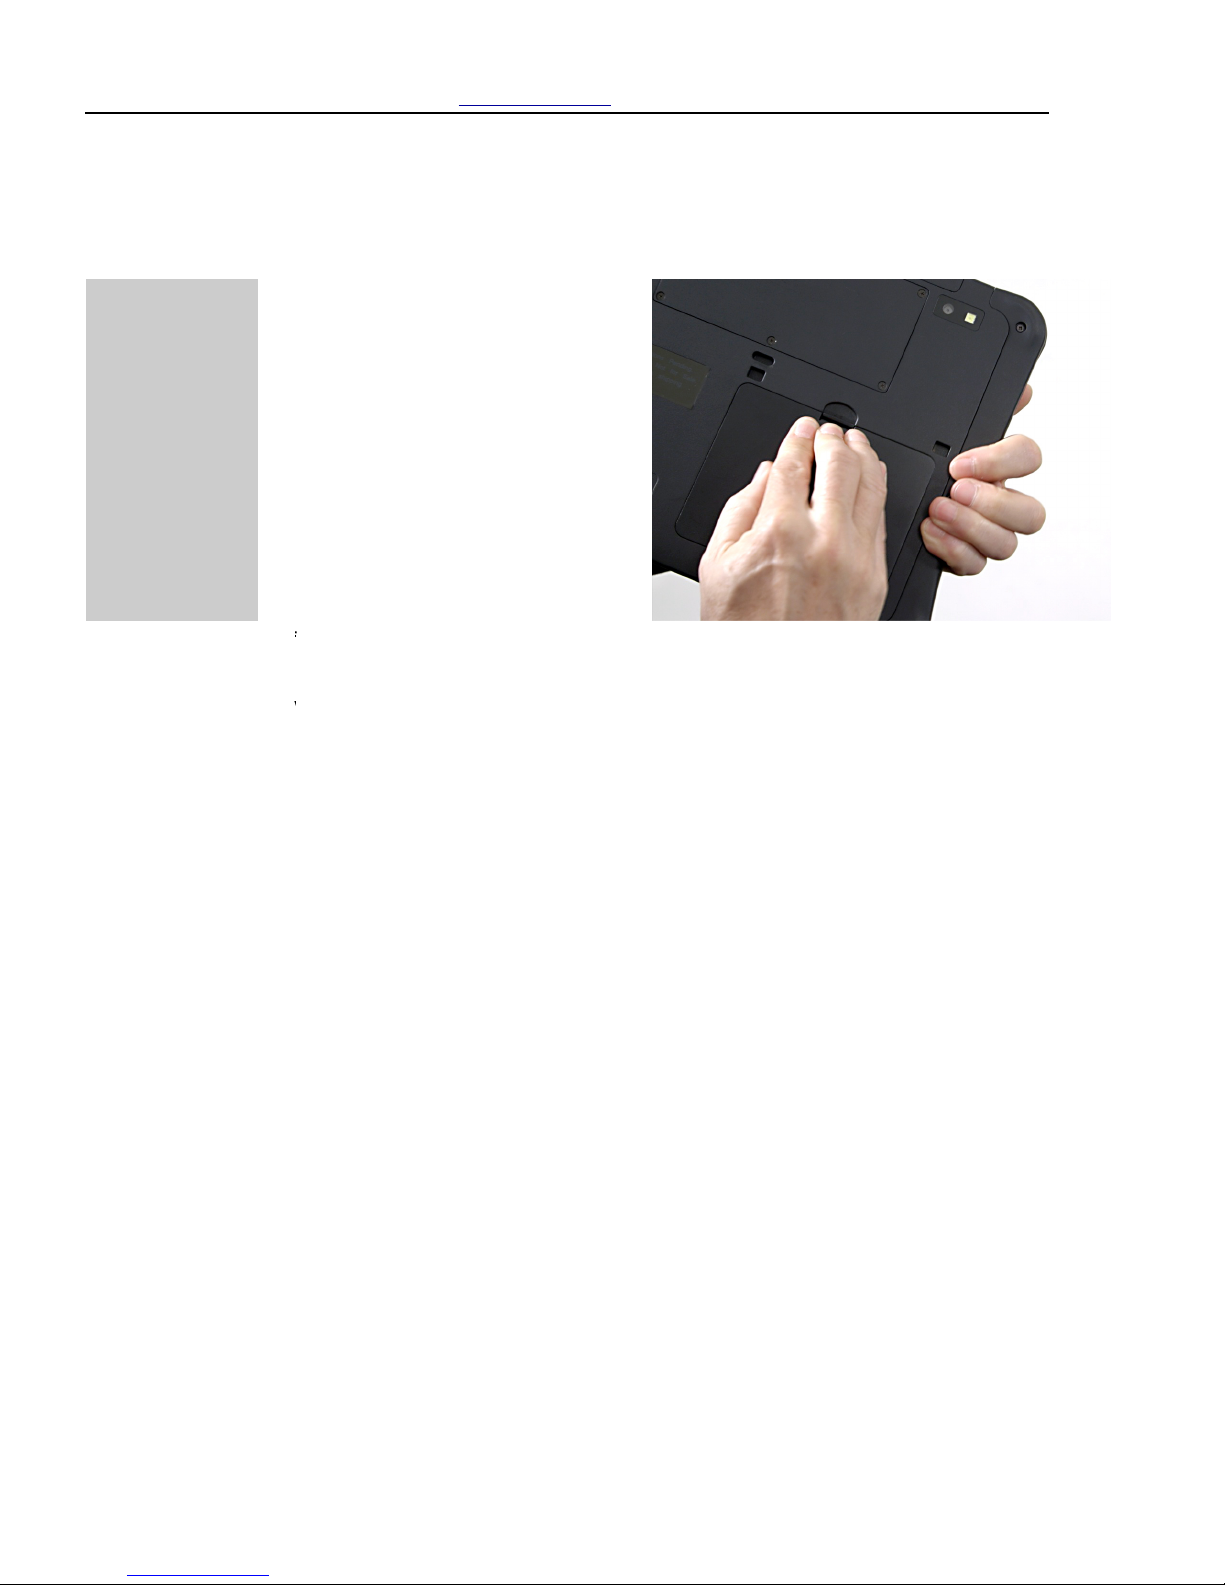
To hot-swap the battery,
simply turn your tablet over
and press down on the battery
clip. When the clip releases,
tilt the battery back and lift it
from the battery bay.
-
Next, angle the bottom of a
fresh battery into the battery
bay and tilt it forward until it
clicks in place.
- To check the status of an uninstalled battery, turn it over and press the charge indicator button. A series of LED lights will visually
indicate the amount of charge remaining in the battery.
- Caution: Do not hot-swap your tablet’s battery in any area possibly exposed to volatile gases or particles.
Move your tablet to an area free of potentially flammable gases or particle to swap the battery.
- Discarding Batteries: Dispose of batteries in accordance with your local government regulations. Under federal, state, or local law,
it may be illegal to put batteries in the trash. Contact your system administrator, municipal waste disposal department/provider
for more information.
Page 18 | Crossfire Pro User Manual | entegratec.com | [email protected]
Hot Swapping the Battery
Page 19
Using the Front Camera
Using the Rear Camera
Your Crossfire is
equipped with two
cameras. One
facing you and one
facing out the back
of the unit. Details
are noted below.
-
The front camera is commonly
used for visual communication
such as video conferencing.
-
This is a 2 mega pixel camera
- The rear camera is commonly used for visual
documentation, or simply taking Photos.
- This is a 5 mega pixel camera.
- To capture images in Windows 8.1 see the instructions
below.
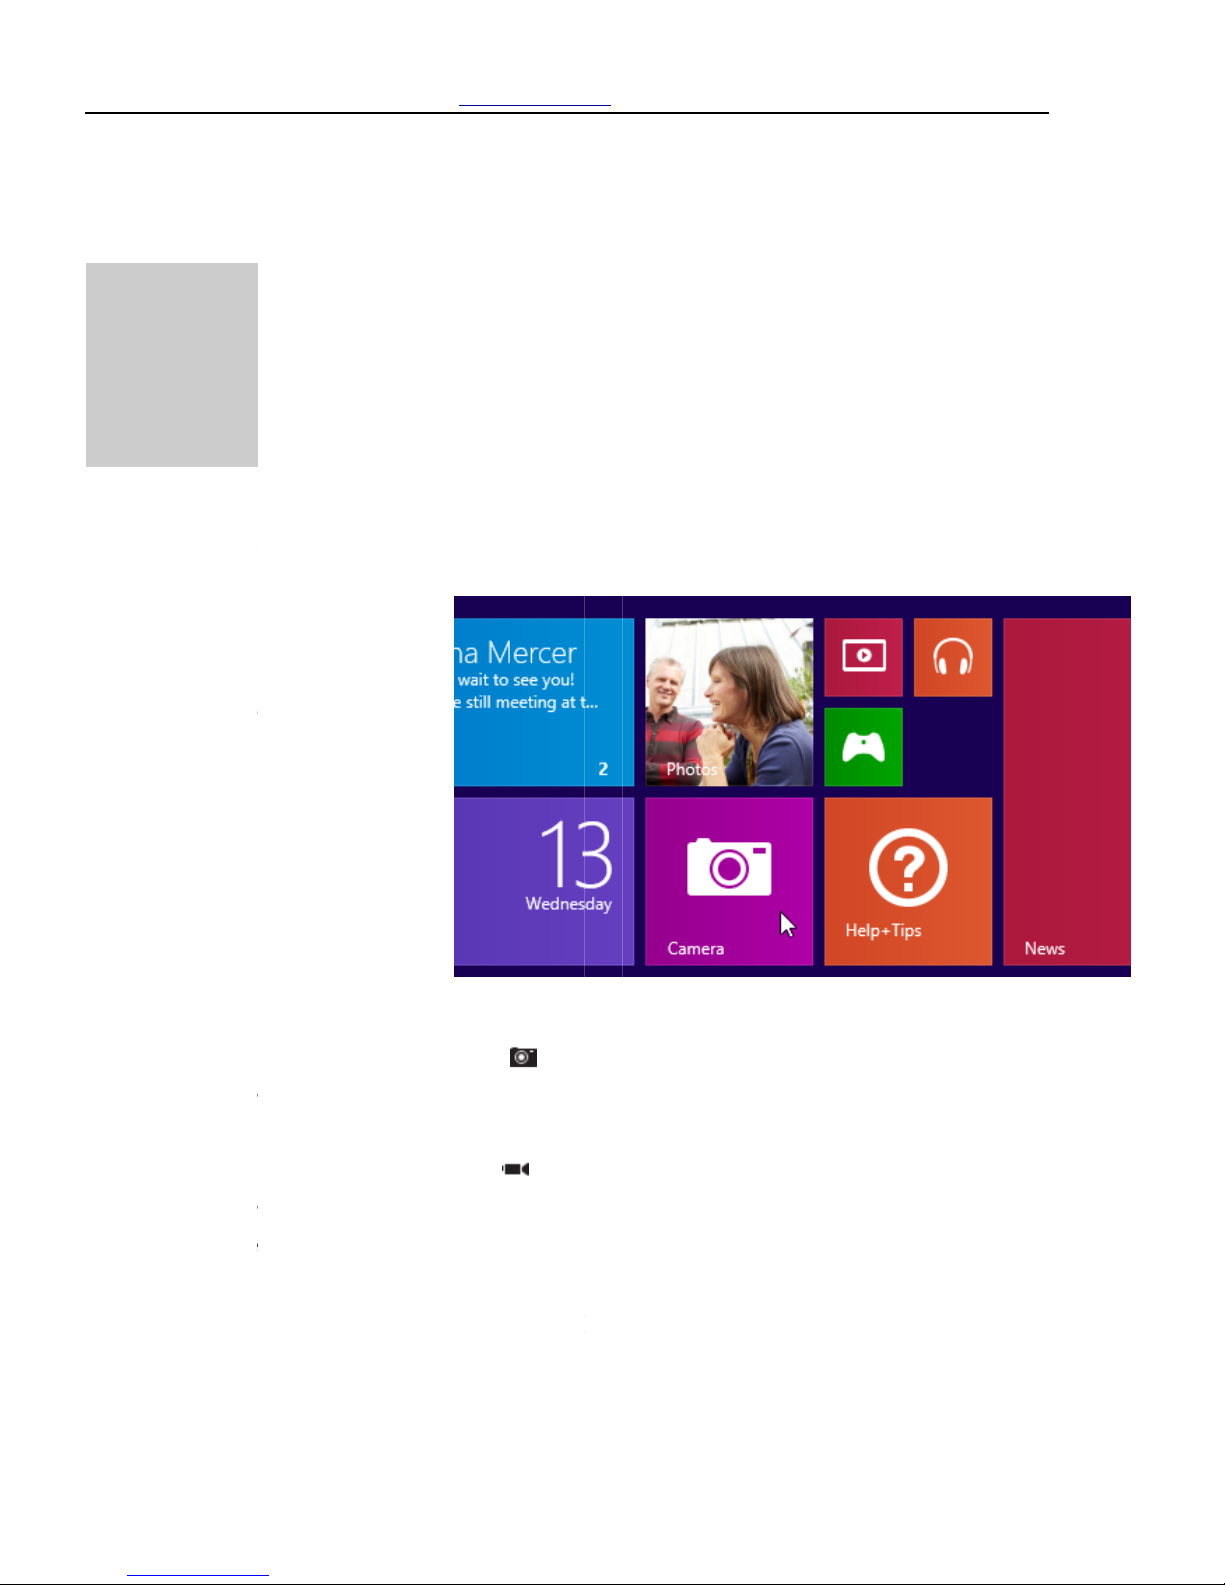
Open the Camera App (Applies to Windows 8.1)
There are a few different ways to open the Camera app. If you're on Start, you can use the tile. If you're using other apps or are on the
desktop, you can search for the app and open it from the search results.
If You’re on Start
- Tap or click the Camera tile.
If you're using another app or the desktop
- Swipe in from the right edge of
the screen, and then tap Search.
(If you're using a mouse, point to
the lower-right corner of the
screen, move the mouse pointer
up, and then click Search.)
- Enter Camera in the search box,
and then tap or click Camera in
the results.
To Take a Photo
-
In the Camera app, tap or click the Photo button .
- If you want to see the photo, drag the screen to the right or click the left arrow.
To Take a Video
-
In the Camera app, tap or click the Video button to start recording. Tap or click it again to stop recording.
- If you want to see the video, drag the screen to the right or click the left arrow.
To Switch to a Different Camera- You can switch cameras before taking a photo or video.
- Open the Camera app.
- Swipe in from the bottom edge to see the app commands. (If you're using a mouse, right-click within the app.)
- Tap or click the Change camera button.
Page 19 | Crossfire Pro User Manual | entegratec.com | [email protected]
Using the Cameras
We know that you may have a personal preference for which kind of Camera application you may use to take images with your Crossfire.
If you prefer to use a different app than what has been shown above please follow the link to the Windows App store (US) to locate an
app of your choice: http://windows.microsoft.com/en-us/windows/search#q=camera+app&s=Store
Page 20
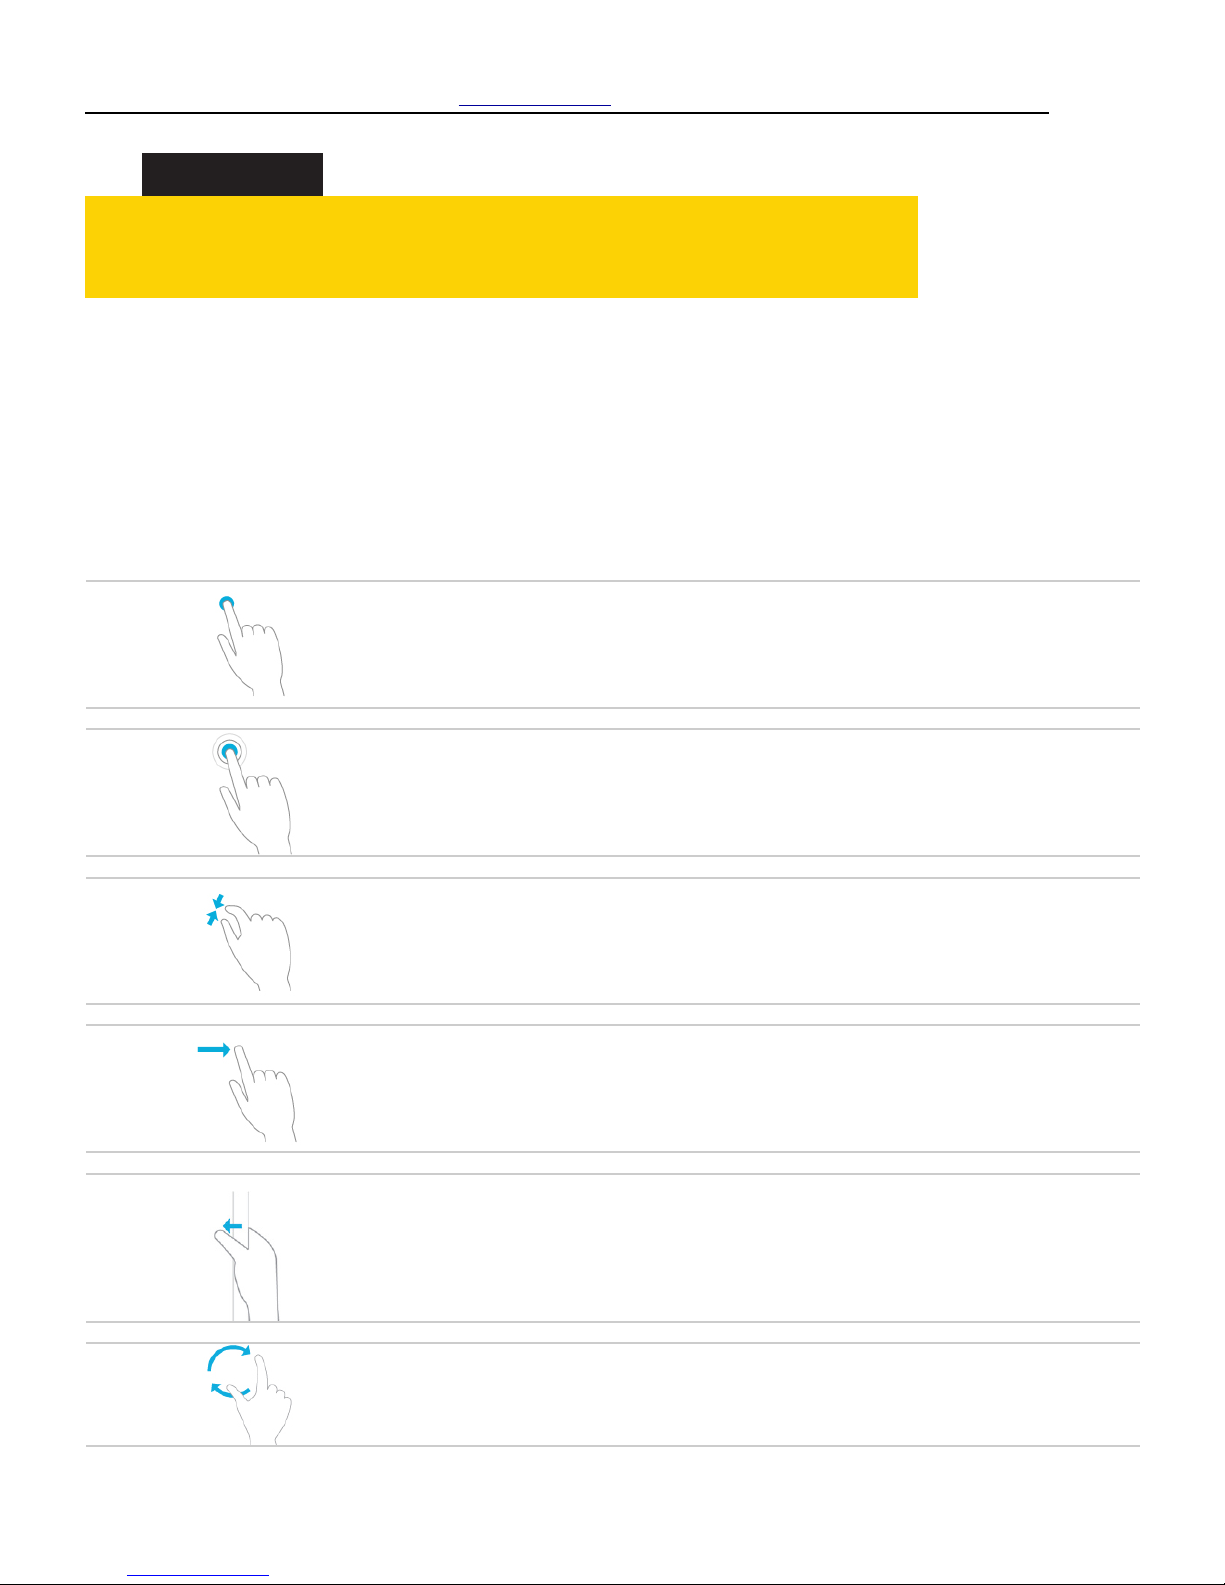
What we say
How to do it
What it does
Tap
Tap once on an item.
Opens, selects, or activates whatever you tap. Similar to clicking with a
mouse.
Press &
Hold
Press your finger down and
hold for about a second.
Shows info to help you learn more about an item or opens a menu
specific to what you're doing. For example, press and hold a tile on the
Start screen to rearrange, resize, or pin it. Only works for some items.
Similar to right clicking with a mouse.
Pinch or
Stretch to
Zoom
Touch the screen or an item
with two or more fingers, and
then move the fingers toward
each other (pinch) or away from
each other (stretch).
Visually zooms in or out, like with pictures or maps. A good place to
explore this is the Start screen.
Slide to
Scroll
Drag your finger on the screen.
Moves through what’s on the screen. Similar to scrolling with a mouse.
Slide or
Swipe from
the edge
Starting on the edge, either
swipe your finger quickly or
slide across the screen without
lifting your finger.
- Open the charms (Search, Share, Start, Devices, Settings). Swipe in
from the right edge.
- Open a recently used app. Swipe in from the left edge. Keep swiping
to switch between all of your recently used apps.
- Close an app. Slide down from the top edge without lifting your
finger, and then drag the app to the bottom of the screen.
Rotate
Put two or more fingers on an
item and then turn your hand.
Rotates items in the direction you turn your hand. Only some items can
be rotated.
Page 20 | Crossfire Pro User Manual | entegratec.com | [email protected]
HELPFUL HINTS
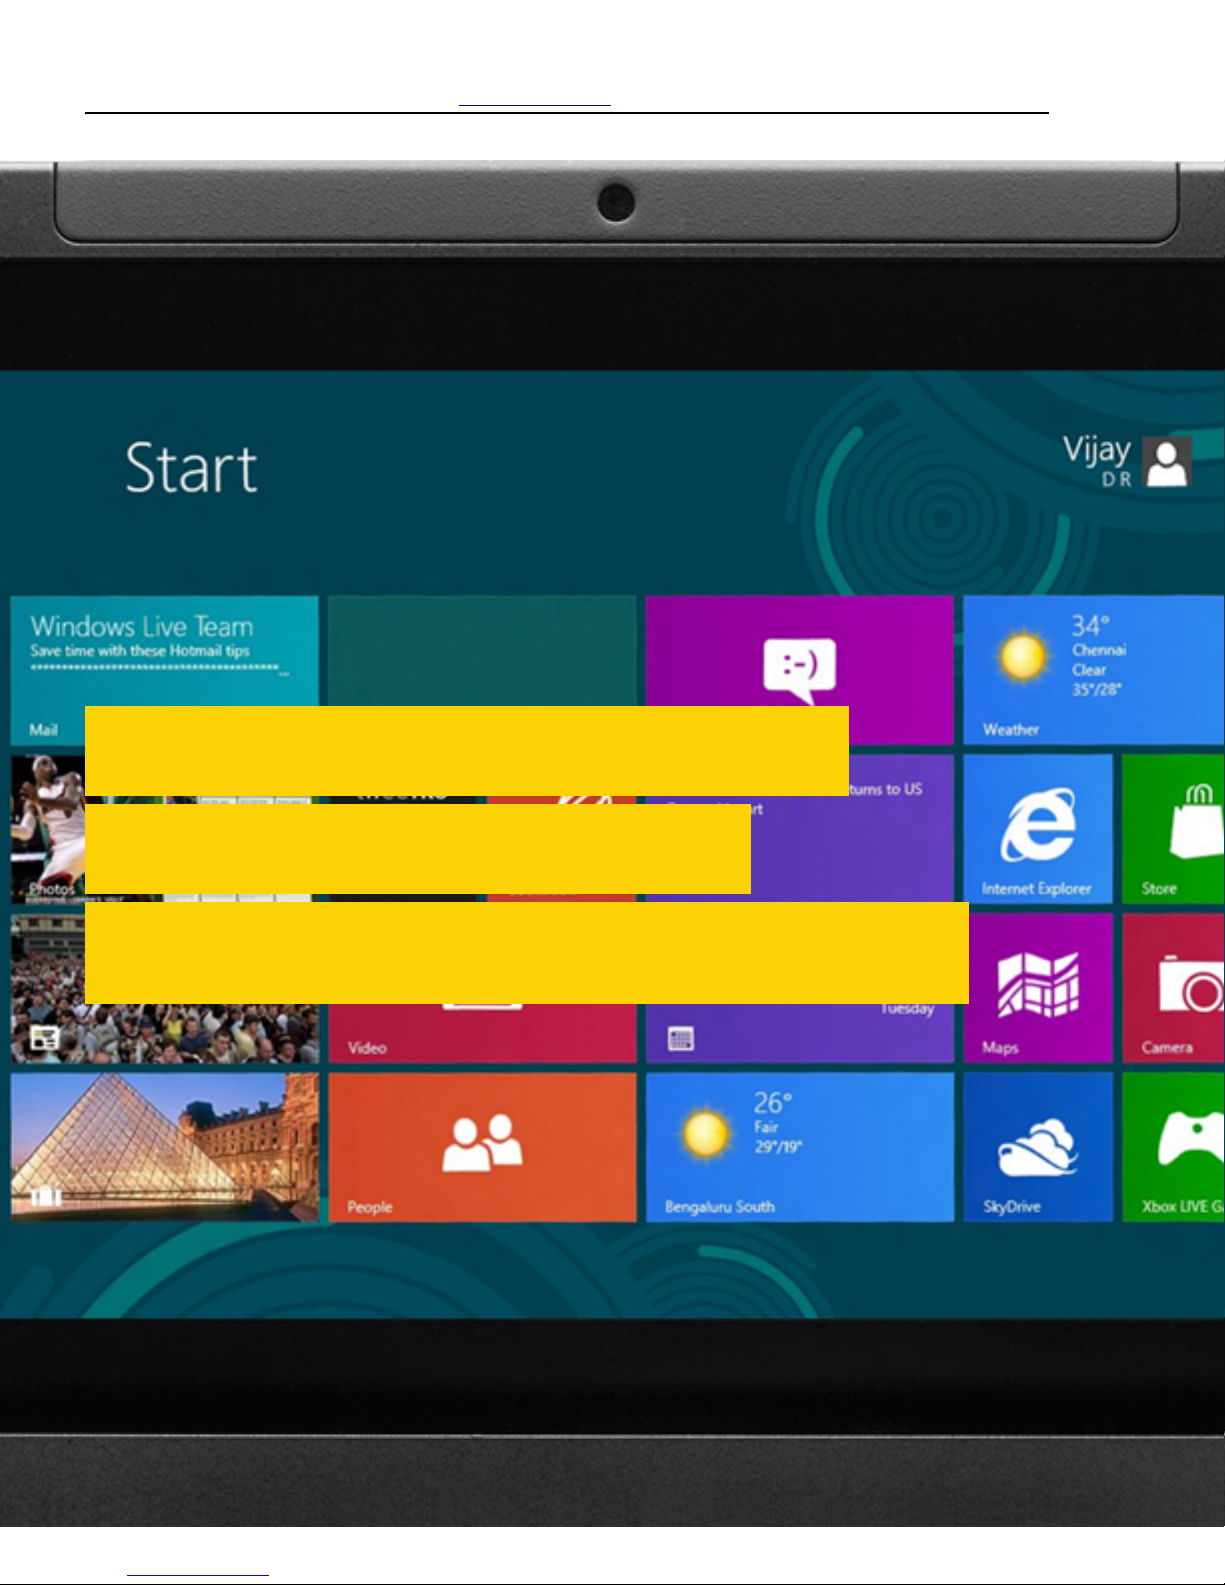
!Tap, swipe & more. !
If you want to know what we mean when we mention swiping, tapping, or other ways of interacting with
Windows when you’re using a touchscreen, take a look at this section.
The touchscreen is the simplest way to interact with your Crossfire. The table below shows you common
“gestures” you may use while working with Windows 8. If you are familiar with tablet & touchscreen use you
may skip forward.
Page 21
Page 21 | Crossfire Pro User Manual | entegratec.com | [email protected]
!We want you to feel
!comfortable with
!maintaining your tablet!
Page 22

Page 22 | Crossfire Pro User Manual | entegratec.com | [email protected]
MAINTENANCE
!Caring for your tablet.
This section provides instructions and information for about how to keep your Crossfire in top working
condition.
Checking power cords and connectors.
Check AC and DC power cords and power connectors
periodically for damage. Replace the power cord immediately if
you find any damage.
Protecting the computer from damage.
• Your computer is designed to sustain a multiple-axis drop
to a non-yielding surface. Do not intentionally drop the
computer, because the cumulative effects of multiple drops
may damage the computer over time.
• Do not place heavy objects on the computer.
• Do not disassemble the computer.
• Keep the computer at least 5 inches (13 centimeters) away
from any electrical appliance that generates a strong
magnetic field, such as a motor, magnet, TV, refrigerator, or
large audio speakers.
Protecting the computer from overheating
The computer monitors its internal temperature. As the internal
temperature approaches the tolerable limits of heat-sensitive
components, system functions are automatically limited or
turned off to prevent damage.
To prevent the computer from overheating, do not leave it
running for long periods of time in direct sun or in areas where
the temperature is above 120oF or 48oC.
Storing the computer
You can store the computer in the Off state for about 30 days
with a fully charged battery installed. After this period, recharge
the battery or replace it with a charged battery.
If you intend to store the computer for more than 30 days,
remove the battery pack and keep it in a cool place.
Caring for the display
To clean the display screen, dampen a soft cotton cloth with water
and gently wipe the screen surface.
Protecting the display
The screen is made from a durable, tempered glass and can
withstand significant pressure. However, it’s best to try to not
place hard items directly against the display.
When to replace the pen or pen tip
With use, the pen tip may become worn and can scratch the
screen. If your pen exhibits one of the following problems, replace
the pen:
• The pen does not move freely across the screen.
• The pen does not perform as expected
Calibrating the digitizer
Calibrating the digitizer adjusts the cursor position on the screen
relative to the position of the pen tip or finger. Calibrate the
digitizer to adjust the distance error between where the pen or
finger is actually touching the screen and where the computer is
registering the pen or finger touch.
You may need to calibrate the digitizer in the following situations:
• You are using the computer for the first time.
• The previous user of the computer writes with the opposite
hand or at a different pen angle.
• The computer has not been used for some time.
• The computer has been serviced.
To see video tutorials click on the link on your desktop or visit
entegratec.com/support for additional video instructions.
Page 23
Problem
Possible cause and solution
Computer will not start
- The battery may be defective or discharged to a critically low level. Connect an
external power supply (such as the AC adapter) or install a charged battery. See
“Installing the battery” on page 12.
- Internal components may be above or below the acceptable operating range (below
-10° C or above 50° C). After the temperature returns to safe operating range the
computer will start.
The computer will not resume
operation after being suspended.
- The battery may be defective or discharged to a critically low level. When the battery
reaches a critically low level, the computer is forced into Suspend- to-RAM mode to
avoid a total system power failure. Connect an external power supply (such as the AC
adapter) or install a charged battery. See “Hot swapping the battery” on page 18.
- The computer may be at the critical thermal limit. To avoid damage to heat-sensitive
components, the computer enters Suspend-to-RAM mode when the computer operates
above 50° C. Operation automatically resumes when the computer cools to below
50°C. Move the computer to a cooler location.
The Battery Status LED is red,
continuous.
- The computer is on, running under battery power, and the charge level in the battery
has reached a critical level. Plug the computer into an AC/DC power source or install a
charged battery.
- The system has encountered a fault and is preventing normal operation. Contact your
local help desk.
The Battery Status LED is red,
blinking.
- The computer is powered on, running under battery power, and the charge level in the
battery is at a minimum warning level. Plug the computer into an AC/DC power source
or install a charged battery.
The screen is blank or difficult to read
- Confirm that the computer is ON (the System Status indicator should be lit)
- The brightness may be set too low, causing the screen to appear too dark. To change
screen brightness, press the onboard up button (right side) to adjust the brightness. (See
page 16.)
- The video time-out may have expired. Tap the display screen to reactivate the display.
- Note: This is a normal, power-saving feature.
- If the System Status light is blinking green, the computer is in Sleep mode because the
temperature is below -10° C or above 50° C. When the temperature returns to a safe
operating range, the display screen automatically comes back on. If possible, move the
computer to a warmer or cooler location.
Page 23 | Crossfire Pro User Manual | entegratec.com | [email protected]
TROUBLESHOOTING
!Simple solutions
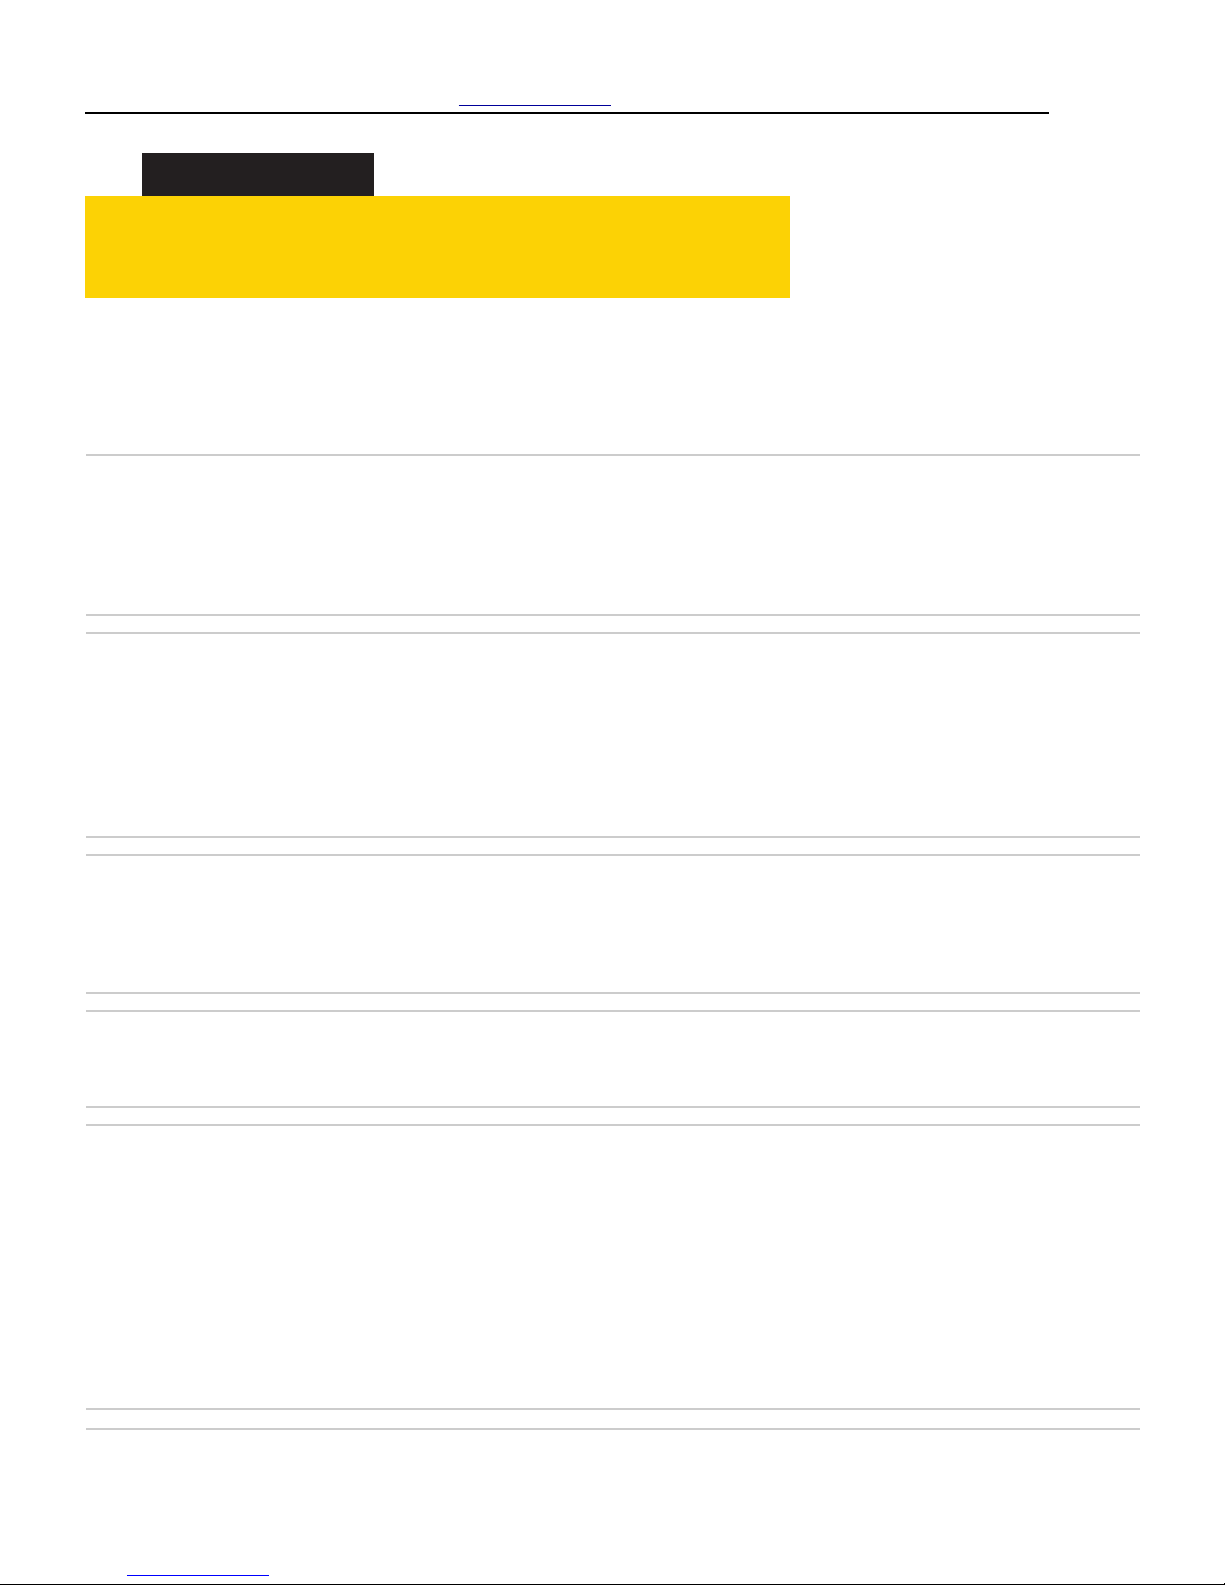
This section contains solutions to some problems. If you cannot solve the problem by taking the actions
described, contact your local help desk, your reseller or entegra for further assistance.
Page 24

My second display is not showing full
screen.
- See the video - HDMI and Pen Calibration Helpful Hints to set up your external monitor
for extend mode. Or as written below:
- Select Control, then Hardware and Sound
- Select Display, then Project to a Second Screen
- Select Extend
Cursor is not tracking the pen when I
am connected to an external display.
- See the video - HDMI and Pen Calibration Helpful Hints to calibrate the digitizer when
using a second display. Or as written below:
- After setting the external display to Extend you should follow these steps to calibrate
the digitizer:
- From Control Panel, Select Hardware and Sound
- Select Tablet PC Settings
- Select the Setup button
- Then follow the onscreen instructions
Computer is not responding to the
stylus or my finger.
- Connect an external USB keyboard to the computer. If the computer does not respond
to the external keyboard, the application or operating system may have been corrupted.
- Press the Reset key. (See page 14.)
- If the system responds to a keyboard but not to the pen, contact your local help desk,
reseller or entegra for further assistance.
Headphone or speaker volume is too
low.
- The volume may be in Mute mode or set too low. To change audio levels, press the
onboard button (left side) to adjust the volume. (See page 16.)
- Make sure the volume control in your audio software is set to an audible level or
uncheck the Mute box on the onscreen control in the System Tray at the bottom of the
screen.
An external device is not working
with the computer
- The device driver may not be installed or installed incorrectly. Unplug the device and
try connecting it again. Often the operating system can resolve these issues this way or
by restarting the computer.
- If it is a Bluetooth device, ensure that it is on and paired to the tablet. To see how to
connect a Bluetooth device watch our video tutorial “Connecting Devices.” This video
can be found on your desktop or on our website: entegratec.com/#support
My onboard buttons don’t control the
volume or brightness
- The buttons (also known as PFK’s - programmable function keys) are controlled via an
integrated application. The default settings are:
- Left Side: PFK1 (top) Volume Up, PFK2 (bottom) Volume Down
- Right Side: PFK3 (top) Brightness Up, PFK4 (bottom) Brightness Down
- Your system administrator may have set them to perform other functions via this
application. Check with them as to the setting - such as launching a specific
application, etc.
- You can find this application in the System Tray - indicated by the “E” icon. Tap and hold
to bring up the menu, then select settings.
The onboard buttons switched my
screen when I pressed them together
- Don’t worry this is supposed to happen. To restore your screen follow the directions
below:
- Rotate Clockwise: Press and hold PFK1, then press PFK4
- Rotate Counter-Clockwise: Press and hold PFK2 , then press PFK3
- Hint: You can go all the way around or press the alternate pattern to go back 1 step.
Page 24 | Crossfire Pro User Manual | entegratec.com | [email protected]
Page 25
TERM
DEFINITION
Adapter
A device that provides an interface between two dissimilar electronic devices. For example, the AC adapter modifies
the power from a wall outlet for use by the computer.
Alternating
Current
Electric current that reverses its direction of flow at regular intervals.
Application
A program that performs specific tasks on your computer, such as word processing or creating spreadsheets.
Boot
To load a program or operating system into system memory.
Bits Per Second
In serial transmission, the instantaneous bit speed with which a device or channel transmits a character.
Compatibility
1. The ability of one computer to accept and process data in the same method as another computer without
modifying the data or the media upon which it is being transferred.
2. The ability of one device to connect or communicate with another system or component.
Computer On
Module (COM)
This is an industry standard computer architecture supported by companies such as Intel®. Crossfire employs this
standard to allow for future system expansion for different types of CPU’s to be deployed with an organization.
Configuration
The specific combination of hardware components of the computer, and their operating status. The configuration of
your computer includes pre-defined memory, type and speed of microprocessor, type of and size of storage, etc.
Default
The preset parameter value automatically selected by the computer when you or a program do not provide
instructions.
Device Driver
A program that controls communication between a specific peripheral device (such as a printer or the pen/stylus)
and the computer.
Display
An image-producing device used to view computer output.
Expansion Bay
An area on the back of Crossfire that allows for additional system expansion to support specific workflows or
computing tasks
Hardware
The physical electronic and mechanical components of a computer system. typically, the computer itself, CPU,
memory, etc.
Page 25 | Crossfire Pro User Manual | entegratec.com | [email protected]
GLOSSARY
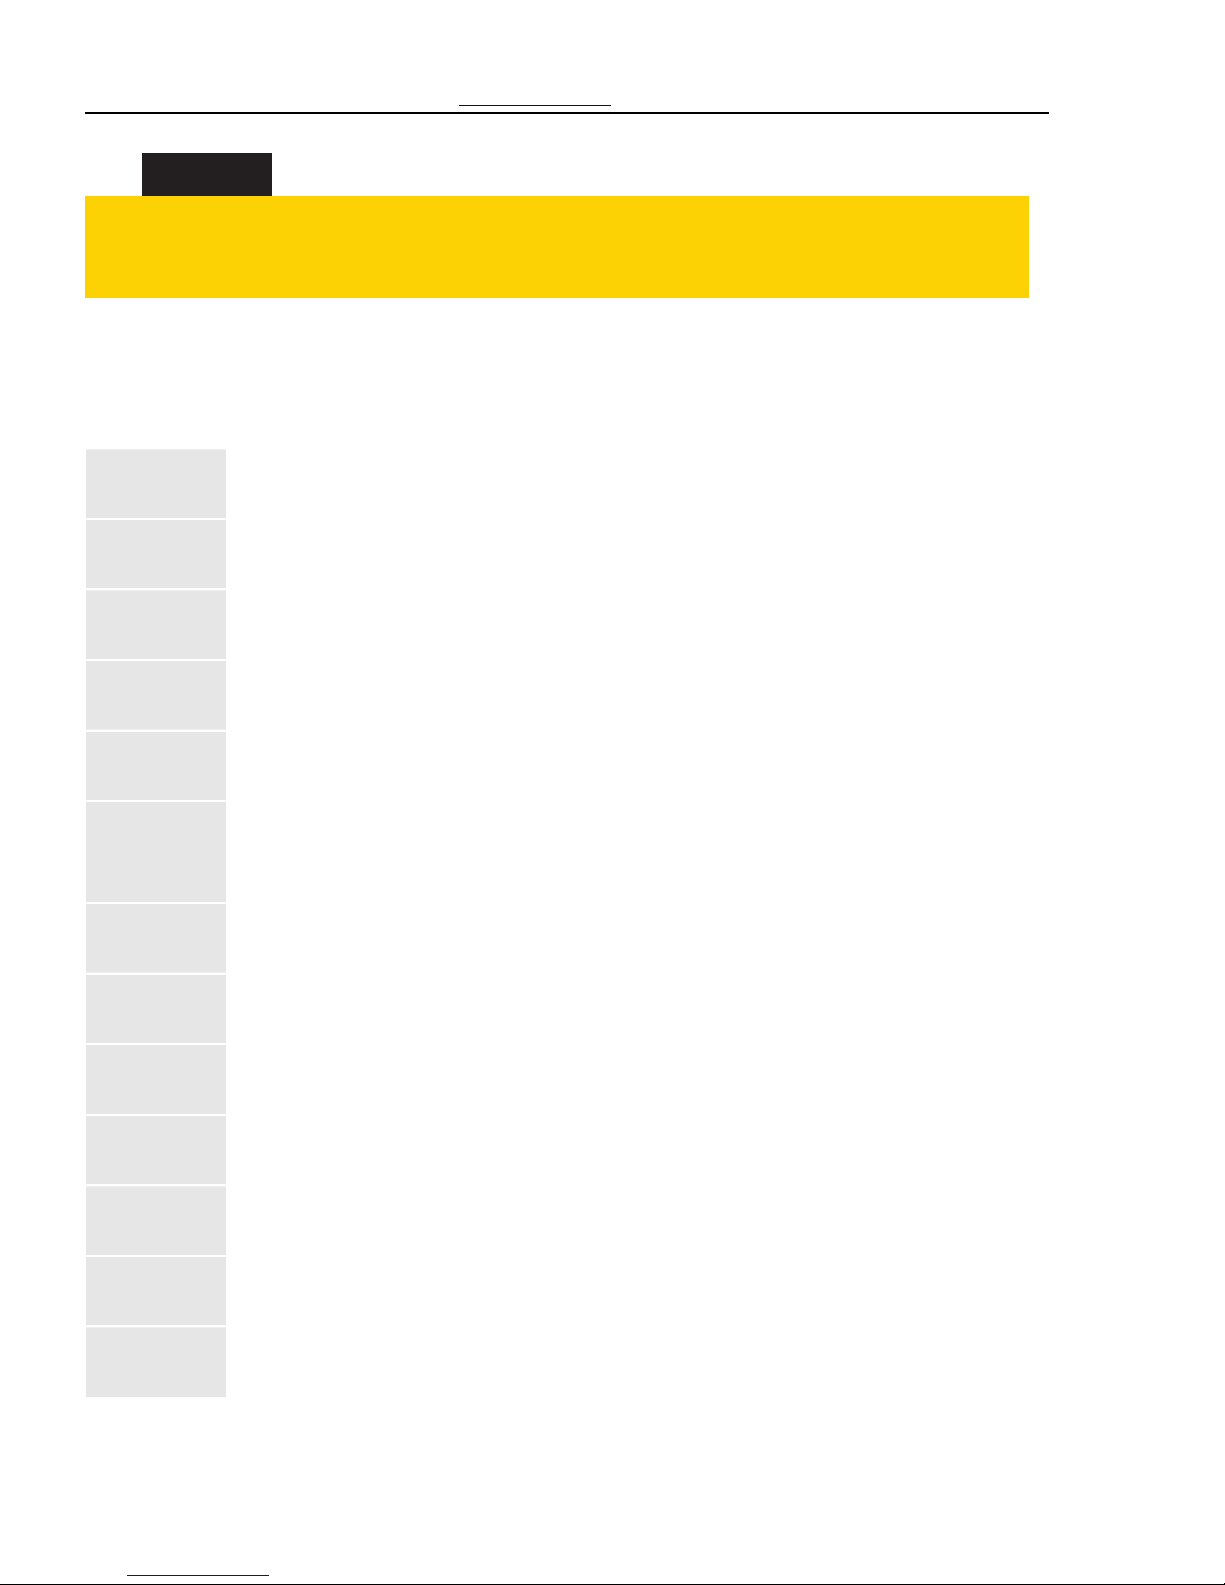
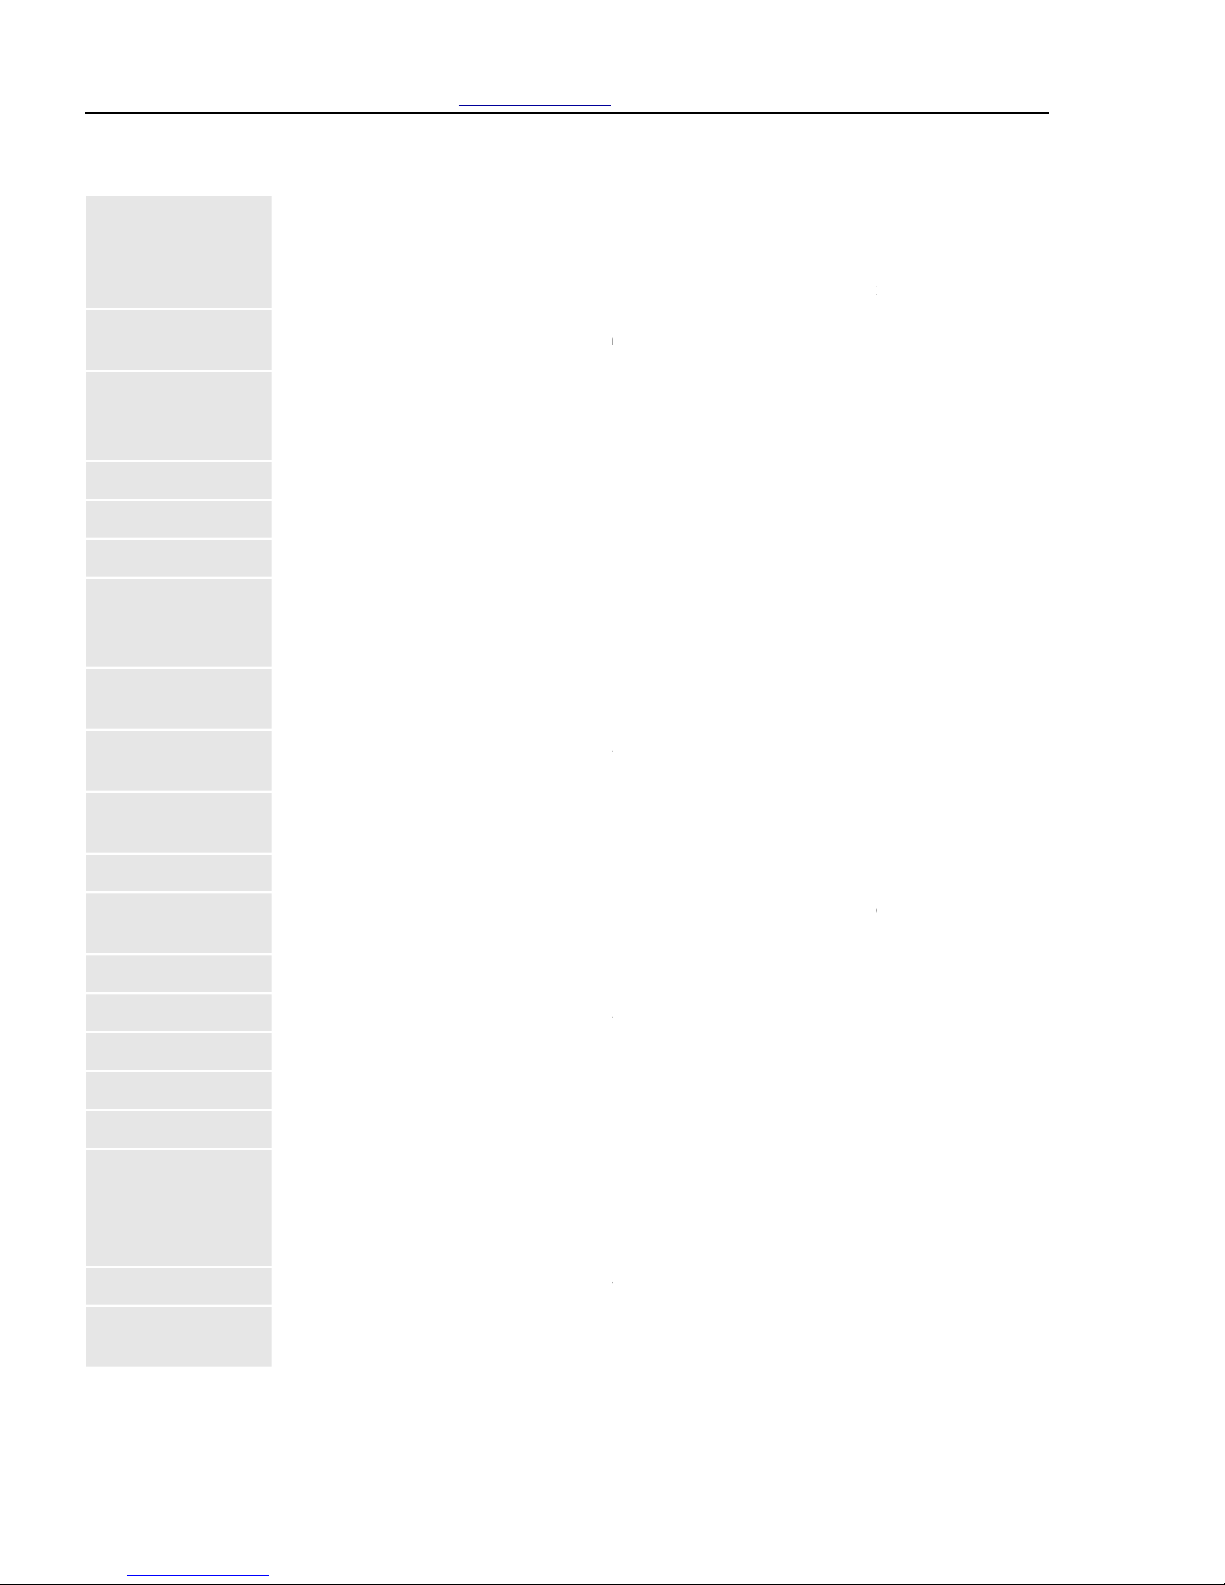
!Common terms used.
To keep you familiar with common technical terms we may used in this manual the glossary is provided below.
Page 26
TERM
DEFINITION
Interface
1. Hardware and/or software components used specifically to connect one computer or device to another.
2. To physically connect one system or device to another to exchange information.
3. The point of contact between user, the computer, and the program (for example, the pen/stylus or a menu).
Light Emitting Diode
(LED)
A semiconductor device that emits light when a current is applied.
Modularity
We use the term Modularity to define characteristics of Crossfire that support specific changeable functions
such as: CPU via the Computer on Module Board, I/O ports, expansion bay. Modularity is what permits Crossfire
to grow with your ever expanding needs as you use it everyday.
Pen
See stylus
Peripheral Device
An input/output device that is external to the computer such as a keyboard or bar code scanner
Pixel
Picture elements (tiny dots) that compose a screen image.
PFK
An acronym for Programmable Function Key (also referred to as onboard buttons). The keys have default
values, but can be changed to perform different functions using the entegra services application found in the
System Tray at the bottom of the screen.
Port
The electrical connection through which the computer sends and receives data to and from devices or other
computers.
Program
A set of instructions a computer can execute to tell the system what to do and how to do it. Sometimes also
referred to as an Application.
Random Access
Memory (RAM).
A hardware component of your computer that temporarily stores active program code and data.
Reset
The act of hard stopping/shutting down the operating system.
Resolution
The number of pixels displayed on the screen. A higher resolution provides greater clarity and allows more
information to be displayed on the screen at once.
Restart
Resetting a computer without turning it off (also called warm boot or soft reset).
Resume
The act of returning the computer to an active, operational state.
Solid State Drive
A data storage device that uses solid-state memory to store persistent data.
Status Indicator (LED)
A light which indicates the current status of the computer or hardware component.
Stylus
A writing / pointing instrument for pen computers, the stylus is used to interface with the display and digitizer
Subscriber Identity
Module (SIM)
A smart card inside a GSM (Global System for Mobile communications) cellular device that encrypts voice and
data transmissions and stores data about the specific user so that the user can be identified and authenticated
by the network supplying the phone service. A SIM can be moved from one device to another and/or different
SIMS can be inserted into any GSM radio.
Suspend Mode
A power conservation mode in which electrical current is removed from most components of the computer.
Universal Serial Bus
(USB)
A serial interface that enables communication between devices and the computer.
Page 26 | Crossfire Pro User Manual | entegratec.com | [email protected]
Page 27

Page 27 | Crossfire Pro User Manual | entegratec.com | [email protected]
AGENCY NOTICES
!The legal stu"
FCC Notices
This device complies with Part 15 of the FCC Rules. Operation is
subject to the following two conditions: (1) this device may not
cause harmful interference, and (2) this device must accept any
interference received, including interference that may cause
undesired operation.
Modifications not expressly approved by entegra technologies
inc. could void the user’s authority to operate the equipment.
NOTE: This equipment has been tested and found to comply
with the limits for a Class B digital device, pursuant to Part 15 of
the FCC Rules.. These limits are designed to provide reasonable
protection against harmful interference in a residential
installation. This equipment generates, uses and can radiate
radio frequency energy and, if not installed and used in
accordance with the instructions, may cause harmful
interference to radio communications.
However, there is no guarantee that interference will not occur
in a particular installation. If this equipment does cause harmful
interference to radio or television reception, which can be
determined by turning the equipment off and on, the user is
encouraged to try to correct the interference by one or more of
the following measures:
- Reorient or relocate the receiving antenna.
- Increase the separation between the equipment and
receiver.
- Connect the equipment into an outlet on a circuit different
from that to which the receiver is connected.
- Consult the dealer or an experienced radio/TV technician
for help.
RF Exposure
Tests for SAR are conducted using standard operating positions
specified by the FCC with the tablet transmitting at its highest
certified power level in all tested frequency bands. Although the
SAR is determined at the highest certified power level, the actual
SAR level of the tablet while operating can be well below the
maximum value. This is because the tablet PC is designed to
operate at multiple power levels so as to use only the power
required to reach the network. In general, the closer you are to a
wireless base station antenna, the lower the power output.
Before a tablet model is available for sale to the public, it must
be tested and certified to the FCC and IC that it does not exceed
the limit established by the government-adopted requirement
for safe exposure. The tests are performed in positions and
locations (e.g., worn on the body) as required by the FCC for each
model. (Body-worn measurements may differ among tablet
models, depending upon available accessories and FCC and IC
requirements). While there may be differences between the SAR
levels of various tablets and at various positions, they all meet
the government requirement for safe exposure.
This device was evaluated and shown to comply with FCC SAR
guidelines.
Exposure to Radio Frequency (RF) Signals
Your wireless tablet is a radio transmitter and receiver. It is
designed and manufactured not to exceed the emission limits
for exposure to radio frequency (RF) energy set by the Federal
Communications Commission of the U.S. Government as well as
the RTT&E directive. These limits are part of comprehensive
guidelines and establish permitted levels of RF energy for the
general population. The guidelines are based on the safety
standards previously set by both U.S. and international standards
bodies:
• American National Standards Institute (ANSI) IEEE.
C95.1-1992
• National Council on Radiation Protection and Measurement
(NCRP). Report 86. 1986
• International Commission on Non-Ionizing Radiation
Protection (ICNIRP) 1996
• Ministry of Health (Canada), Safety Code 6. The standards
include a substantial safety margin designed to assure the
safety of all persons, regardless of age and health.
• European Union RTT&E Directive for SAR
The exposure standard for wireless mobile tablets employs a
unit of measurement known as the Specific Absorption Rate, or
SAR. The SAR limit set by the FCC is 1.6W/kg. The SAR limit set
by the RTT&E is 2.0W/kg
DOC (Industry Canada Notices)
Notice to Users of Radio and Television
This Class B digital apparatus meets all requirements of
Canadian Interference-Causing Equipment Regulations per the
ICES-003 CET appareil numérique de la class B respecte toutes
les exigence du Réglement sur le matérial brouilleur du Canada.
Notice to Users of Radio and Television
This equipment meets the applicable Industry Canada Terminal
Equipment Technical Specifications. This is confirmed by the
registration number. The abbreviation, IC, before the registration
number signifies that registration was performed based on a
Declaration of Conformity indicating that Industry Canada
Page 28
Page 28 | Crossfire Pro User Manual | entegratec.com | [email protected]
technical specifications were met. It does not imply that Industry
Canada approved the equipment.
Before connecting this equipment to a telephone line the user
should ensure that it is permissible to connect this equipment to
the local telecommunication facilities. The user should be aware
that compliance with the certification standards does not
prevent service degradation in some situations.
Repairs to telecommunication equipment should be made by a
Canadian authorized maintenance facility. Any repairs or
alterations not expressly approved by entegra or any equipment
failures may give the telecommunication company cause to
request the user to disconnect the equipment from the
telephone line.
Notice: The Ringer Equivalence Number (REN) for this terminal
equipment is 0.0. The REN assigned to each terminal equipment
provides an indication of the maximum number of terminals
allowed to be connected to a telephone interface. The
termination on an interface may consist of any combination of
devices subject only to the requirement that the sum of the
Ringer Equivalence Numbers of all the devices does not exceed
five.
UL Notice
This unit requires an AC adapter to operate. Use only UL Listed
Class 2 Adapters with an output rating of 12 VDC, with a current
of 5A.
Declaration of Conformity
DECLARATION OF CONFORMITY according to FCC Part 15, IC
ICES-003, and RTT&E directives.
Responsible Party Name: entegra technologies inc.
Address: 6500 Pinecrest Drive, Suite 500, Plano, Texas 75024
Telephone: (800) 766-2026
Declares that product: Model Series: 940-10-972 complies with
Part 15 of the FCC Rules.
This device complies with Part 15 of the FCC rules. Operation is
subject to the following two conditions: (1) This device may not
cause harmful interference, and, (2) This device must accept any
interference received, including interference that may cause
undesired operation.
WARNING
Changes or modifications to this unit not expressly approved by
the party responsible for compliance may void the user’s
authority to operate this equipment.
More information about FCC, IC, and EU rules and their
applicability to this model are included in this section.
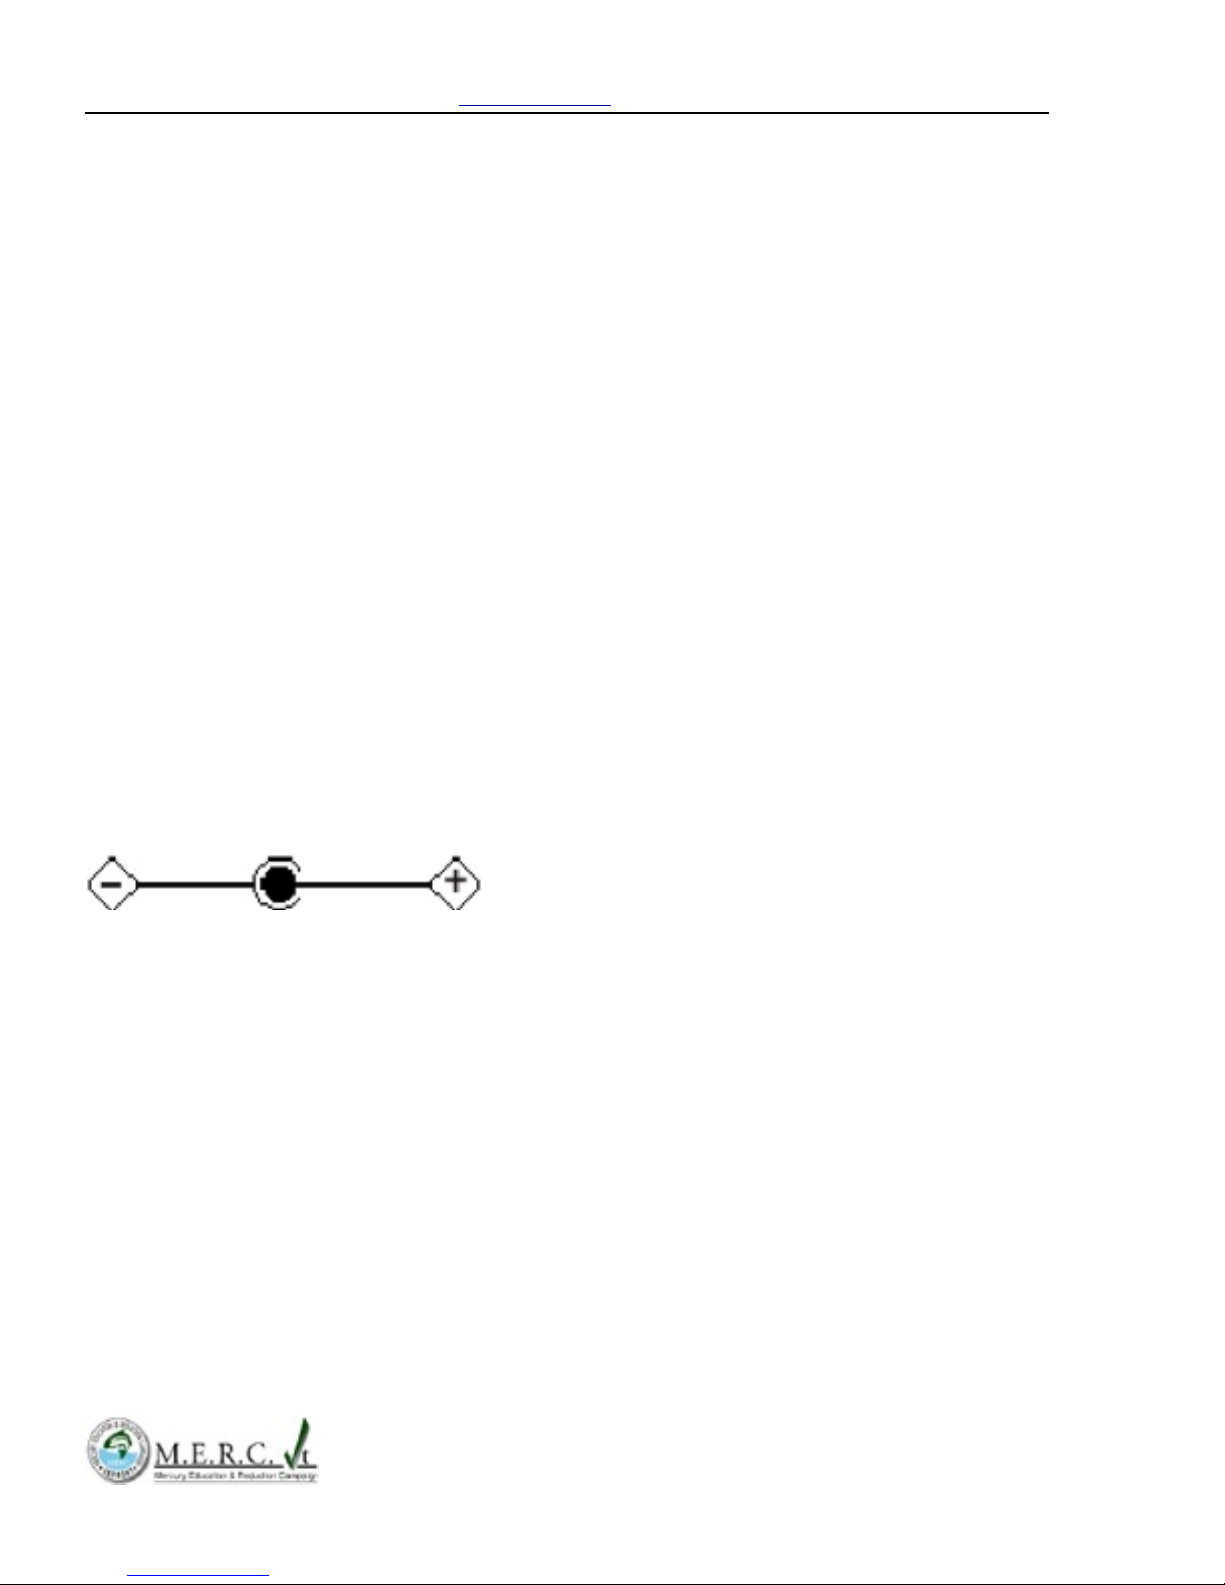
AC Adapter output polarity:
WARNING
For continued protection against risk of fire, replace only with the
same type and rating fuse.
WARNING
Danger of explosion if Lithium (clock) battery is incorrectly
replaced. Replace only with the same equivalent type
recommended by the manufacturer. Dispose of used batteries
according to the manufacturer’s instruction.
System Disposal
In the event of system disposal, observe procedures and
information regarding proper procedures in your area.
The liquid crystal display (LCD) lamps used in this system
contains mercury.
In the event of system disposal, be sure to follow local
guidelines.
Page 29

Page 30

 Loading...