

ENTEGRA COACH Anthem 2017 Comprehensive User's Manual
2017 Comprehensive User Guide


NOTES
II

III

ABOUT THIS GUIDE
This Guide Is For
YOU
It is a demonstration of
Entegra’s commitment to make
your ownership and use of your
Anthem an extraordinary
experience.
It is meant to be both an
introductory guide to support your
initial walk through as well as a
long-term reference source.
IV

TABLE OF CONTENTS
Before We Begin
• About Your Coach
• The Sum of Two Parts 12
• Identifying Exterior Components 13
• Electrical Power
• Sources of Power 15
• Types of Power 16
• Fresh Water 18
• Electronic & Mechanical Switches
and Controls
• Types of Switches 19
• MultiPlex Switching System 19
• Controlling Lights 20
• Operating Shades 20
• En-telligent VegaTouch Pad and 21
Wi-Fi Systems
• Components Controlled 21
by VegaTouch
• Components of VegaTouch 22
System
• How It Works 22
• Interacting with Your 23
VegaTouch system
• Organization of Information 24
And Controls
• Home/All House Screen 25
• Primary Living Room Screen 26
• Primary Bedroom Screen 26
• Bath Room Screen 27
• Exterior Coach Screen 27
• Settings Screen 28
• “How-To” and Troubleshooting 28
Screen
• Setting Up Your VegaTouch 29
System
V

TABLE OF CONTENTS
Before We Begin - continued
• Heating and Cooling
• Aqua-Hot Heating System 30
• AirExel Heat Pumps 31
• Storage and Loading
• In-Step Storage 32
• Interior Storage 33
• Exterior Storage 33
Basic Operations
• Locking/Unlocking the Coach
• Door Handle Touch Pad 36
• VegaTouch Pad 37
• Keys and Remote Controls 38
• Entry Controls
• MultiPlex Switch Pad 39
• Step Light and Power Switches 40
• Cockpit and Co-Pilot Switches
and Controls
• Overall Dashboard 41
• Headlights 42
• Equalizer System for Leveling 43
• SMART Steering Wheel 44
• Center Gauges 45
• Spartan LED Display 46
• Right Side of Dashboard 48
• Driver’s Side Arm Rest Controls 49
• Co-Pilot Arm Rest Controls 51
• Infotainment and GPS Systems
• Infotainment System
• Basic Controls 52
• Broadcast Radio 53
• SiriusXM Radio 54
• DVD Player 55
• USB 56
VI

TABLE OF CONTENTS
Basic Operations – continued
• Infotainment and GPS Systems - continued
• Infotainment System - continued
• Settings 57
• House Mode 58
• GPS: Rand McNally Navi 59
• Main Menu 59
• Preferences 60
• Go To Map 61
• RV Tools 62
• Choose Destination 63
• Preparing to Drive
• Driver Comfort
• Mirror and Pedal Adjustments 64
• Driver and Co-Pilot Seat Controls 65
• Fueling and Adding Diesel Exhaust 66
Fluid (DEF)
• Checklist 67
• Exterior
• Interior
• Starting the Engine 68
• While Driving…
• Using the Transmission 69
• Turn Signal and Hazard Lights 70
• Side Rear View Cameras 71
• Rear Camera 72
• Dumping Tag Axle Air Bags 73
• Engine Alerts 74
VII

TABLE OF CONTENTS
Basic Operations – continued
• Safety Considerations
• Emergency Exits
• Security System
• Fire Extinguisher
• Cold Weather Considerations
• Battery Boost
• Engine Pre-Heat
• Storage Bay/ Basement Heating
• Draining/ Water Lines
• Winterizing 87
Using Your Coach
• Setting Up Camp
• Overall Process
• Extend the Slides
• Level the Coach
• Hook-Up Utilities
• Electric Hook-Up
• Sewer Hook-Up
• Water Hook-Up
• Monitoring Electricity and Tanks
• Getting Comfortable
• Lighting
• Cab/Cockpit Day Shades
• Power Window Shades
• Awnings
• Heating- Cooling
• Controlling the Temperature 96
75
76
77
78
78
79
80
84
85
86
87
88
89
90
91
92
93
94
95
VIII

TABLE OF CONTENTS
Using Your Coach – continued
• Getting Comfortable - continued
• Using the Bath Room Facilities
• Hot Water
• Toilet Flush
• Vent Fan
• Watching Interior TVs:
• Over-the-Air Stations
• Winegard Rayzar Automatic
RV Antenna
• DirecTV Satellite Stations
• Satellite TV Systems
and Antennas
• VegaTouch Audio/Visual Control
• Living Room
• Using the Exterior Entertainment Center
• Getting Ready To Sleep
• Switches Above Bed/ Under Cabinets
• Managing Utilities
• Black and Grey Water Tanks
• Power
• Overall Electrical Status
• Auto Gen Start (AGS)
• Inverters
• Around the Kitchen
• Induction Cooktop
• Dishwasher
• Cleaning Your Coach
• Central Vacuum System
• Cleaning the Vent Registers
• Breaking Camp
• Overall Process
98
98
99
100
101
102
103
104
105
106
107
109
110
111
112
113
114
IX

TABLE OF CONTENTS
Beyond The Basics
• Engine and Chassis
• Diesel Exhaust Fluid (DEF) 116
• Checking Filters and Fluids 117
• Compressed Air Connection 118
• Electrical System
• Introduction 119
• Sources of Power
• Shore Power 120
• Battery Power 120
• Generator Power 121
• Solar Power 121
• Shore or Generator Power Flow Chart 122
• Electrical Applications 124
• Battery Disconnect Switch Panel 125
• 120 Volt Circuit Breakers 126
• Breakers 127
• No Shore or Generator Power Flow Chart 134
• Plumbing System
• Plumbing Flow Chart 129
• Short and Long Term Storage
• VegaTouch Settings 130
Appendices
• VegaTouch Tablet/Smartphone
Application
• Obtaining the Application (APP) 132
• Preparation for Connecting 133
Your Devices
• Entering Application Data 134
• Connecting Your Devices 135
• Connecting Dash Display to 136
VegaTouch
• Motor Home Associations 138
X

BEFORE WE
BEGIN
ABOUT YOUR COACH
IDENTIFYING EXTERIOR
COMPONENTS
POWER MANAGEMENT
FRESH WATER MANAGEMENT
ELECTRONIC & MECHANICAL
SWITCHES AND CONTROLS
HEATING AND COOLING
STORAGE AND LOADING
12
BEFORE WE BEGIN
ABOUT YOUR COACH
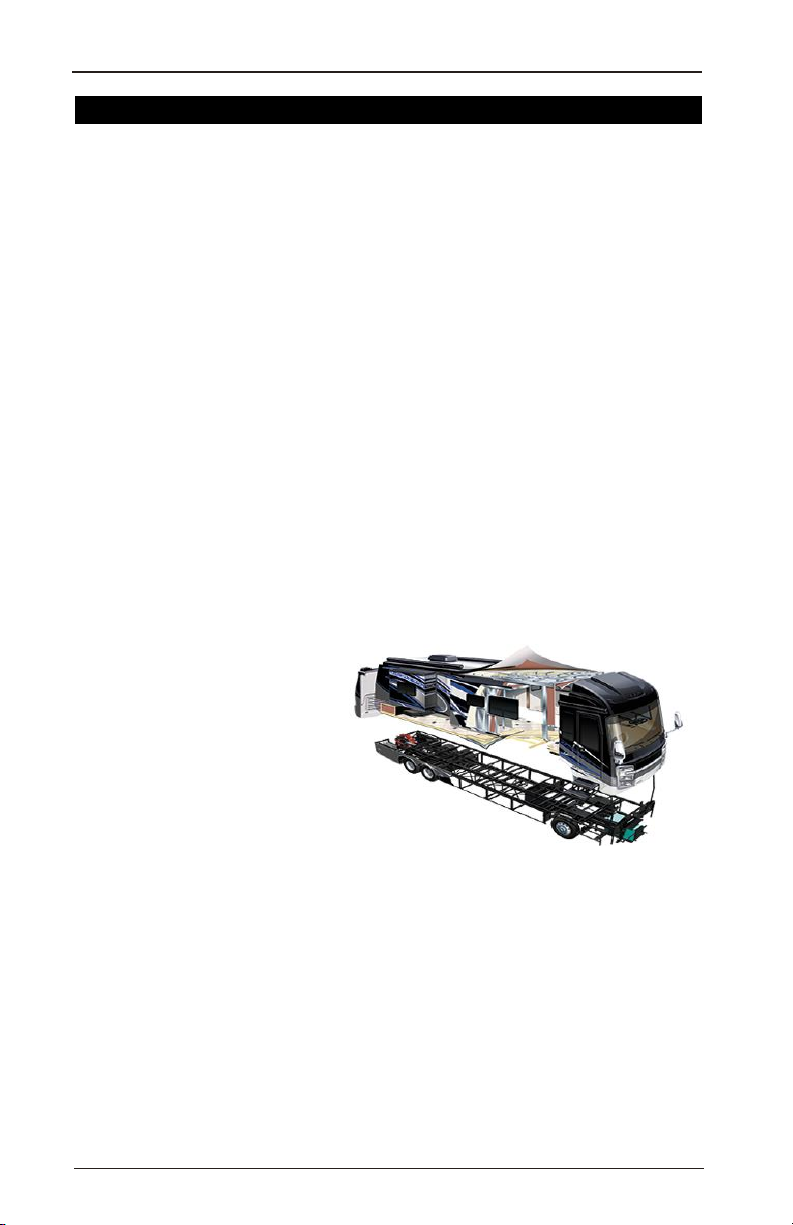
The Sum of Two Parts
The Chassis
• K2 chassis made by Spartan®
• Enhanced by Entegra Coach with stabilizing cross bracing
and other innovations
• Everything “under the floor”
• Outstanding powertrain and handling
• 450 HP 9L Cummins engine for plenty of power
• Allison 3000 transmission for smooth and efficient driving
• Smoothest ride in its class
• Six suspension airbags
• 60 mm Bilstein front shocks
• Independent front wheel suspension
• Cummins generator provides ample electricity while not
connected to “shore power"
• Safety
• Blind Spot Monitoring
The Living Quarters
• Constructed by Entegra Coach
• Quietest riding, best handling coach on the market today. Period.
• Proprietary manufacturing processes
• Wood to wood construction to eliminate squeaking noises
• Front cap design minimizes wind noise
• Cab forward design with large wrap-around windshield to provide
outstanding visibility
© ENTEGRA COACH, 2017 ALL RIGHTS RESERVED
Marker
Light
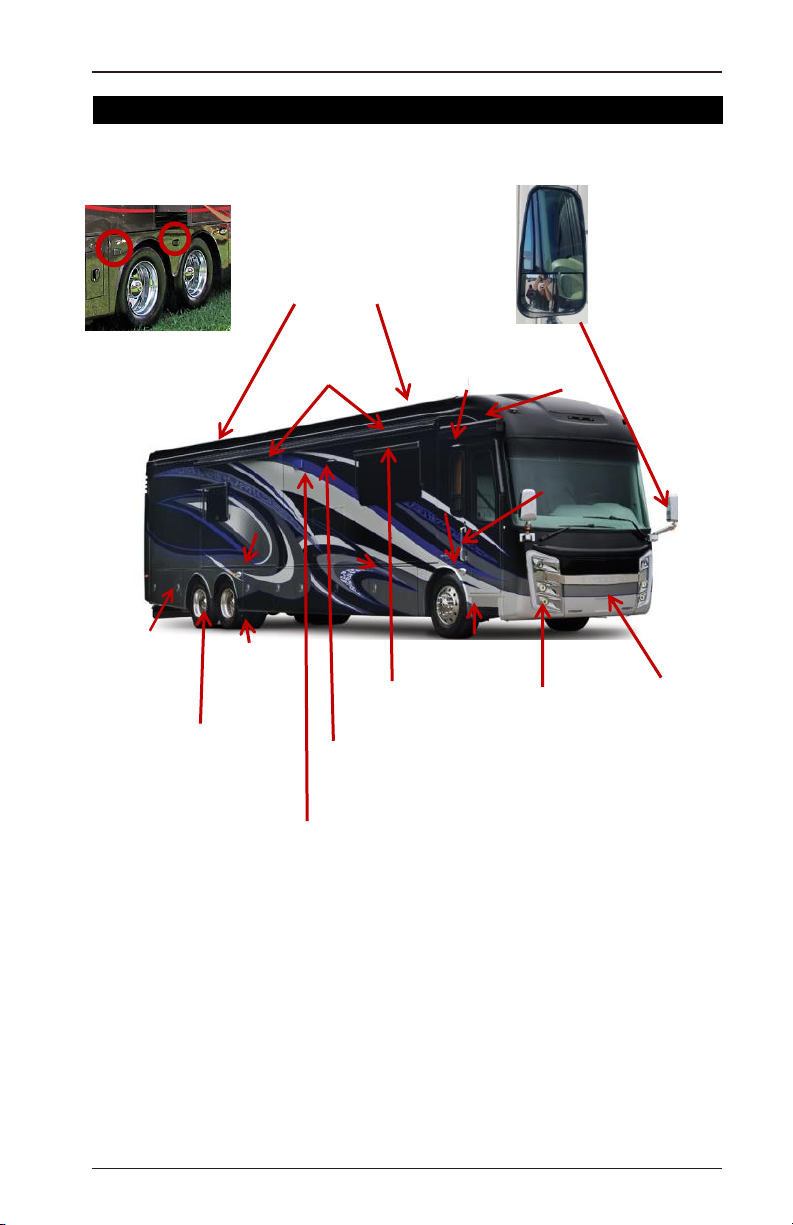
BEFORE WE BEGIN
IDENTIFYING EXTERIOR COMPONENTS
Blind Spot Sensors by Front,
Drive and Tag Wheels
(Drive and Tag Sensors Shown)
Girard Awnings
Docking
Light
Slide Out
Toppers
Turn
Signal
Marker
Light
Porch
Light
Docking
Light
13
Rear View
Mirrors with
Embedded
Rear View
Cameras
and Blind
Spot LEDs
Door
Awning
Key
Pad
Door
Handle
DEF Fill
(One on
each side
of coach)
Drive
Axle
Tag Axle
Window
Awnings
Retractable
Entry Steps
Headlamps
LED
Lighted
Entegra
Badge
Motion/Security
Light
Microwave Vent
(Which Side Depends
on Floor Plan)
FEATURES
• Side turning signal lights make other drivers aware of your
intentions.
• Blind spot detectors ensure greater safety to you and other
vehicles.
• Window awnings contribute to privacy and a comfortable interior
environment by blocking unwanted sunlight.
• Girard awnings provide a wonderful patio area – they are equipped
with LED lighting to provide light for nighttime activities.
© ENTEGRA COACH, 2017 ALL RIGHTS RESERVED

14
BEFORE WE BEGIN
IDENTIFYING EXTERIOR COMPONENTS
Front Cap
Wrap Around
Windshield
Two-Position
Rear Camera
Marker Lights
Rear Cap
Pulsing Third-Brake Light
Entegra
Badges
“C”Lights
Rear
Docking
Lights
FEATURES
• Distinctive “C” lights and badges offer unique campsite
lighting.
• Wraparound windshield is the largest in the industry and
provides unparalleled visibility from inside.
• Bright docking lights in conjunction with the rear camera
visibility make backing up easier and more precise.
• Marker lights around the coach ensure the coach is visible in
both clear and difficult weather conditions.
© ENTEGRA COACH, 2017 ALL RIGHTS RESERVED
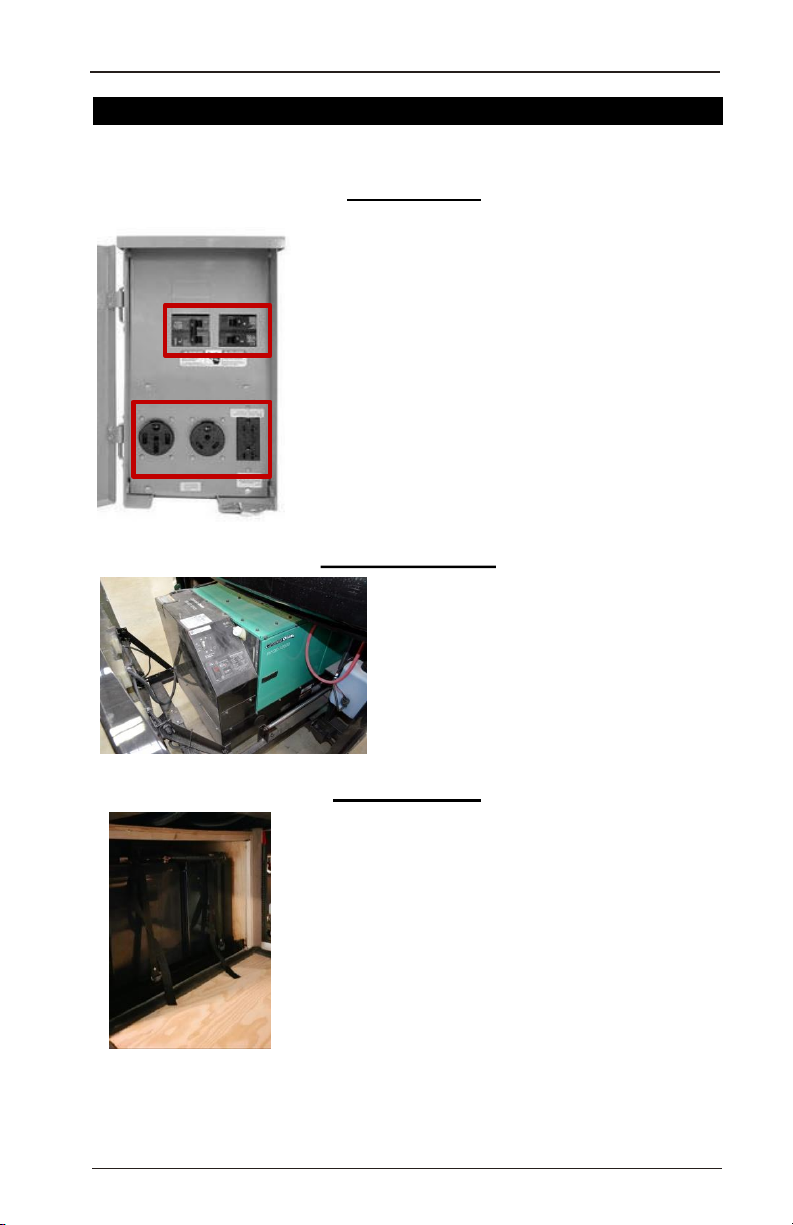
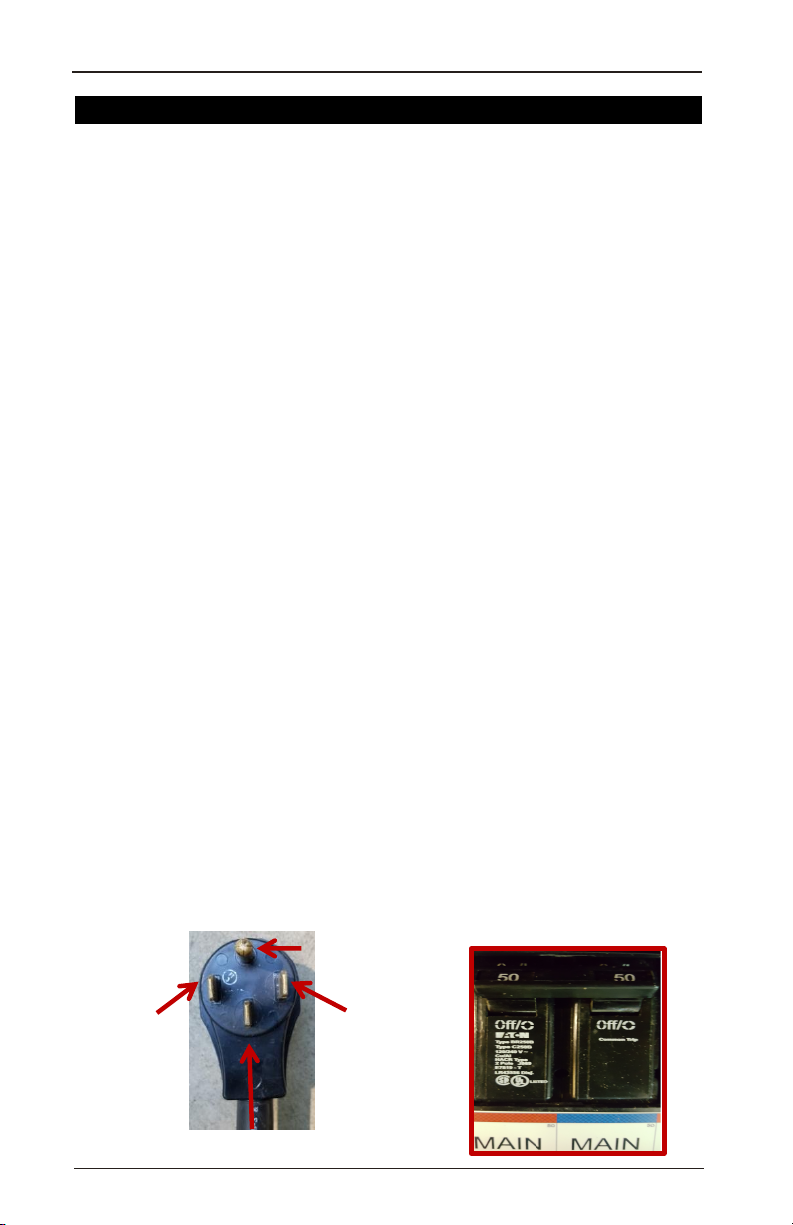
BEFORE WE BEGIN
Sources of Power
Shore Power
• Make sure the circuit
breaker is turned off at the
Pedestal
Circuit
Breakers
50, 30, 20
and 15 amp
Receptacles
Generator Power
pedestal.
• Plug your power cord into
the 50 amp receptacle.
• 50 amp plugs have 4 prongs
• Flip the circuit breaker to the
ON position.
• The transfer switch and
inverters may take up to a
minute to respond.
• Your running generator
provides 50 amps of
service.
• The generator may be
operated manually or set to
start automatically when
pre-set conditions are met.
15
ELECTRICAL POWER
Battery Power
• Your coach has 4 AGM
batteries. This battery
option provides plenty of
power and a long life.
Water NEVER has to be
added.
• The batteries are located
in the middle of the
basement toward the rear
of the coach.
© ENTEGRA COACH, 2017 ALL RIGHTS RESERVED
16
BEFORE WE BEGIN
ELECTRICAL POWER
“Types”of Power
There are two electrical systems in your coach: first, there is a 120
volt AC (alternating current) system used to run your major
appliances (heat pumps, refrigerator, etc.); second, there is a 12 volt
DC (direct current) system to power your lights, slides and other
devices.
Basics of electricity
• Voltage is to electricity as pressure is to water. The higher the
number, the greater the “pressure.”
• Amperage is to electricity as volume is to water. The higher the
number, the more water flows through a given size pipe.
• Your inverters have two functions:
CONVERTING 120 volt AC electricity to 12 volt DC electricity.
• This function enables your batteries to be charged.
INVERTING 12 volt DC electricity to 120 volt AC electricity.
• This function enables your batteries to power your 120 volt
Batteries
• Batteries are used for two functions:
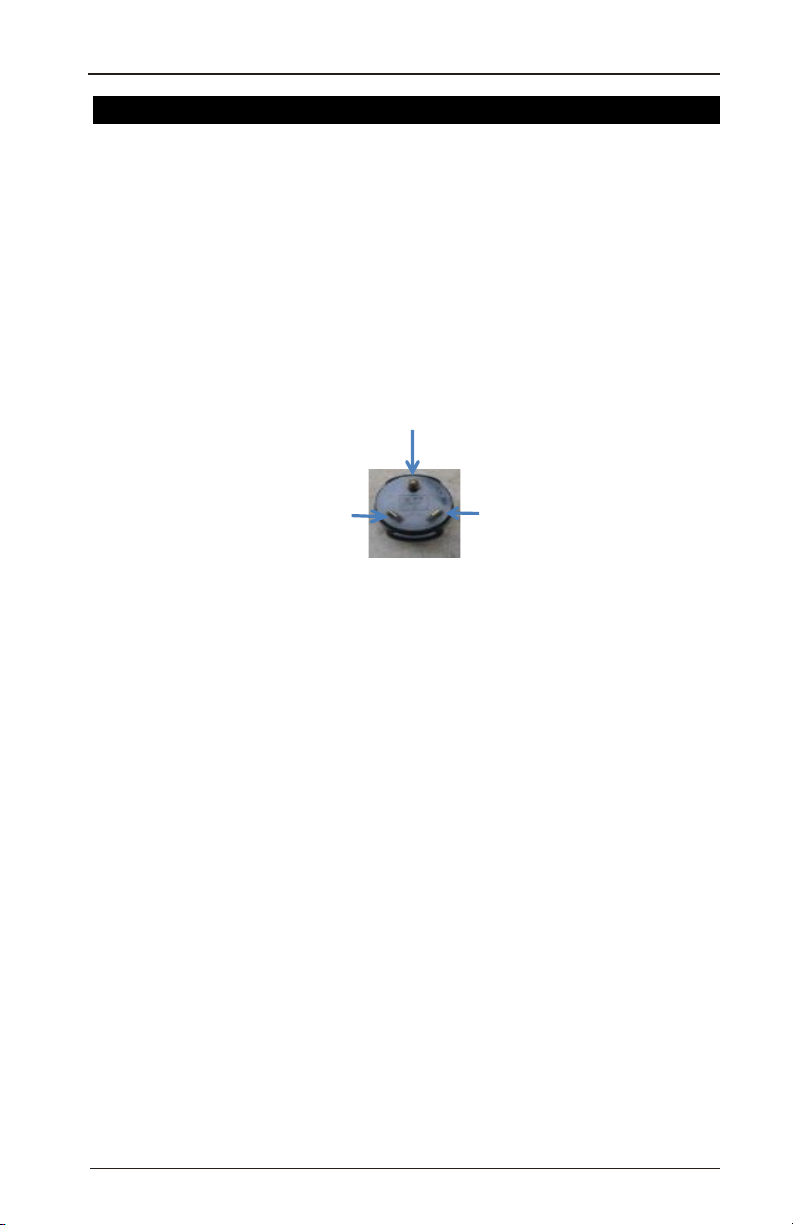
120 Volt System
• 50 amp Service
-50 amp service actually provides 100 amps of power because your
plug gives you access to two 50 amp circuits. If you look at the plug
at the end of your power cord, you will see it has four prongs
(shown below). You will also notice there are two circuit breakers
(generally connected together) at the electric pedestal at the park.
Each is a 50 amp circuit breaker. When your coach is connected to
50 amp service it actually has 100 amps of electricity available to
run the heat pumps, etc.
appliances when you do not have 120 volt power available.
-two CHASSIS batteries are primarily used to start the engine.
-four HOUSE batteries are used to power the coach.
Circuit
1
Ground
Circuit
2
Neutral
© ENTEGRA COACH, 2017 ALL RIGHTS RESERVED
BEFORE WE BEGIN
ELECTRICAL POWER
“Types” of Power
120 Volt System - continued
• 30, 20 and 15 amp Service
-Not all parks or sites in a park have 50 amp service. There will
be times when you will have to connect to other than 50 amp
service. You will need to carry an adapters in order to do this –
you should purchase and always have a 50 amp to 30 amp
adapter and a 30 to 20/15 amp adapter with you.
-When hooking up to 30 amp service (the most common
exception to 50 amp service), the coach is only receiving 30 amps
of power since there is only one “Hot” line being connected.
Ground Wire
17
“Hot” Wire
(30 amps)
-When connected to 30 amp service, your coach is only receiving
30% of the power it receives when connected to 50 amp service –
yes, it can be confusing.
• For this reason, your coach is powered through a
combination of shore, battery and if installed, solar panel
power.
-If not charged, the batteries will completely discharge – “go dead.”
-The batteries can recharge when using the generator.
-The generator can be started manually using 1) the dash
generator ON/OFF button, or 2) by setting the Energy Command
control.
12 Volt System
• The power to operate your lights, slides and other 12 volt devices
comes directly from your 12 volt batteries. The batteries need
recharged so they do not go “dead.” This is discussed in more
detail later in the Guide.
• One of the functions of your inverters is to CONVERT 120 volts
AC to 12 Volts DC so your batteries can be recharged when
needed.
• Part of maintaining your batteries is maintaining a minimal charge
within them. Your coach has a power management system which
is operated through your VegaTouch system but is invisible to
you.
Neutral
Wire
© ENTEGRA COACH, 2017 ALL RIGHTS RESERVED
18
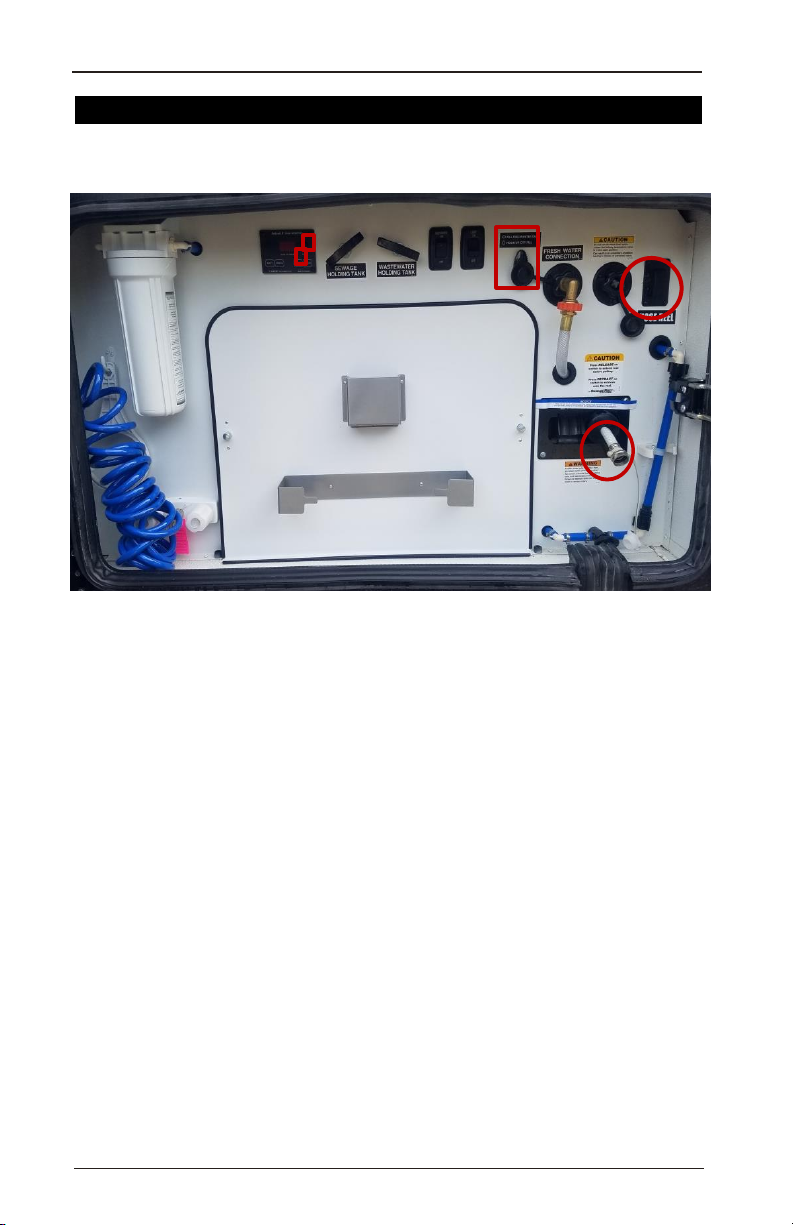
FRESH WATER
BEFORE WE BEGIN
Filling the Fresh Water Tank
1
3
6
4
5
2
Consider purchasing and using a pressure regulator valve to
protect your coach’s plumbing system. Some water sources have
pressures that could cause damage to your plumbing system.
1. Be sure that the water pump is in the OFF position.
2. Connect the coach’s water hose to a potable water source faucet.
When completed, turn on the city/park water faucet.
3. Turn the valve shown above to the horizontal position to fill the
tank.
4. Monitor the amount of water in the tank by pushing the FRESH
button on the tank monitoring system.
5. When the desired amount of water is in the fresh water tank, turn
off the water source and return the valve back to the vertical
position.
6. Retract the fresh water hose by pushing the button.
USING CITY/PARK WATER
Photo shows the valve in the normal vertical position for using city
water.
1. Connect the coach’s water hose to a potable water source faucet.
When completed, turn on the city/park water faucet.
2. Double check that the valve is in the vertical position.
NOTE
If the tank fill valve is not in the vertical position, water from
either the city or fresh water tank will not flow into the coach.
© ENTEGRA COACH, 2017 ALL RIGHTS RESERVED
BEFORE WE BEGIN
19
ELECTRONIC & MECHANICAL SWITCHES AND CONTROLS
Types of Switches
MultiPlex VegaTouch Rocker Switches
Self-Explanatory
These switch systems were chosen to provide you the easiest way
to control all the devices and systems in your coach. There are times
when two different types of switches will be used to accomplish the
same outcome – this is for your convenience and ease of use. Each
of these systems will now be introduced.
MultiPlex Switching System
Individual switches are combined in
several pads located throughout your
coach. Each switch pad contains the
switches relevant to that location:
MultiPlex Switch Color Coding
On/Off Switches: White = Off; Blue = ON
Adjustment Switches (awnings, shades
and designated lights) = Green
© ENTEGRA COACH, 2017 ALL RIGHTS RESERVED
20
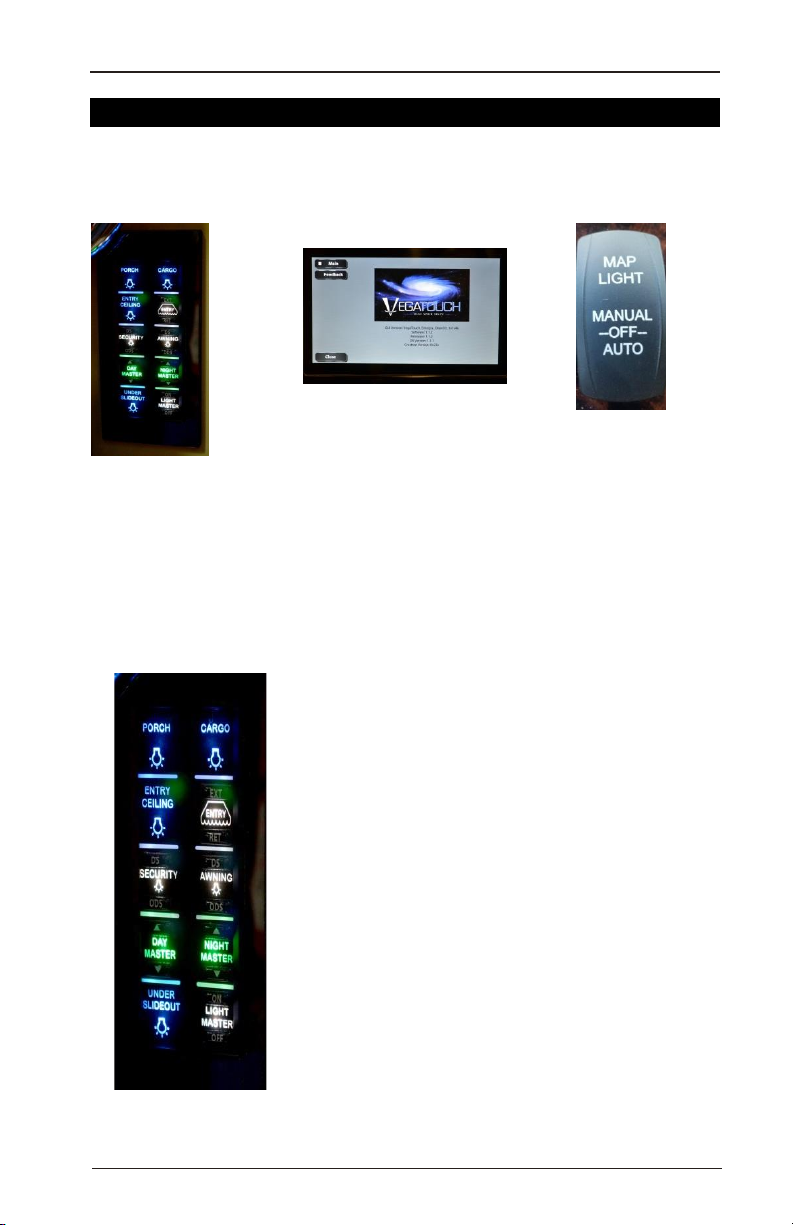
BEFORE WE BEGIN
ELECTRONIC & MECHANICAL SWITCHES AND CONTROLS
MultiPlex Switching System
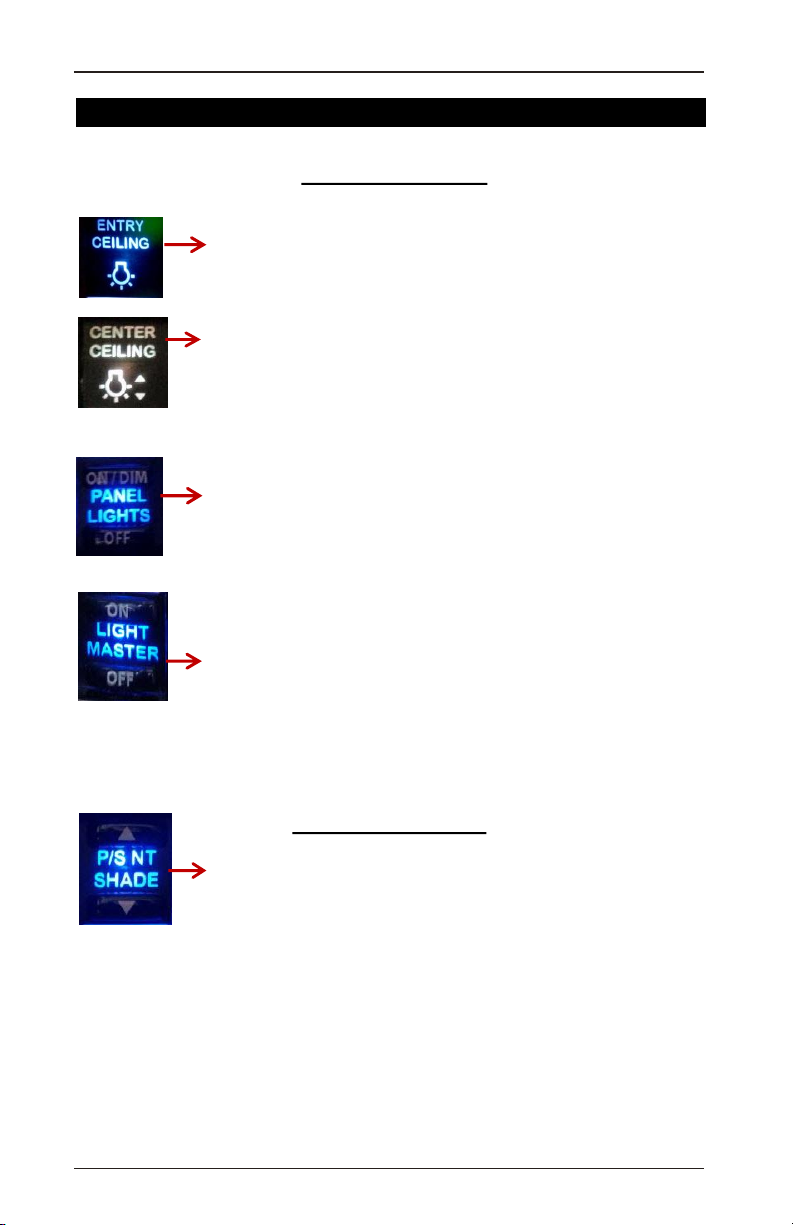
Controlling Lights
• Switches that control lights have a light bulb icon.
• Certain lights can only be turned on and off and have
switches that look like this (see entry ceiling photo).
-----------------------------------------------------------------------------
• Light switches that have up and down arrows can be
dimmed (see center ceiling photo).
• Depress and hold the switch until the desired
illumination is achieved. The multiplex system will
remember the setting when the lights are turned on
again.
-----------------------------------------------------------------------------
• The Panel Lights switch can set two levels of
illumination for switch panels. The light level can be
increased/decreased by depressing the “Dim” button.
• The switch is designed to enable comfortable lighting
levels or sleeping and other activities.
-----------------------------------------------------------------------------
• All the lights that are on when the OFF button is
pressed will go off but remembered by the system.
• When the ON button is pushed, the lights that were
illuminated earlier will be switched on from memory. If
the button is pushed and held, the settings are reset
and all the lights will be illuminated at their brightest
intensity.
• If no lights were on when leaving the coach, the Light
Master ON button will illuminate ALL the lights to their
brightest intensity.
Operating Shades
• To lower or raise one or multiple shades (depending on
the switch) press and release either the down or up
arrow button once.
• To stop the shade in the desired position, press the
arrow button again.
• Master shade switches will control multiple shades inside of the
coach.
• Windshield night shades will not operate when the ignition is in the
ON position.
• There is a slight delay in movement when selecting shade options.
Be patient: DO NOT push the switch multiple times.
• The Master Shade switch controls all the shades EXCEPT the
bathroom.
© ENTEGRA COACH, 2017 ALL RIGHTS RESERVED
PLEASE NOTE

BEFORE WE BEGIN
ELECTRONIC & MECHANICAL SWITCHES AND CONTROLS
En-telligent VegaTouch Pad and Wi-Fi Systems
Your Anthem coach is equipped with the
En-telligent VegaTouch Pad System which
is an industry first coach control system by
Crestron.
Components Controlled by the VegaTouch Pad System
Your VegaTouch Pad system controls the following functions of
your coach, which is described in detail throughout this Guide:
• Locking/ Unlocking the entry door and storage bay doors
• Temperature
- Heating, Ventilation and Air Conditioning
• Plumbing
- Fresh, grey and black water tank monitoring
- Water pump: turning on and off
• Hot water heating source
• Power shades
• Power awnings
• Electric power management
• Slide-outs
• Audio/ Video
• Lighting
• Away/ Stow mode
21
NOTE
An application (App) for your Smartphone or Tablet (Mac and
Android) can be purchased to control a selected number of functions
shown above – see the Appendix. Many people find this helpful
since you can control the lights or unlock the door, for instance, from
your device while in the 30 foot radius of the coach.
This App is explained in detail in the Appendix.
© ENTEGRA COACH, 2017 ALL RIGHTS RESERVED
22
BEFORE WE BEGIN
ELECTRONIC & MECHANICAL SWITCHES AND CONTROLS
Components of VegaTouch System
The primary elements of the VegaTouch system are: a dash
mounted touch screen accessed through the Infotainment System; a
stand-alone mid-ship touch screen; a FireFly wireless router; and,
mechanisms to control each of the components managed by the
VegaTouch system. In addition, the Xite radio can control a limited
number of VegaTouch functions. The FireFly wireless router is co-
located with the living room’s audio/ visual equipment.
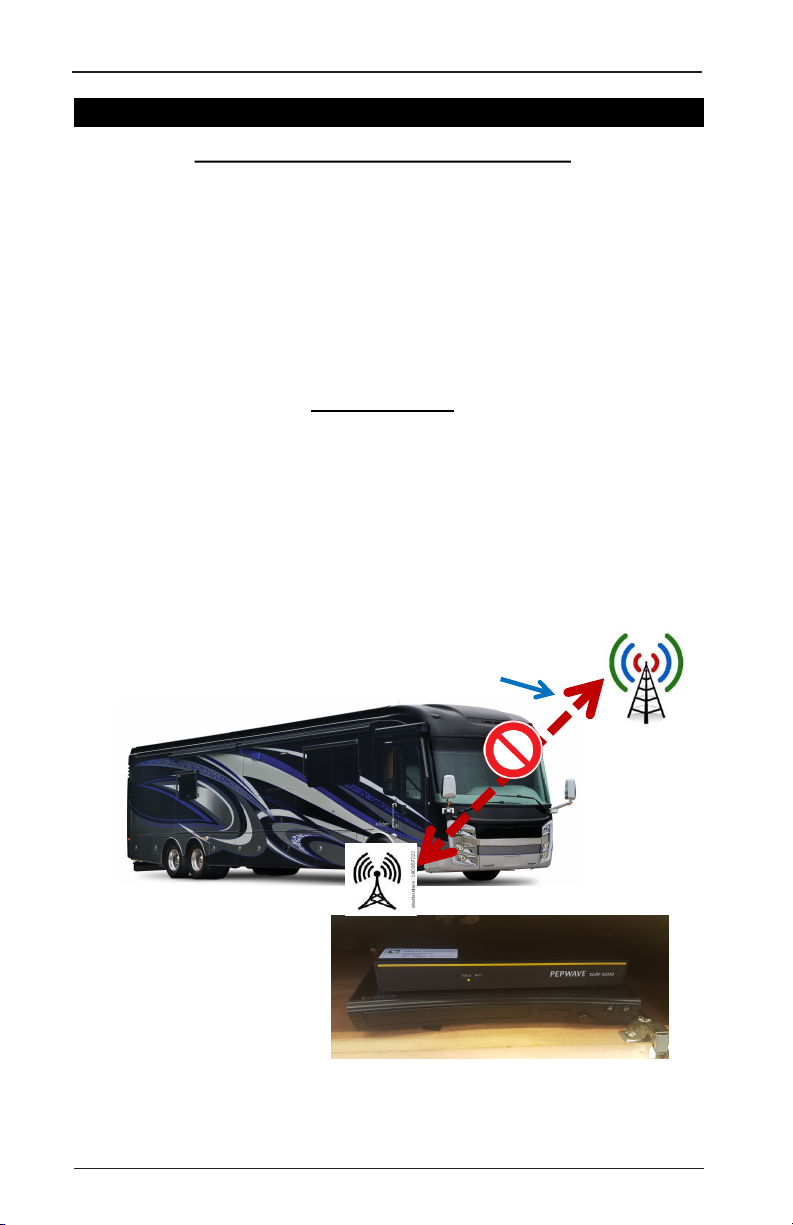
How It Works
The wireless router creates a wireless local area network (LAN)
within the coach that wirelessly connects all the controlled devices to
each of the VegaTouch panels. Note that this LAN is NOT
connected to the Internet and has a range of about 30 feet.
Connection of the LAN to the Internet can only be accomplished
through the use an air card or mobile hot spot device obtained from
your wireless carrier and connected to the router via a USB port.
Only available with a wireless cell phone
carrier USB hot-spot or air card along
with a carrier service plan
Carrier cell
Local Area
Network within
and around
coach
FireFly wireless router
located in coach
If you do not connect your coach’s FireFly router to the Internet via
an air card, devices connected to the coach’s LAN WILL NOT
connect to the Internet.
© ENTEGRA COACH, 2017 ALL RIGHTS RESERVED
phone
tower for
access to
the Internet
BEFORE WE BEGIN
ELECTRONIC & MECHANICAL SWITCHES AND CONTROLS
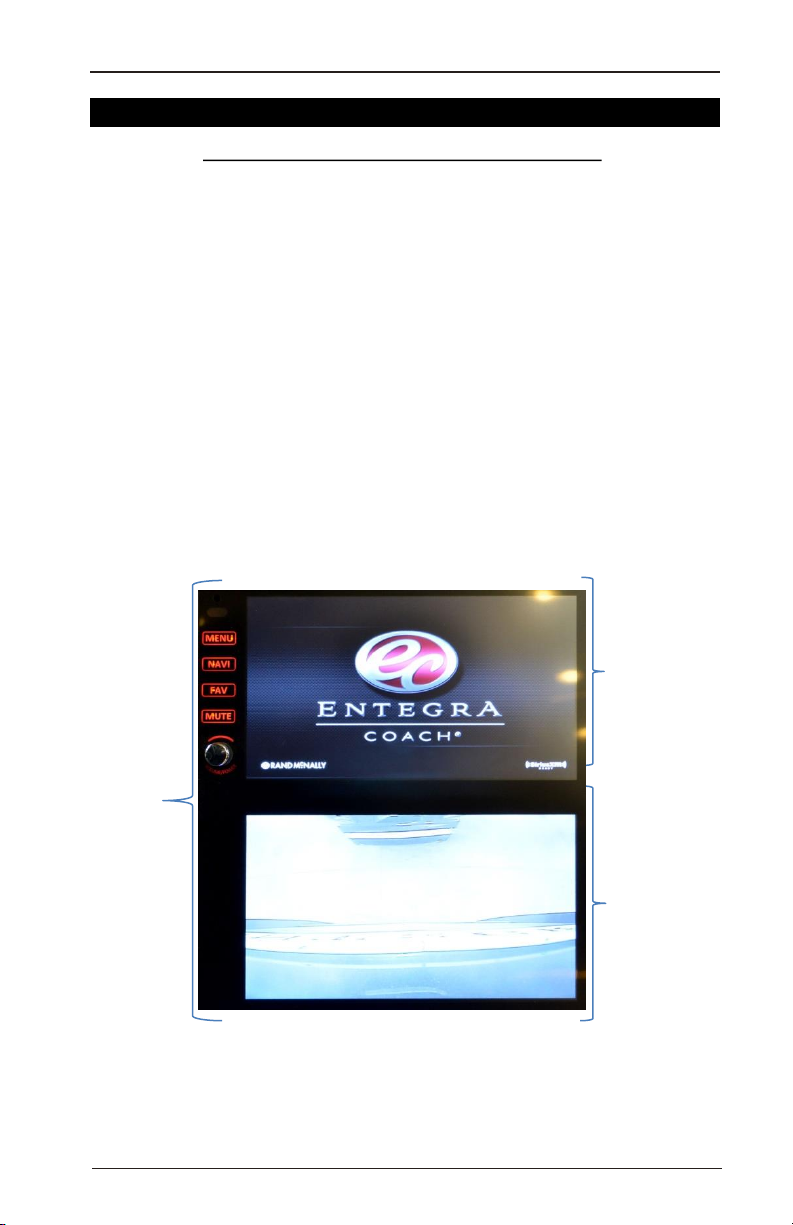
Interacting With Your VegaTouch System
The mid-ship VegaTouch pad is physically connected to your
VegaTouch system. The dashboard touch screen, however, is
connected wirelessly through the Xite radio. Therefore, this display
must be configured to wirelessly connect to your VegaTouch
system. Fortunately the set-up procedure should only have to be
once.
The following commands are used to interface with the displays:
• Tap with one finger – this action on a (virtual) button will bring
up the screen(s) specific to that function.
• Slide one finger across the screen – this action moves the
position of the information displayed on the screen.
• Touch and hold – this action generally brings up more detailed
information than is found on the screen that appears after a tap.
23
Dash
Dual
LCD
Screens
Infotainment
Xite Radio
Camera
Screen
© ENTEGRA COACH, 2017 ALL RIGHTS RESERVED
24
BEFORE WE BEGIN
ELECTRONIC & MECHANICAL SWITCHES AND CONTROLS
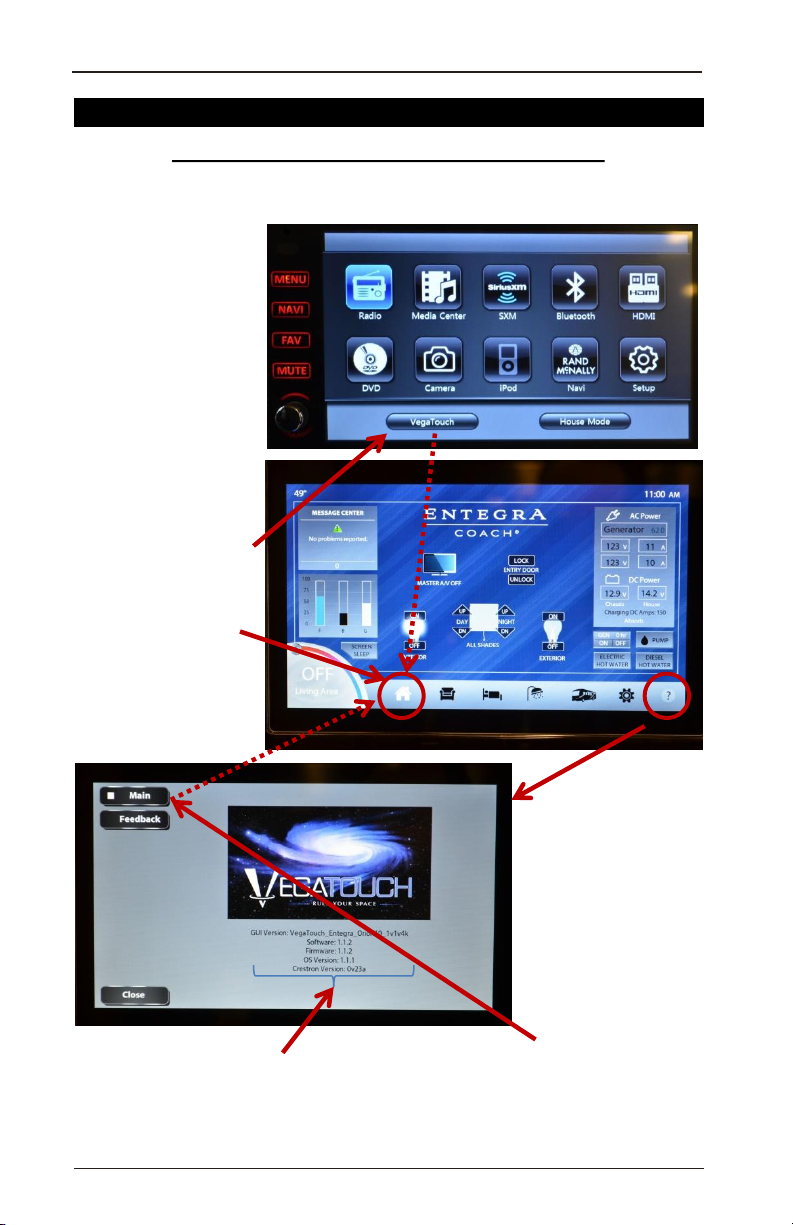
Organization of Information and Controls
Once turned on,
this is the Main
Screen of the
Infotainment
System
Tap the
VegaTouch
button to reach
the
All House/Home
Screen of
VegaTouch
system
(See next page)
The Main screen provides information
on the current software and firmware
installed in your VegaTouch system.
© ENTEGRA COACH, 2017 ALL RIGHTS RESERVED
The VegaTouch
Main screen can
be reached by
touching
(holding) the “?”
button located on
all of the
VegaTouch
screens.
Returning to the
All House/Home
screen is as
simple as
tapping the Main
button.
BEFORE WE BEGIN
ELECTRONIC & MECHANICAL SWITCHES AND CONTROLS
25
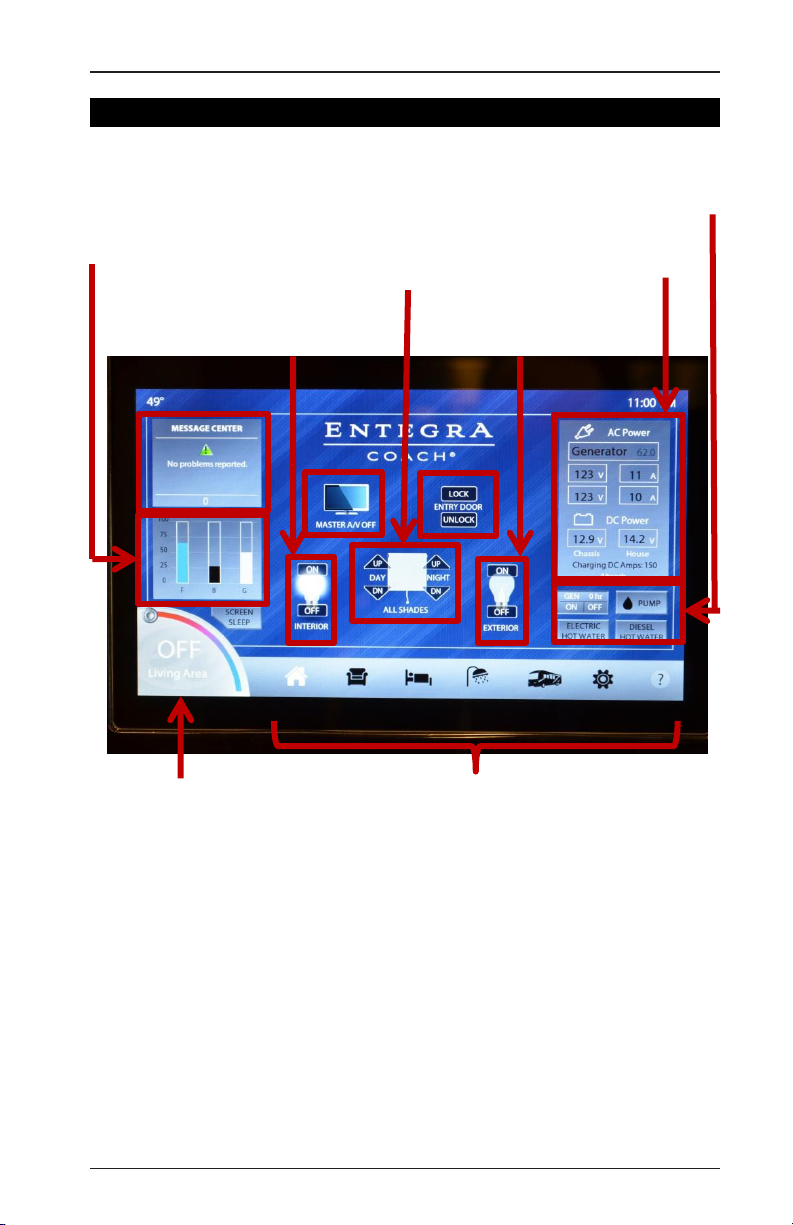
Home/All House Screen with Key Information and Controls
Tank Monitoring
Control
F= Fresh Water Tank
B = Black Water Tank
G = Grey Water Tank
Interior Lighting Switch
1
Hot Water and
Day/Night
Master Shade
Switch
Exterior Lighting Switch
3
2 6
4
Generator Info
Electric Power
5
Info
7
Coach
Temperature
Control
Place finger on
round “button” and
slide along arc to
increase (red) or
decrease (blue) the
temperature in the
coach.
Each Explained In Further Detail On Next Pages
© ENTEGRA COACH, 2017 ALL RIGHTS RESERVED
Screens to Specific Sections of the
Coach, Settings and Information
1 = Home or All House
2 = Living Room
3 = Bedroom
4 = Bathroom
5 = Exterior
6 = Settings
7 = “How – To” and
Troubleshooting
26
BEFORE WE BEGIN
ELECTRONIC & MECHANICAL SWITCHES AND CONTROLS
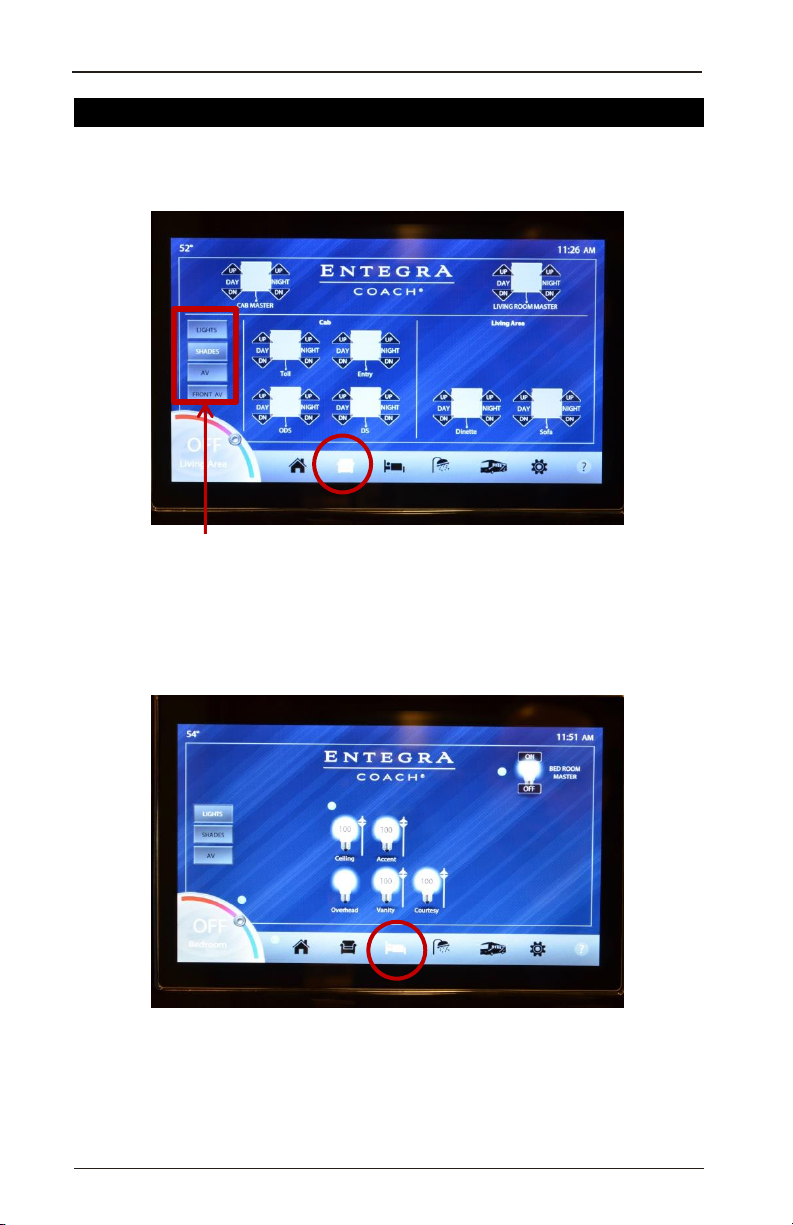
Primary Living Room Screen
(#2)
This command control provides access to the screens that enable
you to modify: lights, shades (shown), audio/visual (AV) and the
front audio visual in the living area.
Primary Bedroom Screen
(#3)
This command control provides access to modify: lights
& shades (shown) and the bedroom audio/visual (AV).
© ENTEGRA COACH, 2017 ALL RIGHTS RESERVED
BEFORE WE BEGIN
27
ELECTRONIC & MECHANICAL SWITCHES AND CONTROLS
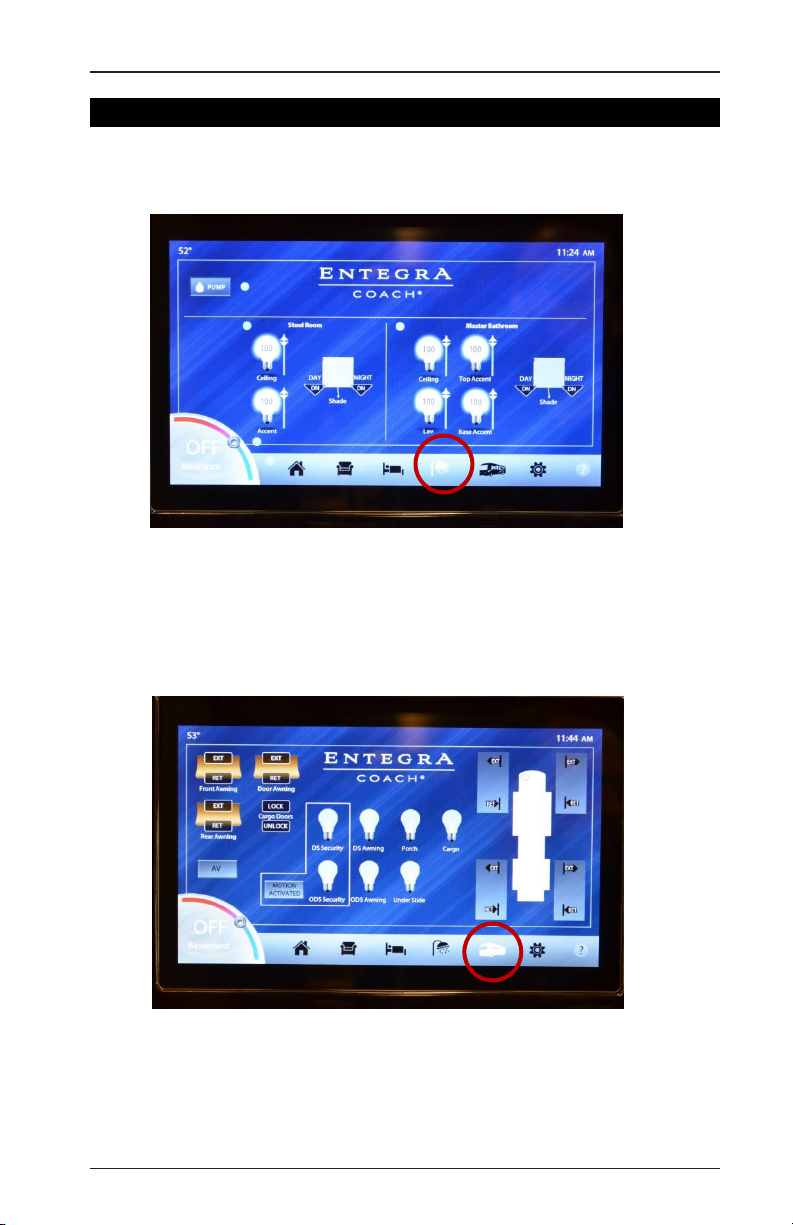
Bathroom Screen
(#4)
This command enables you to control: lights, shades and water
pump in both the main bath and ½ bath (powder/stool room).
Exterior Coach Screen
(#5)
This command enables you to control: exterior lights,
awnings, storage bay locks, exterior audio/visual center and
the four slideout rooms.
© ENTEGRA COACH, 2017 ALL RIGHTS RESERVED
28
BEFORE WE BEGIN
ELECTRONIC & MECHANICAL SWITCHES AND CONTROLS
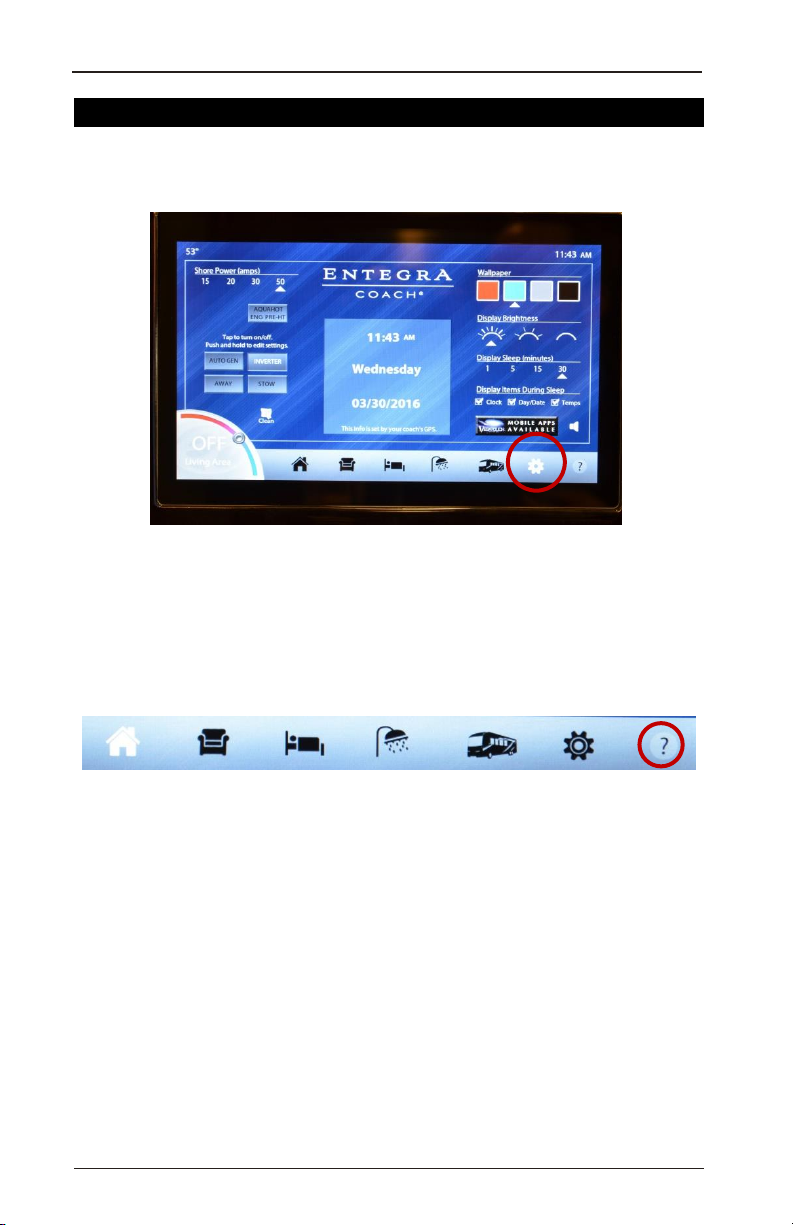
Settings
(#6)
This command option provides access to the screens that enable
you to control: lights, shades (shown), audio/ visual (AV) and the
front audio/ visual.
“How To” and Troubleshooting the VegaTouch system
(#7)
At the bottom of virtually every VegaTouch screen is the “?”
symbol. When this button is tapped, more question marks appear
which direct you to further explanations on how to accomplish
your objective.
© ENTEGRA COACH, 2017 ALL RIGHTS RESERVED

BEFORE WE BEGIN
ELECTRONIC & MECHANICAL SWITCHES AND CONTROLS
Setting Up Your VegaTouch System
The mid-ship VegaTouch pad is physically connected to your
VegaTouch system. The dashboard display, however, is connected
wirelessly. The setup for this connection has already been
completed for you. If the display does not work, the first thing to
check is if the display is, in fact, connected to your VegaTouch
system. This can be easily accomplished by inspecting the
VegaTouch opening screen on your dashboard panel.
If the Crestron
Version number
is displayed, the
touch panel IS
connected.
Connected
29
If Lost Connection
is displayed, the
touch panel is NOT
connected.
Not Connected
Should you encounter this situation, reset the wireless router
located in your audio/visual equipment cabinet and your VegaTouch
display by turning them both off and turning them back on (router
first) AFTER 30 seconds have elapsed. If this does not work, call
Entegra Coach or your local dealer for assistance.
The appendices includes instructions on how to perform the
original set up of the display.
© ENTEGRA COACH, 2017 ALL RIGHTS RESERVED
 Loading...