

Page 1

Musician's Manual
64 Voice Expandable Stage and Studio Keyboard
Page 2
READ THIS FIRST!
WARNING!!WARNING!!
Grounding Instructions
This product must be grounded. If it should malfunction or break down, grounding provides a path of
least resistance for electric current to reduce the risk of electric shock. This product is equipped with a
cord having an equipment-grounding conductor and a grounding plug. The plug must be plugged into an
appropriate outlet that is properly installed and grounded in accordance with all local codes and ordinances.
DANGER: Improper connection of the equipment-grounding conductor can result in the risk of electric
shock. Check with a qualified electrician or service personnel if you are in doubt as to whether the
product is properly grounded. Do not modify the plug provided with this product — if it will not fit the
outlet, have a proper outlet installed by a qualified electrician.
CAUTION
RISK OF ELECTRIC SHOCK
DO NOT OPEN
CAUTION : TO REDUCE THE DANGER OF ELECTRIC SHOCK
DO NOT REMOVE COVER (OR BACK)
NO USER SERVICEABLE PARTS INSIDE
REFER SERVICING TO QUALIFIED SERVICE PERSONNEL
This symbol is intended to alert the user to the
presence of uninsulated "dangerous voltage"
within the product's enclosure that may be of
sufficient magnitude to constitute a risk of electronic shock to persons.
This symbol is intended to alert the user to the
presence of important operating and maintenance (servicing) instructions in the literature
accompanying the appliance.
SEE IMPORTANT SAFETY INSTRUCTIONS ON BACK COVER!
Page 3

"INSTRUCTIONS PERTAINING TO A RISK OF FIRE,
ELECTRIC SHOCK, OR INJURY TO PERSONS"
IMPORTANT SAFETY INSTRUCTIONS
WARNING—When using electric pr oducts, basic precautions should always be followed, including
the following:
1. Read all the instructions before using the product.
2. Do not use this product near water - for example, near a bathtub, washbowl, kitchen sink, in a wet
basement, or near a swimming pool, or the like.
3. This product should be used only with a cart or stand that is recommended by the manufacturer.
4. This product, either alone or in combination with an amplifier and headphones or speakers, may be
capable of producing sound levels that could cause permanent hearing loss. Do not operate for a
long period of time at a high volume level or at a level that is uncomfortable. If you experience any
hearing loss or ringing in the ears, you should consult an audiologist.
5 . The product should be located so that its location or position does not interfere with its proper
ventilation.
6 . The product should be located away from heat sources such as radiators, heat registers, or other
products that produce heat.
7 . The product should be connected to a power s upply only of the type described in the operating
instructions or as marked on the product.
8. This product may be equipped with a polarized line plug (one blade wider than the other). This is a
safety featu r e . If you are unable to insert the plug into the outlet, contact an electrician to replace
your obsolete outlet. Do not defeat the safety purpose of the plug.
9. The power supply cord of the product should be unplugged from the outlet when left unused for a
long period of time.
10. Care should be taken so that objects do not fall and liquids are not spilled into the enclosure through
openings.
11. The product should be serviced by qualified service personnel when:
a. The power supply cord or the plug has been damaged; or
b. Objects have fallen, or liquid has been spilled into the product; or
c. The product has been exposed to rain; or
d. The product does not appear to operate normally or exhibits a marked change in performance;
or
e. The product has been dropped, or the enclosure damaged.
12 . Do not attempt to service the product beyond that described in the user-maintenance instructions.
All other servicing should be referred to qualified service personnel.
SAVE THESE INSTRUCTIONS
Page 4

Page 5

Table of Contents
TTTTaaaabbbblllleeee ooooffff CCCCoooonnnntttteeeennnnttttss
ss
CCCChhhhaaaapppptttteeeerrrr 1111ÑÑÑÑWWWWeeeellllccccoooommmmeeee................................................................................................................................................................................................................................................................................................................................................................................................................................................................................................................................................................................................................................................................................................11
Getting Ready...................................................................................................................................................................................................................................................... 1
Explore the ZR-76 Sounds.............................................................................................................................................................................................................................2
Jam with the ZR-76 Drum Machine.............................................................................................................................................................................................................5
The Inspiration Catcher.....................................................................................................................................................................................................................................7
Listening to The ZR-61 and ZR-76 Demos .............................................................................................................................................................................................9
Playing Standard MIDI Files ..........................................................................................................................................................................................................................10
The ZR-61 and ZR-76 Onscreen Help.................................................................................................................................................................................................. 11
Conceptual Overview of the ZR-61 and ZR-76..................................................................................................................................................................................12
ZR-61 and ZR-76 Controls ........................................................................................................................................................................................................................16
ZR-61 and ZR-76 Accessories .................................................................................................................................................................................................................17
Available Options for Your ZR-61 or ZR-76........................................................................................................................................................................................18
If You Experience Odd Behavior................................................................................................................................................................................................................18
Need More Help?...........................................................................................................................................................................................................................................19
CCCChhhhaaaapppptttteeeerrrr 2222ÑÑÑÑTTTThhhheeee ZZZZRRRR----77776666 SSSSttttuuuuddddiiiioooo................................................................................................................................................................................................................................................................................................................................................................................................................................................................................................................................................................................................................222211
Introduction .......................................................................................................................................................................................................................................................21
Getting Ready................................................................................................................................................................................................................................................... 2 1
What Connections Need to be Made? .......................................................................................................................................................................................... 21
Making MIDI Connections............................................................................................................................................................................................................................21
Using the ZR-76 as a Stand-Alone Studio ....................................................................................................................................................................................22
Using the ZR-76 as the Center of a MIDI Studio.........................................................................................................................................................................22
Using the ZR-76 with a Computer.................................................................................................................................................................................................. 23
Using the ZR-76 with an Audio Recorder ....................................................................................................................................................................................23
Using the ZR-76 with an Alternate Controller.............................................................................................................................................................................24
Using the ZR-76 with a MIDI Patchbay.......................................................................................................................................................................................... 25
Making Audio Connections.......................................................................................................................................................................................................................... 25
Making the Power Connection...................................................................................................................................................................................................................27
Setting Volume Levels...................................................................................................................................................................................................................................27
11
11
CCCChhhhaaaapppptttteeeerrrr 3333ÑÑÑÑGGGGlllloooobbbbaaaallll SSSSeeeettttttttiiiinnnnggggssss............................................................................................................................................................................................................................................................................................................................................................................................................................................................................................................................................................................................................................................222299
How the ZR-76 Remembers System Settings ............................................................................................................................................................................29
General System Editing Techniques.......................................................................................................................................................................................................... 29
The System Groupings.......................................................................................................................................................................................................................29
Setting Your System Preferences............................................................................................................................................................................................................... 31
Adjusting the KeyboardÕs Response to Velocity.......................................................................................................................................................................... 31
Adjusting the KeyboardÕs Response to Pressure.........................................................................................................................................................................32
Using the ZRÕs Four Outputs.............................................................................................................................................................................................................33
Routing Sounds to Specific Outputs ................................................................................................................................................................................................33
Determining the Behavior of the Aux Outs...................................................................................................................................................................................35
Enabling or Disabling Automatic Effect Routing ...........................................................................................................................................................................36
Protecting Track Settings in the 16 Track Recorder.................................................................................................................................................................. 38
Protecting the ZR-76Õs Memory.....................................................................................................................................................................................................39
The 16 Track Recorder Rewind Sound.........................................................................................................................................................................................40
Editing Global Pitch Settings .........................................................................................................................................................................................................................41
Using the Global Pitch Bend Settings .............................................................................................................................................................................................. 41
Global Pitch Bend Up and Down......................................................................................................................................................................................................41
Setting the Global Pitch Bend Mode ...............................................................................................................................................................................................43
Fine Tuning the ZR-76 ....................................................................................................................................................................................................................... 44
Using Pitch Tables.................................................................................................................................................................................................................................45
Setting Up Foot Switches............................................................................................................................................................................................................................... 46
Using Foot Switches.............................................................................................................................................................................................................................. 46
Using a CV Pedal as a Modulator.....................................................................................................................................................................................................49
Editing MIDI-Related Settings....................................................................................................................................................................................................................... 51
SoundFinderÕs MIDI Channel.............................................................................................................................................................................................................51
ENSONIQ ZR-76 Musician's Manual i
99
Page 6

Table of Contents
Synchronizing the ZR-76 to MIDI ...................................................................................................................................................................................................52
Synchronizing Other MIDI Devices to Your ZR-76..................................................................................................................................................................53
Setting the Global Reception of MIDI Bank Selects and Program Changes........................................................................................................................54
Responding to MIDI.............................................................................................................................................................................................................................. 54
Receiving Reset All Controllers MIDI Messages.......................................................................................................................................................................... 55
Setting the Response to All Notes Off MIDI Messages..............................................................................................................................................................55
Using SysEx Device IDs....................................................................................................................................................................................................................... 56
Setting Up New Real-Time Controllers..........................................................................................................................................................................................57
Entering GM Mode ........................................................................................................................................................................................................................................58
Using the ZR-76 with General MIDI ...............................................................................................................................................................................................58
CCCChhhhaaaapppptttteeeerrrr 4444ÑÑÑÑSSSSoooouuuunnnnddddFFFFiiiinnnnddddeeeerrrr............................................................................................................................................................................................................................................................................................................................................................................................................................................................................................................................................................................................................................................................666611
Sound Central................................................................................................................................................................................................................................................... 6 1
Choosing Sounds ............................................................................................................................................................................................................................................62
The SoundFinder Favorites Buttons ................................................................................................................................................................................................62
How to Find Sounds.............................................................................................................................................................................................................................. 64
How SoundFinder Works...................................................................................................................................................................................................................65
Transposing the ZRÕs Keyboard In SoundFinder..................................................................................................................................................................................67
Understanding ZR-76 Sounds...................................................................................................................................................................................................................68
General Sound-Editing Techniques........................................................................................................................................................................................................... 69
Working with the SoundFinder Parameters............................................................................................................................................................................................71
Using Special Pitch Tables..................................................................................................................................................................................................................76
Editing ZR-76 Drum and Percussion Kits................................................................................................................................................................................................88
Working with Special Drum/Percussion Kit Parameters.....................................................................................................................................................................91
Changing a Drum KeyÕs Sound ........................................................................................................................................................................................................92
Saving ZR-76 SoundFinder Sounds .........................................................................................................................................................................................................95
Splitting the ZR-76 Keyboard .....................................................................................................................................................................................................................98
Layering ZR-76 Sounds........................................................................................................................................................................................................................... 100
Presets .................................................................................................................................................................................................................................................. 101
To Save a Split and/or Layer as a Preset.......................................................................................................................................................................... 103
To Select a Preset ................................................................................................................................................................................................................... 104
To Edit a Preset ........................................................................................................................................................................................................................ 105
To Save a Split and/or Layer as a Split/Layer Single Sound ......................................................................................................................................106
Moving a Sound to the 16 Track Recorder........................................................................................................................................................................................ 108
SoundFinder MIDI....................................................................................................................................................................................................................................... 109
Transmitting MIDI from the ZR-76............................................................................................................................................................................................. 109
Using the ZR as a Master Controller for External Sequencing ................................................................................................................................. 111
Receiving MIDI on the ZR-76....................................................................................................................................................................................................... 112
Using RPNs and NRPNs to Edit Parameters ....................................................................................................................................................................................... 113
11
CCCChhhhaaaapppptttteeeerrrr 5555ÑÑÑÑTTTThhhheeee DDDDrrrruuuummmm MMMMaaaacccchhhhiiiinnnneeee........................................................................................................................................................................................................................................................................................................................................................................................................................................................................................................................................................................................1111111155
Playing the Drum Machine....................................................................................................................................................................................................................... 116
Selecting Rhythms....................................................................................................................................................................................................................................... 116
The ZR-76 Rhythms....................................................................................................................................................................................................................... 116
Choosing Variations ................................................................................................................................................................................................................................... 119
Choosing Fills ................................................................................................................................................................................................................................................ 119
Setting the Rhythm Tempo...................................................................................................................................................................................................................... 120
General Drum Machine Editing Techniques ...................................................................................................................................................................................... 121
Selecting a New Drum Kit for a Rhythm ............................................................................................................................................................................................... 123
Changing a RhythmÕs Loudness............................................................................................................................................................................................................. 124
Learning a RhythmÕs Time Signature and Length .............................................................................................................................................................................124
Editing the Sounds Within a RhythmÕs Kit.............................................................................................................................................................................................125
Drum Kits and Zones....................................................................................................................................................................................................................... 125
Editing Drum Kit Zones................................................................................................................................................................................................................... 126
The RthmEditKit....................................................................................................................................................................................................................... 126
Arranging Your Own Variations and Fills............................................................................................................................................................................................. 134
Saving Your Rhythms ................................................................................................................................................................................................................................138
Sending a Rhythm to the 16 Track Recorder.....................................................................................................................................................................................140
Using MIDI to Play the Drum Machine .................................................................................................................................................................................................143
ENSONIQ ZR-76 Musician's Manualii
55
Page 7

Table of Contents
CCCChhhhaaaapppptttteeeerrrr 6666ÑÑÑÑTTTThhhheeee IIIIddddeeeeaaaa PPPPaaaadddd................................................................................................................................................................................................................................................................................................................................................................................................................................................................................................................................................................................................................................................1111444455
The Inspiration Catcher.............................................................................................................................................................................................................................. 145
How the Idea Pad Works .......................................................................................................................................................................................................................... 146
Customizing the Idea Pad .........................................................................................................................................................................................................................148
Using the Idea Pad with the 16 Track Recorder................................................................................................................................................................................ 151
Erasing Ideas from the Idea Pad .............................................................................................................................................................................................................. 155
CCCChhhhaaaapppptttteeeerrrr 7777ÑÑÑÑRRRReeeeccccoooorrrrddddiiiinnnngggg....................................................................................................................................................................................................................................................................................................................................................................................................................................................................................................................................................................................................................................................................1111555577
ZR-76 Recording Concepts.................................................................................................................................................................................................................... 158
How the ZR-76 Records Your Music ........................................................................................................................................................................................ 158
Tracks................................................................................................................................................................................................................................................... 158
Sequences........................................................................................................................................................................................................................................... 159
Song Playlists and Songs .................................................................................................................................................................................................................160
Understanding the Recording LEDs............................................................................................................................................................................................ 161
Introducing the 16 Track Recorder....................................................................................................................................................................................................... 162
Recording Tracks ........................................................................................................................................................................................................................................ 163
Selecting Tracks ................................................................................................................................................................................................................................ 164
Selecting Sounds for Tracks........................................................................................................................................................................................................... 164
Recording Your First Track............................................................................................................................................................................................................ 165
Track Undo......................................................................................................................................................................................................................................... 167
Overdubbing on a Track ................................................................................................................................................................................................................ 168
Track Tools and Techniques................................................................................................................................................................................................................... 169
Changing the Sound on a Track and Assigning a Sound to a New Track....................................................................................................................... 169
Scooping Notes From a Track...................................................................................................................................................................................................... 170
Editing Track Sounds....................................................................................................................................................................................................................... 171
The Fast Forward Button ................................................................................................................................................................................................................ 172
The Fast Forward Button ................................................................................................................................................................................................................ 173
The Fast Forward Button ................................................................................................................................................................................................................ 173
The Rewind Button........................................................................................................................................................................................................................... 175
Jumping to Any Location in a Sequence ....................................................................................................................................................................................176
Punching In on a Track .................................................................................................................................................................................................................... 177
Step Recording in the 16 Track Recorder ................................................................................................................................................................................178
Erasing a Track................................................................................................................................................................................................................................... 186
Quantizing Tracks Conceptual Overview................................................................................................................................................................................. 192
Using a Quantization Template.....................................................................................................................................................................................................197
Using Normal Quantization ........................................................................................................................................................................................................... 200
Using Delta Quantization ................................................................................................................................................................................................................205
Making Your Own Quantization Template.............................................................................................................................................................................. 206
Working with the Rhythm Track ............................................................................................................................................................................................................207
Rhythm Track: Two Tracks in One............................................................................................................................................................................................. 208
Putting a Rhythm on the Rhythm Track..................................................................................................................................................................................... 208
Editing Rhythm Track Settings...................................................................................................................................................................................................... 209
Playing a Drum Machine Rhythm in the 16 Track Recorder.............................................................................................................................................. 209
Recording Variation and Fill Selections .......................................................................................................................................................................................210
Recording Your Own Drum or Percussion Notes.................................................................................................................................................................. 211
Transmitting the Rhythm Track Into an External Sequencer............................................................................................................................................... 214
Sequence Tools and Techniques........................................................................................................................................................................................................... 216
Selecting a Sequence....................................................................................................................................................................................................................... 216
Recording Modes.............................................................................................................................................................................................................................. 216
Sequence Parameters and Values ............................................................................................................................................................................................... 217
Using Regions .................................................................................................................................................................................................................................... 225
Looping Sequences.......................................................................................................................................................................................................................... 229
Copying a Sequence........................................................................................................................................................................................................................229
Erasing a Sequence........................................................................................................................................................................................................................... 232
Renaming a Sequence..................................................................................................................................................................................................................... 234
Recording Automated Sequence Tempo Changes............................................................................................................................................................... 235
Song Tools and Techniques .................................................................................................................................................................................................................... 237
Creating a New Song....................................................................................................................................................................................................................... 237
Creating a Song Playlist ................................................................................................................................................................................................................... 237
55
77
ENSONIQ ZR-76 Musician's Manual iii
Page 8

Table of Contents
Playing a Song .................................................................................................................................................................................................................................... 239
Renaming a Song .............................................................................................................................................................................................................................. 240
Editing an Existing Song Playlist..................................................................................................................................................................................................... 242
Selecting Another Song................................................................................................................................................................................................................... 242
Erasing a Song Playlist or an Entire Song.................................................................................................................................................................................... 246
Working with Standard MIDI Files (SMFs)...........................................................................................................................................................................................248
The Two-Step Process of Converting an SMF into a ZR Sequence................................................................................................................................. 249
16 Track Recorder MIDI .......................................................................................................................................................................................................................... 252
Transmitting MIDI from 16 Track Recorder ............................................................................................................................................................................252
Receiving MIDI on the ZR-76....................................................................................................................................................................................................... 254
Recording Into the 16 Track Recorder From MIDI.......................................................................................................................................................................... 256
Using the ZR-76 with a Computer Sequencer.................................................................................................................................................................................. 260
ZR to Computer to ZR .................................................................................................................................................................................................................... 260
The Transportability of ZR-76 Sequences ............................................................................................................................................................................... 261
Using the ZR as a Master Controller for External Sequencing............................................................................................................................................ 261
CCCChhhhaaaapppptttteeeerrrr 8888ÑÑÑÑMMMMiiiixxxxddddoooowwwwnnnn........................................................................................................................................................................................................................................................................................................................................................................................................................................................................................................................................................................................................................................................................2222666633
Mixing Your ZR-76 Music ...................................................................................................................................................................................................................... 263
Two Mixers In One .................................................................................................................................................................................................................................... 264
Mixing with the SoundFinder FX/Mixdown Strip ............................................................................................................................................................................. 264
SoundFinder FX/Mixdown............................................................................................................................................................................................................ 264
Mixing with the 16 Track Recorder FX/Mixdown Strip................................................................................................................................................................. 268
16 Track Recorder FX/Mixdown ...............................................................................................................................................................................................268
Recording Real-Time Mix and Pan Changes in a Sequence ...............................................................................................................................................269
Recording Volume Changes for Multiple Tracks ................................................................................................................................................................... 270
Working with the Mix Knob..................................................................................................................................................................................................................... 271
Working with the Pan Knob...................................................................................................................................................................................................................... 273
Understanding How the ZR-76 Effects Work ................................................................................................................................................................................... 275
The ZR-76 Effects ............................................................................................................................................................................................................................ 275
Understanding Effects Busses ....................................................................................................................................................................................................... 276
Understanding the Special Alt. FX Bus ....................................................................................................................................................................................... 277
Effects, Sounds, Sequences and Songs ...................................................................................................................................................................................... 277
A Diagram of the ZR-76 Effects .............................................................................................................................................................................................................278
Applying an Effect to a Sound or Track ................................................................................................................................................................................................278
Assigning a SoundFinder Sound to an Effect.............................................................................................................................................................................278
Assigning a Split or Layer Sound to an Effect............................................................................................................................................................................ 279
Assigning a 16 Track Recorder Track to an Effect................................................................................................................................................................. 280
Working with the Insert Effect.................................................................................................................................................................................................................. 281
Selecting an Insert Effect.................................................................................................................................................................................................................. 285
General Technique for Editing an Insert Effect .........................................................................................................................................................................286
Working with the Global Chorus............................................................................................................................................................................................................ 295
General Technique for Editing the Global Chorus.................................................................................................................................................................. 295
Working with the Global Reverb ............................................................................................................................................................................................................ 301
General Technique for Editing the Global Reverb.................................................................................................................................................................. 301
Working with Dry Sounds and Tracks.................................................................................................................................................................................................. 309
Bypassing the ZR-76 Effects ................................................................................................................................................................................................................... 310
Muting and Soloing Tracks in the 16 Track Recorder.....................................................................................................................................................................312
Mute/Solo ........................................................................................................................................................................................................................................... 312
33
CCCChhhhaaaapppptttteeeerrrr 9999ÑÑÑÑSSSSttttoooorrrriiiinnnngggg YYYYoooouuuurrrr MMMMuuuussssiiiicccc............................................................................................................................................................................................................................................................................................................................................................................................................................................................................................................................................................................................3333111133
Understanding ZR-76 Memory ............................................................................................................................................................................................................ 313
ZR Memory Management....................................................................................................................................................................................................................... 314
Introducing The Librarian ............................................................................................................................................................................................................... 314
Working with Floppy Disks ...................................................................................................................................................................................................................... 323
About the ZR-76 Disk Drive......................................................................................................................................................................................................... 323
Saving Files to Floppy Disk .............................................................................................................................................................................................................324
Loading Files from Floppy Disk..................................................................................................................................................................................................... 335
Loading and Using Samples In the ZR-76........................................................................................................................................................................................... 346
Disk File Management ............................................................................................................................................................................................................................... 351
ENSONIQ ZR-76 Musician's Manualiv
33
Page 9

Table of Contents
CCCChhhhaaaapppptttteeeerrrr 11110000ÑÑÑÑEEEExxxxppppaaaannnnddddiiiinnnngggg tttthhhheeee ZZZZRRRR----77776666............................................................................................................................................................................................................................................................................................................................................................................................................................................................................................................................................................3333555577
Using EXP and MR-FLASH Expansion Boards.................................................................................................................................................................................. 357
Installing And Removing Expansion Boards In The ZR-76............................................................................................................................................................ 358
Updating the ZR-76 Operating System .............................................................................................................................................................................................. 360
CCCChhhhaaaapppptttteeeerrrr 11111111ÑÑÑÑIIIInnnnsssseeeerrrrtttt EEEEffffffffeeeecccctttt PPPPaaaarrrraaaammmmeeeetttteeeerrrrssss....................................................................................................................................................................................................................................................................................................................................................................................................................................................................................................................................................3333666655
List of ZR-76 Insert Effects ....................................................................................................................................................................................................................... 366
List of Insert Effect Modulators ................................................................................................................................................................................................................ 366
LFO Wave Shapes...................................................................................................................................................................................................................................... 367
Distortion Curves ........................................................................................................................................................................................................................................ 367
Insert Effect Descriptions........................................................................................................................................................................................................................... 368
CCCChhhhaaaapppptttteeeerrrr 11112222ÑÑÑÑUUUUssssiiiinnnngggg tttthhhheeee UUUUnnnniiiissssyyyynnnn EEEEddddiiiittttiiiinnnngggg SSSSooooffffttttwwwwaaaarrrreeee....................................................................................................................................................................................................................................................................................................................................................................................................................................................................4444111111
Sound Editor Parameters .......................................................................................................................................................................................................................... 411
Perform Editor Parameters....................................................................................................................................................................................................................... 427
Drumkit Editor Parameters....................................................................................................................................................................................................................... 427
InsertFX Parameters................................................................................................................................................................................................................................... 429
System Editor Parameters ........................................................................................................................................................................................................................ 429
CCCChhhhaaaapppptttteeeerrrr 11113333ÑÑÑÑSSSSuuuupppppppplllleeeemmmmeeeennnnttttaaaallll IIIInnnnffffoooorrrrmmmmaaaattttiiiioooonnnn................................................................................................................................................................................................................................................................................................................................................................................................................................................................................................................................4444333311
RhythmFinder Types.................................................................................................................................................................................................................................. 431
List of Wave Names and Classes............................................................................................................................................................................................................ 433
List of Rhythm Pattern Files....................................................................................................................................................................................................................... 439
EXP-4: The Perfect Piano™ by William Coakley.............................................................................................................................................................................. 440
The Perfect Piano™ Waves .......................................................................................................................................................................................................... 440
The Perfect Piano™ Sounds.......................................................................................................................................................................................................... 440
ENSONIQ Drum Map............................................................................................................................................................................................................................... 441
ENSONIQ Percussion Map...................................................................................................................................................................................................................... 441
Built-In ROM Presets.................................................................................................................................................................................................................................. 442
Velocity Response Curves in the ZR-76............................................................................................................................................................................................. 442
What Is MIDI?............................................................................................................................................................................................................................................... 443
What Is General MIDI?............................................................................................................................................................................................................................... 445
General MIDI Sound Map ........................................................................................................................................................................................................................ 447
GM and GS Percussion Key Maps (Channel 10)............................................................................................................................................................................. 448
ZR-76 MIDI Implementation................................................................................................................................................................................................................... 450
Registered and Non-Registered Parameters (RPN/NRPN) .......................................................................................................................................................... 455
List of ROM System Pitch Tables ........................................................................................................................................................................................................... 457
Using the ZR-76 Outputs ........................................................................................................................................................................................................................ 459
A Note about Stereo Foot Switches....................................................................................................................................................................................................... 460
A Note about Mono Foot Switches........................................................................................................................................................................................................ 460
16 Track Recorder Messages ................................................................................................................................................................................................................464
Disk/Global/Storage Messages.............................................................................................................................................................................................................. 466
SoundFinder Message............................................................................................................................................................................................................................... 468
Global Error Message ................................................................................................................................................................................................................................ 468
Glossary.......................................................................................................................................................................................................................................................... 469
77
55
11
11
IIIInnnnddddeeeexxxx........................................................................................................................................................................................................................................................................................................................................................................................................................................................................................................................................................................................................................................................................................................................................................................................................4444777755
ENSONIQ ZR-76 Musician's Manual v
55
Page 10

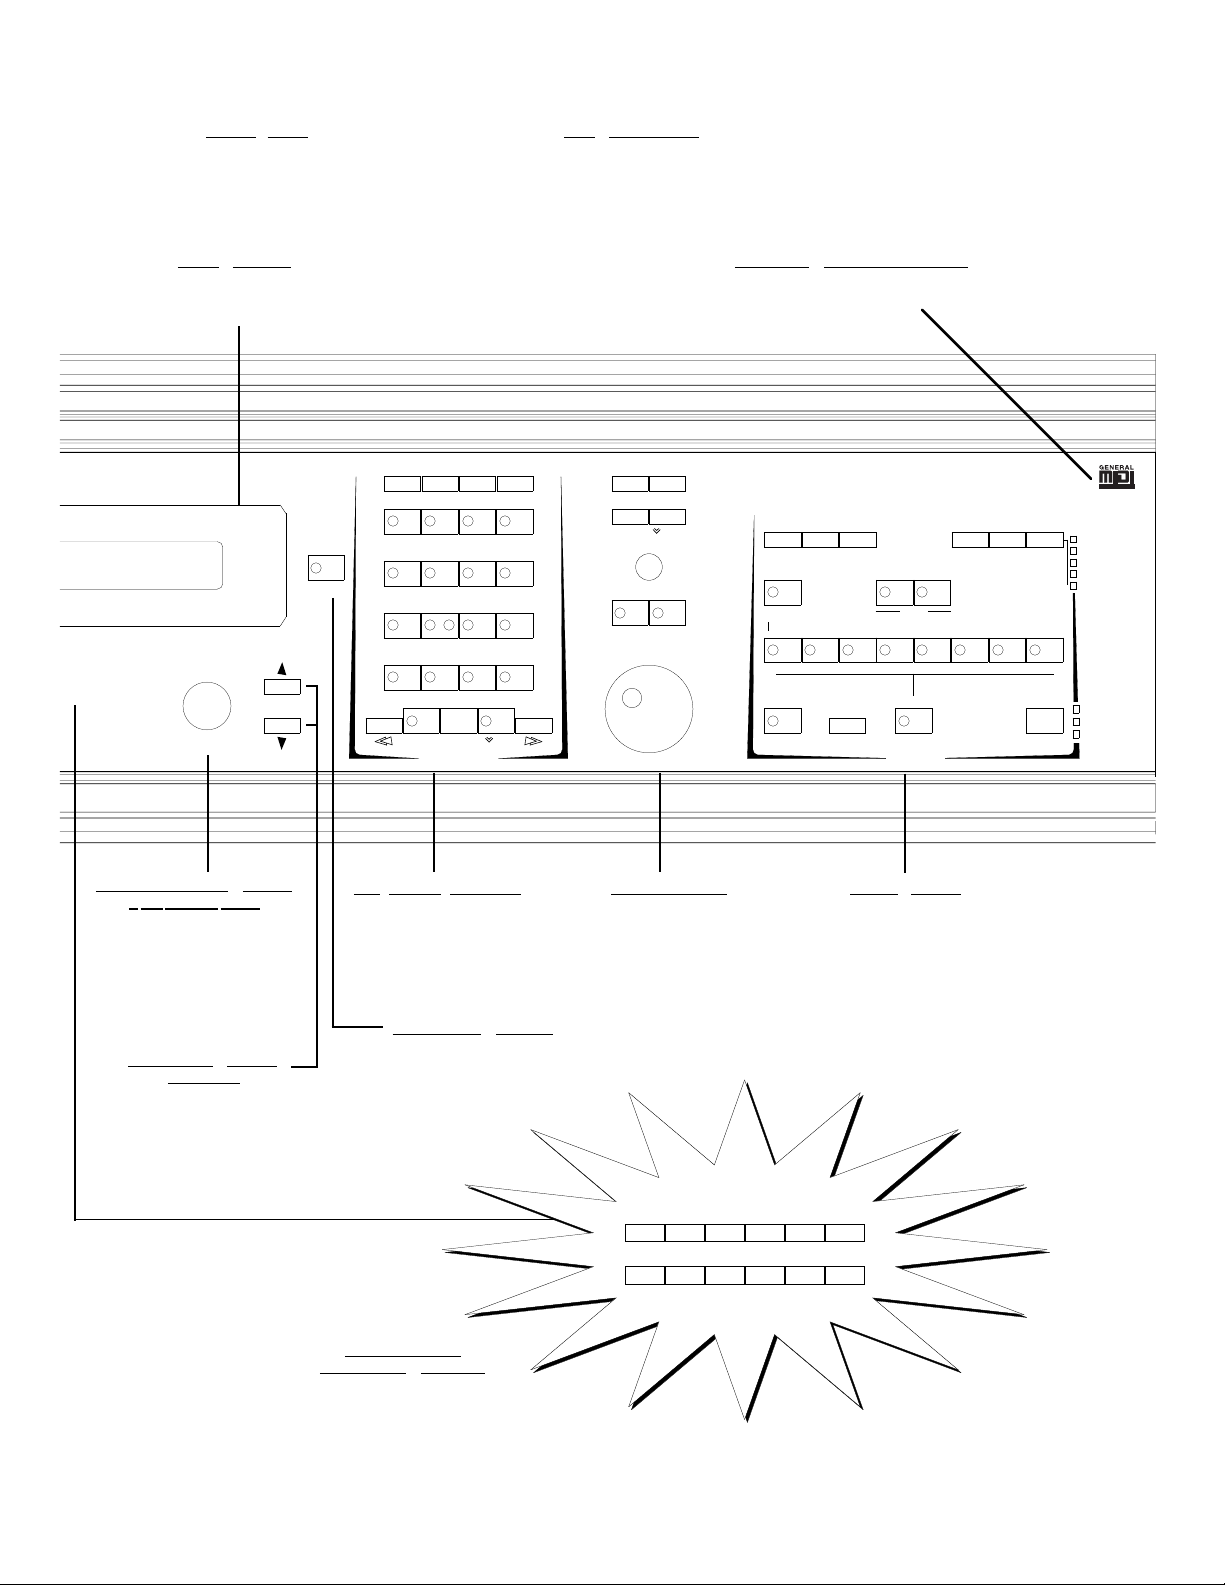
AAAAuuuuddddiiiioooo JJJJaaaacccckkkkss
ss
Phones, MainLeft (Mono), MainRight, AuxLeft (Mono),
AuxRight jacks allow you to listen to the
ZR-76. See Chapter 2.
FFFFooooooootttt PPPPeeeeddddaaaallll JJJJaaaacccckkkkss
ss
CV¥Pedal (Volume), Footswitch1 (Sustain),
Footswitch2 jacks provide additional functionality
through the use of foot pedals. See Chapter 3.
DDDDeeeemmmmoooo bbbbuuuuttttttttoooonn
nn
Plays special demonstration songs
to give you an idea of how terrific
the ZR-76 sounds. See Chapter 1.
01 2
IIIIddddeeeeaaaa PPPPaaaaddddªª
ªª
A special recorder that
continuously captures
your ideas. See Chapter 6.
Demo
All Notes Off
Master Volume
34 9
Save
Load
System Librarian Help
MIDI
Edit Save Send
Split Layer Transpose
SoundFinderª
Save All
Disk /Glo ba l
Select
Sound
Hold To Spe ll
5
Utilities
To Track
7
6
EEEE xxxx iiii tttt //// NNNN oooo bbbb uuuu tttt tttt oooo nn
nn
This button is used to cancel commands and
answer questions posed on the display.
See Chapter 1.
Tempo
Tap
Select
Rhythm
Hold To Spe ll
8
Settings Send
Recall
Idea Start
Idea Pad ª
Save
Edit
Variations / Fills
Variation Fill Start
Drum Machine
ABCDE
To Track
Stop
Send
Stop
Exit
No
To Rhythm Tr ack
Sound / Rhythm Type
Parameter
PPPPiiiittttcccchhhh BBBBeeeennnndddd WWWWhhhheeeeeeeell
ll
This is typically used to raise
and lower the pitch.
See Chapter 3.
MMMMaaaasssstttteeeerrrr VVVVoooolllluuuummmmeeee SSSSlllliiiiddddeeeerr
This controls the volume of
the ZR-76. See Chapter 1.
DDDDiiiisssskkkk DDDDrrrriiiivvvvee
ee
This is used to load and store
sounds, rhythms, and songs.
See Chapter 9.
MMMM oooo dddd uuuu llll aaaa tttt iiii oooo nnnn WWWW hhhh eeee eeee ll
ll
This is used to change or
modulate sounds and effects.
See Chapter 4.
rr
SSSS oooo uuuu nnnn dddd FFFF iiii nnnn dddd eeee rrrr ªª
This module is used to
select and edit sounds.
See Chapter 4.
DDDD iiii ssss kkkk //// GGGG llll oooo bbbb aaaa ll
ll
This module offers the
following disk drive controls:
LoadÑSee Chapter 9
SaveÑSee Chapter 9
UtilitiesÑSee Chapter 9
It also offers System controls:
System/MIDIÑSee Chapter 3
LibrarianÑSee Chapter 1 and 9
HelpÑSee Chapter 1
aaaallllpppphhhhaaaa----nnnnuuuummmmeeeerrrriiiicccc cccchhhhaaaarrrraaaacccctttteeeerrrrssss ((((0000----9999,,,, AAAA----ZZZZ))
The keys correlating to the alpha-numeric
characters can be used to name and select
sounds and sequences. See Chapters 4 and 9.
DDDDrrrruuuummmm MMMMaaaacccchhhhiiiinnnnee
ee
This module offers
various rhythms for
quickly creating and
editing your own rhythm
tracks. See Chapter 5.
ªª
SSSS oooo uuuu nnnn dddd //// RRRR hhhh yyyy tttt hhhh mmmm &&
PPPP aaaa rrrr aaaa mmmm eeee tttt eeee rrrr kkkk nnnn oooo bb
This knob selects sound
types, Drum Machine
rhythm types, and is used
to navigate among
&&
bb
parameters.
See Chapter 1.
))
Page 11
MMMMIIIIDDDDIIII JJJJaaaacccckkkkss
ss
MIDI In, Out Thru jacks allow interfacing
with other MIDI devices.
See Chapter 2.
AAAACCCC LLLLiiiinnnneeee////PPPPoooowwwweeeerr
rr
Jack and switch used for powering up the
ZR-76. See Chapter 1.
LLLLCCCCDDDD DDDDiiiissssppppllllaaaayy
yy
The 40-character display shows
information and offers choices.
GGGG eeee nnnn eeee rrrr aaaa llll MMMM IIII DDDD IIII ---- cccc oooo mmmm pppp aaaa tttt iiii bbbb llll ee
The ZR-76 is General MIDI-
compatible. See Chapter 3.
ee
See Chapter 1.
Edit Copy Erase Quantize
Undo
12
Enter
Yes
Sound / Rhythm Name
Value
GH I J K L M NO P Q RS T U V W X Y Z
Rewind
5
9
3
1
Record Stop Play
Scoop Top
34
7
6
11 12
Rhythm
415
1
Locate
1
6 Track Recorder
8
1
6
Fast
Forward
Reverb Chorus
Insert FX Routing
Pan
LR
Mute Solo
Mix
Bypass
FX / Mixdown
Copy Erase
Loop To
Sequences
ABCD EFGH
Intro
Select
Song
Hold To Spe ll
Misc .
From
Chorus
1
Verse
New Song
1
Verse 2Chorus
Song Playlist
Song Ed itor
Region
Tempo Click Record Mode
Tap Countoff
Bridge Solo Ending
2
Bank (A-H)
Replace
Add
Step
Track Mix
Final Mix
1
2
3
SSSS oooo uuuu nnnn dddd //// RRRR hhhh yyyy tttt hhhh mmmm NNNN aaaa mmmm ee
&&&& VVVVaaaalllluuuueeee kkkknnnnoooobb
ee
bb
This knob selects sounds
using ENSONIQ's exclusive
SoundFinderª and
RhythmFinderª. It is also
used to edit displayed
parameters.
See Chapter 1.
UUUUpppp////DDDDoooowwwwnnnn AAAArrrrrrrrooooww
bbbb uuuu tttt tttt oooo nnnn ss
ww
ss
These buttons are used
to select ZR-76
parameters. See
Chapter 1.
11116666 TTTTrrrraaaacccckkkk RRRReeeeccccoooorrrrddddeeeerr
This module is used to
turn your idea into a
fully-realized musical
arrangement.
See Chapter 7.
EEEE nnnn tttt eeee rrrr //// YYYY eeee ssss bbbb uuuu tttt tttt oooo nn
This button is used to answer
questions posed on the
display. See Chapter 1.
SSSS oooo uuuu nnnn dddd FFFF iiii nnnn dddd eeee rr
FFFF aaaa vvvv oooo rrrr iiii tttt eeee ssss bbbb uuuu tttt tttt oooo nnnn ss
rr
ss
These provide instant
access to your favorite
sounds. See Chapter 4.
rr
FFFF XXXX //// MMMM iiii xxxx dddd oooo wwww nn
This module controls the
volume and pan settings,
and accesses the effects
settings. See Chapter 8.
nn
Strings B ra ss Sax Vocals Synth
nn
This module provides control
over each sequence.
SoundFinder Favorites
1
23
Piano E . Piano Organ Keys Guitar B as s
7
9
8
5
4
10 11 12
Pad
Synth
Lead
SSSSoooonnnngggg EEEEddddiiiittttoooorr
See Chapter 7.
6
rr
Page 12

Chapter 1ÑWelcome
Congratulations on the purchase of your new ZR-76, and thank you for choosing ENSONIQ, the leader in
workstation design since the 1987 introduction of the first affordable workstation, the ESQ-1. The ZR-76 is
an exciting, third-generation product. Based on the popular MR-76, the ZR-76 takes the concept of a song
composition workstation to the next step.
The ZR-76 offers a comprehensive array of tools for the composer and performer: terrific CD-quality 44kHz
soundsÑincluding The Perfect Pianoª by William CoakleyÑcrystal-clear 18-bit effects, a full-featured 16
Track Recorder, a powerful FX/Mixdown facility, a built-in Drum Machine for jamming, and ENSONIQÕs
revolutionary Idea Padª, a brand-new way to capture inspiration as it strikes. The ZR-76 also features the
latest advances in ENSONIQÕs SoundFinderª technology, as well as onscreen Help. These features, and
more, will be discussed in the overview later in this chapter.
The first thing youÕd probably like to do is check out some of your ZRÕs exciting features.
GGGG eeee tttt tttt iiii nnnn gggg RRRR eeee aaaa dddd yyyy
The simplest way to listen to the ZR-76 is by using stereo headphones. Push the ZRÕs Master Volume slider
all the way down and plug your headphones into the rear-panel Phones jack. The Phones jack output
works with both low and high impedance headphones. Make sure you set the Master Volume slider
carefullyÑhigh-output volume levels could damage your hearing. Play some keys on the keyboard, and
carefully move the Master Volume slider up to a comfortable listening level.
You may also listen using the rear-panel Main Left and Main Right outputs (or the Main Left output only if
you want to listen in mono). If youÕre connecting your ZR-76 to a mixer, lower the mixerÕs input trims and
faders all the way. Move the ZRÕs Master Volume slider all the way up, and then adjust the input trims and
faders on your mixer to set the volume to an appropriate level.
If youÕd like to run the ZRÕs Main outputs through your home stereo, bear in mind that your ZR-76 is
capable of producing a far greater dynamic range than what your system may be used to, and so, a little
care is required. Set the ZRÕs Master Volume slider about halfway up, and operate your stereo at
conservative levels to be on the safe side.
ThereÕs a more detailed description of how to connect the ZR-76 and set appropriate volume levels in
Chapter 2 of the ZR-76 Musician's ManualÑThe ZR-76 Studio.
CCCC hhhh aaaa pppp tttt eeee rrrr 1111
WW eeee llll cccc oooo mmmm eeee
WW
PPPPoooowwwweeeerrrriiiinnnngggg UUUUpp
Once youÕve got a listening method established, you can power up your ZR-76.
TTTToooo TTTTuuuurrrrnnnn OOOOnnnn tttthhhheeee ZZZZRRRR----777766
1. Plug the ZRÕs line cord into the AC Line receptacle on its rear panel.
2. Connect the other end of the cable to a grounded AC outlet.
3. Press the Power button on the right side (viewed from the front) of the ZRÕs rear panel.
Once your ZR-76 completes its power-up sequence, the display will look something like this:
YouÕre ready to start enjoying your ZR-76 sounds.
ENSONIQ ZR-76 Musician's Manual 1
pp
66
Sound EXP036:00
PIANO-A :PerfectPno
Page 13
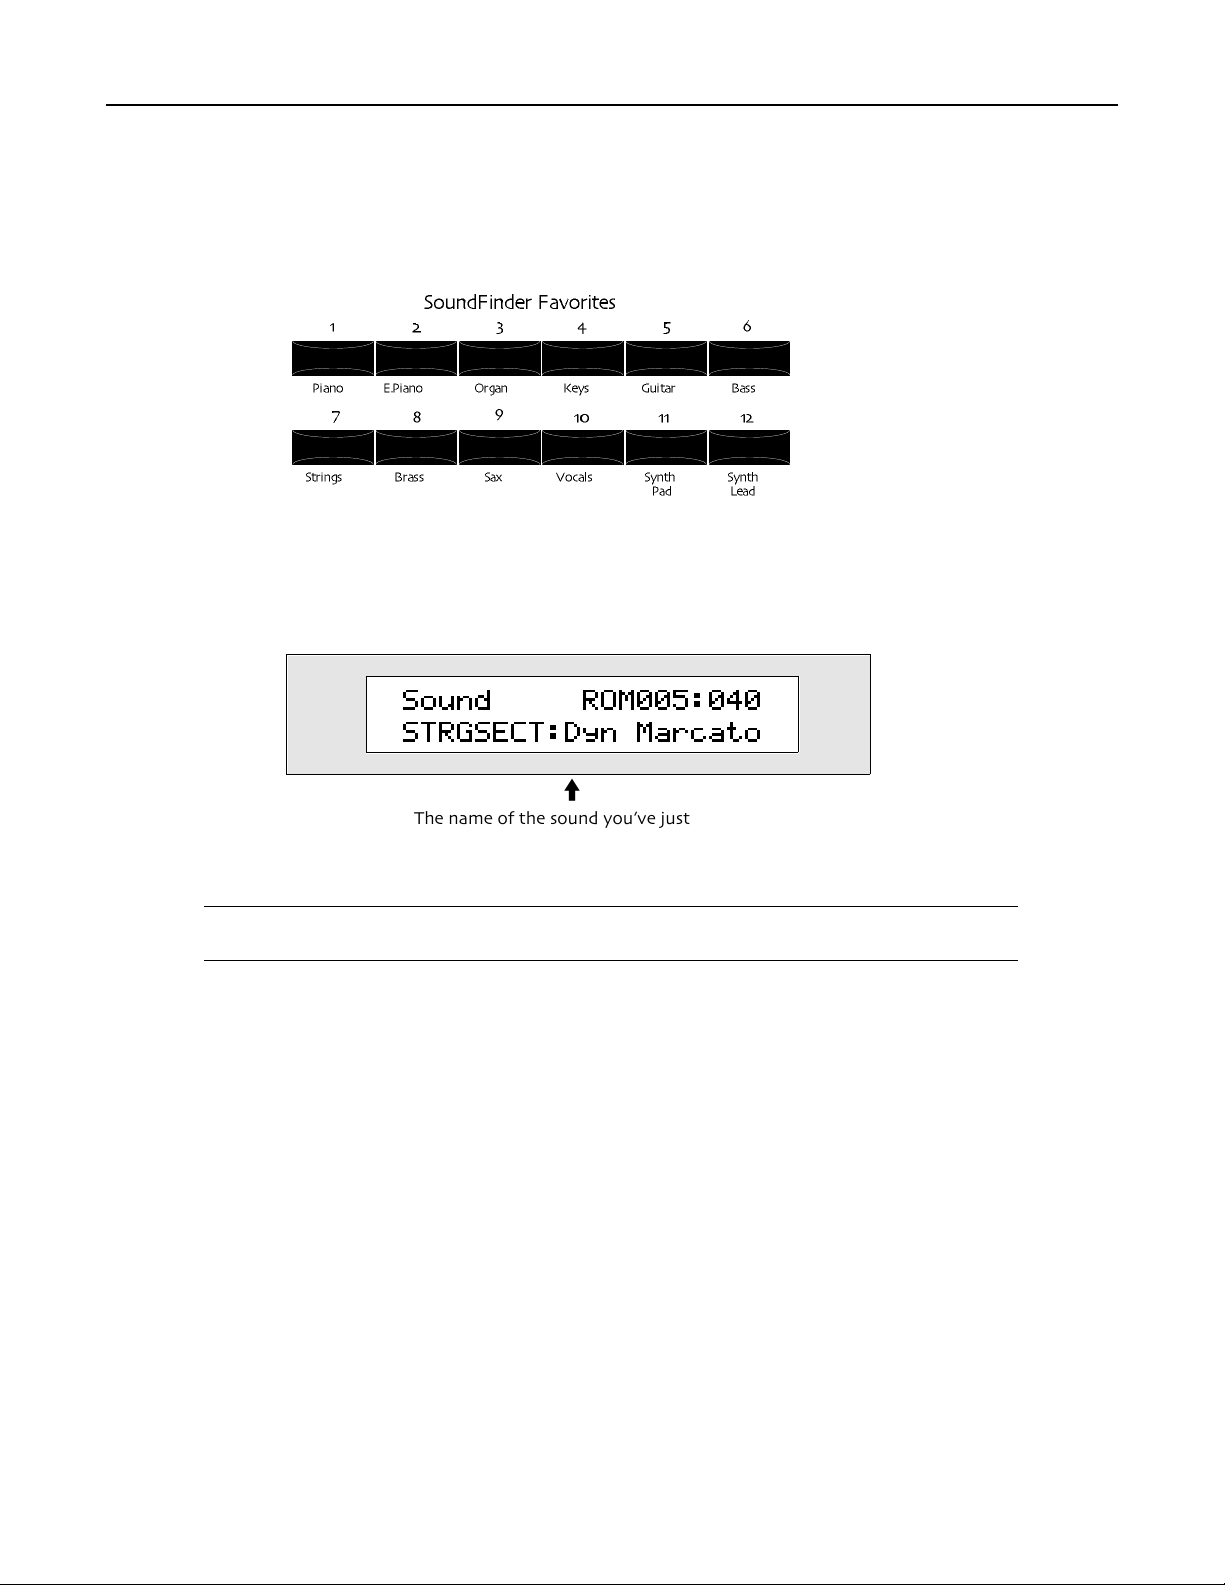
Chapter 1ÑWelcome
EEEE xxxx pppp llll oooo rrrr eeee tttthhhh eeee ZZZZ RRRR ---- 7777 6666 SSSS oooo uuuu nnnn dddd ssss
FFFFiiiinnnnddddiiiinnnngggg FFFFaaaavvvvoooorrrriiiitttteeee SSSSoooouuuunnnnddddss
In the center of the ZR-76Õs front panel, underneath its display, youÕll find the two rows of SoundFinder
Favorites buttons. These buttons provide instant access to the best of the ZR-76Õs sounds.
Under each Favorites button is a description of the sound that will be selected when you press the button.
TTTToooo SSSSeeeelllleeeecccctttt SSSSoooouuuunnnnddddssss UUUUssssiiiinnnngggg tttthhhheeee FFFFaaaavvvvoooorrrriiiitttteeeessss BBBBuuuuttttttttoooonnnnss
1. Press any of the Favorites buttonsÑthe sound assigned to the button will be selected and shown in the
ZRÕs display. For example, if you press the Strings Favorites button, youÕll see:
ss
Sound ROM005:040
STRGSECT:Dyn Marcato
ss
i
The name of the sound youÕve just selected
2. Play the ZRÕs keyboard to enjoy this sound.
3. Press the other Favorites buttons and play the keyboard to hear to the sounds they select.
TTTTiiiipppp:::: You can select six additional favorites by holding down an upper button and pressing
the button just beneath it, or vice versa.
You can actually assign any sound you like to any of Favorites button, or upper/lower pair of buttons. To
learn more about the Favorites buttons, see Chapter 4ÑSoundFinder.
IIIInnnnttttrrrroooodddduuuucccciiiinnnngggg SSSSoooouuuunnnnddddFFFFiiiinnnnddddeeeerr
SoundFinderª sorts the ZRÕs many onboard sounds into useful categories, so that finding them is a snap!
SoundFinder also allows you to locate sounds by typing their names on the keyboard.
SoundFinder will be described more fully in the conceptual overview later in this chapter, and in full detail
in Chapter 4ÑSoundFinder. You can find a complete list of the ZR-76 sounds in Chapter 13ÑSupplemental
Information.
rr
™
ENSONIQ ZR-76 Musician's Manual2
Page 14
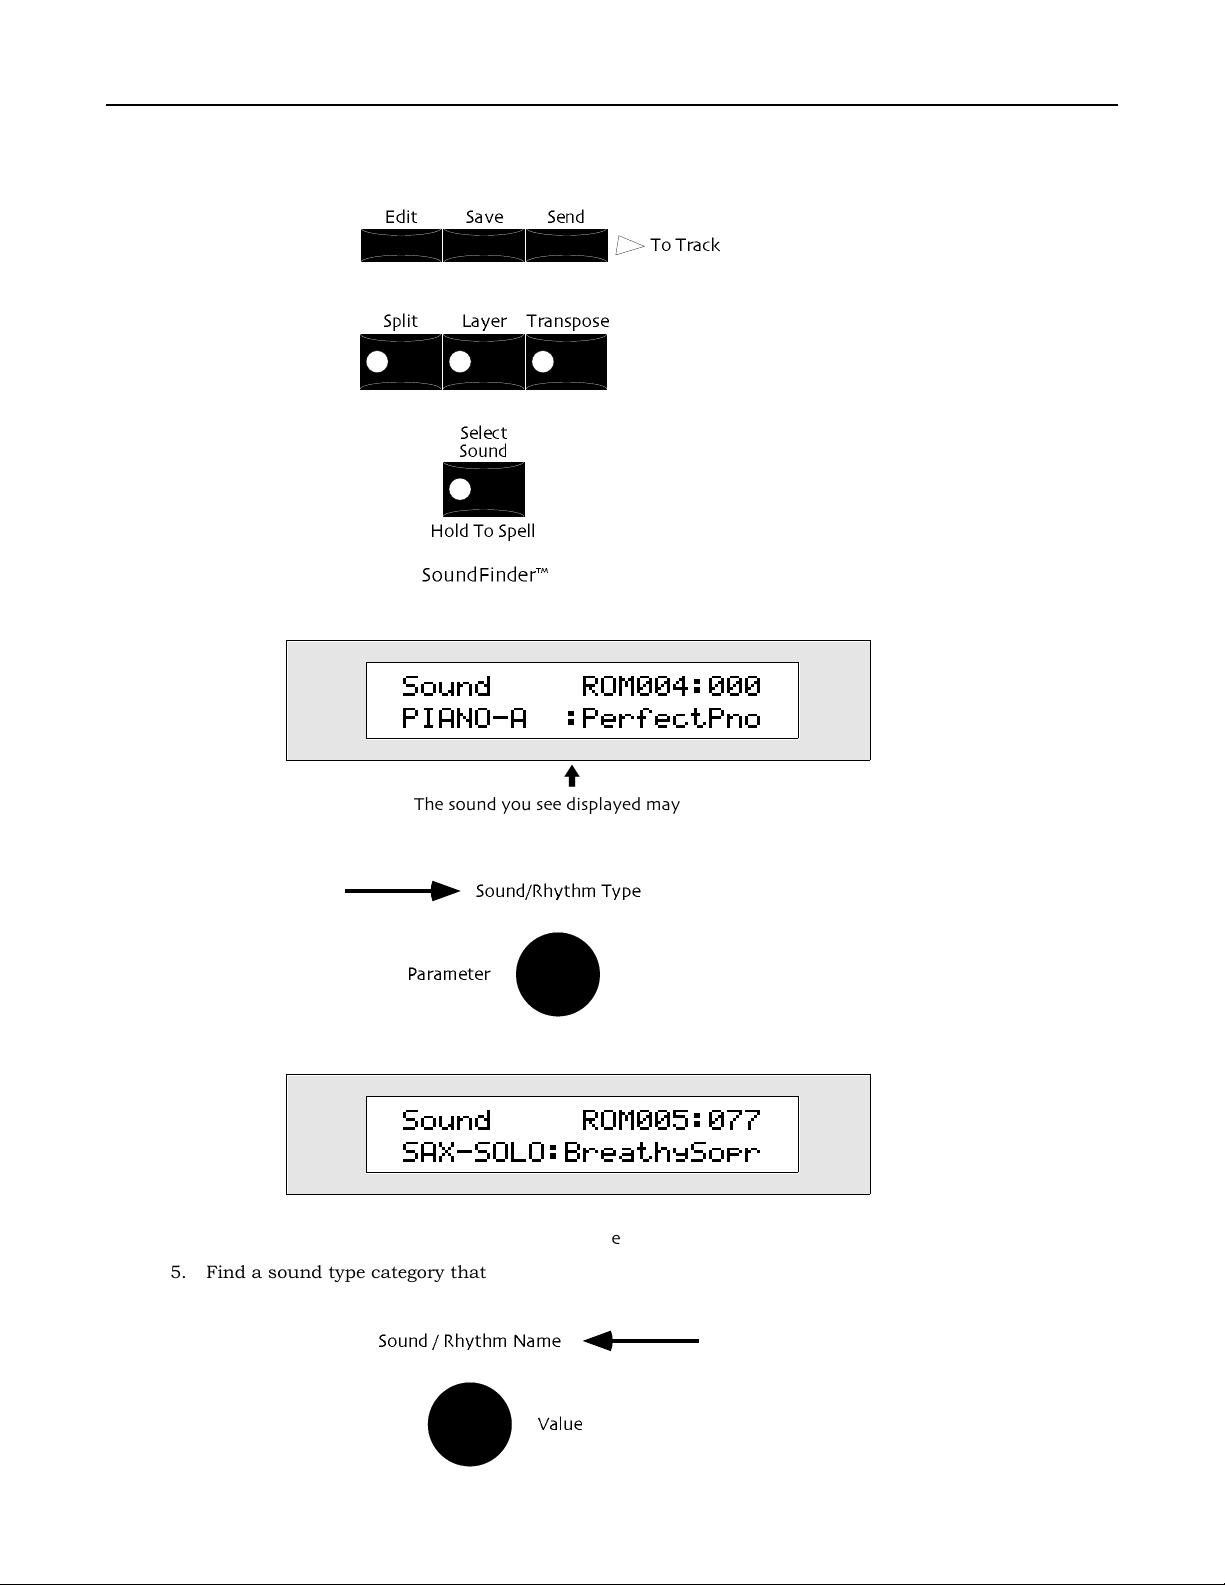
Chapter 1ÑWelcome
TTTToooo CCCChhhhoooooooosssseeee ZZZZRRRR----77776666 SSSSoooouuuunnnnddddssss bbbbyyyy CCCCaaaatttteeeeggggoooorrrryy
1. Locate the SoundFinder section on the ZRÕs front panel.
2. Press the Select Sound buttonÑits LED lights and the main SoundFinder display appears:
Sound ROM004:000
PIANO-A :PerfectPno
yy
i
The sound you see displayed may be different
3. Play the keyboard to hear the selected sound.
4. Turn the left-hand Sound/Rhythm Type knob clockwise and counter-clockwise on the ZRÕs front panel.
As you turn the knob, different sound categories appear in the lower left corner of the display.
Sound ROM005:077
SAX-SOLO:BreathySopr
i
The currently selected sound type
5. Find a sound type category that interests you.
6. Turn the Sound/Rhythm Name knob in either direction to choose a sound of the selected type.
ENSONIQ ZR-76 Musician's Manual 33
Page 15
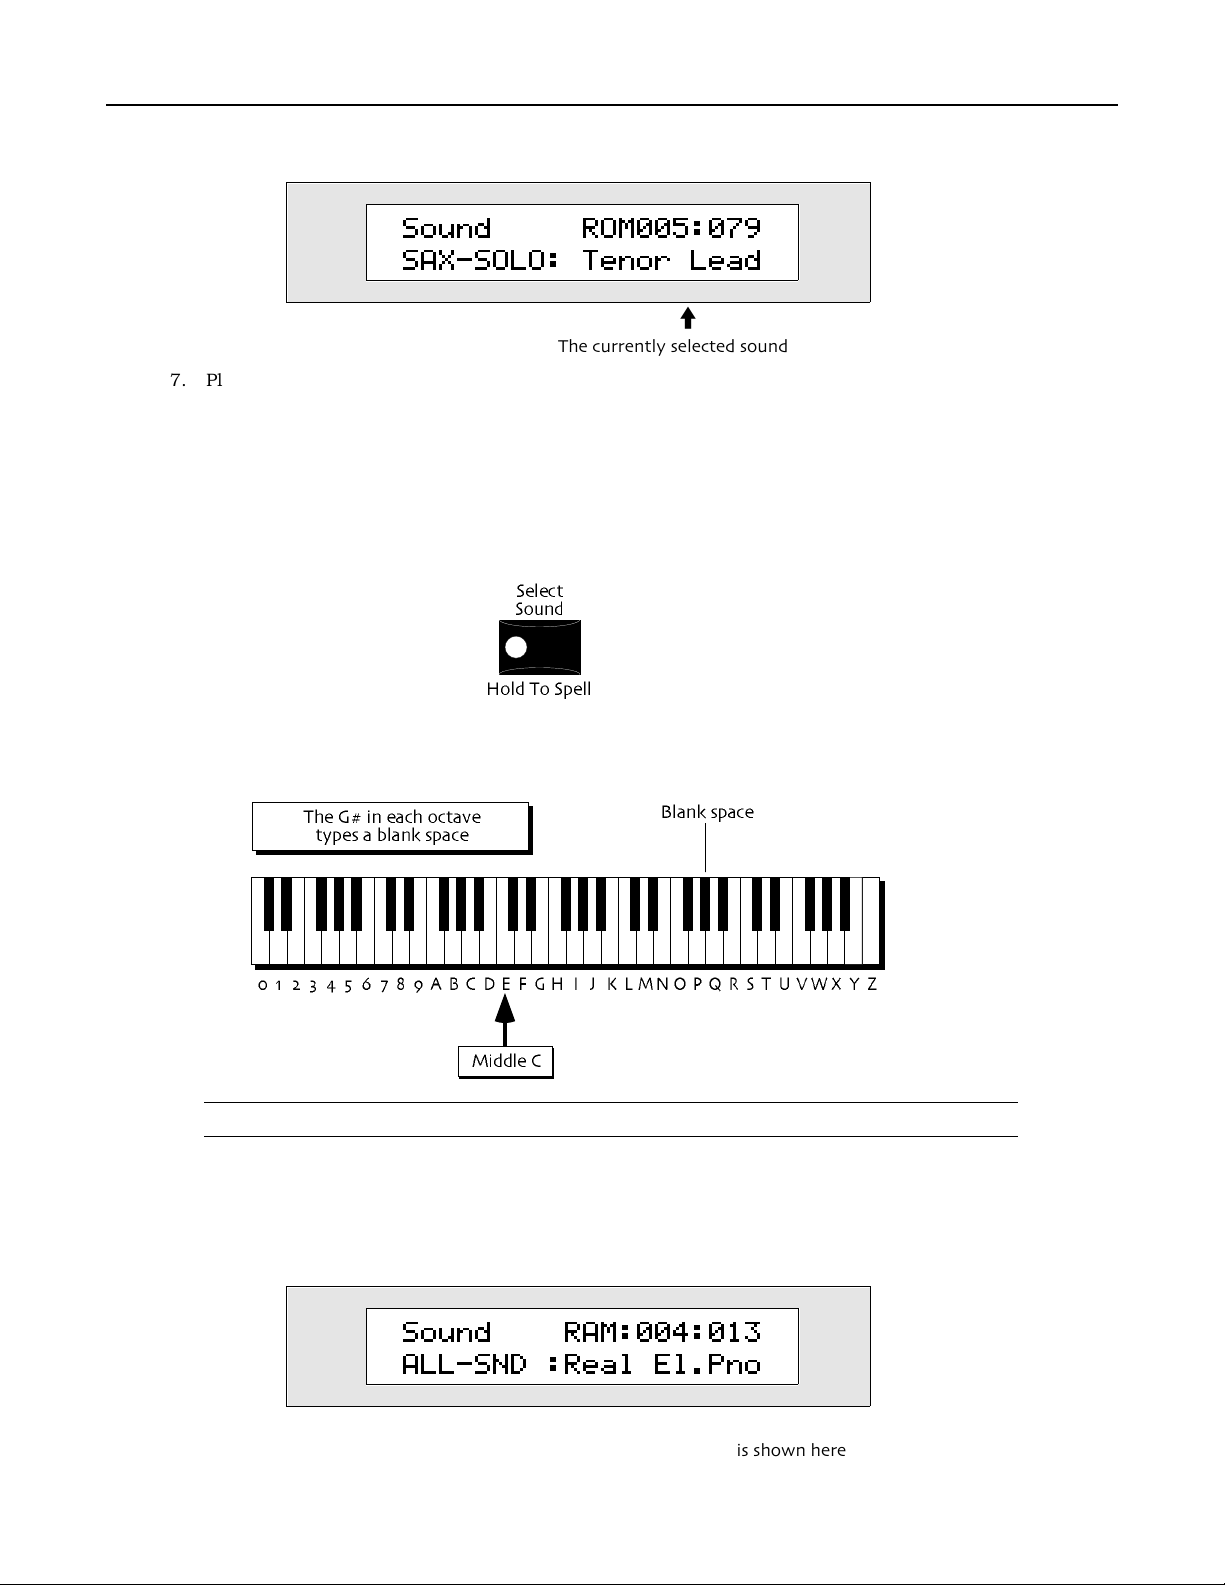
Chapter 1ÑWelcome
Sound names appear on the lower right-hand portion of the display.
7. Play some music on the keyboard to hear the sound youÕve selected.
8. To select other sounds, use the same method: turn the Sound/Rhythm Name knob to locate the type of
sound you want to hear, and the Sound/Rhythm Name knob to pick an individual sound.
Working with the ZR-76 sounds, and with SoundFinder, is described fully in Chapter 4ÑSoundFinder.
Sound ROM005:079
SAX-SOLO: Tenor Lead
i
The currently selected sound
TTTToooo LLLLooooccccaaaatttteeee aaaa ZZZZRRRR----77776666 SSSSoooouuuunnnndddd BBBByyyy NNNNaaaammmmee
1. Locate the SoundFinder section on the ZRÕs front panel.
2. Press the Select Sound button, and hold it down.
Each white key on the ZRÕs keyboard from the C two octaves below Middle C to the B nearly three
octaves above has been assigned a number or letter, printed on the ZR just above the key. The G# in
each octave types a blank space.
ee
NNNNooootttteeee:::: The keys outside of the range shown above are not used for the selection of sounds.
3. While continuing to hold the Select sound button down, use the keyboard to type the beginning of the
name of the sound youÕre looking for.
By watching the ZRÕs display, youÕll see SoundFinder continually narrowing the search as you type
each letter. Sometimes just the first few letters are enough to identify a sound if no other sound shares
those letters.
Sound RAM:004:013
ALL-SND :Real El.Pno
i
The name of each sound you find is shown here
ENSONIQ ZR-76 Musician's Manual4
Page 16
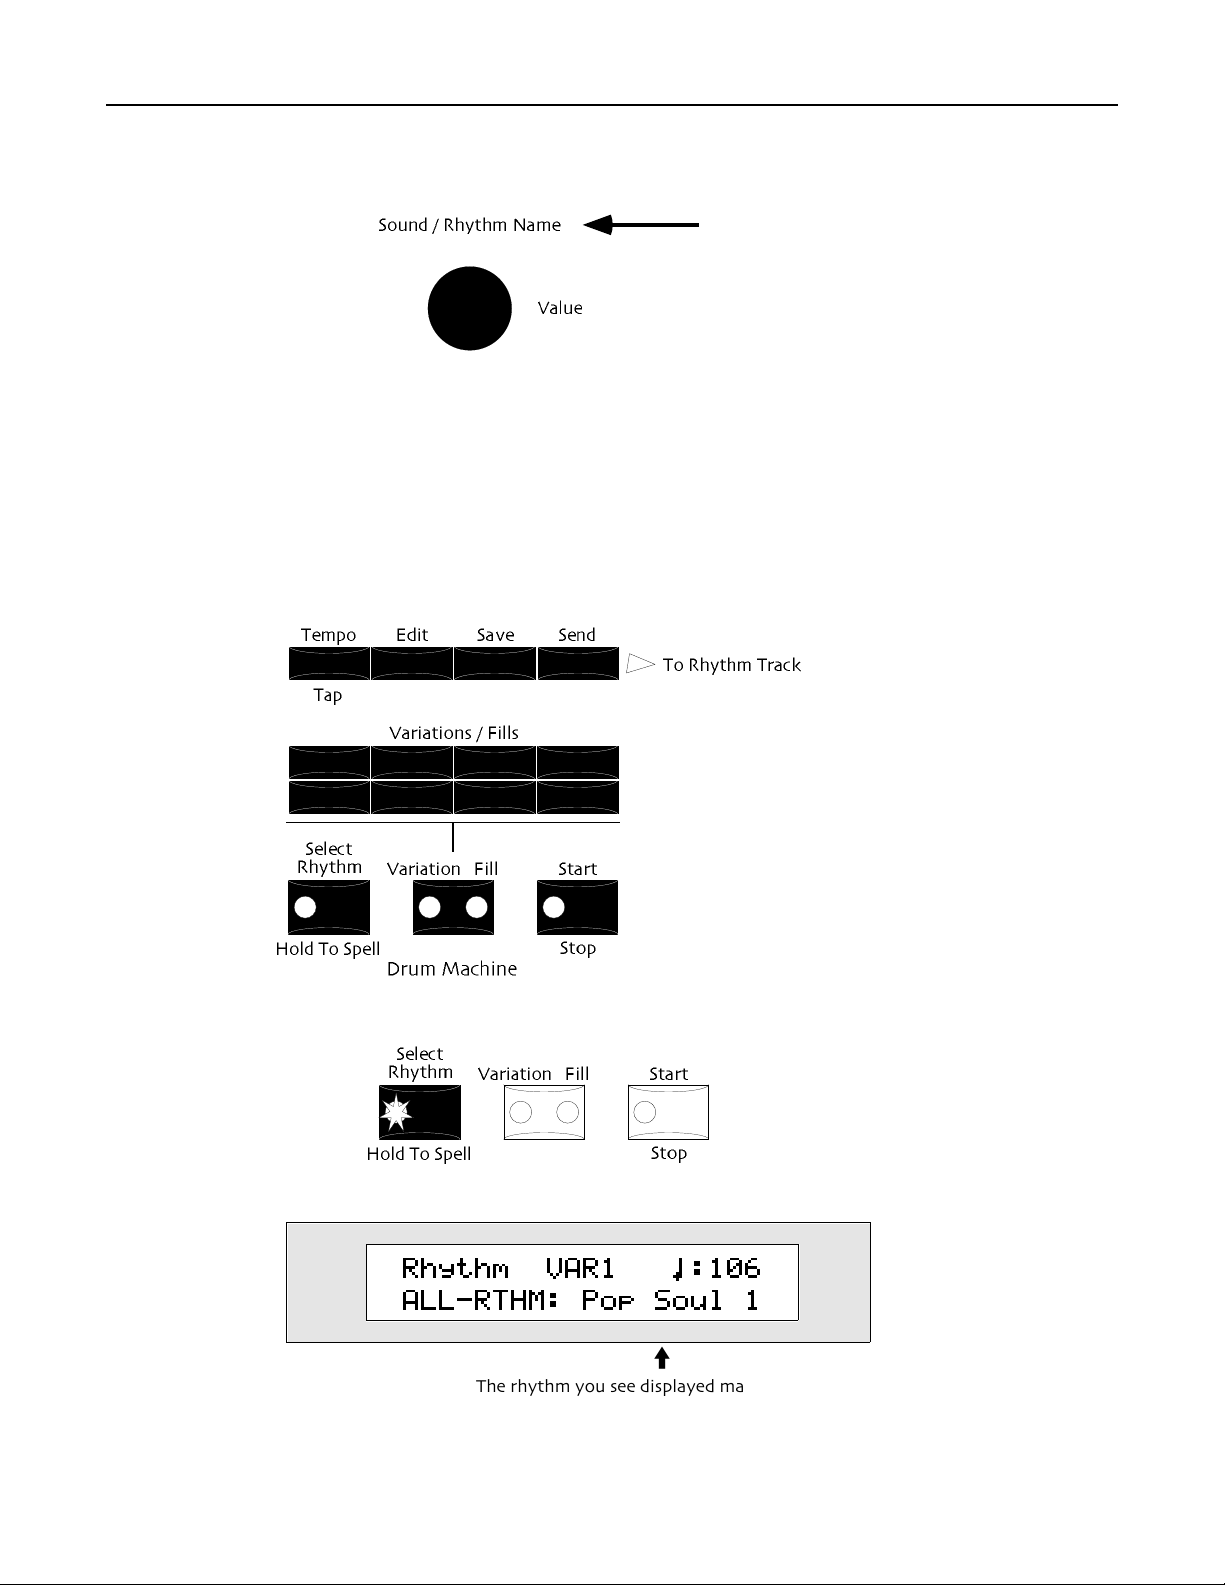
Chapter 1ÑWelcome
If you can only recall the beginning of a soundÕs name, and SoundFinder locates more than one sound
matching what youÕve typed, it will display the alphabetically first sound. To access the other matches,
turn the Sound Name knob clockwise.
JJJJ aaaa mmmm wwww iiii tttt hhhh tttthhhh eeee ZZZZ RRRR ---- 7777 6666 DDDD rrrr uuuu mmmm MMMMaaaa cccc hhhh iiii nnnn eeee
IIIInnnnttttrrrroooodddduuuucccciiiinnnngggg tttthhhheeee DDDDrrrruuuummmm MMMMaaaacccchhhhiiiinnnnee
The ZR-76 includes its own Drum Machine that you can play along with as you investigate musical ideas,
or when you just want to have some fun.
TTTToooo TTTTuuuurrrrnnnn tttthhhheeee DDDDrrrruuuummmm MMMMaaaacccchhhhiiiinnnneeee OOOOnn
1. Locate the Drum Machine on the ZR's front panel.
ee
nn
2. Press the Select Rhythm buttonÑits LED lights up.
The main Drum Machine display appears:
Rhythm VAR1 ™:106
ALL-RTHM: Pop Soul 1
i
The rhythm you see displayed may be different
3. Press the Drum MachineÕs Start/Stop button to hear the selected rhythm. The Start/Stop LED lights,
and the Drum Machine begins to play.
Each rhythm has eight variationsÑlooped patterns that play over and overÑand eight drum fills.
ENSONIQ ZR-76 Musician's Manual 5
Page 17
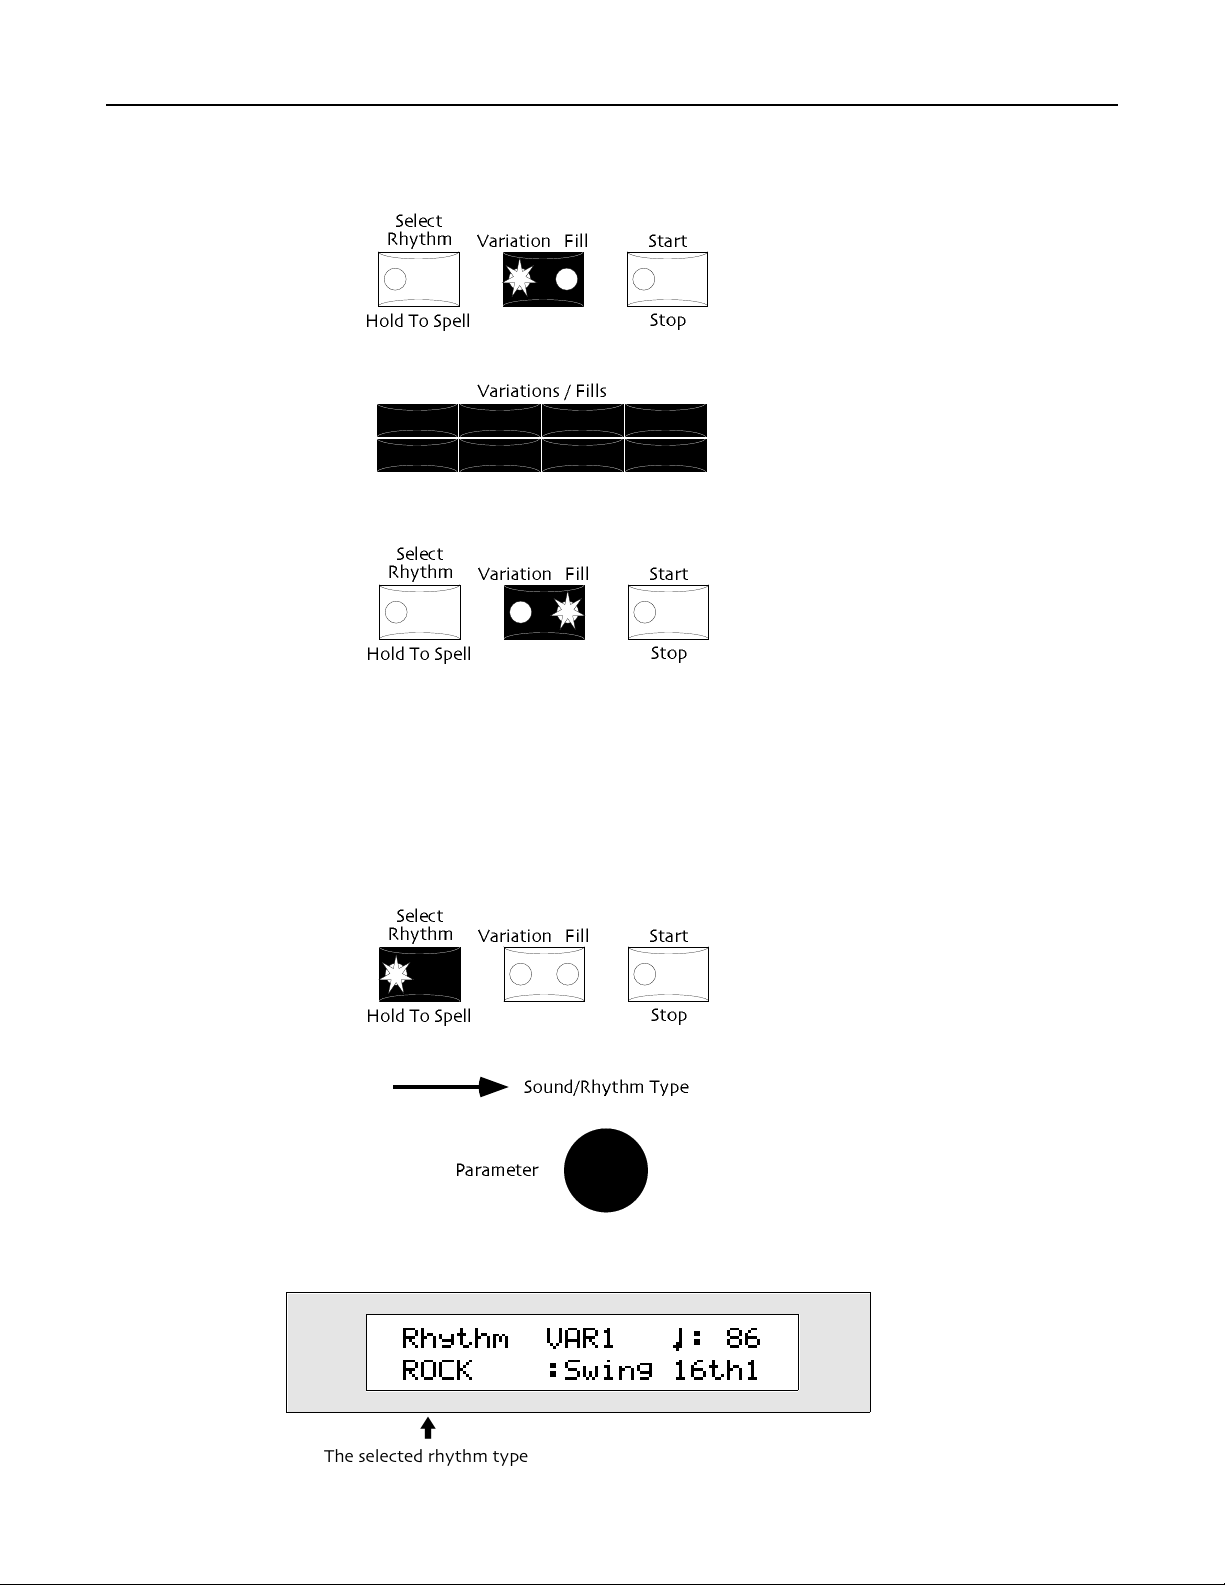
Chapter 1ÑWelcome
4. Without stopping the Drum Machine, press the Variation Fill button until the LED under the word
ÒVariationÓ lights. When this LED is lit, each time you press a Variations/Fills button, youÕll be
selecting one of the rhythmÕs variations.
5. Try pressing each of the Variations/Fills buttons to hear how the rhythm changes.
6. Press the Variation Fill button until the LED under the word ÒFillÓ lights. When this LED is lit, each
time you press a Variations/Fills button, youÕll be selecting one of the rhythmÕs fills.
7. Press each of the Variations/Fills buttons to hear the rhythmÕs fills . After each fill plays, the Drum
Machine returns to the last-selected variation..
Play along with the rhythm by playing on the keyboardÑthe currently selected SoundFinder sound will
be heard. Feel free to use SoundFinder to select other sounds while the Drum Machine plays.
8. Press the Drum Machine Start/Stop button to stop the Drum Machine. The Start/Stop LED goes out,
and the Drum Machine stops playing.
TTTToooo SSSSeeeelllleeeecccctttt OOOOtttthhhheeeerrrr RRRRhhhhyyyytttthhhhmmmmss
1. Press the Select Rhythm button so that its LED lights.
2. Turn the left-hand Sound/Rhythm Type knob clockwise and counter-clockwise on the ZR's front panel.
As you turn the Sound/Rhythm Type knob, youÕll see different Rhythm categories appear in the lower
left part of the ZRÕs display.
ss
Rhythm VAR1 ™: 86
ROCK :Swing 16th1
i
The selected rhythm type
ENSONIQ ZR-76 Musician's Manual6
Page 18
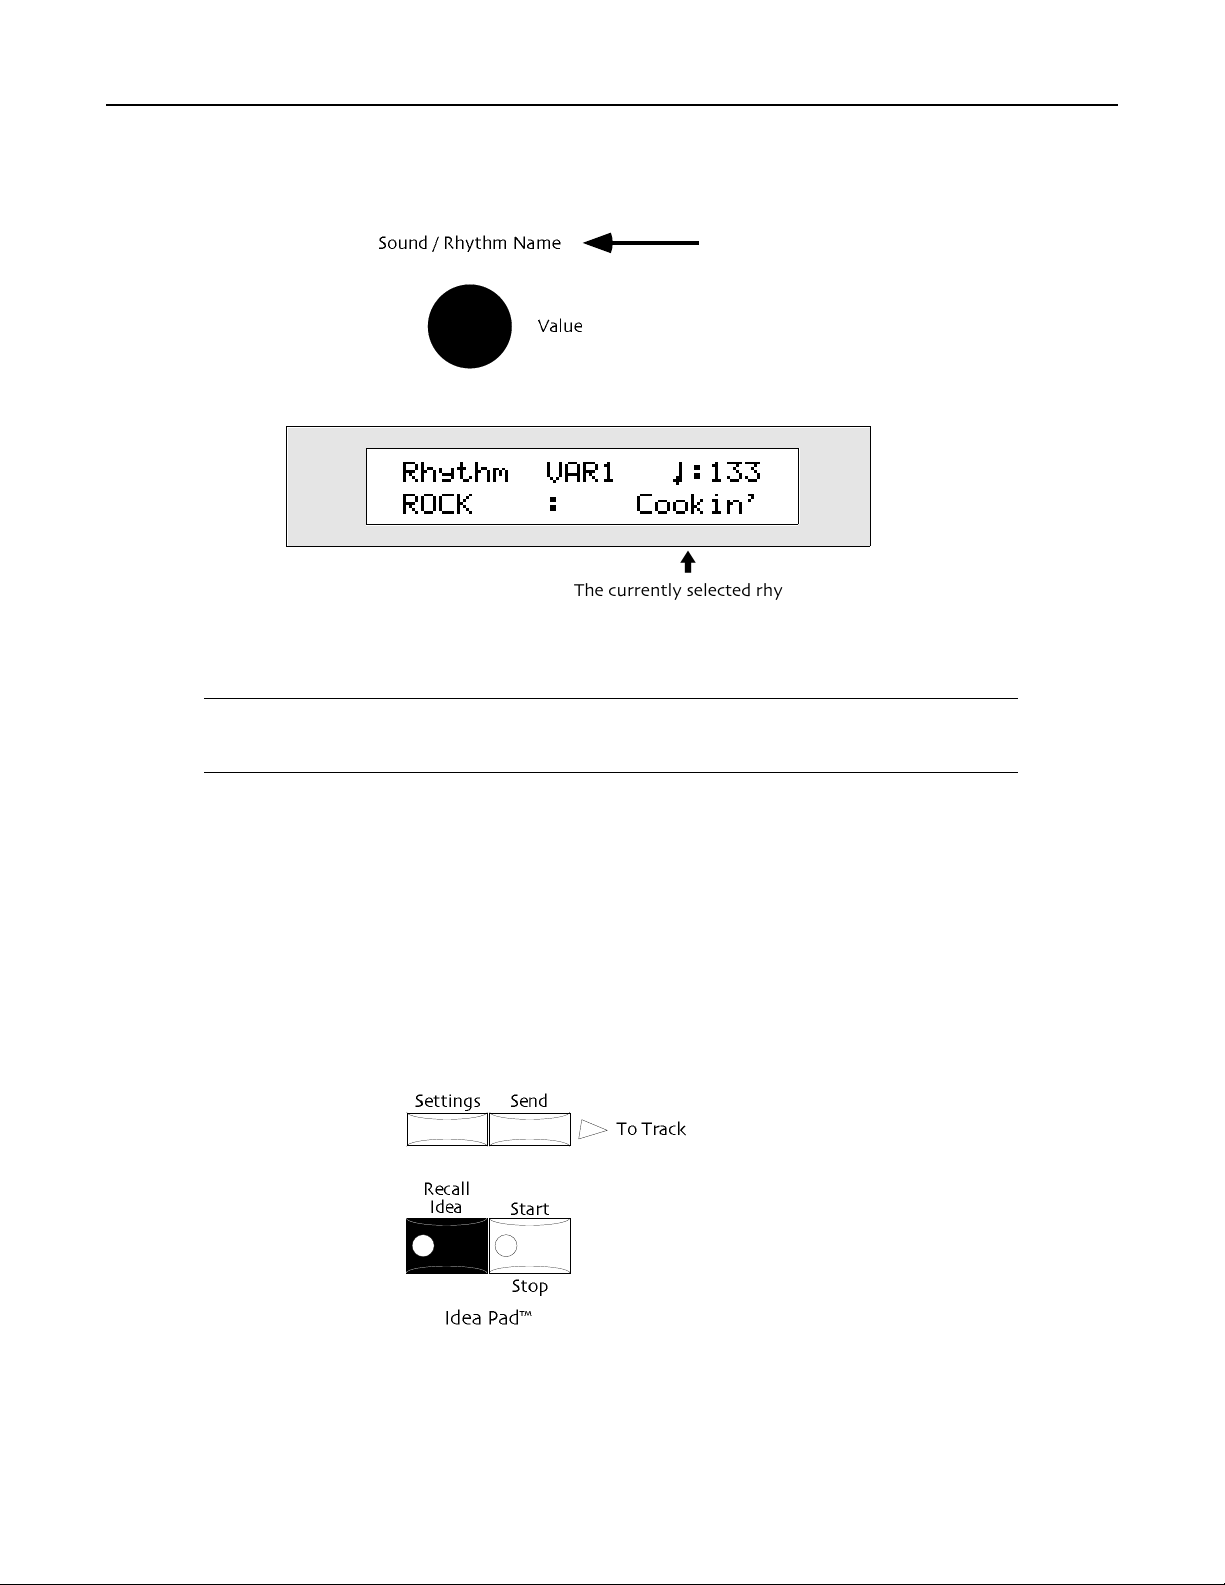
Chapter 1ÑWelcome
3. Find a rhythm type category that interests you.
4. Turn the Sound/Rhythm Name knob clockwise or counter-clockwise to choose a rhythm of the
selected type.
Rhythm names appear on the lower right-hand portion of the display.
Rhythm VAR1 ™:133
ROCK : Cookin'
i
The currently selected rhythm
5. Press the Drum MachineÕs Start/Stop button to hear the rhythm youÕve chosen, and try out its
variations and fills.
6. Press the Start/Stop button to turn off the Drum Machine.
TTTTiiiipppp:::: You can also select rhythms by holding down the Select Rhythm button and spelling
the desired rhythmÕs name on the keyboard. There is a list of the rhythms that shipped
with your ZR-76 in Chapter 13.
Working with the Drum Machine is described more fully in Chapter 5ÑThe Drum Machine.
TTTT hhhh eeee IIIInnnn ssss pppp iiii rrrr aaaa tttt iiii oooo nnnn CCCC aaaa tttt cccc hhhh eeee rrrr
IIIInnnnttttrrrroooodddduuuucccciiiinnnngggg tttthhhheeee IIIIddddeeeeaaaa PPPPaaaadd
Certainly one of the most truly exciting innovations in the ZR-76 is the Idea Pad, an ingenious recorder
thatÕs always recording, capturing everything you play. No more grasping at evaporating flashes of
brillianceÑthe Idea Pad catches every one.
TTTToooo LLLLiiiisssstttteeeennnn TTTToooo WWWWhhhhaaaatttt YYYYoooouuuu JJJJuuuusssstttt PPPPllllaaaayyyyeeeedd
1. Press the Recall Idea buttonÑthe Idea Pad will play the last idea it captured, and then stop.
dd
dd
ENSONIQ ZR-76 Musician's Manual 7
Page 19
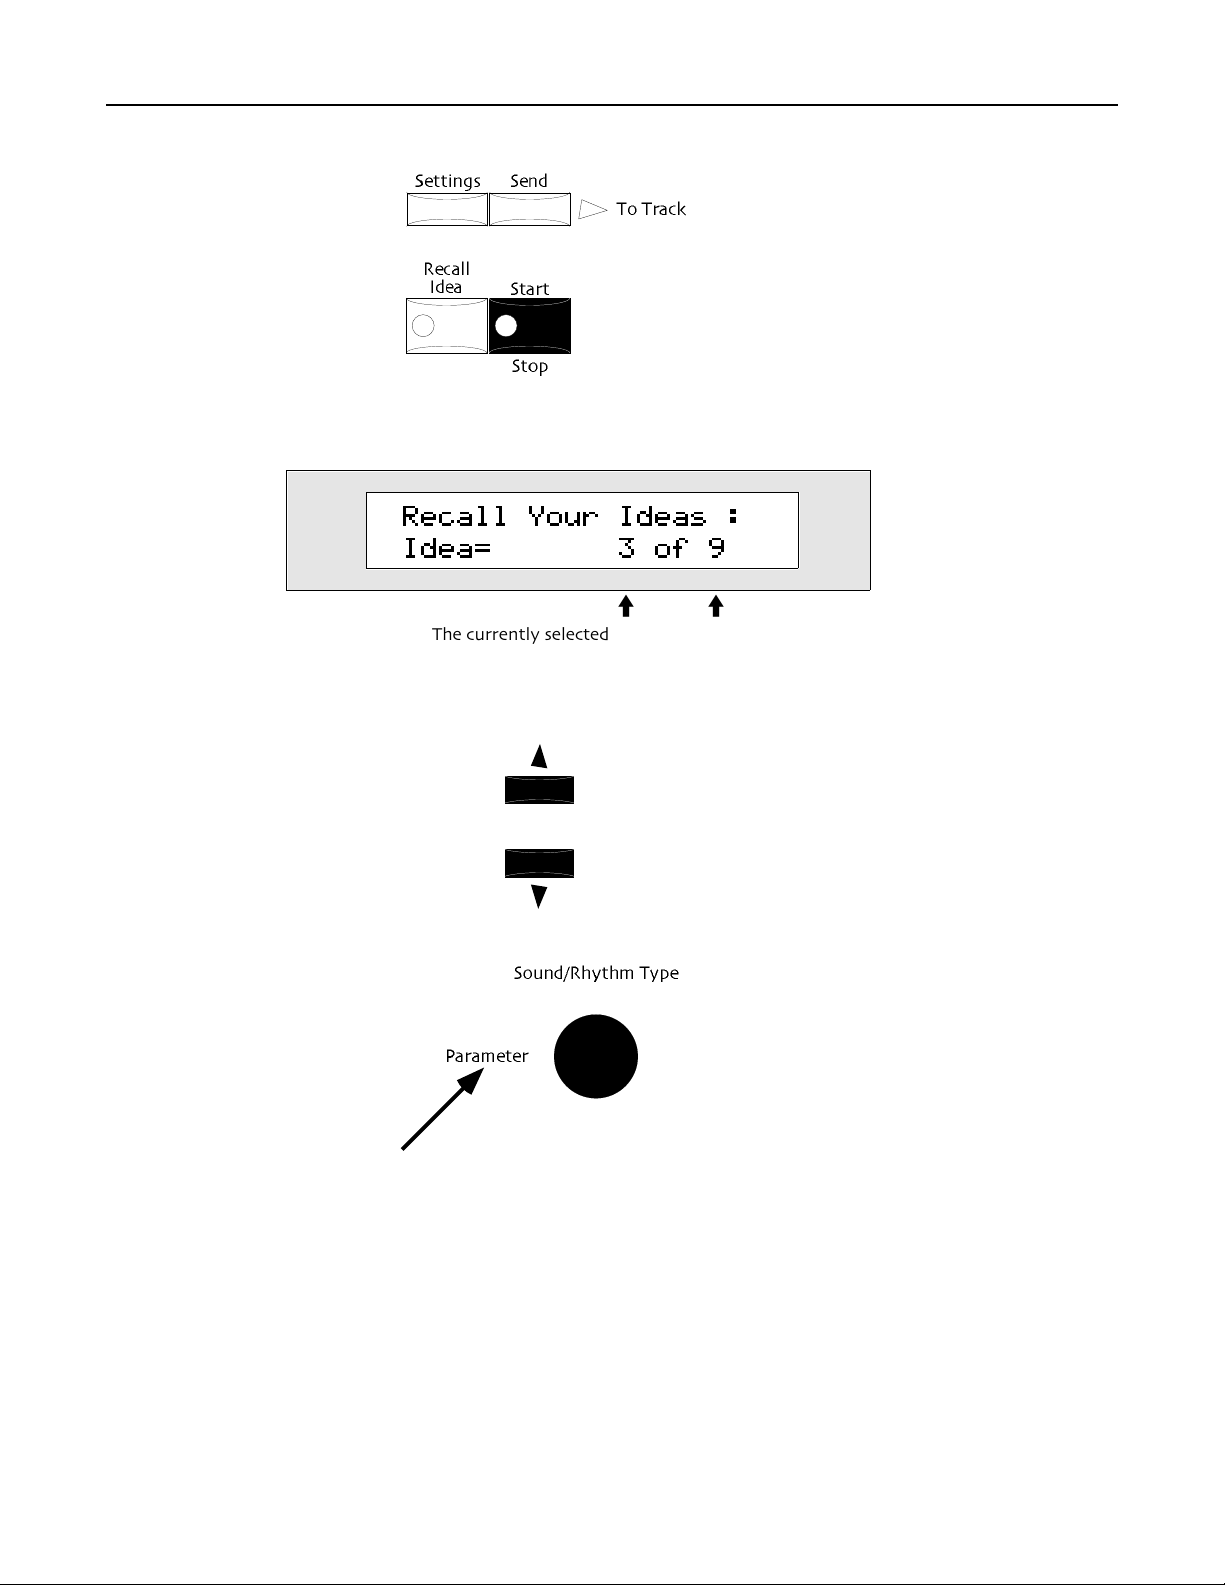
Chapter 1ÑWelcome
2. To hear your latest music again, press the Start/Stop button.
TTTToooo LLLLiiiisssstttteeeennnn ttttoooo OOOOtttthhhheeeerrrr IIIIddddeeeeaaaassss CCCCaaaappppttttuuuurrrreeeedddd bbbbyyyy tttthhhheeee IIIIddddeeeeaaaa PPPPaaaadd
1. If youÕve just listened to an idea, the display will show:
Recall Your Ideas :
Idea= 3 of 9
dd
ii
The currently selected idea The number of ideas in the Idea Pad
If you havenÕt been listening to the Idea Pad, press Recall Idea.
Each idea is assigned a number as itÕs recorded. The higher the number, the more recent the idea is.
You can use the up/down arrow buttons...
...or the Parameter knob to select the idea youÕd like to hear.
If the Idea PadÕs Auto-Play parameter is set to On, selecting an idea with the up or down button will
cause it to automatically begin playing (Chapter 6 describes all of the Idea Pad settings).
2. Use the up/down arrow buttons or the Parameter knob to select an idea.
3. If youÕve selected an idea with the Parameter knob, press the Idea Pad Start/Stop button to begin
playback of the idea.
4. Press the Idea Pad Start/Stop button to end playback of the selected idea.
The Idea Pad is described in detail in Chapter 6ÑThe Idea Pad.
ENSONIQ ZR-76 Musician's Manual8
Page 20
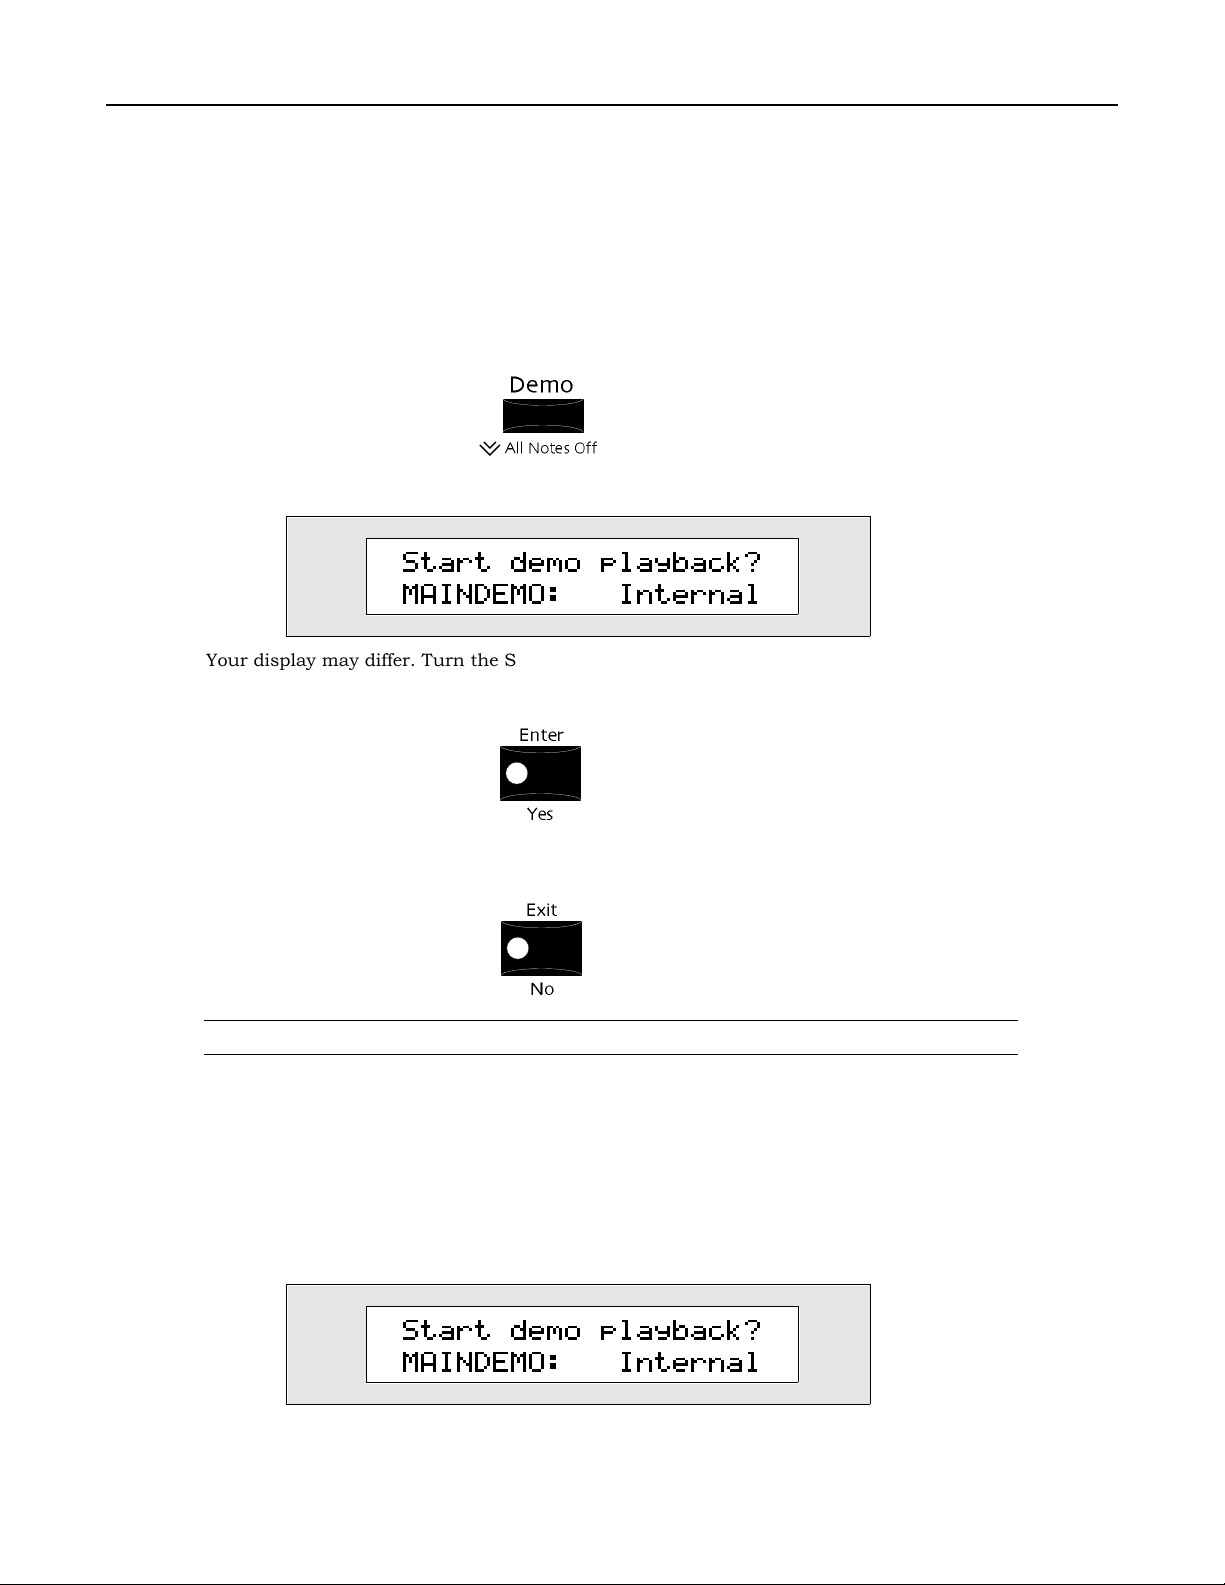
Chapter 1ÑWelcome
LLLL iiii ssss tttt eeee nnnn iiii nnnn gggg ttttoooo TTTThhhh eeee ZZZZ RRRR ---- 7777 6666 DDDD eeee mmmm oooo ssss
TTTThhhheeee BBBBuuuuiiiilllltttt----IIIInnnn DDDDeeeemmmmooooss
Your ZR-76 comes with a collection of built-in demonstration songs that will give you an idea of how great
it sounds. These demos are easily accessed by pressing the Demo button on the ZRÕs front panel.
TTTToooo PPPPllllaaaayyyy tttthhhheeee ZZZZRRRR----77776666 DDDDeeeemmmmooooss
1. Press the Demo button.
The display shows:
Your display may differ. Turn the Sound/Rhythm Name knob counter-clockwise until the display looks
as it does above.
2. Press the Enter/Yes button.
ss
ss
Start demo playback?
MAINDEMO: Internal
The demo will begin playing.
3. If youÕd like to stop the demo before itÕs finished, press the Exit/No button.
NNNNooootttteeee:::: The Demo button also functions as a MIDI All Notes Off button. See below.
SSSSeeeelllleeeeccccttttiiiinnnngggg OOOOtttthhhheeeerrrr DDDDeeeemmmmooooss
You can select any of the ZRÕs demos at any time. TheyÕre sorted by stylistic category so that you can easily
find a demo of interest.
TTTToooo SSSSeeeelllleeeecccctttt AAAAnnnnooootttthhhheeeerrrr DDDDeeeemmmmoooo ttttoooo LLLLiiiisssstttteeeennnn TTTToo
1. If youÕve already pressed the Demo button and listened to the main demo, the display should look
something like this.
ss
oo
Start demo playback?
MAINDEMO: Internal
ii
Demo category Demo name
ENSONIQ ZR-76 Musician's Manual 9
Page 21
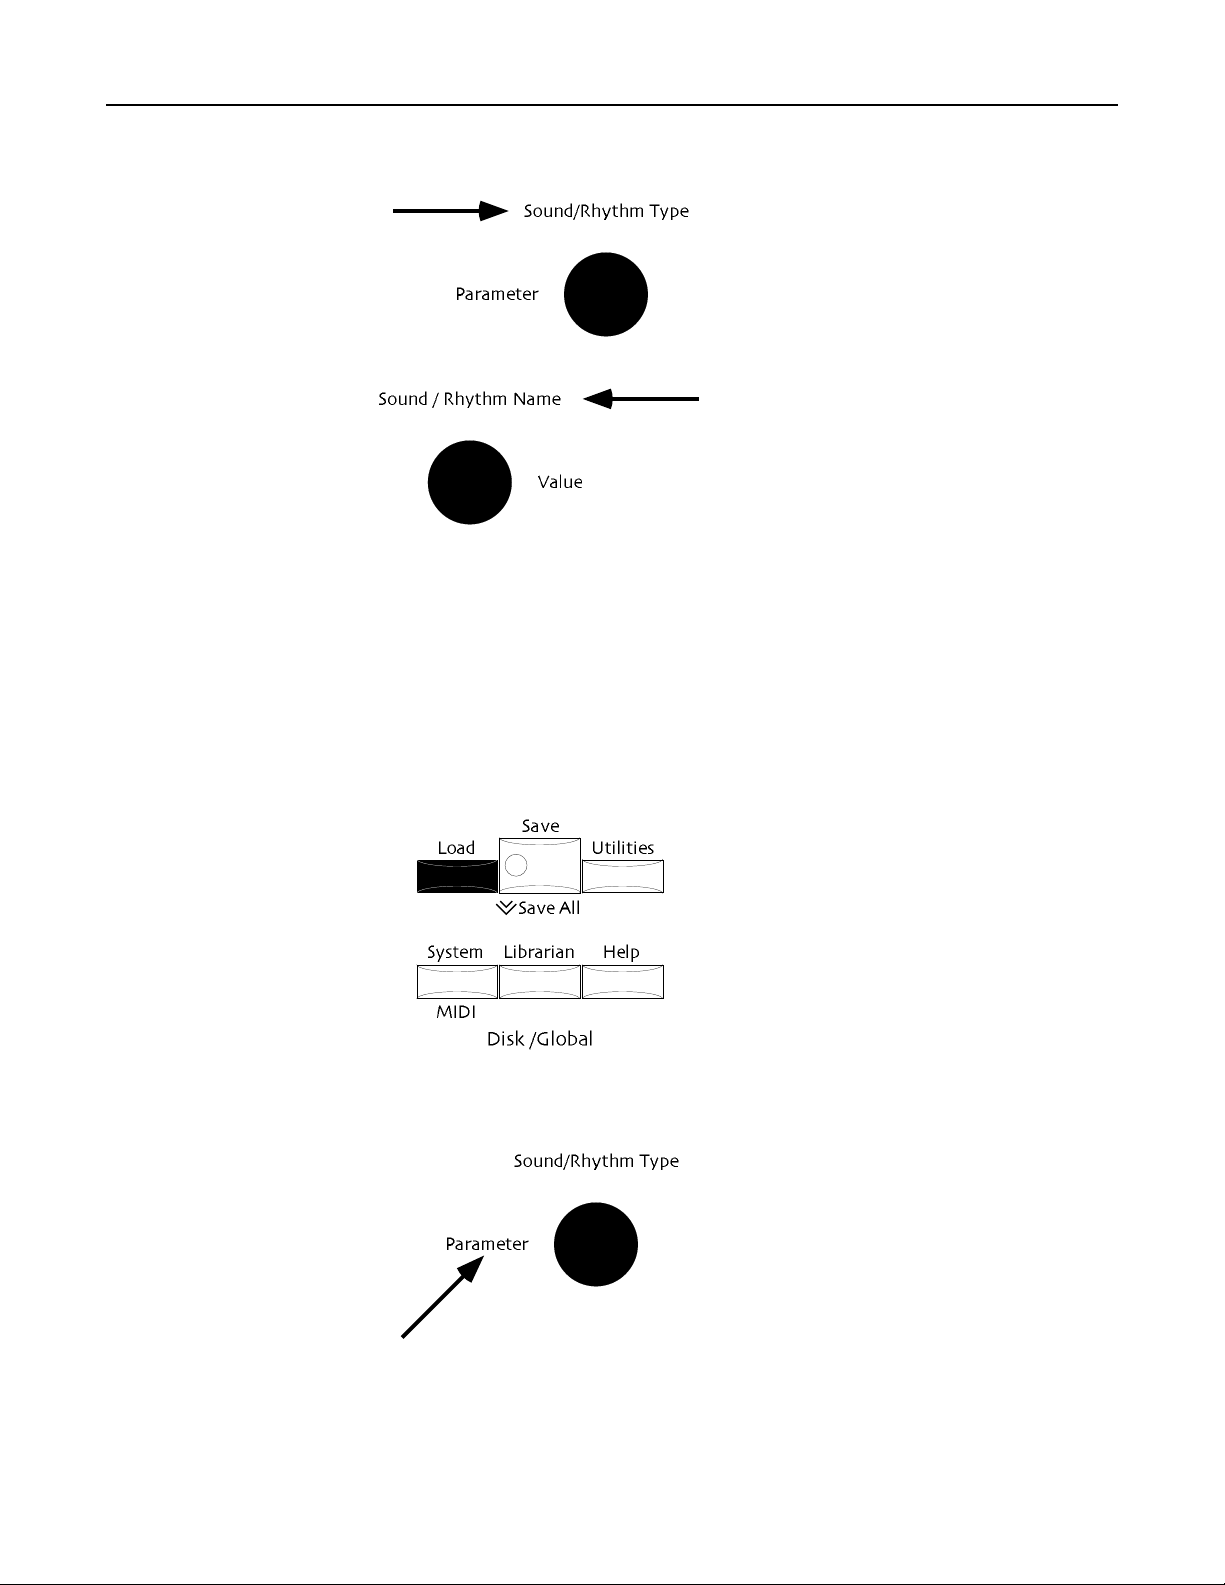
Chapter 1ÑWelcome
If it doesnÕt, press the Demo button now.
2. Use the Sound/Rhythm Type knob to select a demo category.
3. Use the Sound/Rhythm Name knob to select a specific demo.
4. Press the Enter/Yes button to play the demo.
5. If youÕd like to stop the demo, press the Stop/No button to end playback.
PPPP llll aaaa yyyy iiii nnnn gggg SSSS tttt aaaa nnnn dddd aaaa rrrr dddd MMMMIIII DDDD IIII FFFFiiii llll eeee ssss
The ZR-76 can import Standard MIDI Files (SMFs) created on a computer or some other musical device.
Loadable SMF files can be as large as 215k in size.
TTTToooo IIIImmmmppppoooorrrrtttt aaaannnndddd PPPPllllaaaayyyy aaaa SSSSttttaaaannnnddddaaaarrrrdddd MMMMIIIIDDDDIIII FFFFiiiillllee
1. Insert a DOS-formatted HD or DD disk containing an SMF into the ZRÕs floppy disk drive.
2. Press the Load button.
After a few moments, the ÒLoad from Disk?Ó display will appear.
If your display doesnÕt show Ò1-MIDIFILEÓ in its lower left corner, turn the ZRÕs Parameter knob until it
does.
ee
ENSONIQ ZR-76 Musician's Manual10
Page 22

Chapter 1ÑWelcome
3. If thereÕs more than one SMF on the floppy, you can turn the Value knob to select the desired file.
4. Press the Yes button.
5. Press the Yes buttonÑthe selected SMF will load into the lowest-numbered empty sequence location.
6. Press the 16 Track Recorder Play button to hear the imported SMF.
7. You can press the Stop button to end playback.
Chapter 7ÑRecording describes converting Standard MIDI Files into ZR sequences, changing its sounds,
adjusting its track settings and recording new tracks.
TTTT hhhh eeee ZZZZ RRRR ---- 7777 6666 OOOO nnnn ssss cccc rrrr eeee eeee nnnn HHHH eeee llll pppp
The ZR-76 offers special informational displays that explain the purposes of each front-panel button.
When youÕd like to learn what a particular button does, youÕll find the answer right in your ZR-76.
TTTToooo AAAAcccccccceeeessssssss tttthhhheeee ZZZZRRRR----77776666 OOOOnnnnssssccccrrrreeeeeeeennnn HHHHeeeellllpp
1. Press the Help button.
The display will show:
Press a button for
help on its function
pp
2. Press the button youÕd like to learn aboutÑthe display will provide information about that button:
ENSONIQ ZR-76 Musician's Manual 11
Page 23
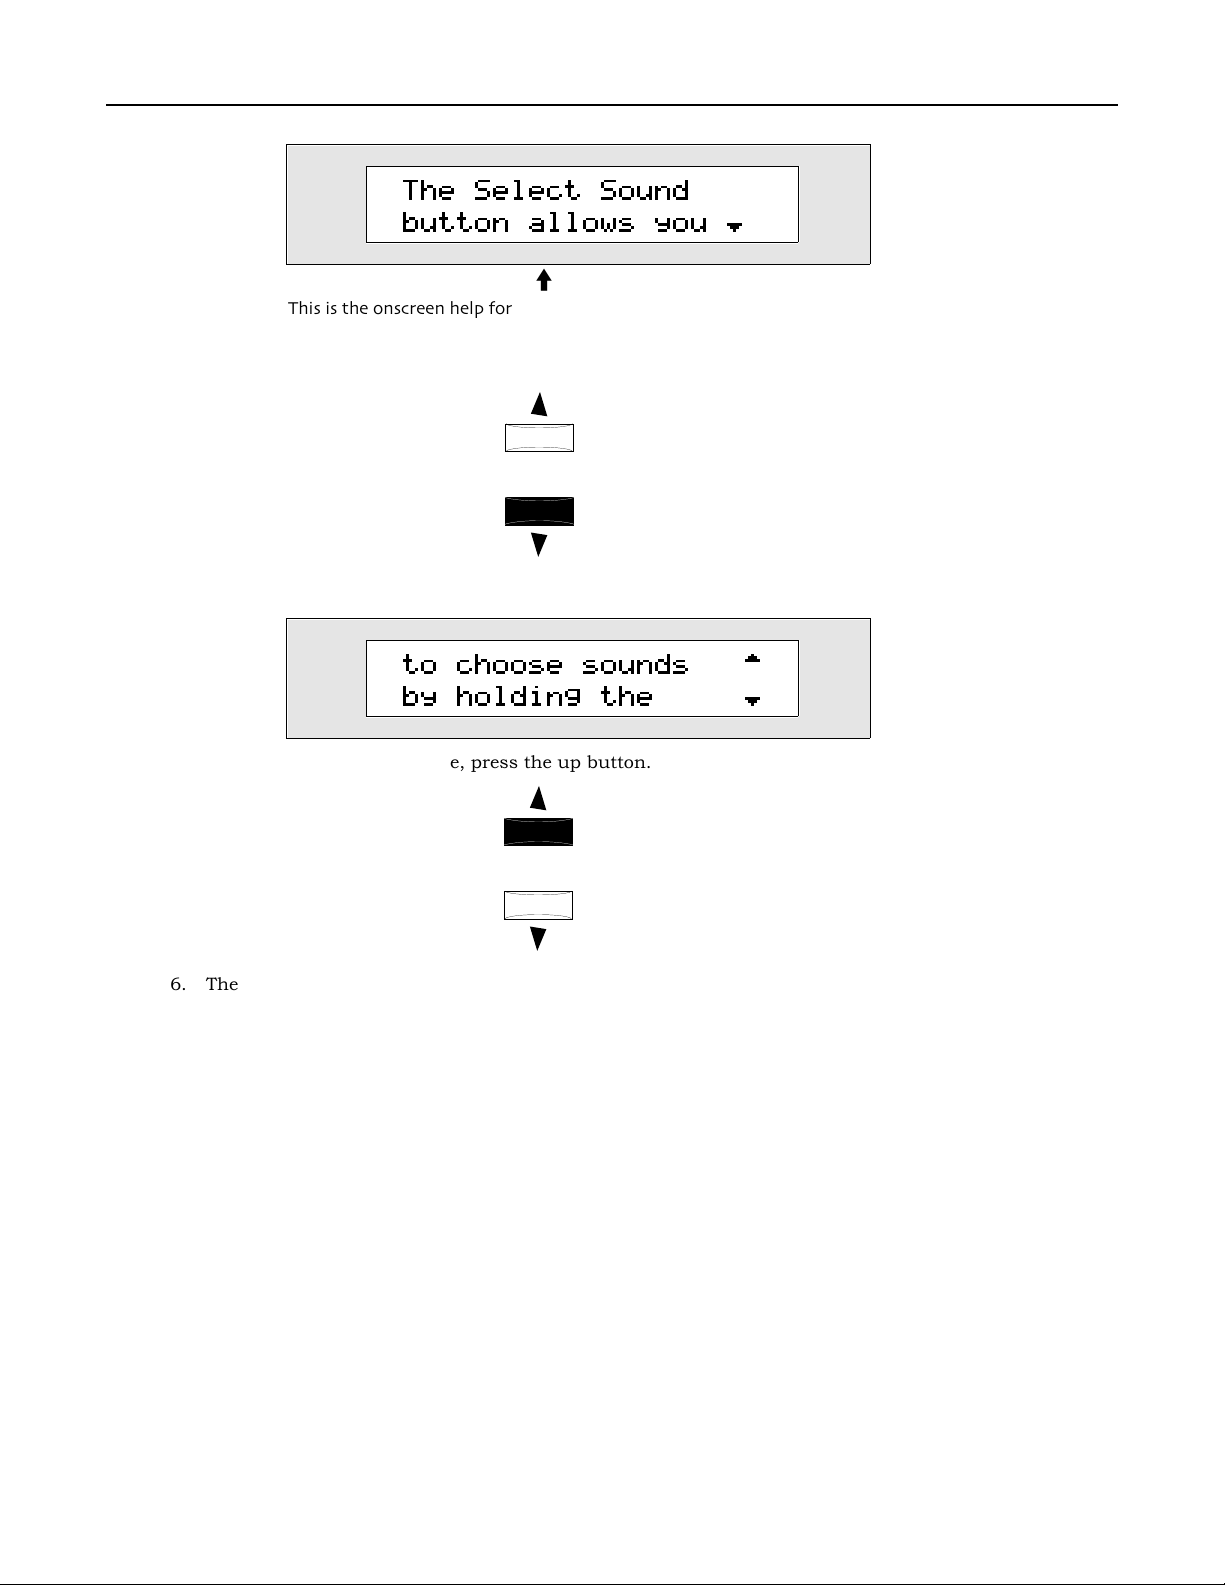
Chapter 1ÑWelcome
Many of the help entries contain more than one displayÕs worth of information.
3. Press the down arrow on the ZRÕs front panel to view the next help page.
4. Continue pressing the down button until youÕve finished reading the description of the selected button.
The Select Sound
button allows you ¯
i
This is the onscreen help for the SoundFinder Select Sound button
to choose sounds ˘
by holding the ¯
5. To go back to an earlier page, press the up button.
6. The help function will display the last-selected page for a few moments and then return to what you
were doing before accessing help.
7. If youÕd like to exit from a help display immediately, press the Help button again.
CCCC oooo nnnn cccc eeee pppp tttt uuuu aaaa llll OOOO vvvv eeee rrrr vvvv iiii eeee wwww oooo ffff tttthhhh eeee ZZZZ RRRR ---- 7777 6666
SSSSoooouuuunnnnddddFFFFiiiinnnnddddeeeerr
SoundFinder, as its name implies, is the place to go for ZR-76 sounds. The ZR-76 contains hundreds of
CD-quality sounds constructed from the many high-quality digital sound waves resident in the each ZR-
76. Typical sounds use up to 16 of these waves.
The ZR-76 also offers a special category of soundsÑdrum and percussion kitsÑwhich can have up to 64
standard sounds assigned to individual keys. Though these are most commonly drum and percussion
sounds, you can use any kind of sound youÕd like in a kit. Each drum or percussion kit key has its own
volume, pan, pitch and effect settings. The drum and percussion kits youÕll find in your ZR-76 were
programmed to work seamlessly with the ZR-76 Drum Machine.
All of the ZR-76 sounds can be customized to suit your needs using the extensive SoundFinder editing
options. In addition, if youÕve got a computer, you can use the supplied Unisyn editing software to build
your own ZR-76 sounds from scratch. Sounds can be saved to high-density and double-density floppy
disks using the ZRÕs disk drive.
rr
™
ENSONIQ ZR-76 Musician's Manual12
Page 24

Chapter 1ÑWelcome
You can add new sounds to your ZR-76 by purchasing ENSONIQ ZRD Series Sound Disks. You may also
install ENSONIQ EXP Series Wave Expansion Boards, which provide completely new sound waves, and
sounds based on them. Additional sounds that take advantage of expansion board waves can be obtained
through the purchase of ENSONIQÕs EXD Series Disks.
In SoundFinder, you can use any sounds to easily create:
¥ splitsÑwhere one sound is heard in the lower part of the keyboard and a different sound is heard in
the upper part
¥ layersÑwhere two sounds are heard stacked on top of each other
¥ combination split/layersÑwhere the lower part of the keyboard plays the split sound, and the upper
area contains two sounds layered on top of each other
Each of these combinations can be saved as a presetÑan ideal tool for performanceÑor as a single sound
that can be used for recording in the ZR-76.
SoundFinder is more than just an area on the front panel of your ZR-76. ItÕs an incredibly simple-to-use
method for finding the sounds you want. Computer users may be familiar with databases, which allow you
to view information in a manner of your choosing. SoundFinder operates in much the same way. Your ZR76 keeps a list of all the sounds available to it at any given time, and shows them to you in logical,
musically convenient categories called sound types.
Sound types show you sounds by instrument familyÑVOCALS or BELLS, for exampleÑor by a number of
other useful criteria, including the location in the ZR's memory where they reside. The ALL-SND category is
especially useful, since it shows all of the ZR's sounds arranged in alphabetical order. The *CUSTOM and
USER-SND categories can be used for storing your own sounds.
If you know the name of the sound youÕre looking for, you can hold down SoundFinderÕs Select Sound
button and spell the soundÕs name using the ZR's keyboard. Each key has been assigned a number or
letter, which is printed above the key. SoundFinder will retrieve the sound you want.
Any sound you select in SoundFinder can be sent to the ZRÕs 16 Track Recorder when it comes time to
develop one of your musical ideas.
The SoundFinder section also unlocks the ZRÕs power as a MIDI keyboard for performance. By setting a
SoundFinder sound, split and/or layer to transmit MIDI, your keyboard can be turned into a three-way
MIDI master controller.
Any sound in SoundFinder can also be selected via MIDI. The sounds are arranged inside the ZR-76 in
groupings called banks. Each bank corresponds to a MIDI Bank Select number, and each sound has its
own MIDI program change.
Sounds, SoundFinder and the customization of sounds are all discussed fully in Chapter 4ÑSoundFinder.
DDDDrrrruuuummmm MMMMaaaacccchhhhiiiinnnnee
The ZR-76 Drum Machine provides highly realistic rhythmic accompaniment for music-making in a wide
variety of styles. Simple to operate, yet packed with editing options, the Drum Machine is perfect for
playing along with in performance, for fun, or while searching for new song ideas.
To operate the Drum Machine, all you need to do is select a rhythm and hit the Start button. The Drum
Machine has its own version of SoundFinderÑcall it RhythmFinder, if you will. Rhythms are divided into
categories that can be selected with the Sound/Rhythm Type knob. The Sound/Rhythm Name knob
chooses individual rhythms from within the selected category. Additional rhythms are available on
ENSONIQÕs ZRD Series Sound Disks.
Each Drum Machine rhythm contains eight variations of the same musical style, as well as eight drum fills
for providing musical punctuation to your beats. Just about everything in a rhythm is customizable: you
can change the drum or percussion kit used by a rhythm, alter the sounds in the kit, or change what each
variation or fill plays. You can change a rhythmÕs tempo by tapping on the Drum MachineÕs Tempo button,
or by dialing it in manually. You can even swap musical phrases between one rhythm and another to
assemble your own rhythms, which can be stored in your ZRÕs memory, and on floppy disk for safekeeping.
You can also save a collection of rhythms to floppy as a rhythm bank. If youÕve got a PC-compatible
computer, you can make your own rhythms using the RhythmBuilder utility you can find at ENSONIQÕs
World Wide Web site at http://www.ensoniq.com.
You can send a Drum Machine rhythm to the 16 Track Recorder, for use as a rhythm track for your music.
The Drum Machine is discussed fully in Chapter 5ÑThe Drum Machine.
ENSONIQ ZR-76 Musician's Manual 13
ee
Page 25

Chapter 1ÑWelcome
IIIIddddeeeeaaaa PPPPaaaadd
11116666 TTTTrrrraaaacccckkkk RRRReeeeccccoooorrrrddddeeeerr
dd
The ZR-76 presents ENSONIQÕs innovative Idea Pad. If youÕve ever had fleeting magic slip through your
fingers when your were unable to recreate something youÕve played, youÕll appreciate the Idea Pad.
The Idea Pad is a special recorder thatÕs always running, automatically capturing everything you play.
Since itÕs always active, you can be confident that everything youÕve just played is safely stashed in the
ZR's memory. To retrieve your ideas, simply press the Idea PadÕs Recall Idea and Start/Stop buttons, and
youÕll hear your latest musical discovery intact, just as it sounded the first time. The Idea Pad will have
caught your idea, the sound you used, and the rhythm you were playing along with if you were jamming
with the Drum Machine.
The Idea Pad is also the perfect place to stash those sudden inspirations that send you running for your
keyboard in the middle of the night or day. Simply turn your ZR-76 on, play your new idea on the
keyboard before it evaporates, and the Idea Pad will capture it for you, fresh from your musical
imagination. No more stopping to set tempos, pick tracks or wait for your computer to boot up: the Idea
Pad gets your thoughts down quickly, before that initial spark has a chance to fade.
If the Idea Pad captures something youÕd like to keep, you can send your ideaÑalong with any Drum
Machine rhythm you were usingÑover to the ZR's 16 Track Recorder for further work.
As you perfect tracks in the 16 Track Recorder, the Idea Pad keeps listening to you, capturing take after
take that you can retrieve and audition at will.
The Idea Pad is described more fully in Chapter 6ÑThe Idea Pad.
rr
The 16 Track Recorder is a digital MIDI sequencer adorned with powerful editing features that will help
you turn your inspirations into full-blown musical arrangements. In addition to standard recording
methods, the 16 Track Recorder offers such treats as looped ADD modeÑwhere the sequence plays over
and over and you can add music each time it cycles around. It includes handy scoop-erase functions. You
can record real-time volume and stereo panning changes on each of its 16 tracks. YouÕll also find several
useful methods for locating to various points within a sequence.
The ZRÕs Undo function allows you to restore any track to the state it was in before the last recording or
editing operation. And when youÕre working with the 16 Track Recorder, the Idea Pad keeps on going,
recording everything you do. As you refine your music take after take, the Idea Pad catches each one and
holds onto it for youÑwith the Idea Pad running, thereÕs no such thing as going a few takes too far. You
can always move an earlier take out of the Idea Pad and right back into the 16 Track Recorder.
The 16 Track Recorder can play Drum Machine rhythms on a special rhythm track. You can record Drum
Machine performancesÑyour inspired selection of variations and fillsÑon this track. You can even record
additional drum notes right on top of the rhythm. The tempo of any sequence can be tapped out or set
manually.
The 16 Track Recorder records each section of musicÑeach sequenceÑas a Standard MIDI file. When
youÕve finished taking advantage of the ZRÕs extensive recording track editing tools, you can save each
sequence to floppy disk and move over to your computer for further work in your favorite software
sequencer. Your computer can send MIDI back to your ZR-76, so that you can continue to use its sounds
and rhythms without missing a beat.
Your ZR-76 loads Standard MIDI Files (SMFs) from DOS-formatted floppies. The 16 Track Recorder can
immediately play SMFs created on a computer or other musical device. SMFs can also be easily converted
to ZR sequences, so that you can customize them to your needs or add new tracks recorded on your ZR-
76.
16 Track Recorder sequences can also be used as set-ups for live performance. By assigning the sounds
you use in a particular song to different tracks in the same sequence, you can use the sequence as a kind
of super-preset containing everything you need for that song. You can set up a whole setÕs worth of sounds
in this manner by creating a sequence for each song youÕll be playing, and saving the whole set as an ZR76 song.
The 16 Track Recorder is described more fully in Chapter 7ÑRecording.
SSSSoooonnnngggg EEEEddddiiiittttoooorr
The Song Editor is the command center for ZR-76 recording operations, providing total control over each
song, from its reference metronome to the manner in which the 16 Track Recorder records, to the lengths
and names of the songÕs component sections . The Song EditorÕs playlist function lets you line up your
rr
ENSONIQ ZR-76 Musician's Manual14
Page 26

Chapter 1ÑWelcome
sections in the order youÕd like them to be heard, regardless of the order in which they were recorded.
When youÕre done experimenting with different structures, youÕll have created a new song.
Chapter 7ÑRecording details the workings of the Song Editor.
FFFFXXXX////MMMMiiiixxxxddddoooowwwwnn
The ZR's FX/Mixdown facility allows you to add the final polish to your sounds, sequences and songs with
its comprehensive volume and stereo panning controls, and by providing access to the ZR's powerful 24-bit
effects (or FX). Each sound and sequence can take advantage of three types of effects:
¥ the insert effectÑeach sound in SoundFinder or sequence in the 16 Track Recorder can have one of
these exceptional effects; sounds in the 16 Track Recorder use the sequenceÕs insert effect
¥ a Global ChorusÑeach song has its own high-quality digital chorus effect that can be used by
SoundFinder sounds, or by 16 Track Recorder sounds
¥ a Global ReverbÑeach song has its own high-quality digital reverb effect that can be used by
SoundFinder sounds, or by 16 Track Recorder sounds
¥ dryÑmany of the ZR-76 sounds sound terrific without any effect at all
The effects are applied by sending each sound or 16 Track Recorder track to an effect bus, or FX Bus.
There are six effect busses:
¥ the Insert FX Bus
¥ the Chorus FX Bus
¥ the LightReverb FX Bus
¥ the MediumReverb FX Bus
¥ the WetReverb
¥ the Dry FX Bus (sounds using this bus are un-effected)
Each FX bus has its own settings that determine how it will use the effect (or effects) it can access, as well
as which rear-panel outputs it will ultimately utilize.
The ZRÕs FX/Mixdown section also provides muting and soloing options for isolating individual tracks or
groups of tracks in the 16 Track Recorder.
Chapter 8ÑFX/Mixdown provides a complete description of the ZRÕs FX/Mixdown facility and the ZR-76
effects.
nn
TTTThhhheeee ZZZZRRRR----77776666 MMMMeeeemmmmoooorrrryyyy aaaannnndddd SSSSttttoooorrrraaaaggggee
The ZRÕs memory is divided into two general categories:
¥ ROM for ÒRead Only MemoryÓÑpermanent, un-erasable memory that holds sounds, rhythms and
presets created by ENSONIQ
¥ INT for ÒInternalÓÑwritable memory that you can use to store your own sounds, rhythms, presets,
sequences and songs
The INT memory itself contains two different types of memory:
¥ FLASHÑmemory which remains in your ZR-76 even when you power off. In addition to holding all of
your system-wide settings, FLASH makes an ideal place to store sounds, rhythms and presets that
youÕll always want to have on hand as creation and performance tools.
¥ RAMÑshort for ÒDRAMÓÑan area of memory useful for holding items that youÕll only need for a
particular work session. When you turn your ZR-76 off, RAM memory is cleared of its contents. The
Idea Pad and the 16 Track Recorder share this type of memory with RAM sound and rhythm banks.
The ZRÕs librarian allows you to perform a number of memory management tasks that allow you to get the
most out of your ZR-76. Using the librarian, you can, among other things, configure your INT memory to
suit your purposes, keep track of your FLASH and RAM memory usage and initiate various kinds of MIDI
System Exclusive data transmissions.
Your ZR-76 has a built-in high-density floppy disk drive (it can also read double-density disks) so you can
save your work to floppy disks. Sounds, rhythms, presets, sequences and songs can be easily saved to
disk.
As a convenience, the ZR-76 Save LED will flash when youÕve got a sound, preset, rhythm or sequence in
RAM that hasnÕt yet been stored on a floppy disk for safekeeping.
ENSONIQ ZR-76 Musician's Manual 15
ee
Page 27
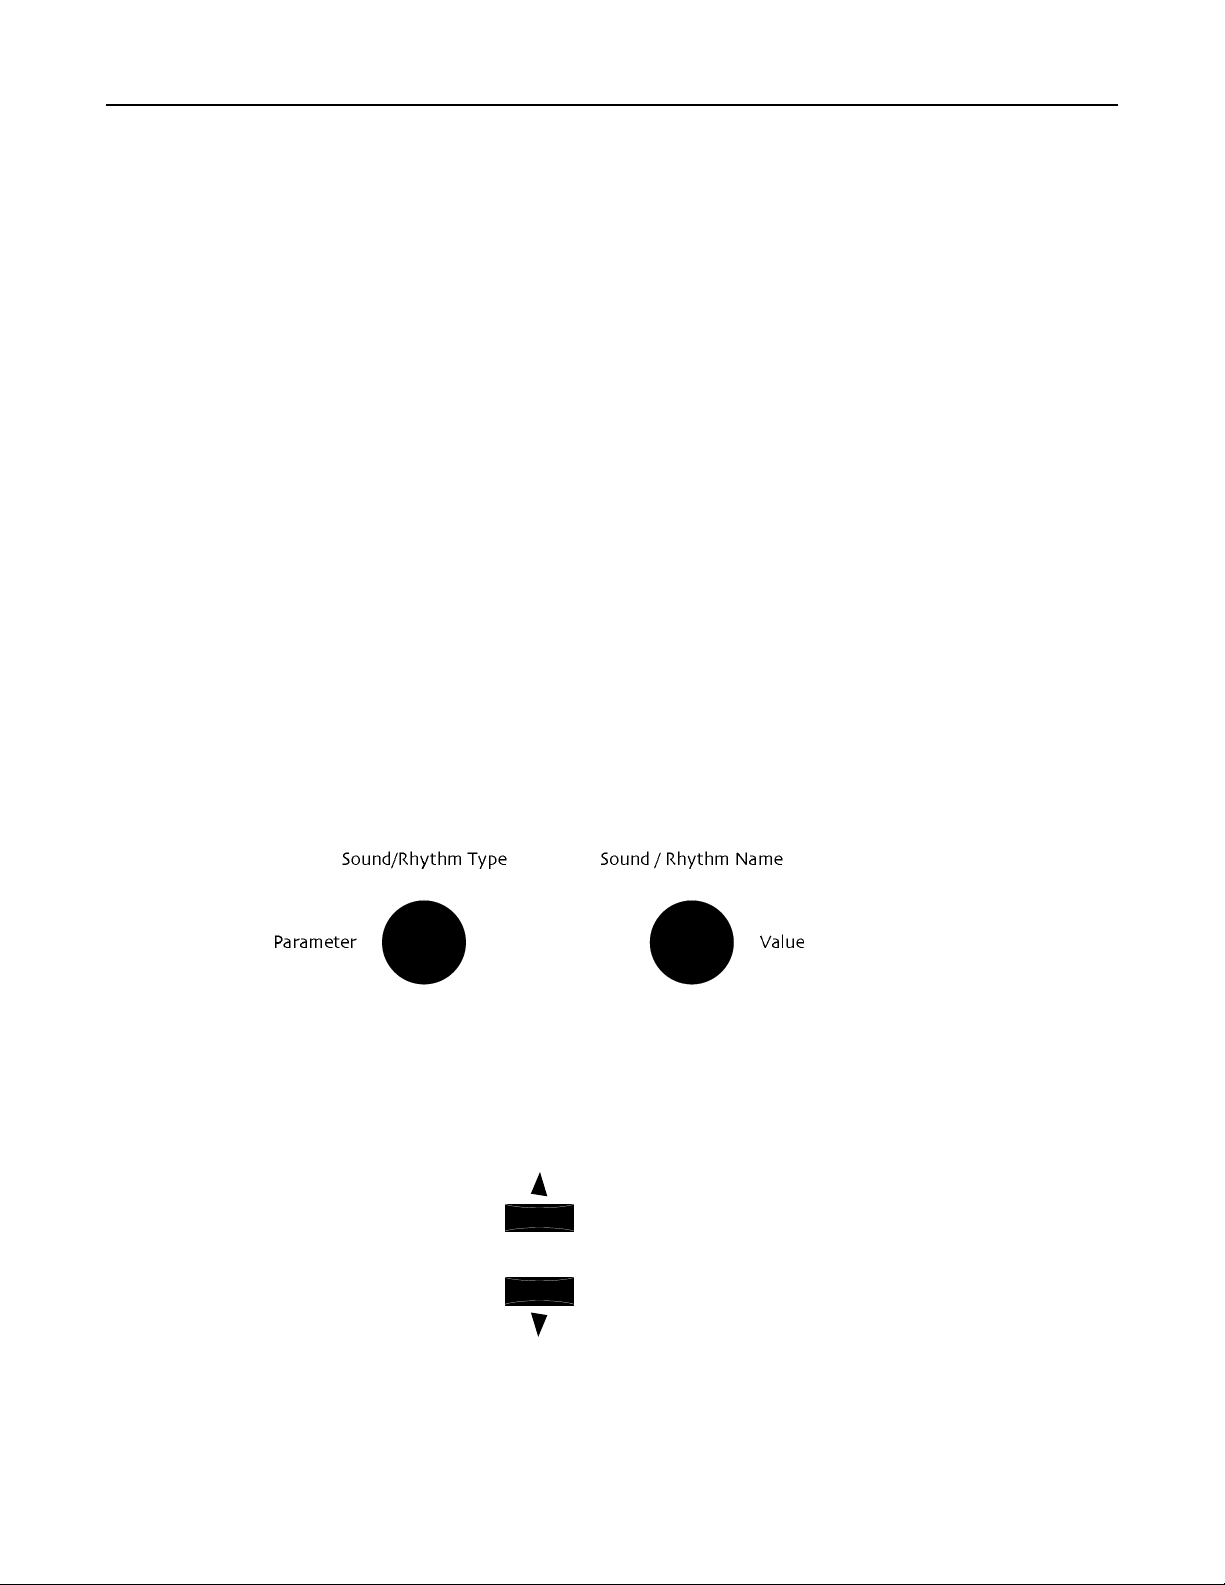
Chapter 1ÑWelcome
If youÕve got a computer, and would like to use your favorite sequencing program to further develop your
sequences, you can pop your ZR-76 floppy into your computerÕs drive and load in your ZR-76 music. Any
computer that can read a DOS-formatted diskÑand that includes just about every recent type of
computerÑcan read the Standard MIDI files on an ZR-76 floppy.
The ZR-76 memory and floppy disk operations are described in Chapter 9ÑMemory and Storage.
EEEENNNNSSSSOOOONNNNIIIIQQQQ EEEEXXXXPPPP SSSSeeeerrrriiiieeeessss WWWWaaaavvvveeee EEEExxxxppppaaaannnnssssiiiioooonnnn BBBBooooaaaarrrrddddssss aaaannnndddd MMMMRRRR----FFFFLLLLAAAASSSSHHHH BBBBooooaaaarrrrddddss
The ZR-76 can be expanded with the addition of ENSONIQ EXP Series Wave Expansion Boards and an
MR-FLASH board. The EXP boards provide a wealth of new sound waves and new sounds, while an MRFLASH board adds the ability to load AIF and .wav samples into your ZR. Expansion boards are mounted
inside the ZR's caseÑyou can easily install them yourself! You can also purchase ENSONIQ EXD Series
floppy disks, which contain additional sounds based on expansion board sound waves.
Your ZR-76 already contains one EXP board: EXP-4, The Perfect Pianoª by William Coakley. As its name
implies, this board adds to the ZRÕs built-in sound waves a top-quality set of Steinway D piano waves, as
well as waves sampled from a pair of electric pianos.
For more details about expanding the ZR-76, see Chapter 10ÑExpanding the ZR-76.
ZZZZ RRRR ---- 7777 6666 CCCC oooo nnnn tttt rrrr oooo llll ssss
TTTThhhheeee ZZZZRRRR----77776666 DDDDiiiissssppppllllaaaayy
The ZR's display has been designed to provide you with all the information youÕll need as you use your ZR-
76. The display will change as you perform different tasks, since what youÕll need to know at any given
time will vary depending on what youÕre doing. The ZR-76 MusicianÕs Manual describes how the display
functions as you use each of the ZRÕs many features.
TTTThhhheeee KKKKnnnnoooobbbbssss UUUUnnnnddddeeeerrrr tttthhhheeee ZZZZRRRR----77776666 DDDDiiiissssppppllllaaaayy
Many of the ZRÕs begin with turning the two large knobs located under the ZRÕs display.
yy
yy
ss
When you select sounds, rhythms or presets, the left knob functions as Sound/Rhythm Type selector,
while the right knob chooses individual sounds, rhythms and presets of the selected type.
Your ZR-76 provides many editing options. Each of these options is called a parameter. ItÕs setting is called
its value. When editing, the left knob chooses parameters and the right knob edits their values.
The up/down arrows to the right of the Sound/Rhythm Name-Value knob perform the same functions as
the knob, except as noted during the manual.
ENSONIQ ZR-76 Musician's Manual16
Page 28
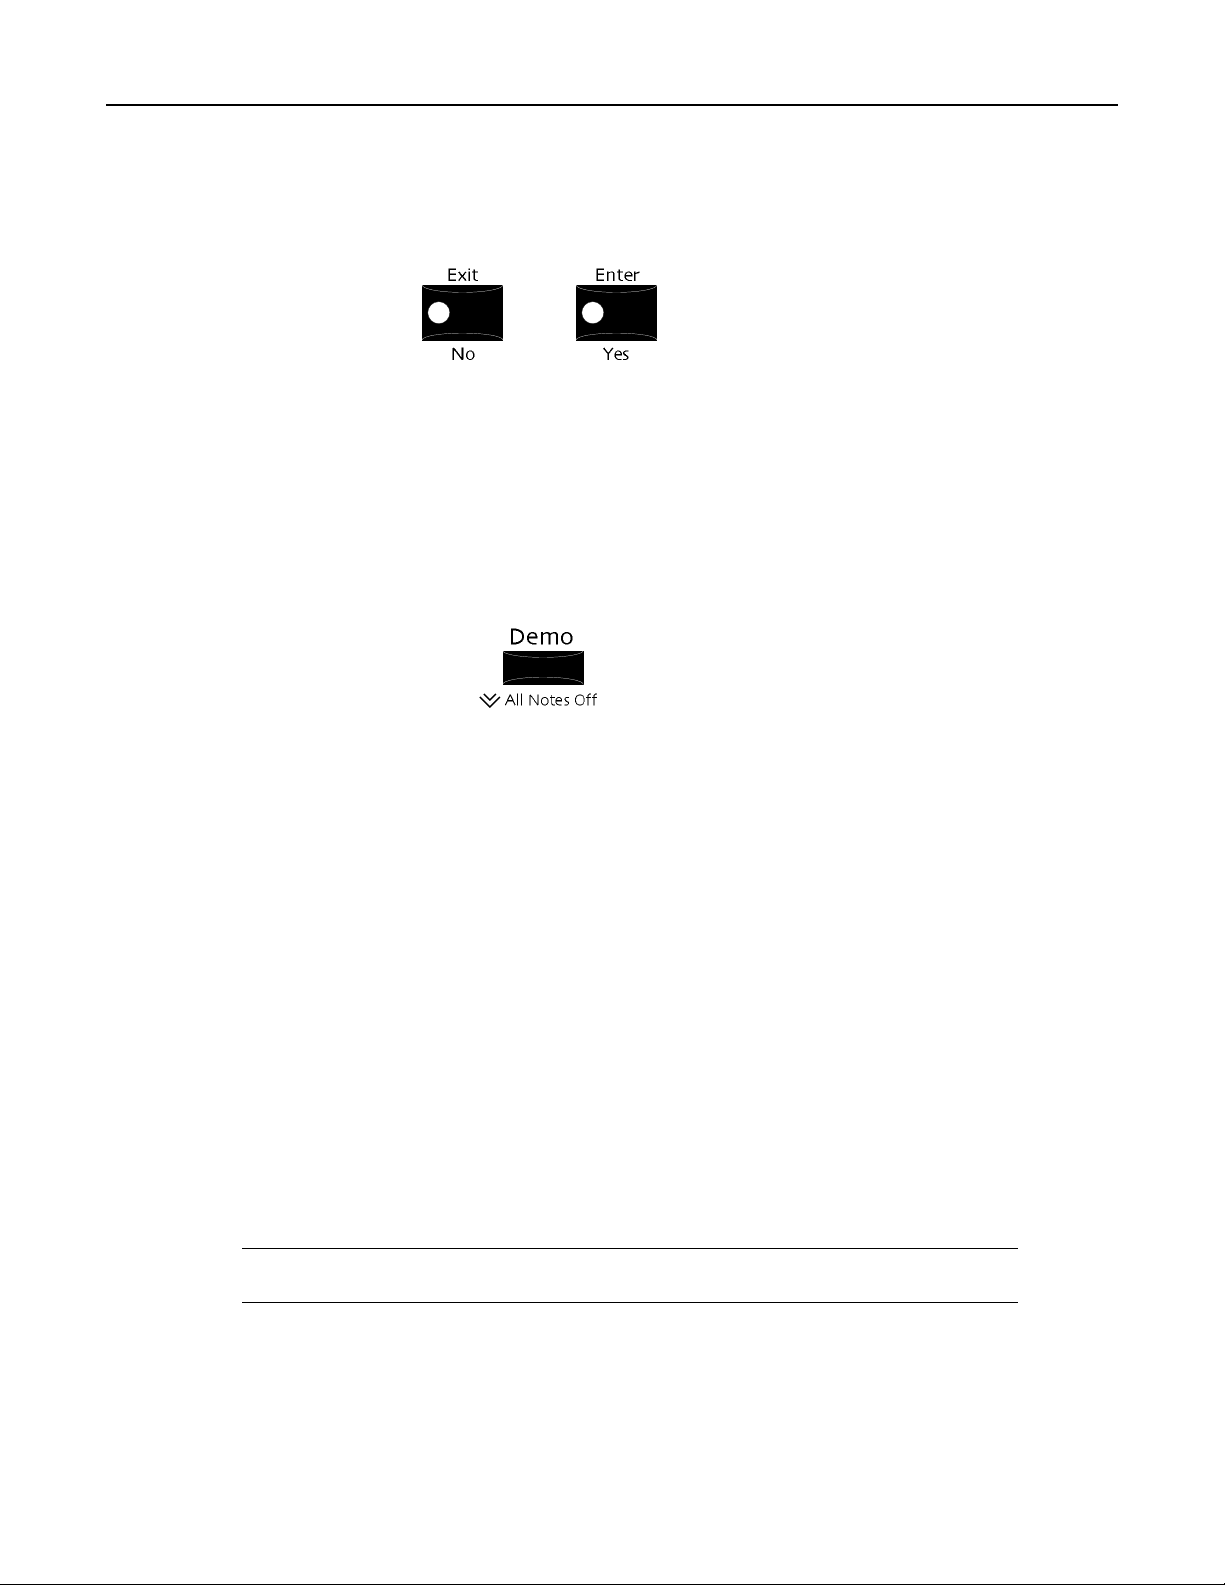
Chapter 1ÑWelcome
TTTThhhheeee BBBBuuuuttttttttoooonnnnssss oooonnnn EEEEiiiitttthhhheeeerrrr SSSSiiiiddddeeee ooooffff tttthhhheeee ZZZZRRRR----77776666 DDDDiiiissssppppllllaaaayy
Many of the operations you can perform in your ZR-76 are offered as questions posed on the ZRÕs display.
Whenever you see a question, youÕll also find that the red LED in the Exit/No button and the green LED in
the Enter/Yes button are flashing.
The flashing LEDs underscore that an answer to the displayed message is required in order to proceed
with, or cancel, the current procedure. Press the Enter/Yes or Exit/No buttons to answer the displayed
question.
AAAAllllllll NNNNooootttteeeessss OOOOffffff
When using MIDI equipment, there are occasions when your system may get confused. This can cause a
barrage of notes to sound which will continue until you do something to stop them. The ZR-76 provides an
All Notes Off button, which you can double-click (press two times quickly) to silence these unwanted notes.
You'll find it in the upper left area of the ZRÕs front panel (itÕs also the Demo button). Think of the All Notes
Off button as a Òpanic button.Ó
ff
yy
ZZZZ RRRR ---- 7777 6666 AAAA cccc cccc eeee ssss ssss oooo rrrr iiii eeee ssss
These accessories came along with your ZR-76. If any of these items is missing, please call ENSONIQ
Customer Service at (610) 647-3930.
¥ ZRD-100 Sound, Rhythm and Sequence Disk, containing:
¥ DRUMDEMO.MF3Ña 16 Track Recorder demo of the ZR-76 drum kits and Drum
Machine rhythms
¥ !FLSRTHM.RBKÑbackup of the 20 Default Flash (INT) Rhythm Patterns
¥ BALLADS.RBKÑbank of 7 Ballad Rhythms
¥ COUNTRY.RBKÑbank of 6 Country Rhythms
¥ DANCE_1.RBKÑbank of 7 Dance Rhythms
¥ DANCE_2.RBKÑbank of 7 Dance Rhythms
¥ ISLAND.RBKÑbank of 5 Island Rhythms
¥ JAZZ.RBKÑbank of 4 Jazz Rhythms
¥ LATIN.RBKÑbank of 7 Latin Rhythms
¥ POP.RBKÑbank of 6 Pop Rhythms
¥ R&B.RBKÑbank of 8 R&B Rhythms
¥ RAP&HOP.RBKÑbank of 9 Rap & Hip-Hop Rhythms
¥ ROCK.RBKÑbank of 16 Rock Rhythms
¥ WORLD.RBKÑbank of 3 World Rhythms
NNNNooootttteeee:::: The three-letter DOS file name suffixes are not visible when loading these files
into the ZR-76.
¥ MusicianÕs Manual (MM-131)
¥ Detachable power cord
¥ Unisyn editing software
¥ SW-6 single damper foot switch
ENSONIQ ZR-76 Musician's Manual 17
Page 29

Chapter 1ÑWelcome
AAAA vvvv aaaa iiii llll aaaa bbbb llll eeee OOOO pppp tttt iiii oooo nnnn ssss ffffoooo rrrr YYYY oooo uuuu rrrr ZZZZ RRRR ---- 7777 6666
These optional accessories are available from your Authorized ENSONIQ Dealer, or by calling ENSONIQÕs
toll-free accessory line at (800) 553-5151:
¥ ZRD Series Sound Disks
¥ EXD Series Sound DisksÑfor use with specific ENSONIQ EXP Series Wave Expansion Boards
¥ ENSONIQ EXP Series Wave Expansion Boards
¥ ENSONIQ MR-FLASH Sample Memory Board
¥ SW-10 Dual Damper Foot SwitchÑ2 pedal piano-type for sustain pedal, sostenuto, and sequencer
start/stop. The ZR-76 can use two of these for a total of four foot switches.
¥ CVP-1 (CV Pedal)Ñfor voice/FX modulation or volume control
¥ Detachable MS-1 Music Stand (ZR-76 only)
IIII ffff YYYY oooo uuuu EEEE xxxx pppp eeee rrrr iiii eeee nnnn cccc eeee OOOO dddd dddd BBBBeeee hhhh aaaa vvvv iiii oooo rrrr
If your ZR-76 is behaving peculiarlyÑfor instance, the display is showing characters that shouldnÕt be
there, or youÕre experiencing Òunexpected eventÓ messagesÑthefollowing procedures may fix your problem,
eliminating the need to call an authorized ENSONIQ repair station or ENSONIQ Customer Service:
¥ A soft restartÑa button combination that acts like turning your ZR-76 off and on.
WWWWaaaarrrrnnnniiiinnnngggg:::: Performing a soft restart will result in your ZR-76 clearing its RAM memory, in the
same way that powering off and on would. If you decide to do a soft restart, try saving any
sequences or RAM sounds, presets or rhythms youÕd like to preserve to a floppy disk before
performing the restart. (see Chapter 9 for details).
¥ A hard reinitialization procedure performs a very deep-level reinitialization of the ZR-76. This
procedure should be primarily be used only in cases where the ZR's front-panel buttons, for some
reason, donÕt allow you to perform a soft restart, or if a soft restart fails to solve your problem.
WWWWaaaarrrrnnnniiiinnnngggg:::: During a hard reinitialization, any sounds, rhythms or presets in FLASH, as well
as any sounds, rhythms, presets, sequences or songs stored in RAM will be lost. All system
parameters will be reset, as well. If you decide to reinitialize, try saving any items you want
to preserve to a floppy firstÑsee Chapter 9 for details. The sounds and rhythms that were
in FLASH when you first purchased your ZR-76 are safely stored on the ZRD-100 floppy
disk that came with your ZR.
TTTToooo PPPPeeeerrrrffffoooorrrrmmmm aaaa SSSSoooofffftttt RRRReeeessssttttaaaarrrrtt
WWWWaaaarrrrnnnniiiinnnngggg:::: Make sure that everything in RAM that youÕd like to keep has been safely stored
on a floppy disk before you reinitialize, since reinitialization will clear the ZR's internal RAM
memory.
1. Press and hold down the SoundFinder Save button.
2. While still holding Save, press the Exit/No button.
If performing a soft restart doesnÕt end the strange occurrences, you may need to perform a hard
reinitialization of your ZR-76.
TTTToooo PPPPeeeerrrrffffoooorrrrmmmm aaaa HHHHaaaarrrrdddd RRRReeeeiiiinnnniiiittttiiiiaaaalllliiiizzzzaaaattttiiiioooonn
WWWWaaaarrrrnnnniiiinnnngggg:::: Make sure that everything in FLASH or RAM that youÕd like to keep has been
safely stored on floppy disk before you reinitialize, since reinitialization will clear the ZR's
internal entire INT memory (it will also reset all system settings to their default values). The
ZRD-100 floppy disk that shipped with your ZR contains a copy of the sound and rhythm
banks that were in FLASH when your ZR-76 shipped from the factory.
1. Turn your ZR-76 off.
2. Press and hold down the Song Editor Erase button.
3. While still holding Erase, turn your ZR-76 on and allow it to power up fully before letting go of erase.
If reinitializing the ZR-76 fails to correct the problem, contact an Authorized ENSONIQ Repair Station
or ENSONIQ Customer Service at (610) 647-3930.
tt
nn
ENSONIQ ZR-76 Musician's Manual18
Page 30

Chapter 1ÑWelcome
NNNN eeee eeee dddd MMMMoooo rrrr eeee HHHH eeee llll pppp ????
Whether youÕre an aspiring programmer looking for additional information about basic effect processing
techniques and MIDI theory, or a professional sound engineer working with advanced applications, you
may want more detailed information beyond the scope of this manual. The following books can help
enhance your understanding of effect processing, MIDI, and related topics. These, in addition to the
numerous monthly magazines, provide a wealth of information. While we donÕt endorse any one of these
publications, we offer this partial list as a resource for you to draw on.
TTTThhhheeee MMMMiiiixxxx BBBBooooooookkkksssshhhheeeellllff
II
MMMMIIIIDDDDII
BECOMING A COMPUTER MUSICIAN, Jeff Bowen
MAKING MUSIC WITH YOUR COMPUTER, David (Rudy) Trubitt, Ed.
MIDI: A COMPREHENSIVE INTRODUCTION, Joseph Rothstein
MIDI XPLAINED, Steinberg/Jones
THE MIDI MANUAL, David Huber
UNDERSTANDING MIDI, David Wills
WHATÕS MIDI?, Jon Eiche
RRRREEEECCCCOOOORRRRDDDDIIIINNNNGG
IMPROVING YOUR SIGNAL PROCESSING SKILLS, (cassette & manual) Bill Gibson
MASTER HANDBOOK OF ACOUSTICS, F. Alton Everest
MODERN RECORDING TECHNIQUES, Huber & Runstein
SOUND REINFORCEMENT HANDBOOK, Davis & Jones
SSSSYYYYNNNNTTTTHHHHEEEESSSSIIIISS
FUNDAMENTAL TECHNOLOGIES OF THE SYNTHESIZER, Errol G. Specter
SYNTHESIZER PERFORMANCE, Jeff Pressing
WHATÕS A SYNTHESIZER?, Jon Eiche
VVVVIIIIDDDDEEEEOOOOSS
SS
SHAPING YOUR SOUND, (video series) Tom Lubin
ff
GG
SS
For prices and more information call: 1-800-233-9604
AAAAllllffffrrrreeeedddd PPPPuuuubbbblllliiiisssshhhhiiiinnnngggg CCCCoooommmmppppaaaannnnyy
II
MMMMIIIIDDDDII
ADVANCED MIDI APPLICATIONS, GPI BASIC MIDI APPLICATIONS, GPI WHAT IS MIDI?, GPI
HHHHaaaallll LLLLeeeeoooonnnnaaaarrrrdddd PPPPuuuubbbblllliiiisssshhhhiiiinnnngggg
MIND OVER MIDI, GPI TUNING IN: MICROTONALITY IN ELECTRONIC MUSIC, Scott R. Wilkinson
MMMMoooonnnntttthhhhllllyyyy MMMMaaaaggggaaaazzzziiiinnnneeeess
The following magazines offer many specific articles and columns that can provide additional information.
TTTTHHHHEEEE TTTTRRRRAAAANNNNSSSSOOOONNNNIIIIQQQQ HHHHAAAACCCCKKKKEEEERR
An independent news magazine for ENSONIQ Users. For prices and information, call 1-503-227-6848.
KKKKEEEEYYYYBBBBOOOOAAAARRRRDD
EEEELLLLEEEECCCCTTTTRRRROOOONNNNIIIICCCC MMMMUUUUSSSSIIIICCCCIIIIAAAANN
HHHHOOOOMMMMEEEE &&&& SSSSTTTTUUUUDDDDIIIIOOOO RRRREEEECCCCOOOORRRRDDDDIIIINNNNGG
XX
MMMMIIIIXX
QQ
EEEEQQ
ENSONIQ ZR-76 Musician's Manual 19
DD
ss
yy
For prices and more information call 1-818-891-5999
For prices and more information call 1-414-774-3630
RR
For subscription rates and more information call 1-800-289-9919
NN
GG
For subscription rates and more information call 1-800-888-5139
For subscription rates and more information call 1-818-407-0744
For subscription rates and more information call 1-800-888-5139
For subscription rates and more information call 1-212-213-3444
Page 31

Chapter 2ÑThe ZR-76 Studio
IIII nnnn tttt rrrr oooo dddd uuuu cccc tttt iiii oooo nnnn
The ZR-76 is a MIDI recording studio unto itself, with powerful composition, arrangement, recording and
mixing tools. The ZR-76 also makes for an excellent central command center for a studio containing other
MIDI modules. In a more elaborate settingÑincluding perhaps a personal computer and/or audio
recorderÑthe ZR-76 is a valuable creative and sonic resource. This chapter describes how to connect and
use the ZR-76 in some of the most popular studio environments.
The key to setting up any studio is to approach the process in an orderly, methodical manner. As each
cable or wire is added, the studio grows in complexity. If you have a firm grasp of whatÕs connected, and
where, youÕll find managing your rig to be much more pleasant. As you add more gearÑor troubleshootÑ
the extra care you take now will pay off in the ease with which youÕll be able to adapt your studio to future
needs.
GGGG eeee tttt tttt iiii nnnn gggg RRRR eeee aaaa dddd yyyy
ItÕs always good policy to turn everything offÑand all volume settings downÑbefore you wire equipment
together. This protects you and your gear from unwelcome surprises.
1. Turn the volume off for each piece of equipment you plan to include in your studio.
2. Turn down any mixer faders or other volume controls for the sound system youÕre using.
3. Turn off the power for everything being included in your set-up.
CCCC hhhh aaaa pppp tttt eeee rrrr 2222
TTTT hhhh eeee ZZZZRRRR ---- 7777 6666 SSSS tttt uuuu dddd iiii oooo
WWWWhhhhaaaatttt CCCCoooonnnnnnnneeeeccccttttiiiioooonnnnssss NNNNeeeeeeeedddd ttttoooo bbbbeeee MMMMaaaaddddeeee??
In any modern MIDI studio system, there are three types of connections to be made:
¥ MIDI connections
¥ Audio connections
¥ Power connections
MMMM aaaa kkkk iiii nnnn gggg MMMMIIII DDDD IIII CCCC oooo nnnn nnnn eeee cccc tttt iiii oooo nnnn ssss
The ZR-76 will communicate with the rest of your equipment via MIDI. The nature of these connections
and the number of MIDI cables youÕll need varies, depending on your set-up. Each studio has its own
needs, which weÕll explain in the individual set-ups in this chapter.
The studio scenarios described in this chapter are:
¥ Using the ZR-76 as a stand-alone studio
¥ Using the ZR-76 as the center of a MIDI studio
¥ Using the ZR-76 with a computer
¥ Using the ZR-76 with an audio recorder
¥ Using the ZR-76 with an alternate controller
¥ Using the ZR-76 with a MIDI patchbay
If youÕve got questions about MIDI itself, or any of the terms above, consult the Glossary or ÒWhat Is
MIDI?Ó sections of Chapter 13.
Even if your plans for the ZR-76 differ from the scenarios described in this chapter, youÕre likely to find the
set-ups useful as starting points for your own studio design.
??
ENSONIQ ZR-76 Musician's Manual 21
Page 32

Chapter 2ÑThe ZR-76 Studio
UUUUssssiiiinnnngggg tttthhhheeee ZZZZRRRR----77776666 aaaassss aaaa SSSSttttaaaannnndddd----AAAAlllloooonnnneeee SSSSttttuuuuddddiiiioo
The ZR-76 is a complete songwriting studio straight out of the box. See ÒMaking Audio ConnectionsÓ and
the ÒMaking the Power ConnectionÓ later in this chapter for important information on using the ZR-76 in a
variety of listening situations, and for tips on powering up.
TTTToooo LLLLeeeeaaaarrrrnnnn MMMMoooorrrree
Chapter 1 provides a good starting point for learning about the ZR-76.
ee
UUUUssssiiiinnnngggg tttthhhheeee ZZZZRRRR----77776666 aaaassss tttthhhheeee CCCCeeeennnntttteeeerrrr ooooffff aaaa MMMMIIIIDDDDIIII SSSSttttuuuuddddiiiioo
The ZR-76 makes an excellent command center for a MIDI studio containing other MIDI instruments,
including sound modules such as ENSONIQÕs ZR-Rack.
WWWWhhhhaaaatttt YYYYoooouuuuÕÕÕÕllllllll NNNNeeeeeeeedd
¥ One less MIDI cable than the number of MIDI devices
NNNNooootttteeee:::: If youÕre going to connect more than one MIDI instrument to the ZR-76, and youÕre
not using a MIDI patchbayÑsee ÒUsing the ZR-76 with a MIDI PatchbayÓ later in this
chapterÑeach of the MIDI instruments must have a MIDI Thru capability (consult each
instrumentÕs manual for further info). This will allow you to Òdaisy-chainÓ the devices.
dd
oo
oo
TTTToooo CCCCoooonnnnnnnneeeecccctttt tttthhhheeee ZZZZRRRR----77776666 ttttoooo OOOOtttthhhheeeerrrr MMMMIIIIDDDDIIII DDDDeeeevvvviiiicccceeeess
1. Connect one end of a MIDI cable to the ZRÕs MIDI Out.
2. Connect its other end to the MIDI In of the first MIDI device you want to use.
3. If you want to add other MIDI instruments, connect another MIDI cable to the first deviceÕs MIDI Thru
jack (some MIDI instruments use the MIDI Out jack for MIDI Thru; see your deviceÕs manual if it has
no MIDI Thru jack).
4. Connect the cableÕs other end to the next deviceÕs MIDI In.
5. Repeat steps three and four for each MIDI device you want to add.
NNNNooootttteeee:::: If your set-up utilizes a MIDI patcher, consult your patcherÕs documentation to learn
how to set up the equivalent of this MIDI connection, and see ÒUsing the ZR-76 with a MIDI
PatchbayÓ later in this chapter.
TTTToooo FFFFiiiinnnniiiisssshhhh YYYYoooouuuurrrr CCCCoooonnnnnnnneeeeccccttttiiiioooonnnnss
Now that youÕve made your MIDI connections between your computer and the ZR-76, skip ahead to
ÒMaking Audio Connections,Ó and then ÒMaking the Power ConnectionÓ later in this chapter.
For more information on using your ZR-76 as a MIDI master controller, see Chapter 4.
ss
ss
ENSONIQ ZR-76 Musician's Manual22
Page 33

Chapter 2ÑThe ZR-76 Studio
UUUUssssiiiinnnngggg tttthhhheeee ZZZZRRRR----77776666 wwwwiiiitttthhhh aaaa CCCCoooommmmppppuuuutttteeeerr
The ZR-76 is designed as the perfect companion for a personal computer. You can edit its sounds on your
computer using the supplied Unisyn software. Use the ZRÕs Idea Pad as your inspiration-catcher and its 16
Track Recorder to flesh out your initial idea. Save the components of the new songÑits sequencesÑto
floppy disk. Since ZR-76 files can be read by any computer that understands Standard Midi Files (SMFs)
and can read a DOS-formatted floppy, you can load your sequences straight off of a floppy and into your
computerÕs sequencerÑor combination sequencing/recording programÑfor further work. When youÕve
moved your ZR sequences over to your computer, your computer will communicate with the ZR-76 via
MIDI to access the sounds you used to create your new song. You can also use your computer to design
your own new sounds using an editing program. After setting up your hardware as described below, see
ÒUsing the ZR-76 with a Computer SequencerÓ at the end of Chapter 7.
Some computers are manufactured with MIDI In/Out/Thru jacks. If yours doesnÕt have built-in MIDI
jacks, youÕll need to purchase a MIDI interface for your computer. Make sure that your computer, its MIDI
programs, andÑif youÕre using oneÑits MIDI interface are configured correctly. Consult their
documentation to learn how to use them with a multi-timbral MIDI device like the ZR-76.
WWWWhhhhaaaatttt YYYYoooouuuuÕÕÕÕllllllll NNNNeeeeeeeedd
¥ Two MIDI cables.
TTTToooo CCCCoooonnnnnnnneeeecccctttt tttthhhheeee ZZZZRRRR----77776666 aaaannnndddd aaaa CCCCoooommmmppppuuuutttteeeerr
1. Connect one end of a MIDI cable to your computerÕs MIDI Out.
2. Connect the cableÕs other end to the ZRÕs MIDI In.
3. Connect one end of the other MIDI cable to the ZRÕs MIDI Out.
4. Connect its other end to the computerÕs MIDI In.
dd
rr
rr
NNNNooootttteeee:::: If your set-up utilizes a MIDI patcher, consult your patcherÕs documentation to learn
how to set up the equivalent of this MIDI connection, and see ÒUsing the ZR-76 with a MIDI
PatchbayÓ later in this chapter.
TTTToooo FFFFiiiinnnniiiisssshhhh YYYYoooouuuurrrr CCCCoooonnnnnnnneeeeccccttttiiiioooonnnnss
Now that youÕve made your MIDI connections between your computer and the ZR-76, skip ahead to
ÒMaking Audio Connections,Ó and then ÒMaking the Power ConnectionÓ later in this chapter.
TTTToooo LLLLeeeeaaaarrrrnnnn MMMMoooorrrree
See ÒUsing the ZR-76 with a Computer SequencerÓ in Chapter 7.
ee
UUUUssssiiiinnnngggg tttthhhheeee ZZZZRRRR----77776666 wwwwiiiitttthhhh aaaannnn AAAAuuuuddddiiiioooo RRRReeeeccccoooorrrrddddeeeerr
The ZR-76 can provide the perfect MIDI complement for an audio recorder, digital or analog, tape or hard
driveÑthe ZR-76 handles all of the MIDI chores, while the recorder handles the audio. Add some effects to
your audio, using an effects processor, and youÕve got a finished master recording.
When using the ZR-76 with an audio recorder, youÕll want to have a means of synchronizing the two
devices. There are a number of capable synchronization products on the marketÑto work with the ZR-76,
yours must support MIDI clocks, as well as the type of synchronization required by your audio recorder
(consult its documentation to learn what kind of synchronization it responds to).
ENSONIQ ZR-76 Musician's Manual 23
ss
rr
Page 34

Chapter 2ÑThe ZR-76 Studio
WWWWhhhhaaaatttt YYYYoooouuuuÕÕÕÕllllllll NNNNeeeeeeeedd
¥ Two MIDI cables to connect the ZR-76 to your synchronization device
¥ The cabling necessary to connect your audio recorder to the synchronization device (consult their
manuals for further information)
TTTToooo CCCCoooonnnnnnnneeeecccctttt tttthhhheeee ZZZZRRRR----77776666 aaaannnndddd aaaannnn AAAAuuuuddddiiiioooo RRRReeeeccccoooorrrrddddeeeerr
1. Connect one end of a MIDI cable to the ZRÕs MIDI Out.
2. Connect the cableÕs other end to your synchronization deviceÕs MIDI In.
3. Connect one end of the other MIDI cable to the ZRÕs MIDI In.
4. Connect its other end to the synchronization deviceÕs MIDI Out.
5. Connect the required cables between the audio recorder and synchronization device.
NNNNooootttteeee:::: If your set-up utilizes a MIDI patcher, consult your patcherÕs documentation to learn
how to set up the equivalent of this MIDI connection, and see ÒUsing the ZR-76 with a MIDI
PatchbayÓ later in this chapter.
dd
rr
TTTToooo FFFFiiiinnnniiiisssshhhh YYYYoooouuuurrrr CCCCoooonnnnnnnneeeeccccttttiiiioooonnnnss
Now that youÕve made the MIDI connections between your audio recorder and the ZR-76, skip ahead to
ÒMaking Audio Connections,Ó and then ÒMaking the Power ConnectionÓ later in this chapter.
TTTToooo LLLLeeeeaaaarrrrnnnn MMMMoooorrrree
Chapter 7 describes how to synchronize the ZRÕs 16 Track Recorder to external MIDI devices.
ee
UUUUssssiiiinnnngggg tttthhhheeee ZZZZRRRR----77776666 wwwwiiiitttthhhh aaaannnn AAAAlllltttteeeerrrrnnnnaaaatttteeee CCCCoooonnnnttttrrrroooolllllllleeeerr
You can use any MIDI controller to play the ZRÕs sounds in SoundFinder or the 16 track recorder. This
includes MIDI wind controllers and other MIDI keyboards, MIDI drum pads or triggers, MIDI guitars, or
anything else a musician might play which sends out MIDI data.
WWWWhhhhaaaatttt YYYYoooouuuuÕÕÕÕllllllll NNNNeeeeeeeedd
¥ One MIDI cable
TTTToooo CCCCoooonnnnnnnneeeecccctttt tttthhhheeee ZZZZRRRR----777766
1. Connect one end of your MIDI cable to your controllerÕs MIDI Out.
2. Connect the other end to the ZRÕs MIDI In.
dd
66
ss
rr
ENSONIQ ZR-76 Musician's Manual24
Page 35

Chapter 2ÑThe ZR-76 Studio
NNNNooootttteeee:::: If your set-up utilizes a MIDI patcher, consult your patcherÕs documentation to learn
how to set up the equivalent of this MIDI connection, or see ÒUsing the ZR-76 with a MIDI
PatchbayÓ below.
TTTToooo FFFFiiiinnnniiiisssshhhh YYYYoooouuuurrrr CCCCoooonnnnnnnneeeeccccttttiiiioooonnnnss
Now that youÕve made the MIDI connections between your controller and the ZR-76, skip ahead to ÒMaking
Audio Connections,Ó and then ÒMaking the Power ConnectionÓ later in this chapter.
TTTToooo LLLLeeeeaaaarrrrnnnn MMMMoooorrrree
For further information:
¥ on playing the ZRÕs sounds via MIDI, see ÒSoundFinder MIDIÓ in Chapter 4.
¥ on recording onto an ZR-76 16 Track Recorder track via MIDI, see Chapter 7.
ee
UUUUssssiiiinnnngggg tttthhhheeee ZZZZRRRR----77776666 wwwwiiiitttthhhh aaaa MMMMIIIIDDDDIIII PPPPaaaattttcccchhhhbbbbaaaayy
A MIDI patchbayÑespecially one with merging capabilitiesÑis the ideal way to connect your ZR-76 to other
MIDI devices. Once everything is wired up to the patchbay, all inter-device connections are just a few
mouse clicks, button presses or knob twists away.
MIDI patchbays typically provide numbered pairs of MIDI In and Out jacksÑeach of these pairs is used by
a single MIDI device. Consult your patchbayÕs documentation to see if the manufacturer has
recommendations as to which locationÑthat is, pairÑshould be used by your computer or your master
controller (your ZR-76 can be used for this purpose). If your patchbayÕs documentation mentions no
specific rules in this regard, you can connect any device to any location.
WWWWhhhhaaaatttt YYYYoooouuuuÕÕÕÕllllllll NNNNeeeeeeeedd
¥ A pair of MIDI cables for each MIDI device youÕll be connecting to the patchbay
TTTToooo MMMMaaaakkkkeeee YYYYoooouuuurrrr ZZZZRRRR----77776666 aaaannnndddd PPPPaaaattttcccchhhhbbbbaaaayyyy CCCCoooonnnnnnnneeeeccccttttiiiioooonnnnss
1. Select a patchbay location for the ZR-76.
2. Connect the ZRÕs MIDI Out to the MIDI In of the patchbay location youÕve chosen for the ZR-76.
3. Connect the same locationÕs MIDI Out to the ZRÕs MIDI In.
4. Repeat these steps for each MIDI device youÕd like to connect to your MIDI patchbay.
dd
ss
yy
ss
Consult your patchbayÕs documentation to learn how to route MIDI signals from one MIDI device to
another (or others). The optimal routings will depend on how youÕll be using your MIDI equipment. The
great thing about a patchbay is that, as new MIDI needs arise, it only takes a few moments to meet them.
TTTToooo FFFFiiiinnnniiiisssshhhh YYYYoooouuuurrrr CCCCoooonnnnnnnneeeeccccttttiiiioooonnnnss
Once youÕve programmed your patchbay, you can move on to Making Audio Connections below.
MMMM aaaa kkkk iiii nnnn gggg AAAA uuuu dddd iiii oooo CCCC oooo nnnn nnnn eeee cccc tttt iiii oooo nnnn ssss
In any set-up, youÕll need to determine what type of audio connection youÕd prefer to establish between the
ZR-76 and the rest of your system. There are a number of options.
¥ You can listen to the ZR-76 with headphones plugged into the rear-panel Phones jack. This is great for
ENSONIQ ZR-76 Musician's Manual 25
ss
Page 36

Chapter 2ÑThe ZR-76 Studio
privacyÑwhen youÕre practicing, no one else can hear what youÕre up to. ItÕs also a convenient way to
experience the ZRÕs crystal-clear sound without added noise from other equipment in your rig. The
ZRÕs Volume knob controls your listening volume.
Using headphones is always available as an option, regardless of other audio connections youÕve made
with the ZR-76. Plugging in headphones does not mute the other audio outputs from the ZR-76.
¥ If youÕd prefer to use the ZR-76 in mono through a traditional keyboard or guitar amplifier, or through
a single fader on a mixing console, connect one end of a 1/4Ó phone-type audio cable to the Main Out
Left jack on the ZRÕs back panel, and the other end to your amplifier or mixer. The ÒZR-76 Output
JacksÓ section in Chapter 13 contains technical information about the ZRÕs output jacks.
¥ If youÕd like to operate your ZR-76 in stereo through a pair of faders on a mixing console, a stereo
amplifier or two separate mono amps, youÕll need two 1/4Ó phone-type cables. Connect one end of each
cable to the ZRÕs rear-panel Main Out Left and Right jacks and the other end to your desired
destination. The ÒZR-76 Output JacksÓ section in Chapter 13 contains technical information about the
ZRÕs output jacks.
¥ You can also connect the ZR-76 to your home stereo, though a bit of caution is required. The ZR-76 is
capable of producing a far greater dynamic range than a home stereo typically encounters when
playing compact discs, cassettes and LPs. See ÒSetting Volume LevelsÓ below to learn how to safely set
the ZRÕs Volume when using it with a home stereo. YouÕll need two 1/4Ó-phone-to-RCA-type cables, or
youÕll need to create some by attaching adapters to standard 1/4Ó phone or RCA cables. Connect the
1/4Ó phone plug end of each 1/4Ó-to-RCA cable to the ZRÕs rear-panel Main Out Left and Right jacks
and the RCA end to your stereoÕs auxiliary inputs. The ÒZR-76 Output JacksÓ section in Chapter 13
contains technical information about the ZRÕs output jacks.
¥ If youÕre connecting the ZR-76 to an audio patch bay, or if youÕve got four available inputs on your
ENSONIQ ZR-76 Musician's Manual26
Page 37

Chapter 2ÑThe ZR-76 Studio
mixing console, you may elect to use all of the ZRÕs outs. The ZR-76 offersÑin addition to the Main
OutsÑa pair of Aux Outs, useful for extracting sounds or groups of sounds from the ZRÕs main outs
mix. This allows you to treat the extracted material with its own outboard processing, or to control its
volume more easily by assigning it separate faders on a mixer. To use all four outputs, youÕll need four
1/4Ó phone-type cables. Connect one end of each to the ZRÕs rear-panel Main and Aux Outs Left and
Right, and the other end to a patch bay position or mixer channel. The ÒZR-76 Output JacksÓ section
in Chapter 13 contains technical information about the ZRÕs output jacks.
ÒUsing the ZRÕs Four OutputsÓ in Chapter 3 describes how to route sounds to the Aux Outs. The ZR-76
also provides a simple switch for easily sending everything you may have routed to the Aux Outs back into
the Main Outs mix. See ÒDetermining the Behavior of the Aux OutsÓ in Chapter 3.
MMMM aaaa kkkk iiii nnnn gggg tttthhhh eeee PPPPoooo wwww eeee rrrr CCCC oooo nnnn nnnn eeee cccc tttt iiii oooo nnnn
The ZR-76 requires grounded AC power, supplied through the power cord that came with your ZR-76. The
ZR-76 power supply is intelligent and will adjust to your local voltage.
TTTToooo PPPPrrrroooovvvviiiiddddeeee PPPPoooowwwweeeerrrr ttttoooo YYYYoooouuuurrrr ZZZZRRRR----777766
1. Connect one end of the ZRÕs power cable to a grounded AC outlet.
2. Connect the other end of the ZRÕs power cord to the AC Line jack on the ZRÕs rear panel.
3. Connect the other pieces of equipment in your system which require AC power to AC outlets.
PPPPoooowwwweeeerrrriiiinnnngggg UUUUpp
You should always turn on the device which will be transmitting MIDI before you turn on the device which
will be receiving it. If you have a series of MIDI devices, start with the first device in the chain, then power
up the second, the third, and so on. This prevents unpleasant surprises which can result from unplanned
MIDI information being ÒspitÓ out of transmitting devices as they power up. Such MIDI garbage could
confuse a receiving device, and possibly disable it temporarily. If this should occur for some reason, and
the ZR-76 becomes Òconfused,Ó try double-clicking the ZRÕs All Notes Off button. If this doesnÕt correct the
problem, turn the ZRÕs power off, and then back on.
pp
SSSS eeee tttt tttt iiii nnnn gggg VVVV oooo llll uuuu mmmm eeee LLLLeeee vvvv eeee llll ssss
The ZRÕs best fidelity is obtained when its volume is turned all the way upÑyou should always set it as
high as possible. Here are some tips:
¥ If youÕre using the ZRÕs Phones jack, the Volume slider controls your listening level. Set it to a
comfortable level.
¥ If youÕre using the ZR-76 with a keyboard or guitar amplifier, start with your amp input at a low
setting. Turn the ZRÕs volume up as far as you can without experiencing distortion (unless thatÕs what
you want). Then turn up your amp channel to a comfortable listening level.
¥ If youÕre routing the ZR-76 directly to a mixing console, or indirectly through a patchbay, turn the ZRÕs
volume all the way up and make adjustments to the input gain of your mixer faders to ensure the
sound doesnÕt undesirably distort.
¥ If youÕre listening to the ZR-76 through a home stereo, set your stereoÕs volume to its normal level.
With the ZRÕs Volume slider all the way down, play the keyboard with maximum force, or load up the
loudest ZR-76 song you have and press Play. Slowly bring up the ZRÕs Volume slider as far as you can
without hearing distortion. The ZR-76 is capable of producing a far greater dynamic range than a
home stereo typically encounters when playing compact discs, cassettes and LPs, and you want to
make sure that loud music from the ZR-76 will not damage your system.
66
ENSONIQ ZR-76 Musician's Manual 27
Page 38

Chapter 3ÑGlobal Settings
CCCC hhhh aaaa pppp tttt eeee rrrr 3333
GGGG llll oooo bbbb aaaa llll SSSS eeee tttt tttt iiii nnnn gggg ssss
The ZR-76 offers a range of options that allow you to tailor its behavior to suit your way of working. These
global, system-wide settings operate in the background, letting you get on with the art of making music.
They remain in effect at all times and are preserved when the ZR-76Õs power is switched off.
These options can be found in the Disk/Global area of your ZR-76. They are accessed by pressing the
System button.
HHHHoooowwww tttthhhheeee ZZZZRRRR----77776666 RRRReeeemmmmeeeemmmmbbbbeeeerrrrssss SSSSyyyysssstttteeeemmmm SSSSeeeettttttttiiiinnnnggggss
All ZR-76 system settings are stored in FLASH memory. 15 seconds after you change any of them, or
when you leave the ZRÕs System area, normal operations will pause briefly to allow the ZR to store the
new settings into FLASH.
The display will briefly show:
ss
Saving system setup.
Please wait...
For more information about FLASH memory, see Chapter 9.
GGGG eeee nnnn eeee rrrr aaaa llll SSSS yyyy ssss tttt eeee mmmm EEEE dddd iiii tttt iiii nnnn gggg TTTT eeee cccc hhhh nnnn iiii qqqq uuuu eeee ssss
TTTThhhheeee SSSSyyyysssstttteeeemmmm GGGGrrrroooouuuuppppiiiinnnnggggss
The ZR-76 provides a great many system settings. In order to make getting to them simpler, theyÕve been
grouped into five sections. Each section is accessed by answering ÒyesÓ to a displayed question.
TTTToooo EEEEddddiiiitttt GGGGlllloooobbbbaaaallll SSSSyyyysssstttteeeemmmm SSSSeeeettttttttiiiinnnnggggss
1. Press the System button.
The No and Yes LEDs will begin to flash.
2. Locate the Parameter knob on the ZRÕs front panel.
ENSONIQ ZR-76 Musician's Manual 29
ss
ss
Page 39

Chapter 3ÑGlobal Settings
3. Turn the Parameter knob to select one of the following questions:
If you now press the Yes button in response to this display, you can change the keyboardÕs velocity
and pressure response, set effect output routings, and control aspects of sound selection and
memory protection.
System/MIDI:
Set system prefs?
System/MIDI:
Alter system pitch?
When you press the Yes button in response to this display, you can change the global pitch bend
settings, global tuning and the global pitch table.
System/MIDI:
Set up foot control?
When you press the Yes button in response to this display, you can assign various functions to the
four possible foot switches available when you add two ENSONIQ SW-10 foot pedals to your ZR-76.
System/MIDI:
Edit MIDI settings?
When you press the Yes button in response to this display, you can change the way the ZR-76 works
with other MIDI devices.
System/MIDI:
Enter GM mode?
When you press the Yes button in response to this display, you can set up the ZR-76 for General
MIDI. (For a description of General MIDI, see ÒWhat Is General MIDI?Ó in Chapter 13.
4. Press the Yes button in response to the question youÕve selected.
ENSONIQ ZR-76 Musician's Manual30
Page 40

Chapter 3ÑGlobal Settings
5. Each one of the system options that you may adjust is called a parameter. Turn the Parameter knob
to select the system parameter youÕd like to set.
6. Use the Value knob to change the selected parameterÕs value.
Each of the system parameters is described later in this chapter.
SSSS eeee tttt tttt iiii nnnn gggg YYYY oooo uuuu rrrr SSSS yyyy ssss tttt eeee mmmm PPPP rrrr eeee ffff eeee rrrr eeee nnnn cccc eeee ssss
AAAAddddjjjjuuuussssttttiiiinnnngggg tttthhhheeee KKKKeeeeyyyybbbbooooaaaarrrrddddÕÕÕÕssss RRRReeeessssppppoooonnnnsssseeee ttttoooo VVVVeeeelllloooocccciiiittttyy
A keyboard such as the one in your ZR-76 senses how hard you play by measuring the velocity of your
keystrikes. The Touch Curve parameter allows you to adjust the velocity response of the ZR-76 keyboard
to match your playing style and technique. Taking the time to find the right setting for you will help you
get the most out of the ZRÕs expressive sounds. There are six velocity curve (Touch) settings:
¥ Table-1 ¥ Table-4
¥ Table-2 ¥ Fixed 64
¥ Table-3 ¥ Fixed127
For more information about the ZR-76 velocity curves, see Chapter 13.
NNNNooootttteeee:::: The ZR-76 keyboard transmits release velocity according to a single specially-
optimized release curve.
When you change any system setting, ZR-76 operations will pause momentarily
to store your settings into FLASH memory.
TTTToooo AAAAddddjjjjuuuusssstttt KKKKeeeeyyyybbbbooooaaaarrrrdddd VVVVeeeelllloooocccciiiittttyy
1. Press the System button.
yy
yy
2. Turn the Parameter knob until the display shows:
System/MIDI:
Set system prefs?
3. Press Yes if youÕd like to change the current system preferences. Press No if youÕd like to cancel the
procedure.
ENSONIQ ZR-76 Musician's Manual 31
Page 41

Chapter 3ÑGlobal Settings
4. Turn the Parameter knob until the display shows:
5. Turn the Value knob or press the up/down arrow buttons to set the Touch Curve parameter to the
value that best matches your playing style. Play some music at each setting to find the value that
feels the most comfortable for your style of playing.
The Touch Curve values that begin with ÒFixedÓ will cause every key to play at the same velocity, no
matter how hard or soft you play.
NNNNooootttteeee:::: This parameter affects the way your ZR-76 responds to velocity internally, as well
as the velocity values it transmits via MIDI.
System Preferences:
Touch Curve= Table-1
i
The current Touch Curve value
AAAAddddjjjjuuuussssttttiiiinnnngggg tttthhhheeee KKKKeeeeyyyybbbbooooaaaarrrrddddÕÕÕÕssss RRRReeeessssppppoooonnnnsssseeee ttttoooo PPPPrrrreeeessssssssuuuurrrree
Some of the sounds in the ZR-76 respond to the Channel Pressure messages produced by the ZRÕs
keyboard when you press down on its keys at the bottom of their travel. ItÕs a good idea to customize your
ZRÕs pressure settings so that you can activate channel pressure without either doing so inadvertently, or
with too much difficulty.
The Press Threshold parameter allows you to adjust the pressure of the keyboard to match your playing
style and technique. The pressure threshold can be varied between SOFT (minimum force required to
bring in pressure) and HARD (maximum force required to bring in pressure).
¥ SOFTÑis for someone with a light touch. With this setting, a minimum amount of pressure is
required to reach the maximum level of any pressure-controlled parameter.
¥ MEDÑrequires slightly harder pressing to reach maximum pressure levels. This is the default
setting.
¥ FIRMÑrepresents average pressure sensitivity. A FIRM setting should be right for the player with an
average touch.
¥ HARDÑis for the strong player who presses the keys hard. It allows the widest possible range of
pressure sensitivity.
TTTTiiiipppp:::: Start with the default settings, then go up or down to find your optimal setting.
When you change any system setting, ZR-76 operations will pause momentarily
to store your settings into FLASH memory.
TTTToooo AAAAddddjjjjuuuusssstttt KKKKeeeeyyyybbbbooooaaaarrrrdddd PPPPrrrreeeessssssssuuuurrrree
1. Press the System button.
ee
ee
2. Turn the Parameter knob until the display shows:
System/MIDI:
Set system prefs?
ENSONIQ ZR-76 Musician's Manual32
Page 42

Chapter 3ÑGlobal Settings
3. Press Yes if youÕd like to change the current system preferences. Press No if youÕd like to cancel the
procedure.
4. Turn the Parameter knob until the display shows:
System Preferences:
Press Threshold= Med
i
The current Press Threshold value
If you would like to make it easy to generate keyboard pressure by pressing on the keys, set the
parameter to Soft. If you would like to make it more difficult to generate keyboard pressure by
pressing on the keys, set the parameter to Hard. Try different settings to find the one most
comfortable for you.
5. Turn the Value knob or press the up/down arrow buttons to set the Touch Curve parameter to the
value that best matches your playing style.
NNNNooootttteeee:::: This parameter affects the way your ZR-76 responds to pressure internally, as well
as the pressure values it transmits via MIDI.
UUUUssssiiiinnnngggg tttthhhheeee ZZZZRRRRÕÕÕÕssss FFFFoooouuuurrrr OOOOuuuuttttppppuuuuttttss
The rear panel of the ZR-76 offers four audio outputs. There are two stereo pairs: the Main Outs and the
Aux Outs.
The Main Outs are used as the primary feed from the ZR-76. The Aux Outs are useful for extracting
sounds or groups of sounds from the ZRÕs Main Out mix. By routing a sound to the Aux Outs, you can
treat it to its own outboard processing, or control its volume individually by assigning it to its own fader
on a mixer. Use standard balanced (TRS stereo cables) or unbalanced (TS mono cables) for the Main and
Aux Outs.
As the labels on the Aux Out jacks and Main Out jacks indicate, the ZR-76 employs automatic switching
on each pair of outputs:
¥ Main Outputs Left and Right are normally stereo outputs. However, if nothing is plugged into the
Right Output, the stereo signal will be summed to mono and sent to the Left Main Output.
¥ Similarly, the Aux Outputs Left and Right are normally stereo outputs. However, if nothing is plugged
into the Right Aux Output, the stereo signal will be summed to mono and sent to the Left Aux Output.
RRRRoooouuuuttttiiiinnnngggg SSSSoooouuuunnnnddddssss ttttoooo SSSSppppeeeecccciiiiffffiiiicccc OOOOuuuuttttppppuuuuttttss
All tracks sounds are routed to a rear-panel output via an effect bus. In routing a sound to a particular
pair of outs:
¥ The sound is assigned to an FX bus.
¥ The bus goes to an effect (except the dry bus, which goes directly to the outputs you choose).
¥ The effect is assigned to either the Main Outs or the Aux Outs.
ss
ss
When you change any system setting, ZR-76 operations will pause momentarily
to store your settings into FLASH memory.
ENSONIQ ZR-76 Musician's Manual 33
Page 43

Chapter 3ÑGlobal Settings
TTTToooo SSSSeeeennnndddd aaaa SSSSoooouuuunnnndddd ttttoooo tttthhhheeee DDDDeeeessssiiiirrrreeeedddd OOOOuuuuttttppppuuuuttttss
1. If youÕre using SoundFinder, select the sound youÕd like to send to a particular output and route it to
an effect bus. (To learn how to route a SoundFinder sound to an effect bus, see Chapter 8.)
If youÕre using the 16 Track Recorder, press the track button containing sound youÕd like to send to
a particular output, and route it to an effect bus. (To learn how to route a sound on a track to an
effect bus, see Chapter 8.)
2. Press the System button.
3. Turn the Parameter knob until the display shows:
System/MIDI:
Set system prefs?
4. Press Yes if youÕd like to change the current system preferences. Press No to cancel the procedure.
5. Turn the Parameter knob until the display shows the output assign parameter for the FX bus youÕve
chosen.
NNNNooootttteeee:::: The LightReverb, Medium Reverb and WetReverb busses all use the
GlobalReverbOut parameter.
ss
6. Use the Value knob to select either the Main or Aux Outs.
When you change any system setting, ZR-76 operations will pause momentarily
to store your settings into FLASH memory.
TTTToooo RRRRoooouuuutttteeee aaaa SSSSppppeeeecccciiiiffffiiiicccc EEEEffffffffeeeecccctttt BBBBuuuussss ttttoooo tttthhhheeee DDDDeeeessssiiiirrrreeeedddd OOOOuuuuttttppppuuuuttttss
1. Press the System button.
2. Turn the Parameter knob until the display shows:
System/MIDI:
Set system prefs?
3. Press Yes if youÕd like to change the current system preferences, or No to cancel the procedure.
4. Turn the Parameter knob until the display shows the name of the Effect Bus you would like to assign
to an output.
System Preferences:
Insert FX Out= Main
ss
ii
The name of the effect bus The current output assignment
ENSONIQ ZR-76 Musician's Manual34
Page 44

Chapter 3ÑGlobal Settings
You can change the routing of the insert, global chorus, global reverb, and dry effect busses. Each of
these effect busses can be routed either to:
¥ MainÑthe ZRÕs primary outputs ¥ AuxÑthe ZRÕs additional outputs
5. Turn the Value knob to route the effect bus you selected to the desired output.
DDDDeeeetttteeeerrrrmmmmiiiinnnniiiinnnngggg tttthhhheeee BBBBeeeehhhhaaaavvvviiiioooorrrr ooooffff tttthhhheeee AAAAuuuuxxxx OOOOuuuuttttss
The Aux Outs are used for the extraction of sounds from the Main Outs mix. The ZR-76 is designed to
provide the maximum flexibility when using the Aux Outs in your rig. The AuxToMainOuts System
parameter offers three different ways to employ the Aux Outs. You can choose which one will work best
for you.
When AuxToMainOuts is set to Auto, the ZR employs intelligent jack switching, which allows it to sense
whether or not youÕve got a cable plugged into the Left Aux Out jack. If you do, the Main and Aux Outs
function as totally discrete stereo feeds. If thereÕs nothing connected to the jack, any signal sent to the
Aux Outputs will be summed into the Main Outputs. This is convenient for musicians who seek to keep
mixer input use to a minimum, or who anticipate using the Aux Outs only rarely.
Musicians who would prefer to permanently connect all four ZR keyboard outs will find the remaining
two AuxToMainOuts values useful. When the parameter is set to Never, the Aux and Main Outs are kept
discrete. When itÕs set to Always, the Aux Outs are summed into the Main Outs. This allows musicians to
leave all four ZR-76 output cables connected. When the Aux Outs are needed as a separate stereo feed,
the AuxToMainOuts parameter can be set to Never. When only the Main Outs are required, it can be set
to Always.
When you change any system setting, ZR-76 operations will pause momentarily
to store your settings into FLASH memory.
TTTToooo EEEEnnnnaaaabbbblllleeee AAAAuuuuttttoooommmmaaaattttiiiicccc AAAAuuuuxxxx OOOOuuuutttt RRRRoooouuuuttttiiiinnnngggg BBBBaaaasssseeeedddd oooonnnn CCCCaaaabbbblllliiiinnnngg
1. Press the System button.
ss
gg
2. Turn the Parameter knob until the display shows:
System/MIDI:
Set system prefs?
3. Press Yes if youÕd like to change the current system preferences. Press No if youÕd like to cancel the
procedure.
4. Turn the Parameter knob until the display shows:
System Preferences:
AuxToMainOuts= Auto
i
The current AuxToMainOuts value
The AuxToMainOuts parameter can be set to:
¥ NeverÑthe Aux and Main Outs will be discrete, even if the Left Aux Out is not connected.
¥ AlwaysÑthe Aux signal will be summed into the Main outputs, even if the Left Aux Out is
connected.
¥ AutoÑthe ZR-76 will sum any sounds sent to the Aux Outs into the Main Outs if thereÕs no cable
ENSONIQ ZR-76 Musician's Manual 35
Page 45

Chapter 3ÑGlobal Settings
plugged into the Left Aux Out jack.
5. Use the Value knob to set AuxToMainOuts to Auto.
When you change any system setting, ZR-76 operations will pause momentarily
to store your settings into FLASH memory.
TTTToooo UUUUttttiiiilllliiiizzzzeeee PPPPeeeerrrrmmmmaaaannnneeeennnnttttllllyyyy CCCCoooonnnnnnnneeeecccctttteeeedddd AAAAuuuuxxxx OOOOuuuuttttss
1. Press the System button.
2. Turn the Parameter knob until the display shows:
System/MIDI:
Set system prefs?
3. Press Yes if youÕd like to change system preferences. Press No if youÕd like to cancel the procedure.
4. Turn the Parameter knob until the display shows:
System Preferences:
AuxToMainOuts= Auto
ss
i
The current AuxToMainOuts value
The AuxToMainOuts parameter can be set to:
¥ NeverÑthe Aux and Main Outs will be discrete, even if the Left Aux Out is not connected.
¥ AlwaysÑthe Aux signal will be summed into the Main outputs, even if the Left Aux Out is
connected.
¥ AutoÑthe ZR-76 will sum any sounds sent to the Aux Outs into the Main Outs if thereÕs no cable
plugged into the Left Aux Out jack.
5. Use the Value knob to set AuxToMainOuts to Never when you need to use the Aux Outs as a discrete
stereo feed, or to Always when using the Main Outs only.
EEEEnnnnaaaabbbblllliiiinnnngggg oooorrrr DDDDiiiissssaaaabbbblllliiiinnnngggg AAAAuuuuttttoooommmmaaaattttiiiicccc EEEEffffffffeeeecccctttt RRRRoooouuuuttttiiiinnnngg
ZR-76 sounds that use an insert effect are also assigned an alternate effect bus routing for situations in
which the desired insert effect is unavailable. This would include times when youÕre already committed
to using some other insert effect in a SoundFinder preset or a 16 Track Recorder sequence. For sounds
that depend on an insert effect, the alternate effect bus, or Alt. FX Bus, provides a sensible ÒsecondbestÓ choice for those situations. The Alt. FX Bus setting for sounds that use an insert effect can be
edited using the supplied Unisyn sound editing editing software.
Not all sounds use an insert effect. Each sound can be assigned instead to the global chorus, global
reverb, or left dry, according to the setting of its FX Bus parameter. This parameter is accessed by
pressing the Routing button in the FX/Mixdown section of the ZRÕs front panel. When you set a soundÕs
FX Bus parameter to Chorus, LightReverb, MediumReverb, WetReverb or Dry, and save the sound, youÕve
also set its Alt. FX Bus to the same value. The Alt. FX Bus for each sound can be directly accessed using
your Unisyn software.
For more on how the ZRÕs effects work, see Chapter 8.
There may be times when you donÕt want this pre-programmed effect routing to be used. The ZR-76
provides the AutoSelect FXBus parameter for enabling or disabling the use of each soundÕs Alt. FX Bus
gg
ENSONIQ ZR-76 Musician's Manual36
Page 46

Chapter 3ÑGlobal Settings
setting when selecting new split or layer sounds in SoundFinder, or track sounds in the 16 Track
Recorder.
WWWWhhhheeeennnn SSSSeeeelllleeeeccccttttiiiinnnngggg aaaa SSSSpppplllliiiitttt oooorrrr LLLLaaaayyyyeeeerrrr SSSSoooouuuunnnndddd iiiinnnn SSSSoooouuuunnnnddddFFFFiiiinnnnddddeeeerr
When you select a new split or layer sound in SoundFinder:
¥ with AutoSelect FXBus on, the sound you choose will be routed to its Alt. FX Bus
¥ with AutoSelect FXBus off, the split or layer effect bus setting will remain unchanged when you
select the new sound
NNNNooootttteeee:::: After youÕve selected a split or layer sound, you can manually change its effect bus
as you please, regardless of the setting of the AutoSelect FXBus parameter.
WWWWhhhheeeennnn SSSSeeeelllleeeeccccttttiiiinnnngggg aaaa SSSSoooouuuunnnndddd ffffoooorrrr aaaa NNNNeeeewwww,,,, UUUUnnnnddddeeeeffffiiiinnnneeeedddd TTTTrrrraaaacccckk
In the 16 Track Recorder, when you select a sound for a new, undefined track:
¥ with AutoSelect FXBus on, the sound you choose will be routed to its Alt. FX Bus
¥ with AutoSelect FXBus off, the track will be set to the effect bus routing currently being used in
SoundFinder
NNNNooootttteeee:::: After youÕve selected a sound, you can manually change the trackÕs effect bus as
you please, regardless of the setting of the AutoSelect FXBus parameter.
WWWWhhhheeeennnn CCCChhhhaaaannnnggggiiiinnnngggg tttthhhheeee SSSSoooouuuunnnndddd oooonnnn aaaa TTTTrrrraaaacccckk
When you change the sound on a track in the 16 Track Recorder:
¥ with AutoSelect FXBus on, the sound you choose will be routed to its Alt. FX Bus
¥ with AutoSelect FXBus off, the track effect bus setting will remain unchanged when you select the
new sound
kk
rr
kk
NNNNooootttteeee:::: After youÕve changed the trackÕs sound, you can manually change the trackÕs effect
bus as you please, regardless of the setting of the AutoSelect FXBus parameter.
When you change any system setting, ZR-76 operations will pause momentarily
to store your settings into FLASH memory.
TTTToooo SSSSeeeetttt tttthhhheeee AAAAuuuuttttooooSSSSeeeelllleeeecccctttt FFFFXXXXBBBBuuuussss PPPPaaaarrrraaaammmmeeeetttteeeerr
1. Press the System button.
2. Turn the Parameter knob until the display shows:
System/MIDI:
Set system prefs?
3. Press Yes if youÕd like to change the current system preferences. Press No if youÕd like to cancel the
procedure.
rr
ENSONIQ ZR-76 Musician's Manual 37
Page 47

Chapter 3ÑGlobal Settings
4. Turn the Parameter knob until the display shows:
The AutoSelect FXBus parameter can be set to:
¥ OnÑto let the ZR-76 pick the chorus or reverb bus for newly-selected sounds that have no
insert effect in SoundFinder, and for newly selected split, layer and 16 Track Recorder track
sounds
¥ OffÑto leave the effect bus assignment unchanged when a new sound is selected anywhere in
your ZR-76
5. Use the Value knob to set AutoSelect FXBus to the desired setting.
System Preferences:
AutoSelect FXBus= On
i
The current AutoSelect FXBus value
PPPPrrrrooootttteeeeccccttttiiiinnnngggg TTTTrrrraaaacccckkkk SSSSeeeettttttttiiiinnnnggggssss iiiinnnn tttthhhheeee 11116666 TTTTrrrraaaacccckkkk RRRReeeeccccoooorrrrddddeeeerr
Sounds are programmed with their own optimal settings, and when you choose a sound, it brings those
settings along. As a result, the following 16 Track Recorder track parameters will be reset when you
select a new sound on a track: Pitch Bend Up, Pitch Bend Down, Octave Shift, Semitone Shift, Fine
Tuning, PtchTbl, Glide Mode, Glide Time, Delay Time, SyncLFO&Noise, Normal LFO Rates, LFO Depth,
LFO Delay Time, Amp Env Attack, Amp Env Decay, Amp Env Release, Filter Cutoff, Filt Env Attack, Filt
Env Decay, Filt Env Release and Amp&FiltEnv Vel.
You might want to choose a new sound without losing your current track settings. You can use the
system Track ParamReset parameter to determine whether or not these track parameter settings will be
retained when you select a new sound. This parameter affects 16 Track Recorder sound selection from
the ZR-76Õs front panel, as well as sound selection through the reception of MIDI Program Changes.
The system Track ParamReset parameter also affects how tracks respond to a Reset All Controllers MIDI
message. When the ResetControlRecv System parameterÑdescribed later in this chapterÑis set to On, a
number of track parameters are reset to default values when the ZR-76 receives a Reset All Controllers
message. (See ÒReceiving Reset All Controllers MIDI MessagesÓ later in this chapter.) Setting the Track
Param Reset to Off will protect the settings of the track parameters listed above from Reset All Controllers
MIDI messages.
When you change any system setting, ZR-76 operations will pause momentarily
to store your settings into FLASH memory.
TTTToooo DDDDeeeetttteeeerrrrmmmmiiiinnnneeee iiiiffff NNNNeeeewwww SSSSoooouuuunnnnddddssss RRRReeeesssseeeetttt TTTTrrrraaaacccckkkk PPPPaaaarrrraaaammmmeeeetttteeeerrrrss
1. Press the System button.
rr
ss
2. Turn the Parameter knob until the display shows:
System/MIDI:
Set system prefs?
3. Press Yes if youÕd like to change the current system preferences. Press No if youÕd like to cancel the
procedure.
ENSONIQ ZR-76 Musician's Manual38
Page 48

Chapter 3ÑGlobal Settings
4. Turn the Parameter knob until the display shows:
System Preferences
Track ParamReset= On
i
The current Track ParamReset value
The Track ParamReset parameter may be set to:
¥ OnÑ16 Track Recorder track parameters will be reset when a new sound is selected for a track
or when Reset All Controllers MIDI messages are received.
¥ OffÑ16 Track Recorder track parameters will not be reset when a new sound is selected for a
track, or when Reset All Controllers MIDI messages are received.
5. Use the Value knob to set Track ParamReset to the desired setting.
When you change any system setting, ZR-76 operations will pause momentarily
to store your settings into FLASH memory.
TTTToooo PPPPrrrrooootttteeeecccctttt TTTTrrrraaaacccckkkk PPPPaaaarrrraaaammmmeeeetttteeeerrrrssss ffffrrrroooommmm RRRReeeesssseeeetttt AAAAllllllll CCCCoooonnnnttttrrrroooolllllllleeeerrrrss
1. Press the System button.
2. Turn the Parameter knob until the display shows:
System/MIDI:
Set system prefs?
3. Press Yes if youÕd like to change the current system preferences. Press No if youÕd like to cancel the
procedure.
4. Turn the Parameter knob until the display shows:
System Preferences
Track ParamReset= On
ss
i
The current Track ParamReset value
The Track ParamReset parameter may be set to:
¥ OnÑtrack parameters will be reset when a new sound is selected for a track or when Reset All
Controllers MIDI messages are received.
¥ OffÑtrack parameters will not be reset when a new sound is selected for a track, or when Reset
All Controllers MIDI messages are received.
5. Use the Value knob to set Track ParamReset to the desired setting.
PPPPrrrrooootttteeeeccccttttiiiinnnngggg tttthhhheeee ZZZZRRRR----77776666ÕÕÕÕssss MMMMeeeemmmmoooorrrryy
When caught in a burst of creativity, itÕs all too easy to inadvertently erase things youÕd rather preserve.
The ZR-76 offers a special screen prompt as a reality check during activities that could result in the loss
of sounds, rhythms or presets you donÕt really want to lose. When saving sounds, rhythms or presets,
ENSONIQ ZR-76 Musician's Manual 39
yy
Page 49

Chapter 3ÑGlobal Settings
the ZR can be set to display:
When you encounter this message, you can press Yes to continue what you were doing, or press No to
abort the procedure. The Write Protect system parameter allows you to enable this parameter if you feel
youÕd benefit from this double-check, or to disable it if youÕd find the prompt unnecessary:
INT memory is write
protected! Override?
When you change any system setting, ZR-76 operations will pause momentarily
to store your settings into FLASH memory.
TTTToooo EEEEnnnnaaaabbbblllleeee oooorrrr DDDDiiiissssaaaabbbblllleeee tttthhhheeee WWWWrrrriiiitttteeee PPPPrrrrooootttteeeecccctttt PPPPrrrroooommmmpppptt
1. Press the System button.
2. Turn the Parameter knob until the display shows:
System/MIDI:
Set system prefs?
3. Press Yes if youÕd like to change the current system preferences. Press No if youÕd like to cancel the
procedure.
4. Use the Parameter knob to scroll until the display shows:
System Preferences:
Write Protect=Prompt
tt
i
The current Write Protect value
¥ OffÑthe ZR-76 will save a sound, rhythm or preset to the RAM or FLASH bank without
displaying the write-protect prompt.
¥ PromptÑthe ZR-76 will display the write-protect prompt before it saves a sound, rhythm or
preset to the RAM or FLASH bank.
5. Use the Value knob to set Write Protect to the desired value.
TTTThhhheeee 11116666 TTTTrrrraaaacccckkkk RRRReeeeccccoooorrrrddddeeeerrrr RRRReeeewwwwiiiinnnndddd SSSSoooouuuunnnndd
Many recording engineers have fond (and some not-so-fond) memories of the classic reel-to-reel
recording tape recorders. One such memory was the sound produced when the tape was rewound. The
ZR-76 offers this novelty sound as an option when you press the 16 Track Recorder Rewind button.
When you change any system setting, ZR-76 operations will pause momentarily
to store your settings into FLASH memory.
dd
ENSONIQ ZR-76 Musician's Manual40
Page 50

Chapter 3ÑGlobal Settings
TTTToooo EEEEnnnnaaaabbbblllleeee////DDDDiiiissssaaaabbbblllleeee tttthhhheeee 11116666 TTTTrrrraaaacccckkkk RRRReeeeccccoooorrrrddddeeeerrrr RRRReeeewwwwiiiinnnndddd SSSSoooouuuunnnndd
1. Press the System button.
2. Turn the Parameter knob until the display shows:
System/MIDI:
Set system prefs?
3. Press Yes if you'd like to change the current system preferences. Press No if you'd like to cancel the
procedure.
4. Turn the Parameter knob until the display shows:
System Preferences:
Rewind Sound= On
dd
i
The current Rewind Sound value
The Rewind Sound parameter may be set to:
¥ OnÑpressing the 16 Track Recorder Rewind button will play the rewind sound.
¥ OffÑpressing the 16 Track Recorder Rewind button will not play the rewind sound.
5. Use the Value knob to set Rewind Sound to the desired setting.
EEEE dddd iiii tttt iiii nnnn gggg GGGG llll oooo bbbb aaaa llll PPPP iiii tttt cccc hhhh SSSS eeee tttt tttt iiii nnnn gggg ssss
UUUUssssiiiinnnngggg tttthhhheeee GGGGlllloooobbbbaaaallll PPPPiiiittttcccchhhh BBBBeeeennnndddd SSSSeeeettttttttiiiinnnnggggss
The pitch bend wheel is the spring-loaded wheel located to the far left of the keyboard. ItÕs most
commonly used to bend the pitch of notes up or down by pushing the wheel forward (up) or pulling it
back (down).
Most ZR-76 sounds are programmed to respond to Pitch Bend messages in ways appropriate to the
purpose of the sound. The ZR also offers a global pitch bend setup, which is always available to any
sound. By setting the soundÕs pitch bend up and down parameters to ÒSys,Ó you can instruct a sound to
use the global pitch bend settings instead of its own programmed settings. (See Chapter 4 for details.)
The ZR-76 offers three parameters for controlling the global pitch bend:
¥ Pitch Bend Up
¥ Pitch Bend Down
¥ PitchBendMode
GGGGlllloooobbbbaaaallll PPPPiiiittttcccchhhh BBBBeeeennnndddd UUUUpppp aaaannnndddd DDDDoooowwwwnn
Both pitch bend up and pitch bend down have their own individual settings, and either can be set to
raise or lower the pitch of any sound. This parameter affects any sound whose Pitch Bend Up or Down
parameter is set to ÒSys.Ó
ss
nn
When you change any system setting, ZR-76 operations will pause momentarily
to store your settings into FLASH memory.
ENSONIQ ZR-76 Musician's Manual 41
Page 51

Chapter 3ÑGlobal Settings
TTTToooo DDDDeeeetttteeeerrrrmmmmiiiinnnneeee tttthhhheeee GGGGlllloooobbbbaaaallll PPPPiiiittttcccchhhh BBBBeeeennnndddd UUUUpppp RRRRaaaannnnggggee
1. Press the System button.
2. Turn the Parameter knob until the display shows:
System/MIDI:
Alter system pitch?
3. Press Yes if youÕd like to change the system pitch settings, or No to cancel the procedure.
4. Turn the Parameter knob until the display shows:
System Pitch:
Pitch Bend Up= 2up
ee
i
The current Pitch Bend Up value
The global Pitch Bend Up parameter can be set to:
¥ 1-12dn or 1-12upÑthe pitch of sounds whose Pitch Bend Up=Sys will be lowered or raised by
the number of equal-temper semitones set here when the pitch bend wheel is pushed all the way
forward.
¥ OffÑsounds whose Pitch Bend Up=Sys will not change pitch when the pitch bend wheel is
pushed forward.
5. Use the Value knob to set the Pitch Bend Up value you desire.
When you change any system setting, ZR-76 operations will pause momentarily
to store your settings into FLASH memory.
TTTToooo DDDDeeeetttteeeerrrrmmmmiiiinnnneeee tttthhhheeee GGGGlllloooobbbbaaaallll PPPPiiiittttcccchhhh BBBBeeeennnndddd DDDDoooowwwwnnnn RRRRaaaannnnggggee
1. Press the System button.
2. Turn the Parameter knob until the display shows:
System/MIDI:
Alter system pitch?
3. Press Yes if youÕd like to change the current system pitch settings. Press No if youÕd like to cancel
the procedure.
ee
ENSONIQ ZR-76 Musician's Manual42
Page 52

Chapter 3ÑGlobal Settings
4. Turn the Parameter knob until the display shows:
System Pitch:
Pitch Bend Down= 2dn
i
The current Pitch Bend Down value
The global Pitch Bend Down parameter can be set to:
¥ 1-12dn or 1-12upÑthe pitch of sounds whose Pitch Bend Down=Sys will be lowered or raised
by the number of equal-temper semitones set here when the pitch bend wheel is pulled all the
way back.
¥ OffÑsounds whose Pitch Bend Down=Sys will not change pitch when the pitch bend wheel is
pulled back.
5. Use the Value knob to set the Pitch Bend Down value you desire.
SSSSeeeettttttttiiiinnnngggg tttthhhheeee GGGGlllloooobbbbaaaallll PPPPiiiittttcccchhhh BBBBeeeennnndddd MMMMooooddddee
The PitchBendMode parameter unlocks a powerful feature that allows you to decide which notes will be
affected by the pitch bend wheel. This parameterÑwhich affects all onboard soundsÑcan be set to one
of three values:
¥ NormalÑPitch Bend messages will affect all notes currently sounding.
¥ HeldÑPitch Bend messages will affect only those notes sounding from keys which are being
physically held down.
Notes held with the sustain pedal or already ringing off will remain at their original pitch. This
feature can be used to create guitar-style pitch bends or to ÒpaintÓ with pitch, leaving different notes
sustaining at different pitches.
¥ ProgÑPitch Bend messages will affect notes according to each soundÕs programmed pitch bend
mode.
When you change any system setting, ZR-76 operations will pause momentarily
TTTToooo CCCCoooonnnnttttrrrroooollll WWWWhhhhiiiicccchhhh NNNNooootttteeeessss WWWWiiiillllllll BBBBeeeennnndd
1. Press the System button.
2. Turn the Parameter knob until the display shows:
ee
to store your settings into FLASH memory.
dd
System/MIDI:
Alter system pitch?
3. Press Yes if youÕd like to change the current system pitch settings. Press No if youÕd like to cancel
the procedure.
ENSONIQ ZR-76 Musician's Manual 43
Page 53

Chapter 3ÑGlobal Settings
4. Turn the Parameter knob until the display shows:
The global PitchBend Mode parameter can be set to:
¥ NormalÑall notes that are playing will be affected by Pitch Bend messages.
¥ HeldÑonly notes which are being physically held down will be affected by Pitch Bend messages.
¥ ProgÑPitch Bend messages will affect notes according to each soundÕs programmed pitch bend
mode.
5. Use the Value knob to set the PitchBend Mode to the desired value.
System Pitch:
PitchBendMode= Prog
i
The current PitchBendMode value
FFFFiiiinnnneeee TTTTuuuunnnniiiinnnngggg tttthhhheeee ZZZZRRRR----777766
There may be a time when you need to use the ZR-76 with an instrument that just canÕt be tuned, or
when you have to deal with musicians who donÕt want to retune for one reason or another. The tuning
parameter allows you to adjust the ZR-76Õs tuning to match other instruments. The ZR-76 defaults to
A=440, with an equi-tempered pitch table.
TTTToooo FFFFiiiinnnneeee TTTTuuuunnnneeee tttthhhheeee ZZZZRRRR----777766
1. Press the System button.
2. Turn the Parameter knob until the display shows:
3. Press Yes if youÕd like to change the current system pitch settings. Press No to cancel the procedure.
4. Turn the Parameter knob until the display shows:
66
When you change any system setting, ZR-76 operations will pause momentarily
to store your settings into FLASH memory.
66
System/MIDI:
Alter system pitch?
System Pitch:
Fine Tuning= Ocents
i
The current fine tuning value
5. Use the Value knob to set the amount that you want to raise or lower the pitch. The pitch can be
lowered or raised from -50 to +49 cents.
NNNNooootttteeee:::: Setting the ZR-76 to 0 cents is equivalent to A=440. 100 cents is the equivalent of a
semitone.
ENSONIQ ZR-76 Musician's Manual44
Page 54

Chapter 3ÑGlobal Settings
UUUUssssiiiinnnngggg PPPPiiiittttcccchhhh TTTTaaaabbbblllleeeess
The intervals (or relationships) between notes in a scale can be altered to create special pitch tables. The
ZRÕs pitch tables have a tuning resolution of 256 cents per semitone. The default pitch table is
ÒEqualTemper,Ó the western 12-tone equi-tempered pitch table. However, you can select from a large
assortment of traditional, modern, ethnic, and exotic pitch tables in the ZR-76. The ZR also provides a
RAM location for a custom pitch table, and supports the MIDI pitch table Bulk Tuning Dump and Single
Note Tuning Change standards (this is explained fully in Chapter 13). If youÕve got the appropriate
computer program, you can create your own pitch tables, and transmit them to the ZR-76 via SysEx.
TTTTiiiipppp:::: Each track in the 16 Track Recorder has its own PitchTbl parameter that determines
the pitch table the track will use. By setting each track to a different pitch table, you can
set up the ZR-76 to produce 16 different tunings at once!
TTTToooo AAAAssssssssiiiiggggnnnn aaaa GGGGlllloooobbbbaaaallll PPPPiiiittttcccchhhh TTTTaaaabbbbllllee
1. Press the System button.
2. Turn the Parameter knob until the display shows:
ss
When you change any system setting, ZR-76 operations will pause momentarily
to store your settings into FLASH memory.
ee
System/MIDI:
Alter system pitch?
3. Press Yes if youÕd like to change the system pitch settings, or No to cancel the procedure.
4. Turn the Parameter knob until the display shows:
System Pitch:
PitchTbl=EqualTemper
i
The current PitchTbl value
5. Use the Value knob to select the pitch table that you want to use. This selects the system pitch table,
and will affect all sounds and tracks that have their PitchTbl parameter set to ÒSys.Ó (See Chapter 4
for details.)
When you change any system setting, ZR-76 operations will pause momentarily
to store your settings into FLASH memory.
TTTToooo AAAAssssssssiiiiggggnnnn aaaa SSSSoooouuuunnnndddd ttttoooo tttthhhheeee GGGGlllloooobbbbaaaallll PPPPiiiittttcccchhhh TTTTaaaabbbbllllee
1. If youÕre using SoundFinder, select the sound youÕd like to assign to the global pitch table and press
the SoundFinder Edit button.
If youÕre using the 16 Track Recorder, press the track button whose sound youÕd like to assign to the
global pitch table.
2. Turn the Parameter knob until the display shows ÒPitchTbl=Ó
ee
ENSONIQ ZR-76 Musician's Manual 45
Page 55

Chapter 3ÑGlobal Settings
PitchTbl can be set to:
¥ ProgÑto use the PitchTbl value programmed into the sound
¥ SysÑto use the global system pitch table
¥ the special pitch tables built into the ZRÕs memory
3. Turn the Value knob to set PitchTbl to Sys.
NNNNooootttteeee:::: When you select a new sound, PitchTbl will be reset to Prog. This can be prevented
in the 16 Track Recorder by setting the System Track ParamReset parameter to Off. The
Track ParamReset parameter is described earlier in this chapter.
This parameter also responds to an NRPN LSB value of 021. To learn what an NRPN, and what it would
be used for, see ÒUsing RPNs and NRPNs to Edit Sound ParametersÓ at the end of Chapter 4.
For a complete list of pitch tables and their descriptions, see Chapter 13Ñ Supplemental Information.
SSSS eeee tttt tttt iiii nnnn gggg UUUU pppp FFFF oooo oooo tttt SSSS wwww iiii tttt cccc hhhh eeee ssss
UUUUssssiiiinnnngggg FFFFooooooootttt SSSSwwwwiiiittttcccchhhheeeess
The ZR-76 is equipped with two stereo foot switch jacks, located on its rear panel:
These two independent foot switch jacks support either a single (mono) or dual (stereo) foot switch, and
can be assigned to a number of different functions, allowing a total of four independent foot switch
controllers when two optional ENSONIQ SW-10 Dual Foot Switches are connected.
ss
ENSONIQ ZR-76 Musician's Manual46
Page 56

Chapter 3ÑGlobal Settings
There are four parameters that let you assign the foot switches to a variety of functions. When a single
foot switch is connected, set the FtSw 1L parameter described below to ÒUnused.Ó
WWWWaaaarrrrnnnniiiinnnngggg:::: If you are using a single foot switch (ENSONIQ SW-2 or SW-6) in either of the
Foot Switch jacks, the FtSw 1L and/or FtSw 2L values on the system page should always
be set to ÒUnused.Ó The foot switch jacks are optimized for use with a stereo foot switch
(such as ENSONIQÕs SW-10 foot switch), and when a single foot switch is connected, it
operates as the right foot switch.
For more information about using mono and stereo foot switches with the ZR-76, see Chapter 13Ñ
Supplemental Information.
When you change any system setting, ZR-76 operations will pause momentarily
to store your settings into FLASH memory.
TTTToooo AAAAssssssssiiiiggggnnnn aaaa FFFFuuuunnnnccccttttiiiioooonnnn ttttoooo aaaa FFFFooooooootttt SSSSwwwwiiiittttcccchh
1. Press the System button.
2. Turn the Parameter knob until the display shows:
System/MIDI:
Set up foot control?
3. Press Yes if youÕd like to change the current foot switch settings. Press No if youÕd like to cancel the
procedure.
There are four foot switch parameters, each of which represents one of the four available foot switch
pedals:
¥ FtSw 1LÑthe left pedal of foot switch 1
¥ FtSw 1RÑthe right pedal of foot switch 1
¥ FtSw 2LÑthe left pedal of foot switch 2
¥ FtSw 2RÑthe right pedal of foot switch 2
Each foot switch pedal can be set to perform a specified function when pressed:
¥ UnusedÑpressing the pedal will have no effect.
¥ SustainÑholding the pedal will cause notes to continue sounding after the key is released, much
like the sustain pedal on a piano.
hh
ENSONIQ ZR-76 Musician's Manual 47
Page 57

Chapter 3ÑGlobal Settings
¥ SostenutoÑany keys that are held down when you press the pedal will sustain until you release
the pedal; keys pressed down after you press the pedal will not sustain. This is similar to the
sostenuto pedal on a piano.
¥ SysCTRL1Ñpressing the pedal down will send a value of 127 to any aspect of a sound or effect
that is modulated by the controller designated as CTRL1; releasing the pedal will send a value of
0 to any aspect of a sound or effect that is modulated by the controller designated as CTRL1. (For
details on setting the CTRL1 parameter and descriptions of CTRL1 settings, see ÒSetting Up New
Real-Time ControllersÓ later in this chapter.)
¥ SysCTRL2Ñpressing the pedal down will send a value of 127 to any aspect of a sound or effect
that is modulated by the controller designated as CTRL2; releasing the pedal will send a value of
0 to any aspect of a sound or effect that is modulated by the controller designated as CTRL2. (For
details on setting the CTRL2 parameter and descriptions of CTRL2 settings, see ÒSetting Up New
Real-Time ControllersÓ later in this chapter.)
¥ SysCTRL3Ñpressing the pedal down will send a value of 127 to any aspect of a sound or effect
that is modulated by the controller designated as CTRL3; releasing the pedal will send a value of
0 to any aspect of a sound or effect that is modulated by the controller designated as CTRL3. (For
details on setting the CTRL3 parameter and descriptions of CTRL3 settings, see ÒSetting Up New
Real-Time ControllersÓ later in this chapter.)
¥ SysCTRL4Ñpressing the pedal down will send a value of 127 to any aspect of a sound or effect
that is modulated by the controller designated as CTRL4; releasing the pedal will send a value of
0 to any aspect of a sound or effect that is modulated by the controller designated as CTRL4. (For
details on setting the CTRL4 parameter and descriptions of CTRL4 settings, see ÒSetting Up New
Real-Time ControllersÓ later in this chapter.)
¥ up arrowÑpressing the pedal will have the same effect as pressing the up arrow button on the
front panel.
¥ down arrowÑpressing the pedal will have the same effect as pressing the down arrow button on
the front panel.
TTTTiiiipppp:::: You can utilize foot switches to select presets or sounds by assigning the two pedals
in an SW-10 stereo foot switch to Òup arrowÓ and Òdown arrow.Ó When youÕve selected the
preset bank in SoundFinder, each press of a pedal will select the next, or previous,
preset. If youÕd like to use this function for choosing sounds, select the desired
SoundFinder category, and the pedals will move you forward and back through the
sounds in the category youÕve chosen.
¥ SplitÑpressing the pedal will have the same effect as pressing the Split button on the front
panel.
¥ LayerÑpressing the pedal will have the same effect as pressing the Layer button on the front
panel.
¥ TransposeÑpressing the pedal will have the same effect as pressing the Transpose button on the
front panel.
¥ Recall IdeaÑpressing the pedal will have the same effect as pressing the Recall Idea button on
the front panel.
¥ IPStartÑpressing the pedal will have the same effect as pressing the Idea Pad Start/Stop button
on the front panel.
¥ DMFillVar1 through DMFillVar8Ñpressing the pedal will have the same effect as pressing the
same numbered Variations/Fills button on the front panel.
¥ Fill/VarÑpressing the pedal will have the same effect as pressing the Fill Variation button on the
front panel.
¥ DMStartÑpressing the pedal will have the same effect as pressing the Drum Machine Start/Stop
button on the front panel.
¥ Play/StopÑpressing the pedal will have the same effect as pressing the 16 Track Recorder Stop
button if a song or sequence is playing; it will have the same effect as pressing the 16 Track
Recorder Play button if a song or sequence is not playing.
¥ PlayTop/StopÑpressing the pedal will have the same effect as pressing the 16 Track Recorder
Play button on the front panel.
¥ RecPlay/StopÑpressing the pedal will start recording on the currently selected track. If the 16
Track Recorder is already recording, pressing the pedal down will stop recording. This setting
can be used for punch-ins in the 16 Track Recorder (see Chapter 7)
¥ RecordÑpressing the pedal will have the same effect as pressing the front panelÕs Record button.
ENSONIQ ZR-76 Musician's Manual48
Page 58

Chapter 3ÑGlobal Settings
¥ StopÑpressing the pedal will have the same effect as pressing the 16 Track Recorder Stop
button on the front panel.
¥ RewindÑpressing the pedal will have the same effect as pressing the 16 Track Recorder Rewind
button on the front panel.
¥ FastForwardÑpressing the pedal will have the same effect as pressing the 16 Track Recorder
Fast Forward button on the front panel.
¥ MuteÑpressing the pedal will have the same effect as pressing the Mute button on the front
panel.
¥ SoloÑpressing the pedal will have the same effect as pressing the Solo button on the front panel.
¥ RegionFromÑpressing the pedal will have the same effect as pressing the Region From button on
the front panel.
¥ RegionToÑpressing the pedal will have the same effect as pressing the Region To button on the
front panel.
¥ PrevFavoriteÑpressing the pedal will select the previous favorite sound from the group of 18
favorites. When the first favorite is selected, tapping the pedal again will select the 18th favorite.
¥ Next FavoriteÑpressing the pedal will select the next favorite sound from the group of 18
favorites. When the last favorite is selected, tapping the pedal again will select the first favorite.
TTTTiiiipppp:::: You can program the Favorites buttons using foot switchesÑsee Chapter 4.
TTTTiiiipppp:::: When a MIDI-OUT sound is selected in SoundFinder (including split or layer
sounds), or on a track in the 16 Track Recorder, MIDI messages produced by the foot
switchesÑsuch as sustain, sostenuto or any MIDI controllers assigned to SysCTRLsÑwill
be transmitted via MIDI by the ZR-76.
5. Turn the Value knob or press the up/down arrow buttons to select the desired foot switch function.
WWWWaaaarrrrnnnniiiinnnngggg:::: If you are using a single foot switch (SW-2 or SW-6) in either of the Foot Switch
jacks, the FtSw 1-L and/or FtSw 2-L values on the system page should always be set to
ÒUnused.Ó The foot switch jacks are optimized for use with a stereo foot switch (such as
ENSONIQÕs SW-10 foot switch), and when a single foot switch is connected, it operates as
the right foot switch.
UUUUssssiiiinnnngggg aaaa CCCCVVVV PPPPeeeeddddaaaallll aaaassss aaaa MMMMoooodddduuuullllaaaattttoooorr
The ZR-76 also offers a CV¥Pedal jack, located on the rear panel of your unit:
This jack is for connecting an optional ENSONIQ Model CVP-1 Control Voltage Foot Pedal, which is
assignable as a modulator to various parameters within the ZR-76. The pedal gives you a handy
alternative modulation source when you want an additional modulation controllerÑas in situations where
both of your hands are busy playing the keyboard.
rr
ENSONIQ ZR-76 Musician's Manual 49
Page 59

Chapter 3ÑGlobal Settings
A CV pedal plugged into this jack can also act as a volume pedal, controlling the overall loudness of your
ZR-76. The System CVPedal parameter determines whether the CV pedal will act as a modulator, a
volume pedal, or as one of the special System Controllers (see below).
PPPPeeeeddddaaaallll////CCCCVVVV SSSSppppeeeeccccssss:::: 3-conductor (Tip=control voltage input, Ring=510 ohm resistor to +5 Volts,
Sleeve=ground). 36 KOhm input impedance, DC coupled. Input voltage range=0 to 3 volts
DC. Scan rate=32mS (maximum recommended modulation input=15 Hz). For use with an
external control voltage, use a 2-conductor cable with the voltage on the tip and the
sleeve grounded.
When you change any system setting, ZR-76 operations will pause momentarily
to store your settings into FLASH memory.
TTTToooo AAAAssssssssiiiiggggnnnn aaaa FFFFuuuunnnnccccttttiiiioooonnnn ttttoooo tttthhhheeee CCCCVVVV PPPPeeeeddddaaaall
1. Press the System button.
2. Turn the Parameter knob until the display shows:
System/MIDI:
Set up foot control?
3. Press Yes if youÕd like to change the current foot switch settings. Press No if youÕd like to cancel the
procedure.
4. Turn the Parameter knob until the display shows:
Foot Controls:
CVPedal=Volume #007
ll
i
The current CV pedal assignment
You can set the CV pedal to send values to any aspect of a sound or effect that is modulated by a
ENSONIQ ZR-76 Musician's Manual50
Page 60

Chapter 3ÑGlobal Settings
MIDI controller. The CVPedal parameter can be set to:
¥ FootCtrl#004Ñto send values to any aspect of a sound or effect that is modulated by MIDI
Controller #4 (Foot pedal).
¥ Volume #007Ñto send values to any aspect of a sound or effect that is modulated by MIDI
Controller #7 (Volume).
¥ SysCTRL1Ñto send values to any aspect of a sound or effect that is modulated by CTRL1. (For
details on setting the CTRL1 parameter and descriptions of CTRL1 settings, see ÒSetting Up New
Real-Time ControllersÓ later in this chapter.)
¥ SysCTRL2Ñto send values to any aspect of a sound or effect that is modulated by CTRL2. (For
details on setting the CTRL2 parameter and descriptions of CTRL2 settings, see ÒSetting Up New
Real-Time ControllersÓ later in this chapter.)
¥ SysCTRL3Ñto send values to any aspect of a sound or effect that is modulated by CTRL3. (For
details on setting the CTRL3 parameter and descriptions of CTRL3 settings, see ÒSetting Up New
Real-Time ControllersÓ later in this chapter.)
¥ SysCTRL4Ñto send values to any aspect of a sound or effect that is modulated by CTRL4. (For
details on setting the CTRL4 parameter and descriptions of CTRL4 settings, see ÒSetting Up New
Real-Time ControllersÓ later in this chapter.)
TTTTiiiipppp:::: When the CV pedal is set to one of the four SysCTRLs, and a MIDI-OUT sound is
selected in SoundFinder or the 16 Track Recorder, the CV pedal will regulate MIDI
transmission of the SysCTRLÕs selected MIDI controller.
EEEE dddd iiii tttt iiii nnnn gggg MMMM IIII DDDD IIII ---- RRRR eeee llll aaaa tttt eeee dddd SSSS eeee tttt tttt iiii nnnn gggg ssss
SSSSoooouuuunnnnddddFFFFiiiinnnnddddeeeerrrrÕÕÕÕssss MMMMIIIIDDDDIIII CCCChhhhaaaannnnnnnneeeell
Whenever you play a sound in SoundFinder that belongs to any SoundFinder category other than MIDIOUT, the ZR-76 transmits the notes you play and the controllers you use via MIDI. The MIDI channel that
carries these messages is called the base MIDI channel. (Selecting a MIDI-OUT sound after pressing the
Select Sound, Split or Layer buttons allows you to transmit MIDI on other channels.)
The ZR-76 also allows you to play SoundFinder sounds from an external MIDI deviceÑsuch as a
keyboard controller or sequencerÑwhenever the Select Sound LED is lit, as long as a non-MIDI-OUT
sound was selected afer pressing the Select Sound button. SoundFinderÑincluding split and layer
soundsÑresponds to MIDI messages received on the ZRÕs base MIDI channel. MIDI Bank Select and
MIDI Program Change messages are also received on the base MIDI channel, affecting only the sound
chosen with the Select Sound button. If split and/or layer are on, sending a MIDI Bank Select or MIDI
Program Change message to your ZR-76 on the base MIDI channel will turn them off. (If a MIDI-OUT
sound is selected, incoming MIDI is sent to the 16 Track Recorder. You can still receive incoming MIDI
in SoundFinder when you use MIDI-OUT sounds for splits or layers, however; only the associated split
or layer will ignore incoming MIDI.)
You can select any MIDI channel from 1-16 as the base MIDI channel using the Base MIDI Channel
parameter.
When you change any system setting, ZR-76 operations will pause momentarily
TTTToooo SSSSeeeetttt tttthhhheeee BBBBaaaasssseeee MMMMIIIIDDDDIIII CCCChhhhaaaannnnnnnneeeell
1. Press the System button.
ll
to store your settings into FLASH memory.
ll
ENSONIQ ZR-76 Musician's Manual 51
Page 61

Chapter 3ÑGlobal Settings
2. Turn the Parameter knob until the display shows:
3. Press Yes if youÕd like to change the current MIDI settings. Press No if youÕd like to cancel the
procedure.
4. Turn the Parameter knob until the display shows:
5. Turn the Value knob or press the up/down arrow buttons to set the Base MIDI Channel to the
channel on which youÕd like SoundFinder to receive MIDI.
System/MIDI:
Edit MIDI settings?
MIDI Settings:
Base MIDI Channel=01
i
The current base MIDI channel
SSSSyyyynnnncccchhhhrrrroooonnnniiiizzzziiiinnnngggg tttthhhheeee ZZZZRRRR----77776666 ttttoooo MMMMIIIIDDDDII
The ZR-76 generates a timing reference created by the tempo of the Drum Machine or 16 Track Recorder
(depending on whether youÕre in SoundFinder or the 16 Track Recorder, respectively). This timing
reference accessed by elements of ZR-76 sounds, and by the ZR effects:
¥ Many ZR-76 sounds use Low Frequency Oscillators (LFOs) and noise generators as a means of
creating vibrato and other rhythmic sonic changes. These LFOs and noise generators can be
synchronized to the Drum Machine and 16 Track Recorder.
¥ Some of the ZRÕs effects contain LFOs and delays that can be synchronized to the Drum Machine and
16 Track Recorder.
The Drum Machine and 16 Track Recorder can themselves be synchronized to MIDI clocks received from
some external source (such as a computer sequencer or drum machine). The 16 Track Recorder also
responds to received MIDI Song Position Pointer messages when it's synchronized to MIDI clocks.
When you change any system setting, ZR-76 operations will pause momentarily
TTTToooo DDDDeeeetttteeeerrrrmmmmiiiinnnneeee tttthhhheeee ZZZZRRRRÕÕÕÕssss MMMMaaaasssstttteeeerrrr TTTTiiiimmmmiiiinnnngggg SSSSoooouuuurrrrccccee
1. Press the System button.
2. Turn the Parameter knob until the display shows:
II
to store your settings into FLASH memory.
ee
System/MIDI:
Edit MIDI settings?
3. Press Yes if youÕd like to change the current system MIDI settings. Press No if youÕd like to cancel
the procedure.
ENSONIQ ZR-76 Musician's Manual52
Page 62

Chapter 3ÑGlobal Settings
4. Turn the Parameter knob until the display shows:
MIDI Settings:
ClockSource=Internal
i
The current Clock Source value
The ClockSource parameter can be set to:
¥ InternalÑto use either the ZRÕs Drum Machine or 16 Track Recorder as the master clock source
¥ MIDIÑto use external MIDI clocks as the timing source, and to enable the 16 Track Recorder's
response to MIDI Song Position Pointer messages
5. Turn the Value knob to set Tempo ClockSrc to the desired setting.
NNNNooootttteeee:::: Whenever ClockSource is set to MIDI, the tempo and sequence location displays in
the Drum Machine and 16 Track Recorder show that the ZR is synchronized to an external
MIDI device.
SSSSyyyynnnncccchhhhrrrroooonnnniiiizzzziiiinnnngggg OOOOtttthhhheeeerrrr MMMMIIIIDDDDIIII DDDDeeeevvvviiiicccceeeessss ttttoooo YYYYoooouuuurrrr ZZZZRRRR----777766
The ZR-76 is capable of transmitting MIDI clocks to other MIDI devices, so that you can use your ZR as
the master timing reference in your setup. When this feature is enabled, the ZR-76 will transmit MIDI
Song Position Pointer, Start, Stop and Continue messages when you press the appropriate button in the
16 Track Recorder.
You can turn this feature on or off using the Xmit MIDI Clocks parameter.
When you change any system setting, ZR-76 operations will pause momentarily
to store your settings into FLASH memory.
TTTToooo CCCCoooonnnnttttrrrroooollll WWWWhhhheeeetttthhhheeeerrrr MMMMIIIIDDDDIIII SSSSyyyynnnncccchhhhrrrroooonnnniiiizzzzaaaattttiiiioooonnnn DDDDaaaattttaaaa iiiissss TTTTrrrraaaannnnssssmmmmiiiitttttttteeeedddd ffffrrrroooommmm tttthhhheeee ZZZZRR
1. Press the System button.
2. Turn the Parameter knob until the display shows:
System/MIDI:
Edit MIDI settings?
3. Press Yes if youÕd like to change the current MIDI settings. Press No if youÕd like to cancel the
procedure.
4. Turn the Parameter knob until the display shows:
66
RR
MIDI Settings:
Xmit MIDI Clocks= On
i
The current Xmit MIDI Clocks value
ENSONIQ ZR-76 Musician's Manual 53
Page 63

Chapter 3ÑGlobal Settings
The Xmit MIDI Clocks parameter controls whether or not the ZR-76 will send out MIDI clocks, as well
as MIDI Song Position Pointer, Start, Stop and Continue messages. This parameter may be set to:
¥ OffÑthe ZR-76 will not send out MIDI clocks or MIDI Song Position Pointer, Start, Stop or
Continue messages.
¥ OnÑthe ZR-76 will send out MIDI clocks and MIDI Song Position Pointer, Start, Stop or Continue
messages.
5. Turn the Value knob or use the up/down arrow buttons to set the Xmit MIDI Clocks parameter to the
desired value.
SSSSeeeettttttttiiiinnnngggg tttthhhheeee GGGGlllloooobbbbaaaallll RRRReeeecccceeeeppppttttiiiioooonnnn ooooffff MMMMIIIIDDDDIIII BBBBaaaannnnkkkk SSSSeeeelllleeeeccccttttssss aaaannnndddd PPPPrrrrooooggggrrrraaaammmm CCCChhhhaaaannnnggggeeeess
The ZR-76 allows you to enable or disable its reception of MIDI Bank Selects and Program Changes on a
system-wide basis. The global Bank&ProgChgRecv System parameter functions as a master switch that
can turn off the ZR-76Õs reception of Bank Selects and Program Changes regardless of the
ProgramChngeRecv and Bank Select Recv parameter settings in SoundFinder or the 16 Track Recorder.
When Bank&ProgChgRecv is set to On, the SoundFinder or track settings determine whether
SoundFinder or the 16 Track Recorder track will respond to or ignore Bank Select and Program Change
messages. When Bank&ProgChgRecv is set to Off, the ZR-76 will ignore MIDI Bank Select and Program
Changes completely.
When you change any system setting, ZR-76 operations will pause momentarily
to store your settings into FLASH memory.
TTTToooo SSSSeeeetttt RRRReeeecccceeeeppppttttiiiioooonnnn ooooffff BBBBaaaannnnkkkk SSSSeeeelllleeeeccccttttssss aaaannnndddd PPPPrrrrooooggggrrrraaaammmm CCCChhhhaaaannnnggggeeeess
1. Press the System button.
2. Turn the Parameter knob until the display shows:
System/MIDI:
Edit MIDI settings?
ss
ss
3. Press Yes if youÕd like to change the current system MIDI settings. Press No to cancel the procedure.
4. Turn the Parameter knob until the display shows:
MIDI Settings:
Bank&ProgChgRecv= On
i
The current Bank&ProgChgRecv value
The Bank&ProgChgRecv parameter can be set to:
¥ OnÑMIDI Bank Selects and Program Changes will be responded to according to the settings of
the ProgramChngeRecv and Bank Select Recv SoundFinder and 16 Track Recorder track
parameters
¥ OffÑthe ZR-76 will ignore MIDI Bank Selects and Program Changes
5. Turn the Value knob to set Bank&ProgChgRecv to the desired value.
RRRReeeessssppppoooonnnnddddiiiinnnngggg ttttoooo MMMMIIIIDDDDIIII ÒÒÒÒPPPPaaaannnniiiiccccÓÓÓÓ MMMMeeeessssssssaaaaggggeeeess
Occasionally MIDI devices get confused. As a result, some MIDI products are able to send out ÒpanicÓ
messages to quickly bring MIDI chaos under control.
ss
ENSONIQ ZR-76 Musician's Manual54
Page 64

The ZR-76 responds to the following messages:
¥ Reset All Controllers (MIDI controller #121)
¥ All Notes Off (MIDI controller #123)
¥ All Sounds Off (MIDI controller #120)
Chapter 3ÑGlobal Settings
RRRReeeecccceeeeiiiivvvviiiinnnngggg RRRReeeesssseeeetttt AAAAllllllll CCCCoooonnnnttttrrrroooolllllllleeeerrrrssss MMMMIIIIDDDDIIII MMMMeeeessssssssaaaaggggeeeess
The ResetControlRecv System parameter allows you to determine how the ZR-76 will respond to Reset All
Controllers MIDI messages. When itÕs set to On, and SoundFinder or a track in the 16 Track Recorder
receives a Reset All Controllers message on its MIDI channel, the ZR will return all of its real-time
controllers and any parameters that respond to MIDI controllers to their default values, clearing up any
hung values or unexpected settings. When ResetControlRecv is set to Off, SoundFinder and 16 Track
Recorder tracks will not respond to Reset All Controllers messages. For more information on the ZR-76Õs
response to Reset All Controllers messages, see ÒReset All Controllers (MIDI controller 121) Reception
BehaviorÓ in Chapter 13ÑSupplemental Information.
When you change any system setting, ZR-76 operations will pause momentarily
to store your settings into FLASH memory.
TTTToooo SSSSeeeetttt tttthhhheeee RRRReeeessssppppoooonnnnsssseeee ttttoooo RRRReeeesssseeeetttt AAAAllllllll CCCCoooonnnnttttrrrroooolllllllleeeerrrrssss MMMMeeeessssssssaaaaggggeeeess
1. Press the System button.
2. Turn the Parameter knob until the display shows:
System/MIDI:
Edit MIDI settings?
ss
ss
3. Press Yes if youÕd like to change the current system MIDI settings. Press No if youÕd like to cancel
the procedure.
4. Turn the Parameter knob until the display shows:
MIDI Settings:
ResetControlRecv= On
i
The current ResetControlRecv value
The ResetControlRecv parameter can be set to:
¥ OffÑthe ZR-76 will ignore Reset All Controllers MIDI messages.
¥ OnÑwhen SoundFinder or any 16 Track Recorder track receives a Reset All Controllers message
on its MIDI channel all of its real-time controllers and parameters that respond to MIDI
controllers will be reset to their default values.
5. Turn the Value knob to set ResetControlRecv to the desired value.
SSSSeeeettttttttiiiinnnngggg tttthhhheeee RRRReeeessssppppoooonnnnsssseeee ttttoooo AAAAllllllll NNNNooootttteeeessss OOOOffffffff MMMMIIIIDDDDIIII MMMMeeeessssssssaaaaggggeeeess
The ZR-76 can respond to All Notes Off and All Sounds Off MIDI control messages. When SoundFinder
or a 16 Track Recorder track receives either of these on its MIDI channel, any of its notes that are
currently sounding are silenced. The AllNotesOff Recv System parameter is a combined filter for both
messages. When itÕs set to On, the ZR-76 will respond to themÑwhen set to Off, it will ignore them.
ENSONIQ ZR-76 Musician's Manual 55
ss
Page 65

Chapter 3ÑGlobal Settings
When you change any system setting, ZR-76 operations will pause momentarily
to store your settings into FLASH memory.
TTTToooo SSSSeeeetttt tttthhhheeee RRRReeeessssppppoooonnnnsssseeee ttttoooo MMMMIIIIDDDDIIII AAAAllllllll NNNNooootttteeeessss OOOOffffffff MMMMeeeessssssssaaaaggggeeeess
1. Press the System button.
2. Turn the Parameter knob until the display shows:
System/MIDI:
Edit MIDI settings?
3. Press Yes if youÕd like to change the current system MIDI settings. Press No if youÕd like to cancel
the procedure.
4. Turn the Parameter knob until the display shows:
MIDI Settings:
AllNotesOff Recv= On
ss
i
The current AllNotesOff Recv value
This AllNotesOff Recv parameter is a combined All Notes Off (MIDI control #123) and All Sounds Off
(MIDI control #120) reception filter. It can be set to:
¥ OffÑthe ZR-76 will ignore the All Notes Off and All Sounds Off MIDI messages.
¥ OnÑwhen SoundFinder or any 16 Track Recorder track receives an All Notes Off and/or All
Sounds Off MIDI message on its MIDI channel, all of its currently sounding notes will be
silenced.
5. Turn the Value knob to set AllNotesOff Recv to the desired value.
UUUUssssiiiinnnngggg SSSSyyyyssssEEEExxxx DDDDeeeevvvviiiicccceeee IIIIDDDDss
The ZR-76 can use MIDI System Exclusive (or ÒSysExÓ) messages to communicate with computersÑthe
Unisyn sound editing software uses this form of communication. SysEx data is a special kind of MIDI
data that doesnÕt require a specific MIDI channel. Every MIDI product has its own SysEx identityÑbut
what if youÕve got several ZR-76s connected at the same time? Each one of them can be assigned its own
SysEx Device ID number, from 000 to 127. In this way, each ZR-76 can identify the MIDI SysEx data that
itÕs meant to receive. Of course, itÕs vital that no two ZR-76s share the same SysEx Device ID number.
TTTToooo SSSSeeeetttt tttthhhheeee ZZZZRRRR----77776666ÕÕÕÕssss SSSSyyyyssssEEEExxxx DDDDeeeevvvviiiicccceeee IIIIDDDD NNNNuuuummmmbbbbeeeerr
1. Press the System button.
ss
rr
ENSONIQ ZR-76 Musician's Manual56
Page 66

Chapter 3ÑGlobal Settings
2. Turn the Parameter knob until the display shows:
System/MIDI:
Edit MIDI settings?
3. Press Yes if youÕd like to change the current system MIDI settings. Press No if youÕd like to cancel
the procedure.
4. Turn the Parameter knob until the display shows:
MIDI Settings:
SysEx Device ID= 000
i
The current SysEx Device ID value
The SysEx Device ID parameter can be set to any number from 000 to 127.
WWWWaaaarrrrnnnniiiinnnngggg:::: Make sure to take note of the SysEx Device ID number you choose. If you perform
a SysEx dump from the librarian (see Chapter 9), this ID is included in the data. When
you send the dump back to your ZR-76, you must have this parameter set to the same ID
number, or the data will not successfully load back in.
5. Use the Value knob to select the SystEx Device ID number you want to use for this ZR-76.
SSSSeeeettttttttiiiinnnngggg UUUUpppp NNNNeeeewwww RRRReeeeaaaallll----TTTTiiiimmmmeeee CCCCoooonnnnttttrrrroooolllllllleeeerrrrss
The ZR-76 can generate, respond to and transmit the following real-time MIDI controllers and messages:
¥ Data Entry Slider ¥ Sustain/Sostenuto pedals
¥ Pitch Bend Wheel ¥ MIDI Volume messages
¥ Mod Wheel ¥ MIDI Pan messages
¥ Foot Pedal ¥ MIDI Expression messages
In addition, the ZR-76 allows you to define four additional real-time MIDI controllers: CTRL1, CTRL2,
CTRL3 and CTRL4. These can be assigned to any legitimate MIDI controller number, and used to
modulate the ZR-76Õs sounds or effects. See Chapter 8 to learn how to use one of the CTRLs as a realtime effect modulator.
TTTTiiiippppssss:::: A CTRL can be assigned to the CV pedal and transmitted via MIDI when a MIDI-OUT
sound is selected. When incoming MIDI is received, the CTRLs can be used to provide ZR
response to any MIDI controller message.
SoundFinder and the 16 Track Recorder tracks offer filters that determine whether or not response to the
CTRLs will be enabled or disabled. See Chapter 4 or Chapter 7 for details.
When you change any system setting, ZR-76 operations will pause momentarily
to store your settings into FLASH memory.
ss
TTTToooo SSSSeeeetttt UUUUpppp tttthhhheeee FFFFoooouuuurrrr SSSSppppeeeecccciiiiaaaallll CCCCoooonnnnttttrrrroooolllllllleeeerrrrss
1. Press the System button.
ENSONIQ ZR-76 Musician's Manual 57
ss
Page 67

Chapter 3ÑGlobal Settings
2. Turn the Parameter knob until the display shows:
3. Press Yes if youÕd like to change the current system MIDI settings. Press No if youÕd like to cancel
the procedure.
4. Turn the Parameter knob until the display shows the name of the system controller youÕd like to use:
¥ CTRL1 ¥ CTRL2 ¥ CTRL3 ¥ CTRL4
5. After selecting one of the four special controllers, use the Value knob to locate the MIDI controller
number youÕd like to assign to the system controller youÕve selected.
NNNNooootttteeee:::: If more than one system controller is assigned to the same MIDI controller number,
only the lower-numbered system controller will respond to the MIDI controller.
When the ZR-76 is shipped from the factory:
¥ CTRL1 is assigned to Breath Controller (MIDI controller #002).
¥ CTRL2 is assigned to FXControl1 (MIDI controller #012).
¥ CTRL3 is assigned to PatchSelct (MIDI controller #070).
¥ CTRL4 is assigned to Timbre (MIDI controller #071).
System/MIDI:
Edit MIDI settings?
EEEE nnnn tttt eeee rrrr iiii nnnn gggg GGGG MMMM MMMM oooo dddd eeee
UUUUssssiiiinnnngggg tttthhhheeee ZZZZRRRR----77776666 wwwwiiiitttthhhh GGGGeeeennnneeeerrrraaaallll MMMMIIIIDDDDII
General MIDI (GM) is an agreed-upon set of sounds and protocols which aims to ensure that, no matter
what brand or model General MIDI instrument you use to play General MIDI sequences, the music is
guaranteed to sound as its arranger intended. For a more detailed description of General MIDI, see
ÒWhat Is General MIDI?Ó found in Chapter 13ÑSupplemental Information.
The ZR-76 can play General MIDI music in either of two ways:
¥ You can load General MIDI Standard MIDI Files from floppy disk into your ZR-76. Once loaded into
the 16 Track Recorder, you can play them back, edit them, and/or add your own new tracks.
¥ You can play GM files on an external deviceÑsuch as a computer or stand-alone sequencerÑand
use the ZRÕs complete set of GM sounds.
The ZR-76 GM mode reconfigures your ZR-76 for General MIDI music. Once in GM Mode, the 16 Track
Recorder will be prepared to play GM Standard MIDI Files loaded from floppy or to act as a 16-channel
General MIDI sound source.
TTTToooo UUUUsssseeee tttthhhheeee ZZZZRRRR----77776666 ffffoooorrrr GGGGeeeennnneeeerrrraaaallll MMMMIIIIDDDDIIII MMMMuuuussssiiiicc
1. Press the System button.
2. Turn the Parameter knob until the display shows:
II
cc
System/MIDI:
Enter GM mode?
3. If youÕd like to continue, press Yes. If not, press No.
ENSONIQ ZR-76 Musician's Manual58
Page 68

Chapter 3ÑGlobal Settings
You can now load a GM Standard MIDI File from floppy disk into any sequence location. To learn how
to load Standard MIDI Files, see Chapter 7.
If youÕre using an external sequencer to play back GM music, your ZR-76 will function perfectly as a
high-quality GM sound source. (Chapter 2 describes the MIDI connections youÕll need to make.)
ZZZZRRRR----77776666 GGGGeeeennnneeeerrrraaaallll MMMMIIIIDDDDIIII DDDDeeeettttaaaaiiiillllssss ffffoooorrrr tttthhhheeee CCCCuuuurrrriiiioooouuuuss
General MIDI is designed to be extremely easy to use, requiring no background technical knowledge of
its workings. However, for ZR-76 users who are interested, hereÕs what happens when you ÒEnter GM
mode.Ó
¥ The ZR-76 moves into its song memory any song currently in the Song Editor.
¥ The ZR-76 creates a new song, selects sequence A in bank 1 and selects track 1 in sequence A.
¥ Tracks 1-16 are set to MIDI channels 1-16, respectively.
¥ Each track in the 16 Track Recorder is set to select sounds from the ZR-76Õs bank of General MIDI
sounds.
¥ Each trackÕs Bank&ProgChgRecv is set to On so that the ZR-76 can respond to General MIDI program
changes.
¥ Bank Select Recv parameter for each track is disabled in the event that the GM sequence being
played contains Bank Select messages on the trackÑthis guarantees that program changes will only
select sounds from the ZRÕs GM sound bank. Track 10 is set to select sounds only from the ZRÕs GM
drum kit bank.
¥ Each trackÕs PitchBendMode is set to Prog so that its GM sounds respond to MIDI Pitch Bend data in
accordance with the General MIDI rules.
¥ The system AutoSelect FXBus parameter is set to Off to allow General MIDI Effect Change messages
to control the ZRÕs chorus and reverb.
¥ The system Track ParamReset parameter is set to Off to prevent the various track parameters preset
for General MIDI from being inadvertently changed.
¥ The system ResetControlRecv and AllNotesOff Recv parameters are set to On so that the ZR-76 can
respond to MIDI panic messages.
¥ The system SysEx Recv parameters is set to On so that you can return the ZR-76 to its original
General MIDI settings any time you like, via a General MIDI On SysEx message.
ss
NNNNooootttteeee:::: When youÕre done using the ZR-76 as a GM sound source, you may want to reset
the following system parameters, which are described elsewhere in this chapter:
AutoSelect FXBus, Track ParamReset, ResetControlRecv, AllNotesOff Recv and SysEx
Recv.
ENSONIQ ZR-76 Musician's Manual 59
Page 69

Chapter 4ÑSoundFinder
SSSS oooo uuuu nnnn dddd CCCC eeee nnnn tttt rrrr aaaa llll
At the heart of the ZR-76 are the hundreds of terrific sounds it contains. ENSONIQÕs SoundFinderª makes
it easy to find just the right one. SoundFinder also provides the means to customize these sounds in many
useful ways.
CCCC hhhh aaaa pppp tttt eeee rrrr 4444
SSSS oooo uuuu nnnn dddd FFFF iiii nnnn dddd eeee rrrr
™
SoundFinderÕs Select Sound, Split, Layer and Transpose buttons contain LEDs that provide helpful provide
information at a glance:
¥ When the Select Sound LED is lit, youÕre in SoundFinder.
¥ When the Split LED is lit, SoundFinderÕs split feature is enabled: the ZRÕs keyboard can play two
different sounds in two different areas of the keyboard. You can set where one area ends and the other
begins.
¥ When the Layer LED is lit, SoundFinderÕs layer feature is enabled: two sounds of your selection will
play at once when you press a key on the keyboard. Layers are described in detail in ÒLayering ZR-76
SoundsÓ later in this chapter.
NNNNooootttteeee:::: SoundFinder can have a split and a layer at the same time. When this is the case, the
sound played in the lower part of the keyboard is heard by itself; the upper area of the
keyboard plays two sounds at once.
¥ When the Transpose LED is lit, SoundFinderÕs transpose feature is enabled: the pitch produced as you
play notes on the keyboard is shifted upward or downward by the number of semitone steps that you
determine. The ZRÕs transpose capabilities are described in detail in ÒTransposing the ZRÕs Keyboard in
SoundFinderÓ later in this chapter.
ENSONIQ ZR-76 Musician's Manual 61
Page 70

Chapter 4ÑSoundFinder
CCCC hhhh oooo oooo ssss iiii nnnn gggg SSSS oooo uuuu nnnn dddd ssss
TTTThhhheeee SSSSoooouuuunnnnddddFFFFiiiinnnnddddeeeerrrr FFFFaaaavvvvoooorrrriiiitttteeeessss BBBBuuuuttttttttoooonnnnss
The SoundFinder Favorites buttonsÑlocated beneath the ZR displayÑprovide one-button access to your
favorite sounds.
The Favorites buttons are programmed by ENSONIQ to select sounds corresponding to their labels:
Favorites button: selects: Favorites button: selects:
1 (Piano) PerfectPno 7 (Strings) Dyn Marcato
2 (E. Piano) Suitcase EP 8 (Brass) StereoBrass
3 (Organ) Fuller B3 9 (Sax) BreathyTenr
4 (Keys) ChatterClav 10 (Vocals) Oooohhhs
5 (Guitar) Dbl 6-String 11 (Synth Pad) Phase Sweep
6 (Bass) Switch Pop1 12 (Synth Lead) Atomic Lead
ss
The buttons are completely programmable, so you can assign your own favorite sounds to any or all of the
buttons, regardless of their labels. See below for details.
TTTToooo SSSSeeeelllleeeecccctttt SSSSoooouuuunnnnddddssss UUUUssssiiiinnnngggg tttthhhheeee FFFFaaaavvvvoooorrrriiiitttteeeessss BBBBuuuuttttttttoooonnnnss
1. Press any Favorite buttonÑthatÕs all there is to it! The sound programmed for that button is now
selected and can be played from the keyboard.
There are six additional ÒhiddenÓ favorites positions.
2. To access the additional six favorites positions, hold down an upper Favorites button while pressing
the button directly beneath it, or vice versa.
These six positions are programmed by ENSONIQ to select (these can also be re-programmed):
Favorites pair: selects: Favorites pair: selects:
1 and 7 Nylon Pad 4 and 10 Live Kit 1
2 and 8 Vibraphone 5 and 11 RainMan
3 and 9 Airy Flute 6 and 12 Big AnaLead
You can program foot switches to select any of the Favorites positions when you want to keep your hands
on the keys. To do this, youÕll first need to program your foot switch(es) for this purpose.
TTTToooo SSSSeeeetttt UUUUpppp aaaannnndddd UUUUsssseeee FFFFooooooootttt SSSSwwwwiiiittttcccchhhheeeessss ffffoooorrrr tttthhhheeee SSSSeeeelllleeeeccccttttiiiioooonnnn ooooffff FFFFaaaavvvvoooorrrriiiitttteeeess
1. Press the System button.
ss
ss
ENSONIQ ZR-76 Musician's Manual62
Page 71

Chapter 4ÑSoundFinder
2. Turn the Parameter knob until the display shows:
System/MIDI:
Set up foot control?
3. Press Yes, or press No if youÕd like to cancel the procedure.
There are four foot switch parameters, each of which represents one of the four foot switch pedals:
¥ FtSw 1LÑthe left pedal of foot switch 1 ¥ FtSw 2LÑthe left pedal of foot switch 2
¥ FtSw 1RÑthe right pedal of foot switch 1 ¥ FtSw 2RÑthe right pedal of foot switch 2
4. Turn the Parameter knob until the pedal youÕre programming is shown at the left of the display.
Each pedal can be programmed with one of two favorites functions:
¥ PrevFavoriteÑpressing the pedal will select the previous favorite sound from the group of 18
favorites. When the first favorite is selected, tapping the pedal again will select the 18th favorite.
¥ Next FavoriteÑpressing the pedal will select the next favorite sound from the group of 18 favorites.
When the last favorite is selected, tapping the pedal again will select the first favorite.
5. Turn the Value knob to choose the desired favorites function for the selected pedal.
6. If youÕve got a dual foot switch, repeat Steps 4 and 5 to set up your other pedal.
TTTTiiiipppp:::: You might find it handy to program a left foot pedal to select the next-lowest favorite,
and the right pedal to select the next-highest.
7. When youÕve finished programming your foot switch(es), tap the appropriate pedals to select Favorites.
PPPPrrrrooooggggrrrraaaammmmmmmmiiiinnnngggg FFFFaaaavvvvoooorrrriiiitttteeeessss OOOOvvvveeeerrrrvvvviiiieeeeww
The Favorites buttons can be programmed in any of three ways. You can select the method most
convenient for you. You can set a button (or pair) by:
¥ holding it down and selecting the desired sound in SoundFinder (as described in ÒTo Locate Sounds by
TypeÓ below). This method is most handy when youÕre setting up the Favorites buttons as a group.
¥ holding down the SoundFinder Select Sound button with the desired sound displayed and pressing the
intended Favorites button, or pair of buttons. This method is useful when youÕve come across a
SoundFinder sound you really like and want to quickly assign it to a Favorites button.
¥ holding down the SoundFinder Select Sound button with the desired sound displayed and pressing a
foot switched programmed to select favorites. This method will be popular with musicians who like to
use their feet.
TTTTiiiipppp:::: The sound programmed as the first favoriteÑassigned to Favorites Button 1Ñis
selected when you power up your ZR. This lets you set the ZRÕs wake-up sound.
TTTTiiiipppp:::: You can assign a MIDI-OUT sound (described later in this chapter) as a favoriteÑwhen
itÕs selected, its Bank Select and Program Changes values will be transmitted from the ZR.
TTTToooo PPPPrrrrooooggggrrrraaaammmm aaaa FFFFaaaavvvvoooorrrriiiitttteeee SSSSttttaaaarrrrttttiiiinnnngggg aaaatttt tttthhhheeee FFFFaaaavvvvoooorrrriiiitttteeeessss BBBBuuuuttttttttoooonn
1. Press and hold down the Favorites button you want to program.
2. While holding down the button, turn the Sound/Rhythm Type knob to select the category of the sound
you want to assign to the button, and turn the Sound/Rhythm Name knob to select the sound itself.
3. Release the Favorites buttonÑitÕs now programmed to select the sound youÕve assigned to it.
ww
nn
TTTToooo PPPPrrrrooooggggrrrraaaammmm FFFFaaaavvvvoooorrrriiiitttteeeessss SSSSttttaaaarrrrttttiiiinnnngggg aaaatttt tttthhhheeee SSSSeeeelllleeeecccctttt SSSSoooouuuunnnndddd BBBBuuuuttttttttoooonn
1. Select a sound in SoundFinder using either technique described in ÒHow to Find SoundsÓ below.
2. Press and hold down the Select Sound button.
3. Press the desired Favorites buttonÑitÕs now programmed to select your SoundFinder sound.
ENSONIQ ZR-76 Musician's Manual 63
nn
Page 72

Chapter 4ÑSoundFinder
PPPPrrrrooooggggrrrraaaammmmmmmmmmmmiiiinnnngggg tttthhhheeee FFFFaaaavvvvoooorrrriiiitttteeeessss BBBBuuuuttttttttoooonnnnssss UUUUssssiiiinnnngggg FFFFooooooootttt SSSSwwwwiiiittttcccchhhheeeess
1. Set up a foot pedal or two for the selection of favorites following the steps in ÒTo Set Up and Use Foot
Switches for the Selection of FavoritesÓ earlier in this section.
2. Select a sound in SoundFinder using either technique described in ÒHow to Find SoundsÓ below.
3. Press and hold down the Select Sound button.
4. Tap the foot pedal that selects the last or next Favorites position from the one currently selected.
TTTTiiiipppp:::: If you want to mentally keep track of which favorites position is currently selected
without having to press a Favorites button, you might find it handy to assign the sound
ÒSilenceÓ to the 18th favorites position. This would provide a recognizable landmark as you
step through your favorites.
TTTTiiiipppp:::: If one pedal is set to PrevFavorite and another to NextFavorite, pressing both together
will cause the ZR to jump to the first favorites position.
MMMMaaaakkkkiiiinnnngggg FFFFaaaavvvvoooorrrriiiitttteeeessss PPPPeeeerrrrmmmmaaaannnneeeennnntt
Favorites assignments are backed up in FLASH memory. When you power up the ZR, theyÕre copied into
RAM, from which theyÕre selected when you press the Favorites buttons or select favorites using foot
switches. (ZR memory is described in Chapter 9). This scheme allows you to set up favorites for a particular
situation, and to quickly restore your permanent favorites by simply turning the ZR off and back on.
To make your favorites assignments permanent, you must save them to FLASH memory (you can also save
favorites to floppy diskÑsee Chapter 9 to learn how).
TTTToooo SSSSaaaavvvveeee FFFFaaaavvvvoooorrrriiiitttteeeessss AAAAssssssssiiiiggggnnnnmmmmeeeennnnttttssss ttttoooo FFFFLLLLAAAASSSSHHHH MMMMeeeemmmmoooorrrryy
1. Press the button.
If the System Write Protect parameter is set to Prompt, the display will show:
tt
yy
ss
INT memory is write
protected! Override?
This display is offered as a double-check for you, to make sure you really want to save your sound. If
youÕd like to avoid this prompt in the future, see ÒProtecting the ZRÕs MemoryÓ in Chapter 3.
2. If youÕd like to cancel the operation, press the No button. If youÕd like to proceed, press the Yes button.
3. Turn the Value knob until the display shows:
Save SoundFinder?
Type= Favorites
4. Press the Yes button.
HHHHoooowwww ttttoooo FFFFiiiinnnndddd SSSSoooouuuunnnnddddss
The ZR-76 offers two methods of locating sounds:
¥ You can locate sounds by sound type
¥ You can immediately access any sound if you know its name
TTTToooo LLLLooooccccaaaatttteeee SSSSoooouuuunnnnddddssss BBBByyyy SSSSoooouuuunnnndddd TTTTyyyyppppee
1. Locate the SoundFinder section on the ZRÕs front panel.
2. Press the Select Sound button.
ss
ee
ENSONIQ ZR-76 Musician's Manual64
Page 73

Chapter 4ÑSoundFinder
The Select Sound buttonÕs LED lights.
3. Turn the left-hand Sound/Rhythm Type knob on the ZRÕs front panel clockwise or counter-clockwise.
As you turn the Sound Type knob, youÕll see different sound categories appear in the lower left part of
the ZRÕs display.
Sound FLS001:014
VOCALS : A Ha Ha Ha
i
The currently selected sound type
4. Find a sound type category that interests you.
5. Turn the Sound/Rhythm Name knob clockwise or counter-clockwise to choose a sound of the selected
type.
Sound names appear on the lower right-hand portion of the display:
Sound ROM005:025
VOCALS :Oh Yeah Pad
i
The name of the currently selected sound
6. Play some music on the keyboard to hear the sound youÕve selected.
7. To select other sounds, use the same method: turn the Sound/Rhythm Type knob to locate the type of
sound you want to hear, and the Sound/Rhythm Name knob to pick an individual sound.
HHHHoooowwww SSSSoooouuuunnnnddddFFFFiiiinnnnddddeeeerrrr WWWWoooorrrrkkkkss
SoundFinder is a database of all the sounds in your ZR-76. The power of a database lies in its ability to let
you to view information in a manner of your choosing. SoundFinder keeps a list of all the sounds available
in your ZR-76, and shows them to you in logical, musically convenient categories called sound types.
SoundFinder sound types show you sounds by instrument familyÑvocals or bells, for exampleÑor by a
number of other useful criteria, including the location in the ZRÕs memory where they reside. ThereÕs a
special SoundFinder category that you can use when you want the ZR-76 to transmit MIDI data and Bank
ENSONIQ ZR-76 Musician's Manual 65
ss
Page 74

Chapter 4ÑSoundFinder
Select and Program Change messages for receipt by an external MIDI module (see ÒSoundFinder MIDIÓ
later in this chapter). SoundFinder also keeps track of presets, which are sound combinationsÑpresets are
used in the construction of split and layer sounds. The ALL-SND category is especially useful, since it
shows all of the ZR-76 sounds arranged in alphabetical order.
You can also search for a sound by name by typing its name on the ZRÕs keyboard, as described below.
YouÕll find a complete list of all the ZR-76 sounds in Chapter 13.
TTTToooo LLLLooooccccaaaatttteeee aaaa ZZZZRRRR----77776666 SSSSoooouuuunnnndddd BBBByyyy NNNNaaaammmmee
1. Locate the SoundFinder section on the ZRÕs front panel.
2. Press the Select Sound button, and hold it down.
Each white key on the ZRÕs keyboard from the C two octaves below Middle C to the B nearly three
octaves above has been assigned a number or letter, printed on the ZRÕs front panel just above the key.
The G# in each octave types a blank space.
ee
NNNNooootttteeee:::: The keys outside of the range shown above are not used for the selection of sounds.
3. While continuing to hold the Select Sound button down, use the keyboard to type the name of the
sound youÕre looking for.
By watching the ZRÕs display, youÕll see SoundFinder continually narrowing the search as you type
each letter. Sometimes just the first few letters is enough to identify a sound if no other sound shares
those letters.
Sound ROM:004:013
ALL-SND :Real El.Pno
i
The name of each sound you find is shown here
If you can only recall the beginning of a soundÕs name, and SoundFinder locates more than one sound
matching what youÕve typed, it will display the alphabetically first sound. To access the other matches,
turn the Sound Name knob clockwise.
ENSONIQ ZR-76 Musician's Manual66
Page 75

Chapter 4ÑSoundFinder
TTTT rrrr aaaa nnnn ssss pppp oooo ssss iiii nnnn gggg tttthhhh eeee ZZZZ RRRR ÕÕÕÕ ssss KKKKeeee yyyy bbbb oooo aaaa rrrr dddd IIIInnnn SSSS oooo uuuu nnnn dddd FFFF iiii nnnn dddd eeee rrrr
TTTTrrrraaaannnnssssppppoooossssiiiinnnngggg tttthhhheeee ZZZZRRRR----77776666 KKKKeeeeyyyybbbbooooaaaarrrrdddd IIIInnnn SSSSoooouuuunnnnddddFFFFiiiinnnnddddeeeerr
The ZR-76 keyboard transpose function allows you to easily change the key in which your music is heard
without actually changing where you place your fingers on the ZRÕs keyboard. You can set the amount of
transposition by holding the Transpose button and pressing a key on the ZRÕs keyboardÑits semitone
distance above or below Middle C will determine the number of semitones by which your music will be
transposed. You can also determine the transposition amount by using the Value knob. In either case, the
ZRÕs display will provide visual confirmation of the keyboard transpose amount.
NNNNooootttteeee:::: The transpose function affects the behavior of the ZR-76 keyboard itselfÑthe sounds
you play are not internally altered. When you turn Transpose off, theyÕll return to their
programmed pitches.
TTTThhhheeee TTTTrrrraaaannnnssssppppoooosssseeee LLLLEEEEDD
The Transpose LED is lit whenever the ZR-76 keyboard is being transposed.
NNNNooootttteeee:::: If the Keyboard Transpose Amount is set to 0st (for Ò0 semitone stepsÓ), the
Transpose LED will not light, since no keyboard transposition occurs at that setting.
TTTToooo TTTTrrrraaaannnnssssppppoooosssseeee tttthhhheeee KKKKeeeeyyyybbbbooooaaaarrrrdddd BBBByyyy PPPPrrrreeeessssssssiiiinnnngggg aaaa KKKKeeeeyy
1. Press and hold the Transpose button.
DD
rr
yy
The display will show:
Keyboard Transpose:
Amount: 0st
i
The number of semitone steps by which the keyboard is currently transposed
The keyboard pitch can be shifted by as many as 24 semitone steps downward (-24st) and 24 steps
upward (+24st). A value of 0st means that the keyboard is not transposed.
You can change this value by pressing a key on the keyboard while the Transpose button is held down.
Middle C will select 0st. Each key up or down from middle C will select a value one semitone higher or
lower than the original pitch.
2. While still holding the Transpose button, press a key on the keyboard to select the desired transpose
value.
TTTToooo TTTTrrrraaaannnnssssppppoooosssseeee YYYYoooouuuurrrr MMMMuuuussssiiiicccc bbbbyyyy DDDDiiiiaaaalllliiiinnnngggg IIIInnnn aaaa SSSSeeeemmmmiiiittttoooonnnneeee VVVVaaaalllluuuuee
1. Press the Transpose button. The display will show:
Keyboard Transpose:
Amount: 0st
ee
i
The number of semitone steps by which the keyboard is currently transposed
ENSONIQ ZR-76 Musician's Manual 67
Page 76

Chapter 4ÑSoundFinder
The keyboard pitch can be shifted by as many as 24 semitone steps downward (-24st) and 24 steps
upward (+24st). A value of 0st means that the keyboard is not transposed.
You can change this value by turning the Value knob or pressing the up/down arrow buttons.
2. Turn the Value knob or press the up/down arrow buttons to select the desired transpose value.
TTTToooo TTTTuuuurrrrnnnn tttthhhheeee TTTTrrrraaaannnnssssppppoooosssseeee FFFFuuuunnnnccccttttiiiioooonnnn OOOOffffff
1. If transpose is currently on, the Transpose LED will be lit. If it is, press the Transpose button to turn
the function off.
You can repeatedly press the Transpose button to toggle keyboard transposition on and offÑyour
transposition amount setting will be retained until you change it or power your ZR-76 off.
ff
UUUU nnnn dddd eeee rrrr ssss tttt aaaa nnnn dddd iiii nnnn gggg ZZZZ RRRR ---- 7777 6666 SSSS oooo uuuu nnnn dddd ssss
The ZR-76 contain two types of sounds: standard sounds and drum kit/percussion kit sounds. Both types
of sound are constructed from high-quality digital sound waves resident in the permanent memory of the
ZR-76 or on ENSONIQ EXP Series Wave Expansion Boards. The explanations and procedures in this
chapter apply to both types of sounds, except as noted.
All ZR-76 sounds take advantage of the ZRÕs powerful 24-bit effects processor. To learn how the ZR-76
effects work, see Chapter 8.
ZZZZRRRR----77776666 SSSSttttaaaannnnddddaaaarrrrdddd SSSSoooouuuunnnnddddss
Standard ZR-76 sounds employ up to 16 layers of sound waves, placed on top of each other. Each layer in
a standard sound has an assortment of editable parameters that allow you to shape the sonic
characteristics of its sound wave.
TTTTiiiipppp:::: You can construct special hybrid sounds that have more than 16 layers. See ÒSaving
Splits and LayersÓ later in this chapter.
ZZZZRRRR----77776666 DDDDrrrruuuummmm KKKKiiiitttt aaaannnndddd PPPPeeeerrrrccccuuuussssssssiiiioooonnnn KKKKiiiitttt SSSSoooouuuunnnnddddss
Drum kit and percussion kit sounds can have up to 64 different standard sounds assigned to individual
keys from the B two octaves below Middle C (B1) to the D three octaves above (D7). Note that these are not
just sound waves, but rather complete ZR sounds! Though these are most commonly drum and percussion
sounds, you can use any kind of sound youÕd like in a drum or percussion kit. Each key, or drum key, in a
drum or percussion kit has its own volume, pan, effect routing and tuning settings.
ss
ss
NNNNooootttteeee:::: When you assign a sound to a drum key, the drum key makes note of the location of
the sound in the ZRÕs memory. When you play the drum key, it looks to that location and
uses the sound it finds there. If you edit the drum keyÕs sound or replace it, the drum key
will play the edited version or the sound youÕve replaced it with. If youÕve assigned a sound
to a drum key, and then erased the soundÑor pointed a drum key to an expansion board
sound, and removed the expansion boardÑthe drum key will be unable to locate its sound
and will produce silence when played.
The arrangement of sounds up and down the keyboard in a drum or percussion kit is called a drum or
percussion map. The ZR-76 drum kit and percussion kit sounds programmed by ENSONIQ adhere to two
types of drum map keyboard layouts, so as to ensure that the sounds function correctly in two specific
contexts:
¥ drum kit or percussion kit sounds that are used by the ZR-76 Drum Machine conform to an ENSONIQ
drum/percussion map optimized for that purpose
¥ drum kit or percussion kit sounds that are used for General MIDI music conform to the General
MIDI/GS percussion key map
NNNNooootttteeee:::: You can program drum kit or percussion kit sounds using your own keyboard layout;
however, such sounds will produce unpredictable results when used by the ZRÕs Drum
Machine, or for General MIDI music.
ENSONIQ ZR-76 Musician's Manual68
Page 77

Chapter 4ÑSoundFinder
The drum kit and percussion kit sounds programmed by ENSONIQ are located in these SoundFinder
categories:
¥ DRUM-KITÑdrum kits that use the ENSONIQ drum map keyboard layout
¥ PERC-KITÑpercussion kits that use the ENSONIQ drum map keyboard layout
¥ DRMKITGMÑdrum kits that use the General MIDI/GS percussion map keyboard layout
TTTThhhheeee EEEENNNNSSSSOOOONNNNIIIIQQQQ DDDDrrrruuuummmm MMMMaaaapp
The ZR-76 Drum Machine rhythms are sets of highly realistic patterns recorded by top-notch professional
drummers performing on MIDI drum pads. The ENSONIQ drum map was designed to be used with these
rhythms. The map provides a standardized set of rules that lay out which set of keys on the keyboard
should represent which portion of a real kit. The result is that any drum kit sound that adheres to the
ENSONIQ drum map can be expected to work at least reasonably well with any Drum Machine rhythm. Of
course, the rhythmsÑand the kits themselvesÑcover such a broad range of musical styles that a certain
degree of unpredictability is inevitable when mixing and matching rhythms to kits (though surprisingly
pleasing combinations abound).
In order to faithfully reproduce the subtle nuances of the original performances on which the rhythms are
based, the ENSONIQ drum map takes advantage of the 64-drum-key drum/percussion kit architecture by
offering numerous expressive shadings for each element of a drum or percussion kit. The drum map is
divided into eight zones, one for each drum kit element, or in the case of percussion kit sounds, each
percussion family. You can design your own drum or percussion kit for use with the Drum Machine by
following the drum or percussion map layout youÕll find in Chapter 13.
If youÕre using the Drum Machine and would like to modify the drum or percussion kit currently being
used by the rhythm youÕve got selected, you can edit the currently selected rhythmÕs kit key-by-key in
SoundFinder, or edit it zone by zone in the Drum Machine. Chapter 5 provides instructions for editing kits
zone-by-zone.
You can use the drum or percussion kit currently being used by the Drum Machine as a starting point in
the construction of a new kit which can be used in any way you like. Select the RthmEditKit using one of
the sound selection methods described at the beginning of this chapter. (The RthmEditKit is located in the
*CUSTOM SoundFinder category.) See ÒEditing ZR-76 Drum and Percussion KitsÓ later in this chapter for
an explanation of the special editing techniques used for ENSONIQÕs powerful drum and percussion kits,
or skip right to ÒEditing a Drum or Percussion Kit YouÕve SelectedÓ for step-by-step instructions.
TTTThhhheeee GGGGeeeennnneeeerrrraaaallll MMMMIIIIDDDDIIII////GGGGSSSS DDDDrrrruuuummmm KKKKiiiitttt MMMMaaaappppss
There are a number of General MIDI/GS percussion key maps named after particular types of drum or
percussion kits. Each map describes in detail what sound shall be mapped to which key in order to be in
compliance with the General MIDI/GS standards. Any drum or percussion kit using the General MIDI/GS
map will work correctly with General MIDI or GS-mapped sequences.
You can design your own drum or percussion kit for use with General MIDI by following the percussion
map layout youÕll find in Chapter 13.
If youÕre currently using a GM drum/percussion kit and would like to modify it for your purposes or make
a new drum/percussion kit sound based on it, select a kit from the DRMKITGM SoundFinder category
using one of the sound selection methods described at the beginning of this chapter. See ÒEditing ZR-76
Drum and Percussion KitsÓ later in this chapter for an explanation of the special editing techniques used
for ENSONIQÕs powerful drum and percussion kits, or skip right to ÒEditing a Drum or Percussion Kit
youÕve SelectedÓ for step-by-step instructions.
pp
ss
WWWWhhhhiiiicccchhhh MMMMaaaapppp ttttoooo UUUUsssseeee??
As you customize a drum or percussion kit soundÑor create one based on a pre-existing kitÑconsider how
youÕll be using it: stick with an ENSONIQ map if your new kit will need to work with the Drum Machine.
Use the General MIDI/GS map if youÕll be using it for General MIDI purposes. If your plans for your new
drum kit or percussion sound donÕt include either of these usesÑperhaps youÕll simply be playing the
sound from the keyboard and recording it into the 16 Track RecorderÑfeel free to put any sound on any
drum key.
GGGG eeee nnnn eeee rrrr aaaa llll SSSS oooo uuuu nnnn dddd ---- EEEE dddd iiii tttt iiii nnnn gggg TTTTeeee cccc hhhh nnnn iiii qqqq uuuu eeee ssss
Every ZR-76 sound has a full suite of options that you can use to customize the sound for your purposes.
Each of these options is called a parameter. When you alter a parameterÕs setting, you are editing its value.
ENSONIQ ZR-76 Musician's Manual 69
??
Page 78

Chapter 4ÑSoundFinder
NNNNooootttteeee:::: When you edit a SoundFinder parameter, the changes you make to the currently
selected sound become permanent only when you save the sound to the ZRÕs FLASH or
RAM memory. See ÒSaving ZR-76 SoundsÓ later in this chapter. After youÕve saved your
edited sound to the ZRÕs internal memory, youÕll probably want to store it on a floppy disk
(see Chapter 9 to learn how).
If youÕve got a computer, you can create your own sounds from scratch using the supplied Unisyn editing
software (Chapter 12 describes the Unisyn sound parameters).
TTTToooo EEEEddddiiiitttt aaaa SSSSoooouuuunnnndd
1. Use either of the sound-selection methods described at the beginning of this chapter to select the
sound youÕd like to edit.
2. Press the SoundFinder Edit button.
3. Turn the Parameter knob clockwise or counter-clockwise to select the parameter youÕd like to edit.
dd
The ZR-76 displays provide helpful information:
The name of the sound youÕre editing
Sound Perc B3-PR
Volume= 110
ii
The currently selected parameter The parameterÕs current value
m
ENSONIQ ZR-76 Musician's Manual70
Page 79

Chapter 4ÑSoundFinder
4. Turn the Value knob clockwise or counter-clockwise to change the parameterÕs setting.
5. If youÕre editing a standard ZR-76 sound, you can now set the selected parameter to any value you
like. For a full description of the editing options available for the ZR-76 sounds, see ÒWorking with the
SoundFinder ParametersÓ later in this chapter.
If the sound youÕre editing is a drum kit sound, the following message may appear:
Read-only! Overwrite
SongEditKit to edit?
6. If youÕd like to proceed, press the Yes button and set the selected parameterÕs value to any setting you
wish. If youÕre unclear about what the displayed question means, pause a moment and see ÒEditing
ZR-76 Drum Kit Sounds,Ó later in this chapter.
NNNNooootttteeee:::: SoundFinder can respond to incoming MIDI, and can generate outgoing MIDI data for
use in controlling external MIDI devices. These capabilities are described in ÒSoundFinder
MIDI,Ó later in this chapter. Many of the ZR-76 SoundFinder parameters may also be edited
via MIDIÑsee the parameter descriptions and procedures later in this chapter for details.
WWWW oooo rrrr kkkk iiii nnnn gggg wwww iiii tttt hhhh tttthhhh eeee SSSS oooo uuuu nnnn dddd FFFF iiii nnnn dddd eeee rrrr PPPPaaaa rrrr aaaa mmmm eeee tttt eeee rrrr ssss
WWWWhhhhaaaatttt tttthhhheeee SSSSoooouuuunnnnddddFFFFiiiinnnnddddeeeerrrr PPPPaaaarrrraaaammmmeeeetttteeeerrrrssss DDDDoo
Each ZR-76 sound is programmed on a computer using the supplied Unisyn editing software. This
software allows the programming of the individual layers within each sound (see Chapter 12 for details).
The SoundFinder parameters let you quickly alter this programming in two ways. The parameters offer:
¥ overrides, which set all of the layers in the currently selected sound to the absolute value you set
¥ offsets, which raise or lower the programmed values by the amount you set
A SoundFinder parameter is an override when its typical use would be to set all of a soundÕs layers to the
same absolute value.
When an override parameter is set to ÒProg,Ó the originally programmed setting for each layer is retained. A
few parameters have system-wide counterparts whose settings can be applied to a sound or trackÑsetting
such a parameter to ÒSysÓ will cause it to use the system-wide setting.
oo
ENSONIQ ZR-76 Musician's Manual 71
Page 80

Chapter 4ÑSoundFinder
A SoundFinder parameter is an offset when it would typically be used to affect all of a soundÕs layers at
once while retaining their different settings in relation to one other. Offset parameters offer values that
have positive/negative aspects (denoted with a Ò+Ó or Ò-Ó). When an offset is set to Ò0,Ó the originally
programmed value for each layer is in effect.
NNNNooootttteeee:::: SoundFinder offsets adjust layer parameters only within the parametersÕ legitimate
rangesÑoffsets will not force them beyond those limits. If a SoundFinder offset parameter
appears to be having no effect, itÕs likely that the layer parameter has already reached its
maximum or minimum setting.
EEEEddddiiiittttiiiinnnngggg SSSSoooouuuunnnnddddssss oooonnnn 11116666 TTTTrrrraaaacccckkkk RRRReeeeccccoooorrrrddddeeeerrrr TTTTrrrraaaacccckkkkss
All of the edit parameters available to sounds in SoundFinder are also available to sounds on tracks in the
16 Track Recorder. Each track in the 16 Track Recorder provides these same parameters for any sound it
usesÑwhen you adjust any of them, your edits become part of the track. All of the parameter explanations
in this chapter, therefore, pertain to sounds in SoundFinder as well as to sounds on tracks in the 16 Track
Recorder.
CCCCoooonnnnttttrrrroooolllllllliiiinnnngggg aaaa SSSSoooouuuunnnnddddÕÕÕÕssss LLLLoooouuuuddddnnnneeeessssss
The ZR-76 provide three parameters for controlling a soundÕs loudness:
¥ Volume determines the maximum loudness of the sound.
¥ Mix (Expression) allows you to lower the soundÕs loudness or raise it up to the maximum set by
Volume. By using Volume and Mix (Expression) together, you can set an acceptable loudness ceiling
for a sound, and then adjust its level without worrying that it will ever become too loud. The Mix
(Expression) parameter can be adjusted with the Parameter and Value knobs, or through the use of
the Mix knob in the ZRÕs FX/Mixdown area (see Chapter 8 for details).
¥ Vol/Mix Polarity allows you to invert the ZRÕs response to Volume and Mix (Expression) changes, so
that greater values for either parameter lower the ZRÕs loudness, and vice versa. This can be useful, for
instance, when youÕd like one sound to fade in as a result of Volume or Expression messages
generated by the optional ENSONIQ CVP-1 CV Pedal, while another fades out from the very same
messages.
When the following parameter is edited in a drum kit, all of the sounds in the
drum kit are affected simultaneously by the changes you make.
TTTToooo SSSSeeeetttt aaaa SSSSoooouuuunnnnddddÕÕÕÕssss MMMMaaaaxxxxiiiimmmmuuuummmm VVVVoooolllluuuummmmee
The Volume parameter allows you to override the loudness ceiling programmed into the currently selected
sound. A Volume setting of 127 will leave the soundÕs level set as it was programmed. Lower values will
reduce the soundÕs loudnessÑdown by 96dB at a value of 0.
1. If youÕre using SoundFinder, select the sound you want to edit and press the SoundFinder Edit button.
If youÕre using the 16 Track Recorder, select the track whose sound youÕd like to edit.
2. Turn the Parameter knob until the display shows ÒVolume=.Ó
3. Turn the Value knob from 0 to 127 to adjust the soundÕs loudness ceiling.
This parameter also responds to MIDI Controller #7 values received via MIDI. The ZRÕs display will
reflect volume changes made via MIDI just as if youÕd made them from the front panel.
ss
ee
ss
ENSONIQ ZR-76 Musician's Manual72
Page 81

Chapter 4ÑSoundFinder
When the following parameter is edited in a drum kit, all of the sounds in the
drum kit are affected simultaneously by the changes you make.
TTTToooo AAAAddddjjjjuuuusssstttt tttthhhheeee RRRReeeellllaaaattttiiiivvvveeee LLLLoooouuuuddddnnnneeeessssssss ooooffff aaaa SSSSoooouuuunnnndd
Mix (Expression) can raise or lower the currently selected soundÕs level, but only up to the maximum set by
Volume.
This allows you to set an acceptable loudness ceiling for a sound, and to adjust its level without worrying
that it will ever become too loud.
1. If youÕre using SoundFinder, select the sound you want to edit and press the SoundFinder Edit button.
If youÕre using the 16 Track Recorder, select the track whose sound youÕd like to edit.
2. Turn the Parameter knob until the display shows ÒMix (Expression)=.Ó
The Mix (Expression) parameter allows you to adjust the level of the currently selected sound up to the
maximum set by the Volume parameter above. A setting of 0 will reduce the soundÕs loudness -96dB
below the level set with the Volume parameter.
3. Turn the Value knob from 0 to 127 to adjust the soundÕs Mix (Expression).
NNNNooootttteeee:::: You can quickly access the Mix (Expression) parameter by turning the FX/Mixdown
Mix knob. Whenever the Select Sound LED is lit, turning the Mix knob adjusts this
parameter for the sound selected in SoundFinder. When the Select Song LED is lit, the Mix
knob edits the currently selected trackÕs Mix (Expression) parameter.
dd
This parameter also responds to Controller #11 values received via MIDI. In addition, you can edit Mix
(Expression) using an NRPN LSB value of 034. See ÒUsing RPNs and NRPNs to Edit SoundFinder
ParametersÓ at the end of this chapter. The ZRÕs display will reflect (Mix) Expression changes made via
MIDI just as if youÕd made them from the front panel.
When the following parameter is edited in a drum kit, all of the sounds in the
drum kit are affected simultaneously by the changes you make.
TTTToooo IIIInnnnvvvveeeerrrrtttt tttthhhheeee RRRReeeessssppppoooonnnnsssseeee ooooffff VVVVoooolllluuuummmmeeee aaaannnndddd MMMMiiiixxxx ((((EEEExxxxpppprrrreeeessssssssiiiioooonnnn))
The Vol/MixPolarity parameter reverses the manner in which a sound will respond to Volume and Mix
(Expression) settings or changes received via MIDI. When set to +Pos, the sound will respond normally:
Higher Volume and Mix (Expression) values will result in greater loudness. When itÕs set to -Neg, higher
Volume and Mix (Expression) values will lower the level of the sound.
1. If youÕre using SoundFinder, select the sound you want to edit and press the SoundFinder Edit button.
If youÕre using the 16 Track Recorder, select the track whose sound youÕd like to edit.
2. Turn the Parameter knob until the display shows ÒVol/MixPolarity=.Ó
3. Turn the Value knob to set the soundÕs Volume/Mix polarity as you prefer.
AAAAddddjjjjuuuussssttttiiiinnnngggg aaaa SSSSoooouuuunnnnddddÕÕÕÕssss PPPPoooossssiiiittttiiiioooonnnn IIIInnnn tttthhhheeee SSSStttteeeerrrreeeeoooo FFFFiiiieeeelllldd
ZR-76 sounds are programmed to ÒappearÓ in specific places in the left/right stereo field. By adjusting the
pan setting, you can offset the stereo placement of the currently selected sound. A value of Center 00 will
leave the sound panned as it was programmed. Lower values will shift it to the left, and higher values will
move it to the right. A pan value of Left -64 shifts a sound hard left, while Right +63 shifts it hard right. If
components within the sound are panned differently, their relative positions will be maintained as the pan
dd
))
ENSONIQ ZR-76 Musician's Manual 73
Page 82

Chapter 4ÑSoundFinder
value shifts the sound in either direction.
If components within the sound are panned differently, their relative positions will be maintained as the
pan value shifts the sound in either direction.
When the following parameter is edited in a drum kit, all of the sounds in the
drum kit are affected simultaneously by the changes you make.
TTTToooo AAAAddddjjjjuuuusssstttt aaaa SSSSoooouuuunnnnddddÕÕÕÕssss SSSStttteeeerrrreeeeoooo PPPPaaaannnnnnnniiiinnnngg
1. If youÕre using SoundFinder, select the sound you want to edit and press the SoundFinder Edit button.
If youÕre using the 16 Track Recorder, select the track whose sound youÕd like to edit.
2. Turn the Parameter knob until the display shows ÒPan=.Ó
The Pan parameter can be set from -64 (hard left) to +63 (hard right).
3. Turn the Value knob to select a location within the stereo field for the sound.
NNNNooootttteeee:::: You can quickly access the Pan parameter by turning the FX/Mixdown Pan knob.
Whenever the Select Sound LED is lit, turning the Pan knob adjusts this parameter for the
sound selected in SoundFinder. When the Select Song LED is lit, the Pan knob edits the
currently selected trackÕs Pan parameter.
This parameter may also be edited via MIDI Controller #10 received via MIDI. The ZRÕs display will
reflect Pan changes made via MIDI just as if youÕd made them from the front panel.
CCCCoooonnnnttttrrrroooolllllllliiiinnnngggg aaaa SSSSoooouuuunnnnddddÕÕÕÕssss PPPPiiiittttcccchhhh BBBBeeeennnndd
The pitch-bend wheel is the spring-loaded wheel located to the far left of the ZR-76 keyboard. ItÕs most
commonly used to bend the pitch of notes up or down by pushing the wheel forward (up) or pulling it back
(down).
The ZR-76 offer two parametersÑPitch Bend Up and Pitch Bend DownÑthat allow you to separately set
how you want each sound to respond to the pitch bend wheel when itÕs pushed in either direction, or when
Pitch Bend messages are received via MIDI.
TTTTiiiipppp:::: Each sound has a filterÑthe Pitch Bend Recv parameterÑthat you can use to disable
or enable the soundÕs response to movements of the ZRÕs pitch bend wheel or to Pitch Bend
messages received via MIDI. This setting of this filter also determines whether or not the ZR
will transmit Pitch Bend messages while the sound is selected. See ÒSound controller
FiltersÓ later in this chapter.
dd
gg
The following parameter is not present when the sound being edited is a drum kit.
TTTToooo CCCChhhhaaaannnnggggeeee aaaa SSSSoooouuuunnnnddddÕÕÕÕssss RRRReeeessssppppoooonnnnsssseeee ttttoooo UUUUppppwwwwaaaarrrrdddd PPPPiiiittttcccchhhh BBBBeeeennnnddddss
1. If youÕre using SoundFinder, select the sound you want to edit and press the SoundFinder Edit button.
If youÕre using the 16 Track Recorder, select the track whose sound youÕd like to edit.
2. Turn the Parameter knob until the display shows ÒPitch Bend Up=.Ó
ss
ENSONIQ ZR-76 Musician's Manual74
Page 83

Chapter 4ÑSoundFinder
Pitch Bend Up can be set to:
¥ 1-12dn or 1-12upÑto lower or raise the pitch of the sound by 1 to 12 equal-temper semitones
when the pitch bend wheel is pushed all the way forward, or when maximum Pitch Bend messages
are received via MIDI
¥ ProgÑto respond to upward pitch bend values according to the response programmed into the
sound
¥ SysÑto use the global system Pitch Bend Up value (see Chapter 3 for details)
¥ OffÑto ignore forward movement of the pitch bend wheel or Pitch Bend Up messages received via
MIDI.
4. Turn the Value knob to select the Pitch Bend Up value you prefer.
NNNNooootttteeee:::: When you select a new sound in SoundFinder, Pitch Bend Up will be reset to Prog.
Selecting a new sound for a track in the 16 Track Recorder will also reset this parameter if
the system Track ParamReset parameter is set to On (see Chapter 3).
This parameter may also be edited via MIDI. It responds to an RPN LSB value of 000 and an NRPN LSB
value of 022. See ÒUsing RPNs and NRPNs to Edit SoundFinder ParametersÓ at the end of this chapter.
The ZRÕs display will reflect Pitch Bend Up changes made via MIDI just as if youÕd made them from the
front panel. The Pitch Bend Up parameter will have no effect if the Pitch Bend Recv parameter is set to
Off.
The following parameter is not present when the sound being edited is a drum kit.
TTTToooo CCCChhhhaaaannnnggggeeee aaaa SSSSoooouuuunnnnddddÕÕÕÕssss RRRReeeessssppppoooonnnnsssseeee ttttoooo DDDDoooowwwwnnnnwwwwaaaarrrrdddd PPPPiiiittttcccchhhh BBBBeeeennnnddddss
1. If youÕre using SoundFinder, select the sound you want to edit and press the SoundFinder Edit button.
If youÕre using the 16 Track Recorder, select the track whose sound youÕd like to edit.
2. Turn the Parameter knob until the display shows ÒPitch Bend Down=.Ó
Pitch Bend Down can be set to:
¥ 1-12dn or 1-12upÑto lower or raise the pitch of the sound by 1 to 12 equal-temper semitones
when the pitch bend wheel is pulled all the way back, or when minimum Pitch Bend messages are
received via MIDI
¥ ProgÑto respond to backward pitch bend movements according to the response programmed into
the sound
¥ SysÑto use the global system Pitch Bend Down value (see Chapter 3 for details)
¥ OffÑto ignore backward movement of the pitch bend wheel or Pitch Bend Down messages received
via MIDI
3. Turn the Value knob to select the Pitch Bend Down value you prefer.
NNNNooootttteeee:::: When you select a new sound in SoundFinder, Pitch Bend Down will be reset to Prog.
Selecting a new sound for a track in the 16 Track Recorder will also reset this parameter if
the system Track ParamReset parameter is set to On (see Chapter 3).
This parameter may also be edited via MIDI. It responds to an RPN LSB value of 000 and an NRPN LSB
value of 023. See ÒUsing RPNs and NRPNs to Edit SoundFinder ParametersÓ at the end of this chapter.
The ZRÕs display will reflect Pitch Bend Down changes made via MIDI just as if youÕd made them from
the front panel.
RRRReeeettttuuuunnnniiiinnnngggg aaaa SSSSoooouuuunnnndd
On a global level, the overall tuning of the ZR-76 can be adjusted with the system Fine Tuning parameter
(see Chapter 3 for details). This parameter retunes all of the sounds in the ZR simultaneously. You can also
re-tune individual standard (non-drum/ percussion kit) sounds with the SoundFinder Octave Tuning,
Coarse Tuning and Fine Tuning parameters.
dd
ss
ENSONIQ ZR-76 Musician's Manual 75
Page 84

Chapter 4ÑSoundFinder
The following parameter is not present when the sound being edited is a drum kit.
TTTToooo RRRReeee----TTTTuuuunnnneeee aaaa SSSSoooouuuunnnndddd BBBByyyy OOOOccccttttaaaavvvveeeess
1. If youÕre using SoundFinder, select the sound you want to edit and press the SoundFinder Edit button.
If youÕre using the 16 Track Recorder, select the track whose sound youÕd like to edit.
2. Turn the Parameter knob until the display shows ÒOctave Shift=.Ó
3. Use the Value knob to retune the sound in octave steps, if desired.
A setting of 0oct means the sound will use its programmed octave tuning value. You can tune the
sound up or down by a maximum of four equal-temper octaves.
This parameter may also be edited via MIDI. It responds to an NRPN LSB value of 011. See ÒUsing
RPNs and NRPNs to Edit SoundFinder ParametersÓ at the end of this chapter. The ZRÕs display will
reflect Octave Shift changes made via MIDI just as if youÕd made them from the front panel.
The following parameter is not present when the sound being edited is a drum kit.
TTTToooo RRRReeee----TTTTuuuunnnneeee aaaa SSSSoooouuuunnnndddd BBBByyyy SSSSeeeemmmmiiiittttoooonnnneeeess
1. If youÕre using SoundFinder, select the sound you want to edit and press the SoundFinder Edit button.
If youÕre using the 16 Track Recorder, select the track whose sound youÕd like to edit.
2. Turn the Parameter knob until the display shows ÒSemitone Shift=.Ó
3. Use the Value knob to set the semitone tuning for the sound.
A setting of 0st means the sound will use its programmed semitone tuning value. You can tune the
sound upward by a maximum of 63 keyboard equal-temper semitones or downward by a maximum of
64.
This parameter may also be edited via MIDI. It responds to an RPN LSB value of 002. See ÒUsing RPNs
and NRPNs to Edit SoundFinder ParametersÓ at the end of this chapter. The ZRÕs display will reflect
Semitone Shift changes made via MIDI just as if youÕd made them from the front panel.
ss
ss
The following parameter is not present when the sound being edited is a drum kit.
TTTToooo FFFFiiiinnnneeee----TTTTuuuunnnneeee aaaa SSSSoooouuuunnnndd
1. If youÕre using SoundFinder, select the sound you want to edit and press the SoundFinder Edit button.
If youÕre using the 16 Track Recorder, select the track whose sound youÕd like to edit.
2. Turn the Parameter knob until the display shows ÒFine Tuning=.Ó
3. Use the Value knob to set the fine tuning for the sound.
A setting of 0cents means the sound will use its programmed fine tuning value. You can lower or raise
the soundÕs fine tuning by -50 to +49 cents. 100 cents equals one semitone.
This parameter may also be edited via MIDI. It responds to an RPN LSB value of 001. See ÒUsing RPNs
and NRPNs to Edit SoundFinder ParametersÓ at the end of this chapter. The ZRÕs display will reflect
fine tuning changes made via MIDI just as if youÕd made them from the front panel.
UUUUssssiiiinnnngggg SSSSppppeeeecccciiiiaaaallll PPPPiiiittttcccchhhh TTTTaaaabbbblllleeeess
Sounds can use special tunings, or pitch tablesÑand the ZR-76 provide a large assortment of them. With
the proper software, you can also design your own pitch table on a computer, and transmit it to your ZR76 via MIDI. "About RAM Pitch Tables" in Chapter 13 provides detailed information on creating your own
pitch tables. Chapter 3 contains details on setting a system-wide, or global, pitch table for the ZR-76 that
can be accessed by any sound.
The following parameter is not present when the sound being edited is a drum kit.
TTTToooo AAAAssssssssiiiiggggnnnn aaaa SSSSoooouuuunnnndddd ttttoooo aaaa SSSSppppeeeecccciiiiaaaallll PPPPiiiittttcccchhhh TTTTaaaabbbbllllee
1. If youÕre using SoundFinder, select the sound you want to edit and press the SoundFinder Edit button.
If youÕre using the 16 Track Recorder, select the track whose sound youÕd like to edit.
dd
ss
ee
ENSONIQ ZR-76 Musician's Manual76
Page 85

Chapter 4ÑSoundFinder
TTTTiiiipppp:::: The ZR-76 allow you to assign the sound on each track in a sequence to its own pitch
tableÑyou can use up to 16 different pitch tables at a time!
2. Turn the Parameter knob until the display shows ÒPitchTbl=.Ó
PitchTbl can be set to:
¥ ProgÑto use the PitchTbl value programmed into the sound
¥ SysÑto use the global system PitchTbl (see Chapter 3 for details)
¥ One of the special pitch tables built into the ZRÕs memory
Chapter 13 provides a list of the ZR-76 ROM pitch tables.
3. Turn the Value knob to select the PitchTbl value you prefer.
This parameter may also be edited via MIDI. It responds to an NRPN LSB value of 021. See ÒUsing
RPNs and NRPNs to Edit SoundFinder ParametersÓ at the end of this chapter. The ZRÕs display will
reflect PitchTbl changes made via MIDI just as if youÕd made them from the front panel.
DDDDeeeetttteeeerrrrmmmmiiiinnnniiiinnnngggg WWWWhhhheeeetttthhhheeeerrrr aaaa SSSSoooouuuunnnndddd WWWWiiiillllllll GGGGlllliiiiddddee
It can be desirable for the notes in a sound to glide from one to the next as you play them. By setting the
SoundFinder Glide Mode parameter to On, the sound will be endowed with this gliding capability. Some of
the ZR-76 sounds are already programmed with components that glide between notesÑif youÕd like, you
can disable the glide built into such a sound by setting its Glide Mode parameter to Off. If youÕd like the
sound to operate as programmed, you can choose the Prog value for the parameter. Gliding can be turned
on or off by using the ZRÕs front-panel controls, or via MIDI.
The following parameter is not present when the sound being edited is a drum kit.
TTTToooo TTTTuuuurrrrnnnn GGGGlllliiiiddddeeee MMMMooooddddeeee OOOOnnnn oooorrrr OOOOffffffff UUUUssssiiiinnnngggg tttthhhheeee ZZZZRRRRÕÕÕÕssss CCCCoooonnnnttttrrrroooollllss
1. If youÕre using SoundFinder, select the sound you want to edit and press the SoundFinder Edit button.
If youÕre using the 16 Track Recorder, select the track whose sound youÕd like to edit.
2. Turn the Parameter knob until the display shows ÒGlide Mode=.Ó
You can set the Glide Mode to:
¥ ProgÑthe sound will use its own programmed glide mode setting
¥ OffÑthe sound will not glide from note to note
¥ OnÑthe sound will glide from note to note
3. Turn the Value knob to set the parameter to the value you desire.
NNNNooootttteeee: When you select a new sound in SoundFinder, glide mode will be reset to Prog if
youÕve changed it by using the ZRÕs front-panel controls. Selecting a new sound for a track
in the 16 Track Recorder will also reset this parameter if the system Track ParamReset
parameter is set to On (see Chapter 3).
ee
ss
UUUUssssiiiinnnngggg MMMMIIIIDDDDIIII ttttoooo DDDDeeeetttteeeerrrrmmmmiiiinnnneeee WWWWhhhheeeetttthhhheeeerrrr aaaa SSSSoooouuuunnnndddd WWWWiiiillllllll GGGGlllliiiiddddee
The ZR-76 support the use of MIDI Controller #65 as a switch for turning a soundÕs glideÑor portamentoÑ
on and off (with no Prog option; see above). Some MIDI control devices allow you to accomplish this with a
foot switch. Since the Glide Mode parameter in the ZR-76 has three optionsÑProg, On and OffÑand MIDI
Controller #65 supports only two settings (a simple On and Off switch), Glide Mode in the ZR is a bit more
complex than other SoundFinder parameters. The two-way MIDI Controller #65 is supported behind the
scenes, while the three-way ZR control is accessible through the Glide Mode parameter and display. The
two methods for turning glide mode on and off overlap in function, and therefore, a particular methodology
is required when using Controller #65 to switch glide on and off.
The following parameter is not present when the sound being edited is a drum kit.
TTTToooo TTTTuuuurrrrnnnn GGGGlllliiiiddddeeee MMMMooooddddeeee OOOOnnnn oooorrrr OOOOffffffff VVVViiiiaaaa MMMMIIIIDDDDII
1. If youÕre using SoundFinder, select the sound you want to edit and press the SoundFinder Edit button.
If youÕre using the 16 Track Recorder, select the track whose sound youÕd like to edit.
ENSONIQ ZR-76 Musician's Manual 77
II
ee
Page 86

Chapter 4ÑSoundFinder
2. Turn the Parameter knob until the display shows ÒGlide Mode=.Ó
3. Using the Value knob, set Glide Mode to Off.
If either the hidden two-way Controller #65 switch or the visible three-way parameter are set to On,
glide mode will remain On. By setting the visible three-way parameter to Off, you allow the sound to
respond to MIDI Controller #65 without any unintended interference from the visible parameter.
4. Send a MIDI Controller #65 value of 64 or higher to turn glide mode on.
At this point, glide mode will be enabled, though the display remains unchanged (it still shows ÒOffÓ).
5. Send a MIDI Controller #65 value of 63 or lower to turn glide mode off.
If youÕve enabled glide via MIDI, the ZR keyboardÕs Value knob will have no effect on the glide mode
setting until the two-way Controller #65 switch has been set to Off via MIDI, following the same logic
discussed above in step 4Ñneither switch can be on if youÕd like to turn glide mode to Off or Prog.
NNNNooootttteeee:::: When you select a new sound in SoundFinder, glide mode will be reset to Prog if
neither the visible three-way parameter or hidden two-way switch are set to On. Selecting a
new sound for a track in the 16 Track Recorder will also reset this parameter if the system
Track ParamReset parameter is set to On (see Chapter 3).
This parameter also responds to an NRPN LSB value of 031. See ÒUsing RPNs and NRPNs to Edit
SoundFinder ParametersÓ at the end of this chapter.
SSSSeeeettttttttiiiinnnngggg aaaa SSSSoooouuuunnnnddddÕÕÕÕssss GGGGlllliiiiddddeeee TTTTiiiimmmmee
When a sound in a ZR-76 is set to glideÑas a result of its original programming or the Glide Mode
parameterÑyou can adjust the speed at which its notes will glide from one to the next. This is
accomplished by adjusting the glide time of the soundÑthe higher the setting, the longer the length of time
it takes to get from one note to another. A glide time of 0 means that the sound will glide at its
programmed speed. If the sound is gliding only as a result of the Glide Mode parameter, it probably has no
glide time programmed into it at all, and therefore wonÕt glide since it will have a glide time setting of 0.
Higher glide time values slow the soundÕs glide, and lower values cause it to speed up.
The following parameter is not present when the sound being edited is a drum kit.
TTTToooo SSSSeeeetttt aaaa SSSSoooouuuunnnnddddÕÕÕÕssss GGGGlllliiiiddddeeee TTTTiiiimmmmee
1. If youÕre using SoundFinder, select the sound you want to edit and press the SoundFinder Edit button.
If youÕre using the 16 Track Recorder, select the track whose sound youÕd like to edit.
2. Turn the Parameter knob until the display shows ÒGlide Time=.Ó
3. Turn the Value knob to set the glide time to the rate you prefer.
NNNNooootttteeee:::: When you select a new sound in SoundFinder, glide time will be reset to 0. Selecting
a new sound for a track in the 16 Track Recorder will also reset this parameter if system
Track ParamReset=On (see Chapter 3).
This parameter may also be edited via MIDI. It responds to MIDI controller 5 values, or an NRPN LSB
value of 032. See ÒUsing RPNs and NRPNs to Edit SoundFinder ParametersÓ at the end of this chapter.
The ZRÕs display will reflect glide time changes made via MIDI just as if youÕd made them from the
front panel.
ee
ee
DDDDeeeellllaaaayyyyiiiinnnngggg SSSSoooouuuunnnnddddss
The Delay Offset parameter can be used to increase the amount of time it will take for a sound to be heard
after it receives a key down (or MIDI Note On) message. If a sound has a delay time already programmed
into it, the delay offset will lengthen that delay by up to 2500 milliseconds (ms). If a sound has no
programmed delay time, the Delay Offset parameter can delay it up to 2500ms. If the delay offset is set to
0ms, no delay time will be added to the sound.
ss
ENSONIQ ZR-76 Musician's Manual78
Page 87

Chapter 4ÑSoundFinder
The following parameter is not present when the sound being edited is a drum kit.
TTTToooo CCCChhhhaaaannnnggggeeee aaaa SSSSoooouuuunnnnddddÕÕÕÕssss DDDDeeeellllaaaayyyy TTTTiiiimmmmee
1. If youÕre using SoundFinder, select the sound you want to edit and press the SoundFinder Edit button.
If youÕre using the 16 Track Recorder, select the track whose sound youÕd like to edit.
2. Turn the Parameter knob until the display shows ÒDelay Offset=.Ó
3. Turn the Value knob to select the delay offset value you prefer.
NNNNooootttteeee:::: When you select a new sound in SoundFinder, the delay offset will be reset to 0ms.
Selecting a new sound for a track in the 16 Track Recorder will also reset this parameter if
the system Track ParamReset parameter is set to On (see Chapter 3).
This parameter may also be edited via MIDI. It responds to an NRPN LSB value of 024. See ÒUsing
RPNs and NRPNs to Edit SoundFinder ParametersÓ at the end of this chapter. The ZRÕs display will
reflect delay offset changes made via MIDI just as if youÕd made them from the front panel.
CCCCuuuussssttttoooommmmiiiizzzziiiinnnngggg SSSSoooouuuunnnndddd LLLLFFFFOOOOss
LFOsÑlow frequency oscillatorsÑand noise generators are two important programming devices used in the
creation of ZR-76 sounds. TheyÕre both rhythm-oriented sound modulators. Some of the LFOs and noise
generators in ZR-76 sounds are programmed to be synchronized (or ÒsyncÕdÓ) to the currently selected
rhythm if youÕre in SoundFinder, or to the currently selected sequenceÕs tempo if youÕre in the 16 Track
Recorder (the Drum Machine and 16 Track Recorder can themselves by synchronized to MIDI clocks
received from an external source). By setting the SyncLFO&Noise SoundFinder parameter to Normal, you
can convert a soundÕs syncÕd LFOs and noise to the normal, unsynchronized variety. You can also use this
parameter to alter the relationship of a soundÕs syncÕd LFOs and noise to the relevant timing reference by
setting them to a division of the reference tempo, from 1/1 to 1/32, including triplets.
You can also set a soundÕs normal LFOs rates, depth and delay time with the Normal LFO Rate, LFO Depth
and LFO Delay Time SoundFinder parameters.
ss
ee
The following parameter is not present when the sound being edited is a drum kit.
TTTToooo UUUUnnnn----SSSSyyyynnnncccc SSSSyyyynnnncccchhhhrrrroooonnnniiiizzzzeeeedddd LLLLFFFFOOOOssss aaaannnndddd NNNNooooiiiissssee
1. If youÕre using SoundFinder, select the sound you want to edit and press the SoundFinder Edit button.
If youÕre using the 16 Track Recorder, select the track whose sound youÕd like to edit.
2. Turn the Parameter knob until the display shows ÒSyncLFO&Noise=.Ó
The SyncLFO&Noise parameter can be set to:
¥ ProgÑto leave the syncÕd LFOs and noise as theyÕre programmed into the sound
¥ NormalÑto convert the syncÕd LFOs and noise to unsyncÕd LFOs and noise
¥ 1/1 to 1/32TÑto set the rhythmic relationship of the syncÕd LFOs and noise to the Drum
MachineÕs or the 16 Track RecorderÕs tempoÑa "T" following a number signifies a triplet value
3. Turn the Value knob to set the SyncLFO&Noise parameter to Normal.
NNNNooootttteeee:::: When you select a new sound in SoundFinder, SyncLFO&Noise will be reset to Prog.
Selecting a new sound for a track in the 16 Track Recorder will also reset this parameter if
the system Track ParamReset parameter is set to On (see Chapter 3).
This parameter may also be edited via MIDI. It responds to an NRPN LSB value of 25. See ÒUsing RPNs
and NRPNs to Edit SoundFinder ParametersÓ at the end of this chapter. The ZRÕs display will reflect
SyncLFO&Noise changes made via MIDI just as if youÕd made them from the front panel.
The following parameter is not present when the sound being edited is a drum kit.
TTTToooo CCCChhhhaaaannnnggggeeee tttthhhheeee RRRRaaaatttteeee ooooffff aaaa SSSSoooouuuunnnnddddÕÕÕÕssss SSSSyyyynnnnccccÕÕÕÕdddd LLLLFFFFOOOOssss aaaannnndddd NNNNooooiiiissssee
1. If youÕre using SoundFinder, select the sound you want to edit and press the SoundFinder Edit button.
ee
ee
ENSONIQ ZR-76 Musician's Manual 79
Page 88

Chapter 4ÑSoundFinder
If youÕre using the 16 Track Recorder, select the track whose sound youÕd like to edit.
2. Turn the Parameter knob until the display shows ÒSyncLFO&Noise=.Ó
The SyncLFO&Noise parameter can be set to:
¥ ProgÑto leave the syncÕd LFOs and noise as theyÕre programmed into the sound
¥ NormalÑto convert the syncÕd LFOs and noise to unsyncÕd LFOs and noise
¥ 1/1 to 1/32TÑto set the rhythmic relationship of the syncÕd LFOs and noise to the Drum
MachineÕs or the 16 Track RecorderÕs tempoÑa "T" following a number signifies a triplet value
3. Turn the Value knob to set the SyncLFO&Noise parameter to the desired fractional value of the Drum
MachineÕs or the 16 Track RecorderÕs tempo.
NNNNooootttteeee:::: When you select a new sound, SyncLFO&Noise will be reset to Prog. Selecting a new
sound for a track in the 16 Track Recorder will also reset this parameter when the system
Track ParamReset parameter is set to On (see Chapter 3).
This parameter may also be edited via MIDI. It responds to an NRPN LSB value of 25. See ÒUsing RPNs
and NRPNs to Edit SoundFinder ParametersÓ at the end of this chapter. The ZRÕs display will reflect
SyncLFO&Noise changes made via MIDI just as if youÕd made them from the front panel.
The following parameter is not present when the sound being edited is a drum kit.
TTTToooo CCCChhhhaaaannnnggggeeee aaaa SSSSoooouuuunnnndddd''''ssss NNNNoooorrrrmmmmaaaallll ((((UUUUnnnnssssyyyynnnncccchhhhrrrroooonnnniiiizzzzeeeedddd)))) LLLLFFFFOOOO RRRRaaaatttteeeess
1. If youÕre using SoundFinder, select the sound you want to edit and press the SoundFinder Edit button.
If youÕre using the 16 Track Recorder, select the track whose sound youÕd like to edit.
2. Turn the Parameter knob until the display shows ÒNormal LFO Rates=.Ó
The Normal LFO Rates parameter can be set from -64 to +63. A value of 0 means the sound will use its
own programmed LFO rate. A value other than 0 will be added to or subtracted from the soundÕs
programmed rate.
3. Turn the Value knob to set the normal LFO rates offset to the desired amount.
NNNNooootttteeee:::: This parameter will only have an effect if the sound contains unsynchronized LFOs,
or if its SyncLFO&Noise parameter is set to Normal.
This parameter may also be edited via MIDI. It responds to MIDI Controller #75 or an NRPN LSB value
of 008. See ÒUsing RPNs and NRPNs to Edit SoundFinder ParametersÓ at the end of this chapter. The
ZRÕs display will reflect changes made via MIDI just as if youÕd made them from the front panel.
The following parameter is not present when the sound being edited is a drum kit.
TTTToooo CCCChhhhaaaannnnggggeeee aaaa SSSSoooouuuunnnndddd''''ssss LLLLFFFFOOOO DDDDeeeepppptttthh
1. If youÕre using SoundFinder, select the sound you want to edit and press the SoundFinder Edit button.
If youÕre using the 16 Track Recorder, select the track whose sound youÕd like to edit.
2. Turn the Parameter knob until the display shows ÒLFO Depth=.Ó
The LFO Depth parameter can be set from -64 to +63. A value of 0 means the sound will use its own
programmed LFO depth. A value other than 0 will be added to or subtracted from the soundÕs
programmed depth.
3. Turn the Value knob to set the LFO depth offset to the desired amount.
hh
ss
NNNNooootttteeee:::: When you select a new sound in SoundFinder, LFO Depth will be reset to 0. Selecting
a new sound for a track in the 16 Track Recorder will also reset this parameter when the
system Track ParamReset parameter is set to On (see Chapter 3).
This parameter may also be edited via MIDI. It responds to an NRPN LSB value of 009. See ÒUsing
RPNs and NRPNs to Edit SoundFinder ParametersÓ at the end of this chapter. The ZRÕs display will
reflect LFO depth changes made via MIDI just as if youÕd made them from the front panel.
ENSONIQ ZR-76 Musician's Manual80
Page 89

Chapter 4ÑSoundFinder
The following parameter is not present when the sound being edited is a drum kit.
TTTToooo CCCChhhhaaaannnnggggeeee aaaa SSSSoooouuuunnnndddd''''ssss LLLLFFFFOOOO DDDDeeeellllaaaayy
1. If youÕre using SoundFinder, select the sound you want to edit and press the SoundFinder Edit button.
If youÕre using the 16 Track Recorder, select the track whose sound youÕd like to edit.
2. Turn the Parameter knob until the display shows ÒLFO Delay Time=.Ó
The LFO Delay Time parameter can be set from -64 to +63. A value of 0 means the sound will use its
own programmed LFO delay time. A value other than 0 will be added to or subtracted from the soundÕs
programmed LFO delay time.
3. Turn the Value knob to set the LFO delay time offset to the desired amount.
NNNNooootttteeee:::: When you select a new sound in SoundFinder, LFO Delay will be reset to 0. Selecting
a new sound for a track in the 16 Track Recorder will also reset this parameter when the
system Track ParamReset parameter is set to On (see Chapter 3).
This parameter may also be edited via MIDI. It responds to an NRPN LSB value of 010. See ÒUsing
RPNs and NRPNs to Edit SoundFinder ParametersÓ at the end of this chapter. The ZRÕs display will
reflect LFO delay changes made via MIDI just as if youÕd made them from the front panel.
CCCCoooonnnnttttrrrroooolllllllliiiinnnngggg tttthhhheeee SSSShhhhaaaappppeeee ooooffff SSSSoooouuuunnnnddddss
Most of the sounds in the ZR-76 use envelopes to shape the volume and frequency content of their
components. The ZR-76 provide a selection of SoundFinder parameters that allow you to adjust these
envelopes to suit your needs. These parameters subtract from or add to the programmed values of the
envelopes programmed into a sound. This preserves the relationship between all the various envelopes that
may exist in a sound while still giving you a great degree of control over the soundÕs volume and timbral
contours. The ZRÕs envelopes are described in detail in Chapter 12.
The SoundFinder parameters which refer only to volume, amplitude or shaping are:
¥ Amp Env Attack
¥ Amp Env Decay
¥ Amp Env Release
The parameters which affect only the filtering of the soundÕs frequency content are:
¥ Filter CutoffÑthis adjusts the soundÕs low-pass filter cutoff settings
¥ Filt Env Attack
¥ Filt Env Decay
¥ Filt Env Release
Many envelopes in the ZR-76 sounds respond to the amount of velocity with which keys on the keyboard
are struck, or to velocity values received via MIDI. The Amp&Filt Env Vel parameter allows you to subtract
from or add to the velocity sensitivity programmed into the amplitude and filter envelopes of a sound.
yy
ss
The following parameter is not present when the sound being edited is a drum kit.
TTTToooo AAAAddddjjjjuuuusssstttt aaaa SSSSoooouuuunnnnddddÕÕÕÕssss VVVVoooolllluuuummmmeeee EEEEnnnnvvvveeeellllooooppppeeee AAAAttttttttaaaacccckkkk TTTTiiiimmmmee
1. If youÕre using SoundFinder, select the sound you want to edit and press the SoundFinder Edit button.
If youÕre using the 16 Track Recorder, select the track whose sound youÕd like to edit.
2. Turn the Parameter knob until the display shows ÒAmp Env Attack=.Ó
The Amp Env Attack parameter can be set from -64 to +63. A value of 0 will leave the soundÕs various
attack times at their programmed settings. A value other than 0 will be added to or subtracted from
the soundÕs programmed settings.
3. Turn the Value knob to set the Amp Env Attack offset to the desired amount.
NNNNooootttteeee:::: When you select a new sound in SoundFinder, Amp Env Attack will be reset to 0.
Selecting a new sound for a track in the 16 Track Recorder will also reset this parameter if
the system Track ParamReset parameter is set to On (see Chapter 3).
ENSONIQ ZR-76 Musician's Manual 81
ee
Page 90

Chapter 4ÑSoundFinder
This parameter may also be edited via MIDI. It responds to MIDI Controller #73 or an NRPN LSB value
of 014. See ÒUsing RPNs and NRPNs to Edit SoundFinder ParametersÓ at the end of this chapter. The
ZRÕs display will reflect Amp Env Attack changes made via MIDI just as if youÕd made them from the
front panel.
The following parameter is not present when the sound being edited is a drum kit.
TTTToooo AAAAddddjjjjuuuusssstttt aaaa SSSSoooouuuunnnnddddÕÕÕÕssss VVVVoooolllluuuummmmeeee EEEEnnnnvvvveeeellllooooppppeeee DDDDeeeeccccaaaayyyy TTTTiiiimmmmeeeess
1. If youÕre using SoundFinder, select the sound you want to edit and press the SoundFinder Edit button.
If youÕre using the 16 Track Recorder, select the track whose sound youÕd like to edit.
2. Turn the Parameter knob until the display shows ÒAmp Env Decay=.Ó
The Amp Env Decay parameter can be set from -64 to +63. A value of 0 will leave the soundÕs various
decay times at their programmed settings. A value other than 0 will be added to or subtracted from the
soundÕs programmed settings.
3. Turn the Value knob to set the Amp Env Decay offset to the desired amount.
NNNNooootttteeee:::: When you select a new sound in SoundFinder, Amp Env Decay will be reset to 0.
Selecting a new sound for a track in the 16 Track Recorder will also reset this parameter if
the system Track ParamReset parameter is set to On (see Chapter 3).
This parameter may also be edited via MIDI. It responds to MIDI controller 76 or an NRPN LSB value of
015. See ÒUsing RPNs and NRPNs to Edit SoundFinder ParametersÓ at the end of this chapter. The
ZRÕs display will reflect Amp Env Decay changes made via MIDI just as if youÕd made them from the
front panel.
The following parameter is not present when the sound being edited is a drum kit.
TTTToooo AAAAddddjjjjuuuusssstttt aaaa SSSSoooouuuunnnnddddÕÕÕÕssss VVVVoooolllluuuummmmeeee EEEEnnnnvvvveeeellllooooppppeeee RRRReeeelllleeeeaaaasssseeee TTTTiiiimmmmee
1. If youÕre using SoundFinder, select the sound you want to edit and press the SoundFinder Edit button.
If youÕre using the 16 Track Recorder, select the track whose sound youÕd like to edit.
2. Turn the Parameter knob until the display shows ÒAmp Env Release=.Ó
The Amp Env Release parameter can be set from -64 to +63. A value of 0 will leave the soundÕs various
release times at their programmed settings. A value other than 0 will be added to or subtracted from
the soundÕs programmed settings.
3. Turn the Value knob to set the Amp Env Release offset to the desired amount.
ss
ee
NNNNooootttteeee:::: When you select a new sound in SoundFinder, Amp Env Release will be reset to 0.
Selecting a new sound for a track in the 16 Track Recorder will also reset this parameter if
the system Track ParamReset parameter is set to On (see Chapter 3).
This parameter may also be edited via MIDI. It responds to MIDI Controller #72 or an NRPN LSB value
of 016. See ÒUsing RPNs and NRPNs to Edit SoundFinder ParametersÓ at the end of this chapter. The
ZRÕs display will reflect Amp Env Release changes made via MIDI just as if youÕd made them from the
front panel.
The following parameter is not present when the sound being edited is a drum kit.
TTTToooo AAAAddddjjjjuuuusssstttt aaaa SSSSoooouuuunnnnddddÕÕÕÕssss FFFFiiiilllltttteeeerrrr CCCCuuuuttttooooffffff
1. If youÕre using SoundFinder, select the sound you want to edit and press the SoundFinder Edit button.
If youÕre using the 16 Track Recorder, select the track whose sound youÕd like to edit.
2. Turn the Parameter knob until the display shows ÒFilter Cutoff=.Ó
The Filter Cutoff parameter can be set from -64 to +63. A value of 0 will leave the soundÕs various filter
cutoffs at their programmed settings. A value other than 0 will be added to or subtracted from the
soundÕs programmed settings.
3. Turn the Value knob to set the filter cutoff offset to the desired amount.
ff
ENSONIQ ZR-76 Musician's Manual82
Page 91

Chapter 4ÑSoundFinder
NNNNooootttteeee:::: When you select a new sound in SoundFinder, Filter Cutoff will be reset to 0.
Selecting a new sound for a track in the 16 Track Recorder will also reset this parameter if
the system Track ParamReset parameter is set to On (see Chapter 3).
This parameter may also be edited via MIDI. It responds to MIDI Controller #74 or an NRPN LSB value
of 012. See ÒUsing RPNs and NRPNs to Edit SoundFinder ParametersÓ at the end of this chapter. The
ZRÕs display will reflect filter cutoff changes made via MIDI as if youÕd made them from the front panel.
The following parameter is not present when the sound being edited is a drum kit.
TTTToooo AAAAddddjjjjuuuusssstttt aaaa SSSSoooouuuunnnnddddÕÕÕÕssss FFFFiiiilllltttteeeerrrr EEEEnnnnvvvveeeellllooooppppeeee AAAAttttttttaaaacccckkkk TTTTiiiimmmmee
1. If youÕre using SoundFinder, select the sound you want to edit and press the SoundFinder Edit button.
If youÕre using the 16 Track Recorder, select the track whose sound youÕd like to edit.
2. Turn the Parameter knob until the display shows ÒFilt Env Attack=.Ó
The Filt Env Attack parameter can be set from -64 to +63. A value of 0 will leave the soundÕs various
filter attack times at their programmed settings. A value other than 0 will be added to or subtracted
from the soundÕs programmed settings.
3. Turn the Value knob to set the Filt Env Attack offset to the desired amount.
NNNNooootttteeee:::: When you select a new sound in SoundFinder, Filt Env Attack will be reset to 0.
Selecting a new sound for a track in the 16 Track Recorder will also reset this parameter if
the system Track ParamReset parameter is set to On (see Chapter 3).
This parameter may also be edited via MIDI. It responds to an NRPN LSB value of 017. See ÒUsing
RPNs and NRPNs to Edit SoundFinder ParametersÓ at the end of this chapter. The ZRÕs display will
reflect Filt Env Attack changes made via MIDI just as if youÕd made them from the front panel.
The following parameter is not present when the sound being edited is a drum kit.
TTTToooo AAAAddddjjjjuuuusssstttt aaaa SSSSoooouuuunnnnddddÕÕÕÕssss FFFFiiiilllltttteeeerrrr EEEEnnnnvvvveeeellllooooppppeeee DDDDeeeeccccaaaayyyy TTTTiiiimmmmeeeess
1. If youÕre using SoundFinder, select the sound you want to edit and press the SoundFinder Edit button.
If youÕre using the 16 Track Recorder, select the track whose sound youÕd like to edit.
2. Turn the Parameter knob until the display shows ÒFilt Env Decay=.Ó
The Filt Env Decay parameter can be set from -64 to +63. A value of 0 will leave the soundÕs various
filter decay times at their programmed settings. A value other than 0 will be added to or subtracted
from the soundÕs programmed settings.
3. Turn the Value knob to set the Filt Env Decay offset to the desired amount.
ee
ss
NNNNooootttteeee:::: When you select a new sound in SoundFinder, Filt Env Decay will be reset to 0.
Selecting a new sound for a track in the 16 Track Recorder will also reset this parameter if
the system Track ParamReset parameter is set to On (see Chapter 3).
This parameter may also be edited via MIDI. It responds to an NRPN LSB value of 018. See ÒUsing
RPNs and NRPNs to Edit SoundFinder ParametersÓ at the end of this chapter. The ZRÕs display will
reflect Filt Env Decay changes made via MIDI just as if youÕd made them from the front panel.
The following parameter is not present when the sound being edited is a drum kit.
TTTToooo AAAAddddjjjjuuuusssstttt aaaa SSSSoooouuuunnnnddddÕÕÕÕssss FFFFiiiilllltttteeeerrrr EEEEnnnnvvvveeeellllooooppppeeee RRRReeeelllleeeeaaaasssseeee TTTTiiiimmmmee
1. If youÕre using SoundFinder, select the sound you want to edit and press the SoundFinder Edit button.
If youÕre using the 16 Track Recorder, select the track whose sound youÕd like to edit.
2. Turn the Parameter knob until the display shows ÒFilt Env Release=.Ó
The Filt Env Release parameter can be set to -64 to +63. A value of 0 will leave the soundÕs various
filter release times at their programmed settings. A value other than 0 will be added to or subtracted
from the soundÕs programmed settings.
ENSONIQ ZR-76 Musician's Manual 83
ee
Page 92

Chapter 4ÑSoundFinder
3. Turn the Value knob to set the Filt Env Release offset to the desired amount.
NNNNooootttteeee:::: When you select a new sound in SoundFinder, Filt Env Release will be reset to 0.
Selecting a new sound for a track in the 16 Track Recorder will also reset this parameter if
the system Track ParamReset parameter is set to On (see Chapter 3).
This parameter may also be edited via MIDI. It responds to an NRPN LSB value of 019. See ÒUsing
RPNs and NRPNs to Edit SoundFinder ParametersÓ at the end of this chapter. The ZRÕs display will
reflect Filt Env Release changes made via MIDI just as if youÕd made them from the front panel.
The following parameter is not present when the sound being edited is a drum kit.
TTTToooo AAAAddddjjjjuuuusssstttt tttthhhheeee VVVVoooolllluuuummmmeeee aaaannnndddd FFFFiiiilllltttteeeerrrr EEEEnnnnvvvveeeellllooooppppeeeessssÕÕÕÕ VVVVeeeelllloooocccciiiittttyyyy RRRReeeessssppppoooonnnnssssee
1. If youÕre using SoundFinder, select the sound you want to edit and press the SoundFinder Edit button.
If youÕre using the 16 Track Recorder, select the track whose sound youÕd like to edit.
2. Turn the Parameter knob until the display shows ÒAmp&Filt Env Vel=.Ó
The Amp&Filt Env Vel parameter can be set to -64 to +63. A value of 0 will leave the envelopesÕ
sensitivity to keyboard or MIDI velocity at their programmed settings. A value other than 0 will be
added to or subtracted from their programmed settings.
3. Turn the Value knob to set the Amp&Filt Env Vel offset to the desired amount.
NNNNooootttteeee:::: When you select a new sound in SoundFinder, Amp&Filt Env Vel will be reset to 0.
Selecting a new sound for a track in the 16 Track Recorder will also reset this parameter if
the system Track ParamReset parameter is set to On (see Chapter 3).
This parameter may also be edited via MIDI. It responds to an NRPN LSB value of 020. See ÒUsing
RPNs and NRPNs to Edit SoundFinder ParametersÓ at the end of this chapter. The ZRÕs display will
reflect Amp&Filt Env Vel changes made via MIDI just as if youÕd made them from the front panel.
CCCChhhhaaaannnnggggiiiinnnngggg aaaa SSSSoooouuuunnnnddddÕÕÕÕssss KKKKeeeeyyyy RRRRaaaannnnggggee
Each sound in the ZR-76 can be set to respond only to notes played within a specified region of the ZR-76
keyboard or via MIDI. A soundÕs key range is defined by setting its lowest note with the Key Range Lo
SoundFinder parameter, and its highest with the Key Range Hi SoundFinder parameter.
TTTTiiiipppp:::: You can silence notes on a 16 Track Recorder trackÑincluding the rhythm trackÑby
limiting the key range of the sound the track uses.
ee
ee
TTTToooo CCCChhhhaaaannnnggggeeee aaaa SSSSoooouuuunnnnddddÕÕÕÕssss KKKKeeeeyyyybbbbooooaaaarrrrdddd RRRRaaaannnnggggee
1. If youÕre using SoundFinder, select the sound you want to edit and press the SoundFinder Edit button.
If youÕre using the 16 Track Recorder, select the track whose sound youÕd like to edit.
2. Turn the Parameter knob until the display shows ÒKey Range Lo=.Ó
The low end of a soundÕs key range can be any note you desire, from A0 to C8.
3. On the ZRÕs keyboard, press the key you would like to be the low end of the key range for the currently
selected sound. You can also turn the Value knob to change this parameter.
Middle C is C4 (some MIDI controller manufacturers refer to Middle C as C3Ñif you are using an
external controller or sequencer with the ZR-76, check the controllerÕs or sequencerÕs manual to see if
thatÕs the case).
4. Turn the Parameter knob until the display shows ÒKey Range Hi=.Ó
The high end of a soundÕs key range can be any note you desire, from A0 to C8.
5. On the ZRÕs keyboard, press the key you would like to be the high end of the key range for the
currently selected sound. You can also turn the Value knob to change this parameter.
If you want to reset the range, simply reselect these parameters and repeat the process.
NNNNooootttteeee:::: A soundÕs Key Range Lo value should not be set above its Key Range Hi setting, nor
should its Key Range Hi value be set below its Key Range Lo setting.
ee
ENSONIQ ZR-76 Musician's Manual84
Page 93

Chapter 4ÑSoundFinder
These parameters may also be edited via MIDI. Key Range Lo responds to an NRPN LSB value of 026,
and Key Range Hi responds to an NRPN LSB value of 27. See ÒUsing RPNs and NRPNs to Edit
SoundFinder ParametersÓ at the end of this chapter. The ZRÕs display will reflect Key Range Lo and Hi
changes made via MIDI just as if youÕd made them from the front panel.
SSSSeeeettttttttiiiinnnngggg SSSSoooouuuunnnndddd VVVVeeeelllloooocccciiiittttyyyy RRRRaaaannnnggggeeeess
Sounds can be programmed so that they are only heard at specified velocities played on the keyboard or
received via MIDI.
When the following parameter is edited in a drum kit, all of the sounds in the
drum kit are affected simultaneously by the changes you make.
TTTToooo SSSSeeeetttt aaaa SSSSoooouuuunnnnddddÕÕÕÕssss VVVVeeeelllloooocccciiiittttyyyy WWWWiiiinnnnddddooooww
1. If youÕre using SoundFinder, select the sound you want to edit and press the SoundFinder Edit button.
If youÕre using the 16 Track Recorder, select the track whose sound youÕd like to edit.
2. Turn the Parameter knob until the display shows ÒVelocityRange Lo=.Ó
The low boundary of a soundÕs velocity window can range from 0 to 127.
3. Turn the Value knob to set the VelocityRange Lo parameter to the desired value.
4. Turn the Parameter knob until the display shows ÒVelocityRange Hi=.Ó
The high boundary of a soundÕs velocity window can range from 0 to 127.
5. Turn the Value knob to set the VelocityRange Hi parameter to the desired value.
NNNNooootttteeee:::: A soundÕs VelocityRange Lo value should not be set above its VelocityRange Hi
setting, nor should its VelocityRange Hi value be set below its VelocityRange Lo setting.
These parameters may also be edited via MIDI. VelocityRange Lo responds to an NRPN LSB value of
028, and VelocityRange Hi responds to an NRPN LSB value of 29. See ÒUsing RPNs and NRPNs to Edit
SoundFinder ParametersÓ at the end of this chapter. The ZRÕs display will reflect VelocityRange Lo and
Hi changes made via MIDI just as if youÕd made them from the front panel.
ss
ww
IIIIssssoooollllaaaattttiiiinnnngggg VVVVeeeelllloooocccciiiittttyyyy----DDDDeeeeppppeeeennnnddddeeeennnntttt CCCCoooommmmppppoooonnnneeeennnnttttssss ooooffff SSSSoooouuuunnnnddddss
Many of the sounds in the ZR-76 are designed to respond musically to varying velocities played on the
keyboard or received via MIDI. ItÕs not uncommon for different components of sounds to be revealed only at
particular velocities. The ZR-76 provides a way to alter sounds so you can reliably produce these values
and, therefore, the sound components the values produce. This lets you easily extract favorite velocitydependent aspects of ZR-76 sounds. When the Velocity Mode parameter is set to any value other than
Normal, velocities that fall within the soundÕs velocity window (see ÒSetting Velocity RangesÓ above) are
automatically converted to the velocity set with the Velocity Mode parameter.
When the following parameter is edited in a drum kit, all of the sounds in the
drum kit are affected simultaneously by the changes you make.
TTTToooo EEEExxxxttttrrrraaaacccctttt FFFFaaaavvvvoooorrrriiiitttteeee VVVVeeeelllloooocccciiiittttyyyy----DDDDeeeeppppeeeennnnddddeeeennnntttt SSSSoooouuuunnnndddd CCCCoooommmmppppoooonnnneeeennnnttttss
1. If youÕre using SoundFinder, select the sound you want to edit and press the SoundFinder Edit button.
If youÕre using the 16 Track Recorder, select the track whose sound youÕd like to edit.
2. Turn the Parameter knob until the display shows ÒVelocity Mode=.Ó
The Velocity Mode parameter can be set to:
¥ NormalÑto allow the soundÕs velocity response to function normally.
¥ 0 to 127Ñto convert any velocity value that falls within the soundÕs velocity window to the value
selected. (See ÒTo Set a SoundÕs Velocity WindowÓ above.)
3. Turn the Value knob to set the Velocity Mode parameter to the desired velocity value.
This parameter may also be edited via MIDI. It responds to an NRPN LSB value of 035. See ÒUsing
RPNs and NRPNs to Edit SoundFinder ParametersÓ at the end of this chapter.
ss
ss
ENSONIQ ZR-76 Musician's Manual 85
Page 94

Chapter 4ÑSoundFinder
SSSSeeeettttttttiiiinnnngggg aaaa SSSSoooouuuunnnnddddÕÕÕÕssss RRRReeeessssppppoooonnnnsssseeee ttttoooo KKKKeeeeyyyybbbbooooaaaarrrrdddd PPPPrrrreeeessssssssuuuurrrree
The ZR-76 keyboard produces channel pressureÑif a sound is programmed to respond to pressure,
pressing down any key on the keyboard affects all of the notes being heard. The ZR-76 also supports key
pressureÑreferred to in some other ENSONIQ products as ÒPolyKeyªÓ pressureÑwhen itÕs received via
MIDI. Key pressure affects just those notes that are being pressed down. The PressureMode parameter
allows you to determine if a sound will respond to both types of pressure, only to channel pressure, only to
key pressure, or will not respond to pressure at all.
When the following parameter is edited in a drum kit, all of the sounds in the
drum kit are affected simultaneously by the changes you make.
TTTToooo SSSSeeeetttt aaaa SSSSoooouuuunnnnddddÕÕÕÕssss PPPPrrrreeeessssssssuuuurrrreeee RRRReeeessssppppoooonnnnssssee
1. If youÕre using SoundFinder, select the sound you want to edit and press the SoundFinder Edit button.
If youÕre using the 16 Track Recorder, select the track whose sound youÕd like to edit.
3. Turn the Parameter knob until the display shows ÒPressure Mode=.Ó
The Pressure Mode parameter can be set to:
¥ OffÑso that the sound will not respond to keyboard pressure. If pressure is assigned as an insert
effect modulation source, that modulation is also disabled.
¥ AutoÑso that the sound responds to both channel pressure generated by the ZRÕs keyboard and
channel and key pressure received via MIDI.
¥ ChannelÑso that the sound will only respond to channel pressure.
¥ KeyÑso that the sound will only respond to key pressure.
4. Turn the Value knob to set the PressureMode parameter to the desired value.
NNNNooootttteeee:::: When you select a new sound in SoundFinder, PressureMode will be reset to Auto.
Selecting a new sound for a track in the 16 Track Recorder will also reset this parameter if
the system Track ParamReset parameter is set to On (see Chapter 3).
ee
ee
This parameter may also be edited via MIDI. It responds to an NRPN LSB value of 030. See ÒUsing
RPNs and NRPNs to Edit SoundFinder ParametersÓ at the end of this chapter.
SSSSoooouuuunnnndddd CCCCoooonnnnttttrrrroooolllllllleeeerrrr FFFFiiiilllltttteeeerrrrss
The ZR-76 provides controller filters that allow you to enable or disable a soundÕs response to a selection of
the ZRÕs controllers. These filters also turn on or off the soundÕs response to various controller messages
received via MIDI, and determine whether or not such messages will be transmitted when the sound is
played. All of the filters are on/off switches.
The controller filter parameters are:
¥ ProgramChnge RecvÑenables or disables response to Program Change messages received via MIDI
¥ Bank Select RecvÑenables or disables response to Bank Select messages received via MIDI
¥ Data Entry RecvÑenables or disables the sound's response to Data Entry messages received via MIDI
¥ Pitch Bend RecvÑenables or disables the sound's response to changes in the position of the ZRÕs pitch
bend wheel, to Pitch Bend messages received via MIDI, and determines whether or not the sound will
transmit Pitch Bend data when the ZRÕs pitch bend wheel is moved
¥ Mod Wheel(1)RecvÑenables or disables the sound's response to changes in the position of the ZRÕs
mod wheel, to Mod Wheel (Controller #1) messages received via MIDI, and whether or not the sound
will transmit Mod Wheel data when the ZRÕs mod wheel is moved
¥ FootPedal(4)RecvÑenables or disables the sound's response to both foot pedal (Controller #4) messages
generated by a CV pedal installed in the ZRÕs CV Pedal jack and set to ModPedal#004 (see Chapter 3),
and to Controller #4 data received via MIDI; also determines whether or not Controller #4 data will be
transmitted if an installed CV pedal set to ModPedal#004 (see Chapter 3) is moved when a MIDI-OUT
sound is selected
¥ Volume(7)RecvÑenables or disables the sound's response to both Volume (Controller #7) messages
generated by a CV pedal installed in the ZRÕs CV Pedal jack and set to Volume #007 (see Chapter 3),
and to Controller #7 data received via MIDI; also determines whether or not Controller #7 data will be
transmitted if an installed CV pedal set to Volume #007 (see Chapter 3) is moved when a MIDI-OUT
sound is selected
ss
ENSONIQ ZR-76 Musician's Manual86
Page 95

Chapter 4ÑSoundFinder
¥ Pan(10)RecvÑenables or disables the sound's response to Pan (Controller #10) messages received via
MIDI; also determines whether or not turning the Pan knob will transmit Controller #10 data when a
MIDI-OUT sound is selected
¥ Expressn(11)RecvÑenables or disables the sound's response to Expression (Controller #11) messages
received via MIDI; also determines whether or not turning the Mix knob will transmit Controller #11
data when a MIDI-OUT sound is selected
¥ Sustain/SostRecvÑenables or disables the sound's response to sustain and sostenuto values
produced by a foot switch plugged into one of the ZRÕs foot switch jacks and set to Sustain or
Sostenuto (see Chapter 3), and to Sustain (Controller #64) and Sostenuto (#66) messages received via
MIDI; also determines whether or not pressing a foot switch assigned to Sustain or Sostenuto will
transmit Controller #64 or Controller #66 values, respectively, when a MIDI-OUT sound is selected
¥ SysCTRL1 RecvÑenables or disables the sound's response to the controller selected for use by the first
system CTRL (see Chapter 3) when received via MIDI; also determines whether or not the controller will
be transmitted when a MIDI-OUT sound is selected and a CV pedal assigned to SysCTRL1 is moved
¥ SysCTRL2 RecvÑenables or disables the sound's response to the controller selected for use by the
second system CTRL (see Chapter 3) when received via MIDI; also determines whether or not the
controller will be transmitted when a MIDI-OUT sound is selected and a CV pedal assigned to
SysCTRL2 is moved
¥ SysCTRL3 RecvÑenables or disables the sound's response to the controller selected for use by the
third system CTRL (see Chapter 3) when received via MIDI; also determines whether or not the
controller will be transmitted when a MIDI-OUT sound is selected and a CV pedal assigned to
SysCTRL3 is moved
¥ SysCTRL4 RecvÑenables or disables the sound's response to the controller selected for use by the
fourth system CTRL (see Chapter 3) when received via MIDI; also determines whether or not the
controller will be transmitted when a MIDI-OUT sound is selected and a CV pedal assigned to
SysCTRL4 is moved
NNNNooootttteeee:::: When a MIDI-OUT sound is selected as the primary sound in SoundFinder, incoming
MIDI data on the base MIDI channel will be ignored. When a MIDI-OUT sound is selected
on a track in the 16 Track Recorder, incoming MIDI data on the trackÕs MIDI channel will
be ignored.
When the following parameter is edited in a drum kit, all of the sounds in the
drum kit are affected simultaneously by the changes you make.
TTTToooo SSSSeeeetttt tttthhhheeee SSSSoooouuuunnnndddd CCCCoooonnnnttttrrrroooolllllllleeeerrrr FFFFiiiilllltttteeeerrrrss
1. If youÕre using SoundFinder, select the sound you want to edit and press the SoundFinder Edit button.
If youÕre using the 16 Track Recorder, select the track whose sound youÕd like to edit.
2. Turn the Parameter knob until the display shows the sound controller filter you want to set:
¥ ProgramChnge Recv ¥ Pan(10)Recv
¥ Bank Select Recv ¥ Expressn(11)Recv
¥ Data Entry Recv ¥ Sustain/SostRecv
¥ Pitch Bend Recv ¥ SysCTRL1 Recv
¥ Mod Wheel(1)Recv ¥ SysCTRL2 Recv
¥ FootPedal(4)Recv ¥ SysCTRL3 Recv
¥ Volume(7)Recv ¥ SysCTRL4 Recv
Any of these parameters can be set to:
¥ OnÑto enable response to and/or transmission of the selected controller.
¥ OffÑto disable response to and/or transmission of the selected controller.
3. Turn the Value knob to set the selected controller filter to the desired value.
ss
NNNNooootttteeee:::: When these filter parameters are edited, wherever relevant, their controllers are reset
to their default values to prevent any unintentionally hung notes on the ZR-76, or in
external MIDI modules.
ENSONIQ ZR-76 Musician's Manual 87
Page 96

Chapter 4ÑSoundFinder
EEEE dddd iiii tttt iiii nnnn gggg ZZZZ RRRR ---- 7777 6666 DDDD rrrr uuuu mmmm aaaa nnnn dddd PPPPeeee rrrr cccc uuuu ssss ssss iiii oooo nnnn KKKKiiii tttt ssss
Drum and percussion kits can have up to 64 different standard sounds assigned to individual keys from
the B two octaves below Middle C (B1) to the D three octaves above (D7). Drum and percussion kit sounds
have a number of parameters which affect the entire kit at once. These are detailed in ÒWorking with
SoundFinder ParametersÓ earlier in this chapter (the description for each parameter notes whether or not
itÕs applicable to drum and percussion kits). Drum and percussion kits also offer individual-key
parameters, which are accessed as described in this section. The parameters are detailed in ÒWorking with
Special Drum/Percussion Kit ParametersÓ below.
TTTThhhheeee SSSSoooonnnnggggEEEEddddiiiittttKKKKiiiitt
The powerful sounds-inside-of-another-sound nature of ZR-76 drum/percussion kits requires a special
location within the ZRÕs memory where they can be edited. There is one such location available in every
ZR-76 song so that you can always have just the drum kit sound you need in each song. This special area
is an edit buffer, which appears in the form of a unique drum/percussion kit called the SongEditKit.
ThereÕs always an active song in the ZR-76Ñeven if you havenÕt recorded or loaded any music, or created a
song playlistÑand thereÕs always a SongEditKit available. YouÕll find it in the *CUSTOM SoundFinder
category (and via MIDI at bank 010, program 000). Once selected, you can use the SongEditKit just as you
would any other sound, and you can edit any of its parameters.
NNNNooootttteeee:::: In the *CUSTOM SoundFinder category, youÕll also find the RthmEditKitÑsee below.
The SongEditKit behaves just like any other drum or percussion kit soundÑexcept that itÕs the only one
whose unique drum key parameters can be edited directly. Any other ZR-76 drum or percussion kit sound
must be moved into this special locationÑor, to put it another way, must become the SongEditKitÑbefore
its drum key parameters can be altered.
Drum/percussion kit sounds also possess many standard parameters that affect the entire kit, as opposed
to individual drum keys, and which may be edited without having to convert the sound into a SongEditKit.
These are the parameters described in ÒWorking with SoundFinder ParametersÓ earlier in this chapter.
When youÕve finished working on a SongEditKit, you can save the results as a normal drum or percussion
kit sound that you can use again however youÕd like. Though each song has a single editable
drum/percussion kitÑthe SongEditKitÑit can employ as many drum or percussion kit sounds as you
need. You can edit each of these kits by designating it as the SongEditKit for as long as you need to work
on it, and then save it as a new drum or percussion kit sound when youÕre done. This frees up the
SongEditKit to be re-used for the editing of other kits used in your song.
tt
UUUUssssiiiinnnngggg tttthhhheeee RRRRtttthhhhmmmmEEEEddddiiiittttKKKKiiiitttt iiiinnnn SSSSoooouuuunnnnddddFFFFiiiinnnnddddeeeerr
Each Drum Machine rhythm uses a drum kit thatÕs appropriate for the music it plays. When you select a
rhythm, its kit becomes available in SoundFinder as the RthmEditKit. The RthmEditKit can be found in
the *CUSTOM SoundFinder category (or via MIDI at bank 010, program 001). When you use the Drum
MachineÕs zone-by-zone editing capabilities to customize the kit, your edits will be reflected in the
rr
ENSONIQ ZR-76 Musician's Manual88
Page 97

Chapter 4ÑSoundFinder
RthmEditKit in SoundFinder. The only time the RthmEditKit in SoundFinder will differ from the kit played
by the currently selected rhythm is when you assign a new kit to the rhythm in the Drum Machine, and
then, without editing the new kit, go immediately to the RthmEditKit in SoundFinder. In that case, the
RthmEditKit will be the kit the rhythm originally used. When you return to the Drum Machine, the
RthmEditKit in SoundFinder will be updated.
TTTTiiiipppp:::: You can augment a rhythm with additional drum or percussion notes by selecting the
RthmEditKit in SoundFinder, playing along with the rhythm, and sending the whole thing
from the Idea Pad to the 16 Track Recorder. The rhythm will go on the selected sequenceÕs
rhythm track and the additional notes you play will go on a track of your choosing. Once
your idea is in the 16 Track Recorder, you can also use the rhythm track to record even
more drum or percussion notes using the rhythmÕs kit.
The RthmEditKit can be used in the same way that youÕd use a normal drum kit sound: you can play it on
the keyboard or use it in the 16 Track Recorder. You can also edit the RhthmEditKit key-by-key in the
same manner as the SongEditKit, using standard SoundFinder drum kit editing techniques.
NNNNooootttteeee:::: When youÕve edited the RthmEditKit in SoundFinder, or if youÕre using it in a
sequence or for any other purpose, make sure to save it as a new drum kit sound before
returning to the Drum Machine. The moment you press any Drum Machine button, the kit
belonging to the currently selected rhythm will become the new RthmEditKit, wiping away
the RthmEditKit you were using and any edits youÕve made to the kit in SoundFinder.
If youÕve edited the RthmEditKit and saved it as a new kit, you can use it as you would any other sound.
You can also assign it to a rhythm in the Drum MachineÑincluding the rhythm it originally came fromÑ
using the technique described in ÒSelecting a New Drum Kit for a RhythmÓ in Chapter 5. ThereÕs a certain
element of unpredictability to building your own kit key-by-key for use with a Drum Machine rhythm,
since you may find it a bit difficult to correctly anticipate how a rhythm will use your newly created kitÑon
the other hand, sometimes itÕs fun to experiment.
TTTTiiiipppp:::: You can take advantage of the RthmEditKit to utilize the Drum MachineÕs zone-by-zone
editing capabilities for the editing of any drum kit sound. In the Drum Machine, assign the
kit youÕd like to edit to a rhythm, edit the kitÕs zones, go back to SoundFinder, and then
save your newly edited kit as a new drum kit sound. See Chapter 5 to learn how to assign
rhythm kits and edit kit zones.
PPPPrrrreeeeppppaaaarrrriiiinnnngggg ttttoooo EEEEddddiiiitttt DDDDrrrruuuummmm oooorrrr PPPPeeeerrrrccccuuuussssssssiiiioooonnnn KKKKiiiittttss
There are three ways to edit a drum or percussion kit soundÕs drum key parameters. You can:
¥ Select a pre-existing drum or percussion kit sound and convert it into the SongEditKit so that you can
customize its special drum key parameters
¥ Directly select the current songÕs SongEditKit and edit its drum key parameters
¥ Directly select the current rhythmÕs RthmEditKit and edit its drum key parameters
TTTToooo EEEEddddiiiitttt aaaa DDDDrrrruuuummmm oooorrrr PPPPeeeerrrrccccuuuussssssssiiiioooonnnn KKKKiiiitttt SSSSoooouuuunnnndddd YYYYoooouuuuÕÕÕÕvvvveeee SSSSeeeelllleeeecccctttteeeedd
1. If youÕre using SoundFinder, select the sound you want to edit and press the SoundFinder Edit button.
If youÕre using the 16 Track Recorder, select the track whose sound youÕd like to edit.
2. Turn the Parameter knob until the ZR shows ÒDrumKey=Ò on the bottom left of its display:
The name of the drum kit sound youÕre going to edit
ss
dd
m
Sound Street Kit
DrumKey= C4
i
What you see here may be different
ENSONIQ ZR-76 Musician's Manual 89
Page 98

Chapter 4ÑSoundFinder
3. Press a key on the keyboard to select a drum key to edit. If you prefer, you may also select a drum key
by dialing in the desired key with the Value knob (Middle C is C4). Drum kits can go from the B two
octaves below Middle C (B1) to the D three octaves above it (D7).
4. Turn the Parameter knob until the ZR shows ÒSound=Ó on the bottom left of its display:
NNNNooootttteeee:::: If the sound assigned to a drum key has been erased from the ZRÕs memoryÑor if an
expansion-board sound has been assigned to a Drum Key and the board has been
removedÑthe sound displayed here will be **EMPTY**.
5. Turn the Value knob to select a new sound for this key.
The display changes to:
The drum key youÕre editing
m
Sound DrumKey=C4
Sound= Bongo
i
What you see here may be different
Read-only! Overwrite
SongEditKit to edit?
The ZR-76 is offering to convert the drum/percussion kit sound youÕve selected into the SongEditKit
for the currently selected song.
6. If youÕd like to continue editing this drum or percussion kitÑand make it the current songÕs
SongEditKitÑpress Yes. If youÕd rather not continue, press No.
Once youÕve pressed Yes, you can edit the drum or percussion kit using the Parameter knob to select
parameters, and the Value knob to change their values. For a full description of the editing options
available for the ZR-76 sounds, see ÒWorking with the SoundFinder ParametersÓ later in this chapter.
TTTToooo EEEEddddiiiitttt tttthhhheeee SSSSoooonnnnggggEEEEddddiiiittttKKKKiiiitttt oooorrrr RRRRtttthhhhmmmmEEEEddddiiiittttKKKKiiiitt
1. If youÕre using SoundFinder, use the Sound Name and Sound Type knobs to select the currently
selected songÕs SongEditKit, located in the *CUSTOM SoundFinder category (or accessible via MIDI at
bank 010, program 000), and press the SoundFinder Edit button.
If youÕre using the 16 Track Recorder, select any track, press the Enter button and use the Sound
Name and Sound Type knobs to select the SongEditKit or the RthmEditKit, both located in the
*CUSTOM SoundFinder category.
ÒkitÓ tells you that this a drum/percussion kit
tt
m
Sound kit010:000
*CUSTOM :SongEditKit
2. Turn the Parameter knob to find the drum/percussion kit parameter you want to alter and use the
Value knob to change its setting. For a full description of the editing options available for the ZR-76
sounds, see ÒWorking with the SoundFinder ParametersÓ later in this chapter.
ENSONIQ ZR-76 Musician's Manual90
Page 99

Chapter 4ÑSoundFinder
WWWW oooo rrrr kkkk iiii nnnn gggg wwww iiii tttt hhhh SSSS pppp eeee cccc iiii aaaa llll DDDD rrrr uuuu mmmm //// PPPP eeee rrrr cccc uuuu ssss ssss iiii oooo nnnn KKKKiiii tttt PPPPaaaa rrrr aaaa mmmm eeee tttt eeee rrrr ssss
The powerful nature of ENSONIQ drum and percussion kits requires some special editing techniques,
described in ÒEditing ZR-76 Drum and Percussion Kits,Ó earlier in this chapter.
SSSSeeeelllleeeeccccttttiiiinnnngggg aaaa DDDDrrrruuuummmm KKKKeeeeyyyy FFFFoooorrrr EEEEddddiiiittttiiiinnnngg
You can edit ZR-76 drum and percussion kits one drum key at a time. To edit a drum or percussion kit
one key at a time, youÕll need to select each drum key you want to edit.
The following parameter is present only when the sound being edited is a drum or percussion kit.
TTTToooo SSSSeeeelllleeeecccctttt aaaa DDDDrrrruuuummmm KKKKeeeeyyyy FFFFoooorrrr EEEEddddiiiittttiiiinnnngg
1. Use either of the sound-selection methods described at the beginning of this chapter to select the drum
or percussion kit sound youÕd like to edit.
2. Use one of the two methods described in ÒPreparing to Edit Drum or Percussion KitsÓ earlier in this
chapter to begin editing the selected drum or percussion kit.
3. If youÕre working in SoundFinder, press the SoundFinder Edit button.
4. Turn the Parameter knob until the display shows:
Sound Street Kit
DrumKey= B1
gg
gg
The currently selected drum/percussion kit
m
i
What you see here may be different
5. Press a key on the keyboard to select a drum key to edit. If you prefer, you may also select a drum key
by dialing in the desired key with the Value knob (Middle C is C4). Drum kits can go from the B two
octaves below Middle C (B1) to the D three octaves above it (D7).
CCCChhhhaaaannnnggggiiiinnnngggg tttthhhheeee SSSSoooouuuurrrrcccceeee ooooffff aaaa DDDDrrrruuuummmm KKKKeeeeyyyyÕÕÕÕssss SSSSoooouuuunnnndd
Each key in a drum or percussion kit can use a sound from any of these SoundFinder sound type
categories.
¥ EXPÑsounds from expansion boards, if there are any installed, except for drum/percussion kits
¥ DRMÑsingle drum or percussion sounds in the ZRÕs ROM, RAM or FLASH memory
¥ GMÑGeneral MIDI sounds
¥ ROMÑall of the sounds in the ZRÕs ROM memory, except for drum/percussion kits
¥ ALLÑthis category includes all of the above. The ALL sound type can be especially handy, since it lists
all of the sounds currently available in your ZR-76 alphabetically, except for drum/percussion kits
NNNNooootttteeee:::: The ZR-76 will only offer single, non-drum/percussion kit sounds for use by a drum
key. You canÕt use a kit within a kit!
The following parameter is present only when the sound being edited is a drum or percussion kit.
TTTToooo CCCChhhhaaaannnnggggeeee tttthhhheeee SSSSoooouuuunnnndddd TTTTyyyyppppeeee UUUUsssseeeedddd BBBByyyy aaaa DDDDrrrruuuummmm KKKKeeeeyy
1. Select a Drum Key to edit (see ÒSelecting a Drum Key for EditingÓ above).
dd
yy
ENSONIQ ZR-76 Musician's Manual 91
Page 100

Chapter 4ÑSoundFinder
2. Turn the Parameter knob until the display shows:
Each Drum Key can be set to use a sound from the SoundFinder categories described above:
¥ EXP ¥ DRM
¥ GM ¥ ROM
¥ ALL
4. Turn the Value knob to select a new SoundFinder category from which you can select a new sound for
the selected Drum Key.
TTTTiiiipppp:::: If youÕd like to work on another Drum Key, select it on the keyboardÑthe upper right-
hand corner of the ZRÕs display will show the new Drum Key youÕve selected.
This show the currently selected drum key
m
Sound DrumKey=B1
Sound Type= DRM-SND
i
You may see a different SoundFinder category here
CCCChhhhaaaannnnggggiiiinnnngggg aaaa DDDDrrrruuuummmm KKKKeeeeyyyyÕÕÕÕssss SSSSoooouuuunnnndd
You can select a new sound for a drum key from the SoundFinder category chosen with the sound type
parameter, described earlier.
NNNNooootttteeee:::: The ZR-76 will only offer standard, non-drum/percussion kit sounds for use by a
Drum key. You canÕt use a kit within a kit!
The following parameter is present only when the sound being edited is a drum or percussion kit.
TTTToooo CCCChhhhaaaannnnggggeeee aaaa DDDDrrrruuuummmm KKKKeeeeyyyyÕÕÕÕssss SSSSoooouuuunnnndd
1. Select a drum key to edit (see ÒSelecting a Drum Key for EditingÓ above).
2. Turn the Parameter knob until the display shows:
dd
dd
This show the currently selected drum key
m
Sound DrumKey=B1
Sound= Bright Kick
i
You may see a different sound here
3. Turn the Value knob to select a new sound for the currently selected drum key.
TTTTiiiipppp:::: If youÕd like to work on another drum key, select it on the keyboardÑthe upper right-
hand corner of the ZRÕs display will show the new drum key youÕve selected.
ENSONIQ ZR-76 Musician's Manual92
 Loading...