

Page 1
WARRANTY
This warranty is given by Ensitech Pty Ltd of Unit 1, 144, Old Bathurst Road, Emu Plains NSW 2750, Australia,
Tel: +61 2 4735 7700, Email: [email protected] The benefi ts given by each warranty set out in this
document are in addition to any other rights and remedies you may have under a law in relation to the
services or goods to which the warranty relates. Our goods come with guarantees that cannot be excluded
under the Australian Consumer Law. You are entitled to a replacement or refund for a major failure and for
compensation for any other reasonably foreseeable loss or damage. You are also entitled to have the goods
repaired or replaced if the goods fail to be of acceptable quality and the failure does not amount to a major
failure. Unless otherwise stated you will bear the cost of claiming the warranty.
What this warranty covers
This warranty applies to any defects in the goods that appears within 24 months from the date of delivery
of the goods to you. To claim under this warranty, the defects must be notifi ed to Ensitech and the goods
returned to Ensitech within two weeks of their appearance. Ensitech will, at its option, replace or repair
the goods within a reasonable time of receiving a valid warranty claim. Ensitech will pay for the repair or
replacement but you must pay all other costs including all transport costs of returning the defective goods to
Ensitech and Ensitech delivering the repaired or replacement part back to you
.
How to make a claim
If you want to make a claim under your warranty, please contact Ensitech Pty Ltd in writing by sending a prepaid letter to Ensitech Pty Ltd, PO Box 179, Springwood NSW 2777, Australia, or email to [email protected].
au. You must include your full name, address and contact telephone number and the details of the defect in
relation to which you make your claim. Ensitech will tell you whether you need to return the goods to Ensitech
Pty Ltd or the approved local distributor. You will need to return the goods together with all accessories and
parts for a full assessment and report.
Additional limitations, exclusions and requirements
This warranty does not extend to:
• consumables such as the brush, insulating shroud and wand;
• any defect caused by normal wear and tear or incidental or inconsequential damage;
• any defect caused by misuse, negligence or other abuse of the goods;
• any defect caused by accidents or alterations;
• goods that have not been cleaned and maintained in accordance with the user’s manual supplied with the
goods;
• loss or damage, including consequential loss or damage, to your work or facilities arising out of or in
connection with the use of the TIG Brush; or
• unless otherwise expressly stated, any right to be reimbursed or compensated for physical or fi nancial
injury, loss, damage, expense, time or inconvenience (whether direct or indirect) arising out of the
occurrence of the defect in the product or your inability to use the product.
Model: TBE-250 Serial No.
Purchased from:
Date of Purchase:
Ensitech Pty Ltd Unit 1/144 Old Bathurst Road, Emu Plains NSW 2750, Australia
Phone: +61 2 4735 7700 Email: [email protected]
TIG Brush TBE-250 Instruction Manual Feb 2012
TBE-250 Instruction Manual
Feb 2012
Ensitech Pty Ltd
www.ensitech.com.au
Stainless Steel Weld Cleaning System
TBE-250
Operation, Safety and
Maintenance Manual
Page 2

2
TBE-250 Instruction Manual
Feb 2012
This manual is a very important tool! Keep it
with the machine at all times.
The purpose of this manual is to provide users
with the necessary operating procedures and
precautions, essential for the safe and proper
operation of the TIG Brush.
Due to continuous improvements, Ensitech
Pty Ltd reserves the right to make specifi cation
changes.
© 2011 Ensitech Pty Ltd
FOREWORD
FOREWORD
19
Ensitech Pty Ltd
www.ensitech.com.au
ON/OFF SWITCH & FRONT PANEL POWER LIGHT
ILLUMINATED & UNIT NOT OPERATING
• Ensure the TIG Brush circuit breaker is reset (it should
be pressed in – see back of unit).
• Ensure the Power Control is not set to STANDBY.
• Ensure the cables are securely plugged into the front of
the TIG Brush.
• Ensure the clamp is gripping the work securely.
Sometimes the clamp position may need adjusting to
make a good contact. If dirt or debris has built up on the
clamp, clean it as this may prevent a good contact
being made.
• Ensure the brush is wet with fl uid.
• Ensure that the work is conductive. If the metal has a
plastic fi lm or a thick layer of oxide, the current cannot
fl ow through the work. A mechanical or chemical
method may need to be used to remove any insulating
fi lm before the TIG Brush can be used.
• Examine all cables for damage and ensure all the cables
are properly connected.
• Ensure the brush is securely screwed into the wand.
NOTE: Be careful when checking, as a loose connection
may be extremely hot.
• Check screw threads on the handle, wand and brush for
dirt and contamination in the screw threads and clean if
required.
Contact your TIG Brush distributor or visit the website for
more help www.tigbrush.com
S8 TROUBLESHOOTING
8.3
Page 3
18
TBE-250 Instruction Manual
Feb 2012
S8 TROUBLESHOOTING
ON/OFF SWITCH NOT ILLUMINATED
ON/OFF SWITCH ILLUMINATED & FRONT
PANEL POWER LIGHT NOT ILLUMINATED
• Ensure the power switch is ON (with the “I” symbol on
the switch pressed in).
• Ensure the power cable is pushed completely into the
socket on the side of the TIG Brush.
• Ensure power is present at the power point (possibly by
plugging in another appliance, such as an
inspection light).
• Check the fuse located below the mains socket. Using a
small screwdriver, place the tip in the indentation under
the plastic fuse drawer and pull out the drawer. If the
fuse at the end of the drawer is broken replace with a
fuse of the same specifi cation (8 amp, slow blow fuse,
size M205).
• If the fuse blows again, contact your TIG Brush Supplier.
• If the TIG Brush was being used prior to it turning off,
and the heat-sink at the back of the unit feels hot
(be careful as it may be very hot) the unit may have
over-heated. Wait 30 minutes for the unit to cool down
before trying to use it again. The unit can be cooled
more quickly by placing a damp cloth on the heat-sink.
8.1
8.2
If the TIG Brush is not operating correctly, please refer to the
following trouble shooting guide before contacting your TIG
Brush distributor.
3
Ensitech Pty Ltd
www.ensitech.com.au
INDICATES AN IMMEDIATELY HAZARDOUS SITUATION. IF NOT
AVOIDED, MAY RESULT IN MINOR OR MODERATE INJURY. IT
MAY ALSO ALERT AGAINST UNSAFE PRACTICES.
DANGER
THIS IS THE SAFETY ALERT SYMBOL. IT IS USED TO ALERT
YOU TO THE POTENTIAL PERSONAL INJURY HAZARDS. OBEY
ALL SAFETY MESSAGES THAT FOLLOW THIS SYMBOL TO
AVOID POSSIBLE INJURY.
WARNING
SYMBOL FOR “VOID WARRANTY” OR “DAMAGED WORK”
V
INDICATES AN IMMEDIATELY HAZARDOUS SITUATION. IF NOT
AVOIDED, MAY RESULT IN MINOR OR MODERATE INJURY. IT
MAY ALSO ALERT AGAINST UNSAFE PRACTICES.
CAUTION
FOREWORD
THIS SYMBOL INDICATES AN IMMEDIATELY HAZARDOUS
SITUATION WHICH SHOWS ENSITECH’S PROVISIONS FOR THE
MILD ACID. IF PRECAUTIONS ARE NOT TAKEN, MAY RESULT
IN MINOR OR MODERATE INJURY.
SAFETY ALERT SYMBOLS AND SAFETY SIGNAL WORDS
Page 4

4
TBE-250 Instruction Manual
Feb 2012
FOREWORD
CONTACT
FOR:
• Accident reporting
• Product safety publications
• Current owner updates
• Questions regarding product safety
• Standards and regulations compliance information
• Questions regarding special product applications
• Questions regarding product modifi cations
Ensitech Pty Ltd
Unit 1/144 Old Bathurst Road
Emu Plains NSW 2750
Australia
Phone: +61 2 4735 7700
Email: [email protected]
Your local TIG Brush distributor.
www.tigbrush.com
17
Ensitech Pty Ltd
www.ensitech.com.au
S7 CONSUMABLES
BRUSHES
INSULATING SHROUD
CLEANING FLUIDS
7.1
7.2
7.3
The brush will wear down with use and need replacing
before the bristles reach the insulating shroud.
Consumable supplies are available from authorised TIG
Brush distributors.
The insulating shroud may become damaged or heataffected. Replacement shrouds are available.
A range of cleaning fl uids is available including:
• TB-21ND Weld Cleaning Fluid: for cleaning & polishing.
• TB-25 Weld Cleaning Fluid: for cleaning & polishing.
• TB-30ND Weld Cleaning Fluid: biodegradable for cleaning
only.
• TB-31ND Neutral Weld Cleaning Fluid: neutral pH, for
cleaning only.
NEUTRALISING FLUIDS7.4
Neutralising fl uids which ensure removal of all cleaning fl uid
residue are available including:
• TB-40 Neutralising Fluid for TB-21ND and TB-25.
• TB-41 Neutralising Fluid for TB-30ND.
MARKING FLUIDS
OTHER FLUIDS
7.5
7.6
• TB-90 Marking Fluid: can be used with custom stencils to
indelibly mark metals.
• A range of Pre-Weld Cleaning, Cleaning and Finishing fl uids
is available for stainless steel and other metals, to remove
surface contamination and provide a clean mark-free fi nish.
Brush Shroud
Fluids
Page 5
16
TBE-250 Instruction Manual
Feb 2012
S6 MAINTENANCE
MAINTENANCE
• When not in use, ensure the On/Off switch is OFF. The
green power light on the front panel and the On/Off
switch should not be illuminated.
• Rinse brush with water to remove excess cleaning fl uid.
• At completion of a work shift, unscrew brush from
wand. Remove the brush from the insulating shroud
and rinse brush, shroud and end of wand with water to
remove cleaning solution. Allow to dry before
re-assembling.
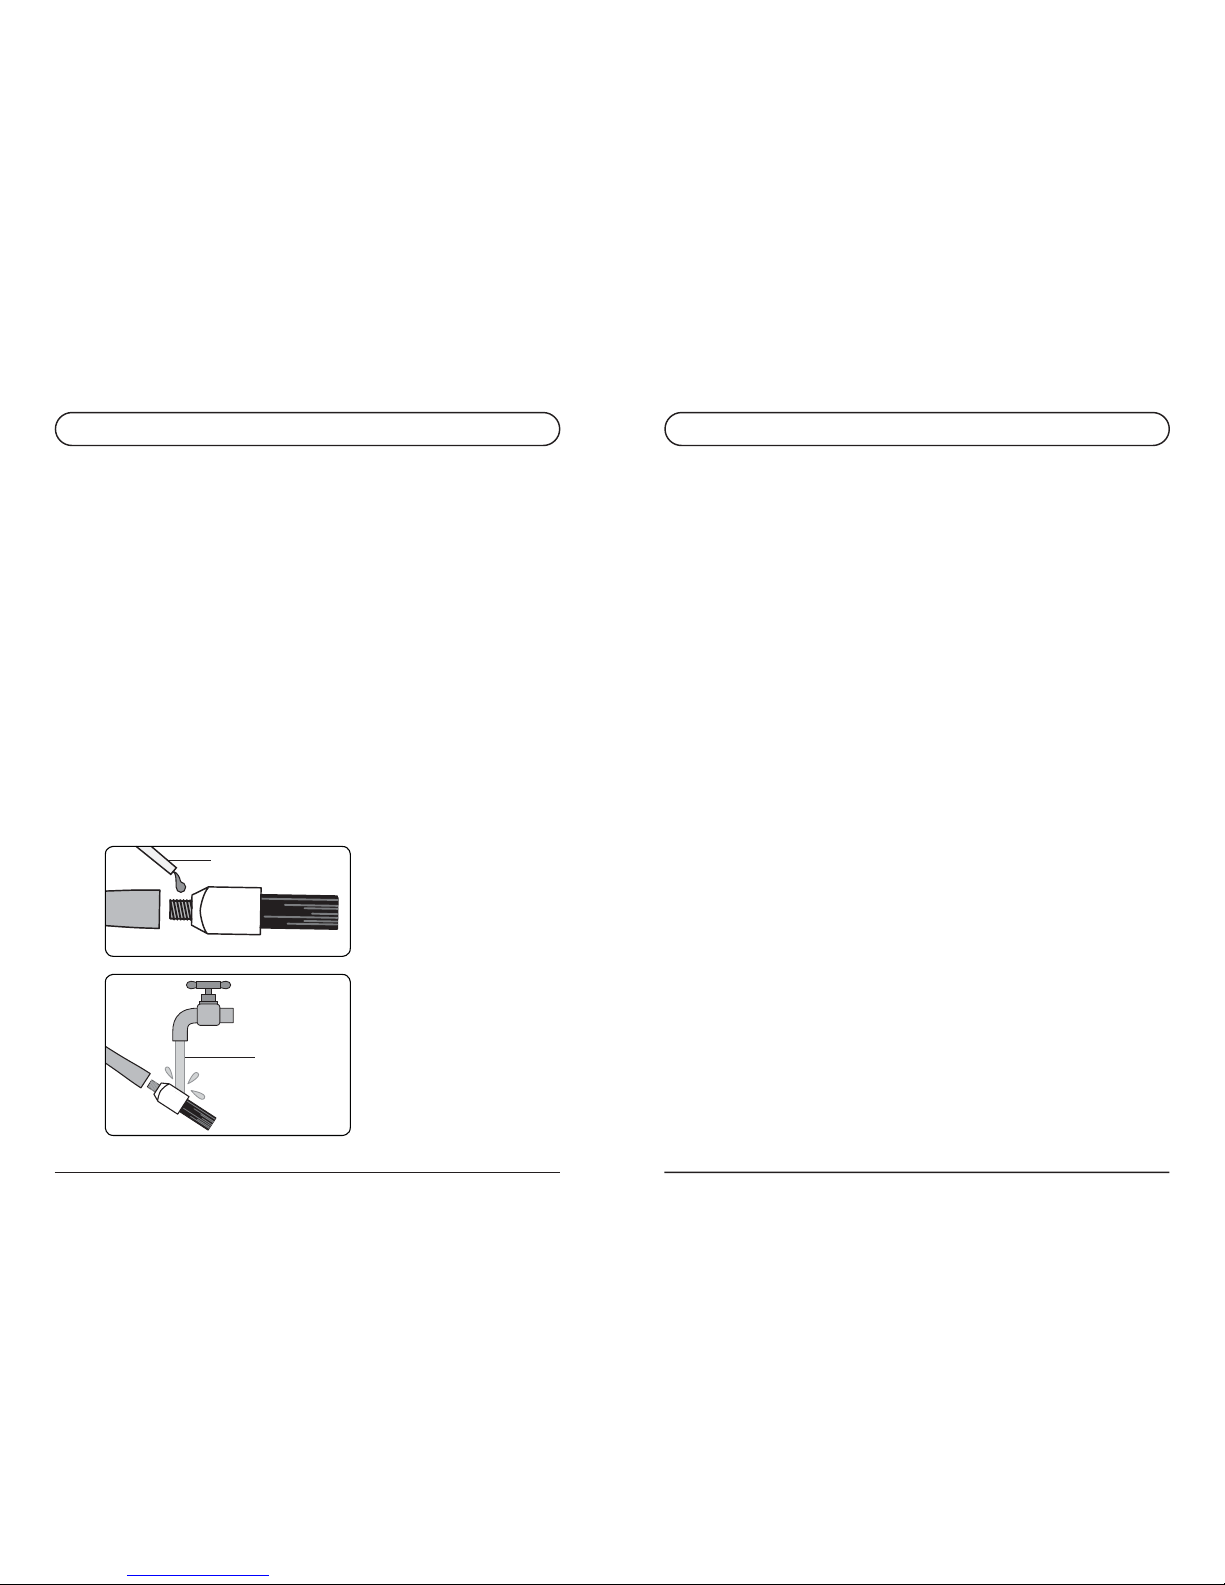
• Before assembling the brush to the wand, coat threads
with copper fi lled anti-seize compound. This will exclude
the acidic solution from the joints and prevent corrosion.
• Rinse clamp with water to remove solution and
prevent corrosion.
• Use a wet cloth to wipe fl uid splashes off the TIG Brush
control unit. After some time splashes and marks may
accumulate and become diffi cult to remove.
Rinse brush
components
after use
Wand Brush
Anti-seize compound
6.1
5
Ensitech Pty Ltd
www.ensitech.com.au
REVISIONS LOG
REVISIONS LOG
Original Issue of Manual: May 2010
Revision: February 2012
Page 6
6
TBE-250 Instruction Manual
Feb 2012
INTRODUCTION
SAFETY PRECAUTIONS
DESCRIPTION OF APPARATUS
OPERATION
4.1 Preparation
4.2 Assembly
4.3 Cleaning Fluid
4.4 Operation
POWER AND GRADE SETTING
5.1 Power Settings
5.2 Mode Settings
MAINTENANCE
CONSUMABLES
7.1 Brushes
7.2 Insulating Shroud
7.3 Cleaning Fluid
7.4 Neutralising Fluid
7.5 Marking Fluid
7.6 Other Fluids
TROUBLESHOOTING
8.1 On/Off Switch Not Illuminated
8.2 On/Off Switch Illuminated & Front Panel
Power Light Not Illuminated
8.3 On/Off Switch & Front Panel Power Light
Illuminated & Unit Not Operating
7
8
10
12
12
12
12
14
15
15
15
16
17
17
17
17
17
17
17
18
18
18
19
CONTENTS
S1
S2
S3
S4
S5
S6
S7
S8
15
Ensitech Pty Ltd
www.ensitech.com.au
S5 POWER AND GRADE SETTINGS
MODE SETTINGS
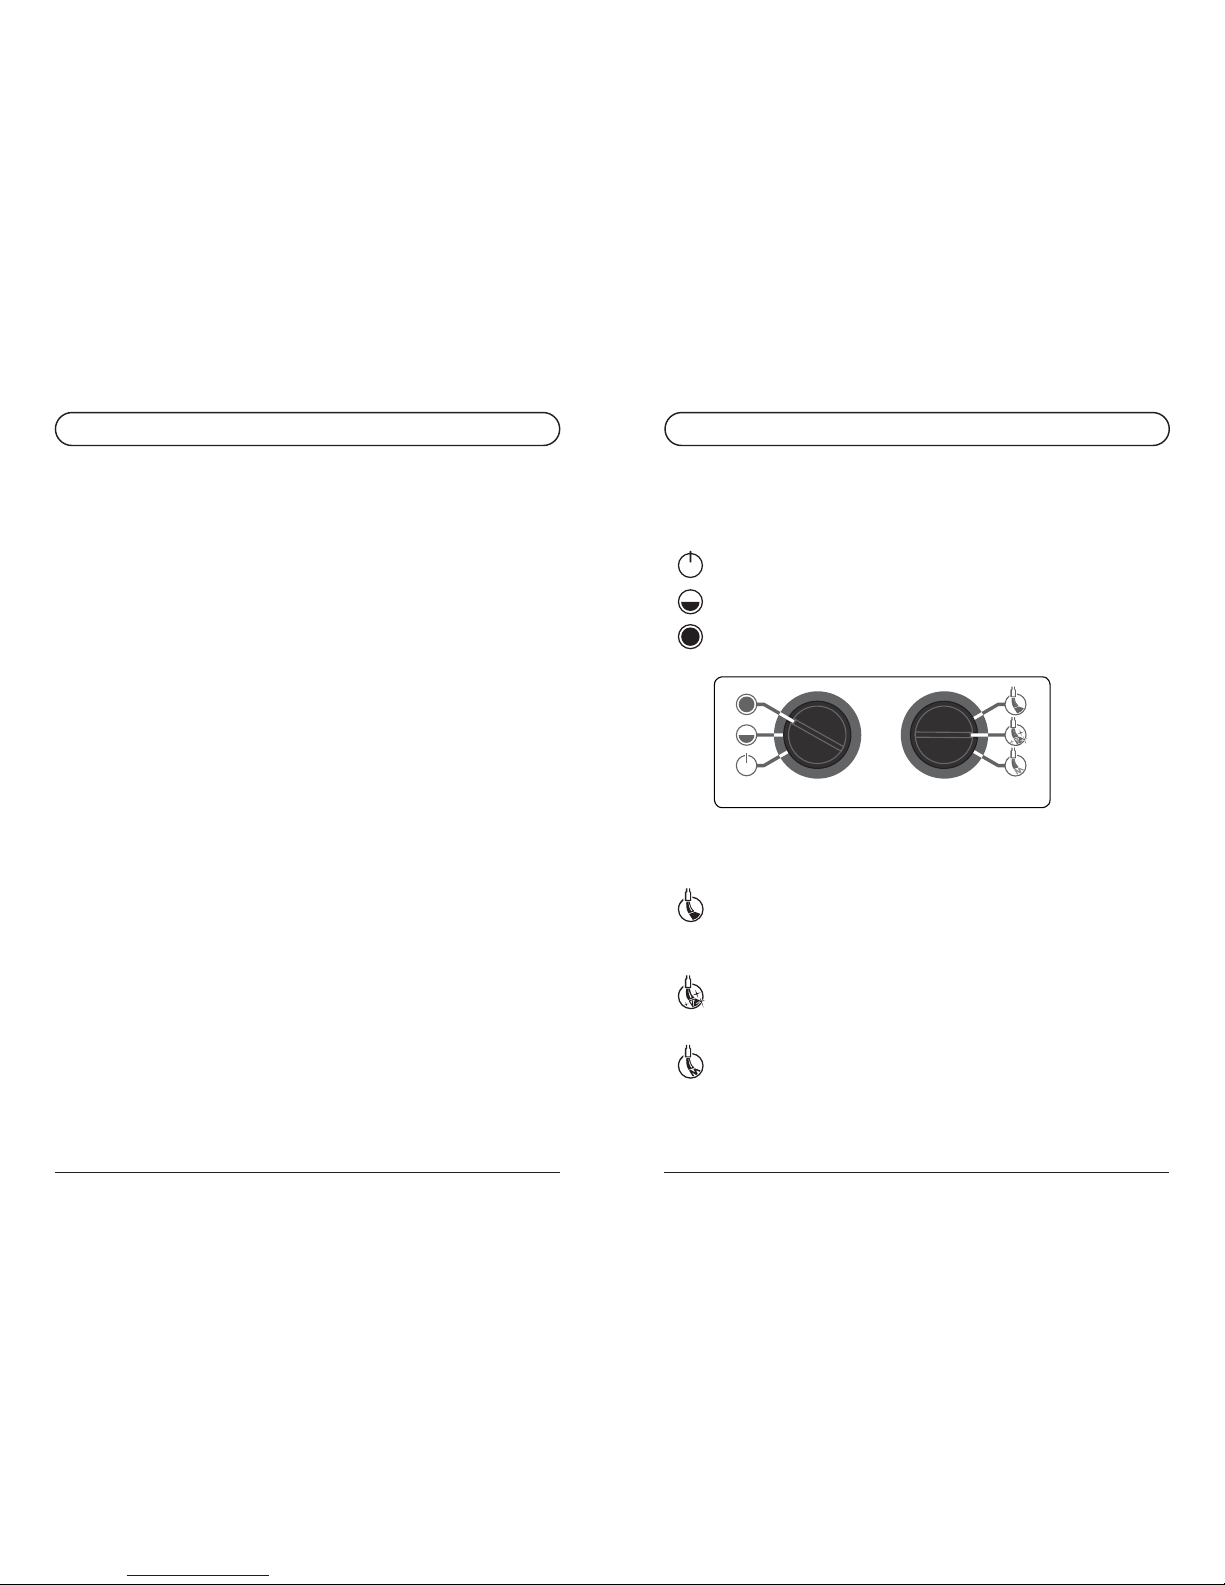
POWER CONTROL MODE CONTROL
5.2
POWER SETTINGS5.1
Choose the cleaning intensity required by selecting the
appropriate setting using the Power Control.
STANDBY - Power is not transmitted to the brush.
LOW - Use for light work and thin metals.
HIGH - Use for most cleaning operations. Provides fastest
cleaning speed.
Choose the type of cleaning required by selecting the
appropriate setting using the mode control.
CLEAN - This mode provides the fastest cleaning at each
power setting. However, prolonged use may cause a milky
appearance on the surface of the metal. If this happens, use
RESTORE to rectify.
RESTORE - This mode provides metal polishing. Use this
grade to repair a dull white surface, including one caused by
over-use of CLEAN.
MARKING - This mode provides surface marking, when used
with the appropriate chemical.
Page 7

14
TBE-250 Instruction Manual
Feb 2012
Refer to illustrations on pages 13 and 15.
1. Set POWER control to STANDBY. Always use this setting
when connecting the clamp or changing the tip.
2. Ensure the power cord is connected to a suitable 110V
or 240V AC power outlet and connected to the TIG Brush
power socket.
3. Turn the On/Off switch to ON. The On/Off switch should
immediately be illuminated. If this does not occur, refer
to the “Troubleshooting” section.
4. Make sure the brush tip has its insulating shroud and the
insulation on the wand is undamaged.
5. Ensure the TIG Brush is switched on and all equipment is
correctly connected as described above in section 4.2.
6. Select power level and operating mode using the rotary
switches. See section 5 below for details.
7. Dip brush in cleaning fl uid and apply brush tip to weld
area to be cleaned. Use only recommended cleaning
fl uids, see S7.2.
8. Ensure brush and work area remain wet with the fl uid
during cleaning.
9. Apply brush only for as long as necessary to remove
discolouration. Prolonged application may affect
surface quality.
10. Some light sparking may occur where brush tip contacts
workpiece, particularly on higher power settings, and this
is normal. Excessive sparking for a prolonged time in one
area may cause surface pitting.
11. When desired surface fi nish is achieved, turn the TIG
Brush Power Control to OFF.
12. After use put the brush down on a non-fl ammable
surface as it may be very hot.
13. Be careful touching the work as it may be hot.
14. Rinse thoroughly with clean water to remove all traces of
cleaning fl uid. To ensure acidic residue is removed, use
the recommended Ensitech neutralising fl uid, see S7.3.
S4 OPERATION
OPERATION4.4
7
Ensitech Pty Ltd
www.ensitech.com.au
S1 INTRODUCTION
The TIG Brush is a metal cleaner/polisher. It uses the action
of an electric current along with a fl uid to remove heat marks
and other surface imperfections from metal surfaces. This
model has been specifi cally designed to clean heat marks left
by TIG welding stainless steel.
Several cleaning solutions are available, each suited to
different applications. Contact Ensitech for more information,
or visit our website www.tigbrush.com
INTRODUCTION
Page 8
8
TBE-250 Instruction Manual
Feb 2012
S2 SAFETY PRECAUTIONS
Protect yourself and others by observing all safety
information, warnings and cautions. Failure to comply with
instructions could result in personal injury and/or damage to
the product or property.
Read this documentation carefully before operating the
equipment. Please retain these instructions for future
reference.
Before using the TIG Brush, make sure the work environment
is well ventilated and away from any combustible
substances. Ensure that all required equipment is available.
Do not use the TIG Brush for any purpose other than that
described in this manual. Failure to observe this warning
may result in permanent damage to the TIG Brush, cause
damage to the workpiece, cause injury to the operator and
void the warranty.
The TIG Brush is one of the safest appliance in its class.
However some precautions must be taken with the use of
the TIG Brush, as with any electro-cleaner.
• The TIG Brush uses mild acids; gloves should be used to
avoid prolonged contact with any of the fl uids.
• Goggles should be worn to prevent fl uid being splashed
in the eyes.
SAFETY PRECAUTIONS
SAFETY INFORMATION
WARNING
13
Ensitech Pty Ltd
www.ensitech.com.au
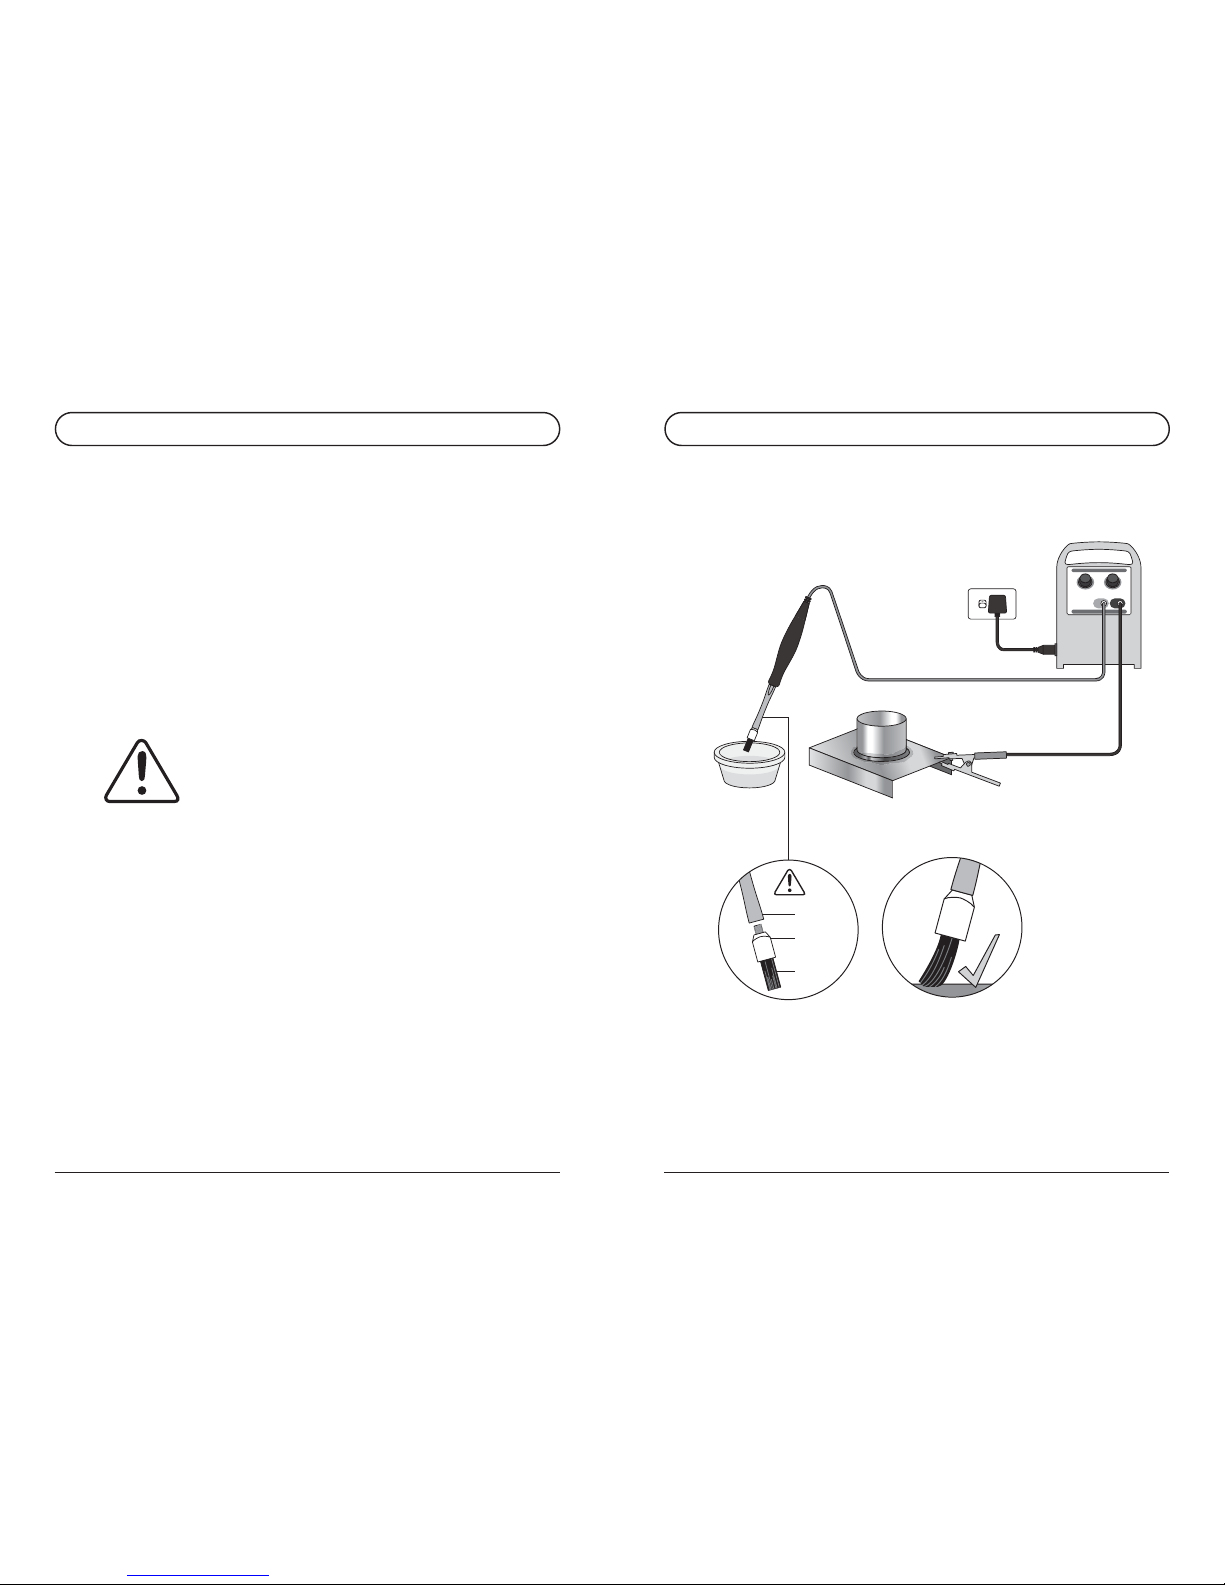
S4 OPERATION
Workpiece
For best performance
use tip of brush only
Wand
Brush
Shroud
Insulating shroud
must be used
Page 9

12
TBE-250 Instruction Manual
Feb 2012
S4 OPERATION
PREPARATION
ASSEMBLY
4.1
4.2
4.3
1. Inspect unit and all cables for damage before use.
2. Ensure the unit is dry.
3. Ensure the work environment is well ventilated and
away from any combustible substances.
4. Ensure that cables do not present a trip hazard.
5. If the items to be cleaned are small, place the parts in a
plastic container that can hold acidic fl uids safely.
6. Parts will need to be sprayed with the recommended
Ensitech neutraliser or washed down with water after
cleaning. Ensure there is ready access to water and a
suitable place for washing.
7. Wear suitable personal protective equipment as
recommended in the MSDS. The minimum requirement
is for gloves to protect hands from the fl uid, and goggles
to prevent fl uid splashing into the eyes.
CLEANING FLUID
Pour a small quantity of the Cleaning Fluid into a shallow
bowl. Place the container close to the work because the tip
will be dipped into the fl uid regularly during operation.
Refer to illustration on page 10.
1. Attach connector of red cable to red connector of TIG
Brush Unit.
2. Screw wand into handle.
3. Place shroud on brush and screw into wand.
4. Attach connector of black cable to black connector of
TIG Brush Unit.
5. Set POWER switch to “OFF”.
6. Attach power cord to mains outlet and TIG Brush Unit.
7. Attach clamp to workpiece.
9
Ensitech Pty Ltd
www.ensitech.com.au
S2 SAFETY PRECAUTIONS
CAUTION
• Fluid spilled on the skin should be washed off as soon
as practical.
• Material Safety Data Sheet is available for all chemicals
and should be read before use.
• The brush gets extremely hot, around 200°C degrees
centigrade. Be very careful touching the brush. Do not
place the brush near any fl ammable materials.
• The TIG Brush produces an electric current which may
generate small sparks between the brush and the metal
being cleaned.
• Hydrogen gas may also be generated (which is an
invisible but explosive gas). Always use the apparatus
in a well ventilated area. Do not use near fl ammable
substances, or in areas where dense fl ammable gases
(such as petrol vapour) may accumulate.
• The TIG Brush TBE-250 uses 110V or 240V AC only.
Do not use with any other voltage. If the power cord is
damaged or if the TIG Brush has been dropped from a
height and damaged, do not use the unit. Contact your
TIG Brush supplier to have the TIG Brush inspected
and repaired.
• Do not short out the terminals, or use the TIG Brush with
a damaged wand or cables. Doing so may permanently
damage the TIG Brush and cause damage to the
workpiece being cleaned. The high currents involved
may also cause intense heating of the shorted or
damaged part, which could result in burns to
the operator.
• Ensure that the TIG Brush is located where it cannot
easily fall and cause injury. Ensure that the cables do
not present a trip hazard.
Page 10
10
TBE-250 Instruction Manual
Feb 2012
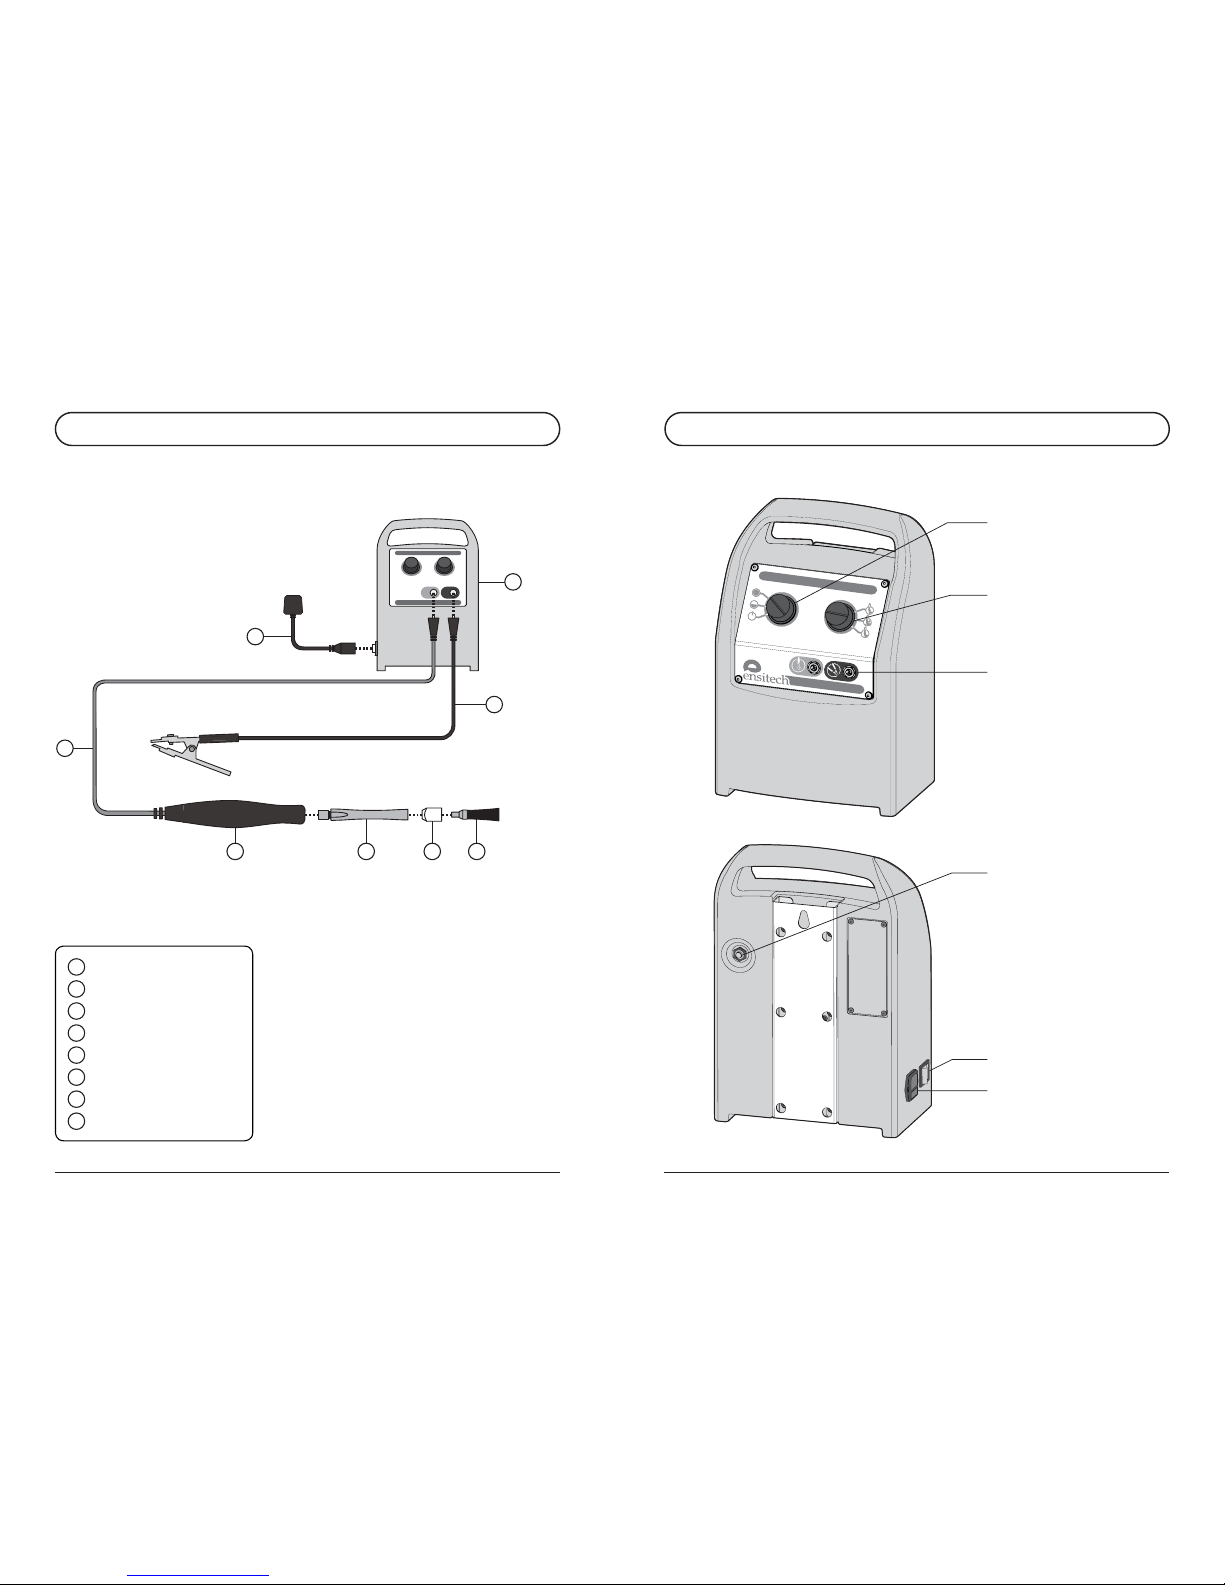
S3 DESCRIPTION OF APPARATUS
1
2
4 5 6 7
8
3
1
2
3
4
5
6
7
8
TIG Brush Control Unit
Clamp Cable
Handle Cable
Handle
Wand
Shroud
Brush
Power Cord
11
Ensitech Pty Ltd
www.ensitech.com.au
T
B
E
-
2
5
0
T
I
G
B
r
u
s
h
®
S3 DESCRIPTION OF APPARATUS
Power Control
Mode Control
Cable Sockets
Reset Button
On/Off Switch
Mains Socket
 Loading...