


BrightEye NXT Routers
Quick Start Guide
Clean and Quiet Video and Audio Routing Switchers
Models 430-X, 430, 415, 410-H, 410

BrightEye NXT 430-X, 430, 415, 410-H, 410 Compact Routers
Front Panel Controls
Page 2

Models 410-H and 410 Rear Connectors
Quick Start Guide
www.ensembledesigns.com Page 3

BrightEye NXT 430-X, 430, 415, 410-H, 410 Compact Routers
Models 430-X, 430 and 415 Rear Connectors
Page 4

Quick Start Guide
Ventilation
Maintaining proper airflow is required to keep the NXT’s internal temperature normal. Air input occurs below the front panel. Air
output occurs through the rear panel. If placing the unit on a surface, the four feet must be mounted on its base. If mounted in a
rack, the unit must be installed in such a way that the air flow on the front and rear is not restricted. Our BERKMT-Full rack mount
kit, designed for this purpose, holds up to 3 NXT units in a 1RU rack.
Connecting Cables to Ports
BrightEye NXT 410-H and 410 Default Port Configuration
The default port configuration for the BrightEye NXT 410 is shown below. Ports that are Unassigned, such as Port 3, can be
configured from the front panel either as a Source or Destination, as described on page 8. The two Clean Switches (CS) can be
assigned to Destinations as described on pages 10 and 11.
In 1: Source
In 2: Source
I/O 3: Unassigned
Out 4: Destination
Out 5: Destination
In 6: Source
In 7: Source
In 8: Source
In 9: Source
Out 10: Destination
SFP I/O 11: Unassigned
SFP I/O 12: Unassigned
TSG 1: Source
TSG 2: Source
CS 1: Unassigned
CS 2: Unassigned
BrightEye NXT 430-X, 430 and 415 Default Port Configuration
The default port configurations for the BrightEye NXT 430-X, 430 and 415 are shown below. Ports that are Unassigned, such as Port
3, can be configured from the front panel either as a Source or Destination, as described on page 8. The two Clean Switches (CS)
can be assigned to Destinations as described on pages 10 and 11.
In 1: Source
In 2: Source
I/O 3: Unassigned
Out 4: Destination
Out 5: Destination
I/O 6: Unassigned
I/O 7: Unassigned
I/O 8: Unassigned
I/O 9: Unassigned
I/O 10: Unassigned
I/O 11: Unassigned
SFP I/O 12/13: Unassigned
SFP I/O 14/15: Unassigned
TSG 1: Source
TSG 2: Source
CS 1: Unassigned (430, 430-X)
CS 2: Unassigned (430, 430-X)
Connect Reference If Needed
The BrightEye NXT locks to house reference or to its own internal precision standard. Select Internal or External from the Timing &
Genlock menu.
Connect Power Supply
Connect the power supply that is provided with the BrightEye NXT unit. The boot up process takes about 40 seconds.
Note: BrightEye NXTs must be powered by their own product-specific power supply that comes with each unit.
This is a 5 amp single power supply, Ensemble Designs part number 23600106, order info: BEPS-NXT.
DO NOT use a BrightEye Spider power supply (BEPS6) or a BrightEye Individual power supply (BEPS, ED part
number 23118900).
www.ensembledesigns.com Page 5

BrightEye NXT 430-X, 430, 415, 410-H, 410 Compact Routers
Selecting Sources and Destinations and
Making a Cross Point Switch
Preset/Take Panel Mode
Use the Dest button to step through the router’s Destinations. The router’s LCD will show
the signal on each Destination. Stop on the Destination you want to use.
Likewise, use the Src button to step through and then select a Source. The LCD will
display the Source, whether it’s a video input or an internal test signal.
Once you’ve selected a Destination and a Source, press Tak e to make a cross
point switch.
Direct Take Panel Mode
Double-tap the Take button to enter Direct Take panel mode. In this mode, selecting
an assigned source shortcut button instantly makes a cross point switch to the alreadyselected destination. Double-tap the Take button again to return to Preset/Take mode.
Mix Transition Panel Mode
For destinations that are going through a Clean Switch, you can mix transitions from the
front panel using configurable transition durations. Switch between Mix mode and Cut
mode by double-tapping the assigned destination shortcut button. Adjust the transition
duration through the Panel Config menu.
Page 6
Front Panel Navigation
Press to bring up the configuration menus on the front panel screen.
Use the arrows to scroll through the configuration menus, navigate submenus, or to
change the values of a selected setting.
Press or to drop down successive levels within a menu.
Press or to come back up one menu level.
Pressing any operational button—any button to the left of the screen—will take you
immediately from configuration mode to the router’s operational mode.
After approximately 30 seconds of inactivity of the configuration controls, the BrightEye
NXT screen will time out and revert to the router’s operational mode.

Front Panel Router Configuration Menus
Quick Start Guide
Panel Config
Ports
TSG1
TSG2
Clean Switch 1
Clean Switch 2
Timing & Genlock
Network
Assign shortcut buttons, adjust mix transition durations, select
preset/take or direct take mode, adjust panel brightness,
number of audio meters, meter reference level, peak display,
disable live video
Name Sources and Destinations, define ports as inputs or
outputs as needed
Select a test signal, choose its standard, adjust test signal
output timing, configure slate, enable audio groups, select tone
frequency
Same as test signal generator 1, but for the 2nd TSG
Set the clean switch’s standard and assign it to an output, adjust
vertical and horizontal timing, enable audio groups, choose
audio source settings, audio type (embedded or AES), split
mode settings, SD > HD Pillar Box settings, HD > SD Letter Box
settings. 430-X, 430, 410-H and 410 units only
Same as Clean Switch 1, but for the 2nd Clean Switch
Select between external and internal reference, get info about
reference status and the system frame rate (determined by
TSG1)
Change the router’s IP address and other network settings
Assigning Shortcut Buttons
Assign Sources and Destinations to the nine shortcut buttons in order to streamline
router operation. You can have any combination of Source buttons and
Destination buttons.
Press to get to the configuration menus. Panel Config is the first configuration
menu. If needed, use the arrow to navigate to Panel Config.
Press or twice to select Shortcuts and then go to the Shortcuts Button
Assignments map. Use the arrows to select the shortcut button you want to
configure.
Use the arrows to select a Source or Destination to assign to the selected shortcut
button. A button can also be unassigned.
After you’ve finished assigning shortcuts, press to save, or press to cancel.
www.ensembledesigns.com Page 7

BrightEye NXT 430-X, 430, 415, 410-H, 410 Compact Routers
Configuring Ports
Some of the BrightEye NXT Router ports are fixed as inputs or outputs, whereas the
flexible I/O ports are configured as inputs or outputs from the Ports menu. Naming the
ports can make router operation more intuitive.
Press to get to the configuration menus. Use the arrows to navigate to the
Ports menu.
Press or to highlight Input #1.
Use the arrows to select the port you want to assign.
Press or to go to Ports Configuration. Use the arrows to select the port’s
assignment. Available choices reflect the type of port you are working with.
Press to set your new port configuration selection, or press to cancel
your selection.
Naming Ports
Page 8
From Ports Configuration, press to enter the Port Name menu. Then press to
go to the front panel keyboard menu.
Use the and arrows to highlight the letter you want to enter. Press to
enter the highlighted letter into the label area. Change case by highlighting and
selecting either “abc” or “ABC.” To backspace or delete letters one at a time, highlight the
“del” key, then press . When finished editing, highlight “Set”, then press .
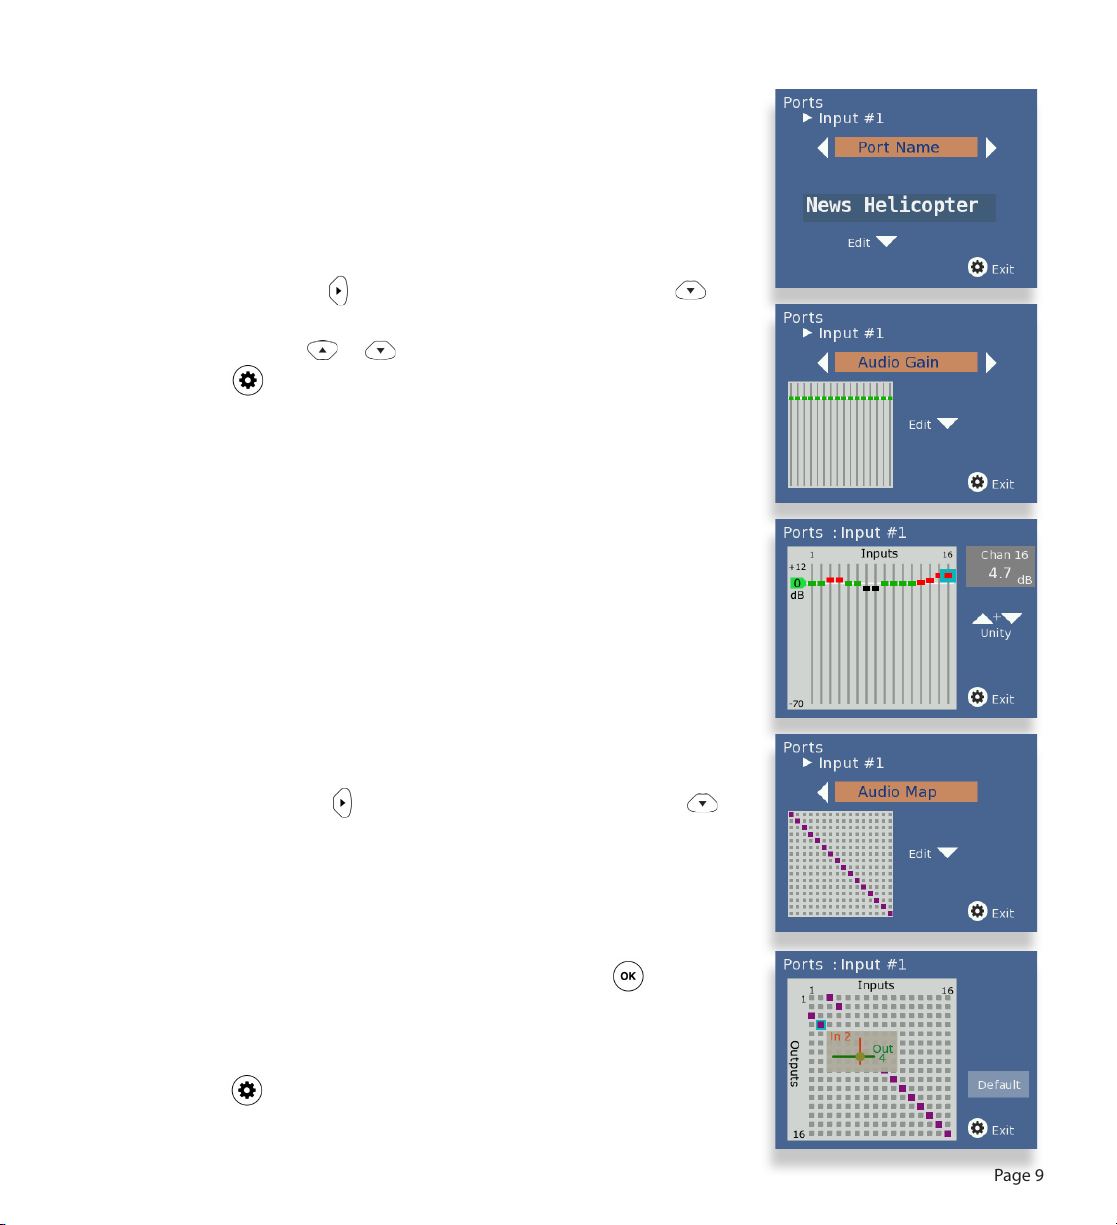
Adjusting Audio Levels
When the signal is output through a Clean Switch, you can adjust audio levels on a
per-input and per-channel basis. The BrightEye NXT compact routers can apply gain or
attenuation from +12.0 dB to -70 dB. When the Clean Switch is in Mix mode, the audio
output will properly mix between the adjusted settings of one input to the adjusted
settings of the new source.
From the Port Name menu, press to enter the Audio Gain menu. Then press to
go to the Audio Gain editing screen. Use the arrows to select one channel at a time and
adjust its levels. Press and hold or to accelerate the rate of adjustment.
When finished, press to return to the Audio Gain menu.
Quick Start Guide
Mapping Audio Channels
From the Audio Gain menu, press to access the Audio Map menu. Then press
to go to the Audio Map editing screen.
Each point on the audio map represents a potential cross-point for a specific audio
channel Input and audio channel Output. By default, Input 1 is mapped to Output 1,
Input 2 is mapped to Output 2, and so forth.
To edit the audio map, use the arrows to select a point on the grid. Press to toggle
between purple and gray. When purple, the cross-point is active. When gray, the cross-
point is not active.
When finished, press to exit.
www.ensembledesigns.com Page 9

BrightEye NXT 430-X, 430, 415, 410-H, 410 Compact Routers
Clean Switching on Models 430 and 410
The BrightEye NXT 430 and 410 have two clean switches that are useful when switching
between asynchronous sources or taking a router output directly to air. To switch cleanly
between different sources, the sources and the clean switch must share the same format
and standard. For example, if you are using 1080i/50 signals, set the clean switch to
1080i/50. Note that if you feed a signal to the clean switch that is a different format and
standard (for example, if a 525 SD signal is fed to a clean switch that is set to 1080i/50),
the clean switch will output black and silence.
There are controls to adjust the output timing of the clean switch with respect to the
genlock reference. If you are using embedded audio, enable the appropriate
audio groups.
Assigning a Clean Switch to a Router Destination
Press to get to the configuration menus. Use the arrows to navigate to the
Clean Switch 1 or Clean Switch 2 configuration menu.
Press or to highlight the Assignment submenu. Then press or to go to
Assignment selection.
Page 10
Use the arrows to select the Destination port to which you want to assign the
selected Clean Switch.
Press to set your new selection, or press to cancel.
Setting the Clean Switch Format and Standard
While in the Clean Switch menu, press to navigate to the Standard menu. Press
to select it.
Use the arrows to select the standard you want the Clean Switch to use.
Press to confirm your new clean switch standard, or press to cancel.

Clean Switching and Up/Down/Cross Converting on
Models 430-X and 410-H
The BrightEye NXT 430-X and 410-H have two clean switches with which you can switch
between asynchronous sources without glitches or pops. Both clean switches also have
up/down/cross converters. Simply by setting the output standard of each clean switch,
configured independently, they automatically convert any SMPTE broadcast resolution
source to your chosen output standard, regardless of the signal’s incoming format.
There are controls to adjust the output timing of the clean switch with respect to the
genlock reference. If you are using embedded audio, enable the appropriate
audio groups.
Assigning a Clean Switch to a Router Destination
Press to get to the configuration menus. Use the arrows to navigate to the
Clean Switch 1 or Clean Switch 2 configuration menu.
Press or to highlight the Assignment submenu. Then press or to go to
Assignment selection.
Quick Start Guide
Use the arrows to select the Destination port to which you want to assign the
selected Clean Switch.
Press to set your new selection, or press to cancel.
Setting the Clean Switch and U/D/C Conversion Output Standard
While in the Clean Switch menu, press to navigate to the Standard menu. Press
to select it.
Use the arrows to select the standard you want the Clean Switch to use.
Press to confirm your new clean switch standard, or press to cancel.
www.ensembledesigns.com Page 11

BrightEye NXT 430-X, 430, 415, 410-H, 410 Compact Routers
Web Control and Ethernet Interface
Your BrightEye NXT Router has a built-in web server providing control from a web
browser. Plug an Ethernet cable into the BrightEye NXT Router to connect directly to a
computer or to your Ethernet network.
When you initially power up the BrightEye NXT as received from the factory, it will have
the self-assigned static IP address of 192.168.1.101. To change the BrightEye NXT’s IP
address and network settings, use the Network menu. Note that the router supports
only manual settings. DHCP is not supported.
Setting the IP Address
Press and use the arrow to navigate to the Network menu.
Press or to highlight the Address submenu. Press or to enter the
Network Address menu.
Use the arrows to modify the IP address and other network settings as needed.
Press to save the new IP address, or press to cancel.
Page 12

Requesting the Web Control Point
After you have set the BrightEye NXT’s IP address to be compatible
with your network, you can connect to the BrightEye NXT with a
web browser to establish a web control point.
Navigate to the BrightEye NXT’s new IP address with your web
browser. The Control Point Needed window displays.
Enter the name you want to use to refer to this web control point;
for example, “NXT 430 Admin.” Click Request Control Point. The
message “Not Authorized” displays.
Select Settings from the upper left part of the browser window.
The Settings window displays.
Click Control Points. The Settings > Control Points window
displays.
Quick Start Guide
The Control Point you just requested will now be shown. Set the
profile to Factory Default (or another profile, if you have one set
up) and click Authorize. Then click Back (or Done). The Router
Control window comes up.
www.ensembledesigns.com Page 13

BrightEye NXT 430-X, 430, 415, 410-H, 410 Compact Routers
Web Browser Router Control Window
You can control the router through its web browser user interface to perform takes, direct takes, dissolves, gang, and gang
combined with direct takes. Thumbnail representations of the router’s Sources are shown in the upper area, Destinations in the
lower area.
Click one of the lower thumbnails to select a Destination. Click one of the
upper thumbnails to select a Source. Click Take or Mix. Your chosen Source is
routed to the Destination you selected.
Click Direct to toggle the Direct Take mode on or off. Sometimes called a “hot
take,” a direct take lets you select a Destination and then immediately Take
simply by selecting a Source.
Gang allows one Source to be routed to multiple Destinations. When Gang is
on, select all of the Destinations you want to use, then select your Source and
click Tak e. Alternately, Gang and Direct can be used together.
Page 14
Keyboard Shortcuts
KEY ACTION
number key Select Source
shift + number key Select Destination
return key Select Take
“m” key Select Mix
“d” key Toggle Direct Mode
“g” key Toggle Gang Mode

Settings Menu > Profiles
The web browser Settings menus provide complete control of the
router, including a software update interface, network settings,
timing and automation control.
Of special interest is the Profiles menu which allows you to define
which Sources and Destinations can be accessed from a Control Point
other than the router itself. Control Points include computers, tablets,
smart phones, automation systems, and production switchers. Each
Control Point must have a Profile assigned to it so that the Control
Point can control the BrightEye NXT Router.
Each Profile can be customized to access unique combinations of
Destinations and Sources. Create as many Profiles as your BrightEye
NXT web users require. You can always create additional Profiles or
edit existing ones later. Multiple Control Points can share the
same Profile.
Creating a Profile
From the left navigation panel of the web interface, click Profiles.
Enter a profile name in the New Profile field.
Quick Start Guide
Click Create. The new Profile is listed on the Profiles page.
Next to the newly created Profile, click Edit. All available Sources and
Destinations are shown.
Click and drag unassigned Sources and Destinations up to the
assigned area as desired for this specific Profile. Rearrange the order
and add Space icons to fit your needs.
Click Save Changes, then click Done.
This newly created Profile is now available to assign to one or more
Control Points.
www.ensembledesigns.com Page 15

BrightEye NXT 430-X, 430, 415, 410-H, 410 Compact Routers
Factory Reset
To reset your BrightEye NXT Router to factory settings, press and hold both the and
the while powering up the unit. Wait for the arrows to turn red and blink three
times. The BrightEye NXT will then be reset to its factory default settings.
Training Videos
In addition to this Quick Start Guide, please see our training videos at the link below to
learn how to set up and program your BrightEye NXT video router. The training videos
address initial setup, configuration, operation, and more.
www.ensembledesigns.com/training
For additional assistance, see the complete manual available through our website, or contact us at +1 530.478.1830 or
service@ensembledesigns.com. All Ensemble Designs products have a 5-year warranty. Avenue and BrightEye products are
designed and built in California at Ensemble Designs. Come visit us!
April 2015www.ensembledesigns.com
 Loading...