

Ensemble Designs BrightEye NXT 900, BrightEye NXT 910, BrightEye NXT 950, BrightEye NXT 955 Quick Start Manual
900 Series Quick Start Guide
• Four independent frame syncs per unit
• Web Interface with Video Proxies
• Optional SFPs for Fiber I/O
• HDMI and HDCP Support
• Front Panel Live Monitor
• Video Proc Amp and Color Correction
• Audio Channel Swap and Level Adjust
• Monitor Pre- and Post-Processed Signals
• Automatic Format and Frame Rate Conversion
• Supports SD to 4K, and Everything In-between
BrightEye NXT 900 Series Frame Syncs
Page 2
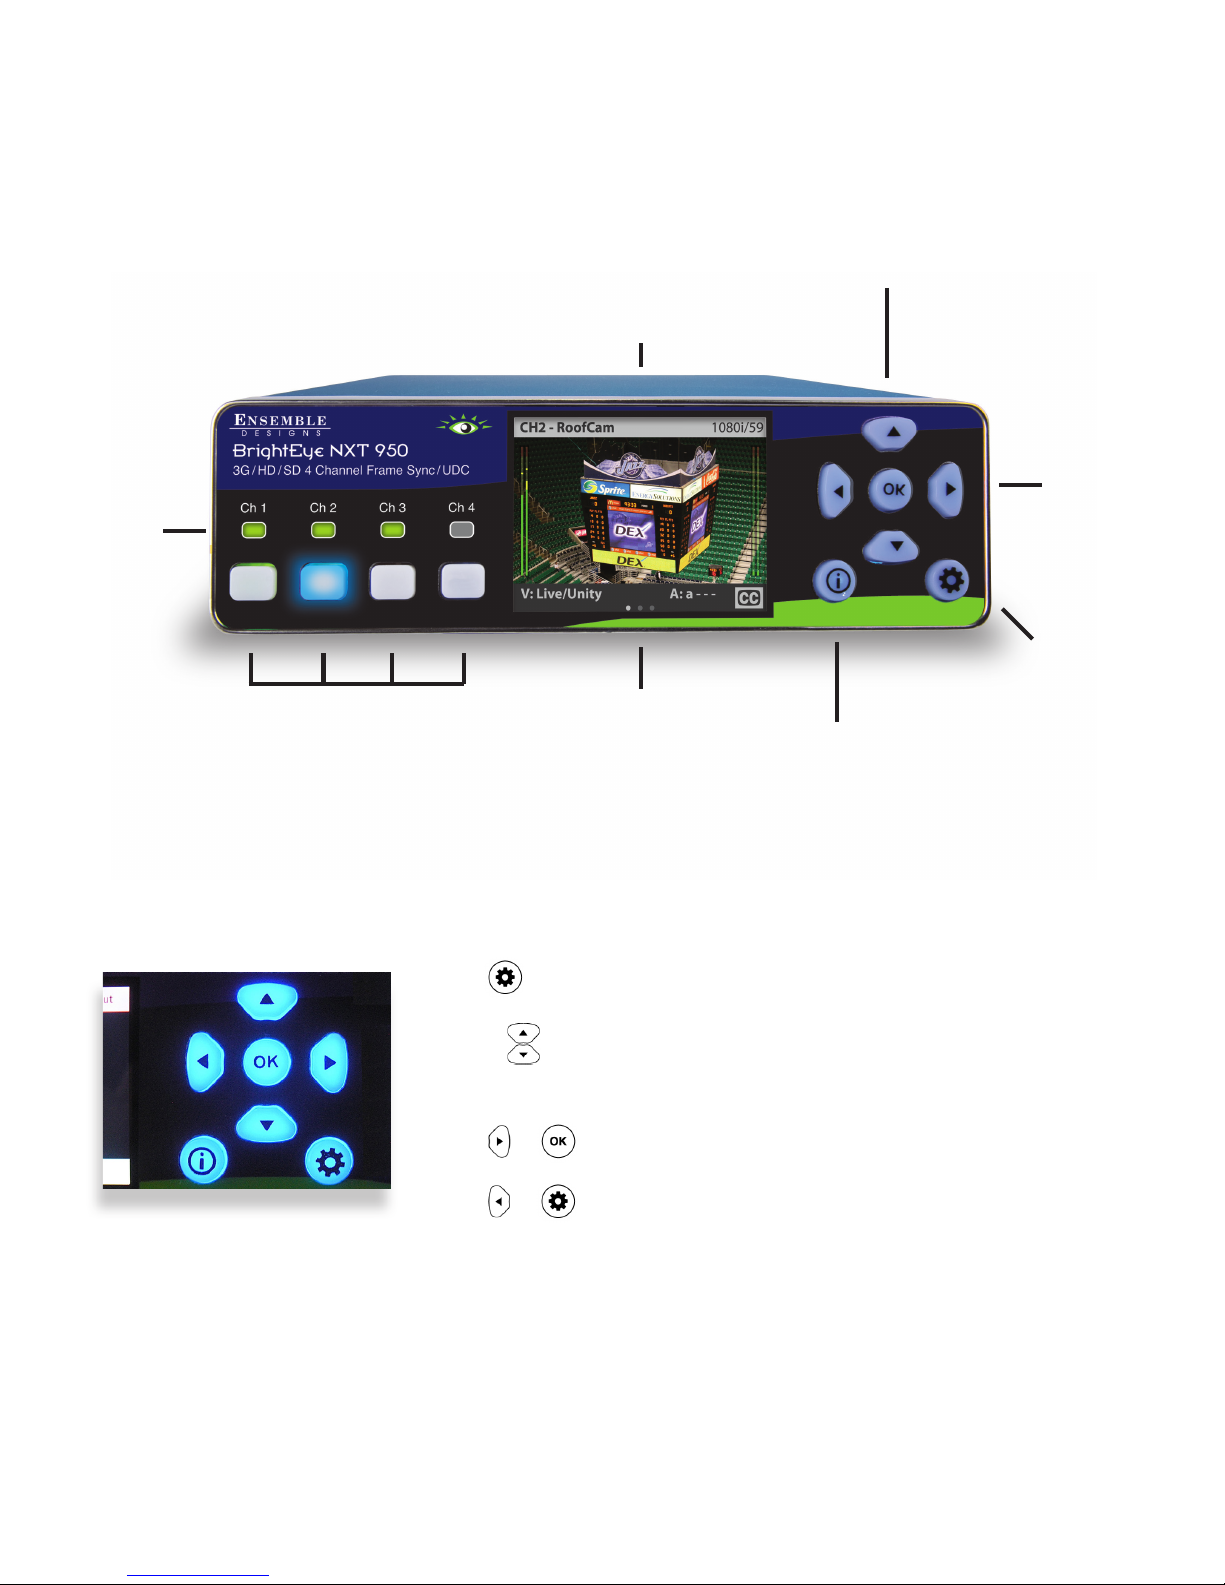
BrightEye NXT 950 Front Panel
Arrow Buttons:
Navigate the Menu
system, adjust settings
OK Button:
Select a Menu
or Control.
In control mode,
save a change
Header:
ID’s channel,
name of channel,
and format
Info Button:
Access screens
about the
Frame Sync
Conguration Button:
Access menus;
back out one
level at a time
Footer:
Reports signal
information
and info
page position
Front Panel Navigation
Press to bring up the conguration menus on the front panel screen.
Use the arrows to scroll through the conguration menus, navigate submenus, or to
change the values of a selected setting.
Press or to drop down successive levels within a menu.
Press or to come back up one menu level.
Pressing any operational button—any button to the left of the screen—will take you
immediately from conguration mode to the unit’s operational mode.
After approximately 30 seconds of inactivity of the conguration controls, the Frame
Sync’s screen will time out and revert to operational mode.
Operational Buttons:
Use to select Frame
Syncs 1 through 4
Input Status:
Illuminates
green when
input is
present
Quick Start Guide
www.ensembledesigns.com Page 3
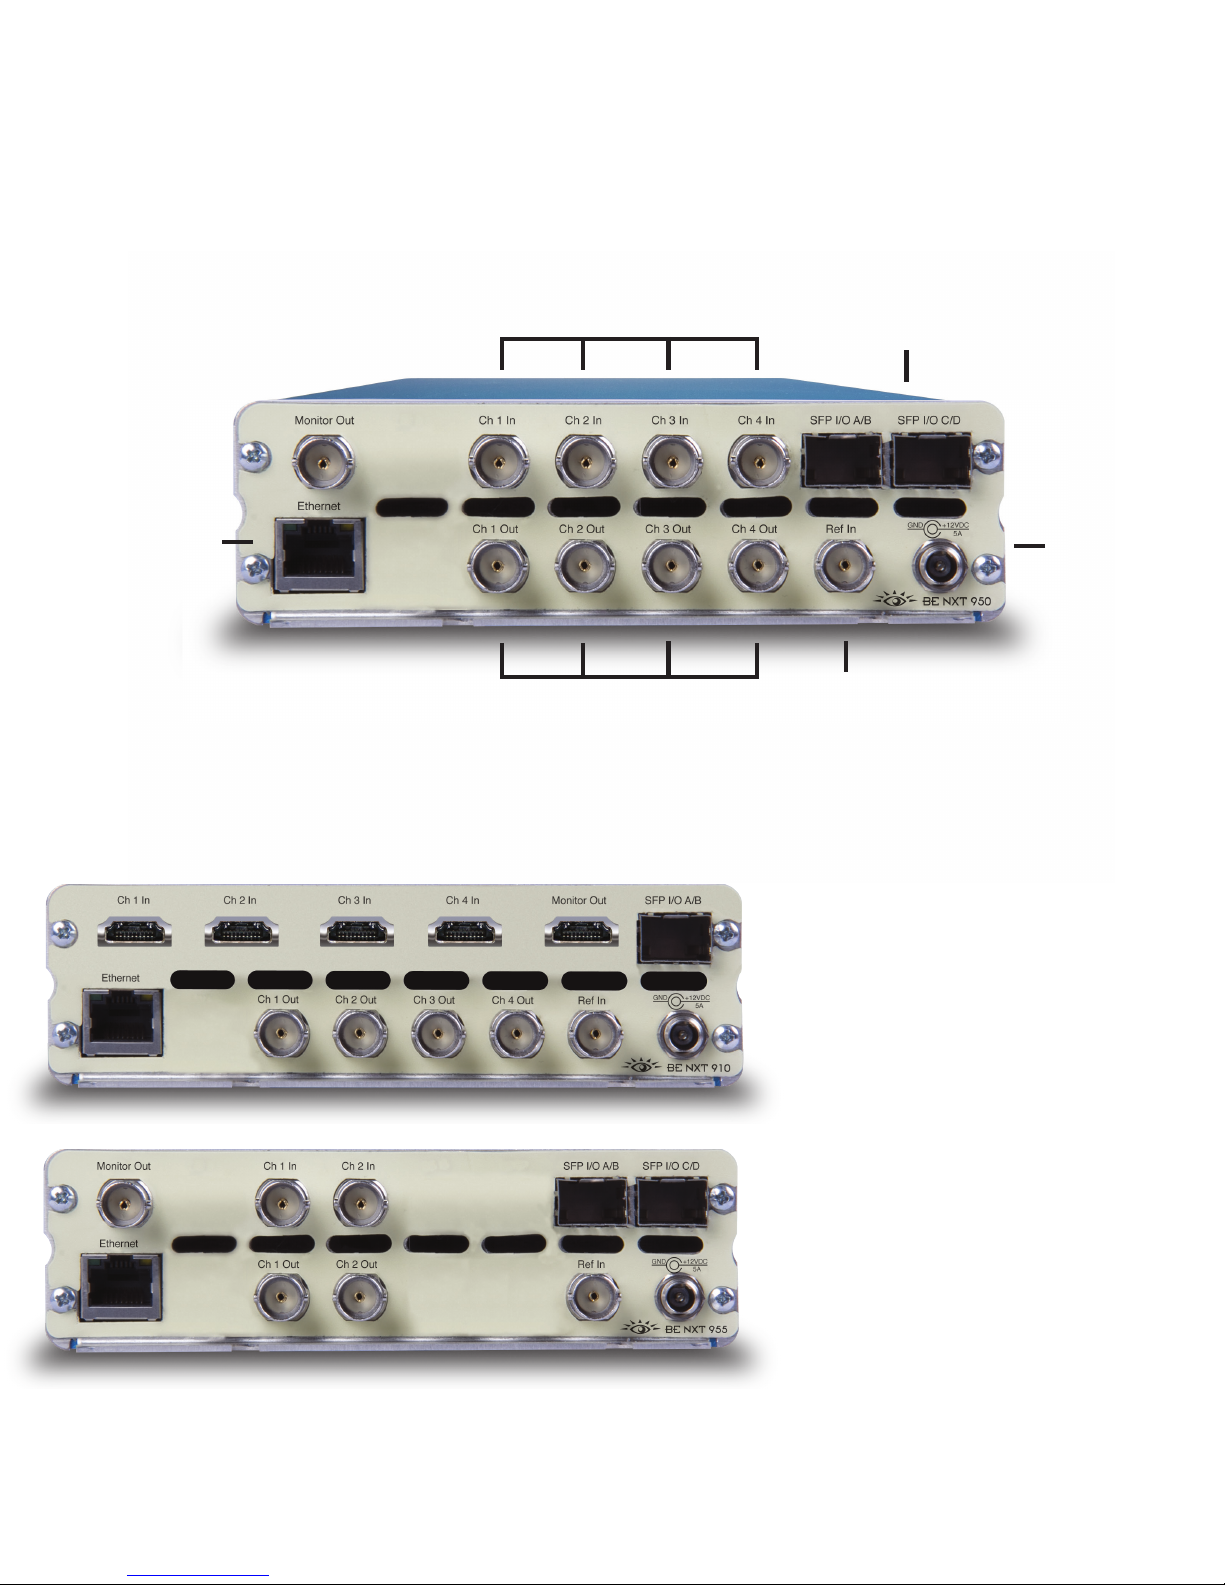
BrightEye NXT 950 Rear Connectors
Control Network
Ethernet Port
For operational
control and setup
of the Frame Sync
from any browser-
enabled device
SDI Inputs
SDI Outputs
Use the
Ref In BNC
if you need to
genlock the unit
Power
Two SFP Ports
Connect ber optic
or SDI signals,
two I/O connections
per port; HDMI one I/O
connection per port
BrightEye NXT 955
2 Channel SDI Frame Sync & U/D/C
The NXT 955 is a two channel version of the
NXT 950.
BrightEye NXT 910
4 Channel HDMI/SDI Frame Sync
with HDCP
For seamless support of HDMI sources, the
NXT 910 provides HDMI inputs and SDI outputs.
Additional I/O options may be added using SFPs.

BrightEye NXT 900 Series Frame Syncs
Page 4
Overview
The BrightEye NXT Frame Syncs pack a lot of features in a tiny package. Frame Synchronization and Format Conversion, with
16 channels of embedded Audio. Each frame sync has independent timing and controls. Each supports automatic input format
detection and conversion to the desired output format. Video and chroma gains can be adjusted with the built-in Proc Amp.
Use the Color Correction to compensate for input material or to match projectors and monitors. Adjust levels and swap/mix
channels in Embedded Audio. Control the Frame Syncs and monitor each channel’s input and output from the front panel, or
through the web interface.
All NXT Frame Syncs have SFP ports so you can add the I/O interfaces you need. SFP’s may be added to provide connections
to Fiber, HDMI, Analog Composite, additional SDI, or IP Encapsulated SDI interfaces. The SFP ports can be used as inputs or
outputs instead of, or in addition to the BNC or HDMI ports.
BrightEye NXT 910 4 Channel HDMI/SDI Frame Sync with HDCP
The NXT 910 has four independent frame synchronizers with HDMI inputs and SDI outputs. Additional I/O options can be
added using SFPs. The following license options may be added to the NXT 910:
• BENXT-910K-UDC, license key for U/D/C
• BENXT-910K-SC, license key for Crop & Scale
BrightEye NXT 950 4 Channel SDI Frame Sync & U/D/C
The NXT 950 has four independent SDI frame synchronizers. Additional I/O options may be added using SFPs.
BrightEye NXT 955 2 Channel SDI Frame Sync & U/D/C
The NXT 955 has two independent SDI frame synchronizers. Additional I/O options may be added using SFPs.

Quick Start Guide
www.ensembledesigns.com Page 5
Getting Started
Setting up your NXT 900 series frame sync is pretty easy. First you’ll establish a network connection, and then congure each
frame sync.
A Note on Ventilation
Maintaining proper airow is required to keep the NXT’s internal temperature normal. Air input occurs below the front panel.
Air output occurs through the rear panel. If placing the unit on a surface, the four feet must be mounted on its base. If mounted
in a rack, the unit must be installed in such a way that the air ow on the front and rear is not restricted. Our BERKMT-Full rack
mount kit, designed for this purpose, holds up to 3 NXT units in a 1RU rack.
1. Connect Inputs and Outputs as Desired
You may connect your ins and outs to the rear of the unit now if desired. Connections are not required to complete the setup
process. If you do connect your I/O’s, you will be able see them on the front panel of the unit and in the web user interface.
2. Connect Reference If Needed
The BrightEye NXT locks to house reference or to its own internal precision standard. During setup you’ll select Internal or
External Reference from the Timing & Genlock menu.
3. Connect Power Supply
Connect the power supply that is provided with the BrightEye NXT. The boot up process takes approximately one minute.
Note: The BrightEye NXT must be powered by its own product-specic power supply that comes with the unit.
This is a 5 amp single power supply, Ensemble Designs part number 23600106, order info: BEPS-NXT.
DO NOT use a BrightEye Spider power supply (BEPS6) or a BrightEye Individual power supply (BEPS, ED
part number 23118900).
4. Establish a Network Connection
Your BrightEye NXT Frame Sync has a built-in web server providing control from
a web browser. Plug an Ethernet cable into the Control Network Ethernet Port
shown on page 3 to connect directly to a computer or to your Ethernet network.
When you initially power up the Frame Sync as received from the factory, it will
have the self-assigned static IP address of 192.168.1.101. To change its IP address
and network settings, use the Network menu on the front panel display (details
are in Step 5). Note that the Frame Sync supports only manual settings. DHCP is
not supported.

BrightEye NXT 900 Series Frame Syncs
Page 6
5. Set the IP Address from the Front Panel
Press and use the arrow to navigate to the Network menu.
Press or to highlight the Address submenu. Press or to enter the
Network Address submenu.
Use the arrows to modify the IP address and other network settings as needed.
Press to save the new IP address, or press to cancel.
Requesting a Web Control Point
To establish a Control Point, browse to the NXT Frame Sync’s IP
address from the computer or device you want a Control Point on.
The Control Point Needed screen displays.
Enter the name you want to use for the Control Point; for example,
“QC Operator.” Click Request Control Point. The message “Not
Authorized” displays.
Select Settings from the upper left pull-down menu in the
browser page. The Settings page displays.
6. Navigate to the NXT on Your Web Browser
After you have set the unit’s IP address to be compatible with your
network, you can connect to it with a web browser. Navigate to the
BrightEye NXT’s new IP address. The Settings page displays.
7. Set an Administrative Password if Desired
By default you will have full access to all controls in the Settings
arena. To set an administrative password, go to the General menu.
Under Admin Password check Required and follow the password
setting steps.
8. Control Options
The NXT Frame Sync can be congured and controlled from the
Settings menus. You may also set up multiple control points that
allow access for dierent operators. You could, for example, set up
a control point that allows full access to frame sync 1, but allows
only monitoring of frame syncs 2, 3 and 4. If you prefer not to
set any Control Points, skip this section and continue on to the
“Conguring the Frame Syncs” section on page 8.

Quick Start Guide
www.ensembledesigns.com Page 7
Click Control Points. The Settings >
Control Points page displays.
The Control Point you just requested
will now be shown at the top of the
Pending Authorization area. You
can rename the Control Point, and
choose which Frame Sync Channels
the Control Point has control of.
Click Done. The Frame Sync Control
page displays. You can repeat this
process from other browsers or
other devices to setup more
Control Points.

BrightEye NXT 900 Series Frame Syncs
Page 8
BrightEye NXT Frame Syncs are congured in the Settings page. Each Frame Sync is independently congured from its specic
menu (Frame Sync 1 through Frame Sync 4). Input signals will be shown in the left-hand thumbnail. The processed output will
be shown in the right-hand side. Frame Sync congurations can be stored with Presets, accessed below the preview thumbnails.
Specic Frame Sync controls are shown in the tabbed panel: Cong, Proc, Color Correction, Audio, and Crop & Scale.
Conguring the Frame Syncs

Quick Start Guide
www.ensembledesigns.com Page 9
Chose the Output Standard
In the Frame Sync menu under the Cong tab,
select the desired output standard. The NXT
will automatically up/down or cross convert
the input to the output standard selected here.
Each of the four frame syncs are individually
congured and can have dierent output
standards.
Cong Tab
The Cong Tab allows you to:
• Custom name the Frame Sync
• Select the Output Standard
• Change the Input Selection if you are using SFPs
Note: If using SFPs, you will select the SFP Port
from the Input Select pulldown here. Then you
will need to congure each SFP as an Input or
Output in the SFP Cong Menu (shown above)
• Adjust the Vertical and Horizontal Timing
• Select Pillar Box or Letter Box when Up or Down
conversion is occurring
• Turn operator access to the Cong Controls
On or O

BrightEye NXT 900 Series Frame Syncs
Page 10
Proc Tab allows you to:
• Enable or disable the Proc Controls
• Adjust Gain, Chroma and Pedestal
• Turn operator access to the Proc Controls On or O
• Enable or disable the Color Correction Controls
• Adjust Red, Green and Blue Gain and Oset
• Turn operator access to the Color Correction Controls
On or O
Color Correction Tab allows you to:

Quick Start Guide
www.ensembledesigns.com Page 11
Audio Tab
Provides agile and complete audio control. Adjust the level of all 16 possible embedded audio channels, and map those
channels to produce any combination of swaps and mixes on the output. Audio delay can be adjusted for timing into your
processing chain.

BrightEye NXT 900 Series Frame Syncs
Page 12
The Crop and Scale feature allows you to position,
crop, and scale the input source into the output
space.
Position and Size Controls
To move or re-size an image, simply click on it. A
border with corner tabs will appear around the
image. Click anywhere on the image and drag to
move it. Use the corner tabs to re-size the image.
Crop and Zoom Controls
Click the Edit Crop button in the control bar to crop
the image and to zoom in and out. In this mode the
border will have corner and side tabs, and the zoom
slider will be in the control bar. Use the corner and
side tabs to dene the crop area, and the slider bar
to zoom the image in and out. Click Done when
nished. When you return to the Position and Size
controls, the crop will be maintained when you
change the size of the image window.
Superior scaling means that you can zoom in on a
small portion of the input signal and the re-sized
image will look great. Correct aspect ratio is always
maintained when images are re-sized.
Crop and Scale Tab
Training Videos
In addition to this Quick Start Guide, please see our training videos at the links below to learn how to set up and congure your
BrightEye NXT Frame Sync. The training videos address initial setup, conguration, operation, and more.
https://www.ensembledesigns.com/videos/nxt-900-series-setup-cong-video
https://www.ensembledesigns.com/videos/nxt-900-series-overview-video
Factory Reset
To reset your BrightEye NXT Frame Sync to factory settings, press and hold both the
and the while powering up the unit. Wait for the arrows to turn red and blink three
times. The unit will then be reset to its factory default settings.
September 2017
For additional assistance, contact us at +1 530.478.1830 or service@ensembledesigns.com. All Ensemble Designs products have
a 5-year warranty. Avenue and BrightEye products are designed and built in California at Ensemble Designs. Come visit us!
 Loading...