

30
Be sure to unplug the machine out of the outlet before disassembling and repairing the parts.
10. DISASSEMBLY INSTRUCTIONS
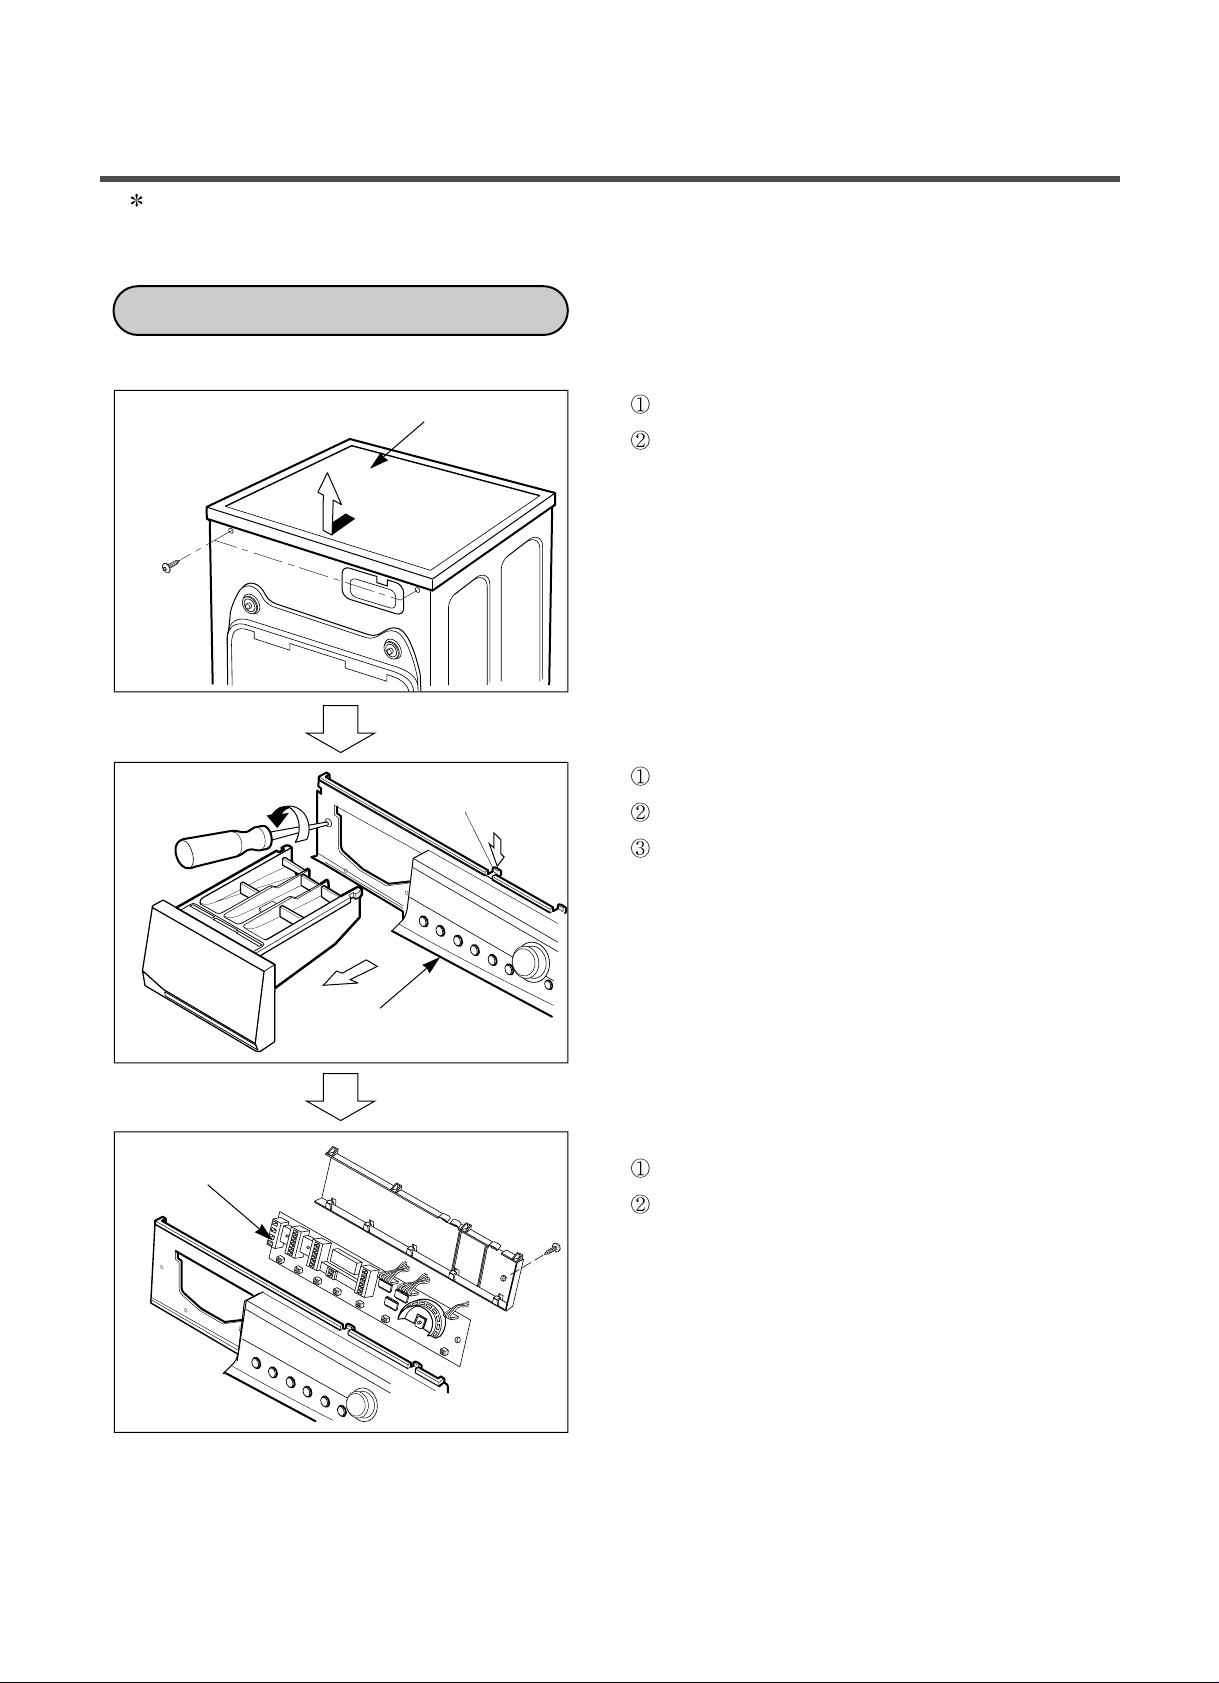
Unscrew 2 screws on the back of the top plate.
Pull the top plate backward and upward as shown.
Disconnect the PWB assy (Display) connector.
Pull out the drawer and unscrew 3 screws.
Push 2 upper hooks down and pull the control panel.
Pull out the Rotary (Dial) knob.
Disconnect the PWB assy (Display) from the control
panel by pushing 5 hooks down and unscrewing
1 screw.
Hook
CONTROL PANEL
PLATE ASSY(TOP)
PANEL ASSY(CONTROL)
PWB ASSY(DISPLAY)
31
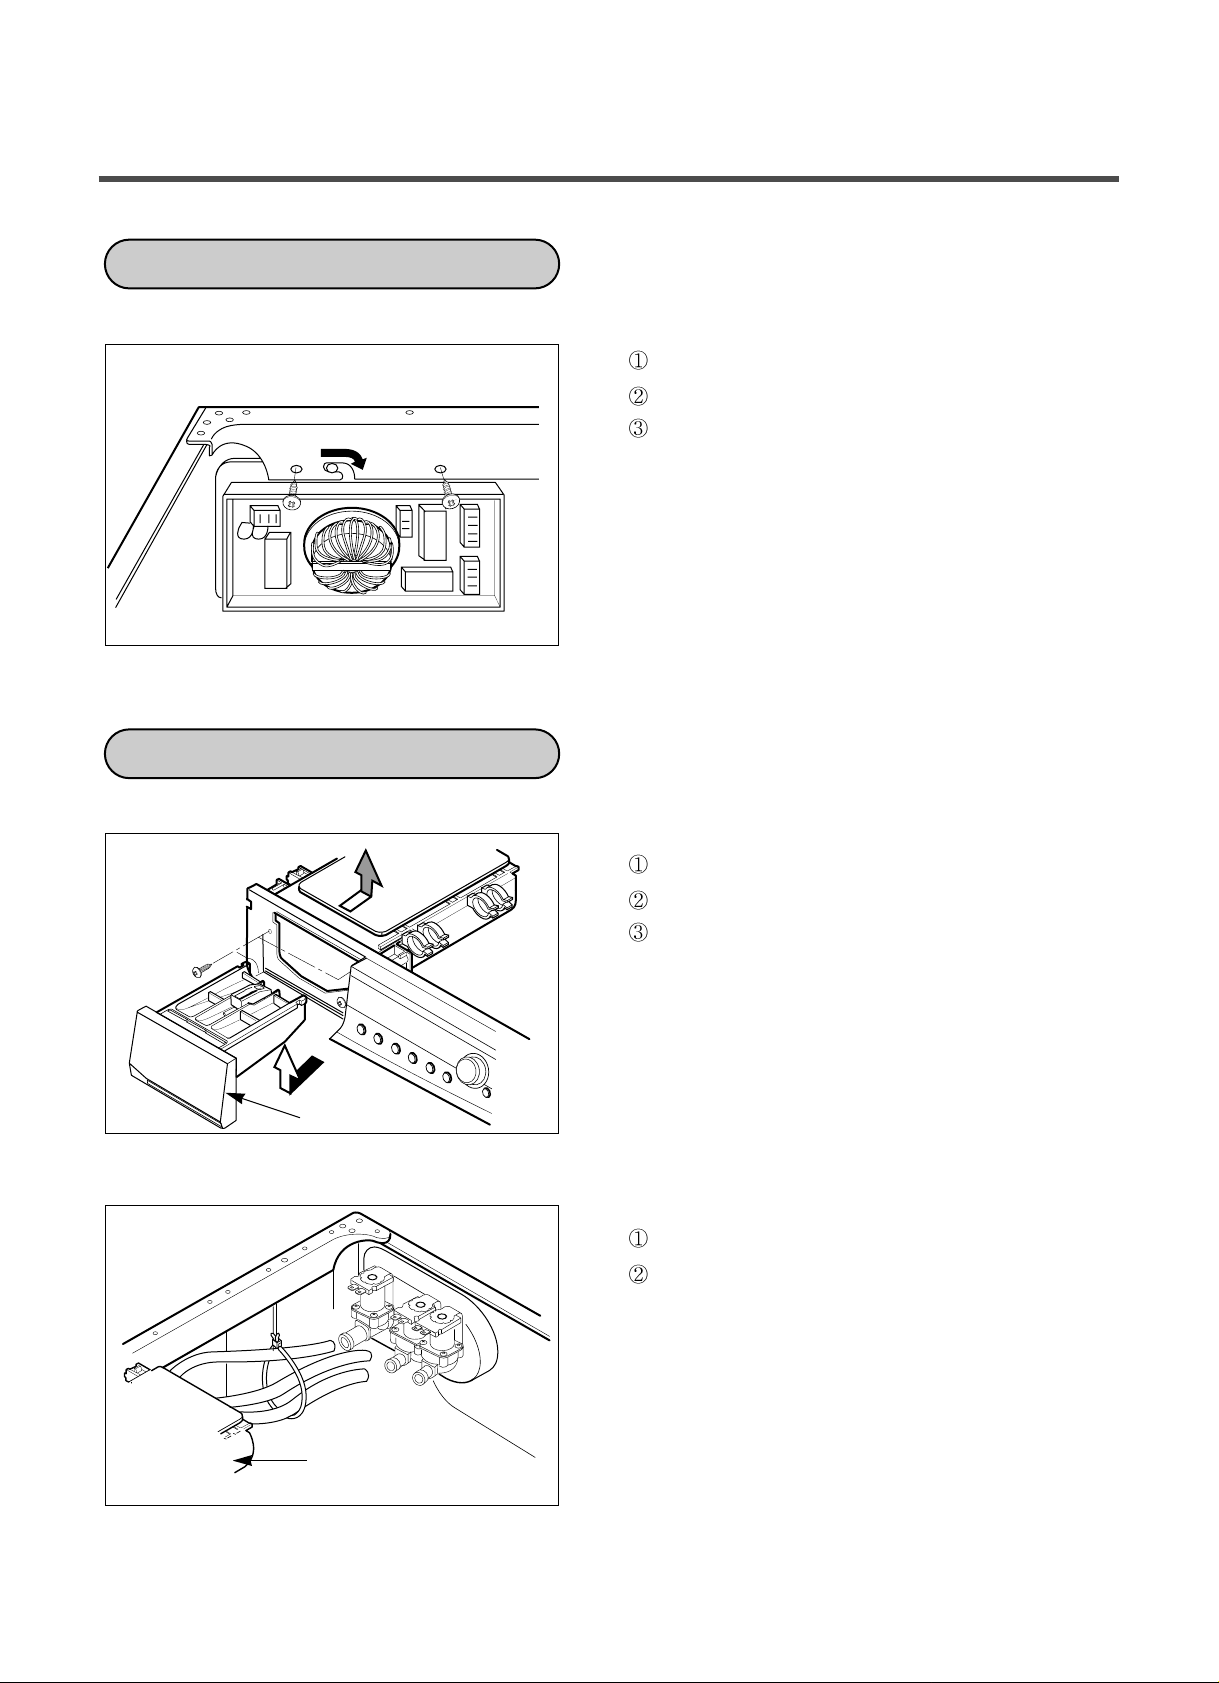
Disassemble the top plate assy .
Unscrew 2 screws.
Disconnect connector from the wiring.
Disassemble the top plate assy .
Pull out the drawer to arrow direction.
Unscrew 2 screws.
The hose clamps and the hose are disassembled.
The ventilation bellows and the water inlet bellows
are disassembled on the tub.
DISPENSER ASSY
PWB ASSY(POWER)
DISPENSOR ASSY
DRAWER
■ WD-8070F(H), WD-1070(5)F(H)
32
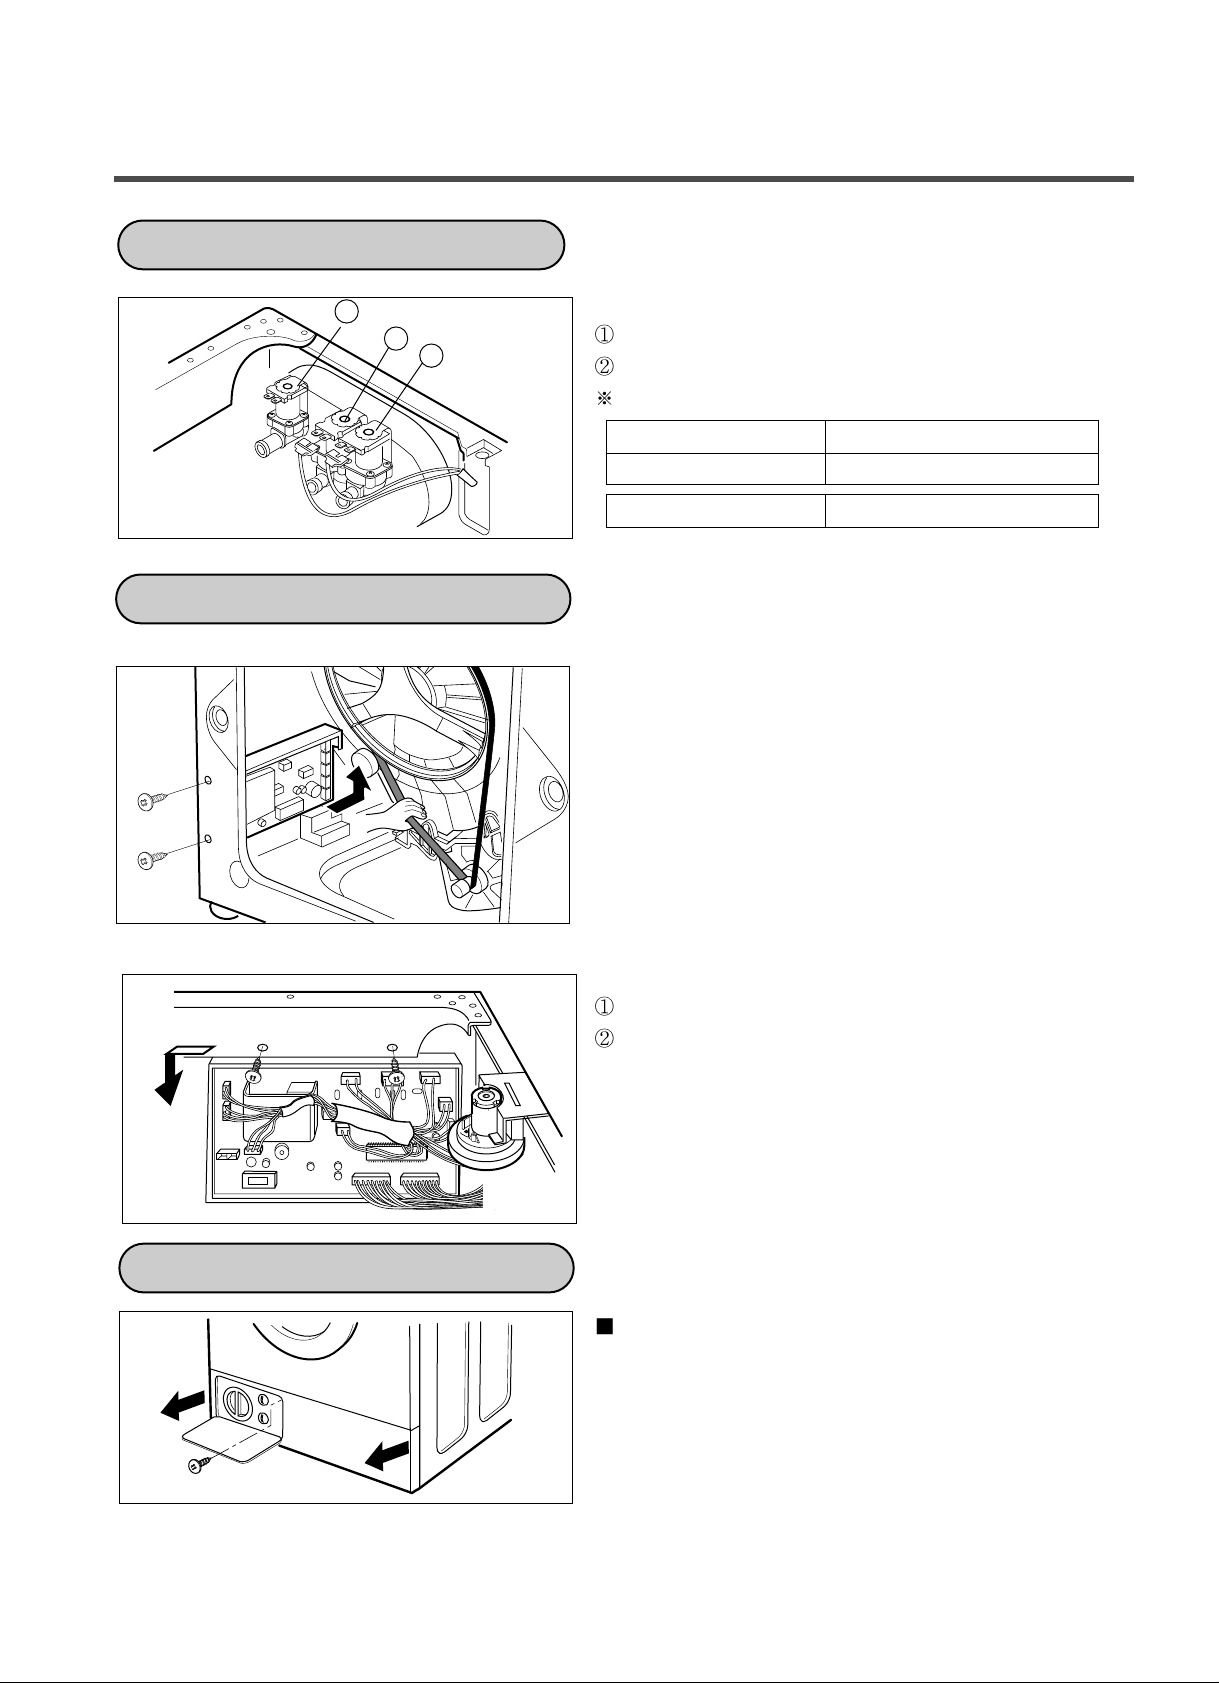
Disconnect the wiring receptacle.
Unscrew 2 screws from the back.
When reconnecting the connector
¤ The back cover is removed.
¤ŁUnscrew 2 screws
¤Ø Pull the PWB assy (Main) as shown.
Unscrew 2 screws
Pull the PWB assy(Main) as shown.
Open the lower cover plate by using coin and pull out the
lower cover in the arrow direction after a screw is
unscrewed.
1
2
3
INLET VALVE
PWB ASSY(MAIN)
LOWER COVER
VALVE #1(MAIN) Whited/Black-Black
VALVE #2(PRE) Gray/ White - Black
VALVE #3(HOT) Blue/Red - Black
[WD-8070FH/WD-1070(5)FH(B)/WD(M)-1170(5)F(H)B /
WD(M)-1270(5)F(H)B / WD(M)-1370(5)F(H)B]
■ WD(M)-8070F(H)B, WD(M)-1070(5)F(H)B, WD(M)-1170(5)F(H)B, WD(M)-1270(5)F(H)B, WD(M)-1370(5)F(H)B
■ WD-8070F(H), WD-1070(5)F(H)

33
Open the door completely .
Remove the two screws from the hinge.
Take apart the cabinet gasket clamp.
Unscrew 2 screws from the cabinet cover.
Open the lower cover cap and unscrew 1 screw inside
Take apart the lower cover
Unscrew all the screws on the upper and lower sides of
the cabinet cover.
Take apart the tub gasket clamp
Make sure that the drain hole of the gasket is put
beneath when reassembling the gasket.
Refer to the arrow mark on the tub cover.
GASKET ASSY
DOOR

34
Remove the back cover.
Take off the belt turning the pulley.
Unscrew the bolt to pull out the pulley.
Unscrew 2 screws from the bracket.
Push the motor in the arrow direction for
disassembling.
When reassembling the motor, make sure that motor
mounting rubbers are not taken off from the bracket.
Pull out the hinge pressing its snap.
Do not use the pulled out hinge again..it may be taken
off during operation.
1
2
3
Hinge,
Damper
Damper
PULLEY, MOTOR, DAMPER
(PULLEY)
(MOTOR)
(DAMPER)
Open the lower cover cap ( ¥L )
by using coin.
Unplug the drain plug (¥M), then
the water flows out,
At this time use a vessel
to prevent water flowing on the
floor. If the water does not flow any
more,turn the pump filter (¥N)
open to the left.
Take out any foreign material
from the pump filter ( ¥N). After
cleaning, turn the pump filter(¥N)
clockwise and insert the
drain plug ( ¥M)to the original
place. close the lower cover cap.
Clean the drain pump filter
1
100
3
2
3
2

Cap
(Remaining Hose)
Screw
Pump Outlet Hose
Tub Pump Bellows
35
Remove pump outlet hose.
Remove tub pump bellows.
Remove cap(Remaining Hose.)
Disconnect the wiring.
Unscrew 3 screws
Remove the pump.
Unscrew 3 screws fixing the heater protecting cover.
Loosen the M6 heater nut to pull out the heater.
When mounting the heater, be sure to insert the heater
into the heater clip on the bottom of the tub.
Pull it out by holding the thermistor bracket.
If it is pulled by the wire, it may be broken.
When mounting the thermistor again, make sure that it
is got back tight to the rubber.
PUMP
HEA TER
THERMISTOR
CAUTION

36
DOOR HINGE ASSY
SWITCH ASSY, DOOR LOCK
WHEN FOREIGN MA TERIAL IS STUCK BETWEEN DRUM AND TUB
Disassemble the door from the door hinge.
Take apart the cabinet cover clamp and release the
gasket.
Unscrew 2 screws on the door hinge.
Push the door hinge arm to the inside of the cabinet
cover for disassembling.
Take apart the cabinet cover clamp and release the
gasket.
Unscrew 2 screws holding the Door Lock.
Disconnect the door lock from the wiring connector.
Remove the heater.
Remove the foreign material (wire, coin and others) by
inserting a long bar through the hole.
 Loading...