

Page 1
CLEARANCES &
INSTALLATION MANUAL
BIOETHANOL ONLY
Please read these instructions and the Burner Operations Manual provided with your burner
completely before operating the appliance.
REFER TO THE OPERATIONS MANUAL IN THE BURNER PACKAGING FOR CLEARANCE AND
INSTALLATION INSTRUCTIONS IF USING PROPANE OR NATURAL GAS.
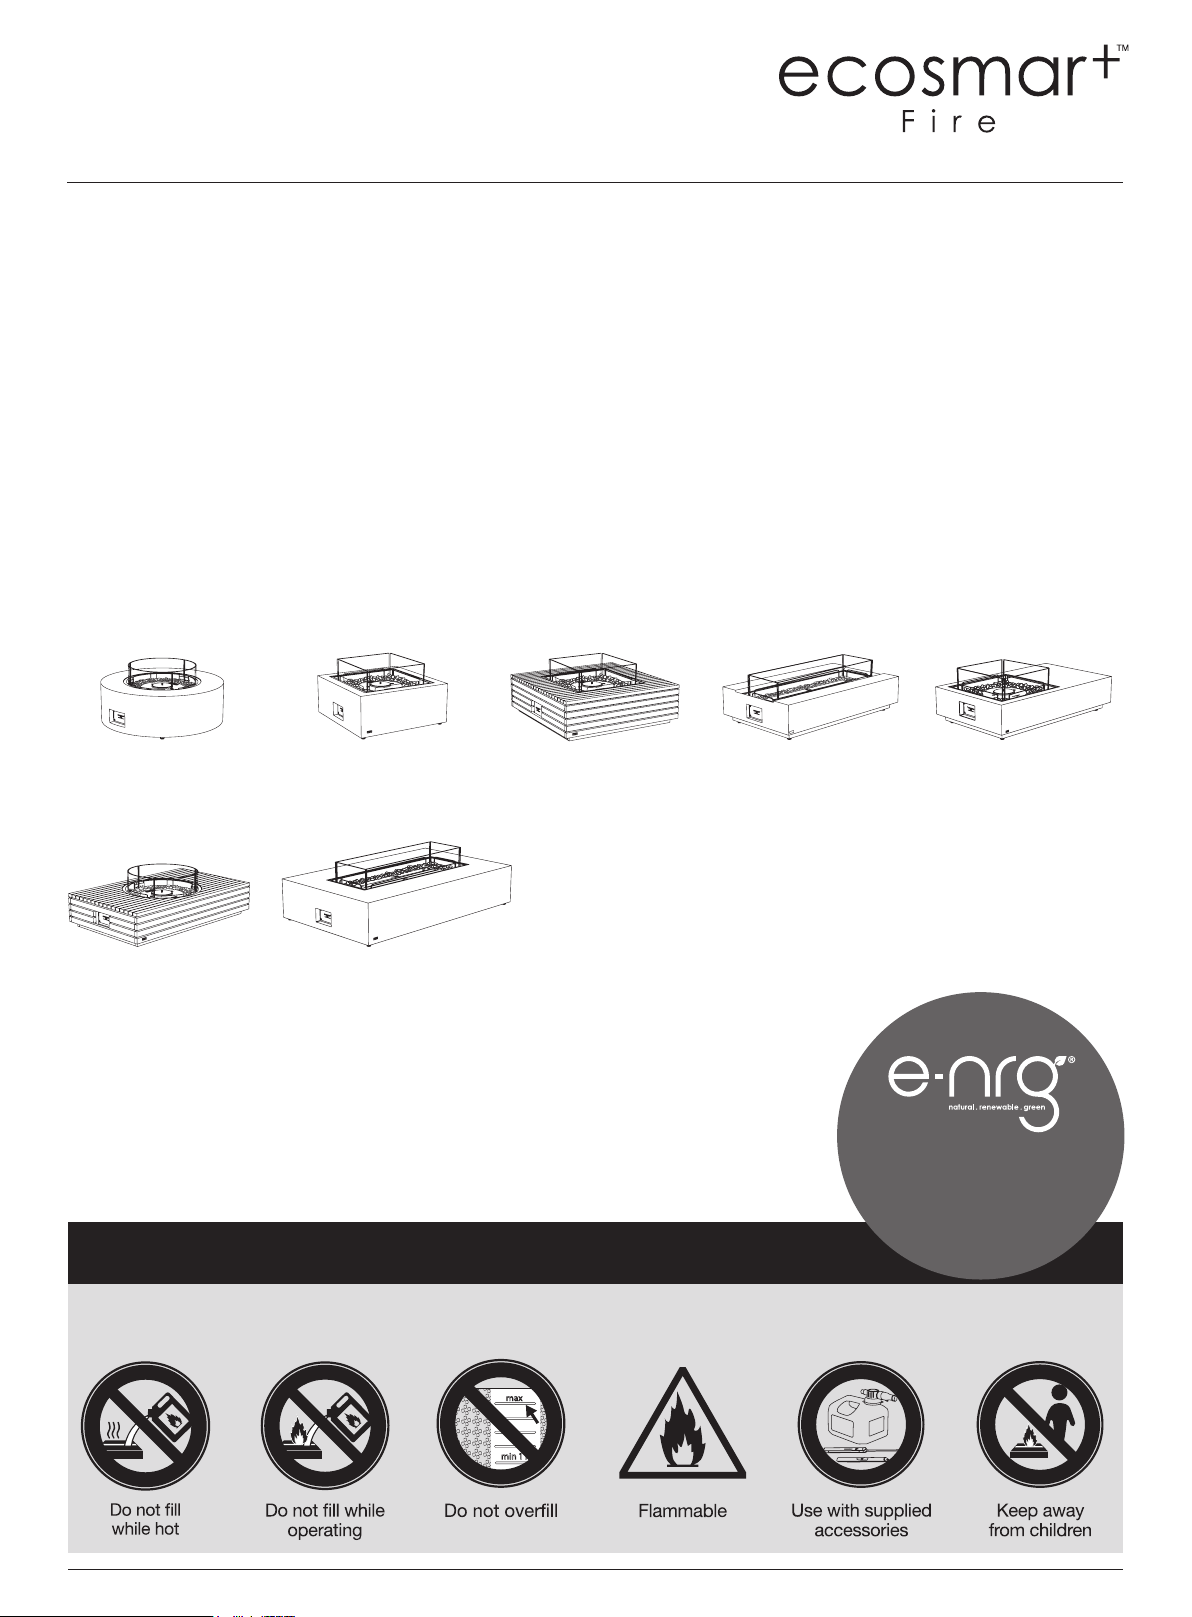
Ark 40
Concrete 68kg, 149.7lbs
Martini 50
Concrete 54.6kg, 120.1lbs
Teak 47.2kg, 103.9lbs
Base 30
Concrete 62.1kg, 136.7lbs
Teak 43.8kg, 96.4lbs
Wharf 65
Concrete 118.3kg, 260.3lbs
Teak 87.3kg, 192.1lbs
Base 40
Concrete 79.4kg, 174.7lbs
Teak 56.8kg, 125lbs
Cosmo 50
Concrete 76.3kg, 167.9lbs
Teak 58.8kg, 129.4lbs
e-NRG is the ONLY fuel to
be used in this appliance.
www.e-nrg.com
www.e-nrg.com.au
! WARNINGS:
IF THE INFORMATION IN THIS MANUAL IS NOT FOLLOWED EXACTLY, A FIRE OR EXPLOSION
MAY RESULT CAUSING PROPERTY DAMAGE, PERSONAL INJURY OR LOSS OF LIFE.
Manhattan 50
Concrete 58.4kg, 128.5lbs
Teak 52.8kg, 116.2lbs
NOTE: Weight is approx only. Weight includes burner, re screen and black glass charcoal.
Page 2
ENGLISH
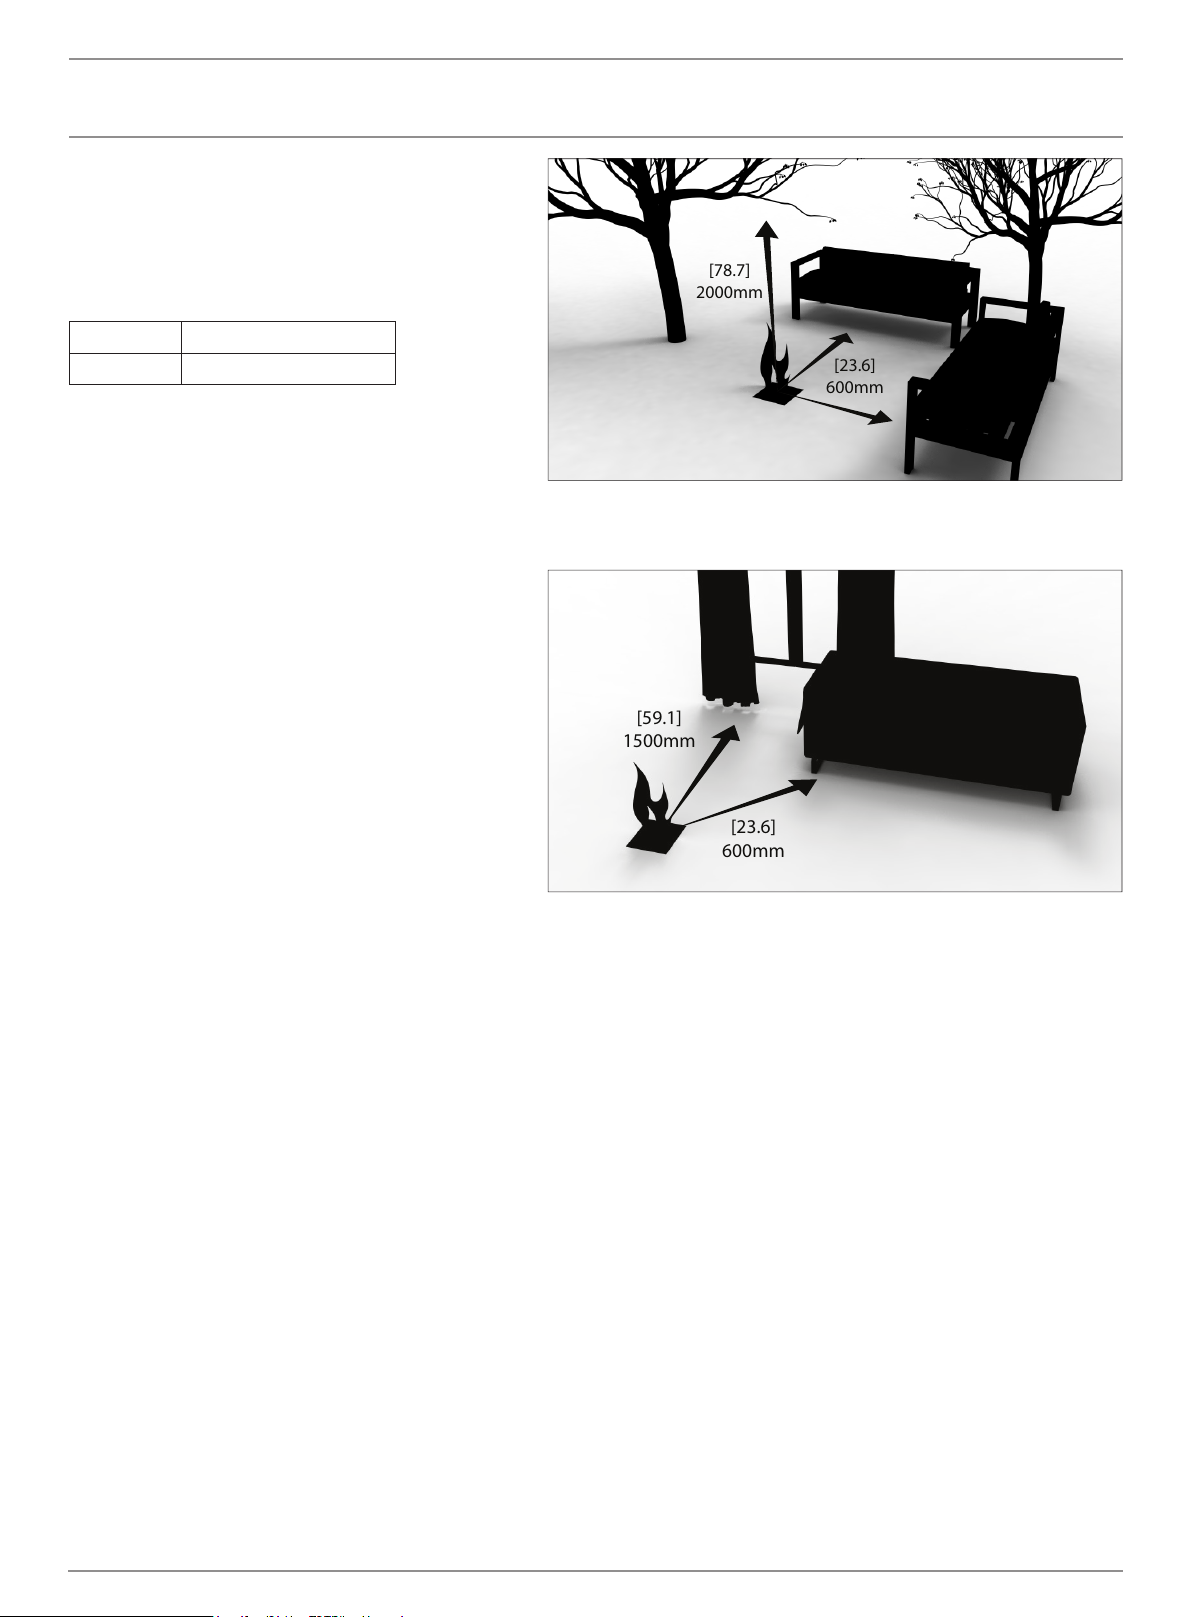
[78.7]
2000mm
[23.6]
600mm
[23.6]
600mm
[59.1]
1500mm
Fireplace
Clearances
When using Bioethanol as a fuel source this
model is suitable for indoor and outdoor use.
Before installation ensure that the model is
positioned in accordance with the compulsory
minimum clearances outlined below.
If used indoors ensure that you pay attention to
the Minimum Room Sizes below:
AB8/ AB8(EN)
XL900
WARNING: Ensure that your re is positioned
away from ammable materials and other
sources of ignition at all times. Pay very close
attention to positioning the re away from
items that may move as a result of wind and
drafts. For example trees/branches/paper and
the like.
The base of the burner within the model must
never come into direct contact with ammable
materials.
116m3 [4096ft3] per burner
3
110m
[3884ft3] per burner
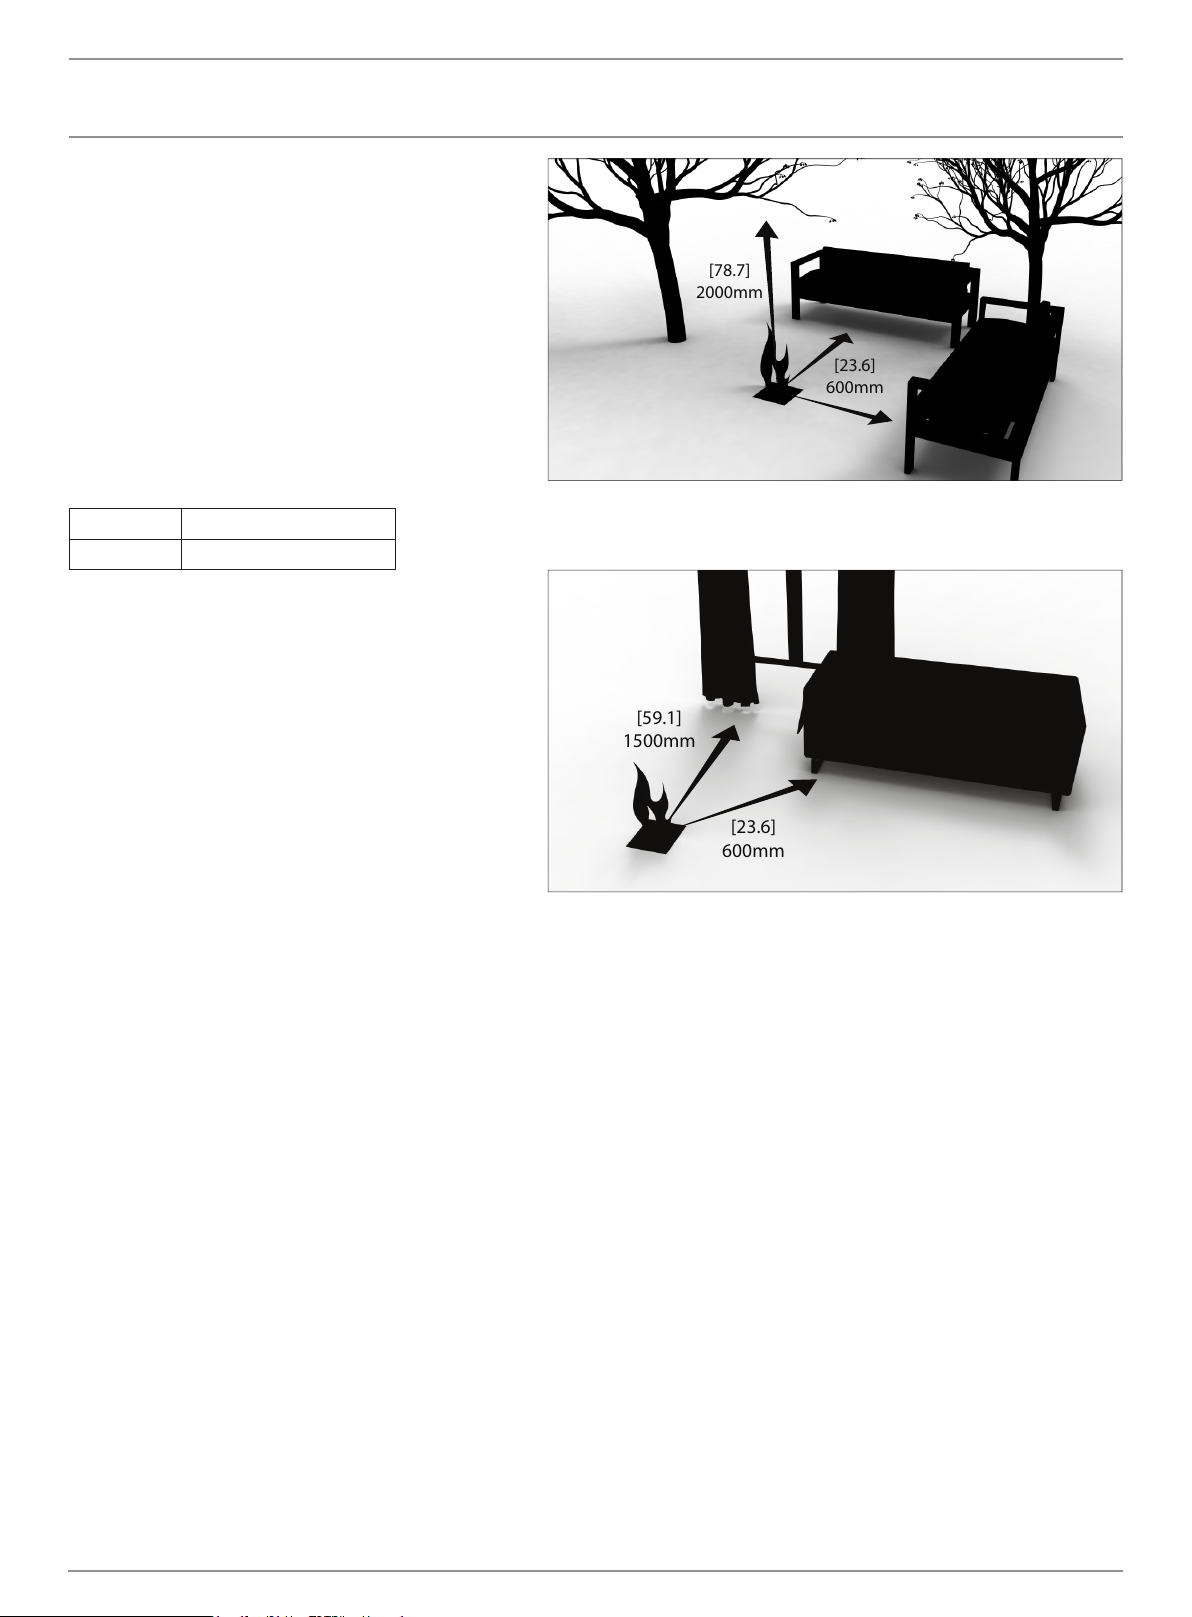
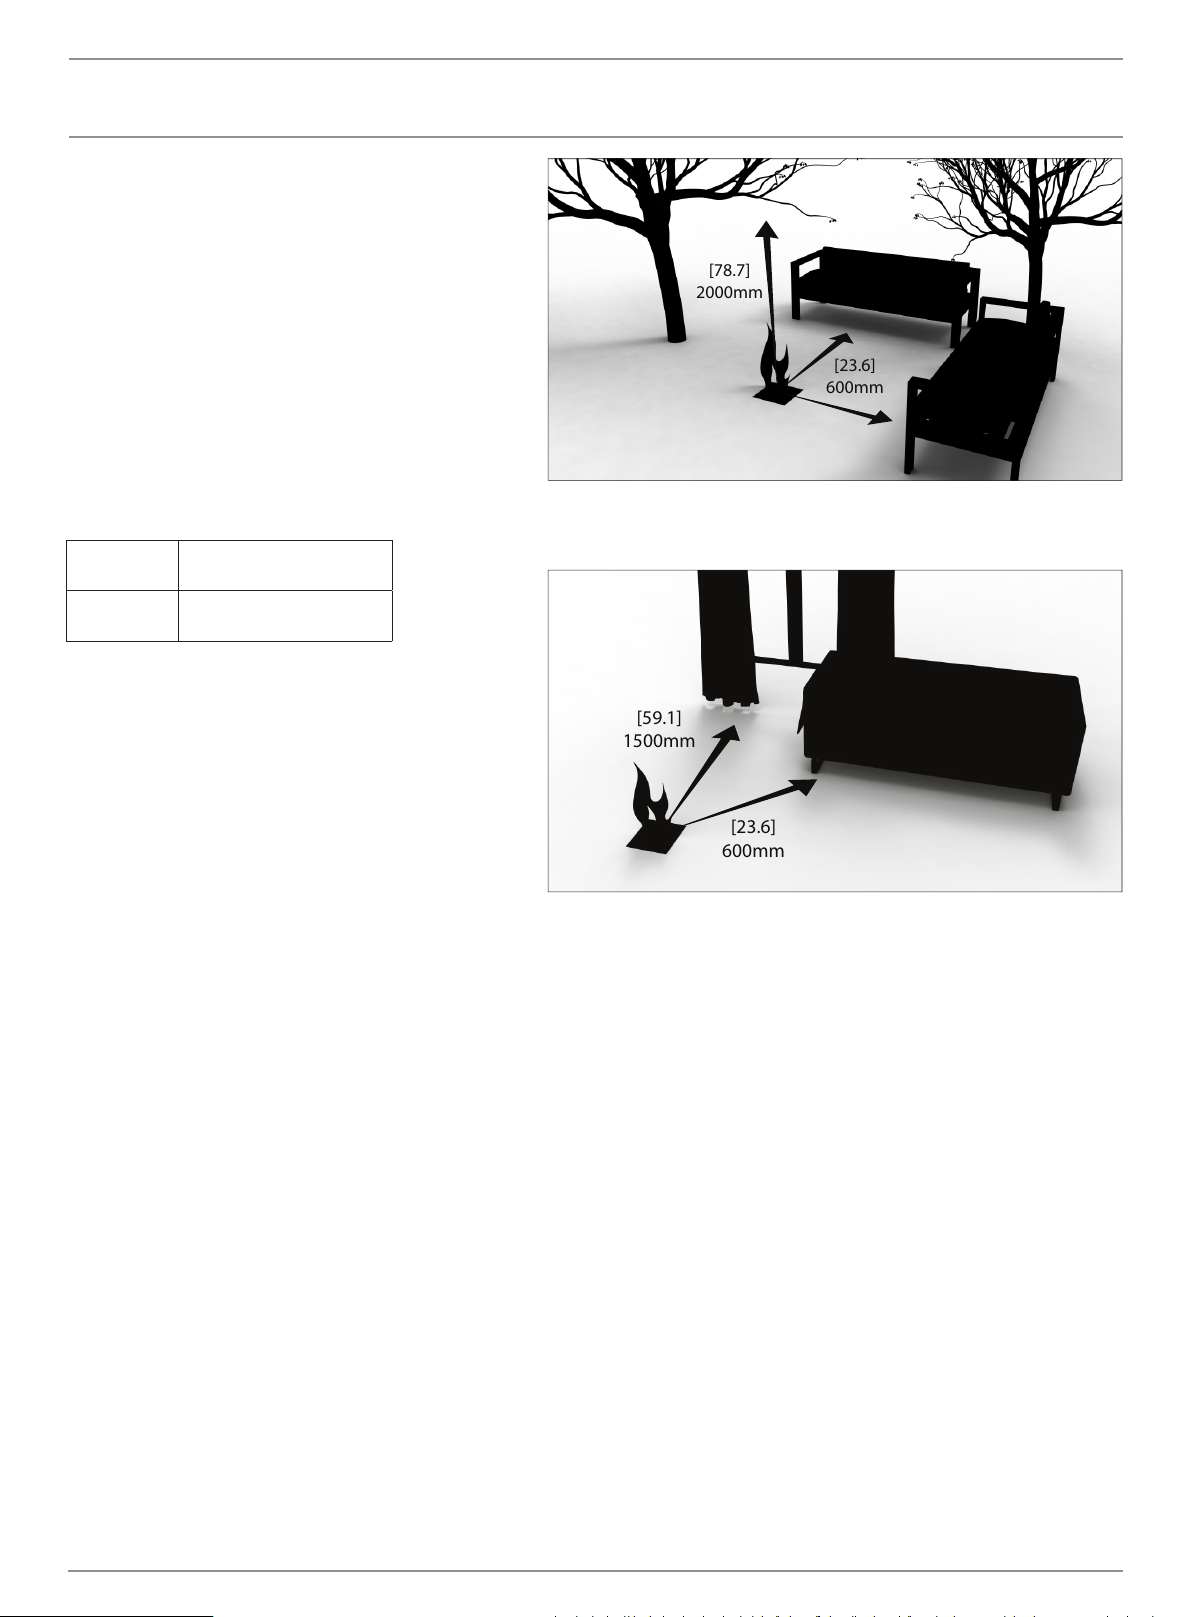
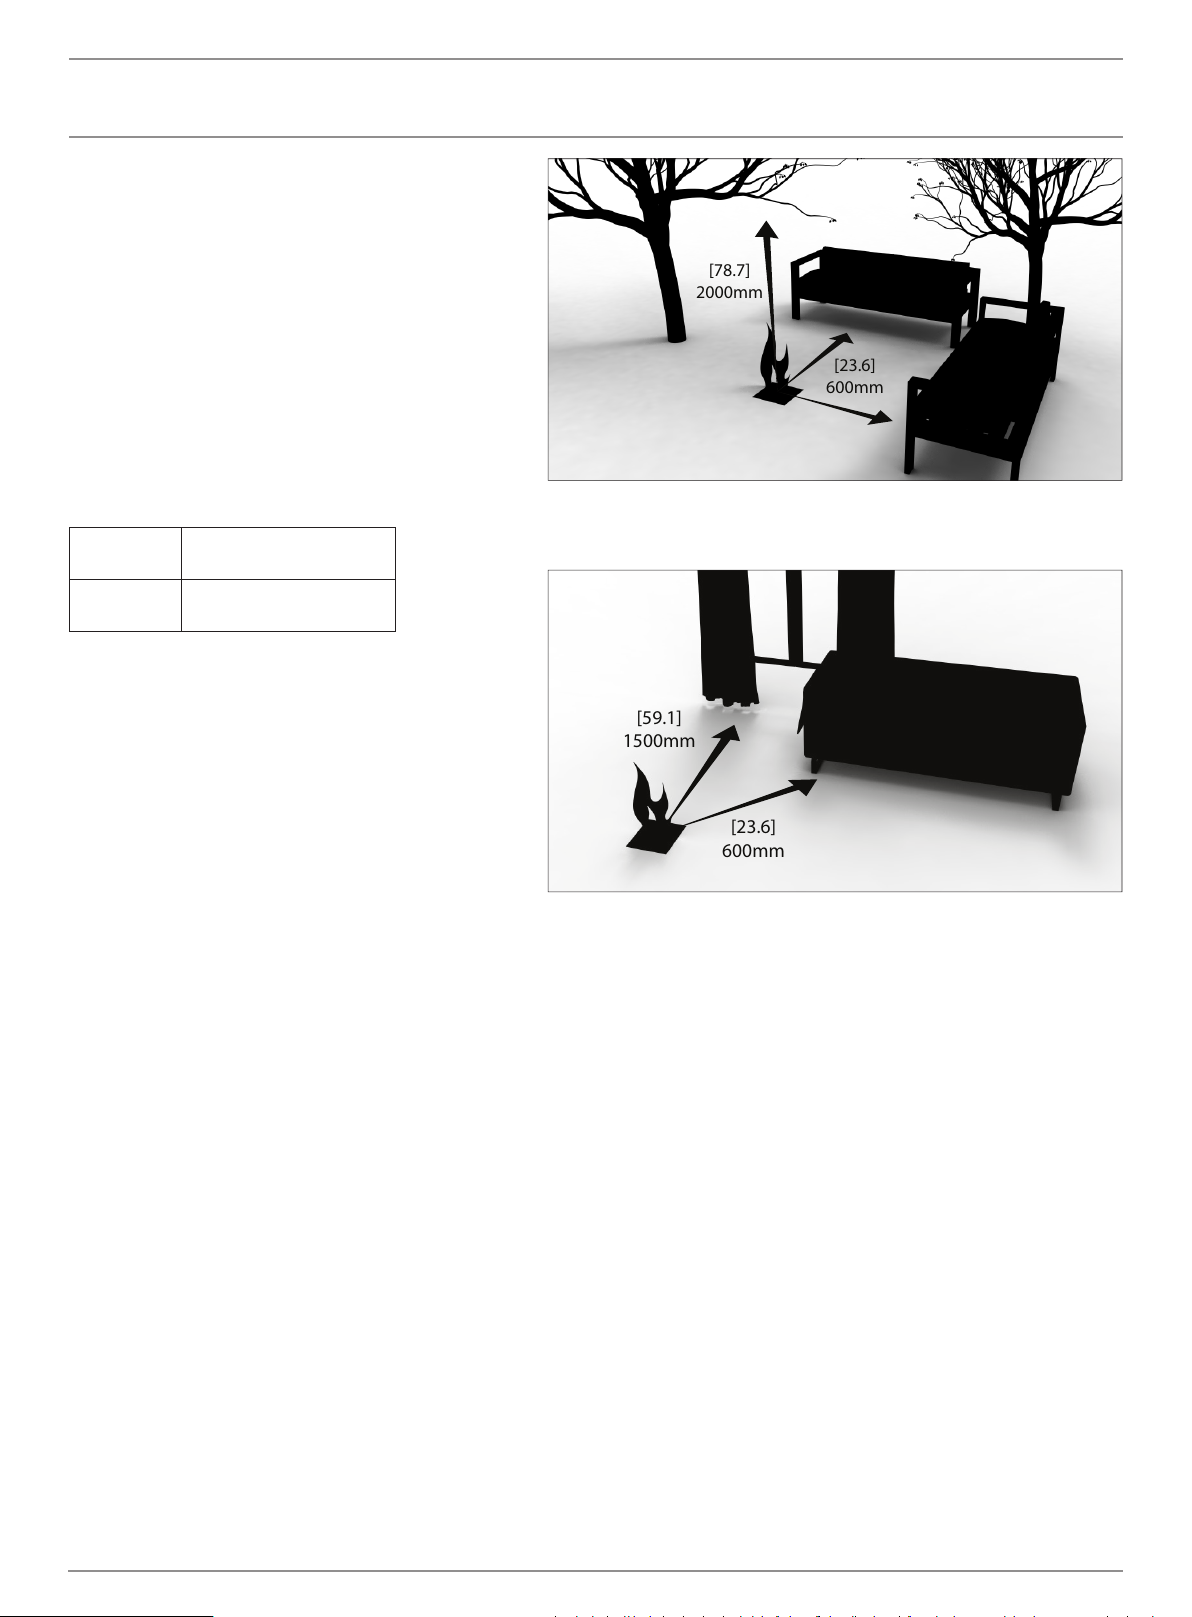
1. Outdoor Clearances
Side clearances to xed and stable furniture items
that are not susceptible to movement
(e.g lounges or patio furniture) must remain a
minumum of 600mm [23.6in] away from the ame
at all times.
Overhead clearances to items that are susceptible
to movement (e.g. Trees) must remain a minimum
of 2000mm [78.7in] away from the ame at all
times.
These products feature 360º height-adjustable
articulating feet. Adjust the feet by turning them in
either direction until you achieve a perfectly level
and stable model before operating.
Stainless steel will rust or corrode over time if
contamination or debris is not cleaned or removed
immediately. Always use the Burner Lid included
with your model to avoid dust and debris from
accumulating inside the burner.
If you live in extreme weather conditions where
accumulation of snow is likely, use of the Winter
Bag is imperative in order to be covered by the
warranty.
2. Indoor Clearances
www.ecosmartre.com
Page 3
ENGLISH
Fireplace
Installation
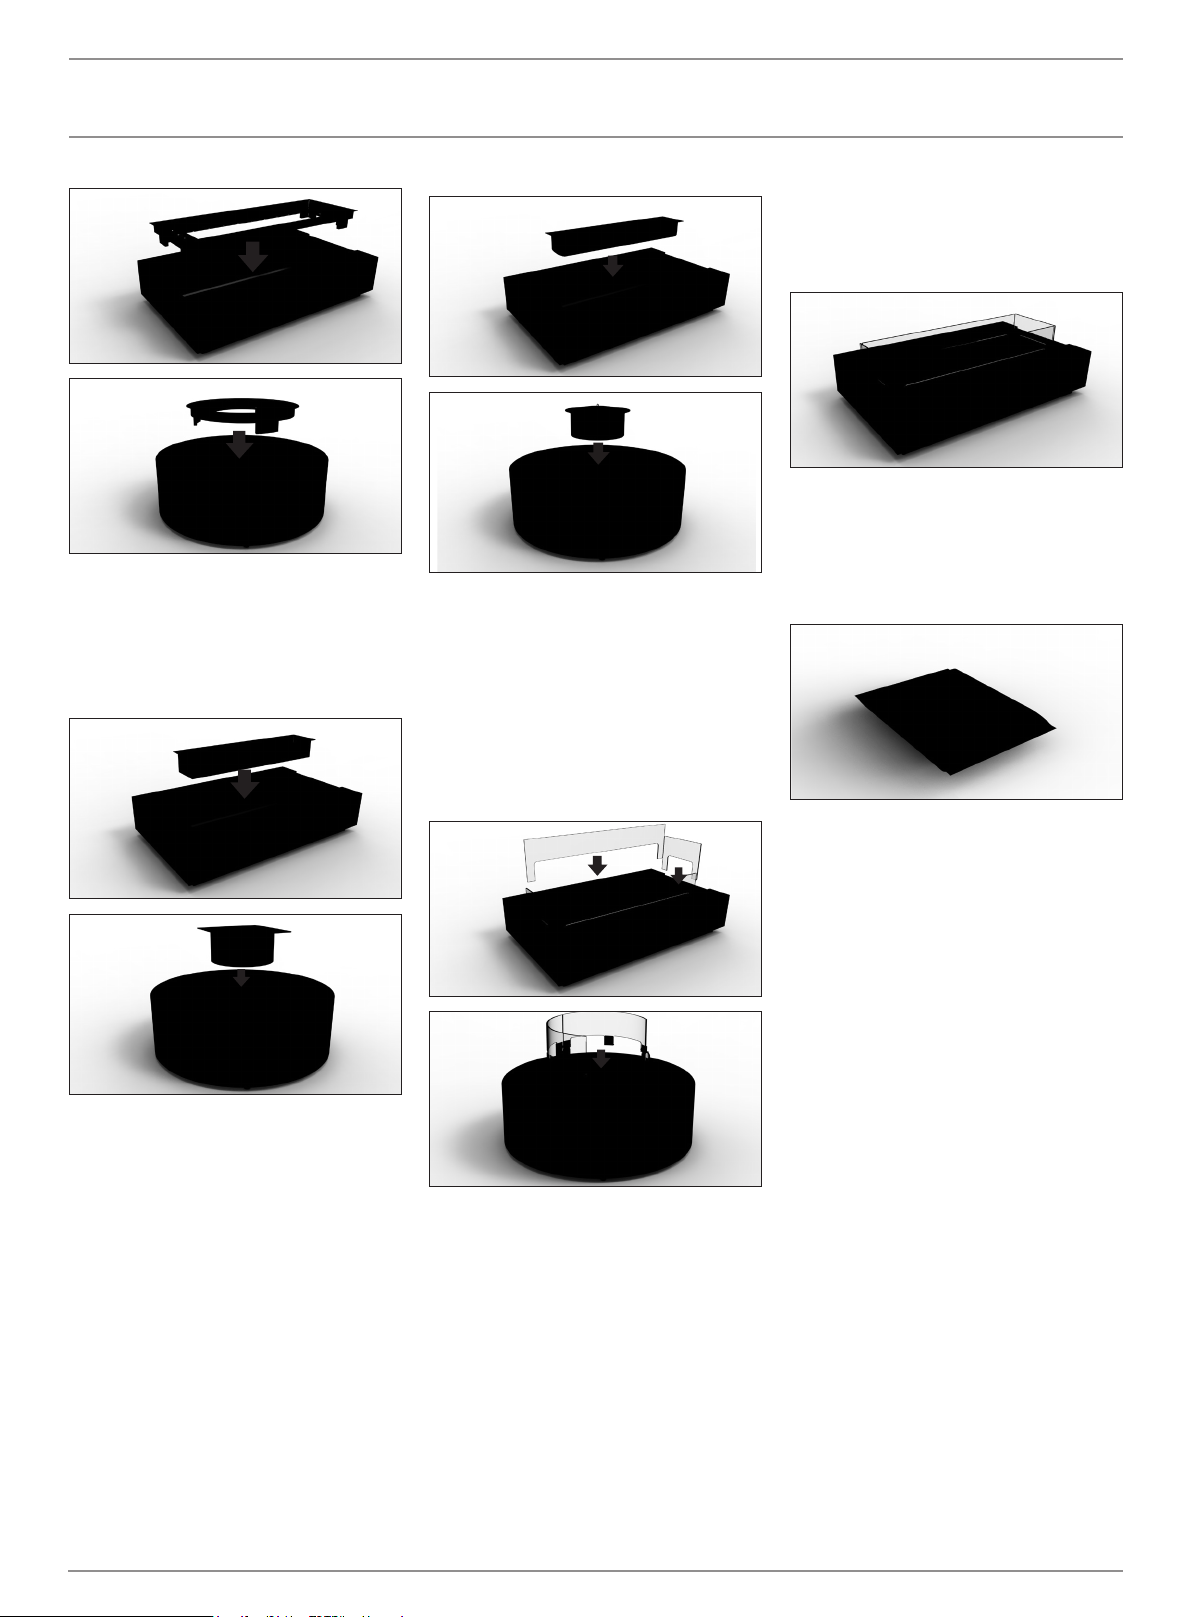
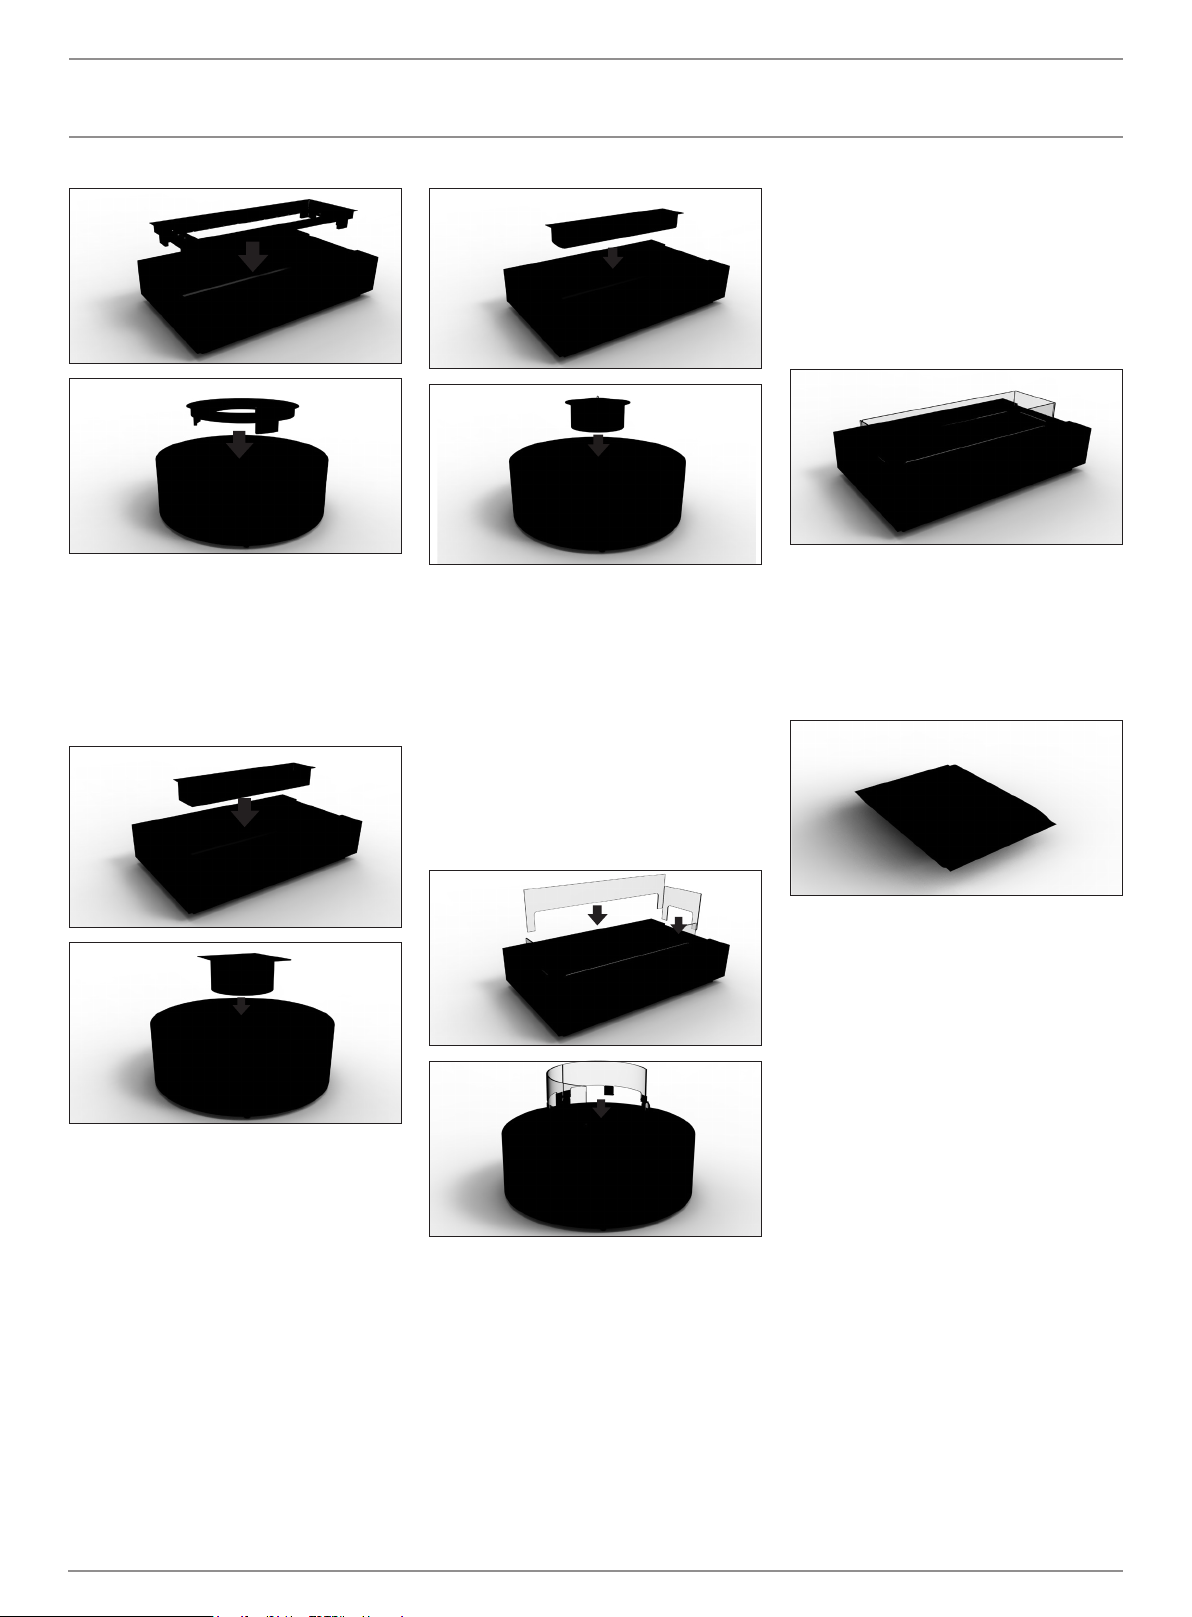
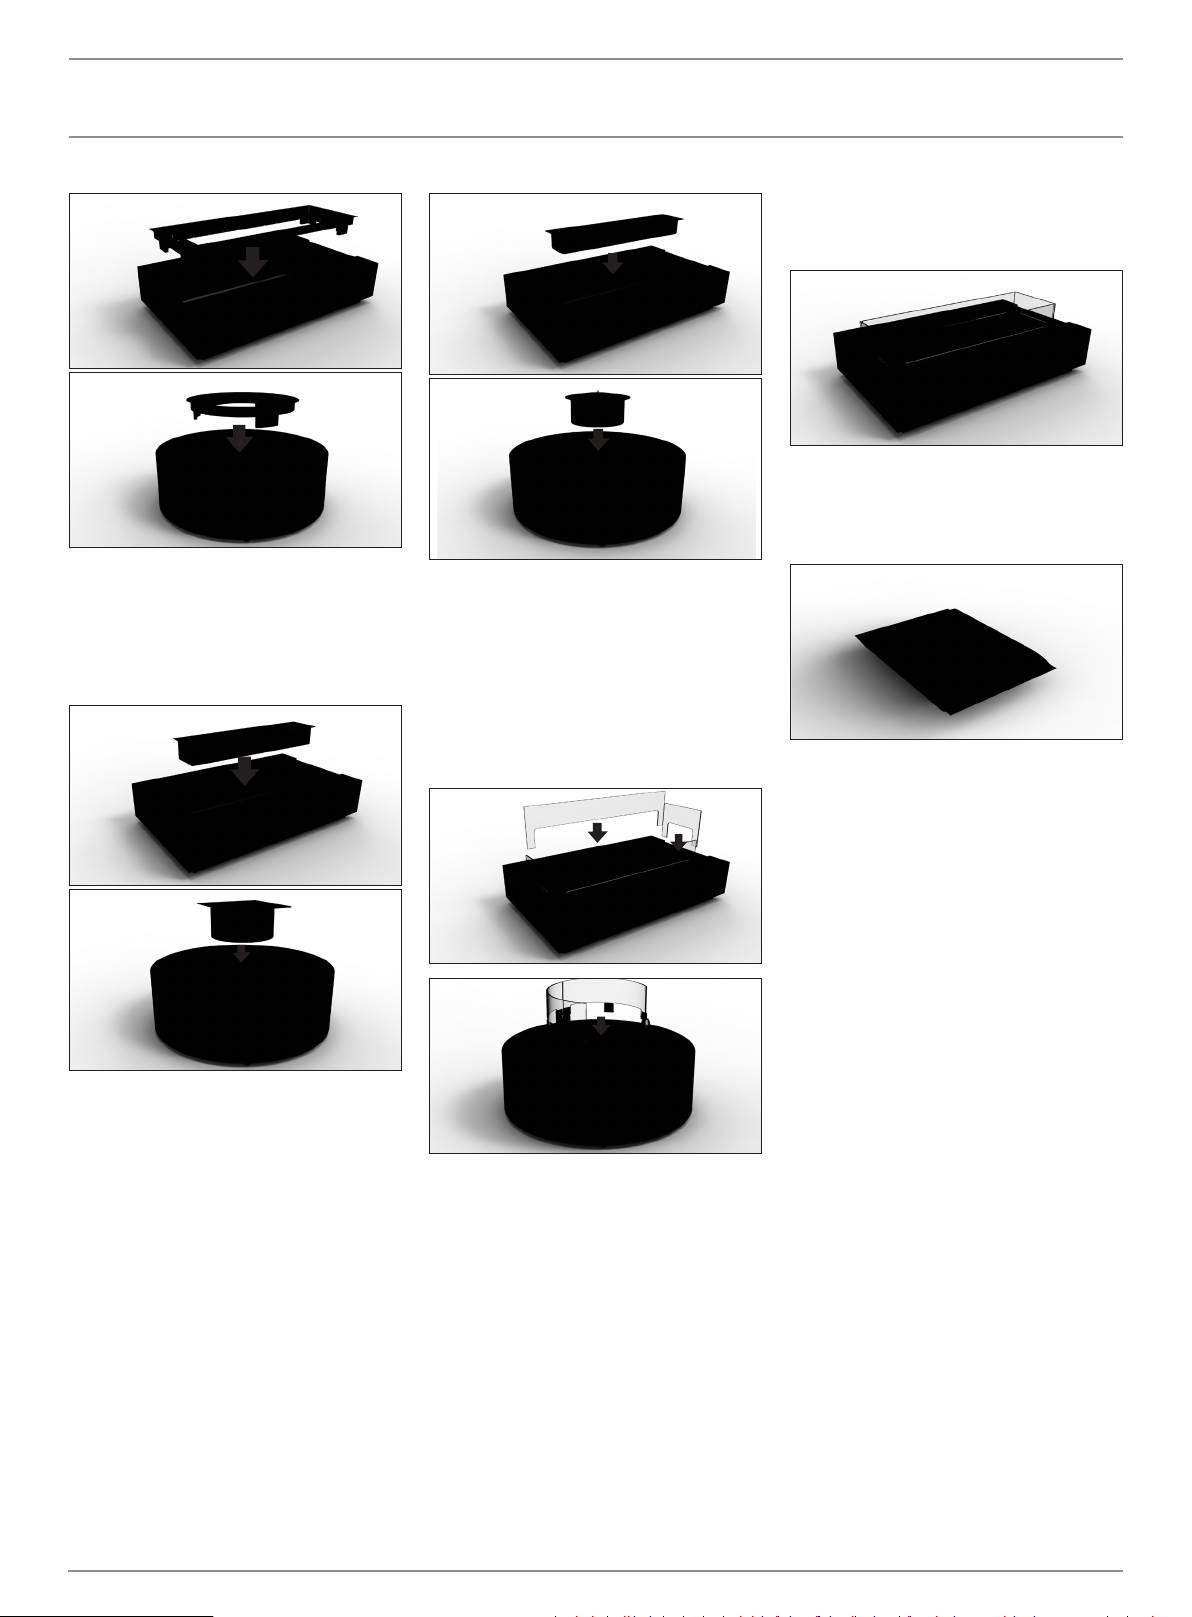
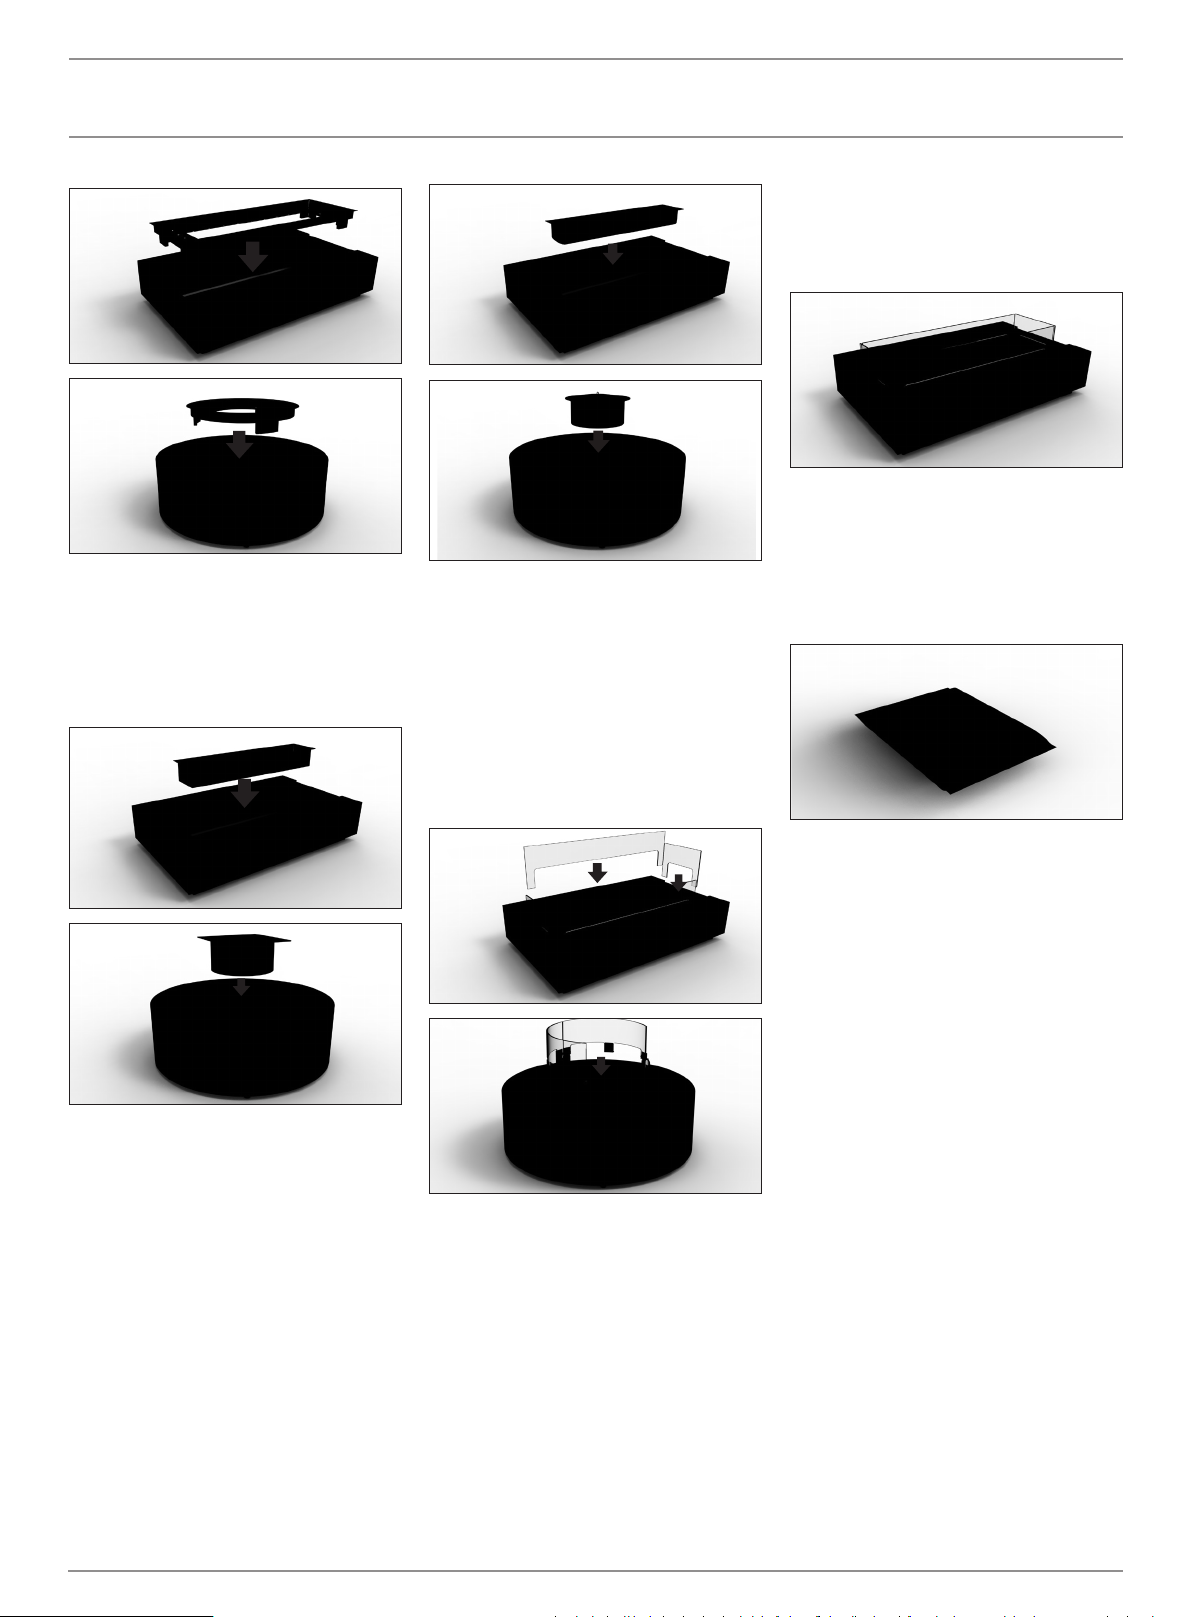
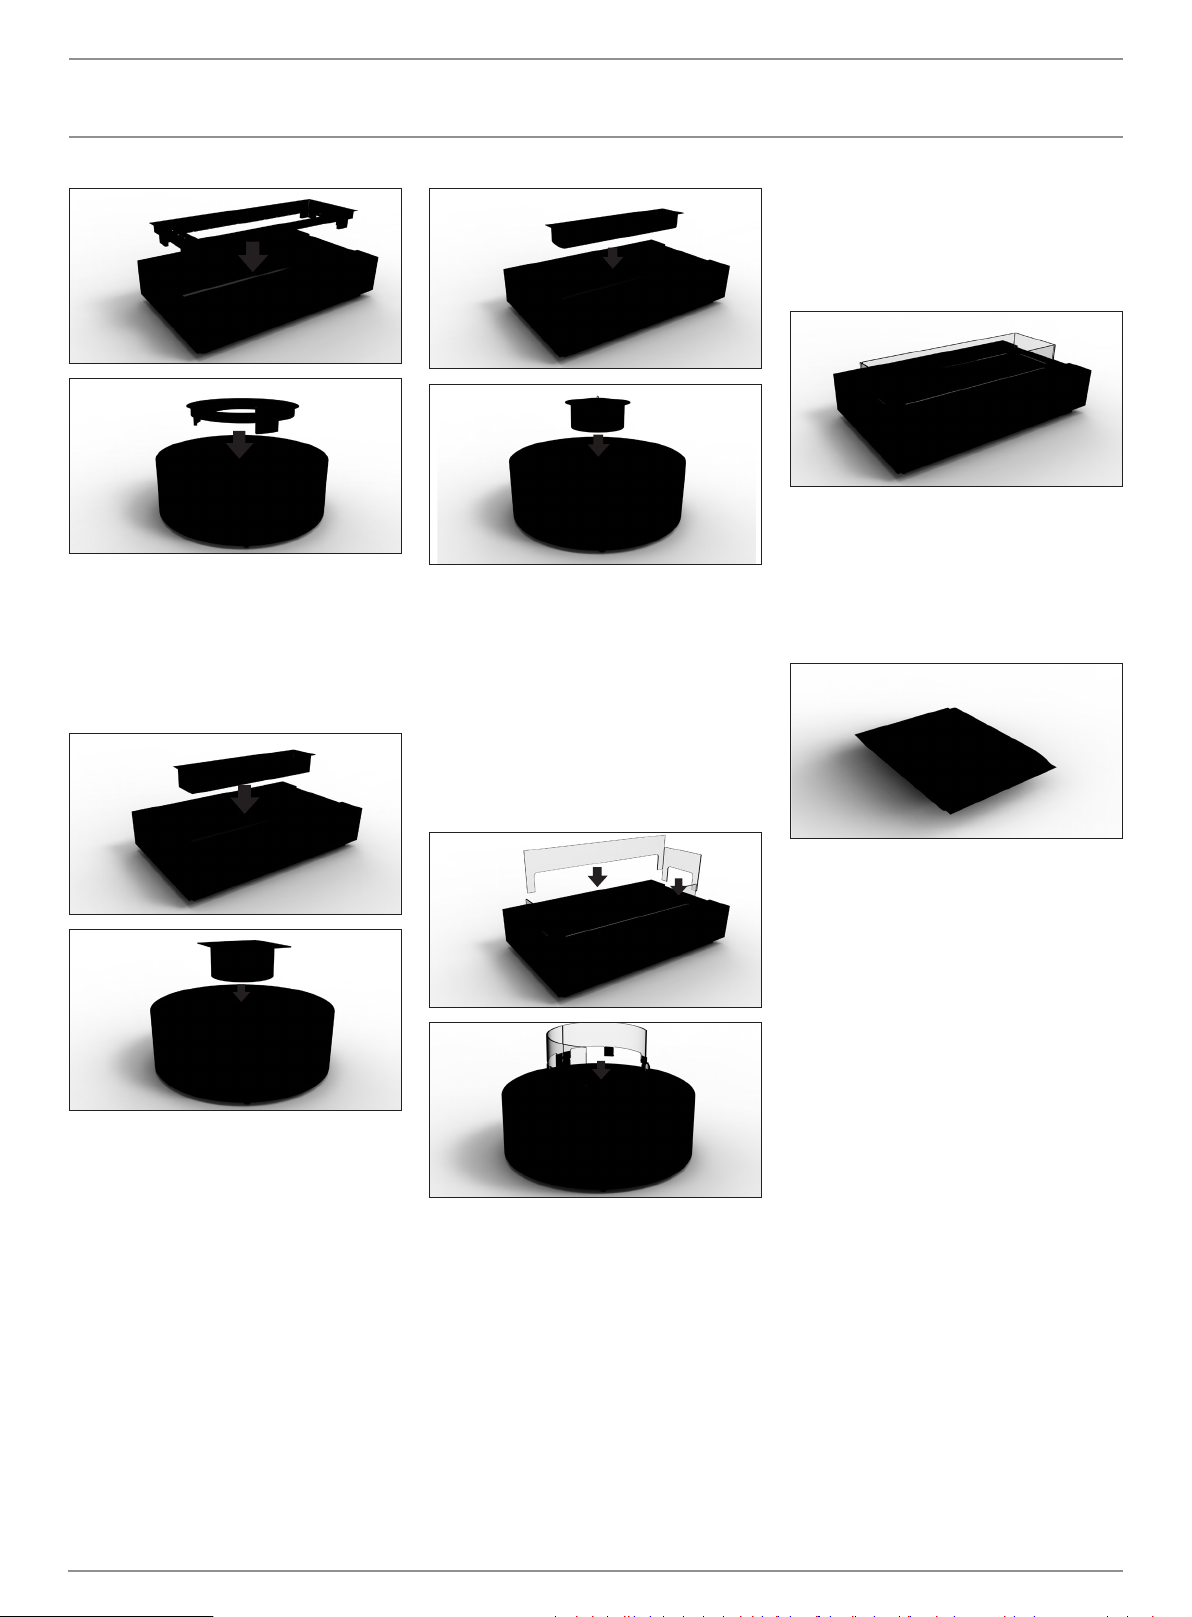
1. Insert the metal tray into the base.
2. For Indoor Installations insert the Indoor
Safety Tray. The appliance must not be
operated indoors without the Safety Tray
installed.
For outdoor installation go to Step 3.
3. Insert Burner into metal tray.
4. Insert Glass Screen. (If applicable).
Align each glass screen tab with the
designated slots in the metal tray, gently put
into position. Exercise caution so as not to
fracture or damage glass.
5. Add glass charcoal around the burner - be
careful not to scratch the burner surface.
Do not place glass charcoal on top of the
burner or where they can interfere with the
operation of the burner or the ame.
6. These models come with Ground Fixing
Brackets so they can be installed in a
xed position. Follow the instructions
supplied with the Ground Fixing Brackets to
complete the installation of the product.
If included as a standard part (compulsory
in the USA), the appliance must not be
operated without the glass screen installed.
OPERATE ACCORDING TO THE BURNER
OPERATIONS MANUAL INCLUDED WITH
THE BURNER.
© Copyright 2004 - 2020 MAD Design Group. All rights reserved. V0920
Page 4
DEUTSCH
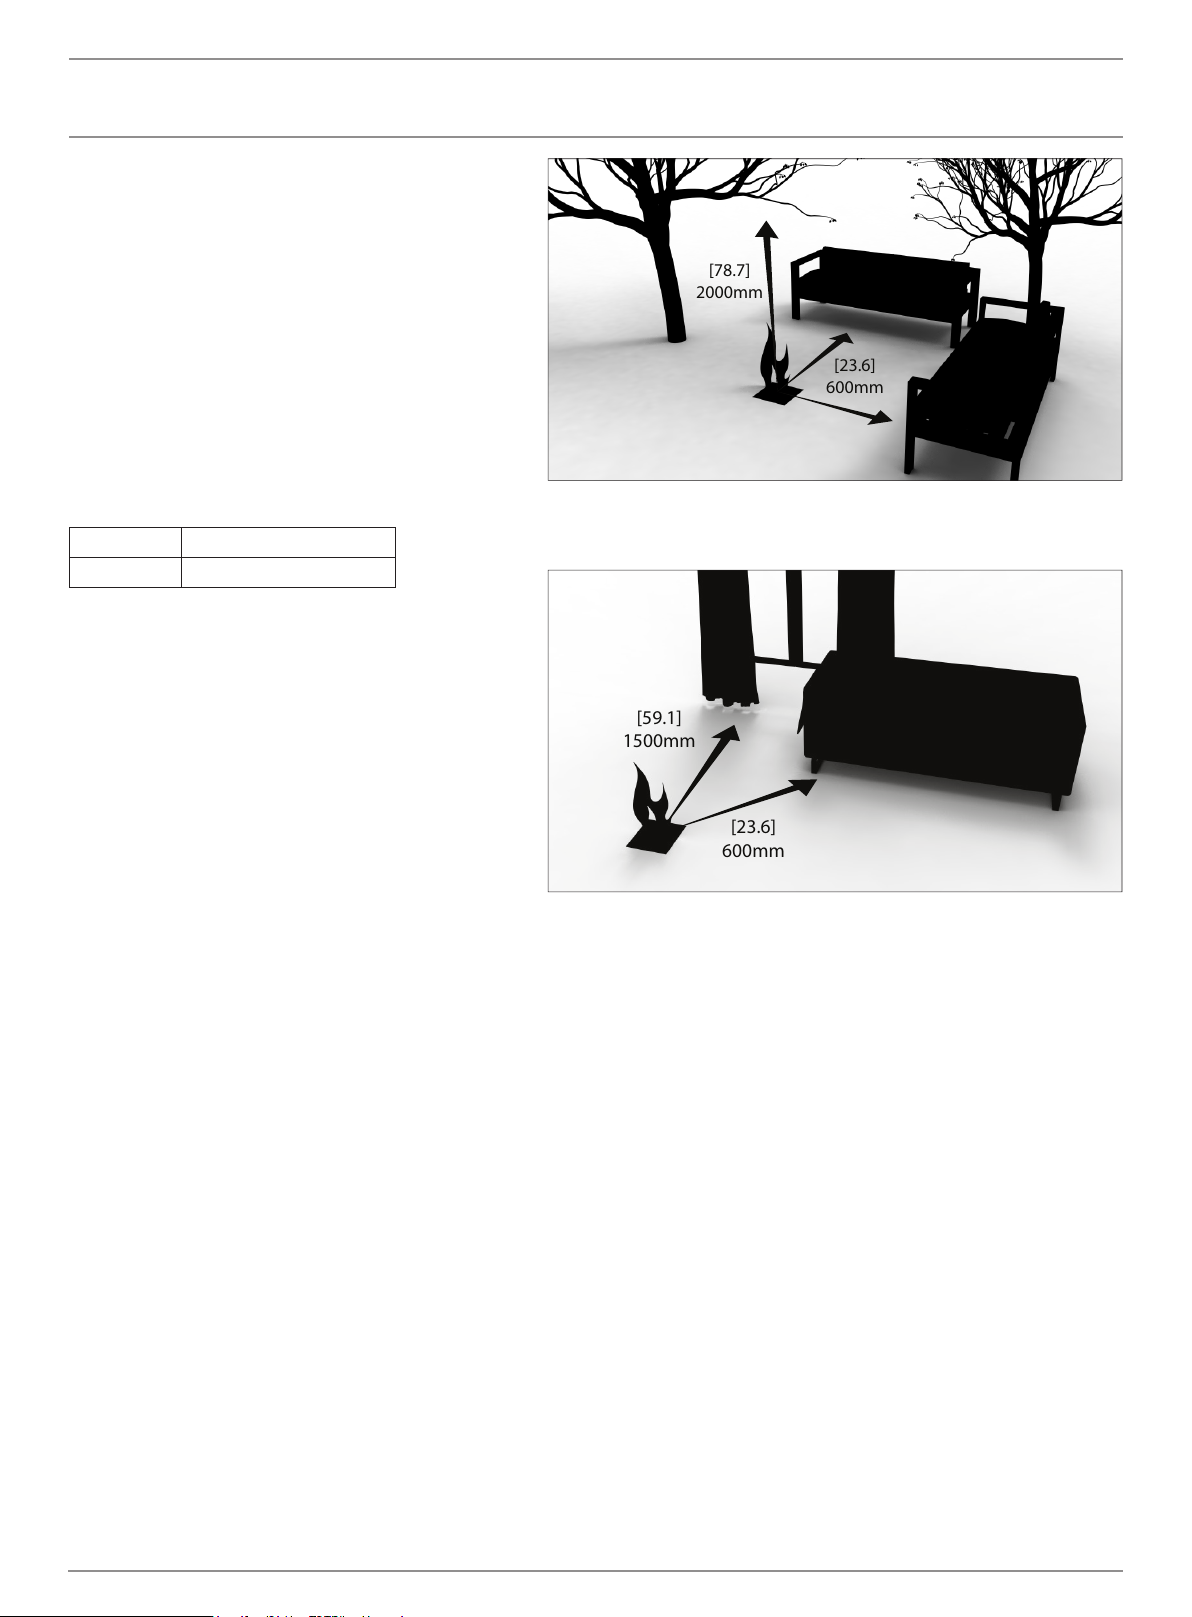
[78.7]
2000mm
[23.6]
600mm
[23.6]
600mm
[59.1]
1500mm
Abstände
zur Feuerstelle
Bitte lessen Sie diese Anleitung sowie
die Gebrauchsanleitung, die Sie mit dem
Brenner erhalten haben sorgfältig und
komplett durch, bevor Sie Ihre Feuerstelle
in Betrieb nehmen. ALLE ABSTÄNDE UND
INSTALLATIONSANWEISUNGEN FÜR DIE
VERWENDUNG VON PROPAN- ODER ERDGAS
FINDEN SIE IN DER BEDIENUNGSANLEITUNG
DES BRENNERS.
Diese Modelle eignen sich nur für den Einsatz im
Freien / Outdoor.
Vor der Installation stellen Sie sicher, dass
die Feuerstelle gem. den unten benannten
erforderlichen Mindest-Abständen platziert wurde.
Bei der Verwendung in Innenräumen, bitte die
Mindest-Raumgröße beachten, siehe unten:
AB8/ AB8(EN)
XL900
ACHTUNG: Stellen Sie sicher, dass das Feuer
jederzeit in sicherem Abstand von brennbaren
und leicht entammbaren Materialien
positioniert ist. Achten Sie v.a. darauf, dass das
Feuer in sicherer Entfernung von beweglichen
bzw. windanfälligen Gegenständen oder
Materialien aufgestellt wird, wie z.B. Panzen,
Bäumen, Vorhängen, Papierdekorationen o.Ä.
Die Unterseite des Burners darf niemals und
zu keiner Zeit mit brennbaren bzw. leicht
entammbaren Materialien in Berührung kommen.
Der seitliche Abstand der Flamme zu schweren
bzw. fest platzierten Einrichtungsgegenständen, die
nur unter hohem Aufwand bewegt werden können,
wie z.B. Lounge- oder Terrassen-Möbel, sollte
mindestens 600mm (23.6 inch) betragen.
Der Mindest-Abstand der Flamme zu leichten,
wind- und bewegungsanfälligen Stoen oder
Dingen (wie Ästen, Bäumen o.Ä.) muss jederzeit
2000 mm [78.2 in] betragen.
Diese Modelle verfügen über 360°
höhenverstellbare Füßchen. Bevor Sie die
Feuerstelle in Betrieb nehmen, stellen Sie die
entsprechende Höhe der Füßchen durch Drehen
in die eine oder andere Richtung ein, bis das
Modell sicher und stabil in der Waage platziert
wurde.
116m3 [4096ft3] pro Burner
3
[3884ft3] pro Burner
110m
Sicherheitsabstände im Außenbereich
Sicherheitsabstände im Innenbereich
Edelstahl korrodiert bzw. rostet mit der Zeit, falls
Verschmutzungen oder Nässe nicht unmittelbar
entfernt werden. Verwenden Sie stets, die mit Ihrem
Modell mitgelieferte Burner-Abdeckung, damit Staub
und Ablagerung innerhal des Burners vermieden
werden.
Sollten extreme Witterungsbedingungen
vorherrschen und Schnee wahrscheinlich
sein, so ist die Benutzung der Wintertasche
vorgeschrieben, damit die Garantie nicht erlischt.
www.ecosmartre.com
Page 5
DEUTSCH
Installation
der Feuerstelle
1. Setzen Sie das Metallblech in die Halterung ein.
2. Bei Installationen in Innenräumen, das
Innenraum-Sicherheitsblech einsetzen.
Der Burner darf in Innenräumen nicht ohne
eingesetztes Sicherheits-Blech betrieben
werden.
Bei Installationen im Außenbereich zu
Schritt 3 wechseln.
3. Setzen Sie den Burner in das Metallblech ein.
4. Die Glasscheibe einsetzen. (Wenn
anwendbar).
Richten Sie jede Glasplatte auf die
entsprechenden Fugen im Metalltablett aus
und bringen Sie diese vorsichtig in Position.
Gehen Sie dabei sehr vorsichtig vor, um das
Glas nicht zu beschädigen.
5. Platzieren Sie die Kohlepartikel-Glassteine
um den Brenner – seien Sie vorsichtig, dass
Sie dabei die Brenner-Oberäche nicht
beschädigen oder zerkratzen.
Platzieren Sie NIEMALS die Kohlepartikel-
Glassteine auf dem Brenner oder über der
Brenner-Önung oder dort, wo sie mit der
Flamme während des Betriebs des Brenners
in Konikt geraten könnten.
6. Diese Modelle sind mit Bodenhaltewinkeln
ausgestattet, damit sie in einer festen
Position montiert werden können. Folgen
Sie den Anweisungen, die mit den
Bodenhaltewinkeln geliefert werden, um die
Montage des Produkts abzuschließen.
Wenn das Gerät als Standardteil enthalten
ist (in den USA obligatorisch), darf es nicht
ohne installierte Glasscheibe betrieben
werden.
NEHMEN SIE DEN BRENNER
ENTSPRECHEND DER BEDIENUNGS- UND
INSTALLATIONS-ANLEITUNG, DIE JEDEM
BRENNER BEIGEFÜGT IST, IN BETRIEB.
© Copyright 2004 - 2020 MAD Design Group. Alle Rechte vorbehalten. V0920
Page 6
FRANÇAIS
[78.7]
2000mm
[23.6]
600mm
[23.6]
600mm
[59.1]
1500mm
Dégagements pour
les Cheminées
Veuillez lire ces instructions dans leur
intégralité ainsi que le manuel fourni avec
votre brûleur avant de faire fonctionner
l’appareil. REPORTEZ-VOUS AU MANUEL
DANS L’EMBALLAGE DU BRÛLEUR POUR
LES DÉGAGEMENTS ET INSTRUCTIONS
D’INSTALLATION EN CAS D’UTILISATION AU
GAZ NATUREL OU PROPANE.
Ces modèles sont adaptés à une utilisation en
extérieur.
Avant l’installation vérier que le modèle
est positionné conformément aux distances
minimales obligatoires décrites ci-dessous.
En cas d’utilisation à l’intérieur, veillez à respecter
les dimensions des pièces minimales ci-dessous :
AB8/ AB8(EN)
XL900
ATTENTION : Assurez-vous que votre
cheminée est constamment positionnée loin
de matériaux inammables et d’autres sources
d’ignition. Faites très attention à positionner
le feu loin des objets / choses susceptibles de
se déplacer en raison du vent et des courants
d’air. Par exemple, les arbres / branches/
rideaux / papiers, etc.
116m3 [4096ft3] par Brûleur
3
[3884ft3] par Brûleur
110m
Dégagements Extérieur
La base du brûleur au sein du modèle ne doit
jamais entrer en contact direct avec des matières
inammables.
Les dégagements latéraux pour les meubles xes
et stables tels que les canapés ou autres meubles
de salon doivent toujours rester à un minimum de
600mm de la amme.
Les dégagements généraux pour des éléments
susceptibles de mouvement (par exemple :
Arbres) doivent toujours rester à un minimum de
2000mm de la amme.
Ces produits se caractérisent par un pied qui
s’articulent à 360 degrès. Régler les pieds en les
tournant dans le sens souhaité jusqu’à ce que le
modèle soit droit et stable avant utilisation.
L’acier inoxydable rouillera ou corrodera au
l du temps en cas de contamination ou de
débris n’ayant pas été nettoyés ou supprimés
immédiatement. Utilisez toujours le couvercle
du brûleur fourni avec votre modèle pour éviter
l’accumulation de poussière et de débris à
l’intérieur du brûleur.
Si vous vivez dans des conditions climatiques
extrêmes où l’accumulation de neige est
probable, l’utilisation du sac d’hiver est impérative
an d’être couvert par la garantie.
2. Dégagements Intérieur
www.ecosmartre.com
Page 7
FRANÇAIS
Installation
des Cheminées
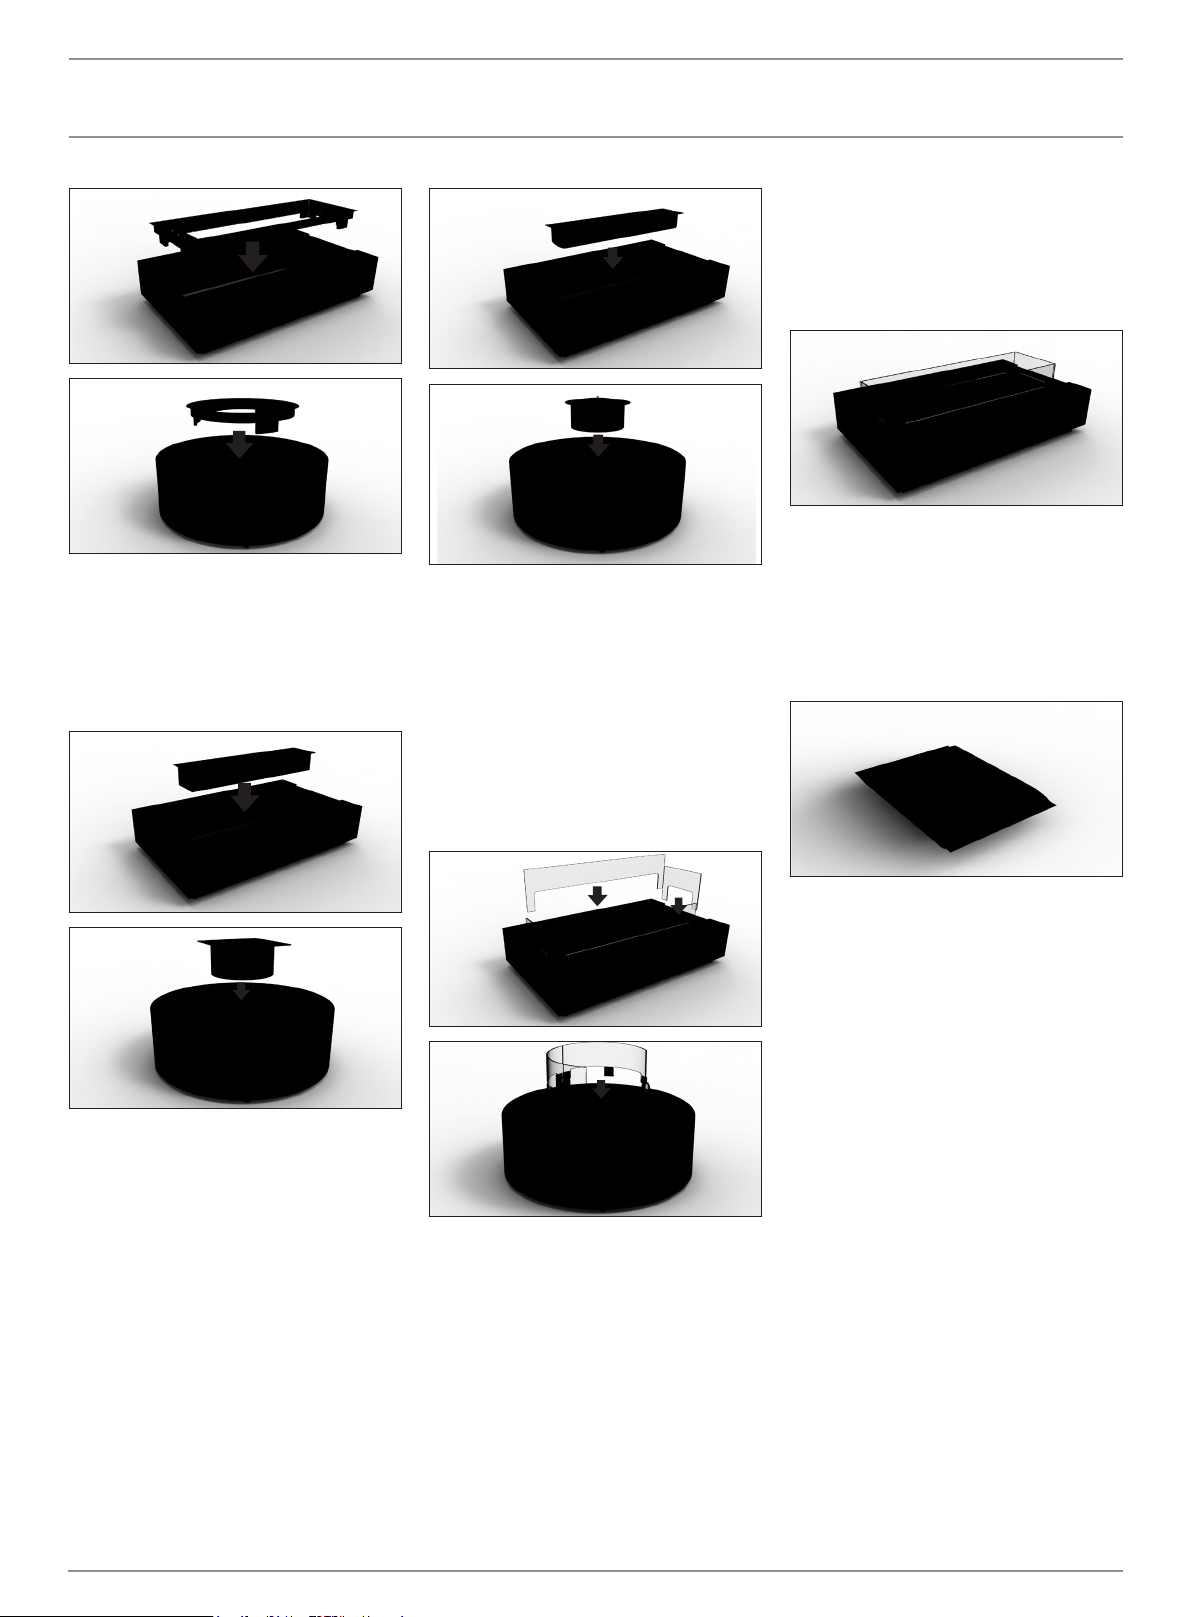
1. Insérez le plateau métallique dans la base.
2. Pour les installations à l’intérieur, insérez
le plateau de sécurité pour l’intérieur.
L’appareil ne doit pas être utilisé à l’intérieur
si le plateau de sécurité n’est pas installé.
Pour l’installation à l’extérieur, passez à
l’étape 3.
3. Insérez le brûleur dans le plateau métallique.
4. Insérez l’écran en verre. (Le cas échéant).
Alignez chaque languette de l’écran de
verre avec les fentes prévues à cet eet
dans le plateau métallique, puis mettez-la
doucement en place. Soyez prudent an de
ne pas briser ou endommager le verre.
5. Ajoutez le verre anthracite autour du brûleur
- Attention à ne pas rayer la surface du
brûleur.
Ne placez pas de verres anthracites sur le
dessus du brûleur où ils peuvent interférer
avec le fonctionnement du brûleur ou la
amme.
6.
Ces modèles sont livrés avec des supports
de xation au sol an qu’ils puissent être
installés dans une position xe. Suivez les
instructions fournies avec les supports de
xation au sol an de compléter l’installation
du produit.
S’il est inclus en tant que pièce standard
(obligatoire aux États-Unis), l’appareil ne
doit pas être utilisé sans l’écran en verre
installé.
UTILISEZ L’APPAREIL EN ACCORDANCE
AVEC LE MANUEL FOURNIS AVEC LE
BRÛLEUR.
© Copyright 2004 - 2020 MAD Design Group. Tous droits résevés. V0920
Page 8
中文
[78.7]
2000mm
[23.6]
600mm
[23.6]
600mm
[59.1]
1500mm
预留壁炉间隙
使用酒精火炉产品前,请先仔细阅读产品配套的安
装,操作和维修指南手册。如果使用煤气或天然气
火炉产品,请参照产品包装内提供的操作指南手册
进行安装。
此类壁炉可于户外或室内使用。
出于安全考量,产品不适用于可挪动的位置或桌上
使用。
安装前,请确保产品的摆放参照以下给出的最小预
留间隙。
若在室内使用,请务必注意下方列出的最小房间尺
寸要求:
AB8/
AB8(EN)
XL900
警告:任何时候请确保壁炉远离易燃物品与明火,
如树枝,窗帘,碎纸等可燃物。小心火焰的位置会
因为风而引起火苗的晃动点燃物品。
每个燃烧器最小空间要求
116m3 [4096ft3]
每个燃烧器最小空间要求
3
[3884ft3]
110m
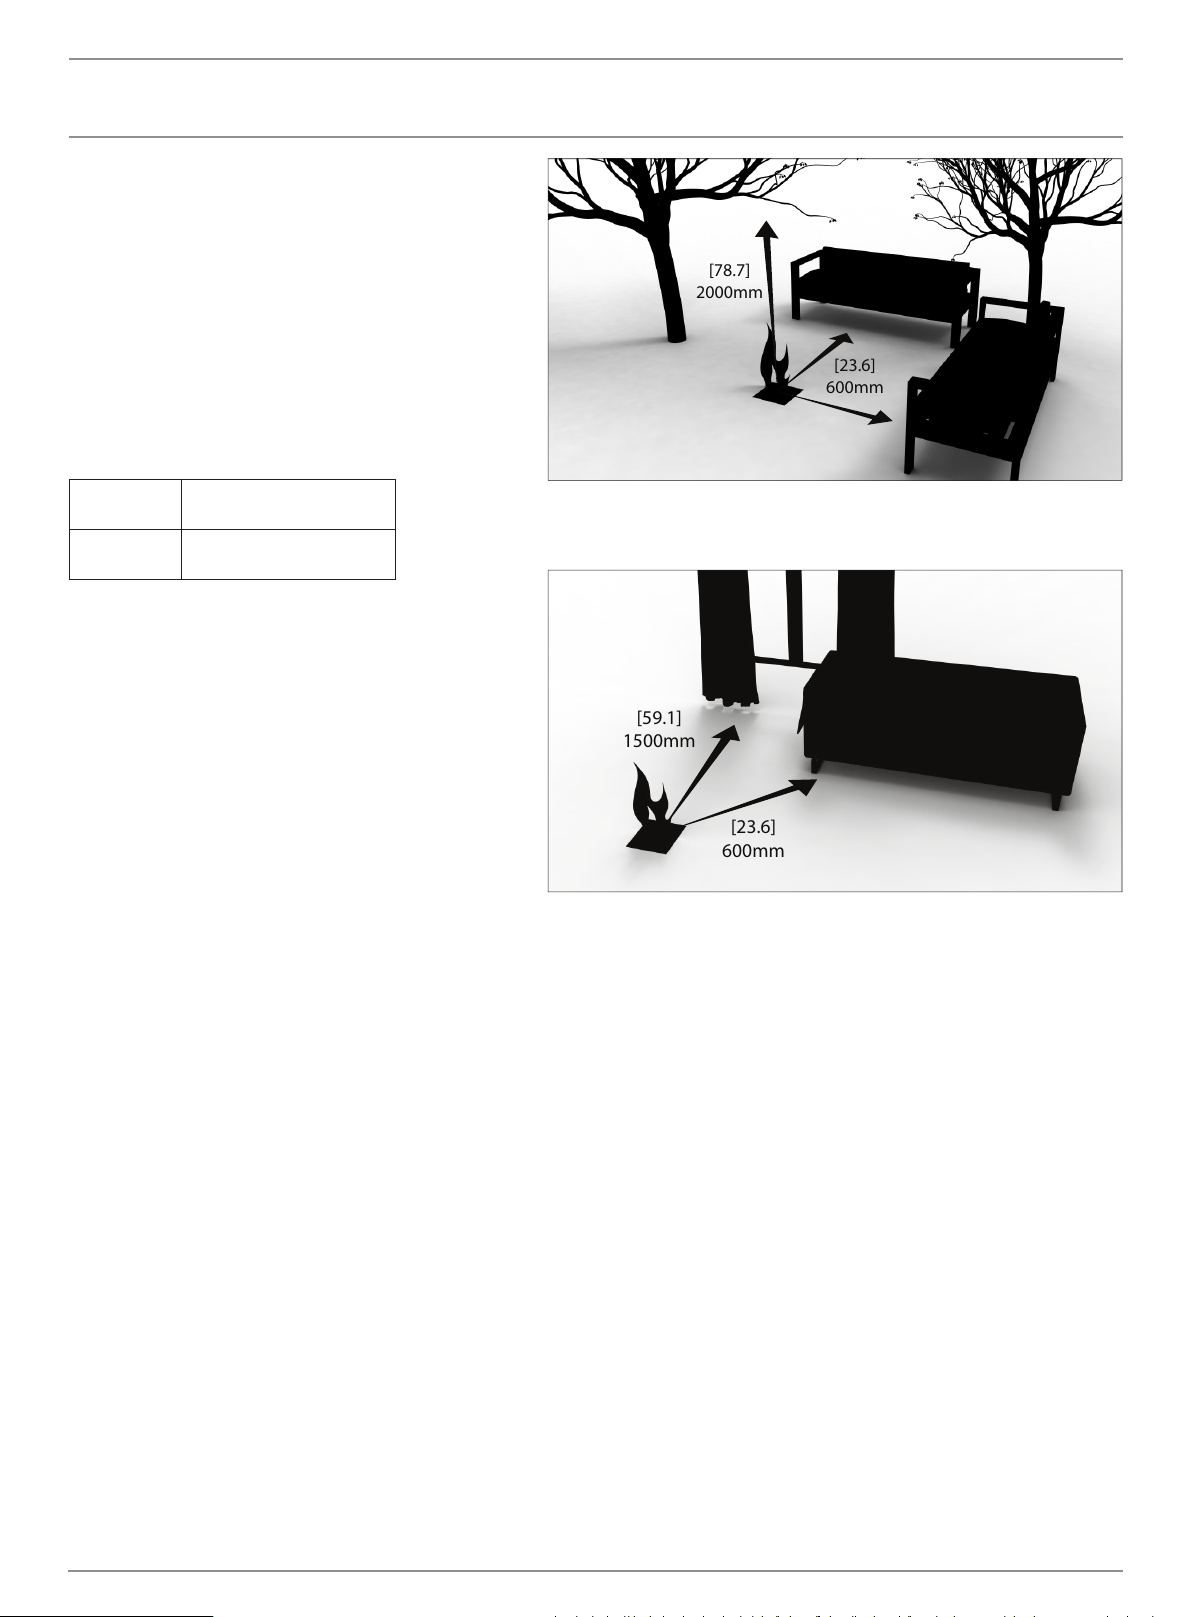
户外安装
任何情况下,壁炉内的燃烧器都不可与易燃物品直
接接触。
对于位置固定的家具,如客厅或户外的环境下,任
何情况下请确保壁炉产品与家具保留至少60厘米以
上的间距。
对于壁炉上方可飘动的物件,如树木等,任何情
况下请确保壁炉与此类物品保留至少2米以上的间
距。
此类产品附带360°可调节脚垫。通过调整脚垫的角
度可确保您在水平与稳定的最佳效果下安全使用火炉
产品。
燃烧器表面上的污渍如不常清理,不锈钢的表面会
随着日常的使用而缓慢生锈。请务必使用您所购买
产品附带的防护罩,以避免燃烧器内灰尘和碎屑
堆积。
如您居住地区的会有积雪,气候条件较为极端,则
有必要使用冬季套装,以便享受质保。
室内安装
www.ecosmartre.com
Page 9
中文
安装壁炉
1. 将金属托盘放入底座中。
2. 若要进行室内安装,请放入室内安全托盘。在
没有安装安全托盘的情况下,请勿在室内使用
产品。
若要进行室外安装,请转至步骤3。
3. 将燃烧器放入金属托盘。
4.
放入挡风玻璃。
将每个玻璃幕墙标签与金属托盘上的指定槽对
齐,然后轻轻放置到位。小心操作,以免打碎
或损坏玻璃。
如果玻璃屏是标配零件(在美国是强制性
的),则在未安装玻璃屏的情况下不得运行
该设备。
(如适用).
5. 在燃烧器周围摆放玻璃木炭石 - 小心挪动避免划
伤燃烧器的表面。
请勿摆放玻璃木炭石在燃烧器的正上方或是会
影响燃烧器正常运作的位置。
6.
此类产品配有地钉紧固件,可以固定位置安
装。请参阅紧固件安装说明完成安装。
壁炉安装(包含燃烧器)请根据安装操作手册。
©版权所有2004–2020 MAD Design Group有限公司保留所有权利。V0920
Page 10
ITALIANO
[78.7]
2000mm
[23.6]
600mm
[23.6]
600mm
[59.1]
1500mm
Sicurezza
Caminetti
Leggere il manuale di istruzioni per l’uso prima
di operare un prodotto EcoSmart™ Fire.
FARE RIFERIMENTO AL MANUALE
OPERAZIONI NELLA SCATOLA DEL
BRUCIATORE PER DISTANZE MINIME E
INSTALLAZIONE IN CASO DI UTILIZZO DI
PROPANO O GAS NATURALE.
Quando si utilizza il bioetanolo come fonte di
carburante, questo modello è adatto per uso
interno ed esterno.
Prima dell’installazione assicurarsi che il
modello sia posizionato in conformità con
le distanze minime obbligatorie indicate di
seguito.
Se utilizzato in ambienti interni, assicurarsi di
prestare attenzione alle dimensioni minime della
stanza sotto elencate
AB8/ AB8(EN)
XL900
ATTENZIONE: Assicurarsi che il fuoco
sia posizionato lontano da materiali
inammabili e altre fonti di ignizione in
ogni momento. Prestare molta attenzione
a posizionare il fuoco lontano da oggetti
che possono muoversi a causa di vento e
correnti d’aria. Per esempio alberi / rami /
carta e simili.
La base del bruciatore all’interno del modello
non deve mai entrare in contatto diretto con
materiali inammabili.
Distanze laterali a mobili ssi e oggetti stabili
che non sono soggetti a movimento come
salotti o mobili da giardino devono rimanere
un minimo di 600mm [23.6in] lontano dalla
amma in ogni momento.
Distanze in eccesso verso oggetti suscettibili
di movimento (ad es. Alberi ) deve rimanere a
una distanza minima di 2000mm [78.7in] dalla
amma in ogni momento.
116m3 [4096ft3] per
bruciatore
3
[3884ft3] per
110m
bruciatore
1. Distanze esterne
Distanza interna
2.
Questi prodotti sono dotati di piedi articolati
regolabili in altezza a 360 °. Regolare i piedi
ruotandoli in entrambe le direzioni no a
raggiungere un modello perfettamente livellato
e stabile prima di operare.
L’acciaio inossidabile si arrugginisce o si
corrode nel tempo se la contaminazione
o i detriti non vengono puliti o rimossi
immediatamente. Utilizzare sempre il
coperchio del bruciatore incluso nel modello
per evitare l’accumulo di polvere e detriti
all’interno del bruciatore.
Se abitate in condizioni climatiche estreme
dove è probabile che nevichi, è obbligatorio
usare la Borsa Invernale per essere coperti
dalla garanzia.
www.ecosmartre.com
Page 11
ITALIANO
Installazione
Caminetti
1. Inserire la vaschetta di metallo nella base.
2. Per Installazioni (in località - please remove)
interne inserire la Vaschetta di Sicurezza.
L’apparecchio non deve essere utilizzato in
località interne se non è stata installata la
Vaschetta di Sicurezza.
Per installazioni all’aperto passare alla Fase 3.
3. Inserire il Bruciatore nella vaschetta di metallo.
4. (Se applicabile) Inserire lo scermo.
Allineare ogni linguetta dello schermo di
vetro con le apposite fessure nel vassoio in
metallo. Esercitare pressione con cautela al
ne di non rompere o danneggiare il vetro.
Se incluso come parte standard
(obbligatorio negli USA), l’apparecchio non
deve essere messo in funzione senza che lo
schermo in vetro sia stato installato.
5. Aggiungere il carbone di vetro attorno al
bruciatore - fare attenzione a non graare
la supercie del bruciatore. Non posizionare
il carbone di vetro sul bruciatore o dove
possono interferire con il funzionamento del
bruciatore o della amma.
6. Questi modelli sono dotati di stae di
ssaggio (Ground Fixing Brackets) a terra
in modo che possano essere installati in
una posizione ssa. Seguire le istruzioni
fornite con le stae di ssaggio a terra per
completare l’installazione del prodotto.
OPERARE IL BRUCIATORE SECONDO IL
MANUALE DI OPERAZIONE INCLUSO.
© Proprietà limitata 2004 - 2020 MAD Design Group. Tutti i diritti riservati. V0920
Page 12
ESPAÑOL
[78.7]
2000mm
[23.6]
600mm
[23.6]
600mm
[59.1]
1500mm
Distancias mínimas para
las Chimeneas
Por favor, lea estas instrucciones y el manual
de operaciones del quemador suministrado
con el mismo completamente antes de
hacerlos funcionar. Dirígase al manual de
operaciones en la caja del quemador para
distancias mínimas e instrucciones de
instalación si se usa propano o gas natural.
Estos modelos están adecuados para uso en
el exterior cuando se utiliza bioetanol como
combustible.
Antes de la instalación asegúrese de que el
modelo este posicionado de acuerdo con las
distancias mínimas indicadas abajo.
Asegúrese de prestar atención a las medidas
mínimas de habitaciones si utilizado en
espacios interiores, a continuación:
AB8/ AB8(EN)
XL900
116m3 [4096ft3] por
quemador
3
110m
[3884ft3] por
quemador
Espacio libre en exterior
PRECAUCIÓN: Asegúrese de que su chimenea
esté situada lejos de materiales inamables
u otras fuertes de ignición en todo momento.
Preste toda la atención al posicionamiento
de la chimenea lejos de cosas que puedan
moverse como resultado del viento o
corrientes. Por ejemplo árboles/ramas/
cortinas/papel y similares.
La base del quemador nunca debe entrar en
contacto directo con materiales inamables.
El espacio libre lateral entre la chimenea y
mobiliario jo o estable debe ser de al menos
600mm hasta la llama en todo momento.
El despeje o la distancia vertical entre la llama y
cualquier objeto que sea susceptible a movimiento
(arboles o plantas) tiene que ser un mínimo de
2000mm [78.7] en todo momento.
Estos productos incluyen pies articulados en 360º
de altura ajustable. Ajuste estos pies girándolos
en la dirección apropiada hasta obtener una
posición nivelada y estable antes de hacerlos
funcionar.
El acero inoxidable puede mostrar restos de
corrosión con el tiempo si la contaminación
o restos no son limpiados inmediatamente.
Siempre utilice la tapa del quemador incluida con
su modelo para evitar que se acumule polvo y
escombros adentro del quemador.
Espacio libre en interior
Si vive en condiciones climáticas extremas
donde es probable que se acumule nieve, es
imprescindible utilizar el cubierta de invierno para
estar cubierto por la garantía.
www.ecosmartre.com
Page 13
ESPAÑOL
Instalación
de la chimenea
1. Inserte la bandeja de metal en la base.
2. Inserte el doble fondo de seguridad para
instalaciones interiores. El aparato no debe
estar utilizado en espacios interiores sin el el
doble fondo de seguridad instalado.
Para la instalación en el exterior, vaya al
Paso 3.
3. Inserte el quemador en la bandeja de metal.
4. Inserte la pantalla de vidrio. (Si se aplica).
Alinee cada pestaña de la pantalla de vidrio
con las ranuras designadas en la bandeja de
metal, coloque suavemente en su posición.
Tenga precaución para no fracturar o dañar
el vidrio.
5. Añade el vidrio antracita alrededor del
quemado - Precaución de no rasgar la
supercie del quemador
No coloque ningún vidrio antracita sobre el
quemador. Esto puede causar interferencia con
la llama y/o el uso apropiado del quemador.
6. Estos modelos vienen con soportes de
jación de tierra para que puedan instalarse
en una posición ja. Siga las instrucciones
suministradas con los soportes de jación
de tierra para completar la instalación del
producto.
Si se incluye como pieza estándar
(obligatorio en EE. UU.), el aparato no debe
utilizarse sin la pantalla de cristal instalada.
SIEMPRE USE DE ACUERDO CON EL
MANUAL OPERACIONAL, INCLUIDO CON
EL QUEMADOR.
© Copyright 2004 - 2020 MAD Design Group. Reservados todos los derechos. V0920
Page 14

MAD Design Group
Showrooms 3 & 4, 40-42 O’Riordan Street
Alexandria NSW 2015 Australia
Tel: +61 2 9997 3050 Email: [email protected]
REV0920
 Loading...