

Enpress PIONEER, CTA0840BBBKP5-04C00 Installation And Operation Manual
TM
INSTALLATION OPERATION MANUAL
This manual should be kept for future reference. If you have any questions regarding your
water lter, contact your local dealer, OEM, or the manufacturer at the following:
ENPRESS, LLC. | 34899 Curtis Blvd., Eastlake Ohio 44095
Phone 866.859.9274 | Fax 440.510.0202 | info@enpress.com
EPA Est. 092577-OH-001
2
TM
WHERE TO INSTALL
The System comes preassembled without the cartridge installed.
1. Push down the top cap with both hands to unseat the retaining ring, and remove the retaining ring by carefully grasping the handle
and pulling inward, then upward. The retaining ring should slide completely out of the groove.
2. Remove the Top Cap from the housing assembly by pulling the cap out of the top of the tank, by lifting up on the top handles. Place
removed Top Cap on a clean and dry surface, free of debris, so no contamination of the o-ring occurs.
3. Look down into the tank assembly, and you should see a small opening centered in the bottom of the tank.
4. Remove packaging from lter, then place the cartridge into the tank with the double o’ring facing down.
5. Position the cartridge so that it is aligned with the bottom, center opening.
6. Press down on the cartridge so that the double o’ring seal moves into place within the bottom, center opening.
7. Reposition the Top Cap into its original location.
8. Reattach the top tank Snap Ring, pull up on the Top Cap to seat o-rings.
9. Run water through system for 10 minutes before use.
INSTALLING THE CARTRIDGE
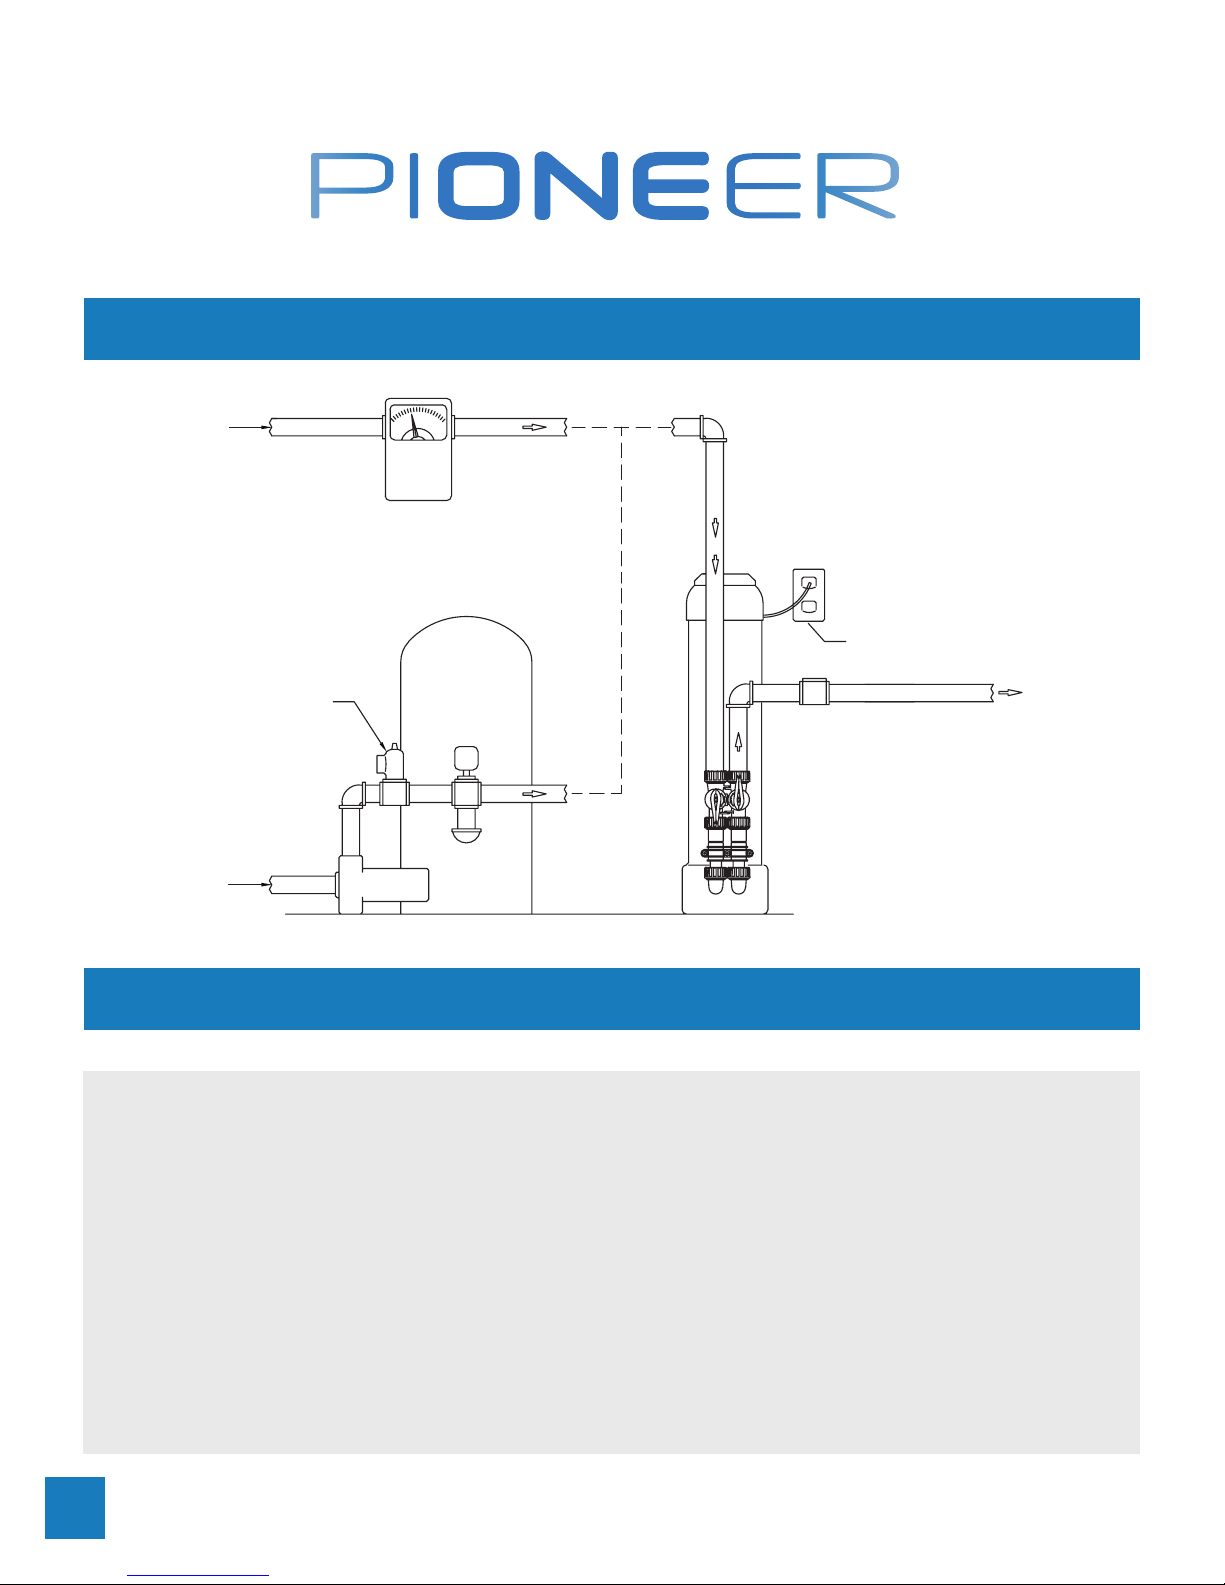
CITY WATER
INLET
WELL
INLET
RELIEF VALVE
MUST BE
INSTALLED
PRESSURE
TANK
WATER
METER
PUMP
SERVICE
G
R
O
U
N
D
E
D
&
U
N
S
W
IT
C
H
E
D
1
1
5
-
V
O
L
T
O
U
T
L
E
T

3
1. Turn off the water supply to the system by shutting off the inlet and outlet valves on the bypass.
2. (Optional) Install a 3/8” PE X tubing hose to the provided John Guest® tting and shut-off that
connects to the inlet side of the ltration system. Run the hose to a oor drain or bucket, and use to
drain sediment or to aid in lter removal during change-out.
3. Remove Umbrella Cap on the top of the vessel. Replace the 3-A AA batteries with new batteries.
Push and hold the reset button on the metered board for 3 seconds to reset the totalizer. When the
totalizer is reset the LED lights will ash green 3 times to conrm that it is reset.
4. Depressurize the system by pushing down on the red depressurization button on the top cap of the
system. Keep the button pushed down until all the air or water pressure is completely released.
5. Push down the top cap with both hands to unseat the retaining ring.
6. Remove the retaining ring by carefully grasping the handle and pulling inward, then upward. The
retaining ring should slide completely out of the groove.
7. Remove the top cap of the system by lifting up on the top handles, remove old lter.
8. Open the John Guest® tting and shut-off , and ush out the bottom of the system.
9. Look down into the tank assembly, and you should see a small opening centered in the bottom of
the tank.
10. Remove packaging from the new lter, place the new cartridge into the tank with the double o’ring
facing down.
11. Position the cartridge so that it is aligned with the bottom, center opening.
12. Press down on the cartridge so that the double o’ring seal moves into place within the bottom,
center opening.
13. Reposition the Top Cap into its original location.
14. Reattach the top tank Snap Ring, pull up on the Top Cap to seat o-rings.
15. (If completed Step 2, then…) Close the John Guest® tting and shut-off.
16. Turn the water supply on, opening the inlet and outlet valves on the bypass.
17. Relieve the system of air in the tank as the system lls with water, by pushing down on the red
depressurization button on the top cap of the system. Keep the button pushed down until all the air
pressure is completely released, and water comes out of the red depressurization button.
18. Release the red depressurization button.
19. Replace the Umbrella cap to the top of the system.
20. Check for leaks.
21. Flush the new cartridge per its installation instructions.
22. During ush, conrm green LED lights are ashing with owing water. If lights are not ashing
green, go back to step 3.
REPLACING THE CARTRIDGE
#3 UMBRELLA CAP
& LED LIGHTS
The Real-time Dynamic LED System monitors water and ow rate and provides a visual color-coded
notication to the homeowner, letting them know when to replace their lter.
*Meter preset at 100,000 gallons; see page 6 for adjusting presets.
*Three AAA batteries not included, for battery back-up. Change annually with lter change-out.
EASY TO UNDERSTAND LED REPLACEMENT NOTIFICATIONS
GREEN
FILTER
GOOD
YELLOW
CHANGE
SOON
10%
FI LTER
LIFE
REMAINING
RED
CHANGE
NOW
PIONEER uses state-of-the-art snap-ring technology to eliminate the need for cumbersome tools.
Homeowners can easily replace the lter in their PIONEER system by followng a few simple steps.
EASY FILTER REPLACEMENTS AND NO TOOLS REQUIRED
LIFT TOP CAPPRESS THE RED PRESSURE RELIEF VALVE & PULL SNAP-RING
 Loading...