

Page 1
ENVOY QUICK INSTALL GUIDE
Installing the
Envoy Communications Gateway
Read and follow all warnings and instructions in this Guide and in the Envoy® Communications Gateway Installation
and Operation Manual at http://www.enphase.com/support. Use this guide as a quick reference during installation and
setup of the Envoy.
®
1
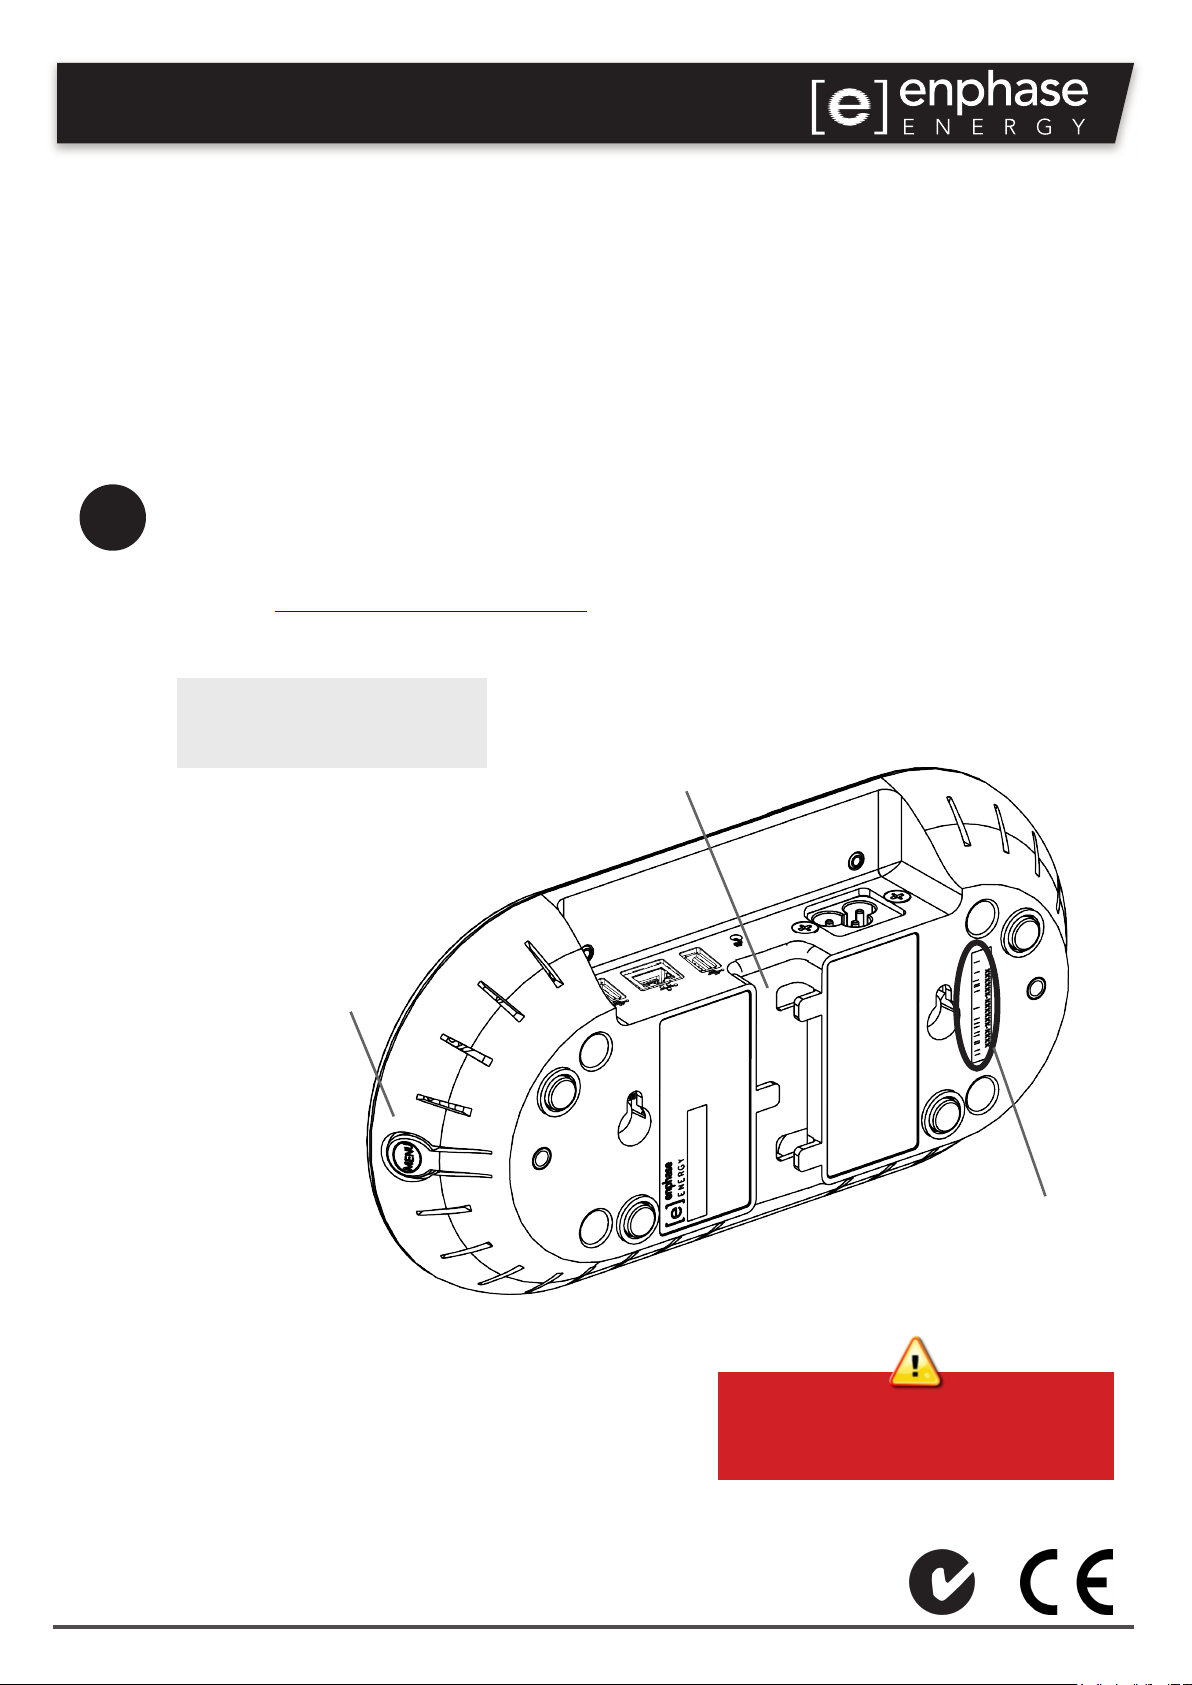
Find the Envoy Serial Number
The serial number label is on the back of the Envoy, near the left mounting bracket.
• You can use the Enphase Installer Toolkit to scan the serial number. For more information,
refer to http://enphase.com/products/arraygun.
• Or you can peel the label from the Envoy and afx it to the installation map.
Note: If needed, you can nd an
installation map at the back of the
Enphase Microinverter manual.
menu
button
DO NOT route the power
cable or the Ethernet cable
through the cable tray.
serial
number
label
Warning. Envoy warranty void if cover
removed. No serviceable parts inside.
Refer servicing to qualied personnel.
Page 2
2
Register the Envoy
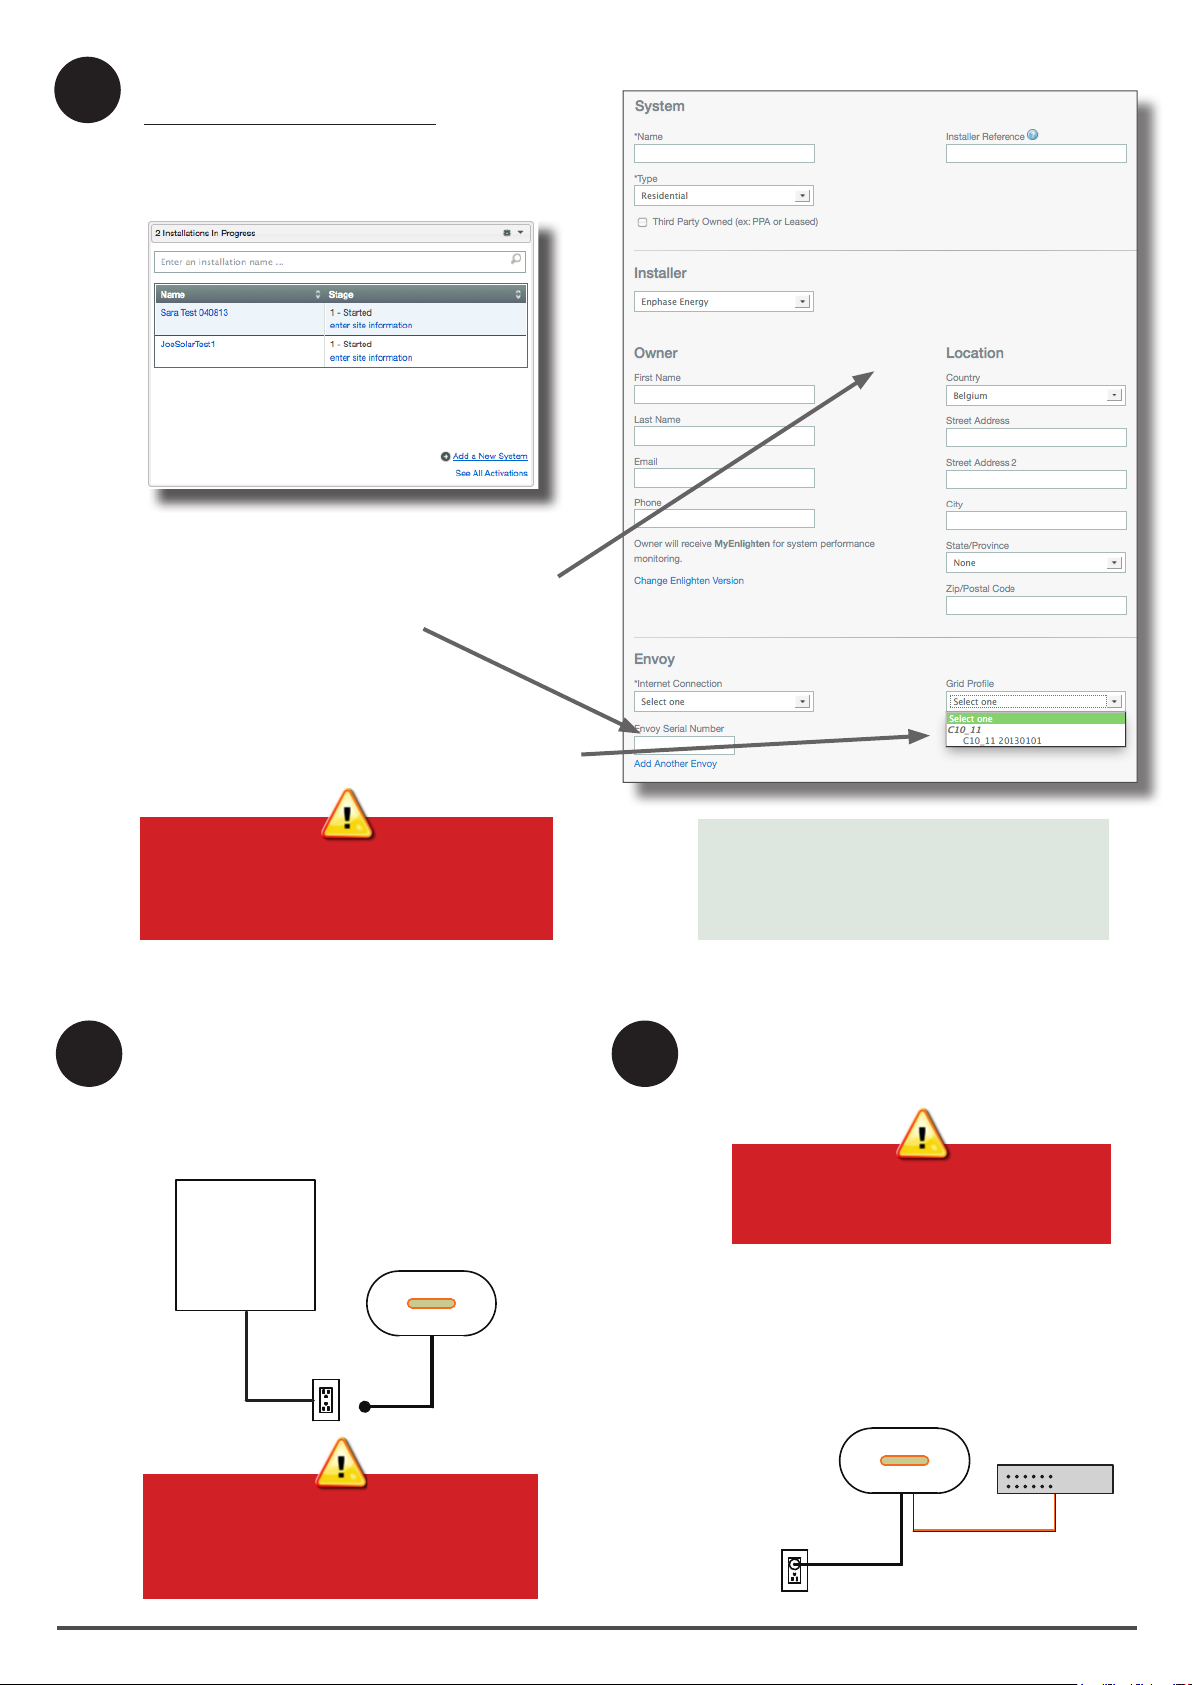
Register the Envoy at the Enlighten website:
https://enlighten.enphaseenergy.com.
a. Log in to Enlighten
• At the installer dashboard, click Add a New System.
b. Enter System Activation Information
• Enter the System, Installer, Owner, and Location
information.
• Enter the Envoy serial number.
c. Select the Grid Prole
Once you select your Country, the Grid
Prole menu appears.
• Select the appropriate prole from the Grid Prole
menu.
• Click Save to submit the form.
System Activation form
3
The microinverters will not export power until the
Envoy is installed and detects all the
microinverters at the site. The grid prole must also
be set and propagated to the microinverters.
Find a Location for the Envoy
• Locate an electrical outlet that is indoors and
close to the AC mains.
• Place the Envoy so that its AC cord can reach
this outlet.
• Plug the AC cord into a dedicated wall outlet.
AC mains
Envoy
4
For more information on Grid Proles, see the
Envoy Communications Gateway Installation
and Operation Manual at:
http://www.enphase.com/support.
Connect to the Internet
Connect to a broadband router using one of the following
three methods:
Warning: Do not remove power from
the Envoy if the LCD displays:
“Upgrading. . . Do Not Unplug.”
Method A: Ethernet Cable
• Plug the Ethernet cable into the Ethernet port on the
Envoy.
• Plug the other end of the cable into a port on the
broadband router.
Do not plug the Envoy into a power strip,
surge protector, or uninterruptable power
supply (UPS). These devices impede power
line communications.
Envoy
AC power
cord
broadband
router
Ethernet cable
Page 3
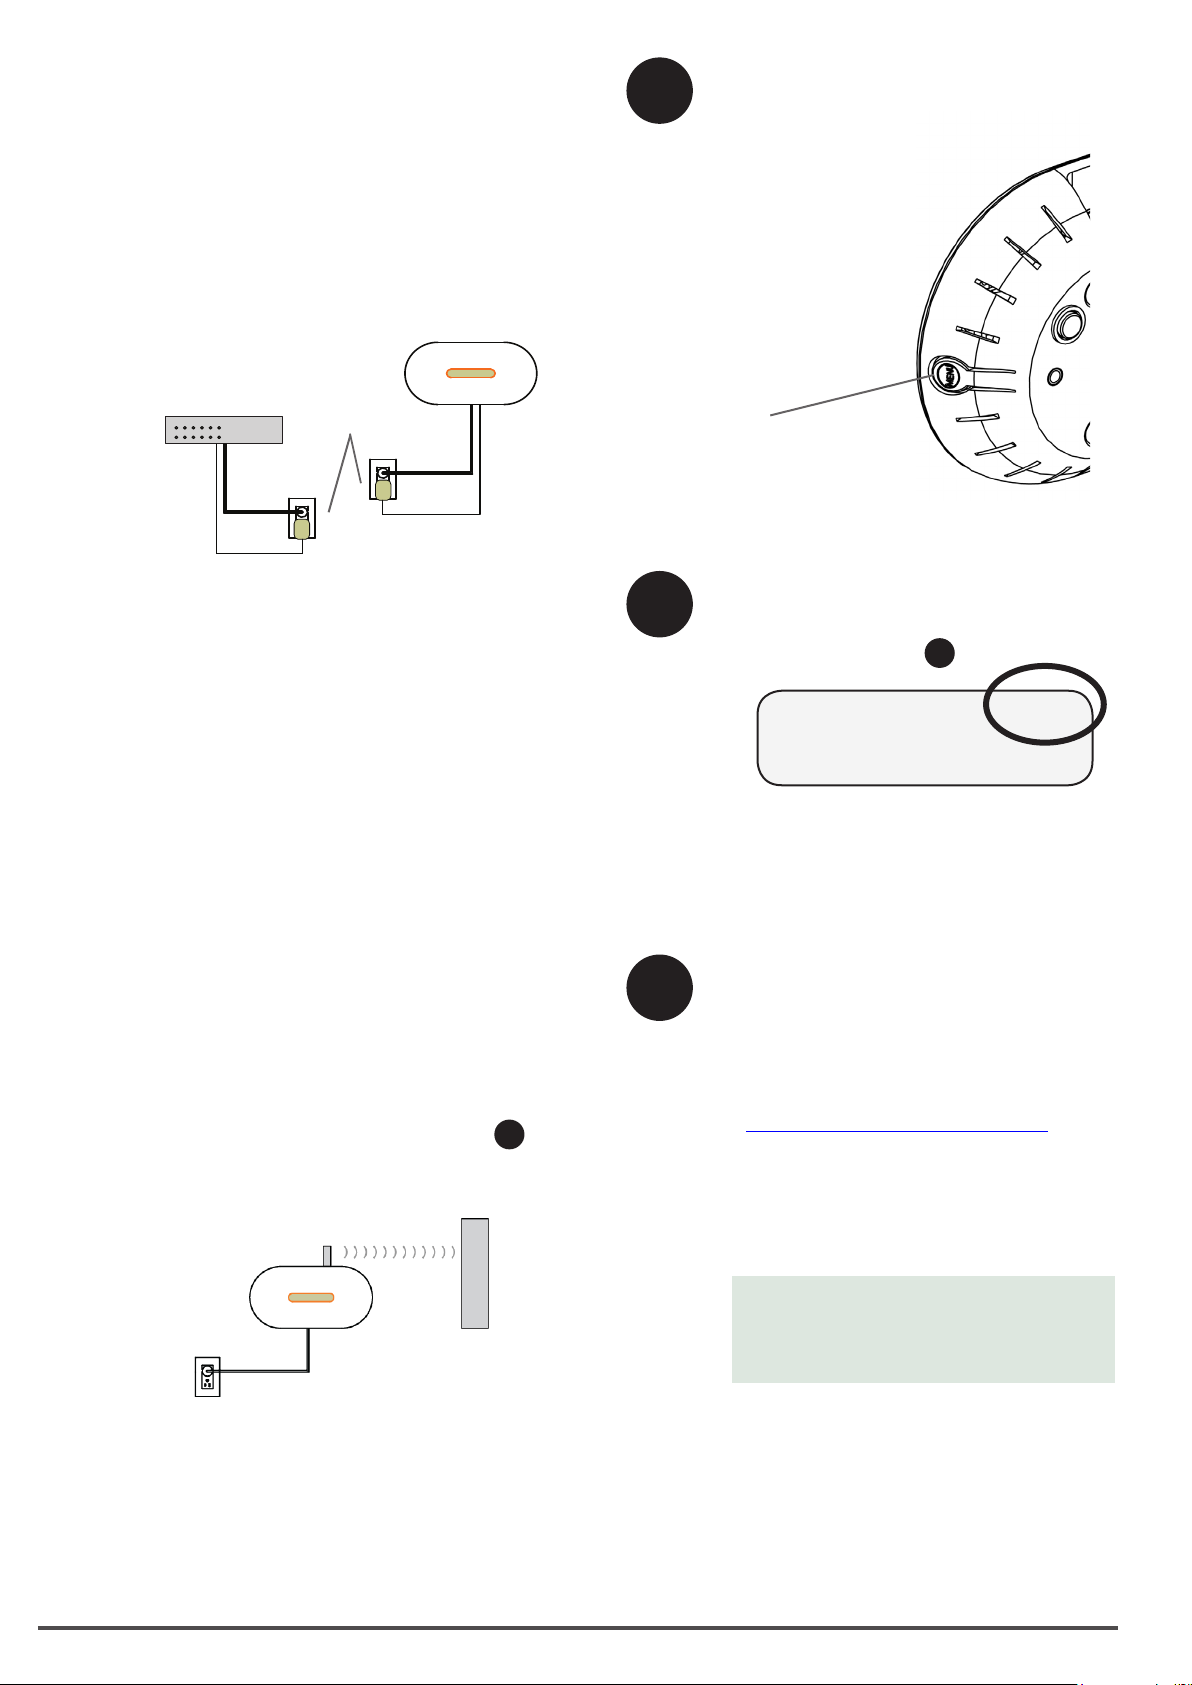
Method B: Power Line Communication Bridges
(Order EPLC-02, EPLC-03 or EPLC-04 separately.)
Use power line communication bridges if the Envoy needs
to be located away from the broadband router.
• Plug one of the bridges into the same AC outlet as
the broadband router and attach an Ethernet cable to
the bridge.
• Plug the other bridge into an AC outlet near the Envoy and attach the Ethernet cable to the bridge.
• Press and hold the Envoy menu button; release the
button when the LCD displays Get New IP Address.
5
Select the Language
During start up, the Envoy LCD panel will
scroll through the available language settings. When you see the setting you prefer,
press the Menu button and hold for two
seconds.
The choices are: English,
Français, Deutsch,
Italiano, and Espanol.
broadband
router
Method C: Wi-Fi (Enphase Wireless Adapter)
(Order WF-01 separately.)
Requires a wireless router.
• On the Envoy, verify that no Ethernet cable is plugged
into the Envoy RJ45 port.
• Plug the Enphase wireless adapter into the left USB
port (looking at Envoy from the front).
• Verify that the startup message on the LCD screen
reads “R3.8” or later.
- If not, upgrade the Envoy by connecting the En-
voy Ethernet port to the broadband router with
the Ethernet cable that came with the Envoy.
- After the upgrade completes, remove the Ether-
net cable from the Envoy.
• Press and hold the WPS button on the wireless
router for two seconds. On many routers, the WPS
button ashes at this point.
• Return to the Envoy. Press and hold the Envoy menu
button. Release the Envoy menu button when the
LCD displays Enable Wi-Fi WPS.
• Within two minutes an updated IP address appears
on the Envoy LCD screen. This IP address begins
with a “W” to indicate a wireless connection.
• If the connection fails, see Troubleshooting a.
Power line
communication
bridges
Envoy
6
7
menu
button
Envoy
Check the Internet Connection
Look for the + Web indication. If it does not appear
within 5 minutes after connecting to the broadband
router, see Troubleshooting b.
192.168.2.140 +Web
0W 0kWh 0
Install the Microinverters and Modules
• Install the PV modules and microinverters
as directed by the installation manuals. For
Enphase installation manuals, go to
http://www.enphase.com/support.
• Use the ArrayGun to scan the microinverters.
For more information, go to
http://enphase.com/products/arraygun.
• As an alternative, you can manually build the
map: Peel the removable serial number label
from each microinverter and afx it to the
respective location on the map.
wireless adapter
Envoy
wireless
router
Refer to the Enphase Microinverter
installation and operation manual for
information on microinverter installation and
commissioning.
Page 4
8
9
Check the Envoy’s Progress
An automatic device scan will detect the microinverters
when the DC and AC connections are completed and
the AC circuit is energised.
a. Check the Power Line Communications
• Check the number of bars shown on the Envoy
LCD (Level/Devices screen). If fewer than three bars
are shown, see Troubleshooting c.
Level:
[ ]
Devices: 25
b. Stop the Scan When All Devices are Detected
• Check that the Envoy LCD shows a complete device
count after about 30 minutes. If it does not, see
Troubleshooting d and e.
• Once all devices have been detected, disable the
Envoy’s device scan:
• Press and hold the Envoy menu button (on the
right side of the Envoy).
• Release the menu button when the LCD displays
Disable Device Scan.
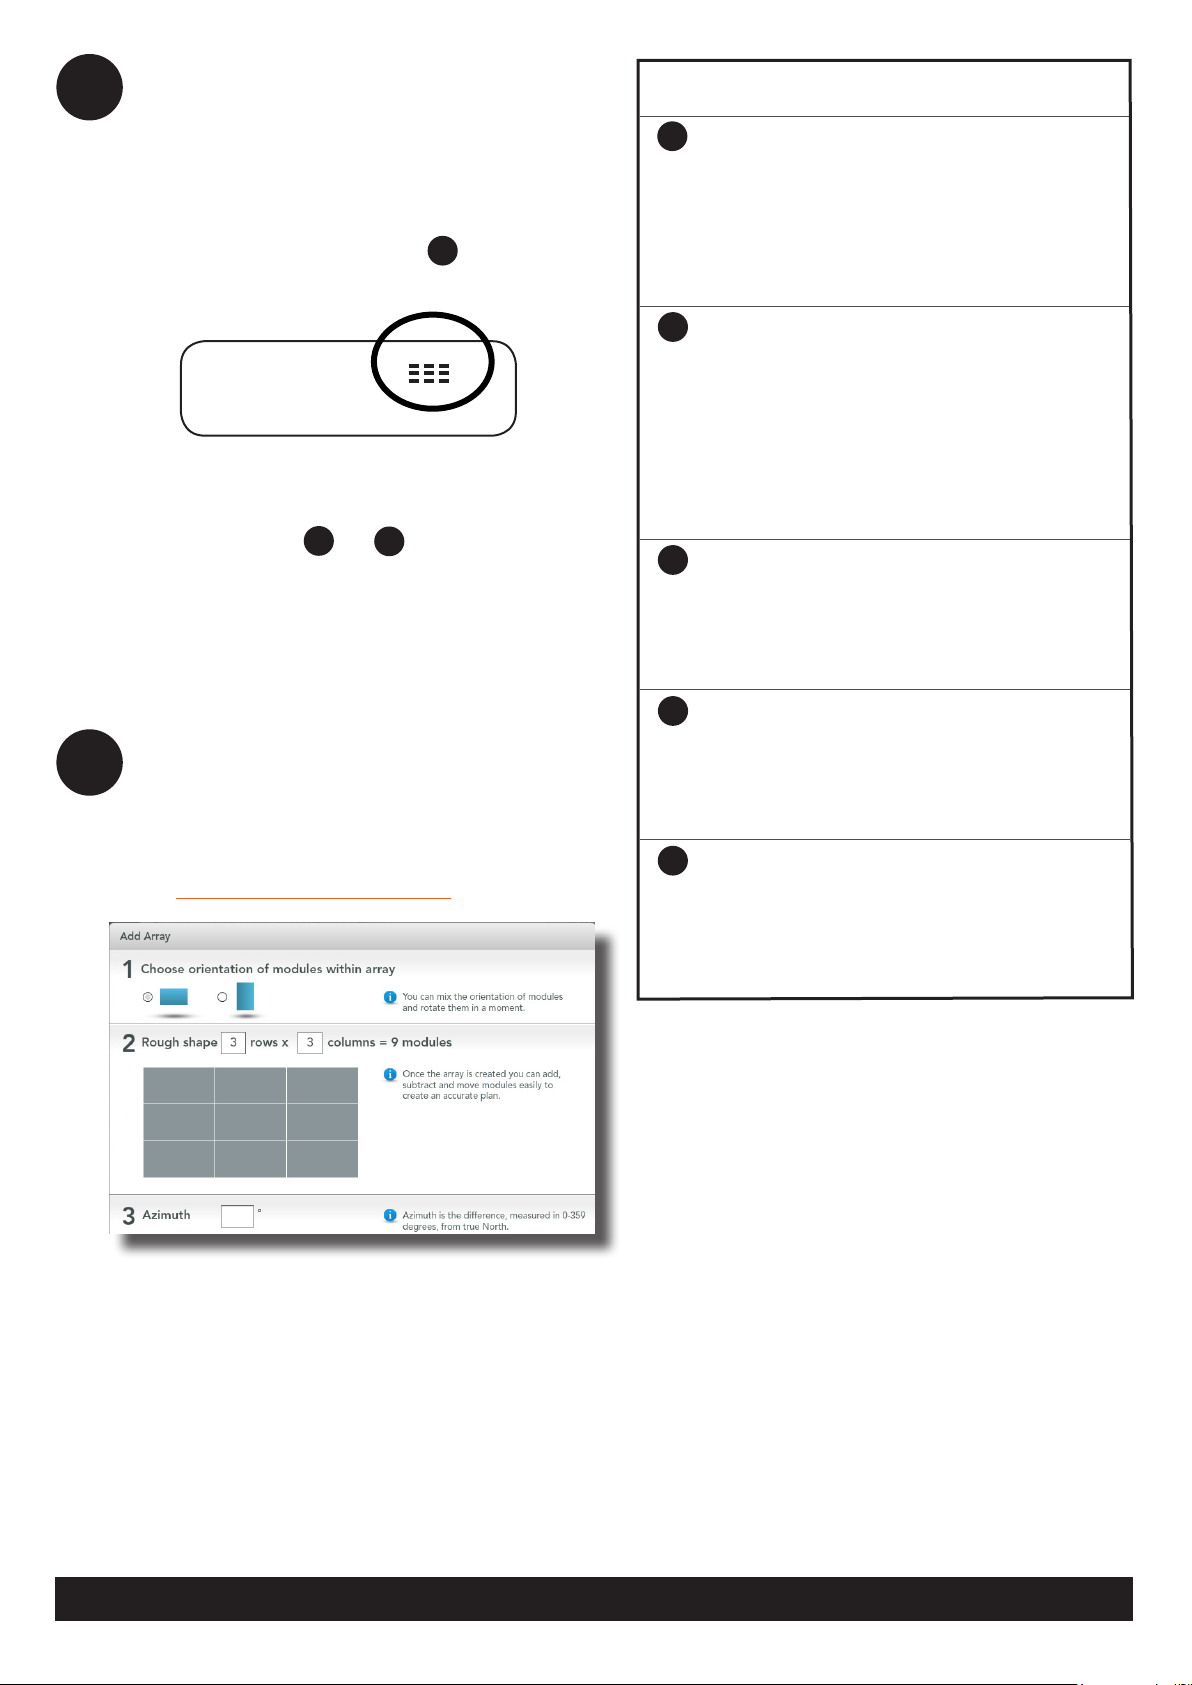
Build the Virtual Array in Enlighten
• Log in to Enlighten.
• Use Array Builder to create the virtual array using
the installation map as your reference.
• To see the Array Builder demo, go to
http://enphase.com/support/videos.
Troubleshooting
a
Wi-Fi Connection Issue
If Wi-Fi connection fails, retry the connection steps as the
connection window may have timed out.
Remember that metal enclosures or obstructions impede
wireless communication.
If you remove the wireless adapter, wait 15 seconds before
reinserting it.
Internet Connection Issue
b
If, after 15 minutes, you see -Web instead of +Web, make
sure that the broadband router is operational. Check that
other devices at the site can access the Internet.
If the broadband router is operational, press and hold the
Envoy menu button. Release the button when the LCD
displays Get New IP Address. Wait for 5 minutes.
If this fails, unplug the Envoy, wait for 20 seconds, and
plug it back in. Wait 5 minutes for connection.
Power Line Communication Level is Low
c
If the number of bars is fewer than three as a result of a
communication check, relocate the Envoy to the AC outlet
closest to the AC mains. (You may also need to use power
line communication bridges if the AC mains is remote from
the router).
Device Detection Slow
d
If, after 30 minutes (longer for large installations), the
device count shown is lower than the number of microinverters installed, or if the number of bars is between zero
and two, relocate the Envoy to the power outlet closest to
the AC mains.
Device Detection Stalled
e
If the number of bars is three or more, but the Envoy has
not detected all of the installed microinverters within 30
minutes (longer for large installations), contact Enphase
Customer Support.
• You can now view System Performance in
Enlighten.
© 2014 Enphase Energy Inc. All rights reserved.
Enphase Energy Customer Support: [email protected]
 Loading...