

Page 1
Page 2
Table of Contents
Getting started
Safety notes ................................................................................................................4
Features ......................................................................................................................6
Package contents ........................................................................................................8
Names of the parts ......................................................................................................9
Using the player (Basic Operations)
Turning the power on/off..............................................................................................11
Selecting folder............................................................................................................12
Voice recording (VR selection)....................................................................................13
Playing back file ..........................................................................................................14
Using the player (Additional Operations)
Setting the A-B repeat ................................................................................................15
Deleting file..................................................................................................................16
Deleting all files in the player ......................................................................................19
Setting the Intro scan ..................................................................................................20
Setting menu (when the MP3 is selected) ..................................................................21
Setting My Option (when the MP3 is selected) ..........................................................22
● Setting the EQ mode........................................................................................22
● Setting the Repetition ......................................................................................23
● Setting the LCD light ........................................................................................24
● Setting the display............................................................................................25
● Setting the Resume function............................................................................26
● Setting the Navigation ......................................................................................27
● Checking the memory ......................................................................................28
Setting menu (when the recording folder is selected) ................................................29
Setting My Option (when the recording folder is selected)..........................................30
● Setting the REC mode ....................................................................................30
Listening to FM radio ..................................................................................................31
● Tuning and saving the station frequency ........................................................31
● Listening to radio with saved frequency ..........................................................33
● Deleting saved frequency ................................................................................33
● Recording while listening to FM radio..............................................................34
● Setting the FM radio reception area ................................................................35
Connecting to external devices ..................................................................................36
● Recording by connecting to audio ....................................................................36
● Recording the recorded contents to audio ......................................................37
Connecting to PC
Connecting to your PC ................................................................................................38
Using the X-ONE window and icon ............................................................................44
Uploading file ..............................................................................................................46
Downloading file ..........................................................................................................47
Searching for the PC Help ..........................................................................................48
Appendix
Check points before inquiry ........................................................................................49
Product Specifications ................................................................................................50
Warranty ......................................................................................................................51
32
Page 3
Safety notes
PLAY/STOP VOLUME REC./STOP
PLAY/STOP VOLUME REC./STOP
PLAY/STOP VOLUME REC./STOP
PLAY/STOP VOLUME REC./STOP
PLAY/STOP VOLUME
REC./STOP
PLAY/STOP VOLUME REC./STOP
PLAY/STOP VOLUME REC./STOP
PLAY/STOP VOLUME REC./STOP
PLAY/STOP VOLUME REC./STOP
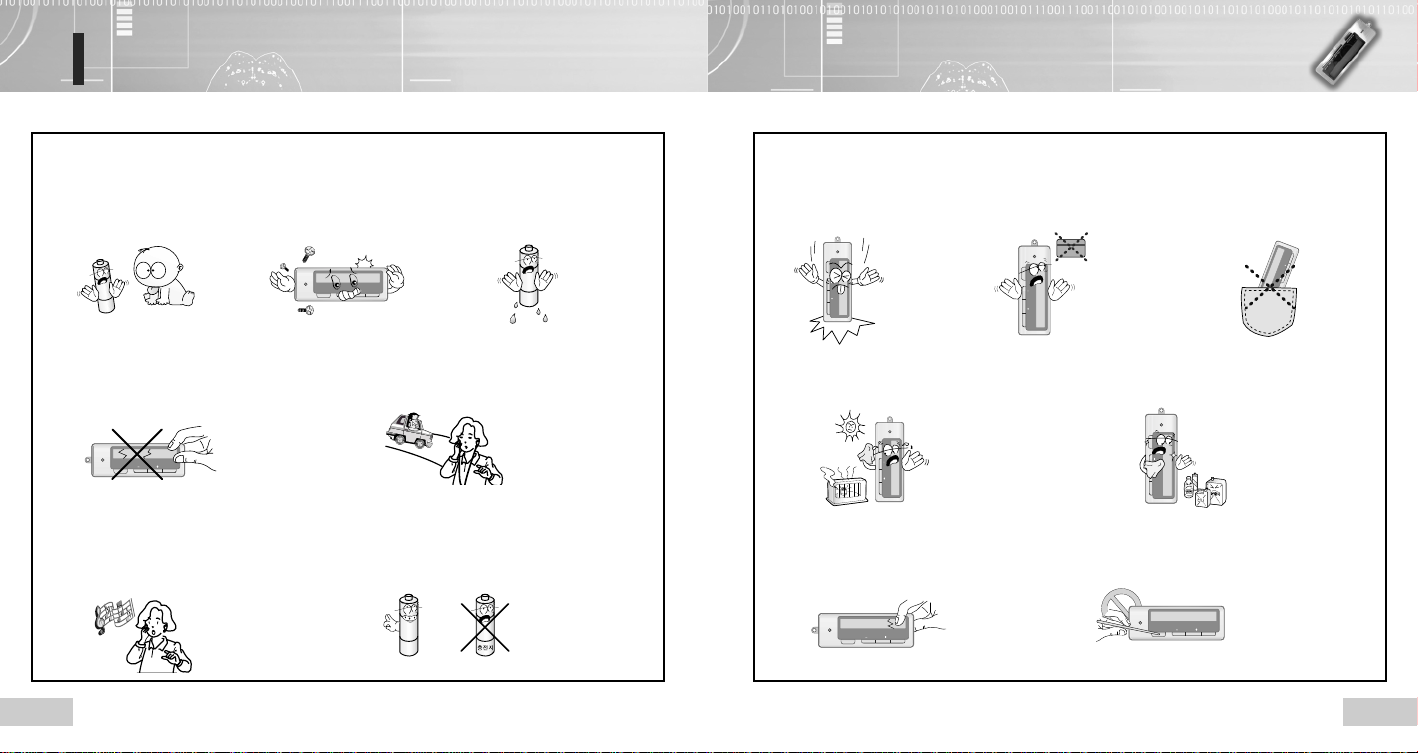
Read this manual completely before using this product.
Keep away from the reach of
infants and children. Batteries
are dangerous to them. If anyone
swallows the battery, consult with
doctor immediately.
If the LCD screen is broken, never touch
oozing fluid. If your eyes or skin is
contaminated, wipe out with clean water
and consult with doctor.
Do not set the volume level of earphone
loudly. Doctors point out the risk of
listening to loud sound for a long time.
If you feel echoing in your ears, reduce
the volume or stop using the earphone.
Do not short, disassemble, heat,
apply pressure or throw into fire.
It can cause electrolyte leakage,
overheat, breakdown or fire.
Do not use the earphone while driving a bike, car or
motorcycle. It is dangerous or even illegal depending on
the local conditions. Do not set the volume level of
earphone loudly during walking.
Make sure to use the alkaline battery (1.5V, LR03, AAA
size or UM-4). If you use the charger, malfunction can
occur and cause serious noise, which can injure your
hearing sense.
If your eyes are contaminated with
battery electrolyte, wipe out with
clean water and receive medical
attention immediately. You may lose
your vision if not treated properly.
Do not drop or apply strong
shock to the player. It may
cause malfunction.
Stay away from the direct sunlight,
high-temperature area like a heater.
Do not press the LCD unit strongly
since it is made of glass.
Do not put the magnetic materials such
as a cash card close to the microphone.
Magnetism can be changed by these
materials and the card may be
damaged.
Do not keep in the rear pocket
of your pants. When you sit
down, the LCD unit made of a
glass can be damaged.
When you want to delete dust instead of fluid solution
(thinner or benzene), you should use the soft or wet cloth.
Do not press the key strongly as shown in
the figure. It may be broken.
54
Page 4
Features
■ Digital music playback
Plays back the MP3 and WMA type digital music.(For WMA file playback, bit rate of
64Kbps or more is available.)
■ FM radio reception and recording
Available to listen to FM radio and record the FM broadcasting.
■ Digital interface (USB)
Saves the recorded files in PC and plays back in media player or sends email (including
attachment with motion picture).
■ Portable storage device
Available to use as a storage device that conveniently carried with.
■ Graphical LCD
Supports various languages and files by supporting graphical display.
■ LCD backlight
You can set the backlight up to 5 seconds.
■ Equalizer setting
Sets the audio playback tone quality (Normal _Classic _Live _POP _Rock).
■ Navigation function
Navigates track while another track is played back.
■ Automatic FM radio channel setting
Up to 20 FM radio channels can be set automatically.
■ Automatic station scanning
The optimal frequency is automatically scanned for FM radio.
■ Local selection mode (FM radio)
You can select FM frequency that corresponds to your residential area
(Korea, U.S., Europe or Japan).
■ Telephone recording
Records the ordinary telephone or mobile phone.
■ Connection to external devices
Records the sound from the outputs of external device or send the recorded sound to external devices.
■ Continuous recording
Up to 35 hours (128MB) and 71 hours (256MB) can be recorded.
■ Free memory display
The player will figure out the memory in use as well as the remaining amount.
■ Resume function
The last played back point will be saved even though the power is turned off.
■ Easy-to-use operation button
Easy-to-use basic buttons such as the PLAY, REC or STOP as well as other functional buttons
such as DELETE or FOLDER are exposed to external side.
■ Automatic power off
The player will be turned off automatically if it is not used for more than a minute.
■ Recording sound quality setting
You can set the recording sound quality depending on the situations – high quality (HQ),
standard quality (SP) or long-hour sound quality (LP).
■ Folder function
The player provides 6 folders including 4 recording folders, 1 music folder and 1 data folder.
■ Formatting function
Deletes all saved data and checks the bad section.
■ Section (A-B) repeat function the bad sector
You can set the specific section of the file and play it back repeatedly.
■ Repetitive playback function
You can repeat playback by designated setting (Normal _One _Folder _Random _All).
■ Simultaneous playback of the recording details
You can listen to the recording details while recording it.
76
Page 5
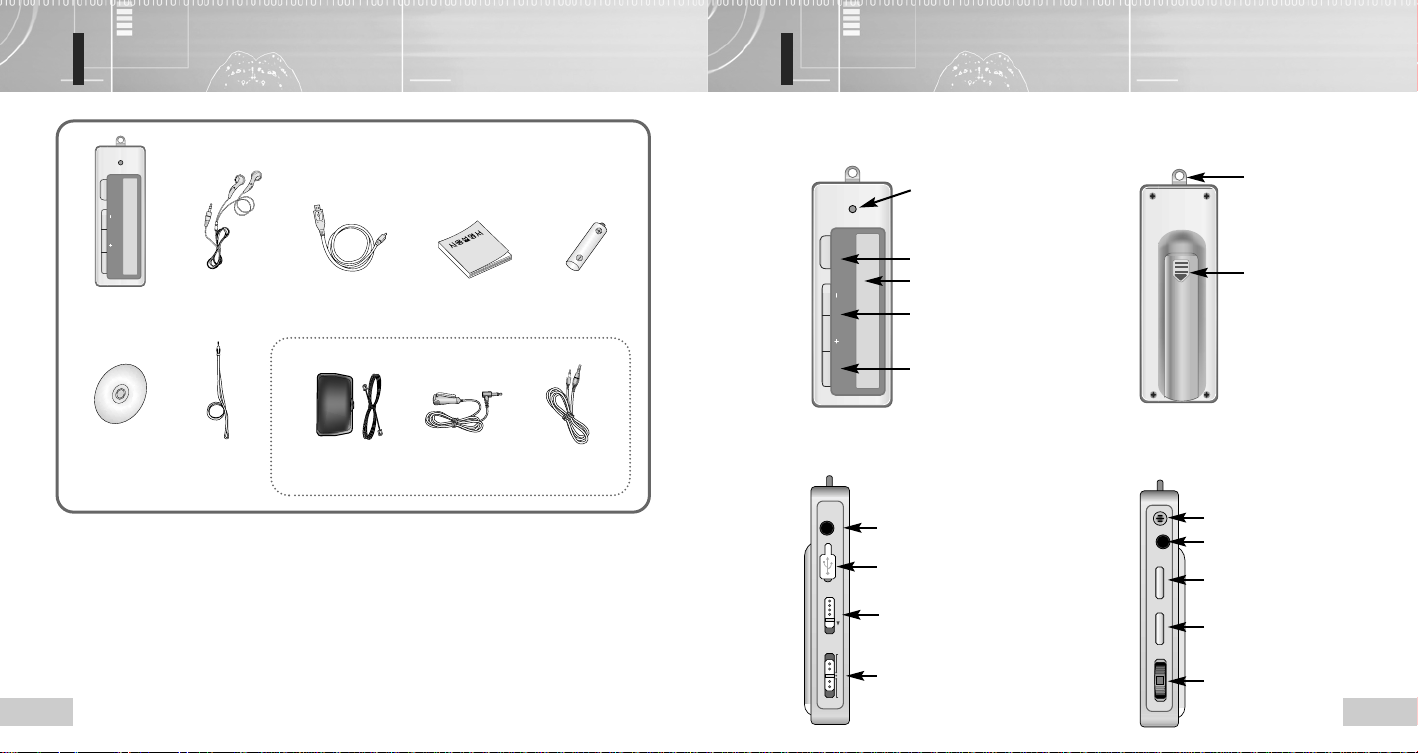
Package contents
PLAY/STOP VOLUME REC./STOP
PLAY/STOP VOLUME REC./STOP
RADIO
HOLD
PHONES
MP3 VR
MIC
LINE IN
ERASE
A-B RPT/FOLDER
REW MENU FF
Names of the parts
√
Front
√
Rear
Voice Recorder Earphone USB connection cable User's Manual Battery (AAA)
Optional
Installation CD Neck strap Phone connection
● If these accessories are damaged or broken, you can get them from the Service Center.
● Appearance of the components is subject to change for the purpose of enhancing
performance.
cord/adaptor
External
microphone
8
External device
connection cable
√
Left
LCD display
Recording: Red
Playing back: Green, red or orange
Listening to FM radio: Green, red, orange
PLAY/STOP button
Display
Volume button
REC/STOP button
Earphone output terminal
USB port connection terminal
HOLD (lock) switch
Radio/MP3/VR (Radio/Music/Voice
Recording) mode selection switch
√
Right
Internal microphone
Line in terminal
Erase button
A-B RPT/Folder selection
button
Jog/Fast search button.
Neck strap clip-on
Battery cover
9
Page 6
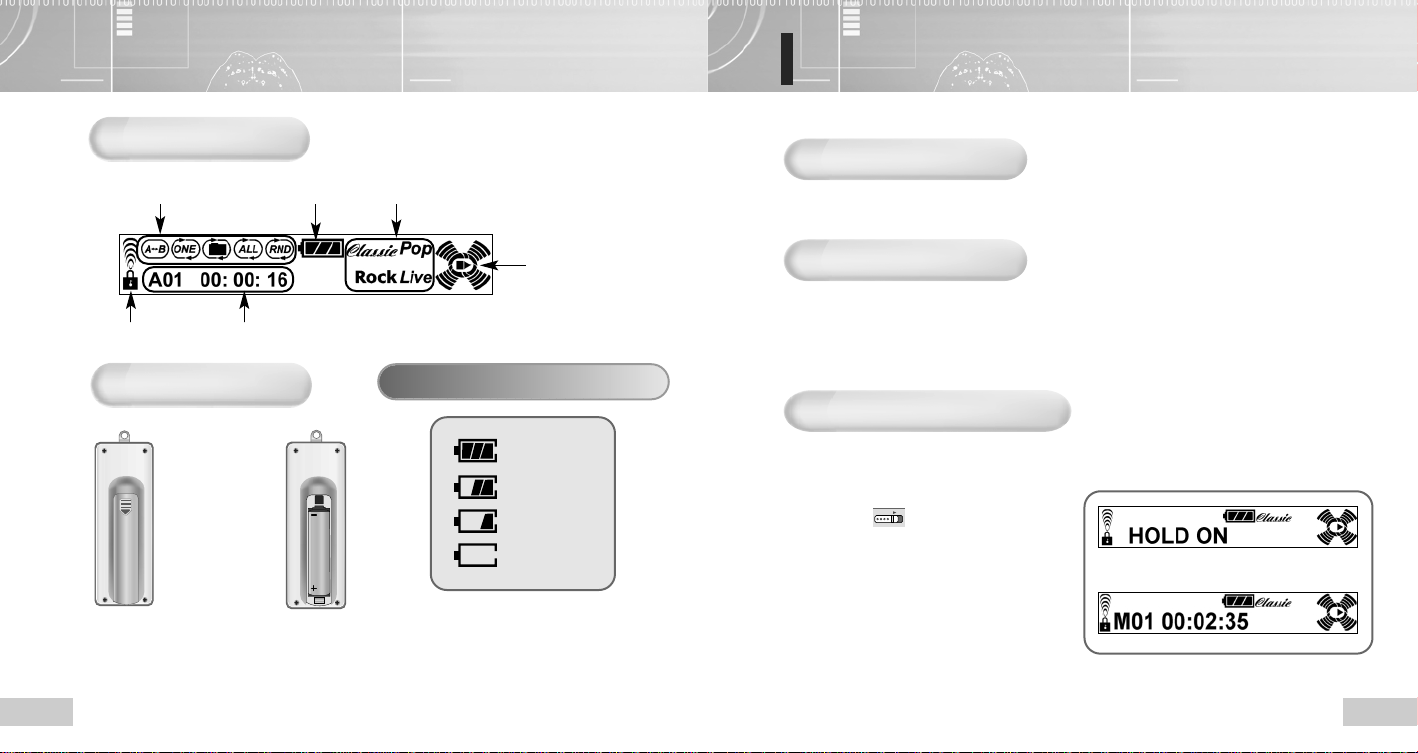
Turning the power on/off
HOLD
LCD display
To turn the power on
A-B repeat on/off
Locking status
Music number and playback time
Inserting battery
Remaining battery amount
Displaying EQ mode
Displaying Playback mode
Check the remaining battery amount.
Press the Play/Stop button longer than a second to turn the power on.
To turn the power off
Turning off automatically: If you don’t use the play longer than 1 minute in the Stop mode,
the power will be turned off automatically.
Turning off manually: If you press the Play/Stop button longer than 2 seconds in the Stop
mode, the power will be turned off.
Setting the Locking mode
➟
➪
Push the cover to
1
the arrow direction
to open the cover.
10
Insert a battery (AAA type)
2
with the correct polarities
(+,-) and close the cover.
NNoottee :
When the battery is replaced,
the recorded contents will not be
deleted.
Enough
Little used
Much used
Empty
:
When you set the locking function, all buttons will be not operated to prevent unexpected
operation by mistake.
● Locking in the Play/Stop mode (HOLD)
Push the ( ) switch to the √ direction.
● To release it, push the switch to the
opposite direction.
➡
11
Page 7
Selecting folder
Voice recording
(VR selection)
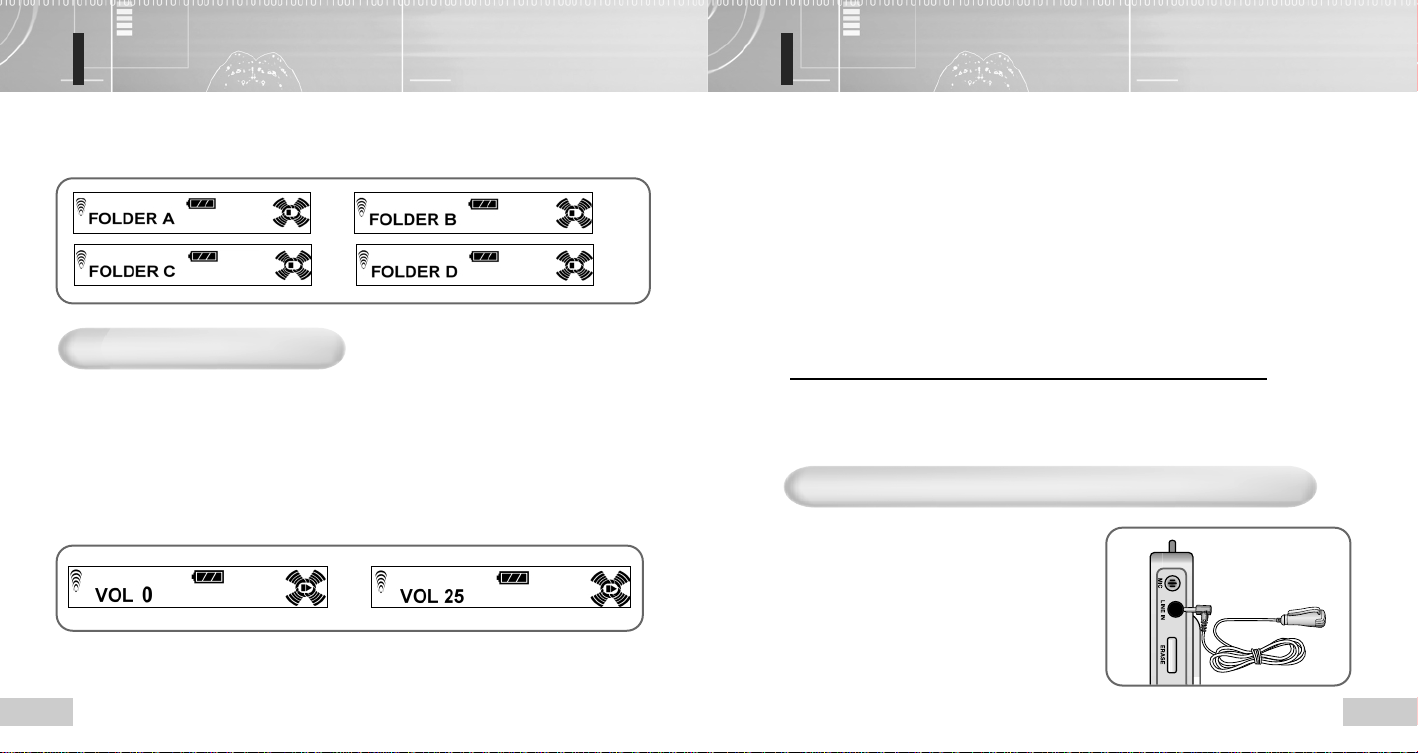
You can select a folder to playback in the VR or FM Radio mode.
Press the Folder selection button (A-B RPT/FOLDER) button in the Stop mode.
➡➡
➡
To control the volume level
You can control the volume level from 0 to 25 in the Stop or Playback mode.
Press the “+” or “-” of the Volume (VOL) button.
● As the number increases on the LCD display, the volume goes is risen.
● As the number decreases in the LCD display, the volume goes is fallen.
● Press the button shortly to control the volume step by step and press the button
more than on second to control it continuously.
➡
Push the switch to the VR direction by pressing the Play/Stop button while the
1
power is turned on.
● Make the integrated microphone to face towards the sound source when recording.
Press the REC/Stop button.
2
● After the red recording lamp will be turned on and the progress status will be displayed on the
LCD display, the recording is started. At this time, the previous folder and the next file
number of lastly recorded file will be selected by default.
Press the REC/Stop button again.
3
● The red recording lamp will be off and the recording will be stopped.
To record the track st the next file number while recording
Pull the FF button shortly while recording.
Then, recording in the current file will be stopped and resumed at the next file number.
Recording by connecting to external microphone (Microphone - optional)
If you use the external microphone, you can
record the voice while moving around.
Connect the external microphone as
shown in the figure.
Follow the steps in the “Voice recording”
to record the voice.
12
13
Page 8
Playing back file
Setting the A-B repeat
Press the Play/Stop button to turn on the power and select the mode – MP3 or VR.
1
● In the VR mode, select the folder containing the file to playback by pressing the folder selection
button (A-B RPT/FOLDER). Whenever you press the button, the folder will be changed by the
order of A, B, C and D.
● Select the file to playback using the REW/FF button in the MP3 mode.
Press the Play/Stop button.
2
● Time to playback will be displayed and playback will be started
Press the Play/Stop button again to stop playback.
3
To playback the specific section after searching for
● If you pull the REW/FF button for a long time during playback, you can move
forward/backward to/from the file to playback and find the section you want.
Release the button to resume the normal playback.
● Pull the REW/FF button for more that long time to increase the search speed.
14
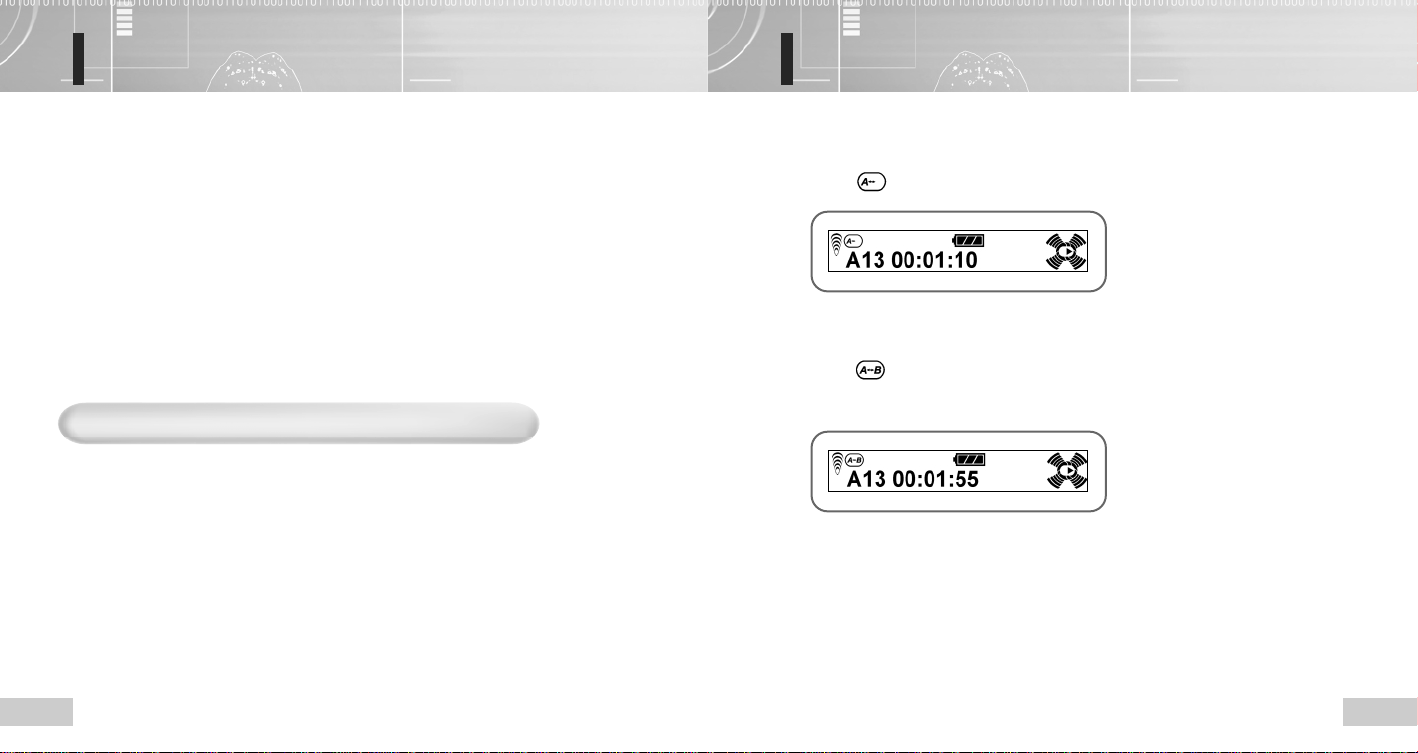
Press the A-B repeat (A-B RPT/FOLDER) button at the point where you want to
1
start A-B repeat playback during playback.
● The will be set.
Press the A-B repeat (A-B RPT/FOLDER) button again at the point where you
2
want to finish A-B repeat playback during playback.
● The will be displayed, and section from marked “A” to the one marked “B” will be
played back repeatedly. If you press the A-B repeat (A-B RPT/FOLDER) button during A-B
repeat playback, it will be released and normal playback will be resumed.
:
NNoottee :
● Press the Play/Stop button to release A-B repeat playback by setting the
A-B section.
● If you press the REC/Stop button during A-B repeat playback,
A-B repeat setting will be cleared and recording will be started.
15
Page 9
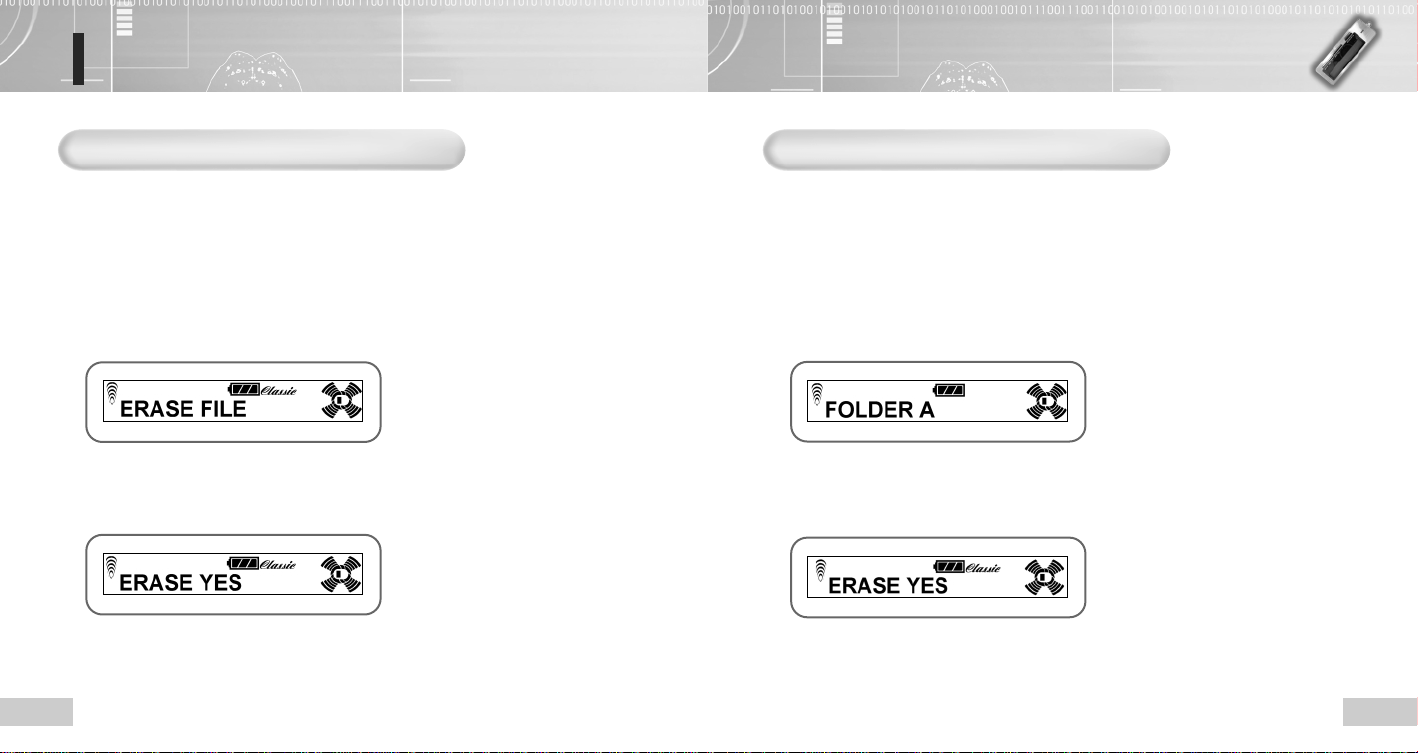
Deleting file
To delete one music or voice file
Press the Play/Stop button to turn on the power and select the mode – MP3 or VR.
1
● In the VR mode, select the folder containing the file to playback by pressing the folder selection
button (A-B RPT/FOLDER). Whenever you press the button, the folder will be changed by the
order of A, B, C and D.
● Select the file to playback using the REW/FF button in the MP3 mode.
After selecting the file and pressing the Erase button, press the Menu button.
2
● File deletion screen will be displayed.
Select the “ERASE YES” using the REW/FF button and press the Menu button.
3
● The File deletion screen will be displayed.
● To cancel the file deletion, press the Play/Stop button or select the "ERASE NO".
:
NNoottee :
● Once the music/voice file is deleted, it cannot be resaved permanently.
16
To delete all files in the folder
Select the VR mode and press the folder selection button (A-B RPT/FOLDER) to
1
select the folder containing the file to delete.
● Whenever you press the "A-B Rpt/Folder" button, the folder will be changed by the order
of A, B, C and D.
Press the Erase button. If the selected folder is displayed using the REW/FF
2
button, press the Menu button.
e.g.,) When the "FOLDER A" is selected.
Select the “ERASE YES” using the REW/FF button and press the Menu button.
3
● All voice files in the selected folder will be deleted.
● To cancel file deletion, press the Play/Stop button or select the "ERASE NO".
:
NNoottee :
● Once the music/voice file is deleted, it cannot be resaved permanently.
17
Page 10
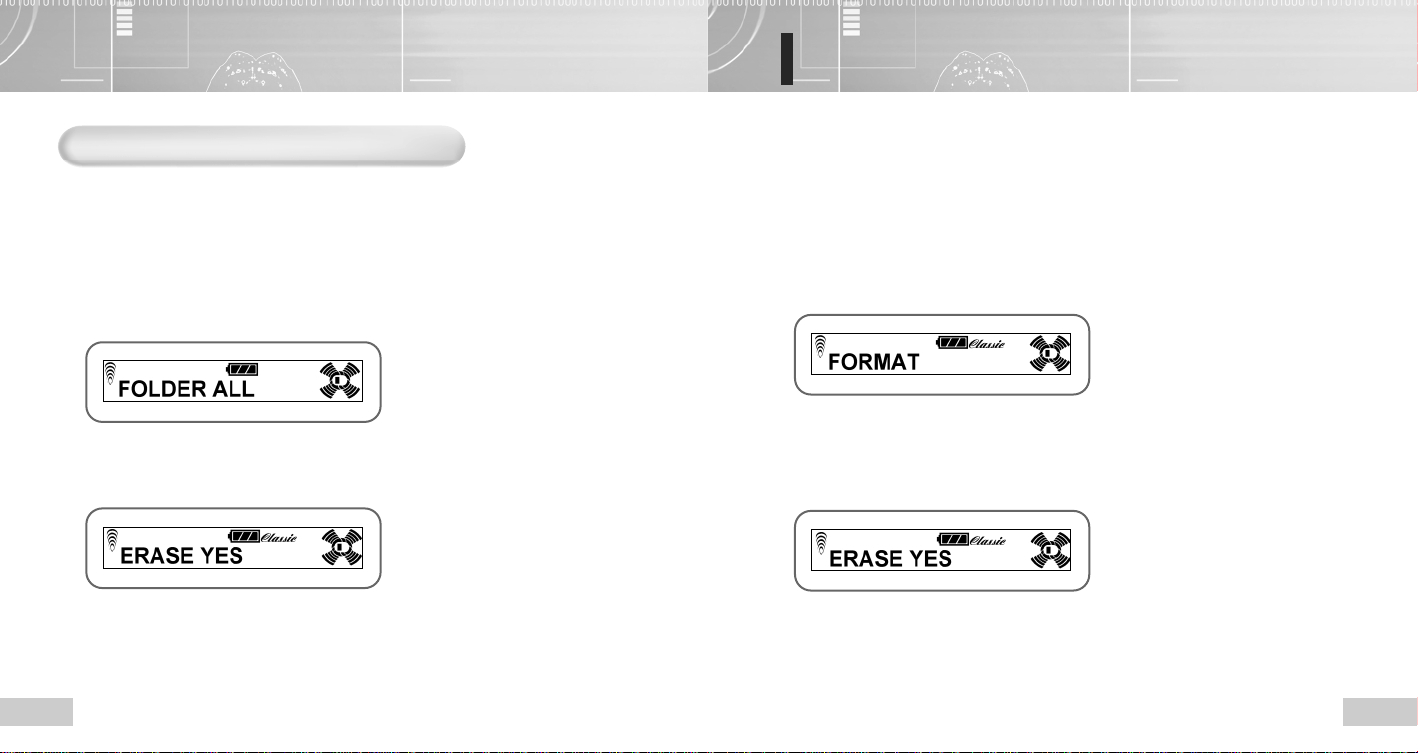
To delete entire music or voice files
Deleting all files in the player
Select the MP3 or VR file and press the Erase button.
1
● Select the “ALL MP3” for the MP3 mode, or select “FOLDER ALL” for the VR mode.
Select the “ALL MP3" or the “FOLDER ALL" using the REW/FF button
2
and press the Menu button.
● If you select the “FOLDER ALL” in the VR mode, all recording files in A/B/C/D will
be deleted.
Select the “ERASE YES” using the REW/FF button and press the Menu button.
3
● To cancel the file deletion, press the Play/Stop button or select the "ERASE NO".
:
NNoottee :
● Once the music/voice file is deleted, it cannot be resaved permanently.
18
Press the Erase button.
1
Select the “FORMAT” using the REW/FF button and press the Menu button.
2
● The Erasing all files menu will appear.
Select the “ERASE YES” using the REW/FF button and press the Menu
3
button to delete all files.
● All saved files will be deleted.
● To cancel file deletion, press the Play/Stop button or select the "ERASE NO".
NNoottiiccee :
● If you select the “FORMAT”, all voice and music files as well as the data files
:
downloaded from the PC will be deleted permanently. Check again before
formatting.
19
Page 11
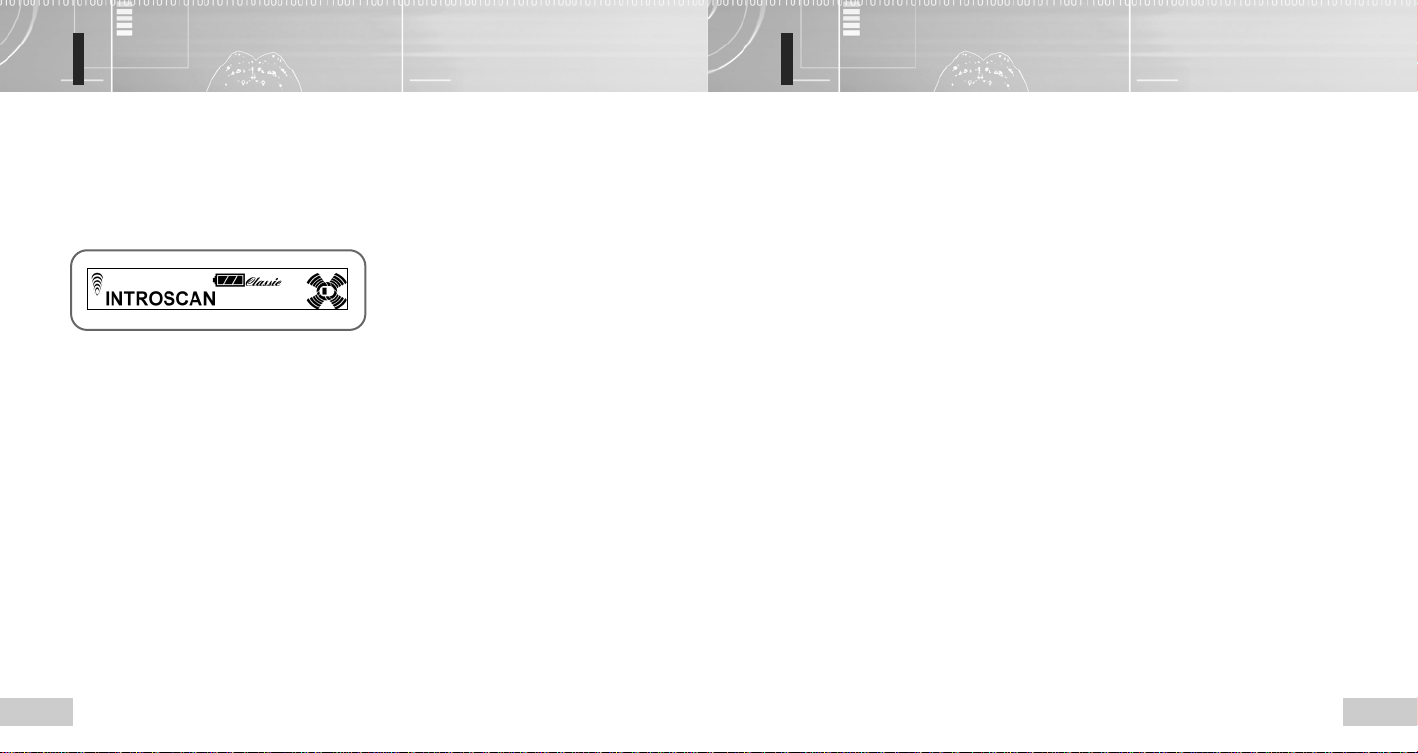
Setting the Intro scan
Setting menu (when the MP3 is selected)
Press the Play/Stop button longer than 2 seconds while playing back MP3 or VR files.
● Starting from the current file, the intro section of all files will be played back for
7 seconds, and the mode will be released and the initial state will be resumed.
20
Press the Play/Stop button to turn on the power and select the MP3 mode.
1
After pressing the Menu button in the Playback or Stop mode, move to the
2
intended function using the REW/FF button.
● You can select all functions in the Playback mode.
The mode will be selected by the order of EQ Mode ➔ REPEAT ➔ LCD light ➔ DISPLAY ➔
RESUME ➔ NAVIGATION ➔ FREE MEMORY when you pull toward the "FF" button.
● You cannot set the navigation function in the Stop mode.
Press the Menu button gain to select the function. It will return to the previous
3
screen.
● After setting the function, press the Menu button to move to the next menu. Likewise,
you can set other menu.
● If you don’t input anything for 5 seconds in the Menu mode during playback, the Menu
mode will be released.
21
Page 12
Setting My Option (when the MP3 is selected)
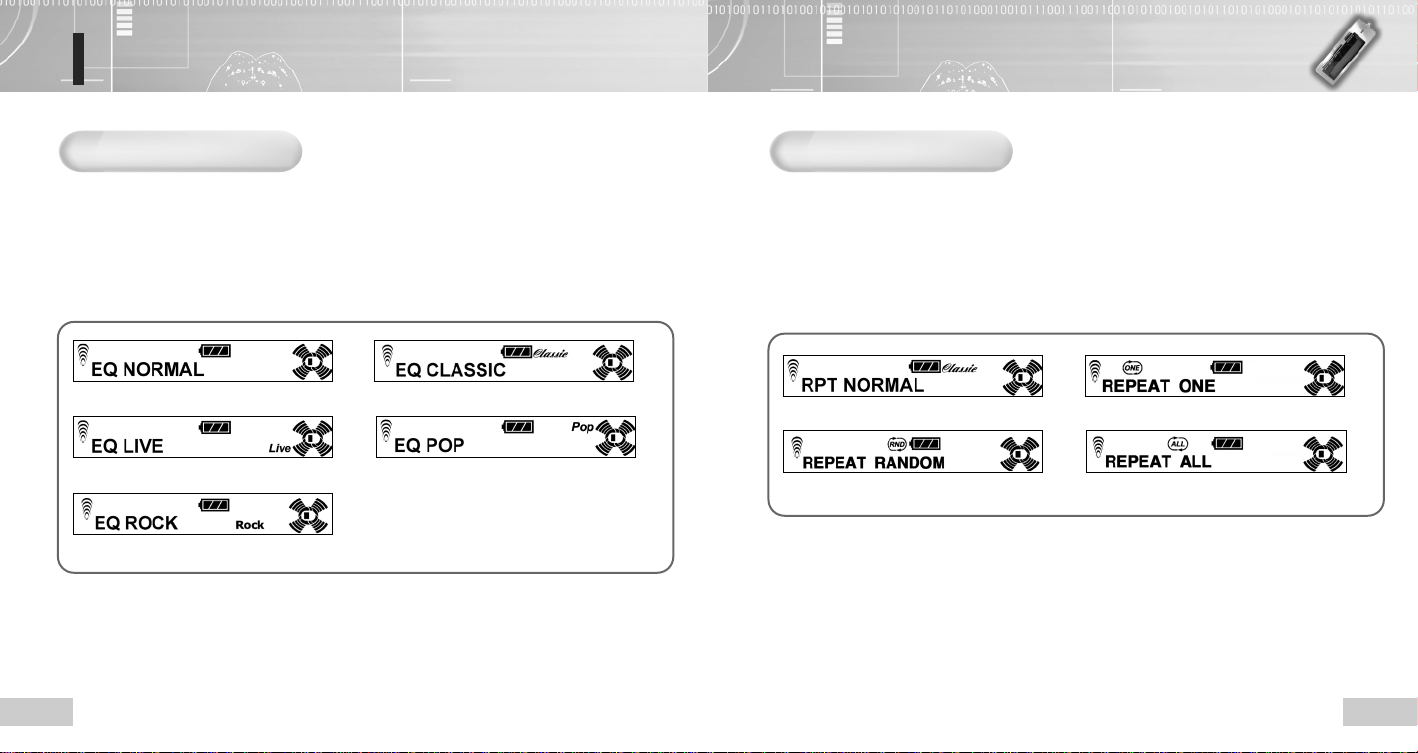
Setting the EQ mode
After pressing the Menu button in the Playback or Stop mode, select the EQ Mode
1
using the REW/FF button.
● The player will enter the Sound setting mode.
Select the tone you want using the REW/FF button.
2
➡
Normal mode Classic mode
➡
Live mode Pop mode
Rock mode
Press the Menu button again to save the setting.
3
➡
➡
Setting the Repetition
You can playback the selected file once or repeatedly.
Press the Menu button in the Playback or Stop mode and select the
1
REPEAT using the REW/FF button.
Select the repetition type you want using the REW/FF button.
2
➡
No repetition. Repeats one file.
➡
Repeats all files randomly. Repeats all recorded files.
Press the Menu button again to save the setting.
3
:
NNoottee :
● The “REPEAT FOLDER” will be enabled in the VR mode because there are saved
folders – A, B, C and D.
● The REPEATNORMAL → REPEAT ONE → REPEAT FOLDER → REPEAT
RANDOM → REPEAT ALL will be displayed.
➡
➡
2322
Page 13
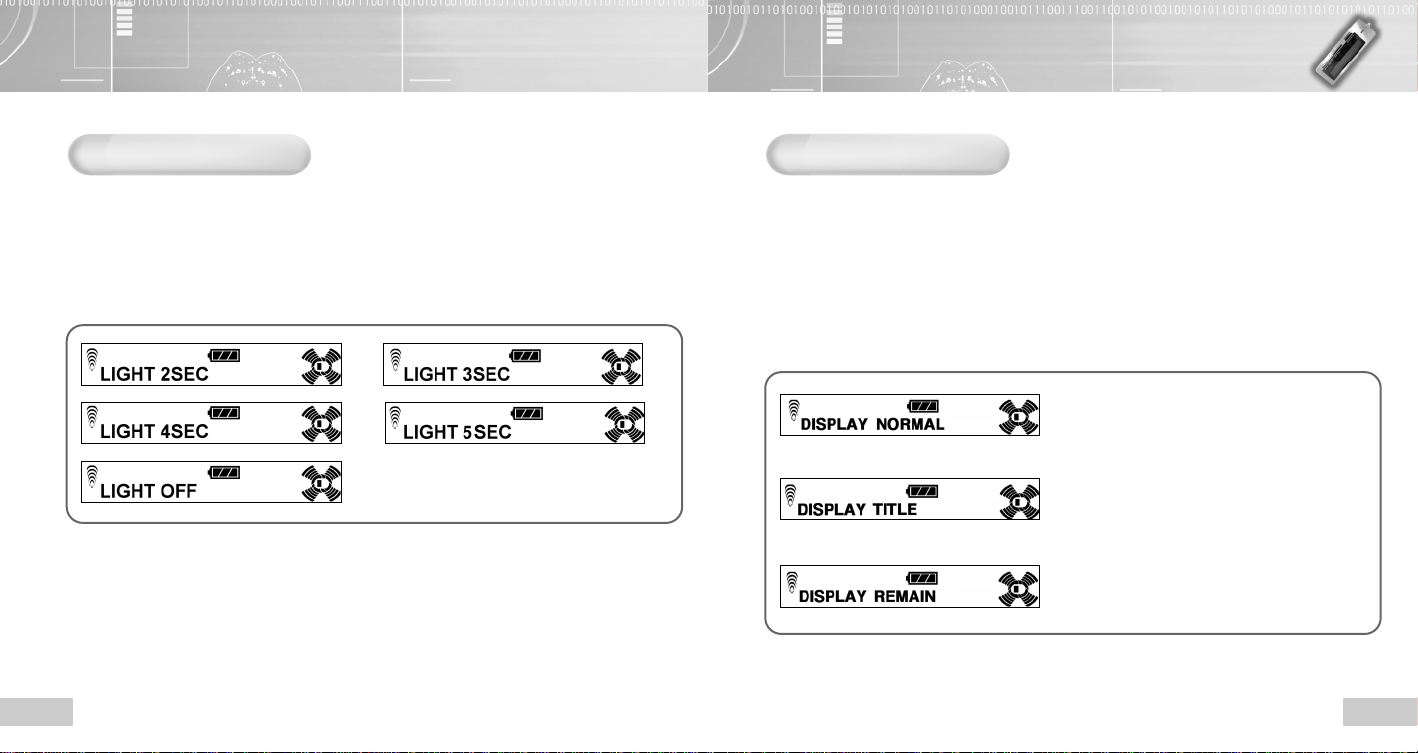
Setting the LCD light
Setting the display
After pressing the Menu button in the Playback or Stop mode, select the LCD light
1
using the REW/FF button.
Select the time you want using the REW/FF button.
2
● You can set the flashing time of the LCD light by 5 steps (2 – 5 seconds) after
button manipulation.
➡
➡➡
Press the Menu button again to save the setting.
3
➡
You can check file name, playback time or remaining playback time
(or available recording time), depending on the settings.
After pressing the Menu button in the Playback or Stop mode, select the
1
Display using the REW/FF button.
Select information you want using the REW/FF button.
2
The elapsed time of current recording or playback
is displayed.
➡➡
File name is displayed.
The remaining playback time is displayed.
The available recording time is displayed while recording.
2524
Page 14
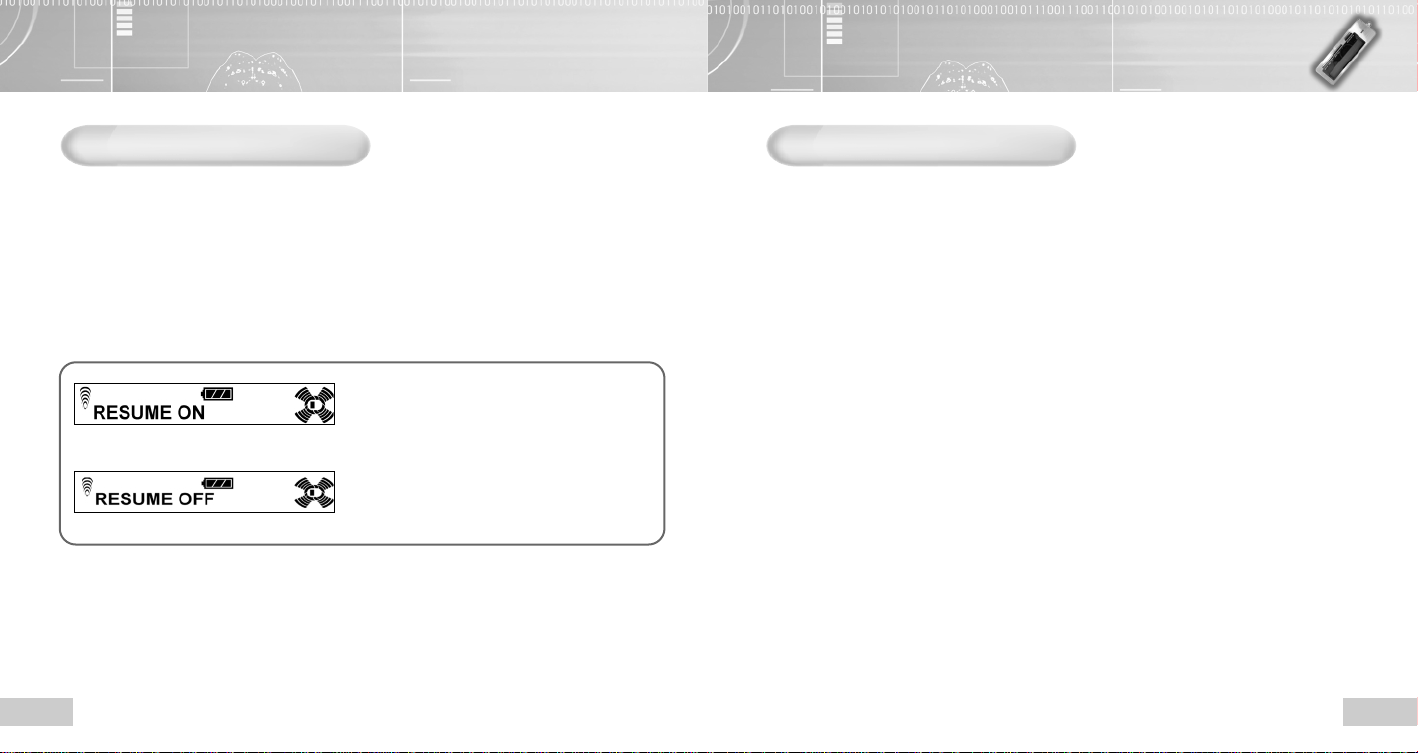
Setting the Resume function
Setting the Navigation
If you stop playback by pressing the Play/Stop button during playback and start
playback again, the playback will be resumed from the last played position.
After pressing the Menu button in the Playback or Stop mode, select the
1
RESUME using the REW/FF button.
Select the ON or OFF using the REW/FF button.
2
● The Playback will be resumed the last playback position.
The Playback will be resumed the last playback
position.
➡
The Playback will be started from the beginning. To
cancel the resume setting, press the Play/Stop
button or select the “RESUME OFF”.
:
NNoottee :
● When the Resume is set to "on", you can stop playback and select the other track
using REW/FF button to playback from the beginning of the selected track.
If you use the navigation function during music file playback, you can check
information on other files while playing back the current file without interruption.
Use the REW or FF button to perform this function..
Press the Menu button while playing back the music file and select the
1
NAVIGATION using the REW/FF button.
Select the ON or OFF using the REW/FF button.
2
Press the Menu button again to save the setting.
3
Check information on the previous/next file using the REW/FF button.
4
Set the navigation using the same method in the music file to playback next.
5
● When the playing file is completed, the navigation-set file will be played back.
● If the navigation-set file is played back completely, the next file will be played back.
● If the playing file is completed while setting navigation, the next file will be played back
and the navigation setting will continue.
● Press the Play/Stop button to cancel navigation setting.
The playing music will be played back continuously but navigation will be released.
2726
Page 15
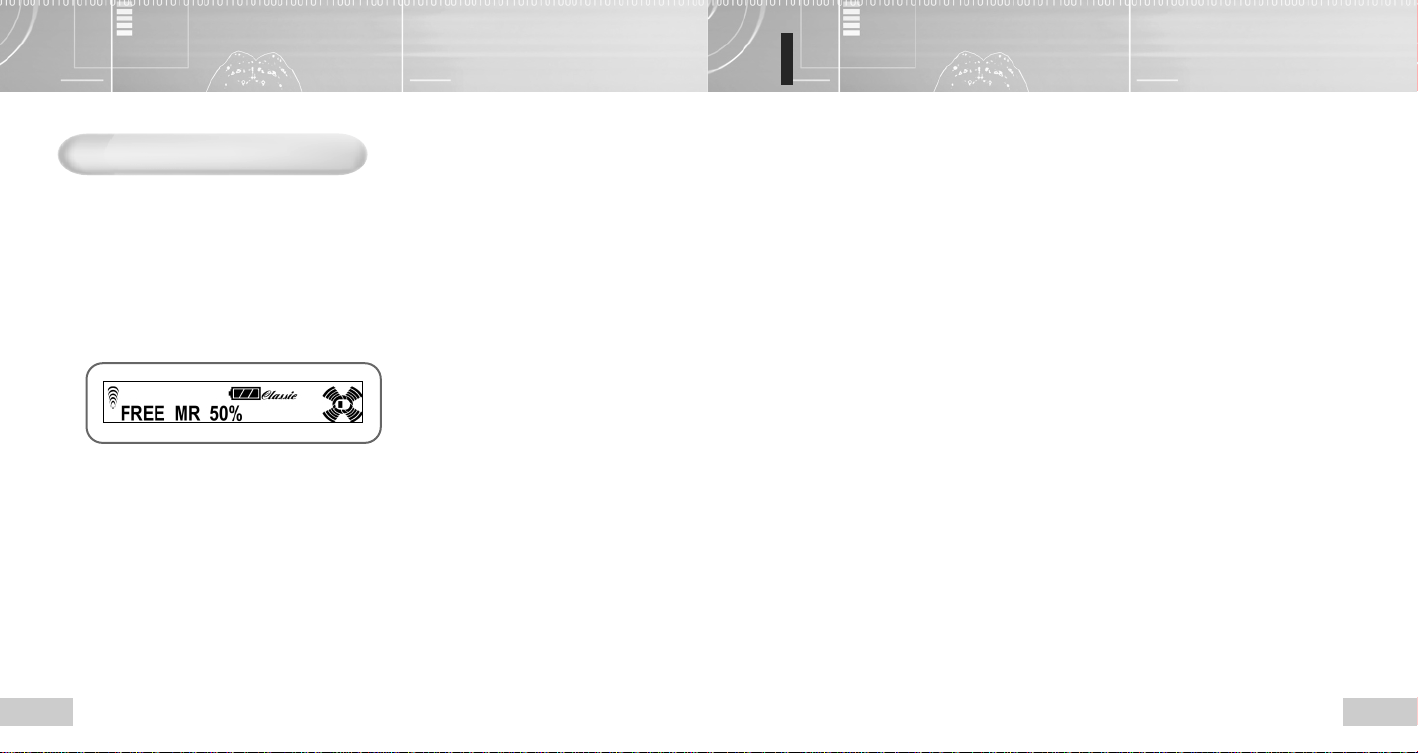
Setting menu (when the recording folder is selected)
Checking the memory
You can check the available memory in the Playback or Stop mode.
After pressing the Menu button in the Playback or Stop mode, check the
1
available free memory using the REW/FF button.
Press the Menu button again to see the remaining memory compared
2
with the total memory.
28
Select the VR mode while the power is turned on by pressing the Play/Stop button.
1
Press the folder button to select the fonder that will save the file to record among
2
A, B, C or D.
Press the Menu button in the Playback or Stop mode and move to the intended
3
function using the REW/FF button.
● The REC MODE ➔ REPEAT ➔ LCD light ➔ DISPLAY ➔ RESUME ➔ FREE MEMORY will be
displayed.
Press the Menu button again to select the function. It will return to the previous
4
screen.
● After setting the function, press the Menu button to move to the next menu.
Likewise, you can set other menus.
● If you don’t input anything for 5 seconds in the Menu mode while the player is playing back
or paused, the Menu mode will be released.
:
NNoottee :
● Refer to the “Setting My Option (when the recording folder is selected)” for
more information on the repetition function, LCD light, display, resume function
and memory check.
29
Page 16
Setting My Option (when the recording folder is selected)
Setting the REC mode
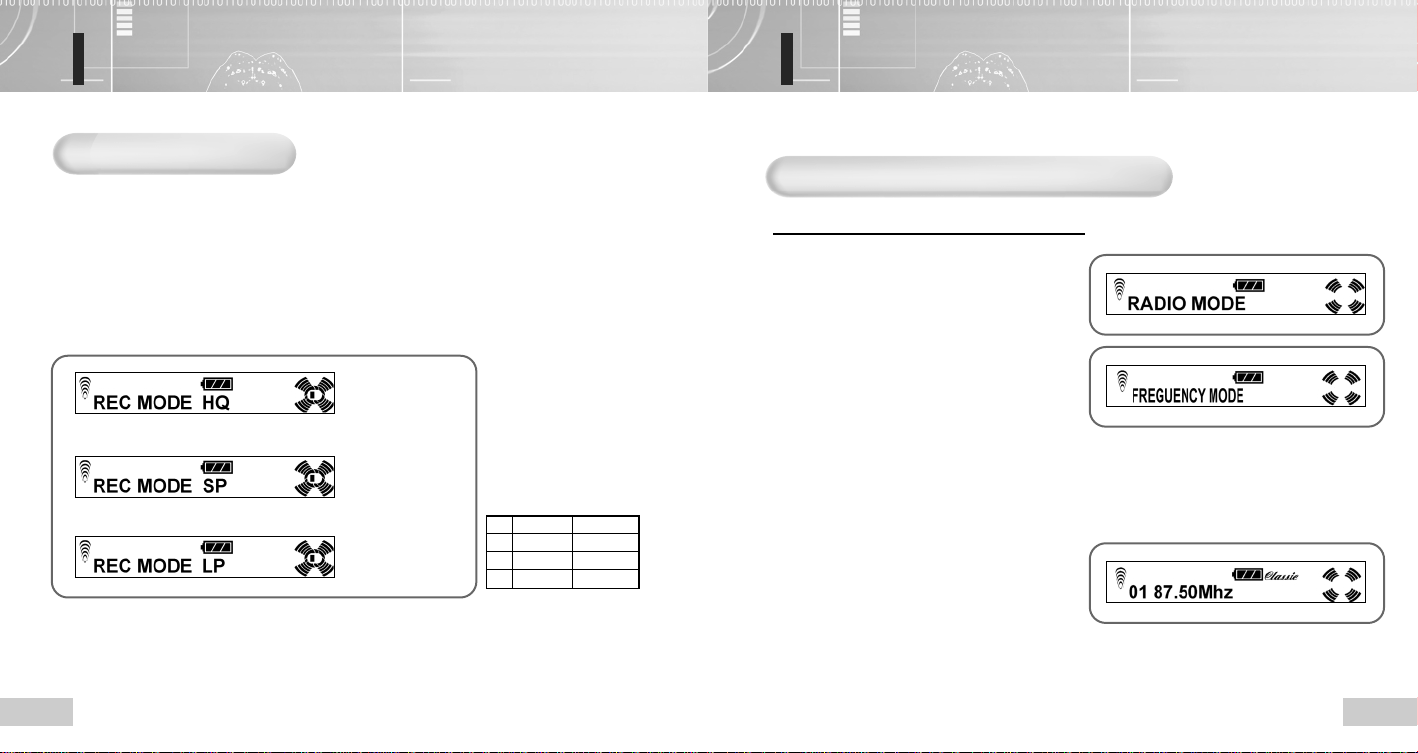
You can select the recording quality – HQ, SP or LP. You can also set the recording time
depending on the recording quality.
After pressing the Menu button in the Playback or Stop mode, select the REC MODE
1
using the REW/FF button.
● The player will enter the Sound setting mode.
Select the recording quality you want using the REW/FF button.
2
➡➡
Press the Menu button again to save the setting.
3
30
High quality mode
Standard mode
Long hour mode
Recording time
125MB 256MB
HQ 8H 50M 17H 40M
SP 17H 40M 35H 20M
LP 35H 25M 70H 50M
Listening to FM radio
Push Play/Stop button to the FM direction while the power is turned on.
If you select the FM Radio mode, the frequency of last selected will be set automatically.
Tuning and saving the station frequency
To tune and save the station manually
Press the Menu button.
1
● The player will enter the Radio mode.
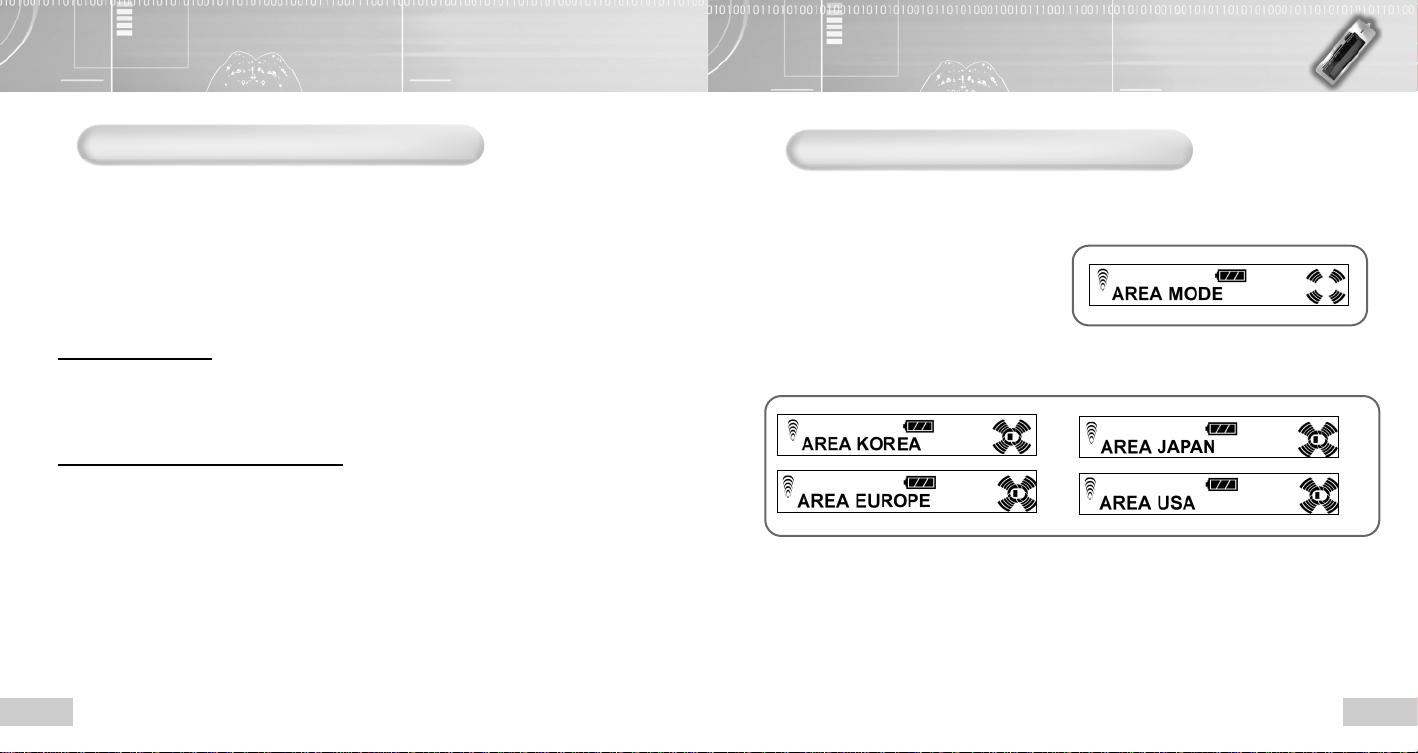
Press the Menu button again to Select the
2
“FREQUENCY MODE" using the REW/FF
button and press the Menu button.
● The manual frequency channel setting mode
will be selected.
Select the frequency manually by pulling the REW/FF button shortly.
3
● If you pull the REW/FF button longer than a second, the radio broadcasting frequency will be
automatically scanned.
After selecting the frequency to save,
4
press the play/stop button.
● The channel number will blink.
Select the channel number to save using the REW/FF button and save it
5
by the play/stop button.
● Save other broadcasting frequency using the same method as described above.
31
Page 17
To set and save the station automatically
Only the identifiable frequency will beset in the area that receives weak frequency.
Press the Menu button.
1
● The player will enter the Radio mode.
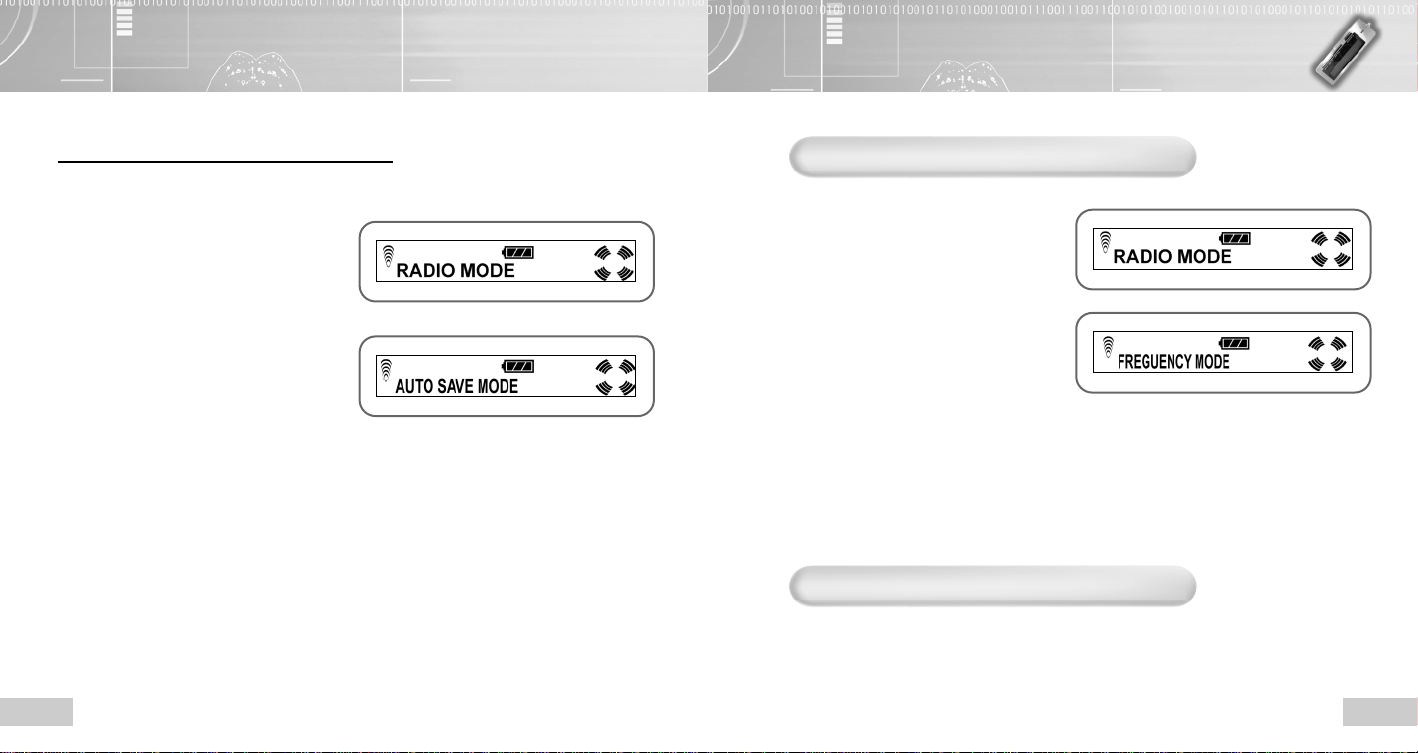
Press the Menu button again to select
2
the “AUTO SAVE MODE" using the
REW/FF button and press the Menu
button.
● Radio broadcasting frequencies that can
be received will be scanned automatically
and saved in the CH01 ~ CH20.
Listening to radio with saved frequency
Press the Menu button.
1
● The player will enter the Radio mode.
Press the Menu button again to select
2
the “PRESET MODE " using the
REW/FF button and press the Menu
button.
● The manual frequency channel setting
mode will be selected
Pull the REW/FF button shortly and find the saved channel.
3
● If you pull the REW/FF button for a long time in the PRESET mode, you can
search the broadcasting frequency manually since the mode is changed to the
"FREQUENCY MODE".
Deleting saved frequency
Whenever you press the Erase button, the saved frequency will be
deleted one by one and the next frequency will be selected.
3332
Page 18
Recording while listening to FM radio
Setting the FM radio reception area
Press the REC/Stop button.
1
The red lamp will flash and the saved folder and number will be
2
displayed. Then, the recording will be started.
● If you press the Folder button before recording, the recording folder will be
selected and saved in the file next to the recorded file.
To finish recording
Press the REC/Stop button again.
● The red lamp will be off and the recording will be stopped.
To playback the recorded message
● Change to the VR mode and select the recorded file. Then, press the Play/Stop button to play it back.
(For more details, refer to the “Playing Back the Files”, page 14.)
:
NNoottee :
● It is recommended to use the HQ mode to record as much as possible.
The sound quality can be deteriorated when you record and playback the FM radio broadcasting.
(See page 30.)
● You may experience serious noise when recording in the area with weak reception.
Move the player or the earphone line to the better location.
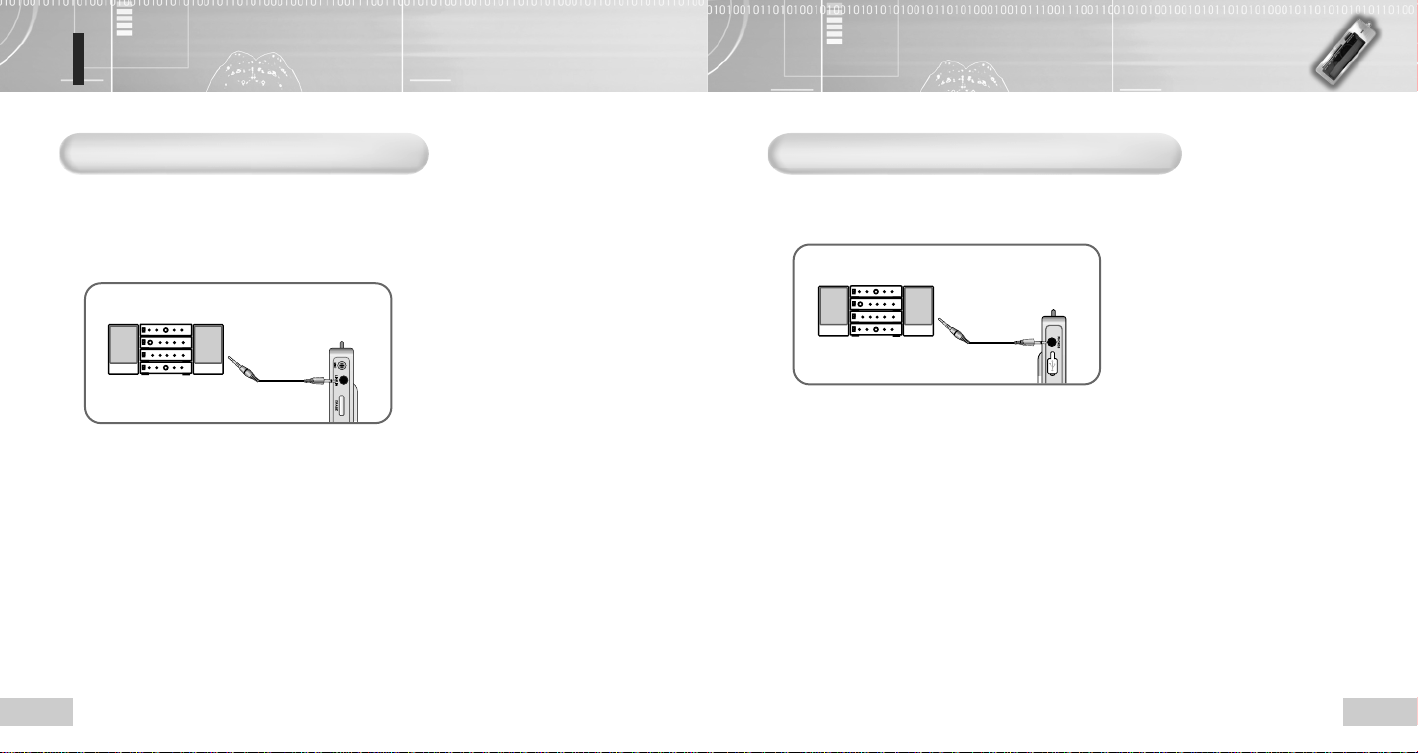
Press the Menu button and pull the FF button once to select the
1
“AREA MODE”. Then, press the Menu button gain.
● The player will enter the Area setting mode.
Select the reception area using the REW/FF button and set the area by pressing the
2
Menu button. (The 4 countries on display were just meaned by frequency ranges. )
➡➡
➡➡
● AREA KOREA: 87.5 kHz ~108 kHz, step:100 kHz
● AREA JAPAN: 76 kHz ~108 kHz, step:100 kHz
● AREA EUROPE (China, ASIA, CIS, AFRICAand East ASIA): 87.5 kHz ~108 kHz, step:50 kHz
● AREA USA (Canada, South America): 87.5 kHz ~108 kHz, step:100 kHz
3534
Page 19
Connecting to external devices
Recording by connecting to audio
You can save the outputs from the external devices as the EVR type or records the file saved in
the MP3 player in external devices.
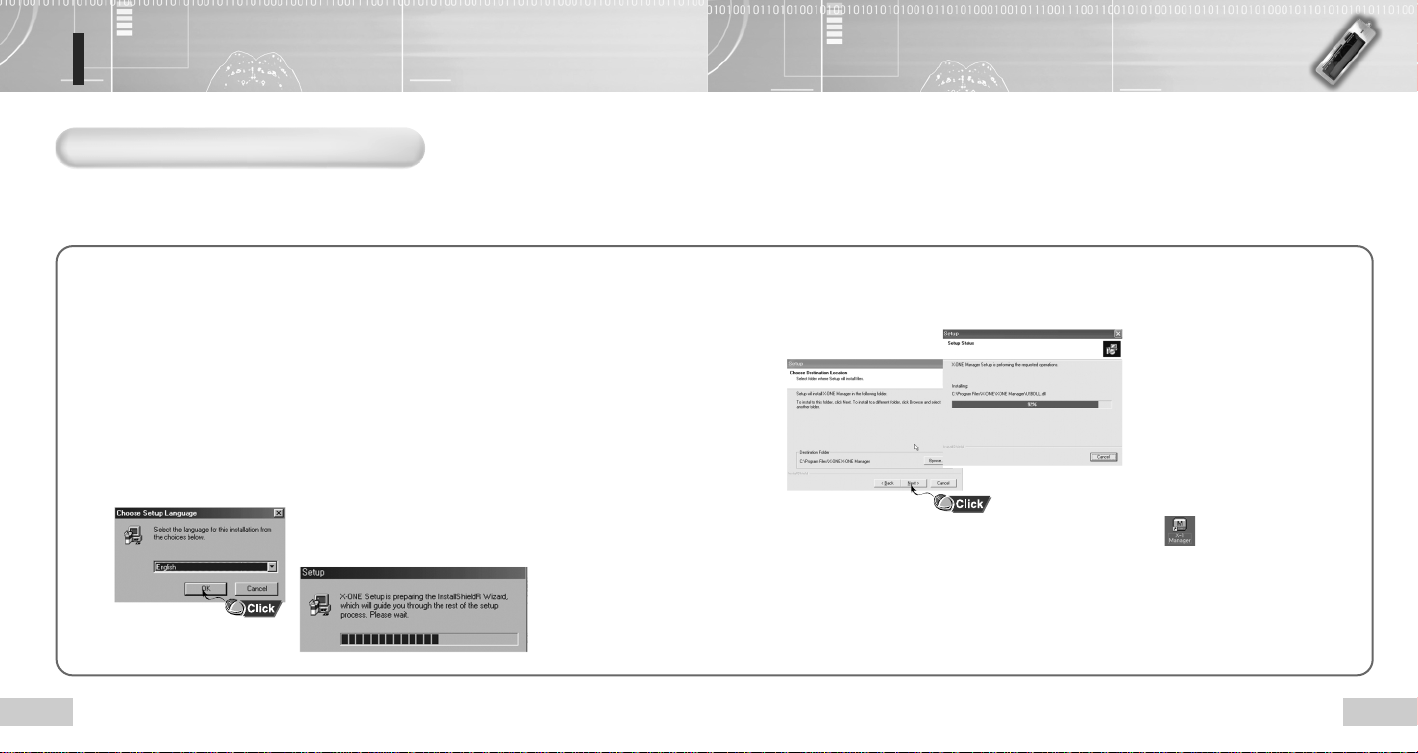
Connect the microphone input terminal of the MP3 player to the output
1
terminal of the external device using the external device connection cable.
Audio
Press the REC/Stop button in the MP3 player while playing back in the external
2
device.
● The input details will be heard from the MP3 player earphone and recording will be started.
Press the REC/Stop button again to stop recording.
3
:
NNoottee :
● To adjust recording sound level, use the audio’s volume control function.
● Recording sound quality can be deteriorated depending on performance of the external devices.
Recording the recorded contents to audio
Connect the microphone output terminal of the MP3 player to the input
1
terminal of the external device using the external device connection cable
Audio
Select a file to record in the external device.
2
Press the Play/Stop button of the MP3 player and the REC button of the
3
external device at the same time.
● The contents in the MP3 player will be recorded in the external device.
Press the Play/Stop button of the MP3 player and the STOP button of the
4
external device at the same time to stop recording.
3736
Page 20
Connecting to your PC
To connect the player to your PC
To install the X-ONE Manager
You can upload the file saved in the player to the PC, or download the file saved in the
PC to the player.
System requirements
Computer: Pentium or faster CPU on the IBM compatible PC with USB port support.
Memory: 64MB or more.
OS: Windows 98/Me /2000 /XP
HDD: More than 100MB free disk space
Playback: Sound card and speaker
Recording: Sound card and speaker
When you insert the "X-ONE Manager" CD into the CD-Rom driver, the installation
window will appear after a while. If the installation window is not popped up, doubleclick the "SETUP.exe" after opening My Computer and selecting the "CD-ROM".
Select the language to use.
1
Press the [Next] button in each window
2
that appears sequentially.
When the installation is completed, the shortcut icon ( ) will be appeared
3
on the desktop window.
:
NNoottee :
● To uninstall the X-ONE Manger, select [Start] → [Settings] → [Control Panel] →
[Add/Remove Program] or select [Start] → [Programs] → [X-ONE] → [X-1manager] → [Uninstall].
3938
Page 21
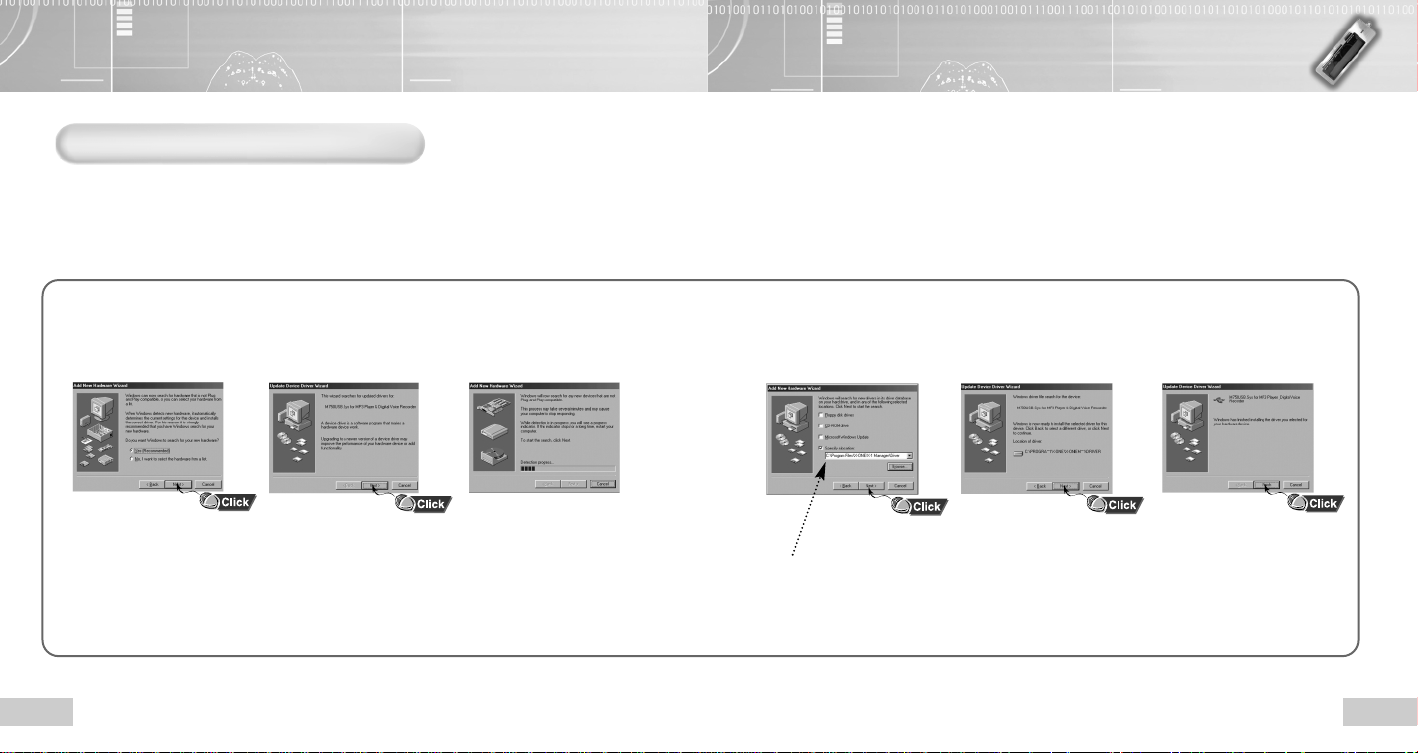
To install the driver
To install the driver on WINDOW 98/ME/2000
The driver will be automatically installed when you connect the player to the PC after installing the
X-ONE Manager. If the PC cannot recognize the player, the “New Hardware Installation Wizard”
message will appear. In this case, take the following steps.
Press the [Next] button in each window that appears sequentially.
:
NNoottee :
● If the "New Hardware Installation Wizard" window is not displayed, disconnect the product from
your PC and run the process as follows.
Remove the USB device in My Computer ➝ Control Panel ➝ System ➝ Device Manager ➝
‘Other Devices’ folder ➝ Remove ‘USB DEVICE’ and connect the product to your PC again.
Click the 'Browse’ and specify the path as follows.
C:\Program Flles\X-ONE\X-ONE Manager\Driver
Then, click ‘Next’.
Continued...
4140
Page 22
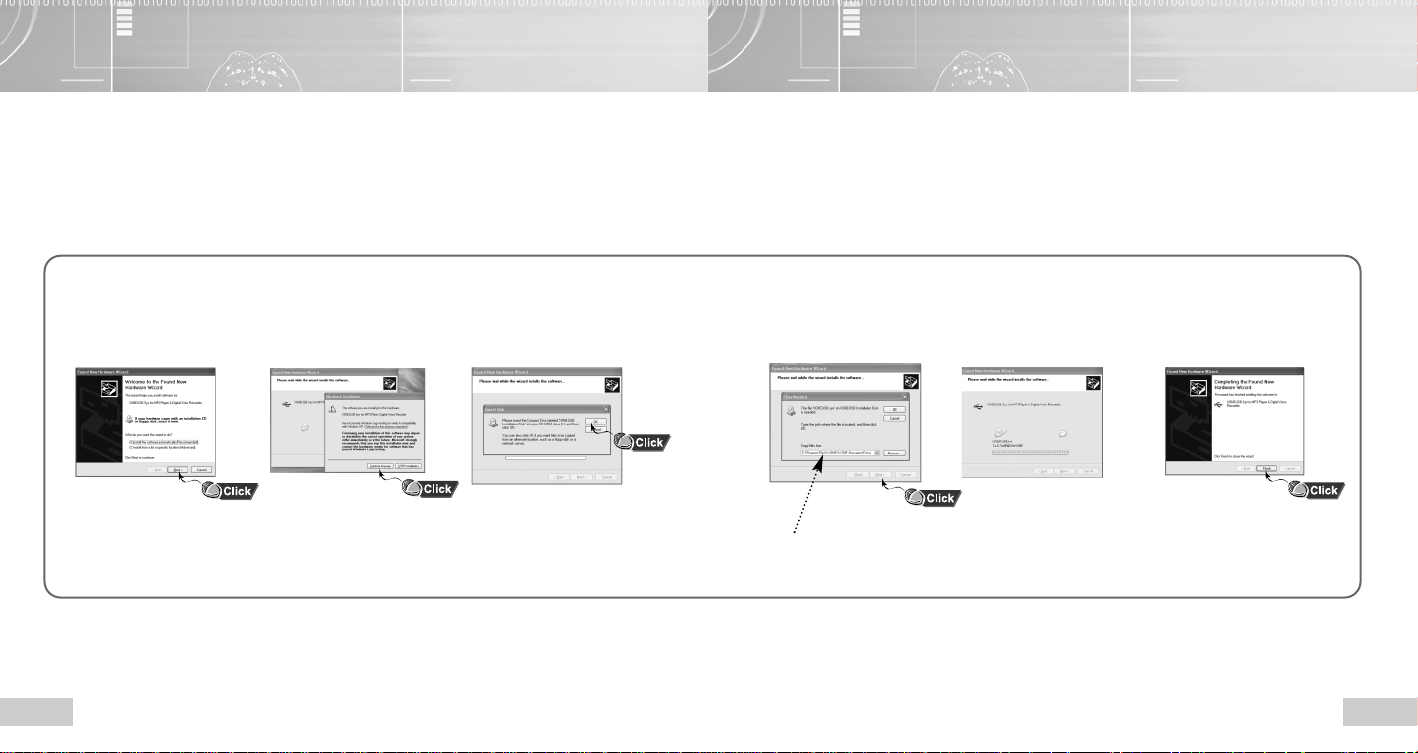
To install the driver on WINDOW XP
If you install the X-ONE Manager and connect the product to your PC, the
"New Hardware Installation Wizard" window is displayed.
Press the [Next] button in each window that appears sequentially.
Click the 'Browse’ and specify the path as follows.
C:\Program Flles\X-ONE\X-ONE Manager\Driver
Then, click ‘Next’.
4342
Page 23
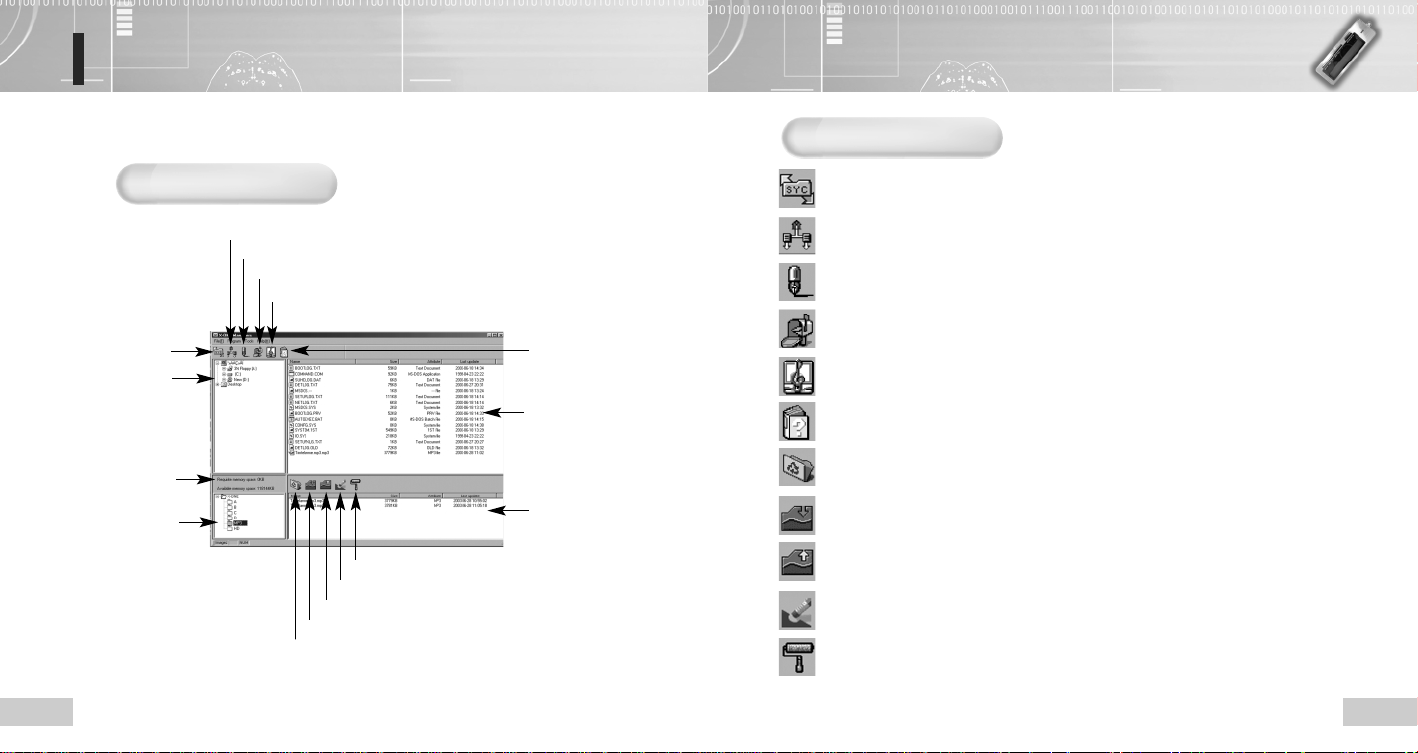
Using the X-ONE window and icon
Double-click the X-ONE shortcut icon on the desktop window while the USB is
connected to run the X-ONE program.
Icon
Main window
Folder sync icon
Explorer
Information related with
product memory space
Player folder list
Play list sync icon
ID3 tag edit icon
Mail program icon
Player program icon
Erase icon
Upload icon
Download icon
Refresh icon
Format icon
Information icon
PC file list
Player file list
Folder Sync: Downloads all files on one folder in PC to the player.
Play List Sync: Downloads the list saved in the play list file to the player.
ID3 Tag Edit: Adds or modifies the ID3 tags in the MP3 file.
Mail program: Runs the program that is provided by the mail service for the
recorded file and media file.
Player Program: Runs the program that plays back the recorded file and the
media file.
Information: Displays information on the X-ONE Manager.
Refresh: Refreshes the list of entire files or the connection status.
Download: Downloads files in PC to the player.
Upload: Uploads the files in the player to PC.
Erase: Deletes the files in the player.
Format: Initializes the product
4544
Page 24
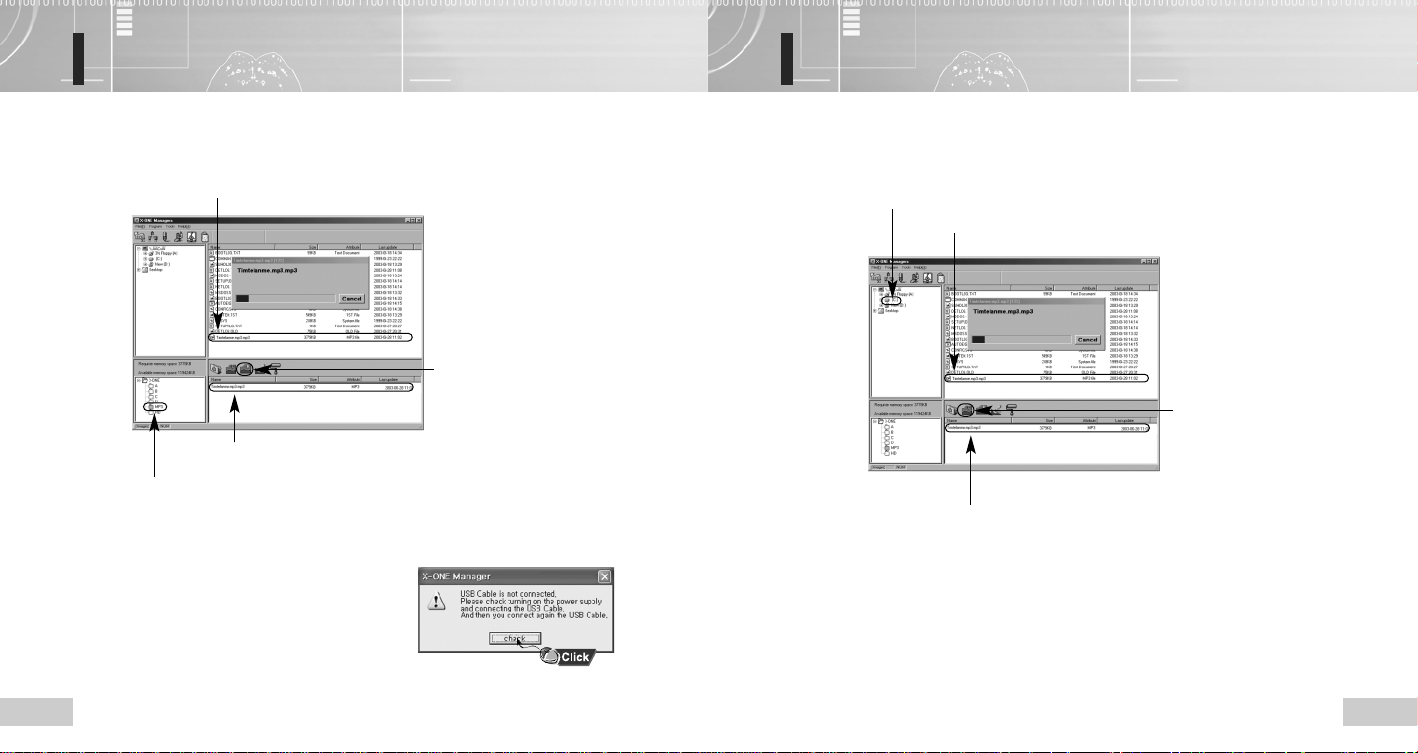
Uploading file
4. The selected files will be uploaded to PC.
● To rename the file, click the right mouse button
and input new name.
2. Select the player file
1. Select the player folder.
:
NNoottee :
● If you execute the program when the USB cable is not
connected, the error message as shown at right side
will appear. In this case, click check and connect the
USB cable.
3. Click the Upload icon.
Downloading file
1. Select a folder in PC.
2. Select the file in PC.
3. Click the Download icon.
4. The selected file will be downloaded to
the player.
:
NNoottee :
● Do not disconnect the USB cable from PC while upload or download process
is running. It may cause critical damages to your PC and the product.
46
47
Page 25
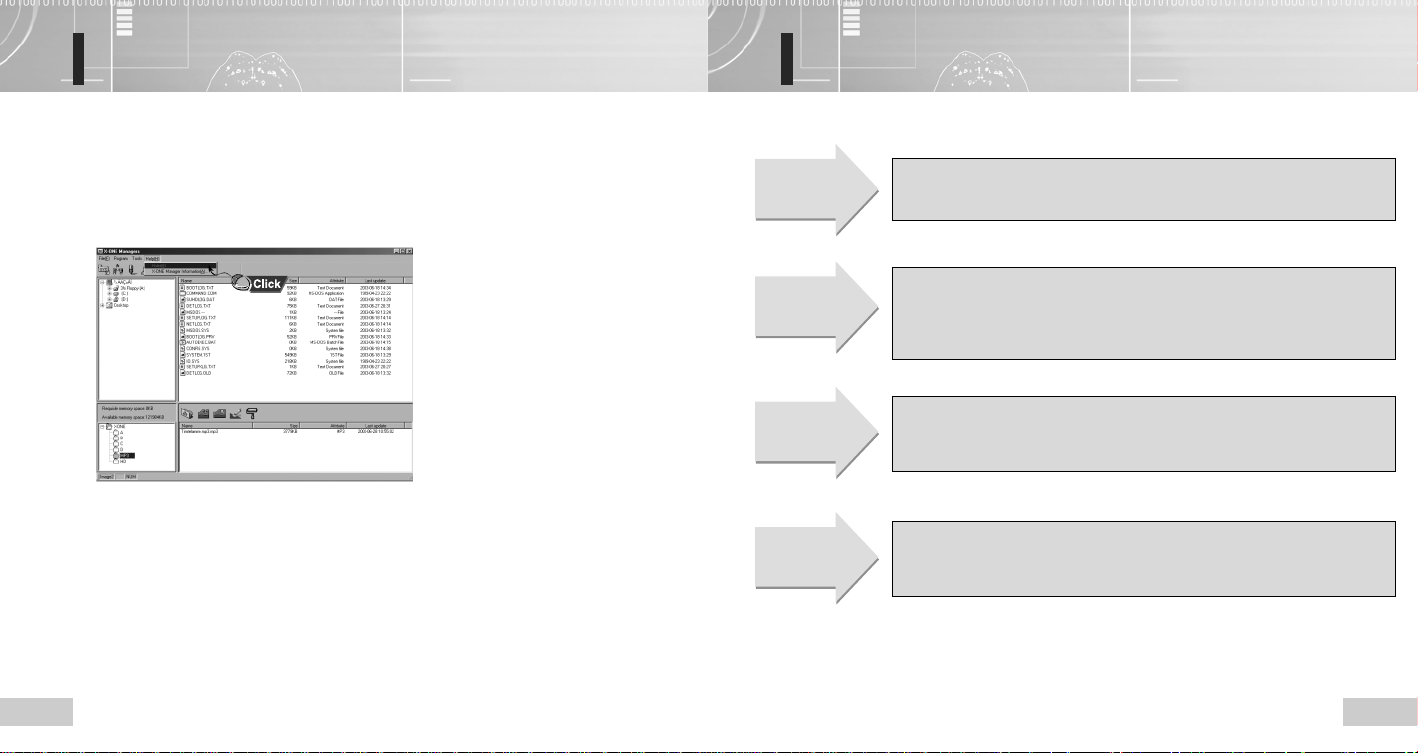
Searching for the PC Help
1. Click Help button twice to display information on the PC application.
2. Click Help to display information on the PC application.
Check points before enquiry
11
The LCD
display is off.
CCCChhhheeeecccckkkk PPPPooooiiiinnnnttttssss11
CCCChhhheeeecccckkkk PPPPooooiiiinnnnttttssss22
Isn't the battery empty?
22
Are the battery polarities correct?
√ Replace with new one.
√ Check the battery polarities.
48
Fails to record.
Fails to
playback.
No sound
heard from the
earphone.
CCCChhhheeeecccckkkk PPPPooooiiiinnnnttttssss11
CCCChhhheeeecccckkkk PPPPooooiiiinnnnttttssss22
CCCChhhheeeecccckkkk PPPPooooiiiinnnnttttssss33
CCCChhhheeeecccckkkk PPPPooooiiiinnnnttttssss11
CCCChhhheeeecccckkkk PPPPooooiiiinnnnttttssss22
CCCChhhheeeecccckkkk PPPPooooiiiinnnnttttssss33
CCCChhhheeeecccckkkk PPPPooooiiiinnnnttttssss11
CCCChhhheeeecccckkkk PPPPooooiiiinnnnttttssss22
11
Is the player locked?
22
Is the recording number or
memory space full?
33
Isn't the battery empty?
11
Is the player locked?
22
Nothing has been recorded?
33
Isn't the battery empty?
11
Volume level is set to 0?
22
Is the earphone inserted
properly?
√ Release the HOLD button.
√ Remove the unnecessary item.
√ Replace with new one.
√ Release the HOLD button.
√ Remove the unnecessary item.
√ Replace with new one.
√ Increase the volume level.
√ Firmly insert the earphone.
49
Page 26
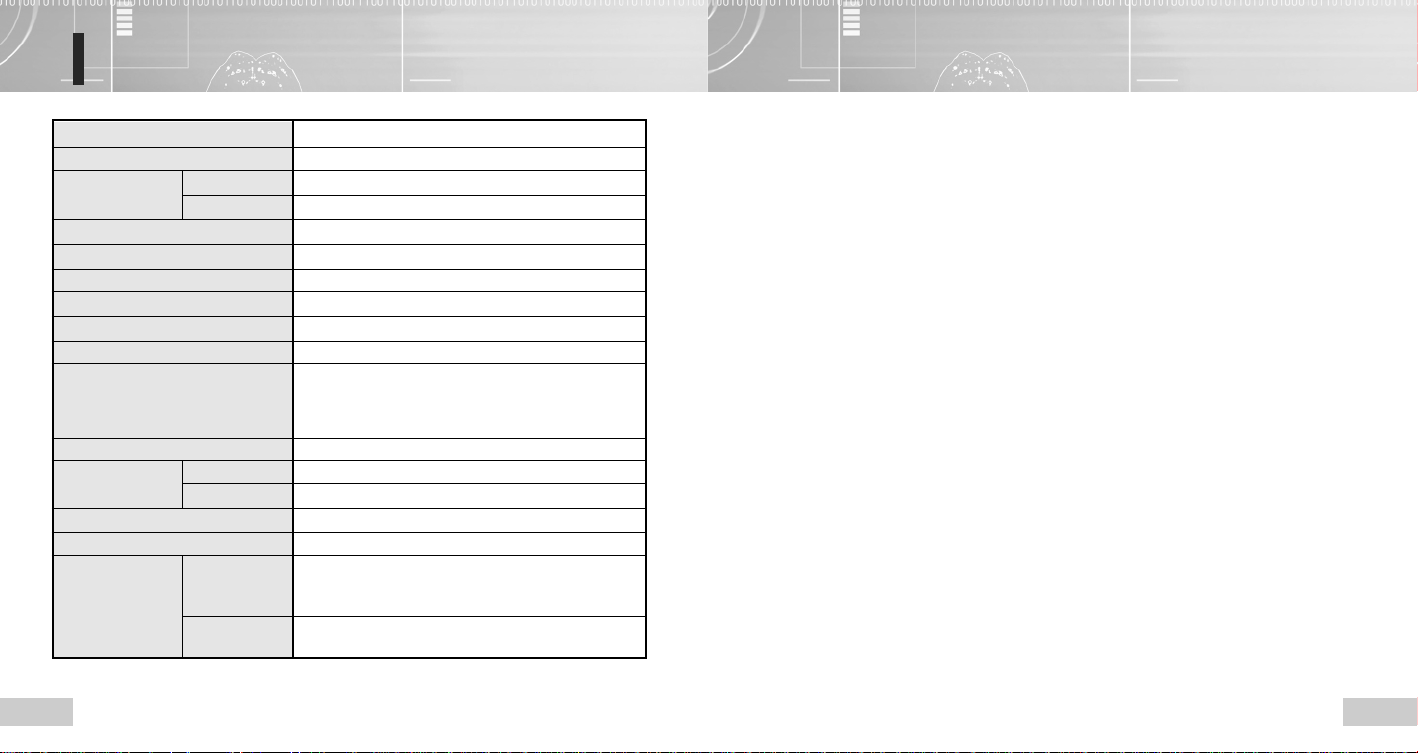
Product Specifications
Model Name
File Format
Recording Time EVR-M750
EVR-M760
Dimensions
Weight
Power Supply
Battery Durability
Recording Media
Practical Maximum Output
Frequency Range
PC Interface
Input Internal
External
Output
Operational Conditions
Accessories Basic Items
Optional Items
EVR-M750 (128M)/EVR-M760 (256M)
MP3 and WMA
Up to 35 hours
Up to 71 hours
86(H) ✕ 31(W) ✕ 17(D)mm
31.7g (excluding the battery)
DC 1.5V, battery (Size "AAA"LR03) 1 ea.
About 10 hours
Internal flash memory
8mW-2ch
MP3: 20Hz ~20kHz
Voice: 300Hz ~4kHz
Radio: 87.5MHz ~108MHz
USB (Universal Serial Bus)
Internal non-directional condenser microphone
Plug-in condenser microphone
Earphone (Stereo 16 Ω)
Temperature 0°C ~ 40°C
AAA size battery 1, earphone, USB connection cable,
program installation CD, user’s manual/warranty,
necklace string
External microphone, external device connection cable,
phone recording adaptor and phone connection cord.
(For WMA file playback, bit rate of 64Kbps or more is available.)
5150
 Loading...