


UM.02
ENOLINE
WINE CARD
Page 1 of 46
Rev 09, May
2010
Enoline 8 Wine Card
Enoline 8 Wine Card (temperature control model)
eno
line 4 wine card
eno
line 4 wine card temperature control
eno
line
8 wine card
enoline
8 wine card temperature control
User s Manual
UM.02
Rev. 0
8
May 20
10
Enomatic srl
Via di Meleto,1/19
I-
50027 Greve in Chianti
Firenze - Italy
Tel. +39 055 8547272
Fax. +39 055 8547807
www.enomatic.it

UM.02
ENOLINE WINE CARD
Page 2 of 46
Rev 0
8, May 2010
WARNING
Should warranty terms be a
pplied, please return the
product, included original
packing, all
accessories and
docum entation ( i.e. user s manual and power supply cable).
ATTENZIONE
Nei casi in cui l'applicazione della garanzia pr
eveda la
restituzione del prodotto, il bene dovrà essere restituito dal
cliente nella confezione originale, completa di tutte le sue
parti (compresi imballo, eventuale documentazione ed
accessori: manuale di istruzioni e cavo alimentazione)
.

UM.02
ENOLINE WINE CARD
Page 3 of 46
Rev 0
8, May 2010
INDEX
1. Intro
duction
4
2.
Model identification
...
4
3.
Warning
..
.5
4.
Transportation and storage
...
...6
5.
Unpack ..6
6. In
stallation .6
7.
Operating I nstructions 11
8.
Troubleshooting .18
9. Mainte
na
nce and cleaning
20
10. Techni
cal characteristics .. 22
Decla
ration of Compliance
23
Important notice f
or the user .25
Statement of W arranty ..26
UM.02
ENOLINE WINE CARD
Page 4 of 46
Rev 0
8, May 2010
1.
Introduction
This
Operating Manual is an integral part of the
Enomatic Wine Serving System, therefore w e
recommend
you
to keep it available for future
reference
s.
Before proceeding to i
nstall
and operate your Enomatic Wine Serving System
,
please
read carefully the instructions contained in this Operating Manual. They
provide important information
on
safety during installation,
duty
and
maintenance.
The manufacturer will not be liable in any way for any damage that may be
caused by unsuitable or unreasonable use and incorrect interpretation of the
safety rules and installation
instructions.
2.
Model
Identification
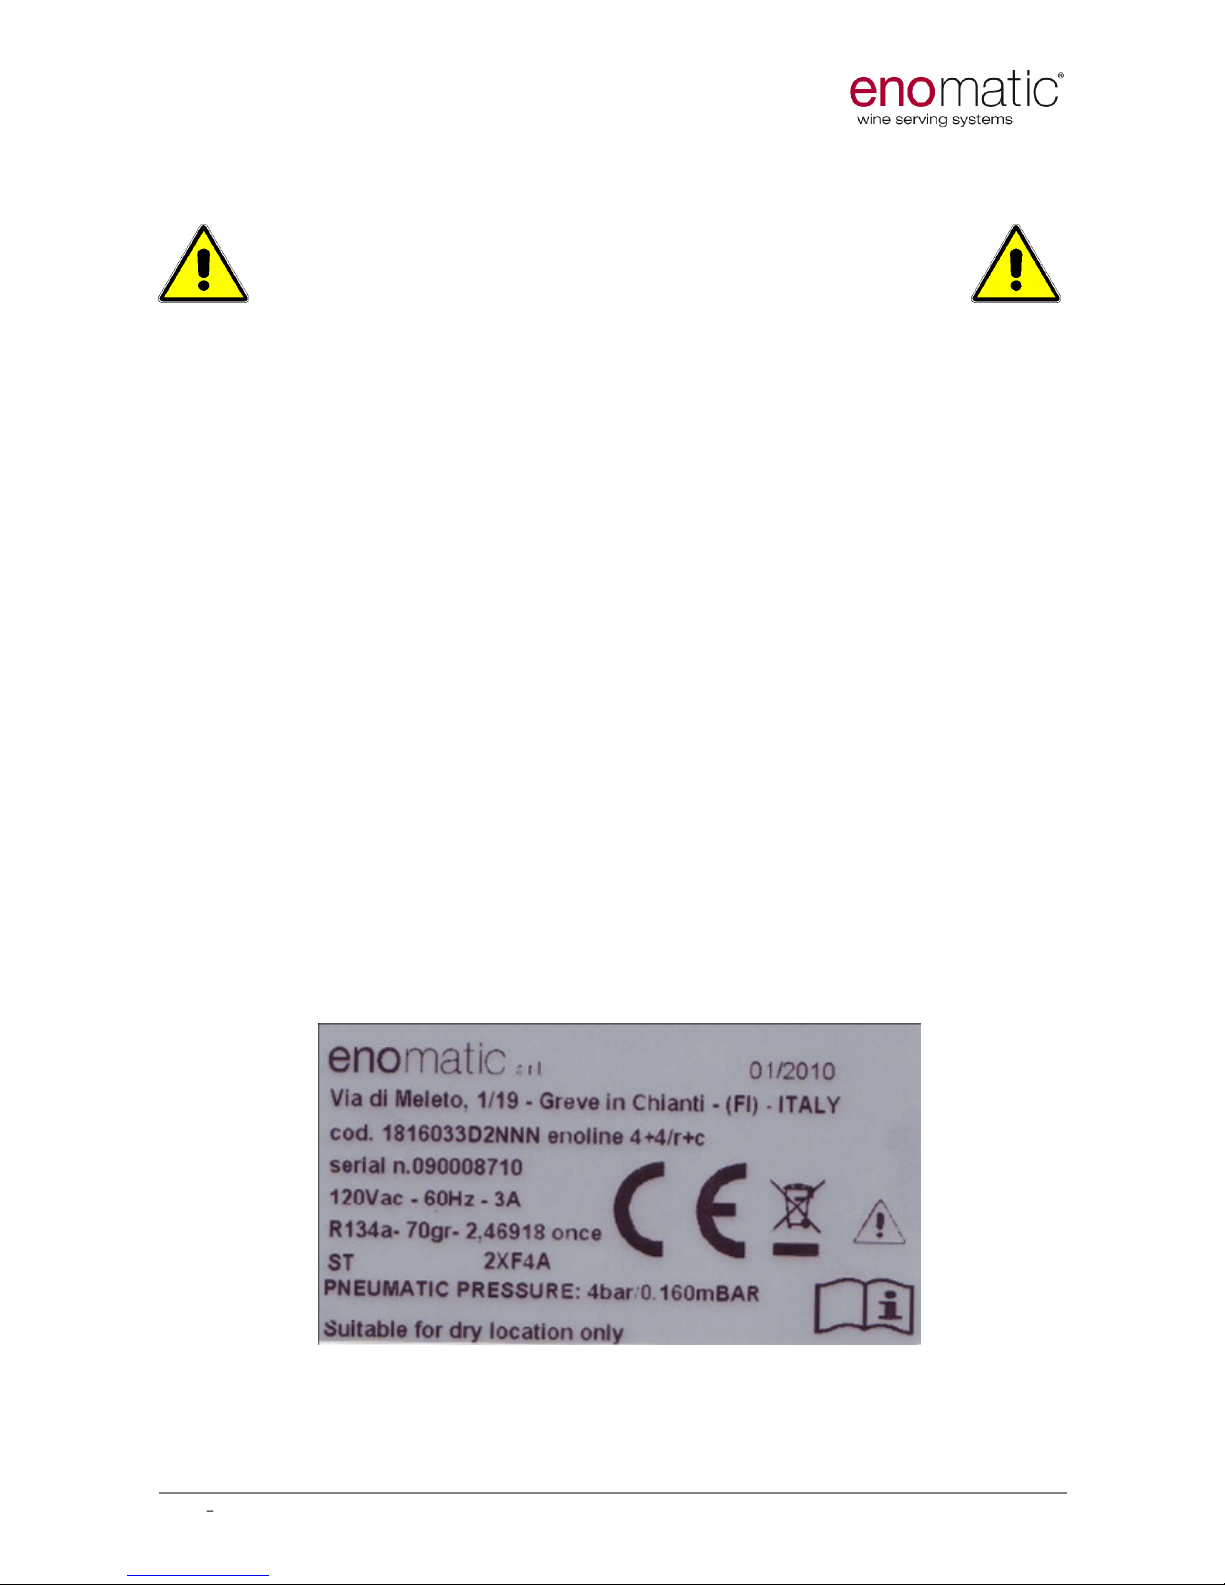
Every Enomatic
model
is identified with a unique serial number printed on a
D
ata Label
.
There are two Data Labels on the machine: one is on the rear panel, close to
electric socket, the other one is on the fro
ntal side and lays beneath the drop
tray.
The D
ata Label
is the only means of identification authorised by the
manufacturer and it contains all the data needed by the manufacturer to
provide prompt and clear information concerning any technical aspects and to
facilitate the replacement of parts.
AVOID DAMAGE OR REMOVAL OF THE DATA
LABEL
.
Example:
UM.02
ENOLINE WINE CARD
Page 5 of 46
Rev 0
8, May 2010
3.
Warnings
During operation it is essential to pay attention to these safety requirements to avoid
the risk of fire, electric shocks or other
incidents.
1. Before operating the Enomatic Wine Serving System, carefully read the
instructions contained in this Operating Manual and all other documentation you
received.
2. Do not immerse the electrical cord, plugs or the Enomatic model in water or any
ot
her liquid.
3. Be extra careful when operating the Enomatic Wine Serving System in the
presence of children.
4. Always unplug the Enomatic model from the electrical socket and let it cool down
before carrying out extraordinary maintenance operations.
5. Do not operate the Enomatic model if the electrical cord, plug or any other parts
are damaged or broken, but rather remove it immediately pulling it out of plug
and contact your local distributor.
6. Do not use electrical appliances inside the food storage compartments of the
appliance, unless they are of the type recommended by the manufacturer.
7. For any repairs contact only Service Centres authorised by the manufacturer or
supplier and insist to get only original spare parts. Failure to comply with the
above may harm
persons, damage property and will invalidate the Warranty.
8. This appliance is not intended for use by persons (including children) with reduced
physical, sensory or mental capabilities, or lack of experience and knowledge,
unless they have been given supervision or instruction concerning use of the
appliance by a person responsible for their safety. Children should be supervised
to ensure that they do not play with the appliance
.
9.
Do not operate the Enomatic Wine Serving System outdoors.
10.
Avoid the electrical cord hanging down the supporting surface (table, counter,
etc.) and from coming into contact with hot surfaces. Do not place the Enomatic
model on top of its electrical cord. Never connect a damaged cord, but ask your
local distributor for a spare part. Us
e original spare parts only.
11.
Keep the Enomatic Wine Serving System far away from heat sources.
Keep
ventilation openings, in the appliance enclosure or in the built-in structure, clear of
obstruction
.
12. Before plugging the Enomatic model into the electrical
socket, check that the main
switch General is set to 0 (off) mode.
13.
Before supplying the Enomatic model, check the voltage indicated on the Data
Label, it has to correspond to your country s standard voltage supply value. You
may require an adapter to
plug the cable into your electrical socket.
14.
Do not clean with corrosive detergents or scraping tools. Use only a soft damp
cloth.
4.
Transportation and Storage
Because of the weight and size of the
Enomatic
models
, two people are needed for transportation
.
To avoid damages, it is necessary to take big care during loading and unloading
operations. It is necessary to lift according to the symbol found on the
cardboard package. It is important that
the
Enomatic
models are not placed on
top of each other and
that the right vertical position (indicated by arrows on the
package) is maintained at all times. Avoid shaking or turning the
Enomatic
models
upside down.
UM.02
ENOLINE WINE CARD
Page 6 of 46
Rev 0
8, May 2010
5. Unpack
When you
removed the packaging, check that the Enomatic model has not been
damaged during transport. If you have any doubts, do not operate the
Enomatic model
and quickly contact your Enomatic distributor in order to define
a supervising visit. Please make sure that following items are included in the
delivery:
- 1x -
Enoline, 4 bottles capaci
ty or 1x
Enoline, 8 bottles capacity;
-
1x - Enoline Wine Card
Series
1 - User and Maintenance Manual;
-
5x - plastic straws
or 10x
plastic straws
;
-
2x - steel holders to secure Enoline to the wall;
-
1x - Ø 10mm pipe for water drainage;
-
1x
electrical cord;
-
1x
spirit level;
-
1x - tap seals kit;
-
2x - fuses;
Never leave the packaging contents (plastic
bags, foamed polystyrene, nails, etc.) within
the reach of children, since they are a source
of potential danger. Please be eco
-
friendly and
recycle
the packaging components.
Above-mentioned operations
must be run by skilled personnel only and authorized by the
Manufacturer.
6.
Installation
For an optimum installation, a technical inspection is needed where the
installation will be performed, in order to establish the correct positioning,
ensure
there is a suitable space for the location of the inert gas cylinder
(
nitrogen
or argon) and air compressor (if required)
and
an earthed
electrical
socket which complies with the regulations.
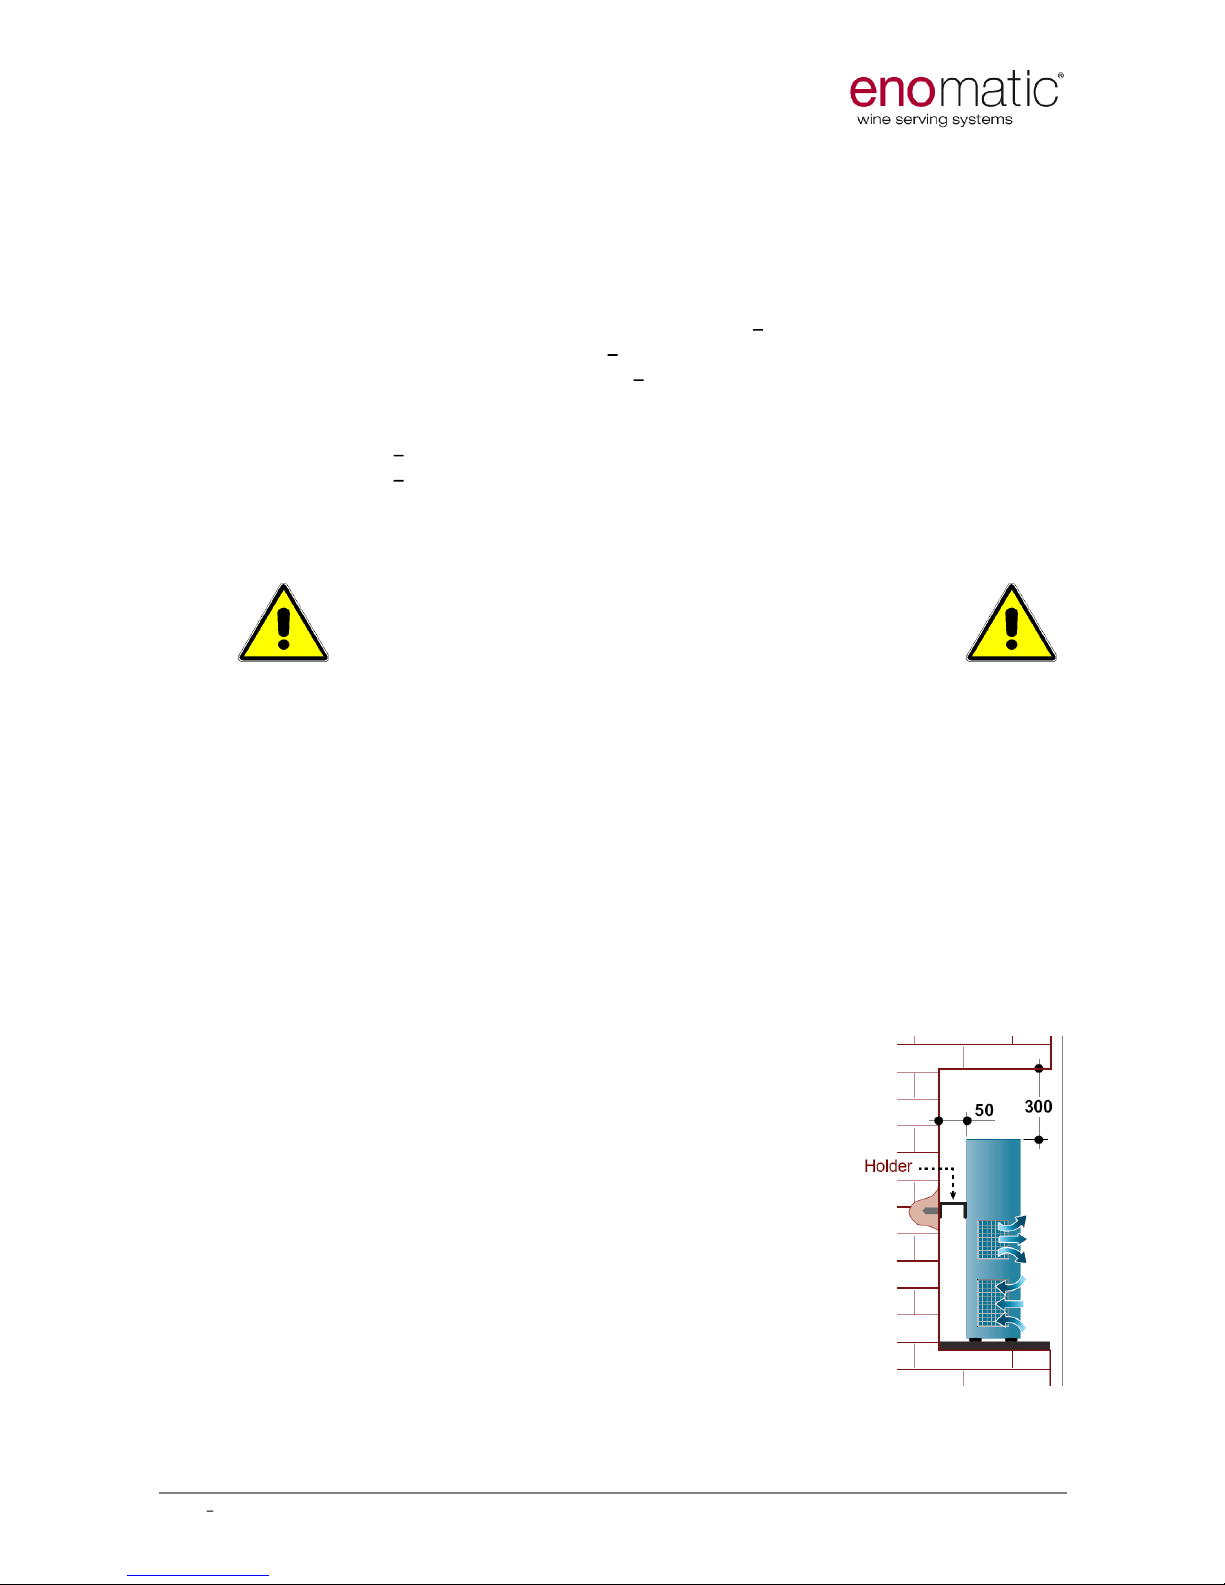
1.
After unpacking
your Enomatic Wine Serving System, place it on a solid
desk
or holder, between 800 and 1300mm from floor. The surface where the
dispenser will be placed must be made by fire-extinguisher materials.
2. Please consider a 300mm clereance on fridge
compressor
side and 50mm aback in order to ensure
proper exhaust
air
exchange.
3. Check the stance and correct it if necessary actin
g
on proper adjusting foot/feet. Refer to delivered
spirit level for accurate placement.
4. Secure the machine through supplied holders to th
e
wall if needed.
5. Tight pressure regulator (6434) to nitrogen or argon
tank, using supplied seal (if previewed).
6. Connect FOODGRADE LLDPE 4mm pipes in order to
bond machine and nitrogen source.
7.
Connect the electrical cord
and turn the machine on.
8. Open the nitrogen or argon tank and turn the outlets
levers on vertical position; the gas will then reach
the machine.
9. From now on Your Enomatic wine Serving System is ready for bottles
engagements. Enjoy your wines!!!!
UM.02
ENOLINE WINE CARD
Page 7 of 46
Rev 0
8, May 2010
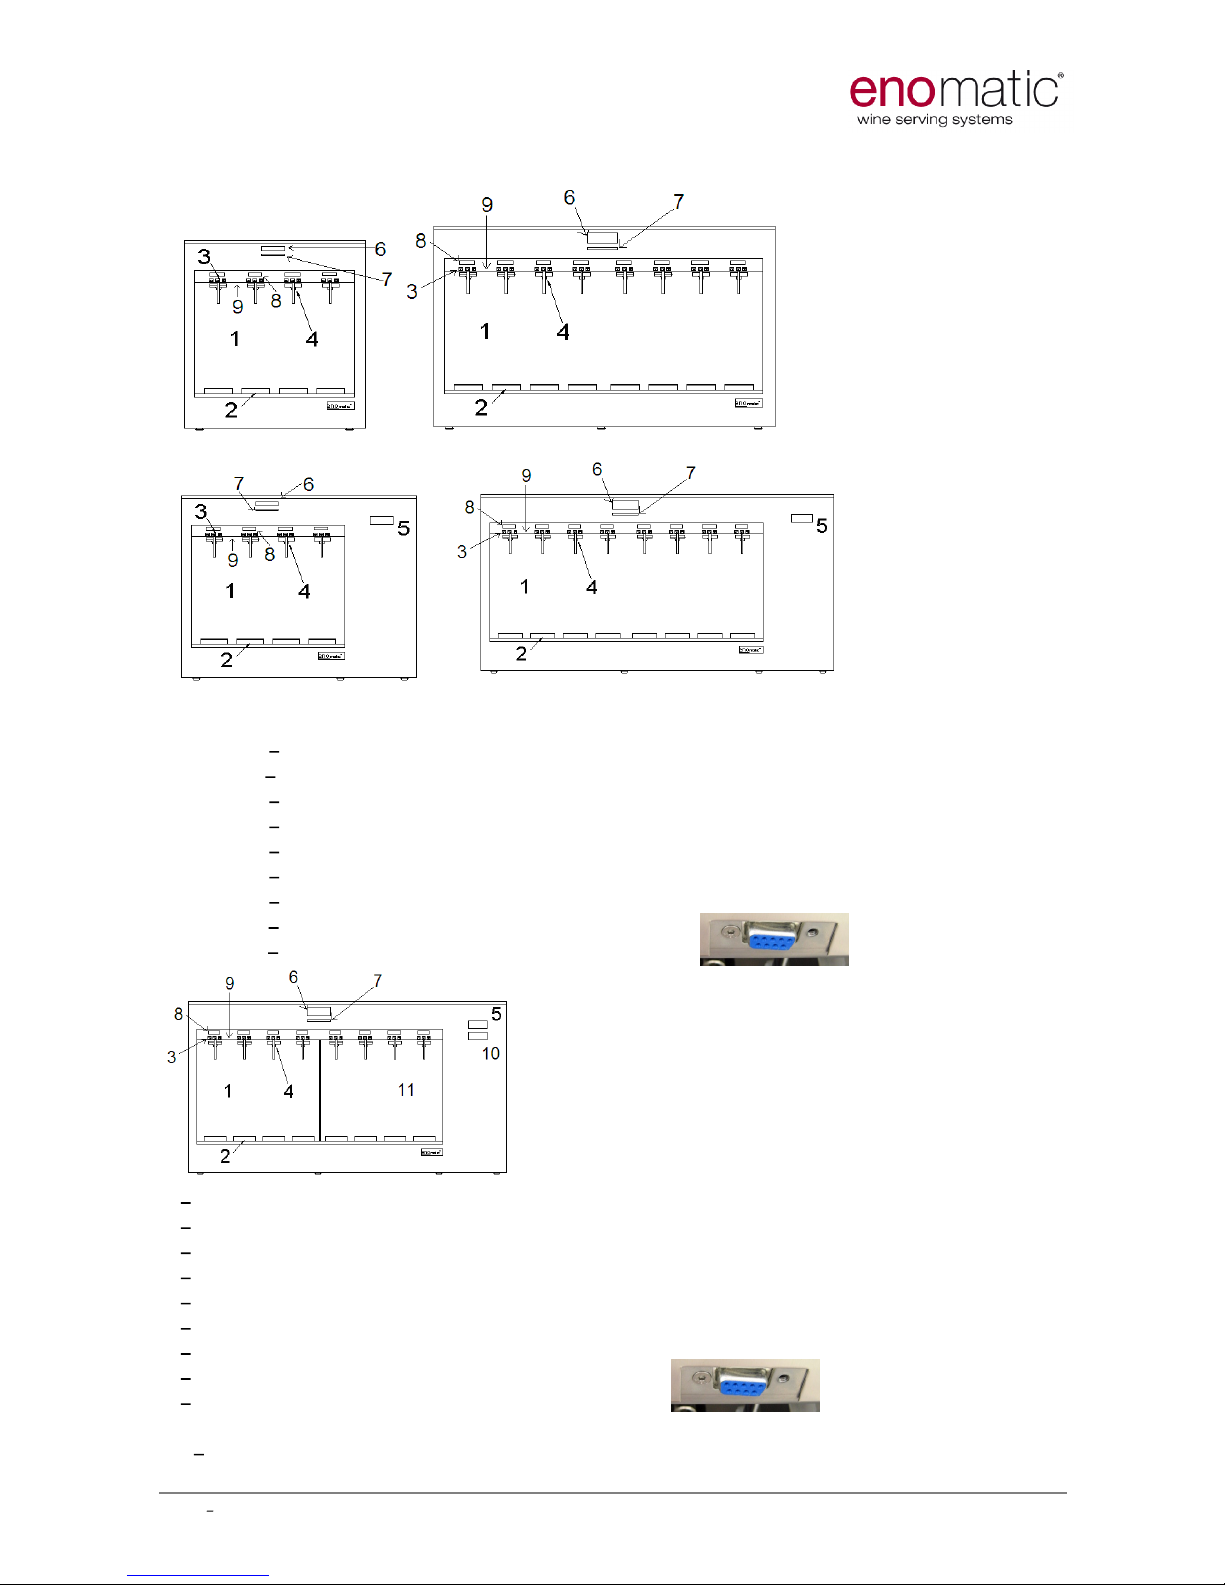
6.1
Parts of the Enomatic Wine Serving Syste
m
1
Bottle space
2
Bottle Piston with cover
3
Serving Buttons
4
Serving Spouts
5
Thermostat (available on temperature models only)
6
Wine card Display
7
Wine Card Reader slot
8 Price displays
9 Enoprog socket (see picture aside
)
Enoline 4+4 Wine Card
1
Red Wines b
ottle space
2
Bottle Piston with cover
3
Serving Buttons
4
Serving Spouts
5
Thermostat for red wines bottle space
6
W
ine card Display
7
Wine Card Reader slot
8
Price displays
9
Enoprog socket (see picture aside
)
10 - Thermostat for white wines bottle space
11
White wines bottle space

UM.02
ENOLINE WINE CARD
Page 8 of 46
Rev 0
8, May 2010
6.2 Electrical supply
The
eno
line models operate at either 110 or 220V
de
pending upon the country. Before connecting
these models to the electrical sockets, check the
voltage detailed on the Data Label on the back
panel. The room temperature
eno
line models have
one main switch on the power panel (photo on
right) which also cont
ains the fuses
(left side)
.
Ensure enough access to switch
es, fuses
and cable plug.
The temperature controlled
eno
line models have three (3) switches located on
the back
refer to the photo below. The enoline models feature also external
RJ45 connecti
ons to enable them to be connected to a data network.
For all switches O is OFF and
or | is ON.
The Enomatic models must be connected to a supply system equipped with an
effective earth connection in accordance with the rules and provisions
prescribed by law.
Switch all switches to O mode. Connect the electrical supply cord. With a
ll
models black main switch turns power onto the model.
For temperature controlled enoline (right
side reference)
models secondary switches are:
Right side - turns on and off the compressor for
the temperature control.
Left side - turns on and off the electronics inside
the enoline model.
6.3 Gas Line Connections
Two different pressure lines are typically required to operate your Enomati
c
Wine Serving System
, and those are:
Bottle Piston Supply - 4.0 Bar pressure
Nitrogen or air compressor
Nitroge
n (or Argon) Gas Supply - 0.16 Bar pressure
4mm pipe connection outlets are located at the back of enoline models, on the
bottom (photo below); 4 bar line (bottle pistons movements) can be supplied
by compressed air coming from an external source (not p
rovided), as well as by
nitrogen.
Use certified FOODGRADE materials and
LLDPE pipes for nitrogen (argon)
connections
UM.02
ENOLINE WINE CARD
Page 9 of 46
Rev 0
8, May 2010
6.3.1
Bottle Piston Supply
The 4 bar line supplies the Bottle Pistons to raise and hold the bottles upwards,
in order to ensure an air tight seal on the Tap. It is recommended to use a
compressed air supply in case of more than 12 bottles installations
.
4.0 Bar pressure must be provided from either:
an air compressor
the Nitrogen (or Argon) Gas supply cylinder
a Nitrogen Generator (recom
mended for very large installations)
If an air compressor is used, the air source must be equipped with a sluice
gate, a pressure regulator
(4
Bar
outlet required
) and a filter to avoid impurities
blocking the pneumatic circuits. A moisture trap is also required in humid
environments.
Connect the Bottle Piston Supply to the Enomatic model by firmly pushing the
4mm FOODGRADE LLDPE pipe
into the friction fitting.
6.3.2
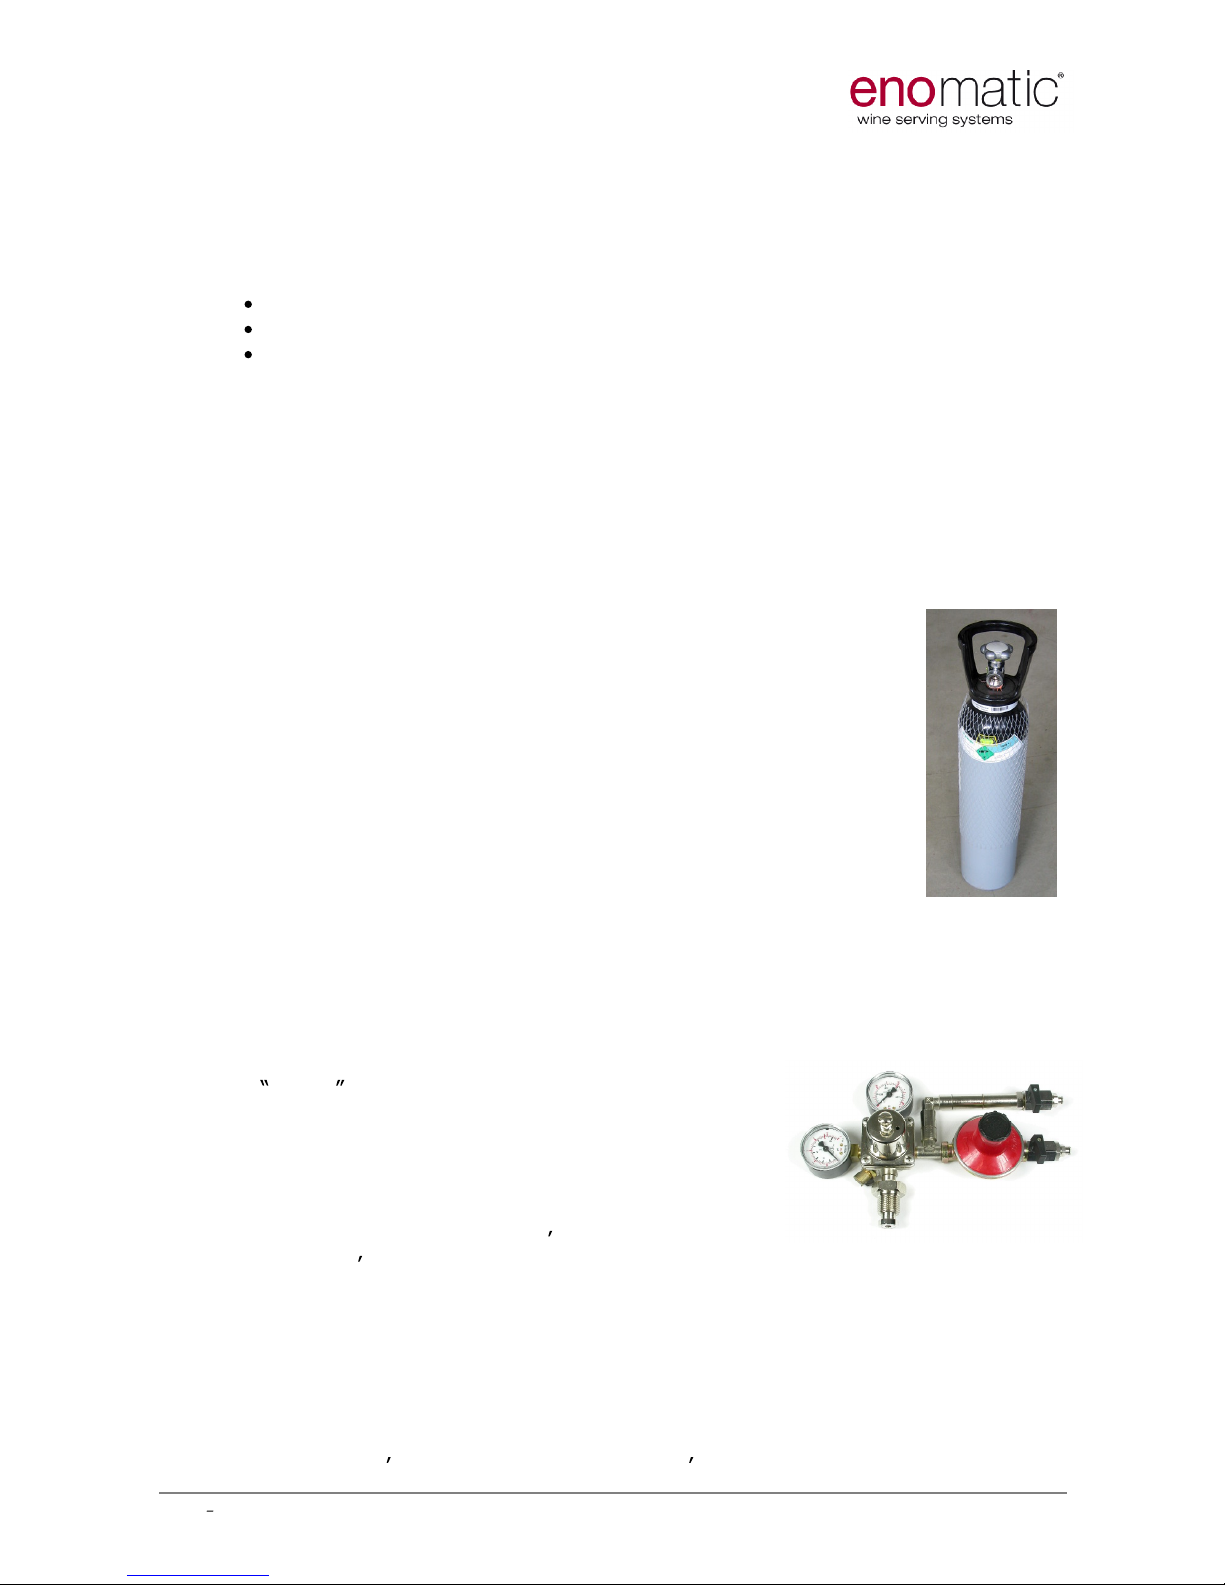
Nitrogen (Argon) Gas Supply
Main purpose for the use of Nitrogen or Argon is to preser
ve
wines from oxidation processes. As soon as a bottle is engaged
into the machine, Nitrogen is inflated into it and the preservation
starts. Second main purpose for Nitrogen is to dispense wines
from the bottle to the Serving Spout. It is also used to clean the
Serving Spout after each serve.
Foodgrade Nitrogen (or Argon) Gas of greater than 99.5% purity
must be used. This is typically supplied as a compressed gas
stored in cylinders, at high pressure. The pressure varies
between countries but it is typically between 150 or 200 Bar.
Alternatively a
certified n
itrogen generator can be used.
The Nitrogen (or Argon) Gas cylinder must be secured in a
vertical position and stored in a ventilated space. It must be connected to a
regulator to reduce the pressure to 0.16 Bar (that value may vary depending
installation features)
.
The following procedure must be carried out when connecting the Nitrogen (or
Argon) Gas cylinder:
1. Ensure the regulator outlet valves are in the
closed position (as shown in the p
hoto).
2. Insert the seal (if previewed) and tight
the
regulator system to the cylinder and ensure an
air-tight connection.
3. Open the cylinder valve, note down the
indicated max pressure value, and close the
cylinder; the value doesn t have to decrease
withi
n 15 in order to avoid risk of leak.
4. Connect the Nitrogen (or Argon) Gas Supply
from the regulator to the outlets on the Enomatic model by firmly pushing
the 4mm FOODGRADE LLDPE pipe into the friction fitting, on the Enomatic
model and
on
the regulator
as
well
.
5.
Completely open the valve of the cylinder.
6.
Open the regulator levers
.
7. Note down the indicated max pressure value, and close the cylinder; the
value doesn t have to decrease within 15 in order to avoid risk of leak.

UM.02
ENOLINE WINE CARD
Page 10 of 46
Rev 0
8, May 2010
8. Check that the pressure on the low pressure gauge is correct= 4 bar.
Also
check every 6-7 days the pressure of the cylinder.
9. When the tank is almost empty and change is required, close all inlets and
outlets and pull the safety valve ring to discharge residual pressure; loose
mano
meter bolt and replace the tank.
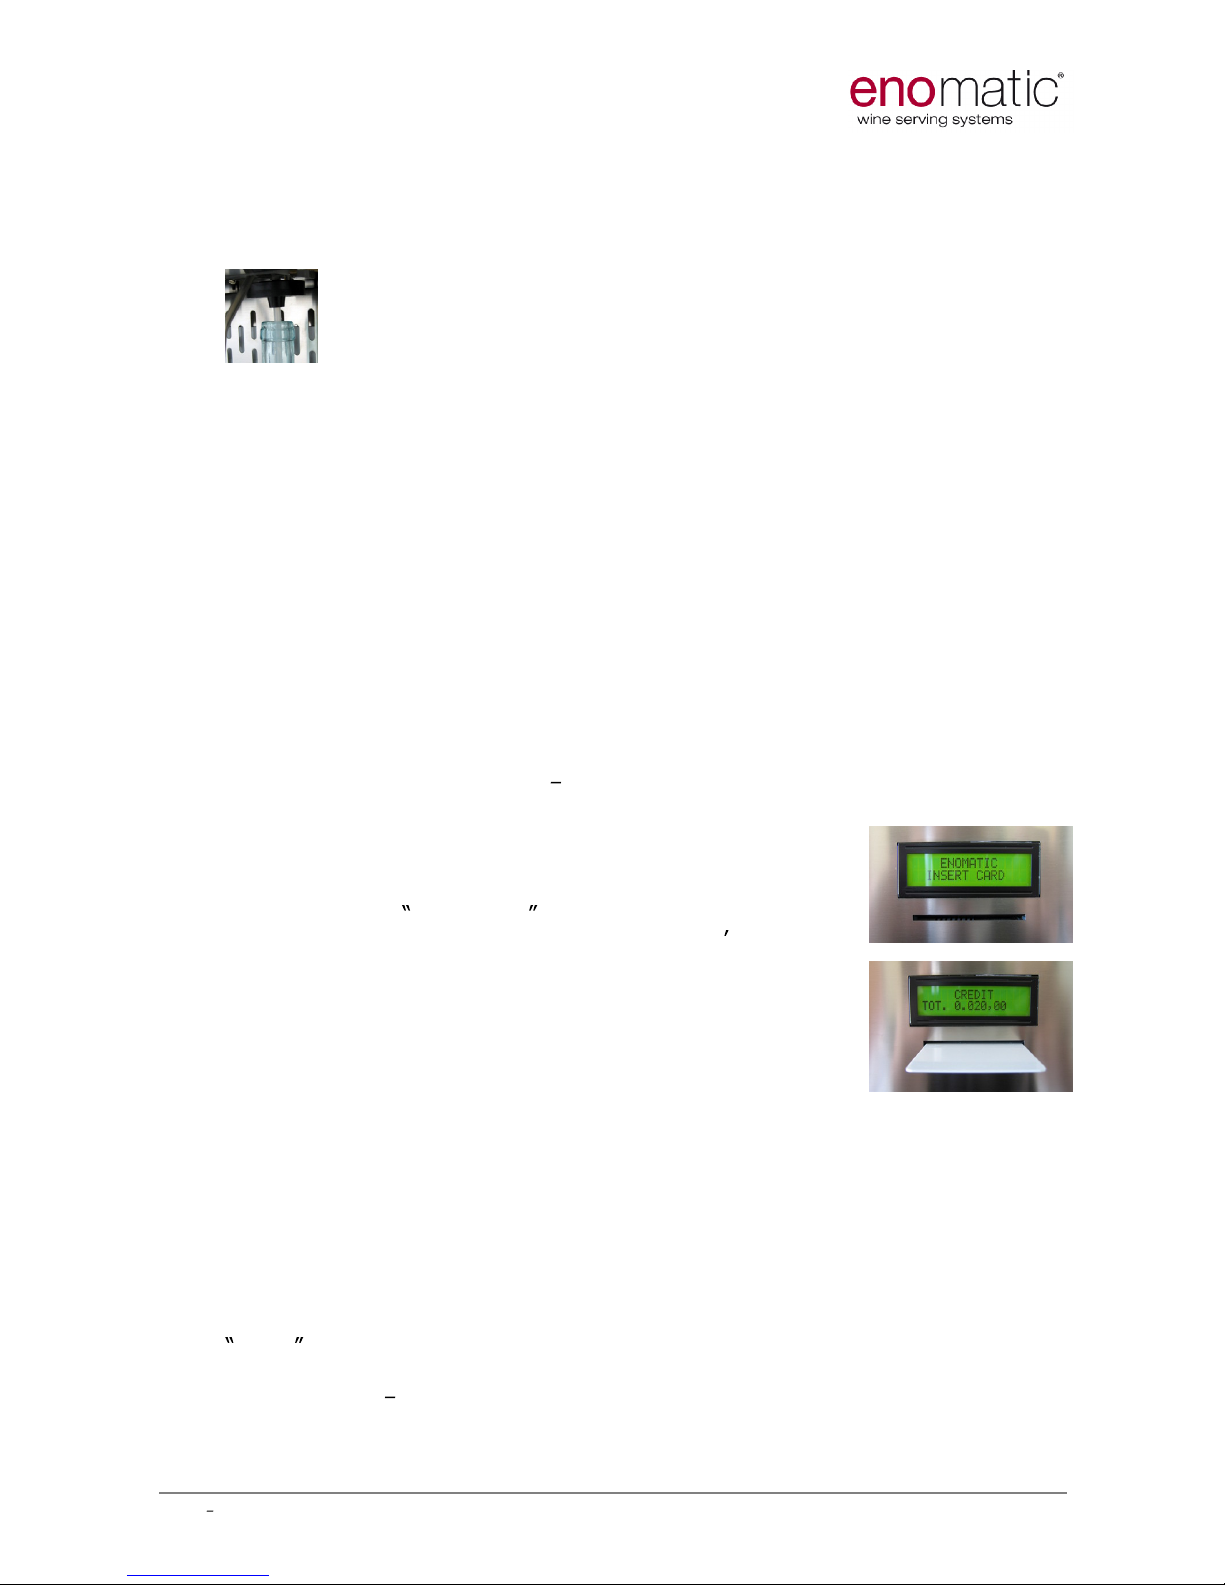
6.4
Water
Drain
age
E
noline Temperature Controlled
models only
A condensate drain tube (10mm O/D) must be
connected into the back of the temperature
controlled enoline models and discharged to a
permanent drain or into a bottle that is emptied
regularly.
7
Operating Instructions
Turn on the power.
Switch on main black switch and two secondary switches (for temperature
controlled enoline only).
7.1 Inserting the Bottle Tube
Insert the Bottle Tube into the centre of each Tap by pushing it firmly to create
a secure fit (pic A).
PIC A
PIC B
The Bottle Tube has a filter (pic B) to prevent sediment from red wines entering
the Tap valve. The Bottle Tube should extend to the bottom of the bottle.
However, for heavy
sediment red wines, it is recommended to cut
the
tube shorter, in order not to reach the bottom of the bottle; this is to
avoid the
sediment entering the tap.
7.2 Loading the Bottle
Open the bottle, remove any eventual foreign object from bottle neck u
pper
part and slide the Bottle Tube inside the bottle while lifting the bottle towards
the tap. Place the bottle on the piston (pic C). Insert a Technical Card (*) into
the slot and firmly press the central button above the bottle you desire to
engage. Th
e maximum bottle size is 360mm high. The Enomatic model is
supplied with plastic packers below the bottle piston covers. These packers can
be removed to fit the tallest bottles
, or added to fit shortest ones.
PIC C
UM.02
ENOLINE WINE CARD
Page 11 of 46
Rev 0
8, May 2010
Ensure that the neck of the bottle
lines u
p to
the conical neck of the Tap (
pic D
)
in order to enter it. Some
bottles
may feature
particular cork-necks
dimensions
;
should they be too large, please use the apposite large-
corks
-adapter (6510
item
code
).
PIC D
Once the bottle has been engaged, turn it lightly on its axis in order to increase
and improve air-tight on the neck seal. The lights above the bottle will flash.
Select a wine from Enosoft database to match to it
(*)
, and insert a User Card
with sufficient money on (*). Hold a glass be
neath
the Serving Spout, push the
Serving Button and verify the supply of the wine. Repeat the instructions above
for all bottles, the same actions to lift down engaged ones. To calibrate
the
serve, insert the Technical Card and keep buttons #1 and #3 pressed (about
4sec); the display will show
Cali
and then 100. Hit central button to pour and
measure the serve, adjusting 100ml value on display by tapping buttons #1 (to
decrease) and #3 (to increase); repeat till 100ml are poured, then remove the
Technical
Card to store the value; repeat same procedure for all taps.
Please remember to remove the frontal Plexiglas panel only when
loading/replacing the bottle, and in any case no longer than strictly required
time. Please remember also to load in your Enomatic Wine Serving System
already cold white wines.
(*
): to get information about Technical C
ard, User Card and Enosoft in general
,
pleas
e refer to
manual
UM.13
enosoft 2.0
.
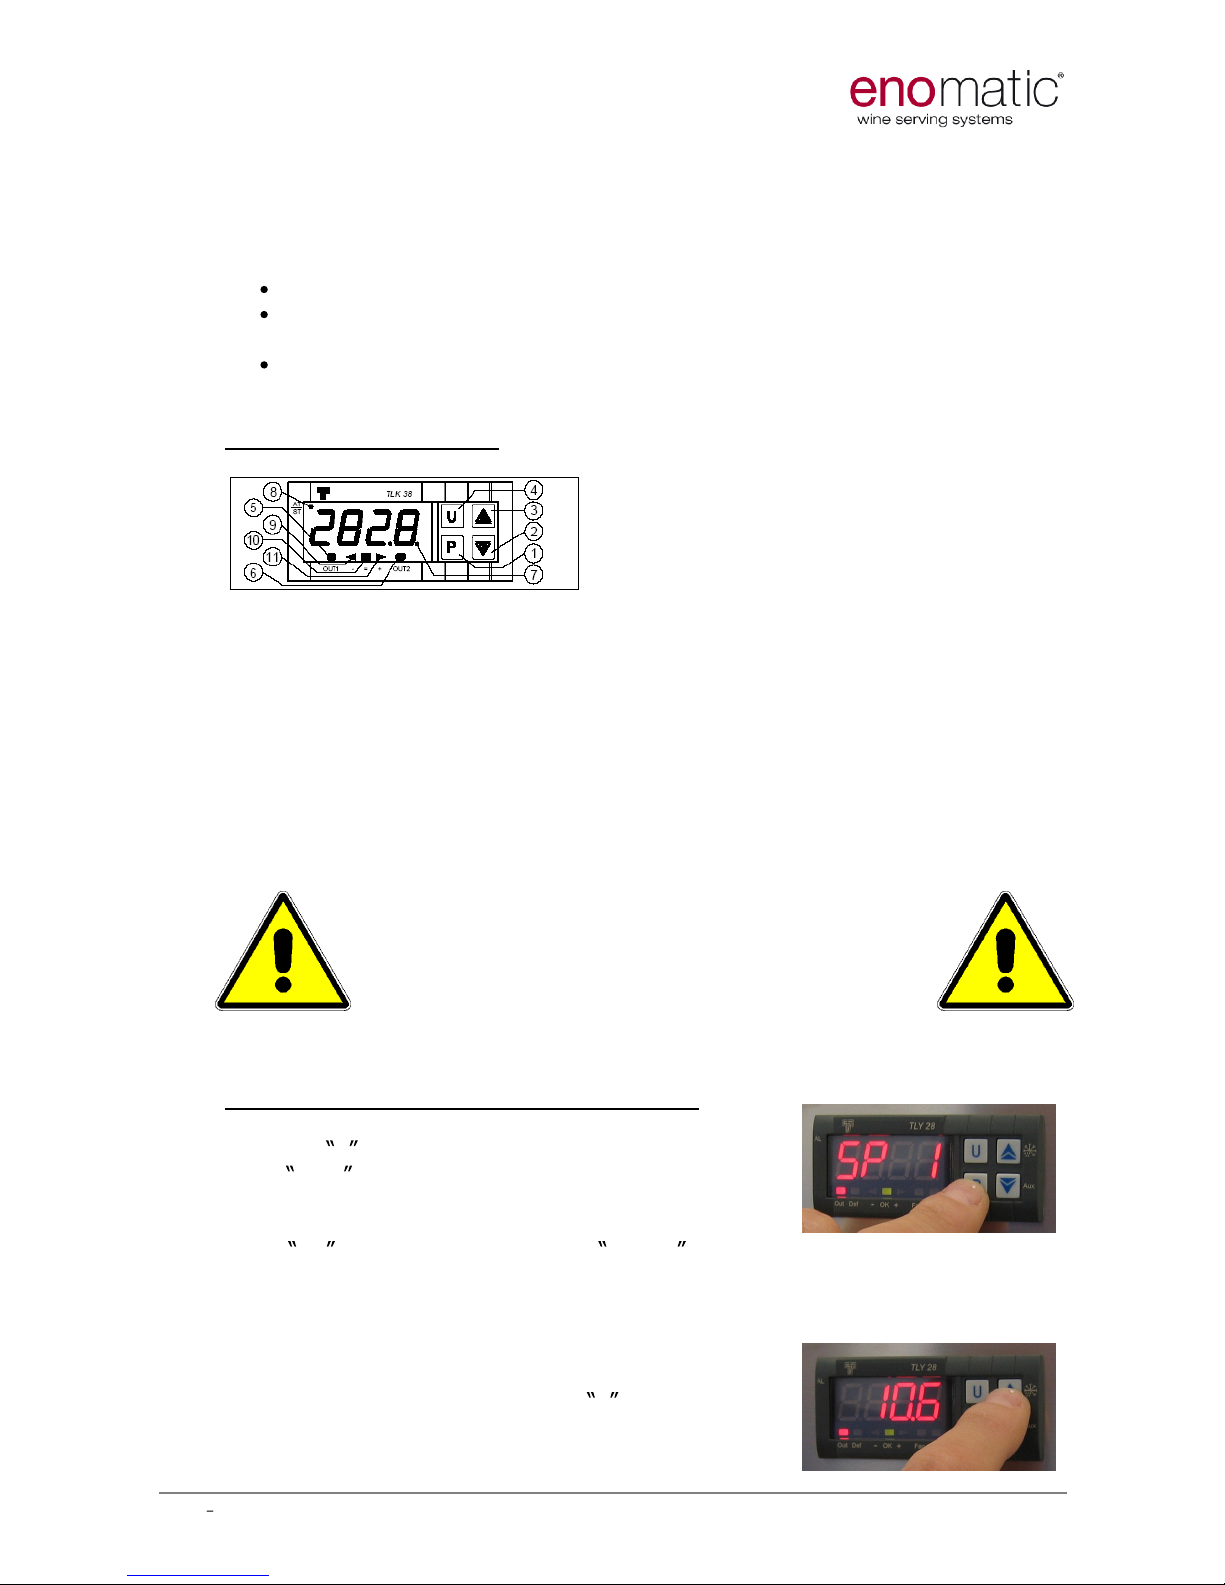
7.3 Use of the Enomatic Wine Serving System
When no card is inside the card slot, the name of the
installation and insert card are shown; that is the re
st
condition.
In order to activate a dispensing, it s necessary
to insert a card with a sufficient amount of money and hit
the desired volume/price button. The name of the selected
wine will be shown on main display.
The
system will
decrease relative price from your card balance and will pour
the wine. Remaining credit on the card is shown on main
display.
7.4 Replacing Bottles
In order to lower the Bottle Piston, insert a T
echnical Card (*) and press firmly
central button related to the bottle you want to remove
.
Remove the empty bottle and the straw inside. Clean thoroughly the straw
under a flush of water.
Repeat procedure from 7.2 to engage another bottle. Press the central bu
tton
to confirm same wine indication when the display above the bottle will display
SAME , or remove the Technical Card to assign a new wine.
(*):
to get information about Technical Card and User Card, please refer to
manual
UM.13
enosoft 2.0
.
UM.02
ENOLINE WINE CARD
Page 12 of 46
Rev 0
8, May 2010
7.5 Change
the
Temperature
Set Point
(enoline temperature controlled models only)
If your enoline is a temperature controlled model it will typically be supplied
pre-programmed to:
8°C for refrigerated models (down to 7°C is possible), or
18°C for climate controlled models (between 7°C to 20°C range is
possible)
, or
8°C and 18°C for dual climate models.
If you wish to change these temperatures, please refer to the following
instructions.
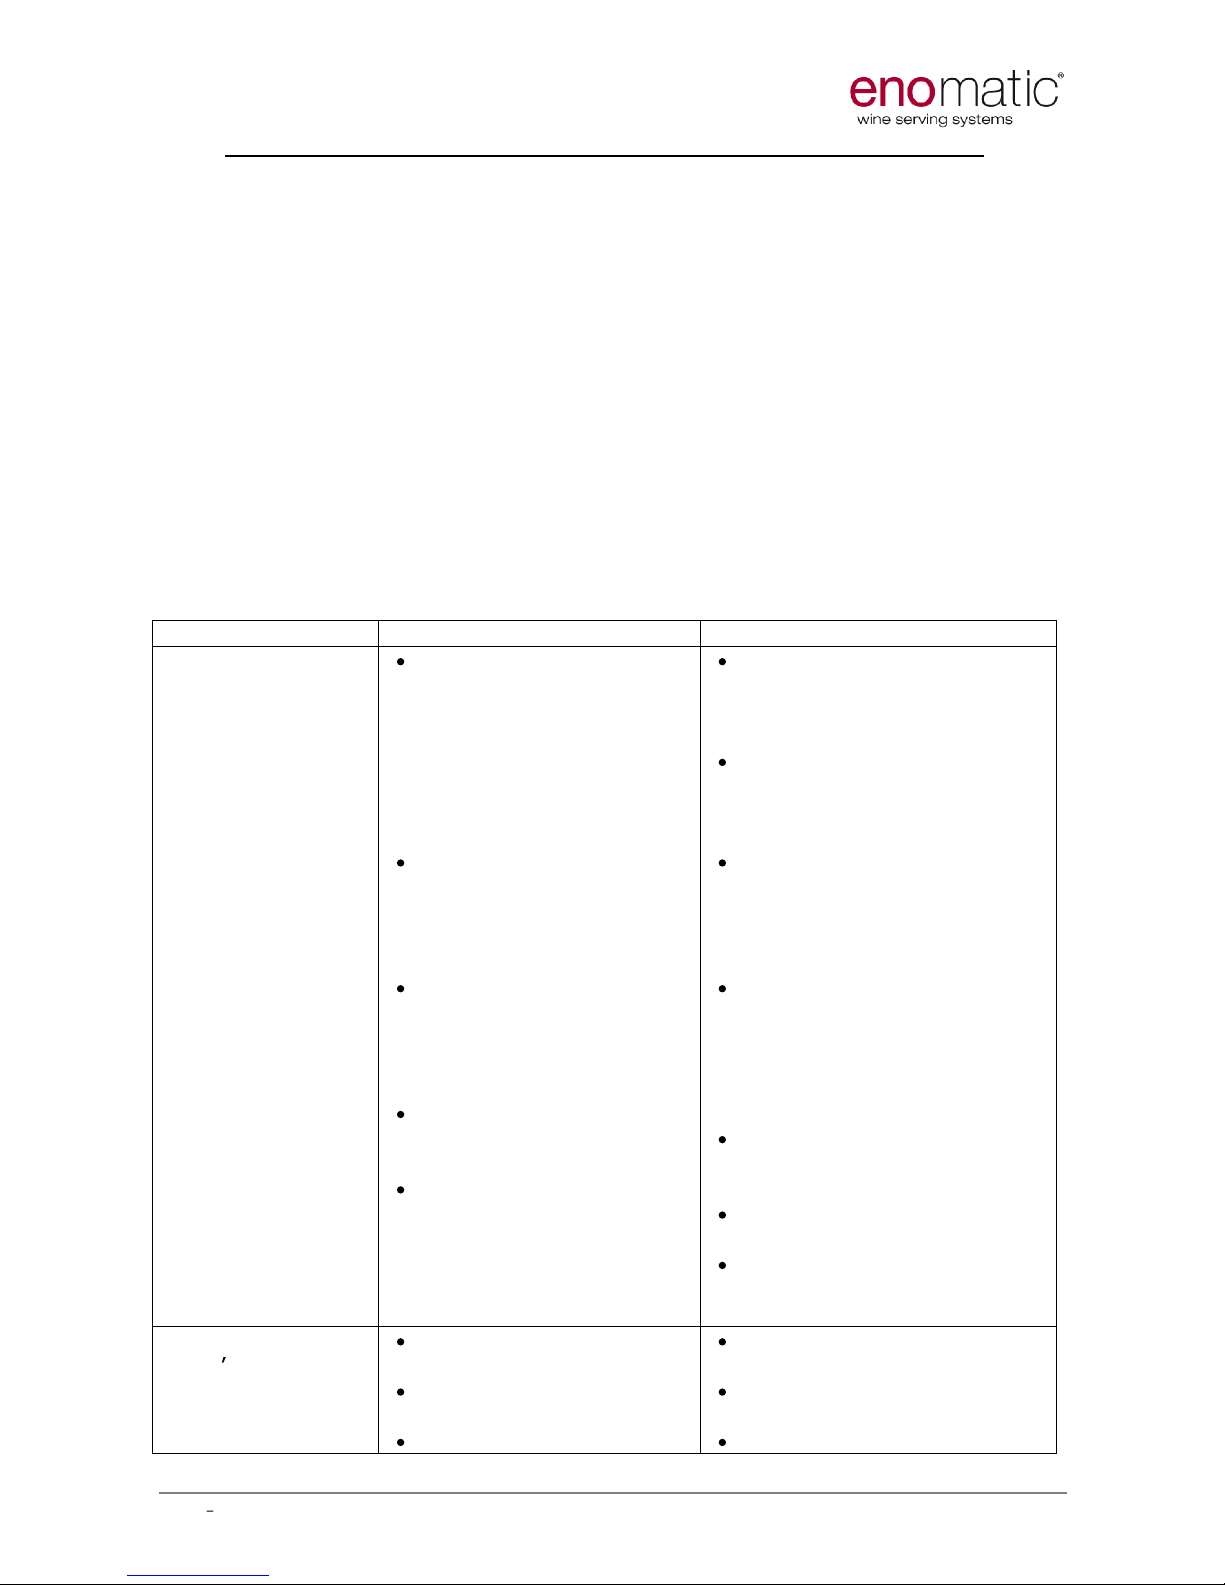
Front Panel Description
1
- Key P : This is used to access the programming parameters and to confirm
selection.
2 - Key DOWN
: This is used to decrease the values to be set and to select the
parameters. If the key is held down, the controls return to the previous
programming level until it exits the programming mode.
3
- Key UP : This is used to increase the values to be set and to select the
parameters. If the key is held down, the controls return to the previous
programming level until it exits the programming mode.
The other buttons and functions are not required to change the
temperature set
point.
Please settle the Enomatic Wine
Serving System in environments
with temperature range between
10°C and 30°C, and relative humidity
lower than 60%.
Programming
the Temperature Set Point
Push key P , then release it and the disp
lay will
show SP 1 . (If you
press the button
too
long it will
enter another menu;
to return to the SP mode, wait
for
10 seconds).To modify t
he temperature value,
press
UP
key to increase it or the DOWN key to decrease it. These keys
change the valu
e one-by-one digit but if they are pressed longer than three
seconds, the value increases or decreases rapidly; after two seconds in the
same condition, the changing speed increases in order to allow the desired
value to be reached rapidly.
Adjust until the desired temperature value has been
reached.
Exit by pushing key P and after 15
seconds the set temperature will be displayed.
UM.02
ENOLINE WINE CARD
Page 13 of 46
Rev 0
8, May 2010
Programming the Temperature set points on dual climate models
Dual climate models involve two separated rooms where two diff
erent
temperatures can be set, in order to typically engage 4 red wine bottles and 4
white wine bottles. Red wine bottle space thermostat allows to modify the
temperature between 16°C and 20°C, whilst white wine bottle space thermostat
permits a settable range between 7°C and 20°C. Upper thermostat (TLK38)
refers to red zone bottle space, while lower one (TLY28) is about white wine
bottle space. White wine bottle space is the one closer to thermostat (right side
if your model is right hand compressor as in picture at page 7). White wines
must be already cold before being engaged into the dispenser, and the frontal
Plexiglas panel must be removed just for strictly necessary replacement bottle
time.
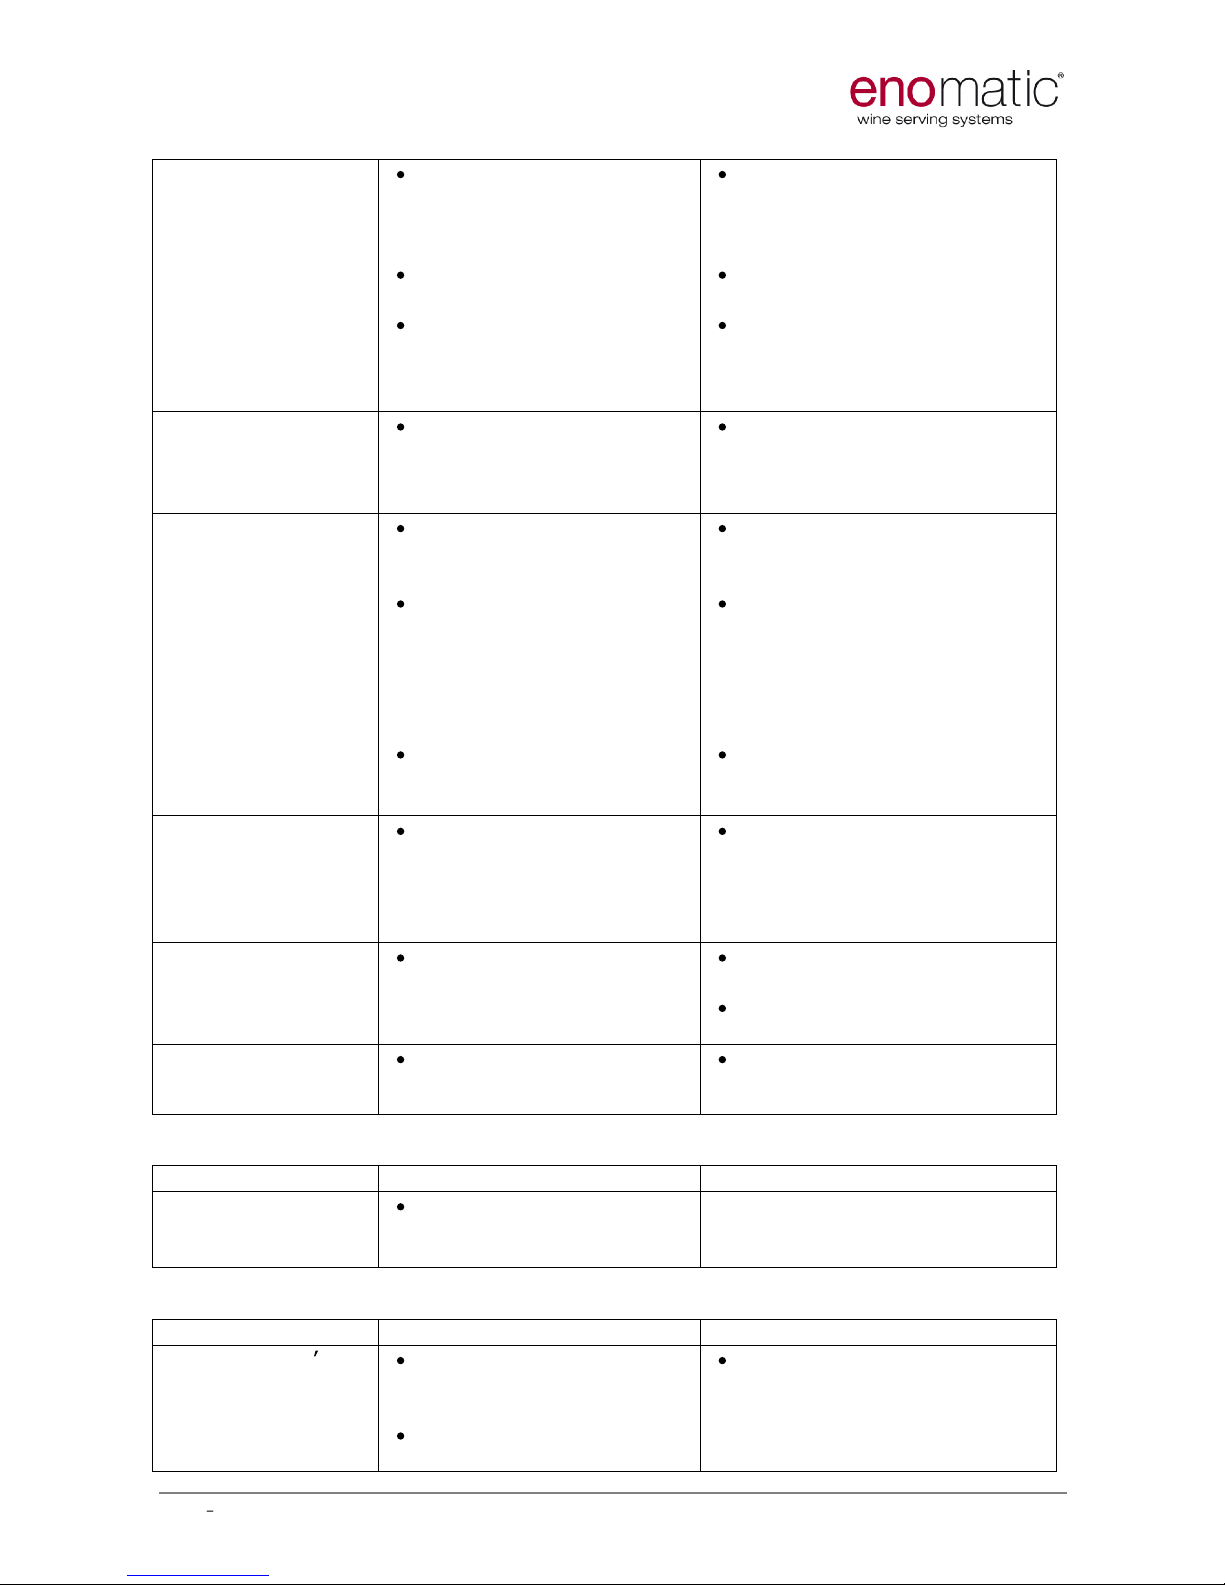
9
. Troubleshooting
This guide is to provide a quick support in case of faulty behaviours. I n case
the problems remain, please contact your local eno
matic
dealer.
Full list is available on www.enomatic.it
Trouble
Origin
Solution
There is a leak of
nitrogen
(or argon)
The bottle is not properly
engaged.
One
or more too short
bottle was engaged and
the sealing on the tap is
not correct.
If no bottle is engaged a
valve inside the tap
might be stucked.
Tank seal is missing (if
previewed).
Tank or pipes joints are
loose.
Check all the bottles triyng
to he
ar a whistle coming
from the necks or wet your
finger and surround them.
Check all the bottles are
pushed upwards and tight
against the seals.
Install cylindric adapter
(code 6012) between bottle
and piston.
Manually move the tap seal
downwards in order
to
release the valve anch for
leaks.
Puor cleaning
solutions.
Remove the manometer, fix
the seal and tight the bolt.
Check correct pipe fixing
and jointing.
Check manometer
tightening.
The machine
doesn t switch on.
Power failure.
Switch(es) is (are
) off.
Fuses are burned.
Plug the machine to a
power supply.
Switch on.
Change the fuses.
UM.02
ENOLINE WINE CARD
Page 14 of 46
Rev 0
8, May 2010
Bottle engagement
indicator led(s) is
(are) off.
Only some bottle
engagement
indicator leds are
on.
Bottle was engaged
while the machine was
off.
Bottle is m
issing.
Tap sealing is not
pushing the microswitch
behind the tap. (for off
ones)
Remove the bottle and
insert it while the machine
is on.
Engage the bottle.
Push manually upwards the
tap sealing checking the
click of the switch.
Bottle engagement
ind
icator led
switches off when
bottle is not empty.
Wrong operative
parameters.
Check parameter # 5 (full
bottle capacity) in
programmino mode.
Pouring is not
fluent.
Internal straw is not
properly inserted.
The filter at the bottom
of the internal straw i
s
stucked (especially with
sediment or aged
wines).
Tank is almost empty or
pressure is not enough.
Remove the bottle and fix it
properly.
Remove the bottle and
clean the filter.
Change the tank.
Wine drops falling
from the spouts.
Some wine sediments or
cork pieces are blocking
the dispensing valve.
Pour citric acid solution to
remove all the sediments
and foreign objects from the
valve.
Pistons fall down.
Loss or leak of pressure
on compressed
air/nitrogen supply pipe.
Check correct duty press
ure
(4 Bar).
Check the pipe not to be
pressed or pricked.
Wine bubbles in the
glass while pouring.
Wine is falling on the
bottom of the glass.
Lean the glass towards the
spout.
T
EMPERATURE CONTROLLED MODELS
Trouble
Origin
Solution
Set temperature is
n
ot reached.
Not enough air
circulation.
Check the free space aside the
compressor engine (300mm)
and provide it if missing.
WINE CARD MODELS
Trouble
Origin
Solution
Machine doesn t
react when a
winecard is
inserted.
The winecard is not
properly inserted.
The winecard reader is
not activated.
Insert the winecard with the
chip facing downwards.
Activate the card reader
through Module Card.
UM.02
ENOLINE WINE CARD
Page 15 of 46
Rev 0
8, May 2010
10.
Maintenance and Cleaning
A frequent and
severe
dispensing taps cleaning is
necessary to maintain you
r En
omatic Wine
Serving System in full performances
and
to grant wine flavours preservation. If
you respect the maintenance
programme your Enomatic Wine Serving
System will be efficient fo
r
long time. For repairs and
maintenance, in case of faults or faulty o
perations, call
only an authorised after
-
sales service centre, or contact
your local Distributor.
10 .1
Daily Maintenance
On a daily basis:
-
clean the drip tray with a damp sponge.
-
clean the Serving Spout by immersing it in water and then rinse thoro
ughly.
-
clean the
bodywork with a non-abrasive cloth.
10.2
Bottle Tube and Tap Cleaning
Dispensing taps and internal straws must be cleaned EVERY 10 POURED
BOTTLES PER DISPENSING POSITION (please note the chart available at the
end of this manual to
be ticked at any bottle engagement for tracking)
. A
n ideal
time to clean the entire Bottle Tube and Tap is when a bottle is being changed
this is because a partly used bottle can not be reinstalled into the system (it will
contain air
, and preservation
won t be effective); act as follow:
replacing the wine with a bottle containing diluted citric acid (3-4
teaspoons each 750 ml of water
, ca. 15-20 grams of product);
run some citric acid cleaning solution pours , wait 10 minutes and repeat
the
supply (serve approximately 300
mls
each time). Wait a few more
minutes and remove the bottle containing the cleaning solution;
insert
a bottle of clean water and flush the Bottle Tube and Tap with
the water (serve approximately 200mls);
replace the water with a new
bottle of the wine to be served and supply a
serve in order to fill the empty Bottle Tube.

UM.02
ENOLINE WINE CARD
Page 16 of 46
Rev 0
8, May 2010
10.3
Extraordinary maintenance
An extraordinary maintenance must be run every six months in order to ensure
perfect cleaning on the ducts and to avoid wine sediments all over them.
Change the wine bottle with one containing chlorine based cleaner
non
smelling (diluted in clean water in accordance with the manufacturers
instructions);
supply a few serves of the chlorine based cleaning solution, wait 10
minutes a
nd
repeat the supply (serve approximately 100mls). Wait
5 minutes and remove the
bottle containing the cleaning solution;
replace the bottle with a bottle containing diluted citric acid (10 grams of
citric acid added to a wine bottle of clean water) and
serve approximately
150mls;
install a bottle of clean water and flush the Bottle Tube and Tap with
the water (serve approximately 200mls);
R
eplace the water with a new bottle of the wine to be served and supply a serve
in order to fill the empty Bottle
Tube.
Execute an intense cleaning before leaving your
Enomatic Wine S
erving System not
operative
longer than three days.
Please note that
dispensing
sweet
or
particularly aged
wines
may result
into
severe
wine-deposit inside the
d
ucts. Intensify cle
aning through
citric acid solutions in
case.

UM.02
ENOLINE WINE CARD
Page 17 of 46
Rev 0
8, May 2010
11.
Technical Characteristics
enoline 4
MODEL
enoline 4
rf/cc
enoline
8
enoline 8
rf/cc/4+4
Height
643
643
643
643
Width
530
750
970
1190
Size (mm)
Depth
200
200
200
200
Diameter
- - - -
Weight (kg)
25
40
45
65
Voltage (V)
110/220 110
220
110/220
110
220
Electrical
Frequency
(Hz)
50
/60
60
50 50
/60
60
50
Performance
Watts (W)
30
150
150
30
150
150
Fuses (NOT
COVER BY
WARRANTY)
(Amps)
2 x
2 Amp
2 x
8
Amp
2 x
4
Amp
2 x 2
Amp
2 x 8 Amp 2 x 4
Amp
Nitrogen or Argon Gas
Supply Pressure (Bar)
4.0 single
4.0 single
0.16
0.16
Air Supply Pressure (Bar)
connection
connection
4.00
4.00
R-
134°=
96(80gr.dual)
Refrigerant
- R-
134°=80
gr
-
Electronic
Electronic
Refrigeration
Method to
change
temp.
-
Controller
- Controller
Details
Automatic
via
Automatic via
-
Electronic
-
Electronic
Defrost
method
Controller
Controller
Temp.
display
-
Digital
-
Digital

UM.02
ENOLINE WINE CARD
Page 18 of 46
Rev 0
8, May 2010
DECLARATION OF COMPLIANCE
Manufacturer:
eno
matic
Address:
Via di meleto 1/19 50027 Strada in Chianti Firenze Italy
Being the manufacturer, hereby declares within its own responsibility that the:
AUTOMATIC WINE SERVING SYSTEM,
m
odel
Enoline,Enomodule, Enoround, Enomove
To which this statement refers to, if used according to the Operating Manual, conforms to the
following CE legal standards:
CEI EN 60335
-1 modification A2, A13,
A14, A15, A16
Household and similar electrical appliances and similar . General
norm file n. 4196C
-
CEI EN 50081-1
Electro-Magnetic Compatibility general emissions standards Part
1:residential, commercial and light industry environments. File
3215 June 1997
-
CEI EN 50082-1
Electro-
Magneti
c Compatibility general immunity standards . Part
1: residential, commercial and light industry environments. File
4498 May 1998
-
CEI EN 61000
-3-2 Electromagnetic Compatibility EMC. Part 3: limits. Section 2:
limitations of voltage fluctuations and f
licker in low voltage supply
systems (appliances with rated current <16A per phase). File 4749
C
-
CEI EN 61000
-3-3 Electro-Magnetic Compatibility EMC .Part3: limits. Section 3
limiting in voltage fluctuation and of flickers in low voltage feeding
sys
tems for appliances with nominal current <16A . File 2650E
Also declares that it conforms with the requisite Directives:
-
Low Voltage Directive
2006/95 EC( Directive: regulation concerning the approach of State
Members laws regarding the electric ma
terial destined to be used within certain voltage limits)
-
Electro-Magnetic Compatibility
2004/108 EC (Directive regarding the approach of State
Members laws concerning about electro-
magnetic compatibility
Also declares that it is formally conformed
to all the Directives of the MACHINES REGULATION
CE 98/37as, following the comma 2 enclosed 1, the risk of the machine is to be considered
MAINLY electric, therefore is enough to fulfil the above regulations 2006
/95 EC/ 2004/108 ce
eno
matic srl
08
________________________
the last 2 digit of the year of production
Via di Meleto 1/19
50027 Strada in Chianti
Firenze Italy
P.I. 01066310523

UM.02
ENOLINE WINE CARD
Page 19 of 46
Rev 0
8, May 2010
The Enomatic models comply with the provisions of the following community directives:
Low
Voltage
Directive
73/23
/EEC and Directive
93/68
/EEC
Machinery
Directive 98/37
/EEC
EMC Directive 89/336
/EEC and Directive 93/68/EEC
The
Enomatic models comply
with the following technical regulations:
EN 60335-1 2a Edition
EN 50081-1 1a Edition
E
N 50082-1 2a Edition
EN 610003-2 2a Edition
EN 610003-3 1a Edition
The Microprocessor-based Digital Electronic Controller
TLK38
complies with the following
technical regulations:
ECC directive EMC 89/336 (EN 61326), ECC directive LV 73/23 and 93/68 (EN
61010-1)
C-
UL (file n. E206847)
The Microprocessor-based Digital Electronic Controller TLY28 complies with the following
technical regulations:
ECC directive EMC 89/336 (EN 61326), ECC directive LV 73/23 and 93/68 (EN
61010-1)
All Enomatic models desc
ribed
in this manual are
SUITABLE FOR DRY LOCATIONS ONLY
In accompliance to ISO-7000
Graphical Sym
bols for use on equipment

UM.02
ENOLINE WINE CARD
Page 20 of 46
Rev 0
8, May 2010
IMPORTANT
NOTICE FOR THE USER
As prescribed by Art.13 D.L
#151, July 25th 2005:
Attuazione delle Direttive 2002/95/CE, 2002/96/CE e 2003/108/CE, relative
alla riduzione dell uso di sostanze perico
lose nelle apparecchiature elettriche ed
elettroniche, nonché allo smaltimento dei rifiuti
In respect of
2002/95/EC, 2002/96/EC and
2003/108/EC, about the reduction
of dangerous material use contained in electric and electronic equipments, and
about wast
e disposal.
The symbol showing a crossed litter, labelled on the device and/or on the
packing, is to mean the need to separately dispose the equipment from normal
domestic waste. User must therefore forward the dead equipment to an
authorized electric and
electronic waste collection, in order to ensure
environment respectful disposal. User can also forward the dead equipment to
an authorized dealer and ask for substitution in case of same machinery
purchase.
A correct disposal and treatment of expired equ
ipments will result into reduced
risks for population and increased environment respect. Recycling process will
be easier.
Illegal disposal is a crime persecuted by law.

UM.02
ENOLINE WINE CARD
Page 21 of 46
Rev 0
8, May 2010
S
TATEMENT OF WARRANTY
WE Enomatic srl WARRANT that the Enomatic Wine Serving Systems (the Goods),models
eno
line,
eno
system,
eno
round and
eno
move, manufactured by Enomatic s.r.l are sold and
delivered to the Purchaser free from manufacturing defects in materials and workmanship.
From the Installation A
cceptance Date, Enomatic
(the Company) undertakes that the Warranty
shall cover free of charge to the Purchaser:
the repair or replacement (at the Company s sole discretion) of any functionally
inoperative
PARTS
that according to the Company s incontestable judgement, are
deemed to be defective in workmanship or materials because of a manufacturing defect
detected within the first 12 months (excluding software);
the diagnosis and elimination of any errors found in the
SOFTWARE
programmes
(provided that the errors are recurrent and documented) by way of supply of new
corrected versions of the software for the first 6 months;
the warranty shall include only the replacement of those defective parts and shall not
include
LABOUR
.
This is the Company s entire l
iability in respect of such Warranty.
Enomatic shall provide warranty services directly or through its own authorized repair centers.
Materials covered by warranty must be sent to the Repair Centers free of charge for enomatic
and shall be sent back at t
he customer s expense. Any parts replaced shall remain the property
of enomatic.
The Purchaser must save proof of the Installation Acceptance date as detailed on the
Installation Acceptance Certificate together with the sales receipt or invoice stating the item
numbers of the purchased Goods. All claims for Goods under Warranty shall be forwarded to
the Company together with proof of the Installation Acceptance date and a copy of this
Statement of Warranty.
In the event that installation of the Goods is delayed by the Purchaser for more than 1 month
from the original date of delivery of the Goods as requested by the Purchaser, then the
Installation Acceptance date shall be deemed to commence 1 month after the original date of
delivery of the Goods was
requested.
The Warranty only applies to the original Purchaser of the Goods and is not transferable.
All Warranty service will be provided by the Company during normal working hours. Replaced
parts become the property of the Company and repairs or replacements do not extend the
Warranty period. Any transportation costs (including return shipment) associated with a
Warranty claim will be the responsibility of the Purchaser.
THE WARRANTY DOES NOT COVER any defect, failure or damage arising from:
a)
failure to follow normal operating procedures and instructions or failure to ensure
proper care, use and regular maintenance as outlined in the documentation provided by
the Company;
b) incorrect transportation, installation, removal or handling;
c) the effects o
f fair wear and tear, rusting or damage to varnish, enamel or paintwork;
d)
periodic general cleaning and any labour or part charges incurred as a result of service
in the nature of maintenance and support including the replacement of consumable
parts, house
fuses or resetting of circuit breakers;
e)
incorrect storage or exposure to unusual or excessive environmental, chemical,
atmospheric, mechanical, electrical (including defective house wiring or by operating
the Goods on incorrect voltage or cycles or fluctuations or interruptions in the power
supply) or thermal stress during the course of installation or use;
f) any drawing, design or specification supplied by the Purchaser;
g) wilful or accidental damage, misuse, abuse or negligence;

UM.02
ENOLINE WINE CARD
Page 22 of 46
Rev 0
8, May 2010
h)
any modification (whether by alteration, deletion, addition, repair or otherwise) to the
Goods by the Purchaser or any other unauthorised persons unless the Purchaser has
obtained the prior written consent of the Company. If any such unauthorised
modification is made, then, without prejudice to the Company s other rights and
remedies, the Warranty will be null and void;
i) the use of any spare parts that are not originals as supplied by the Company;
j)
if the original identification markings on the Goods have been removed, defaced, or
altered.
The Company will be under no liability under the above Warranty (or any other warranty,
condition or guarantee):
a)
if the total price for the Goods has not been paid by the Purchaser by the due date for
payment;
b)
for any indirect, incidental or consequential loss, damage, cost or expense of any kind
whatsoever, whether arising under an accident, contracts tort (including negligence) or
otherwise;
c)
for compensation for any reasons whatsoever resulting from any inoperative down time
of the Goods including any
loss of wine or other beverage.
d) If the labels or marks are removed from the machines.
If a defect or failure of the Goods is found upon investigation not to be the Company s
responsibility under this Warranty, the Company may charge the Purchaser for all reasonable
costs and expenses incurred by the Company in the course of, or in consequence of, such
investigation. Without prejudice to the foregoing, the Company reserves the right to charge
for travelling time and incidental expenses incurred in respect of attendance at your premises
to investigate and rectify any problem reported by you.
The Company s obligations under the Warranty are contingent upon the Company s agents or
servants being given full details of the defects without delay and adequate time and access to
the Goods during normal working hours to rectify such defect. If the Company rectifies the
defect within a reasonable period of time then the Company will have no other liability in any
respect of, or arising from, such defect.
The above Warranty does not extend to parts, materials or equipment not manufactured by
Enomatic s.r.l, in respect of which the Purchaser will only be entitled to the benefit of any such
warranty or guarantee as is given by the supplier or service provider to the
Company.
eno
matic s.r.l
Amministratore Delegato
Italo Baldini
Code and serial number

UM.02
ENOLINE
WINE CARD
Page 23 of 46
Rev 09, May
2010
Enoline 8 Wine Card
Enoline 8 Wine Card (modello a temperature controllata
)
eno
line 4 wine card
eno
line 4 wine card a temperatura
controllata
eno
line 8 wine card
eno
line 8 wine card a temperature controllata
Manuale di Uso e Manutenzione
UM.02
Rev. 0
8
Maggio
20
10
Enomatic srl
Via di Meleto,1/19
I-
50027 Greve in Chianti Firenze - Italy
Tel. +39 055 8547272
Fax. +39 055 8547807
www.enomatic.it

UM.02
ENOLINE WINE CARD
Page 24 of 46
Rev 0
8, May 2010
WARNING
Should warranty terms be a
pplied, please
return the product, included original
packing, all
accessories and documentati
on
( i.e. user s manual and pow er supply
cable).
ATTENZIONE
Nei casi in cui l'applicazione della garanzia
preveda la restituzione del prodotto, il
bene dovrà essere restituito dal cliente
nella confezione originale, completa di
tutte le sue part
i (compresi imballo, eventuale
documentazione ed accessori: manuale di istruzioni e cavo
alimentazione)
.

UM.02
ENOLINE WINE CARD
Page 25 of 46
Rev 0
8, May 2010
I
NDICE
1.
I ntroduzione 29
2.
Targa di identificazione . 29
3.
Avvertenze .. .30
4. Trasporto e posizionamento..
.30
5. Disimballo
. . ..31
6.
I nstallazione . ..31
7.
I struzioni operative .. ..36
8. Guida
alla risoluzione dei guasti 44
9.
Manutenzione e igiene . ..
47
10. Car
atteristiche tecniche .49
Dic
hiarazione di Conformità .51
I
nforma
tiva per l
utente .52
Ce
rtificato di Garanzia .53

UM.02
ENOLINE WINE CARD
Page 26 of 46
Rev 0
8, May 2010
1.
Introduzione
Questo manuale operativo è parte
integrante della fornitura, pertanto si
raccomanda di conservarlo sempre
insieme alla macchina.
Prima di procedere all installazione e all utilizzo del Vostro sistema Enomatic
Wine Serving System, si prega di leggere attentamente le istruzioni contenute
nel presente Manuale: queste forniscono importanti informazioni sulla sicurezza
durante le fasi di installazione, utilizzo e manutenzio
ne.
Il Costruttore non si ritiene responsabile in alcun modo di danni provocati da un
uso irrazionale o irresponsabile del sistema, nonché da una errata
interpretazione delle istruzioni sulla sicurezza e sulla installazione.
2.
Targa di identi
ficazione
Ogni modello
eno
line è univocamente riconoscibile da un numero di serie
stampato su due targhe di identificazione; la prima è posizionata sulla
fiancata posteriore; la seconda è accessibile dal fronte macchina rimuovendo
il vassoio di raccol
ta gocce.
La targa è l unico elemento di identificazione autorizzato dal Costruttore e
contiene tutti i dati necessari per fornire informazioni chiare ed immediate sulle
caratteristiche tecniche di utilizzo e per facilitare l eventuale sostituzione di p
arti
di ricambio.
Non rimuovere o danneggiare per alcun
motivo i dati riportati sulla targa.
Esempio :

UM.02
ENOLINE WINE CARD
Page 27 of 46
Rev 0
8, May 2010
3.
Avvertenze
Durante il funzionamento è essenziale prestare l'attenzione a questi requisiti di
sicurezza per evitare rischi di incendio, scosse elettriche e/o di altri
avvenimenti.
1. prima dell utilizzo i modelli Enomatic leggere attentamente le istruzioni
contenute nel presente Manuale o in ogni altro documento contenuto
nell imballaggio;
2. non posizionare i modelli Enomatic in prossimità di getti d acqua e non
immergere il cavo di alimentazione e gli altri componenti elettrici/elettronici
in acqua o altri liquidi;
3. porre particolare attenzione all utilizzo in presenza di bambini;
4.
scollegare
sempre il cavo di alimentazione elettrica dalla macchina e lasciare
raffreddare prima della pulizia o della manutenzione;
5. non utilizzare i modelli Enomatic se il cavo di alimentazione o qualsiasi altro
componente elettrico/elettronico fossero danneggiati o guasti, ma procedere
immediatamente alla ri
mozione tirando il connettore dalla presa
;
6. non utilizzare apparecchiature elettriche all interno della zona alimentare se
non espressamente indicato dal costruttore;
7. richiedere sempre per la sostituzione parti di ricambio originali. L utilizzo di
parti di ricambio non originali può provocare infortuni alle persone,
danneggiare la macchina e fa decadere la garanzia del Costruttore;
8. per qualsiasi riparazione rivolgersi sempre ad Officine autorizzate dal
Costruttore
o dal Concessionario e pretendere che siano usate solo parti di
ricambio originali;
9.
non utilizzare
i modelli Enomatic
all aperto;
10.
evitare che il cavo di alimentazione rimanga in posizione penzolante o che
venga in contatto con sorgenti di calore. Evitare assolutamente il
posizionamento della macchi
na sopra il proprio cavo di alimentazione;
11.
tenere lontano la macchina da sorgenti di calore; mantenere i punti di
ventilazione/scambio termico
12.
prima di collegare la macchina alla presa elettrica assicurarsi che
l interruttore generale sia disinserito;
13.prima di collegare la macchina alla presa elettrica assicurarsi che la tensione
della linea sia corrispondente a quella riportata nella targa di identificazione
(110/220 V).
14.
non effettuare pulizie della macchina con sostanze corrosive o con utensili
che pot
rebbero danneggiarla. Usare solo uno straccio soffice e bagnato;
4.
Trasporto e posizionamento
Per il peso e le dimensioni dei modelli
eno
line sono necessarie due persone per
la movimentazione.
Per evitare danni alla macchina è necessario prestare particolare attenzione
durante il carico e lo scarico e sollevare il peso in accordo ai simboli riportati
sull imballaggio esterno. Mantenere sempre il sistema in posizione verticale, non
capovolgere o sdraiare.
Posizionare la macchina in locali asciutti con temperatura compresa tra 10°C e
25°C, e con umidità relativa non superiore al 60%.

UM.02
ENOLINE WINE CARD
Page 28 of 46
Rev 0
8, May 2010
5.
Disimballo
Una volta asportato l imballo controllare che la macchina non abbia subito danni
durante il trasporto. Qualora vi fossero dubbi sull integrità della fornitura e
vitare
di utilizzare la macchina e rivolgersi direttamente al Concessionario o al
Costruttore per un eventuale intervento di assistenza tecnica. Verificare il
contenuto della fornitura che deve comprendere :
-
1 sistema
eno
line 4 bottiglie, o
-
1 sistema
enoline 8 bottiglie;
- 1 copia del presente Manuale di Uso e Manutenzione, Guida alla
risoluzione dei guasti, Certificazione di Conformità, Garanzia;
-
5 cannucce di aspirazione, o
-
10 cannucce di aspirazione;
- 2 staffe per l ancoraggio al muro del Vs. sistema Enoma
tic;
- 1 tubo Ø 10mm per lo scarico di condensa (solo per i modelli refrigerati o
climatizzati;
-
1 cavo di alimentazione elettrica
;
- 1 livella a bolla d acqua;
-
1 kit guarnizioni rubinetto;
Non lasciare m ai i resti dell imballo ( involucri di
plastica, ecc.)
alla portata dei bambini poiché
possono rappresentare un potenziale pericolo.
Le seguenti operazioni devono essere eseguite solo da personale
specializzato, e specificatamente autorizzato da Enomatic
6.
Installazione
1. Dopo aver sballato il dispenser, posizionarlo su un piano di appoggio solido,
robusto e consono all utilizzo. Il piano di appoggio e tutte le superfici in prossimità
del/i dispenser/s devono essere composti da materiali ignifughi, ad un altezza
compresa tra 800 e 1300mm dal suolo. Considerare per i modelli a controllo di
temperatura uno spazio libero pari ad almeno 300mm dal lato del compressore
frigo e 50mm per il pannello posteriore.
2. Verificare il posizionamento con una livella ad acqua ed
eventualmente compensare tramite i piedini di reg
olazione;
pregasi fare riferimento alla livella ad acqua in dotazione.
Accertarsi della buona stabilità della macchina, e se
necessario assicurare l erogatrice al muro tramite le
apposite staffe in dotazione.
3. Collegare il riduttore di pressione (6434) alla bombola di
Azoto o Argon, usando la guarnizione fornita col riduttore, e
verificare l assenza di perdite.
4. Collegare macchina e bombola mediante l apposito tubo
LLDPE foodgrade da 4mm
5. Collegare il cavo di alimentazione elettrica nell apposita
spina posta
nel retro del dispenser e connetterlo alla rete.
6. Aprire la bombola di azoto e posizionare il rubinetto di
uscita in posizione verticale; in questo modo il gas
raggiungerà la macchina.
7. A questo punto il dispenser è pronto per accogliere le bottiglie del Vostro vino
preferito. Seguire le istruzioni per l inserimento delle bottiglie.

UM.02
ENOLINE WINE CARD
Page 29 of 46
Rev 0
8, May 2010
6.1 Componenti della macchina
1
Alloggiamento bottiglie
2
Pistone per bottiglie con adattatori
3
Pulsanti di erogazione
4
Be
ccucci di erogazione
5
Termostati (disponibili solo sui modelli a temperature controllata)
6 Display Wine card
7
Fessura inserimento Wine Card
8
Display prezzi
9
Connettore Enoprog (vedi foto)
Enoline 4+4 Wine Card
1 Alloggiamento vini rossi
2
Cilindro bottigle con adattatori
3
Pulsanti di erogazione
4
Beccucci di erogazione
5
Termostato alloggiamento vini rossi
6 Display Wine card
7
Fessura inserimento Wine Card
8
Display prezzi
9
Connettore Enoprog (vedi foto)
10
Termostato alloggiamento vini bianchi
11
Alloggiamento vini bianchi

UM.02
ENOLINE WINE CARD
Page 30 of 46
Rev 0
8, May 2010
6.2 Alimentazione elettrica
Prima di collegarsi alla linea elettrica controllare la tensione della macchina.
Questa è evidenziata sulla targa posta sul retro della macchina. Può essere
utilizzato un trasformatore esterno per erogare la corretta tensione di
alimentazione.
I modelli
eno
line
4 e 8 lavorano a 220 V (su richiesta anche a 110 V) ed hanno
un solo interruttore generale posto sul retro della macchina.
Quando l interruttore si trova nella posizione 0 la
macchina è spenta.
Per iniziare ad alimentare la macchina portare
l interruttore in posizione 0 . Collegare il cavo elettrico,
ad una presa elettrica provvista di collegamento a terra e
portare l interruttore in posizione 1 .
Per ragioni di sicurezza è assolutamente necessario che la
macchina sia collegata ad una rete dotata di un effettivo sistema di messa a
terra, realizzato in conformità con le norme tecniche di legge.
Enoline 4 e 8 a temperatura controllata è dotata di un
interruttore principale e due interruttori secondari; quello più
interno alla macchina alimenta le funzionalità elettroniche
(erogazione e gestione schede), quello più esterno accende o
spegne l impianto frigorifero
6.3 Connessioni gas
Utilizzare esclusivamente materiale
certificato FOODGRADE e tubi in LLDPE per le
con
nessioni di azoto
Per un corretto funzionamento Enoline 4 e 8 necessitano di due differenti
alimentazioni di pressione:
Linea 4 Bar: serve per l alimentazione pneumatica dei cilindri sotto le
bottiglie; può essere sia di azoto se collegata direttamente alla bombola
o ad un generatore di azoto (non incluso), o di aria compressa se
collegata ad un compressore esterno da ordinare separatamente.
Linea 160 mBar: serve per la conservazione e per l erogazione del vino,
e, ulteriormente ridotta, per la pulizia dei beccucci; deve essere
esclusivamente in azoto puro al 99,99%, specificatamente marcato per
uso alimentare

UM.02
ENOLINE WINE CARD
Page 31 of 46
Rev 0
8, May 2010
La preservazione del vino dai processi ossidativi avviene grazie all inflazione di
azoto o argon all interno della bottiglia. La preservazione comincia non appena
una bottiglia viene posizionata in contatto con un rubinetto erogatore all interno
del dispenser. Inoltre il gas in pressione assicura l erogazione del vino dai
beccucci. Infine viene utilizzato per la
pulizia dei beccucci stessi una volta che la
fase di erogazione è terminata. Pregasi utilizzare Azoto o Argon di
tipo alimentare, con grado di purezza pari almeno al
99.5%.
Normalmente la fornitura di azoto o argon avviene tramite
bombole, riempite ad alta pressione. La pressione massima
dipende dalle normative di ogni singolo Paese, ma general
mente
varia da 150 a 200 Bar. In alternativa può essere utilizzato un
generatore di azoto
certificato
.
La bombola di azoto o argon deve rimanere in posizione verti
cale
e fissata tramite una catena, in una stanza sufficientemente
ventilate.
Deve inoltre essere collegata ad un apposito regolatore
di pressione, il cui valore di uscita varia a seconda della tipologia e delle
caratteristiche dell installazione.
Chiudere
la bombola, inserire la guarnizione (se prevista) nell attacco
femmina e avvitare con decisione il manometro. Chiudere i rubinetti di
uscita del manometro.
Verificare l assenza di perdite di gas; annotare la carica massima indicata
dal
manometro con la
bombola aperta, chiudere la bombola e
controllare dopo circa 15 che il valore non sia variato.
Uscita a 4 bar
Uscita a 160 mBar
Attacco alla bombola
Collegare l uscita del regolatore a 160 mBar all attacco della macchina
corrispondente mediante il tubo da 4mm, premendo con decisione nelle
apposite sedi (lato riduttore e lato macchina).
Collegare l uscita del regolatore a 4 Bar o quella del compressore
all ingresso della macchina corrispondente mediante il tubo da 4mm,
premendo con decisione nelle apposite sedi (lato rid
uttore/compressore e
lato macchina).
Aprire i rubinetti di uscita del riduttore e la valvola della bombola.
Verificare l assenza di perdite di gas; annotare la carica massima indicata
dal manometro con la bombola aperta, chiudere la bombola e controllare
dopo circa 15 che il valore non sia variato.
Per sostituire la bombola quando è terminata, chiudere il rubinetto di
uscita e la
valvola principale; scaricare la pressione residua tirando
l anello di sicurezza e solo ad avventa scarica svitare il manometro.

UM.02
ENOLINE WINE CARD
Page 32 of 46
Rev 0
8, May 2010
6.3.1
Drenaggio della condensa ( solo per i modelli a controllo di
temperatura)
Il tubo da 10mm (in dotazione) deve essere collegato all attacco predisposto
sulla macchina (foto in alto, indicato come water drainage) per permettere lo
scarico della condensa in un contenitore che dovrà essere svuotato
regolarmente.
7.
Istruzioni operative
7.1 Inserimento del tubo di pescaggio
Inserire il tubo di pescaggio al centro del beccuccio di erogazione e premere
verso l alto fino alla battuta (foto A). Il tubo ha un filtro all estremità inferiore
per evitare che eventuali sedimenti provenienti dal vino entrino in macchina
(foto
B). Il tubo deve entrare all interno della bottiglia fino al fondo. E
comunque consigliato per vini particolarmente sedimentati tagliare il tubo
leggermente più corto della lunghezza della bottiglia.
FOTO A
FOTO B
7.2 Caricamento della bottiglia
Aprire la bottiglia, controllare la perfetta pulizia e integrità della parte superiore
del collo ed
inserire il tubo di pescaggio al suo interno, posizionandola quindi
sul cilindro (foto C).
Inserire la Carta Tecnica (*) e premere il pulsante centrale,
il cilindrò salirà portando in contatto la bottiglia con il rubinetto erogatore; da
questo momento inizia la preservazione del vino. Le luci sopra la bottiglia
lampeggeranno, in attesa dell associazione con un vino presente nel database di
Enosoft (*).
FOTO C
Assicurarsi che la parte conica dell erogatore sia inserito all interno del collo.
Qualora non fosse possibile introdurre la bottiglia in macchina, rimuovere il
distanziale sottostante il cilindro per consentire l introduzione di bottiglie più
alte. Pregasi notare che l altezza massima consentita per la bottiglia è 360mm.
Nel caso che siano utilizzate bottiglie più basse di 275mm, è necessario
aggiungere
un distanziale tra cilindro e bottiglia (codice Enomatic 6011).
Qualora si stesse utilizzando un modello a temperatura controllata, rimuovere il
pannello frontale in plexiglas per il minor tempo possibile, e solo
contestualmente al cambio delle bottiglie.
Rammentasi di inserire in macchina vini bianchi già freddi.
Una volta che la bottiglia è stata inserita, verificarne la corretta centratura
ortogonale e la corretta aderenza alla guarnizione d
el rubinetto erogante.
(*): per saperne di più riguardo la Carta Tecnica
e Enosoft
pregasi fare
riferimento al
manuale UM.13
enosoft 2.0

UM.02
ENOLINE WINE CARD
Page 33 of 46
Rev 0
8, May 2010
7.3
U
tilizzo di Enomatic Wine Serving System
Quando non c è alcuna Wine Card inserita il display mostra
la scritta lampeggiante Inserire Card
e il nome
dell installazione. Per ottenere un erogazione di vino è
necessario inserire una Wine Card con una sufficiente
somma di denaro precaricata e premere il pulsante
relativo
alla dose desiderata. Il display visualizzerà il nome del vino
selezionato.
Il sistema decurterà automaticamente il costo
della dose selezionata ed erogherà il vino. Il credito
rimanente verrà visualizzato sul display fino alla rimozione
della Wine Card. Per calibrare l erogazione, inserire la Carta
Tecnica e premere i pulsanti #1 e #3 per circa 5 secondi: il display visualizza
Cali
e successivamente 100; premere il tasto centrale per erogare, misurare la
quantità ottenuta e impostare il valore sul display. (agire sul tasto #1 per
diminuire il valore o sul tasto #3 per incrementarlo); ripetere l operazione fino
all ottenimento di 100ml di liquido, quindi rimuovere la Carta Tecnica per
memorizzare il valore. Ripetere la procedura per tutti gli altri rubinetti erogatori.
7.5 Sostituzione delle bottigl
ie
Per rimuovere una bottiglia, inserire una Carta Tecnica (*) e premere il pulsante
centrale relativo. Il cilindro si abbasserà, togliere la bottiglia e scollegare il tubo
di pescaggio, sciacquarlo abbondantemente e ripetere la procedura dal punto
7
.1.
Premere il tasto centrale sopra la bottiglia per assegnare lo stesso vino, o
rimuovere la Carta Tecnica per abbinare una nuova bottiglia.
(* ): per saperne di più riguardo la Carta Tecnica pregasi fare riferimento
al manuale UM.13
enosoft 2.0
7.6 Var
iazione della temperatura impostata (solo per i modelli a
controllo di temperatura)
Per i modelli a temperatura controllata la macchina viene fornita con le seguenti
temperature impostate in fabbrica:
8°C per i vini bianchi (con possibilità di variare la temperatura da 7°C a
20°C nei modelli refrigerati:
eno
line 4rf);
18°C per i vini rossi (con possibilità di variare la temperatura da 7°C a
20°C per i modelli climatizzati: :
eno
line 4cl).
Per cambiare le temperature impostate attenersi alle seguenti is
truzioni.
Descrizione del display frontale

UM.02
ENOLINE WINE CARD
Page 34 of 46
Rev 0
8, May 2010
1
- Tasto P : si usa per accedere alla programmazione dei parametri e per
confermare la
selezione.
2
- Tasto Dow n
: si usa per diminuire il valore di temperatura indicato.
3
- Tasto Up
: si usa per
aumentare il valore di temperatura indicato.
Gli altri pulsanti e funzioni non riguardano l impostazione della temperatura.
Impostazione della temperatura
NON PREMERE I L TASTO U
Premere il tasto P . Il display mostrerà la
scritt
a SP 1 ( premendo il tasto troppo a
lungo si entra in un altro menù, per ritornare
al modo SP 1 aspettare 10 secondi) e dopo
qualche secondo mostrerà il valore di una
temperatura espressa in °C.
Per aumentare il valore della temperatura premere il tasto Up , per diminuirlo il
tasto Down . I tasti Up e Down variano il valore della temperatura ad ogni
pressione; se vengono mantenuti premuti il valore della temperatura varia
velocemente. Premere i tasti Up e Down fino al raggiungimento del valore di
temperatura desiderato.
Uscire premendo il tasto P e aspettare circa 15 secondi per vedere visualizzata sul
display la
temperatura impostata.
Impostazione delle temperature sui modelli dual
I modelli a doppia
temperatura
(dual) sono caratterizzati da due camere
separate all interno dello stessa macchina, dove è possibile impostare due
temperature differenti; la tipica applicazione è per l alloggiamento di 4 vini
bianchi da una parte e 4 vini rossi dall altra. Il termostato della zona vini rossi
consente un range di impostazione tra 16° e 20° C, mentre la zona per i vini
bianchi può essere impostata ad una
temperatura
di funzionamento tra
7°C
e
20°C.
Il t
ermostat
o superiore, (TLK38), controlla la zona dei vini rossi, mentre
quello inferiore (TLY28) si riferisce alla temperatura nella zona dei vini bianchi.
La zona di alloggiamento dei vini bianchi è quella che si trova più vicina al vano
compressore.
Rammentasi di inserire vini bianchi già freddi, e di rimuovere il
pannello frontale in plexiglas per il tempo strettamente ed esclusivamente
necessario alla sostituzione delle bottiglie.
Posizionare la macchina in locali
asciutti con temperatura compresa tra
10°C e 25°C, e con umidità relativa non
superiore al 60%.

UM.02
ENOLINE WINE CARD
Page 35 of 46
Rev 0
8, May 2010
9.
Guida alla Risoluzione dei
problemi
Questa guida ha lo scopo di dare un primo aiuto nel caso si verifichino problem i di
funzionamento della macchina.
Inconveniente
Probabile causa
Rimedio
C è una perdita di
azoto
( o argon)
La bottiglia non è installata
correttamente.
E stata utilizzata una
bottiglia troppo corta che
non permette al pistone di
fornire una sufficiente
pressione in modo da
creare una perfetta
aderenza del collo della
bottiglia con la guarnizione
dell erogatore.
Se non è presente la
bottiglia controllare
che il
beccuccio non sia bloccato
e assicurarsi che non sia
rimasto premuto contro la
valvola che fa uscire il gas.
La connessione alla
bombola/tubi è allentata.
Se l azoto ( o l argon )
viene usato anche per
azionare i pistoni allora
TUTTI i pistoni d
evono
essere alzati per evitare
perdite
.
Controllare ogni bottiglia
ascoltando il soffio di eventuali
perdite. Si può anche provare
ad inumidire le dita e
avvicinarle all erogatore per
sentire se ci sono perdite.
Controllare che la bottiglia sia
posiziona
ta correttamente e
premuta in piano contro la
guarnizione dell erogatore.
Installare l adattatore cilindrico
(codice 6012) fra la bottiglia e
il pistone.
Portare manualmente il
beccuccio dell erogatore nella
sua posizione di riposo
controllando che n
on ci siano
perdite di gas. Condurre dei
lavaggi con acido citrico.
Controllare che i tubi siano
perfettamente inseriti.
Controllare che il collettore del
regolatore di pressione sia
stretto con forza alla bombola.
Alzare tutti i pistoni.
La macchina non
si
accende .
Manca il collegamento
elettrico.
L interruttore è spento.
Collegare la macchina alla
presa.
Accendere l interruttore.
La spia che indica la
presenza della
bottiglia non si
accende
Solo alcune spie sono
accese
La bottiglia è stata inserita
quando la macchina era
spenta.
Manca la bottiglia.
Il beccuccio dell erogatore
(sulle molle) non è
attaccata al corpo
erogatore.
Abbassare la bottiglia e
rimetterla in posizione con la
macchina accesa.
Inserire la bottiglia.
Premere manualmente il
beccu
ccio nella parte
posteriore spingendo verso
l alto e assicurarsi che si senta
scattare l interruttore.

UM.02
ENOLINE WINE CARD
Page 36 of 46
Rev 0
8, May 2010
La spia della bottiglia
si spengne mentre c è
ancora del vino
all interno.
Programmazione sbagliata.
Controllare il parametro 5
(capacità bottiglia)
nella
programmazione.
L erogazione non
avviene in modo
fluido.
Il tubo della bottiglia non è
inserito correttamente
nell erogatore.
Il filtro posto nella parte
bassa del tubo di
aspirazione potrebbe
essere intasato
(specialmente se si tratta
di una macchi
na per vini
rossi contenenti sedimenti).
Il gas è esaurito oppure la
pressione è bassa.
Rimuovere la bottiglia e
premere il tubicino nel foro
dell erogatore.
Rimuovere la bottiglia e
controllare che il filtro sia
pulito.
Sostituire la bombola con una
n
uova. Controllare la pressione
del gas.
Gocce di vino escono
dal tubicino di
erogazione
Alcuni sedimenti
provenienti dai vini rossi
sono depositati sulla
valvola dell erogatore.
Rimuovere la bottiglia, inserire
una bottiglia di acqua e acido
citrico e e
rogare affinché
l erogatore venga ripulito da
ogni sedimento.
I pistoni si abbassano.
Blocco o perdita di
aria/Azoto dalla linea di
alimentazione.
Controllare che il compressore
o la bombola stiano
funzionando alla pressione
corretta (4 Bar).
Controllare
che il tubo dell aria
non sia schiacciato o piegato in
modo da impedire il passaggio
dell aria o del gas.
Nel bicchiere si
formano bollicine
durante l erogazione
del vino.
Il vino sta cadendo dal tubo
di erogazione direttamente
sul fondo del bicchiere.
T
enere il bicchiere vicino
all erogatore inclinandolo in
modo che il vino scenda sulla
parete.
M
ODELLI CON IL CONTROLLO DI TEMPERATURA
Problema
Probabile causa
Cosa fare
Non si riesce a
raggiungere la
temperatura
desiderata.
Insufficiente circolazione di
aria.
Controllare che lateralmente lato
motore ci sia uno spazio libero di
almeno 20/30 cm
MODELLI CON WINE CARD
Problema
Probabile causa
Cosa fare
La macchina non
risponde quando si
inserisce la carta.
La carta non è stata
inserita correttamente.
Il
lettore della carta non è
attivato.
Inserire la carta con il microchip
disposto verso il basso in
direzione della fessura .
Attivare il lettore della carta per
mezzo della carta MASTER.
Se dopo aver seguito le istruzioni sopra descritte il problem a da Voi riscontrato
persiste, contattare il centro assistenza eno
matic
più vicino.
P
er informazioni:
www.enomatic.it

UM.02
ENOLINE WINE CARD
Page 37 of 46
Rev 0
8, May 2010
10.
Manutenzione ed Igiene
U
na puntuale e frequente pulizia degli erogatori è
funzionale alla p
erfetta conservazione di tutti i sapori e
gli aromi del vino; inoltre rispettando
il programma di manutenzione del
Costruttore la macchina rimarrà
efficiente per lungo tempo. Per
riparazioni o manutenzione, in caso
di guasti o funzionamento anomalo, richie
dere
l intervento solo di centri di assistenza autorizzati.
10.1
Manutenzione giornaliera
pulire con una spugna bagnata le tracce di gocce;
pulire il tubo di erogazione in acciaio immergendolo in un bicchiere
d acqua;
pulire la zona di lavoro con una s
pugna non abrasiva.
10.2
Sanificazione periodica
-
Igiene
La pulizia dei tubi di aspirazione e degli erogatori deve essere fatta OGNI 10
BOTTIGLIE CONSUMATE PER EROGATORE, compatibilmente a quando si
esaurisce il vino nella bottiglia (quindi anche in momenti distinti per ogni
posizione
, si consiglia a tal proposito di utilizzare la tabella alla fine di questo
manuale
); devono essere utilizzati specifici detergenti per enologia, tipicamente
l acido citrico. Un momento ottimale per pulire i tubi delle bottiglie e gli
erogatori è durante il cambio delle bottiglie.
La procedura è la seguente:
- sostituire la bottiglia di vino con una bottiglia contenente la soluzione
detergente (circa 5 cucchiaini da caffè ogni 750ml di acqua);
- eseguire alcune erogazioni con la soluzione detergente, aspettare per
qualche minuto e ripetere nuovamente le erogazioni; aspettare ancora
qualche minuto;
- continuare ad erogare la soluzione fino ad esaurimento e rimpiazzarla con
un altra contenente solo acqua potabile;
-
ripetere
le erogazioni fino a rimuovere completamente il detergente, dopo di
che sostituire la bottiglia presente con una di vino da servire. Erogare un
servizio per riempire il tubo della bottiglia con vino ed espellere così gli
ultimi residui di acqua.

UM.02
ENOLINE WINE CARD
Page 38 of 46
Rev 0
8, May 2010
10
.3
Manutenzione straordinaria
-
Igiene
La pulizia straordinaria deve essere fatta ogni sei mesi per una perfetta
sanificazione
degli erogatori usando un detergente disinfettante specifico per uso in
ambienti alimentari, nelle proporzioni e quantità fornite
dal produttore.
Un momento ottimale per pulire i tubi delle bottiglie e gli erogatori è durante il
cambio delle bottiglie.
La procedura è la seguente:
- sostituire la bottiglia di vino con una bottiglia contenente la soluzione
detergente;
- eseguire alcune erogazioni con la soluzione detergente, aspettare per qualche
minuto e ripetere nuovamente le erogazioni; aspettare ancora qualche minuto;
- continuare ad erogare la soluzione fino ad esaurimento e rimpiazzarla con
un altra contenente soluzione di ac
ido citrico;
- eseguire alcune erogazioni con la soluzione detergente, aspettare per qualche
minuto e ripetere nuovamente le erogazioni; aspettare ancora qualche minuto;
- continuare ad erogare la soluzione fino ad esaurimento e rimpiazzarla con
un altra c
ontenente acqua potabile;
-
ripetere le erogazioni fino a rimuovere completamente il detergente, dopo di che
sostituire la bottiglia presente con una di vino da servire. Erogare un servizio
per riempire il tubo delle bottiglie ed espellere gli ultimi resid
ui di acqua.
Eseguire un intensa pulizia prima di lasciare le macchina non
operativa per pe
riodi superiori a 3 giorni.
Pregasi notare che l utilizzo di vini dolci
o particolarmente invecchiati può
causare la formazioni di depositi vinosi
nei condotti. Intensificare la pulizia con acido citrico nel
caso
.

UM.02
ENOLINE WINE CARD
Page 39 of 46
Rev 0
8, May 2010
11. Caratteristiche tecniche
MODELLO
enoline
4
enoline 4
rf/cc
enoline
8
Altezza (mm)
643
643
643
Larghezza
(mm)
530
750
970
Profondità
(mm)
200
200
200
Dimensioni
peso (kg)
25
38
45
Tensione (V)
110/220
110
220 110/220
Frequenza
(Hz)
50
/60
60
50
50
/60
Potenza(W)
30
150
150
30
Caratt
eristiche
elettriche
Fusibili (Amps)
2 x 2
Amp
2 x 8
Amp
2 x 4
Amp
2 x 2
Amp
0.16
0.16 0.16
0.16
Pressione azoto (Bar)
4.00
4.00 4.00
4.00
Refrigerant
e
R-
134°=80 gr
11.1
Fusibili di protezione
I fusibili di protezione sono posti sul retro della macchina (foto sotto).
eno
line
4
eno
line
4rf
modello
refrigerato
eno
line
4cl
modello
climatizzato
Fusibili
2
A x 2
4A x 2
4A x 2

UM.02
ENOLINE WINE CARD
Page 40 of 46
Rev 0
8, May 2010
11.2
Normative
La macchina ottempera alle seguenti direttive comunitarie:
Direttiva Bassa tensione 73/23/CE e Direttiva 93/68/CE;
Direttiva Macchine 98/37/CE
Diret
tiva EMC 89/336/EEC e Direttiva 93/68/CE
La macchina è in accordo con le seguenti norme:
EN 60335
-1 2a Edizione
EN 50081
-1 1a Edizione
EN 50082
-1 2a Edizione
EN 610003-2 2a Edizione
EN 610003-3 1a Edizione
Il controllore elettronico digitale
TLY28 per le macchine refrigerate rispetta le seguenti
norme:
Conformità: Direttiva CEE EMC 89/336 (EN 61326), Direttive CEE BT 73/23 e 93/68
(EN 61010-1)
Omologazione: C-UL (file n. E212227)
Il regolatore elettronico digitale TLK38 per le macchine clim
atizzate rispetta le seguenti
norme:
Conformità: Direttiva CEE EMC 89/336 (EN 61326), Direttive CEE 73/23 e 93/68/CE
(EN 61010-1)
Omologazione: C-UL (file n. E206847)
Tutti i modelli Enomatic descritti in
questo manuale
sono
INDICATI
PER OPERARE I
N AMBIENTI ASCIUTTI

UM.02
ENOLINE WINE CARD
Page 41 of 46
Rev 0
8, May 2010
DI CHI ARAZI ONE CE DI CONFORMI TA
La Ditta
eno
matic srl
con sede legale in
Via
di Meleto 1 int 19, Strada in Chianti (FI)
dichiara sotto la propria responsabilità che il prodotto
DISPENSER AUTOMATICO PER VINI
modello
eno
module,
eno
line,
eno
round,
eno
move
al quale questa dichiarazione si riferisce è conforme alle seguenti norme:
CEI EN 60335-1
varianti
A2, A13,
A14, A15, A16
Sicurezza degli apparecchi elettrici d uso domestico e similare. Parte
1: Norme generali fascicolo 4196C.
CEI EN 50081
-1
Compatibilità elettromagnetica -
Norma generica sull'emissione. Parte
1: Ambienti
residenziali, commerciali e dell'industria leggera Fascicolo
3215. Giugno 1997
CEI EN 50082
-1
"Compatibilità elettromagnetica. Norma generica sull'immunità. Parte 1:
Ambienti residenziali, commerciali e dell'industria leggera". Fascicolo
4498 . Maggio 1
998.
CEI EN 61000
-3-2
"Compatibilità elettromagnetica (EMC) - Parte 3: Limiti - Sezione 2:
Limiti per le emissioni di corrente armonica (apparecchiature con
corrente di ingresso < 16A per fase)." Fascicolo 4749C.
CEI EN 61000
-3-3
"Compatibilità elettro
magnetica (EMC) - Parte 3: Limiti - Sezione 3:
Limitazioni delle fluttuazioni di tensione e del flicker in sistemi di
alimentazione in bassa tensione per apparecchiature con corrente
nominale < 16A." Fascicolo 2650E.
e quindi rispondente ai requisiti es
senziali delle Direttive:
- Direttiva Bassa Tensione 2006/95 CE (Direttiva concernente il ravvicinamento delle legislazioni
degli Stati membri relativa al materiale elettrico destinato a essere utilizzato entro taluni limiti di
tensione).
-
Direttive Comp
atibilità Elettromagnetica 2004/108 CE.
(Direttiva concernente il ravvicinamento delle legislazioni degli Stati membri relativa alla
compatibilità elettromagnetica).
Inoltre soddisfa formalmente a tutti i requisiti richiesti dalla Direttiva Macchine CE 9
8/37 in
quanto, secondo il comma 2 allegato 1, il rischio della macchina è PREVALENTEMENTE elettrico e
quindi si rimanda allottemperanza delle direttive di cui sopra:
2006 / 95 CE / / 2004 / 108 CE
Strada in Chianti, 06/03/08
08____________________________
(ultime due cifre dell anno di apposizione della marcatura)
enomatic s.r.l.
Via di Meleto
50027 Strada in Chianti (FI)
P.I. 01066310523

UM.02
ENOLINE WINE CARD
Page 42 of 46
Rev 0
8, May 2010
INFORMAZIONE AGLI UTENTI
Ai sensi dell art. 13 del Decreto Legislati
vo 25 luglio 2005, n. 151
:
Attuazione delle Direttive 2002/95/CE, 2002/96/CE e 2003/108/CE, relative
alla riduzione dell uso di sostanze pericolose nelle apparecchiature elettriche ed
elettroniche, nonché allo smaltimento dei rifiuti
Il simbolo del cassonetto barrato riportato sull apparecchiatura o sulla sua
confezione indica che il prodotto alla fine della propria vita utile deve essere
raccolto separatamente dagli altri rifiuti.
L utente dovrà, pertanto, conferire l apparecchiatura giunta a fine vita a
gli
idonei centri di raccolta differenziata dei rifiuti elettronici ed elettrotecnici,
oppure riconsegnarla al rivenditore al momento dell acquisto di una nuova
apparecchiatura di tipo equivalente, in ragione di uno a uno.
L adeguata raccolta differenziata per l avvio successivo dell apparecchiatura
dismessa al riciclaggio, al trattamento e allo smaltimento ambientalmente
compatibile contribuisce ad evitare possibili effetti negativi sull ambiente e sulla
salute e favorisce il reimpiego e/o riciclo dei materiali di cui è composta
l apparecchiatura.
Lo smaltimento abusivo del prodotto da parte dell utente comporta
l applicazione delle sanzioni amministrative previste dalla normativa vigente.

UM.02
ENOLINE WINE CARD
Page 43 of 46
Rev 0
8, May 2010
GARANZIA dei PRODOTTI ENOMATIC
Te
rmini della garanzia fornita dal produttore
eno
matic srl:
eno
matic garantisce il materiale fornito per 12 mesi dalla data di consegna,
purché venga regolarmente certificata da un documento fiscale valido (fattura o
scontrino fiscale con bolla di accompagnamento), riportante gli estremi dei
prodotti installati.
La durata della garanzia per la macchina è di dodici (12) mesi dalla data di
consegna.
La durata della garanzia per le parti meccaniche, elettriche ed elettroniche è di
dodici (12) mesi dalla data di
consegna.
La garanzia è gratuita per i primi 30gg dalla data di consegna. Per i successivi
undici (11) mesi il cliente dovrà riconoscere ad
eno
matic il solo diritto di chiamata.
Gli interventi effettuati nel periodo di garanzia non estendono in alcun modo il
periodo di validità della garanzia della macchina ad eccezione che per la parte
sostituita.
La garanzia Software è di 3 mesi dall installazione dell impianto; in tale periodo
verrà eseguita la diagnosi e l eliminazione degli eventuali errori riscontrati nei
programmi, purché riproducibili e documentati.
La garanzia consiste nella riparazione o sostituzione gratuita delle parti riconosciute
difettose nella fabbricazione ad insindacabile giudizio di
eno
matic.
eno
matic presta la garanzia direttamente o tramite i propri Centri di Riparazione, il
materiale in garanzia deve essere spedito ai Centri di Riparazione in porto franco e
verrà rispedito in porto assegnato. Il materiale sostituito rimarrà di proprietà
eno
matic
.
Non è riconosciuto alcun indennizzo per il periodo di non operatività dell impianto.
L intervento non prolunga il termine di durata della garanzia.
eno
matic si riserva il
diritto di non prestare la garanzia qualora l impianto non sia costituito totalmente da
componenti forniti da
enomatic,
o
nel caso in cui l acquirente sia inadempiente nel
pagamento. Resta inteso che la validità della garanzia è subordinato al rispetto delle
specifiche prestazionali dei prodotti indicate da
eno
matic.
La garanzia inoltre non comprende:
Avarie o danni causati
dal trasporto.
Avarie o danni causati da vizi dell impianto elettrico e/o da trascuratezza,
negligenza, inadeguatezza dell impianto all uso al quale è destinato e in ogni caso
da uso anomalo.
Difetti causati da agenti chimici o fenomeni atmosferici.
Il mat
eriale di consumo.
Gli interventi per vizi presunti o le verifiche di comodo.
eno
matic s.r.l
Amministratore Delegato
Dr. Italo Baldini
Codice e numero di matricola del
sistema

UM.02
ENOLINE WINE CARD
Page 44 of 46
Rev 0
8, May 2010
Manufactured by:
Distributed
by:
For
service please contact:
Enomatic
S.R.L
Via di Meleto 1/19
Greve in Chianti (Fl)
Italy

UM.02
ENOLINE
WINE CARD
Page 45 of 46
Rev 09, May
2010
POSITION # 1 POSITION # 2 POSITION # 3 POSITION # 4 POSITION # 5 POSITION # 6 POSITION # 7 POSITION # 8
DATE
1
BOTTLE
DATE
2
BOTTLE
DATE
3
BOTTLE
DATE
4
BOTTLE
DATE
5
BOTTLE
DATE
6
BOTTLE
DATE
7
BOTTLE
DATE
8
BOTTLE
DATE
9
BOTTLE
DATE
10
BOTTLE
CLEANING SOLUTION REQUIRED - ESEGUIRE LAVAGGI DI PULIZIA - CLEANING SOLUTION REQUIRED

UM.02
ENOLINE WINE CARD
Page 46 of 46
Rev 0
8, May 2010
POSITION # 1 POSITIO
N # 2 POSITION # 3 POSITION # 4 POSITION # 5 POSITION # 6 POSITION # 7 POSITION # 8
DATE
1
BOTTLE
DATE
2
BOTTLE
DATE
3
BOTTLE
DATE
4
BOTTLE
DATE
5
BOTTLE
DATE
6
BOTTLE
DATE
7
BOTTLE
DATE
8
BOTTLE
DATE
9
BOTTLE
DATE
10
BOTTLE
CLEANING SOLUTION REQUIRED - ESEGUIRE LAVAGGI DI PULIZIA - CLEANING SOLUTION REQUIRED

This document was created with Win2PDF available at http://www.win2pdf.com.
The unregistered version of Win2PDF is for evaluation or non-commercial use only.
This page will not be added after purchasing Win2PDF.
 Loading...